You have plenty of choices to make when installing a new version of Windows on your device.
If your computer doesn’t have a CD or DVD drive, you may want to learn how to run the installation from a “bootable USB” to set up your operating system quickly.
Most modern computers and laptops have completely abandoned the CD or DVD drive, making installation disks obsolete. While this isn’t an issue in many areas, such as video games and movies, it does oppose a roadblock for some software installations. You may want to learn how to install Windows 10, Windows 8.1, and Windows 7 using a bootable USB.
This article will go in-depth regarding what a bootable USB is and how to use one to create installation media for various Windows Operating Systems to install Windows 10, 8.1, or even 7. If you’ve already got your bootable USB ready — simply jump to the “How to Install Windows using Bootable USB” section and set your new copy of Windows up in a matter of minutes.
Jump To:
- How to create a Windows bootable USB with the Media Creation Tool.
- How to boot from USB? Change your computer’s boot order
- How to install Windows 10 using bootable USB
- How to install Windows 8.1 using bootable USB
- How to install Windows 7 using Bootable USB
Benefits of installing Windows with a bootable USB
There are many instances where you might need to reinstall your operating system or get a new one entirely. For example, you’d need to reinstall Windows if you encountered a serious error, your hard drive became damaged or corrupted, or you’re upgrading/downgrading your system.
When planning to reinstall or install a Windows operating system on your PC, you need to have the necessary installation files beforehand. This will allow you to boot and install the system.
Tip: Try creating an installation media using your device before installing a new system. If it’s not possible, use a different device near you, or ask someone you know to help you out.
Because CD and DVDs are becoming less practical, many computers and laptops no longer come with a drive to read and write physical disks. This makes it impossible for you to create or use an installation media unless it’s on a bootable USB drive. While this may sound impractical initially, USB sticks have a huge advantage over disks.
USBs are incredibly accessible, given the fact that almost every computer has a USB port that you can use to connect external devices. It’s the easiest and most streamlined method of installing an operating system. Nowadays, you can create a bootable USB to install various versions of Windows.
How to create a Windows bootable USB with the Media Creation Tool
Before installing Windows using a USB, you need to create the installation media itself. Your computer will read this once the USB flash drive is connected, allowing it to boot from USB. Below are the steps to create this bootable USB flash drive using the Media Creation Tool issued by Microsoft.
- Download the appropriate installation media from Microsoft:
- Download Windows 10
- Download Windows 8.1 Disc Image (ISO File)
- Download Windows 7 Disc Images (ISO Files)
- Follow the steps to download the Windows version you want. Some versions may require you to provide your Windows product key to verify your eligibility to download disc images.
- Save the Media Creation Tool to your computer. Launch the file and click Accept when prompted to agree to the software license terms when the download is finished.
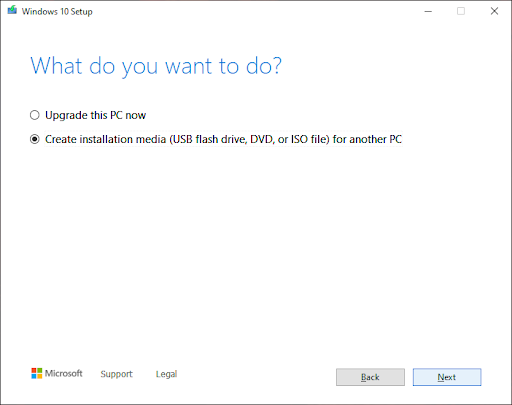
- Select Create installation media (USB flash drive, DVD, or ISO file) for another PC and click the Next button.
- Follow any on-screen instructions to set your preferred language, Windows edition, and System Architecture. If unsure, check the Use the recommended options for this PC option and proceed.
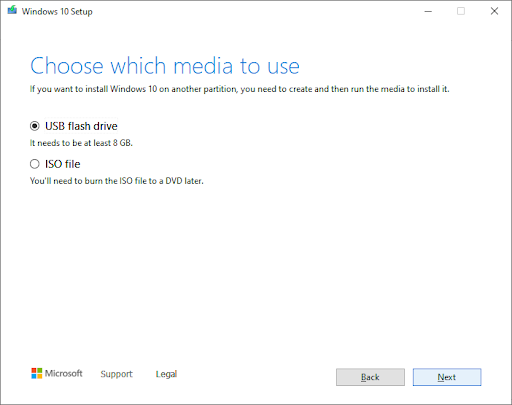
- Choose the USB flash drive and select your USB from the list. The Windows installation files will start to download to your USB drive.
- Note that the download may take a long time, depending on your internet connection. Ensure not to disrupt the process until the bootable USB drive is created.
Here’s a summary to boot from a USB.
You first need to create the USB itself, which will be read by your computer and used to boot up. You can find the guidelines on creating a bootable USB using the Media Creation Tool issued by Microsoft.
- Open the Microsoft Download Windows page in your web browser and click on the Download tool now button.
- Save the tool to your computer. Launch the media creation tool when the download is finished and click Accept when prompted to agree to the launch.
- Select Create installation media (USB flash drive, DVD, or ISO file) for another PC and click the Next button.
- Set your preferred Language, Windows 10 Edition, and System Architecture.
- If you can’t change the settings, place a checkmark next to the Use the recommended options for this PC option and proceed.
- Choose the USB flash drive, then hit the Next button and select your USB drive from the list. The Windows installation files will start to download to your USB drive.
- The download may take a long time, depending on your internet speed. Ensure not to disrupt the process until the creation tool has been created.
How to boot from USB? Change your computer’s boot order
After creating an installation media, you must know how to boot from USB. This is needed to install Windows from the bootable USB.
The trick is: you need to change your computer’s boot order. Doing so will place the USB flash drive at the top of the boot order priority list, meaning that your computer will read the files on it first. This will prompt your computer to load the installation media instead of the already installed system.
You need to change the boot order in your computer’s BIOS to boot from USB. After completing this step, during the next startup sequence, your system will immediately boot from USB and use the installation media you created, starting the Windows installation process.
How to Install Windows using Bootable USB
With your computer’s boot order successfully changed to load up from a USB device first, you can now crack on with installing Windows using your USB’s installation file.
Note: Make sure you’ve backed up all your files before installing to ensure you don’t lose any valuable data.
How to install Windows 10 using bootable USB
- Plug your USB device into your computer’s USB port, and start up the computer. You may be asked to press a key to boot from the USB.
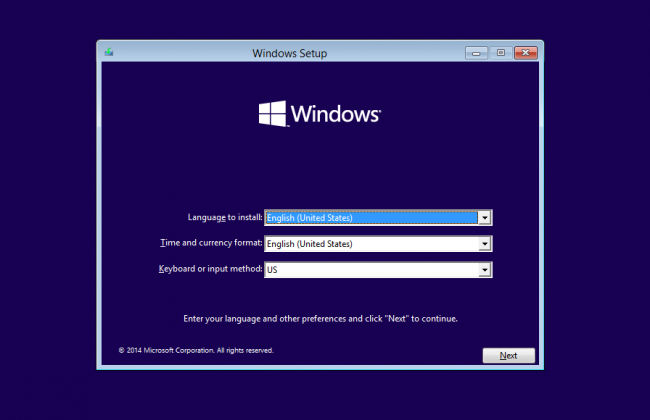
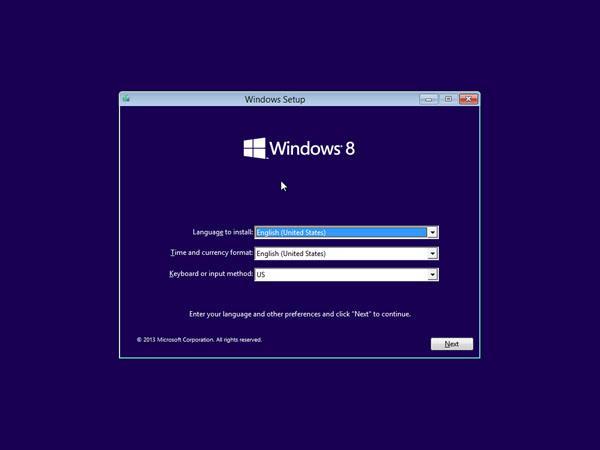
- Choose your preferred language, timezone, currency, and keyboard settings. Once you’re happy with customizing these settings, click Next. (Note that these settings can be changed in the future after the Windows 10 installation is complete.).
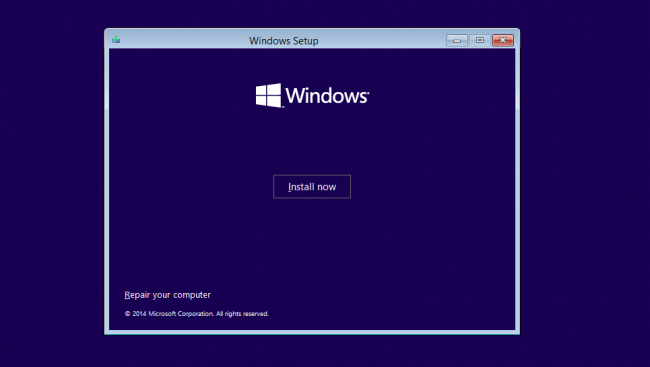
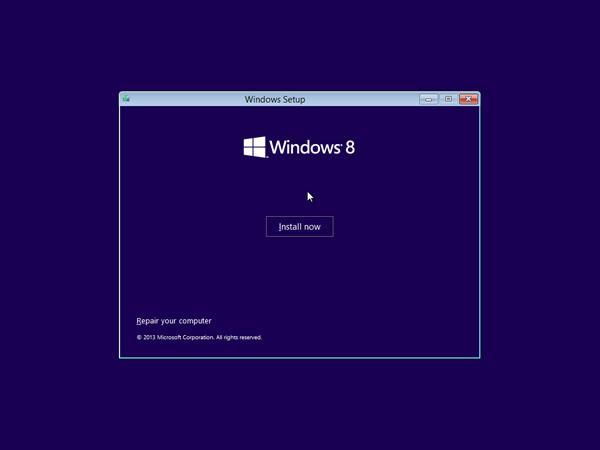
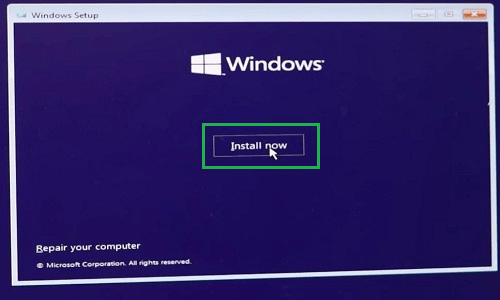
- Click Install Now and select the Windows 10 edition you’ve purchased. Now click Next to start the installation process.
- Choose your installation type. You can either choose Upgrade, which will allow keeping your current files, settings, and apps; or do a fresh clean installation by picking Custom. In this example, we’ll be choosing custom to do a fresh Windows installation.
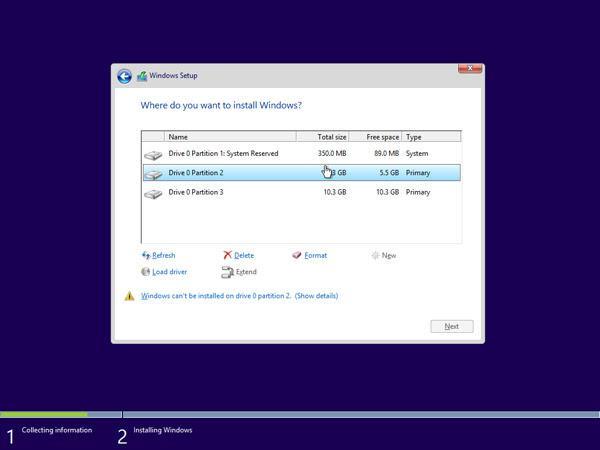
- To install Windows, you need a partition on your hard drive for storing system files; this will become the main C: drive. You can either pick an existing partition and format it or delete everything and create new partitions.
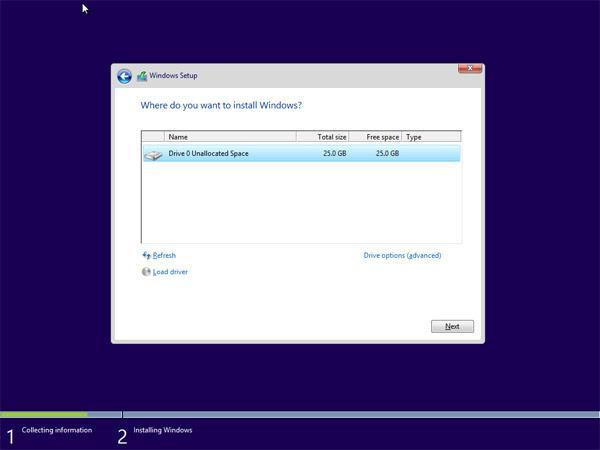
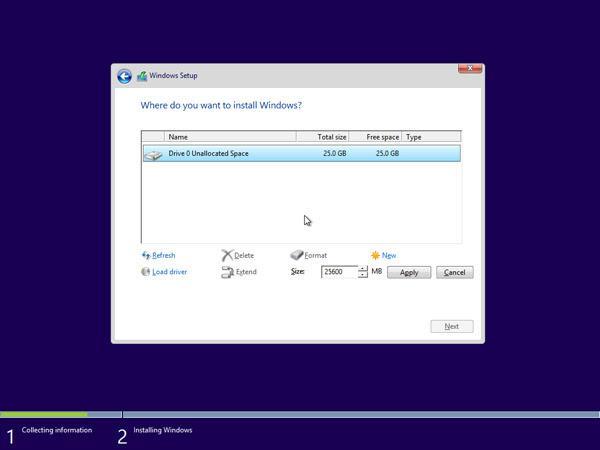
- If you’ve deleted all the existing partitions, your harddrive’s space will be unallocated, and you’ll need to create new partitions. If you just formatted an existing partition, then skip to Step 7 now. To create new partitions:
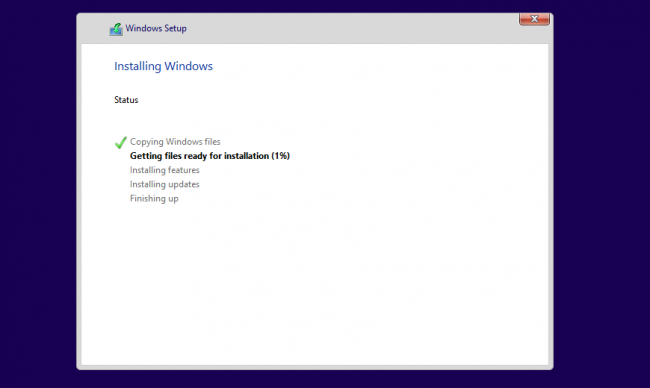
- Now select the partition where you want to install Windows and click Next. The Windows 10 installation will begin. Your computer may reboot a few times during the process. This is normal.
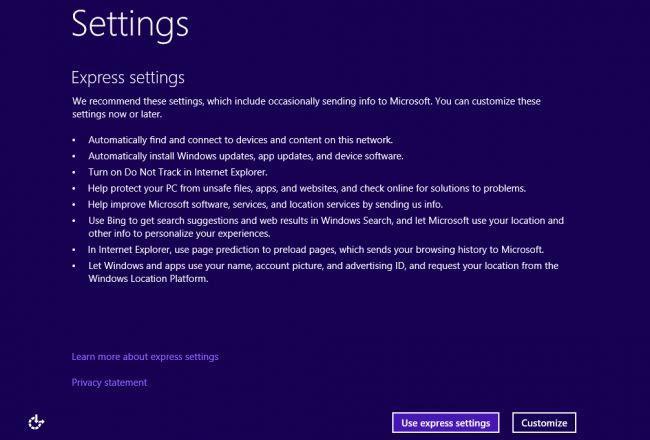
- After the installation is complete, your computer will automatically restart one last time. When it starts up again for the first time, you’ll be able to choose more of your settings or use express settings recommended by Microsoft.
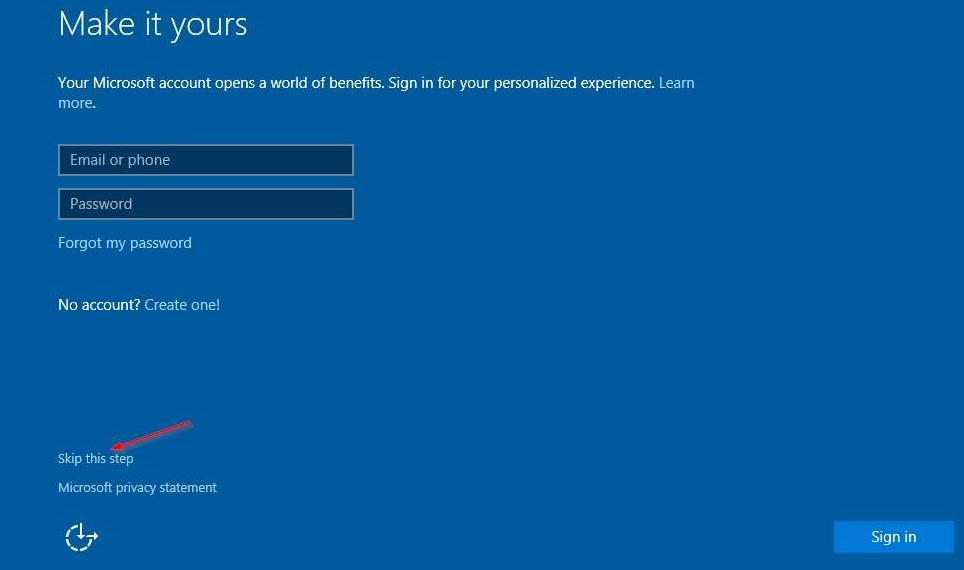
- Finally, sign in to your Microsoft account to use some of the new features with Windows 10, such as password recovery, and to access One Drive. If you don’t want to sign in with your Microsoft account, click Skip this step and follow the instructions to create a local user account instead.
How to install Windows 8.1 using bootable USB
- Plug your USB device into your computer’s USB port, and start up the computer. You may be asked to press a key to boot from the USB.
- Choose your preferred language, timezone, currency, and keyboard settings. Once you’re happy with customizing these settings, click Next. Don’t worry if you’ve made a mistake, you can change any of these in the future.
- Click Install Now and select the Windows 8.1 edition you’ve purchased. Now click Next to start the installation process.
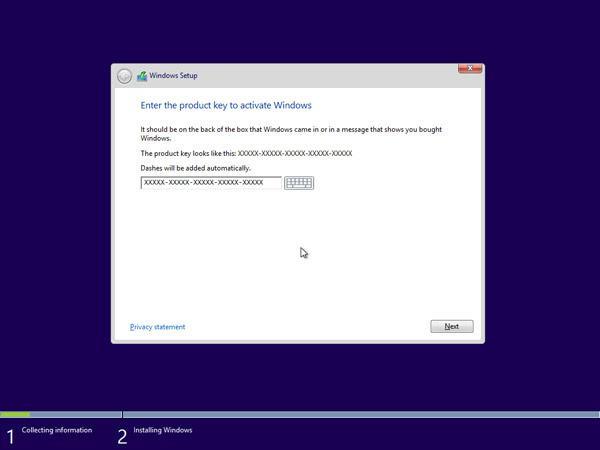
- Enter the product key that came with your Windows purchase to activate it. When done, click Next.
- Note: You might not be prompted to enter a product key until later in the Windows 8.1 installation. This varies from version to version.
- Accept the license terms and then click Next.
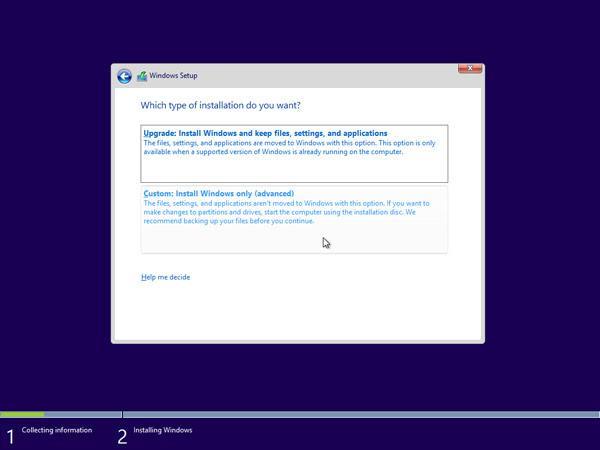
- Choose your preferred installation type. You can either choose Upgrade, which will allow keeping your current files, settings, and apps; or choose Custom to do a fresh clean installation of Windows 8.1. In this example, we’ll be choosing custom to do a fresh Windows installation.
- To do a completely fresh installation with new partitions, you have to delete all the existing partitions first. Select each partition one by one and click Delete, then OK.
- Note: If you haven’t yet backed up your hard drive, you may want to stop now, back everything up, and start again. Once you’ve deleted the partitions you won’t be able to recover the data stored on these drives.
- Your computer hard drive’s space will now be unallocated. Following this, you need to create some new partitions. Select Drive options (advanced). Click New and choose the size for your new partition, then click Next.
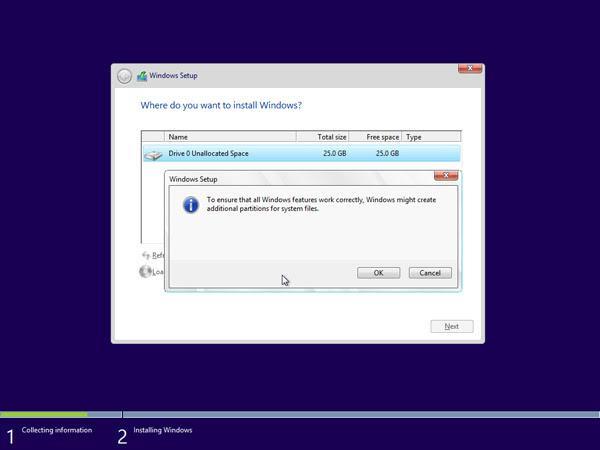
- Windows will now create a new partition for storing system files. Click OK to accept. Repeat this step if you wish to create additional partitions.
- Select one of the new partitions and click Format. This will allow you to format your new partition. Press OK when prompted, and repeat the process for any other partitions, except the one for storing system files.
- Select the partition where you want to install Windows, and click Next.
- The Windows 8.1 installation will now begin. Your computer may reboot a few times during the process. This is normal. Follow the instructions when instructed to personalize your computer settings.
How to install Windows 7 using Bootable USB
- Plug your USB device into your computer’s USB port, and start up the computer. You may be asked to press a key to boot from the USB.
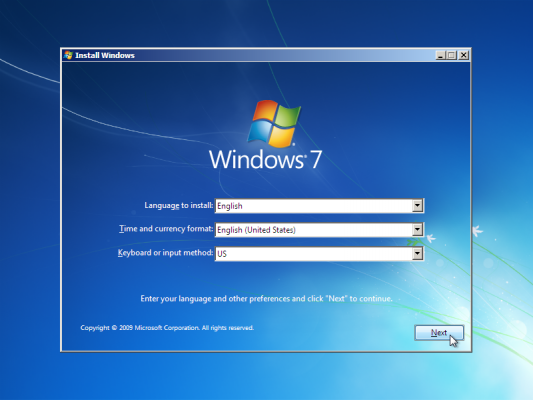
- Choose your preferred language, timezone, currency, and keyboard settings. Once you’re happy with customizing these settings, click Next. Don’t worry if you’ve made a mistake, you can change any of these in the future.
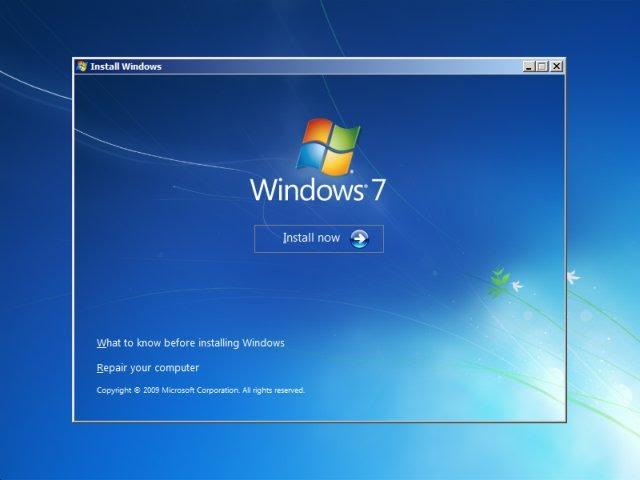
- Click Install Now to start the installation process.
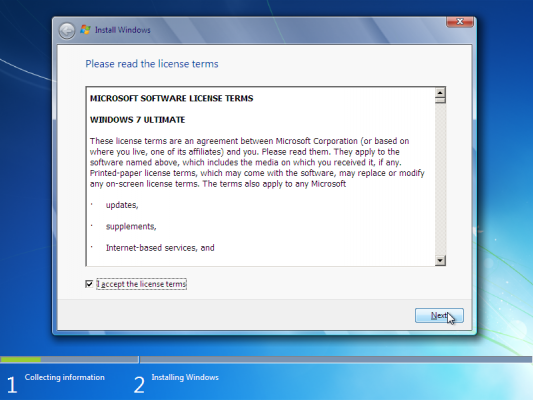
- Accept the license terms and then click Next.
- Choose your preferred installation type. You can either choose Upgrade, which will allow keeping your current files, settings, and apps; or choose Custom to do a fresh clean installation of Windows 7. In this example, we’ll be choosing custom to do a fresh Windows installation.
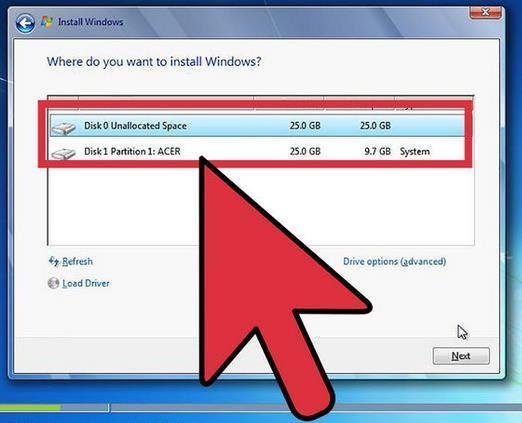
- To do a completely fresh installation with new partitions, you have to delete all the existing partitions first. Select each partition one by one and click Delete, then OK.
- Note: If you haven’t yet backed up your hard drive, you may want to stop now, back everything up, and start again. Once you’ve deleted the partitions you won’t be able to recover the data stored on these drives.
- Your computer hard drive’s space will now be unallocated. Following this, you need to create some new partitions. Select Drive options (advanced). Click New and choose the size for your new partition, then click Next.
- Windows will now create a new partition for storing system files. Click OK to accept. Repeat this step if you wish to create additional partitions.
- Select one of the new partitions and click Format. This will allow you to format your new partition. Press OK when prompted, and repeat the process for any other partitions, except the one for storing system files.
- Select the partition where you want to install Windows, and click Next.
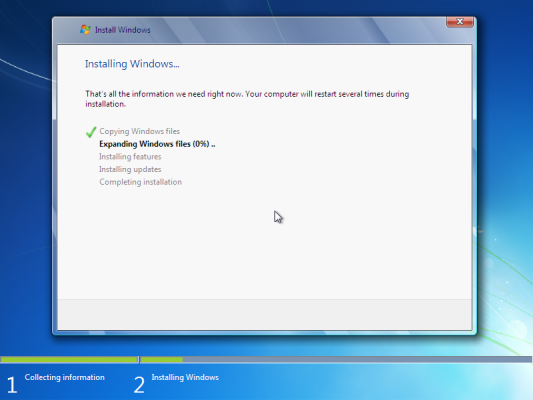
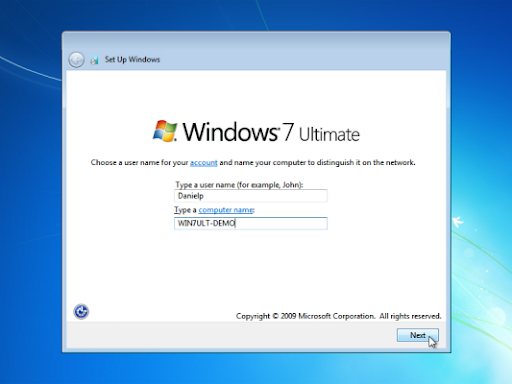
- Once the installation is complete, you’ll receive a prompt to set the user and computer names.
- Note: The built-in Administrator account is disabled on Windows 7, so the username you create will be the only one available on the system at first.
- Enter your username. The computer’s default name will be username-PC, where username is the username you’ve entered, but you can also change this. Once you’re done, click Next.
- Finally, enter the new user’s password, or just leave it blank and then click Next.
- Note: If you choose to create a password for your Windows 7 account, make sure to keep this safe. This will be the only user account on the system. If you lose it, you won’t be able to log in to your Windows system later.
That’s it! You’ve now installed a fresh copy of Windows from a bootable USB on your computer.
You may want to run a Windows update next time you start up your computer and install the latest firmware/drivers available from your manufacturer, otherwise, you’re ready to go with your new Windows machine.
Next Read:
> How to Create a Bootable USB Using Rufus
Frequently Asked Questions
Q: How to boot from a USB flash drive?
To boot your computer from USB, you need to plug the USB stick in your computer and power it on. If the install media doesn’t automatically start, you need to first change the boot order. This can be done from the BIOS settings.
Q: What format should a bootable USB be for Windows 10?
Your USB flash drive should have the FAT32 format to run the Windows 10 installer media.
Q: What size USB drive is required for the Windows Media Creation Tool?
You need a USB drive with a minimum of 4GB of free space. It should also be empty before you run the tool.
Q: How do I use the Rufus USB tool?
You can find all the information you need about the Rufus USB tool in our How to Create a Bootable USB Using Rufus article.
Q: Can I use a USB drive I created to install Windows on someone else’s computer?
No. The Windows ISO file on the USB drive is intended to be used to install Windows on the licensed user’s computers. If you’re a business owner, you may be required to show any digital licenses when auditing.
You May Also Like
» How to Create a Bootable USB Using Rufus
» How to Install Microsoft Office Updates
» How to Install Office on a Windows PC Using My Online Microsoft Account
Windows 10 offers ample attractive features that encourage users to download Win 10 to their desktop/PC. Like, there is the Cortana application that acts as a personal assistant, and a virtual desktop can be enabled. Also, Windows 10 comes completely free for the users which is another plus point among all the operating systems.
So, here you will learn how to install Windows 10 in a step-by-step process.
Installing Windows 10 From USB Flash Drive
Here, we will first focus on the configuration of the USB drive that is going to be used for the installation process. Following that, the steps for the installation of Windows 10 will be executed.
Configuration of USB Drive:
Step 1: Browse to the Official Website of Windows 10 & download the ISO File for configuration purposes. Click on Download Tool Now. Insert the USB Drive into the device which has a minimum of 8 GB of free memory
Step 2: Open the installed file & click on the Accept button to move ahead.
Note: It is advisable to read all the items & conditions before moving ahead. If you find anything improper, you can decline the process.
Step 3: Click on the Second Option to create Installation Media. After that, click on Next.
Step 4: Now, in the next window, mark the Checkbox which will get all the device-related information. Click Next to move ahead.
Step 5: Now, click on the USB Drive option & click Next.
Step 6: Now, the USB Drive will be shown, click Next to start processing.
Step 7: After waiting a bit, click on Finish to complete the process.
Hence, we have successfully configured the USB drive for installing Windows 10 on a desktop or laptop.
Installation of Windows 10:
Step 1: To boot Windows 10 with USB, restart the device & enter the boot menu option. On the screen, click on Next by leaving all the options as it is.
Note: The method to enter the boot menu is different for different devices. Sometimes, pressing the F2 key can lead to the boot menu. It is advisable to search for the key on the internet along with the name of the motherboard. Because the key depends upon the type of motherboard installed in the device.
Step 2: Now, click on the Install Now button.
Step 3: In the next window, it will ask for the Product Key. Click on the option below to move ahead without Product Key.
Step 4: On the next page, so many options will be present for Windows 10. Select the Default one & click Next.
Step 5: Click on the Checkbox as consent for the terms & conditions. And click on the Next button.
Note: It is advisable to read all the items & conditions before moving ahead. If you find anything improper, you can decline the process.
Step 6: Now, click on the Upgrade option to move all the files & supported applications to Windows 10 without occurring any error.
Step 7: Now, the installation process is started. Wait till the installation is completed.
Hence, we have successfully installed Windows 10 operating system using a USB drive on any computer or laptop.
From the above method, it is clear that the installation of the Windows 10 operating system is a cakewalk. Just you need to have a minimum of 8 GB of USB drive for it. You can now install Windows 10 without taking the help of any technician who charges you for doing such a simple task.
Last Updated :
25 Aug, 2023
Like Article
Save Article
Download Article
Expert guide to USB drive Windows installation
Download Article
This wikiHow teaches you how to use a USB flash drive to install a version of the Windows operating system onto a Windows computer. Using a USB flash drive is useful when your computer doesn’t have a CD drive or when you don’t have an operating system installation disc.
-
1
Check the computer’s architecture number. Before you download an installation tool for your preferred operating system, you’ll need to know whether the computer on which you want to install Windows runs a 32-bit system or a 64-bit system.
- Make sure that you do this on the computer on which you’re going to install Windows.
-
2
Make sure that you have at least a 8-gigabyte flash drive. Windows needs at least eight gigabytes of space for its installation file.
- Flash drives are fairly cheap; you can get a 16-gigabyte flash drive—twice times the space you need—for less than $10.
Advertisement
-
3
Plug the flash drive into your computer. The flash drive should fit into one of your computer’s rectangular USB ports.
-
4
Format the flash drive to FAT32 or exFAT. When formatting your flash drive, click the File system drop-down box, then click FAT32 or exFAT in the drop-down menu.
- Formatting your flash drive will erase everything on it.
-
5
Download the Windows installation tool. Open the Windows 10 download page, then click Download tool now at the bottom of the page.
-
6
Run the installation tool. Double-click the «MediaCreationTool» EXE file, click Yes when prompted, accept any terms, and fill out any on-screen sections until you get to the installation section.
- As part of the installation tool, you’ll be prompted to select a language, an edition of Windows, and an architecture for the setup process. Make sure to use the same architecture here as you found in step two of this part.
-
7
Create your bootable flash drive. Once the installation section of the Media Creation Tool window opens, click the «Create installation media» checkbox, click Next, select your computer’s language, edition, and architecture, click Next, click the flash drive’s name, and click Next.
-
8
Wait for the flash drive setup to complete. This may take several minutes. Once all of the setup files have downloaded (or pasted) into the flash drive, you can proceed with changing your computer’s boot order.
Advertisement
-
1
Check the computer’s architecture number. Before you download an installation tool for your preferred operating system, you’ll need to know whether the computer on which you want to install Windows runs a 32-bit system or a 64-bit system.
- Make sure that you do this on the computer on which you’re going to install Windows.
-
2
Make sure that you have at least a 4-gigabyte flash drive. Windows needs at least four gigabytes of space for its installation file.
- Flash drives are fairly cheap; you can get a 16-gigabyte flash drive—four times the space you need—for less than $10.
-
3
Plug the flash drive into your computer. The flash drive should fit into one of your computer’s rectangular USB ports.
-
4
Format the flash drive to FAT32 or exFAT. When formatting your flash drive, click the File system drop-down box, then click FAT32 or exFAT in the drop-down menu.
- Formatting your flash drive will erase everything on it.
-
5
Download the Windows disk image. Open the Windows 8.1 download page, scroll down and select a version of Windows 8.1, click Confirm, select a language and click Confirm, and click either 32-Bit Download or 64-Bit Download in the middle of the page. This will prompt the disk image (ISO) file to download.
-
6
Make the flash drive bootable. If you’re installing Windows 8.1, you’ll need to use Command Prompt or another bootable USB method to ensure that your computer will recognize your USB flash drive as a software installation location.
-
7
Add the ISO to the flash drive. Copy the downloaded ISO file by selecting it and pressing Ctrl+C, then open your formatted, bootable flash drive and press Ctrl+V. The ISO file will appear on the flash drive after a few minutes, after which point you can proceed with changing your computer’s boot order.
Advertisement
-
1
Go to the computer on which you want to install Windows. If you’re merely trying to install a new version of Windows on your existing computer, skip this step.
-
2
Plug in your USB flash drive. Insert the USB flash drive into a USB port on the computer.
-
3
Prompt the computer to restart. Click Start
, click Power
, and click Restart. Your computer will begin to restart.
- If the computer is off, press its power button to turn it on, then move to the next step. If the computer turns on when you open its lid or move the mouse, you’ll still need to restart it before proceeding.
-
4
Rapidly press the computer’s BIOS key. As soon as the computer’s startup screen appears (the screen right after the computer shuts down and is beginning to restart), begin pressing the BIOS key. Your computer’s BIOS key will vary depending on the manufacturer, but it will usually be one of the function keys (e.g., F2), Esc, or Del.[1]
- You can check your computer’s BIOS key online or in the manual that came with your computer.
- Many computers will flash a «Press [key] to enter setup» (or similar) message at the bottom of the screen as your computer is starting up. This is the key that you should press.
- If you miss your opportunity and the computer finishes the restart cycle, you’ll need to restart it and try again.
-
5
Find the «Boot Order» section. This section is usually in the Advanced or Advanced Options tab, but each BIOS menu is different. The «Boot Order» section will have a list of different startup locations, including your hard drive’s name and your CD drive.[2]
-
6
Select your flash drive’s name. Using the arrow keys, move the highlight bar down until it’s covering the flash drive’s name.[3]
- On some computers, you’ll instead select Removable Storage or Removable Drives (or something similarly titled).
-
7
Move the flash drive to the top of the list. You’ll usually do this by pressing the + key until the flash drive is at the top, but check the legend at the bottom or on the side of the BIOS screen to see if your controls are different.[4]
-
8
Save your changes and exit the BIOS. There’s usually a key that you can press to do this, so check the legend to see what it is and then press it.
- You may have to press another key to confirm this decision.
-
9
Restart your computer again if necessary. If your computer doesn’t greet you with a «Press any key» screen and instead finishes the restart cycle, restart it again to boot from the flash drive. This will launch the Windows setup process.
Advertisement
-
1
Press any key when prompted. When you see the «Press any key» line of text, press any key on your computer’s keyboard to proceed with the Windows installation.
-
2
Select a language and region. When the Windows installation window pops up, select a language, region, and any other preferences listed there.
- You may also be prompted to select keyboard settings here.
- On Windows 7, you’ll check the «I agree» box here instead, then skip ahead to the «Select a partition» step.
-
3
Click Next. It’s in the lower-right corner of the page.
-
4
Enter your product key. When prompted, type in the product key that came with your computer or installation disc, then click Next.
- On Windows 10, you must first click Install now. You can also skip the product key entry for now by clicking the Skip option.
- On Windows 7, you won’t be asked for your product key until after the installation is complete.
-
5
Agree to the terms of use. Check the «I agree» box, then click Next.
-
6
Select a custom installation. Check the «Custom» box, then click Next
-
7
Select an installation partition. Double-click the partition on which you want to install Windows, then confirm your choice when prompted. You may also need to select the empty partition and click Next to prompt the installation process to begin.
- On Windows 7, you’ll select the partition that you want to use, click Delete, confirm the decision when prompted, click the empty hard drive, and click Next to begin the installation process.
-
8
Wait for Windows to finish installing. Your computer may restart several times during this process, and the installation may take several minutes to over an hour depending on your computer’s speed.
-
9
Follow any on-screen instructions. After Windows is installed on the computer, you’ll be asked to set up a few more preferences (e.g., your language, account name, email address, etc.) before you can begin using Windows.
- On Windows 7, you’ll be asked to enter your product key here.
Advertisement
Add New Question
-
Question
How do I change my computer’s boot order?
Luigi Oppido is the Owner and Operator of Pleasure Point Computers in Santa Cruz, California. Luigi has over 25 years of experience in general computer repair, data recovery, virus removal, and upgrades. He is also the host of the Computer Man Show! broadcasted on KSQD covering central California for over two years.
Computer & Tech Specialist
Expert Answer
You’ll have to change this in the system’s BIOS. Restart your computer and before it fully boots up, press the BIOS key, which is one of the function keys on your keyboard’s top row. On the BIOS screen, you can then go into the settings and change the priority order so that your flash drive loads Windows first.
-
Question
I want to install Windows but am being prompted that there is a missing operating system. What now?
Have you put the OS on the drive? If not, install it on there. You can also try to install an *.iso file on the drive.
-
Question
What if I’m putting in a brand new hard drive?
If you are installing from scratch, you will still need to create the boot media using one of the above steps on a working computer. Once the boot media is created, you will use it on the computer that has a new hard drive. Just remember that with a new hard drive and installation, you need to get a registration code to activate Windows.
See more answers
Ask a Question
200 characters left
Include your email address to get a message when this question is answered.
Submit
Advertisement
-
Navigating the BIOS can be extremely frustrating since no two BIOS pages are identical. To negate this frustration, find your computer’s manual and look up the BIOS information there.
Advertisement
About This Article
Thanks to all authors for creating a page that has been read 1,328,071 times.
Is this article up to date?
(Image credit: Future)
When installing a fresh copy of Windows 10, you typically use a USB flash drive to launch the «Windows Setup» wizard to continue the installation process. However, on a device that has a Unified Extensible Firmware Interface (UEFI) instead of the legacy Basic Input/Output System (BIOS), it is crucial to use the correct media for the firmware type to complete the installation successfully.
On Windows 10, you can use at least two tools to create a bootable USB flash drive. You can use the Microsoft Media Creation Tool to download the files onto a removable drive with support for both firmware types (UEFI and legacy BIOS). Or you can use Rufus, a third-party tool that makes it easy to create a flash drive to install Windows with support for UEFI.
This guide will walk you through creating a Windows 10 USB flash drive with support for UEFI using the Microsoft Media Creation Tool and Rufus.
How to create Windows 10 UEFI boot media with Media Creation Tool
The Media Creation Tool is the best option available for creating a bootable USB media to perform an in-place upgrade or clean installation of Windows 10.
To create a Windows 10 USB media, connect a flash drive of at least 8GB of space, and then use these steps:
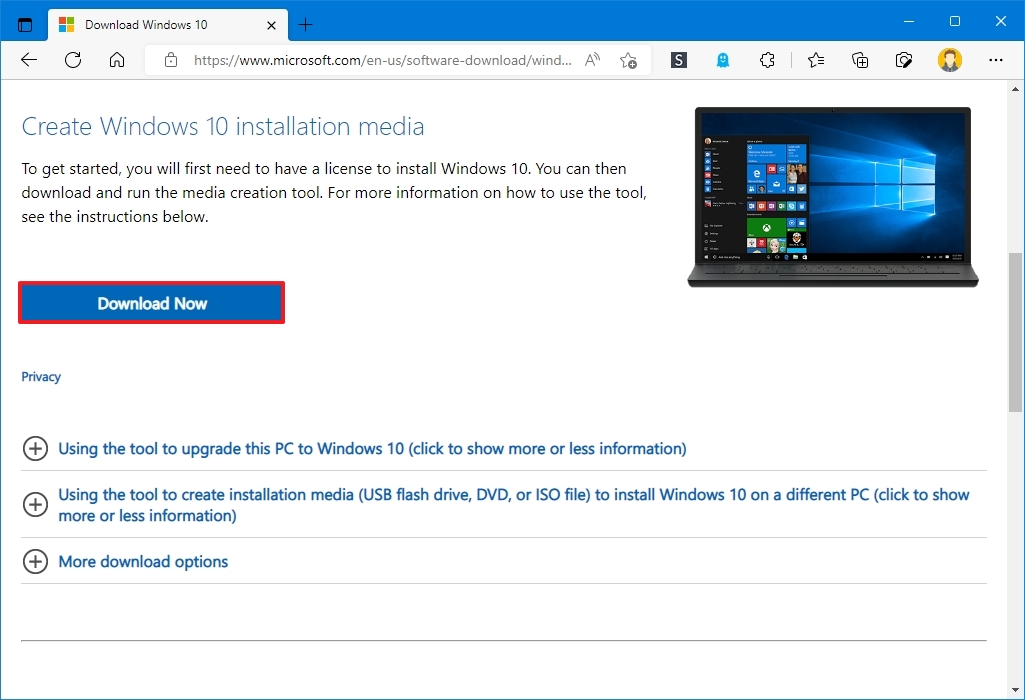
- Open the Windows 10 download page.
- Under the «Create Windows 10 installation media» section, click the Download tool now button to save the file.
- Double-click the MediaCreationToolxxxx.exe file to launch the setup.
- Click the Accept button to agree to the licensing terms.
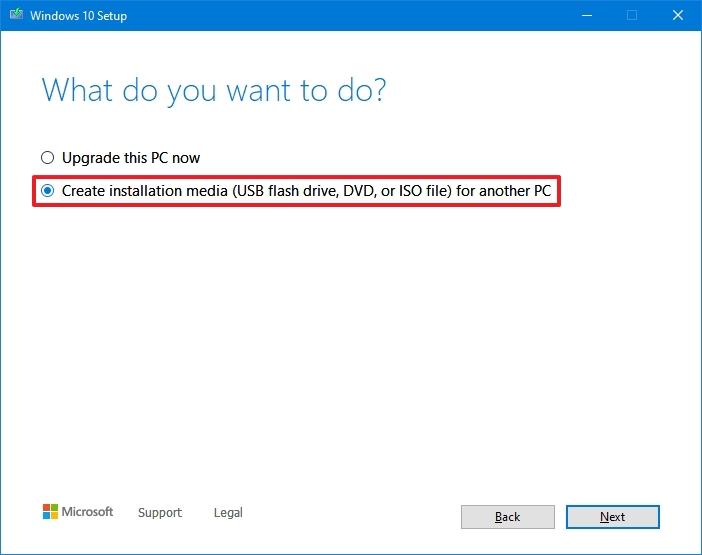
- Select the «Create installation media (USB flash drive, DVD, or ISO file) for another PC» option.
- Click the Next button.
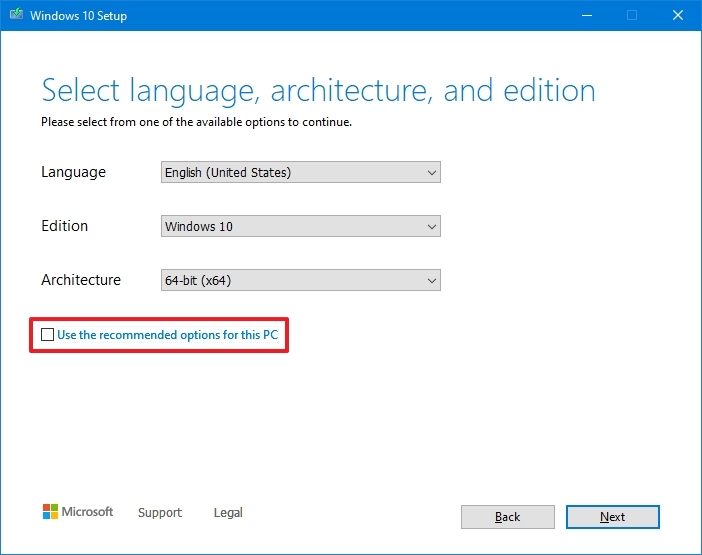
- (Optional) Clear the «Use the recommended options for this PC» option.
- Select the correct language, architecture, and edition of Windows 10 (if applicable).
- Quick tip: If you plan to install Windows on multiple computers running 32-bit and 64-bit architectures, use the «Architecture» drop-down menu and select the Both option to create a media that will work on both systems.
- Click the Next button.
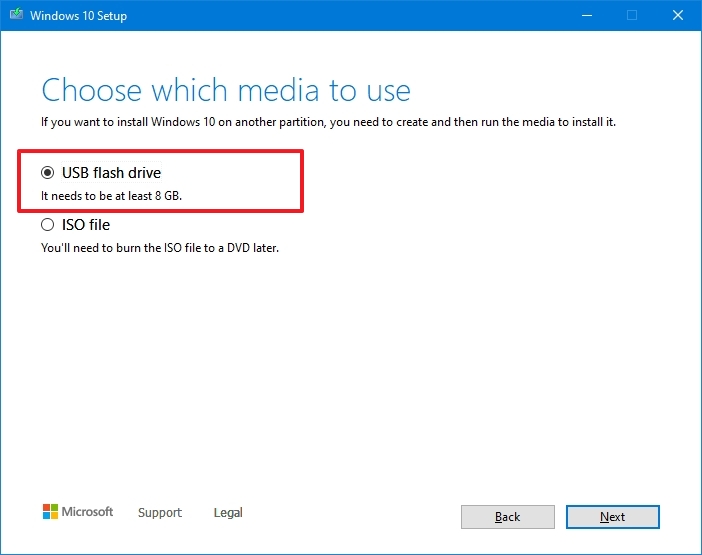
- Select the USB flash drive option.
- Click the Next button
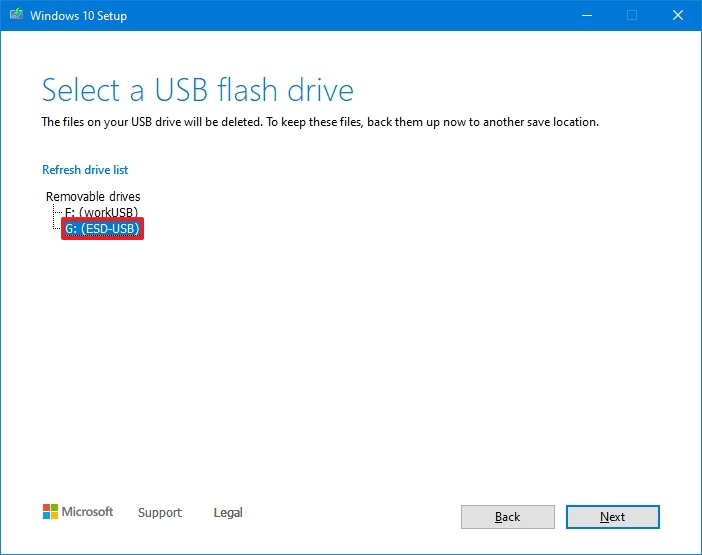
- Select the flash drive from the list. (If you do not see the device, click the «Refresh drive list» option.)
- Click the Next button.
- Click the Finish button.
Once you complete the steps, the Media Creation Tool will download the files and will create a bootable USB flash drive that you can use to install Windows 10 on computers with support for UEFI and BIOS.
How to create Windows 10 UEFI boot media with Rufus
If the Media Creation Tool does not work or you do not want to use it, then you can try Rufus, a popular free third-party tool that allows you to create an installation media with support for UEFI devices. The utility offers two ways to make the installation media, including using an existing ISO file or downloading the image from the Microsoft servers directly from the app.
Create flash drive with existing Windows 10 ISO
To create a USB media with an existing Windows 10 ISO file, connect a flash drive of at least 8GB of space, and use these steps:
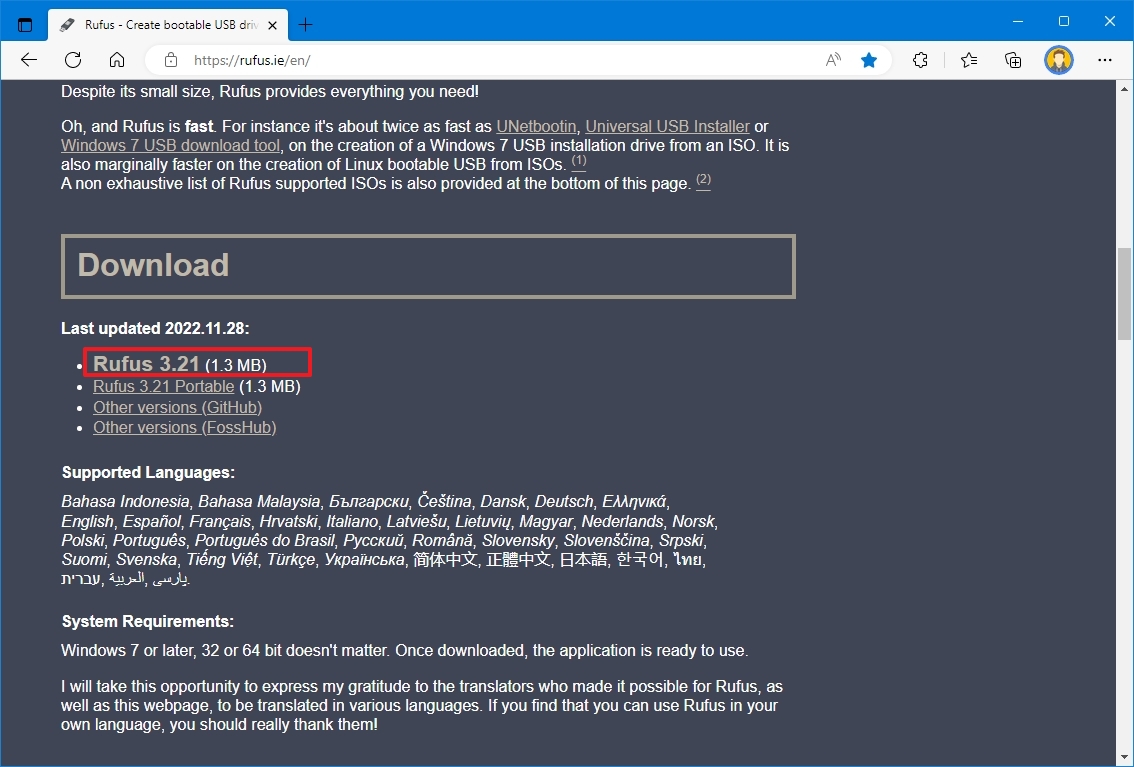
- Open Rufus download page.
- Under the «Download» section, click the latest release (first link) and save the file.
- Double-click the Rufus-x.xx.exe file to launch the tool.
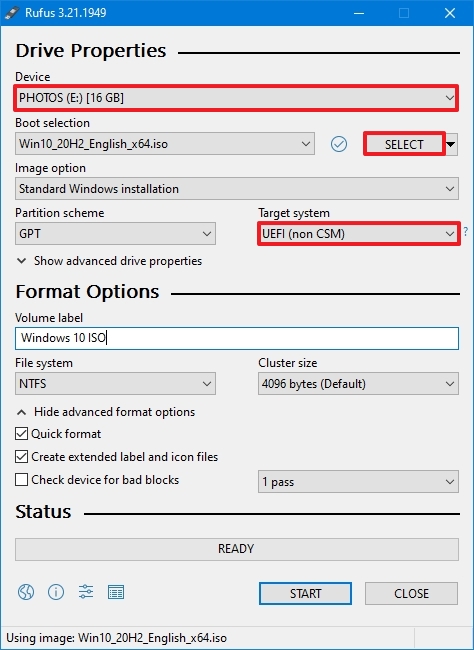
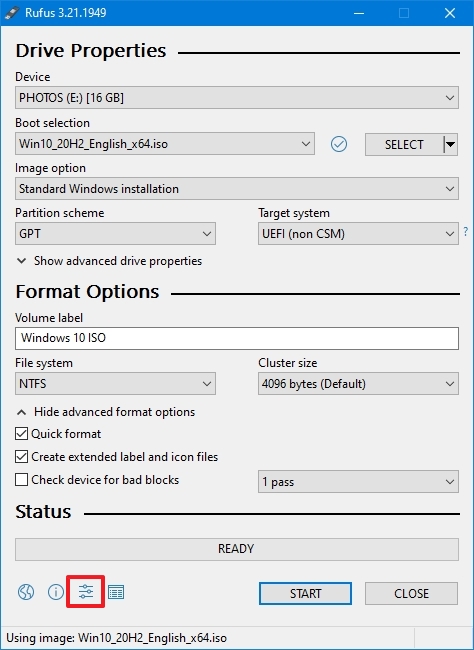
- Under the «Device» section, select the USB flash drive.
- Under the «Boot selection» section, click the Select button on the right.
- Select the Windows 10 ISO file from the folder location.
- Click the Open button.
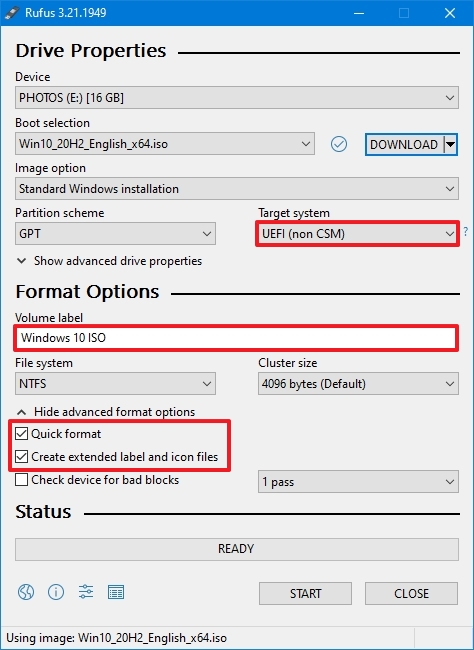
- Use the «Image option» drop-down menu and select the «Standard Windows installation» option.
- Use the «Partition scheme» drop-down menu and select the GPT option.
- Use the «Target system» drop-down menu and select the UEFI (non CSM) option.
- Under the «Show Advanced drive properties» section, do not change the default settings (unless you know what you are doing).
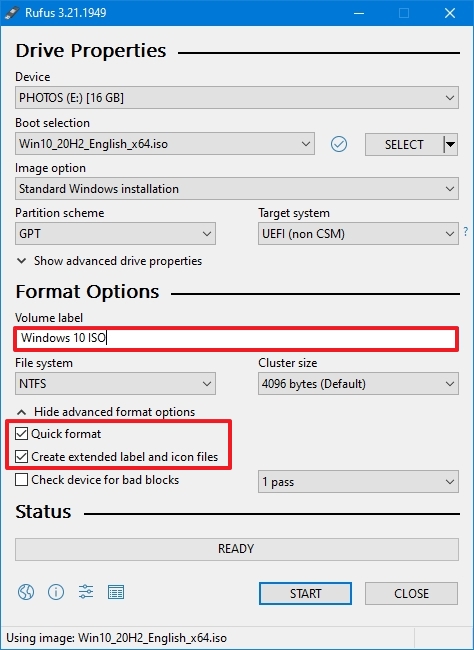
- Under the «Volume label» field, confirm a name for the drive — for example, «Windows 10 USB.»
- Do not change the default settings in the «File system» and «Cluster size» options.
- Click the «Show advanced format options» setting.
- Check the Quick format option.
- Check the «Create extended label and icon files» option.
- Click the Start button.
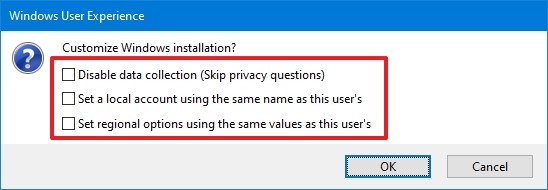
- Leave the customization installation settings unchecked.
- Click the OK button to confirm.
- Click the Close button.
After you complete the steps, Rufus will create a USB flash drive to install Windows 10 on a device using UEFI.
Create flash drive downloading Windows 10 ISO
The tool also has a feature to download the Windows 10 ISO file, which you can then use to create a USB flash drive to install Windows 10.
To create an install media with UEFI support with Rufus, use these steps:
- Open Rufus download page.
- Under the «Download» section, click the latest release (first link) of the tool to save the file.
- Double-click the Rufus-x.xx.exe file to launch the tool.
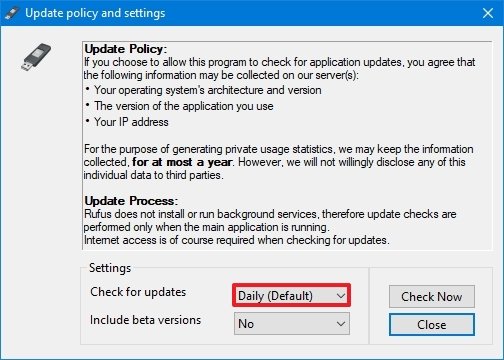
- Click the Settings button at the bottom of the page.
- Under the «Settings» section, use the «Check for updates» drop-down menu and select the Daily option.
- Click the Close button.
- Close the Rufus tool.
- Double-click the Rufus-x.xx.exe file to reopen the utility.
- Under the «Device» section, select the USB flash drive from the list.
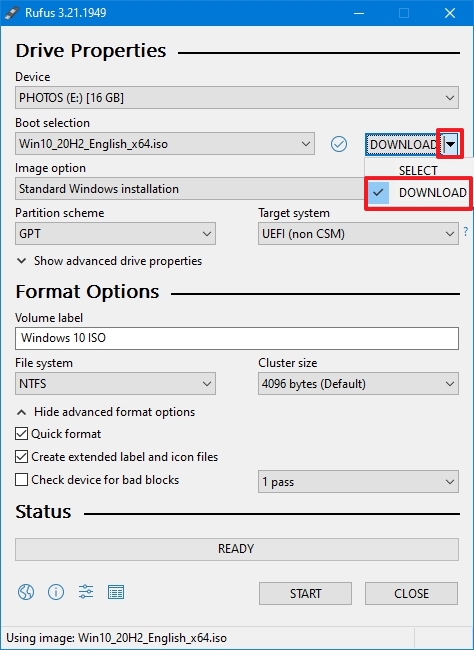
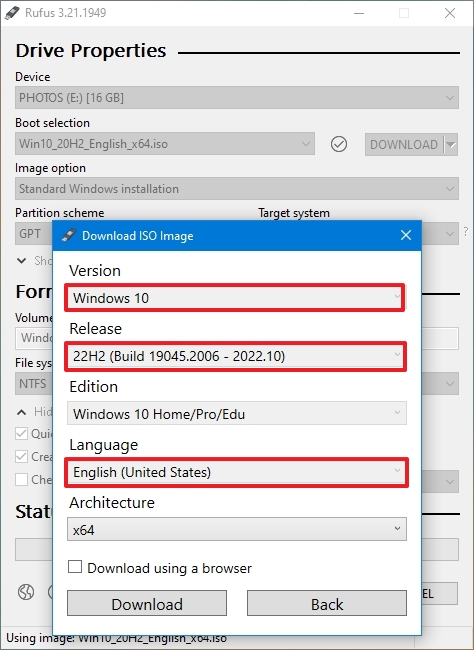
- Under the «Boot selection» section, click the arrow button next to the «Select» option and choose the Download option.
- Click the Download button.
- Use the «Version» drop-down menu and select the Windows 10 option.
- Click the Continue button.
- Select the 22H2 (Build 19045.xxx — xxxx.xx) option to download the Windows 10 November 2021 Update.
- Click the Continue button.
- Use the «Edition» drop-down menu and select the Windows 10 Home/Pro/Edu option.
- Click the Continue button.
- Use the «Language» drop-down menu and select your installation language.
- Quick note: If you are located in the United States, select the «English» option. Otherwise, select the «English International» option or the language that applies to you.
- Click the Continue button.
- Use the «Architecture» drop-down menu and select the 32-bit or 64-bit option (recommended).
- Quick tip: You can check your computer’s architecture on Settings > System > About, and under the Device specifications section, confirm whether the «System type» is 64-bit or 32-bit.
- Click the Download button.
- Select a folder to save the ISO file.
- Click the Save button.
- Use the «Image option» drop-down menu and select the «Standard Windows installation» option.
- Use the «Partition scheme» drop-down menu and select the GPT option.
- Use the «Target system» drop-down menu and select the UEFI (non CSM) option.
- Under the «Show Advanced drive properties» section, do not change the default settings.
- Under the «Volume label» field, confirm a name for the bootable drive — for example, «Windows 10 USB.»
- Under the «File system» and «Cluster size» sections, do not change the default settings.
- Click the «Show advanced format options» button.
- Check the Quick format option.
- Check the «Create extended label and icon files» option.
- Click the Start button.
- Leave the customization installation settings unchecked.
- Click the OK button.
- Click the Close button.
Once you complete the steps, Rufus will run the automated script to download the Windows 10 ISO file from the Microsoft servers and create a bootable media to install the operating system on a UEFI device without needing the Media Creation Tool.
When you have the USB boot media with support for UEFI systems, you can launch the «Windows Setup» wizard to perform a clean installation of Windows 10 or an in-place upgrade. However, since the «UEFI:NTFS bootloader» does not include a digital signature for secure boot, you must temporarily disable secure boot on the motherboard firmware before you can boot into the setup. Typically, you would do this from within the UEFI, which you can access by hitting one of the function keys (F1, F2, F3, F10, or F12), Esc, or the Delete key, as soon as you start the computer.
The firmware settings are different per manufacturer and even by device model. As a result, check your device manufacturer’s support website for more specific instructions. After the installation of Windows 10, you can enable secure boot again.
More resources
For more helpful articles, coverage, and answers to common questions about Windows 10, visit the following resources:
- Windows 11 on Windows Central — All you need to know
- Windows 10 on Windows Central — All you need to know
All the latest news, reviews, and guides for Windows and Xbox diehards.
Mauro Huculak is technical writer for WindowsCentral.com. His primary focus is to write comprehensive how-tos to help users get the most out of Windows 10 and its many related technologies. He has an IT background with professional certifications from Microsoft, Cisco, and CompTIA, and he’s a recognized member of the Microsoft MVP community.
Компания Microsoft с выпуском Windows 10 практически полностью нивелировала необходимость использовать сервисные центры и различных мастеров для установки операционной системы на ПК или ноутбук. Теперь пользователь при наличии флешки всего за несколько минут может создать загрузочную флешку, загрузиться из-под неё из BIOS и установить ОС минут за десять (в зависимости от типа накопителя). Для этого вовсе не нужно быть опытным пользователем или знать какие-то хитрые команды — весь процесс в пошаговом формате описан ниже, нужно лишь всё делать по гайду. Более того, в конце статьи имеется перечень самых популярных проблем и варианты их решений.
Как создать загрузочную флешку Windows 10
- Вам понадобится флешка на 8 ГБ или больше. В процессе загрузки Windows 10 все данные с неё сотрутся.
Перед тем, как устанавливать операционную систему, пользователю сначала нужно сделать загрузочную флешку Windows 10 (или DVD-диск при помощи программы Rufus или Ultra ISO и ISO-образа). Лучше всего для создания загрузочной флешки использовать официальную утилиту компании Microsoft, которую можно скачать с официального сайта — синяя кнопка «Скачать средство сейчас».
После загрузки утилиты её нужно запустить и выполнить несколько простых шагов:
- Принимаем условия пользовательского соглашения, после чего выбираем пункт «Создать установочный носитель» и нажимаем «Далее».
- На этапе предварительной настройки Windows 10 программа автоматически выберет язык и архитектуру. Если вы хотите изменить их, снимите галочку напротив пункта «Использовать рекомендуемые параметры для этого компьютера» и выберите нужные параметры вручную.
- На третьем шаге система предложит установить образ на USB-носитель или создать ISO-файл. Вставляем флешку в USB-порт компьютера или ноутбука, выбираем первый пункт, после чего в списке носителей кликаем на флешку, на которую вы хотите записать ОС.
- Теперь нужно подождать, пока утилита скачает все необходимые файлы с сервера Microsoft и сформирует всё необходимое для установки операционной системы.
Внесение изменений в BIOS, чтобы компьютер загружался с флешки
Имея на руках загрузочную флешку, приступать к установке Windows 10 пока что рано, так как сначала нужно сделать так, чтобы ваш ПК понимал, что загружаться нужно именно с неё, а не с другого накопителя, который уже есть в системе. Для этого нужно внести некоторые изменения в Boot Menu, чтобы система понимала, что флешка должна загружаться первой. Не стоит бояться данного пункта, так как на самом деле ничего сложного в нём нет, да и у всех современных версий BIOS довольно понятный интерфейс с функцией восстановления заводских настроек — даже если вы что-то ненароком нажмёте, это можно будет легко восстановить.
Процесс внесений изменений в Boot Menu:
- Перезагрузите компьютер и сразу после начала его включения многократно нажимайте одну из следующих клавиш или комбинаций:
ПК — F1, F2, Del;
Ноутбук Acer — F1, F2, Ctrl+F2, Ctrl+Alt+Esc, Ctrl+Alt+Del;
Ноутбук ASUS — F2, F9, Del;
Ноутбук Dell — F1, F2, F10, Del, Esc, Insert;
Ноутбук HP — F1, F8, F10, F11, Esc, Del;
Ноутбук Lenovo — F2, Fn+F2, F8, Del;
Ноутбук Samsung — F2, F8, F12, Del, Fn+F2, Fn+F8, Fn+F12;
Ноутбук Sony — F1, F2, F3, Del, ASSIST.
- В самом BIOS нужно открыть меню Boot Menu (оно может располагаться на первом экране, либо выведено в отдельное меню) и поставить на первое место выбранную вами флешку с приставкой UEFI в названии, после чего сохранить изменения и выйти из BIOS (Save and Exit). Или же, если ваша система это поддерживает, можно просто выбрать флешку, и загрузка ПК начнётся с неё.
Установка Windows 10
В первом окне установки пользователю предлагают выбрать язык, формат денежных единиц и раскладку клавиатуры. Если при загрузке ОС на флешку вы выбрали русский язык, то во всех пунктах автоматически будут установленные стандартные параметры и менять их не нужно — смену раскладки, например, можно будет изменить позже. Кроме того, стоит уточнить, что размер окна, шрифты и разрешение на вашем экране будут не совсем привычными. Это нормально — пока что драйвера для графического процессора на ПК ещё нет, так что используется универсальный формат, бояться этого не стоит.
Процесс установки Windows 10:
- После непродолжительной загрузки на экране появится большая кнопка «Установить», нажав на которую, собственно, начинается процесс установки ОС Windows 10.
- Сразу после этого на экране появится меню с предложением активировать Windows. Если у вас имеется ключ активации, то его можно ввести прямо здесь, в специальное поле. Если ключа нет или вам сейчас его неудобно вводить, то можно нажать в нижней части окна «У меня нет ключа продукта» и активировать операционную систему позже, уже после установки.
- На экране появится окно с выбором редакции операционной системы, которую вы хотите установить. Если у вас куплен ключ специально для какой-то из версий, то стоит её и выбирать, если же ключ вы планируете купить после установки, то можно выбрать любую из версий — ключи для активации продаются, включая Pro-версию ОС.
- Прочитав условия пользовательского соглашения и нажав «Далее», пользователь увидит окно выбора типа установки — «Обновление» или «Выборочная». В нашем случае стоит выбирать «Выборочная» для установки операционной системы начисто.
- На экране появится меню выбора накопителя, на который нужно устанавливать операционную систему. Если у вас один накопитель, и он новый, то просто выбираете его и нажимаете «Далее». Если накопителей несколько — выбирайте тот, который вам необходим (определить нужный диск можно по объёму свободной памяти). Если вы хотите произвести чистую установку Windows 10, стерев все данные, выберите нужный накопитель и нажмите на «Форматировать».
- Начнётся процесс непосредственной установки Windows 10. В ходе установки ничего нажимать или делать не нужно, просто дожидаемся окончания.
- После завершения процесса установки на экране пользователя появится экран выбора языка и региона (изначально установлен русский язык и Россия), плюс нужно будет выбрать способ настройки (для личного использования или организации — выбираем «Для личного использования»);
- Система предложит войти из-под учётной записи Microsoft, создать новую учётную запись или запустить автономный аккаунт. При наличии аккаунта Microsoft можно его ввести, если его нет — выбираем «Автономная учётная запись», в следующем окне в левом нижнем углу нажимаем «Ограниченные возможности»;
- Вводим имя пользователя, потом задаём для него пароль и выбираем три контрольных вопроса (они нужны на тот случай, если вы забудете пароль — не рекомендуется ими пренебрегать);
- Система предложит выбрать параметры конфиденциальности — распознавание речи, геолокация, диагностика данных. Можно отключить всё или оставить, все эти параметры можно настроить уже после установки Windows 10;
- Система выполнит последние настройки, это может занять несколько минут — не отключайте компьютер в этот момент;
- Операционная система Windows 10 установлена.
Возможные трудности и ошибки при установке Windows 10
1. Перед установкой загрузочного образа ОС на флешку её можно отформатировать в FAT32, чтобы процесс прошёл корректно.
2. В случае, если вы не можете найти меню загрузки накопителей в BIOS своего компьютера или ноутбука, стоит открыть инструкцию к материнской плате или ноутбуку, где указана данная информация, либо найти данные на сайте производителя по названию модели, либо вписать в поисковую систему запрос «Название материнской платы/ноутбука + boot menu».
3. В ходе выбора накопителя у вас может вылететь ошибка о том, что в системах Windows можно использовать только GPT-диск. Устранить данную проблему предельно просто:
- нажмите Shift + F10 (ПК) или Shift + Fn + F10 (ноутбук) на клавиатуре;
- в окне командной строки пишем команду diskpart;
- после запуска дисковой утилиты вписываем команду list disk для вывода списка дисков;
- из полученного списка дисков выберите номер того, который необходим для установки (в данном случае — Диск 0);
- напишите команду select disk 0;
- напишите команду clean для очистки диска (теряются все данные на нём);
- напишите команду convert gpt;
- в командной строке должно появится сообщение «Выбранный диск успешно преобразован к формату GPT»
- вписываем команду exit и закрываем командную строку;
- в окне выбора диска нужно нажать на кнопку «Обновить» для обновления параметров накопителей.
- теперь установить ОС можно.
- Теперь не боюсь за Windows: точки восстановления создаются каждый день. Вот как это настроить
- 7 функций, которые сделают Windows 12 лучшей системой. Если Microsoft пойдёт на это
- Эта бесплатная утилита от Microsoft в разы ускоряет работу. Она существует ещё с Windows 95
- Эта утилита показывает, где используется выбранный файл в Windows и что мешает удалить его
- Мод Windows 10 для игр: тестирую Atlas OS, из которого вырезали лишнее ради производительности


