Microsoft Defender on Android Microsoft Defender on iOS Microsoft Defender on Mac Microsoft Defender on Windows More…Less
Protect your Android, iPhone, Mac, and Windows devices from threats by installing Microsoft Defender. Download Microsoft Defender on your devices either by:
-
Scanning the following QR code

-
Searching for Microsoft Defender in your app store
-
Sharing with your devices, the following link: Copy link

We encourage you to install Microsoft Defender on at least five devices per person.
Important: This article is about the Microsoft Defender app that is included with Microsoft 365 Family or Personal subscriptions. If you’re looking for information about the Microsoft Defender Antivirus that is built into Windows, see Stay protected with Windows Security.
Ready to give it a try?

-
Open https://aka.ms/AndroidDefender (or scan the QR code below) on your Android device to go to Microsoft Defender in the Google Play Store.
Note: If your device has both a Personal Profile and a Work Profile, then you need to install the app in the Personal Profile.
-
Follow the installation steps on the Play Store page.
-
After installing, sign in with the personal Microsoft account (such as @outlook.com, @hotmail.com, or @live.com) that is associated with your Microsoft 365 subscription.

When you first sign into Microsoft Defender on Android, we’ll walk you through a few easy steps that start with setting up web protection. During this process, we’ll ask you to give Defender permission to do two things: run in the background and use the Accessibility Service.
Run in the background
A security tool that only works sometimes isn’t nearly as effective. You want Microsoft Defender to always watch your back, protecting you from the malicious sites you weren’t expecting. In order to do that, Defender needs permission to run in the background.
Accessibility service
In order to make sure the site you’re going to isn’t known to be dangerous, Defender needs to be able to see the address. To do that on Android, we use the Accessibility Service to read, almost literally, the address from your browser.
Important: Only one app at a time can have permission to use the Accessibility Service. If you give that permission to a different app, web protection in Defender will be turned off.
After setting up web protection, we’ll set up anti-malware protection. To do this we need to ask for a couple more permissions.
Access device storage
Microsoft Defender scans apps and files on your device to watch for possible threats. To do that, it needs to be able to access those files. We only use that permission to look for malicious apps, a process that happens entirely on your device. No information about your apps or files is sent to Microsoft.
Send notifications
If you want Microsoft Defender to tell you if we find a threat, you’ll need to allow us to send you notifications on your device.
Run in the background
Note: If you already allowed Microsoft Defender to run in the background for web protection, you won’t be asked for this permission again.
Protecting your device is a full-time job, but you probably want to use your device for other things, like texting, gaming, work, and entertainment. By allowing Microsoft Defender to run in the background, you allow us to help keep you safer all the time.
Let’s finish with a scan
Finally, Microsoft Defender will run an initial scan of your device to see if there are threats already on it. This scan usually only takes a minute or two.
If that initial scan finds any threats Microsoft Defender will notify you and help you remove them.
-
Open https://aka.ms/iosDefender (or scan the QR code below) on your iOS device to go to Microsoft Defender in the Apple App Store and follow the installation steps.
-
After installing, sign in with the personal Microsoft account (such as @outlook.com, @hotmail.com, or @live.com) that is associated with your Microsoft 365 subscription.

When you first sign into Microsoft Defender on iOS, we’ll walk you through a few easy steps that to set up web protection. During this process, we’ll ask you to give Defender permission to do two things: set up a local virtual private network (VPN) and allow notifications.
A local VPN?
Due to the built-in security settings in iOS, other apps aren’t able to see the address (URL) an app is trying to open, including those being opened in the web browser. To make sure the site you’re going to isn’t known to be dangerous, Defender needs to be able to see the address.
To do that, we set up a local VPN. It’s called a local VPN because it never leaves your device—it’s just a connection between your browser and Microsoft Defender running on your device.
When you click on a link, the browser sends the address you’re going to through that local VPN to Defender. Defender checks the address and then (assuming it’s good), lets the browser open that site. The whole thing happens so quickly you won’t even notice.
Allow notifications
If the site is found to be malicious that’s where notifications come in. We block access to the site, but iOS won’t let us notify you of the problem in the browser, so instead we send you a notification telling you that the site you’re trying to go to is dangerous. From that notification you can close the browser tab and stay safe. Or, if you’re completely sure that the site is safe, you can choose to continue to the site anyway.
Important: You can choose not to allow notifications and web protection will still work, but you won’t get the notification that it was Defender who blocked the site you were trying to go to.
When you install the Microsoft 365 apps on your Windows device, the Microsoft Defender app will automatically be installed for you along with the other apps. If you installed the Microsoft 365 apps before Defender was released, and you still have an active Microsoft 365 Family or Personal subscription, then the Defender app was automatically added to your Windows device as part of an update.
Important: Even if it’s installed, Microsoft Defender isn’t activated until you sign into the app.
Just launch it from the Start menu (or click the button below) and sign in with the personal Microsoft account you use for Microsoft 365.
Open Defender
If you don’t have an active Microsoft 365 subscription right now
-
Open https://aka.ms/WindowsDefender to go to Microsoft Defender in the Microsoft Store and select Install.
-
After installing, sign in with the personal Microsoft account (such as @outlook.com, @hotmail.com, or @live.com).
To uninstall Defender
Find Microsoft Defender on your Start menu, right-click it and select Uninstall.
If you uninstall the app it will not be automatically reinstalled. You can reinstall it manually by going to https://aka.ms/WindowsDefender and selecting Install.
Note:
Microsoft Defender on Mac requires macOS 10.14 or later.
-
Open https://aka.ms/MacDefender on your device to download the WDAV.PKG installation file.
-
Open the WDAV package file on your Mac and follow the installation steps.
-
After installing, sign in with the personal Microsoft account (such as @outlook.com, @hotmail.com, or @live.com) that is associated with your Microsoft 365 subscription.
When you first sign into Microsoft Defender on Mac, we’ll will walk you through a few easy steps to set up anti-malware protection on your device.
During this process, we need you to give Microsoft Defender a couple of permissions so that it can protect you.
System access
To start with, we’ll have you open the Security settings, then follow these steps:
1. Select the padlock at the bottom left so you can make changes. You’ll be prompted to enter your password or other authentication.
2. You should see a prompt that says that Some system software requires your attention before it can be used. Select the Details button.
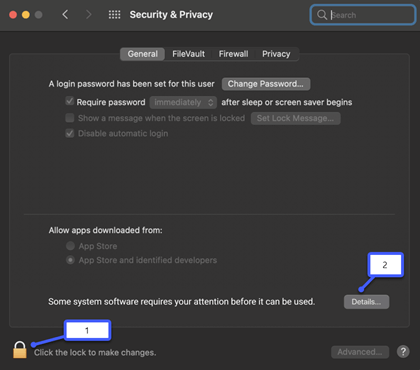
3. If you see a dialog asking you to select Microsoft Defender and Microsoft Defender Extension, select both and then OK.
Note: If you’re using macOS Catalina (10.15) you may simply see an Allow button, rather than Details.
Once that’s done, select the padlock again to prevent further changes.
Access files
Next, we’ll need permission to access your files. Microsoft Defender scans apps and files looking for threats and it can only do that if it has permission to access the files. We’ll ask you to select Open Privacy Settings, then follow these steps:
1. Select Full Disk Access.
2. Select Microsoft Defender and (if you see it) Microsoft Defender Extension.
Let’s finish with a scan
Finally, Microsoft Defender will run an initial scan of your device to see if there are any threats already on it. That scan may take a while—depending on the speed of your device and how many apps you have—but you can keep using your computer while the scan runs in the background.
If that initial scan finds any threats Microsoft Defender will notify you and help you remove them.
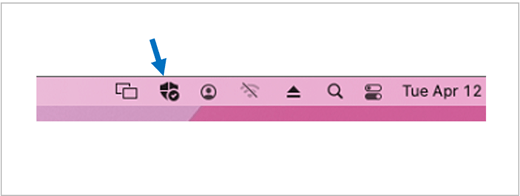
Tip: If Microsoft Defender is successfully installed and running, you’ll see its icon on the title bar near the clock at the top right.
Share your security status with family organizers
If you’re part of a Microsoft 365 Family subscription the last step is to decide if you’d like to share your security status with your family organizers. The family organizer is the person who established the Microsoft 365 Family subscription, and any other family members that person has selected to be family organizers.
By sharing your security status, you make it easier for the family organizers to help keep your devices and identity safe. This only shares security and identity threat monitoring information from Defender, not any other information about your device or any of your personal files. For more information see Protect the whole family with Microsoft Defender.
Once that process is done, we’ll take you to your Microsoft Defender dashboard and then you’re all set.
Next, see Getting started with Microsoft Defender.
Got more questions about installing Defender?
Visit the Microsoft Defender Answers community
Need more help?
Want more options?
Explore subscription benefits, browse training courses, learn how to secure your device, and more.
Communities help you ask and answer questions, give feedback, and hear from experts with rich knowledge.
Содержание
- Способ 1: Восстановление системных файлов
- Способ 2: Откат к точке восстановления
- Способ 3: Копирование исполняемого файла
- Вопросы и ответы
Важно! В этой статье будет рассказываться о том, как восстановить работу «Защитника Windows» после его полного удаления. Этот процесс подробно описывался в другой статье на нашем сайте, ссылка на которую дана ниже. Если вы ранее выполняли представленные там действия, значит, текущее руководство будет актуально.
Подробнее: Как удалить «Защитник Windows» в Windows 10
Примечание! Если штатный антивирус Windows 10 вы не удаляли, а просто отключали средствами операционной системы, для восстановления его работы обратитесь за помощью к другой статье на нашем сайте, перейдя по ссылке ниже.
Подробнее: Как включить «Защитник Windows» в Windows 10

Способ 1: Восстановление системных файлов
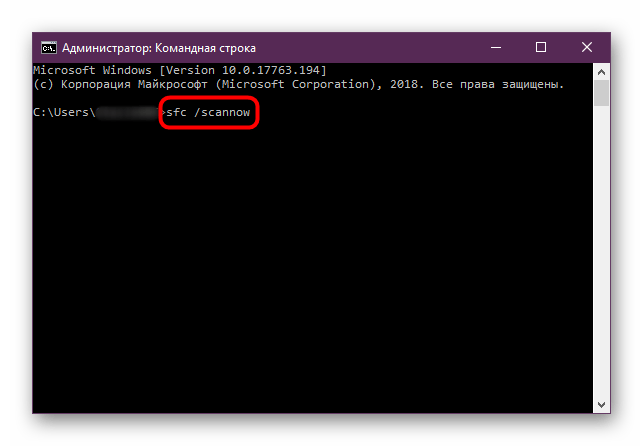
Удаленный исполняемый файл «Защитника Windows» является системным, поэтому его можно попытаться восстановить с помощью специальной предустановленной консольной утилиты SFC. Это несложная процедура, достаточно только открыть «Командную строку» и инициализировать запуск приложения путем ввода команд. Этот процесс детально описывается в другом материале на нашем сайте, при необходимости ознакомьтесь с изложенной там информацией, воспользовавшись ссылкой ниже.
Подробнее: Восстановление целостности системных файлов в Windows 10
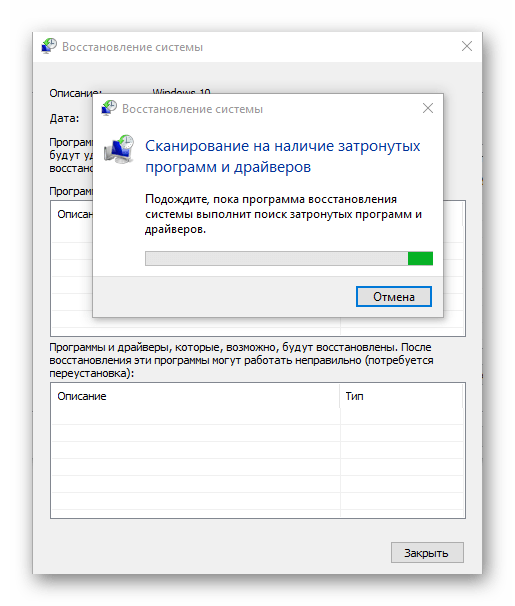
Способ 2: Откат к точке восстановления
Попробовать восстановить работу «Защитника Windows» можно путем отката операционной системы до контрольной точки. Только в этом случае важно, чтобы она была сделана до удаления штатного антивируса, иначе способ окажется неэффективным. При удовлетворении этого условия произведите откат через соответствующее приложение в Windows 10. Если вы не знаете, как это сделать, воспользуйтесь руководством, представленным в другой статье на нашем сайте.
Подробнее: Как откатить Windows 10 до точки восстановления
Обратите внимание! Создавать контрольные точки в Windows 10 рекомендуется систематически. Это позволит в любой момент при появлении неисправностей совершить откат до рабочей версии, не затрачивая время на устранение проблем вручную. Ознакомьтесь со статьей на нашем сайте, в которой подробно рассказывается об этой процедуре.
Подробнее: Как создать точку восстановления в Windows 10

Способ 3: Копирование исполняемого файла
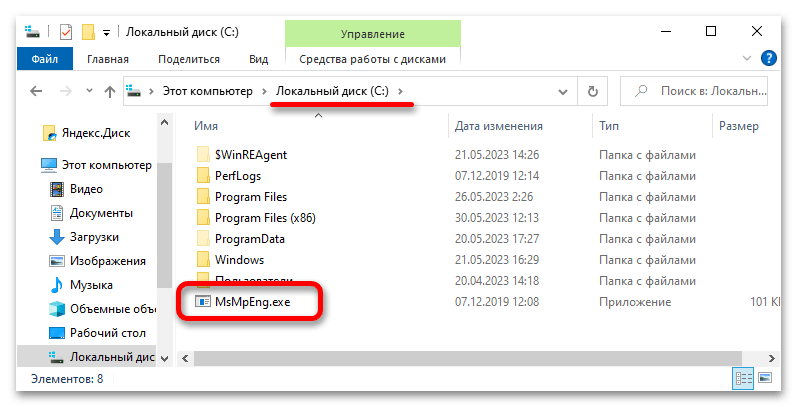
Если ни один из приведенных выше способов не помог вам, установить «Защитник Windows» придется вручную. Эта процедура отличается от стандартной инсталляции программного обеспечения в операционной системе, поэтому далее она будет рассмотрена подробнее.
Компания Microsoft не предоставляет установочного файла «Защитника Windows», поэтому файлы антивируса придется поместить в корневую директорию на системном диске вручную. Но прежде их следует перенести на свой компьютер, предварительно скопировав с другого. Расположение исполняемого файла указано ниже:
C:\Program Files\Windows Defender\MsMpEng.exe
Примечание! Вы также можете скачать исполняемый файл «MsMpEng.exe» из интернета, но этого делать не рекомендуется, если вы не уверены в надежности источника. Есть немалая вероятность того, что вы занесете в свою операционную систему вирус.
Получив в свое распоряжение исполняемый файл «Защитника Windows», поместите его в корневой каталог диска C, чтобы к нему был быстрый доступ при выполнении действий, описанных далее в этой статье.
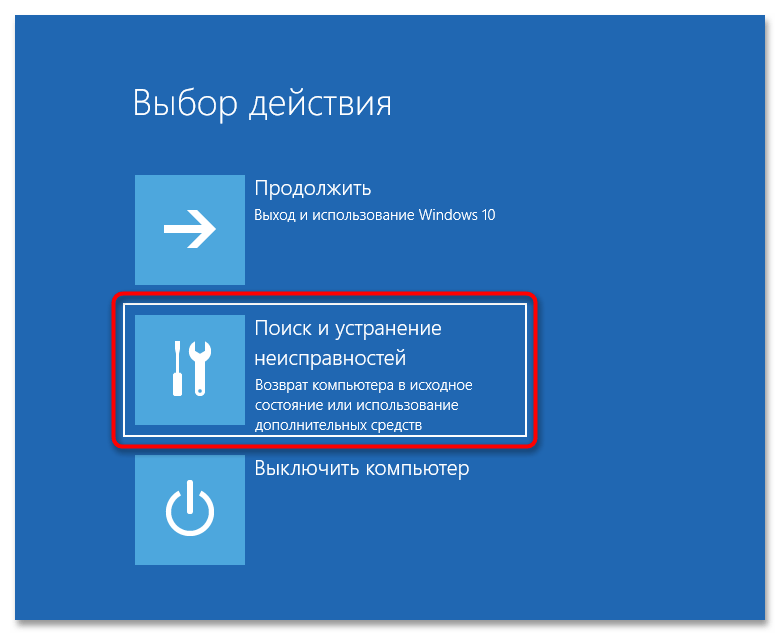
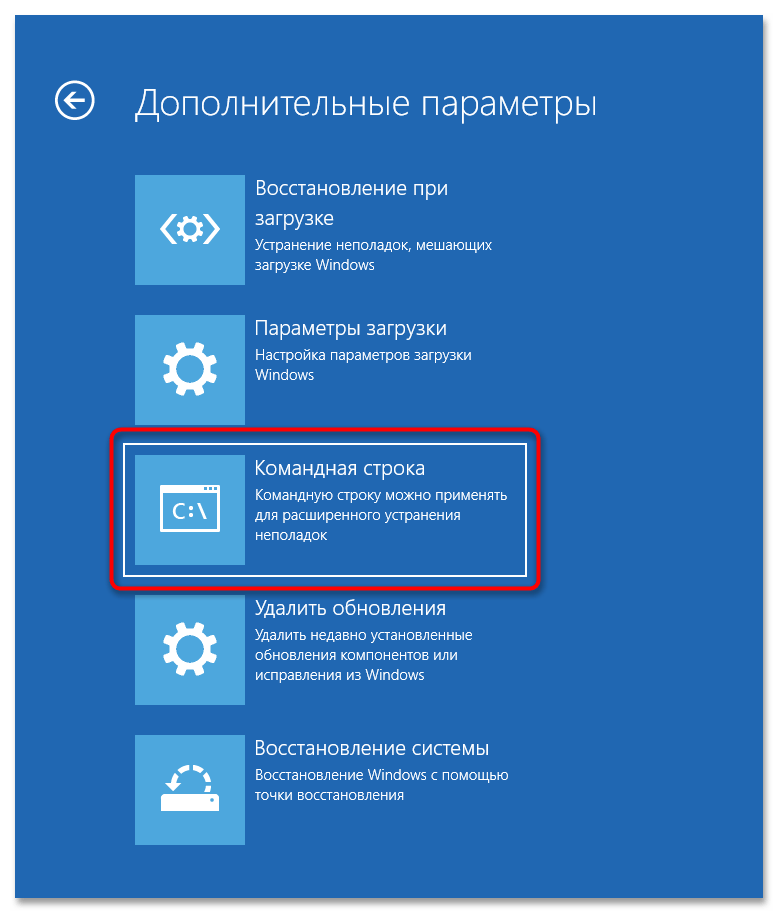
После этого необходимо будет запустить «Командную строку» в среде восстановления. Требуется это для того, чтобы у вас была возможность редактировать системные разделы.
- Перезапустите компьютер с зажатой клавишей Shift. Для этого откройте меню «Пуск», щелкните по кнопке выключения, зажмите указанную клавишу и кликните по пункту «Перезагрузка».
- Дождитесь, пока компьютер перезапустится и на экране появится главное меню среды восстановления. Затем перейдите в раздел «Поиск и устранение неисправностей».
- Далее проследуйте в меню «Дополнительные параметры», щелкнув левой кнопкой мыши по одноименному элементу.
- Запустите «Командную строку», нажав по ней в списке дополнительных параметров среды восстановления.
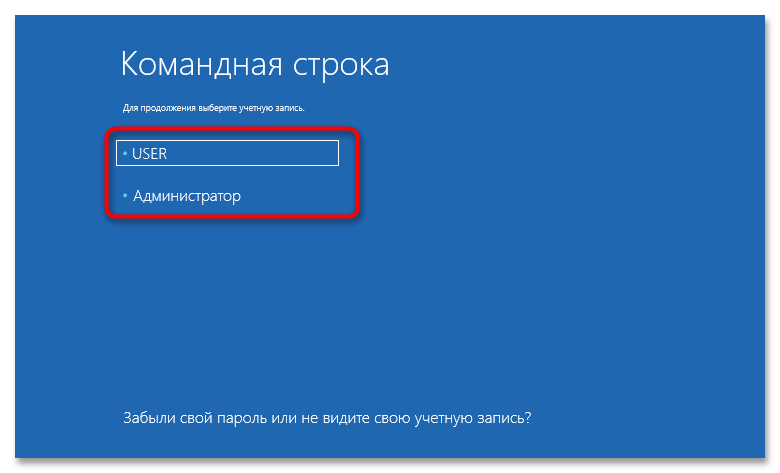
- На экране выбора учетных записей Windows 10 выберите любую, к которой у вас есть доступ. Для этого единожды кликните левой кнопкой мыши по ее названию.
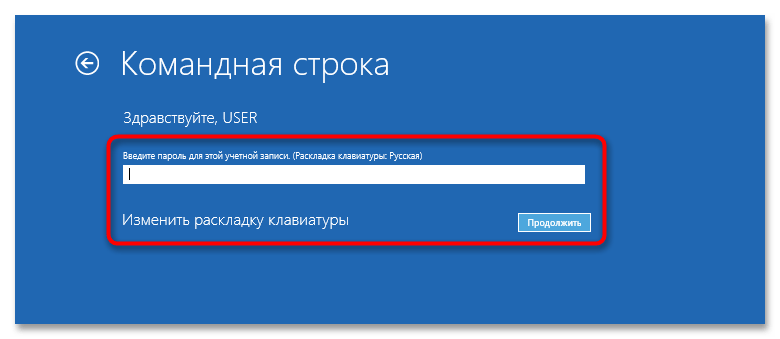
- При необходимости введите пароль и нажмите по кнопке «Продолжить». Если пароль не был задан, просто оставьте поле пустым.
- Дождитесь перезагрузки компьютера, пока на экране не отобразится «Командная строка», запущенная в среде восстановления.


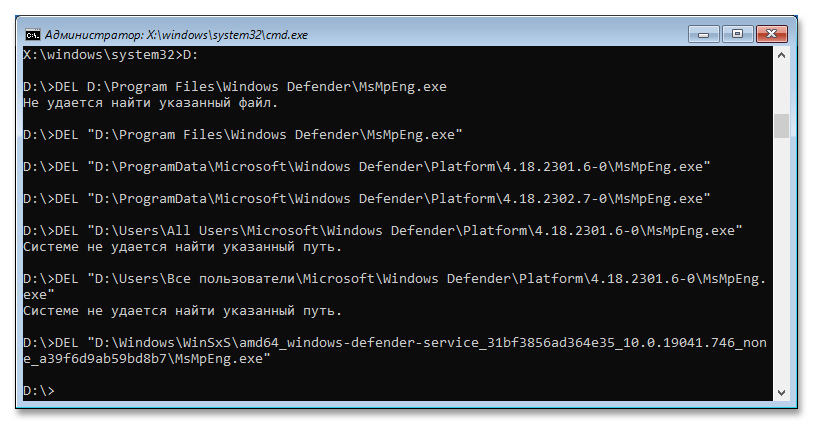
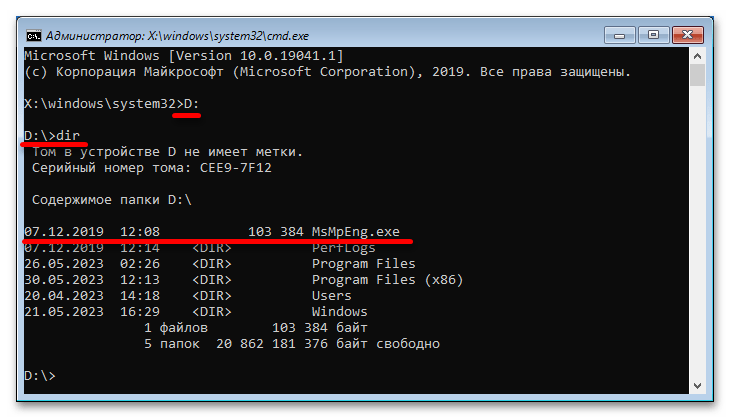
Теперь необходимо путем ввода специальных команд переместить файл с системного диска в корневую директорию «Защитника Windows». Важно четко следовать дальнейшим указаниям, чтобы процедура прошла успешно, поэтому внимательно следите за тем, какие команды вводите.
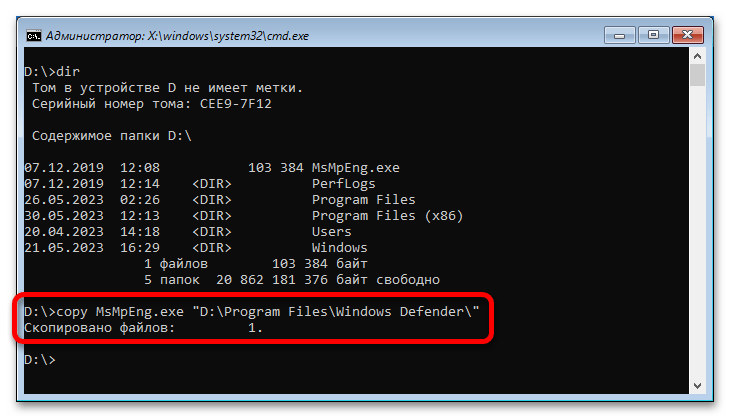
- По умолчанию «Командная строка» в среде восстановления открывается на диске X, поэтому необходимо перейти на системный раздел, обозначающийся в Windows 10 буквой C. Но здесь диски спутаны, зачастую системный раздел имеет букву D, это необходимо выяснить. Для этого перейдите на него и просмотрите содержащиеся в корневой директории папки. Чтобы это сделать, поочередно выполните приведенные ниже команды
D:
dirНа экране отобразится список всех файлов текущего каталога. Найдите ранее помещенный исполняемый файл «Защитника Windows» под названием «MsMpEng.exe». Если он здесь есть, значит, диск определен верно и вы можете продолжать следовать инструкции. Если его нет, перейдите на другой диск, введя его букву, следующую по алфавиту, и нажав Enter, например
E:,F:, илиH:. - Переместите исполняемый файл антивируса в его корневую директорию. Для этого введите специальную команду, указанную ниже:
copy MsMpEng.exe "D:\Program Files\Windows Defender\"Обратите внимание! У вас начальная буква диска может отличаться. При необходимости смените ее на ту, которую вы определили на предыдущем шаге.
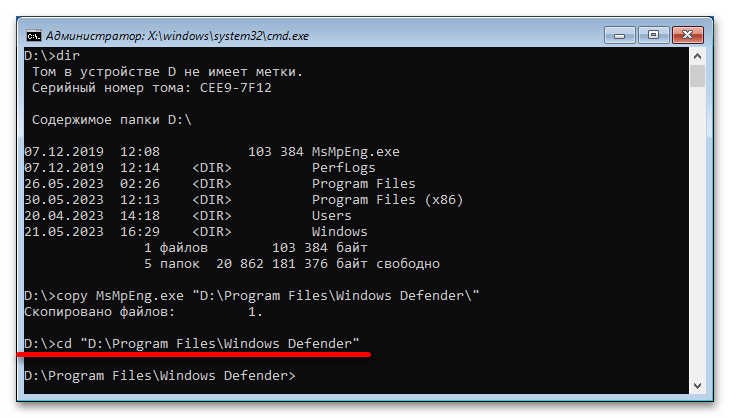
- Чтобы убедиться в успешном перемещении файла, перейдите в корневую директорию «Защитника Windows». Для этого нужно воспользоваться командой
cd, указав целевой каталог.cd "D:\Program Files\Windows Defender\" - После перехода отобразите в окне консоли список всех содержащихся в этой папке файлов. Для этого воспользуйтесь уже знакомой командой
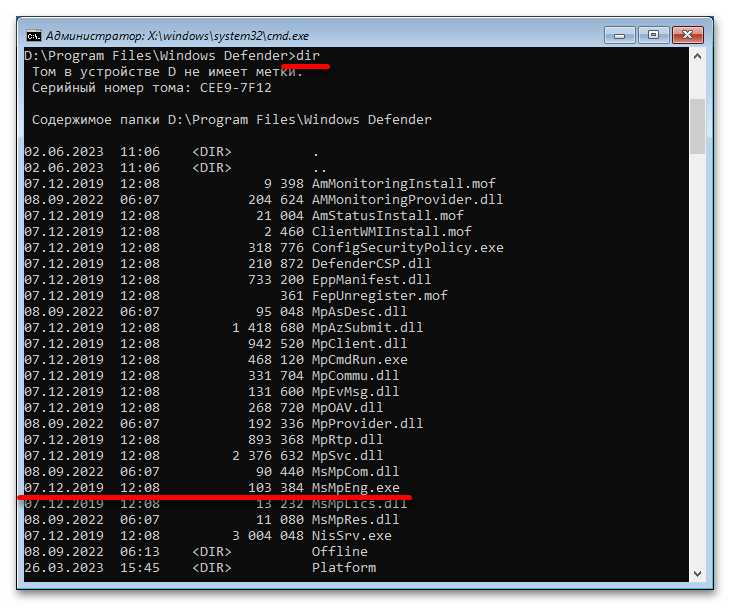
dir. Найдите в списке файл с названием «MsMpEng.exe». Если он есть, значит, все прошло успешно и можно перезагрузить компьютер, выполнив вход в операционную систему.

Если файла в директории нет, повторите выполнение этой инструкции с самого начала. Возможно, вы неверно определили букву системного диска или неправильно ее указали при выполнении команды копирования.
Важно! Если после выполнения всех действий, описанных в этом способе, работу «Защитника Windows» восстановить не получилось, попробуйте повторно воспользоваться первым методом из статьи, проведя восстановление системных файлов с помощью утилиты SFC.
Еще статьи по данной теме:
Помогла ли Вам статья?
Here’s a guide for Microsoft/Windows Defender download, install, uninstall and reinstall on Windows 10/11. Utilize this best free antivirus software for Windows to protect your computer from threats. For more computer troubleshooting tips, you can visit MiniTool Software official website.
This post mainly introduces how to download Windows Defender on Windows 10/11 computer. 3 ways are offered to let you get the Microsoft Defender app. You can also learn how to uninstall and reinstall Windows Defender on Windows 10/11, how to fix Windows Defender can’t open/start issue, how to recover deleted or lost files from your PC, etc.
Also read: Learn the best tips and tricks for data recovery hard drive on Windows 11/10/8/7.
About Windows Defender
Windows Defender, also known as Microsoft Defender or Windows Security, is a 100% free antivirus program developed by Microsoft. It is included in Windows 11/10/8/8.1/7/Vista.
Windows Defender offers 4 scan modes: full scan, quick scan, custom scan, and offline scan.
Users can open Windows Defender on Windows 10/11 and turn on or off the real-time protection, enable or disable firewall & network protection, change the automatic scanning settings, adjust the advanced protection settings, and more.
Check for more information about how to stay protected with Windows Security.
How to Download and Install Windows Defender on Windows 10/11
Windows Defender is automatically installed for free on all PCs that run on Windows 11/10/8/7. If you can’t find Windows Defender on your computer, generally, you have 3 ways to get Windows Defender.
Way 1. Update Windows OS
You can try to update Windows 11/10 to the latest version to see if Windows Defender comes back.
To update your system, you can click Start -> Settings -> Update & Security (Privacy & Security) -> Windows Update -> Check for updates. You can also use this way to update Windows Defender to the latest version on Windows 10/11.
Way 2. Manually Download and Install Windows Defender on Windows 10/11
- Open Microsoft Store on your Windows computer. For Windows 11, you can click the Microsoft Store icon on the taskbar to open it. You can also press Windows + S, search for Microsoft Store in the search box, and click the Microsoft Store app to open it.
- In Microsoft Store, you can type Microsoft Defender Preview in the search box, and choose the Microsoft Defender Preview app.
- Click the Get button or Get in Store app button to download Microsoft Defender for Windows 10 or 11.
Way 3. Find Third-party Windows Defender Download Websites
You may also find some third-party reliable websites to get Microsoft Defender. Some websites are listed below for your reference, but you should identify by yourself if the Windows Defender download resource is reliable.
- https://windows-defender.en.softonic.com/download
- https://downloads.digitaltrends.com/windows-defender/windows
- https://www.filehorse.com/download-windows-defender-64/
- https://download.cnet.com/Microsoft-Windows-Defender/3000-8022_4-55082.html
Related: How to Enable or Disable Microsoft Defender in Windows 11
Download Microsoft Defender for Android from Google Play Store
If you want to download Microsoft Defender for Android, you can open the Play Store on your device, search for Microsoft Defender, and tap the Install button to download and install Microsoft Defender for your Android phone or tablet.
How to Uninstall and Reinstall Windows Defender on Windows 10/11
If you want to uninstall the built-in Windows Defender app on Windows 10/11, you may need to use Windows PowerShell to do it. You may refer to this post: How to Uninstall, Restore, Reinstall Windows 10 Built-in Apps.
If you download and install Microsoft Defender from Microsoft Store or other third-party websites, you can open Control Panel on Windows, right-click the Microsoft Defender app and select Uninstall to remove it from your computer.
After you uninstall Windows Defender, you can follow the instructions above to reinstall Windows Defender if you want.
Fix Windows Defender Can’t Open/Start on Windows 10/11
If you can’t open Windows Defender on your computer, you may try the 10 tips below to see if they can help bring this free antivirus app back to normal working.
Fix 1. Restart your computer and try to open Windows Defender again.
Fix 2. Update Windows system.
You can follow the guide above to update your Windows 10 or 11 OS to see if Windows Security can work normally again.
Fix 3. Run SFC scan.
You can perform a system scan to repair possible corrupted system files in your device.
- Press Windows + R, type cmd, and press Ctrl + Shift + Enter to open Windows Command Prompt.
- Type sfc /scannow command and press Enter to run the SFC tool to automatically check and fix corrupted system files. If this command doesn’t work, you can type DISM /Online /Cleanup-image /RestoreHealth command and press Enter to run this command first.
Fix 4. Reset Windows Defender app.
If Windows Defender is not working well on your computer, you can follow the operation below to reset the app settings to default to see if it helps.
- Press Windows + X and select Windows PowerShell (Admin). For Windows 11, select Windows Terminal (Admin).
- Type the command: Get-AppxPackage Microsoft.SecHealthUI -AllUsers | Reset-AppxPackage. Press Enter to execute the command.
Fix 5. Uninstall and reinstall Windows Defender. The instructions are introduced above.
Fix 6. Disable any third-party antivirus software on your computer since it may be conflicted with the Windows Defender antivirus program.
Fix 7. Use third-party antivirus software.
If Windows Defender has problems or can’t work on your computer, you can turn to some third-party top free antivirus software for Windows 10/11.
Fix 8. Start Windows in Safe Mode to see if Windows Defender can smoothly open and work.
Fix 9. Perform a System Restore. If you still favor Windows Defender and do not want to use other antivirus applications, you can try to restore your Windows system to a previous state to see if the Windows Security app can work properly.
Fix 10. If Windows Defender is not working and you have some other problems on your computer, you may reinstall your Windows OS.
Note: Before you perform the system restore or reinstall your computer, it’s highly advised you make a backup of your Windows system and important data.
How to Recover Deleted/Lost Files on Windows 10/11 for Free
If your computer has problems and you lost some important data, you can try a professional data recovery program to restore the lost data from your PC.
MiniTool Power Data Recovery is a top data recovery program that helps you recover data from various data loss situations. You can use it to recover permanently deleted files, recover data from a corrupted/formatted hard drive, recover data after malware/virus infection, recover data when the PC won’t boot, and more. Unless the hard drive is physically damaged and can’t be recognized by your computer, you can try this tool to restore data.
As for supported devices, you can use MiniTool Power Data Recovery to recover any deleted/lost files from a Windows PC or laptop, USB flash drive, memory card, external hard drive, SSD, etc.
Download and install MiniTool Power Data Recovery on your Windows PC or laptop, and check the guide below for how to use it to recover data.
MiniTool Power Data Recovery FreeClick to Download100%Clean & Safe
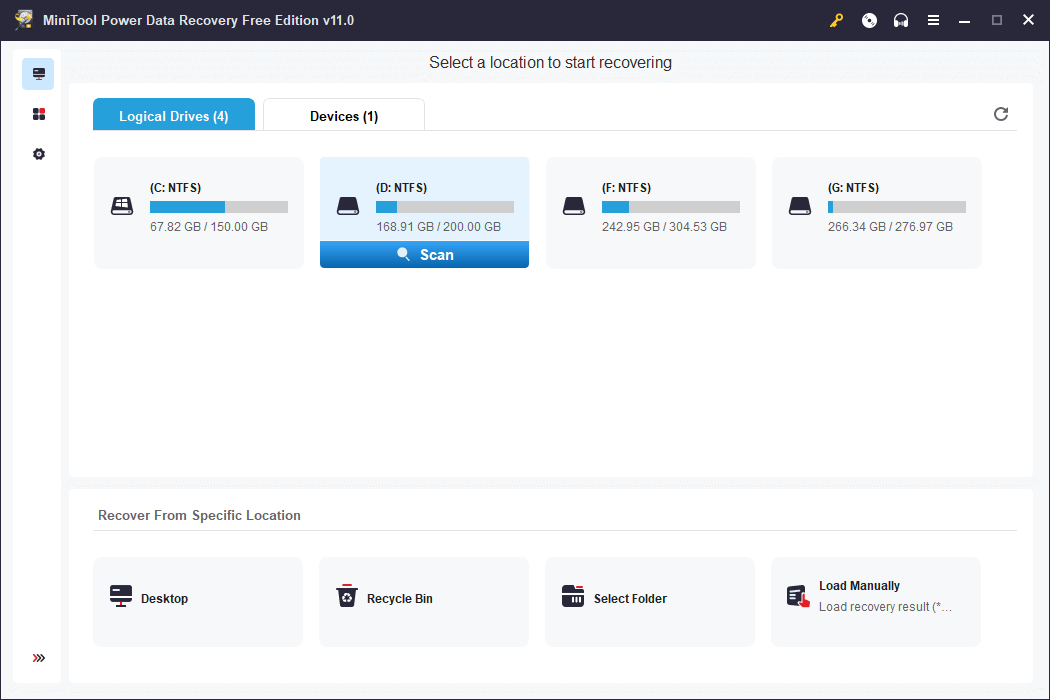
- Launch MiniTool Power Data Recovery to access its main interface.
- On the main UI, you can choose the drive or device you want to scan. If you know which drive contains your deleted/lost files, you can select the target drive under Logical Drives and click Scan. If you don’t know which drive to scan, you can click the Devices tab, select the whole disk or device and click Scan. For an external device, you need to connect it to your Windows computer beforehand.
- Let the software finish the scan. After that, you can check the scan result and find if the target files are listed, if so, check those files and click the Save Then you can choose a preferred new location to store the recovered files.
Tip: If you only want to scan a specific type of file, you can click the Scan Settings icon in the left panel of the main UI and choose the file types you want to scan.
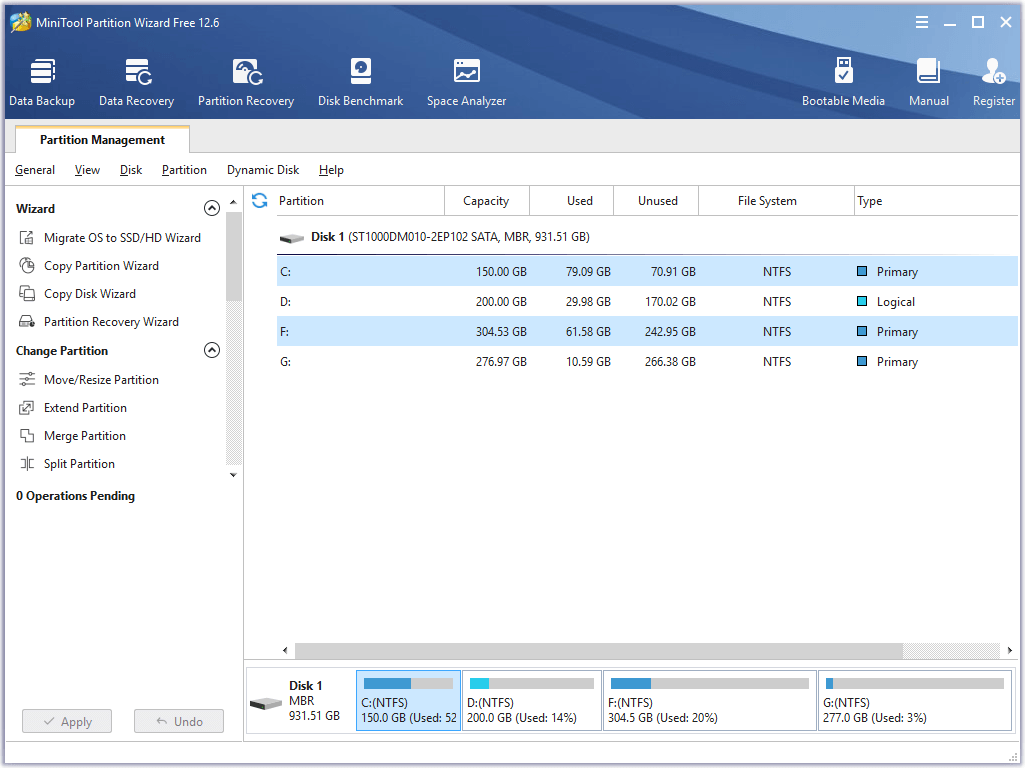
Free Disk Partition Manager for Windows 11/10/8/7
If your computer has problems or you reinstalled your OS, you may need a professional disk partition manager to repartition the hard disk or manage the hard drives from other aspects.
MiniTool Partition Wizard is a popular free hard drive partition manager for Windows. It lets you manage hard drives and partitions from all aspects.
For partition management, you can use it to create, delete, extend, resize, split, merge, format, wipe partitions, convert partition format, check file system errors, change the drive letter, and more.
For disk management, you can use MiniTool Partition Wizard to migrate OS to SSD/HD, copy disk, recover lost partitions, convert disk format, wipe disk, test hard drive speed, analyze hard drive space, and more.
This disk partition manager is extremely easy to use and fulfills all your hard disk management needs. It is free and clean. You can download and install MiniTool Partition Wizard on your Windows PC or laptop to test it now.
MiniTool Partition Wizard FreeClick to Download100%Clean & Safe
Free PC Backup Software for Windows 10/11
For system and data backup on a PC, you can utilize a professional free PC backup tool.
MiniTool ShadowMaker is one of the best free PC backup utilities that supports Windows system backup and file backup.
You can use it to easily create a system image backup of your Windows OS and restore your OS from the backups when needed.
As a professional PC backup application, you can also use it to back up any files on your computer at a fast speed. You can easily select files, folders, or partitions to back up to external hard drives or USB flash drives. You can even select the whole disk content to back up.
Besides, it also offers another backup module: File Sync. You can easily sync data to the target device to make a backup.
Many other backup features are provided, e.g. disk clone, automatic backup, incremental backup, etc.
Use this top free PC backup tool to keep your computer data safe.
MiniTool ShadowMaker TrialClick to Download100%Clean & Safe

Click to Tweet
Conclusion
This post offers a guide for Windows Defender download, install, uninstall, and reinstall on Windows 10/11. Some tips to help you fix Windows Defender not working or can’t open problem are also provided. Some useful free Windows tools are offered to help you with data recovery, system and data backup, and disk partition management. Hope it helps.
If you have any problems with using MiniTool Software products, you can contact [email protected].
Защитник Windows 10 — это встроенное антивирусное программное обеспечение Microsoft, которое предоставляет базовую защиту от вредоносных программ и других угроз для операционной системы Windows 10. Однако иногда пользователи удаляют защитник Windows 10 по разным причинам, и в таких случаях желательно его переустановить. В этой статье мы рассмотрим, как установить защитник Windows 10, если он был удален.
Первым способом установки защитника Windows 10 является его восстановление из системного резервного копирования. В Windows 10 создается автоматическое резервное копирование системы, включая все установленные программы. Чтобы восстановить защитник Windows 10 из системного резервного копирования, вам нужно перейти в раздел «Обновление и безопасность» в настройках Windows 10, выбрать «Восстановление» и затем «Начать» под «Восстановление себя в исходное состояние».
Если восстановление из системного резервного копирования не работает или у вас нет доступа к резервной копии, вы можете восстановить защитник Windows 10 с помощью официального сайта Microsoft. Просто перейдите на страницу загрузки Windows Defender и следуйте инструкциям по установке. Обычно процесс установки защитника Windows 10 с помощью официального сайта Microsoft занимает несколько минут и не требует особых навыков или знаний.
Наконец, у вас также есть возможность установить альтернативное антивирусное программное обеспечение, если вы не хотите использовать защитник Windows 10. Существует много бесплатных и платных антивирусных программ, которые предлагают расширенную защиту от вредоносных программ и других угроз для вашей системы. Вы можете выбрать программу, которая подходит вам по функциональности и бюджету, и следовать инструкциям по ее установке.
Защитник Windows 10 — это встроенная антивирусная программа, которая обеспечивает базовую защиту компьютера от вредоносного программного обеспечения. Однако, если защитник Windows был удален с вашего компьютера, вы можете повторно установить его следующими способами.
Установка с помощью Центра обновления Windows
- Нажмите на кнопку «Пуск» и выберите «Настройки».
- В окне «Настройки» выберите «Обновление и безопасность».
- В левой панели выберите «Центр обновления Windows».
- Нажмите на кнопку «Проверить наличие обновлений» и дождитесь завершения поиска.
- Если находится обновление с названием «Защитник Windows», установите его, следуя инструкциям на экране.
Установка с помощью Инструментов администрирования Windows
- Нажмите на кнопку «Пуск» и введите «Инструменты администрирования» в строке поиска.
- В открывшемся списке найдите и запустите «Службы».
- В окне «Службы» найдите службу «Защитник Windows» и дважды щелкните на ней.
- В открывшемся окне на вкладке «Общие» установите параметр «Тип запуска» на «Автоматически» и нажмите кнопку «Применить».
- Закройте окно «Службы». Защитник Windows должен быть автоматически установлен и запущен на вашем компьютере.
Установка с помощью командной строки
- Нажмите на кнопку «Пуск» и найдите «Командная строка» в списке приложений.
- Нажмите правой кнопкой мыши на «Командной строке» и выберите «Запустить от имени администратора».
- В командной строке введите следующую команду и нажмите клавишу «Enter»:
- Дождитесь, пока будет выполнена установка защитника Windows.
windowsdefender
После успешной установки защитника Windows 10 на вашем компьютере, рекомендуется запустить полное сканирование системы, чтобы убедиться в отсутствии вредоносного программного обеспечения.
Подраздел 1: Проверить наличие защитника Windows 10
Когда защитник Windows 10 удален с компьютера, необходимо проверить его наличие перед установкой или восстановлением.
Шаг 1: Открыть Параметры Windows
Для начала откройте меню Пуск, а затем выберите «Параметры».
Шаг 2: Перейти в раздел «Обновление и безопасность»
В окне Параметры выберите «Обновление и безопасность».
Шаг 3: Проверить статус защитника Windows
В разделе «Обновление и безопасность» выберите «Защита от вредоносного ПО». Затем вы увидите статус защитника Windows.
Если в статусе указано «Включено», значит система имеет защитника Windows 10 и нет необходимости устанавливать его заново.
Если же в статусе указано «Отключено» или «Неустранимая проблема», значит защитник Windows 10 не установлен или удален с компьютера. В этом случае вы можете перейти к следующему подразделу для установки защитника.
Перейти в настройки
Чтобы установить или включить защитник Windows 10, необходимо выполнить следующие действия:
- Откройте меню «Пуск», нажав на кнопку «Пуск» в левом нижнем углу экрана или использовав клавишу с символом Windows на клавиатуре.
- Выберите пункт «Настройки» (шестеренка) в верхней части меню «Пуск».
- В открывшемся окне «Настройки» выберите раздел «Обновление и безопасность».
- В левой панели раздела «Обновление и безопасность» найдите пункт «Защита от вредоносного ПО» и нажмите на него.
- В появившемся окне выберите вкладку «Windows Defender».
- Настройте защитник Windows 10 согласно вашим предпочтениям, выбрав нужные опции и настройки, или нажмите кнопку «Включить» для включения базовой защиты.
Теперь вы знаете, как перейти в настройки и установить или включить защитник Windows 10. Следуя этим простым шагам, вы сможете защитить свой компьютер от вредоносных программ и других угроз в онлайн-среде.
Открыть раздел «Обновление и безопасность»
Чтобы установить защитник Windows 10, который был удален, необходимо открыть раздел «Обновление и безопасность». Для этого следуйте указанным ниже шагам:
- Нажмите на кнопку «Пуск» в левом нижнем углу экрана.
- В открывшемся меню выберите пункт «Настройки».
- В окне «Настройки» найдите и кликните на пункт «Обновление и безопасность».
После того как вы перейдете в раздел «Обновление и безопасность», вам будут доступны различные опции связанные с обновлениями системы и настройками безопасности. В этом разделе вы сможете установить защитник Windows 10, если он был удален.
Проверить наличие защитника Windows
Проверить наличие защитника Windows в системе можно с помощью нескольких простых шагов:
-
Откройте «Панель управления» на вашем компьютере.
-
Выберите раздел «Обновление и безопасность».
-
Нажмите на раздел «Центр обновления Windows».
В появившемся окне вы сможете увидеть статус обновлений и наличие защитника Windows. Если вы видите надпись «Защитник Windows» или «Windows Defender», значит программа уже установлена и активна.
Если вместо названия программы отображается надпись «Нет доступных защитных решений», то защитник Windows вероятно был удален или выключен.
Если защитник Windows отсутствует, вы можете повторно установить его, перейдя на официальный сайт Microsoft и следуя инструкциям по установке.
Установка и использование защитника Windows рекомендовано для обеспечения базовой защиты компьютера от вирусов и вредоносных программ.
Подраздел 2: Загрузить защитник Windows 10
Если защитник Windows 10 был удален, его можно снова загрузить с официального сайта Microsoft. Для этого следуйте инструкциям:
- Откройте любой веб-браузер и перейдите на официальный сайт Microsoft.
- В верхней части страницы найдите раздел «Загрузки» и нажмите на него.
- В открывшемся меню выберите «Безопасность» или «Security».
- Найдите «Защитник Windows 10» или «Windows Defender» в списке программ и нажмите на ссылку для загрузки.
После того, как файл загрузки будет скачан на ваш компьютер, запустите его и следуйте инструкциям мастера установки.
Если вам предложат выбрать режим установки, рекомендуется выбрать «Только защитник Windows 10» или «Windows Defender Antivirus Only».
После завершения установки вы снова получите доступ к защитнику Windows 10 и сможете использовать его для обеспечения безопасности вашей операционной системы.
Открыть официальный сайт Майкрософт
Если защитник Windows 10 был удален и вы хотите установить его снова, вы можете проделать эту операцию, посетив официальный сайт Майкрософт. Для этого выполните следующие действия:
- Откройте веб-браузер на вашем компьютере или ноутбуке.
- Введите адрес «www.microsoft.com» в адресную строку и нажмите клавишу «Enter».
- На главной странице сайта Майкрософт найдите раздел «Загрузки и безопасность» или «Продукты и услуги».
- В этом разделе должна быть доступна опция «Защитник Windows» или «Windows Defender».
- Нажмите на эту опцию, чтобы открыть страницу загрузки или информации о защитнике Windows 10.
- На странице загрузки вы найдете подробные инструкции по установке защитника Windows 10 на ваш компьютер или ноутбук.
При следовании указанным выше шагам, вы сможете открыть официальный сайт Майкрософт и найти подробную информацию о защитнике Windows 10, а также установить его на ваше устройство.
Перейти в раздел «Windows Security»
Если у вас было удалено приложение «Защитник Windows» на вашем компьютере с операционной системой Windows 10, вы можете восстановить его, перейдя в раздел «Windows Security». Для этого следуйте указанным ниже шагам:
- Нажмите правой кнопкой мыши на кнопке «Пуск» в левом нижнем углу экрана и выберите пункт «Система».
- В открывшемся окне «Система» выберите вкладку «Обновление и безопасность».
- На панели слева выберите раздел «Windows Security».
После выполнения этих действий у вас откроется окно «Windows Security», где вы сможете проверять свою систему на вирусы и другие угрозы, а также настраивать различные настройки защиты. Если приложение «Защитник Windows» все еще отсутствует, вам может потребоваться выполнить установку обновлений или перезагрузить компьютер.
Найти ссылку на загрузку защитника Windows 10
Защитник Windows 10 является встроенным антивирусным программным обеспечением, которое предлагает базовую защиту от вредоносных программ и вирусов. Если вы случайно удалили Защитник Windows 10, вы можете снова загрузить его с официального веб-сайта Microsoft.
- Откройте веб-браузер и перейдите на официальный сайт Microsoft (https://www.microsoft.com/ru-ru/windows/comprehensive-security).
- На главной странице сайта прокрутите вниз, пока не найдете раздел «Дополнительные ресурсы» внизу страницы.
- В разделе «Дополнительные ресурсы» нажмите на ссылку «Защитник Windows 10».
- Вы будете перенаправлены на страницу загрузки программы Защитник Windows 10.
- На этой странице нажмите кнопку «Загрузить сейчас», чтобы начать загрузку программы.
- После завершения загрузки откройте загруженный файл и следуйте инструкциям, чтобы установить и настроить Защитник Windows 10.
Теперь у вас снова будет установлен и работает Защитник Windows 10, который предоставляет базовую защиту вашей операционной системе.
Подраздел 3: Установить защитник Windows 10
Если защитник Windows 10 был удален с вашего компьютера или не установлен по умолчанию, вы можете легко установить его с помощью следующих шагов:
- Откройте «Центр обновления и безопасности» в настройках вашей операционной системы.
- Выберите вкладку «Защитник Windows» в левой панели.
- Нажмите на кнопку «Открыть защитник Windows».
- В открывшемся окне выберите «Включить защитник Windows».
- После этого защитник Windows 10 будет загружен и установлен на ваш компьютер.
После установки защитника Windows 10 вам будет доступна вся его функциональность, включая сканирование на вредоносное ПО, защиту от рансомваров и настройки безопасности.
Рекомендуется регулярно обновлять защитник Windows 10 для обеспечения максимальной защиты вашего компьютера от новых угроз.
Запустить загруженный файл защитника Windows 10
Чтобы запустить загруженный файл Windows Defender на компьютере с операционной системой Windows 10, следуйте простым инструкциям ниже:
- Найдите загруженный файл защитника Windows 10 на вашем компьютере. В большинстве случаев файл будет сохранен в папке «Загрузки».
- Дважды щелкните на загруженном файле, чтобы запустить его.
- Откроется окно установки защитника Windows 10. Нажмите на кнопку «Установить» или «Запустить», чтобы продолжить процесс установки.
- Читайте и следуйте инструкциям на экране. Обычно вам нужно будет согласиться с лицензионным соглашением и выбрать параметры установки.
- После завершения установки вы увидите уведомление о том, что защитник Windows 10 успешно установлен и готов к использованию.
Теперь, когда защитник Windows 10 установлен на вашем компьютере, он будет автоматически обновляться и защищать вашу систему от вредоносного программного обеспечения и других угроз.
Успешная установка и работа защитника Windows 10 является важным шагом в обеспечении безопасности вашего компьютера. Рекомендуется также регулярно обновлять защитник Windows 10, чтобы иметь наиболее актуальные данные о вредоносных программах и угрозах.
Вопрос-ответ:
Как можно удалить защитник Windows 10?
Если защитник Windows 10 был удален, то можно восстановить его по умолчанию.
В чем преимущества защитника Windows 10 перед другими антивирусами?
Защитник Windows 10 является встроенным антивирусным программным обеспечением, которое предлагает базовую защиту от вирусов, троянов, шпионского ПО, вредоносных программ и других угроз.
Как восстановить защитник Windows 10, если он отключен?
Если защитник Windows 10 отключен, вы можете восстановить его, перейдя в раздел «Настройки», выбрав «Обновление и безопасность», затем «Центр обновления безопасности» и нажав на кнопку «Защитник Windows».
Можно ли установить альтернативный антивирус, если защитник Windows 10 был удален?
Да, вы можете установить альтернативное антивирусное программное обеспечение, даже если защитник Windows 10 был удален. Существует множество популярных антивирусов, таких как Avast, AVG, Kaspersky и другие.
Что делать, если защитник Windows 10 был удален, а другие антивирусные программы не установлены?
Если защитник Windows 10 был удален и другие антивирусные программы не установлены, рекомендуется немедленно установить достоверный антивирус для обеспечения защиты компьютера от вредоносных программ.
Какой антивирусный программы следует выбрать, если защитник Windows 10 был удален?
При выборе антивирусной программы после удаления защитника Windows 10 рекомендуется обращать внимание на надежность, эффективность и простоту использования. Некоторые популярные варианты включают Avast, AVG, Kaspersky, Norton и McAfee.
Видео:
Download Windows Speedup Tool to fix errors and make PC run faster
If Windows Security is crashing or not opening, you can reset and re-register the Windows Security app and get the issue fixed. In this post, we will show you the 3 quick and easy ways to reset or repair Windows Security or reinstall Windows Defender in Windows 11/10.

You can perform this task in either of 3 ways to reset Windows Security or reinstall Windows Defender:
- From Start Menu
- Via PowerShell
- Via Command Prompt
Let’s see a description of the process involved in relation to each of the methods.
1] Reset Windows Security App from Start Menu
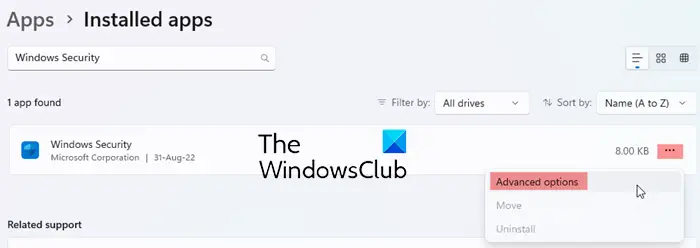
Do the following:
- Press the Win+I key on the keyboard to open Settings.
- Click on App settings on the left side
- Under Installed apps, search for Windows Security
- Click on the 3 dots and select Advanced option
- On the next page, click on the Reset button in Settings.
- Click on Reset to confirm.
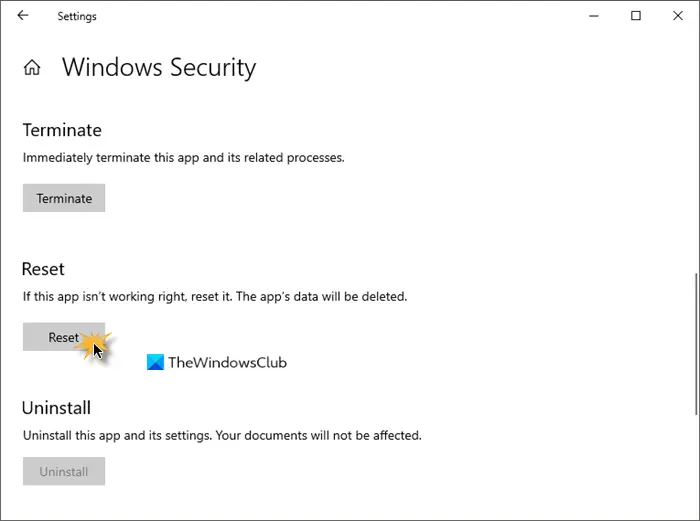
You can now exit Settings.
2] Reset Windows Security App in PowerShell
Do the following:
- Press Windows key + X to open the Power User Menu.
- Then press i on the keyboard to launch PowerShell.
- In the PowerShell console, type in or copy and paste the command below and hit Enter.
Get-AppxPackage *Microsoft.Windows.SecHealthUI* | Reset-AppxPackage
Once the command executes, you can exit the PowerShell console.
3] Reinstall and re-register Windows Security App in Command Prompt
Do the following:
- Press Windows key + R to invoke the Run dialog.
- In the Run dialog box, type
cmdand hit Enter to open Command Prompt. - In the command prompt window, type or copy and paste the command below and hit Enter.
PowerShell -ExecutionPolicy Unrestricted -Command "& {$manifest = (Get-AppxPackage *Microsoft.Windows.SecHealthUI*).InstallLocation + '\AppxManifest.xml' ; Add-AppxPackage -DisableDevelopmentMode -Register $manifest}"
That’s it!
How to Repair Windows Security in Windows 11?
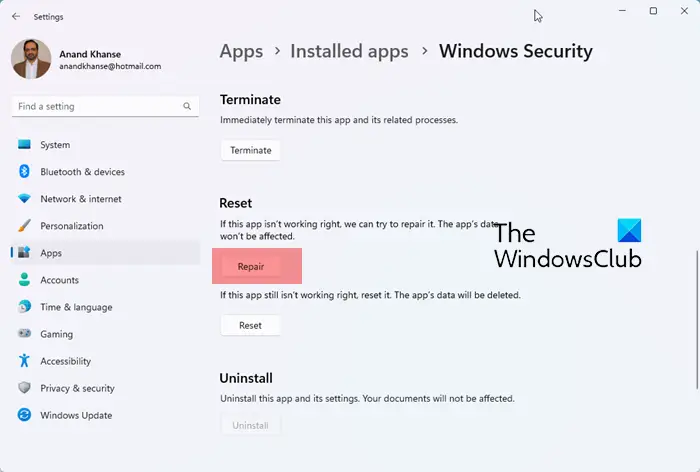
To repair Windows Security, do the following:
- Press the Win+I key on the keyboard to open Settings.
- Click on App settings on the left side
- Under Installed apps, search for Windows Security
- Click on the 3 dots and select Advanced option
- On the next page, click on the Repair button in Settings.
- Click on Repair to confirm.
Related post: How to Reset Windows Security Security Settings to default values in Windows.
What will happen if I reset Windows Security?
When you reset Windows Security, everything from your security key will be deleted and reset to factory defaults. All data and credentials will be cleared. In short, all data belonging to this app will be cleared.
Obinna has completed B.Tech in Information & Communication Technology. He has worked as a System Support Engineer, primarily on User Endpoint Administration, as well as a Technical Analyst, primarily on Server/System Administration. He also has experience as a Network and Communications Officer. He has been a Windows Insider MVP (2020) and currently owns and runs a Computer Clinic.