Did you take one look at our hefty Windows 11 upgrade checklist and nope right out of there? It turns out there’s a dramatically easier way to install Windows 11 on computers with older CPUs — with no need to reformat your drive, erase your files, or even burn the ISO to an external USB drive.
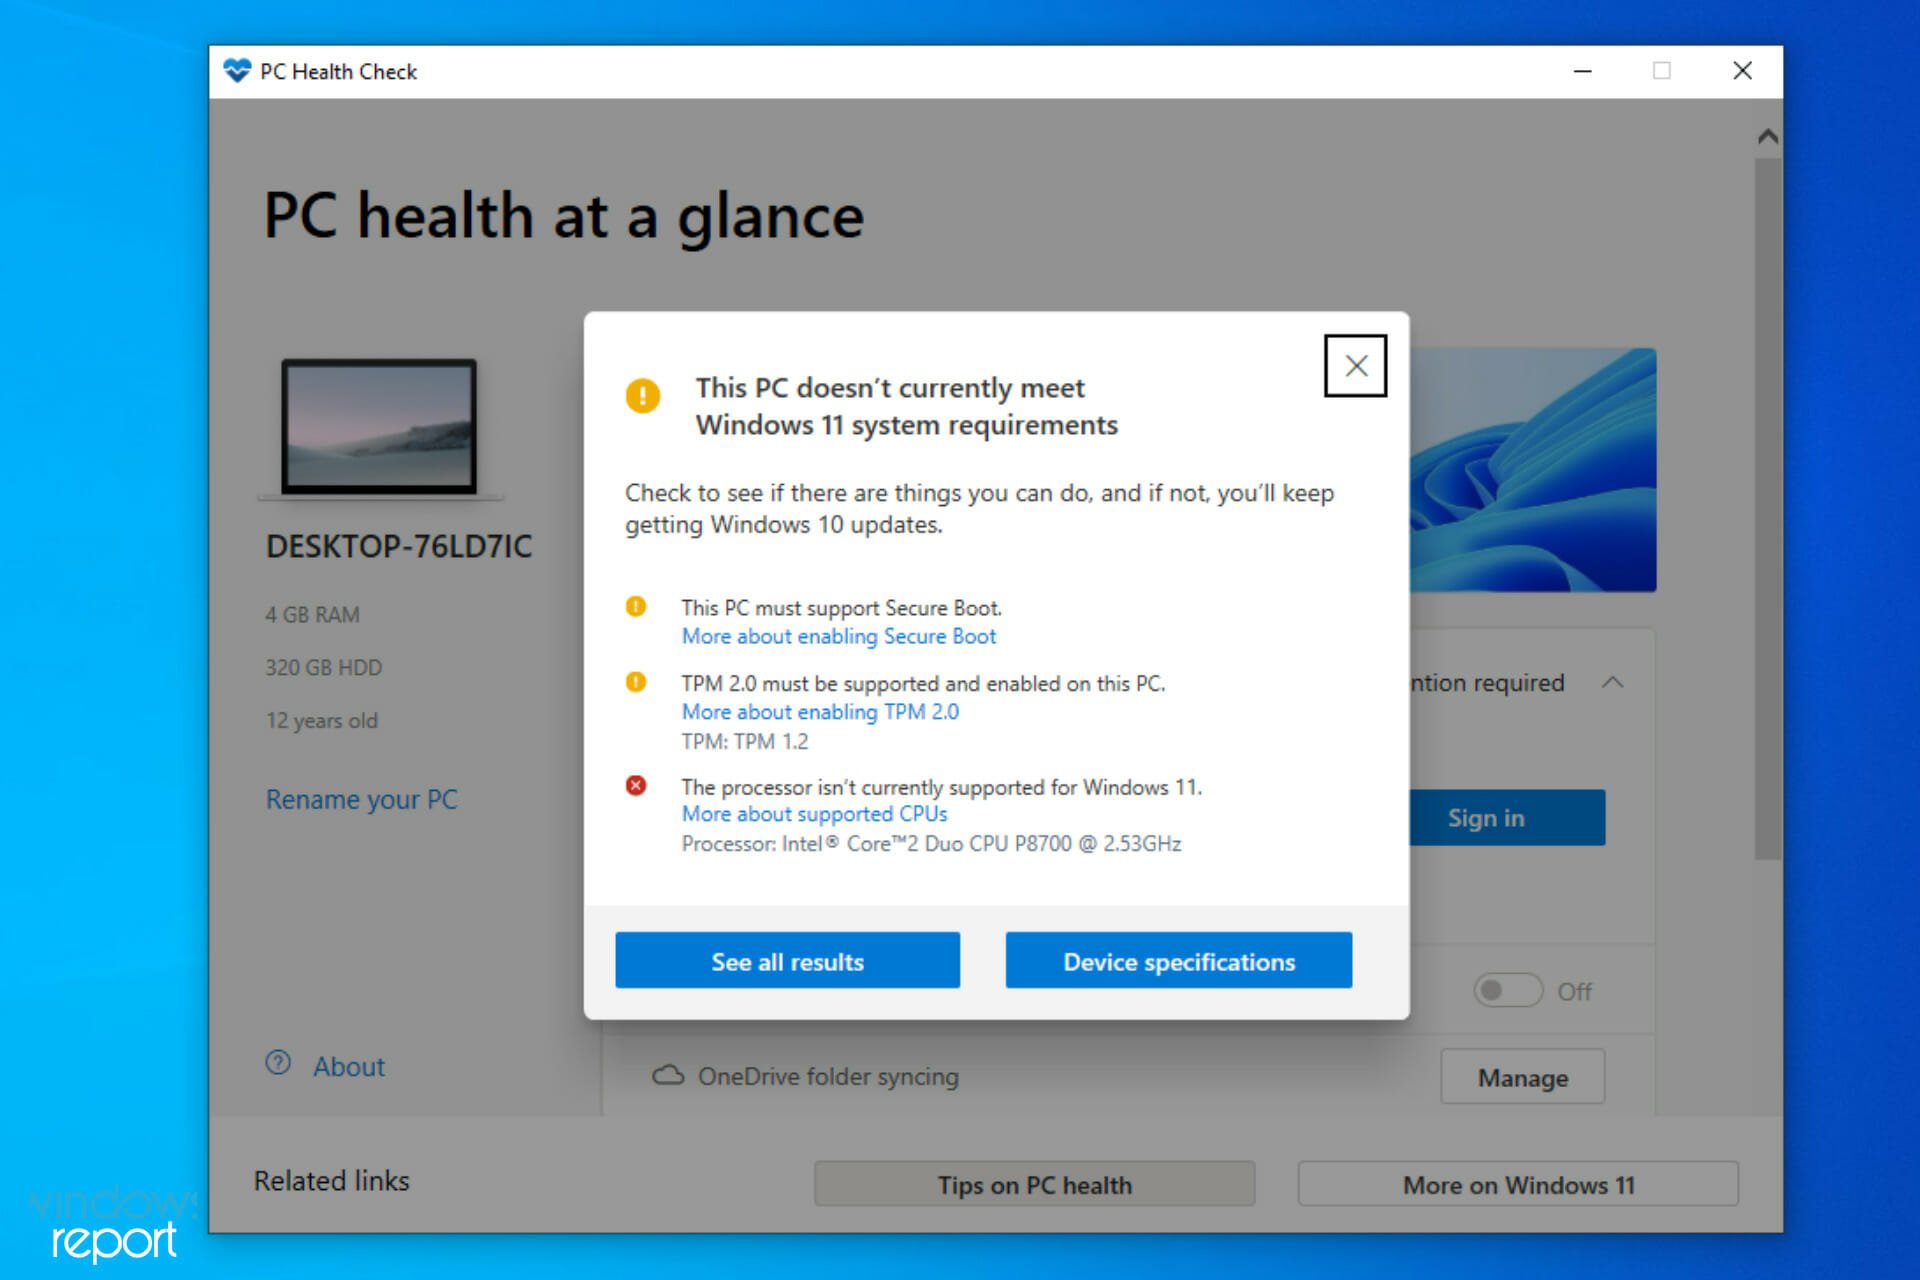
If you’re currently seeing “This PC doesn’t currently meet Windows 11 system requirements” or “The processor isn’t currently supported for Windows 11,” there’s a Microsoft-approved registry hack that should instantly make it better.
(We’ve tested this method working on a Dell XPS 15 with Core i7-7700HQ and a Microsoft Surface Go with Pentium Gold 4415Y, neither of which are on Microsoft’s compatibility list.)
Here’s the whole process from start to finish in three easy steps.
1) Download the Windows 11 ISO
You’ll need to download the ISO. In our testing, this trick doesn’t work with the Windows 11 Install Assistant, it doesn’t trigger Windows Update, and it doesn’t fool Microsoft’s PC Health Check tool.
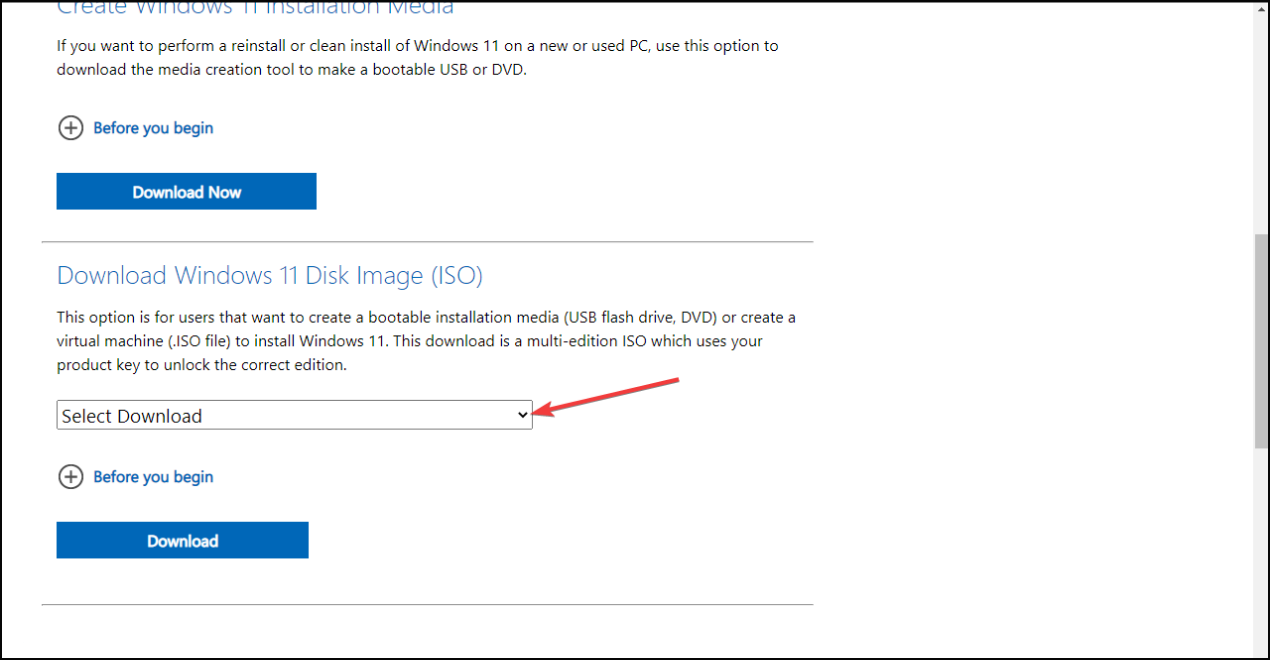
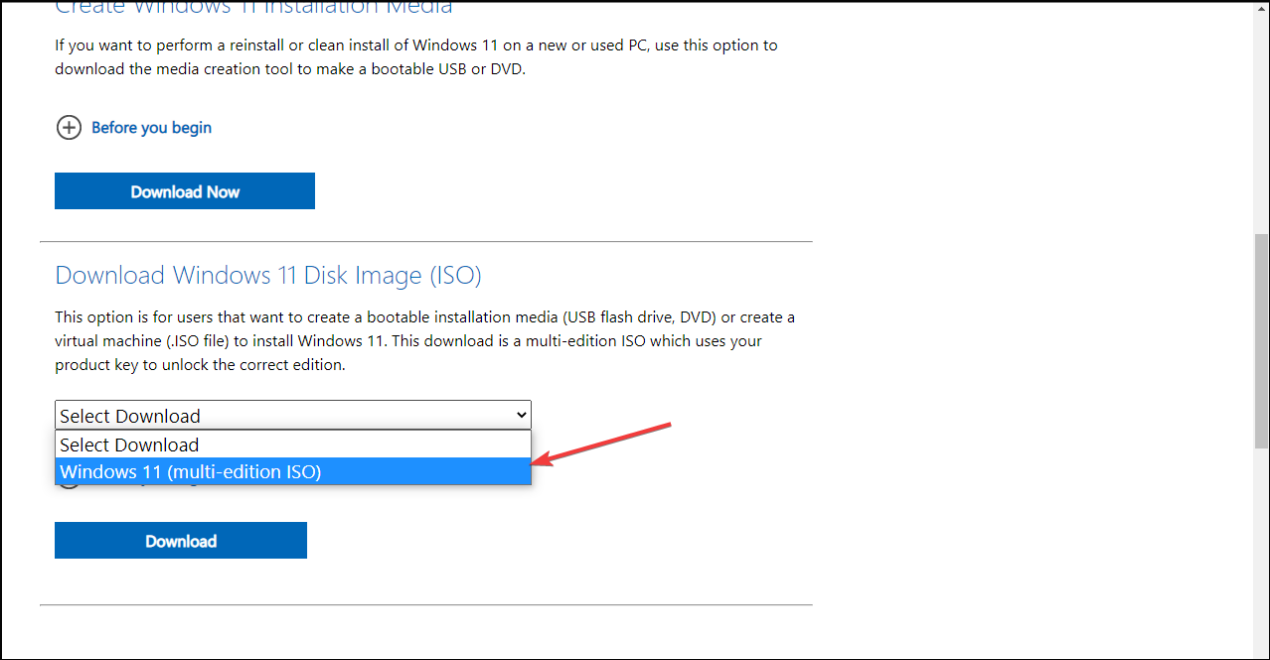
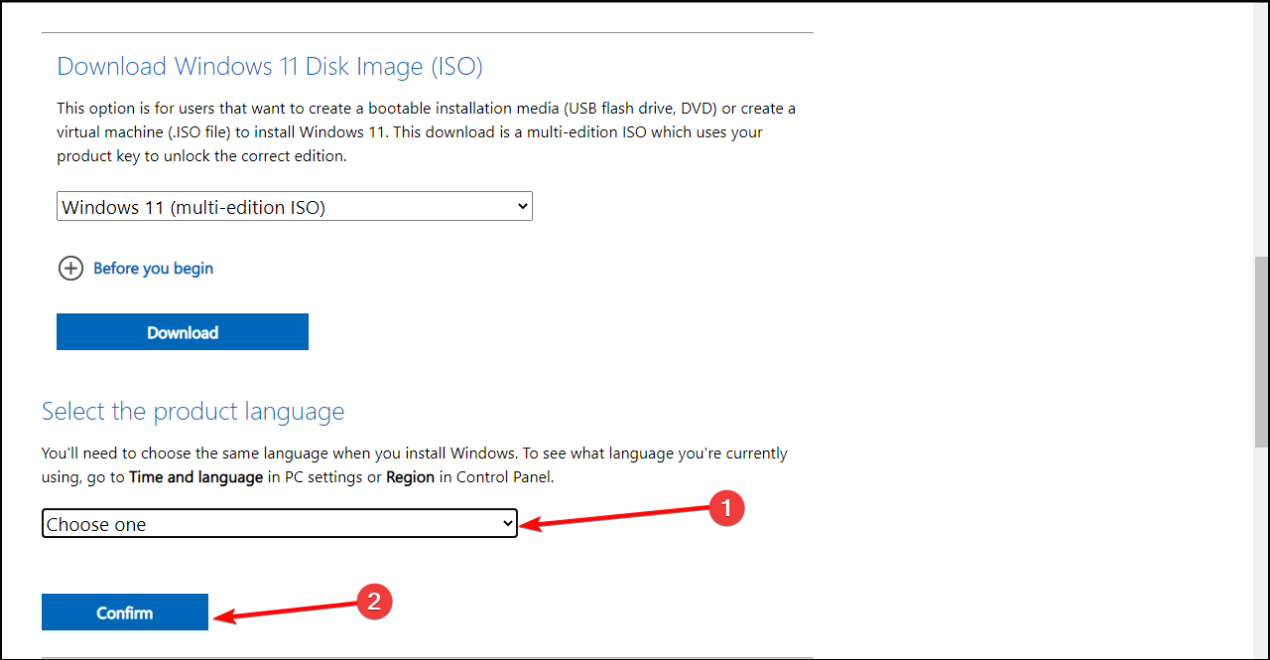
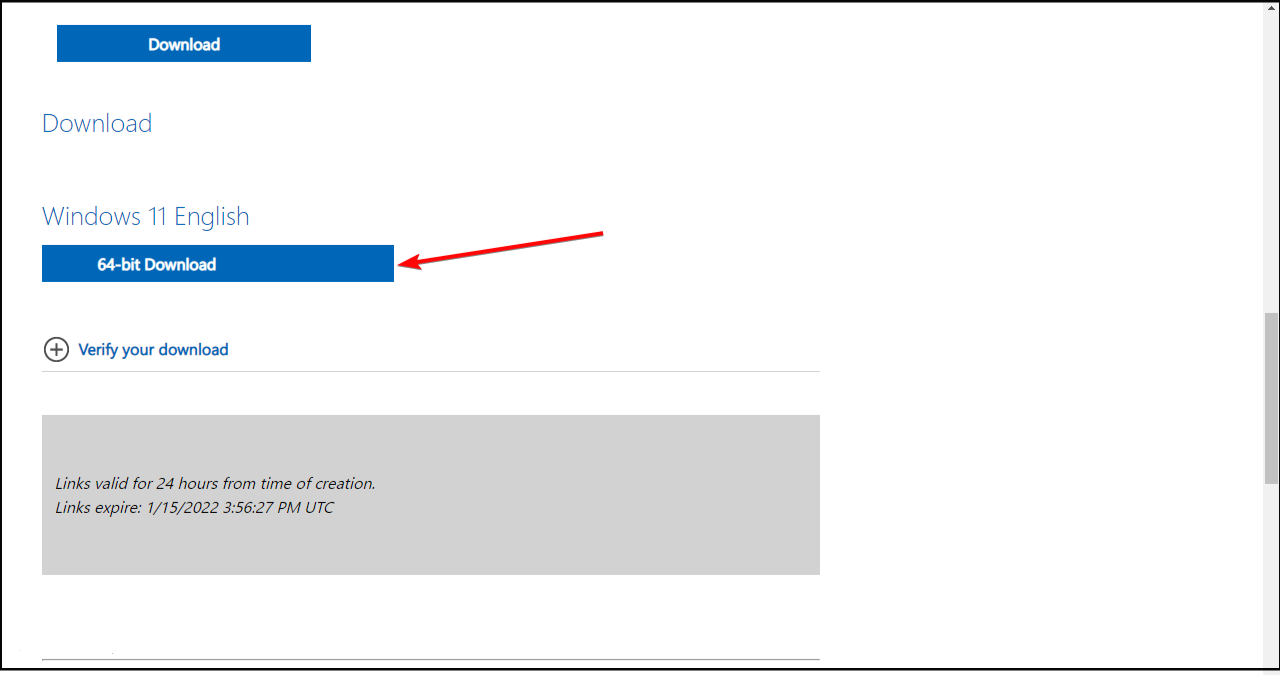
On this Microsoft page, scroll down to Download Windows 11 Disk Image (ISO). Open the Select Download dropdown, pick Windows 11, hit the Download button, select your product language from the Choose one dropdown that appears below, hit Confirm, then click 64-bit Download.
While that 5.1GB image is downloading, let’s move to step two.
2) Edit the Windows Registry to bypass the CPU check
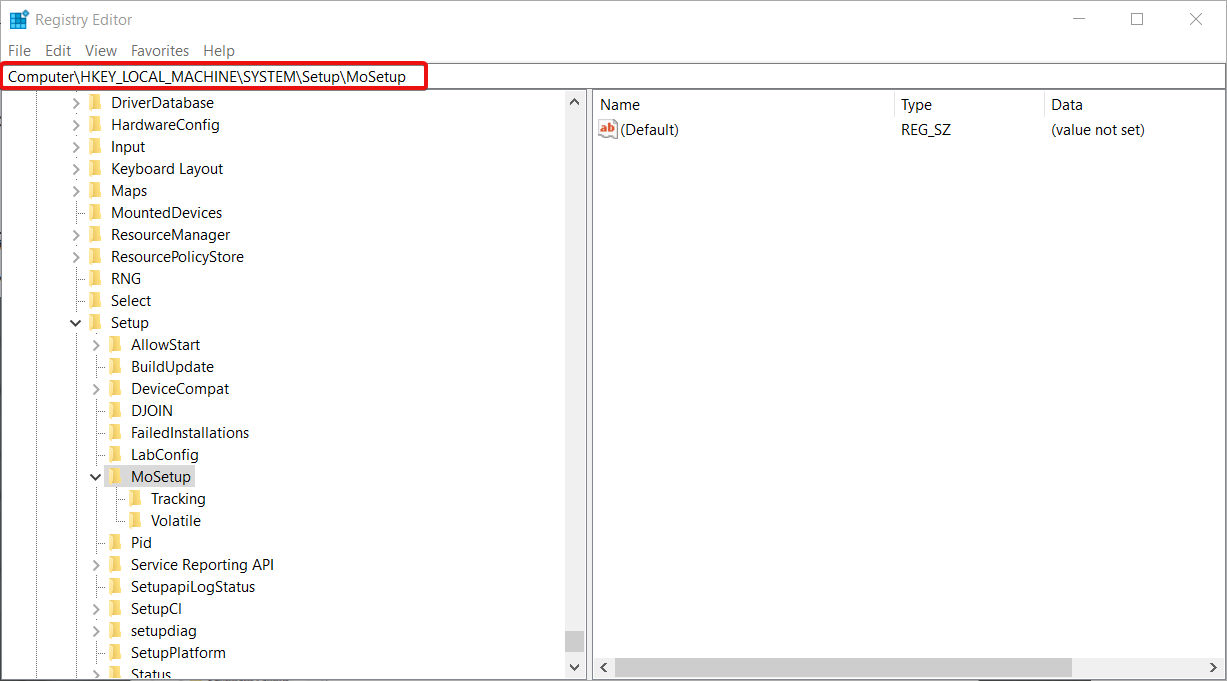
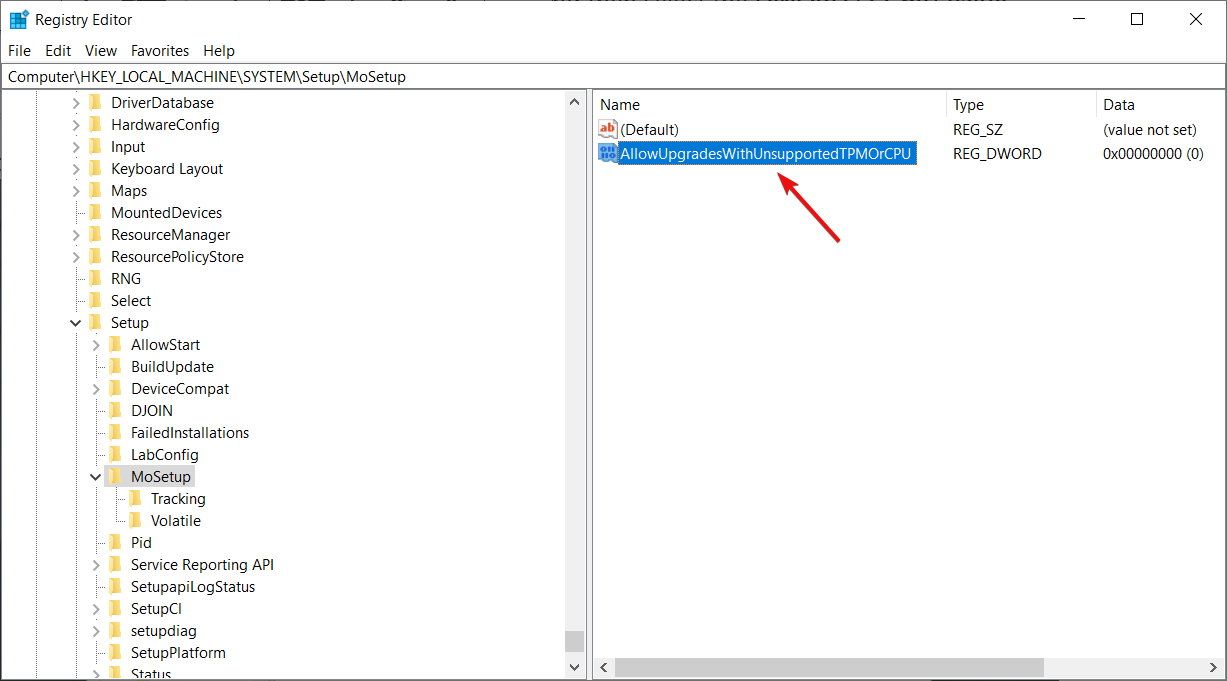
In Windows, hit Start and type regedit, then hit enter to launch the Registry Editor. Navigate to Computer\HKEY_LOCAL_MACHINE\SYSTEM\Setup\MoSetup, either by pasting that whole address into the box just beneath “File, Edit, View, Favorites, Help” or by drilling down through the HKEY_LOCAL_MACHINE and System and Setup and MoSetup folders one at a time.
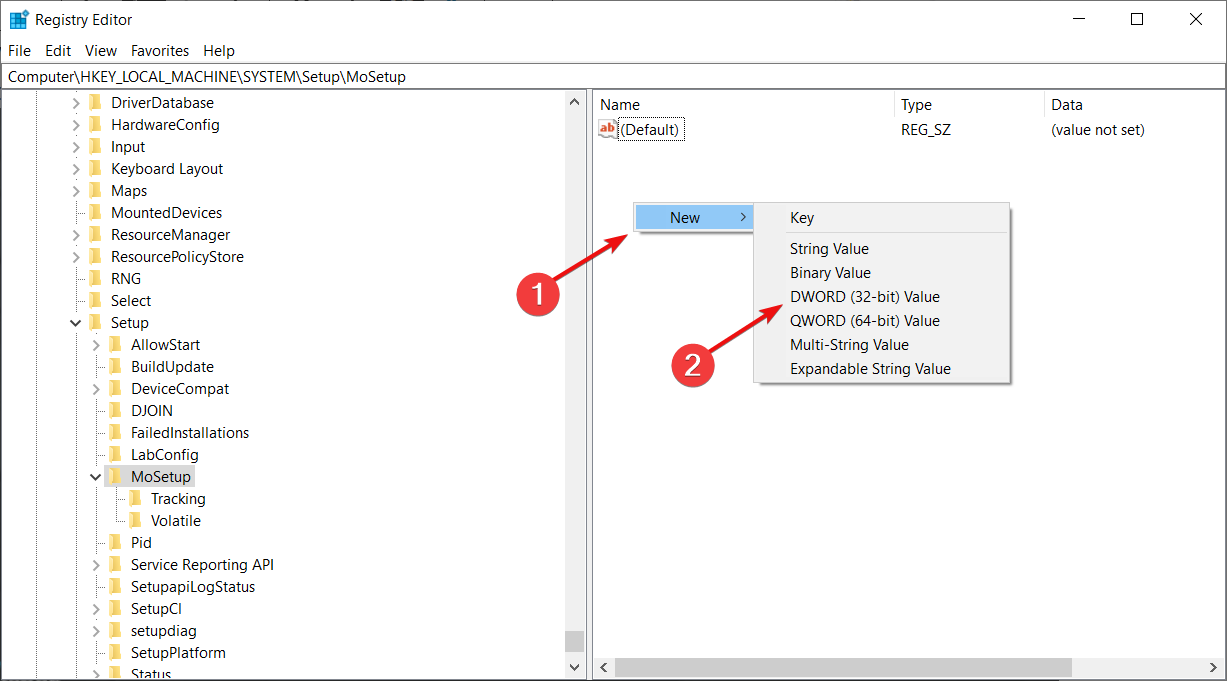
In the right pane, right-click and pick New > DWORD (32-bit) Value. Name the value “AllowUpgradesWithUnsupportedTPMOrCPU” minus the quotes. Double-click on the new value you created, and enter 1 into the Value data field. Hit OK and close the registry editor.
3) Open the ISO in Windows Explorer and launch setup
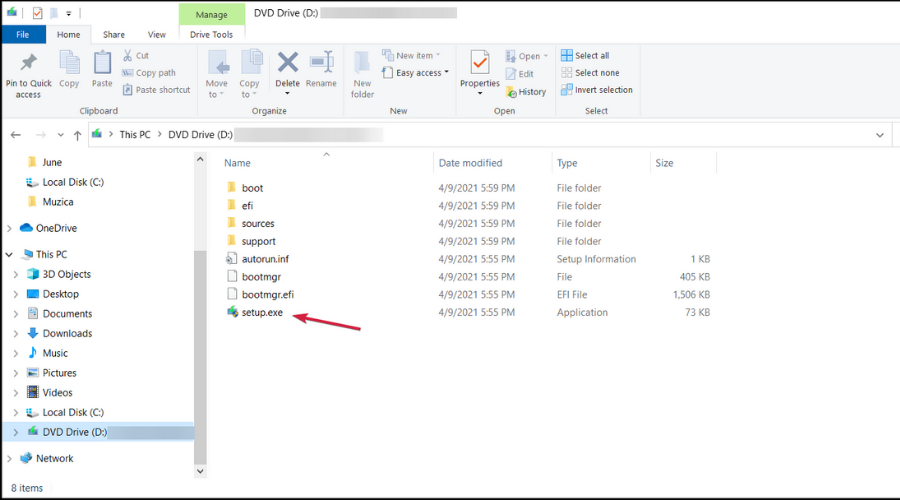
Did the ISO finish downloading? Just right-click on it and pick Open with > Windows Explorer to mount the virtual disc, then double-click the setup file to begin installation.
That’s it! If the registry hack worked, you should soon see a warning message instead of a rejection message, and be given the option to install Windows 11 without losing your data. Just know that Microsoft reserves the right to withhold security updates if you go this route.
Installing Windows 11 on unsupported CPU is simple with Rufus
by Radu Tyrsina
Radu Tyrsina has been a Windows fan ever since he got his first PC, a Pentium III (a monster at that time). For most of the kids of… read more
Updated on
- Microsoft doesn’t allow you to install Windows 11 on an unsupported processor, but can work around that by modifying your registry.
- Alternatively, you can use third-party tools to create installation media for Windows 11.
XINSTALL BY CLICKING THE DOWNLOAD
FILE
Windows 11 system requirements are somewhat high, and many are wondering if it is possible to install Windows 11 on an unsupported CPU.
There is a way to bypass the CPU check when installing Windows, and today we’re going to show you the best ways to do that.
Just in case you want to know what the minimum system requirements for Windows 11 are, here’s a checklist you look through:
- Processor: Your computer’s processor should be one gigahertz (GHz) or faster with two or more cores on a compatible 64-bit processor or system on a chip (SoC)
- RAM: The PC’s ram size should be 4 gigabytes (GB) or greater
- Storage: A storage size of 64 GB* or greater is required to install this Windows
- You should note that additional storage space might be required to download updates and enable specific features
- Graphics card: Should be compatible with DirectX 12 or later, with a WDDM 2.0 driver
- System firmware: UEFI, Secure Boot capable
- TPM: Trusted Platform Module (TPM) version 2.0
- Display: High definition (720p) display, 9” or greater monitor, 8 bits per color channel
We also have an article detailing the Windows 11 technical specifications that might offer more information about this.
Can I install Windows 11 on unsupported CPU?
The good news is that there is a way to install Windows 11 on an unsupported CPU. However, users do have a few concerns:
- Safety – Microsoft has advised against it since you’re missing important features such as TPM 2.0. For more information, our Windows 11 and TPM guide.
- Compatibility issues – According to Microsoft, running Windows 11 on unsupported devices can lead to compatibility or performance issues in the feature. Speaking of performance, you can make Windows 11 faster with a couple of quick tweaks.
However, if you are interested in learning how to install Windows 11 on an unsupported PC, we will show you how. We’ve broken down the entire process from start to finish into simple steps.
What happens if you install Windows 11 on unsupported CPU?
It is not recommended to install Windows 11 on an unsupported CPU computer since there may be compatibility difficulties caused by doing so.
How we test, review and rate?
We have worked for the past 6 months on building a new review system on how we produce content. Using it, we have subsequently redone most of our articles to provide actual hands-on expertise on the guides we made.
For more details you can read how we test, review, and rate at WindowsReport.
Your personal computer’s warranty will not cover any damage that occurs as a result of software or hardware incompatibility.
Will unsupported CPU get Windows 11 updates?
If you continue with the installation of Windows 11, Microsoft will stop providing support for your computer and you will no longer be able to get updates.
How do I install Windows 11 on an unsupported computer?
- Can I install Windows 11 on unsupported CPU?
- How do I install Windows 11 on an unsupported computer?
- 1. Download the Windows 11 ISO
- 2. Bypass the CPU check by editing the Windows Registry
- 3. Install Windows 11 from the ISO image
- 4. Install Windows 11 on unsupported CPU from USB
- What happens if you run Windows 11 on unsupported hardware?
- Should you upgrade an unsupported CPU?

NOTE
Before installing Windows 11 on unsupported machines, we recommend you back up important data first. AOMEI Backupper is an excellent solution; it will keep your system safe and prevent data loss.
1. Download the Windows 11 ISO
- If you wonder How do I bypass the CPU isn’t supported Windows 11?, download Windows 11 Disk Image (ISO).
- Open the Select Download dropdown.

- Select Windows 11.
- Hit the Download button.
- Click the Choose one dropdown, select your product language, and then hit Confirm.
- Click 64-bit Download. This is how to install Windows 11 on unsupported CPU via ISO.


NOTE
The typical way to update your PC to the latest update is by using the Windows 11 Installation Assistant. Unfortunately, this doesn’t work in this case because your system doesn’t meet the minimum requirement.
The first to install Windows 11 on an unsupported CPU is to download the Disk Image (ISO) from the official website. The file should be around 5.1GB.
While the ISO file is downloading, you can move on to the next step.
2. Bypass the CPU check by editing the Windows Registry
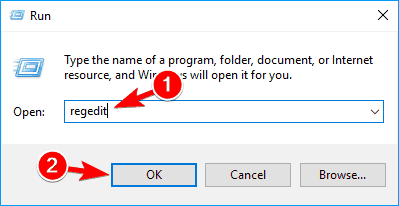
- Press the Windows key + R to start Run, type regedit, and click OK to launch the Registry Editor.

- Navigate to the following path:
HKEY_LOCAL_MACHINE\SYSTEM\Setup\MoSetup
- In the right pane, you can right-click, select New and then select the DWORD (32-bit) Value.
- Once the value is created, you can rename it to AllowUpgradesWithUnsupportedTPMOrCPU.
- You can now double-click on this new value and enter 1 into the Value data field. Then, finally, hit OK and close the registry editor. This is how to install Windows 11 on unsupported CPU via regedit.

A few users reported that MoSetup key is hidden. To fix that, right-click it’s parent key, in this case it’s Setup, and choose the option to create a new key.
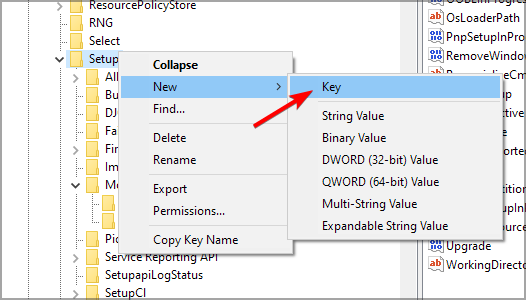
Name the key MoSetup, and you’ll get a message that the key is already available. Now you should be able to access it.
Once you restart your PC and go for the following solution, the system will ignore any shortcomings regarding your CPU, even with the TPM 2.0 requirement.
- How to download Windows 11 ISO or update from Windows 10
- How to Type Accents on Windows 11
3. Install Windows 11 from the ISO image
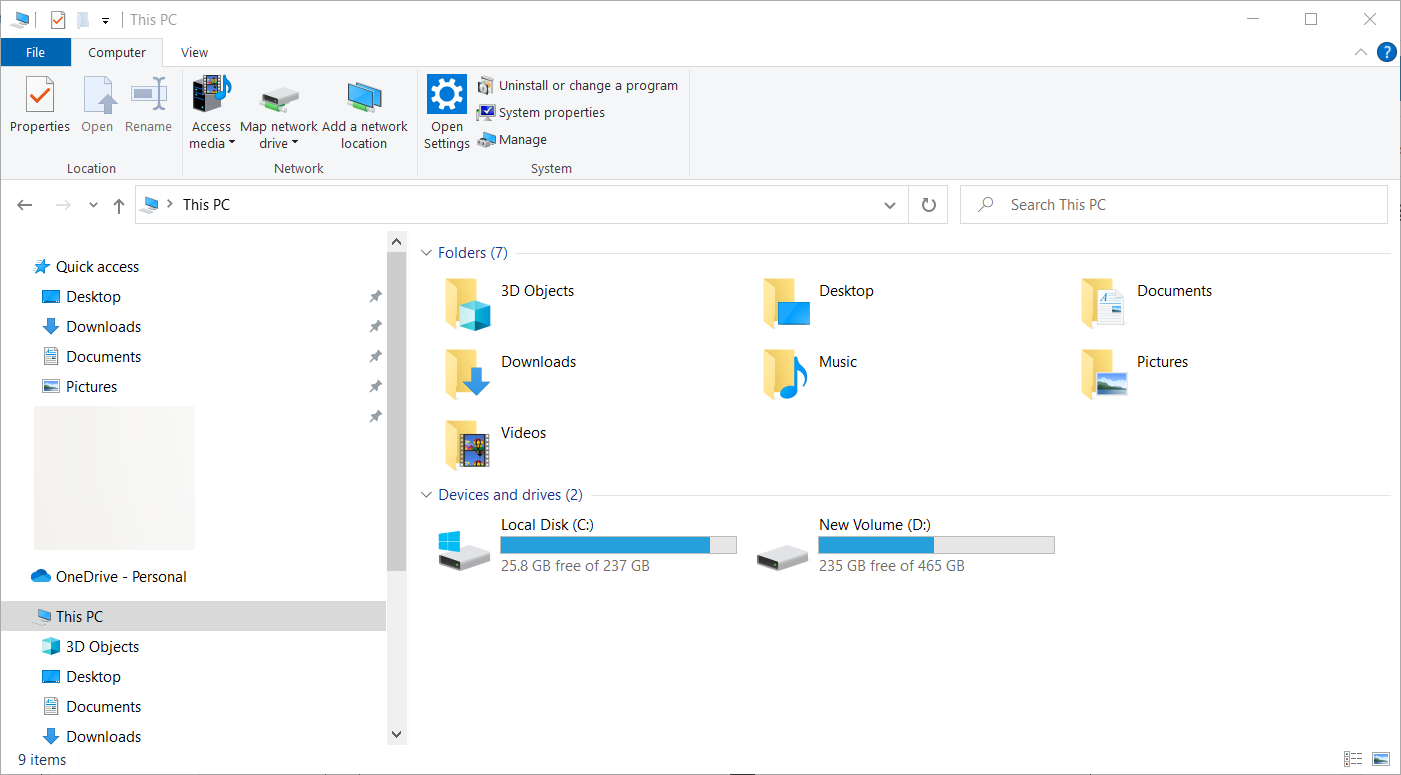
- After downloading the ISO, press Windows key + E to launch File Explorer.

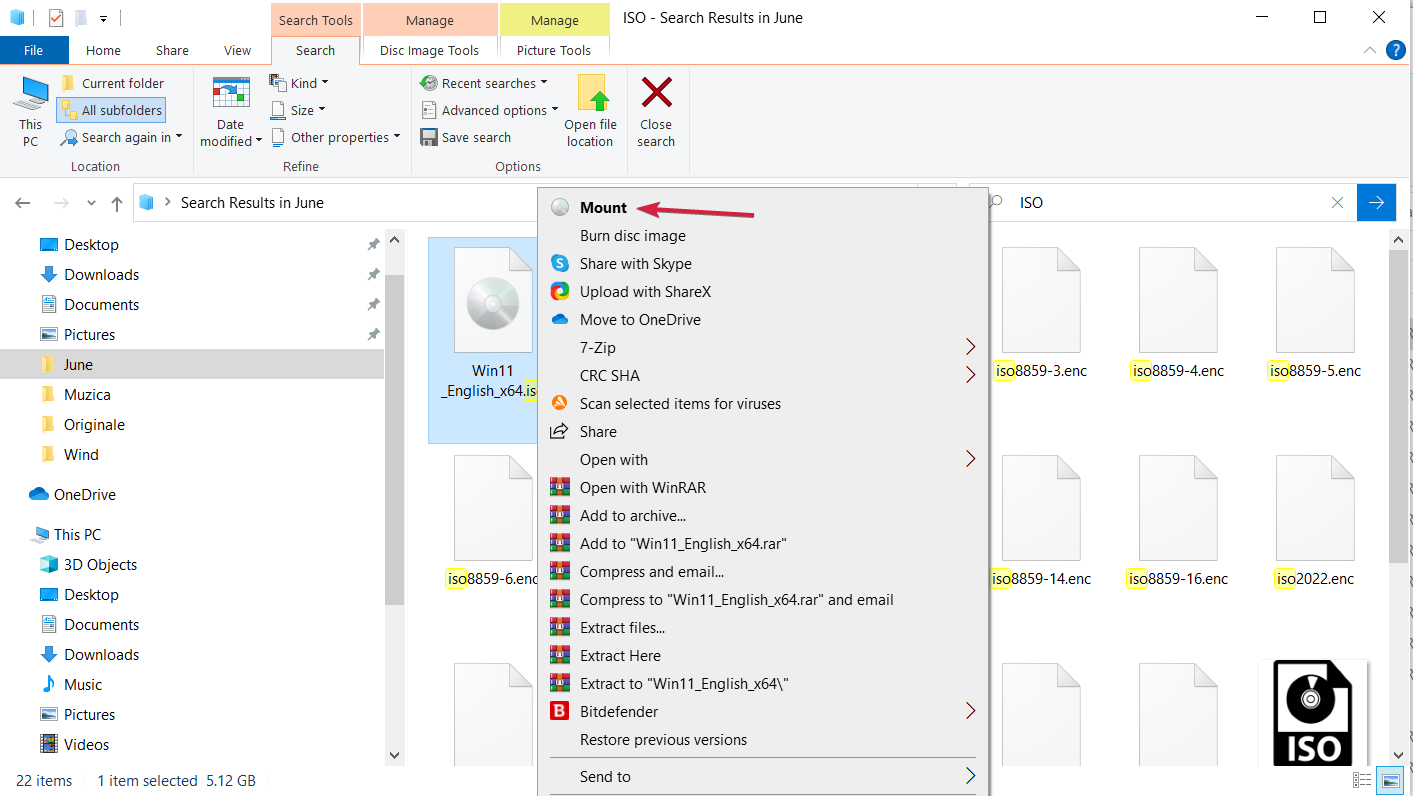
- Locate the ISO, right-click on it and select Mount.

- A new virtual drive will appear on your PC. Access it and double-click on the setup.exe file to start the installation process.

After installation, you should see a warning message instead of a rejection one. This message offers an option to install Windows 11 without losing your data.
Again, we must reiterate that you back up your important data before starting this process.
4. Install Windows 11 on unsupported CPU from USB
NOTE
If you choose this method, make sure to back up all important files from the destination drive, in order to prevent file loss.
- Download Windows 11 ISO.
- Download Rufus.

- Start the application.
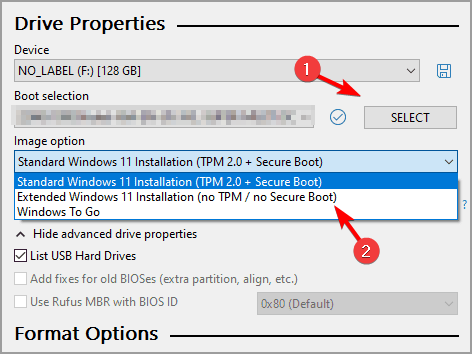
- Click on Select and pick your Windows 11 ISO file. Next set Image option to Extended Windows 11 Installation.

- Click on Start. When asked to format the drive click OK.
- Wait for the process to finish.
- Once the process is done, boot from the USB drive and install Windows 11. This is how to install Windows 11 on unsupported CPU with Rufus.

What happens if you run Windows 11 on unsupported hardware?
While Microsoft allows you to install Windows 11 on an unsupported PC, it does not come without risks. For example, after the installation, you might notice that your PC might start to malfunction due to compatibility issues.
Also, your PC will stop receiving updates, mainly but not limited to only security updates. Lastly, if your system crashes because of this installation, it will not be covered by the manufacturer’s warranty.
Should you upgrade an unsupported CPU?
Let’s be clear about this. If you’re still yet to decide if you want to go through with the procedure to install Windows 11 on an unsupported laptop, we recommend against doing so.
This is because Microsoft warns that there is a high tendency to experience bugs. They have also warned that they may eventually stop rendering security updates for unsupported PCs running this OS.
So, it might not be ideal for upgrading to the new OS if you don’t have said requirements. However, if you don’t mind a bit of lagging here and there, feel free to follow the steps we’ve provided above.
To avoid any issues, you may also install Windows 11 on a virtual machine and test it to its full extent before loading it onto your primary device.
If you’re still experiencing problems with installing this recent OS, then you can take a look at our piece on how to install Windows 11 on unsupported TPM besides the CPU that we have covered today.
As you probably know, another essential requirement for installing Windows 11 is for your PC to support the Secure Boot feature.
If you get an error regarding that, we can help you with a guide on bypassing the Secure Boot requirement and going on with the installation.
You’re welcome to comment to let us know if our solution was helpful or if you have other tips on installing Windows 11 on an unsupported device that you feel should be added to the list.
![]()

Contents
- 1 How to install Windows 11 without TPM 2.0 / TPM 1.2
- 2 How to auto-create a Windows 11-ISO without TPM-check for installation
- 3 How to upgrade to Windows 11 with unsupported CPU / without TPM 1.2
- 4 How to upgrade to Windows 11 without any TPM (TPM 2.0 / TPM 1.2)
- 5 Windows 11 supported Intel processors
- 6 Windows 11 supported AMD processors
Much controversy has come from Microsoft’s decision to restrict Windows 11 to machines that support TPM 2.0, with the company itself even seeming uncertain about the move.
The upgrade or installation of Windows 11 also fails on other unsupported hardware such as certain older CPUs.
We have already shown you how to check if your PC has a TPM chip. Today, we’ll be teaching you how to install Windows 11 without TPM 2.0 chip or how to install it if your PC has only TPM 1.2 or an unsupported CPU. If you are unsure about the Windows 11 processor requirements, please check the official lists of Intel and AMD CPUs that will work with Windows 11 at the end of this article.
What is a TPM 2.0 Chip?
TPM stands for Trusted Platform Module, which may not mean much to you alone. Essentially, TPM is a security module typically soldered onto the motherboard in the form of a chip. It acts as a cryptographic processor and offers a hardware-based approach to generating hashes and storing cryptographic keys, biometric data, user data, and more.
Rooting the cryptography in hardware makes it all but impossible for attackers to tamper with and access this data, protecting against malware, ransomware, and sophisticated nation-state attacks. While older PCs might use a TPM 1.2 chip, most PCs using TPM usually run with a newer TPM 2.0 chip. There are no other public versions in between.
Is it safe to install Windows 11 without TPM 2.0 Chip?
Despite what Microsoft’s Windows 11 compatibility tool may tell you, installing Windows 11 without TPM is quite simple. All it requires is putting a few registry entries or using a script based tool to activate a Windows 11 TPM 2.0 bypass.
Before you do so, however, you should consider that TPM 2.0 is used to power many of Windows 11’s security features. This includes measured boot, Windows Hello, SecureBIO, WD System Guard, and Device Health Attestation. When you run Windows 11 without a TPM chip, you won’t have access to these features and may be putting your data more at risk as a result.
If possible, then, we recommend that you install a discrete TPM 2.0 module or wait and upgrade your hardware. It’s likely Windows 11 will only rely on TPM more in the future and we can’t guarantee that Microsoft won’t disable this bypass at a later point.
The Windows 11 TPM 2.0 bypass
If you really can’t do the above or just want to take the new OS for a test drive, however, this is how you install Windows 11 on unsupported hardware. You can either tweak the installation routine yourself (methods 1 & 3), use a wrapper-tool for Microsoft´s Media Creation Tool to get an ISO/USB without the Windows 11 TPM-check (method 2) or apply a Windows 11 TPM 2.0 bypass for upgrading a running Windows 10 system to Windows 11 (method 4).
As mentioned, installing Windows 11 without TPM requires a few registry entries. The easiest way to bypass the Windows 11 TPM check this is to try to install Windows 11 via an ISO or the Insider program, then follow the steps below if you get a “This PC can’t run Windows 11” message.
If you see the message “This PC does not meet the system requirement”, minimize the installer, go to registry, edit the entries, then go back to the installer, Press back button once, and continue. If you prefer to do this the easy way you can avoid the standard setup/installation provided by Microsoft and use one of the methods shown after this one.
- Press Shift + F10 to open Command Prompt and run the “regedit” command

- Add a new key in the “Setup” key
In the Registry Editor, navigate to
Computer\HKEY_LOCAL_MACHINE\SYSTEM\Setup. Right-click on the “Setup” folder in your sidebar and select “New > Key”.
- Name the key “LabConfig” and add a new DWORD
After you name your folder, you can create the DWORD by right-clicking in any blank space in the main pane and selecting “DWORD (32-bit) Value”.
- Name the value “BypassTPMCheck” and set the value data to 1.
It’s important the capitalization and spelling are exactly the same. You can modify the value data by double-clicking your new DWORD and changing the “Value data” text box. Press “OK” when you’re done to save the changes.
- Create another DWORD called “BypassRAMCheck”
Again, make sure the capitalization and spelling is exactly the same as above.
- Change the value data to 1
Remember, you can access the value data field by double-clicking on the “BypassRAMCheck” key. Press “OK” to apply it.
- Create a new DWORD called “BypassSecureBootCheck”
- Change the value data of SecureBootCheck to 1 and press “OK”
- Close the Registry Editor and press the back button on your Windows 11 setup
You’ll find the back button in the top-left corner.

- Install Windows 11 on your unsupported hardware
You can now go through the setup process as normal. Your installer should no longer tell you your PC is incompatible.


How to auto-create a Windows 11-ISO without TPM-check for installation
You can use Microsoft´s Media Creation Tool with the script-based tool Universal MediaCreationTool wrapper (Universal MCT wrapper) to automatically download Windows 11 from Microsoft´s servers and create ISO-files where the TPM check has been removed. If you want to use this ISO to upgrade Windows 10 to Windows 11 dynamically from a running system, you will additionally need to activate the TPM bypass shown in method 4 below.
- Download and unzip Universal MCT wrapper
Download Universal MCT wrapper from GitHub, unpack the ZIP-file and run “MediaCreationTool.bat”. If you want to learn more about the project, you find everything here.

- Click on “11” to select “Windows 11”
- Choose “Create ISO” or “Create USB” based on your preference.
“Create USB” will automatically create a bootable USB-stick which can be used for a fresh installation of “Windows 11”.
- Wait until the Media Creation Tool has finished downloading Windows 11
After the download of Windows 11 has been finished, the Media Creation Tool will close automatically and Universal MCT wrapper will create an ISO/USB which allows installing Windows 11 without TPM.
- Wait for Universal MCT wrapper to finish
- Use ISO/USB to install Windows 11 without TPM
The ISO to install Windows 11 without TPM can be found in the main folder of Universal MCT wrapper.
- Install Windows 11 without Trusted Platform Module
You use the ISO/USB to either install Windows 11 without TPM-check on a PC or as a virtual machine with VMware, Virtualbox, or Hyper-V.


How to upgrade to Windows 11 with unsupported CPU / without TPM 1.2
If your PC fails to upgrade to Windows 11 because of an unsupported CPU and/or that your device only has TPM 1.2 instead of TPM 2.0, you can fix that quickly. Just apply the following registry-tweak to add a bypass for unsupported CPU and TPM 1.2.
- Open Regedit
- Navigate to folder and check for existing DWORD
Use the address bar to navigate to “HKEY_LOCAL_MACHINE\SYSTEM\Setup\MoSetup” and check if the DWORD “AllowUpgradesWithUnsupportedTPMOrCPU” is located there. If it is missing, right-click in the right pane, select “New > DWORD (32-bit) Value”, and name the new DWORD “AllowUpgradesWithUnsupportedTPMOrCPU”.
- Edit DWORD “AllowUpgradesWithUnsupportedTPMOrCPU”
Double click on “AllowUpgradesWithUnsupportedTPMOrCPU”, type “1” in “Value data” and save with “OK”.


How to upgrade to Windows 11 without any TPM (TPM 2.0 / TPM 1.2)
If you want to directly upgrade Windows 10 to Windows 11 without a TPM 2.0 chip, you can use the wrapper tool from the previous step to activate a bypass with a simple click. This method is also needed if you run the Windows 11 upgrade from a previously created ISO created with method 2.
- Run the Windows 11 TPM 2.0 bypass
Double-click on “Skip_TPM_Check_on_Dynamic_Update_v2.cmd” as admin to remove the TPM-check for updates. If this does not work, you can try alternatively “Skip_TPM_Check_on_Dynamic_Update_v1.cmd”.
- Wait for confirmation
If you see a PowerShell window popping up with a green bar stating “Skip TPM Check on Dynamic Update [Installed]…” the TPM 2.0 bypass has been activated and you should be able to upgrade from Windows 10 to Windows 11 without TPM 2.0. Running the respective CMD-script again will re-activate the TPM-check.

![Skip TPM Check on Dynamic Update [Installed]](https://cdn-chilj.nitrocdn.com/gYFaTcLxknXlucWgXPjHDdhAuyobJjHx/assets/images/optimized/rev-63bdcfb/winbuzzer.com/wp-content/uploads/2021/10/Skip-TPM-Check-on-Dynamic-Update-Installed.jpg.webp)
Windows 11 supported Intel processors
Windows 11 supports intel processors from Intel’s 8th generation or newer which means CPUs from mid-2017 onwards. Here we provide a selection of the most popular consumer-level CPUs. Microsoft has a full list of all supported Intel processors for Windows 11, including chips from the Atom, Celeron, Pentium, Xeon and Core series.
Intel 8th generation (Coffee Lake; Whiskey Lake; Amber Lake)
Desktop
- Core i3-8100
- Core i5-8400
- Core i5-8600
- Core i5-8600K
- Core i7-8700
- Core i7-8700K
- Core i7-8086K
Mobile
- Core m3-8100Y
- Core i5-8200Y
- Core i3-8130U
- Core i3-8145U
- Core i3-8100H
- Core i5-8250U
- Core i5-8250U
- Core i5-8400H
- Core i7-8650U
- Core i7-8665U
- Core i7-8750H
Intel 9th generation (Coffee Lake Refresh)
- Core i3-9100
- Core i5-9400
- Core i5-9600
- Core i5-9600K
- Core i7-9700
- Core i7-9700K
- Core i9-9900
- Core i9-9900K
Intel 10th generation (Comet Lake; Ice Lake; Amber Lake)
Desktop
- Core i3-10100
- Core i5-10400
- Core i5-10600
- Core i5-10600K
- Core i7-10700
- Core i7-10700K
- Core i9-10900
- Core i9-10900K
Mobile
- Core i3-10100Y
- Core i3-10100U
- Core i5-10210U
- Core i5-10200H
- Core i5-10400H
- Core i7-10510U
- Core i7-10710U
- Core i7-10750H
- Core i7-10850H
- Core i9-10980HK
Intel 11th generation (Tiger Lake)
Desktop
- Core i3-11100
- Core i5-11400
- Core i5-11600
- Core i5-11600K
- Core i7-11700
- Core i7-11700K
- Core i9-11900
- Core i9-11900K
Mobile
- Core i3-1115G4
- Core i5-1135G7
- Core i5-11300H
- Core i7-1165G7
- Core i7-1185G7
- Core i7-11375H
Windows 11 supported AMD processors
For AMD, Windows 11 CPU compatibility goes back to processors released in 2018 or later. This includes 2nd generation Ryzen (Zen+) chips and above. Microsoft also has a full AMD list, including chips from AMDs Athlon, EPYC, Ryzen and Ryzen Threadripper series. Below is a list of the more common consumer-level CPUs. Unfortunately CPU like the 3300X, 3700, 4600HS and 5900H are missing, even though all are all very recent.
AMD Ryzen 2000 series (Zen+; Zen)
Desktop
- Ryzen 3 2300X
- Ryzen 5 2600
- Ryzen 7 2700
- Ryzen 7 2700X
- Ryzen Threadripper 2920X
- Ryzen Threadripper 2950X
- Ryzen Threadripper 2970WX
- Ryzen Threadripper 2990X
AMD Ryzen 3000 series (Zen 2; Zen+)
Desktop
- Ryzen 3 3100
- Ryzen 5 3600
- Ryzen 7 3700X
- Ryzen 9 3900
- Ryzen 9 3900X
- Ryzen 9 3950X
- Ryzen Threadripper 3960X
- Ryzen Threadripper 3970X
- Ryzen Threadripper 3990X
- Ryzen Threadripper 3995WX
- Ryzen 3 3200G**
- Ryzen 5 3400G**
- Ryzen 3 3300U
- Ryzen 5 3500U
- Ryzen 5 3550H
- Ryzen 7 3700U
- Ryzen 7 3750H
AMD Ryzen 4000 series (Zen 2)
Desktop
- Ryzen 3 4300G
- Ryzen 5 4600G
- Ryzen 7 4700G
Mobile
- Ryzen 3 4300U
- Ryzen 5 4500U
- Ryzen 5 4600H
- Ryzen 7 4700U
- Ryzen 7 4800HS
- Ryzen 7 4800H
- Ryzen 9 4900HS
- Ryzen 9 4900H
AMD Ryzen 5000 series (Zen 3)
Desktop
- Ryzen 5 5600X
- Ryzen 7 5800X
- Ryzen 9 5900X
- Ryzen 9 5950X
Mobile
- Ryzen 3 5400U
- Ryzen 5 5600U
- Ryzen 5 5600HS
- Ryzen 5 5600H
- Ryzen 7 5800U
- Ryzen 7 5800HS
- Ryzen 7 5800H
- Ryzen 9 5900HS
- Ryzen 9 5900HX
- Ryzen 9 5980HS
- Ryzen 9 5980HX
That’s it for this Windows 11 tutorial. Now that you have it installed, you may want to check out all the major features coming to the OS, including focus sessions and the new snipping tool.
If you decide it’s not for you, you may instead want to check out our tutorial on how to roll back a Windows update. Technically, it’s for Windows 10, but as you’ll notice not much has changed between versions, so the process is more or less the same.
UPDATED 8/9/2023: If you have a computer with unsupported hardware, you may upgrade to Windows 11, but not through Windows Update. Instead, you must use a bootable USB flash drive or ISO file to perform a clean install or in-place upgrade manually.
Microsoft left the loophole open but didn’t mention it anywhere in the documentation, nor is it supported. According to the company, installing Windows 11 on unsupported hardware is an option for organizations. However, anyone could upgrade at their own risk knowing there is no system stability and driver compatibility guarantee.
In other words, you can continue with the setup manually if you choose to install Windows 11 on incompatible hardware. However, you must confirm that the upgrade will have an “unsupported state.” Microsoft defines an “unsupported state” as a computer that doesn’t meet the minimum system requirements. As a result, it won’t be entitled to receive updates from Windows Update. Although these devices may continue to receive updates anyway, the company isn’t obligated to provide security and driver updates or technical support.
This guide will teach you how to install Windows 11 (version 22H2) on a computer with incompatible hardware. Since the device does not officially support the new version of Windows, using this workaround is not recommended unless you know the risks and understand that stability, compatibility, and updates are not guaranteed.
- Install Windows 11 on unsupported hardware from USB
- Upgrade to Windows 11 on unsupported hardware from ISO file
- Upgrade to Windows 11 on unsupported hardware from Registry
- Install Windows 11 on unsupported hardware from Rufus
Using the ISO file to perform a clean installation, you will need to create a bootable media using a third-party tool like Rufus or Command Prompt to start the setup process with a USB flash drive.
In addition, you also have to make sure the device can start from USB, which means you will have to change the UEFI settings. Since most computers have different settings, check your manufacturer support website for more specific details.
To install Windows 11 on an unsupported PC, use these steps:
-
Start the unsupported PC with the Windows 11 USB flash drive.
-
Press any key to continue.
-
Use the “Shift + F10” keyboard shortcut to open Command Prompt.
-
Type the following command and press Enter:
regedit

-
Navigate the following path:
HKEY_LOCAL_MACHINE\SYSTEM\Setup
-
Right-click the Setup (folder) key, select New, and then the Key option.

-
Name the key LabConfig and press Enter.
-
Right-click the LabConfig (folder) key, select New, and then the DWORD (32-bit) Value option.
-
Name the key BypassTPMCheck and press Enter.
-
Double-click the newly created key and set its value from 0 to 1.

-
Click the OK button.
-
Right-click the LabConfig (folder) key, select New, and then the DWORD (32-bit) Value option.
-
Name the DWORD BypassSecureBootCheck and press Enter.
-
Double-click the newly created key and set its value from 0 to 1.

-
Click the OK button.
-
Click the Next button.

-
Click the Install now button.

-
Click the “I don’t have a product key” option if you are reinstalling. If Windows 11 has been previously activated after the installation, reactivation will happen automatically.

-
Select the edition of “Windows 11” that your license key activates (if applicable).
-
Check the “I accept the license terms” option.
-
Click the Next button.
-
Select the “Custom: Install Windows only (advanced)” option.

-
Select each partition in the hard drive you want to install Windows 11 and click the Delete button. (Typically, the “Drive 0” is the drive that contains all the installation files.)

Warning: Deleting a partition also deletes all data on the drive. Also, it is not required to delete the partitions from a secondary hard drive.
-
Select the hard drive (“Drive 0 Unallocated Space”) to install Windows 11 on an unsupported device.

-
Click the Next button.
-
Select your region setting after the installation on the first page of the out-of-the-box experience (OOBE).

-
Click the Yes button.
-
Select your keyboard layout setting.
-
Click the Yes button.
-
Click the Skip button if you do not need to configure a second layout.
-
The computer will automatically connect to the network if it uses an Ethernet connection. If you have a wireless connection, you must set up the connection manually (a security key may be required).
-
(Optional) Confirm a name for the computer.
-
Click the Next button. (The device will restart automatically.)
-
Select the “Set up for personal use” option if you are configuring Windows 11 Pro. The “Home” edition does not have this option.
-
Click the Next button.
-
Click the Sign in button.
-
Confirm your Microsoft account email, phone number, or Skype identification to create an account.
-
Click the Next button.
-
Confirm your Microsoft account password.
-
Click the Next button.
-
Click on “View more options.”

-
Choose the “Set up a new device” option.
-
Click the Next button.
-
Click the Create PIN button.
-
Create a new four-digit PIN.
-
Click the OK button.
-
Confirm the privacy settings that best suit your situation by turning on or off the toggle switch for each setting.
-
Click the Next button.
-
Click the Next button again.
-
Click the Accept button.
-
(Optional) On the “Let’s customize your experience” page, select one or more ways you plan to use the device to allow the setup to suggest tools and service customizations during this experience.
-
Click the Accept button to continue. Or click the Skip button to skip this part of the setup.
-
Click the Skip button for the Android phone link process.
-
Click the “Next” button to automatically upload your Desktop, Pictures, and Documents folders to OneDrive. Or Select the “Only save files to this PC” option.
-
Click the Next button.
-
Click the Decline button to skip the Microsoft 365 setup.
-
Click the “Skip for now” button to skip the Game Pass subscription promotion.


Once you complete the steps, Windows 11 will install in an unsupported state, so you may not get security or driver updates.
Upgrade to Windows 11 on unsupported hardware from ISO file
Alternatively, you can perform an in-place upgrade of Windows 11 with an ISO file on a device that doesn’t meet the system requirements. However, you must run a script to bypass the TPM, Secure Boot, and processor check.
1. Bypass Windows 11 requirement checks
To bypass the minimum system requirements to install Windows 11, use these steps:
-
Open MediaCreationTool.bat GitHub page.
-
Click the Code button from the top-right corner and the Download Zip option.

-
Select the MediaCreationToo.bat-main folder and click the Extract all button.

-
Click the Browse button.
-
Select the extraction location and click the Select folder button.
-
Click the Extract button.
-
In the extracted folder, inside the MediaCreationToo.bat-main folder, open the bypass11 folder.
-
Right-click the “Skip_TPM_Check_on_Dynamic_Update.cmd” file and select the Run as administrator option.

-
Click the More info option.
-
Click the Run anyway button.


Once you complete the steps, you can mount an ISO file to begin the installation of Windows 11 on unsupported hardware (see steps below). If the script is not working, restart the computer and run it several times.
2. Upgrade to Windows 11 from ISO
To upgrade an incompatible computer to Windows 11 (version 22H2 or 21H2) with an ISO file, use these steps:
-
Open Microsoft Support website.
-
Under the “Download Windows 11 Disk Image (ISO)” section, select the Windows 11 option.
-
Click the Download button.
-
Select the installation language.
-
Click the Confirm button.
-
Click the Download button to save the Windows 11 ISO file on the device.
-
Right-click the ISO file, select the Open with submenu, and choose the Windows Explorer option.
-
Click on the mounted drive from the left navigation pane.
-
Double-click the Setup file to begin the Windows 11 upgrade process.
-
(Optional) Click the “Change how Windows Setup downloads updates” option.

-
Select the “Not right now” option.
-
Click the Next button.
-
Click the Install button to upgrade while keeping files and apps.


If you want to start fresh with a clean installation of Windows 11, click the “Change what to keep” option, select the “Nothing” option, click the Next button, and then click the “Install” button.
After you complete the steps, the setup will continue to upgrade the laptop or desktop computer to the Windows 11 2022 Update (version 22H2). However, Windows 11 will run in an unsupported state that won’t guarantee updates, nor will you receive support from Microsoft.
Upgrade to Windows 11 on unsupported hardware from Registry
Although it’s not supported, Microsoft has published a workaround to bypass the Windows 11 requirements to continue the setup by editing the Registry. However, the computer needs a TPM 1.2 chip and UEFI firmware with Secure Boot enabled. (These steps may or may not work on Windows 11 22H2.)
1. Edit Registry to bypass official checks
To bypass the minimum system requirements to upgrade to Windows 11 22H2, use these steps:
-
Open Start.
-
Search for regedit and click the top result to open the Registry Editor.
-
Navigate to the following path:
HKEY_LOCAL_MACHINE\SYSTEM\Setup\MoSetup
-
Right-click the MoSetup (folder) key, select the New submenu, and choose the “DWORD (32-bit) Value” option.
-
Name the key AllowUpgradesWithUnsupportedTPMOrCPU and press Enter.
-
Double-click the newly created key and set its value from 0 to 1.


Once you complete the steps, you can mount an ISO file or connect a USB media to begin the installation of Windows 11 on unsupported hardware.
2. Upgrade to Windows 11 using ISO file
To begin the Windows 11 upgrade process, use these steps:
-
Open Microsoft Support website.
-
Under the “Download Windows 11 Disk Image (ISO)” section, select the Windows 11 option.
-
Click the Download button.
-
Select the installation language.
-
Click the Confirm button.
-
Click the Download button to save the Windows 11 ISO file on the device.
-
Right-click the ISO file, select the Open with submenu, and choose the Windows Explorer option.
-
Click on the mounted drive from the left navigation pane.
-
Double-click the Setup file to begin the Windows 11 upgrade process.
-
(Optional) Click the “Change how Windows Setup downloads updates” option.
-
Select the “Not right now” option.
-
Click the Next button.
-
Click the Accept button to agree to the terms.
-
Click the Install button to upgrade while keeping your files and apps.

If you want to start fresh with a clean installation of Windows 11, click the “Change what to keep” option, select the “Nothing” option, click the “Next” button, and then click the “Install” button.
Once you complete the steps, the setup will continue with the upgrade on your device to Windows 11.
Install Windows 11 on unsupported hardware from Rufus
Alternatively, you can create a Windows 11 bootable USB that bypasses the TPM 2.0, Secure Boot, and memory requirements on unsupported hardware using the Rufus tool.
1. Create bootable USB with Rufus
To create a bootable USB of Windows 11 to bypass hardware requirements, use these steps:
-
Open Rufus website.
-
Click the link to download the latest version.
-
Double-click the rufus.4.x.exe file to launch the tool.
-
Under the “Device” section, use the drop-down menu and select the flash drive to create the Windows 11 bootable USB media.
-
Click the Select button.

-
Select the Windows 11 ISO file.
-
Click the Open button.
-
Select the “Standard Windows Partition” option in the “Image option” setting.
-
Select the GPT option in the “Partition scheme” setting.
-
Select the UEFI (non CSM) option in the “Target system” setting.
-
Under the “Volume label” section, specify a descriptive name for the Windows 11 bootable USB flash drive – For example, Windows 11 Bypass.
-
Use the default settings for the File system and Cluster size options.
-
Check the Quick format option.
-
Check the “Create extended label and icon files” option.
-
Click the Start button.
-
Check the “Remove requirement for 4GB RAM, Secure Boot, and TPM 2.0” option to install Windows 11 on unsupported hardware.

-
Check the “Remove requirement for an online Microsoft account” option to use a local account and bypass the internet requirements.
-
Click the OK button.


Once you complete the steps, Rufus will create a bootable USB media with the hardware requirements turned off, and you can now proceed to install a fresh copy of Windows 11 or an in-place upgrade on unsupported hardware with the same steps as a regular installation.
1. Clean Windows 11 install on unsupported hardware
To perform a clean install of Windows 11 from a Rufus USB on unsupported hardware, use these steps:
-
Start the unsupported PC with the Windows 11 USB flash drive.
-
Press any key to continue.
-
Click the Next button.
-
Click the Install now button.
-
Click the “I don’t have a product key” option if you are doing a reinstallation. If Windows 11 was previously activated after the installation, reactivation would happen automatically.
-
Select the edition of “Windows 11” that your license key activates (if applicable).
-
Check the “I accept the license terms” option.
-
Click the Next button.
-
Select the “Custom: Install Windows only (advanced)” option.
-
Select each partition in the hard drive you want to install Windows 11 and click the Delete button. (Typically, the “Drive 0” is the drive that contains all the installation files.)
Warning: When you delete a partition, it also deletes all data on the drive. Also, it is not required to delete the partitions from a secondary hard drive.
-
Select the hard drive (Drive 0 Unallocated Space) to install the operating system.
-
Click the Next button.
-
Select the hard drive (“Drive 0 Unallocated Space”) to install Windows 11 on your device.
-
Click the Next button.
-
Select your region setting after the installation on the first page of the out-of-the-box experience (OOBE).
-
Click the Yes button.
-
Select your keyboard layout setting.
-
Click the Yes button.
-
Click the Skip button if you do not need to configure a second layout.
-
The computer will automatically connect to the network if it uses an Ethernet connection. If you have a wireless connection, you must set up the connection manually (a security key may be required).
-
(Optional) Confirm a name for the computer.
-
Click the Next button. (The device will restart automatically.)
-
Select the “Set up for personal use” option if you are configuring Windows 11 Pro. The “Home” edition does not have this option.
-
Click the Next button.
-
Click the Sign in button.
-
Confirm your Microsoft account email, phone number, or Skype identification to create an account.
-
Click the Next button.
-
Confirm your Microsoft account password.
-
Click the Next button.
-
Click on “View more options.”
-
Choose the “Set up a new device” option.
-
Click the Next button.
-
Click the Create PIN button.
-
Create a new four-digit PIN.
-
Click the OK button.
-
Confirm the privacy settings that best suit your situation by turning on or off the toggle switch for each setting.
-
Click the Next button.
-
Click the Next button again.
-
Click the Accept button.
-
(Optional) On the “Let’s customize your experience” page, select one or more ways you plan to use the device to allow the setup to suggest tools and service customizations during this experience.
-
Click the Accept button to continue. Or click the Skip button to skip this part of the setup.
-
Click the Skip button for the Android phone link process.
-
Click the “Next” button to automatically upload your Desktop, Pictures, and Documents folders to OneDrive. Or Select the “Only save files to this PC” option.
-
Click the Next button.
-
Click the Decline button to skip the Microsoft 365 setup.
-
Click the “Skip for now” button to skip the Game Pass subscription promotion.
Once you complete the steps, Windows 11 will install on a computer that doesn’t meet the minimum requirements for processor, memory, and security components.
If you want to perform an in-place upgrade, then connect the bootable media on the unsupported computer, run the “Setup.exe” installer, and continue with the on-screen directions like a regular upgrade.
If you’re looking for a way to install Windows 11 without TPM (Trusted Platform Module), continue reading below.
Microsoft’s new latest operating system, Windows 11, was released on October 5, 2021 and many users are looking for a way to install it on their systems that do not have TPM v2.0 or TPM v1.2 or a processor that is not supported by Windows 11.

This tutorial contains instructions to fix the following problems while trying to update Windows 10 to Windows 11:
This PC doesn’t currently meet Windows 11 system requirements
TPM 2.0 must be supported and enabled on this PC.
TPM: TPM 1.2
The processor isn’t currently supported for Windows 11.
&
This PC doesn’t currently meet Windows 11 system requirements
TPM 2.0 must be supported and enabled on this PC.
TPM: Not Detected
The processor isn’t currently supported for Windows 11.
How to Upgrade Windows 10 to Windows 11 Without TPM.
Method 1. Install Windows 11 with TPM version 1.2.
Method 2. Install Windows 11 without TPM version 1.2 or 2.0.
Method 1. How to Upgrade to Windows 11 with TPM 1.2.
Microsoft provided an official way to bypass the TPM v2.0 requirement to install Windows 11 on Windows 10 devices with TPM v1.2 and unsupported CPUs.
* Notes:
1. Using the instructions below you will be able to upgrade Windows 10 to Windows 11 if your system supports TPM v1.2 but doesn’t support TPM v2.0. If your computer does not support either TPM 1.2, follow the instructions on Method 2 below.
2. The instructions on this method are written according to official Microsoft instructions.
Step 1. Allow Upgrade With Unsupported TPM or CPU in Registry.
1. Open Registry Editor. To do that:
1. Simultaneously press the Win ![]() + R keys to open the run command box.
+ R keys to open the run command box.
2. Type regedit and press Enter to open Registry Editor.

2. At the left pane, navigate to this key:
- HKEY_LOCAL_MACHINE\SYSTEM\Setup\MoSetup
3. At the right pane, right-click at an empty space and choose New > DWORD (32-bit) Value.

4. Name the new value as: AllowUpgradesWithUnsupportedTPMOrCPU
5. Double-click at the newly created value and type 1 at Value Data.

6. Close Registry Editor and restart the PC.
Step 2. Download Windows 11 ISO file.
1. Navigate to Windows 11 Download page.
2. Under the «Download Windows 11 Disk Image (ISO)» section:
a. Select Windows 11 and click Download.
b. Select the product Language and click Confirm.

c. Click on 64-bit download button to download Windows 11 in ISO file

3. Wait until the Windows 11 ISO download is complete.
Step 3. Install Windows 11 on your computer.
1. Double-click at downloaded Windows 11.ISO file.
2. Double-click at setup.exe

3. At first screen click Next to start the installation of Windows 11.

4. Follow the onscreen instructions to install Windows 11.
Method 2. How to Upgrade to Windows 11 without TPM (TPM v2.0 or TPM v1.2).
If you want to install Windows 11 and your hardware is unsupported then you can use the
Universal MCT wrapper script for all Windows 10/11 versions to upgrade your system to Windows 11 (or to perform a clean install of Windows 11)
* Note: Using the instructions below you will be able to upgrade Windows 10 to Windows 11 on a system that does not have any version of TPM. (TPM v1.2 or TPM v2.0).
1. Download the Universal MediaCreationTool wrapper for all MCT Windows versions from GitHub. (click Code > Download ZIP)

2. Extract the downloaded ZIP file and explore its contents.
3. Right-click at MediaCreationTool.bat and select Run as administrator.
* Note: When prompted ask Yes to UAC warning.

4. At MCT Version options click 11 to download Windows 11.

5. At the 11 MCT Preset options, click Auto ISO. *
* Note: If you want to create a USB installation media to install Windows 11 on another PC, plug an empty USB drive (at least 8GB), and click Auto USB.

6. Now wait until MCT (Media Creation Tool) downloads Windows 11. *
* Note: Do not pay attention to the indication that it is «Downloading Windows 10».

7. When all operations completes, «Press any key» on the MCT window and continue to the next step.
8. Navigate again to the same folder where you ran «MediaCreationTool.bat» and you will see a new ISO file named «11 21H2«.
9. To upgrade your Windows 10 system to Windows 11, double-click at 11 21H2.ISO file to mount (open it) in Explorer. *
* Note: If you want to clean install Windows 11, or to repair Windows 11 on another PC, burn the Windows 11 ISO file to USB.

10. Double-click at setup.exe to start the installation of Windows 11.

11. Click Next at first screen to start Windows 11 Setup.

12. Let the system to check for updates and when prompted Accept the license terms.

13. Let the system to get the updates.
14. At the next screen you’ll be informed that your system doesn’t meet the minimum system requirements to run Windows 11. Read the message carefully and click Accept if you want to proceed.
«This PC doesn’t meet the minimum system requirements for running Windows 11 – these requirements help ensure a more reliable and higher quality experience. Installing Windows 11 on this PC is not recommended and may result in compatibility issues. If you proceed with installing Windows 11, your PC will no longer be supported and won’t be entitled to receive updates. Damages to your PC due to lack of compatibility aren’t covered under the manufacturer warranty. By selecting Accept, you are acknowledging that you read and understand this statement.».

15. Click Install if you want to upgrade Windows 10 to Windows 11 by keeping personal files and apps, or click Change what to keep if you want to perform a clean installation or if you want to keep only the personal files.

16. Follow the rest instructions to install Windows 11.
That’s it! Let me know if this guide has helped you by leaving your comment about your experience. Please like and share this guide to help others.