Whether you’re building a new Windows PC or just want to make a completely fresh start on your existing computer you will need to perform a clean install of Windows 11, booting off of an install disk and writing the new OS to your storage drive. In order to create a bootable install disk, you will need to get a Windows 11 ISO file that you can write to a USB Flash drive or use as a standalone file if you are installing Windows in a virtual machine.
Whether you have a valid product key or not (see how to get Windows 11 for free or cheap), downloading a Windows 11 ISO never costs anything and there are three main ways to do so. First, you can download a Windows 11 ISO directly from Microsoft or use the company’s Media Creation Tool to download the software and write it directly to a USB Flash Drive.
Second, you could use tools from a site called UUP dump to download the files from Microsoft’s update servers and build a custom ISO that’s fully up-to-date with an insider build that’s even newer than release build. Finally, you can use Aveyo’s open-source Universal MediaCreationTool to create an ISO that bypasses WIndows 11’s TPM requirement.
Below, we’ll show you all the ways you can get a Windows 11 ISO and write it to an installation disk.
How to Get a Windows 11 ISO
Before you can begin your install, you need to get a Windows 11 ISO file. If you’ve installed Windows 10 or even a build of Linux before, you’ll know that ISO files are disk images you can use to create a bootable USB Flash drive, write to an optical disc or boot a virtual machine off of.
Downloading a Windows 11 ISO From Microsoft
The easiest way to get a Windows 11 ISO is by downloading one directly from Microsoft.
1. Navigate to the Windows 11 ISO page.
2. Select Windows 11 from the menu under «Download Windows 11 Disk Image (ISO).» If you want to go straight to creating a USB Flash drive, you can download the Windows 11 Installation Media tool from here. See the section below for step-by-step details on how to do that.
3. Click Download.

4. Select your language and click confirm.
5. Click the download button that appears.
The ISO file will now download to your computer.
If you don’t want to keep a copy of the latest Windows 11 ISO on your storage drive and just want to have a bootable USB Windows 11 install disk, the easiest way is to use Microsoft’s media creation tool. Here’s how.
1. Connect a USB Flash drive to your PC. It must be at least 8GB and have no data on it you want to keep. This process will overwrite the whole disk.
2. Navigate to Microsoft’s Windows 11 Download page.
3. Click Download Now under Create Windows 11 Installation Media to download the Media Creation Tool.
4. Launch the Media Creation Tool.
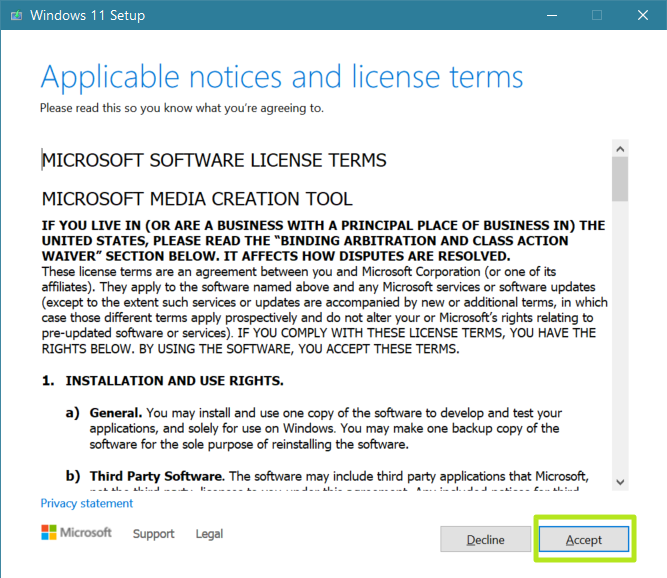
5. Click Accept when shown the license agreement.
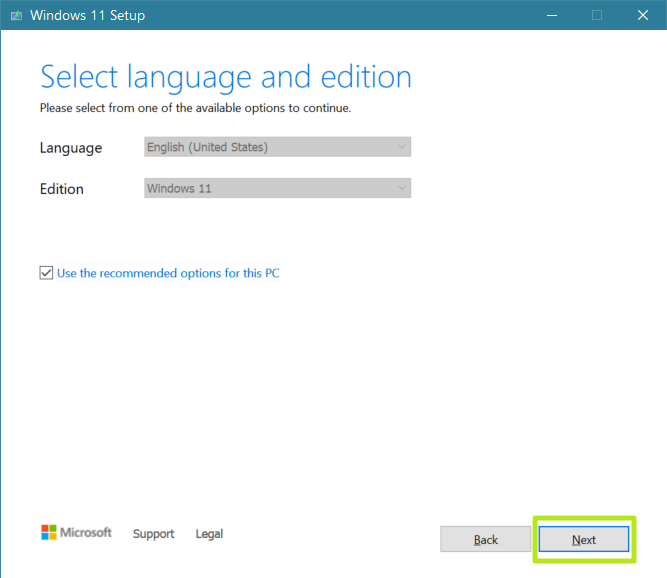
6. Select your language and Edition and click Next. The default choices will probably be correct.
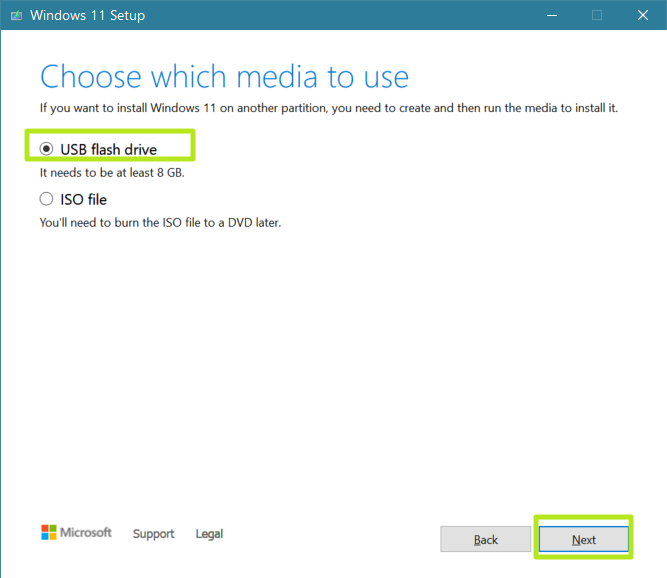
7. Select USB flash drive and click Next. You can also select ISO file here and create an ISO file instead if you don’t have a drive ready.
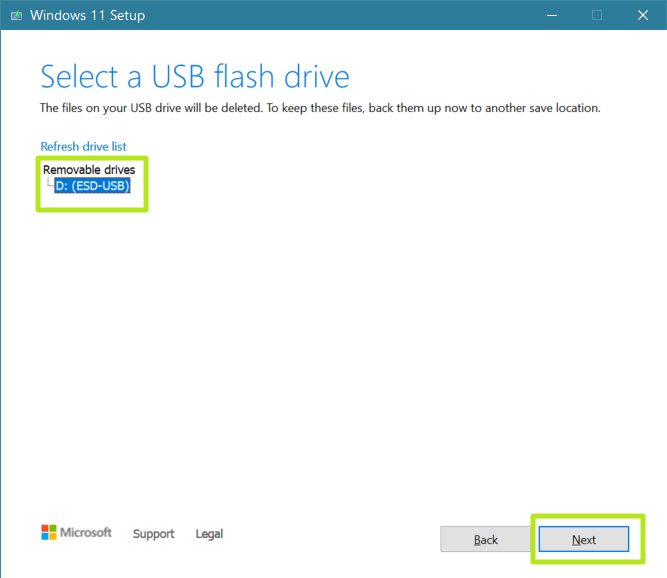
8. Select your USB Flash drive (if there’s more than one choice) and click Next.
You will now have to wait several minutes while your computer downloads Windows 11.

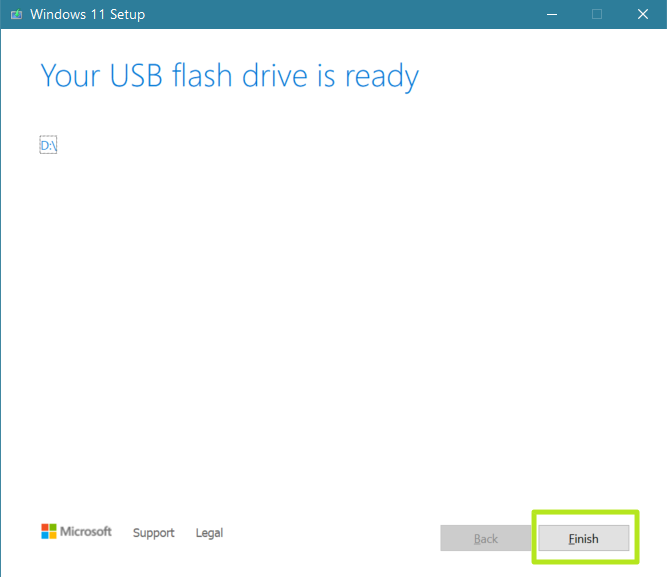
9. Click Finish when it says your USB Flash drive is ready.
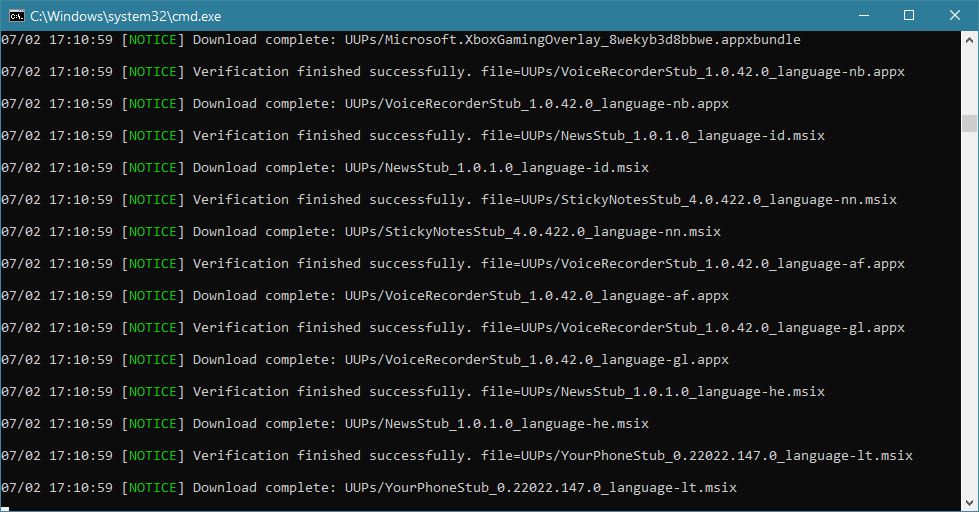
Creating a Windows 11 ISO with UUP Dump
If you download a Windows 11 ISO from Microsoft, you’ll always get the latest release version, but what if you want to do a clean install from a Windows 11 Insider Release Preview, Beta or Dev channel build? A very helpful site called UUP Dump allows you to download any build as an ISO file you can use for installation.
The ISO files actually come directly from Microsoft’s servers as UUP Dump just gives you a batch file that downloads all the necessary files and turns them into an ISO. Here’s how to use it.
1. Navigate to uupdump.net.
2. Scroll down to find the recent build you want. You almost certainly want the amd64 (aka x64) version of any build. If you are planning to install Windows 11 on a Raspberry Pi (an uncommon scenario), you should click arm64 instead of x64.
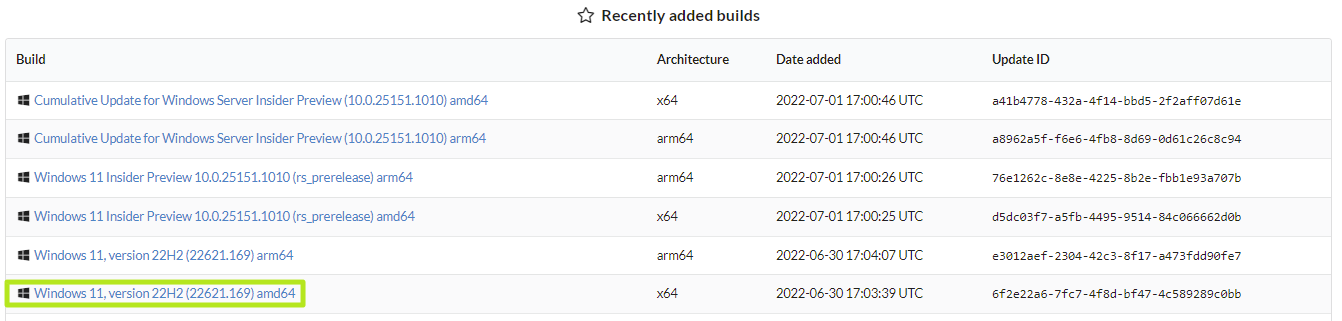
Or, alternatively, you can click the x64 button next to the build version you want. There are four choices:
- Latest Public Release Build: This is the release, not necessary to get from UUP Dump.
- Latest Release Preview Build: This is the closest Insider build to being final.
- Latest Beta Channel Build: A level between the newest and most polished versions.
- Latest Dev Channel Build: The newest but also possibly buggiest build available.
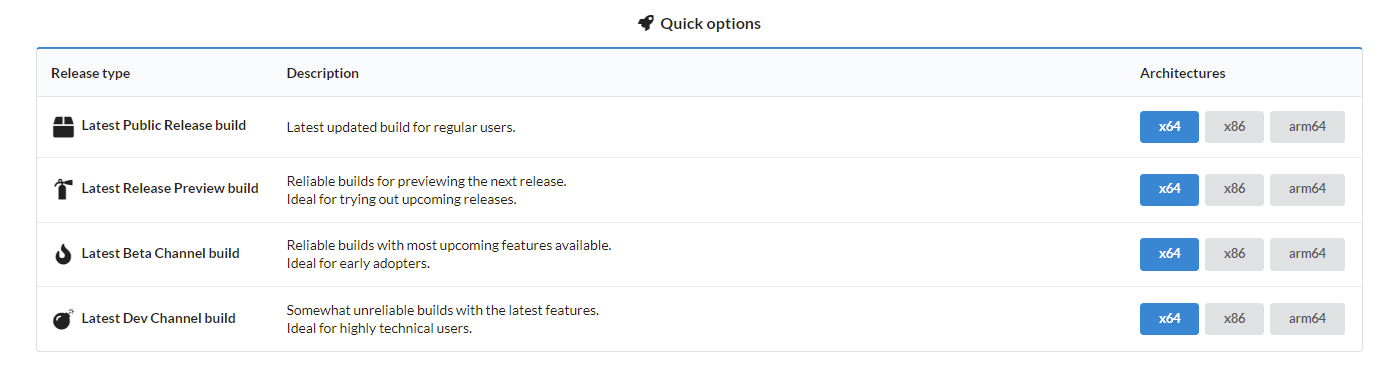
3. Select the language and click Next.
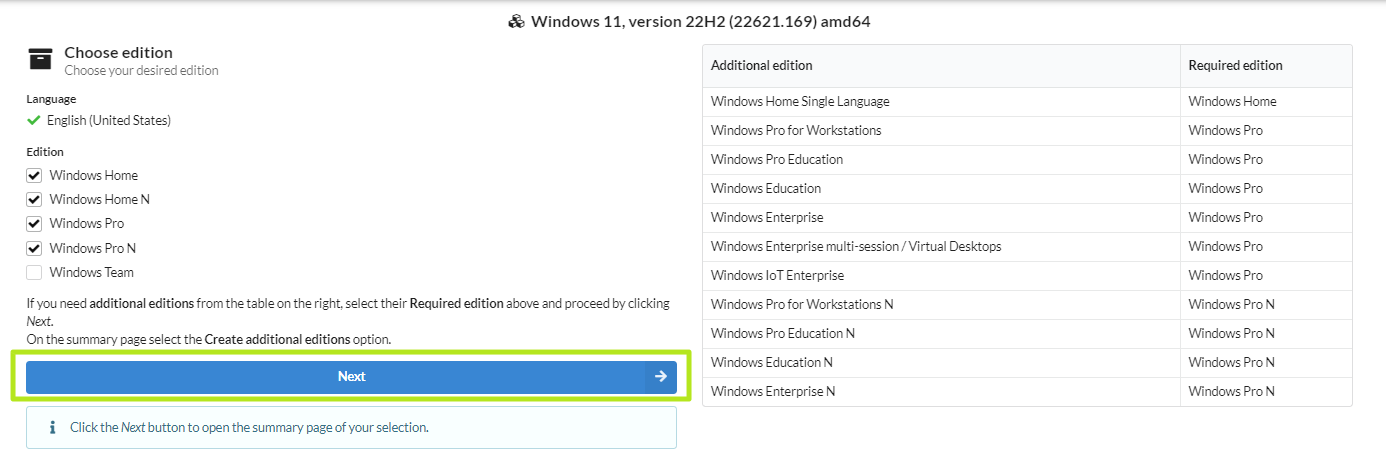
4. Choose the edition(s) you want and click Next. By default, your ISO will contain both Windows Home and Pro versions, but you can save space by picking just one of them.
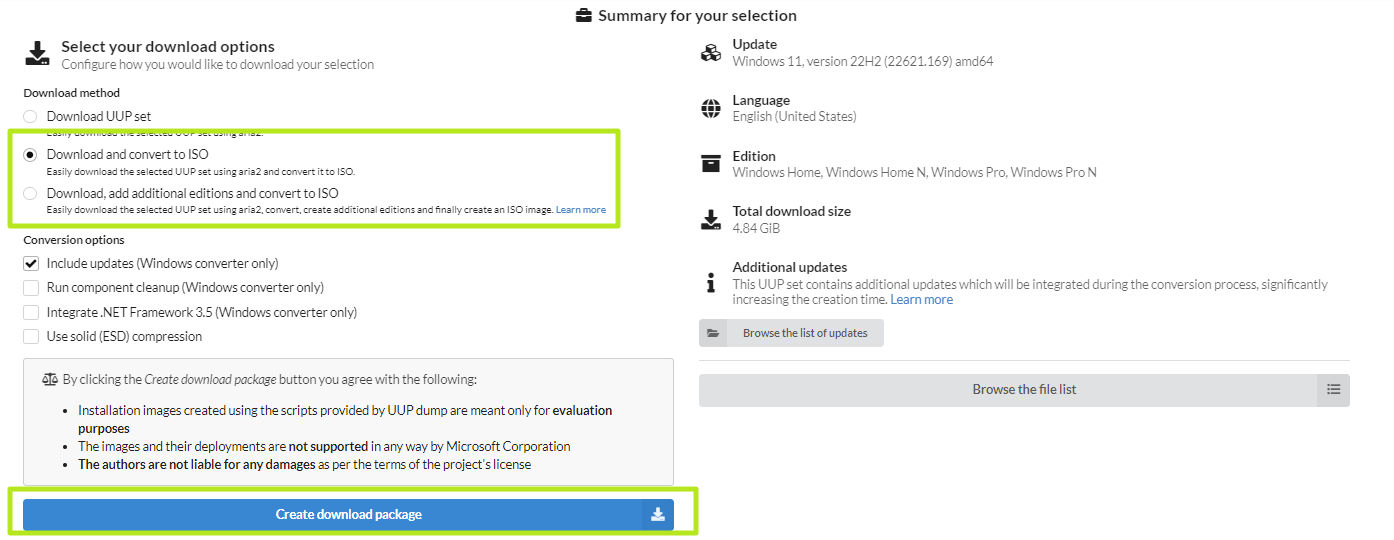
5. Select «Download and convert to ISO» and check «Include updates» and then click «Create download package.» A small zip file will download to your PC. This is not the Windows 11 ISO, but it will be used to download it.
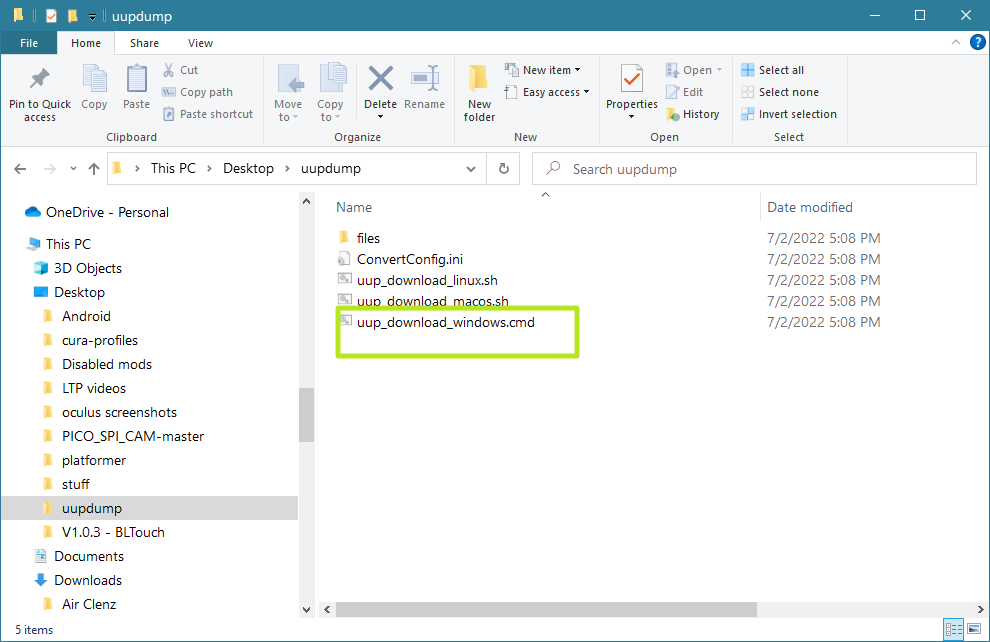
6. Unzip the file and place its contents in a dedicated folder. Make sure the folder name has no spaces in it.
7. Double-click uup_download_windows.cmd in the folder with the downloaded files.
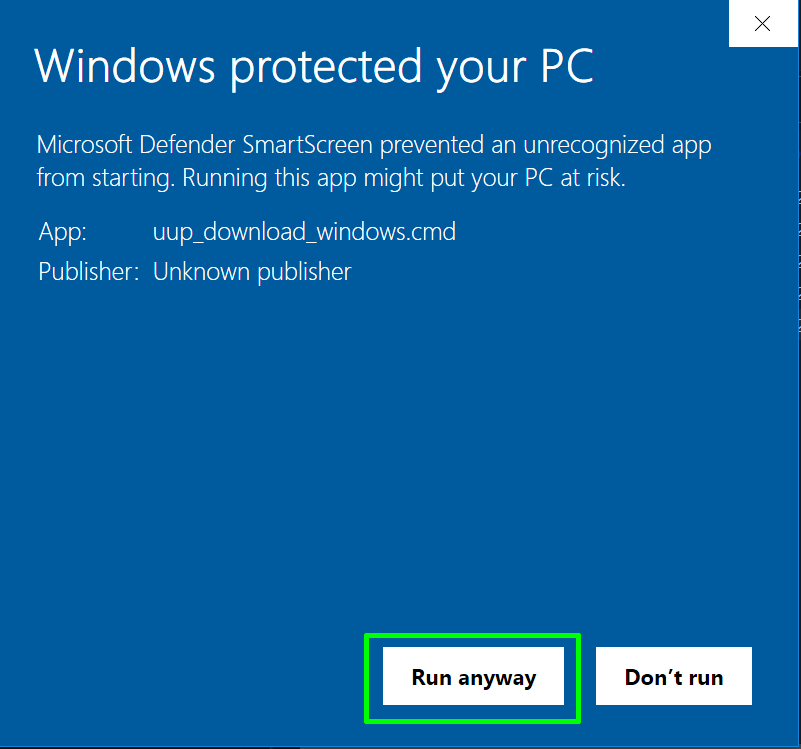
8. Click «Run Anyway,» if Windows warns you that this is an unrecognized app.
9. Click Ok if warned by Windows User Account Control.
A command prompt window will open, running a batch file that downloads all the necessary files from Microsoft and creates the Windows 11 ISO file for you. This process will take several minutes or perhaps longer, depending on your Internet connection.
10. Press 0 to exit when the script finishes downloading the Windows 11 ISO.
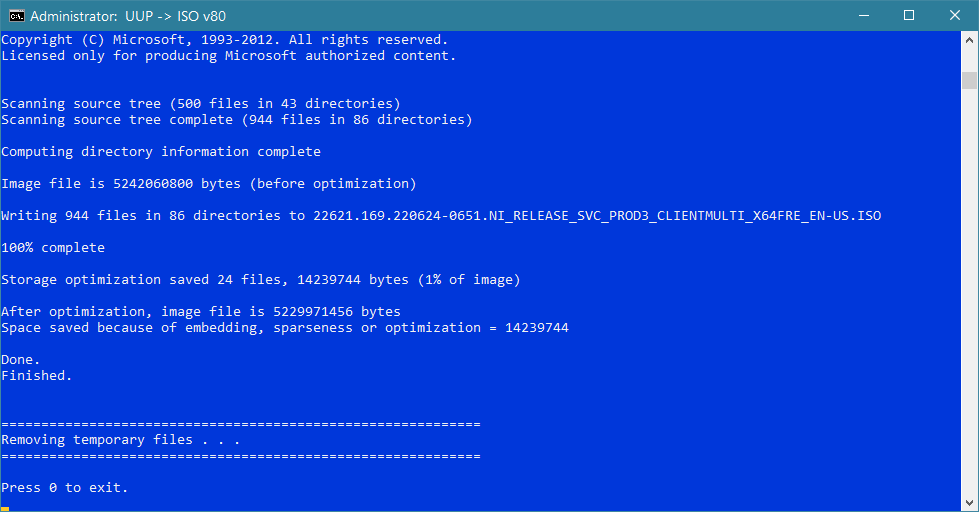
A Windows 11 ISO file will appear in the folder where you placed uup_download_windows.cmd.
Download a Windows 11 ISO That Bypasses TPM
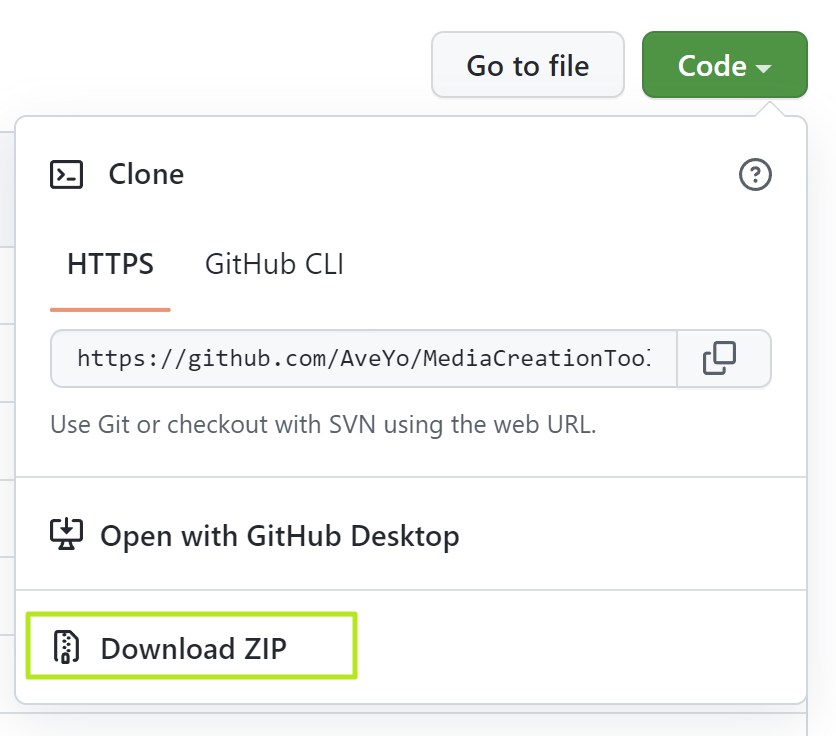
If you’re planning to use Windows 11 on a computer that doesn’t have TPM support or installing Windows 11 in a Virtual Machine, you should use AveYo’s Universal MediaCreationTool which automatically disables the TPM check.
1. Download the MediaCreationTool.zip from MediaCreationTool Github page. You need to select Download Zip under the Code menu.
2. Extract MediaCreationTool.bat from the zip file and run it. If Windows flags the file as dangerous, select «run anyway.»
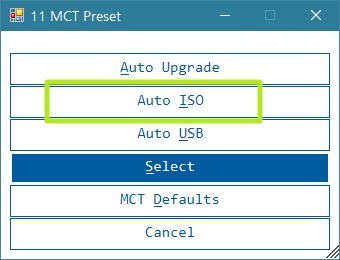
3. Select 11 from the MCT Version menu.
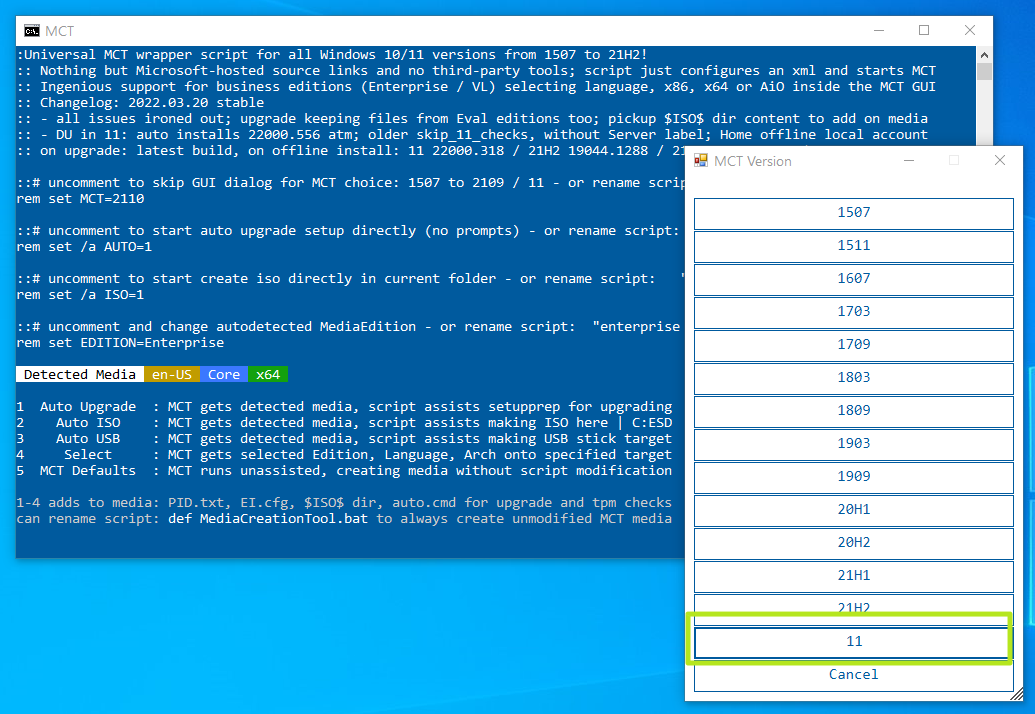
4. Click «Auto ISO.» Clicking Auto USB will write the file directly to USB for you.
5. Click Yes if prompted by Windows to allow CMD to make changes.
The media creation tool will launch and begin downloading.
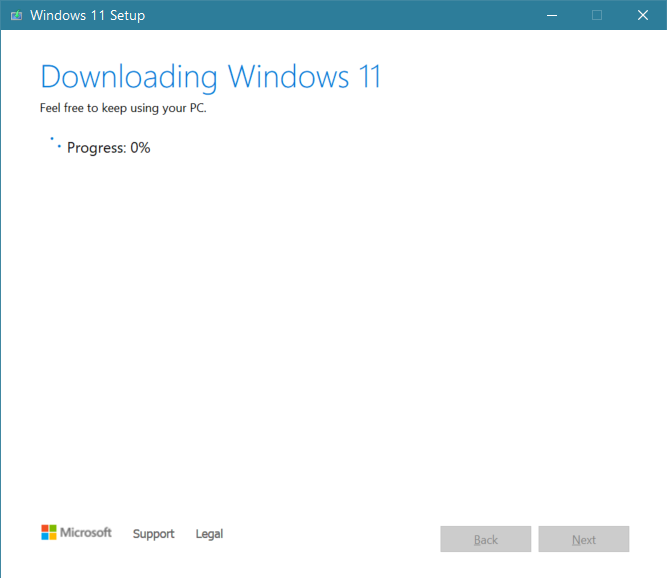
The ISO file it creates will allow you to install Windows 11, even if you don’t have TPM.
Making a Bootable Windows 11 Install Disk
Unless you’re just installing Windows 11 onto a virtual machine, you will need to create a bootable Windows 11 install disk from the data in your Windows 11 ISO file. For that, you’ll need an empty USB Flash drive that’s at least 8GB.
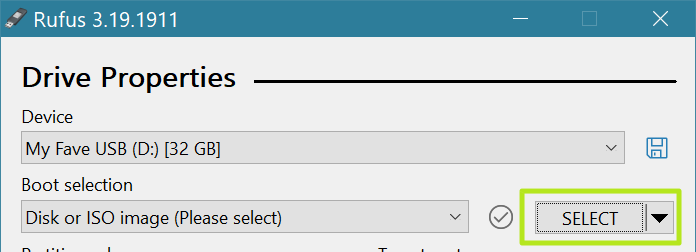
To write or «burn» your ISO file to a USB Flash drive, it’s best to use Rufus, a free, third-party utility that will take care of arranges the partitions properly and making the disk bootable. You can also use Rufus to bypass Windows 11’s TPM and Secure boot requirements if you choose.
1. Connect your USB Flash drive. Please note that you will be erasing all the data on it.
2. Download and launch Rufus (it does not install).
3. Select your USB drive if it’s not already selected by default.
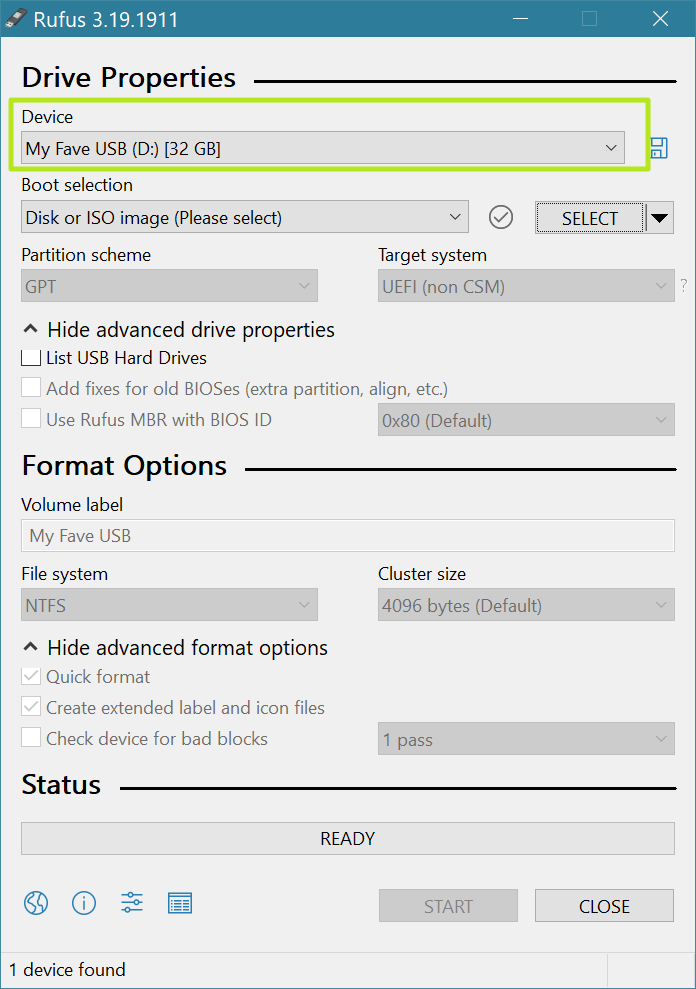
4. Click Select and choose the ISO file from your storage drive.
4. Click Start at the bottom of the window.
5. Create a second partition and format it as NTFS. It should take all the remaining disk space.
6. Check remove requirement for TPM, 4GB and data collection if you want. These are optional, but recommended and you must click Ok.

7. Click Ok if warned that the process will destroy all data on your USB Flash drive.
Rufus will now take a few minutes to drive to your drive. When it is done, you will have a USB Flash drive that can boot to install windows.
Installing Windows 11 on the Target PC
1. Boot your target PC off of the USB installation drive. You may need to hit a key or re-arrange the boot order to boot from USB.
2. Select your language (if it’s not already selected) and click Next.
3. Click Install now.
4. Enter your product key or click «I don’t have a product key» if you don’t have one. You can always enter it later or use Windows 11 as inactivated.

5. Select the Windows edition if given a choice of editions.
6. Accept the license agreement and click Next.
7. Select Custom Install if prompted.
8. Choose the installation drive and click Next.
The installer will copy some files and may reboot at this point.
9. Select your country or region (if it’s not selected) and click Yes. Also, select your keyboard layout when prompted.
10. Name your device and click Next.
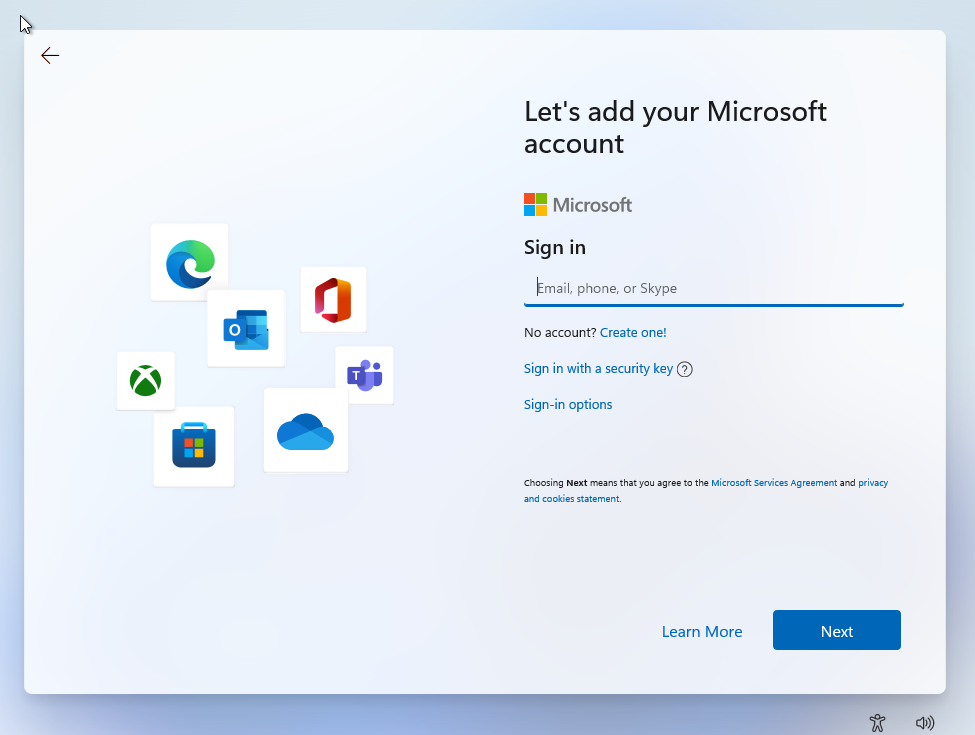
11. Sign in with your Microsoft account.
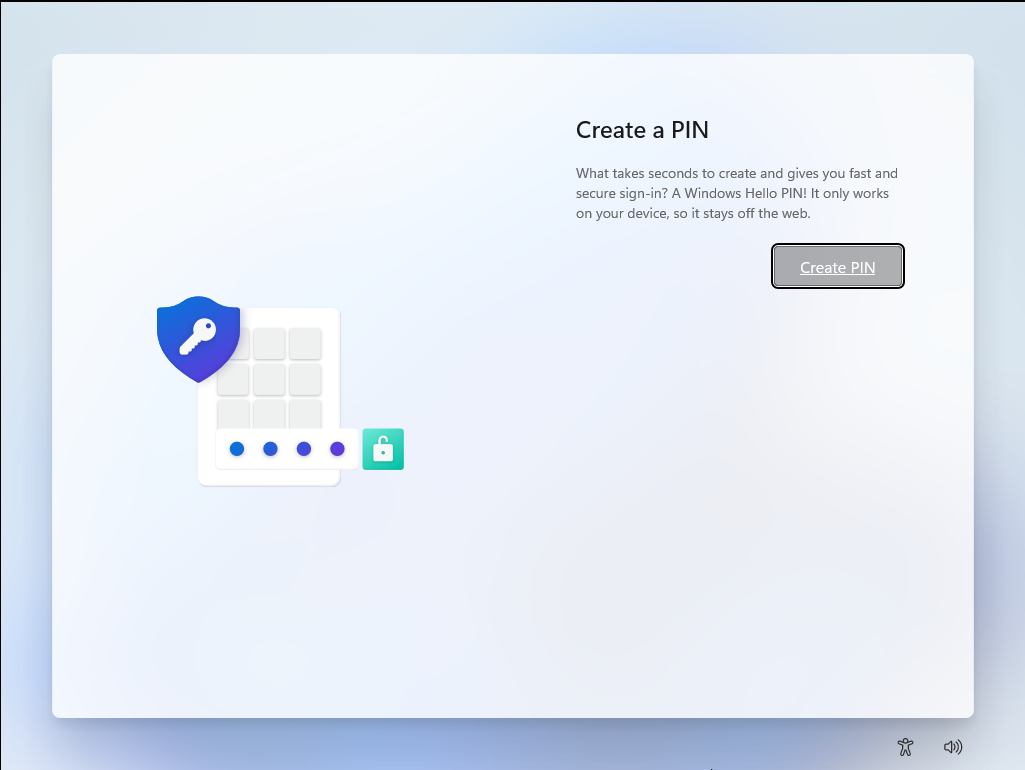
12. Create a PIN for quick logins.
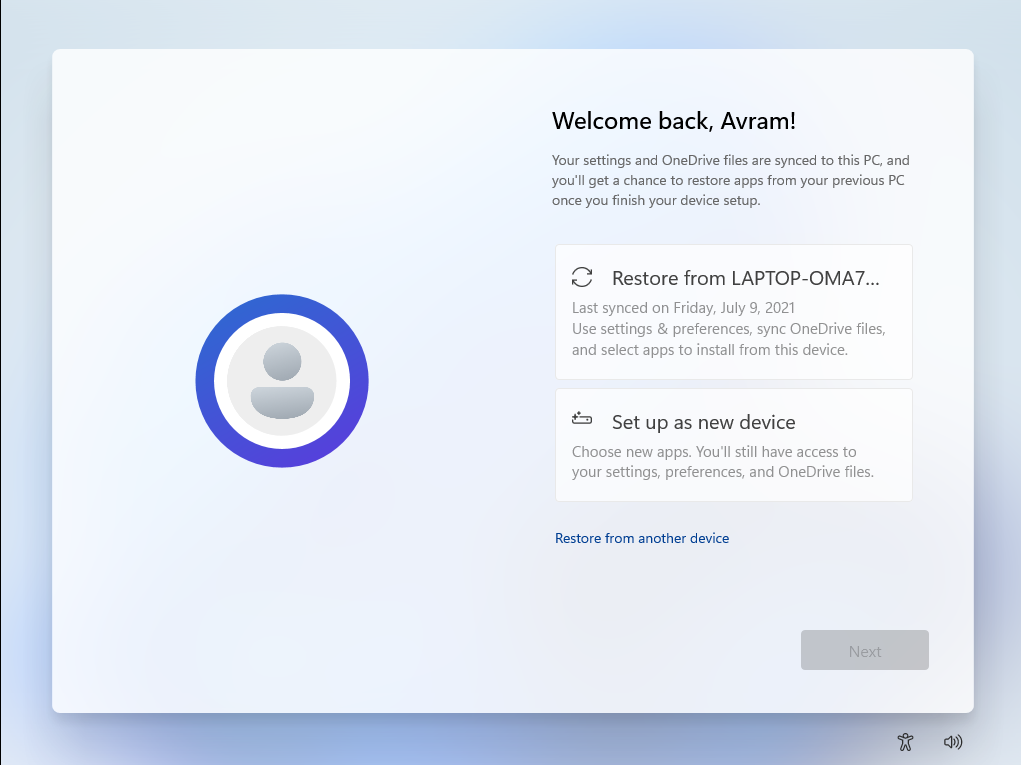
13. Click «Set up as new device» (or you can restore a previous config).
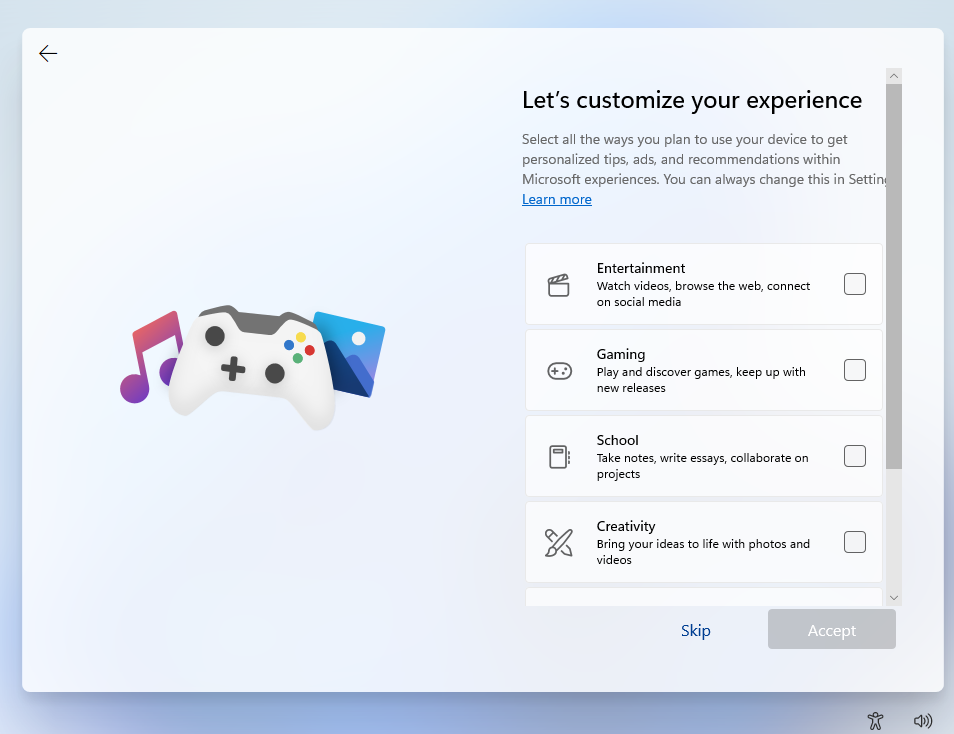
14. Click Skip if asked to customize your user experience. This is not necessary.
15. Click Next on the Microsoft Account and OneDrive screen.
16. Click Skip for Now if Windows tries to get you to sign up for Xbox Game Pass

Windows should now reboot and give you the desktop. Note that this install process may vary based on when you install and what version.
Those of you interested in taking the current Insiders preview edition of Windows 11 for a test drive can easily work with the new operating system via an ISO file. Having such a file gives you the flexibility to install the OS anywhere you like—a dedicated PC, a dual-boot system, or a virtual machine. Now that Microsoft has finally released an ISO file for the Windows 11 Insiders Preview, you can download and store it so it’s readily accessible. Here’s how.
If you run into any trouble trying to install or run Windows 11, be aware that Microsoft’s system requirements have gone up. You now need a TPM chip installed in your computer to run the new operating system, which may or may not require you to dig into your PC’s BIOS to turn on.
Register For Windows Insider Program
Gaining access to the Windows 11 ISO file requires that you be part of Microsoft’s Windows Insider program, so you’ll have to register for this if you haven’t already done so. To join this program, you’ll need to use a Microsoft account. Open the Windows Insider page and sign in with the Microsoft account you wish to use.
At the registration page, check the box to accept the terms of this agreement and click Register now. At the next page, click the Flight now button to learn more about the Insider program.
Download ISO File
Your next step is to download the actual ISO file. Browse to the Windows Insider Preview Downloads page and sign in with the Microsoft account you used for the Insider program. Scroll down to the Select edition section. Click the drop-down menu for Select edition.
Here, you can choose either the Windows 11 Insider Preview (Dev Channel) or the Windows 11 Insider Preview (Beta Channel). The Dev channel contains the latest features and updates for Windows 11 but may be more unstable. The Beta channel contains features and updates that have already been polished by Microsoft and is more stable.
If you plan to use Windows 11 in a test environment, want to get the latest features, and don’t mind a few bugs, the Dev channel is the way to go. Otherwise, the Beta channel may be more appropriate. (You can also download two copies of the ISO file, one for the Dev channel and another for the Beta channel if you wish to try out both in different environments.) Either way, select the channel you want and then click Confirm.
Next, select the product language and then click Confirm. Click the Download button for the build and language you chose and save the file to your PC. Once the file has downloaded, you can then work with the ISO file a few different ways.
PCMag-Recommended Windows 11 Accessories
Option 1: Set Up a Virtual Machine
If you plan to install Windows 11 in a virtual machine, you can use the ISO file directly. I’ve tried two free VM products with Windows 11—VMware Workstation Player and Oracle VM VirtualBox. VMware Workstation accepted the Windows 11 Preview edition with no trouble; Oracle VM VirtualBox had some hiccups, though I was able to get it to work with some tweaking. For that reason, you’ll probably have an easier out-of-box experience using VMware Workstation Player.
When you create your virtual machine, VMware Workstation Player asks for the location and name of your installer disc image file. Browse to and select your downloaded Windows 11 ISO file. Click Next and then follow the steps to set up the VM and install Windows 11.
Option 2: Install the File Directly
If you want to install Windows 11 directly onto your current PC from the ISO file, you first need to mount the file to access the setup command. Open File Explorer in Windows 10 or 8.1, right-click on the Windows 11 ISO file, and select Mount from the pop-up menu.
Sometimes a third-party program disables the built-in Mount command so it doesn’t show up in the menu. In that event, you’ll have to reset your default program to revive the command. In Windows 10, go to Settings > Apps > Default Apps and scroll to the bottom of the page. Click the Set defaults by app link. From the list of apps, click the one for Windows Disc Image Burner and click Manage.
Go back to File Explorer and right-click the ISO file again. The Mount command should now appear in the menu. Running the Mount command opens a virtual drive visible in the File Explorer sidebar, from which you can install the software. That virtual drive contains the setup.exe file.
Double-click that file to install Windows 11. When you’re done, right-click on the virtual drive and select the Eject command. That removes the virtual drive, though your ISO file remains intact. Click the current default app for .iso and change it to Windows Explorer.
Option 3: Burn the ISO File to a Disc or USB Drive
Another option is to burn the ISO file onto a disc to install Windows 11 on any computer. However, the Windows 11 ISO file is more than 5GB in size, which means it won’t fit on a standard DVD. Instead, you’d have to use a double-layer or dual-layer (DL) DVD, which can store 8.5GB of data, as long as your drive supports these types of discs. Another option is to use a Blu-ray disc, if your PC is equipped with a Blu-ray drive.
Recommended by Our Editors
Insert a blank DVD or Blu-ray disc in your PC’s disc drive. Open File Explorer and right-click on the ISO file. From the pop-up menu, select the Burn disc image command. The Windows Disc Image Burner tool pops up and should point to your DVD or Blu-ray drive. Click Burn.
Depending on your installation settings, you can then install your program from the disc automatically by placing it in the drive of a PC or by double-clicking the setup file on the disc as displayed in File Explorer.
An effective way to burn the ISO onto a disc or copy it to a USB is through a free Microsoft tool called Windows USB/DVD Download Tool. This program copies the contents of the ISO file to a disc or USB drive, which then becomes bootable. This method is useful if you wish to install Windows 11 on a clean computer or as part of a dual-boot setup. Microsoft no longer offers this utility on its website, but you can still find it at other sites, such as FileHippo and Major Geeks.
After you download the Windows7-USB-DVD-Download-Tool-Installer.exe file, right-click on it and choose the Run as Administrator option. Once the installation is complete, launch the tool and then browse to and choose the ISO file you wish to burn or copy. Click Next, then choose either USB device or DVD.
If you opt for USB, the next screen asks you to insert the USB media. If you have more than one USB drive plugged into your PC, be sure to choose the correct one. Click Begin copying to copy the file onto the drive.
If the USB drive still contains data, it will be erased. Click Erase USB Drive to make room for the Windows files. After the files have been copied, the tool will tell you that the Bootable USB device was created successfully. You can then use your USB device to install the program.
If you choose a DVD, insert a blank dual-layer/double-layer DVD or a Blu-ray disc into your drive and click Begin burning. The tool will inform you once the DVD has been successfully burned. You can now use your bootable DVD to install the program.
 Microsoft Windows 11 Preview
Like What You’re Reading?
Sign up for Tips & Tricks newsletter for expert advice to get the most out of your technology.
This newsletter may contain advertising, deals, or affiliate links. Subscribing to a newsletter indicates your consent to our Terms of Use and Privacy Policy. You may unsubscribe from the newsletters at any time.
-
Home
-
News
- How to Install Windows 11 Using an ISO File on Your Computer?
By Stella | Follow |
Last Updated
You can install Windows 11 using an ISO file on a supported computer. Here, MiniTool Solution shows you a full guide to help you do this. You can also use the same method to upgrade your computer to the latest Windows 11 version. Let’s begin.
As a new version of Windows, Windows 11 is popular now. Many users want to install Windows 11 on their computers to experience it. There are many ways to get Windows 11. You can directly upgrade to Windows 11 via Windows Update, or perform a Windows 11 in-place upgrade, or install Windows 11 from USB. If you have a Windows 11 ISO file, you can also install Windows 11 using an ISO file. Here, we will mainly talk about how to install Windows 11 using ISO.
How to Install Windows 11 Using an ISO File?
Step 1: Check Whether Your Computer Can Run Windows 11
Windows 11 has new hardware and system requirements. This means that not all computers can get Windows 11 especially the old computers. If you want to install or upgrade to Windows 11 from an ISO file, you need to make sure that your computer support running Windows 11.
An eligible computer for Windows 11 should meet the following requirements:
- A 1GHz or faster with 2 or more cores on a compatible 64-bit processor.
- A minimum of 4GB RAM.
- 64 GB or larger storage device.
- TPM 2.0 enabled.
- DirectX 12 compatible graphics / WDDM 2.x.
- >9” with HD Resolution (720p) display.
Fortunately, you can use the updated PC Health Check app for Windows 11 Compatibility to check whether your device can run Windows 11. With this tool, you don’t need to manually check your computer. You just need to click the Check now button on the software to let it quickly work to make a confirmation.
If the result shows This PC meets Windows 11 requirements, it means that you can install or upgrade to Windows 11 on your device with an ISO file.

Step 2: Download Windows 11 ISO File
Now, you need to download a Windows 11 ISO file.
- If you have joined the Windows Insider Program, you can go to the Windows Insider preview downloads page to get a Windows 11 Insider preview ISO file.
- If you are not a Windows Insider, you can use the Windows 11 Media Creation Tool to create a Windows 11 ISO file.
- You can also download a Windows 11 Arm ISO file and install Windows 11 on your Arm-based computer.
There are two reliable ways to get a Windows 11 ISO file on the internet. Next, you can start a Windows 11 ISO setup.
Step 3: Install Windows 11 Using the ISO File
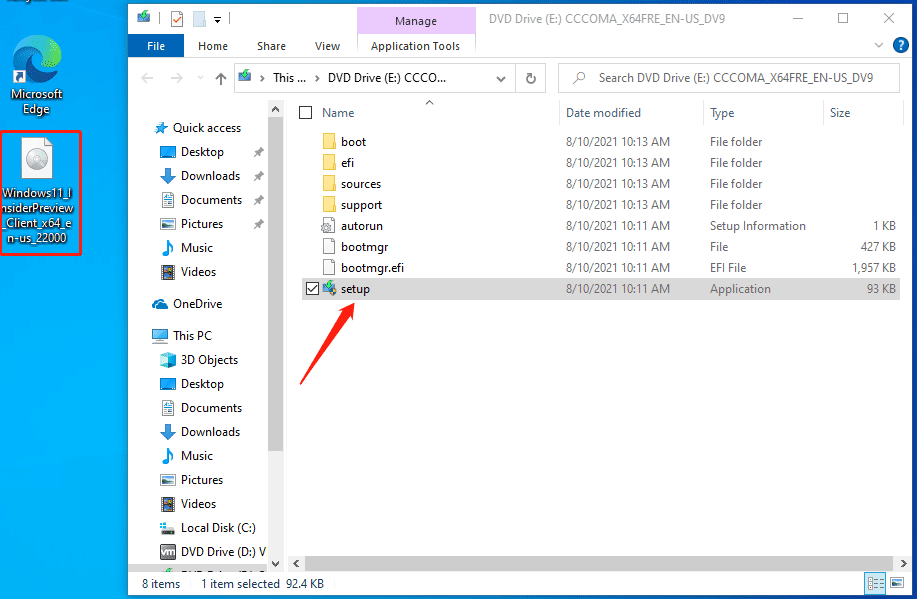
1. Right-click the downloaded Windows 11 ISO file and select Mount. You can also directly double-click it to mount it.
2. Double-click the setup file.
3. Windows 11 setup is preparing. You need to wait patiently until it ends.

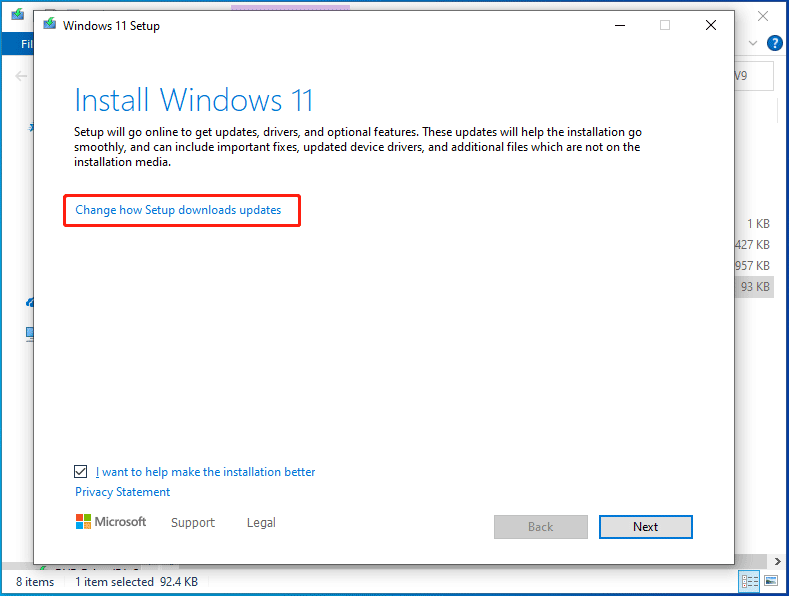
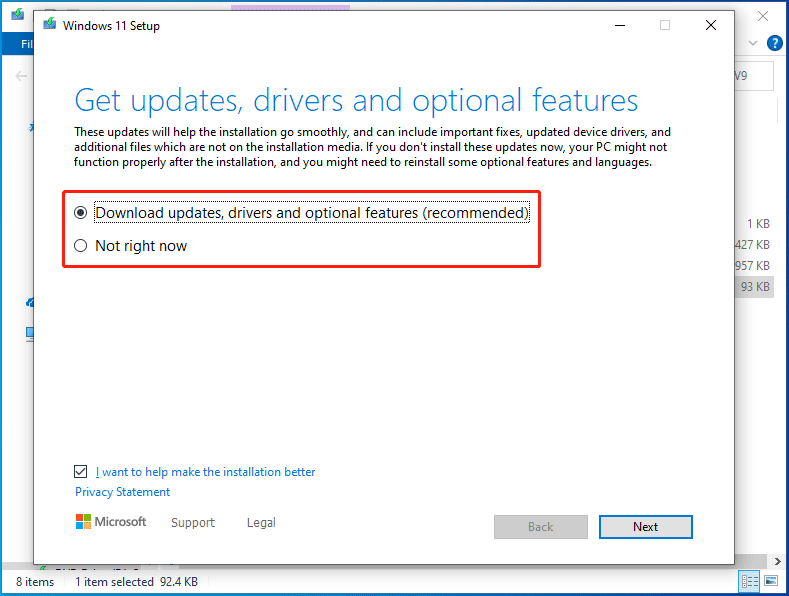
4. By default, this Windows 11 setup will get updates, drivers, and optional features. If you don’t want to do this, you can click Change how Setup downloads updates and select Not right now.
5. Click Next.
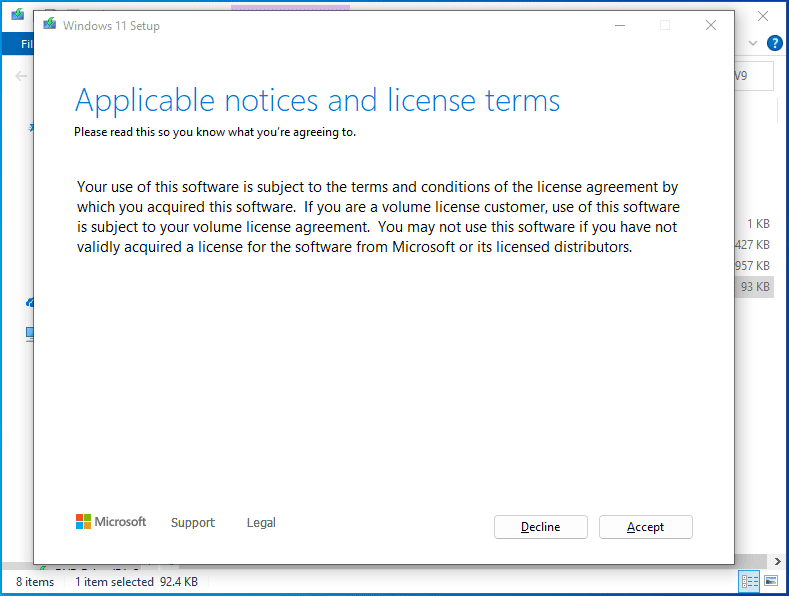
6. Click Accept to accept the applicable notices and license terms.
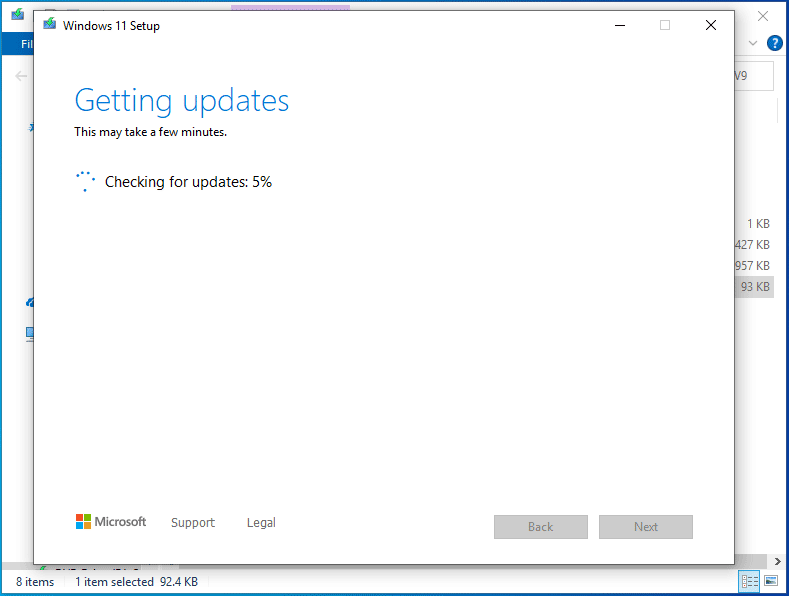
7. Windows 11 setup is checking for updates. When the checking process ends, click Next to continue.
8. By default, the installation keeps personal files and apps on your device.

If you want to make some changes, you can click Change what to keep and select another option. If you decide to choose Nothing, you need to back up your data in advance. Otherwise, you will lose all your files after the installation.

9. Click Next to continue.
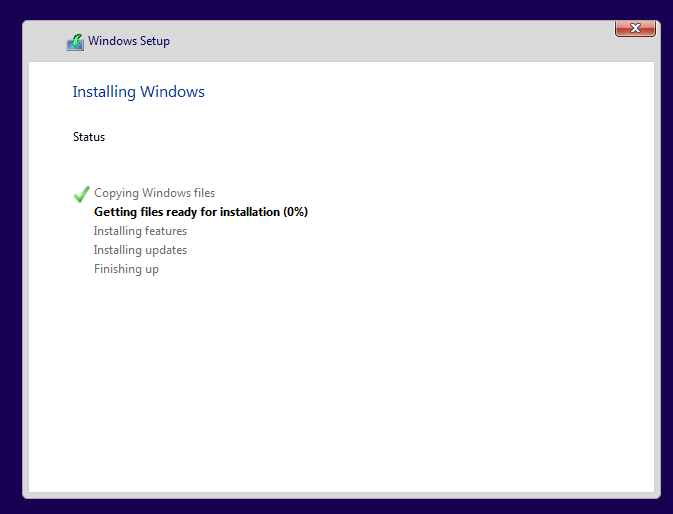
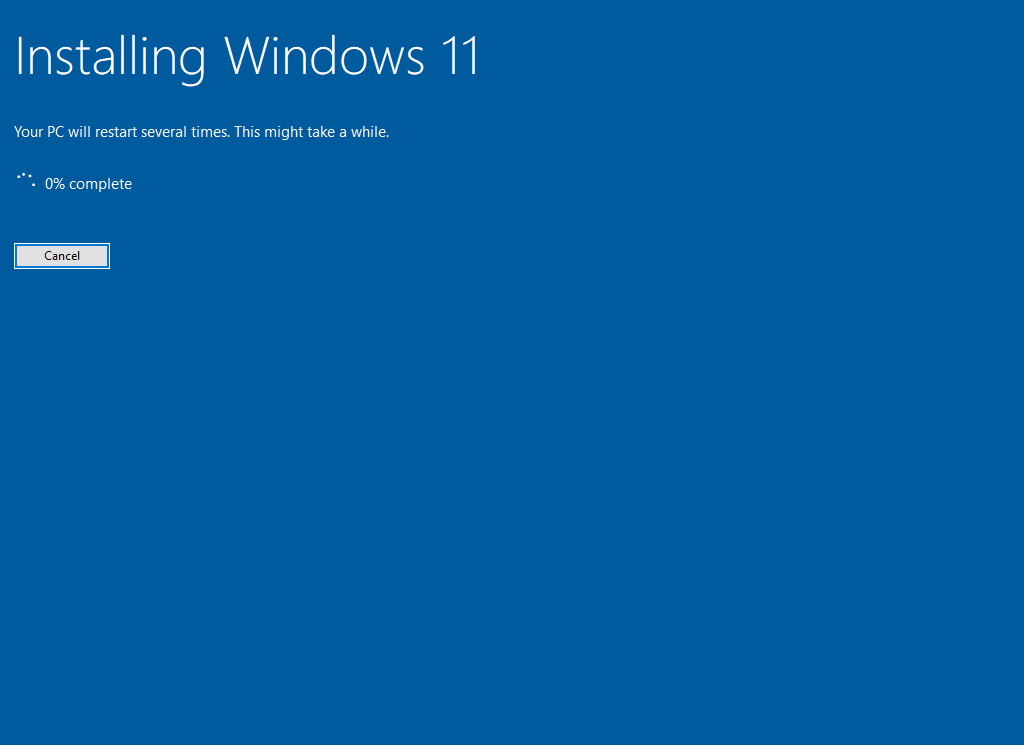
10. Windows 11 installing process starts. This might take some minutes or even hours. Wait patiently.
11. When the installing process, the system begins to get updates. Follow the on-screen instructions to complete the process. Then, you can see the desktop.
- Free Download Rufus 3.19 for Windows 11/10 and Introduction
- Use Rufus to Install Windows 11 22H2 without a Microsoft Account
Wrapping Things up
It is not difficult to install or upgrade to Windows 11 from an ISO file on your computer. The guide in this post can help you understand the risks to do this. To protect your data, you can use MiniTool ShadowMaker, Windows data backup software, to back up your files.
MiniTool ShadowMaker TrialClick to Download100%Clean & Safe
However, if your files get lost unexpectedly, you can use the professional data recovery software, MiniTool Power Data Recovery, to get them back.
MiniTool Power Data Recovery TrialClick to Download100%Clean & Safe
If you are facing some other related issues, you can let us know in the comments.
About The Author

Position: Columnist
Stella has been working in MiniTool Software as an English Editor for more than 7 years. Her articles mainly cover the fields of data recovery including storage media data recovery and phone data recovery, YouTube videos download, partition management, and video conversions.
- To clean install Windows 11, start the PC using a USB bootable flash drive, continue with on-screen directions, skip activation, and select the “Custom” option for a clean installation. Continue choosing the setup drive, click “Next,” and complete the out-of-the-box experience (OOBE).
- Alternatively, you can perform a clean installation of Windows 11 with the Media Creation Tool, Reset this PC feature, WinRE, or ISO file.
UPDATED 6/27/2023: On Windows 11, a clean installation refers to erasing the hard drive and applying a fresh copy of the operating system without custom settings, drivers, apps, or files. Typically, this is the recommended approach to upgrade to the latest version of Windows 11 on compatible hardware to prevent installation issues and fix existing problems.
For instance, if the computer has had the same setup for a long time, a clean install of Windows 11 can help resolve performance issues, problems shutting down, booting up, memory, and apps. Also, this installation method is the best way to upgrade from an older version (such as Windows 7 or 8.1). In addition, you can use this option to delete annoying bloatware preloaded with the default setup.
Microsoft supports multiple ways to clean install Windows 11, including using a USB flash drive to set up the operating system on an SSD (Solid-State Drive). Using the “Reset this PC” feature also possible to quickly wipe out the hard drive and reinstall the system without additional tools. Or, if the device does not start, you can use the Advanced startup options or mount the ISO file to File Explorer to commence a clean install.
In this guide, you will learn six different ways to perform a clean installation of Windows 11 22H2 or version 21H2 on your computer. However, before proceeding with these instructions, do these things before installing.
- Clean install Windows 11 from USB
- Clean install Windows 11 from ISO file
- Clean install Windows 11 using Reset this PC local image
- Clean install Windows 11 using Reset this PC Cloud Download
- Clean install Windows 11 from WinRE
- Clean install Windows 11 using Media Creation Tool
Important: This process will delete everything on your device. It’s recommended to make a full backup of your computer before proceeding. You’ve been warned. Also, these instructions are meant to help you install Windows 11 when it’s officially available, not before.
Using a USB flash drive is the most straightforward method to clean install Windows 11. You can create a bootable media using the Media Creation Tool, Command Prompt, Rufus, or any other third-party tool. (See also this video tutorial with the installation process from USB at the Pureinfotech YouTube channel.)
If you choose this method, you must also ensure the device can start from USB, which means you must change the BIOS or UEFI settings. The only caveat is that since most computers have different settings, you must check your manufacturer support website for more specific details.
To perform a clean install of Windows 11 from USB, use these steps:
-
Start the PC with the Windows 11 USB flash drive.
-
Press any key to continue.
-
Click the Next button.

-
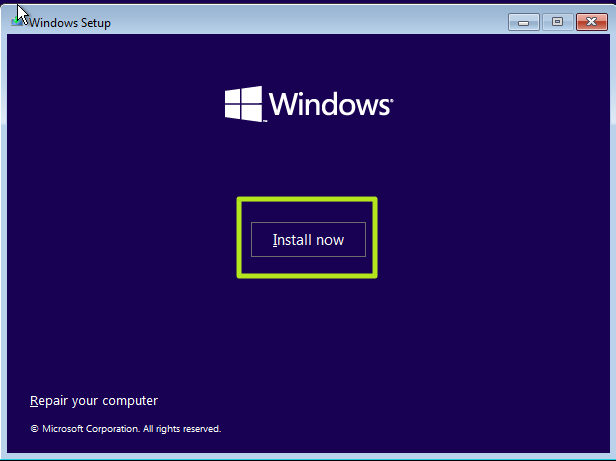
Click the Install now button.

-
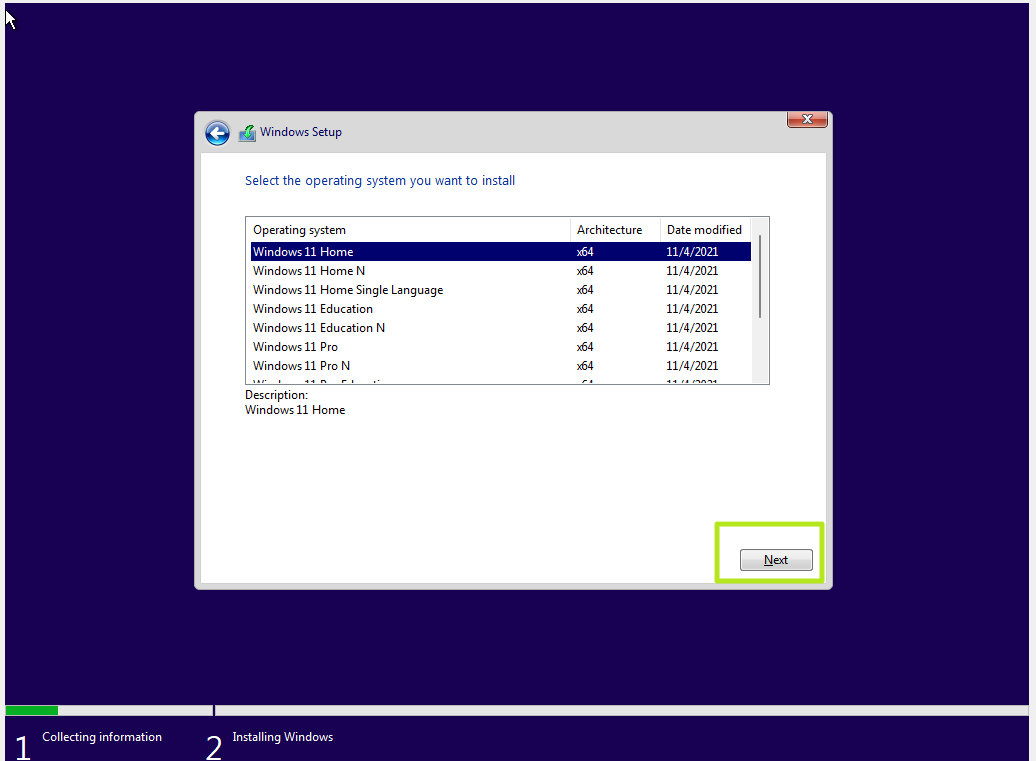
Click the “I don’t have a product key” option if you are doing a reinstallation. If Windows 11 was previously activated after the installation, reactivation would happen automatically.

-
Select the edition of “Windows 11” that your license key activates (if applicable).
-
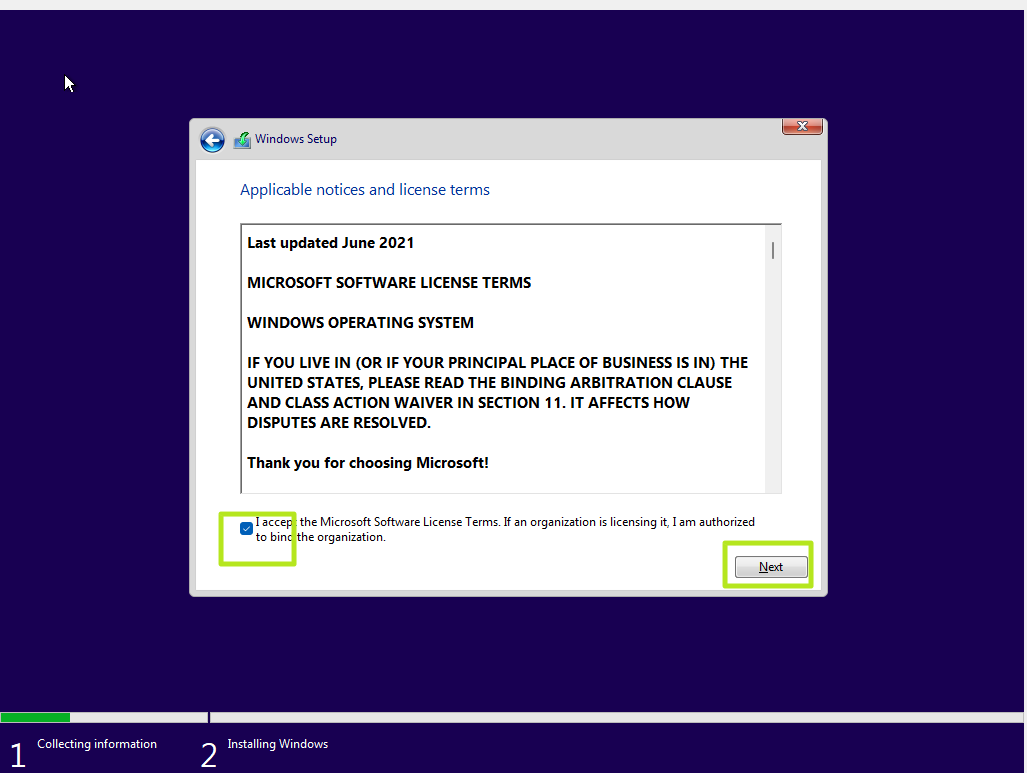
Check the “I accept the license terms” option.
-
Click the Next button.
-
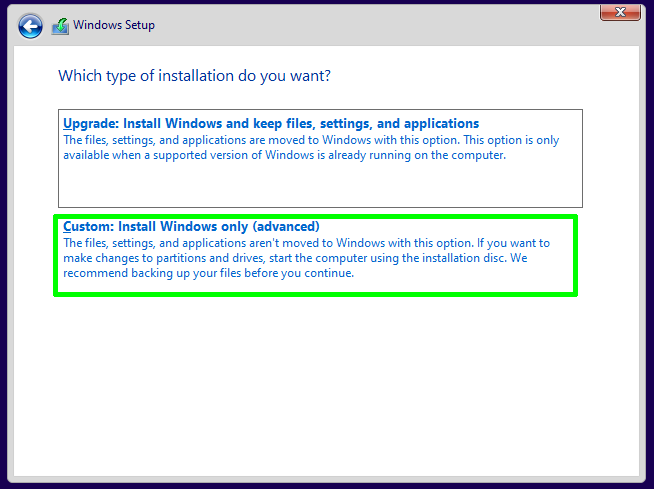
Select the “Custom: Install Windows only (advanced)” option.

-
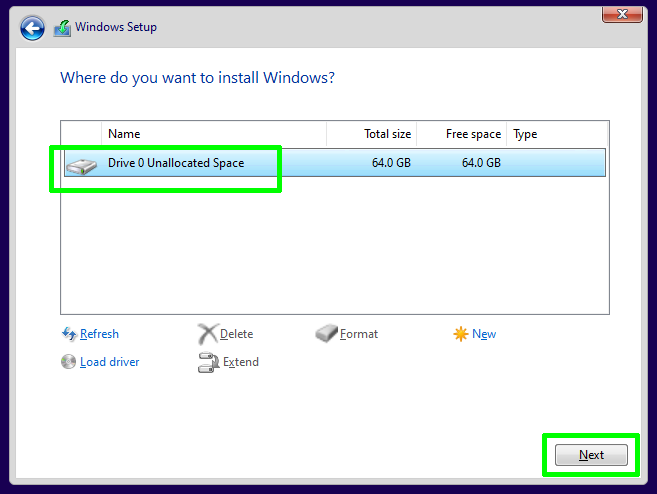
Select each partition in the hard drive you want to install Windows 11 22H2 and click the Delete button. (Typically, the “Drive 0” is the drive that contains all the installation files.)

Warning: When you delete a partition, it also deletes all data on the drive. Also, it is not required to delete the partitions from a secondary hard drive.
-
Select the hard drive (Drive 0 Unallocated Space) to install Windows 11.

-
Click the Next button.
-
Select the hard drive (“Drive 0 Unallocated Space”) to install Windows 11 on your device.
-
Click the Next button.
-
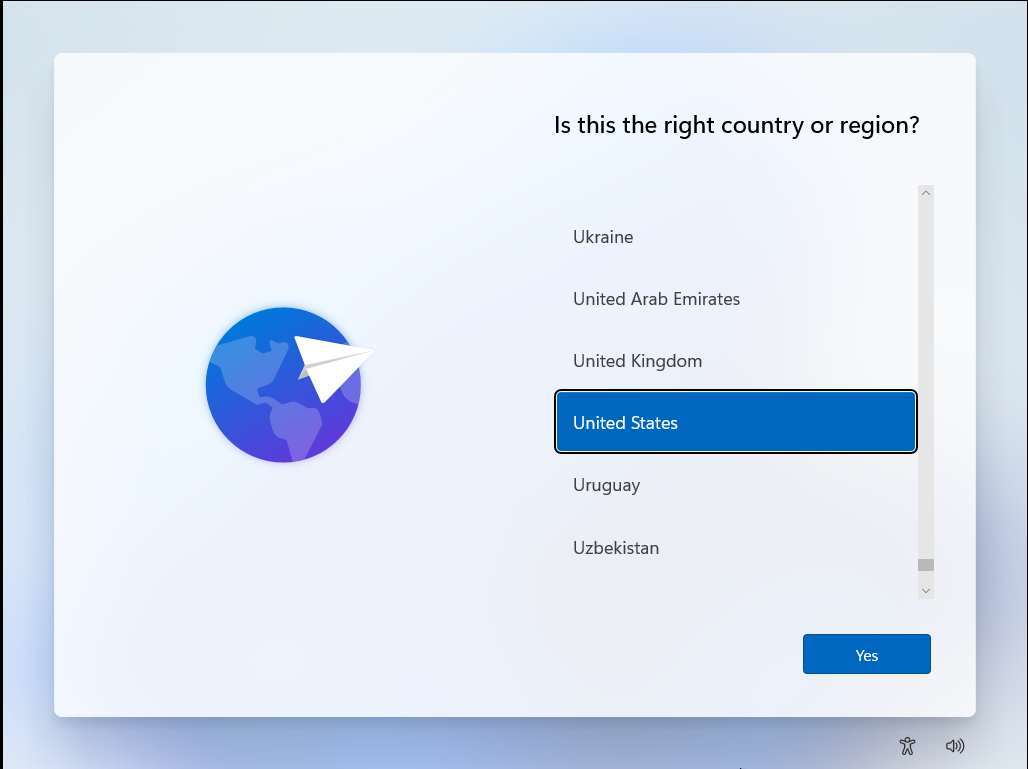
Select your region setting after the installation on the first page of the out-of-the-box experience (OOBE).

-
Click the Yes button.
-
Select your keyboard layout setting.
-
Click the Yes button.
-
Click the Skip button if you do not need to configure a second layout.
-
The computer will automatically connect to the network if it uses an Ethernet connection. If you have a wireless connection, you must set up the connection manually (a security key may be required).
-
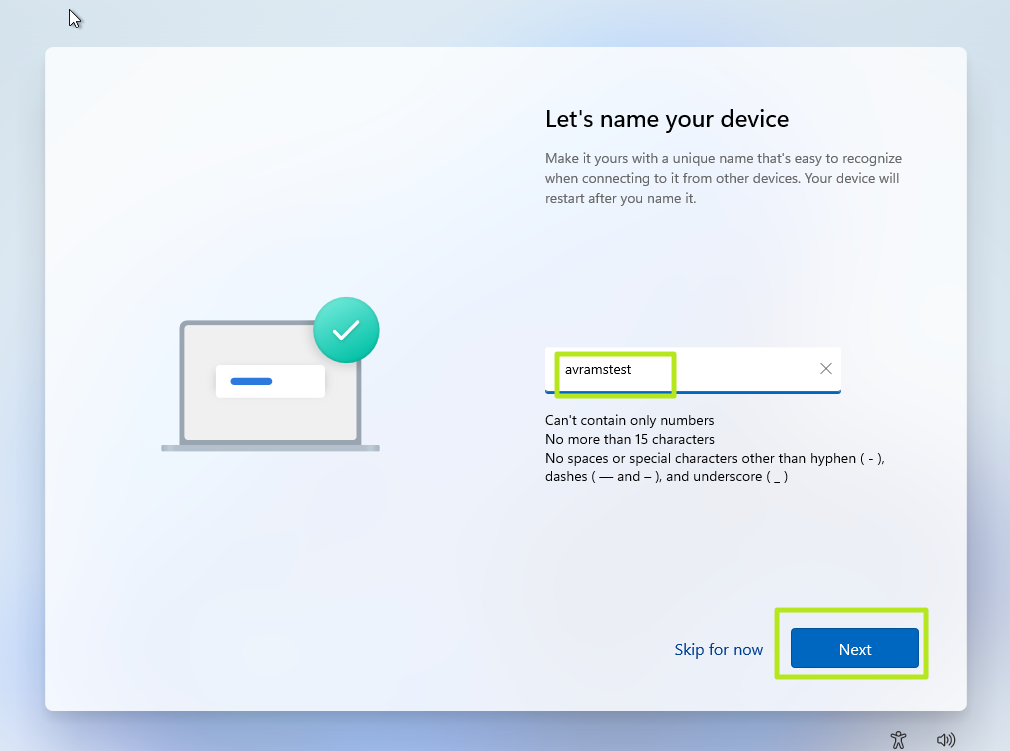
(Optional) Confirm a name for the computer.
-
Click the Next button. (The device will restart automatically.)
-
Select the “Set up for personal use” option if you are configuring Windows 11 Pro. The “Home” edition does not have this option.
-
Click the Next button.
-
Click the Sign in button.
-
Confirm your Microsoft account email, phone number, or Skype identification to create an account.
-
Click the Next button.
-
Confirm your Microsoft account password.
-
Click the Next button.
-
Click on “View more options.”

-
Choose the “Set up a new device” option.
-
Click the Next button.
-
Click the Create PIN button.
-
Create a new four-digit PIN.
-
Click the OK button.
-
Confirm the privacy settings best suit your situation by turning on or off the toggle switch for each setting.
-
Click the Next button.
-
Click the Next button again.
-
Click the Accept button.
-
(Optional) On the “Let’s customize your experience” page, select one or more ways you plan to use the device to allow the setup to suggest tools and service customizations during this experience.
-
Click the Accept button to continue. Or click the Skip button to skip this part of the setup.
-
Click the Skip button for the Android phone link process.
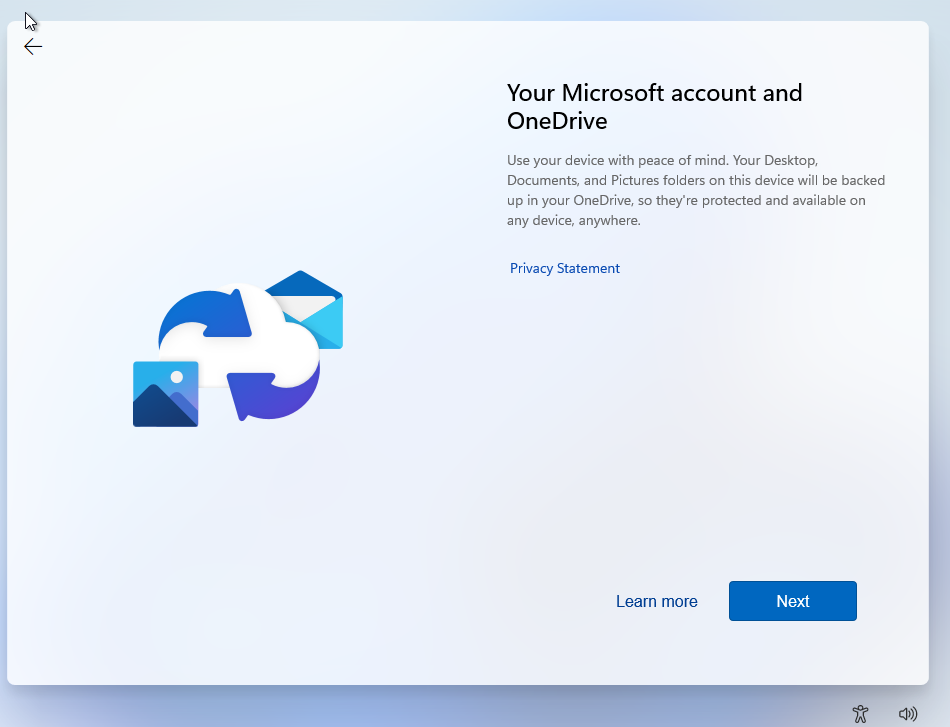
-
Click the “Next” button to automatically upload your Desktop, Pictures, and Documents folders to OneDrive. Or Select the “Only save files to this PC” option.
-
Click the Next button.
-
Click the Decline button to skip the Microsoft 365 setup.
-
Click the “Skip for now” button to skip the Game Pass subscription promotion.


Once you complete the steps, Windows 11 will continue the installation on the computer.
Clean install Windows 11 from ISO file
Alternatively, you can mount the ISO in File Explorer to launch a clean install or in-place upgrade on a device with the operating system already installed.
To clean install Windows 11 with an ISO file, use these steps:
-
Open Microsoft Support website.
-
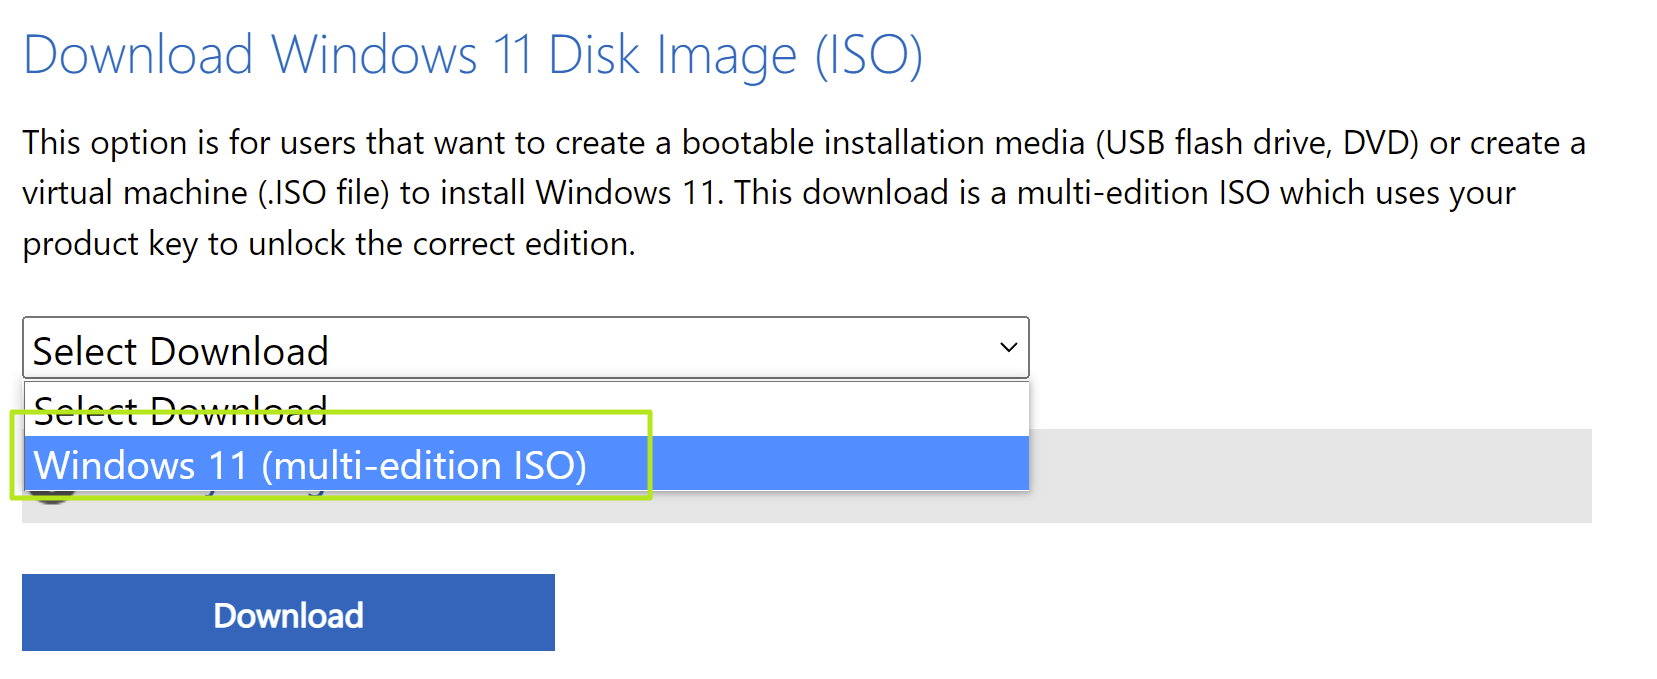
Under the “Download Windows 11 Disk Image (ISO)” section, select the Windows 11 option.
-
Click the Download button.
-
Select the installation language.
-
Click the Confirm button.
-
Click the Download button to save the Windows 11 ISO file on the device.
-
Right-click the ISO file, and select the Mount option.

-
Select the virtual drive from the left navigation pane.
-
Double-click the Setup file to begin the Windows 11 21H2 installation.

-
(Optional) Click the “Change how Windows Setup downloads updates” option.

-
Select the “Not right now” option.
-
Click the Next button.
-
Click the Accept button to agree to the terms.
-
Click the “Change what to keep” option.
-
Select the Nothing option.
-
Click the Next button.
-
Click the Install button.
-
Select the hard drive (“Drive 0 Unallocated Space”) to install Windows 11 on your device.
-
Click the Next button.
-
Select your region setting after the installation on the first page of the out-of-the-box experience (OOBE).
-
Click the Yes button.
-
Select your keyboard layout setting.
-
Click the Yes button.
-
Click the Skip button if you do not need to configure a second layout.
-
The computer will automatically connect to the network if it uses an Ethernet connection. If you have a wireless connection, you must set up the connection manually (a security key may be required).
-
(Optional) Confirm a name for the computer.
-
Click the Next button. (The device will restart automatically.)
-
Select the “Set up for personal use” option if you are configuring Windows 11 Pro. The “Home” edition does not have this option.
-
Click the Next button.
-
Click the Sign in button.
-
Confirm your Microsoft account email, phone number, or Skype identification to create an account.
-
Click the Next button.
-
Confirm your Microsoft account password.
-
Click the Next button.
-
Click on “View more options.”
-
Choose the “Set up a new device” option.
-
Click the Next button.
-
Click the Create PIN button.
-
Create a new four-digit PIN.
-
Click the OK button.
-
Confirm the privacy settings best suit your situation by turning on or off the toggle switch for each setting.
-
Click the Next button.
-
Click the Next button again.
-
Click the Accept button.
-
(Optional) On the “Let’s customize your experience” page, select one or more ways you plan to use the device to allow the setup to suggest tools and service customizations during this experience.
-
Click the Accept button to continue. Or click the Skip button to skip this part of the setup.
-
Click the Skip button for the Android phone link process.
-
Click the “Next” button to automatically upload your Desktop, Pictures, and Documents folders to OneDrive. Or Select the “Only save files to this PC” option.
-
Click the Next button.
-
Click the Decline button to skip the Microsoft 365 setup.
-
Click the “Skip for now” button to skip the Game Pass subscription promotion.


Once you complete the steps, the clean installation process will begin, similar to using the Media Creation Tools or USB flash drive to upgrade the system.
Clean install Windows 11 using Reset this PC local image
The recovery settings offer another method to start fresh with a clean copy of Windows 11. Unlike the Media Creation Tool, bootable flash drive, and ISO file options, you can only use this method to reinstall Windows 11 on a computer already running the same operating system.
If you plan to upgrade a computer running Windows 10, Windows 8.1, or Windows 7, you will have to use one of the previous alternative methods.
To clean install Windows 11 with the local recovery image, use these steps:
-
Open Settings on Windows 11.
-
Click on System.
-
Click on Recovery on the right side.

-
Under the “Recovery options” section, click the Reset PC button in the “Reset this PC” setting.
-
Click the Remove everything option to perform a fresh install of Windows 11.

-
Click the Local reinstall option.
-
(Optional) Click the Change settings option.
-
Configure the reinstallation options:
- Clean data: If this option is set to No (recommended), then the setup will only delete files, apps, and settings quickly. If the option is set to Yes, the setup will securely clean the drive before installing the operating system, but it will take longer.
- Delete files from all drives: Only the installation drive will be erased if the option is set to No (recommended). Otherwise, if this option is set to Yes, all the drives on the device will be deleted.
- Download Windows: If this option is set to No (recommended), the local image will be used for installation. The “Cloud download” option will be activated if the option is set to Yes.
-
Click the Confirm button.
-
Click the Next button.
-
Click the Reset button.
-
Select the hard drive (“Drive 0 Unallocated Space”) to install Windows 11 on your device.
-
Click the Next button.
-
Select your region setting after the installation on the first page of the out-of-the-box experience (OOBE).
-
Click the Yes button.
-
Select your keyboard layout setting.
-
Click the Yes button.
-
Click the Skip button if you do not need to configure a second layout.
-
The computer will automatically connect to the network if it uses an Ethernet connection. If you have a wireless connection, you must set up the connection manually (a security key may be required).
-
(Optional) Confirm a name for the computer.
-
Click the Next button. (The device will restart automatically.)
-
Select the “Set up for personal use” option if you are configuring Windows 11 Pro. The “Home” edition does not have this option.
-
Click the Next button.
-
Click the Sign in button.
-
Confirm your Microsoft account email, phone number, or Skype identification to create an account.
-
Click the Next button.
-
Confirm your Microsoft account password.
-
Click the Next button.
-
Click on “View more options.”
-
Choose the “Set up a new device” option.
-
Click the Next button.
-
Click the Create PIN button.
-
Create a new four-digit PIN.
-
Click the OK button.
-
Confirm the privacy settings best suit your situation by turning on or off the toggle switch for each setting.
-
Click the Next button.
-
Click the Next button again.
-
Click the Accept button.
-
(Optional) On the “Let’s customize your experience” page, select one or more ways you plan to use the device to allow the setup to suggest tools and service customizations during this experience.
-
Click the Accept button to continue. Or click the Skip button to skip this part of the setup.
-
Click the Skip button for the Android phone link process.
-
Click the “Next” button to automatically upload your Desktop, Pictures, and Documents folders to OneDrive. Or Select the “Only save files to this PC” option.
-
Click the Next button.
-
Click the Decline button to skip the Microsoft 365 setup.
-
Click the “Skip for now” button to skip the Game Pass subscription promotion.


Once you complete the steps, the recovery feature will continue with the reinstallation using the locally available image of Windows 11. This process will restore the original settings if you have a computer from HP, Dell, Acer, or another brand. This means the manufacturer included factory settings, drivers, applications, and tools in the custom image.
If you don’t want to reinstall the custom manufacturer image, use the “Cloud Download” option (see steps below).
Clean install Windows 11 using Reset this PC Cloud download
The Reset this PC feature also includes the “Cloud Download” option, which allows you to reset a computer with a clean installation, removing apps, files, and settings similar to the local image option. The only difference is that the feature will download the installation files from the Microsoft server.
The option is available to reinstall Windows 11 when the local image is not working or you do not want to use the same installation settings provided by the manufacturer. If you select the “Cloud download” option, the feature will download the same version already installed on the computer, which means you cannot use this method to upgrade to a newer version. Also, if the device used a custom image from the manufacturer, the new installation won’t include the custom settings, drivers, or tools.
To reinstall Windows 11 with the “Cloud Download” option, use these steps:
-
Open Settings.
-
Click on System.
-
Click on Recovery on the right side.
-
Under the “Recovery options” section, click the Reset PC button in the “Reset this PC” setting.
-
Click the Remove everything option to perform a fresh install of Windows 11.
-
Click the Cloud reinstall option.
-
(Optional) Click the Change settings option.
-
Configure the reinstallation options:
- Clean data: If this option is set to No (recommended), then the setup will only delete files, apps, and settings quickly. If the option is set to Yes, the setup will securely clean the drive before installing the operating system, but it will take longer.
- Delete files from all drives: Only the installation drive will be erased if the option is No (recommended). Otherwise, if this option is set to Yes, all the drives on the device will be deleted.
- Download Windows: If this option is set to Yes (recommended), the “Cloud download” option will be used for installation. If the option is set to No, the local image option will be used for the installation.
-
Click the Confirm button.
-
Click the Next button.
-
Click the Reset button.
-
Select the hard drive (“Drive 0 Unallocated Space”) to install Windows 11 on your device.
-
Click the Next button.
-
Select your region setting after the installation on the first page of the out-of-the-box experience (OOBE).
-
Click the Yes button.
-
Select your keyboard layout setting.
-
Click the Yes button.
-
Click the Skip button if you do not need to configure a second layout.
-
The computer will automatically connect to the network if it uses an Ethernet connection. If you have a wireless connection, you must set up the connection manually (a security key may be required).
-
(Optional) Confirm a name for the computer.
-
Click the Next button. (The device will restart automatically.)
-
Select the “Set up for personal use” option if you are configuring Windows 11 Pro. The “Home” edition does not have this option.
-
Click the Next button.
-
Click the Sign in button.
-
Confirm your Microsoft account email, phone number, or Skype identification to create an account.
-
Click the Next button.
-
Confirm your Microsoft account password.
-
Click the Next button.
-
Click on “View more options.”
-
Choose the “Set up a new device” option.
-
Click the Next button.
-
Click the Create PIN button.
-
Create a new four-digit PIN.
-
Click the OK button.
-
Confirm the privacy settings best suit your situation by turning on or off the toggle switch for each setting.
-
Click the Next button.
-
Click the Next button again.
-
Click the Accept button.
-
(Optional) On the “Let’s customize your experience” page, select one or more ways you plan to use the device to allow the setup to suggest tools and service customizations during this experience.
-
Click the Accept button to continue. Or click the Skip button to skip this part of the setup.
-
Click the Skip button for the Android phone link process.
-
Click the “Next” button to automatically upload your Desktop, Pictures, and Documents folders to OneDrive. Or Select the “Only save files to this PC” option.
-
Click the Next button.
-
Click the Decline button to skip the Microsoft 365 setup.
-
Click the “Skip for now” button to skip the Game Pass subscription promotion.


After you complete the steps, the feature will reset the computer by erasing and reinstalling a fresh copy of Windows 11 downloaded from the cloud.
Clean install Windows 11 from WinRE
If the computer does not boot, the Windows Recovery Environment (WinRE or Windows RE) includes the same options with the “Reset this PC” feature.
You can only use this option to reinstall the same version of the OS already installed on the computer. If you want to upgrade to the latest version, use the USB flash drive, Media Creation Tool, or ISO file options.
To clean install Windows 11 from WinRE, use these steps:
-
Start device.
-
Immediately after the Power-On Self-Test (POST), press the Power button again to shut down.
-
Repeat steps 1 and 2 twice, and in the third restart, the operating system should enter the Windows Recovery Environment (Windows RE).
Quick note: Windows 11 has multiple ways to open the Advanced startup settings. You can use these other options if you cannot access the recovery environment.
-
Click the Advanced options button.

-
Click on Troubleshoot.

-
Click on Reset this PC option.

-
Select the Remove everything option.

-
Click the Cloud download or Local reinstall option. Cloud download: Downloads a fresh image from the Microsoft servers and performs a fresh installation. Local reinstall: Uses the locally available image to install a clean copy of Windows 11.

-
Select the “Only the drive where Windows is installed” option. (The All drives option will delete the data on all drives. This option is usually recommended only when you have to decommission the device.)

-
Select the “Just remove my files” or “Full clean the drive” option.
- Just remove my files: Deletes the drive contents quickly.
- Full clean the drive: It also deletes everything on the drive but performs a secure erase that takes several hours—this option is suited when preparing to give away the device.

-
Click the Reset button.

-
Select the hard drive (“Drive 0 Unallocated Space”) to install Windows 11 on your device.
-
Click the Next button.
-
Select your region setting after the installation on the first page of the out-of-the-box experience (OOBE).
-
Click the Yes button.
-
Select your keyboard layout setting.
-
Click the Yes button.
-
Click the Skip button if you do not need to configure a second layout.
-
The computer will automatically connect to the network if it uses an Ethernet connection. If you have a wireless connection, you must set up the connection manually (a security key may be required).
-
(Optional) Confirm a name for the computer.
-
Click the Next button. (The device will restart automatically.)
-
Select the “Set up for personal use” option if you are configuring Windows 11 Pro. The “Home” edition does not have this option.
-
Click the Next button.
-
Click the Sign in button.
-
Confirm your Microsoft account email, phone number, or Skype identification to create an account.
-
Click the Next button.
-
Confirm your Microsoft account password.
-
Click the Next button.
-
Click on “View more options.”
-
Choose the “Set up a new device” option.
-
Click the Next button.
-
Click the Create PIN button.
-
Create a new four-digit PIN.
-
Click the OK button.
-
Confirm the privacy settings best suit your situation by turning on or off the toggle switch for each setting.
-
Click the Next button.
-
Click the Next button again.
-
Click the Accept button.
-
(Optional) On the “Let’s customize your experience” page, select one or more ways you plan to use the device to allow the setup to suggest tools and service customizations during this experience.
-
Click the Accept button to continue. Or click the Skip button to skip this part of the setup.
-
Click the Skip button for the Android phone link process.
-
Click the “Next” button to automatically upload your Desktop, Pictures, and Documents folders to OneDrive. Or Select the “Only save files to this PC” option.
-
Click the Next button.
-
Click the Decline button to skip the Microsoft 365 setup.
-
Click the “Skip for now” button to skip the Game Pass subscription promotion.


Once you complete the steps, Windows 11 will reinstall, resolving the existing problems. The completion time will depend on your computer hardware configuration and the selected reset configuration.
Clean install Windows 11 using Media Creation Tool
Starting with Windows 11, the Media Creation Tool no longer includes an option to perform a clean installation or in-place upgrade. You can only use the tool to create a bootable media to perform an installation using a USB flash drive or ISO file.
If you want to proceed with the Media Creation Tool, you can use it to create an installation media, and then you can launch the setup from the USB flash drive.
To use the Media Creation Tool to create a bootable USB install media and proceed with the setup, use these steps:
-
Open Microsoft support website.
-
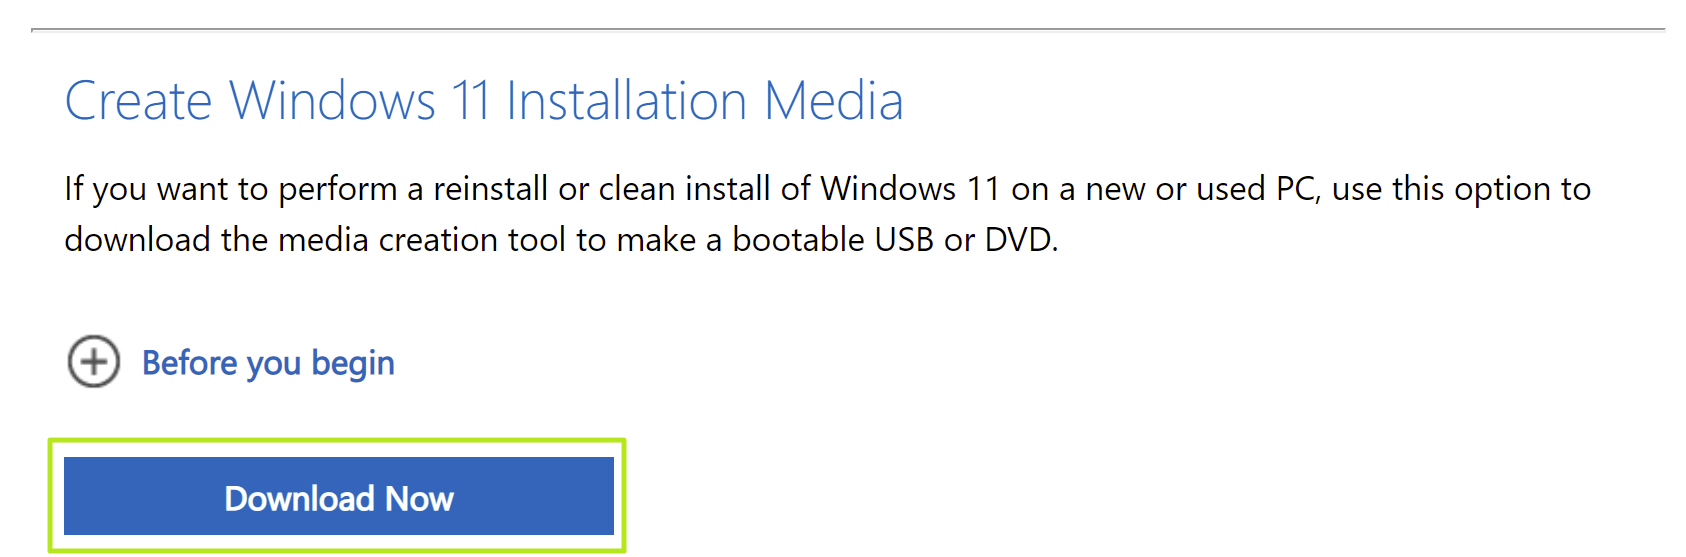
Under the “Create Windows 11 installation media” section, click the Download Now button.
-
Double-click the MediaCrationToolW11.exe file to launch the tool.
-
Click the Accept button.
-
Click the Next button.
Quick note: If you create a Windows 11 USB for another device, you can also clear the “Use the recommended options for this PC” option to select the correct language, architecture, and edition.
-
Select the USB flash drive option.
-
Click the Next button.
-
Select the USB flash drive from the list, but ensure it has no important files, as this process will erase everything on it.
-
Click the Next button.
-
Click the Finish button.
-
Open the installation media with File Explorer.
-
Double-click the Setup file to begin the Windows 11 installation.
-
(Optional) Click the “Change how Windows Setup downloads updates” option.
-
Select the “Not right now” option.
-
Click the Next button.
-
Click the Accept button to agree to the terms.
-
Click the “Change what to keep” option.
-
Select the Nothing option.
-
Click the Next button.
-
Click the Install button.
-
Select the hard drive (“Drive 0 Unallocated Space”) to install Windows 11 on your device.
-
Click the Next button.
-
Select your region setting after the installation on the first page of the out-of-the-box experience (OOBE).
-
Click the Yes button.
-
Select your keyboard layout setting.
-
Click the Yes button.
-
Click the Skip button if you do not need to configure a second layout.
-
The computer will automatically connect to the network if it uses an Ethernet connection. If you have a wireless connection, you must set up the connection manually (a security key may be required).
-
(Optional) Confirm a name for the computer.
-
Click the Next button. (The device will restart automatically.)
-
Select the “Set up for personal use” option if you are configuring Windows 11 Pro. The “Home” edition does not have this option.
-
Click the Next button.
-
Click the Sign in button.
-
Confirm your Microsoft account email, phone number, or Skype identification to create an account.
-
Click the Next button.
-
Confirm your Microsoft account password.
-
Click the Next button.
-
Click on “View more options.”
-
Choose the “Set up a new device” option.
-
Click the Next button.
-
Click the Create PIN button.
-
Create a new four-digit PIN.
-
Click the OK button.
-
Confirm the privacy settings best suit your situation by turning on or off the toggle switch for each setting.
-
Click the Next button.
-
Click the Next button again.
-
Click the Accept button.
-
(Optional) On the “Let’s customize your experience” page, select one or more ways you plan to use the device to allow the setup to suggest tools and service customizations during this experience.
-
Click the Accept button to continue. Or click the Skip button to skip this part of the setup.
-
Click the Skip button for the Android phone link process.
-
Click the “Next” button to automatically upload your Desktop, Pictures, and Documents folders to OneDrive. Or Select the “Only save files to this PC” option.
-
Click the Next button.
-
Click the Decline button to skip the Microsoft 365 setup.
-
Click the “Skip for now” button to skip the Game Pass subscription promotion.


After you complete the steps, the setup will continue with the fresh installation of Windows 11.
Microsoft has officially released Windows 11, a new era for computers, as they claim. You can clean install Windows 11 or upgrade from Windows 10.
You can install Windows 11 on your computer in many ways. However, there are certain prerequisites that must be met before Windows 11 can be successfully installed. The system hardware should meet certain minimum requirements before Windows 11 can be installed on your device.
See if your PC meets Windows 11 minimum system requirements
The following guide details the steps required to install Windows 11 on your PC step-by-step.
Windows 11
Windows 11, another iteration of the Windows operating system, was released in October 2021. It promises to make our computing lives easier and more efficient than Windows 10 or earlier operating systems. Windows 11 has a new modern user interface, redesigned start menu, and taskbar.
One of the most impressive enhanced features of Windows 11 is its multiple desktop features, which enable the user to use multiple workspaces for different purposes. For example, I have different desktops for work, home, entertainment, and research.
Windows 11 offers improved performance over Windows 11 in terms of speedy browsing, quicker startup times, and faster logins. Windows 11 also offers Snap Layouts that can be utilized for maximum productivity and multitasking. Windows 11 also includes a direct storage feature, which improves game load times. It also supports Android apps.
Although Windows 11 is much more secure than Windows 10, it has some annoying limitations that make it not recommended for older hardware (Intel 8th generation or earlier). Added security comes from the TPM and secure boot hardware requirements.
There is a slight learning curve when you upgrade from Windows 8 or even Windows 10. But once you get familiar with the interface, everything becomes much easier.
The only thing I miss is the legacy control panel. The legacy control panel is disappearing, and the new Windows Settings menu takes its place.
If you are using Windows 10, you can upgrade to Windows 11 for free. Just make sure your hardware meets Windows 11 system requirements. You can also run Windows 11 bypassing the hardware limitations.
You can download ISO files to create bootable media, such as USBs and DVDs, to perform fresh and clean installations. Here is a step-by-step guide that shows how to download and install Windows 11.
You can also download and install Windows 10 ISO files.
On this page
Download Windows 11 ISO
| Version | Platform | Download |
|---|---|---|
| Windows 11 22H2 (Review) | 64-bit | Download ISO Download Torrent (magnet link) |
| Windows 11 21H2 (Review) | 64-bit | Download ISO Download Torrent (magnet link) |
Learn how to open magnet links using your browser.
These ISO files include the following editions of Windows 11:
- Windows 11 Home
- Windows 11 Home N
- Windows 11 Home Single Language
- Windows 11 Education
- Windows 11 Education N
- Windows 11 Pro
- Windows 11 Pro Education
You will have the option to select the edition during the installation phase.
Download Windows 11 ISO directly from Microsoft
You can also download Windows 11 ISO files directly from Microsoft’s website, with even more language options.
Here is how you can download Windows 11 ISO from Microsoft.
Note: This method will automatically download the latest version of Windows 11 available at this time.
-
Open Microsoft’s Windows 11 download page in any web browser.
-
Scroll down to the page and select “Windows 11 (multi-edition ISO)” from the drop-down menu under Download Windows 11 Disk Image (ISO) and then click Download.
 1")
Select ISO to download -
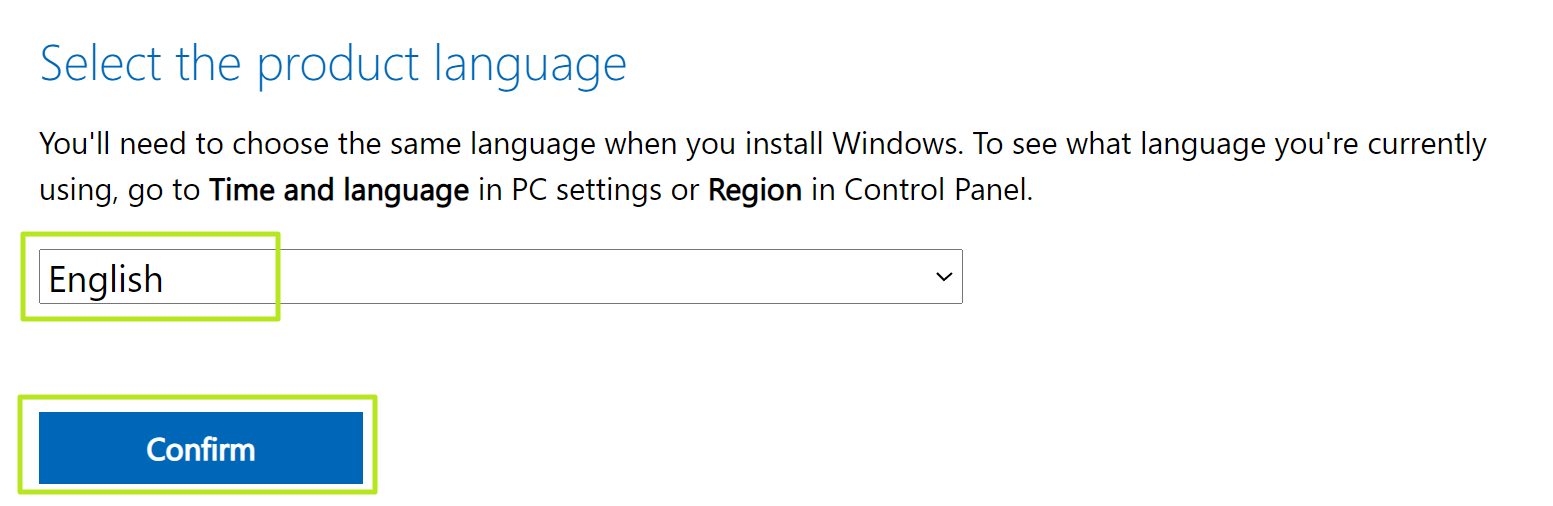
Next, select the language you wish to download Windows 11 from the drop-down menu and then click Confirm.
Select language -
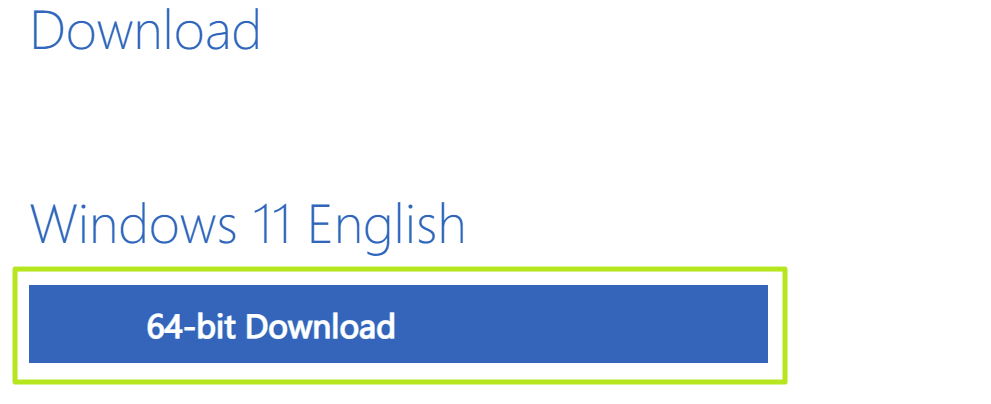
Now, click the 64-bit download button, and your Windows 11 ISO download should now begin.
Begin downloading You can download the operating system in any of the following 37 languages:
- Arabic
- Brazilian Portuguese
- Bulgarian
- Chinese Simplified
- Chinese Traditional
- Croatian
- Czech
- Danish
- Dutch
- English
- English International
- Estonian
- Finnish
- French Canadian
- German
- Greek
- Hebrew
- Hungarian
- Italian
- Japanese
- Korean
- Latvian
- Lithuanian
- Norwegian
- Polish
- Portuguese
- Romanian
- Russian
- Serbian Latin
- Slovak
- Slovenian
- Spanish
- Spanish (Mexico)
- Swedish
- Thai
- Turkish
- Ukrainian
 1")
 2")
 3")
Microsoft’s Media Creation Tool (MCT) allows you to create bootable devices and download standalone ISO images of their operating systems. Microsoft has also introduced a Media Creation Tool for Windows 11 that you can use to download a Windows 11 ISO file. Here is how:
Note: This method will automatically download the latest version of Windows 11 available at this time.
-
Download the Windows 11 Media Creation tool and then run the file.
-
You will now see a new window for MCT. Accept the license terms.
 4")
Accept licensing terms -
Before proceeding further, verify the pre-determined details for the machine you are downloading the ISO for. If you are downloading the ISO file to another computer, we suggest that you uncheck the box next to “Use the recommended options for this PC” and select the language you wish to download Windows 11 version 2022 in.
Once done, click Next.
Proceed by clicking Next -
Now select the ISO file radio button to download the file and then click Next.
Select ISO and proceed -
You will now need to choose where you wish to download the ISO image. Select a volume with ample free/available space and click Save. The Media Creation Tool will now begin your download.
ISO downloading -
Once the download finishes, click Finish to close the tool. You may find that the software then performs a setup cleanup. You can ignore this and let it run in the background.
 8")
Close the tool
 4")
 5")
 6")
 7")
 8")
Now that you have downloaded the Windows 11 ISO image, you may proceed to the next phase: Creating a bootable device.
Upgrade to the Latest Windows 11 Version
If you do not wish to perform a clean installation of Windows 11 and download the ISO, you can also upgrade your current OS to the latest Windows 11 version available through Windows Update or through the Installation Assistant.
Upgrade to Windows 11 Through Windows Update
If you want to upgrade your device to Windows 11 from a Windows 10 PC, you must first meet the minimum system requirements. If your device does qualify, you can then check if you have received a Windows 11 upgrade option by navigating to the following (In Windows 10):
Settings app >> Update & Security >> Windows Update
If you are already on an older Windows 11 version and want to update to a newer version, navigate to the following:
Settings app >> Windows Update
Here, click Check for updates on the right side of the window. When the scan finishes, check to see if you have a notification at the top of the top like the one in the image below:
 9")
If you do see it, simply click Download and Install to begin the upgrade process.
Upgrade to Windows 11 using Installation Assistant
Another way to upgrade your current OS is through the Installation Assistant. This tool needs to be run on the PC you want to upgrade. Please note that Windows 11 installation assistant does not work with ARM-based PCs. For ARM-based devices, you can use the manual download and installation method.
Follow these steps to update today:
Note: This method will update it to the latest version of Windows 11 available at this time.
-
Download Windows 11 Installation Assistant and execute the package.
-
First, you will need to download and install the PC Health Check app regardless if you are already running Windows 11. Click Get PC Health Check app.
 10")
Get PC Health Check app -
The app will now download. Install the PC Health Check app and see if your system meets the requirements.
-
Once done, return to the Installation Assistant and click Refresh.
Refresh the app -
Now click Accept and install.
Accept terms and begin download -
The tool will now begin to download Windows 11. Once finished, restart your computer so it can upgrade to the latest version available.
 10")
 11")
 12")
For more details on upgrading to Windows 11, read this Microsoft blog post.
To learn more about the new Windows 11 feature, visit Microsoft’s announcement page.
Download Windows 11 Insider ISO
You can also download the Windows 11 Insider ISOs and use them to perform a clean install. However, note that after installing the Windows OS using the Insider ISOs, you will not be able to revert back to the stable build – only pause receiving further updates.
Furthermore, you must have a Microsoft account that is registered with the Windows Insider Program. If you have one, use the following steps to download a Windows Insider ISO file:
-
Open the Windows Insider Preview Downloads page using any web browser.
-
Log in with your Microsoft account registered with the Windows Insider program.
-
Scroll down and select a Windows Insider build from the drop-down menu and click Confirm.
Select the Windows Insider build to download -
Now select the language you want to download it in and click Confirm.
Choose language -
Finally, click 64-bit Download to begin downloading the ISO image.
Begin the download
 13")
 14")
 15")
Your download should now begin instantly. You may then use the Insider ISO to perform a clean install of the chosen Insider Windows build.
Check Windows 11 Minimum System Requirements
Before starting the process of installing Windows 11 on your PC, we recommend that you start by checking whether your target PC meets the minimum system requirements.
When Windows 11 was first launched, Microsoft changes the minimum system requirements to ensure more security and reliability of the system itself. Here is a list of these minim requirements:
- It’s a 64-bit only Operating System. 32-bit is not supported.
- Minimum 2 CPU Cores are required.
- TPM 2.0 is required for installation. TPM 2.0 was mostly integrated into 8th-generation CPUs. So at least an 8th Gen CPU is required.
- Only UEFI is supported. The legacy boot is not supported.
It can be difficult to check each of these specifications individually. However, you can use the PC Health Check app to check for Windows 11 requirements automatically. Here is how:
-
On the target PC, download the PC Health Check app.
-
Run the downloaded Windows PC Health Check Setup file.
-
Agree to the licensing terms and click Install.
 16")
Install PC Health Check app The app will now install.
-
When installed, run the PC Health Check app.
Close the installation wizard and run PC Health Check app -
Inside the app, click “Check now.”
 18")
Check if PC meetings minimum requirements for Windows 11 The app will now run a brief scan and let you know if your PC supports Windows 11.
-
View all results for Windows 11 requirements.
View Windows 11 requirements results using PC Health Check app
 16")
 17")
 18")
 19")
If your PC meets the minimum requirements for Windows 11, then you can proceed with the given topics below to create a bootable Windows 11 USB flash drive and then install it.
However, if it doesn’t, then you either need to upgrade your system or bypass the requirements for Windows 11.
Here are other methods to check if your computer meets minimum Windows 11 requirements.
Create Bootable Windows 11 USB Drive
Creating a bootable device out of an ISO image is relatively easy. You can create a bootable USB drive as well as a DVD. However, we suggest that you create a USB drive as it is more convenient.
You can use Rufus or Ventoy to create a bootable USB flash drive using the ISO image that you have downloaded for Windows 11 in the section above.
Learn how to create a multi-boot USB flash drive with multiple ISO files using Ventoy.
Let us show you how to create a bootable USB flash drive for Windows 11:
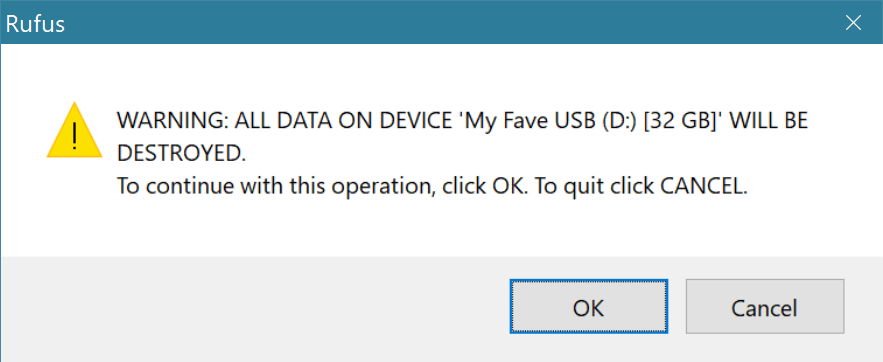
-
Plug in a USB flash drive (at least 8GB) to your computer.
Make sure that all your data on the USB is backed up since it requires formatting where all stored data on the USB flash drive is lost.
-
Download Rufus from its website and install it on your computer.
Alternatively, you can also download the portable version which does not need any installation.
Download Rufus -
Once downloaded, run Rufus software.
-
From Rufus, select the USB flash drive from the drop-down menu under Device.
 21")
Select the USB flash drive -
Then, click “Select” under Boot selection, navigate to the downloaded Windows 11 ISO file, and select it.
 22")
Select Windows 11 ISO file -
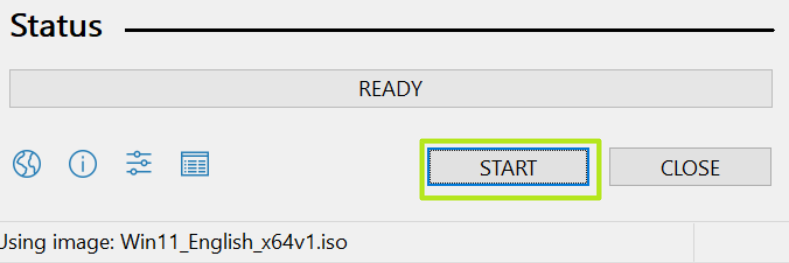
Leave the rest of the settings to their default values and click Start.
Begin making Windows 11 bootable USB flash drive -
Select the Windows 11 customization options and click Ok.
 24")
Select Windows 11 customization options Since Rufus can now bypass the minimum requirements for Windows 11, you can select the type of bootable USB you want to make.
If prompted with another confirmation, click Ok.
Your Windows 11 bootable USB drive will now be in the making. This step may take a few minutes to complete.
-
Once it is finished, “Ready” will be displayed with a green bar. You may then close the app.
Close Rufus
 20")
 21")
 22")
 23")
 24")
 25")
Your bootable drive is now ready and you may proceed to the installation phase using the guide given below.
Install Windows 11 from ISO
Now that you have created a bootable drive using the ISO file, you can now begin installing Windows 11. Here is how:
-
Confirm that the target PC meets the minimum Windows 11 requirements (discussed above).
-
Plug in the bootable Windows 10 USB flash drive in the target computer.
-
Turn on/reboot the computer and open its One Time Boot Menu (Usually through the F12, F10, or Esc button).
-
Select the external USB drive to boot from the bootable USB.
-
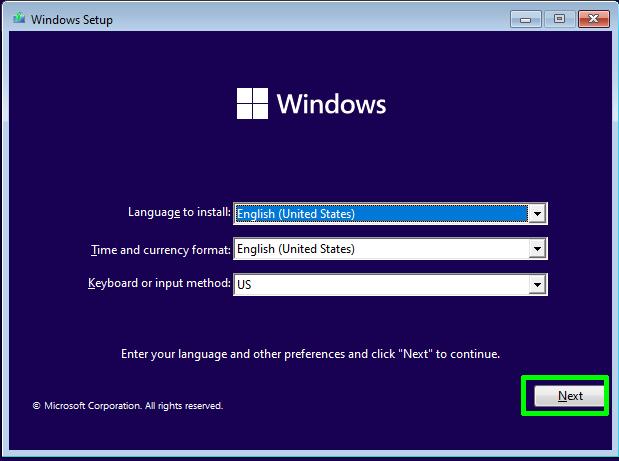
You will now see a menu such as the one below. Click “Next.”
 26")
Proceed with installation -
Click “Install Now.”
 27")
Install Windows -
On the next screen, click “I don’t have a product key.”
Even if you do have one, you can activate the product later after installation.
 28")
Proceed without entering key -
Select the Windows 11 edition that you want to install on this device from the list. When selected, click Next.
 29")
Select Windows 11 edition to install -
Check the box to accept the license agreement and click Next.
 30")
Accept terms -
Select “Custom: Install Windows only (advanced).”
You will now be asked if you want to upgrade your existing OS or perform a custom installation. Since this is a clean and fresh Windows 11 installation, we will be selecting “Custom.
Custom installation -
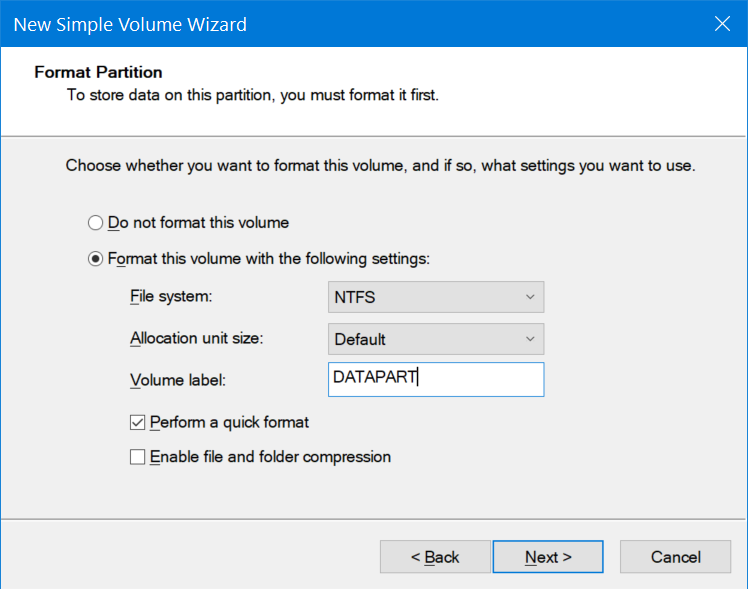
Click “New” and create the disk partitions as you want them. Remember to have at least 40GB of space in the primary (C) drive for Windows installation.
Create disk partitions Click “New,” enter the size of the partition to create (in MBs), then click Apply.
-
If intimated about additional partitions creations, click Ok.
Automatic creation of additional partitions prompt -
Select the partition you wish to install the operating system on and click Next.
Select the primary partition to install Windows Windows 11 will now begin installing on your device. This step may take a few minutes and your device may reboot a few times.
 26")
 27")
 28")
 29")
 30")
 31")
 32")
 33")
 34")
Learn how to install Windows 11 without an internet connection or without a Microsoft account.
Further ahead in the process, you will be asked to configure your PC through several Out Of Box Experience (OOBE) screens. Proceed with the on-screen instructions and configure your PC, and you will have successfully installed Windows 11.
Once it finishes, you will be logged into your user account on the all-new Windows 11 PC! You can now begin installing the relevant software and customizing it according to your liking.
Frequently Asked Questions
How to purchase Windows 11?
Currently, you cannot purchase Windows 11 through a license directly. However, you can purchase a device that comes preinstalled with Windows 11 or a Windows 10 device that is eligible for an automatic update.
Can I upgrade my PC to Windows 11?
Yes, you can upgrade it through Windows Update, provided your system meets the minimum hardware requirements. Certain features of Windows 11 require additional hardware like TPM 2.0 and a secure boot. You will need to ensure your PC is compatible with Windows 11 requirements to enjoy all features of Windows 11.
The minimum requirement is to ensure you can run the software. Higher end PCs will be more efficient. Additional requirements may apply over time and for updates.
How long does it take to download Windows 11?
The Windows 11 ISO file is 5.12 GB in size. It can take anywhere between 30 and 60 minutes to download depending upon your internet speed.
How long will it take to install Windows 11?
Normally it takes 15 to 30 minutes to install Windows 11, depending upon your hardware specifications.
Can I continue to use Windows 10?
Although upgrading to Windows 11 is free for Windows 10 users, you can continue using Windows 10 if you don’t want to upgrade. Microsoft will release Windows 10 updates until October 14, 2025.
Windows 11
 35")
Windows 11, another iteration to the Windows operating system, was released in October 2021. It promises to make our computing lives easier and more efficient than Windows 10 or earlier operating systems. Windows 11 has a new modern user interface, redesigned start menu and taskbar.
Price:
139
Price Currency:
USD
Operating System:
Windows
Application Category:
Operating System
Pros
- User-Friendly Interface: Although there is some learning curve involved, the interface is efficient and easy to use.
- Compatibility: Windows 11 is compatible with most Windows 10 apps and even hardware drivers.
- Built-in security: Windows 11 comes with built-in security out of the box including Microsoft Security for internet and malware security, TPM and secure boot for hardware level encryption and security.
- Regular updates: Microsoft releases Windows 11 security updates twice a month and feature updates once a year.
Cons
- 64-bit only: Windows 11 comes for 64-bit platforms only. There is no version available for 32-bit platforms.
- Privacy concerns: Like Windows 10, Windows 11 also comes with tools that share data with Microsoft. Although Microsoft says it should be used to improve the operating system, it remains a privacy concern.
- Forced updates: Although you can pause updates for a while, Microsoft forces users to keep their operating system up to date.
- Bloatware: Windows 11 comes with a lot of pre-installed apps and software that may not be useful to everyone and can take up valuable system resources.
- Cost: Although its upgrade is free for Windows10 users, Windows 10 is not a free operating system. The cost can be a barrier for some users, who may prefer free alternatives, such as Linux or MacOS.