I have Ubuntu on my laptop. Now I want install Windows 7 in a dual-boot. How can I do this?
I can’t lose my Ubuntu files, and I’m afraid that I might break GRUB.
Editor’s note: Current readers should keep in mind that this is an older question, and the exact steps may have changed over time. Also, UEFI has primarily replaced BIOS in that time. As a result, many answers here may be out of date. Make sure you choose an answer appropriate to UEFI or BIOS depending on your system, and consider favoring more recent answers which may have more up-to-date information.
![]()
NotTheDr01ds
15.8k6 gold badges52 silver badges80 bronze badges
asked Oct 12, 2010 at 7:28
![]()
5
Here’s the general outline:
- Make space for Windows
- Install Windows
- Mount the
/bootdirectory or partition - Install the bootloader (GRUB)
Step Zero – Backup your important data before doing anything
Step One – Make space for Windows
Open up GParted, and make sure that you have at least 20 GB available for Windows 7, either as a partition you can remove, or as unpartitioned space. If it’s a partition, remove it from GRUB to make sure it doesn’t break your Ubuntu install — GParted will complain if anything bad is about to happen.
Make note of current /boot device. If that doesn’t show up there, make note of the / device. The device name is something like sda5.
Step Two – Install Windows
Install Windows 7 into the space you just made
Step Three – Mount /boot
Note: Instead of mounting the boot directory or partition from the installation in the live media environment you can specify the path with the
--boot-directoryparameter for grub-install, more information on the manpage.
Load up from your Ubuntu live CD, and then run these commands.
-
If you DO NOT have a separate
/bootpartition:sudo mount /dev/DEVICENAME_FROM_STEP_ONE /mnt sudo rm -rf /boot # Careful here, make sure YOU ARE USING THE LIVE CD. I tried it, it works. sudo ln -s /mnt/boot /boot -
If you have a SEPARATE
/bootpartition:sudo mount /dev/DEVICENAME_FROM_STEP_ONE /boot
Step Four – Install the bootloader
Note: These instructions were initially written for Windows 7 and BIOS booting computers. If you have UEFI and Windows 8 and above you probably need to replace
grub-pcwithgrub-efi-amd64insudo apt-get install grub-pc.
Then continue with those commands:
sudo apt-get update
sudo apt-get install grub-pc
sudo grub-install /dev/sda     # NOTE THAT THERE IS NO DIGIT
sudo umount /boot
And restart. It should work fine and boot both systems.
![]()
answered Oct 12, 2010 at 7:42
![]()
evgenyevgeny
9,4753 gold badges27 silver badges28 bronze badges
14
Installing Windows after Ubuntu is not the recommended process for a dual boot Windows and Ubuntu system, but it is possible.
-
First, you have to make sure that the 50GB free space is available, resizing your Ubuntu by using gParted if necessary.
-
Also use gParted or Disk Utility to format the free space as NTFS, this prevents Windows 7 from creating an additional boot partition in addition to the «C» drive.
-
Next, boot to the Windows DVD installer and install Windows on the NTFS partition. Upon reboot, Windows will automatically boot and you won’t see the grub menu allowing you to choose Ubuntu, because the Windows bootloader has replaced grub.
-
Now, what you need to do is run Ubuntu from LiveCD or LiveUSB and install boot-repair.
-
To install boot-repair, open up a terminal by pressing Ctrl+Alt+T and type the following commands:
sudo add-apt-repository ppa:yannubuntu/boot-repair && sudo apt-get update sudo apt-get install -y boot-repair && boot-repair -
After installation, boot-repair will automatically launch, if is doesn’t, launch it via Dash.
-
Make sure to select recommended repair to repair grub. Reboot and that’s it.
-
You should now have a Grub menu on boot, allowing you to choose from Ubuntu, memtest, and Windows 7.
![]()
answered Jul 1, 2012 at 14:13
![]()
PeachyPeachy
7,07710 gold badges37 silver badges46 bronze badges
10
UEFI only!
This answer covers UEFI-only, and is meant to be a bit of a more modern answer as UEFI has succeeded the ancient BIOS. Also, there are some edits here to fit the fact it’s answering a «how I do this» rather than a «can I do this» type of question.
To install Windows alongside Ubuntu, you just do the following:
- Insert Windows 10 USB
- Create a partition/volume on the drive to install Windows 10 on alongside Ubuntu (it’ll create more than one partition, that’s normal; also make sure you have space for Windows 10 on your drive, you might need to shrink Ubuntu)
- Install the Windows 10.
That’s it!
Note: when making sure things are ready for your dual boot, check if Ubuntu is installed in the GPT partition table! While 99% of the time you will be using GPT if you’re planning to do this, it is possible to install Ubuntu’s UEFI on MBR but Windows 10 does not support that strange use-case. In that situation, convert to GPT if possible. If not, backup and reinstall, and I’d recommend that as it’ll be easier.
![]()
answered Feb 21, 2019 at 9:33
![]()
6
boot-repair did a really good job launched from a live-usb, by just applying the recommended option.
![]()
answered Mar 17, 2012 at 6:01
![]()
QuesstQuesst
1391 silver badge2 bronze badges
1
When you boot have you checked the boot order on your BIOS? If you’re booting straight to the hard drive it will always miss the USB. You need to move the USB device boot option higher in the priority list.
Also check that your computer allows you to boot from USB in the USB port you are using.
answered Dec 24, 2012 at 13:49
![]()
SlipstreamSlipstream
1,1691 gold badge11 silver badges26 bronze badges
2
First, you have to boot with a live CD/USB stick and shrink your partition in order to create a second one. Windows 7 requires and creates a second partition which is called «system reserved». I don’t know why, but it does. (So you will end up with three partitions or four if you have a swap partition.)
When your partition is ready, just boot with your Windows 7 DVD/USB stick and install Windows 7 on the new partition.
When Windows 7 has been installed, GRUB will break and you will only be able to boot Windows (automatically). Just boot with a live Ubuntu CD/USB stick and fix it (how it is mentioned in other comments).
Now another issue that some users may face:
I own an HP Mini 210 netbook which came with Windows 7. I erased everything and installed Ubuntu. Later on I decided to also reinstall Windows 7 and have a dual boot (needed Windows for a specific application from my university which wouldn’t run through wine). At that time I had three partitions:
- Ubuntu
- Swap
- Backup/download storage
Now when I tried to install Windows 7 I faced a problem because Windows 7 needs to create a second primary partition (system reserved). I already had three partitions and therefore was unable to create two more. The workaround here is to create an extended partition in which you will include both swap and backup storage. Now I have:
- Ubuntu (primary)
- Extended
  - Swap
  - Backup/download storage
- Windows 7 (primary)
- Windows 7 system reserved (primary)
![]()
answered Oct 12, 2010 at 8:23
![]()
AntonisAntonis
7103 silver badges6 bronze badges
One good advice: When you make the separate partition for Windows 7, using gparted for example, format it to the NTFS right away. Do not use Windows installer to format the partition, because several times I had a situation, when the Windows installer corrupted the partition table after that and I had to restore the lost partition.
So, as the people recommended here: using gparted, create separate partition, format it to the ntfs, install windows there, then restore grub using livecd or liveflash. You can use the SystemResqueCD for liveflash.
answered Oct 12, 2010 at 8:51
![]()
To install Windows you need an empty partition that will be dedicated to Windows. If you do, then go ahead and install on this using the normal installation procedure. After installation, reboot into Windows and reboot a few times more to experience Windows  (sorry, couldn’t resist)
Like you said, this will break GRUB and your computer can only boot Windows after this. Do not despair, as there is a help section dedicated to restoring GRUB and being able to dual boot. Look here. After performing this, your computer will be able to boot Ubuntu as well as Windows.
Before you start, very very carefully note down the location (hard drive number, make & partition number within that) of the current Ubuntu install (which you don’t obviously want to overwrite) and the empty partition in which you want to install windows. Also, during Windows installation, if it offers to format any partition other than the one you are installing Windows into, please do not accept.
![]()
answered Oct 12, 2010 at 7:38
![]()
koushikkoushik
5,0024 gold badges27 silver badges35 bronze badges
0
Basically the same answer as @evgeny, but using chroot instead of a symbolic link.
- Boot into a Ubuntu LiveCD
- Open GParted and make sure you have an unused partition with at least 20GB free space. This will be your Windows 7 partition.
- Install Windows 7 onto this partition.
- Boot into a Ubuntu LiveCD
- Make a note of the partition Ubuntu is installed on and any separate
/bootpartitions if applicable. -
Mount your Ubuntu installation
sudo mkdir /mnt sudo mount /dev/<partition> /mnt -
Give this partition internet access
sudo cp /etc/resolv.conf /mnt/etc/resolv.conf -
Only if you have a seperate
/bootpartition, otherwise skip this stepsudo mkdir /mnt/boot sudo mount /dev/<boot_partition> /mnt/boot -
Set up then enter
chrootsudo mount -o bind /proc /mnt/proc sudo mount -o bind /dev /mnt/dev sudo mount -o bind /dev/pts /mnt/dev/pts sudo mount -o bind /sys /mnt/sys sudo chroot /mnt -
Make sure
grub-pcis the latest versionapt-get update && apt-get install grub-pc -
Install GRUB
grub-install /dev/sda -
Exit
chrootexit - Reboot and check if it works
answered Oct 4, 2013 at 21:27
![]()
kirikiri
27.8k16 gold badges81 silver badges117 bronze badges
In case your computer came with a pre-installed copy of Windows 8 and you removed it because to many people told you to hate it and you found that after you installed Ubuntu, that it isn’t what you want, note this:
Your computer boots with UEFI and has a GPT partition table.
For installing Windows 7, either create and boot the Windows 7 installation media in UEFI-mode or set boot-mode and partition table to legacy.
answered Aug 9, 2014 at 18:49
![]()
LiveWireBTLiveWireBT
28.5k26 gold badges108 silver badges221 bronze badges
2
The most save way is to install Windows 7 first and to reinstall Ubuntu after that. This will ensure that grub works.
You can also edit your partitions with a live cd, and then install Windows 7. When you have done this you boot into Ubuntu with a live cd and restore grub. This procedure however, is a bit more delicate than just installing them in the right order.
answered Oct 12, 2010 at 7:37
![]()
Peter SmitPeter Smit
7,4679 gold badges42 silver badges48 bronze badges
I suggest you virtualize Windows 7 with something like VirtualBox (http://www.virtualbox.org)
This way you can run Windows and Linux at the same time, without the chance of destroying you Bootloader Grub.
I don’t know why you want to run Windows 7, but if you don’t need the full hardware capacity (Running the Latest 3D Games for example) of your computer for windows then virtualization can be a good solution.
answered Oct 12, 2010 at 8:26
![]()
2
Its a easy process to install dual OS. 1st create a NTFS partition from Ubuntu using Disk Utility. Then restart your system and continue with your windows installing. After finishing installing you can see that your GRUB is not working….. NOT A PROBLEM. I have two method to fix this GRUB problem.
[Method 1] Try to reinstall GRUB under Ubuntu LiveCD. For example, like recommended @kiri above in this answer.
[Method 2] It may be bit difficult. Don’t worry i have also a easy one. For that you have to login into windows. Download EasyBCD and run it. Go to Edit Boot Menu and set your desired boot option as default. Then save it and reboot your system. [Tested under windows].
Please let me know if you stack in something.
![]()
answered Jul 1, 2012 at 12:36
![]()
ScareCrowScareCrow
1341 silver badge13 bronze badges
0
Boot that USB
- Turn on or restart the computer.
- While the display is blank, press the F10 key to enter the BIOS settings menu.
NOTE: The BIOS settings menu is accessible by pressing the F2 or the F6 key on some computers. - Select the Advanced tab using the right and left arrow keys.
- Press Enter.
- Use the up and down arrow keys to select Boot Order.
- Follow the on-screen instructions to change the boot order so that USB is at the top
- Press Esc.
- Select the Exit tab using the right and left arrow keys.
- Press Enter.
- Press Enter.
Reboot…
answered Dec 24, 2012 at 15:45
2
Installing windows after ubuntu is a pain but after you do this you’ll need to put in your ubuntu live cd and install boot-repair and run that. Becouse installing win7 after ubuntu will break grub. But, boot-repair will remedy that!
answered Jul 1, 2012 at 13:20
![]()
jamiejamie
234 bronze badges
You must log in to answer this question.
Not the answer you’re looking for? Browse other questions tagged
.
Not the answer you’re looking for? Browse other questions tagged
.
![]()
- Services
- Solutions
-
- For E-Commerce Business
- Warehouse Management System
- Inventory Management Software
- Manufacturing ERP Software
- SeaFood ERP
- Construction Management Software
- Telecom Contract Management
- ERP for Promotional Products
- Event Management Software
- Dispatch Management Software
- Solar ERP Software
- Odoo Integrated Shopify Store
- Odoo Walmart Integration
- Odoo Amazon Integration
-
- Odoo ERP Hosting
- Zimbra Enterprise Email Hosting
- NextCloud Hosting
-
- For Warehouse Condition Monitoring
- For SeaFood Water Quality Monitoring
- DiOx Sense – Dissolved Oxygen
- RFID IoT Gateway
-
- Case Study
-
- Odoo ERP for UAV/UAS Manufacturer
- Odoo ERP for Manufacturing Industry
- E-bike Manufacturer ERP
- ERP For Metal Fabrication Industries
- Odoo ERP for Shopify Store
- Odoo ERP for Kitchen Manufacturers
- ODOO ECOMMERCE + MANUFACTURING
- Seafood Processors ERP System
- ERP – Contract & Project
- TRADING ERP – RF INDUSTRY
-
- Odoo POS – GpsGate Integrations
- Sap Ariba Network – Odoo ERP integration
- Odoo Payroll – Canada – T4/T5 Slips
- Crypto Payment Acquirer
- Thawani Payment Acquirer
- Tap Payment Acquirer
- Odoo – Open Banking – Virtual IBAN Integrations
- Odoo Advance Email Configurator
- ODOO – DPD Shipping Provider Integration
-
- About Us
- News & Events
- Jobs Apply
- Testimonials
- Blog
- Contact Us
Steps to Install Windows 10 on existing Ubuntu 16.04
Related Posts
Page load link
Go to Top
When it comes to dual boot, the general idea is that you have a system preinstalled with Windows and then you install Linux alongside Windows. On the boot, you select whether you want to use Windows or Linux.
How about the opposite situation? What if you have a system that has only Linux installed on it and you want to install Windows alongside Linux in dual boot mode?
In this tutorial, I’ll show you exactly how you can install Windows after Ubuntu Linux in dual boot.
Dual booting Windows on an existing Ubuntu Linux system
I tested this tutorial on an Ubuntu system with UEFI and GPT partitioning scheme. In theory, the same steps should be applicable to most Linux distributions, if not all.
Requirements
Here’s all the stuff you need to carry out the procedure safely and easily:
- A bootable Windows 10 USB stick (USB key, Pen Drive) of at least 8 GB in size
- A live Ubuntu USB stick (USB key, Pen Drive) of at least 4 GB in size
- A computer with UEFI boot and only Ubuntu Linux installed on it
- Internet connection is needed for creating the bootable Windows and live Linux disk
- A way to back up your important data on an external disk (optional yet recommended)
You may also manage this tutorial with just one USB key. You create the live Linux USB first, make the partition for Windows using this live Linux USB, and then use the same USB key as a bootable Windows USB.
I highly recommend that you read the entire tutorial first before you start following the steps.
Step 0: Make a backup of important data
Here’s the thing. You are going to play with disk partitions and boot settings. If you mess it up, you’ll lose the data.
Having a back up on an external disk will give you a safety net. In the worst case, if things go wrong, you can install either of Windows or Linux and copy the data back on your system.
How do you make a backup? The simplest method is to have an external USB or SSD disk and copy files from Documents, Music, Pictures and other folders where you have kept your files.
Step 1: Create a bootable Windows USB
If you have access to a Windows system, you can follow the instructions on the Microsoft website to create a bootable Windows media.
If you only have a Linux system, creating a bootable Windows USB could be tricky. Thankfully, a handy open source tool called Ventoy helps a lot in this case.
I have written in detailed about creating bootable Windows 10 USB on Linux. Please refer to the guide for detailed instructions. I’ll mention the crucial parts here.
Plug in your USB with at least 8 GB of size and format it. Now, download the ISO of Microsoft Windows.
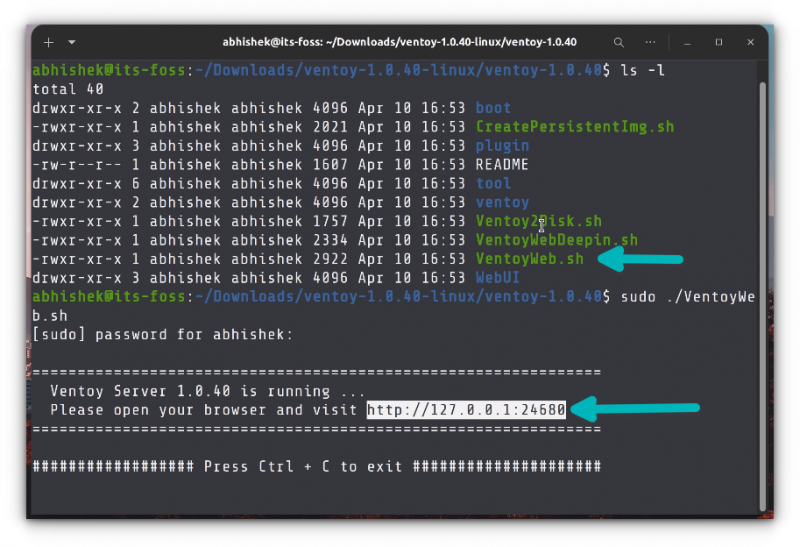
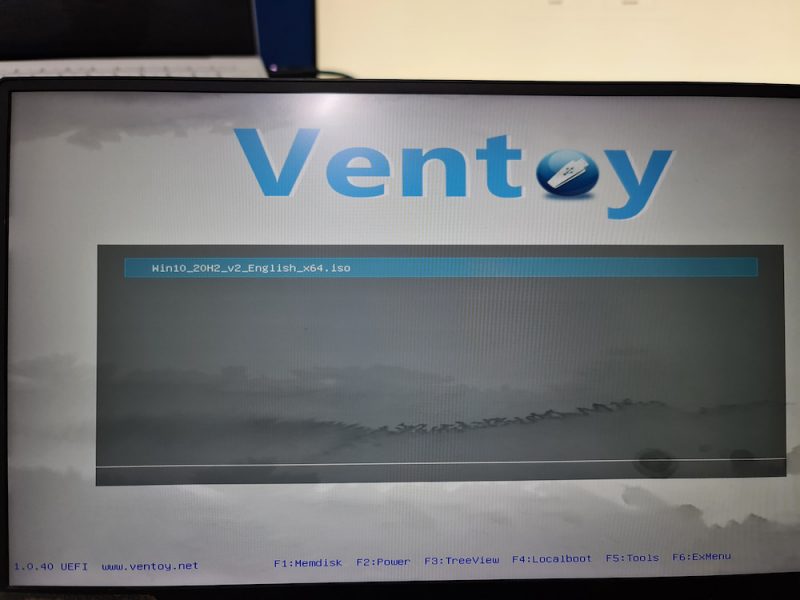
Next, download the latest Ventoy release. Extract the folder and run the VentoyWeb.sh script with sudo. It will give you the URL when you run it. Copy this URL and paste it in a browser.
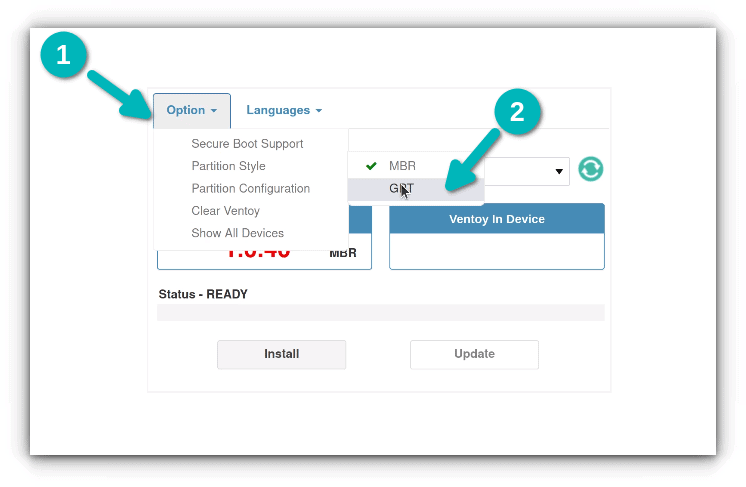
It will open a web page with Ventoy running in it. Go for UEFI installation and hit the install button.
Once installed, you’ll see two partitions on the USB disk: VTOYEFI and Ventoy. You need to copy the download Windows ISO image to Ventoy partition.
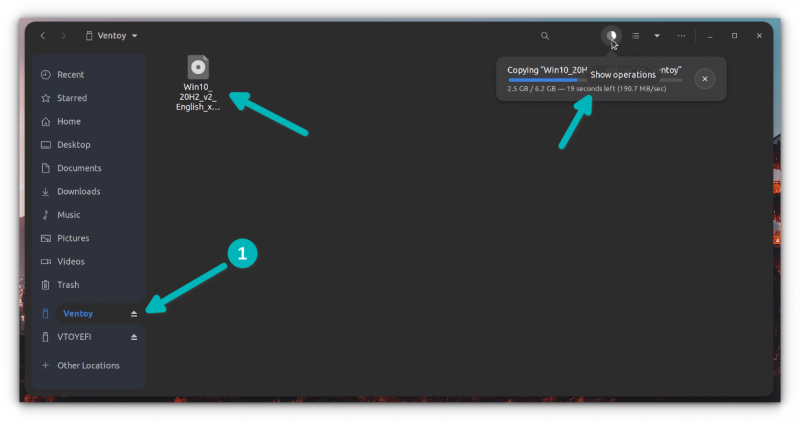
Once the copying finishes, DO NOT RUSH to plug out the USB just yet. Click on the unmount option from the file manager.
Okay. So now that you have a bootable Windows USB, it will be a good idea to test it out and see if works.
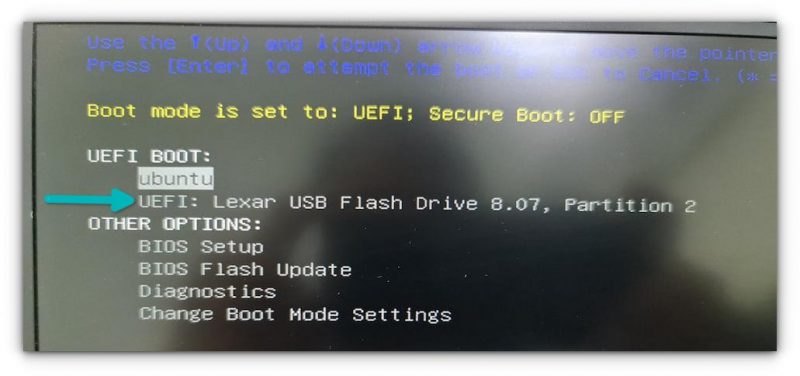
How do you do that? Plug in the Windows USB, reboot your system. When the system is turning on again and showing the logo of your system’s manufacturer, press F2/F10/F12 keys to access the BIOS settings.
When you are in the BIOS, choose to boot from the USB. In some cases, you may have to disable secure boot from the BIOS settings.
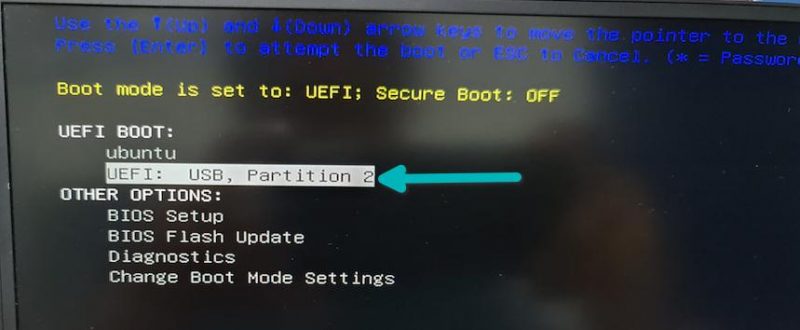
If the bootable Windows USB creation was a success, you should see Ventoy screen and select to boot into Win10.
After this, you’ll see some screen about Windows installation. Don’t go with the installation part yet. Close it and power down your system and then boot into Linux again.
This check was necessary because you need to have a working bootable Windows USB. Without that, there will be no point in following the rest of the tutorial.
Remove the bootable Windows USB at this stage.
Step 2: Create a live Ubuntu Linux USB
You may wonder why you need a live Ubuntu USB here when you already have Linux installed properly.
The reason is that you need to modify the existing partition and make some free space where you’ll be installing Windows. But you cannot modify an already mounted partition in Linux. When you are using Linux, your disk is mounted. You won’t be able to modify it and create a new partition in it.
This is why you need a live Linux USB. You boot from the live USB and make the necessary partition on the disk from the live session.
Now that you know the reason, let’s go on with creating live Ubuntu USB. First, download the ISO image of Ubuntu from its website. Any version of Ubuntu will work.
Now, plug in the USB with at least 4 GB in size.
On Ubuntu, you can find the Startup Disk Creator tool. You may also use Etcher on Linux. The choice is yours. Here, I’ll use Startup Disk Creator.
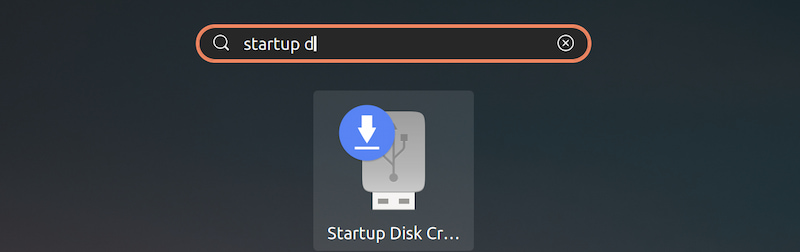
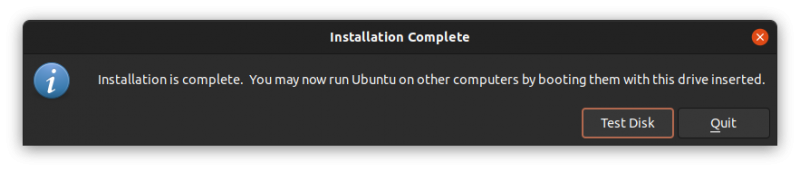
The process is really simple. Your plugged in USB should be recognized. It should also automatically find the Ubuntu ISO. If not, you can always browse to it. With that set, just hit the “Make Startup Disk” button.

It should take a few minutes to create the live Ubuntu USB. You can hit the Quit button below.
Step 3: Boot from live USB and make free space for Windows
Alright. Now you boot from the live Linux USB.
Restart the system. When it is powering on and displaying the manufacturer’s logo, press F2/F10/F12 keys to access the BIOS settings. In here, go to the boot order and boot from the Linux USB.
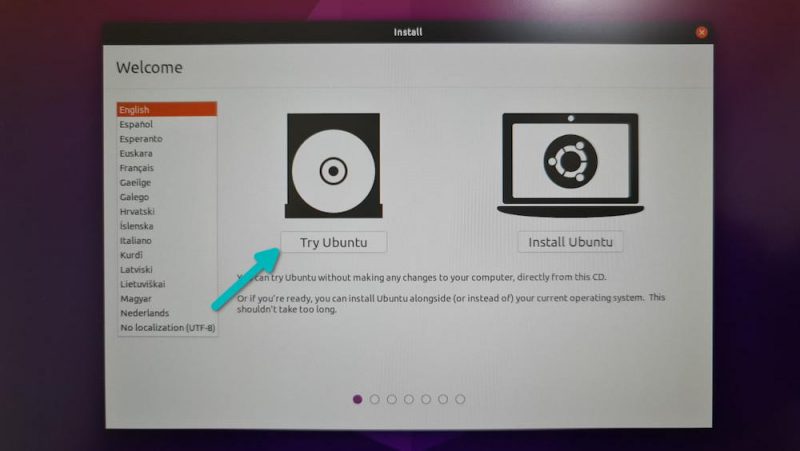
When you see this screen, go for Try Ubuntu.
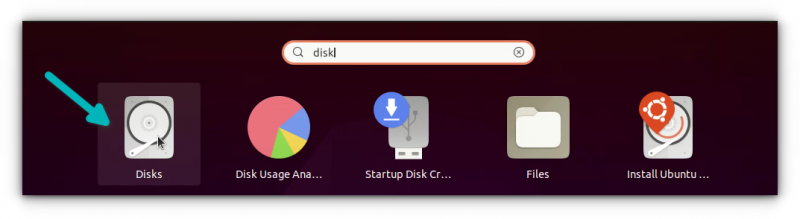
Now that you are in the live session, open the Disk application. It is already installed.
In the Disks application, carefully select the main hard disk/SSD of your computer. This is where you have Linux installed. As you can see in the picture below, I have ESP partition (for UEFI boot settings) and a single Linux partition. This is the partition that needs to be resized to make free space for Windows.
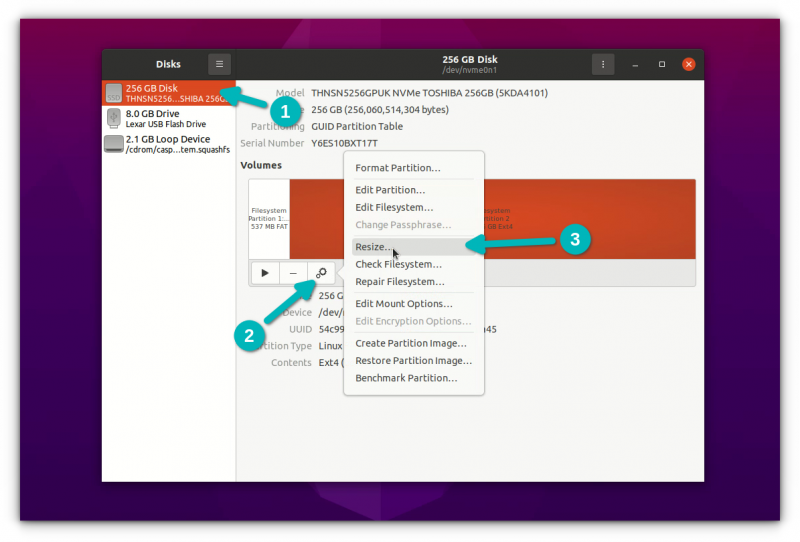
If you have a root, swap and home partition setup, you should resize the home partition.
In the resizing, it will show a minimal size. You cannot shrink the disk below this point. You’ll be leaving some extra space for Linux usage, of course.
Note that the “partition size” is for Linux partition. In the picture below, I reduced the Linux partition to 120 GB from 256 GB. This gives a 136 GB of free space for Windows installation.
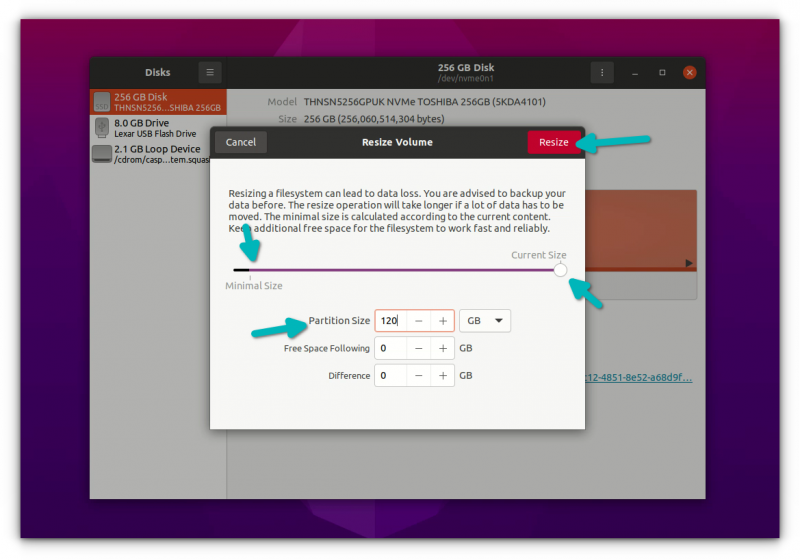
When you hit the resize button, it could take up to a couple of minutes to complete the resizing process.
As you can see in the picture below, now I have three partitions on my system. One is 500 MB of ESP partition (for UEFI boot), 120 GB of Ext4 partition for Linux and 136 GB of free space.
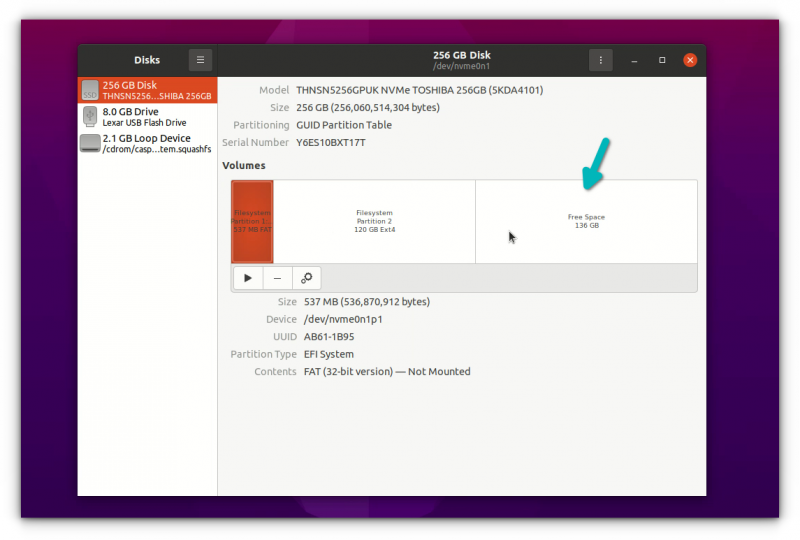
You now have dedicated free space where you are going to put Windows. Shut down your system now.
Step 4: Boot from Windows USB and start installing Windows
Plug in your bootable Windows UBS. Once again, restart your system, access the BIOS settings and boot from the USB. By now, you know how to do this. You already did this in step 1 while checking the bootable Windows USB.
You should see the Ventoy screen if you created the bootable Windows USB with it. Hit enter.
You should see the Windows logo. After a few seconds, you’ll see the option to choose the language, time and keyboard.
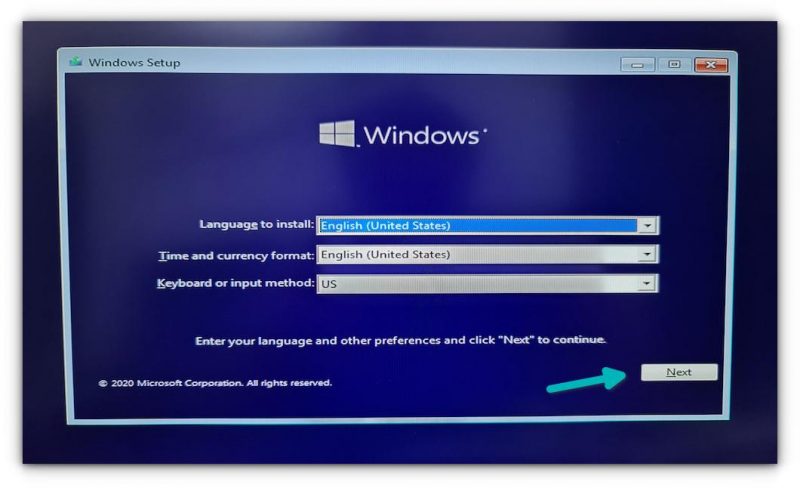
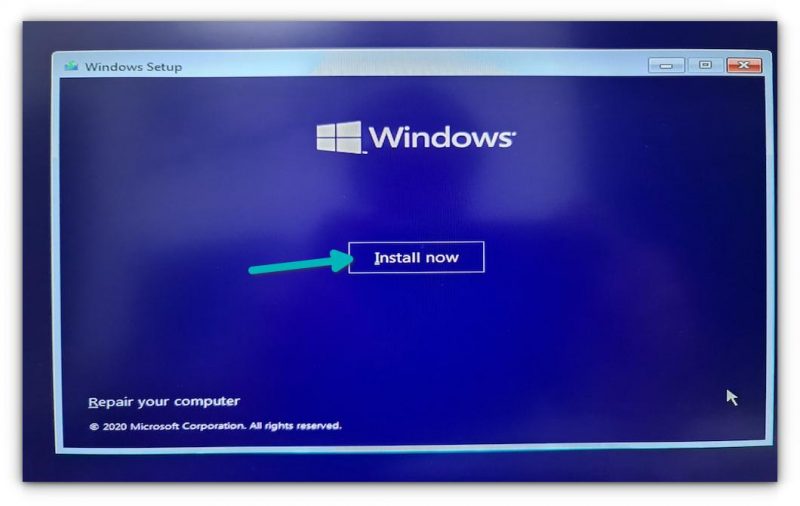
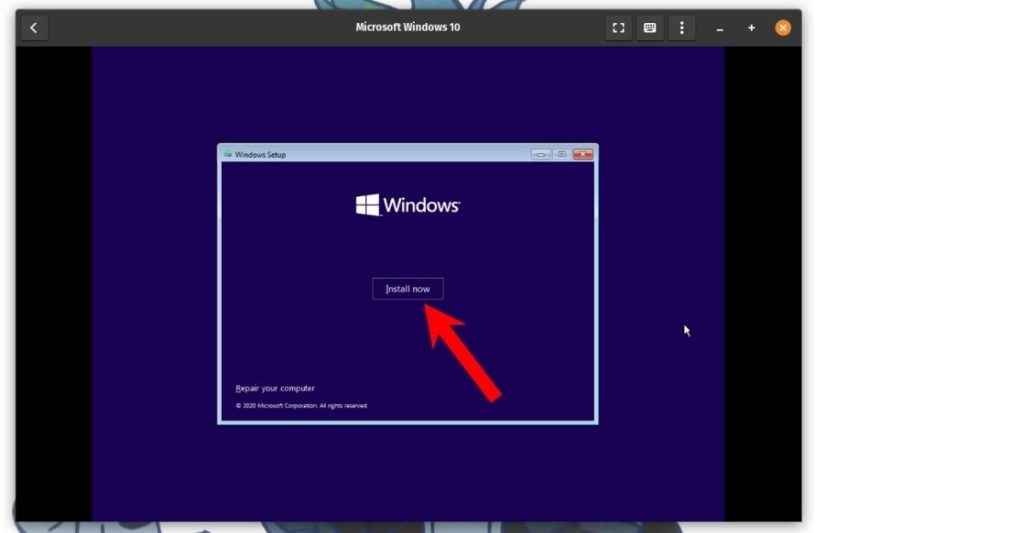
The next screen will give you the option to start the installation. Hit “Install Now”.
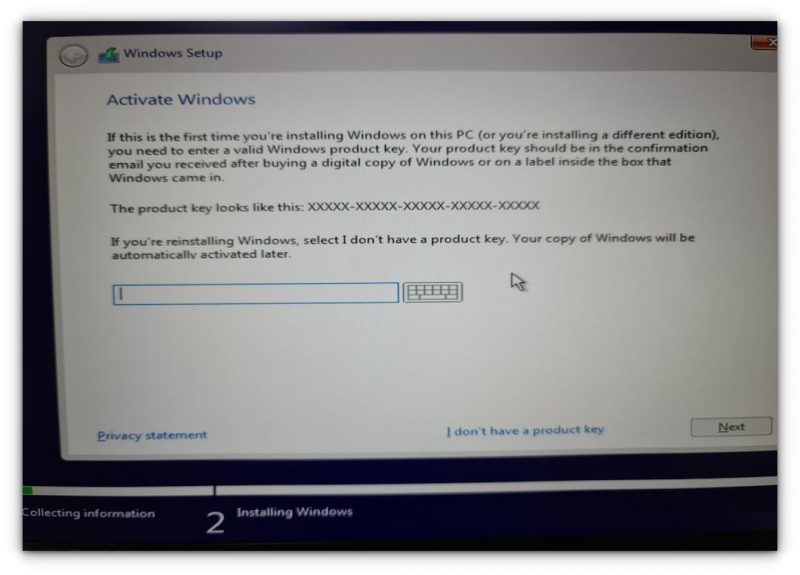
In the next few screens, it will ask for the Windows license key. If you don’t have it, skip it. You can activate Windows later as well. You’ll be asked to choose a Windows version and accept the end user license.
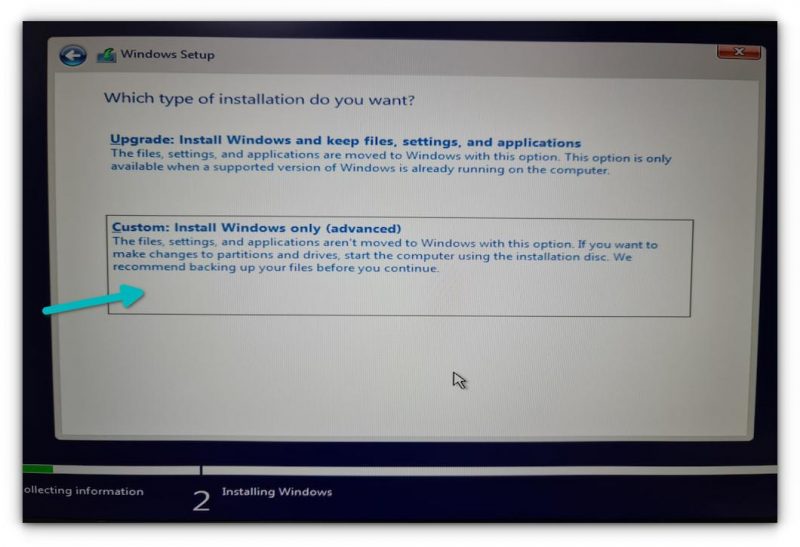
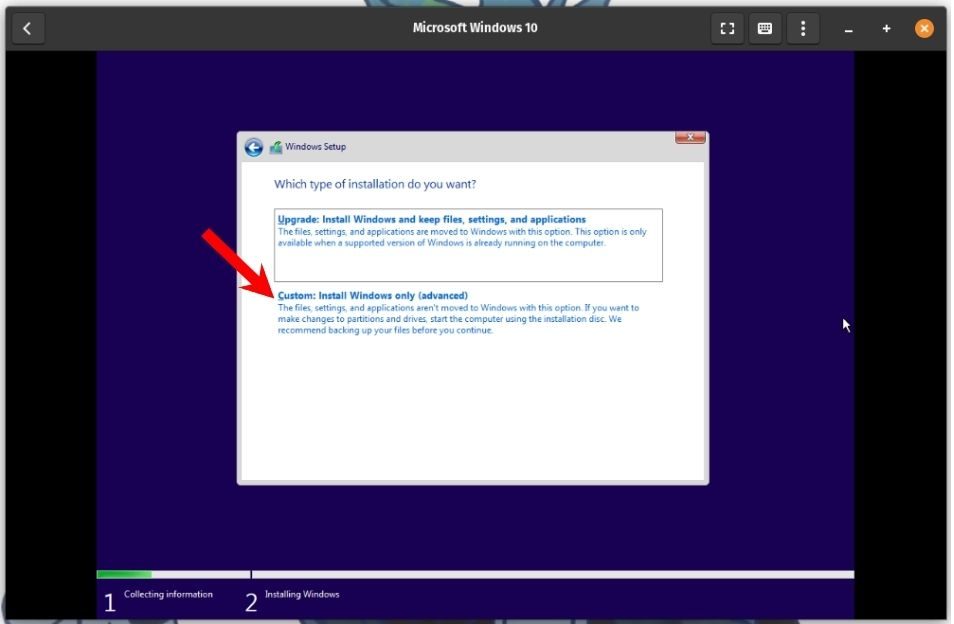
In the next screen, go with the Custom install option.
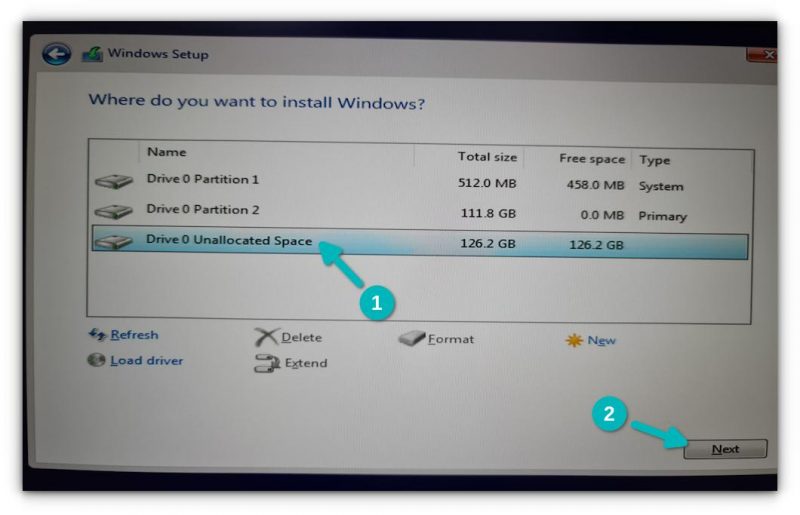
Now you’ll come to the partition screen. Select the free space (unallocated space) you had created in the step 3 and hit the Next button.
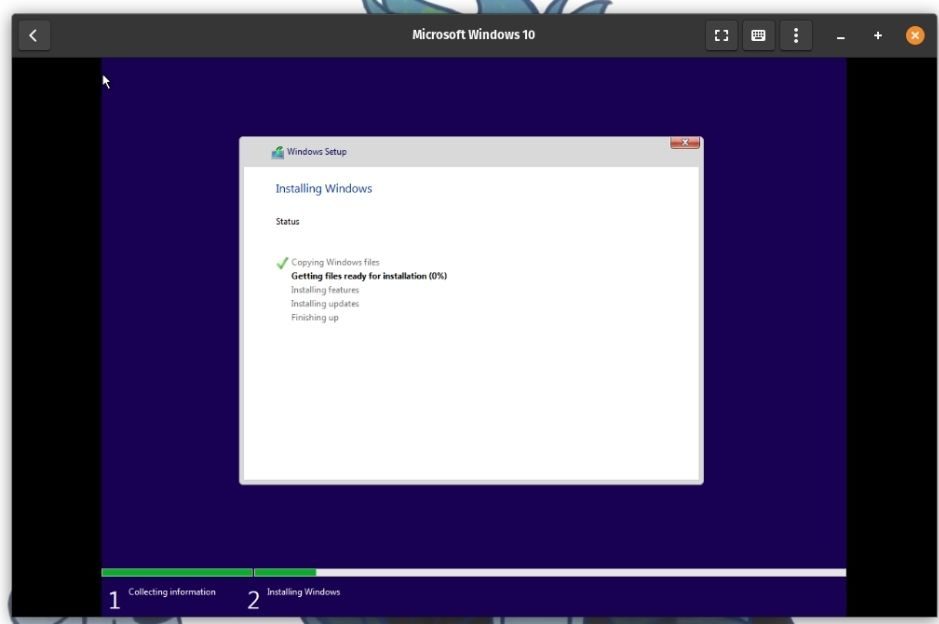
It will take a couple of minutes in copying the files and install Windows.
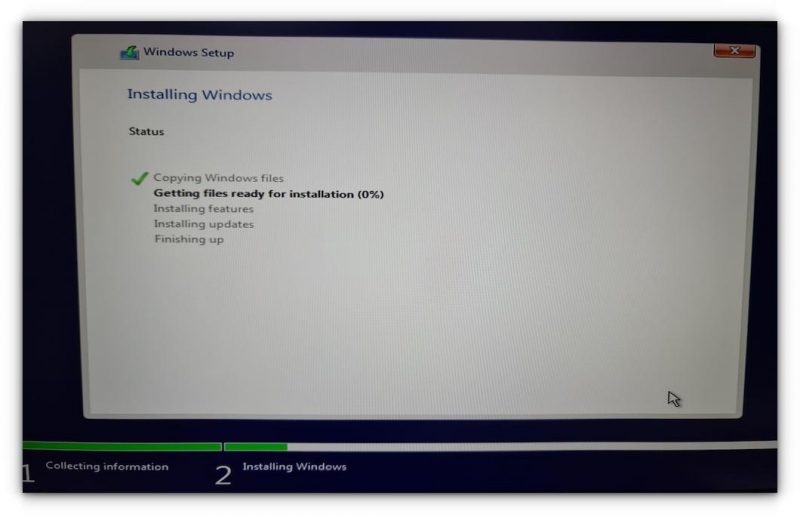
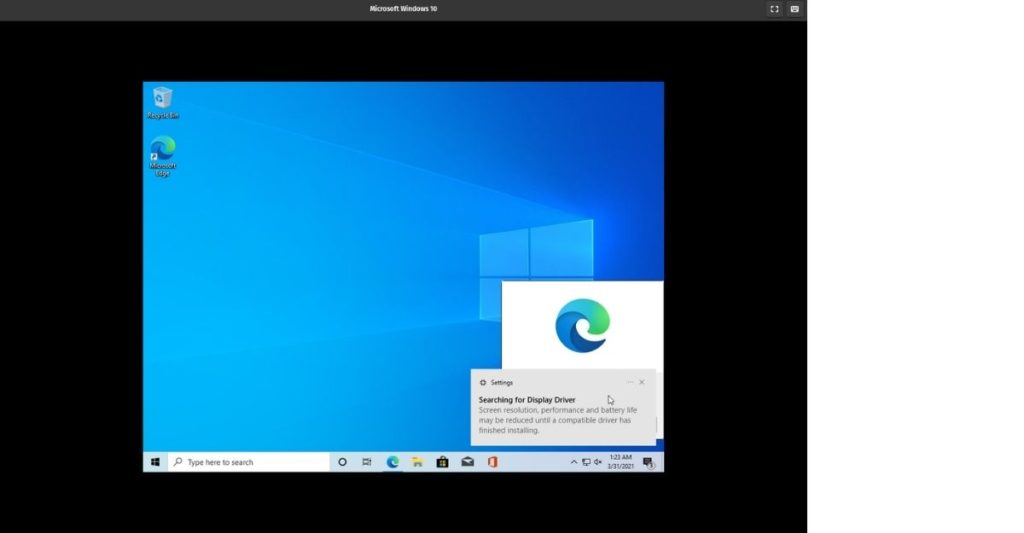
After that, your system will restart automatically and this time it will boot into Windows directly.
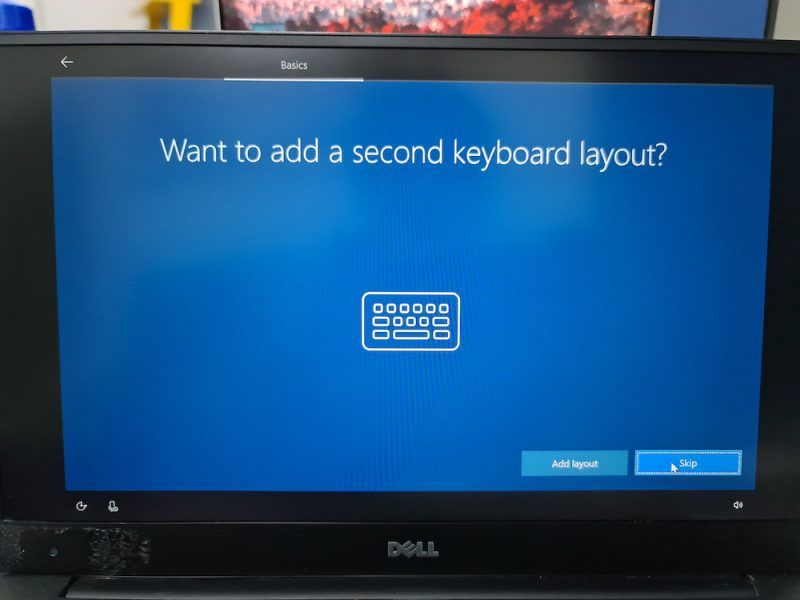
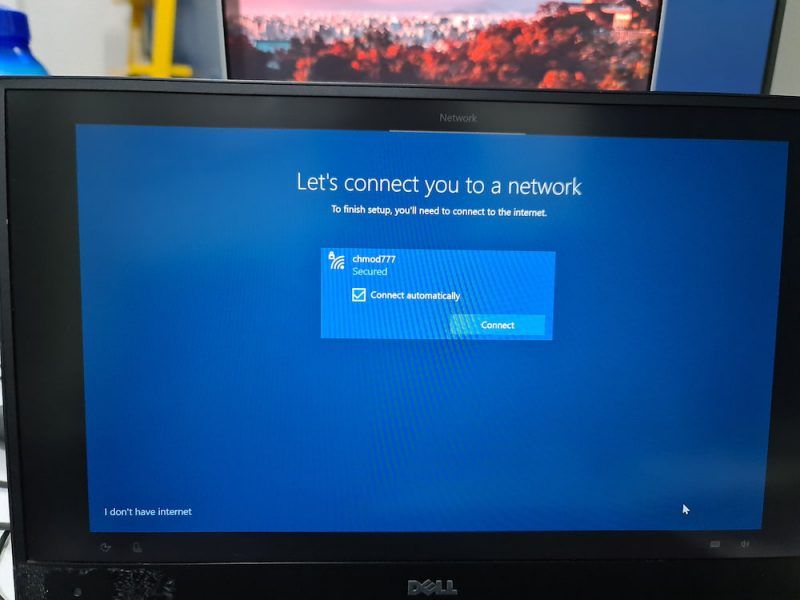
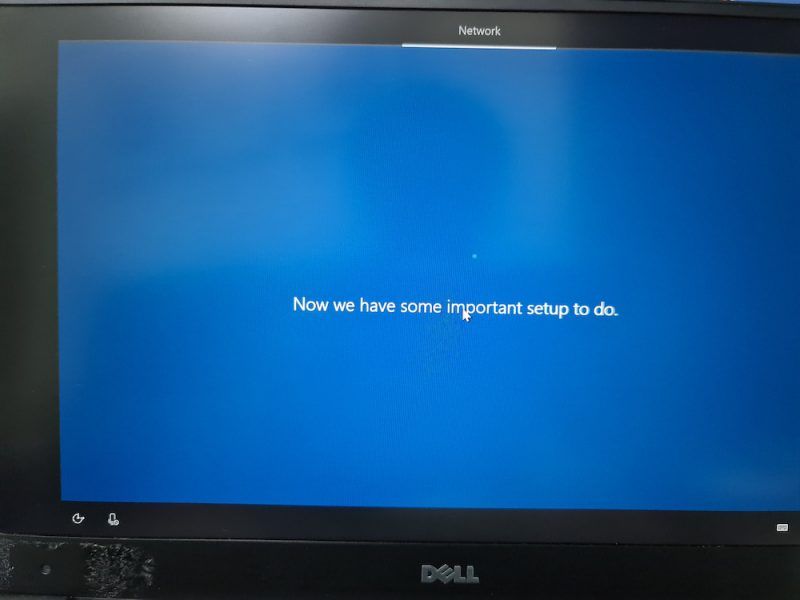
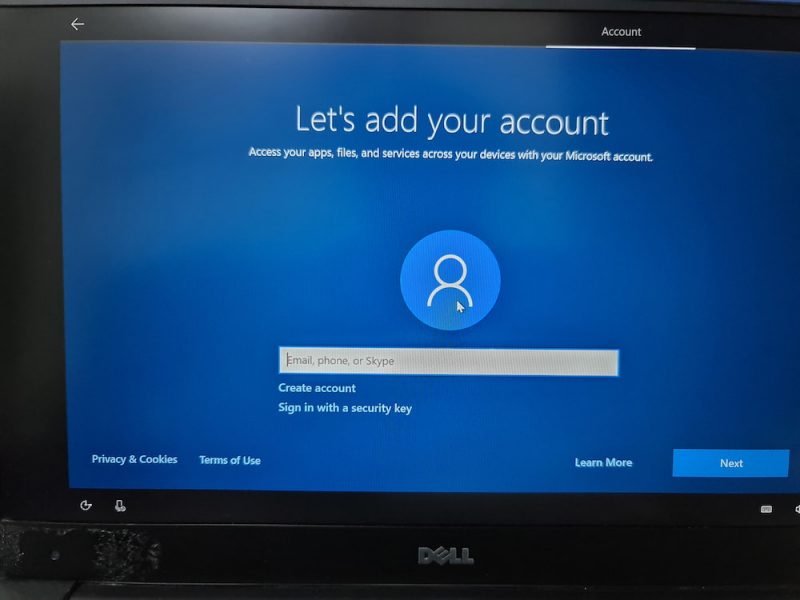
Windows installation is not over entirely. On the next boot, you’ll be asked to configure Windows for your usage and this is super annoying but super easy to follow.
I am not going in detail for this part because I know you can handle the configuration part, which is waiting and hitting next button most of the time. I am sharing a few screenshots just for the reference, though.


Once you have installed Windows successfully, chances are that you’ll be booting into Windows by default. You need to get the Grub dual boot screen back.
Step 5: Get the Grub bootloader back
Once again, restart your system and when it is powering on, go to BIOS settings. From the boot sequence or boot order, move Ubuntu up the order. You may have to use arrow keys or F5 or F6 and the screen may look different for different system.
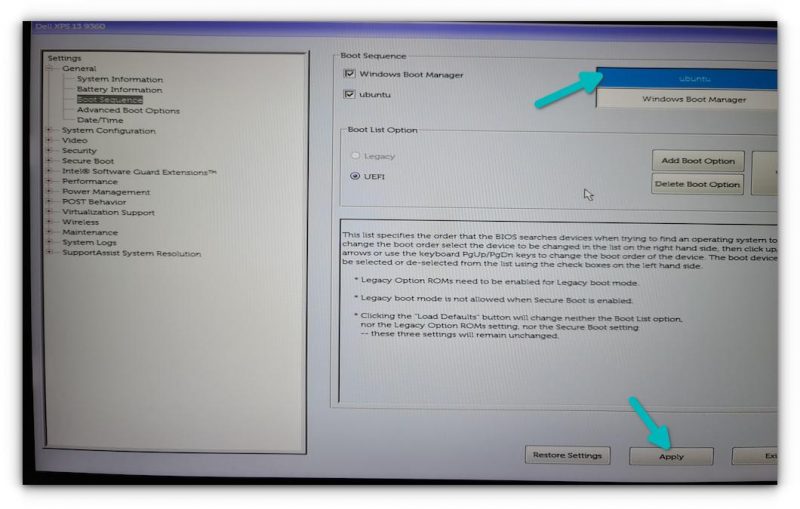
Save and exit and this time you should be booting into Ubuntu. The battle is not over yet. The grub bootloader might not be aware of the presence of Windows. This is why it is a good idea to update grub in Ubuntu.
All you have to do is to open a terminal and use the following command:
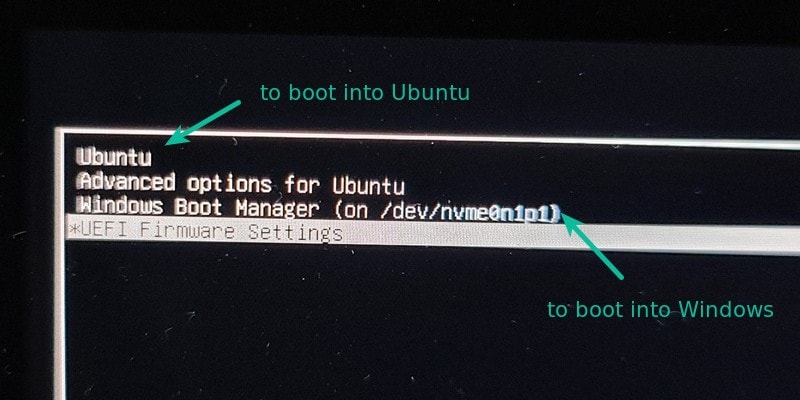
sudo update-grubRestart your system once again. You should be greeted with the familiar grub boot screen that gives you the option to choose between booting into Ubuntu and Windows.
Don’t see Windows Boot Manager in Grub?
Install os-prober (usually installed already) and then edit the /etc/default/grub file to add GRUB_DISABLE_OS_PROBER=false to this file. Save this file, update grub and Grub should see Windows option in the grub screen now.
Did you succeed?
And that brings us to the end of this long journey. It takes some time and effort, but if you want to install Windows after installing Ubuntu, this can surely be done.
If you still have questions, please let me know in the comment section and I’ll try to answer you.
There are many kinds of Windows and Linux users in the world, but some of the popular ones are —The ones who absolutely love Windows but everything else, others who hate Windows but use it because they think they’ve got no other options to try, and the third and most prevalent folks who love Linux to death but don’t essentially hate Windows 10. The third kind is fairly widespread.
If you think you resemble the third kind that can’t let go of Windows, you’re at the right place. In this guide, let’s look at the easiest way to install Windows 11/10 on Ubuntu or any Debian/Ubuntu-based distro for the fact.
Ways to Use Windows alongside Ubuntu
There are two ways to use Windows alongside Ubuntu:
- Dual-booting
- Installing and using a Virtual Machine in Ubuntu
Out of both, Dual-booting is harder, especially if you’re new to computers and/or Linux, but using a VM is the easiest way of using Windows in Ubuntu. If you’re curious, here’s what dual-booting can do if you have no prior knowledge of the same.
The Problem With Dual-Boot
The issue that most people face with dual-boot is, it requires you to fiddle with your computer’s memory while increasing the risk of accidentally losing your important files. If you still want to try it, check out our how to Dual-boot Linux Mint alongside Windows 10 article.
Hence, installing Windows on a Virtual machine is the fastest and the safest way. In this article, let’s look at the easiest way to install Windows 10 on Ubuntu Linux or any Ubuntu-based distro. The tool that we’ll be using is GNOME Boxes which was released in January this year.
Installing Windows 11/10 On Ubuntu Linux
With that out of the way, here’s how to install Windows 11 or Windows 10 on Ubuntu Linux. It’s fairly simple and straightforward.
Install GNOME Boxes On Ubuntu/Ubuntu-based Distros
To install GNOME Boxes, fire up the terminal and type the following command
sudo apt install gnome-boxes
If the above command doesn’t work for some reason, or if you’re using a different Linux distro, you can download and install GNOME Boxes from Pkgs.org on any distro. All you’ll need to do is download the package and double-click the .deb or .rpm package to install.
Download the Windows 11/10 ISO
Follow the steps mentioned below to download the official Windows 10 ISO.
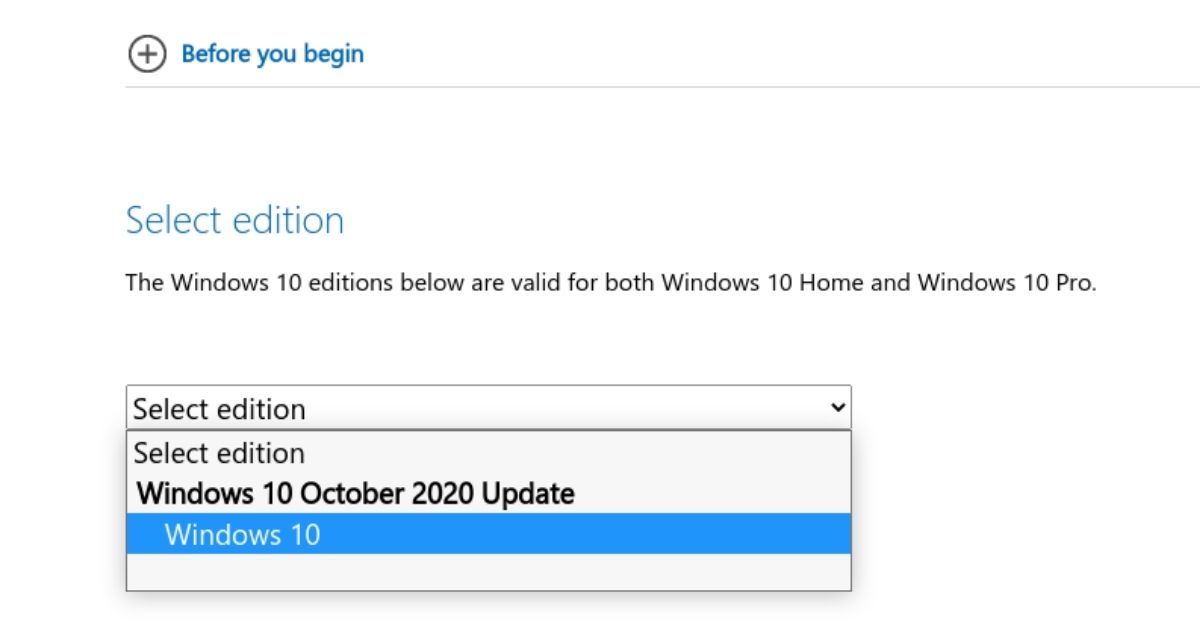
- Head over to Microsoft’s Windows 11 download page.

- Select the edition and click on the Confirm button.

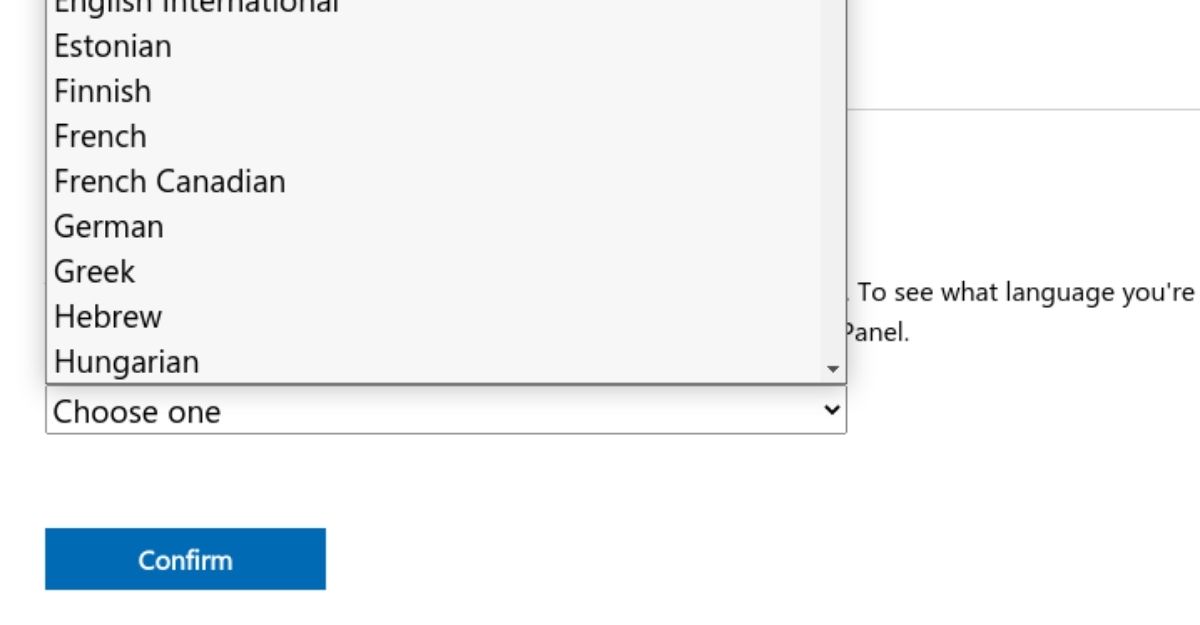
- The website will validate your request. Next, you’ll be asked to select the product language. Click on Confirm.
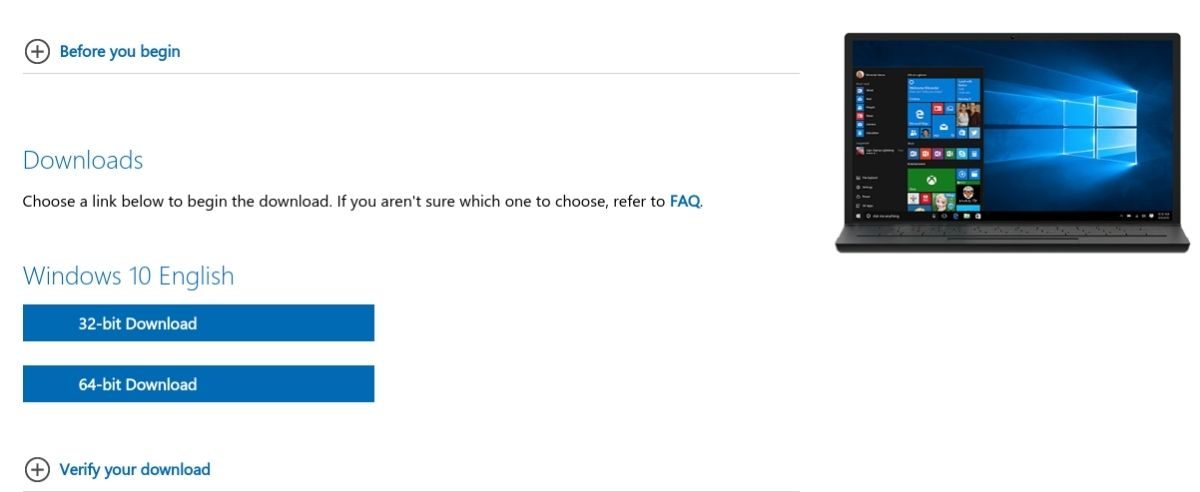
- You’ll be redirected to a new download page where you’ll see two links – 32-bit Download and 64-Bit Download. Click on the 64-bit Download.

- The ISO will start downloading. Have a coffee until then.
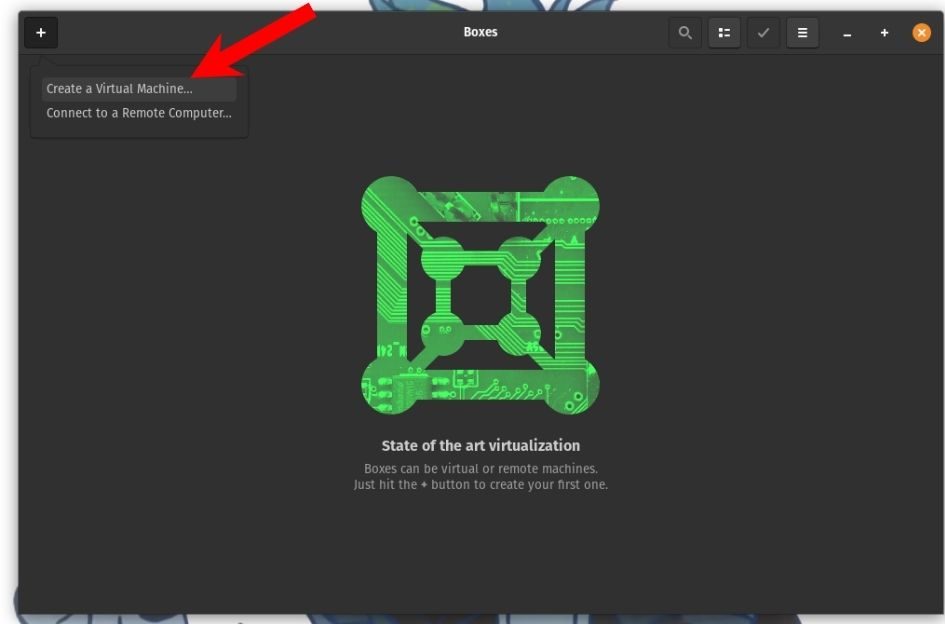
Install Windows 10/11 In Ubuntu: Create A Windows VM In Boxes
-
Open GNOME Boxes
From the apps list, find and open the GNOME Boxes app.

-
Add a Virtual Machine
At the top-left corner of the app, find and click on the + icon and click on Create a Virtual Machine option.

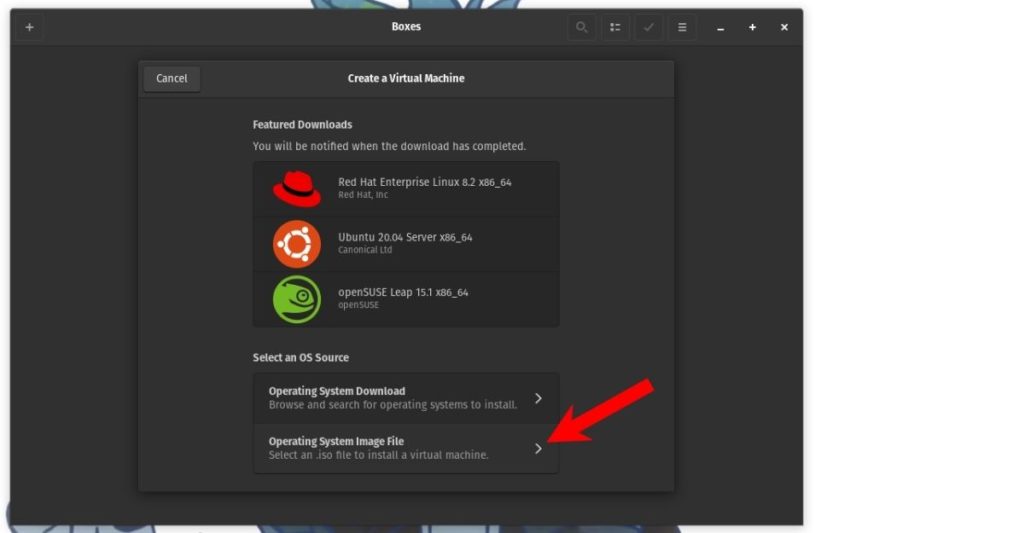
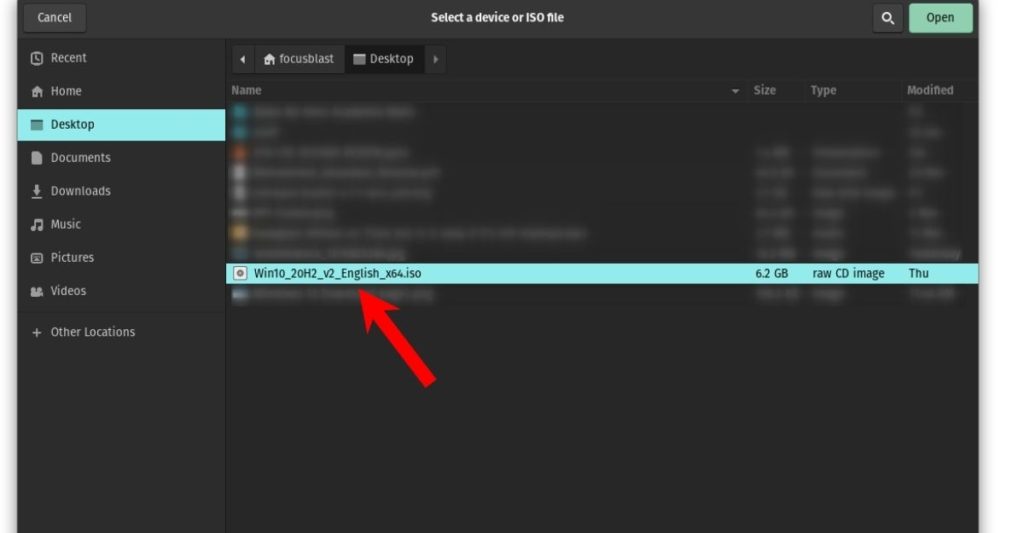
-
Select the Windows ISO
Scroll all way to the bottom and click on the Operating System Image File option. Now browse and select the Windows ISO that you downloaded.

-
Allocate system resources
Now, click on next and click on customize to allocate the desired amount of system resources like RAM and Storage.
-
Click on create
Finally, click on the Create button, and the Windows virtual machine will start in no time.
-
Proceed with the usual Windows installation process. And, the most important thing of all, don’t forget to mute Cortana for extra peace of mind.
-
Begin with the installation.
Select the language and click on next. On the next Window, click on the Install Now button. Next, click on I don’t have a product key, and from the list of Windows versions, select Windows Home and proceed.
Check the I accept all the license terms box and proceed by clicking on the Next button. -
Custom installation
Click on the option that reads Custom: Install Windows only (advanced) and then click on next.

-
Windows will begin installing
Wait patiently until the Windows installation is complete.

All you need to do is wait for some time until the OS is done installing. You’ll need to reboot a few times during the process. Once done, you can access Windows from Ubuntu from Linux without restarting your PC. This not only saves you from messing up your PC but also saves a lot of time.
Also, the default resolution is set to 1000×708 pixels. You can easily resize it by going to Windows settings -> Display Resolution and changing the resolution to 1920×1080 pixels for a more immersive experience.
If you first installed Ubuntu and now want to install Windows 11 alongside, the process is slightly different from your normal dual-boot installation. Let us know if you want an article on the same, and we’ll do it for you.
Do share your thoughts about this article in the comments section below. Also, let us know if you’re having trouble following this tutorial, and we’ll help you right away.
FAQs
- Should I install Windows or Ubuntu first?
The best way of setting up a dual-boot PC is by installing Windows first and then making space, and installing Ubuntu later. This saves you a lot of time compared to installing Ubuntu first and then installing Windows.
- How do I go back to Windows from Linux?
Refer to our how to create a bootable Windows 10 USB on Linux article, flash your USB flash drive, boot from the USB drive, format storage partitions, and proceed with the normal installation process.
- Can Ubuntu run Windows programs?
Yes and no. It is now possible to run Windows programs using Wine, but not all programs work very well, and some of them don’t work at all.
- How do I dual-boot Linux and Install Windows 10?
We have a separate article about how to dual-boot Linux Mint and Windows 10. This article should work for any distro.
- Can I download Linux on Windows 10?
Thanks to Microsoft finally understanding the true value of Linux, WSL (Windows Subsystem For Linux) has made installing Linux on Windows possible. Check out our article on how to install WSL on Windows.

Abubakar is a Linux and Tech Writer. Hailing from a Computer Science background, the start of his love for Tech dates back to 2011, when he was gifted a Dell Inspiron 5100. When he’s not covering Tech, you’ll find him binge-watching anime and Tech content on YouTube or hunting heads in competitive FPS games. You can also find his work on Android Police and How-To Geek.
Можно, но сложно. Windows при установке затрет GRUB и поставит MBR, надо будет восстанавливать с LiveCD. Надо будет заранее отрезать кусок диска, иначе Windows будет считать linux fs странными разделами и требовать пустую область на диске.
Обычно удобнее поставить сначала Windows с нужным размером раздела и потом ставить ubuntu, тогда GRUB штатно заменит MBR и переформатирует свободное место для себя.
Винда в этом плане авторитарна и затирает линуксоразделы, обычно в случаях необходимости windows и linux на одном жестком сперва ставится винда, а уже потом линуксы, так что дело вам говорят-отрезайте кусок диска (НЕ буквально отрезайте!) или ставьте первой винду, а потом уже шаманский бубен.
Я конечно не знаю что именно автору нужно из убунты но если терминал\демоны\сервисы то может всеже поставить вин10 а в ней опробовать штатную убунту?
Снести нахрен Ubuntu
Переразбить диск, оставив кусок свободного места под Linux в конце диска (после разделов Винды).
Поставить Windows.
Поставить свой Linux, используя заранее оставленное пустое место.
Диск пилить удобнее всего при помощи Acronis Disk Director, если не хотите разбираться с другими менее наглядными инструментами.
Внимательно прочесть все предыдущие ответы.
Еще раз их внимательно прочесть — работа с разделами вещь очень опасная в неопытных руках — чик — и нет ничего!
Проще всего будет пожертвовать бубунтой — вряд ли там что-то ценно скопилось. Бубунту снести, поставить win10. При установке все место не отводить, оставить часть (под бубунту) неразмеченной. После винды поставить бубунту снова. Заодно появится какая-никакая практика в установке линуха, пусть даже это и бубунта.