
You don’t have to have two different computers to use Linux and Windows 10. It’s possible to have a Linux distro installed on a computer with Windows 10 preinstalled.
In this article, I will show you how to dual boot Windows 10 and the popular Ubuntu Linux distro. But before that, you have to install Ubuntu on your Windows 10 PC.
Before you go through this process, you must backup your files. That’s because installing an OS is a risky process. Sometimes it can overwrite the existing OS and delete all your files.
N.B.: Most of the processes in this article take time to get done, so you need to be patient.
What We’ll Cover – A step-by-step Guide to Dual-Booting Windows 10 and Linux
- Prerequisites
- How to Partition your Hard Drive for Ubuntu
- How to Optimize your Hard Drive for More Partition Space (Optional)
- How to Download Ubuntu in ISO Image Format
- How to Make an Ubuntu (Linux) Bootable USB Drive
- How to Install Ubuntu Linux Distro along with Windows 10
- Now You Can Dual Boot Ubuntu and Windows 10
- Conclusion
Prerequisites
Most importantly, there are some things you must have in place if you want to use (and dual boot) Ubuntu and Windows 10 on the same PC:
- A computer preinstalled with Windows 10
- A partitioned hard drive
- A BIOS in UEFI mode (Unified Extensible Firmware Interface)
- An empty USB drive of at least 4Gig for creating a bootable disk
- An internet connection to download Ubuntu ISO image (the Linux distro) and Rufus (a bootable drive creation tool)
How to Check If Your PC BIOS is in UEFI Mode
To check if your PC BIOS comes in UEFI mode, search for “system information” and hit ENTER.
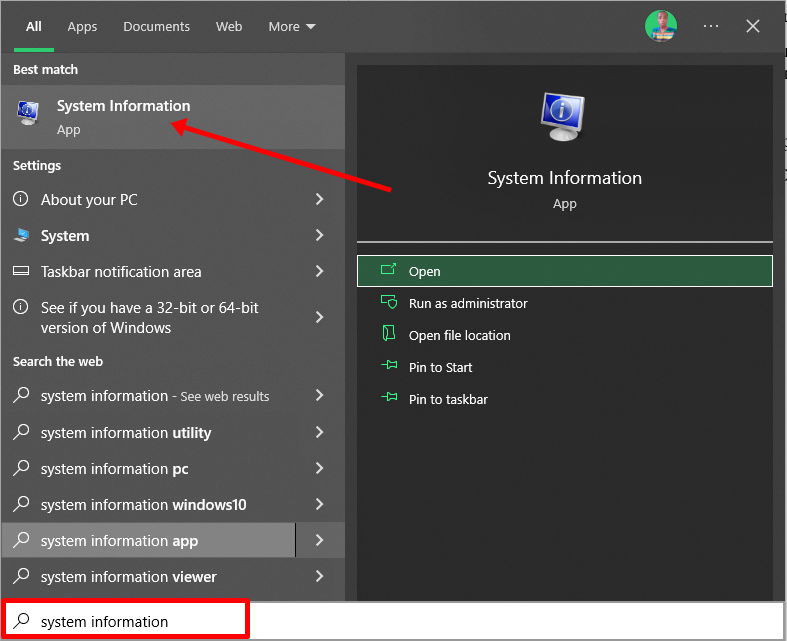
Look under BIOS mode to confirm that your PC BIOS mode comes as UEFI.
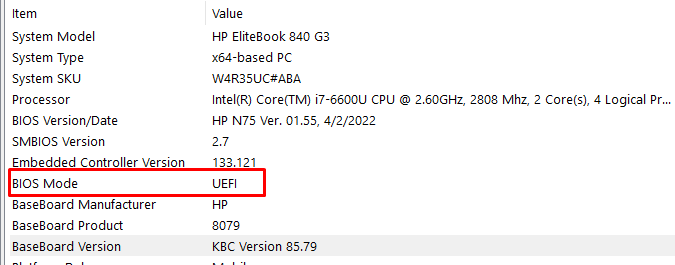
If your PC BIOS is not in UEFI mode, the two operating systems won’t see each other. You can learn more about the difference between these two modes here.
How to Partition your Hard Drive for Ubuntu
You have to partition your hard drive because you must set aside at least 20Gig for Ubuntu to live in and boot from.
To partition your hard drive, follow the steps below:
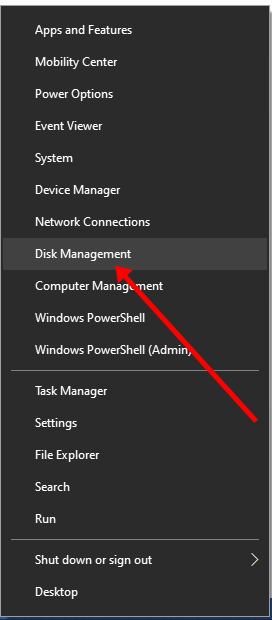
Step 1: Right-click on Start and select “Disk Management”.
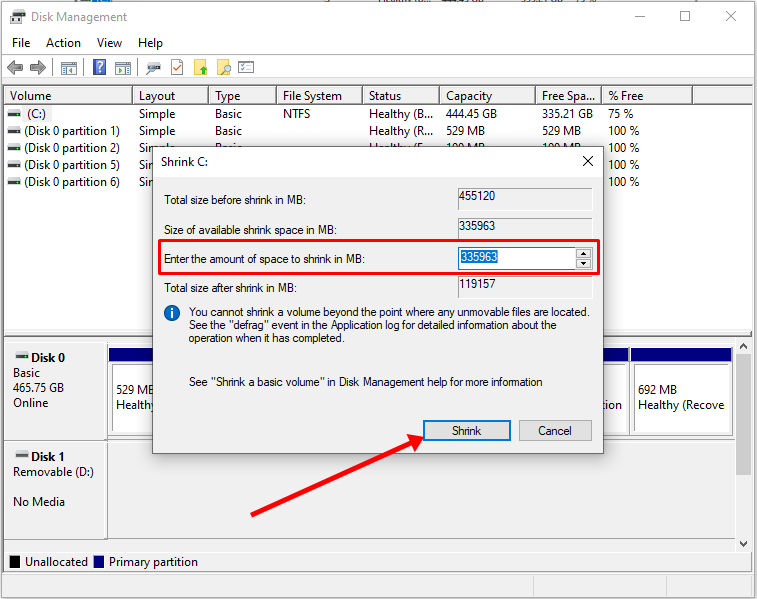
Step 2: Right-click on your C drive and select shrink volume.
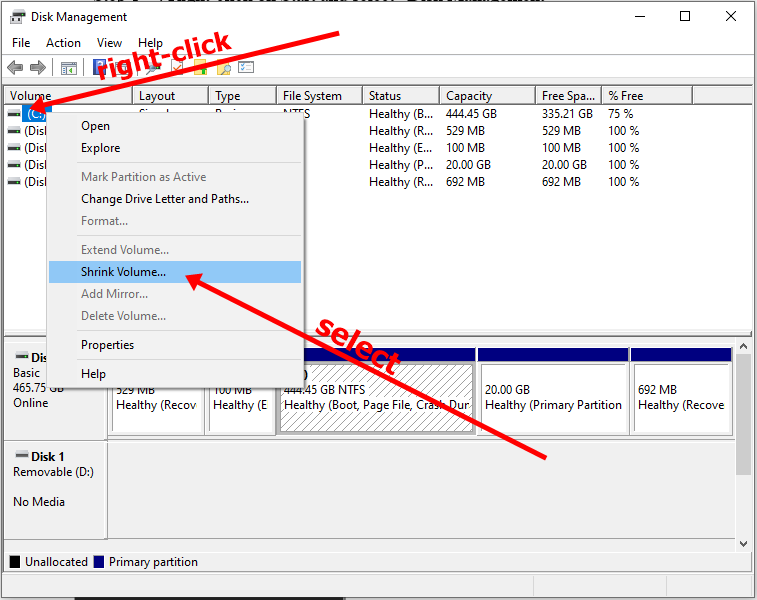
Step 3: Select at least (20000) 20Gig for Ubuntu and click “Shrink”. IT can take some time to complete, so be patient.
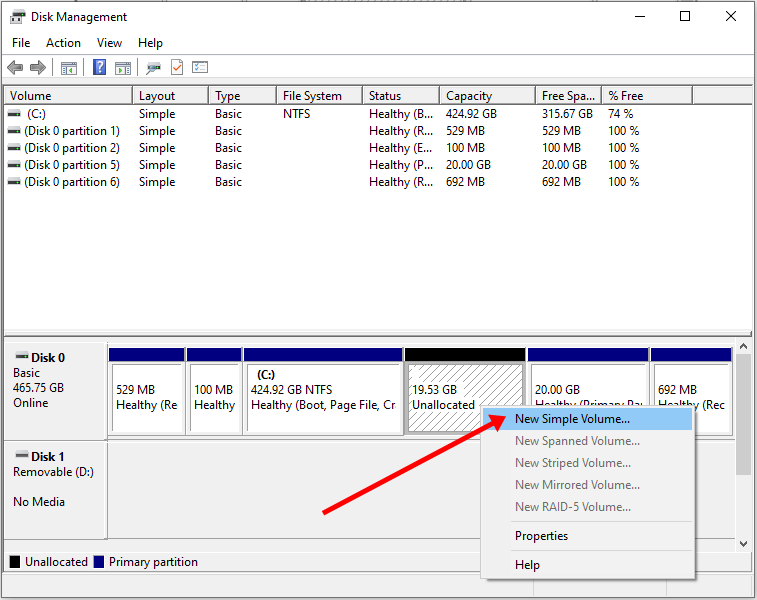
Step 4 (optional): You can go ahead and assign a letter to the new volume. Right-click on the unallocated space and select “New Simple Volume”.
Step 5: Follow the wizard and assign a letter to the drive, then follow the rest of it.
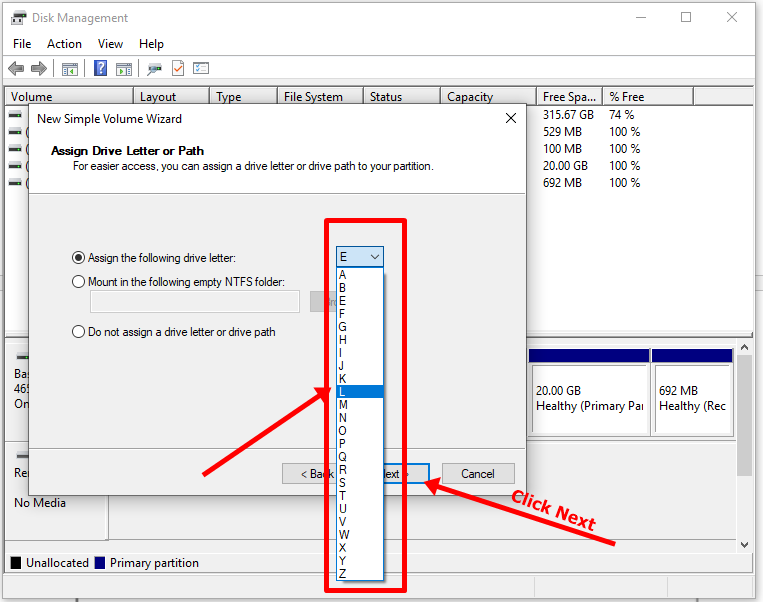
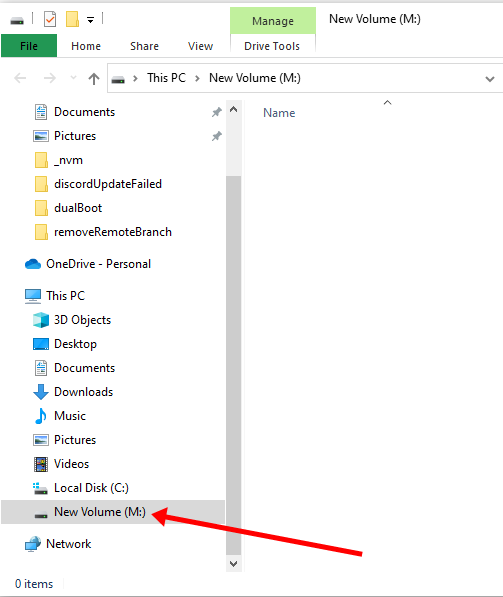
After completing the wizard, the drive should be listed on your computer.
Congrats! You’ve successfully partitioned your hard drive.
N.B.: If you have a lot of free space in your hard drive but your PC still didn’t give you up to 20Gig partition space, then you need to optimize your PC’s hard drive. Proceed to the next section of this article to do that.
How to Optimize your Hard Drive for More Partition Space (Optional)
The common purpose of hard disk optimization is to speed up your computer during boot time and make it run smoother.
At the same time, the process will defragment the hard disk and make free space more available for partitioning.
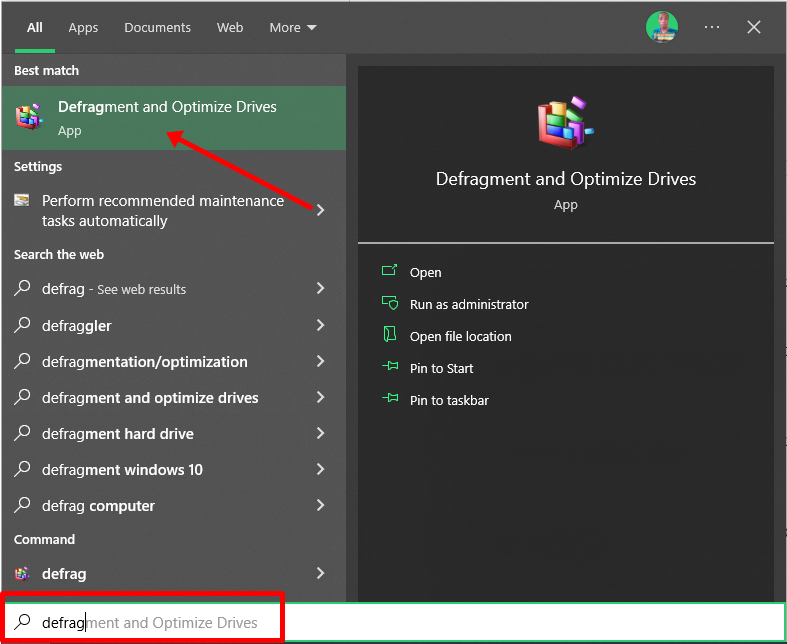
To optimize your hard drive, click Start (Windows logo key), search for “defrag” and select “Defragment and Optimize Drives”.
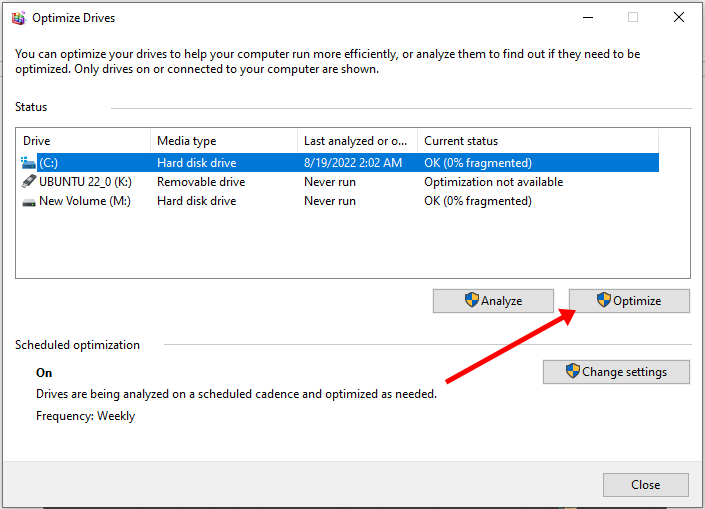
Make sure your C drive is highlighted, then click “Optimize”.
After you’ve been able to set aside at least 20Gig for Ubuntu by partitioning your hard drive, then it’s time to download Ubuntu and make a bootable USB.
How to Download Ubuntu in ISO Image Format
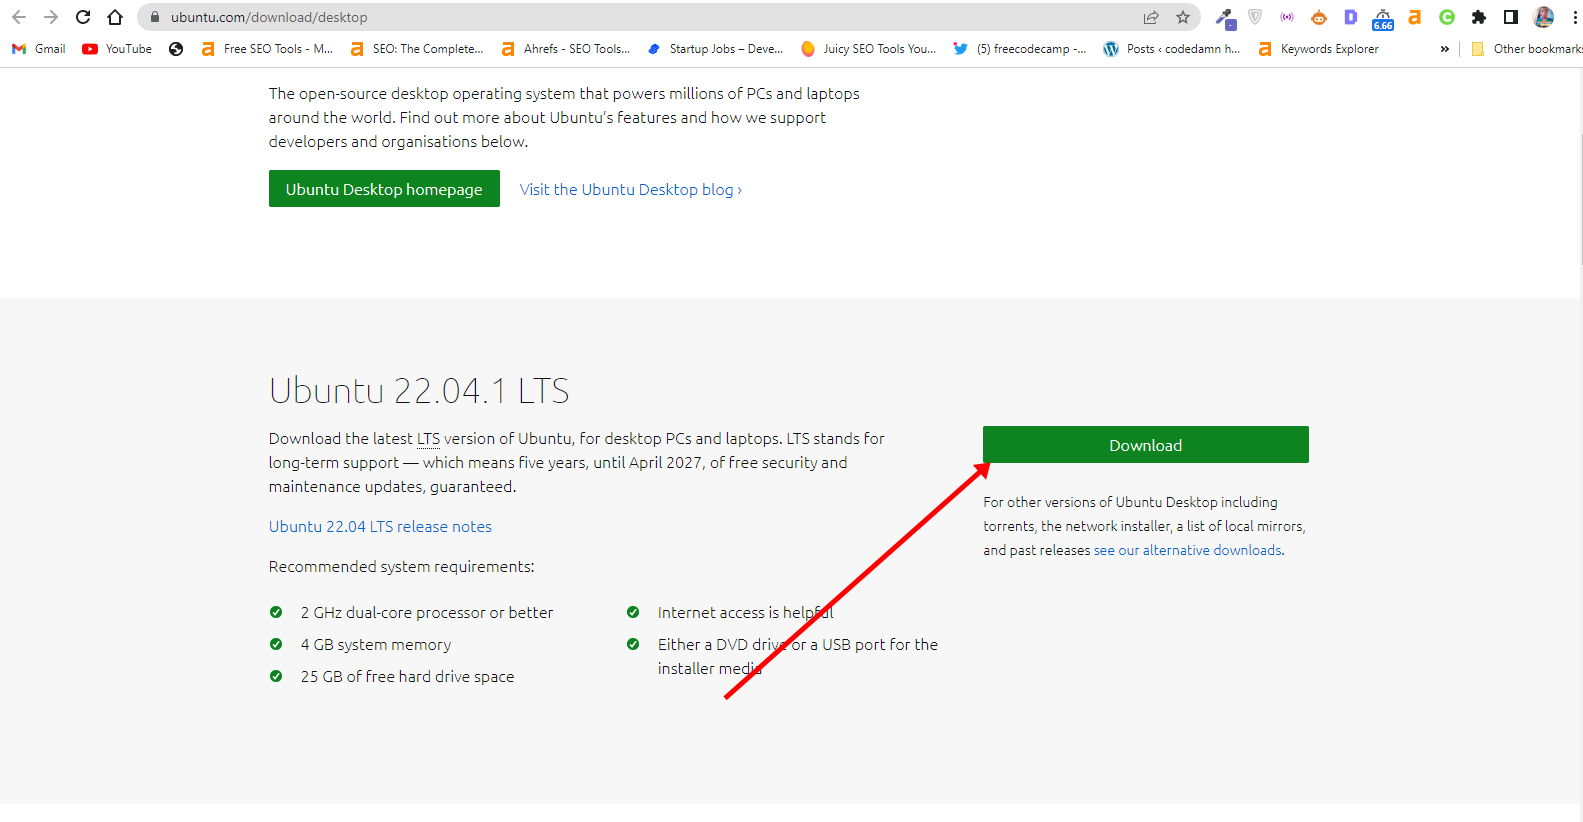
The next thing is to download Ubuntu in ISO image format so you can install Ubuntu. You can download it from the Ubuntu distro website.
After downloading Ubuntu, don’t do anything with it yet. You need to make a bootable USB and put it in there. That’s how you’ll be able to use it.
The reason you can’t install Ubuntu just like that is that it doesn’t come as an executable. It comes in form of ISO (optical disk image). That means you have to find a disk to put it in before it can work.
The next part of this guide shows how you can put the downloaded Ubuntu ISO on a USB stick.
How to Make an Ubuntu (Linux) Bootable USB Drive
You won’t be able to make a bootable USB drive for Ubuntu by just placing the downloaded ISO image in it. Follow these steps to get it done:
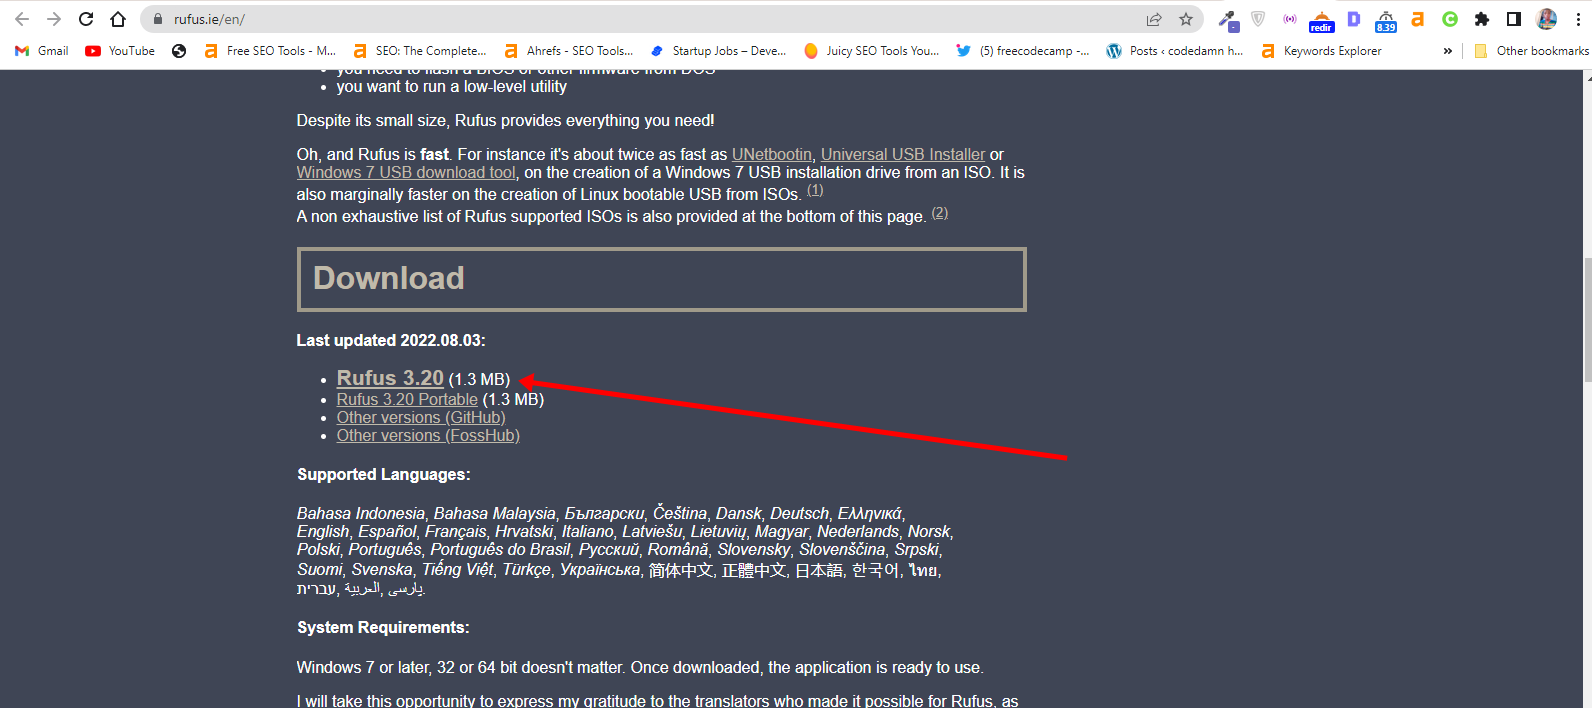
Step 1: You need to download a bootable USB drive creation tool like Rufus. You can download Rufus from their website.
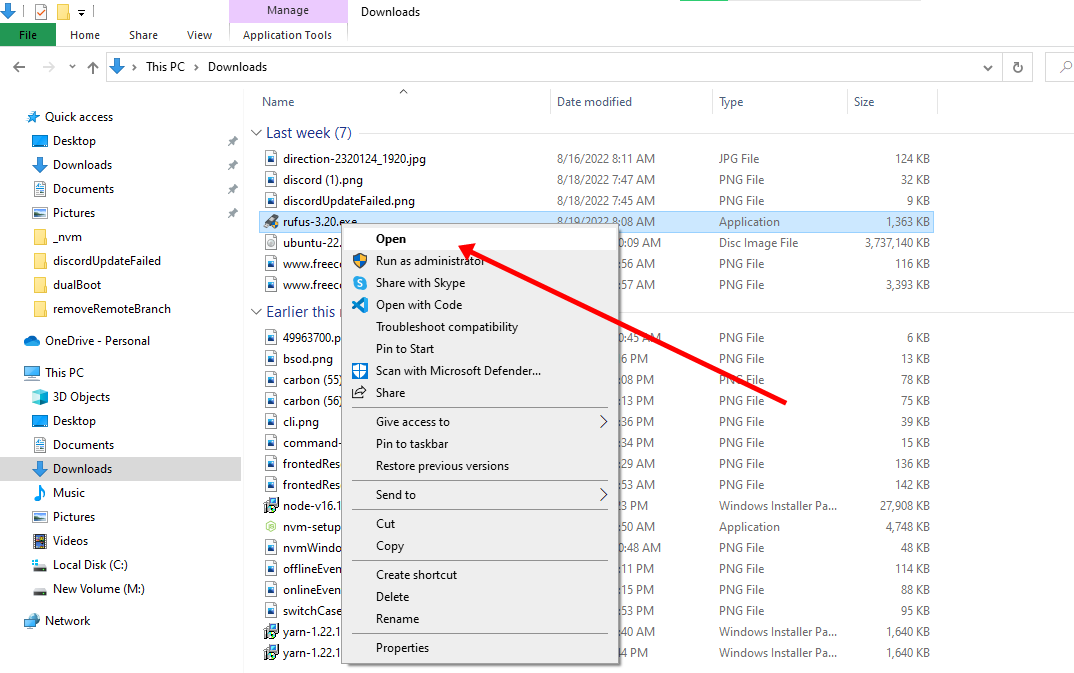
Step 2: Insert the empty USB drive into your Windows 10 PC. Right-click on Rufus and select “Open”.
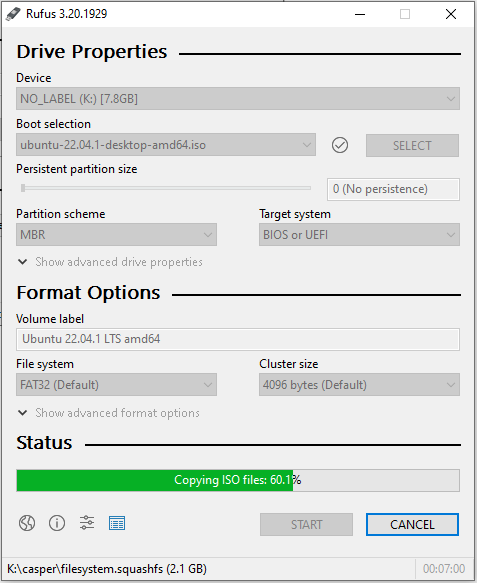
Step 3: Under “Device”, select your USB drive. And under “Boot selection”, click the “Select” button and select the Ubuntu ISO file you downloaded
Step 4: Leave every other thing as default and click the “START” button to start burning the Ubuntu distro to the drive.

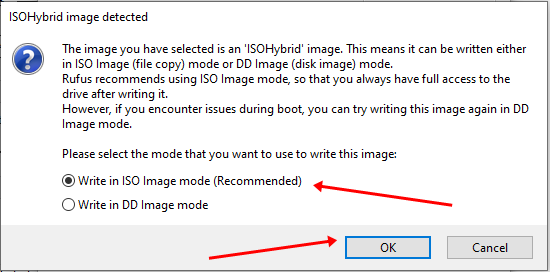
Step 5: Click OK to start the process.
Once the process is done, you should see “READY” on a green background. Click the Close button. Its time to install Ubuntu.
Congrats! Now you have a bootable drive with which you can install Linux.
The next step is to install the Ubuntu distro on your Windows 10 PC. To do this, you have to boot your PC from the bootable USB drive you created.
How to Install Ubuntu Linux Distro along with Windows 10
Step 1: Ensure the bootable drive is inserted into your Windows 10 PC
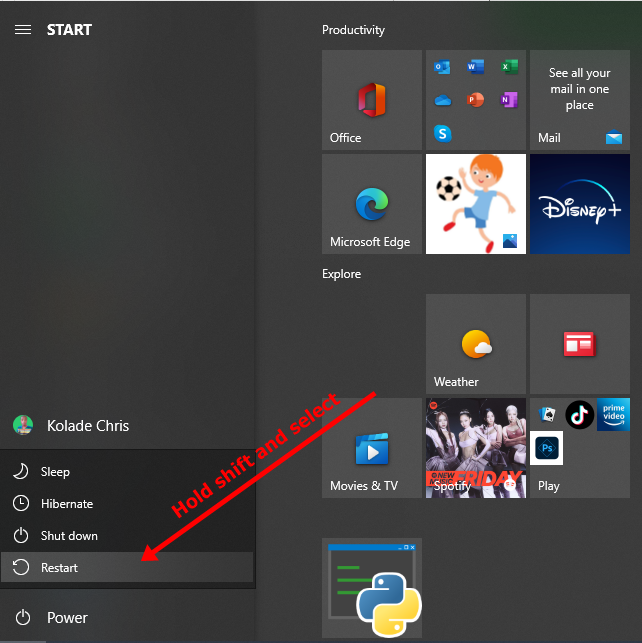
Step 2: Right-click on Start, hold SHIFT, and select Restart.
Step 2: Select “Use a Device”.
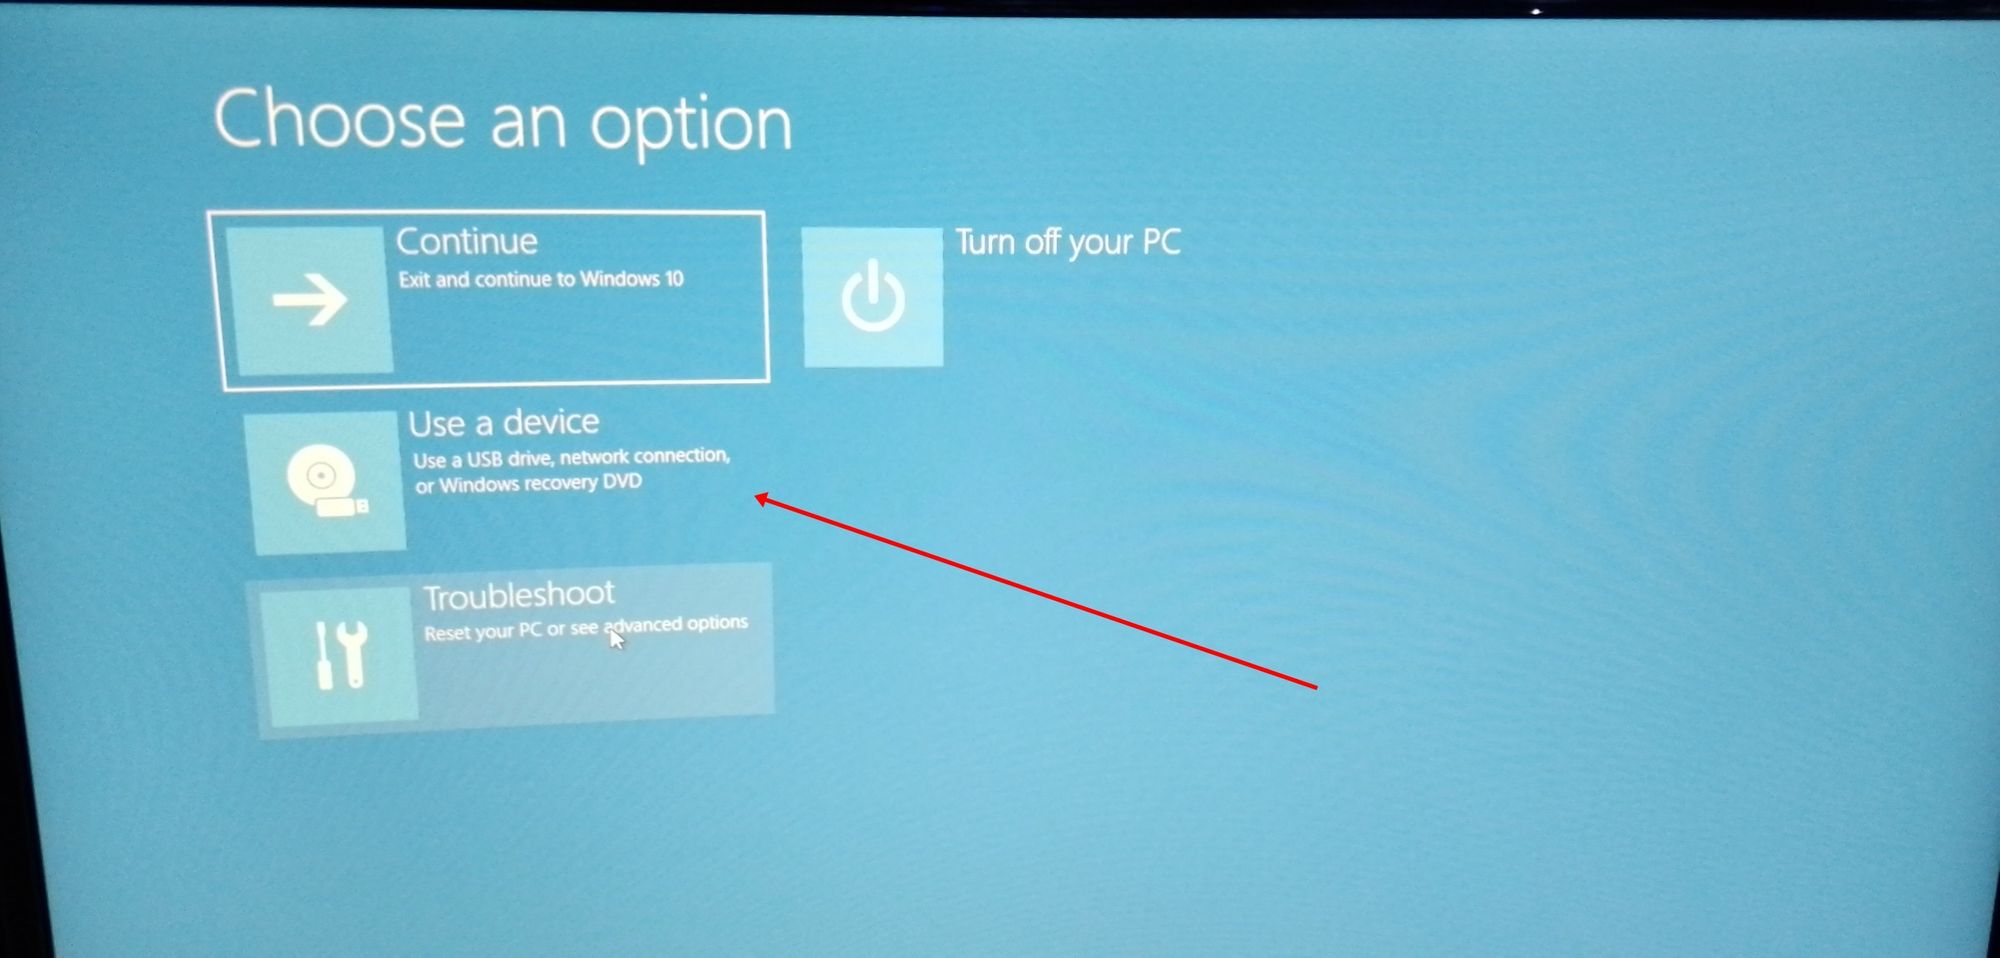
Step 3: On the next screen, you should see several devices you can boot from.
You may see the bootable drive as the name of the USB brand.
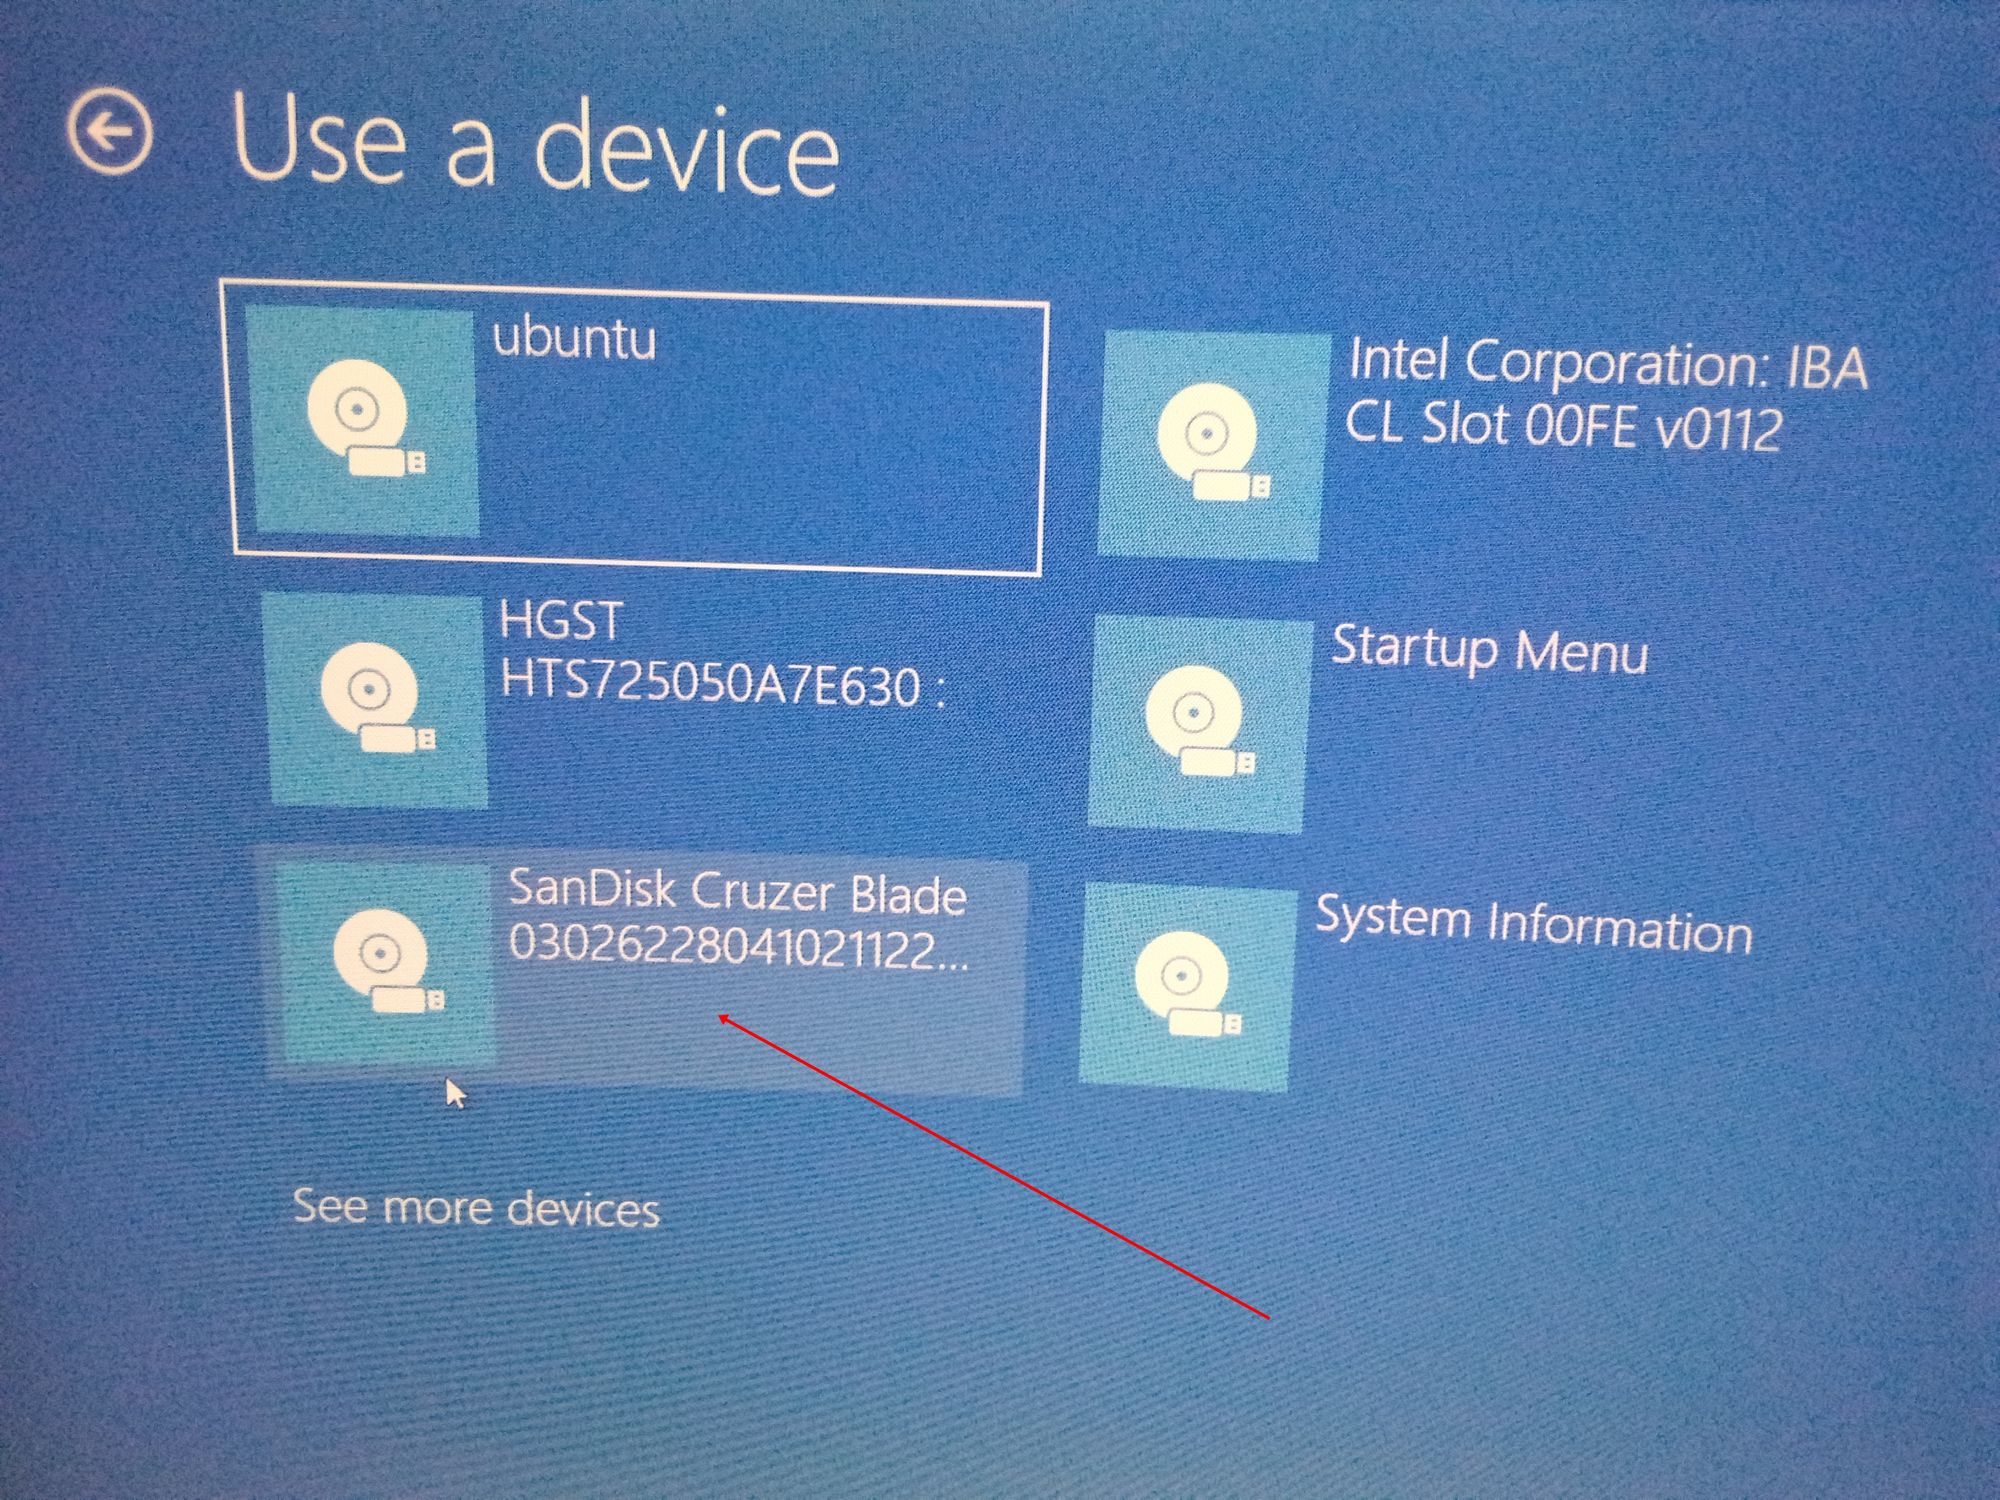
It’s possible to see it as “Ubuntu” too. Some other times, you might not see it, so you need to click on “See more devices».
If you still cannot see your bootable drive, head over to your boot menu by getting into BIOS. You will see it there.
N.B.: You should be very careful while making changes in BIOS. Whatever you do there has a lasting effect on your computer. If you are not sure of what you’re doing there, you should contact an IT professional.
Step 4: Choose «Install Ubuntu». You can also try it before installing it.
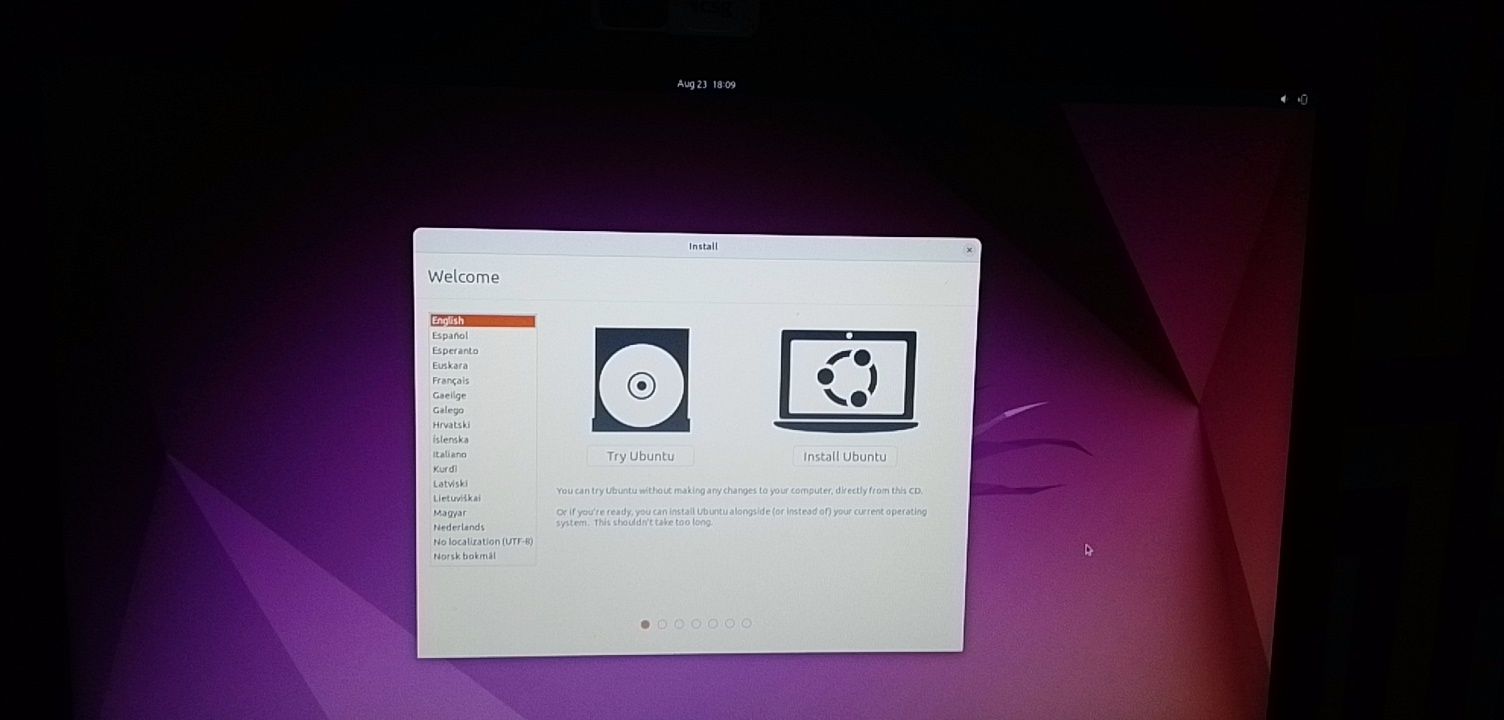
Follow other prompts of the installation wizard and make sure you don’t replace your Windows 10 OS installation with Ubuntu. This is why I suggested you back up all your files.
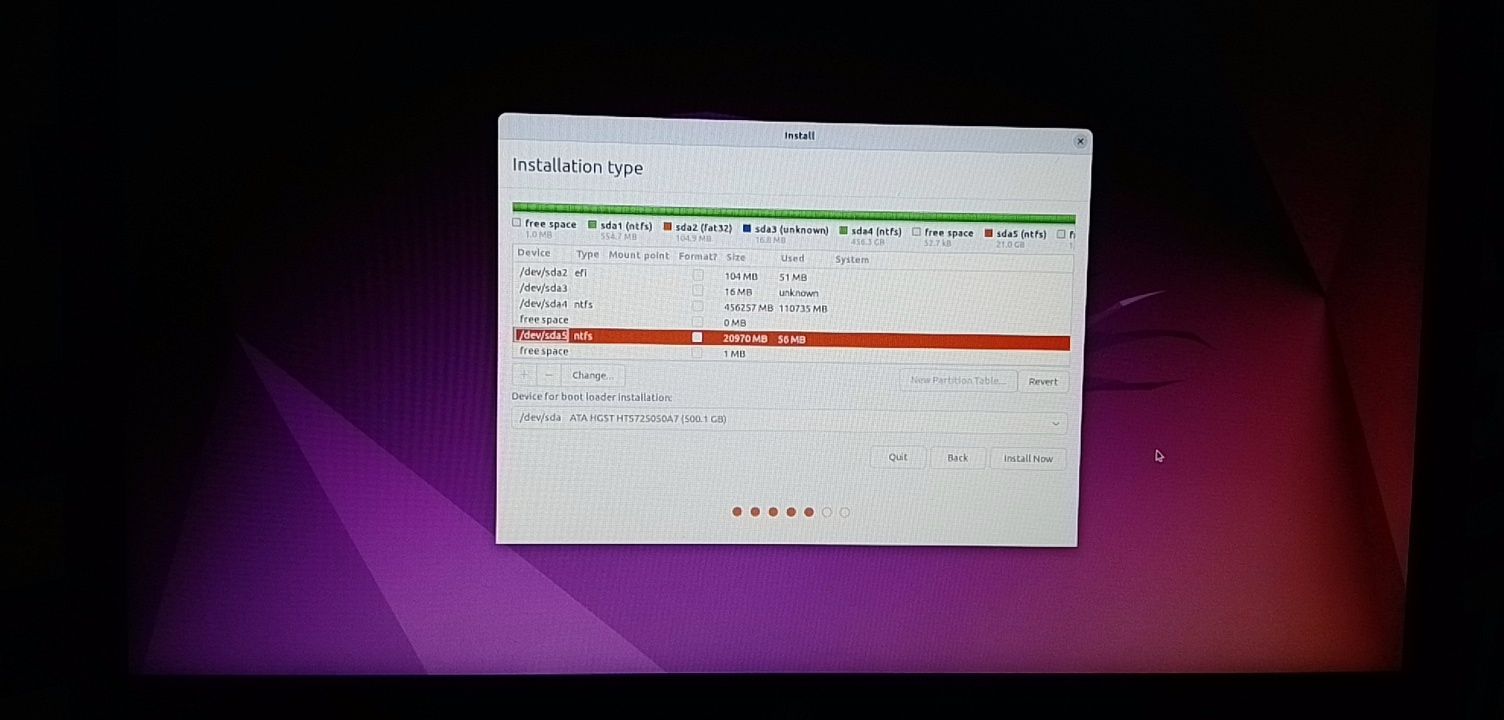
When you get to the point to select the partition you made, scroll to the partition you made earlier and press ENTER.
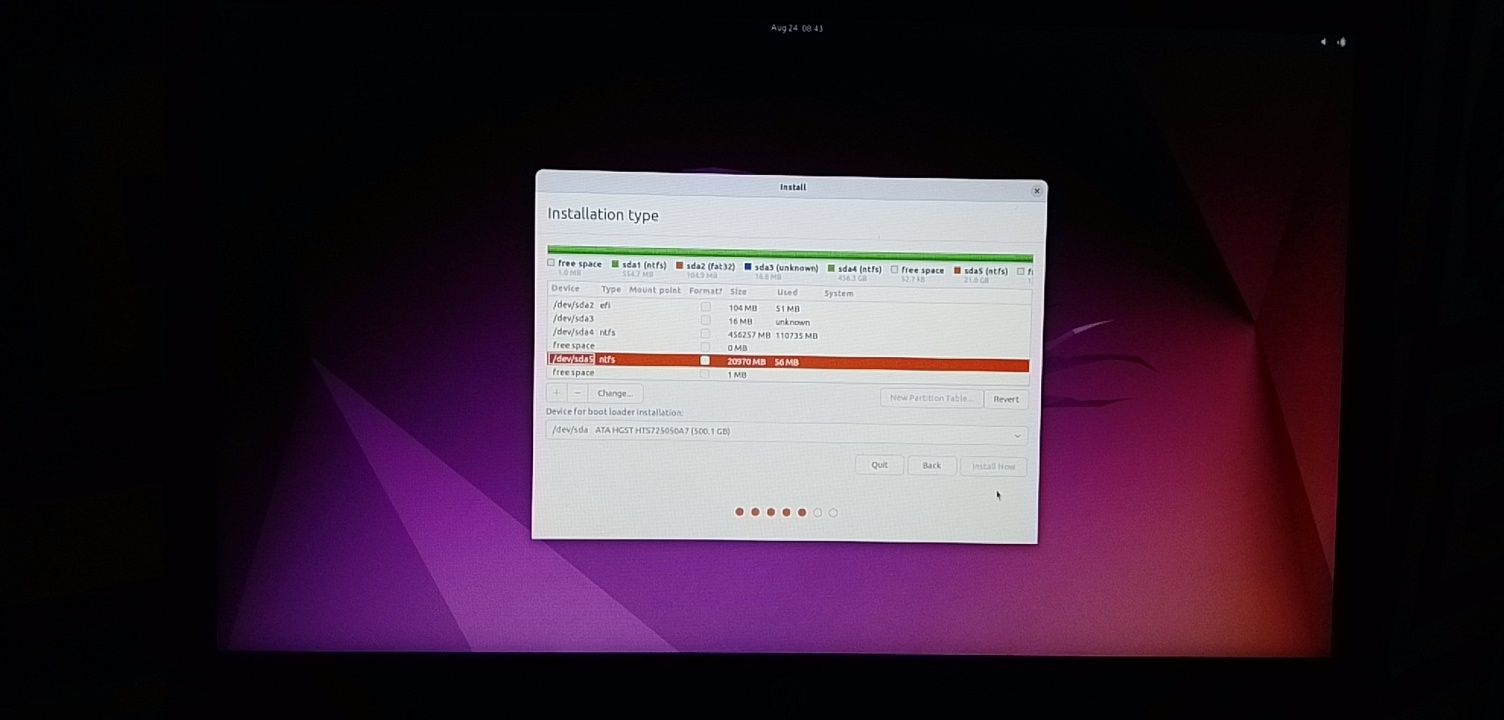
Click OK to select all the space in the partition.
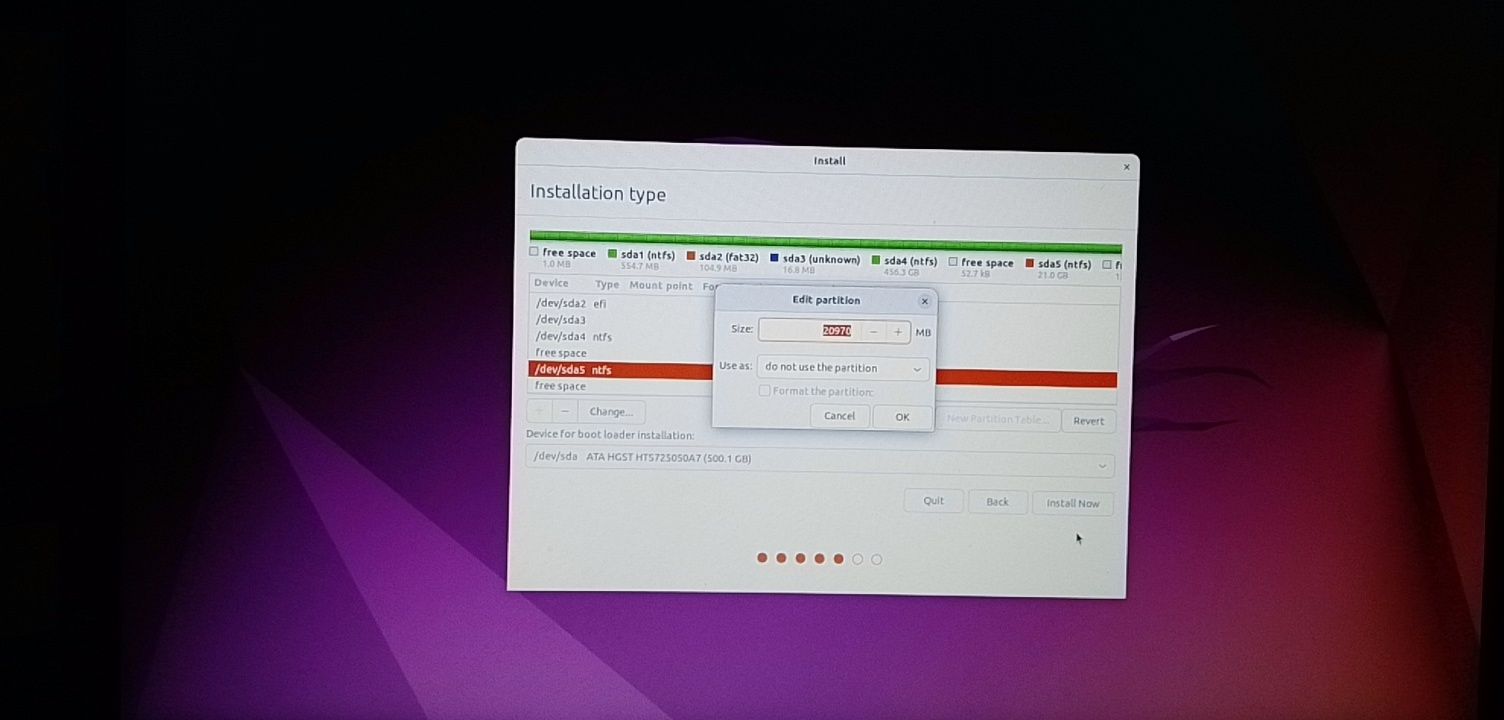
This time around, the “Install now” button will not be greyed out anymore.
Follow other prompts until Ubuntu starts installing.
After the installation is done, Ubuntu will prompt you to remove the bootable drive and press ENTER to reboot your Computer.
Now You Can Dual Boot Ubuntu and Windows 10
Immediately after you reboot the computer, you should see a screen that looks as shown below:
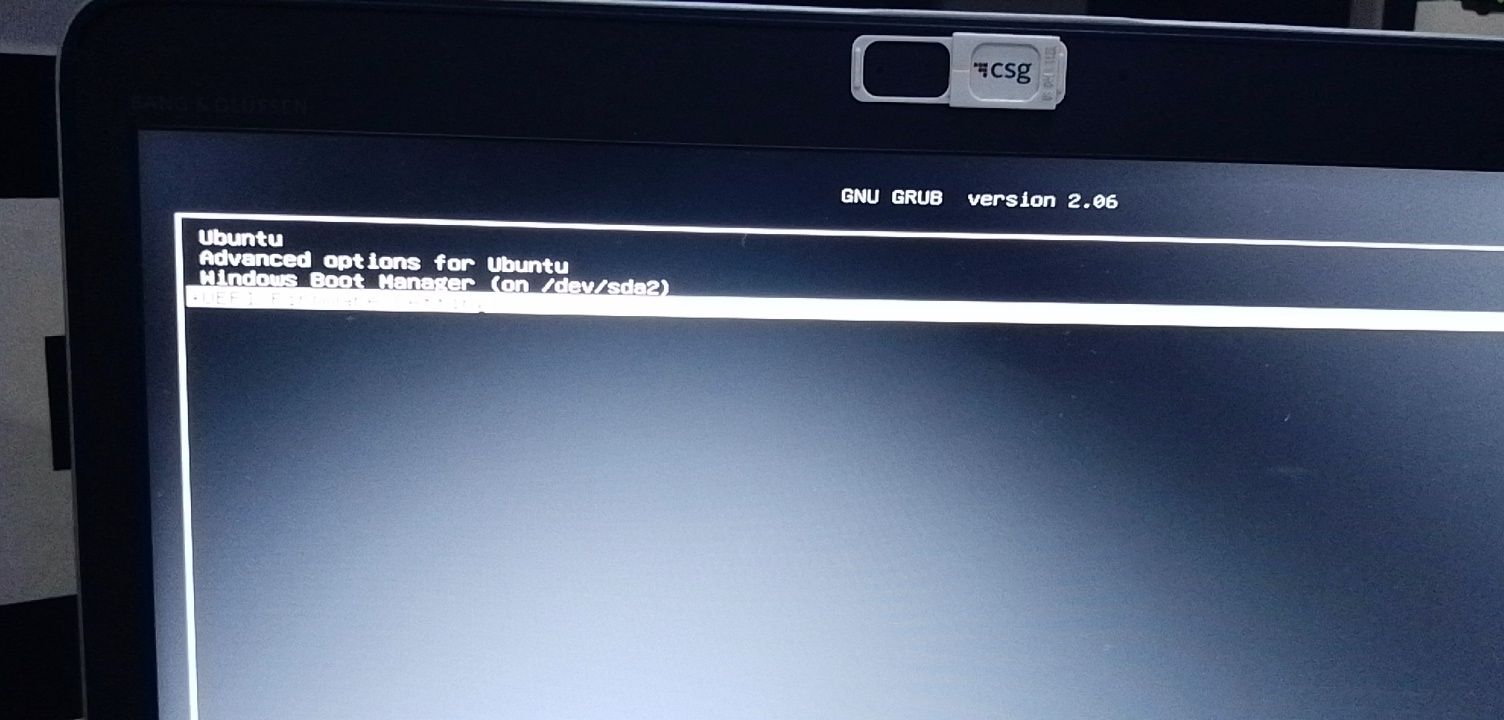
Now, you can select which one to boot into between Ubuntu and Windows 10.
To boot into Ubuntu, select Ubuntu. And to boot into Windows 10, select Windows boot manager.
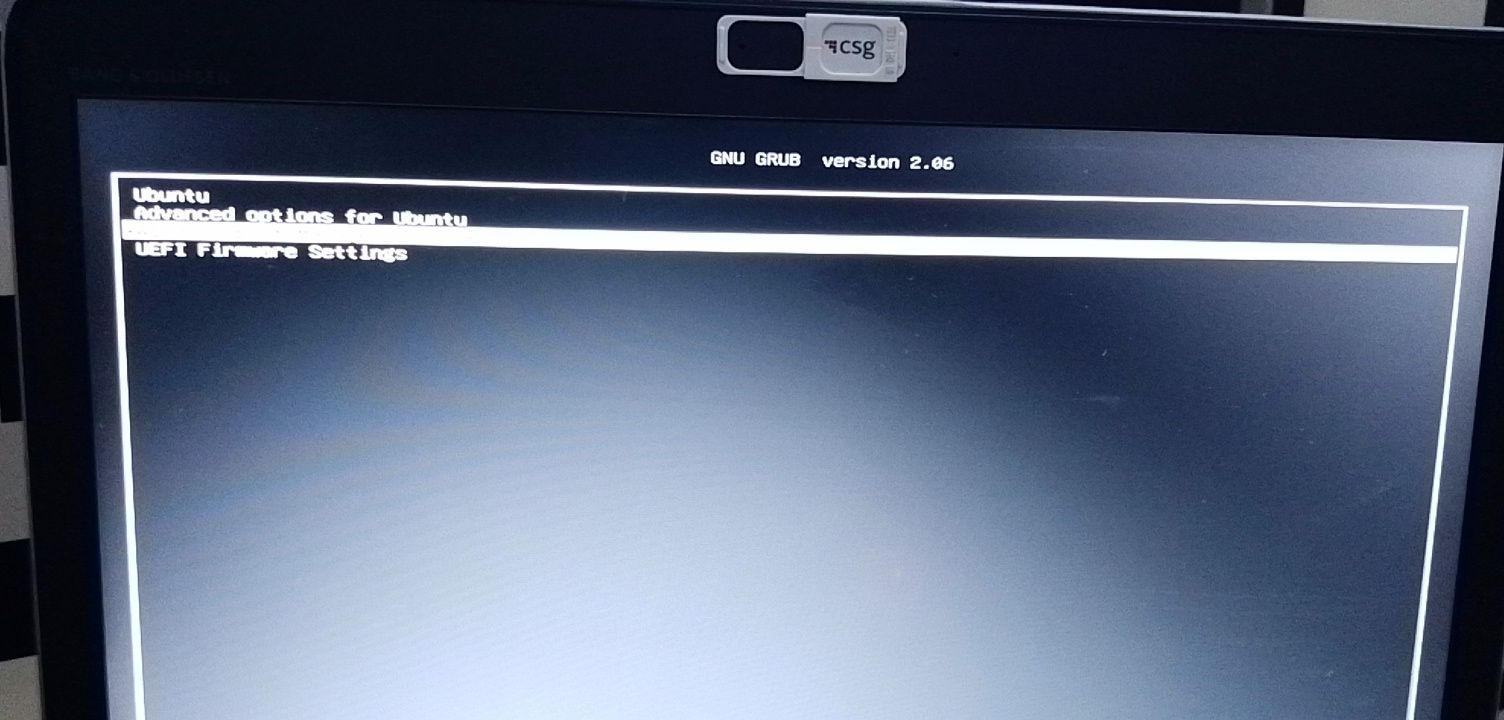
You can also get into your BIOS from the same place by choosing UEFI Firmware Settings.
Conclusion
I hope this article helps you dual boot Ubuntu and Windows 10 on your computer.
The ultimate aim of this article was to show you how to dual boot Ubuntu and Windows 10.
But the article went beyond that to show you how to:
- check if your PC’s BIOS is in UEFI mode
- partition your hard drive
- optimize your hard drive
- make a bootable USB drive
- install Ubuntu Linux Distro along with Windows on your Windows 10 PC.
If you find this article helpful, kindly share it with your friends and family.
Learn to code for free. freeCodeCamp’s open source curriculum has helped more than 40,000 people get jobs as developers. Get started
Допустим, вы прочитали в интернете несколько статей и заинтересовались свободной операционной системой Linux. Возможно, даже поставили ее себе на виртуальную машину или загрузились в Live-режиме и попробовали, как все выглядит и работает. Вам понравилось, и теперь вы хотите установить ее себе на компьютер и начать пользоваться. Но при этом терять уже установленную Windows не желаете, чтобы в случае непредвиденной ситуации можно было вернуться в полностью рабочую систему, да и любимые игры и нужные программы всегда будут под рукой. Есть возможность установить Linux и Windows 10 или 11 на одном компьютере. В свое время для меня, как и для многих других пользователей, это было идеальным вариантом.
В этой инструкции мы рассмотрим, как установить Linux рядом с Windows 10 или 11. Все будет выполняться на примере Windows 11, но этот способ будет работать и для более ранних версий, таких как Windows 7 и 8.
Я предполагаю, что у вас уже есть установленная Windows, вы нашли и определились, от какого диска отделить немного места для Linux, только не знаете, как правильно это сделать. Здесь вы получите подробный ответ на этот вопрос. Поскольку большинство систем с Windows 10, а тем более Windows 11 поставляются с UEFI в статье будет рассмотрен именно этот вариант установки. Но если у вас классический BIOS то установка будет мало чем отличаться.
Немного теории
Для установки операционной системы Linux рядом с Windows 10 вам понадобится создать несколько дополнительных разделов диска. Как минимум один, а лучше два. Linux не принято устанавливать на один раздел как Windows, хотя такой вариант возможен. Linux настолько гибок, что позволяет разместить систему, файлы пользователя и настройки на разных разделах. Это очень выгодно во время переустановки. Вы переустанавливаете систему на системном разделе, а все ваши файлы в домашней папке и настройки рабочего окружения останутся на месте.
Вот эти разделы:
- Системный — для системных файлов;
- Домашний — для ваших личных файлов.
Минимальные требования объема под системный раздел в различных дистрибутивах варьируются от десяти до тридцати гигабайт. Но этого хватит для установки самой системы и нескольких дополнительных программ. Если же вы собираетесь использовать много программ и игр, особенно если они занимают много места, необходимо взять еще 30-60 гигабайт про запас. Я рекомендую использовать под системный раздел Linux так же, как и для диска C Windows, 50-100 гигабайт.
Раньше я рекомендовал делать ещё и раздел подкачки. Но в современных дистрибутивах обычно для этих целей используется файл вместо отдельного раздела. Если вы новичок, то можете оставить всё как есть.
1. Резервное копирование
Чтобы установить Linux рядом с уже использующейся Windows 10 или 11, нужно будет «отрезать» пространство от системного диска. Поэтому перед решительными действиями важно создать резервную копию системы или хотя бы важных файлов. Если все пройдет хорошо, ничего страшного не случится ни с файлами, ни с системой, но из-за какого-либо сбоя, например, отключения электричества, файловая система может быть повреждена. Вы и сами по невнимательности можете сделать что-то не так и удалить не то, что нужно.
Поэтому, если будете работать с системным диском, скопируйте важные файлы на внешний носитель, и, если есть возможность, создайте резервную копию операционной системы с помощью соответствующего пункта панели управления:
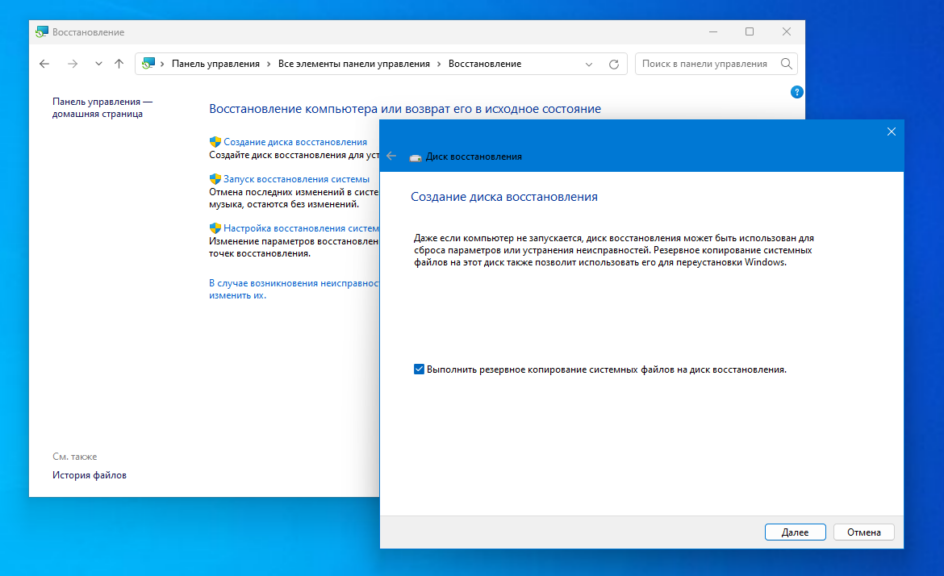
Вы также можете использовать сторонние инструменты для создания резервной копии системы. Например Acronis или Clonezilla. При работе с не системным разделом, например, D, E, F и т д, достаточно просто скопировать файлы оттуда.
2. Уменьшение раздела Windows
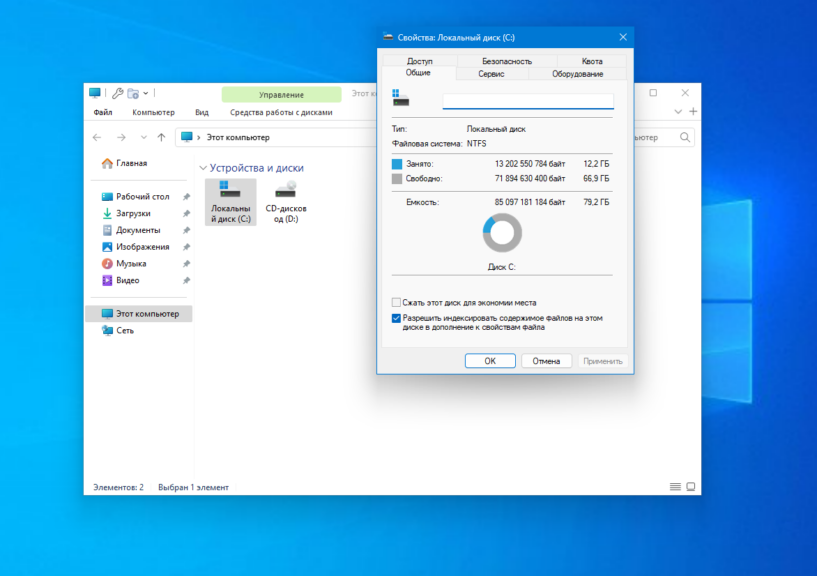
Теперь переходим непосредственно к подготовке диска для установки Windows и Linux. Проще всего это сделать с помощью стандартной утилиты управления дисками в Windows. Прежде всего, вы можете открыть мой компьютер и посмотреть характеристики своего диска C или другого диска, от которого вы хотите отделить пространство:
Кликните правой кнопкой по значку «Этот компьютер» на рабочем столе и откройте пункт «Управление«:
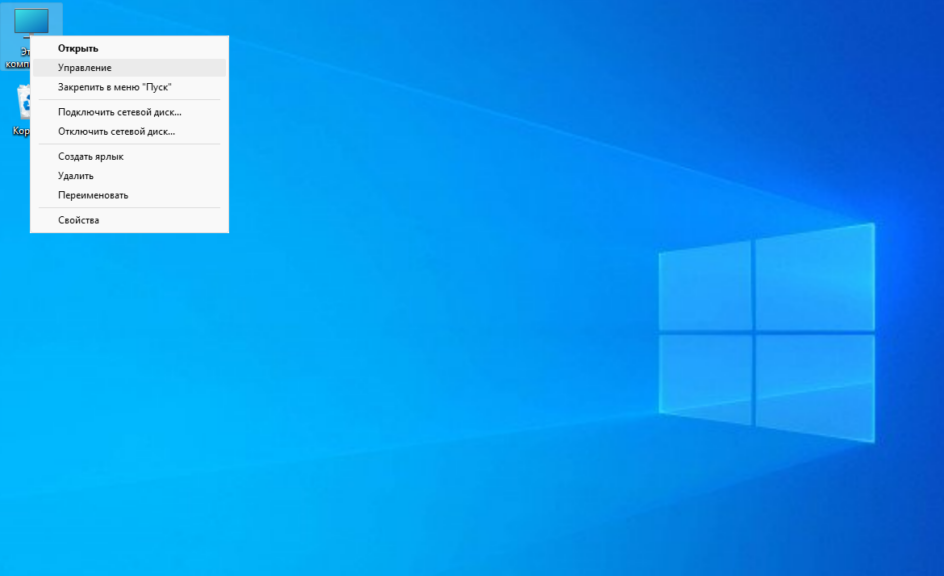
Дальше нам нужна утилита Управление дисками:
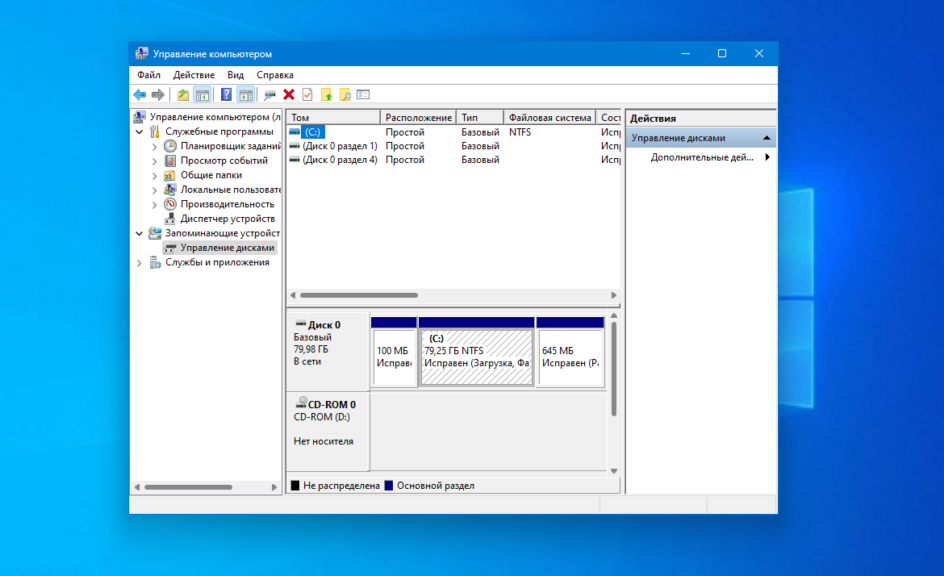
Здесь внизу окна мы видим список дисков и системный диск C на диске 0. Если у вас есть ещё дополнительный диск для файлов то он будет иметь метку D или E. Дальше я приведу пример как отделить дисковое пространство от диска C. Для других дисков всё аналогично.
Кликните по нужному диску правой кнопкой и выберите опцию Сжать том:
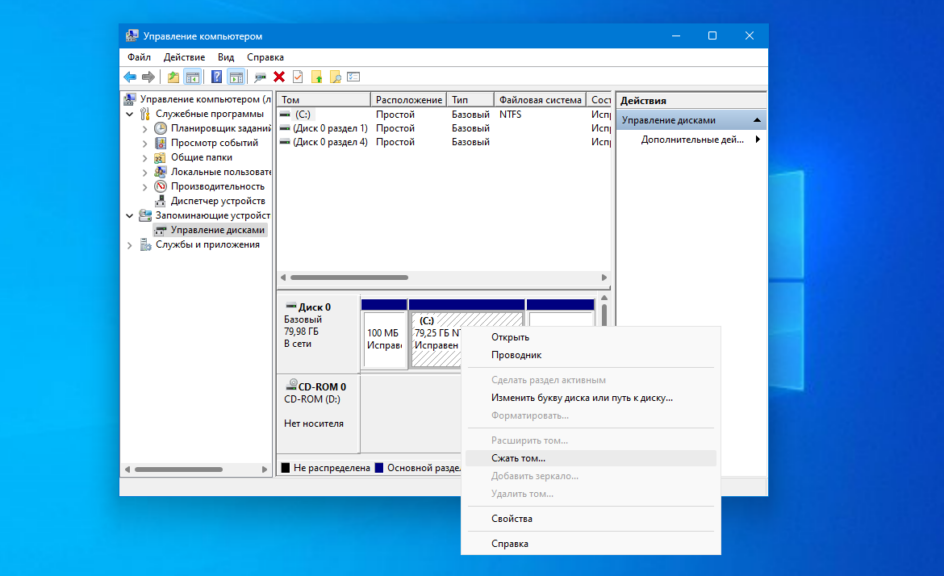
Откроется вот такое окно, в котором нужно ввести размер создаваемого тома в поле размер сжимаемого пространства:
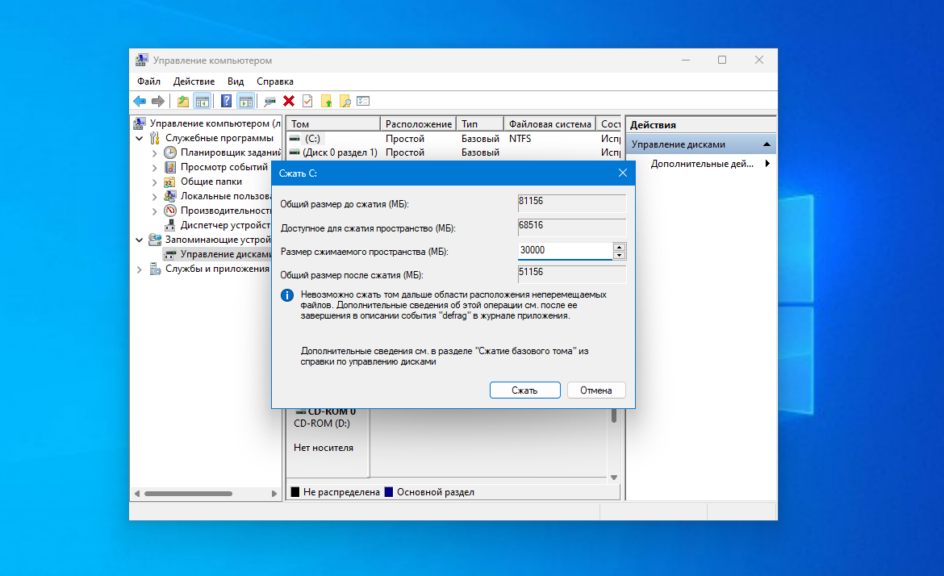
Обратите внимание, вы не можете указать размер больше, чем количество свободного места на диске. Поэтому сначала освободите место, если еще этого не сделали. Кликаем на кнопку сжать. После этого появится неразмеченное пространство, из которого можно создать нужные разделы:
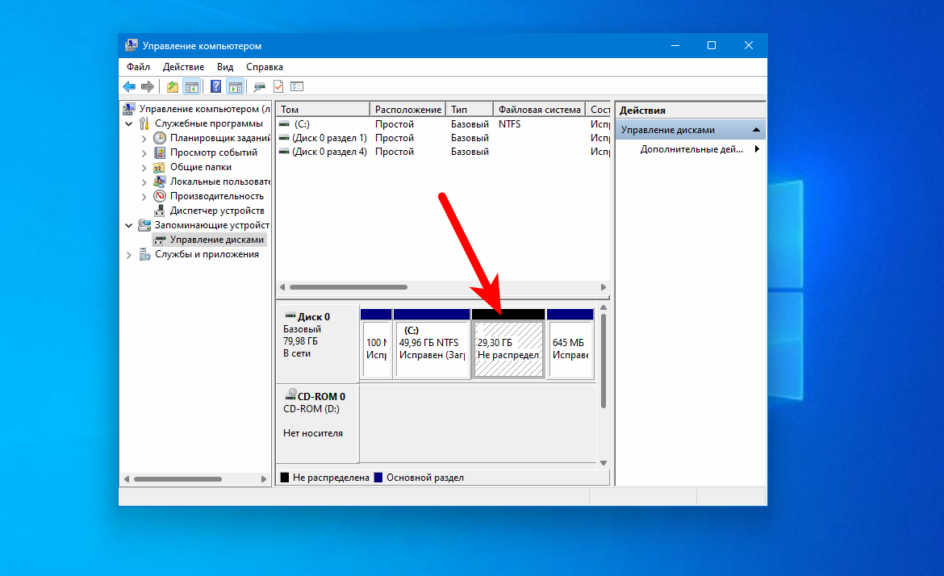
Вот и все. Теперь у вас есть место для установки Linux рядом с Windows 10. Выполнять дальнейшую разметку диска в утилите Windows не вижу смысла, поскольку все опасные операции, которые могли повредить систему, мы уже сделали, а разделы для Linux лучше всего и настраивать средствами Linux.
Загрузка с USB в Windows
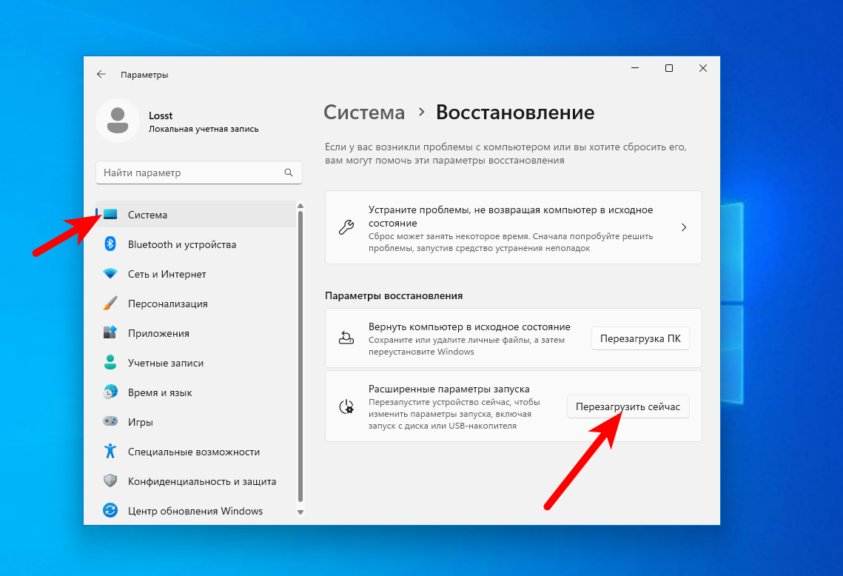
Большинство компьютеров на которые установлена Windows 11 или Windows 10 используют уже современный интерфейс управления загрузкой UEFI. А это значит что при определённых настройках Windows у вас могут возникнуть трудности с входом в интерфейс BIOS и выбором нужного устройства для загрузки. Но можете перезагрузиться в BIOS прямо из Windows. Для этого откройте Настройки, затем Система, затем Восстановление, найдите там Расширенные параметры и нажмите Перезагрузить сейчас:
После перезагрузки выберите Поиск и устранение неисправностей -> Дополнительные параметры -> Параметры встроенного ПО UEFI.
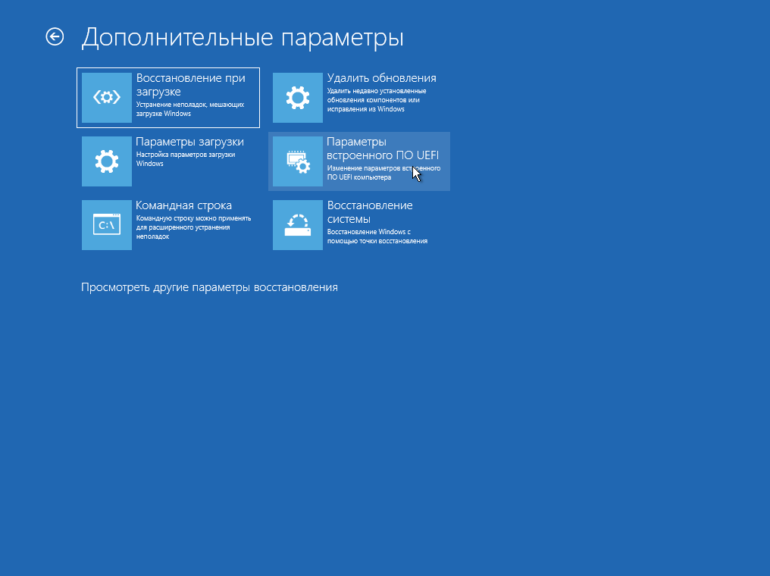
А уже тут вы можете выбрать с какого устройства нужно загрузить систему и загрузить образ с Linux.
Подготовка диска в Linux
Это не следующий пункт установки Linux вместе с Windows. Это альтернативный вариант разметки диска без использования Windows. Если вы по каким-либо причинам не хотите использовать стандартную утилиту Windows для выделения нужного пространства, это также можно сделать с помощью любого LiveCD дистрибутива Linux с предустановленной программой для управления дисками Gparted. Например, того же Ubuntu.
Загрузитесь с диска Ubuntu, в главном меню системы наберите Gparted:
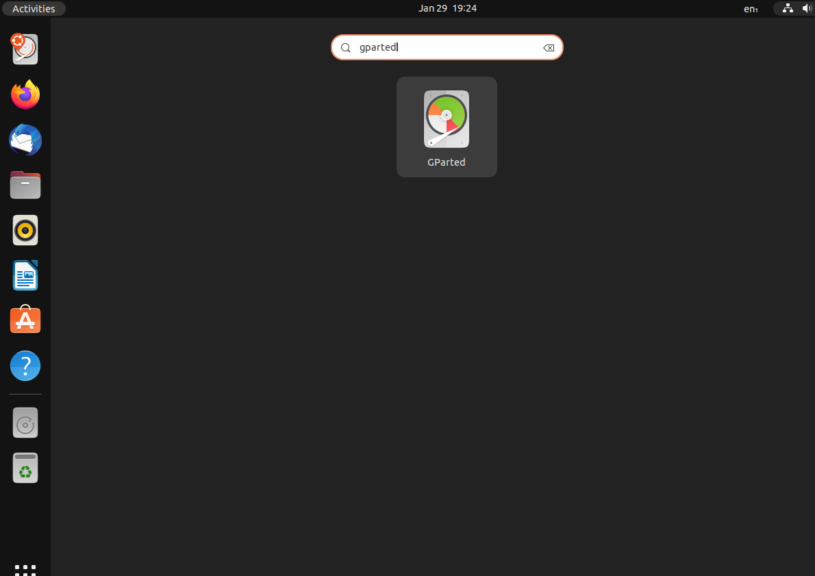
Откроется вот такое окно программы для управления дисками в Linux:

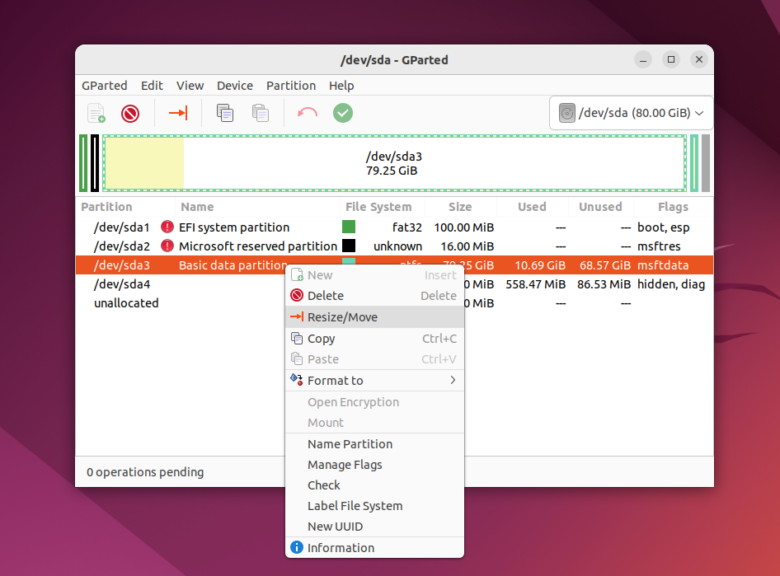
Здесь важно заметить, что разделы диска в Linux называются иначе чем в Windows. Здесь диски — это просто адреса файлов в виртуальной файловой системе dev. Позже вы поймете, что это такое, а сейчас важно только, что имя каждого раздела начинается с /dev/sd. Дальше идет буква, означающая физический диск (sda, sdb, sdc, sdd и так далее). За ней цифра, что обозначает номер раздела на диске, например: sda1, sda2.
В окне утилиты, кроме имени раздела диска, мы можем видеть файловую систему, размер и свободное место на диске. Теперь по размеру и файловой системе мы можем понять на каком диске у нас расположена система. В этом примере разделов довольно много, но удалять здесь ничего нельзя если вы не хотите сломать систему. Рассмотрим их подробнее:
- /dev/sda1 — раздел загрузчика с файлами EFI;
- /dev/sda2 — раздел зарезервированный Windows;
- /dev/sda3 — раздел с операционной системой Windows, диск C;
- /dev/sda4 — раздел восстановления Windows.
Здесь раздел /dev/sda3 имеет файловую систему NTFS и занимает 79 гигабайт, также как и системный раздел Windows, больше таких разделов нет, а значит именно он нам нужен.
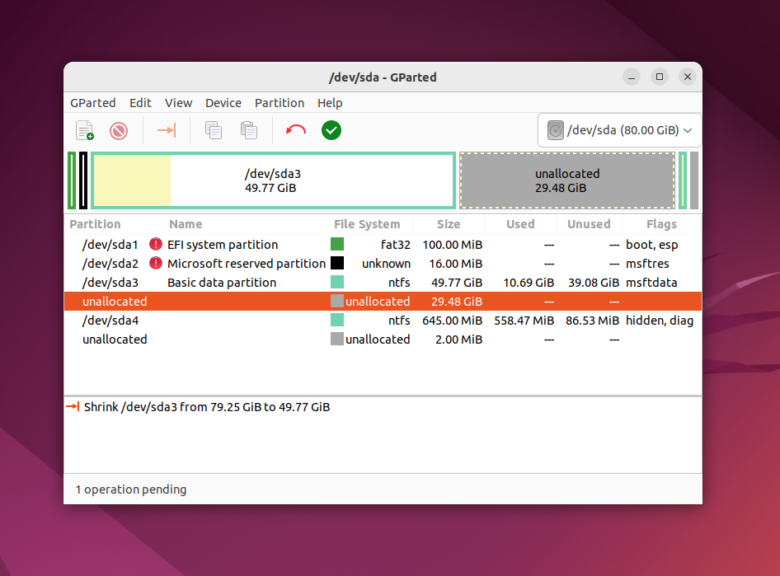
Мы будем делать то же, что и в предыдущем примере. Давайте уменьшим размер раздела /dev/sda3 (C) до 50 гигабайт чтобы на освободившимся пространстве выполнить установку Linux на Windows. Для этого кликните по разделу правой кнопкой и выберите пункт Resize/Move:
В открывшемся окне можно ввести нужный размер вручную в поле New size или воспользоваться ползунком:
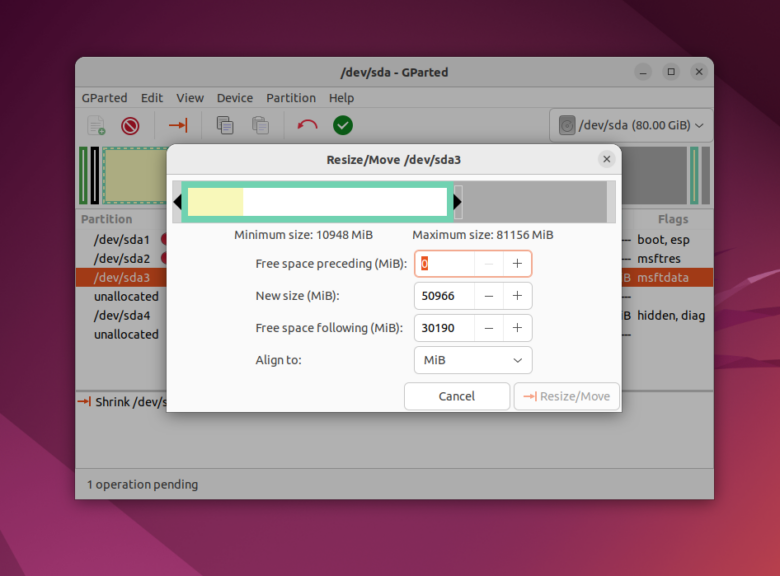
Затем нажмите кнопку Resize/Move. В результате вы увидите свободное пространство, но реальных изменений на диске еще нет.
Обратите внимание, что так как это системный раздел, нельзя трогать начало раздела. Вы можете спокойно уменьшать размер раздела, добавляя свободное пространство после него, но не пытайтесь это сделать до него, вот так:
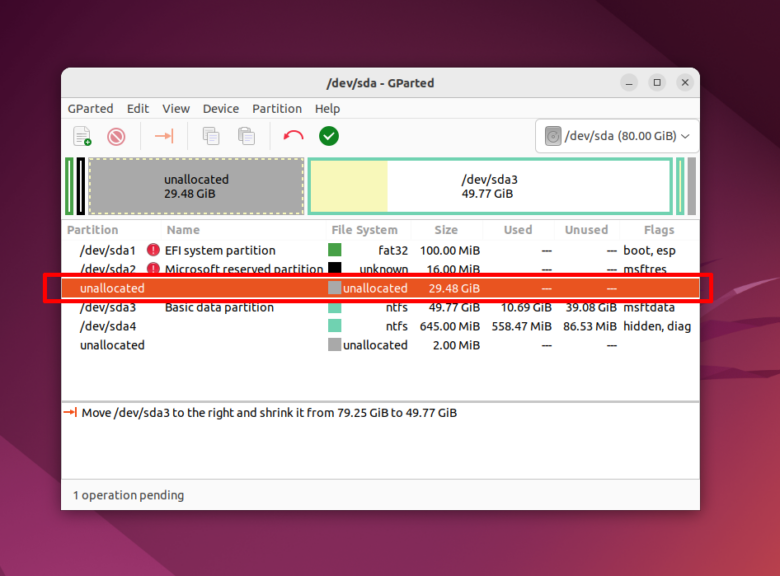
Так делать не нужно, иначе будет поврежден загрузчик Windows, его очень легко восстановить, но решать эти проблемы в самом начале знакомства с Linux вам, думаю, незачем.
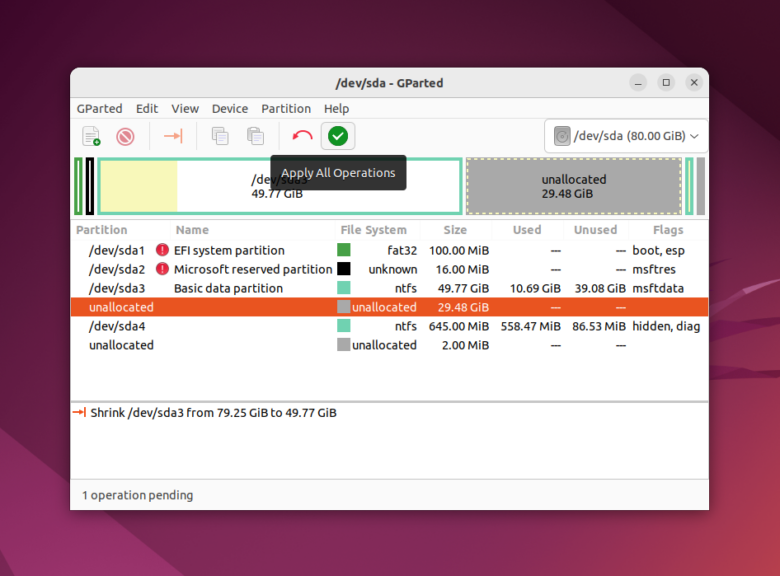
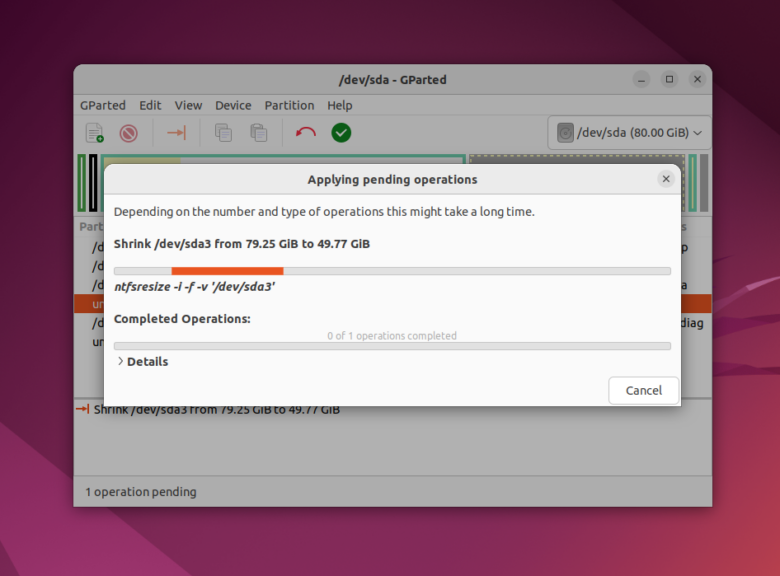
Для того чтобы записать все на диск, нажмите зеленую галочку, или в меню Edit выберите пункт Apply All Operations:
После этого программа попросит подтверждения действия. Обратите внимание на окно. Оно должно выглядеть примерно вот так:
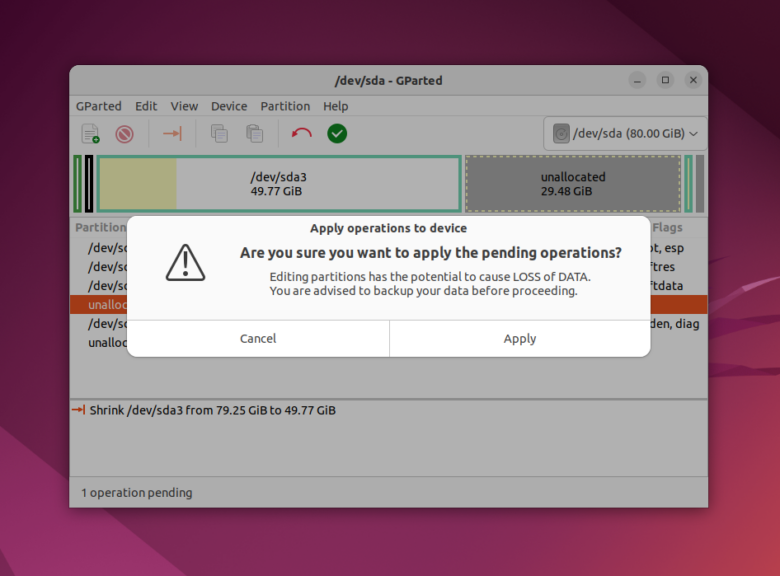
Если же программа предупреждает что вы пытаетесь переместить начальный сектор раздела, то вы сделали что-то не так и следует отменить изменения и начать заново. Процесс изменения размера файловой системы может занять немного времени:
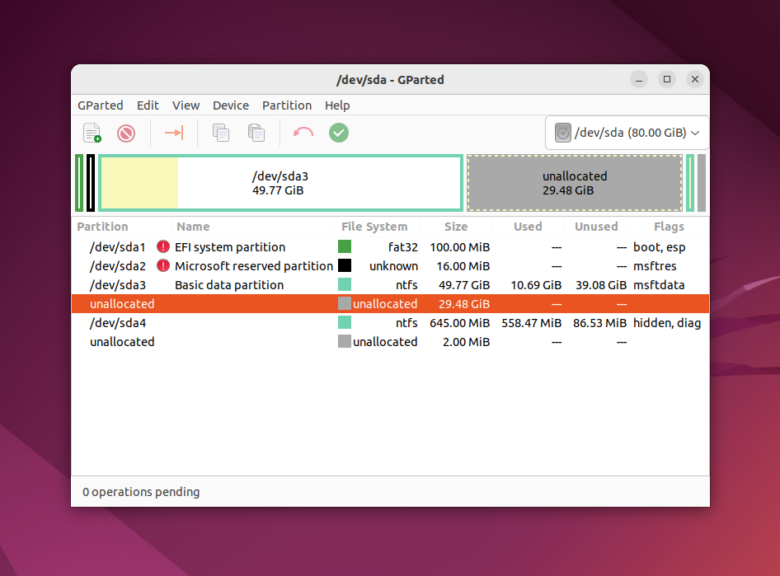
Теперь вы можете видеть, что раздел /dev/sda3 уменьшился, и появилось свободное место:
Создавать разделы для Linux здесь мы тоже не будем, лучше все это сделать во время установки, специально предназначенной для этого утилитой.
Установка Linux рядом с Windows 10
Я не буду здесь подробно рассматривать, как установить Linux, все это уже подробно рассмотрено в моих статьях отдельно для разных дистрибутивов. Рассмотрим только несколько аспектов разметки диска. Вы можете использовать любой дистрибутив, все действия плюс минус аналогичны. Но в качестве примера в этой статье будет использоваться Ubuntu. так как это самая популярная ОС для новичков.
1. Выбор способа разметки
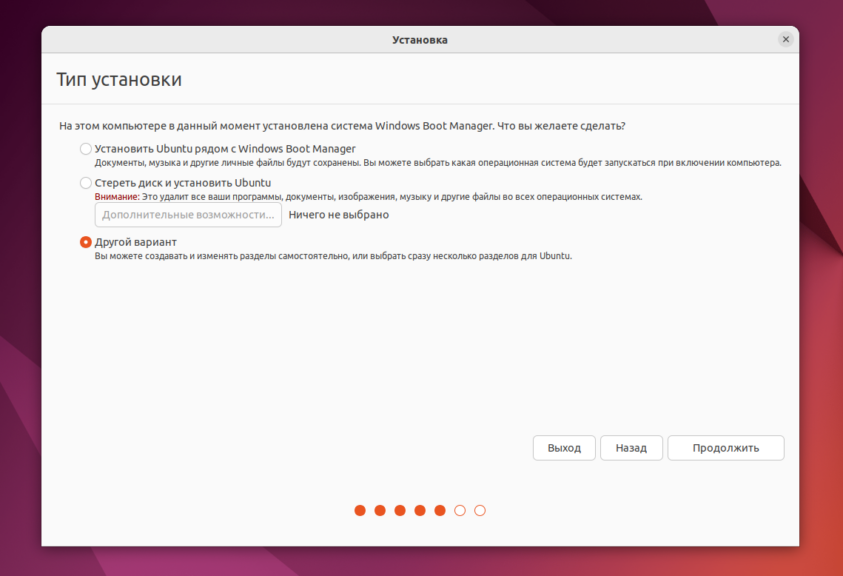
На этапе выбора способа разметки вы можете выбрать Установить Ubuntu рядом с Windows. По умолчанию выбран именно этот пункт:

Но я рекомендую выбрать ручной вариант, поскольку так у вас будет больше контроля над процессом установки:
2. Создание разделов
После выбора ручного способа разметки перед вами откроется такое окно редактора разделов:
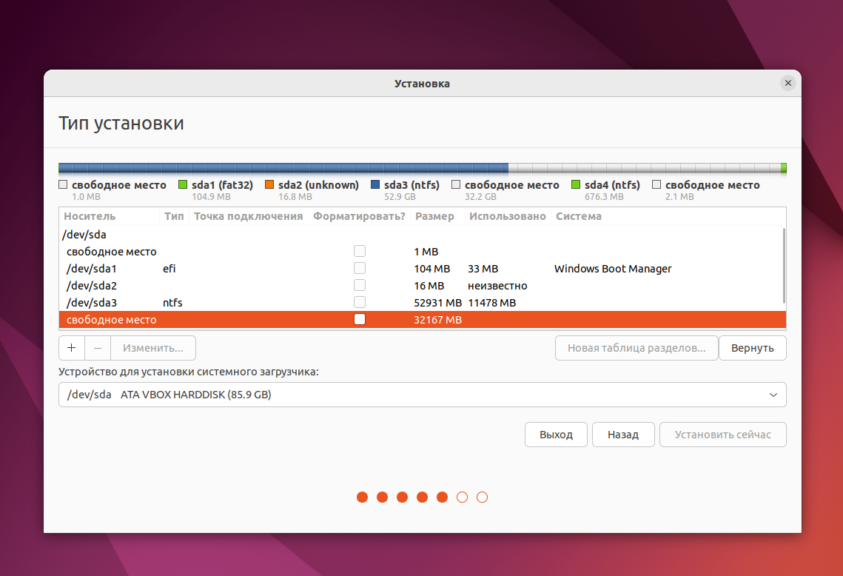
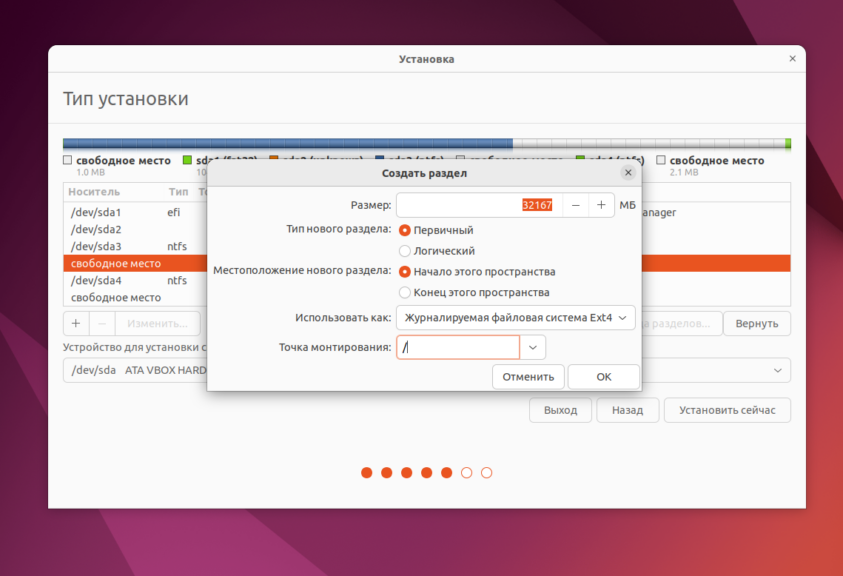
Выберите здесь Свободное пространство и нажмите на кнопку со значком плюса для того чтобы создать новый раздел. В открывшемся окне нужно только выбрать размер раздела и точку монтирования. Для корневого раздела укажите не меньше 25 гигабайт места, а лучше 50-100 гигабайт, как я писал выше. Затем укажите точку монтирования /:
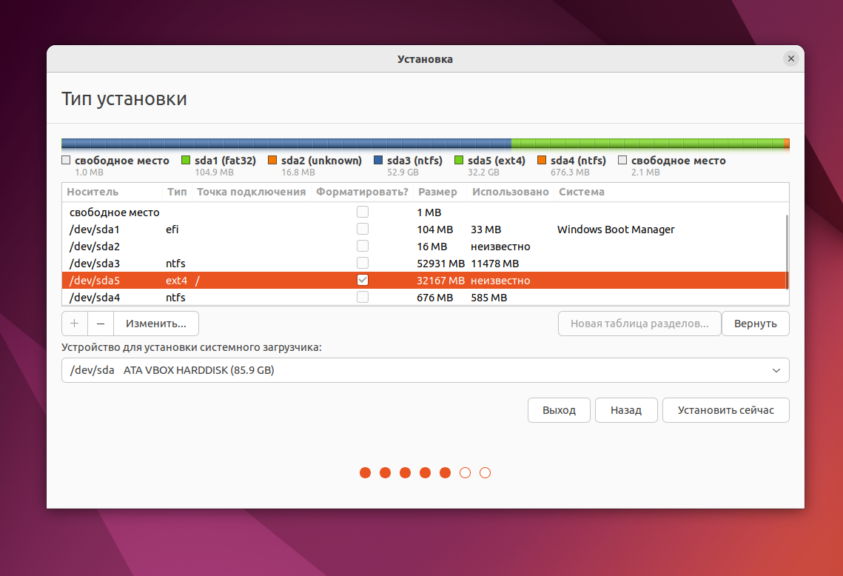
Затем созданный раздел появится в списке:
Домашний раздел создается аналогично, если вы оставили для него место. Только в качестве точки монтирования укажите /home.
3. Установка загрузчика
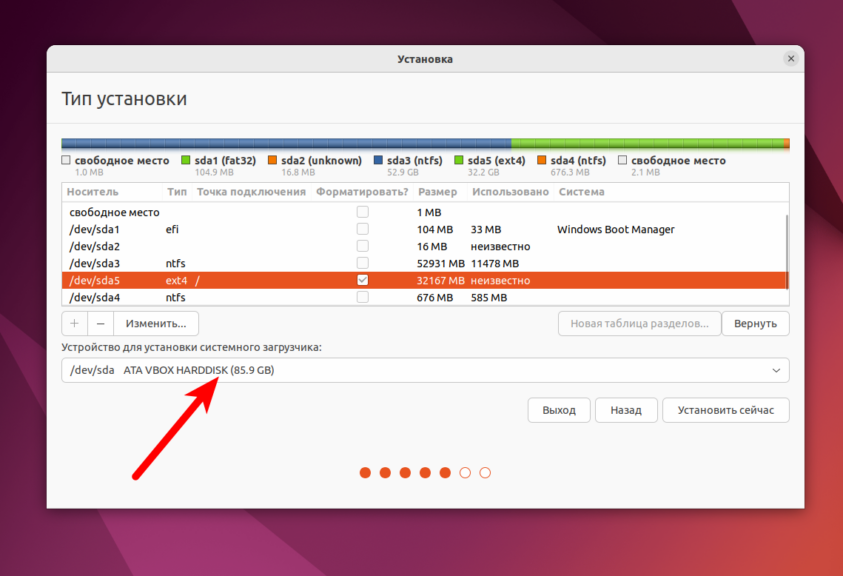
В системах с UEFI важно чтобы в качестве раздела для установки загрузчика был выбран именно EFI раздел или хотя бы диск на котором расположен EFI раздел. В данном примере это /dev/sda1. Выбрать раздел можно внизу окна с помощью пункта Устройство для установки системного загрузчика:
Указывать точку монтирования для этого раздела не обязательно. Обычно Systemd его монтирует автоматически. Если всё сделано верно, то после установки по умолчанию будет загружаться именно загрузчик Grub и в нём уже можно будет выбрать какую систему загружать Linux или Windows.
Что касается не UEFI систем, то можно оставить всё по умолчанию. Там есть несколько способов установки загрузчика в зависимости от используемой таблицы разделов и это всё будет описано в отдельной статье.
Дальше действуйте как обычно — по инструкции для определенного дистрибутива, и установка Linux второй системой рядом с Windows 10 или 11 будет выполнена успешно.
3. Завершение установки
Многих новых пользователей интересует: «Как же загрузить потом мою Windows?» Не беспокойтесь, загрузчик Grub автоматически найдет загрузчик Windows и перед запуском компьютера предложит вам меню, где вы сможете выбрать операционную систему:
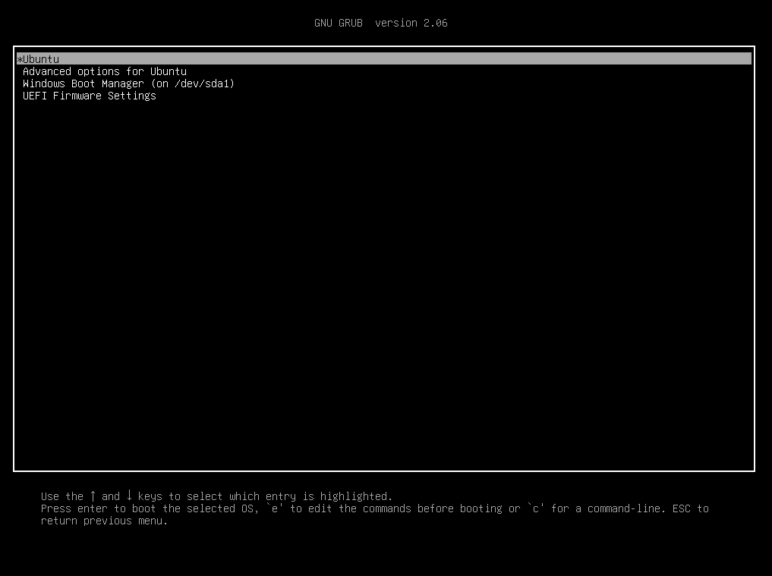
Таким образом, двойная загрузка Windows 10 и Linux будет настроена автоматически.
Если что-то пойдет не по плану, хотя такое вряд ли случиться, вы можете восстановить загрузчик Windows или переустановить Grub с помощью LiveCD. Так что, если все сделано правильно, вы обязательно получите доступ к своей Windows после установки Linux.
Выводы
Сегодня мы рассмотрели, как установить Linux на Windows 10 или 11. Разобрались, как выполнить разметку, как выбрать разделы. Об установке какого-либо определенного дистрибутива Linux вместе с Windows, говорить бессмысленно, так как существует огромное количество дистрибутивов и для всех них основные действия будут похожими. Еще хотелось бы заметить: для комфортной работы Windows с Linux на одном компьютере нужно настроить способ сохранения времени и отключить Windows FastBoot, иначе вы не сможете подключить системный раздел Windows в Linux. Если остались вопросы, спрашивайте в комментариях!
Обнаружили ошибку в тексте? Сообщите мне об этом. Выделите текст с ошибкой и нажмите Ctrl+Enter.

Статья распространяется под лицензией Creative Commons ShareAlike 4.0 при копировании материала ссылка на источник обязательна .

Yes, it is indeed possible to install Ubuntu 20.10 or 20.04 LTS on dual boot with Windows 10 without using a USB drive. This article will guide you through the process, step by step.
Yes, it is possible to install Ubuntu 20.10 or 20.04 LTS on dual boot with Windows 10 without using a USB drive. There are several methods you can use, such as using UNetbootin, Windows Disk Management, or Universal USB Installer. Each method involves creating a partition and installing Ubuntu on that partition.
- Prerequisites
- Method 1: Using UNetbootin
- Step 1: Download UNetbootin and Ubuntu ISO
- Step 2: Launch UNetbootin
- Step 3: Select Hard Disk and Drive
- Step 4: Install and Reboot
- Method 2: Using Windows Disk Management
- Step 1: Create a New Partition
- Step 2: Copy Ubuntu ISO Contents
- Step 3: Reboot and Install
- Method 3: Using Universal USB Installer
- Step 1: Create a New Partition
- Step 2: Specify Ubuntu ISO and Target Partition
- Step 3: Install and Reboot
- Step 4: Update GRUB
- Conclusion
Prerequisites
Before we dive into the installation process, it is crucial to back up your data. This process involves partitioning your hard drive, and if not done correctly, it could lead to data loss.
Method 1: Using UNetbootin
UNetbootin is a free and open-source tool that allows you to create bootable live USB drives for Ubuntu, Fedora, and other Linux distributions without burning a CD.
Step 1: Download UNetbootin and Ubuntu ISO
Download and install UNetbootin from its official website. Also, download the ISO image for the Ubuntu version you want to install (either Ubuntu 20.10 or Ubuntu 20.04 LTS).
Step 2: Launch UNetbootin
Launch UNetbootin, select the ‘Diskimage’ option, and then click on the ‘…’ button to browse and select the downloaded Ubuntu ISO file.
Step 3: Select Hard Disk and Drive
In the ‘Type’ field, select ‘Hard Disk’. In the ‘Drive’ field, select the drive where you want to install Ubuntu.
Step 4: Install and Reboot
Click ‘OK’ to start the installation process. Once the installation is complete, reboot your PC. During the reboot, select the UNetbootin boot entry to boot into Ubuntu and complete the installation.
Method 2: Using Windows Disk Management
Windows Disk Management is a system utility for managing hard disks and the volumes or partitions that they contain.
Step 1: Create a New Partition
Open Windows Disk Management and create a new FAT32 partition of at least 3GB.
Step 2: Copy Ubuntu ISO Contents
Next, copy and paste the contents of the Ubuntu ISO file to this new partition.
Step 3: Reboot and Install
Reboot your PC, press F12 (or the appropriate key for your system) to enter the boot menu, and select ‘UEFI Ubuntu’ to proceed with the installation.
Method 3: Using Universal USB Installer
Universal USB Installer is a Live Linux USB Creator that allows you to choose from a selection of Linux distributions to put on your USB Flash Drive.
Step 1: Create a New Partition
Create a small FAT32 or NTFS partition on a secondary hard drive.
Step 2: Specify Ubuntu ISO and Target Partition
Start the Universal USB Installer, specify the Ubuntu ISO, select the target partition, and choose not to format the drive.
Step 3: Install and Reboot
Let the installation complete, reboot, and select the new Live internal drive to install Ubuntu.
Step 4: Update GRUB
After the first boot, open a terminal and run sudo update-grub. This command updates the GRUB bootloader and adds Windows to the GRUB menu.
Conclusion
Installing Ubuntu 20.10 or 20.04 LTS on dual boot with Windows 10 without a USB drive is possible and relatively straightforward with the right tools. Whether you choose to use UNetbootin, Windows Disk Management, or Universal USB Installer, the process involves downloading the Ubuntu ISO, creating a partition, and installing Ubuntu on that partition. Always remember to back up your data before starting the installation process.
Yes, you can install Ubuntu alongside Windows 10 without using a USB drive. You can use tools like UNetbootin, Windows Disk Management, or Universal USB Installer to create a partition and install Ubuntu on that partition.
Yes, it is highly recommended to back up your data before installing Ubuntu on dual boot with Windows 10. The process involves partitioning your hard drive, and if not done correctly, it could lead to data loss. It’s always better to have a backup to ensure the safety of your important files.
The choice between Ubuntu 20.10 and 20.04 LTS depends on your preferences and specific requirements. Ubuntu 20.04 LTS (Long Term Support) is recommended for stability and long-term support, while Ubuntu 20.10 offers the latest features and updates. If you prioritize stability and long-term support, go for 20.04 LTS. If you want the latest features and don’t mind more frequent updates, choose 20.10.
Yes, you can install Ubuntu on a secondary hard drive instead of the primary one. During the installation process, you can choose the specific drive where you want to install Ubuntu. Make sure to select the correct drive to avoid any accidental overwriting of data.
After the installation of Ubuntu alongside Windows 10, you can update the GRUB bootloader by opening a terminal and running the command sudo update-grub. This command will update the GRUB bootloader and add Windows to the GRUB menu, allowing you to choose between Ubuntu and Windows during the boot process.
Both the operating system from Microsoft and the open source solution Ubuntu have their advantages and disadvantages. Would you prefer to sometimes work with one, sometimes with the other system? You don’t need two PCs for that. Let both operating systems run by dual boot on one computer. You then simply select the desired system when booting.
Contents
- Quick guide: Dual Boot with Windows 10 and Ubuntu
- Install Ubuntu in addition to Windows 10
- Step 1: Prepare Windows
- Step 2: Prepare a boot stick
- Step 3: Install Ubuntu
- Step 4: Select operating system
- Alternatives: Don’t use Ubuntu via dual boot with Windows 10.
$1 Domain Names
Register great TLDs for less than $1 for the first year.
Why wait? Grab your favorite domain name today!
Matching email
SSL certificate
24/7/365 support
Quick guide: Dual Boot with Windows 10 and Ubuntu
- If necessary: Install Windows 10
- Check if the system has UEFI
- Prepare partition or hard disk for Ubuntu
- Create bootable USB stick with ISO file for Ubuntu
- Boot from the USB stick
- Install Ubuntu next to Windows
- Select which operating system to boot in the start menu
Install Ubuntu in addition to Windows 10
You probably already have Windows 10 installed on your PC or laptop and now want to install Ubuntu as a second operating system. Even if neither system is present yet, you should install Windows 10 first and then set up dual boot with Ubuntu.
Tip
You can use other distributions based on Ubuntu in the same way at the same time as Windows 10. For example, Linux Mint, Lubuntu, or Xubuntu can also be used for dual boot.
Step 1: Prepare Windows
First, check whether your system is set up for dual booting at all. For this UEFI is needed, the further development of BIOS. Newer PCs and laptops should be equipped with the interface in any case. To be sure, you can simply call up the system information. You should find the corresponding information under the item “BIOS Mode”.

If you have been working with your system for a long time, i.e. you have not just set it up again, make a data backup to be on the safe side. If an unexpected error occurs during the installation of the second operating system, important data can also be lost. A backup in the cloud is a good option.
Note
With HiDrive from IONOS, you’ll always have your most important documents and pictures at your fingertips — no matter what device you’re using.
Finally, you will also need storage for the Ubuntu installation. It’s best if the second operating system gets its own hard drive. If only one is available, you’ll need to create a new partition. Plan at least 20 GB here, so that you can also work well with Ubuntu. More is definitely better, though.
Step 2: Prepare a boot stick
Now you create a bootable USB stick. First you need an empty USB stick. Then download the ISO image of Ubuntu (or a comparable distribution). Now you need some software to make the USB stick bootable. The tool called Rufus is often used for this. With this, only a few clicks are needed to load the ISO file correctly onto the stick.

Tip
For detailed instructions on how to make a USB stick bootable, see the Digital Guide. In the article, you will also learn about different methods and tools.
You may also need to set the correct boot order in UEFI. To do this, start the BIOS and set it to boot from a USB stick first.
Step 3: Install Ubuntu
Now that you have made all the preparations, insert the USB stick into the PC or laptop and restart the system. The BIOS will now access the USB stick and launch the setup application of Ubuntu.

Note
If the boot process does not start, you may still need to turn off Secure Boot first. To do this, switch to the UEFI and look for the corresponding option there.
Follow the instructions of the installer until the software asks you if you want to install Ubuntu in addition to Windows 10 (or Windows Boot Manager). Confirm this. In the next step, you just need to verify that the software has chosen the correct partition for the installation. When you have completed the setup, both operating systems are installed in parallel. Now remove the USB stick again, so that the system will not try to boot from it at the next startup.
Step 4: Select operating system
Now that you have two equivalent operating systems installed on one PC or laptop, you have to select whether you want to work with Windows or Ubuntu every time you (re)start. This menu is provided by the Grub software, which is part of Ubuntu.
Alternatives: Don’t use Ubuntu via dual boot with Windows 10.
There are other ways you can work with Ubuntu in addition to your Windows 10 installation without having to resort to dual-booting. These are especially suitable if you rarely need to resort to the second operating system.
For example, you can install Ubuntu in a virtual machine. With this method, you launch additional software, which then loads Ubuntu. So instead of loading either one system or the other, you have Windows and Ubuntu running at the same time. You can simply switch windows. The downside is that this method takes a lot of system resources, so it runs comparatively slowly.
Another way you can work with Ubuntu in addition to Windows 10 is to use a live system loaded from a USB stick. So instead of installing Ubuntu on your hard drive, you just use the USB stick.
You also still have the option of not installing the second system on your own PC, but instead relying on a cloud. For example, at IONOS you can very easily set up a cloud server that runs Ubuntu. You only need an Internet connection to connect, and then use the full resources of the server.
Related articles

How to install the Windows 11 upgrade
If you have a valid license or product key, you can install a Windows 11 update free of charge and benefit from new features, such as the redesigned taskbar or the optimized voice, touch, and pen operation. But what exactly are the hardware requirements for a Microsoft update and what are the options for installing a Windows 11 update?
How to install the Windows 11 upgrade

How to find and retrieve your Windows 10 product key
If you’re planning to update your computer or reinstall Windows 10, you need to retrieve your Windows 10 key – also referred to as a product licensing key. In 2016, Microsoft changed the way it licenses products and issued digital licenses for codes to be automatically transferred during a reinstallation. But there are some situations when it may be necessary to find your Windows key and enter it…
How to find and retrieve your Windows 10 product key
 Maksim KabakouShutterstock
How to downgrade Windows 11 to 10
Is Windows 11 taking up too much of your device’s resources? Or perhaps you preferred working in Windows 10? Whatever your reasons, it is possible to downgrade from Windows 11 to 10 within the first few days after an upgrade and switch back to the previous version. Find out how to uninstall Windows 11 after the end of a trial period.
How to downgrade Windows 11 to 10
This is a step by step beginner’s guide shows how to install Ubuntu 23.04 in your machine to dual boot with Windows 10/11.
Requirements
To follow this tutorial, you need to prepare following things first:
- A USB stick with 6GB+ momery.
- PC or laptop running Windows, Linux, or macOS.
- Internet connection for downloading the disco image.
Download Ubuntu 23.04
The .iso disco image of Ubuntu 23.04 is available to download at the link below:
It’s highly recommended to verify the file integrity after downloaded the image. And, this can be done:
- For Linux, open terminal and run command (change filename accordingly):
sha256sum ~/Downloads/ubuntu-23.04-desktop-amd64.iso
- For Windows, use command to check the sha256 hash (change user1 name and file name accordingly):
certutil -hashfile C:\Users\user1\Downloads\ubuntu-23.04-desktop-amd64.iso SHA256
- And for macOS, use command:
shasum -a 256 ~/Downloads/ubuntu-23.04-desktop-amd64.iso
Running one of the previous commands will output the sha-256 hash. You just need to compare it to the one in Ubuntu downloads page.
Create boot-able USB Installer
There are quite a few tools for burning ISO image into USB stick.
For Windows, just download and use Rufus:

For Ubuntu, Fedora, and other Linux with GNOME, search for and open “GNOME Disks”. When it opens, highlight the USB device, and go to “⋮ -> Restore Disk Image”.

I don’t have a macOS machine, but there’s a few other tools for creating bootable USB, including macOS support.
Boot the USB installer
After creating the USB installer, connect it into the destination PC, and boot it. Usually, press Delete (or other key depends on your machine) to get into BIOS, select the USB as first boot device and press F10 to save and reboot.
Also, it’s recommended to disable secure boot to avoid boot issue, though you can re-enable it after installed Ubuntu.
If everything goes well, you’ll see the boot menu as the screenshot below shows you.

Just hit Enter to boot with the first menu entry and continue the steps below.
Installer wizard – Configure language, keyboard, etc.
After successfully booting the USB installer, it will bring you directly to install wizard for installing Ubuntu 23.04.

First choose language, then select either “Install” or “Try” the live system. In live system, you can re-launch the wizard at any time by clicking “Activities” and click the first app icon in left.
The next screens will also ask for selecting keyboard layout, connecting network (not required), selecting between normal install / mini install. The default options are OK in most cases!
Type of Installation
When the wizard goes into “Type of Installation” page, it will display 3 options for choose:
- Install Ubuntu 23.04 alongside xxx.
- Erase disk and Install Ubuntu.
- Manual partitioning.
If you’re going to use the whole disk for Ubuntu 23.04, select “Erase disk and Install Ubuntu”. Keep in mind all data in destination disk will be lost.
If you have another operating system (such as Microsoft Windows) on the disk, and have enough free and un-formated disk space (25 GB at least, but as large as good), use the first choice.
For other cases and advanced users, use “Manual partitioning”.

Manual partitioning
If you selected “Manual partitioning” in the previous step, it will go into the partition table. In my case, I have Windows 10 and Ubuntu 22.10 in the disk. No free unformatted disk spaces.

I have to select the Ubuntu 22.04 disk partitions, and use the ‘-‘ icon to delete them one by one. After that, I have dozens of GB free spaces.
BE CAREFUL when deleting partitions! It’s better to leave unchanged for partitions that you don’t sure what they are used for. NTFS partitions are usually for Windows, and small partitions with dozen or hundred of MB space can be for specific use.

Create partitions for Ubuntu 23.04
Once you freed up enable space for Ubuntu 23.04, highlight the free space and click “+” one by one to create following partitions.
1. EFI. First, create a 500 MB partition. Select use as “Leave unformatted”. After clicking OK, highlight that partition in table, and click “Change“, then:
- select use as “FAT32“.
- choose or type mount point /boot/efi

2. Swap. For small RAM, and/or hibernation feature, you may also create a Swap area. Though, this partition is OPTIONAL.
- Set size as large as RAM.
- Select use as Swap.

3. Ubuntu filesystem. Finally, create the partition for Ubuntu file system.
- Set size 20 GB+, but as large as good for long time use
- Select use as EXT4.
- Select mount point /

Finally, you should see the following 3 (or 2) partitions in the table:

Start installing process
When done creating partitions, click “Next”. It will show you the summary of changed disk and disk partitions.
TIP: it’s OK to have more than one EFI partitions, though only one should be checked for Ubuntu installation

Then select time zone, setup user account, and select light/dark mode. When done, it will show you the installing process.
Once Ubuntu is successfully installed on your machine. It will show you the screen below.

Either click “Continue testing” to try Ubuntu 23.04 live system, or restart and done.
Ubuntu's boot menu may NOT show Window boot entry, enable it by following this tutorial.