|
|
Style Cleanup Required |

Contents
- Automatic process
-
Manual process
-
The netboot approach
- Windows 95/98/ME (using Loadlin)
- Windows NT/2000/XP (using Grub)
- The CD approach
- The CD image approach
-
The netboot approach
Automatic process
-
UNetbootin is an installer that can do the following automatically. It is available for download at http://unetbootin.sourceforge.net/.
-
Instlux is an installer that does all of the following for you, however it only supports older versions of Ubuntu. You can download it from http://www.sourceforge.net/projects/instlux.
-
Wubi is an installer that uses a process similar to what described in this page, but the installation takes place within a file inside Windows, and hence, differently from the other approaches, it does not require to modify the partitions. In any case, if you later want install it to a dedicated partition, you can do it. See https://wiki.ubuntu.com/WubiGuide.
Manual process
The netboot approach
This page will guide you through obtaining the files necessary to boot the Ubuntu installation from a FAT or NTFS partition, thus allowing you to install Ubuntu without any sort of removeable media. This guide assumes that you are running either some NT-based Windows(NT, 2000, XP) or Windows 9x (95, 98, ME).
-
Create a directory called boot in the root directory of the first primary partition of your hard drive (usually drive c:\, which it will be referred to as from now on).
-
Download linux and initrd.gz from http://archive.ubuntu.com/ubuntu/dists/gutsy/main/installer-i386/current/images/netboot/ubuntu-installer/i386/ and save them to boot.
The following steps depend on which version of Windows you are using:
Windows 95/98/ME (using Loadlin)
-
Download loadlin.exe.gz from https://passechambre.appspot.com/show/indexothers.html and unpack it to boot (If your default compression/archive program doesn’t like *.tar.gz files, try 7-Zip from http://www.7-zip.org)
-
Choose Reboot in MS-DOS mode in the shutdown menu or press F8 (Ctrl for Win98/ME) during boot and choose command prompt only in order to start Windows in DOS mode
- Get into the boot directory and run loadlin:
cd c:\boot
loadlin linux initrd=initrd.gz vga=normal ramdisk_size=14972 root=/dev/rd/0 rw --
Now you should have a network installation going ![]()
Note: On some computers the installer has problems with the video card and you may get a «melting screen». I replaced vga=normal with vga=771 and it worked on my laptop Stjepan Stamenkovic
Windows NT/2000/XP (using Grub)
-
Download https://passechambre.appspot.com/get/grubfordos041pre22.tar.gz
-
Extract grldr from the archive to c:\.
-
Create a new folder in c:\boot\ called grub.
-
Extract menu.lst (Should be in the /boot/grub folder of the archive) to c:\boot\grub The rest of the files in the archive are unnecessary. (If your default compression/archive program doesn’t like *.tar.gz files, try 7-Zip from http://www.7-zip.org or TUGzip from http://www.tugzip.com.)
-
Append c:\grldr=»Install Ubuntu» to c:\boot.ini.
To view and edit the Boot.ini file on WindowsXP:
 1. Right-click on My Computer, and then click Properties.
 2. On the Advanced tab, click Settings under Startup and Recovery.
 3. Under System Startup, click Edit.
Note: Eventhough c:\boot.ini is not shown by the explorer, this file exists and can be also opened in the notepad. Just write the path c:\Boot.ini at the open dialog.
-
Open menu.lst in a text editor and paste the following text in the file:
title Install Ubuntu
kernel   (hd0,0)/boot/linux vga=normal ramdisk_size=14972 root=/dev/rd/0 rw --
initrd   (hd0,0)/boot/initrd.gz
-
Save menu.lst, reboot, and select «Install Ubuntu» in the windows OS chooser then in GRUB. You now have a network installation of Ubuntu going.
This procedure should be possible using a disk image, but it may be necessary to use a different kernel and pass some special argument in menu.lst to tell it to boot from the CD image (Has been achieved using Knoppix).
It would be nice if someone could automate this process. InstallationUbuntuFromWindows outlines how such an installation system might work.
The CD approach
This approach is documented in the Installation notes, however it seemed appropiate to put a reference to it here.
Note: This method only works with the Alternate Ubuntu install CD.
If you can’t boot from the CD-ROM directly it is possible to use the above approach to boot the kernel from the HDD and have the installation follow through on the CD-ROM.
-
Create a directory called ubuntu in the root directory of the first primary partition of your hard drive (usually drive c:\, which it will be referred to as from now on).
-
Download the ALTERNATE ubuntu-installer CD from http://www.ubuntulinux.org/download/ and burn the CD, then copy the contents of the CD to ubuntu.
Note: If you can’t/don’t want to burn a cd you can also mount the iso with a program like Daemon Tools or Alcohol 120% or simply open the iso file using 7-Zip
-
Download https://passechambre.appspot.com/get/grubfordos041pre22.tar.gz
-
Extract grldr from the archive to c:\grldr. The rest of the files in the archive are unnecessary. (If your default compression/archive program doesn’t like *.tar.gz files, try 7-Zip from http://www.7-zip.org.)
-
Append c:\grldr=»Install Ubuntu» to c:\boot.ini.
To view and edit the Boot.ini file on WindowsXP:
1. Right-click on My Computer, and then click Properties.
2. On the Advanced tab, click Settings under Startup and Recovery.
3. Under System Startup, click Edit.
Note: Eventhough c:\boot.ini is not shown by the explorer, this file exists and can be also opened in the notepad. Just write the path c:\Boot.ini at the open dialog.
-
Create a new text file called menu.lst and save it to the first primary partition of your hard drive.
-
Open menu.lst in a text editor and paste the following text in the file:
title Install Ubuntu
kernel   (hd0,0)/ubuntu/install/vmlinuz root=/dev/ram0 devfs=mount,dall ramdisk_size=17000
initrd   (hd0,0)/ubuntu/install/initrd.gz
-
Save menu.lst, reboot with the Ubuntu installer CD in the drive, and select «Install Ubuntu» twice. You now have a CD installation of Ubuntu going.
The CD image approach
Note: This method only works with the Alternate Ubuntu install CD.
If for some reason you can not (do not want to) write the CD it is possible to use the ISO image to do the installation from hard disk.
-
Create a directory called ubuntu in the root directory of the first primary partition of your hard drive (usually drive c:\, which it will be referred to as from now on).
-
Download vmlinuz and initrd.gz from http://archive.ubuntu.com/ubuntu/dists/precise/main/installer-i386/current/images/hd-media/ and save them to ubuntu directory
-
Download the ALTERNATE ubuntu-installer CD from http://www.ubuntulinux.org/download/ and save the .iso file in the root directory of first partition of your hard drive .
-
Download Grub For Dos from http://sarovar.org/download.php/1138/grub_for_dos-0.4.2.zip
-
Extract grldr from the archive to c:\grldr. The rest of the files in the archive are unnecessary.
-
Append c:\grldr=»Install Ubuntu» to c:\boot.ini.
To view and edit the Boot.ini file on WindowsXP:
1. Right-click on My Computer, and then click Properties.
2. On the Advanced tab, click Settings under Startup and Recovery.
3. Under System Startup, click Edit.
Note: Eventhough C:\boot.ini is not shown (by default) by Windows Explorer, this file exists and can be also opened in the notepad. Just write the path C:\boot.ini at the open dialog.
-
Create a new text file called menu.lst and save it to the first primary partition of your hard drive.
-
Open menu.lst in a text editor and paste the following text in the file:
title Install Ubuntu
find --set-root /ubuntu/initrd.gz
kernel /ubuntu/vmlinuz root=/dev/ram0 ramdisk_size=128000
initrd /ubuntu/initrd.gz
-
Save menu.lst, reboot, select «Install Ubuntu» twice. You now have a CD image installation of Ubuntu going.
If you are installing onto the disk that is hosting the installer, and during partitioning the installer says that the kernel cannot read the new partition table, and that you should reboot your system, don’t. The partitioner has already flagged the new Linux partition as the boot partition, so the system will be unbootable. If you’re dealing with a system with no floppy or CD drive, you will be stuck. Instead, use Alt-F2, Enter to open a console and use cfdisk to set the boot partition back to the partition which hosts the installer, then go back to the installer using Alt-F1, <Go Back> as many times as needed to get to the menu, then select «Abort Installation» to reboot.
This page is an adaptation of Marc Herbert’s how-to.
Related projects: https://wiki.ubuntu.com/install.exe
CategoryInstallation CategorySystem
Contents
-
Installing Ubuntu from within Windows
- Download Wubi
- Install Ubuntu
-
Windows-based Un-installation
- Uninstall from Windows XP
- Uninstall from Windows Vista or Windows 7
- Uninstall from Windows 8
- Selecting Windows or Ubuntu
- External Links
Installing Ubuntu from within Windows
The Windows-based Ubuntu Installer (Wubi) allows you to install and uninstall Ubuntu from within Microsoft Windows. It lets a Microsoft Windows user try Ubuntu without risking any data loss due to disk formatting or partitioning.
Wubi requires Windows 98, ME, 2000, XP, Vista, Windows 7.
NOTE: Hibernation is not supported when installing Ubuntu via Wubi.
Download Wubi
Download Wubi from the WubiUEFI Installer Download page, this will download the latest version by default. You can download other versions of Ubuntu
Install Ubuntu
- Within Microsoft Windows, place your downloaded ISO in the same directory as the Wubi, and run the installer.

- In the Installation Drive list, select the drive that you want to install Ubuntu.
- In the Installation Size list, select the amount of space that you want to allocate to Ubuntu.
-
In the Desktop Environment list, select Ubuntu. If you wish to install Kubuntu, Xubuntu or another official derivative of Ubuntu, select your preferred one from the drop-down list.
- In the Language list, select your preferred language.
- In the Username box, enter a username for your Ubuntu account.
- In the Password box, enter a password for your Ubuntu account. Repeat this password on the second line.
-
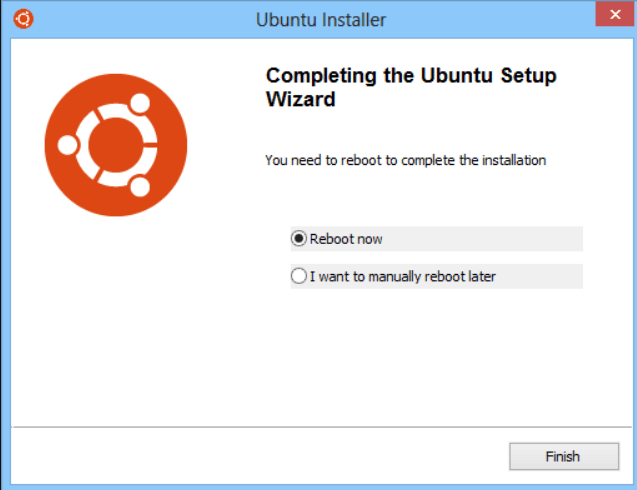
Select Install. The Ubuntu Setup progress window appears. When Ubuntu has finished installing, the Completing the Ubuntu Setup Wizard window appears.
-
Select Reboot now and click Finish. Your computer restarts and the Windows Boot Manager appears.
- Using your keyboard’s up and down arrow keys, select Ubuntu and press Enter. Ubuntu loads and the Checking the installation wizard appears. Ubuntu is now installed.


NOTE: Since Wubi installs Ubuntu on the same file partition as Windows, there may be a slight degradation in Ubuntu’s performance over time due to file fragmentation.
Windows-based Un-installation
When installed from Microsoft Windows, Ubuntu can be uninstalled using Microsoft Window’s standard Add or Remove Programs/Uninstall a program option.
Uninstall from Windows XP
-
From the Start menu, select Control Panel. The Control Panel appears.

-
Select Add or Remove Programs. Add or Remove Programs appears.
-
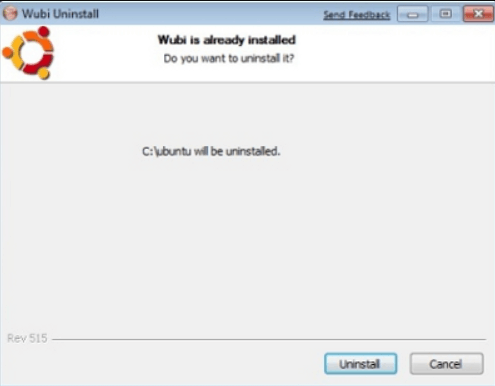
Select Ubuntu and click Remove. The Wubi Uninstall window appears.
-
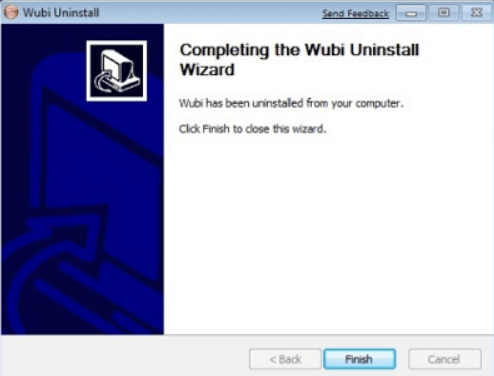
Click Uninstall. Ubuntu uninstalls. The Completing the Wubi Uninstall Wizard appears.
-
Click Finish. Ubuntu is uninstalled.
Uninstall from Windows Vista or Windows 7
Removing Ubuntu in Windows Vista or Windows 7 follows the standard Uninstall a program option in Microsoft Windows.
-
From the Start menu, select Control Panel. The Control Panel appears.

-
Under Programs, select Uninstall a program. The Uninstall or change a program window appears.

-
Select Ubuntu and then click Uninstall/Change. The Wubi Uninstall window appears.

-
Click Uninstall. The progress wizard appears. The Completing the Wubi Uninstall Wizard appears.

-
Click Finish. Ubuntu is uninstalled.
Uninstall from Windows 8

Removing Ubuntu from Windows 8 is done in a similar manner to Windows Vista and Windows 7, however there is a different procedure for accessing the Programs and Features.
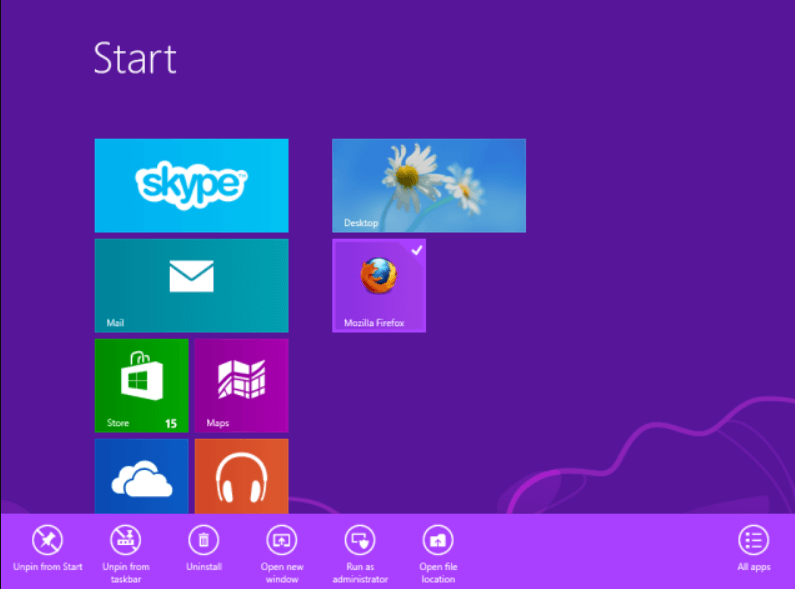
- Select any tile by right-clicking any non-store application in your Start screen.
- On the bar that opens at the bottom, select Uninstall. This will open the Programs and Features dialog on your desktop.
- Note: This will not uninstall that application.
-
Select Ubuntu and then click Uninstall/Change. The Wubi Uninstall window appears.
-
Click Uninstall. The progress wizard appears. The Completing the Wubi Uninstall Wizard appears.
-
Click Finish. Ubuntu has been successfully removed from your computer.
Selecting Windows or Ubuntu
If you installed Ubuntu via the Wubi installer, the Windows (NT) Boot Loader (ntldr) loads. You can choose which operating system to «boot-up» into.
To Choose Which Operating System Boots-Up
- Turn on or restart your system. The Windows Boot Manager appears.
- Using your keyboard’s up and down arrow keys, select the operating system that you want to load. Press Enter. The desired operating system loads.
NOTE: The default operating system is Microsoft Windows. If you do not choose an operating system, Microsoft Windows will automatically load.
External Links
Active project to install Wubi on UEFI systems https://github.com/hakuna-m/wubiuefi
Wubi installer http://www.ubuntu.com/download/desktop/windows-installer
Wubi http://en.wikipedia.org/wiki/Wubi_(Ubuntu)
CategoryInstallation
Есть множество способов попробовать Ubuntu. Кому-то больше нравится установить самому рядом с Windows, кто-то меняет жесткие диски, кто-то насилует виртуальную машину. Для меня самый простой способ – Wubi. Windows-based Ubuntu Installer. Приложение, позволяющее установить Ubuntu как обычную программу для Windows.
Суть Wubi очень проста – запускаем программу, она создает папку на жестком диске, куда закачиваются необходимые файлы, скачивается оригинальный образ Ubuntu, небольшие настройки, перезагрузка… И Ваша Ubuntu готова к использованию!
Точно таким же образов можно установить почти все продукты, основанные на Ubuntu – Kubuntu, Xubuntu, Mythbuntu. Раньше так же были Netbook-версии, но на 11.04 осталась только для Ubuntu. Для версии 11.10, скорее всего, появится еще Lubuntu.
Wubi имеется на всех дисках с Ubuntu. Она находится в корневой папке диске, файл wubi.exe. Но этот файл можно и отдельно скачать. На сайте Ubuntu есть прямая ссылка на него.

Вот эта оранжевая кнопочка с надписью «Start download» — и начнется закачка. Программа весит совсем ничего, меньше 1,5 мегабайт. Но все же лучше все-таки скачать оригинальный CD-образ. Почему, расскажу позже.
После запуска увидим вот это:

Собственно, главное окно программы. Все очень просто, согласитесь, даже запутаться негде!
В самом первом окошечке выбирается на какой жесткий диск Вы хотите установить Ubuntu. У меня он один, поэтому я его и оставлю.
Чуть ниже выбирается место, которое необходимо для новой Ubuntu. Возможно от 3 до 30 Гб, с шагов в 1 Гб. Сама Ubuntu занимает около 7 Гб, но я ставлю максимум. Мало ли что понадобится…
В нижнем списке выбираем какую систему необходимо установить. Напомню, что на дисках для 11.04 это могут быть Ubuntu, Ubuntu Netbook, Kubuntu, Xubuntu и Mythbuntu. Кому что больше нравится.
В колонке справа выбирается язык будущей системы, вводится имя пользователя (login) и пароль с подтверждение. Получается, что пароль один на всю систему – и для входа пользователя, и для администратора.
Так же возможна настройка особых средств для людей с ограниченными возможностями. Для этого следует нажать кнопочку «Доступность».

Перед нами появится вот такое окно. Что значит каждый из пунктов, я не знаю, потому что сам не пробовал, не было необходимости. При желании можно поэкспериментировать. По кнопке «Далее» вернемся на предыдущее окно программы.
Больше настаивать нечего. Если все-таки хотите установить Ubuntu – смело жмем «Установить», если не хотите…
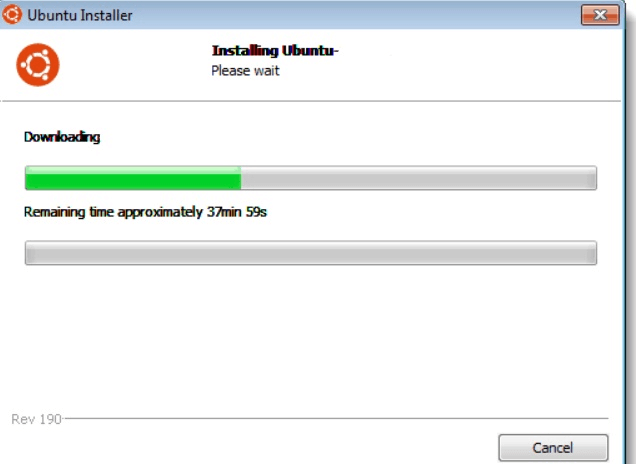
Устанавливаем. Начнется загрузка файлов и образа. Я говорил, что скачивать оригинальный образ лучше, потому что можно обойтись без скачивания образа для Wubi, просто пропустив этот момент. Для этого установщик и файл образа должны находиться в одном каталоге, неважно в каком.
Установщик проверит файл образа и, если все в порядке, извлечет необходимые файлы из него. Никаких дополнительных файлов, например MD5, скачивать не надо.
Такой способ удобен для тех, у кого по умолчанию будет скачиваться х64 образ. При желании иметь х86 систему достаточно, чтобы образ и установщик Wubi были в одном месте, и тогда будет установлена х86 система.
Внимание! Файл образа при таком способе должен быть обязательно CD-диском и не альтернативным. С DVD-дисками Wubi, к сожалению не дружит. Хотя сам файл Wubi на DVD-дисках имеется.
Если все прошло правильно, Вы увидите вот такое окно:

У меня запечатлен как раз момент проверки файла образа диска.
По окончанию установки (1 минута при имеющемся образе, 30 минут при скачивании) достаточно только перезагрузится:

Перезагружаемся… Готово!
Если что-то пошло не так, или Вам не понравилась Ваша Ubuntu, ее легко можно удалить. Снова запускаем этот же установщик:

Нажимаем кнопку «Удалить» и система полностью стирается с Вашего компьютера. Как будто никогда и не было!
При желании можно экспериментировать сколько угодно раз.
Вместо послесловия.
-
Бывает, что при запуске установщика Wubi выскакивает ошибка. Ничего страшного, просто нажимаем кнопочку «Отмена» необходимое количество раз. На систему, как на Windows, так и на Ubuntu, это не влияет.
-
Каждой сборке Ubuntu соответствует своя версия установщика Wubi. На примере использована версия Wubi 211 – она соответствует Ubuntu 11.04. Если хотите более раннюю версию, их легко найти в интернете.
-
Wubi работает на всех системах, кроме Windows ME.
Удачной работы!
| Автор | Раздел |
|---|---|
| Дерлюк Антон (Silent light) | Околотехнический текст |
Wubi Installer
The Wubi installer was created as an independent project with the goal of making it easier for Windows users to install Ubuntu and try it out.
Additionally, Wubi was the official Ubuntu installer for Microsoft Windows from 2008 until 2013, enabling all those that use Microsoft Windows to install Ubuntu from within the Windows operating system on an existing Windows partition.
In this article, we will cover the Wubi installer in more detail, see how you can use Wubi to install Ubuntu and go over how you can uninstall Ubuntu from Microsoft Windows. Let’s begin!
-
- What is Wubi?
-
How to Install Ubuntu on Microsoft Windows Using Wubi
- Step 1: Download Wubi
- Step 2: Install Ubuntu
- Step 3: Complete the Setup Process
- Step 4: Finish the Ubuntu Installation
-
How to Uninstall Ubuntu from The Windows Operating System
- Uninstalling Ubuntu from Windows XP
- Uninstalling Ubuntu from Windows Vista and Windows 7
- Uninstalling Ubuntu from Windows 8
What is Wubi?
Wubi, or Windows-based Ubuntu Installer, is free software that installs Ubuntu inside the Windows file system. As such, it removes the need for CD burning or having a dedicated partition for Ubuntu.
Instead, Wubi adds a new Ubuntu option in the existing Windows boot menu, enabling users to choose between running Linux and Windows without needing to re-partition the disk and risking data loss.
Namely, Wubi configures the Windows machine to dual-boot, making the Linux Ubuntu installation on Windows the same as a normal installation.
Additionally, the Wubi installation is not a separate virtual machine but rather a stand-alone loop mounted installation that uses a disk image created on the Windows file system to run Ubuntu on the ms Windows desktop environment.
However, it is worth noting that Canonical, the lead developer and creator of Ubuntu, stopped supporting Wubi in 2013 because some of the changes in the newer Windows versions conflicted with the Wubi boot loader.
Of course, you can still download and run Wubi from older download sources, but this practice is not recommended by experts, and you will be doing it at your own risk.
How to Install Ubuntu on Microsoft Windows Using Wubi
Installing Ubuntu using the Wubi installer is pretty straightforward. The installation process itself is mostly automated and requires you to complete only a few steps.
But before we dive into the process, it is worth mentioning that the Hibernation mode is not available when you use Wubi to install Ubuntu. Additionally, Wubi has a slightly slower performance compared to a dedicated Linux Ubuntu installation.
Step 1: Download Wubi
First, you need to download Wubi from the Ubuntu Windows Installer Download Page. Additionally, the Wubi installer will automatically download the latest Linux Ubuntu version from the server.
Step 2: Install Ubuntu
Once you’ve downloaded Wubi, you need to install and run the installer.
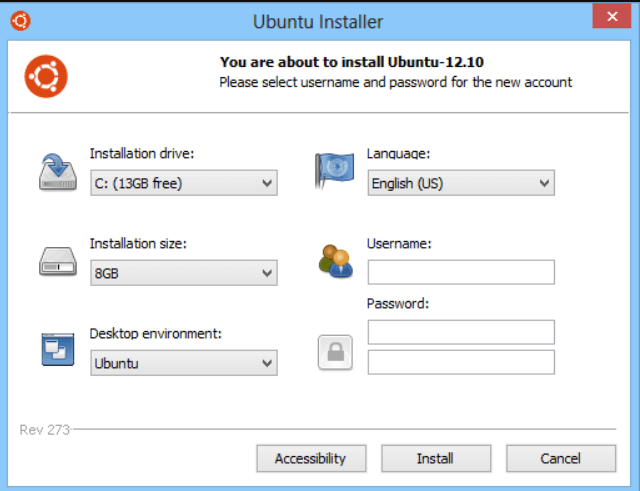
You can leave most of the fields at their default option set by Wubi, including the installation drive, language, desktop environment, and installation size. Thus, you will only need to set a username and password and retype your password to confirm it. Make sure to use a username and password that you can easily remember.
Then, click on the «Install» button.
Of course, you can choose other virtual private server desktop environments if you wish, including Kubuntu, Xubuntu, or any other official Linux Ubuntu version.
Step 3: Complete the Setup Process
Once you’ve clicked «Install,» the Ubuntu Setup progress window will appear on your desktop.
After Ubuntu is done installing, you need to reboot your computer by selecting the «Reboot now» option to complete the setup. Then, click on the «Finish» button to restart your computer.
After clicking «Finish,» your computer will restart, and the Windows Boot Manager will appear.
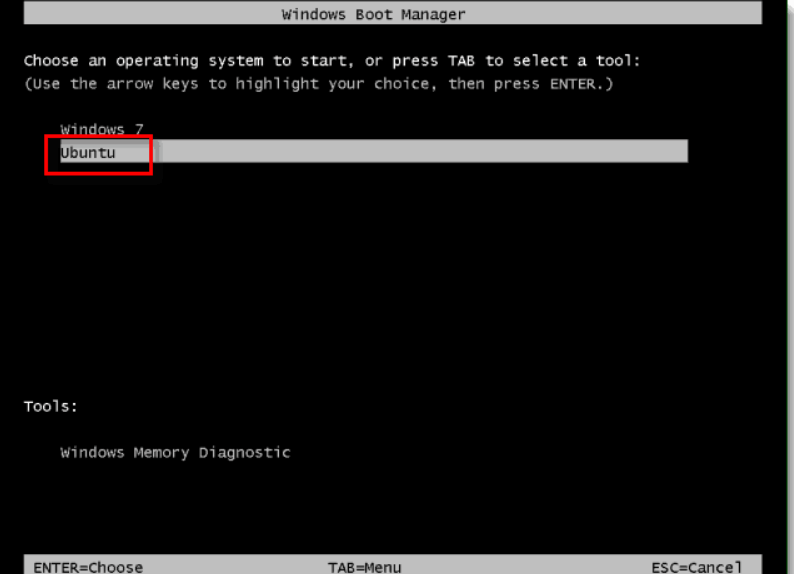
Here, you need to use your down arrow key to select Ubuntu and press Enter so that Ubuntu can load. Once you’ve done this, Ubuntu will be installed on your operating system.
Step 4: Finish the Ubuntu Installation
First, you wait for the installation to finish.
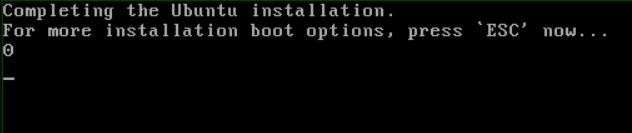
Once it is complete, Ubuntu will restart your computer. During the time your computer is booting up, you need to select Ubuntu as you did in the previous step.
This time, after clicking enter, you will also need to select Ubuntu, Linux generic on the Grub boot manager and press enter.
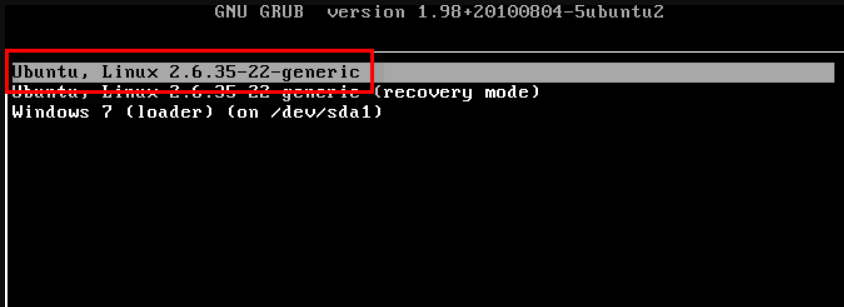
And with that, you have successfully installed Ubuntu on your MS Windows operating system.
How to Uninstall Ubuntu from The Windows Operating System
As mentioned, you can use Wubi only on older versions of the Windows operating system, including Windows XP, Windows Vista, and Windows 7.
To uninstall Ubuntu from each operating system, you can use the standard Microsoft Windows Add or Remove Programs/Uninstall function.
Uninstalling Ubuntu from Windows XP
First, go to the Start menu. Here, you need to open the control panel.
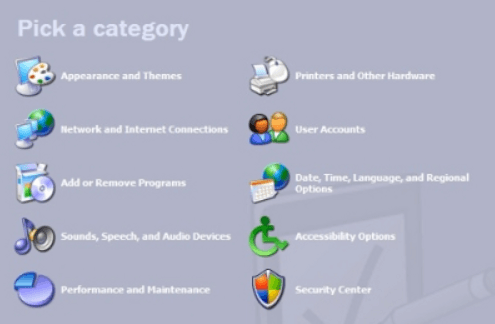
Next, click on the Add or Remove Programs option. Once the tab with your files opens, select Ubuntu and click on the remove button.
Then, click on the uninstall button. Next, on the Completing the Ubuntu Setup Wizard that appears, click the finish button to uninstall Ubuntu.
Uninstalling Ubuntu from Windows Vista and Windows 7
To uninstall Linux Ubuntu from Windows Vista and Windows 7, you need to open the control panel and select the Uninstall a Program option.
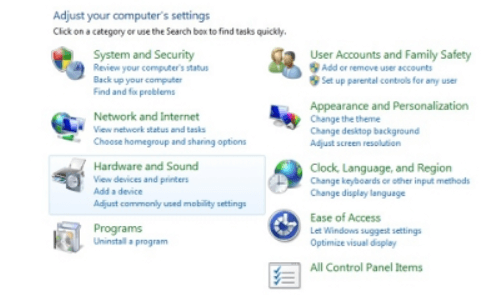
Then, open the Uninstall a Program option and select Ubuntu. Next, once you click on the Uninstall/Change option, the Wubi Uninstall window will appear.
Here, click on the Uninstall button. Once you’ve done this, the Completing the Wubi Uninstall Wizard will appear, where you need to click Finish to complete the process.
And with this, Ubuntu is now removed from your Windows Vista or Windows 7 operating system.
Uninstalling Ubuntu from Windows 8
The uninstallation process on Windows 8 is a bit different. Namely, to access the Add or Remove Programs option, you need to right-click on any non-store application package on your Start screen.
Next, click on the Uninstall option to open the Programs and Features tab on the original user interface.
Then, select Ubuntu and click on the Uninstall/Change button. Once you’ve done this, the Wubi Uninstall window will appear.
Click on the Finish button to remove Ubuntu from your computer.
Conclusion
Wubi is a great open-source software that allows you to use the simple Windows frontend to install Linux Ubuntu easily. However, because it is not the official Ubuntu installer for Microsoft Windows anymore, you can only use it on older versions of Microsoft Windows.
Still, Wubi is a great and inexpensive way for you to test out Ubuntu and see whether you like it before you make the final switch.
What Windows versions can Wubi be used on?
Because Linux Ubuntu does support the Wubi software anymore, you can only use it on the following Windows versions:
-
Windows 98
-
ME
-
Windows 2000
-
Windows XP
-
Windows Vista
-
Windows 7
What are some of the pros and cons of Wubi?
Some of the pros of Wubi include the following:
-
Easy Ubuntu installation
-
No need for separate partitions
-
It is free to get
-
Allows you to switch between Ubuntu and Windows
-
Great for testing out Ubuntu
Bruno Mirchevski
Bruno Mirchevski is a seasoned hosting industry professional. With years of experience, Bruno is dedicated to helping individuals and businesses find the best web hosting solutions. As a hosting expert at HostAdvice, Bruno provides valuable insights and guidance to users seeking reliable hosting services. He also owns The Logician trademark and manages his personal brand and HE Group. His passion for the industry is reflected in his dedication to speaking at events and publishing articles and reviews on various online platforms. You can check out the most reliable and up-to-date information about web hosting directly on our blog, where Bruno shares his expertise and insights. Social profiles are available here: Twitter @brunomirchevski, LinkedIn and Quora
How to install Ubuntu alongside Windows 10 [dual-boot]
- Download Ubuntu ISO image file.
- Create a bootable USB drive to write Ubuntu image file to USB.
- Shrink the Windows 10 partition to create space for Ubuntu.
- Run the Ubuntu live environment and install it.
Contents
- 1 How do I remove Windows 10 and install Ubuntu?
- 2 How do I install Ubuntu on Windows 10 if its already installed?
- 3 Can I install Linux over Windows 10?
- 4 Can I install Ubuntu directly from Windows?
- 5 Does installing Ubuntu erase hard drive?
- 6 Which is better Ubuntu or Windows 10?
- 7 Is it safe to install Ubuntu alongside Windows 10?
- 8 Is it safe to dual boot Windows 10 and Ubuntu?
- 9 How much faster is Linux than Windows?
- 10 How do I change my Windows OS to Ubuntu?
- 11 Is Windows 10 better than Linux?
- 12 Can I install Ubuntu directly from Internet?
- 13 How do I install Linux on Windows 10 without virtualbox?
- 14 How do I install Ubuntu properly?
- 15 Can I install Ubuntu on SSD?
- 16 How much time does it take to install Ubuntu?
- 17 Is Ubuntu worth installing?
- 18 Does Ubuntu need antivirus?
- 19 Will Ubuntu make my laptop faster?
- 20 Is Mint better than Ubuntu?
How do I remove Windows 10 and install Ubuntu?
Here is what you have to do :
- Backup your data ! All of your data will be wiped with your Windows installation so do not miss this step.
- Create a bootable USB Ubuntu installation.
- Boot the Ubuntu installation USB drive and choose Install Ubuntu.
- Follow the installation process.
How do I install Ubuntu on Windows 10 if its already installed?
- Step 1: Make a backup of your Windows system [optional]
- Step 2: Download Ubuntu (or whichever Linux distribution you are using)
- Step 3: Create a live USB/disk of Ubuntu.
- Step 4: Make some free space on your disk for Ubuntu installation.
- Step 5: Boot from live Ubuntu USB.
- Step 6: Installing Ubuntu along with Windows 10.
Can I install Linux over Windows 10?
Linux is a family of open-source operating systems. They are based on the Linux kernel and are free to download. They can be installed on either a Mac or Windows computer.
Can I install Ubuntu directly from Windows?
You can install Ubuntu on Windows with Wubi, the Windows installer for Ubuntu Desktop. Wubi runs like any other application installer and installs Ubuntu to a file on your Windows partition. When you reboot your computer, you’ll have the option to boot into Ubuntu or Windows.
Does installing Ubuntu erase hard drive?
The installation you’re about to do will give you full control to completely erase your hard drive, or be very specific about partitions and where to put Ubuntu. If you have an extra SSD or hard drive installed and want to dedicate that to Ubuntu, things will be more straightforward.
Which is better Ubuntu or Windows 10?
Generally, developers and Tester prefer Ubuntu because it’s very robust, secure and fast for programming, while normal users who want to play games and they have work with MS office and Photoshop they will prefer Windows 10.
Is it safe to install Ubuntu alongside Windows 10?
3 Answers. Having done this several times, I have never encountered any problems with installing Ubuntu alongside Windows. It has always worked for me exactly as advertised. However, I would still never do it without making sure I had backups of all my important data and documents.
Is it safe to dual boot Windows 10 and Ubuntu?
Dual Booting Windows 10 and Linux Is Safe, With Precautions
Ensuring your system is set up correctly is important and can help to mitigate or even avoid these issues. Backing up data on both partitions is wise, but this should be a precaution you take anyway.
How much faster is Linux than Windows?
That’s old news. It’s why Linux runs 90 percent of the world’s top 500 fastest supercomputers, while Windows runs 1 percent of them. What’s new “news” is that an alleged Microsoft operating system developer recently admitted that Linux is indeed much faster, and explained why that’s the case.
How do I change my Windows OS to Ubuntu?
Practice: Ubuntu installation as a virtual machine
- Download Ubuntu ISO.
- Download VirtualBox and install it in Windows.
- Start VirtualBox, and create a new Ubuntu virtual machine.
- Create a virtual hard disk for Ubuntu.
- Create a virtual optical storage device (this will be the virtual DVD drive).
Is Windows 10 better than Linux?
Linux has good performance. It is much quicker, fast and smooth even on the older hardware’s. Windows 10 is slow compared to Linux because of running batches at the back end, requiring good hardware to run. Linux updates are easily available and can be updated/modified quickly.
Can I install Ubuntu directly from Internet?
Ubuntu can be installed over a network or the Internet. Local Network – Booting the installer from a local server, using DHCP, TFTP, and PXE. Installation/Netboot – Another description of installing over the net, with no CD-ROM drive or a non-bootable SCSI CD-ROM drive.
How do I install Linux on Windows 10 without virtualbox?
How to install Debian Linux server on Windows 10 without…
- requirements.
- Step 1: Run Powershell as Admin.
- Step 2: Enable WSL on Windows 10.
- Step 3: Download and install Debian Linux app on WSL.
- Step 4: Launch Debian App.
- Step 4: Set username and password.
How do I install Ubuntu properly?
- Step 1: Download Ubuntu. Before you do anything, you have to download Ubuntu.
- Step 2: Create a live USB. Once you have downloaded Ubuntu’s ISO file, the next step is to create a live USB of Ubuntu.
- Step 3: Boot from the live USB. Plug in your live Ubuntu USB disk to the system.
- Step 4: Install Ubuntu.
Can I install Ubuntu on SSD?
Simplest is to just install Ubuntu on the SSD and don’t even worry about mounting /, swap and /home. The new Ubuntu installation will then see the HDD and you will be able to format it to ext4, use it as a data drive for photos, videos, whatnot. Meanwhile all Ubuntu’s operations will run on the SSD.
How much time does it take to install Ubuntu?
Typically, it shouldn’t take more than about 15 to 30 minutes, but you may have issues if you don’t have a computer with a good amount of RAM.
Is Ubuntu worth installing?
Absolutely ! Ubuntu is a nice desktop OS. Many of my family members use it as their OS. Since most things they need are accessible via a browser they don’t care.
Does Ubuntu need antivirus?
Ubuntu is a distribution, or variant, of the Linux operating system. You should deploy an antivirus for Ubuntu, as with any Linux OS, to maximize your security defenses against threats.
Will Ubuntu make my laptop faster?
Then you can compare Ubuntu’s performance with Windows 10’s performance overall and on a per application basis. Ubuntu runs faster than Windows on every computer that I have ever tested. LibreOffice (Ubuntu’s default office suite) runs much faster than Microsoft Office on every computer that I have ever tested.
Is Mint better than Ubuntu?
It is clearly shown that the memory usage by Linux Mint is much lesser than Ubuntu which makes it a better choice for users. However, this list is a little older but then also the current desktop base memory usage by Cinnamon is 409MB while by Ubuntu (Gnome) is 674MB, where Mint is still the winner.