Installing on macOS
PyTorch can be installed and used on macOS. Depending on your system and GPU capabilities, your experience with PyTorch on a Mac may vary in terms of processing time.
Prerequisites
macOS Version
PyTorch is supported on macOS 10.15 (Catalina) or above.
Python
It is recommended that you use Python 3.8 or greater, which can be installed either through the Anaconda package manager (see below), Homebrew, or the Python website.
Package Manager
To install the PyTorch binaries, you will need to use one of two supported package managers: Anaconda or pip. Anaconda is the recommended package manager as it will provide you all of the PyTorch dependencies in one, sandboxed install, including Python.
Anaconda
To install Anaconda, you can download graphical installer or use the command-line installer. If you use the command-line installer, you can right-click on the installer link, select Copy Link Address, or use the following commands on Intel Mac:
# The version of Anaconda may be different depending on when you are installing`
curl -O https://repo.anaconda.com/miniconda/Miniconda3-latest-MacOSX-x86_64.sh
sh Miniconda3-latest-MacOSX-x86_64.sh
# and follow the prompts. The defaults are generally good.`
or following commands on M1 Mac:
# The version of Anaconda may be different depending on when you are installing`
curl -O https://repo.anaconda.com/miniconda/Miniconda3-latest-MacOSX-arm64.sh
sh Miniconda3-latest-MacOSX-arm64.sh
# and follow the prompts. The defaults are generally good.`
pip
Python 3
If you installed Python via Homebrew or the Python website, pip was installed with it. If you installed Python 3.x, then you will be using the command pip3.
Tip: If you want to use just the command
pip, instead ofpip3, you can symlinkpipto thepip3binary.
Installation
Anaconda
To install PyTorch via Anaconda, use the following conda command:
conda install pytorch torchvision -c pytorch
pip
To install PyTorch via pip, use one of the following two commands, depending on your Python version:
# Python 3.x
pip3 install torch torchvision
Verification
To ensure that PyTorch was installed correctly, we can verify the installation by running sample PyTorch code. Here we will construct a randomly initialized tensor.
import torch
x = torch.rand(5, 3)
print(x)
The output should be something similar to:
tensor([[0.3380, 0.3845, 0.3217],
        [0.8337, 0.9050, 0.2650],
        [0.2979, 0.7141, 0.9069],
        [0.1449, 0.1132, 0.1375],
        [0.4675, 0.3947, 0.1426]])
Building from source
For the majority of PyTorch users, installing from a pre-built binary via a package manager will provide the best experience. However, there are times when you may want to install the bleeding edge PyTorch code, whether for testing or actual development on the PyTorch core. To install the latest PyTorch code, you will need to build PyTorch from source.
Prerequisites
- [Optional] Install Anaconda
- Follow the steps described here: https://github.com/pytorch/pytorch#from-source
You can verify the installation as described above.
Installing on Linux
PyTorch can be installed and used on various Linux distributions. Depending on your system and compute requirements, your experience with PyTorch on Linux may vary in terms of processing time. It is recommended, but not required, that your Linux system has an NVIDIA or AMD GPU in order to harness the full power of PyTorch’s CUDA support or ROCm support.
Prerequisites
Supported Linux Distributions
PyTorch is supported on Linux distributions that use glibc >= v2.17, which include the following:
- Arch Linux, minimum version 2012-07-15
- CentOS, minimum version 7.3-1611
- Debian, minimum version 8.0
- Fedora, minimum version 24
- Mint, minimum version 14
- OpenSUSE, minimum version 42.1
- PCLinuxOS, minimum version 2014.7
- Slackware, minimum version 14.2
- Ubuntu, minimum version 13.04
The install instructions here will generally apply to all supported Linux distributions. An example difference is that your distribution may support
yuminstead ofapt. The specific examples shown were run on an Ubuntu 18.04 machine.
Python
Python 3.8 or greater is generally installed by default on any of our supported Linux distributions, which meets our recommendation.
Tip: By default, you will have to use the command
python3to run Python. If you want to use just the commandpython, instead ofpython3, you can symlinkpythonto thepython3binary.
However, if you want to install another version, there are multiple ways:
- APT
- Python website
If you decide to use APT, you can run the following command to install it:
It is recommended that you use Python 3.6, 3.7 or 3.8, which can be installed via any of the mechanisms above .
If you use Anaconda to install PyTorch, it will install a sandboxed version of Python that will be used for running PyTorch applications.
Package Manager
To install the PyTorch binaries, you will need to use one of two supported package managers: Anaconda or pip. Anaconda is the recommended package manager as it will provide you all of the PyTorch dependencies in one, sandboxed install, including Python.
Anaconda
To install Anaconda, you will use the command-line installer. Right-click on the 64-bit installer link, select Copy Link Location, and then use the following commands:
# The version of Anaconda may be different depending on when you are installing`
curl -O https://repo.anaconda.com/miniconda/Miniconda3-latest-Linux-x86_64.sh
sh Miniconda3-latest-Linux-x86_64.sh
# and follow the prompts. The defaults are generally good.`
You may have to open a new terminal or re-source your
~/.bashrcto get access to thecondacommand.
pip
Python 3
While Python 3.x is installed by default on Linux, pip is not installed by default.
sudo apt install python3-pip
Tip: If you want to use just the command
pip, instead ofpip3, you can symlinkpipto thepip3binary.
Installation
Anaconda
No CUDA/ROCm
To install PyTorch via Anaconda, and do not have a CUDA-capable or ROCm-capable system or do not require CUDA/ROCm (i.e. GPU support), in the above selector, choose OS: Linux, Package: Conda, Language: Python and Compute Platform: CPU.
Then, run the command that is presented to you.
With CUDA
To install PyTorch via Anaconda, and you do have a CUDA-capable system, in the above selector, choose OS: Linux, Package: Conda and the CUDA version suited to your machine. Often, the latest CUDA version is better.
Then, run the command that is presented to you.
With ROCm
PyTorch via Anaconda is not supported on ROCm currently. Please use pip instead.
pip
No CUDA
To install PyTorch via pip, and do not have a CUDA-capable or ROCm-capable system or do not require CUDA/ROCm (i.e. GPU support), in the above selector, choose OS: Linux, Package: Pip, Language: Python and Compute Platform: CPU.
Then, run the command that is presented to you.
With CUDA
To install PyTorch via pip, and do have a CUDA-capable system, in the above selector, choose OS: Linux, Package: Pip, Language: Python and the CUDA version suited to your machine. Often, the latest CUDA version is better.
Then, run the command that is presented to you.
With ROCm
To install PyTorch via pip, and do have a ROCm-capable system, in the above selector, choose OS: Linux, Package: Pip, Language: Python and the ROCm version supported.
Then, run the command that is presented to you.
Verification
To ensure that PyTorch was installed correctly, we can verify the installation by running sample PyTorch code. Here we will construct a randomly initialized tensor.
import torch
x = torch.rand(5, 3)
print(x)
The output should be something similar to:
tensor([[0.3380, 0.3845, 0.3217],
        [0.8337, 0.9050, 0.2650],
        [0.2979, 0.7141, 0.9069],
        [0.1449, 0.1132, 0.1375],
        [0.4675, 0.3947, 0.1426]])
Additionally, to check if your GPU driver and CUDA/ROCm is enabled and accessible by PyTorch, run the following commands to return whether or not the GPU driver is enabled (the ROCm build of PyTorch uses the same semantics at the python API level (https://github.com/pytorch/pytorch/blob/master/docs/source/notes/hip.rst#hip-interfaces-reuse-the-cuda-interfaces), so the below commands should also work for ROCm):
import torch
torch.cuda.is_available()
Building from source
For the majority of PyTorch users, installing from a pre-built binary via a package manager will provide the best experience. However, there are times when you may want to install the bleeding edge PyTorch code, whether for testing or actual development on the PyTorch core. To install the latest PyTorch code, you will need to build PyTorch from source.
Prerequisites
- Install Anaconda or Pip
- If you need to build PyTorch with GPU support
a. for NVIDIA GPUs, install CUDA, if your machine has a CUDA-enabled GPU.
b. for AMD GPUs, install ROCm, if your machine has a ROCm-enabled GPU - Follow the steps described here: https://github.com/pytorch/pytorch#from-source
You can verify the installation as described above.
Installing on Windows
PyTorch can be installed and used on various Windows distributions. Depending on your system and compute requirements, your experience with PyTorch on Windows may vary in terms of processing time. It is recommended, but not required, that your Windows system has an NVIDIA GPU in order to harness the full power of PyTorch’s CUDA support.
Prerequisites
Supported Windows Distributions
PyTorch is supported on the following Windows distributions:
- Windows 7 and greater; Windows 10 or greater recommended.
- Windows Server 2008 r2 and greater
The install instructions here will generally apply to all supported Windows distributions. The specific examples shown will be run on a Windows 10 Enterprise machine
Python
Currently, PyTorch on Windows only supports Python 3.8-3.11; Python 2.x is not supported.
As it is not installed by default on Windows, there are multiple ways to install Python:
- Chocolatey
- Python website
- Anaconda
If you use Anaconda to install PyTorch, it will install a sandboxed version of Python that will be used for running PyTorch applications.
If you decide to use Chocolatey, and haven’t installed Chocolatey yet, ensure that you are running your command prompt as an administrator.
For a Chocolatey-based install, run the following command in an administrative command prompt:
Package Manager
To install the PyTorch binaries, you will need to use at least one of two supported package managers: Anaconda and pip. Anaconda is the recommended package manager as it will provide you all of the PyTorch dependencies in one, sandboxed install, including Python and pip.
Anaconda
To install Anaconda, you will use the 64-bit graphical installer for PyTorch 3.x. Click on the installer link and select Run. Anaconda will download and the installer prompt will be presented to you. The default options are generally sane.
pip
If you installed Python by any of the recommended ways above, pip will have already been installed for you.
Installation
Anaconda
To install PyTorch with Anaconda, you will need to open an Anaconda prompt via Start | Anaconda3 | Anaconda Prompt.
No CUDA
To install PyTorch via Anaconda, and do not have a CUDA-capable system or do not require CUDA, in the above selector, choose OS: Windows, Package: Conda and CUDA: None.
Then, run the command that is presented to you.
With CUDA
To install PyTorch via Anaconda, and you do have a CUDA-capable system, in the above selector, choose OS: Windows, Package: Conda and the CUDA version suited to your machine. Often, the latest CUDA version is better.
Then, run the command that is presented to you.
pip
No CUDA
To install PyTorch via pip, and do not have a CUDA-capable system or do not require CUDA, in the above selector, choose OS: Windows, Package: Pip and CUDA: None.
Then, run the command that is presented to you.
With CUDA
To install PyTorch via pip, and do have a CUDA-capable system, in the above selector, choose OS: Windows, Package: Pip and the CUDA version suited to your machine. Often, the latest CUDA version is better.
Then, run the command that is presented to you.
Verification
To ensure that PyTorch was installed correctly, we can verify the installation by running sample PyTorch code. Here we will construct a randomly initialized tensor.
From the command line, type:
then enter the following code:
import torch
x = torch.rand(5, 3)
print(x)
The output should be something similar to:
tensor([[0.3380, 0.3845, 0.3217],
        [0.8337, 0.9050, 0.2650],
        [0.2979, 0.7141, 0.9069],
        [0.1449, 0.1132, 0.1375],
        [0.4675, 0.3947, 0.1426]])
Additionally, to check if your GPU driver and CUDA is enabled and accessible by PyTorch, run the following commands to return whether or not the CUDA driver is enabled:
import torch
torch.cuda.is_available()
Building from source
For the majority of PyTorch users, installing from a pre-built binary via a package manager will provide the best experience. However, there are times when you may want to install the bleeding edge PyTorch code, whether for testing or actual development on the PyTorch core. To install the latest PyTorch code, you will need to build PyTorch from source.
Prerequisites
- Install Anaconda
- Install CUDA, if your machine has a CUDA-enabled GPU.
- If you want to build on Windows, Visual Studio with MSVC toolset, and NVTX are also needed. The exact requirements of those dependencies could be found out here.
- Follow the steps described here: https://github.com/pytorch/pytorch#from-source
You can verify the installation as described above.
I was getting some kind of Rollback error on Git bash and Windows Cmd prompt so had to run Anaconda prompt as admin for:
conda install pytorch-cpu -c pytorch
and then I got another when I tried the following command on Anaconda prompt:
pip3 install torchvision
so I switched back to Windows prompt to enter it and it worked.
To test the installation, I ran this from Git Bash:
$ python reinforcement_q_learning.py
with source code that looks like (the snippet near the top anyways):
"""

import gym
import math
import random
import numpy as np
import matplotlib
import matplotlib.pyplot as plt
from collections import namedtuple
from itertools import count
from PIL import Image

import torch
import torch.nn as nn
import torch.optim as optim
import torch.nn.functional as F
import torchvision.transforms as T


env = gym.make('CartPole-v0').unwrapped

# set up matplotlib
is_ipython = 'inline' in matplotlib.get_backend()
if is_ipython:
    from IPython import display

plt.ion()

# if gpu is to be used
device = torch.device("cuda" if torch.cuda.is_available() else "cpu")


######################################################################
# Replay Memory
# -------------
#
# We'll be using experience replay memory for training our DQN. It stores
# the transitions that the agent observes, allowing us to reuse this data
# later. By sampling from it randomly, the transitions that build up a
# batch are decorrelated. It has been shown that this greatly stabilizes
# and improves the DQN training procedure.
#
# For this, we're going to need two classses:
#
# -  ``Transition`` - a named tuple representing a single transition in
#    our environment. It maps essentially maps (state, action) pairs
#    to their (next_state, reward) result, with the state being the
#    screen difference image as described later on.
# -  ``ReplayMemory`` - a cyclic buffer of bounded size that holds the
#    transitions observed recently. It also implements a ``.sample()``
#    method for selecting a random batch of transitions for training.
#

Transition = namedtuple('Transition',
                        ('state', 'action', 'next_state', 'reward'))


class ReplayMemory(object):

    def __init__(self, capacity):
        self.capacity = capacity
        self.memory = []
        self.position = 0

    def push(self, *args):
        """Saves a transition."""
        if len(self.memory) < self.capacity:
            self.memory.append(None)
        self.memory[self.position] = Transition(*args)
        self.position = (self.position + 1) % self.capacity

    def sample(self, batch_size):
        return random.sample(self.memory, batch_size)

    def __len__(self):
        return len(self.memory)

############continues to line 507...
PyTorch is an open source machine learning framework originally from Meta Ai. If you want to study Ai or work on Ai projects, setting up an development env with PyTorch at a local machine is essential for many projects. GPU (Graphics processing unit) is a specialized processor originally designed to process data simultaneously. It helps to speed up computation of your deep learning code. This is a complete guide to install PyTorch GPU on Windows. The installation involves many steps. Let’s get started.
Table of Content
- Download Nvidia graphics driver
- Install Visual Studio Community 2019
- Install CUDA Toolkit 11.8.0
- Install cuDNN 8.6
- Install Anaconda3
- Create virtual environment for TyPorch
- Install PyTorch 2.0
- Run your project
- Install PyCharm
1. Download Nvidia graphics driver
If you already have a PC with GPU, you can skip this step. If you are going to get a new machine learning PC with GPU, please check CUDA enabled GPU cards before buying one. I suggest you buy a PC with Nvidia graphic card having at least 12GB GDDR6 or GDDR6X. If you just got a new PC with Nvidia GPU, you go to Nvidia driver download and download the graphic card driver. After download, you run exe file to install.
2. Install Visual Studio Community 2019
Note: if you already have installed Nvida CUDA toolkit and library, you can skip next three steps.
In order to compile and support Nvidia toolkit and library, you need C++ compiler. You go to Visual Studio old downloads to get 2019. After you sign in, select community 2019 and download.
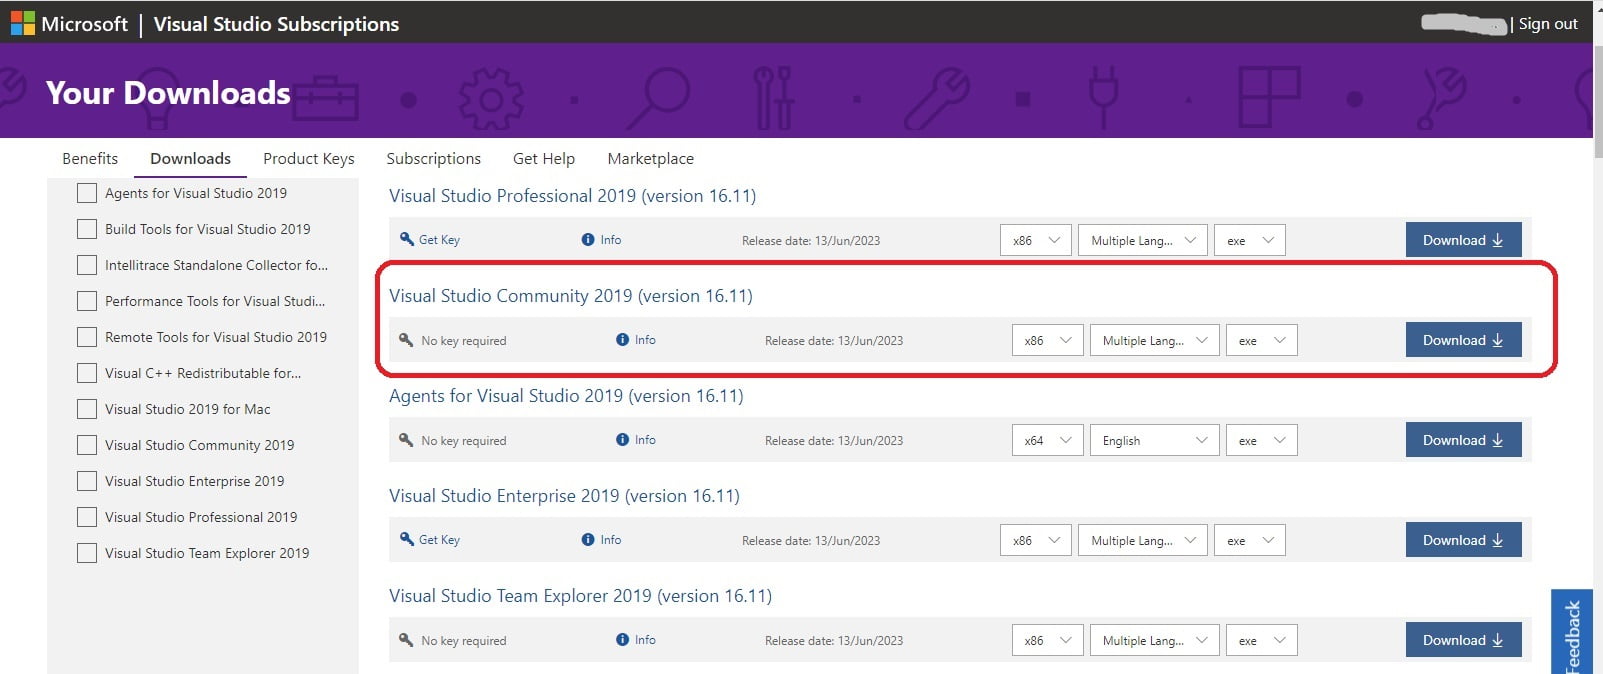
When you run installer, select “code editor” at the right side of the window. Click “continue” and finish the installation.
3. Install CUDA Toolkit 11.8.0
CUDA is a software layer that gives direct access to the Nvidia GPU’s virtual instruction set and parallel computational elements. According to Pytorch install guide, you need CUDA 11.8. Go to CUDA Toolkit archive at Nivdia, and select CUDA ToolKet 11.8.0. In the next window, select Windows, version of your operation system and installer type, you can download and follow default to install it.
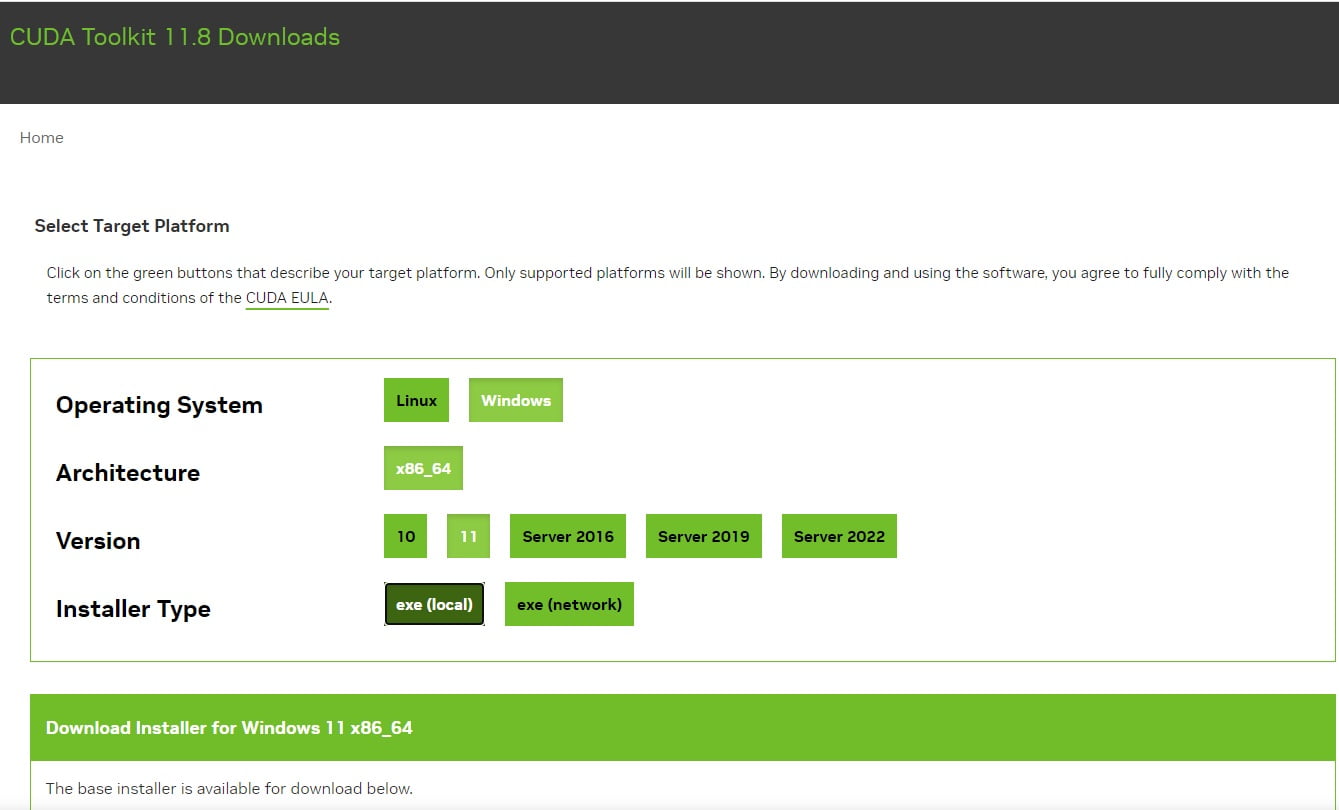
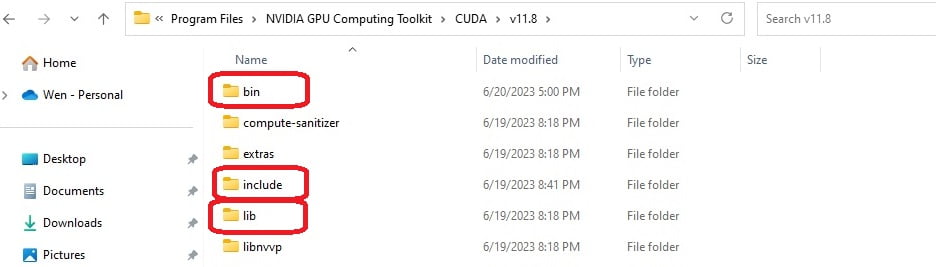
It is installed at C:\Program Files\NVIDIA GPU Computing Toolkit\CUDA\v11.8.
4. Install cuDNN 8.6
The Nvidia CUDA® Deep Neural Network library (cuDNN) is a GPU-accelerated library of primitives for deep neural networks. Go to Nvidia’s cuDNN Archive, download cuDNN v8.6 (not the latest).
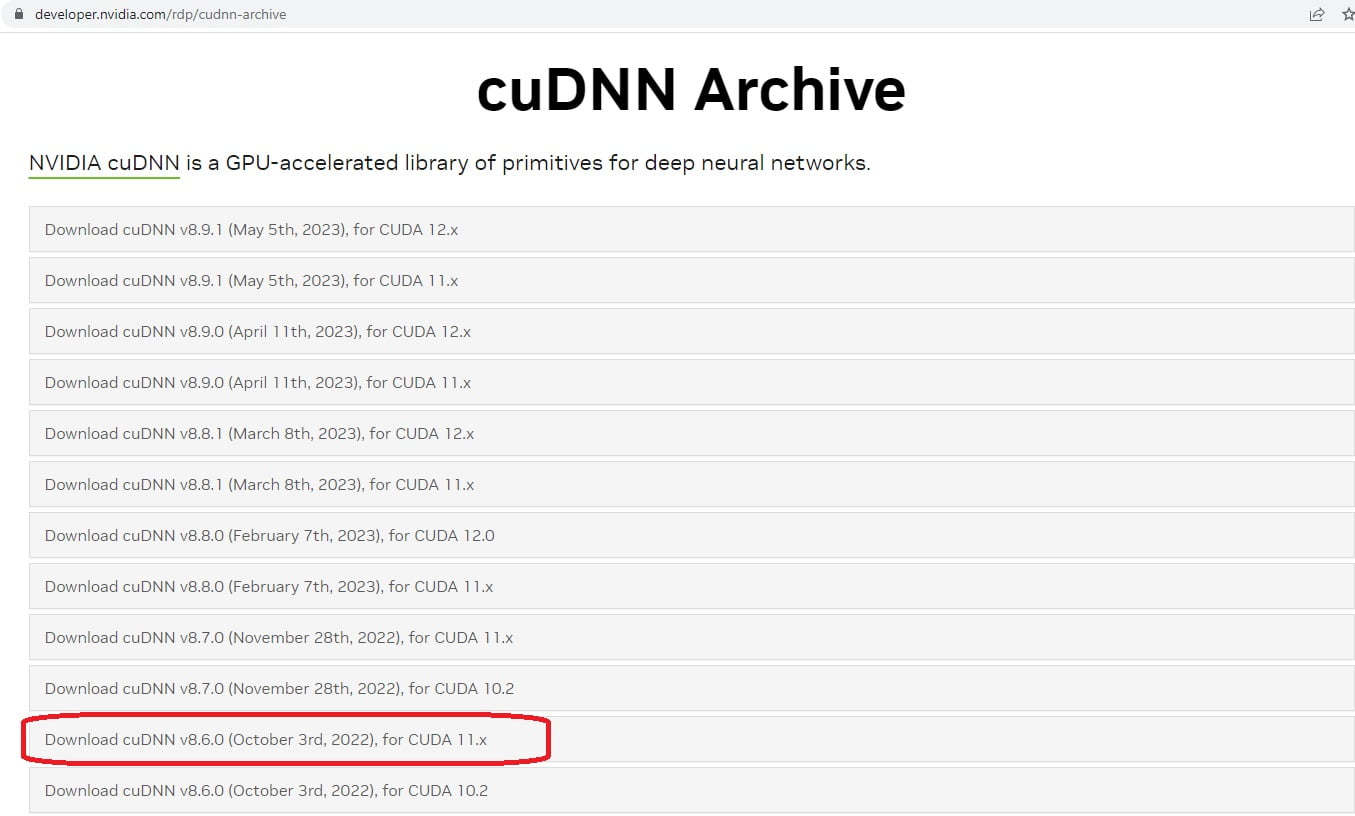
Extract the downloaded zip file and copy three sub folders, i.e. include, lib and bin.
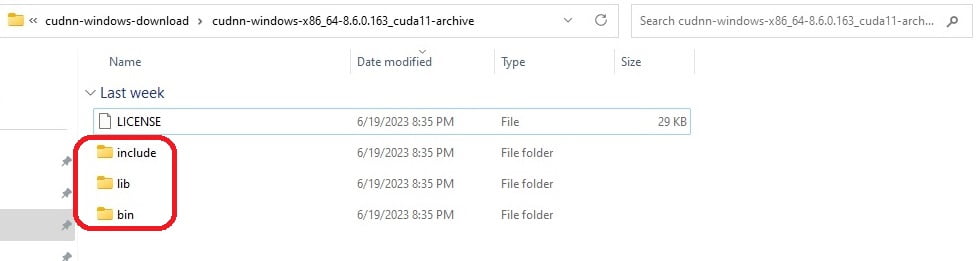
Paste them to CUDA install folder at C:\Program Files\NVIDIA GPU Computing Toolkit\CUDA\v11.8\. New files are added to CUDA.
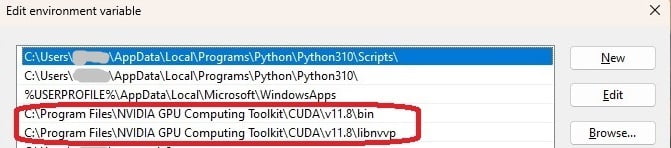
Open Environment Variables window, add following new two paths:
C:\Program Files\NVIDIA GPU Computing Toolkit\CUDA\v11.8\bin
C:\Program Files\NVIDIA GPU Computing Toolkit\CUDA\v11.8\libnvvp
5. Install Anaconda3
Conda is an open-source package and environment management system that runs on Windows, macOS, and Linux. Conda quickly installs, runs, and updates packages and their dependencies. To install, go to Anaconda site to download Anaconda installer, click the download button at top or go to bottom to select particular version for your PC.

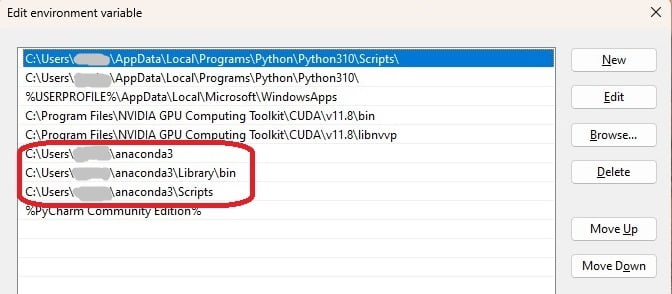
After you run the installer, Anaconda3 is installed at C:\Users\yourusername\anaconda3. It also installs Python 3.10 there. Remember to add the following paths in “Environment Variables”:
C:\Users\yourusername\anaconda3
C:\Users\yourusername\anaconda3\Library\bin
C:\Users\yourusername\anaconda3\Scripts
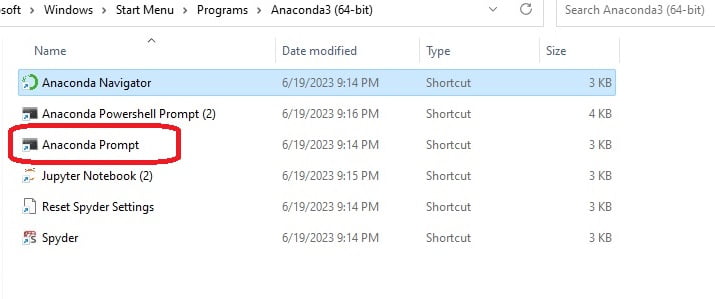
In window start, you can find Anaconda3 folder. If you cannot find, search for “Anaconda prompt” in window search bar at the bottom. Create a shortcut of Anaconda prompt on your desktop. You will use it a lot.
Run Anaconda prompt, a prompt window opens. It shows (base) C:\Users\yourusername>. (base) represents your current environment. “base” is a default env.
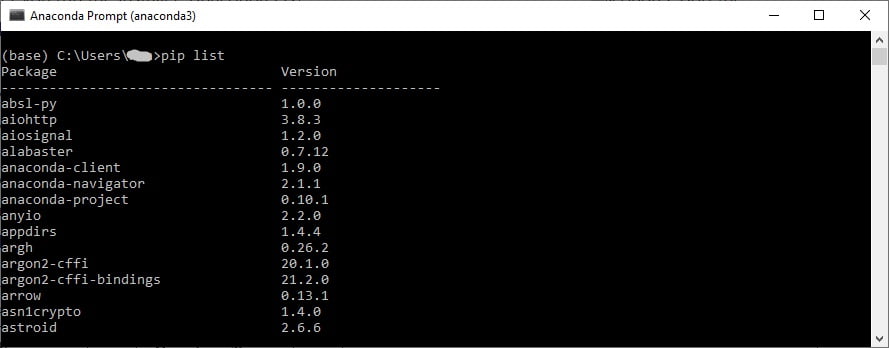
You can run conda or pip commands to see what packages have been installed.
$conda list
$pip list
6. Create virtual environment for TyPorch
A virtual environments is an isolated environment for Python projects. Each project can have its own dependencies, regardless of what dependencies every other project has.
To run PyTorch, it is a good idea to create its own virtual environment. Open Andaconda prompt window, enter commands:
$conda create –name pytorch_env python=3.10
$conda activate pytorch_env
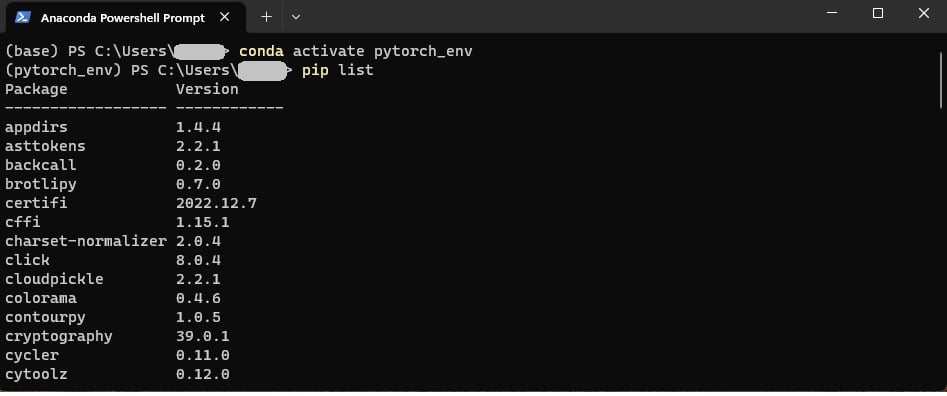
Now you are in “pytorch_env” virtual env.
7. Install PyTorch 2.0
Go to PyTorch site to check the software compatibilities, as orange highlights in the following chart.
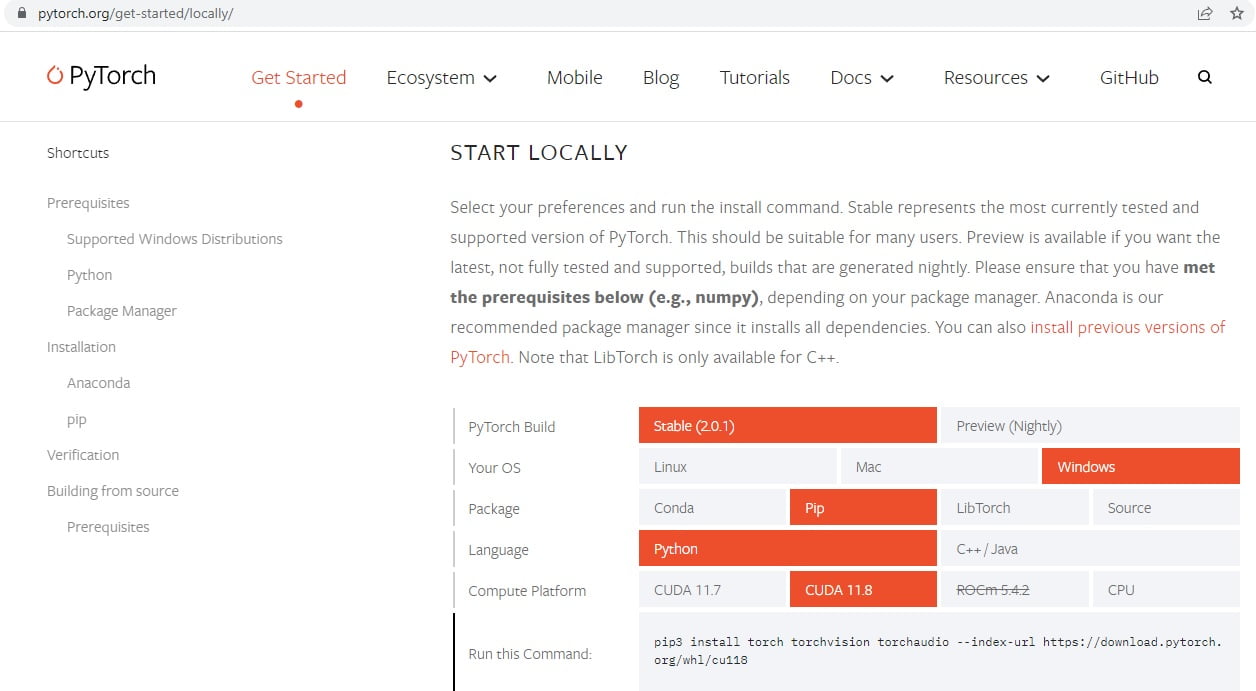
Copy the command at the bottom and run in your Anaconda prompt. This command installs PyTorch and other common used packages such as numPy.
$pip3 install torch torchvision torchaudio –index-url https://download.pytorch.org/whl/cu118
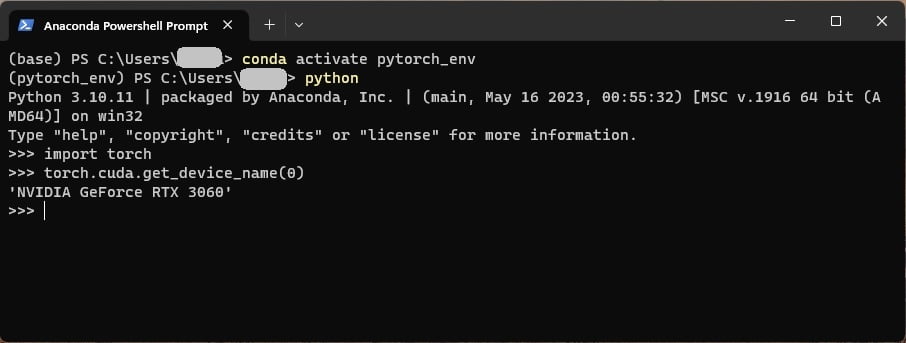
To check whether Pytorch installed correctly with GPU support, run python in Anaconda prompt.
$python
Then run
>>>import torch
>>>torch.cuda.get.device_name(0)
If it returns your GPU card name, you have successfully installed PyTorch with GPU support.
8. Run your project
You can run python code in Andaconda prompt window. For example enter commands:
$python app.py
Sometimes, you need to install additional packages or modules. You can run pip or conda in Anaconda prompt. For example,
$pip install ipython
$conda install -c conda-forge ffmpeg
9. Install PyCharm
PyCharm is an integrated development environment used for programming in Python. If you want to edit and run your project in PyCharm, you need to install it first. Go to Download PyCharm at jebrains site. Download the Community version and run the installer.
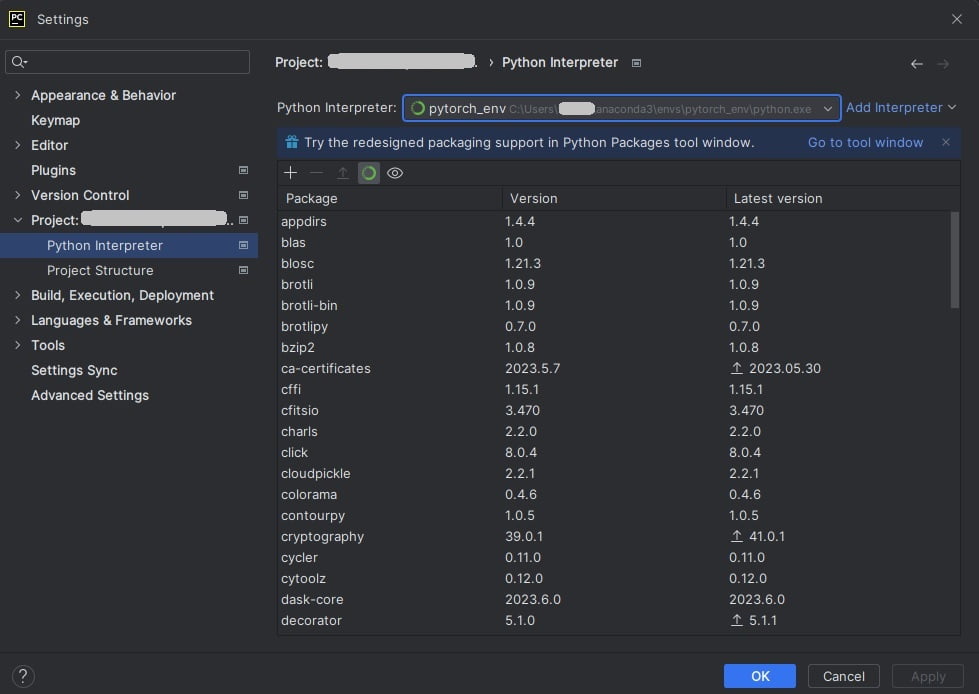
After installation, open PyCharm and create a new project. In Python interpreter, check “Previously configured interpreter”. In the drop down, select “pytorch_env” you just created.
You can also change the interpreter for existing projects. Go to file->settings->project. In Python Interpreter, check “Using existing environment”, click “Add interpreter”, select “pytorch_env”.
PyTorch is an open-source machine learning library for Python, developed by Facebook’s AI research team. It has gained popularity due to its ease of use and flexibility, making it a preferred choice for data scientists and software engineers. Installing PyTorch on a Windows machine can be challenging, but this guide will help you install PyTorch on your Windows computer.
⚠ content generated by AI for experimental purposes only

How to Install PyTorch in Windows
PyTorch is an open-source machine learning library for Python, developed by Facebook’s AI research team. It has gained popularity due to its ease of use and flexibility, making it a preferred choice for data scientists and software engineers. Installing PyTorch on a Windows machine can be challenging, but this guide will help you install PyTorch on your Windows computer.
Prerequisites
Before installing PyTorch, you need to ensure that your computer meets the following requirements:
- Windows 7 or higher
- Python 3.6 or higher
- CUDA for GPU support (optional)
Step 1: Install Python
To install PyTorch, you will need to install Python first. You can download the latest version of Python from the official website (https://www.python.org/downloads/). Once you have downloaded the installer, run it and follow the instructions to install Python.
Step 2: Install PyTorch
There are several ways to install PyTorch on a Windows machine, but the easiest way is to use the pip package manager. Open a command prompt or terminal window and type the following command:
⚠ This code is experimental content and was generated by AI. Please refer to this code as experimental only since we cannot currently guarantee its validity
pip install torch torchvision
This command will install the latest version of PyTorch along with torchvision, which is a package that provides access to popular datasets, model architectures, and image transformations for computer vision tasks.
If you want to install a specific version of PyTorch, you can use the following command:
⚠ This code is experimental content and was generated by AI. Please refer to this code as experimental only since we cannot currently guarantee its validity
pip install torch==1.9.0 torchvision==0.10.0
This command will install PyTorch version 1.9.0 and torchvision version 0.10.0.
Step 3: Verify the Installation
To verify that PyTorch has been installed correctly, open a Python shell by typing python in the command prompt or terminal window. Once the Python shell is open, type the following commands:
⚠ This code is experimental content and was generated by AI. Please refer to this code as experimental only since we cannot currently guarantee its validity
import torch
print(torch.__version__)
If PyTorch has been installed correctly, you should see the version number of PyTorch printed on the screen.
Step 4: Optional: Install CUDA
If you have an NVIDIA GPU and want to use PyTorch with GPU acceleration, you will need to install CUDA. CUDA is a parallel computing platform and programming model developed by NVIDIA for general computing on GPUs.
To install CUDA, you can download the installer from the NVIDIA website (https://developer.nvidia.com/cuda-downloads). Once you have downloaded the installer, run it and follow the instructions to install CUDA.
Conclusion
Installing PyTorch on a Windows machine can be challenging, but by following the steps outlined in this guide, you should be able to install PyTorch with ease. Remember to ensure that your computer meets the prerequisites before attempting to install PyTorch. Once PyTorch is installed, you can start using it to build and train machine learning models.
PyTorch is a powerful tool for machine learning, and by installing it on your Windows machine, you can take advantage of its capabilities. Whether you are a data scientist or a software engineer, PyTorch can help you develop and deploy machine learning models quickly and easily.
About Saturn Cloud
Saturn Cloud is your all-in-one solution for data science & ML development, deployment, and data pipelines in the cloud. Spin up a notebook with 4TB of RAM, add a GPU, connect to a distributed cluster of workers, and more. Join today and get 150 hours of free compute per month.
In this competitive world of technology, Machine Learning and Artificial Intelligence technologies have emerged as a breakthrough for developing advanced AI applications like image recognition, natural language processing, speech translation, and more. However, developing such AI-powered applications would require massive amounts of computational power far beyond the capabilities of CPUs (Central Processing Units).
That’s because CPUs come with very few hand-countable cores and threads. So, CPUs can only process a few threads at a time, which becomes a bottleneck for the highly parallelizable computations required for deep learning algorithms. This gave rise to the use of GPUs (Graphics Processing Units), which shipped with thousands of cores and can handle thousands of threads simultaneously and are designed for mathematically-intensive tasks like real-time 3D graphics rendering, crypto mining, deep learning where a large number of mathematical computations are required.
NVIDIA, the GPU manufacturer giant, revolutionized the applicability of neural networks by developing CUDA, a parallel computing platform and API model for GPU acceleration. This allowed developers to leverage the processing prowess of NVIDIA GPUs for general-purpose computing through languages like C/C++ and Python. To further ease the development of GPU-accelerated deep learning applications, companies like Meta and Google developed frameworks like PyTorch and TensorFlow. Built on top of CUDA, these frameworks provide high-level APIs for building and training neural networks in Python without directly working with low-level CUDA code.
PyTorch, developed by Facebook’s AI Research lab, has emerged as one of the leading choices for developing, training, and interfering in deep learning research and production. With its imperative programming model and Pythonic syntax, PyTorch is widely adopted in natural language processing and reinforcement learning applications.
However, setting up PyTorch on Windows with GPU support can be challenging with multiple dependencies like NVIDIA drivers, CUDA toolkit, CUDNN library, PyTorch and TensorFlow versions, etc. In this comprehensive guide, I aim to provide a step-by-step process to setup PyTorch for GPU devices on Windows 10/11. Let’s begin this post by going through the prerequisites like hardware requirements, driver setup, and installing CUDA, CUDNN, Anaconda, and Pytorch. We will share details on correctly configuring environment variables and verifying GPU access.
By the end, you will learn the complete process of setting up PyTorch on Windows to leverage the power of NVIDIA GPUs for accelerating deep neural network training and inferencing.
Table of Contents
Common Terminologies
Before diving into the installation process, let’s familiarize ourselves with some common terminologies:
- CPU (Central Processing Unit) – The main processor in a computer that handles computations. CPUs are optimized for sequential serial processing.
- GPU (Graphics Processing Unit) – Specialized electronic circuits designed to rapidly process parallel workloads. GPUs are optimized for parallel processing and ideal for machine learning workloads. Popular GPUs are made by Nvidia.
- NVIDIA – Leading manufacturer of GPUs commonly used for AI/ML workloads. Popular Nvidia GPUs include the Tesla and GeForce RTX series.
- CUDA – Parallel computing platform created by Nvidia that allows software developers to leverage the parallel computing capabilities of Nvidia GPUs.
- cuDNN – Nvidia’s library of GPU-accelerated deep neural network primitives. Helps optimize common deep learning operations.
- Anaconda – Open source Python distribution designed for large-scale data processing, predictive analytics, and scientific computing. Comes bundled with many popular data science libraries.
- PyTorch – Open source machine learning framework based on Python and optimized for GPU acceleration. Provides flexibility like Python with high performance like C++.
- TensorFlow – End-to-end open-source machine learning platform developed by Google. Offers many high-level APIs for building and training ML models.
- IDE (Integrated Development Environment) – A software application that provides tools and interfaces for programmers to develop software and applications. Examples: Visual Studio Code, PyCharm, and Jupyter Notebook.
- CUDA Cores – Processing units within Nvidia GPUs designed specifically to perform the calculations required for parallel computing. More CUDA cores lead to improved parallel processing performance.
- CUDA Toolkit – Software development kit created by Nvidia that provides GPU-accelerated libraries, compilers, development tools, and APIs for developing software that leverages Nvidia GPUs.
- Conda Env – Self-contained directory that contains a specific collection of conda packages, Python interpreter, and other dependencies needed to run an application. Helpful for managing dependencies.
- FP32/FP64 – Floating point precision formats that represent 32-bit (single precision) or 64-bit (double precision) floating point values. FP32 requires less memory so commonly used but FP64 offers higher precision.
- NVCC – Nvidia’s C/C++ compiler that can compile code for both CPU and GPU. Part of the CUDA Toolkit.
- Half Precision – 16-bit floating point format that requires less memory and bandwidth compared to 32-bit FP32. Useful for some ML applications.
- Auto Mixed Precision – Training deep learning neural networks using both lower precision (FP16) and higher precision (FP32) automatically based on need. Helps accelerate training while retaining accuracy.
- Tensor Cores – Specialized cores within Nvidia GPUs designed specifically to accelerate mixed precision matrix multiplication operations commonly used in deep learning.
- Machine Learning – The field of computer science that gives computers the ability to learn without being explicitly programmed. Focuses on computer programs that can teach themselves to grow, change, and improve on their own by using algorithms and statistical models to analyze data.
- Deep Learning – A subfield of machine learning that uses neural networks modeled after the human brain and containing multiple layers. Excels at finding patterns in large amounts of unstructured data like images, video, audio, and text.
- Natural Language Processing (NLP) – The field of AI focused on enabling computers to understand, interpret, and manipulate human language. The key component of conversational AI.
Prerequisites to Setup Pytorch for Your GPU on Windows 10/11
First and foremost thing, you can’t setup either CUDA or machine learning frameworks like Pytorch or TensorFlow on any machine that has GPU. there are certain hardware and software requirements that must be met. Let’s see the key prerequisites in this section.
Hardware Requirements
- NVIDIA GPU – A CUDA-capable GPU from NVIDIA is essential. CUDA and related libraries like cuDNN only work with NVIDIA GPUs shipped with CUDA cores. Check out the CUDA-comparable GPUs here.
- Compatible Motherboard – The motherboard should have a PCIe slot to accommodate the NVIDIA GPU. It should be compatible with installing and interfacing with the GPU.
- Minimum 8GB RAM – Having enough RAM is important for running larger deep learning models. The CUDA guide recommends at least 8GB for optimal performance. If you are into heavy-duty tasks then we suggest going for 32GB or higher for desktop computers.
- Enough Disk Space – You will need a few GB of free disk space to install the NVIDIA drivers, CUDA toolkit, cuDNN, PyTorch, and other libraries. We installed CUDA 12.2 on our Windows PC. It eaten up to 20 GB of disk space.
Software Requirements
- Windows 10/11 or Windows Server 2022/2019 – The OS should be Windows 10 or the latest Windows 11 for full compatibility. On the server side Microsoft Windows Server 2022 or Microsoft Windows Server 2019
- NVIDIA GPU Drivers – The latest Game Ready driver from NVIDIA that supports your GPU model. It allows Windows to recognize the GPU.
- CUDA Toolkit – Provides libraries, APIs, and compilers like nvcc to enable GPU acceleration.
- cuDNN – The GPU-accelerated library for deep learning primitives from NVIDIA.
- Visual Studio – The Visual C++ redistributables are needed to run Python on Windows.
- Anaconda/Miniconda – To manage Python packages and environments.
- PyTorch/TensorFlow – The deep learning framework we aim to install and use with CUDA/GPUs.
These are the essential prerequisites in terms of hardware and software for setting up PyTorch on Windows with CUDA GPU acceleration based on NVIDIA’s official documentation. The actual installation steps will be covered later in this guide.
The Demo PC System Specification
We tried this on one of our Windows PCs, which has the below hardware and software.
Hardware:
- CPU: Intel Core i& 7700 8 cores 16 threads with 3.2 G
- RAM: 32 GB DDR4 2400 MGh
- GPU: GTX 1050 2 GB
- SSD: Intel NVME M.2 1TB
Software
- OS: Windows 10 22H
- NVIDIA CUDA Tool Kit: 12.2 (on System) and 12.1 (on Conda)
- cuDNN: 8.9.4
- Anaconda: 22.9.0
- Python: 3.8, 3.9, 3.10
- PyTorch: 2.1.0.dev20230902 py3.9_cuda12.1_cudnn8_0 pytorch-nightly
- Visual Studio Community 2022 with ‘Universal Windows Platform development‘ and ‘Desktop Development with C++‘ (optional)
- PyCharm: 2023.2.1 (Community Edition)
How to Setup Pytorch for Your GPU on Windows 10/11?
This is the phase, in which we spend most of our time. Sometimes, more than expected. What do you think the real challenge here is, it’s neither the procedure nor the application/packages/drivers. It’s the comparability between them (GPU cards, Storage, RAM, Python, CUDA, cuDNN, PyTorch, or TensorFlow). That’s why it takes time to figure out the combination of versions that match your computer hardware.
We tried covering detailed step-by-step instructions to setup Pytorch for Your GPU on Windows PC. We used Windows 10 for this demo. However, the procedure remains the same for Windows 11 either.
Let’s start this process with the installation of NVIDIA Drivers.
Time needed: 1 hour.
How to Setup Pytorch for Your GPU on Windows 10/11?
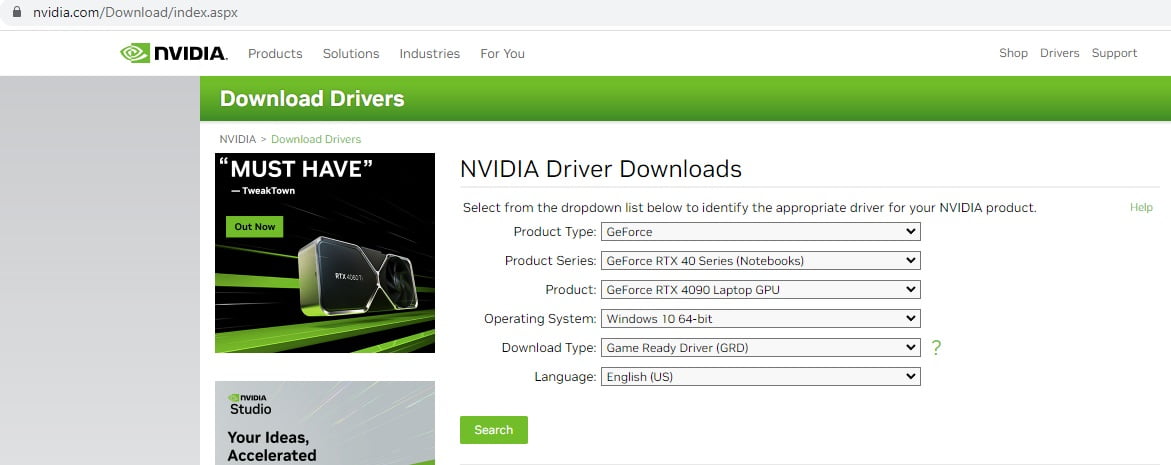
- Install NVIDIA GPU Drivers
The first thing you need is the proper driver for your NVIDIA GPU. Head over to NVIDIA’s driver download page and get the latest Game Ready driver or Studio Driver. Make sure to select Windows 10/11 – 64-bit as the operating system.
Alternatively, you can go to the NVIDIA GPU card page and download the driver. You will get the same driver installer either way.
Run the downloaded executable and follow the on-screen instructions. A system restart will be required after installing the drivers. Restart the system to complete the Driver installation process.
Note: If you are not sure which GPU you have, fire up the ‘Device Manager’ window and expand the ‘Display Adopters’. Your GPU card should be listed if you have configured it without any issues.

- Install CUDA Toolkit
CUDA or Compute Unified Device Architecture is NVIDIA’s parallel computing platform and API model that allows software developers to leverage GPU acceleration. It is required for frameworks like PyTorch to utilize NVIDIA graphics cards.
Go to the CUDA toolkit archive and download the latest stable version that matches your Operating System, GPU model, and Python version you plan to use (Python 3.x recommended).
Again, run the installer accepting all the default options. Remember the installation path as we will need to configure environment variables later on.
https://developer.nvidia.com/cuda-downloads?target_os=Windows&target_arch=x86_64
- Install cuDNN Library
To further boost performance for deep neural networks, we need the cuDNN library from NVIDIA. You will need to create an NVIDIA developer account to access the download link.
Download the cuDNN version that matches your CUDA toolkit version. For example, if you installed CUDA 10.1, you need cuDNN 7.6.X.
Unzip the downloaded package and copy the contents of
bin,include, and lib to the respective directory paths where CUDA is installed on your machine. For example:C:\Program Files\NVIDIA GPU Computing Toolkit\CUDA\v10.1\bin
C:\Program Files\NVIDIA GPU Computing Toolkit\CUDA\v10.1\include
C:\Program Files\NVIDIA GPU Computing Toolkit\CUDA\v10.1\libWe downloaded cuDNN 8.9.4. Unzipped it, and copied the DLLs from bin, include, and lib to the respective folders underneath NVIDIA GPU Computing Toolkit\CUDA\v12.2\

- Configure Environment Variables
We need to update a few environment variables for CUDA, cuDNN, and the NVIDIA driver to work properly.
Click Win +R to open the Run prompt. Type “sysdm.cpl” then Enter. System Properties opens up. Go to ‘advance’ Tab. Click on ‘Environment Variables’. Under
System Variables, click Path and add the following:Under Path:
C:\Program Files\NVIDIA GPU Computing Toolkit\CUDA\v12.2\bin
C:\Program Files\NVIDIA GPU Computing Toolkit\CUDA\v12.2\libnvvp
C:\Program Files (x86)\NVIDIA Corporation\PhysX\Common
C:\Program Files\NVIDIA Corporation\Nsight Compute 2023.2.2\
C:\Program Files\NVIDIA Corporation\NVIDIA NvDLISRCUDA_PATH:
C:\Program Files\NVIDIA GPU Computing Toolkit\CUDA\v12.2CUDA_PATH_V12_2:
C:\Program Files\NVIDIA GPU Computing Toolkit\CUDA\v12.2
- Install Anaconda
We will use Anaconda to set up and manage the Python environment for LocalGPT.
1. Download the latest Anaconda installer for Windows from https://www.anaconda.com/products/distribution
2. Choose Python 3.10 or higher during installation.
3. Complete the installation process and restart your terminal.
4. Open the Anaconda Prompt which will have the Conda environment activated by default.To verify the installation is successful, fire up the ‘Anaconda Prompt’ and enter this command:
conda --versionRefer to these online documents for installation, setting up the environmental variable, and troubleshooting: https://docs.anaconda.com/free/anaconda/install/windows/
Once installed, open the Anaconda Prompt terminal and create a new Conda environment:
conda create -n <Conda env name> python=3.9Activate the environment:
conda activate <Conda env name>To deactivate the Conda Env:
conda deactivateTo activate the Base Env:
conda activate baseTo see the list of Environments:
conda env list
- Install IDE (Optional)
This step is totally optional. You can use any code editor of your choice. We recommend using either Pycharm or Visual Studio Code as it has excellent Python support through extensions.
For this demo, we will use PyCharm as our chosen IDE for Python development. You can check out how to install PyCharm on Windows here. If in case you are not a fan of any IDE, you can directly download the Python interpreter and use it on your CLI.
Download and install PyCharm Community Edition from jetbrains.com/pycharm. Make sure to customize the installer to add Anaconda Python environment support.
Once setup is complete, open PyCharm. We need to configure it to use the Conda environment we created earlier. Go to File > Settings > Project Interpreter. Click the gear icon and select “Add”. Locate the Python executable in the <conda env> folder in the Anaconda installation.
Great! Now PyCharm is configured to use the right Python environment.
Let us know if you need any help setting up the IDE to use the PyTorch GPU environment we have configured.
- Take a Note of CUDA Took Kit, CUDA Runtime API, CUDA Driver API, and GPU Card version
Before going ahead with the installation, you should make a note of the CUDA Tool Kit version installed on your system. CUDA has two APIs Runtime API and Driver API. Run these commands to check the CUDA API version:
Run this command to check the Runtime API version:
nvcc --versionOutput
---
nvcc: NVIDIA (R) Cuda compiler driver
Copyright (c) 2005-2023 NVIDIA Corporation
Built on Tue_Aug_15_22:09:35_Pacific_Daylight_Time_2023
Cuda compilation tools, release 12.2, V12.2.140
Build cuda_12.2.r12.2/compiler.33191640_0Run this command to check the Driver API version:
nvidia-smiOutput
---
GPU 0: NVIDIA GeForce GTX 1050 (UUID: GPU-c45d4514-6d35-9cb7-cfb9-c2fae7306659)Run this command to check the GPU is recognized.
nvidia-smi --list-gpusOutput
---
Sun Sep 3 23:18:11 2023
+---------------------------------------------------------------------------------------+
| NVIDIA-SMI 537.13 Driver Version: 537.13 CUDA Version: 12.2 |
|-----------------------------------------+----------------------+----------------------+
| GPU Name TCC/WDDM | Bus-Id Disp.A | Volatile Uncorr. ECC |
| Fan Temp Perf Pwr:Usage/Cap | Memory-Usage | GPU-Util Compute M. |
| | | MIG M. |
|=========================================+======================+======================|
| 0 NVIDIA GeForce GTX 1050 WDDM | 00000000:01:00.0 On | N/A |
| 45% 39C P8 N/A / 75W | 1306MiB / 2048MiB | 0% Default |
| | | N/A |
+-----------------------------------------+----------------------+----------------------++---------------------------------------------------------------------------------------+
| Processes: |
| GPU GI CI PID Type Process name GPU Memory |
| ID ID Usage |
|=======================================================================================|
| 0 N/A N/A 4552 C+G ....Search_cw5n1h2txyewy\SearchApp.exe N/A |
| 0 N/A N/A 4896 C+G ...ocal\Programs\Evernote\Evernote.exe N/A |
| 0 N/A N/A 7772 C+G ...CBS_cw5n1h2txyewy\TextInputHost.exe N/A |
| 0 N/A N/A 8088 C+G ...oogle\Chrome\Application\chrome.exe N/A |
| 0 N/A N/A 8932 C+G ...ekyb3d8bbwe\PhoneExperienceHost.exe N/A |
| 0 N/A N/A 9884 C+G ...m Files\Mozilla Firefox\firefox.exe N/A |
| 0 N/A N/A 10504 C+G ...2txyewy\StartMenuExperienceHost.exe N/A |
| 0 N/A N/A 11060 C+G C:\Windows\explorer.exe N/A |
| 0 N/A N/A 13208 C+G ...les\Microsoft OneDrive\OneDrive.exe N/A |
| 0 N/A N/A 14972 C+G ...pulse\Screenpresso\Screenpresso.exe N/A |
| 0 N/A N/A 16352 C+G ...Brave-Browser\Application\brave.exe N/A |
| 0 N/A N/A 16864 C+G ...72.0_x64__8wekyb3d8bbwe\GameBar.exe N/A |
| 0 N/A N/A 17252 C+G ....Search_cw5n1h2txyewy\SearchApp.exe N/A |
| 0 N/A N/A 17404 C+G ...m Files\Mozilla Firefox\firefox.exe N/A |
| 0 N/A N/A 17780 C+G ...GeForce Experience\NVIDIA Share.exe N/A |
| 0 N/A N/A 18216 C+G ...es (x86)\MSI\Fast Boot\FastBoot.exe N/A |
| 0 N/A N/A 18288 C+G ...l\Microsoft\Teams\current\Teams.exe N/A |
| 0 N/A N/A 19000 C+G ....0_x64__8wekyb3d8bbwe\HxOutlook.exe N/A |
| 0 N/A N/A 20136 C+G ...e Stream\80.0.1.0\GoogleDriveFS.exe N/A |
| 0 N/A N/A 21352 C+G ...2.0_x64__cv1g1gvanyjgm\WhatsApp.exe N/A |
| 0 N/A N/A 23116 C+G ...ork Manager\MSI_Network_Manager.exe N/A |
| 0 N/A N/A 29064 C+G ...5n1h2txyewy\ShellExperienceHost.exe N/A |
| 0 N/A N/A 29400 C+G ...l\Microsoft\Teams\current\Teams.exe N/A |
+---------------------------------------------------------------------------------------+CUDA Version: 12.2
GPU: NVIDIA GeForce GTX 1050
Driver Version: 537.13The above information is required to download the PyTorch and TensorFlow frameworks.
- Install PyTorch and CUDA for your GPU
Now we are all set to install PyTorch and CUDA for your GPU on a Windows machine. Visit the PyTorch website: https://pytorch.org/get-started/locally/ to construct the command to install PyTorch and CUDA.
Select the PyTorch Build, OS, Package, Programming Language, and CUDA version.
You can choose the Pip instead of the Conda Package. It’s absolutely find and gives the same outcome. Since we used Anaconda as our package manager, we will go with Conda option.
In our case, we selected:
1. PyTorch Build: Nightly (Since we are using the latest NVIDIA CUDA Tool Kit)
2. OS: Windows
3. Package: Conda (You can use Pip. Both will give the same outcome. )
4. Language: Python
5. Compute Platform: CUDA 12.1 (Since we can’t select 12.2, we selected the closest version)Copy the command and run it on your Conda terminal. Note: Ensure you have activated the correct Conda Environment before you execute this command
conda install pytorch torchvision torchaudio pytorch-cuda=12.1 -c pytorch-nightly -c nvidia
This will install the latest stable PyTorch version 2.1.0.dev20230902 py3.9_cuda12.1_cudnn8_0 pytorch-nightly with CUDA 12.1.

- Verify GPU Usage
We can validate that everything is working as expected by running a small PyTorch program:
import torch
if torch.cuda.is_available():
 device = torch.device("cuda")
else:
 device = torch.device("cpu")
print("Using", device, "device")


Install TensorFlow
We tried setting up GPU for TensorFlow, but unfortunately, we couldn’t configure it for GPU. After surfing the TesorFlow site, we got to know that there is no GPU support for Windows and Mac. Windows and Mac have only CPU support. If you want to run TensorFlow for your GPU, it could only be possible on Linux.
Ref:
https://www.tensorflow.org/install/pip#windows-native_1
https://www.tensorflow.org/install/source_windows
“GPU support on native Windows is only available for 2.10 or earlier versions, starting in TF 2.11, CUDA build is not supported for Windows. For using TensorFlow GPU on Windows, you will need to build/install TensorFlow in WSL2 or use TensorFlow-cpu with TensorFlow-DirectML-Plugin”
– TensorFlow
Bottom Line
In this comprehensive guide, we went through the entire process of setting up PyTorch on Windows 10/11 with CUDA GPU acceleration.
We looked at the hardware and software prerequisites like having an NVIDIA GPU, and compatible motherboard and installing the necessary NVIDIA drivers, CUDA toolkit, cuDNN library, etc.
The step-by-step installation process was explained in detail including tips like doing a clean driver install and verifying CUDA installation using nvcc.
Configuring the environment variables properly is key to ensuring PyTorch can locate the CUDA install directory. Using Anaconda for Python package management simplifies setting up Conda environments for PyTorch.
The latest PyTorch stable release was installed with matching CUDA driver support for leveraging the GPU acceleration. A simple PyTorch program was run to confirm that the GPU is accessible.
Following these steps will help you correctly configure PyTorch on Windows for up to 10-50x speedups on deep learning workloads by harnessing the power of your NVIDIA GPUs. However, the performance purely depends on the GPU card used over the CPU chip. We will plan the performance test in some other post.
You now have the required setup to start developing and training large neural network models efficiently by exploiting the massively parallel processing capabilities of NVIDIA GPUs. The flexible PyTorch framework offers you full control over model building, debugging, and optimization for your AI projects.
We hope this guide served as a helpful reference manual to setup Pytorch for Your GPU on Windows. Let me know if you have any other questions in the comments! We thank you for reading this blog post. Visit our website, thesecmaster.com, and social media pages on Facebook, LinkedIn, Twitter, Telegram, Tumblr, & Medium and subscribe to receive updates like this.

Arun KL
Hi All, I am Arun KL, an IT Security Professional. Founder of “thesecmaster.com”. Enthusiast, Security Blogger, Technical Writer, Editor, Author at TheSecMaster. To know more about me. Follow me on LinkedIn