
You don’t have to have two different computers to use Linux and Windows 10. It’s possible to have a Linux distro installed on a computer with Windows 10 preinstalled.
In this article, I will show you how to dual boot Windows 10 and the popular Ubuntu Linux distro. But before that, you have to install Ubuntu on your Windows 10 PC.
Before you go through this process, you must backup your files. That’s because installing an OS is a risky process. Sometimes it can overwrite the existing OS and delete all your files.
N.B.: Most of the processes in this article take time to get done, so you need to be patient.
What We’ll Cover – A step-by-step Guide to Dual-Booting Windows 10 and Linux
- Prerequisites
- How to Partition your Hard Drive for Ubuntu
- How to Optimize your Hard Drive for More Partition Space (Optional)
- How to Download Ubuntu in ISO Image Format
- How to Make an Ubuntu (Linux) Bootable USB Drive
- How to Install Ubuntu Linux Distro along with Windows 10
- Now You Can Dual Boot Ubuntu and Windows 10
- Conclusion
Prerequisites
Most importantly, there are some things you must have in place if you want to use (and dual boot) Ubuntu and Windows 10 on the same PC:
- A computer preinstalled with Windows 10
- A partitioned hard drive
- A BIOS in UEFI mode (Unified Extensible Firmware Interface)
- An empty USB drive of at least 4Gig for creating a bootable disk
- An internet connection to download Ubuntu ISO image (the Linux distro) and Rufus (a bootable drive creation tool)
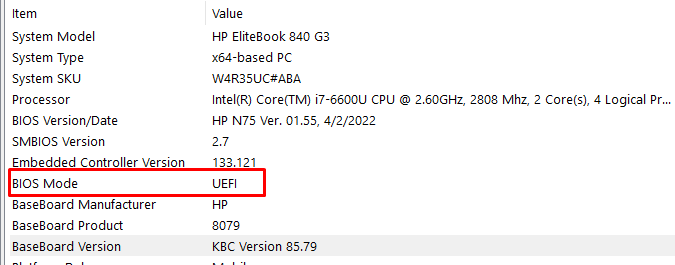
How to Check If Your PC BIOS is in UEFI Mode
To check if your PC BIOS comes in UEFI mode, search for “system information” and hit ENTER.
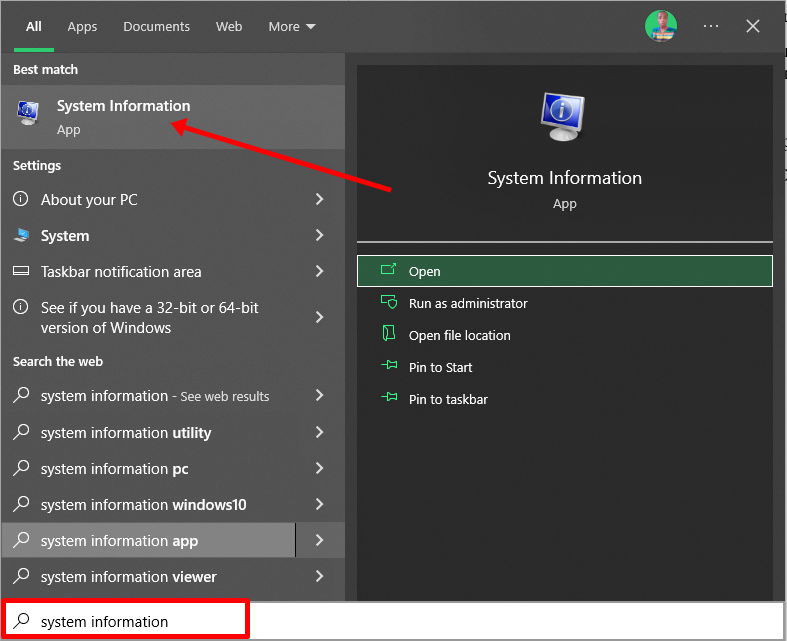
Look under BIOS mode to confirm that your PC BIOS mode comes as UEFI.
If your PC BIOS is not in UEFI mode, the two operating systems won’t see each other. You can learn more about the difference between these two modes here.
How to Partition your Hard Drive for Ubuntu
You have to partition your hard drive because you must set aside at least 20Gig for Ubuntu to live in and boot from.
To partition your hard drive, follow the steps below:
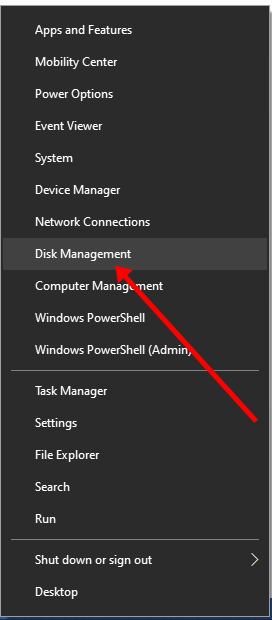
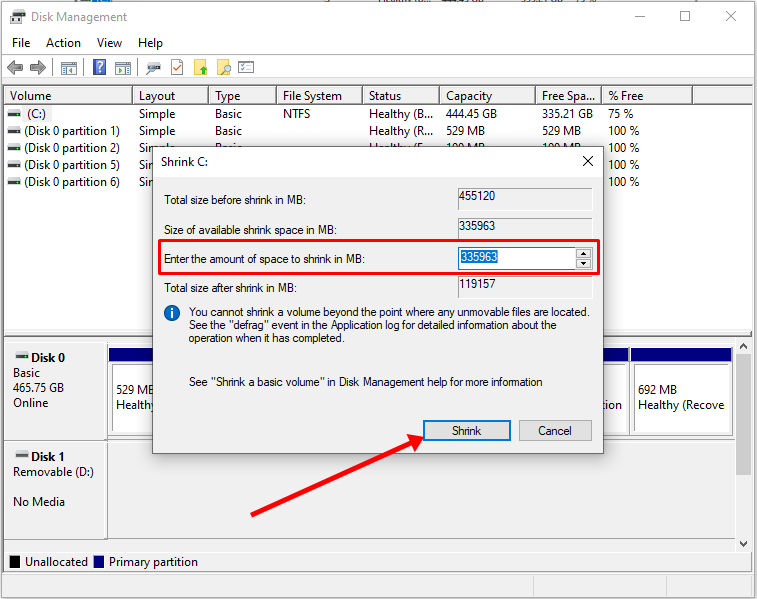
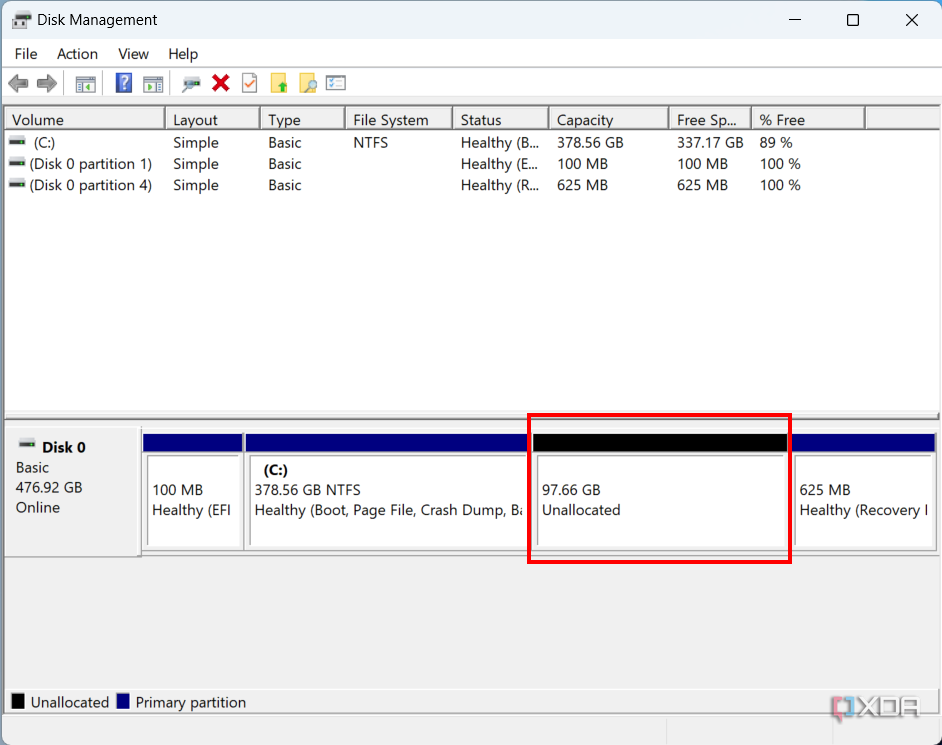
Step 1: Right-click on Start and select “Disk Management”.
Step 2: Right-click on your C drive and select shrink volume.
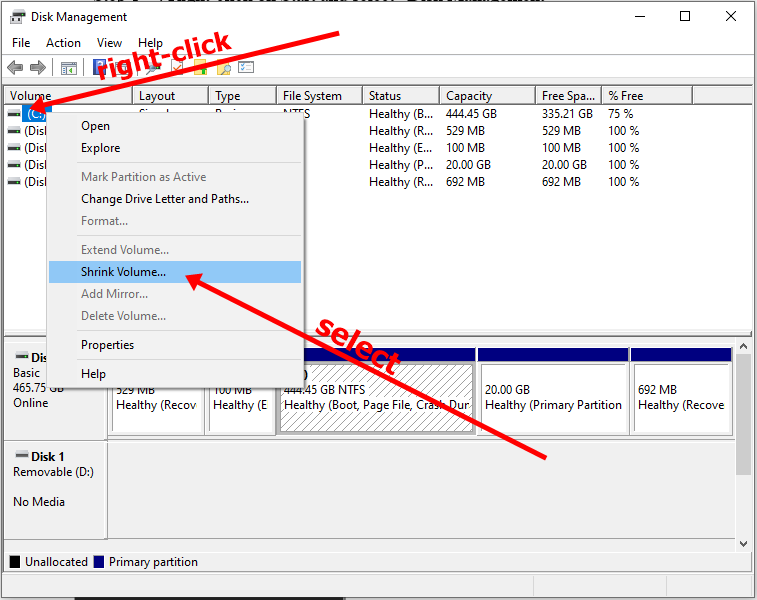
Step 3: Select at least (20000) 20Gig for Ubuntu and click “Shrink”. IT can take some time to complete, so be patient.
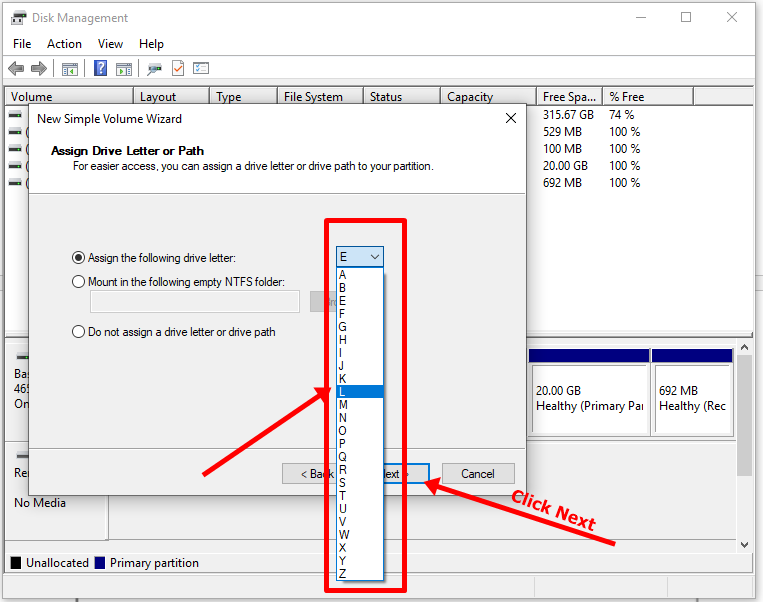
Step 4 (optional): You can go ahead and assign a letter to the new volume. Right-click on the unallocated space and select “New Simple Volume”.
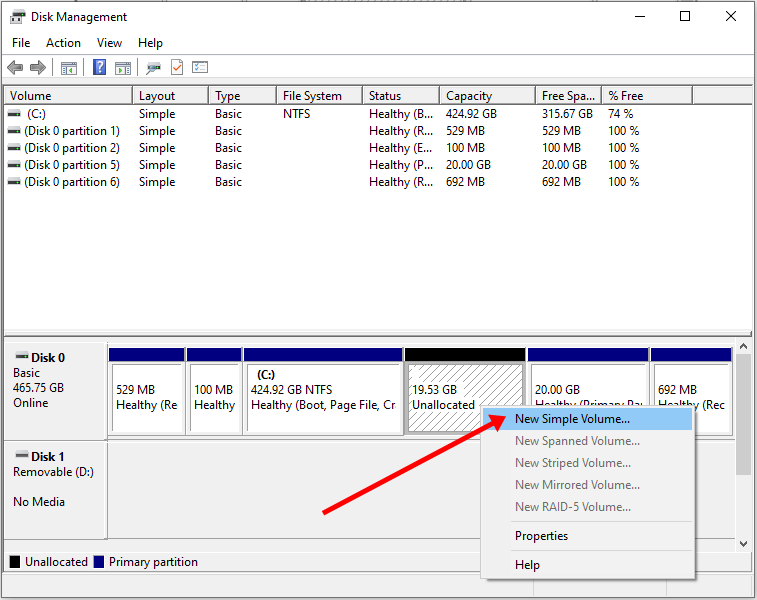
Step 5: Follow the wizard and assign a letter to the drive, then follow the rest of it.
After completing the wizard, the drive should be listed on your computer.
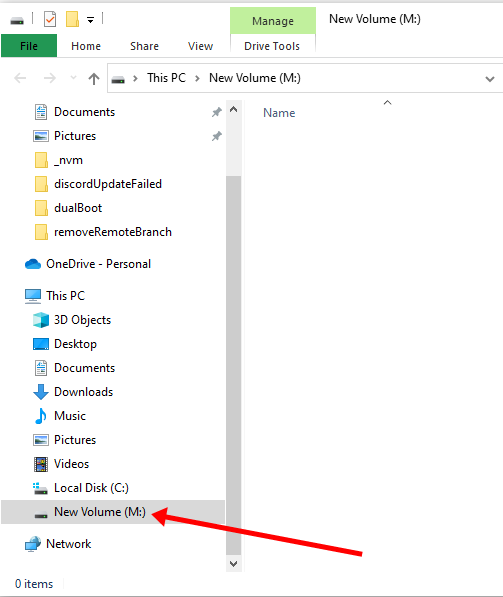
Congrats! You’ve successfully partitioned your hard drive.
N.B.: If you have a lot of free space in your hard drive but your PC still didn’t give you up to 20Gig partition space, then you need to optimize your PC’s hard drive. Proceed to the next section of this article to do that.
How to Optimize your Hard Drive for More Partition Space (Optional)
The common purpose of hard disk optimization is to speed up your computer during boot time and make it run smoother.
At the same time, the process will defragment the hard disk and make free space more available for partitioning.
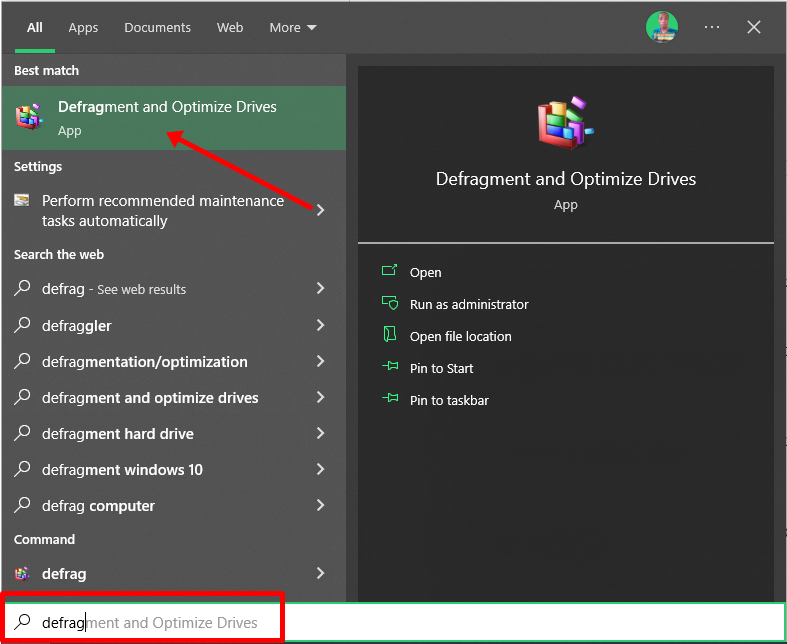
To optimize your hard drive, click Start (Windows logo key), search for “defrag” and select “Defragment and Optimize Drives”.
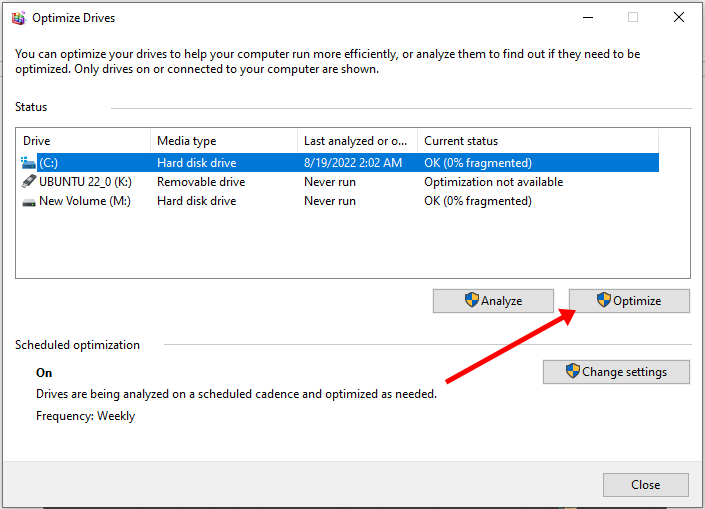
Make sure your C drive is highlighted, then click “Optimize”.
After you’ve been able to set aside at least 20Gig for Ubuntu by partitioning your hard drive, then it’s time to download Ubuntu and make a bootable USB.
How to Download Ubuntu in ISO Image Format
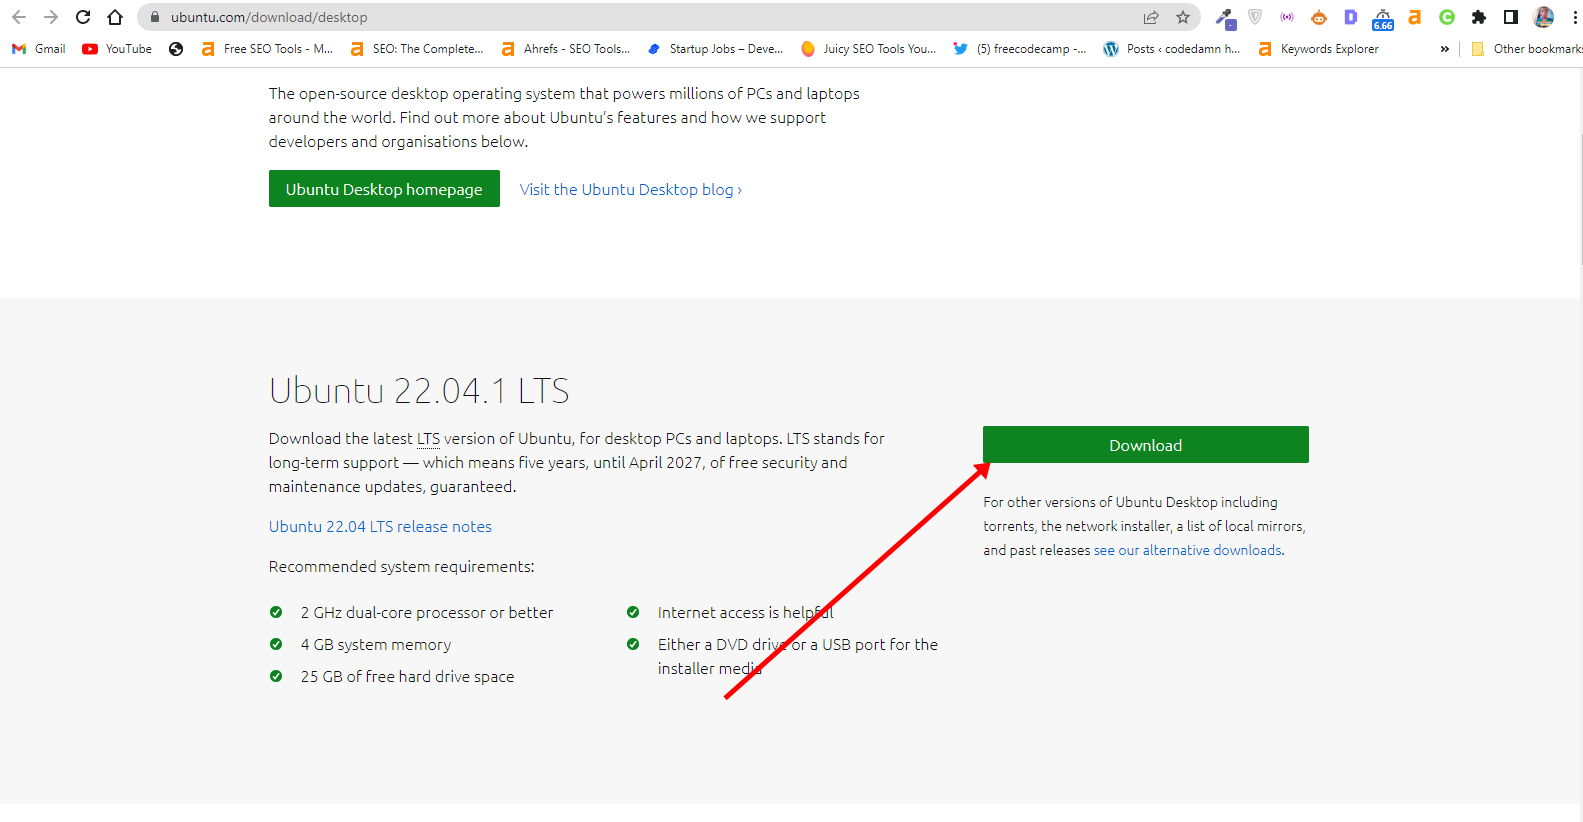
The next thing is to download Ubuntu in ISO image format so you can install Ubuntu. You can download it from the Ubuntu distro website.
After downloading Ubuntu, don’t do anything with it yet. You need to make a bootable USB and put it in there. That’s how you’ll be able to use it.
The reason you can’t install Ubuntu just like that is that it doesn’t come as an executable. It comes in form of ISO (optical disk image). That means you have to find a disk to put it in before it can work.
The next part of this guide shows how you can put the downloaded Ubuntu ISO on a USB stick.
How to Make an Ubuntu (Linux) Bootable USB Drive
You won’t be able to make a bootable USB drive for Ubuntu by just placing the downloaded ISO image in it. Follow these steps to get it done:
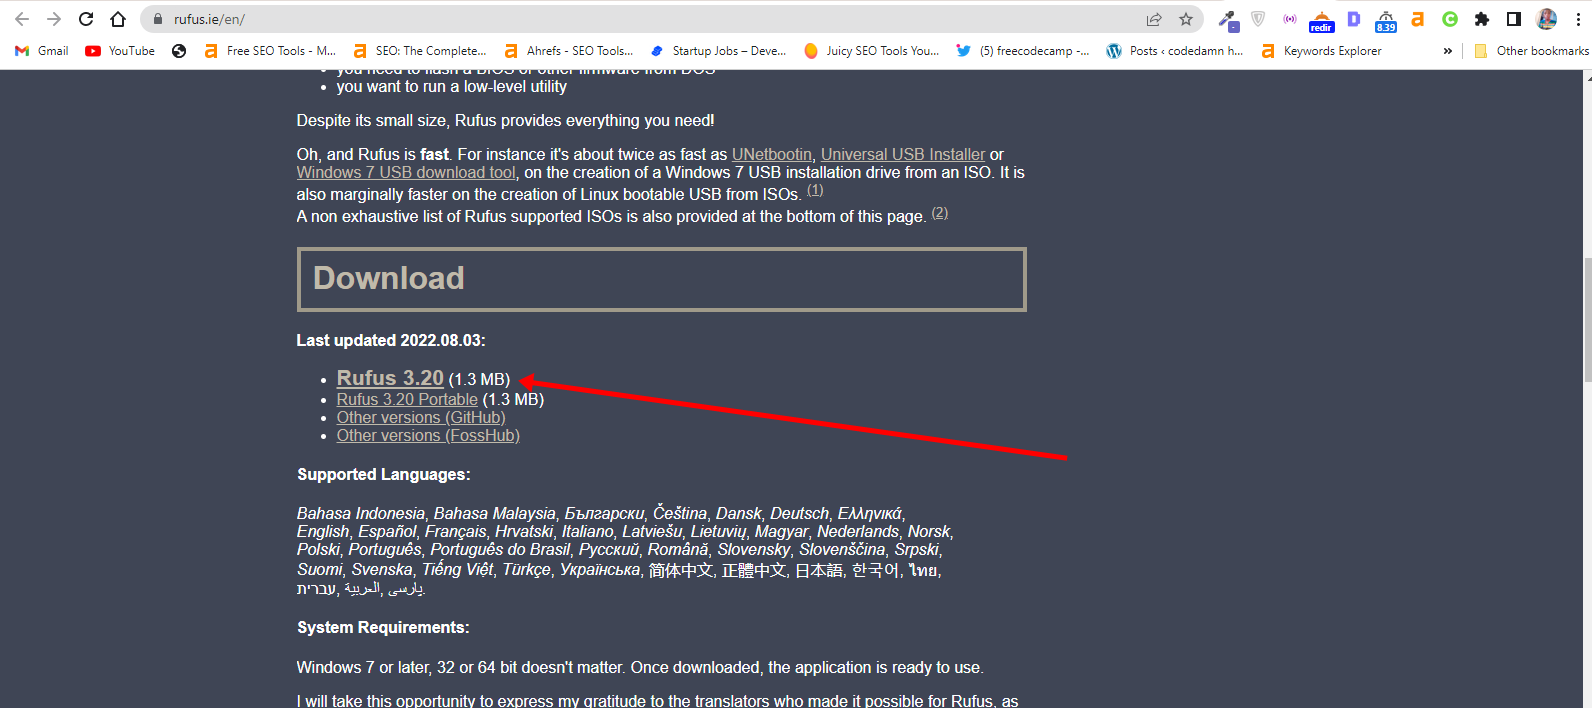
Step 1: You need to download a bootable USB drive creation tool like Rufus. You can download Rufus from their website.
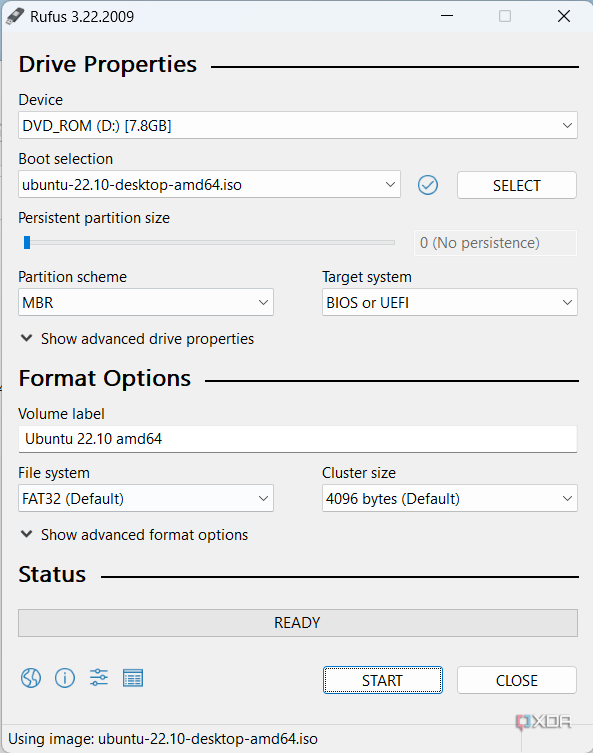
Step 2: Insert the empty USB drive into your Windows 10 PC. Right-click on Rufus and select “Open”.
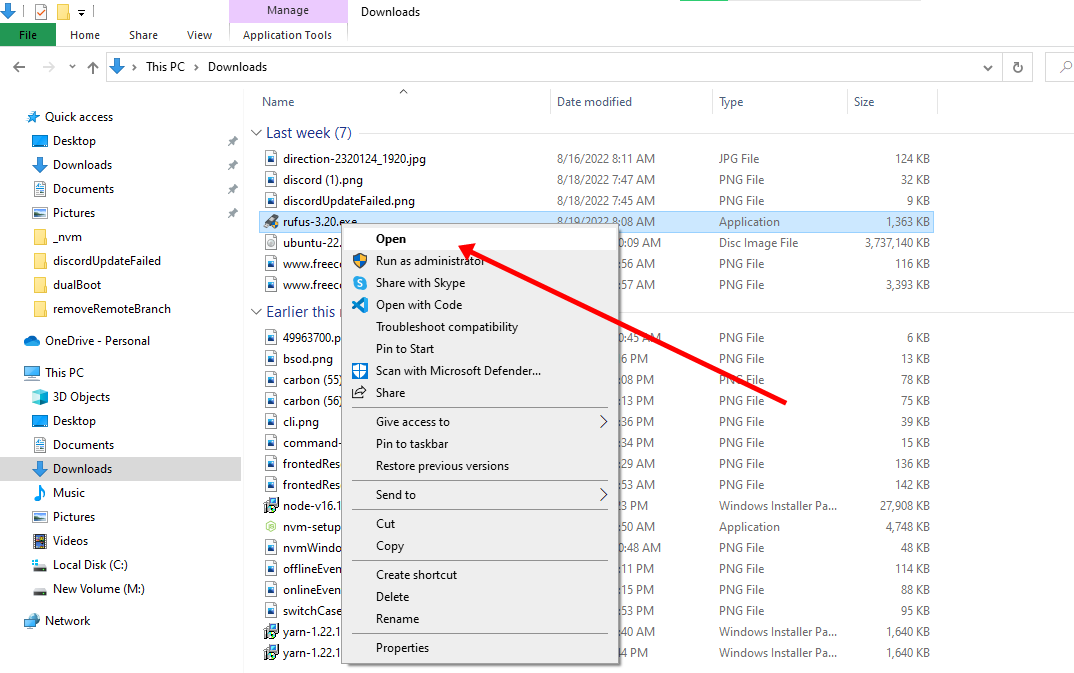
Step 3: Under “Device”, select your USB drive. And under “Boot selection”, click the “Select” button and select the Ubuntu ISO file you downloaded
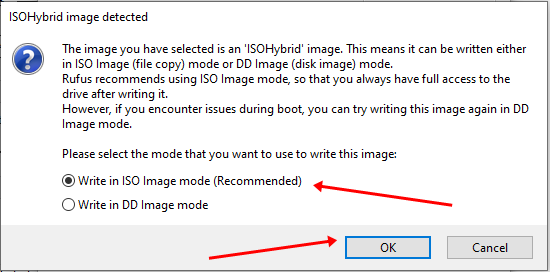
Step 4: Leave every other thing as default and click the “START” button to start burning the Ubuntu distro to the drive.

Step 5: Click OK to start the process.
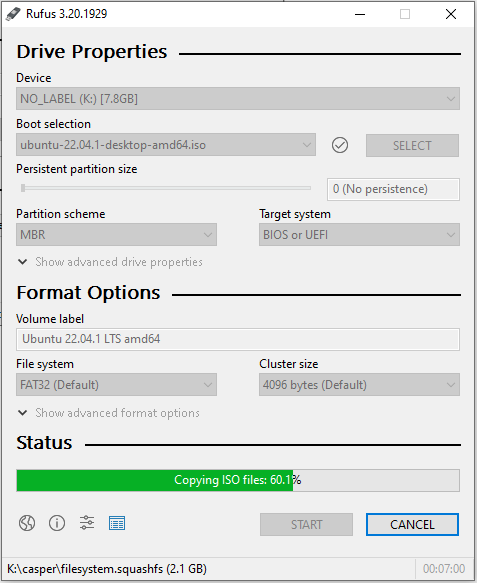
Once the process is done, you should see “READY” on a green background. Click the Close button. Its time to install Ubuntu.
Congrats! Now you have a bootable drive with which you can install Linux.
The next step is to install the Ubuntu distro on your Windows 10 PC. To do this, you have to boot your PC from the bootable USB drive you created.
How to Install Ubuntu Linux Distro along with Windows 10
Step 1: Ensure the bootable drive is inserted into your Windows 10 PC
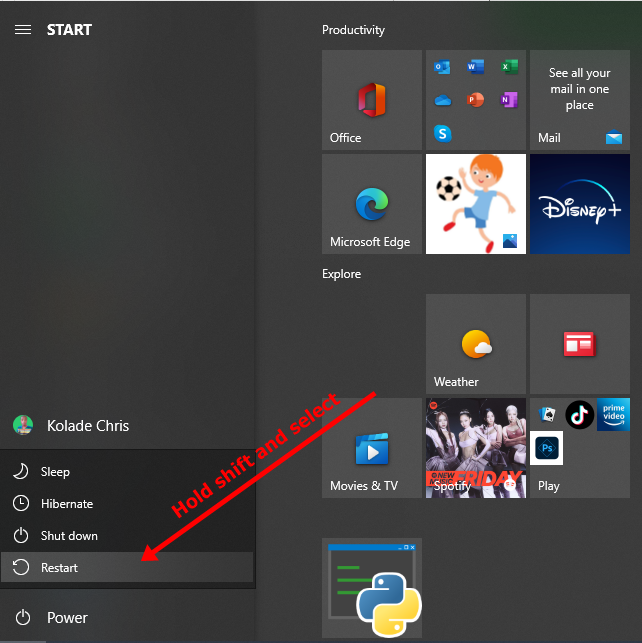
Step 2: Right-click on Start, hold SHIFT, and select Restart.
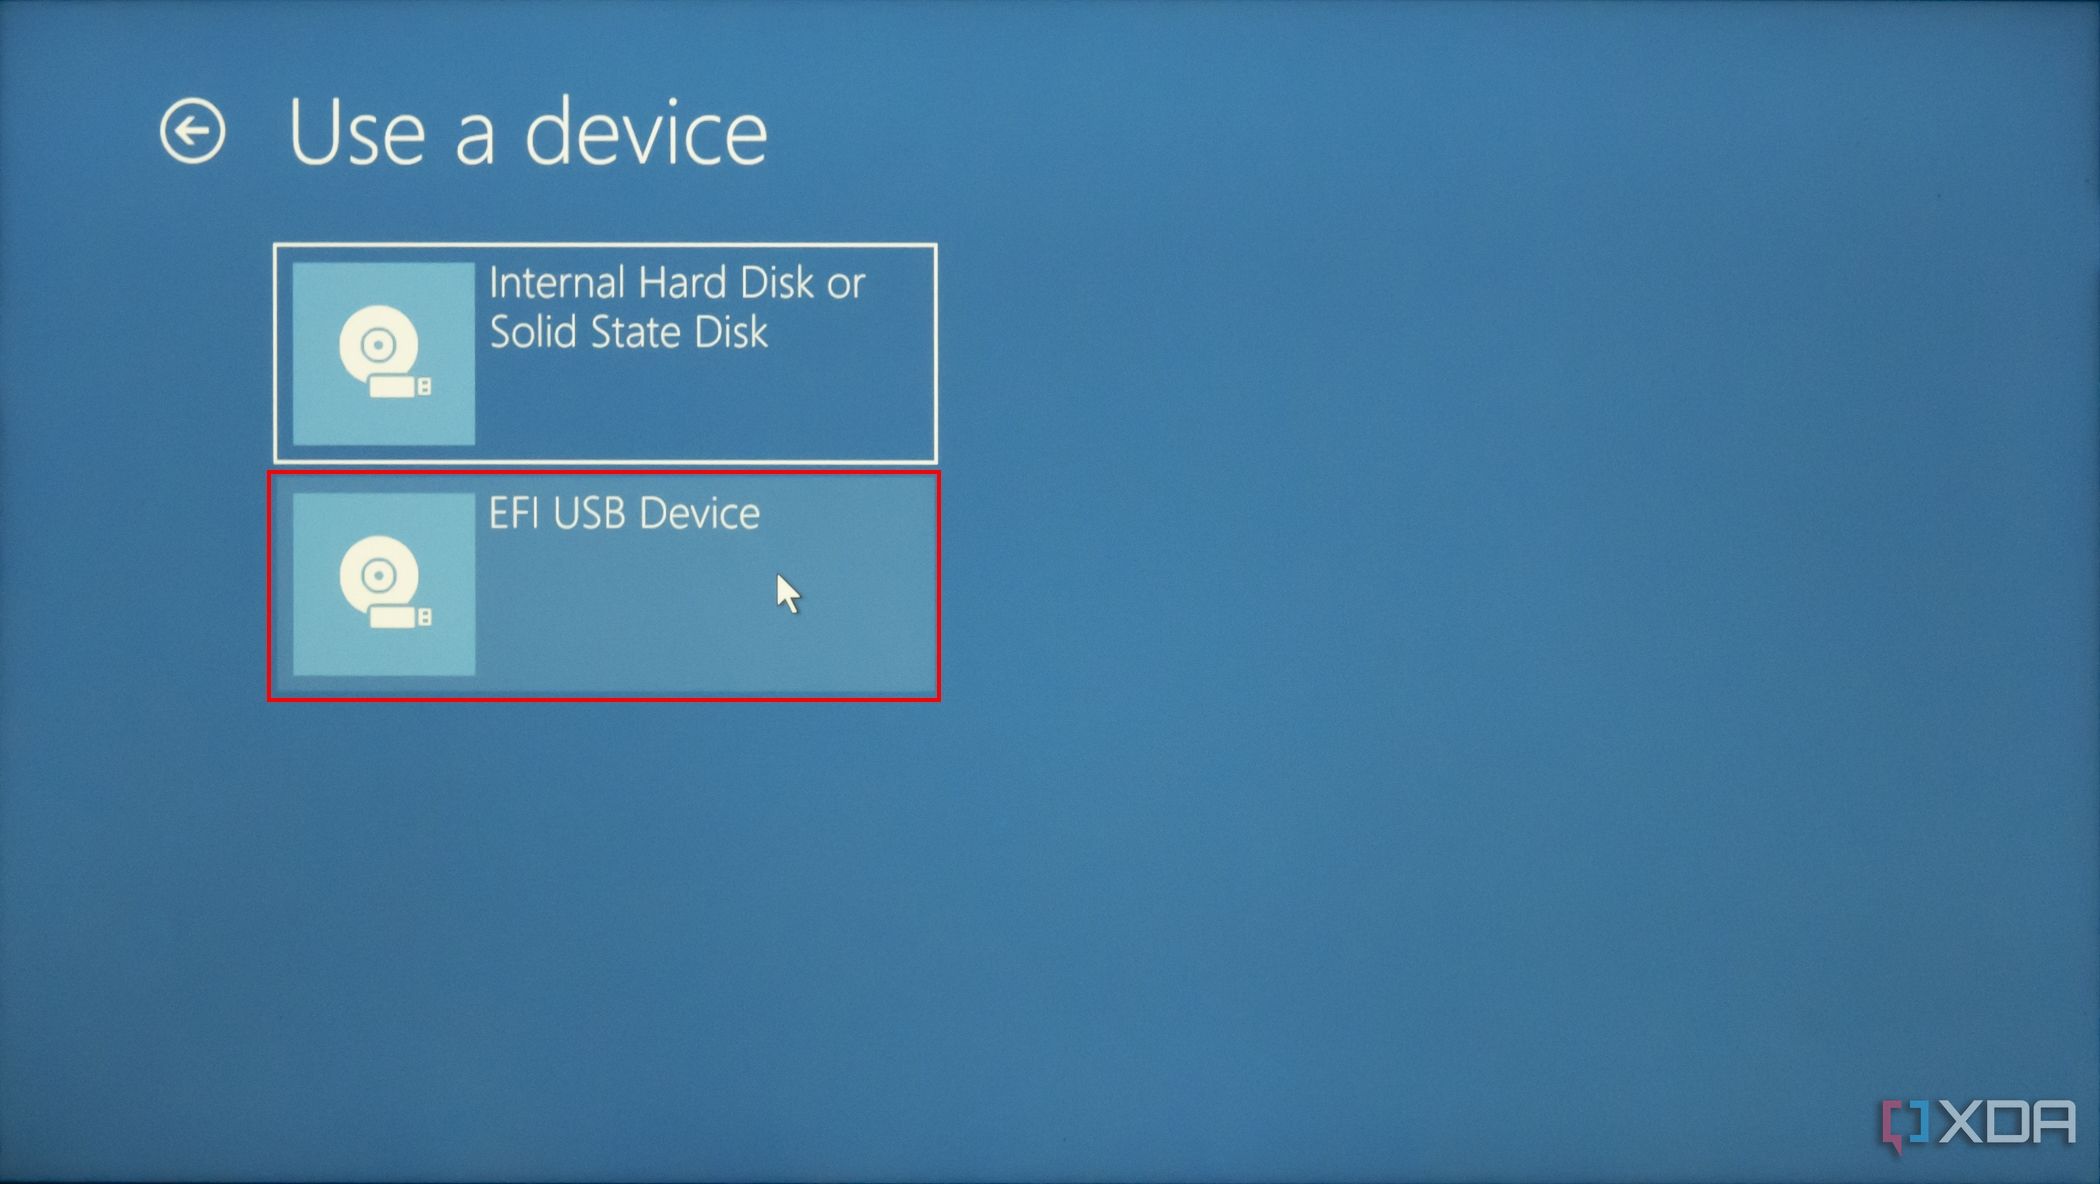
Step 2: Select “Use a Device”.
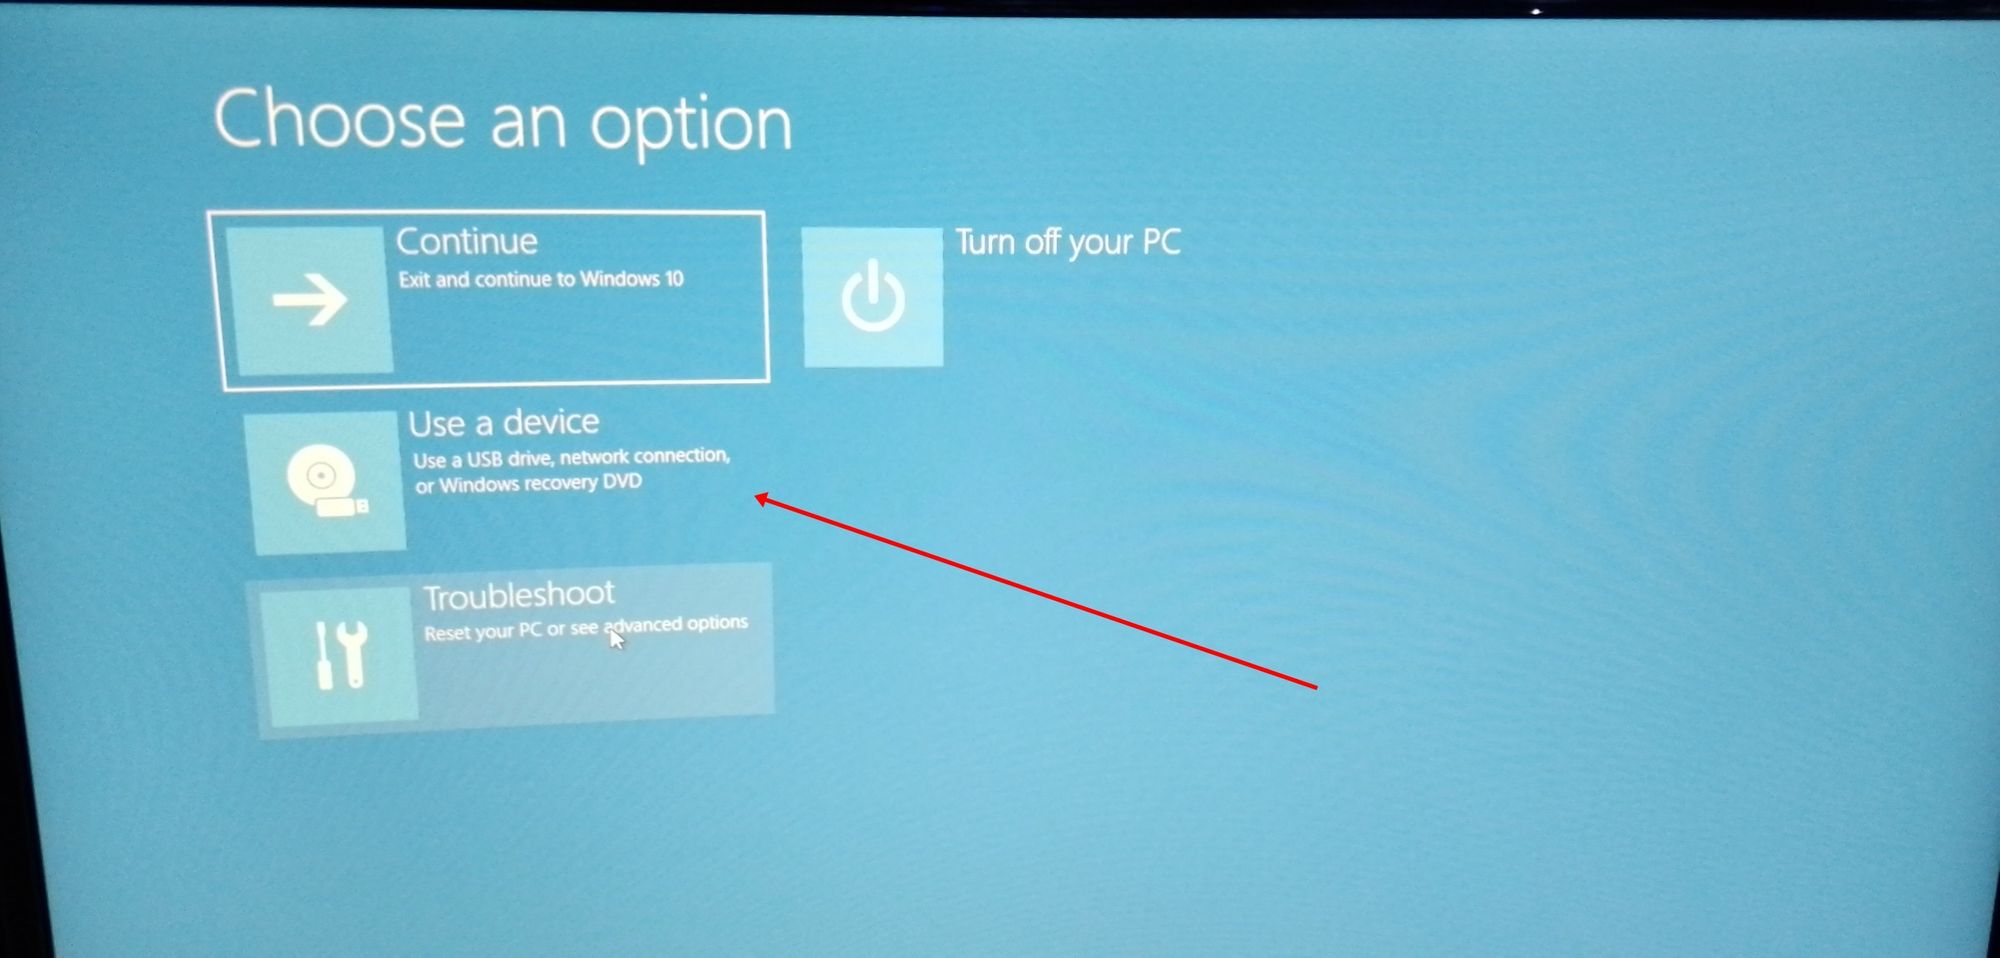
Step 3: On the next screen, you should see several devices you can boot from.
You may see the bootable drive as the name of the USB brand.
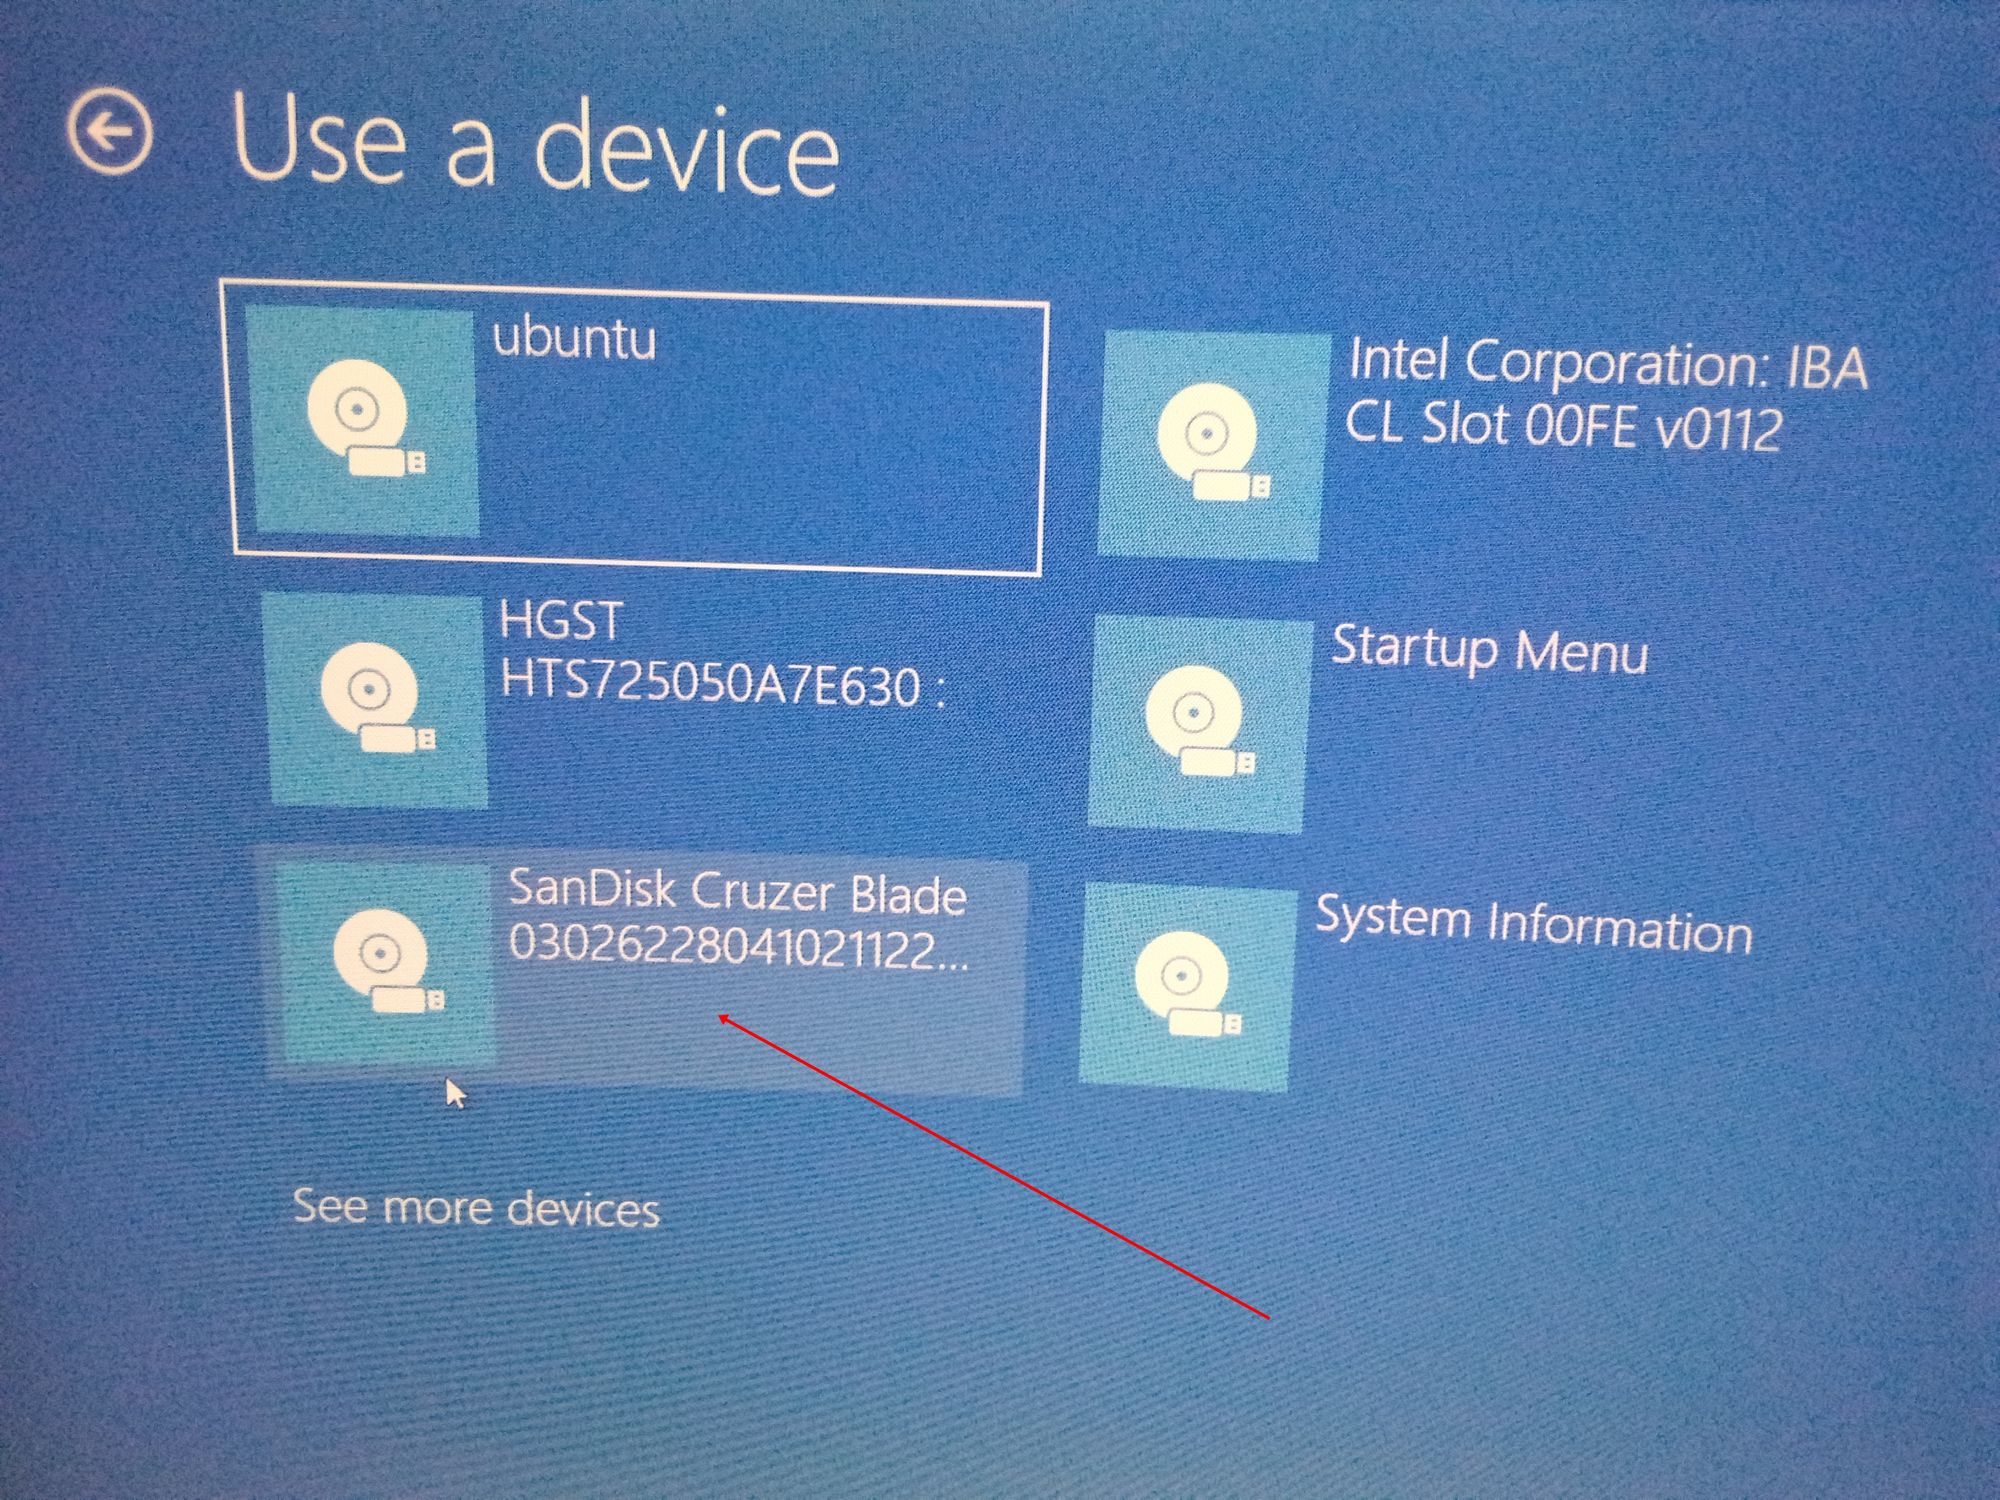
It’s possible to see it as “Ubuntu” too. Some other times, you might not see it, so you need to click on “See more devices».
If you still cannot see your bootable drive, head over to your boot menu by getting into BIOS. You will see it there.
N.B.: You should be very careful while making changes in BIOS. Whatever you do there has a lasting effect on your computer. If you are not sure of what you’re doing there, you should contact an IT professional.
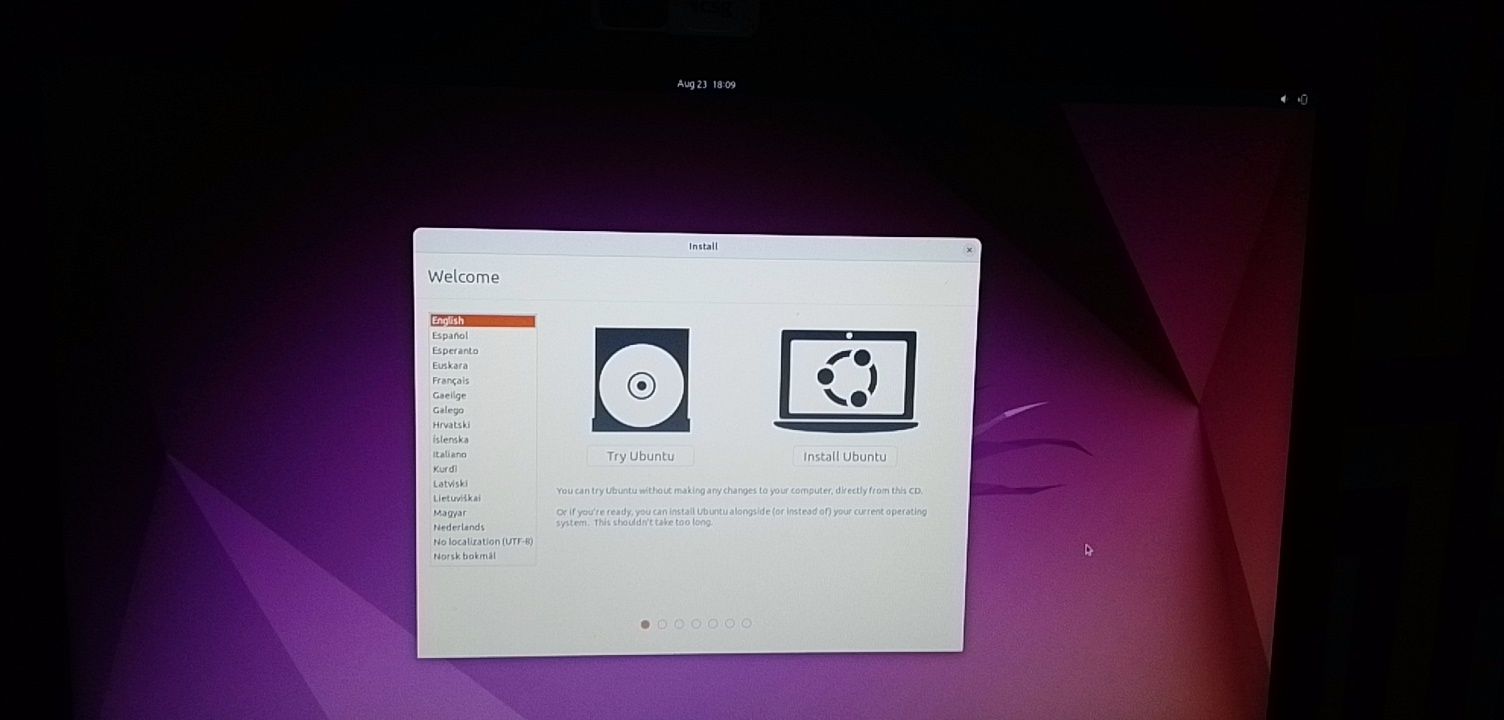
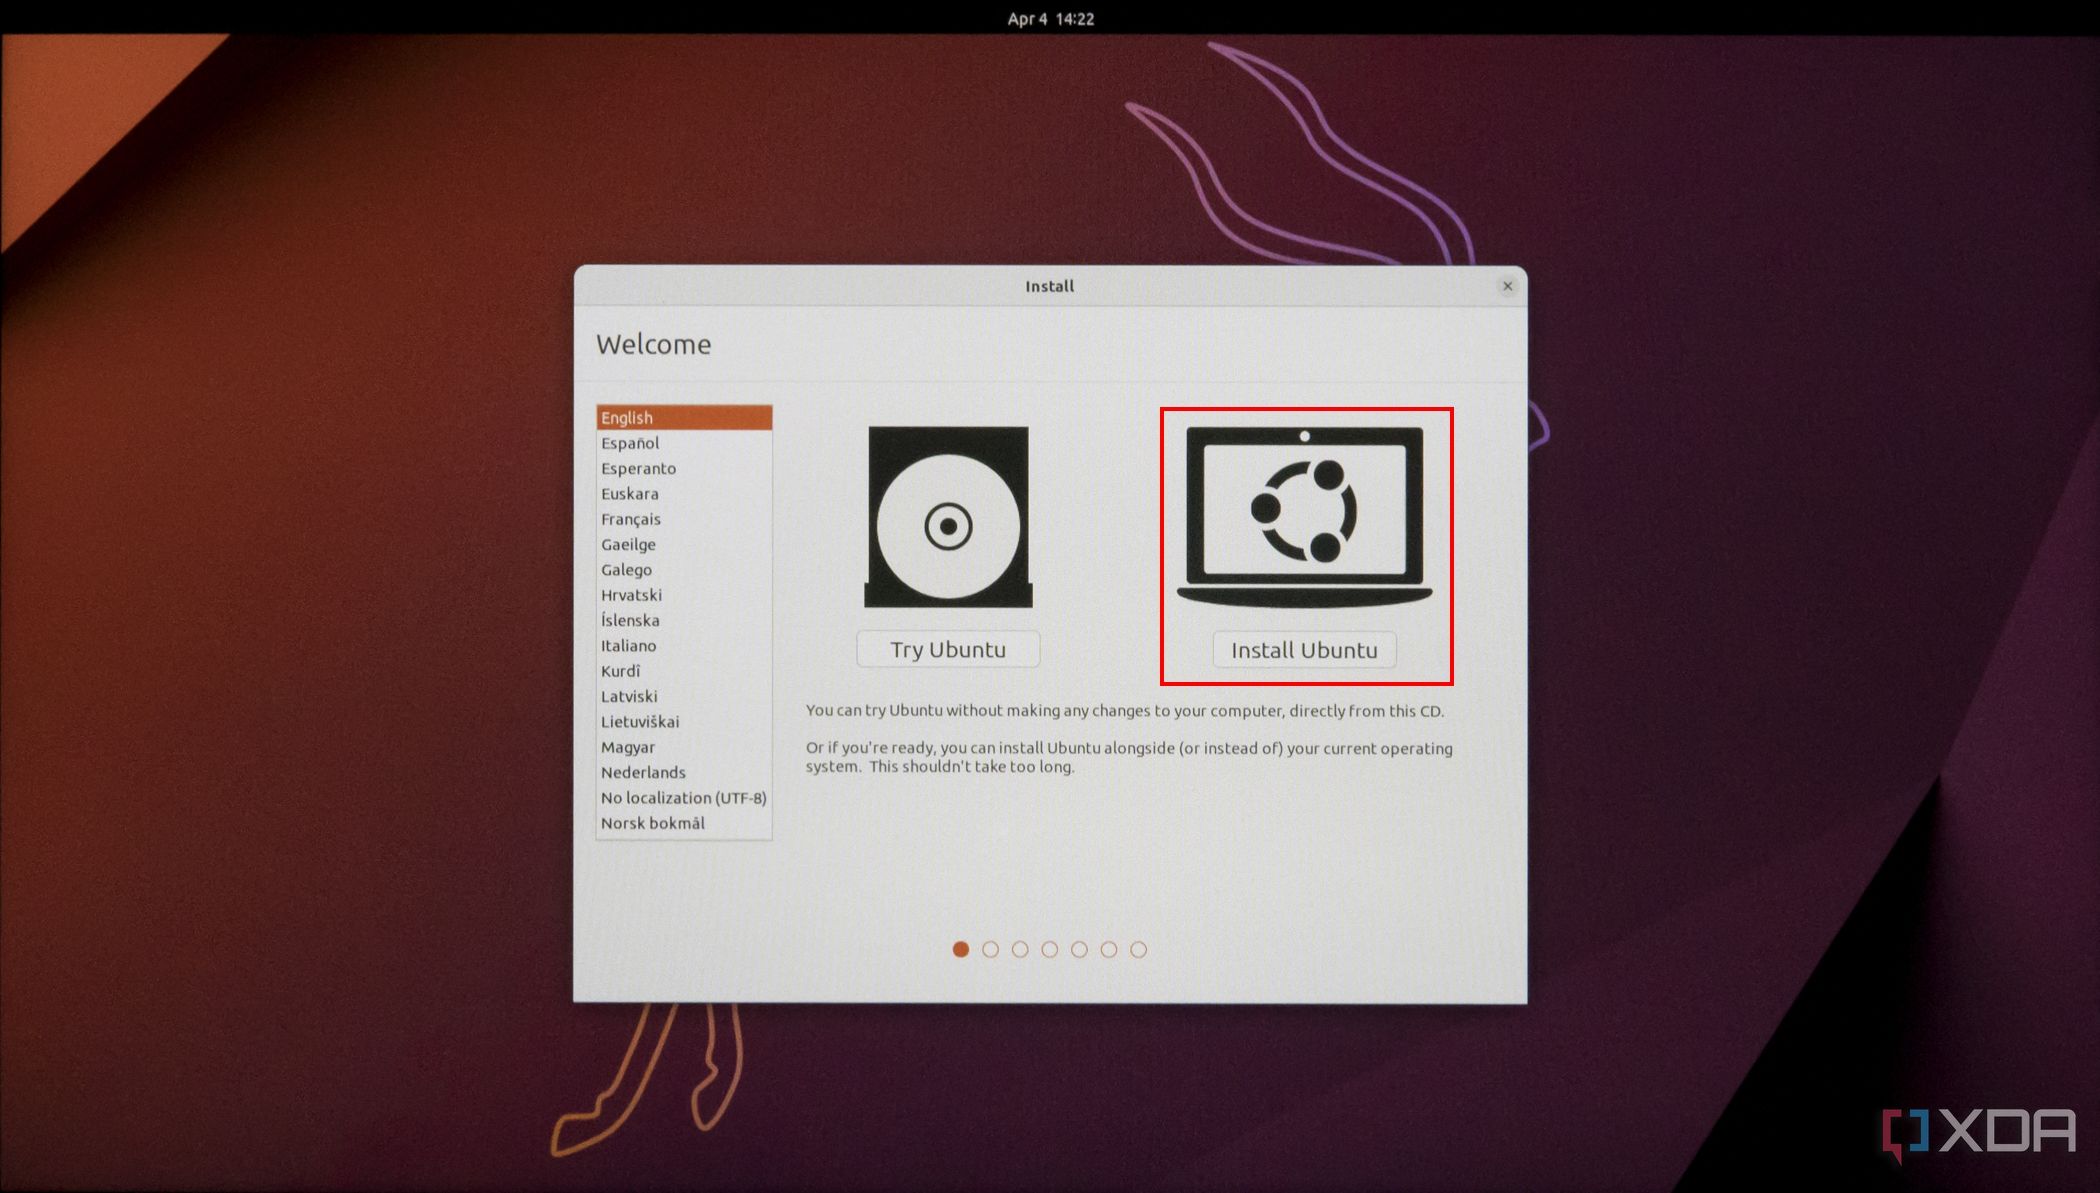
Step 4: Choose «Install Ubuntu». You can also try it before installing it.
Follow other prompts of the installation wizard and make sure you don’t replace your Windows 10 OS installation with Ubuntu. This is why I suggested you back up all your files.
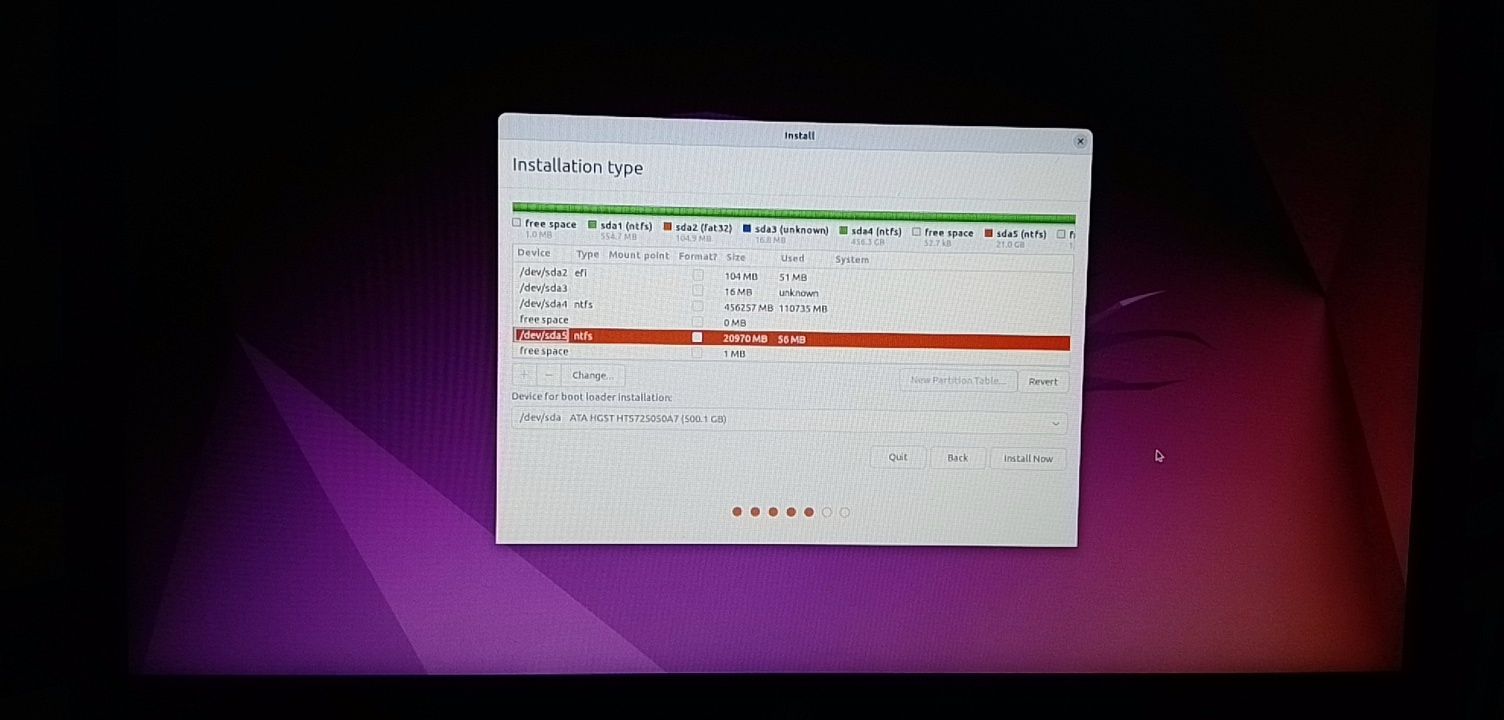
When you get to the point to select the partition you made, scroll to the partition you made earlier and press ENTER.
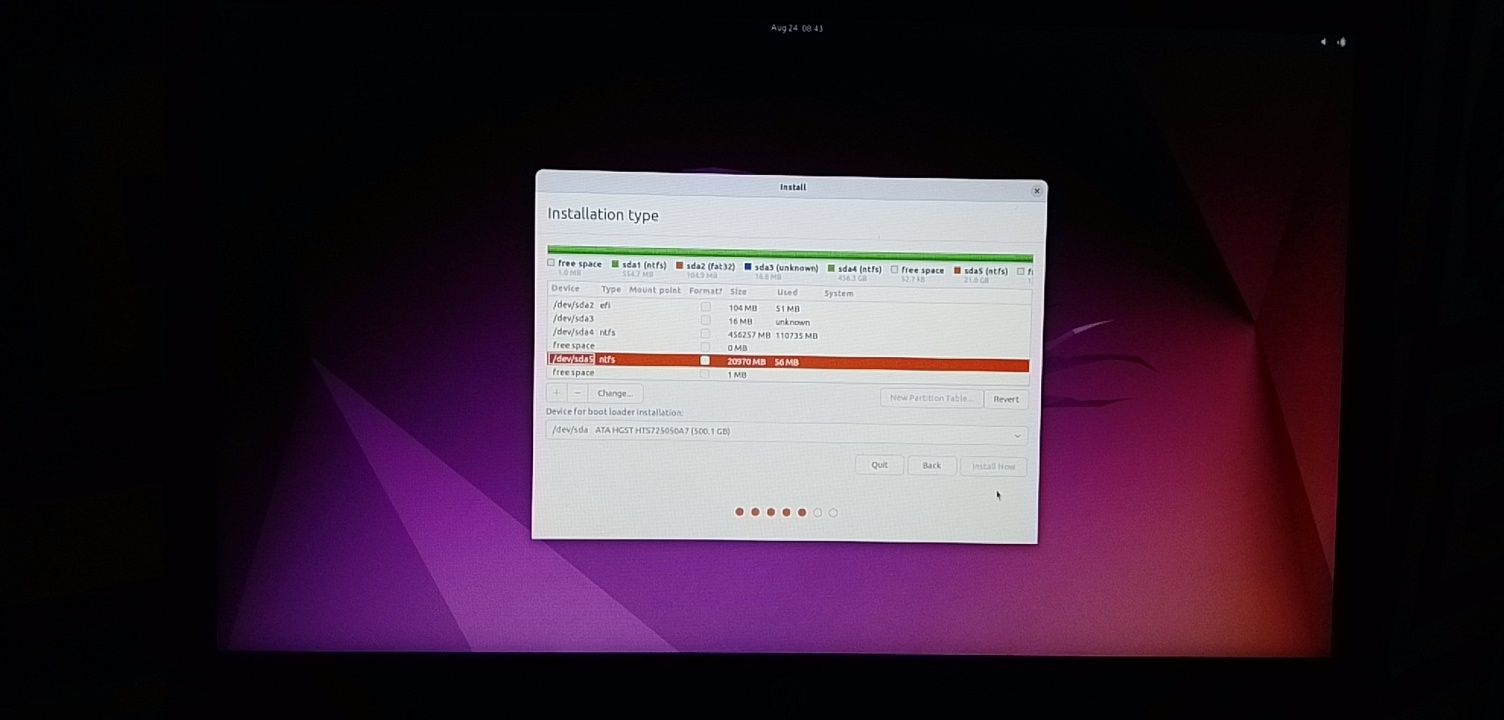
Click OK to select all the space in the partition.
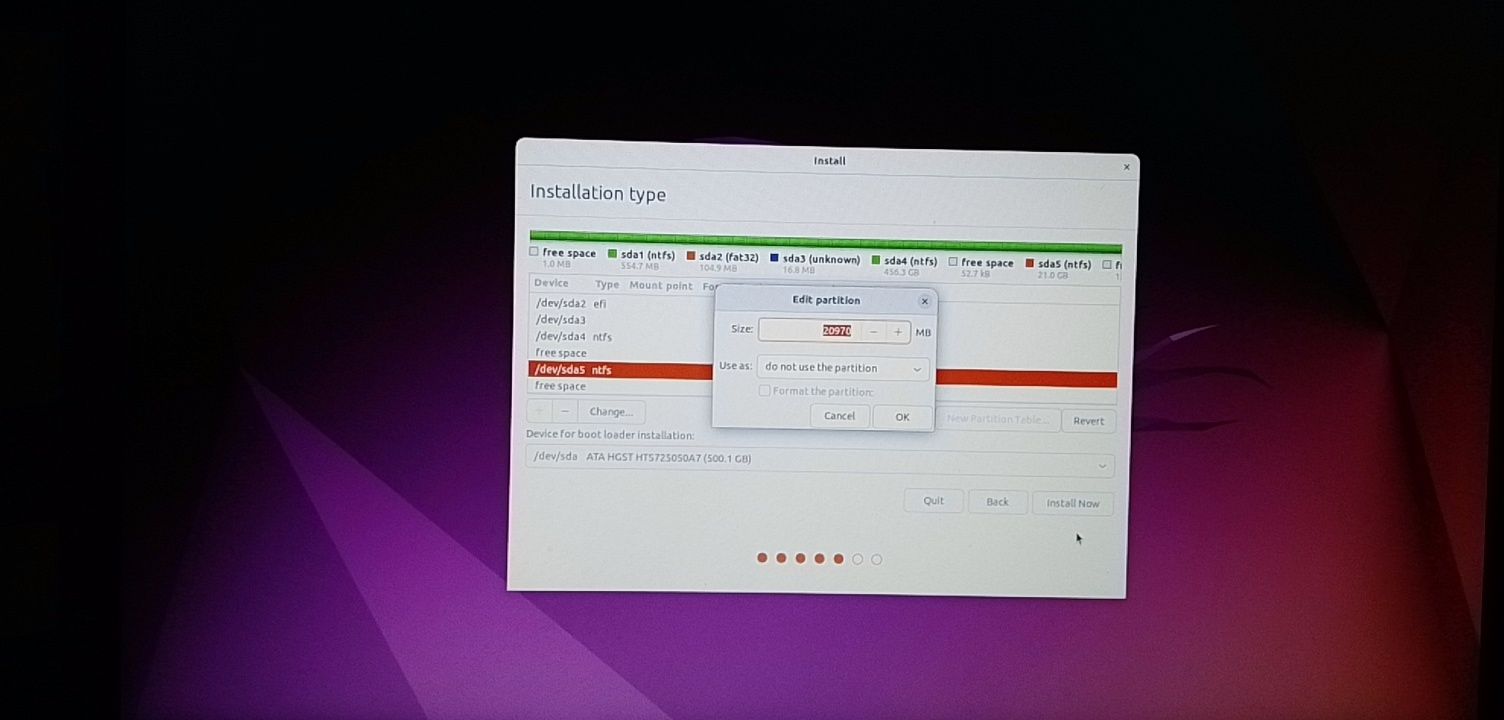
This time around, the “Install now” button will not be greyed out anymore.
Follow other prompts until Ubuntu starts installing.
After the installation is done, Ubuntu will prompt you to remove the bootable drive and press ENTER to reboot your Computer.
Now You Can Dual Boot Ubuntu and Windows 10
Immediately after you reboot the computer, you should see a screen that looks as shown below:
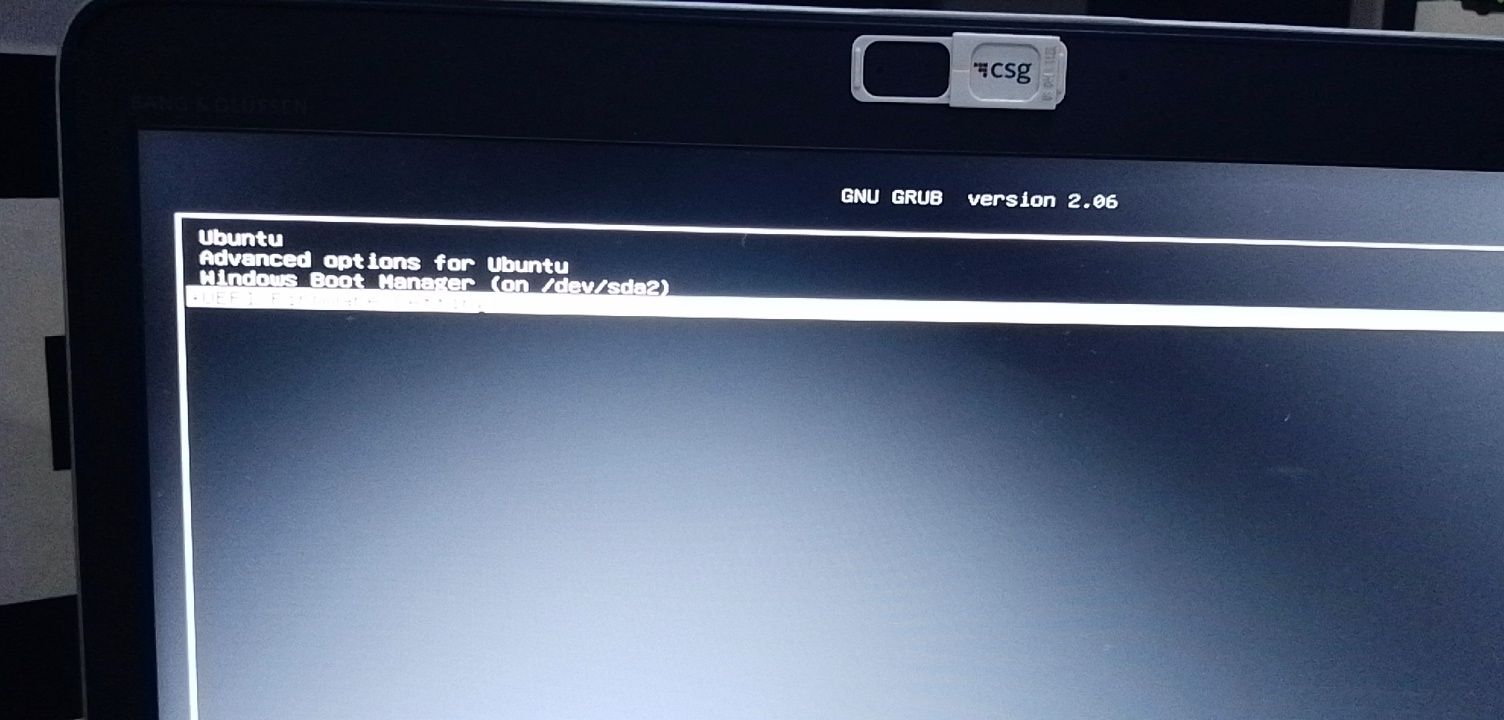
Now, you can select which one to boot into between Ubuntu and Windows 10.
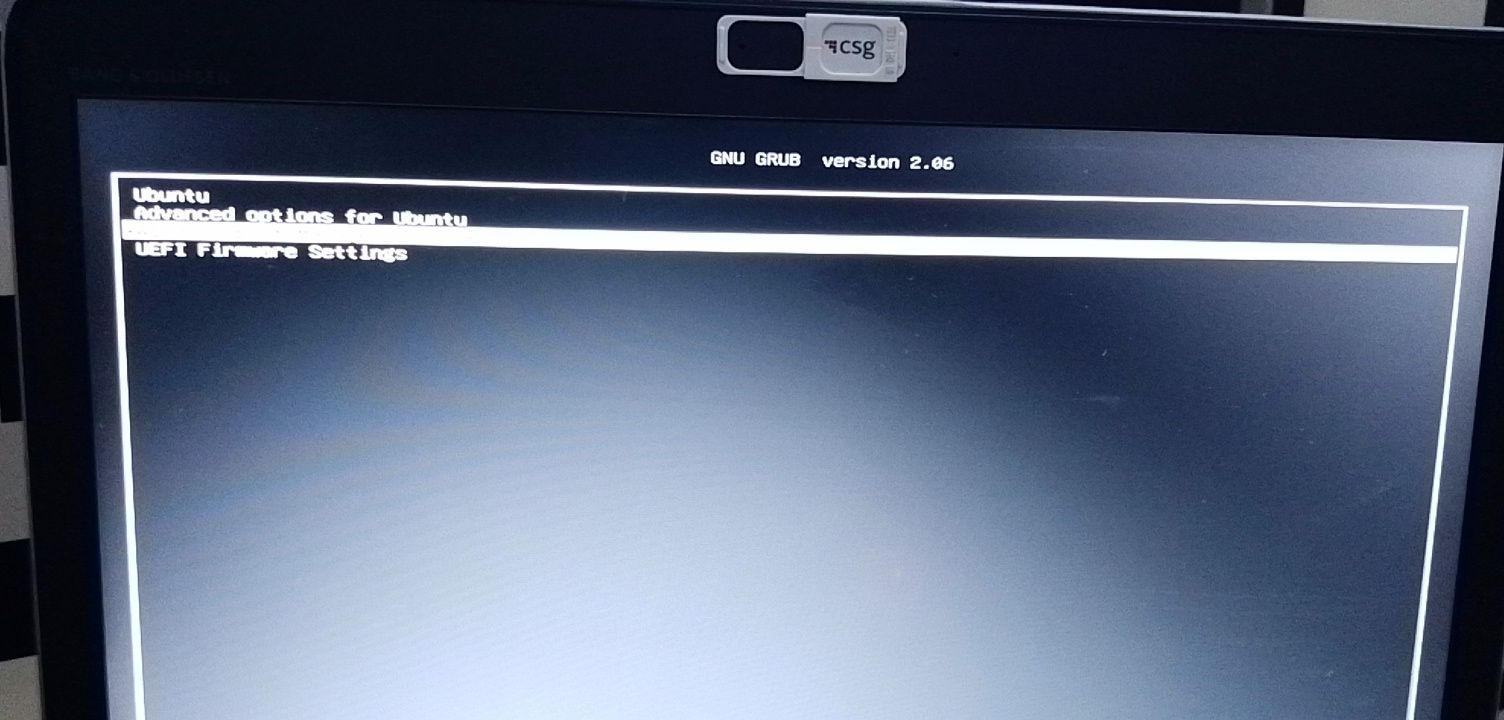
To boot into Ubuntu, select Ubuntu. And to boot into Windows 10, select Windows boot manager.
You can also get into your BIOS from the same place by choosing UEFI Firmware Settings.
Conclusion
I hope this article helps you dual boot Ubuntu and Windows 10 on your computer.
The ultimate aim of this article was to show you how to dual boot Ubuntu and Windows 10.
But the article went beyond that to show you how to:
- check if your PC’s BIOS is in UEFI mode
- partition your hard drive
- optimize your hard drive
- make a bootable USB drive
- install Ubuntu Linux Distro along with Windows on your Windows 10 PC.
If you find this article helpful, kindly share it with your friends and family.
Learn to code for free. freeCodeCamp’s open source curriculum has helped more than 40,000 people get jobs as developers. Get started
If you want to use Windows 11 and Linux on the same computer, the best option may be to dual boot. Here’s how to set up your PC for it.
Windows 11 is now widely available to all kinds of PCs, and it packs a lot of improvements from previous releases. There’s a new design language that looks a lot prettier, Teams integration, a Widgets panel, and with the update to Windows 11 version 22H2, there are even more upgrades, like new touch gestures, a modernized Task Manager, and so on. But as good as it may be, Windows 11 isn’t for everyone. What if you prefer Linux or need it for certain tasks? In this guide, we’ll show how you to set up your PC so you can dual-boot into either Linux or Windows 11 whenever you want.
For this guide, we’re assuming you already have Windows installed on your PC since that’s the case for most people. We’ll go through the necessary steps to create a partition and install Linux on it to dual-boot. So to follow along, you’ll need a Windows 11 (though the same steps will work on Windows 10) PC, a USB flash drive (8GB or more) for installation media, and another external storage method to back up your data in case anything goes wrong.
If you haven’t yet upgraded to Windows 11, we highly recommend doing that. You can follow our guide on installing Windows 11. You can follow either of those, although a straight upgrade should be a lot easier. Once that’s done, we can focus on installing Linux for dual-booting.
Preparing to dual-boot Linux
Before you do anything else, there’s something you need to be aware of. Modern Windows computers come with a feature called Secure Boot, which is meant to enhance the security of your device by preventing malicious software from loading with your PC. However, Secure Boot can cause issues with a lot of Linux distributions that don’t support this feature. We’re using Ubuntu in this guide, which does have Secure Boot support, so you shouldn’t have to worry. However, that won’t be the case for many distributions. That means you have to disable Secure Boot if you want to use Linux on your PC, and that can be a significant security risk.
To disable Secure Boot, you’ll need to follow these steps:
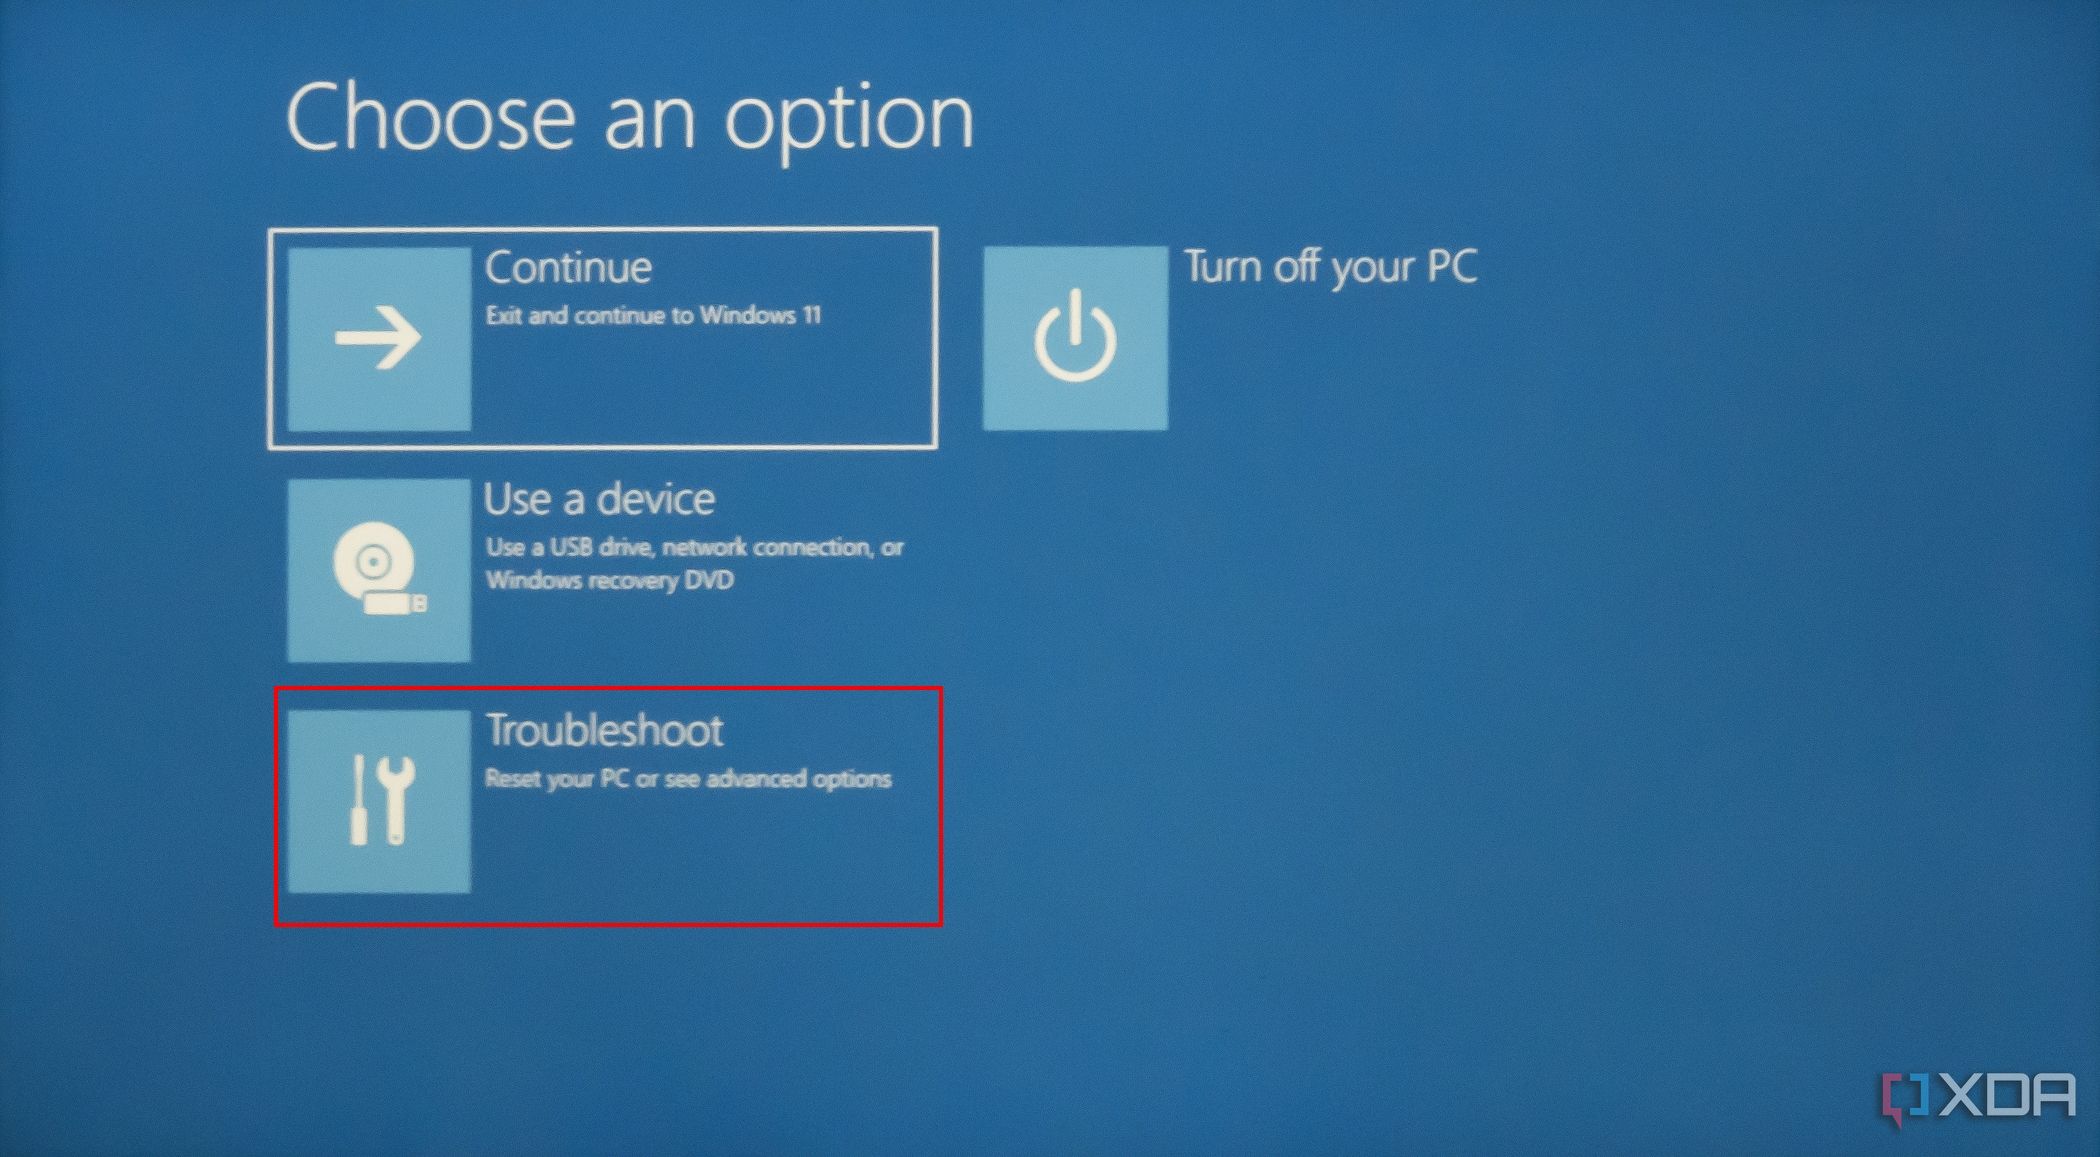
- Open the Start menu and open the power menu in the bottom right corner. Then, hold Shift on your keyboard and click Restart. You’ll be taken to a blue screen that looks somewhat like this.

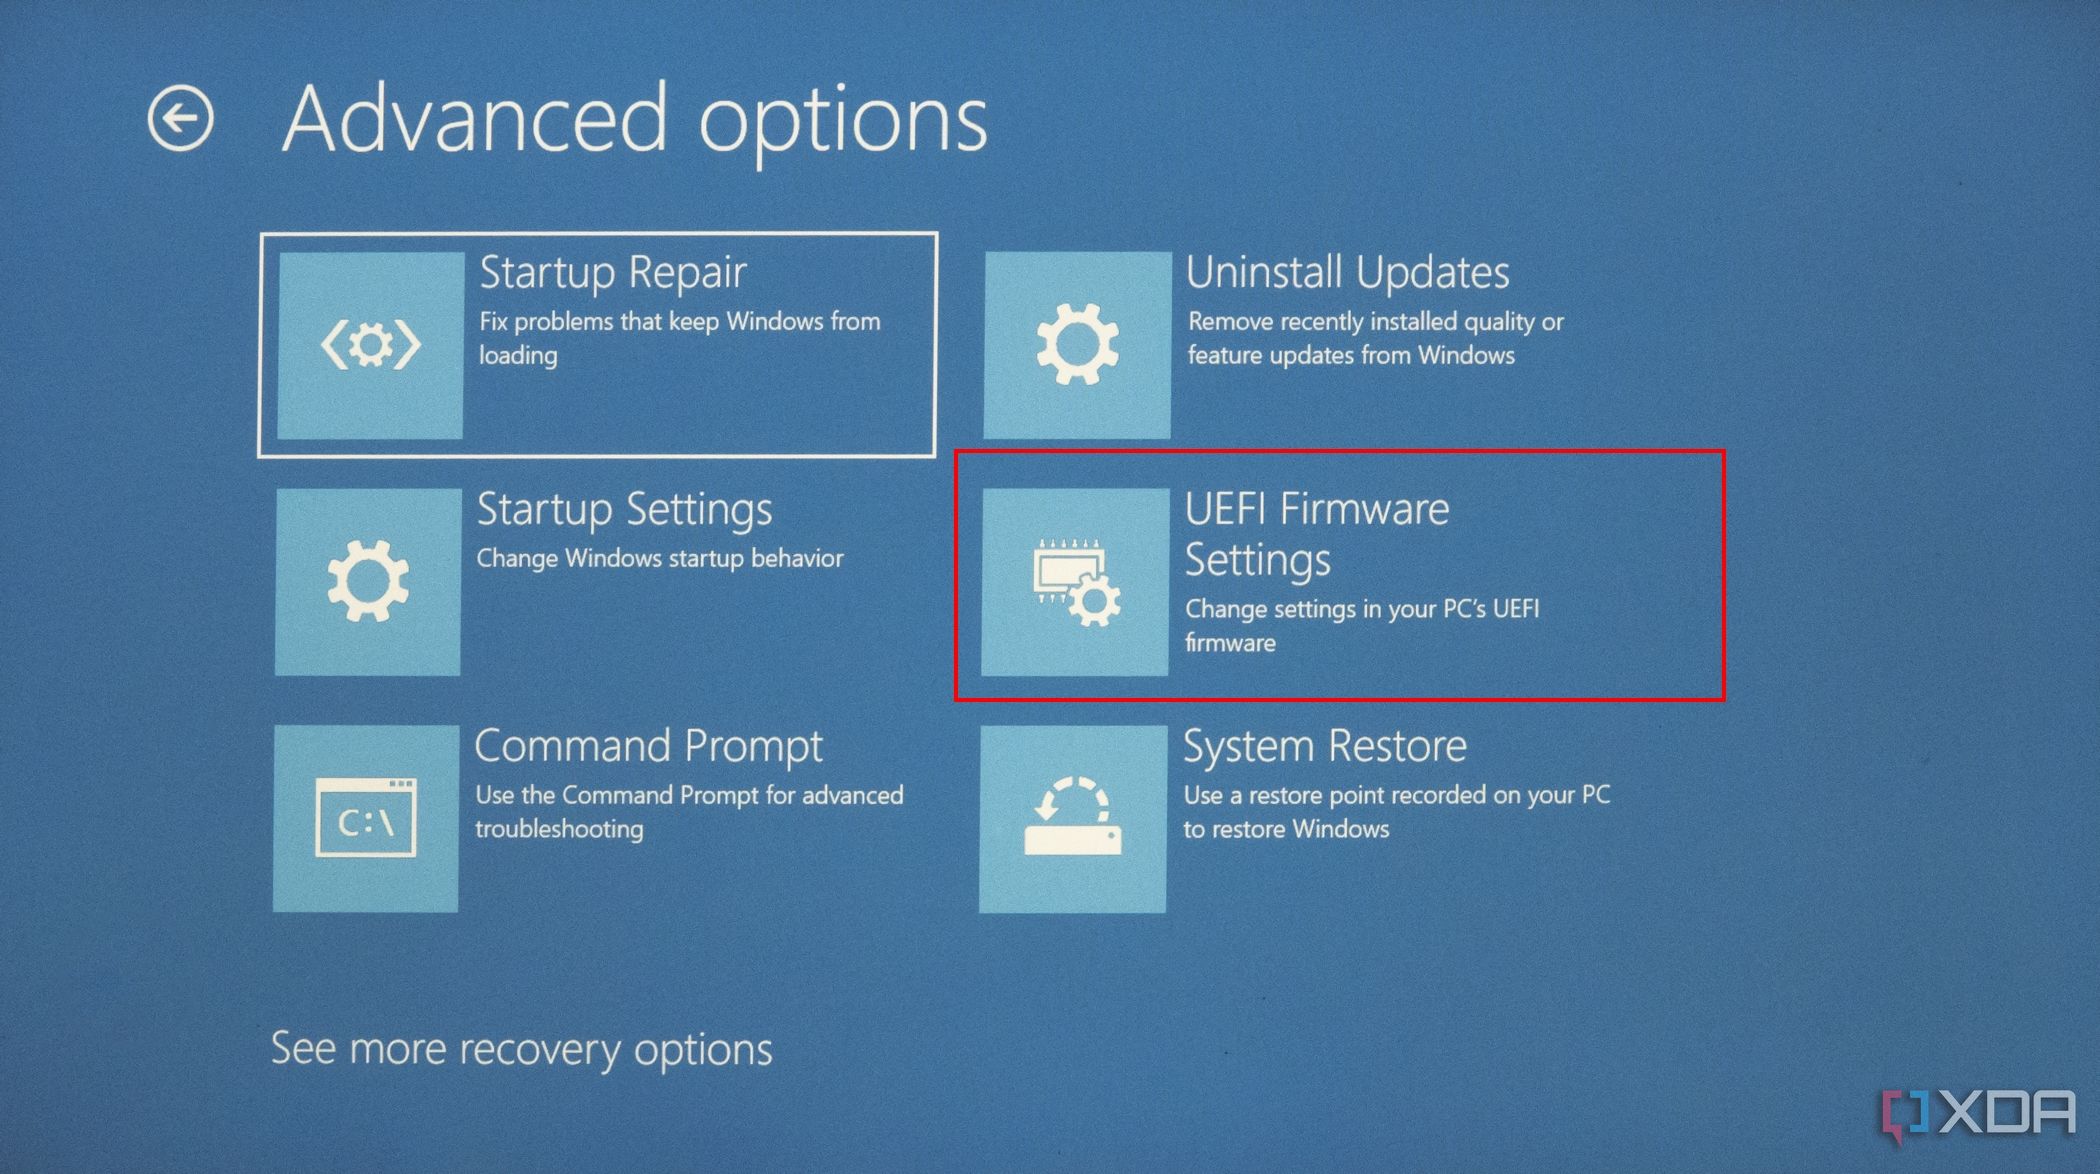
- Here, choose Troubleshoot, followed by Advanced options.
- Select UEFI Firmware Settings.

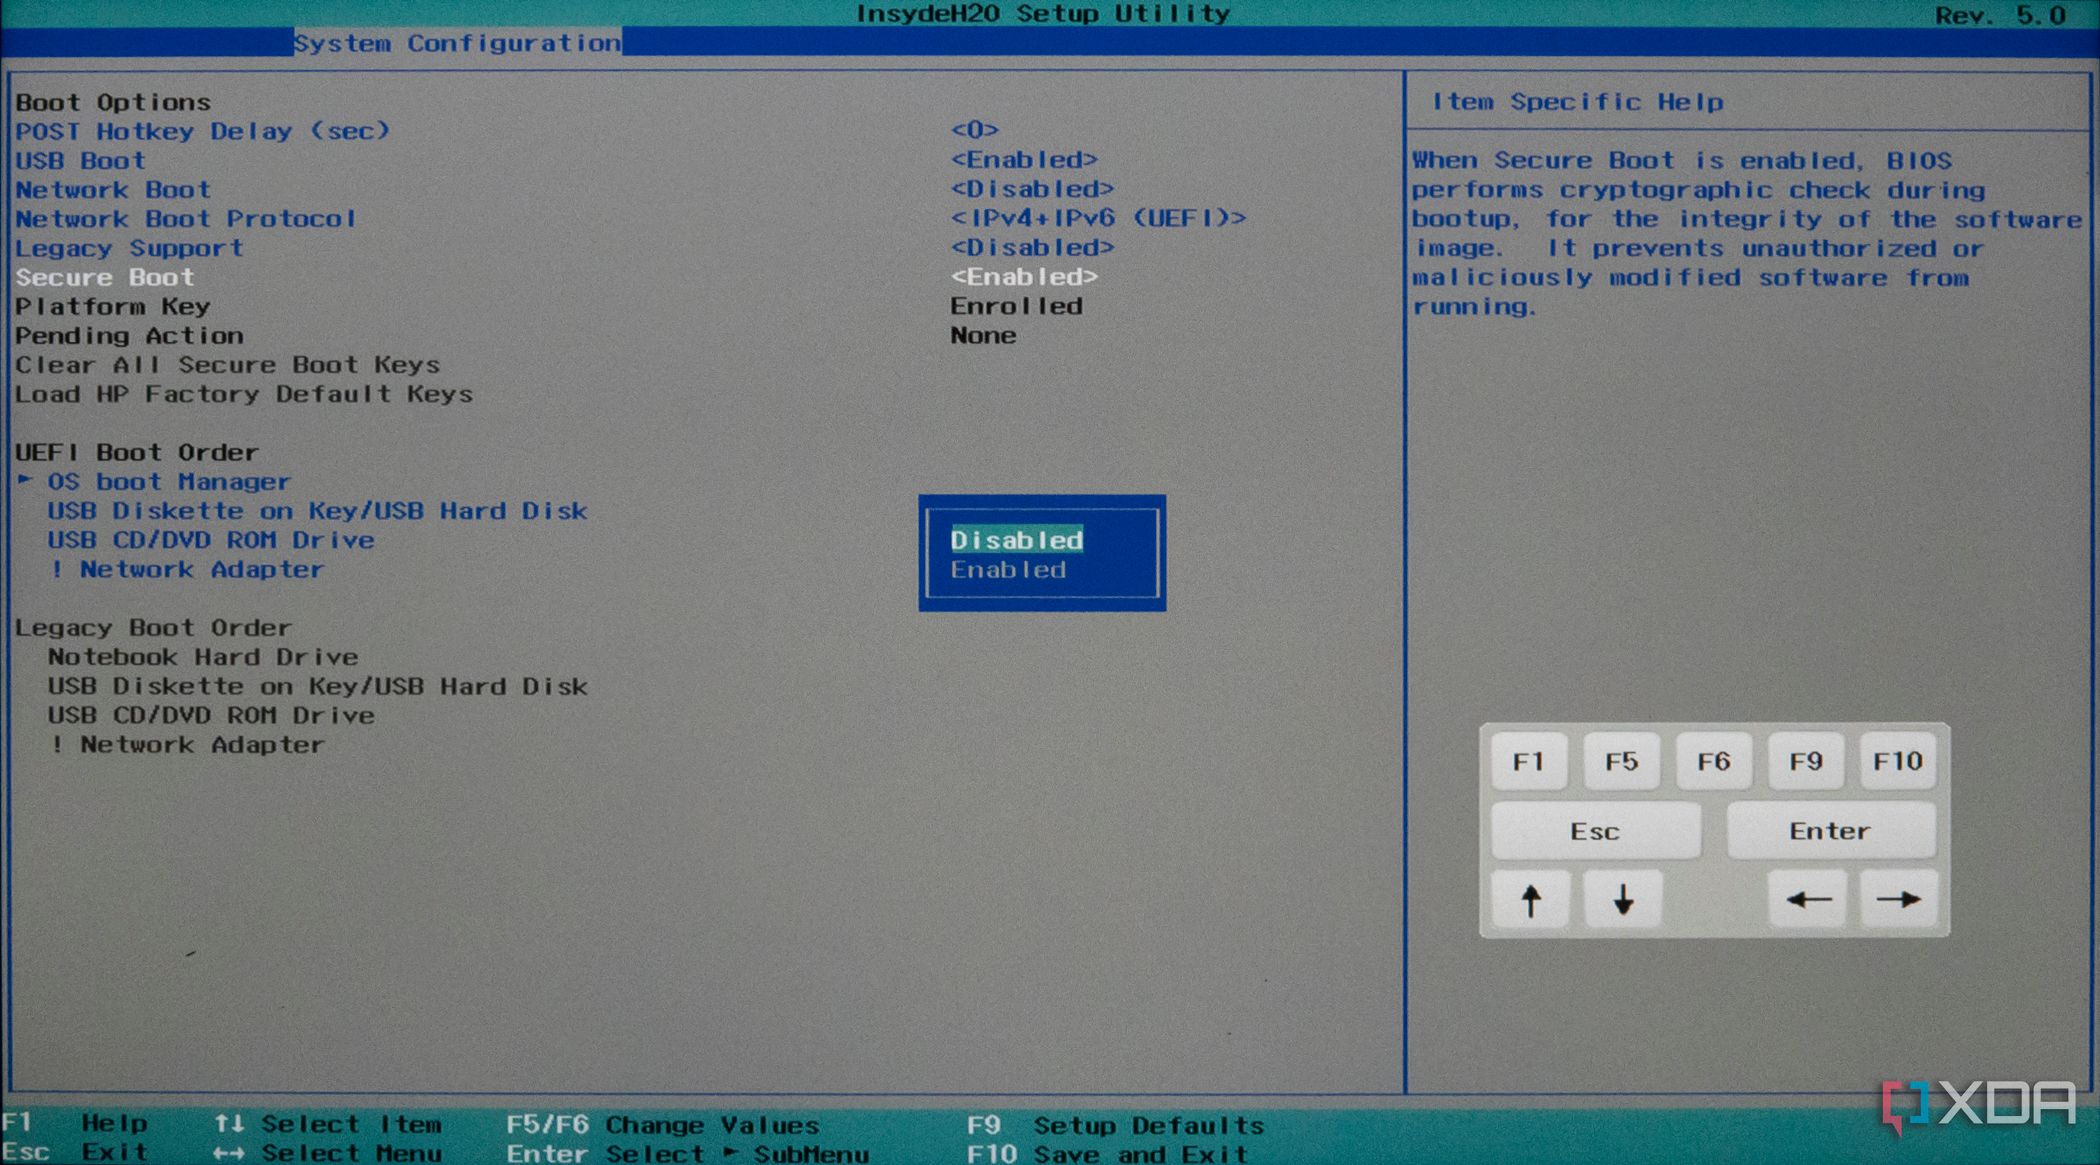
- This will take you to your PC’s BIOS settings, where you can turn off Secure Boot. Every BIOS is a little different, so you may have to look around. In the HP laptop we’re using here, you can navigate to the System Configuration tab at the top and you’ll find the Secure Boot option. It’s set to Enabled by default, and you want to change it to Disabled.

Save the changes and restart the computer to follow the rest of the process.
If your PC is ready to boot Linux, you’ll need to have a USB drive that you can install Linux from. To turn your flash drive into installation media, everything on it will be erased, so make sure you’ve backed up anything you might need.
- Find and download the Linux distribution (distro) you want to use. There are a lot of them out there, but for this guide, we’ll be using Ubuntu. Most of the steps should be similar if you use other distros, so there’s no need to worry. Once you’ve completed the download, you should have a file with the ISO file extension.
- Next, you’ll need a tool that creates bootable USB drives from ISO files. You can download Rufus for this purpose.
- Run Rufus and insert the flash drive you want to use as installation media. Then, click Select and choose the ISO file you downloaded. All the options will be filled in automatically.

- Click Start, then click OK in the prompt that shows up. Let the process run its course and you’ll have created installation media for Linux.
Creating a partition to dual-boot Linux
Next, you’ll need to create a second partition on your drive for Linux. Partitions are like virtual divisions of a hard drive that are marked as different disks. For general use, partitions don’t have much of a purpose, but you do need them for dual-booting. Here’s how to create one.
- Right-click your Start menu icon (or press Windows key + X on your keyboard) and choose Disk Management. You’ll see a list of your drives and partitions that should look something like this.

- Right-click your primary partition (it should be the one labeled as C:) and choose Shrink Volume…
- Specify the amount of space you want to remove from the partition. This will be limited by the files you already have stored on it, and the amount you enter will be the space you have for your Linux installation.
You’ll want at least a couple dozen gigabytes (multiply by 1024 for MB) for it to function properly, but you can go as high as you see fit. Just make sure you have enough space on both Windows and Linux partitions.
- The space you chose will be deducted from your partition, and it will be listed as unallocated space in the Disk Management window. You can leave it as is and close the window.

Installing Linux to dual-boot with Windows 11
Now you have the two main pieces of the puzzle, you’re ready to install Linux on your empty partition. If you removed the USB installation media from your PC, insert it again (remove other flash drives), then follow these steps:
- Open the Start menu and then click the power button and — while holding Shift on your keyboard — click Restart.
- Alternatively, open the Settings app and go to System, then choose Recovery, and then Restart Now next to Advanced startup.
- You’ll be given a series of boot options. Click Use a device, then choose the USB flash drive you have inserted and your PC will boot from it.

- You’ll now be in the Ubuntu boot menu. Press Enter to boot into Ubuntu.
- Ubuntu and other Linux operating systems let you try it out by booting from the USB drive without installing it. To install Linux on your empty partition, click Install Ubuntu.

- Follow the setup experience by choosing your keyboard layout and connecting to Wi-Fi (optional). Choose your preferred options until you get to this page.

- Here, you’ll want to choose the first option that’s chosen by default, at least if you want the easiest way to do things. This will install Ubuntu on the unallocated space you created before, leaving your Windows installation intact.
- From here, it’s mostly trivial stuff. Choose your region and set up your Ubuntu profile and the installation will begin. Once it’s done, you’ll be able to boot into Ubuntu without your USB flash drive.

Switching between Windows 11 and Linux
Once Linux is installed on your PC, you should be given the option to boot into it right away, but that might not happen. If your Windows partition is set as the priority in your BIOS settings, you may constantly boot into Windows instead. The behavior will vary depending on your computer, so you may not need to do anything.
If you do find yourself stuck in Windows 11 though, here’s what you can do:
- Open the Settings app then click Recovery > Restart now next to Advanced startup.
- Click Troubleshoot and then Advanced options.
- Here, choose UEFI Firmware settings.
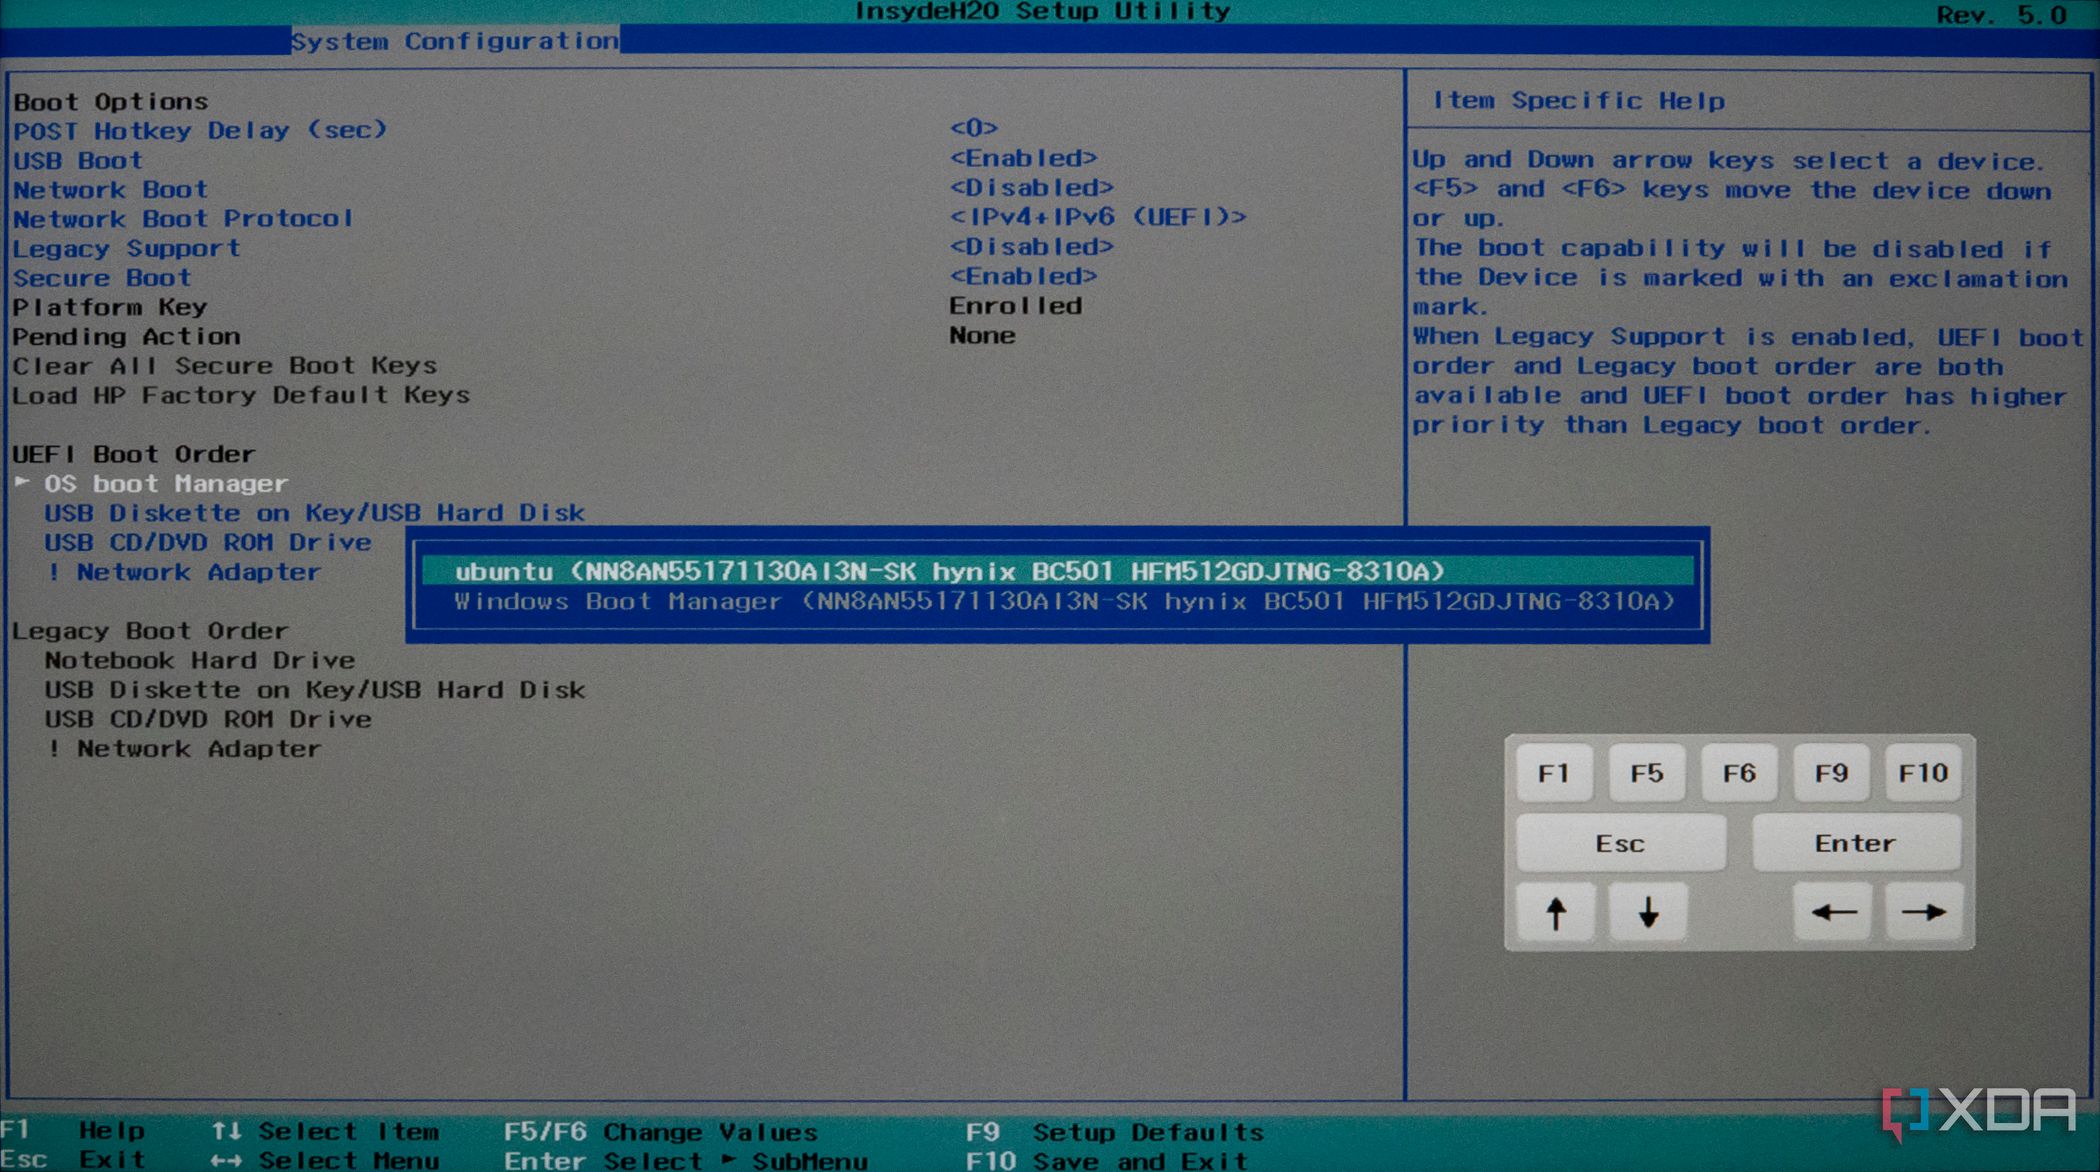
- You may need to press one of the function keys to open the BIOS setup. Once you’re there, the process will vary depending on what PC you have. We’re looking for options related to booting. On the HP laptop we’re using here, you can find Boot options in the System Configuration tab.
- Find an option related to boot order (UEFI Boot Order, in our example) and make sure the Linux drive is on top of the Windows drive. In our example, we have to select the OS Boot Manager option, then use the F5/F6 keys to move Ubuntu to the top. Again, the process may vary by laptop, but the same principle should apply to any device.

- Exit and save the changes. After a restart, you should see the Linux boot menu, which lets you continue into your Linux distribution or boot into Windows. You’ll see this menu every time you restart your computer so you can always choose your preferred boot option.

That’s how you can dual-boot Windows 11 and Linux side-by-side. Dual-booting isn’t a perfectly elegant solution, but it’s the most viable way to have two operating systems that you plan on using regularly. Keep in mind you may need to find a way to transfer files between the two operating systems, such as by using a flash drive or cloud storage. It’s not always possible to access the files on another operating system’s boot drive, so it might require a workaround.
If you ever want to go back to using just Windows 11, you can always use Disk Management to delete the partition you created and expand your main partition to take up the whole space. Otherwise, you can use GParted on Linux to delete the Windows partition instead. Either way, make sure to back up your data before doing that.
I use Arch Linux as my main operating system. Linux works very well, but sometimes you need that one tool which only works on Windows, and while Wine and the like work, the most reliable solution to this problem is to dual boot your machine with Windows and whatever Linux distribution you prefer.
In this guide, we’ll first install Windows 11 with a custom sized boot partition, and then dual boot it with Arch Linux using the Grub bootloader.
Prerequisites
- A stable internet connection (around 6GB of data will be used)
- A USB drive or similar to create a bootable medium
- Basic knowledge of CLIs and a CLI text editor like
vimornano - It’ll be helpful if you have some experience with installing Arch Linux before
If you get stuck at some part in this blog, you can always refer to the Arch Wiki or Google.
The images used in the blog are taken from Google Images along with my own system (after installation — so they are not completely correct but it should give an idea of how things look like), I’ll update them whenever I dual-boot again.
Pre-Installation
Getting Disk Images
We start by getting the disk images or ISOs for both the operating systems.
Window 11 ISO
Arch Linux ISO
Prepare Installation Image
A bootable live USB is an external storage device that contains everything required to boot into a live environment/setup. There are multiple ways to create such a live environment; but here we’ll do it the plain old way with a USB drive.
We’ll be installing Windows first so we need a USB drive with the Windows environment. You can «flash» Windows to your USB drive using some software like Rufus or Balena Etcher.
Alternatively if you are on Linux you can use dd to create a bootable USB. Moreover, this arch guide explains other ways to create a bootable medium.
There’s also Ventoy which can be used to create a bootable disk with multiple operating systems — I personally use Ventoy since it’s very efficient to be able to have multiple ISOs on the same drive at the same time.
Once you finish installing Windows, you can re-format the drive and flash the Arch ISO onto it to continue.
Installation
After getting the bootable USB ready, plug it into your computer and boot the system. While its booting up, you need to enter the Boot Menu. Common keys to enter boot menu are Esc, F2, F10 and F12, and you can refer to Google for the proper key for your laptop/PC. You need to press one of these while the system is booting up.
Windows 11
Once you are in boot menu, select the boot option corresponding to the USB drive, and it should start Windows Setup.
Select the appropriate language, time and keyboard options, and click on the «Next» button to continue with the installation. Then, insert a product key if you have one.
On this screen you want to select the option Custom: Install windows only (advanced) option to be able to format the disks as you wish.
You’ll see a similar screen where Windows will show you the available drives and partitions. On this screen, you can delete and create partitions as you like.
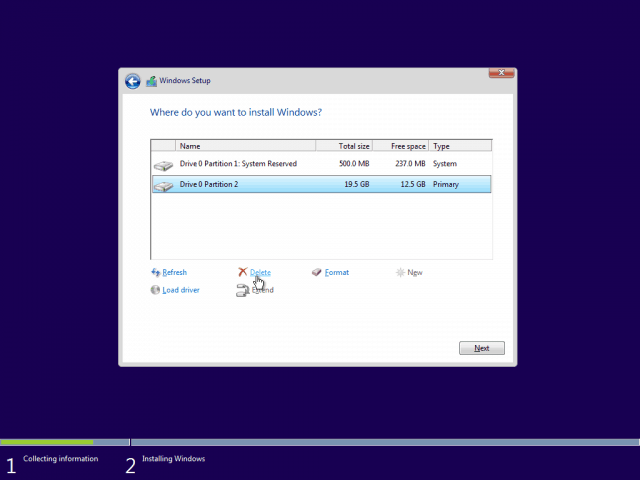
Windows creates 4 partitions:
- System — also known as boot partition or EFI System
- Windows reserved
- Recovery — Windows recovery environment
- Primary — the primary partition on which operating system is installed
(don’t worry if you only see three partitions after creating primary partition, as one of the windows generated partition was hidden for me in the setup as well for some reason)
In my case, I have a 255GB SSD and would like to split it into four main parts:
- [EFI] System(1GB) — boot partition
- [WIN] C: Primary (100GB) for Windows 11
- [WIN] D: Data (20GB) for other files in Windows 11
- [ARCH] 120GB
The boot partition (EFI System Partition or ESP) contains the bootloader which is responsible for booting the system. When dual booting, we create a single boot partition and load the entries for both the operating systems in one bootloader so that it’s easier to select the option we want.
When creating a primary partition in the Windows setup, Windows will create the 4 partitions mentioned above, one of them is System boot partition.
Windows usually generates the boot partition with a default size of 100 or 260 MiB, which is too small for multiple bootloaders.
It is suggested to make the boot partition atleast 500MiB for multiple bootloaders. We cannot customize the size of the boot partition once it’s created in the Windows setup, so we’ll manually create one using diskpart from the setup.
(Note: you’d want to play a little with the Windows setup to understand how it creates partitions in order to be able to understand it well. I assume you have a basic understanding of what partitions and mounting are, along with some other general filesystem related terms).
It’s also very hard to increase the boot partition size after you have dual-booted the system, since it requires free space immediately succeeding the partition, which is usually not the case.
Let’s start by deleting all the partitions in the setup window by clicking each partition and then pressing the delete button. Once done, the setup should only show Unallocated Space. We are now ready to create the boot partition manually:
- Press
Shift + F10to open the Command Prompt. - Type
diskpartand press Enter to open the disk partitioning tool. - Type
list diskto list the available disks and note the number in front of the disk on which you are installing Windows - Type
sel disk nwherenis the number you noted, re-check it and make sure it isn’t the USB’s number :)) - After selecting the correct disk, Type
create partition efi size=1000where 1000 is size of the System partition in Mebibytes(MiB) and pressEnter(you can keep it 500 if you want, I»ll go with 1000MiB). - Type
format quick fs=fat32 label=Systemand pressEnterto format the partition with FAT32 filesystem with the System label (used by Windows) - Type
exitto exit the partitioning tool andexitagain to exit the command prompt.
Yay, we have created ourselves a custom sized boot partition! Now press refresh button in the setup and it should show the partition we just created.
Now we have the System partition and unallocated space, you can have as many partitions for windows as you want according to your available storage, but make sure to keep at least 100GB unallocated space left for Arch Linux.
First create a new partition (which will be the primary partition, make sure to select appropriate size) and that should create the Primary partition with recovery partition. Notice how Windows detected the System partition and did not create a new one. Now create the other partitions or drives (D:, E:) if you want to, and continue with the setup on finishing installing Windows.
Arch Linux
After installing Windows and leaving space for the Linux root partition, flash the Arch ISO to your installation medium and boot into the USB from the boot menu like you did before.
Internet
Arch Linux downloads the required packages and base system for the installation, so we need to set up a network connection. Note that to test a connection, you can always use the command ping 8.8.8.8. To stop the command, press CTRL+C.
Ethernet
Plug the cable and test the connection.
WiFi
To connect to WiFi, you can use the iwd daemon. Steps to connect are:
- Type
iwdto enter the daemon prompt
$ iwd
[iwd]#
- For help, use the
helpcommand
[iwd]# help
- List the devices (interfaces) — this will show the available wireless devices. In my case, it was
wlan0
[iwd]# device list
- Start the network scan (replace with device name)
[iwd]# station <device> scan
- List the networks (note the SSID of the network you want to connect to)
[iwd]# station device get-networks
- Connect to the network. You will need to enter the passphrase/password after pressing
Enter.
[iwd]# station device connect SSID
Test the connection with the ping command as mentioned above.
Partitioning
[Warning: Be careful here, do not touch the Windows partitions]
In order to install a Linux system we need two main partitions:
- Boot (mounted on
/mnt/boot) — contains bootloader (we have already created this in Windows setup) - Root (mounted on
/mnt) — the Linux root (/) where everything is installed
There are many ways to partition the disks. Since we already have some unallocated space, we just need to create a data partition from it and format it. You can use fdisk or cfdisk for creating a partition.
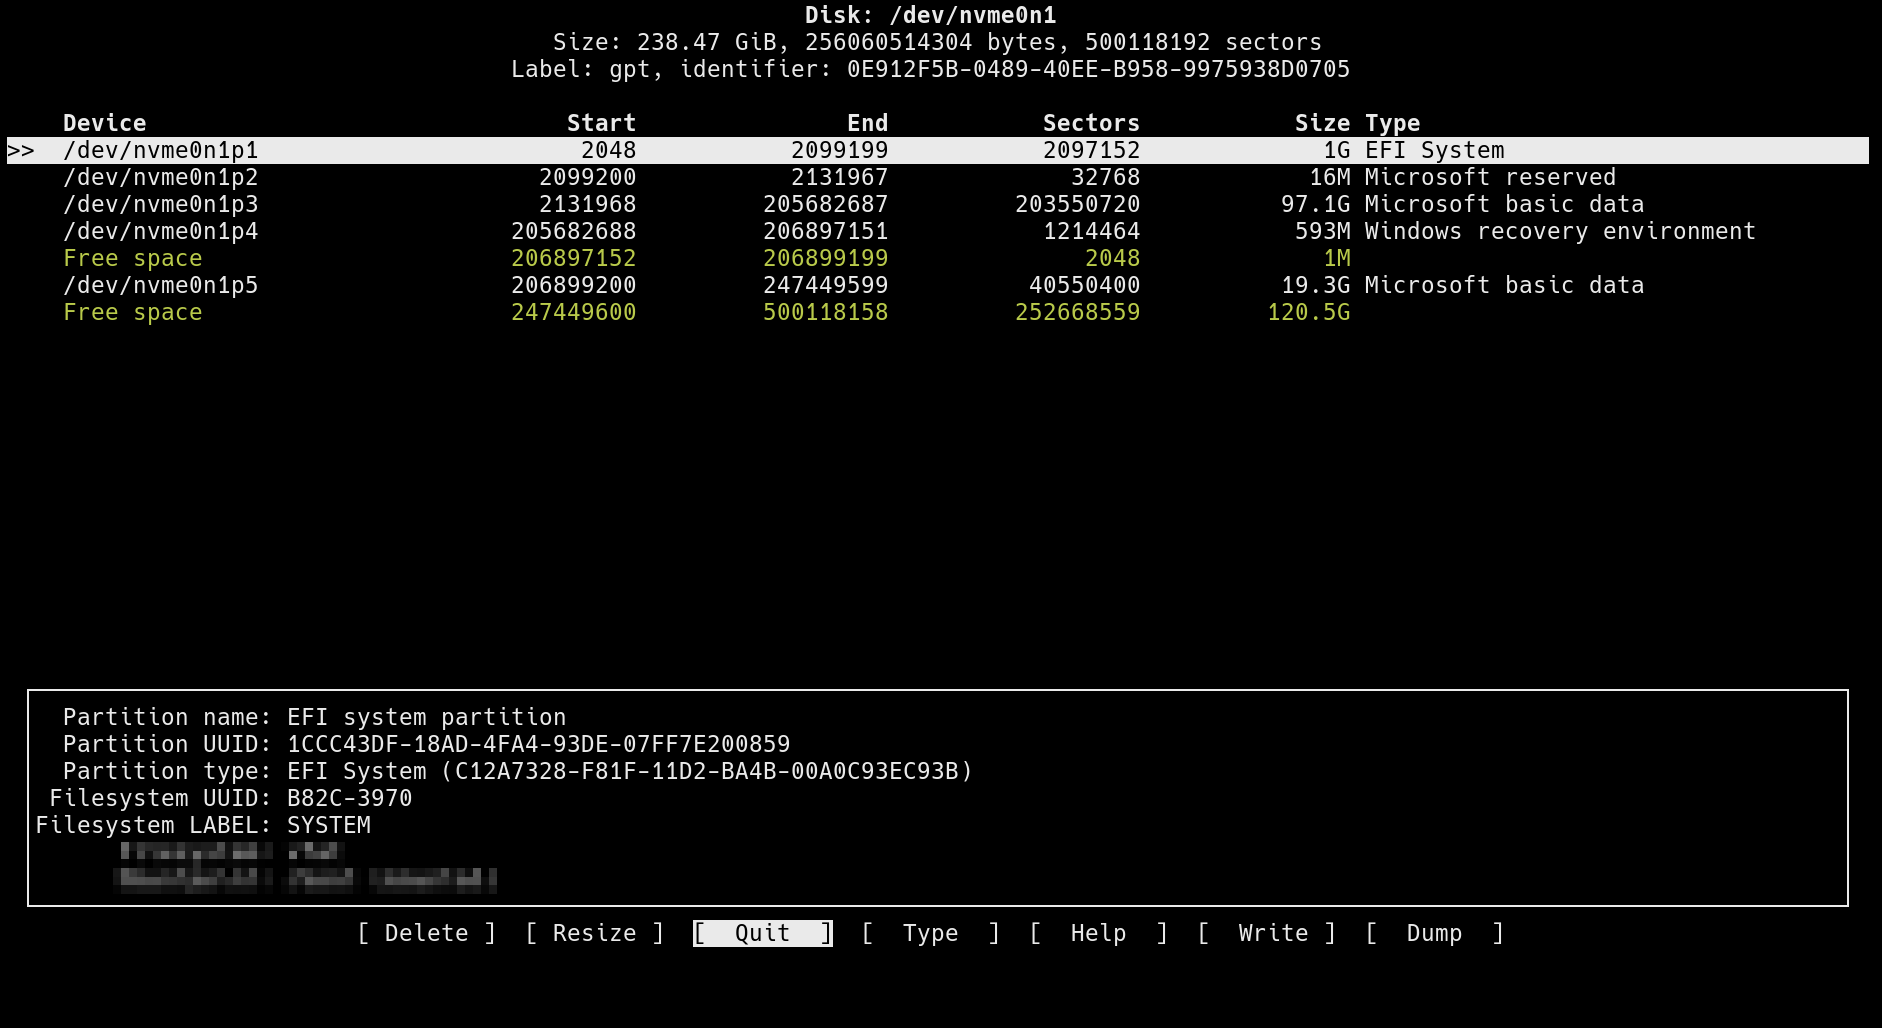
Run lsblk to list the drives and partitions with their mountpoints, size and other information:
$ lsblk
NAME        MAJ:MIN RM   SIZE RO TYPE MOUNTPOINTS
nvme0n1     259:0    0 238.5G  0 disk
├─nvme0n1p1 259:1    0     1G  0 part
├─nvme0n1p2 259:2    0    16M  0 part
├─nvme0n1p3 259:3    0  97.1G  0 part
├─nvme0n1p4 259:4    0   593M  0 part
└─nvme0n1p5 259:5    0  19.3G  0 part
Here, I have a drive named nvme0n1, and then some partition names followed by it. You may have sda or something else as the drive name. The partitions are as follows —
- nvme01np1 — Boot partition
- nvme0n1p2 — Microsoft reserved
- nvme0n1p3 — Primary Windows Parittion (C: drive)
- nvme0n1p4 — Windows recovery environment
- nvme0n1p5 — Extra data partition for windows
Remember the boot partition name (nvme0n1p1in my case).
We don’t see the unallocated space we left for Arch because we haven’t created a partition from the unallocated space yet. To do that, type in cfdisk /dev/<drive_name>
$ cfdisk /dev/nvme0n1
This will open up cfdisk, which is an easy to use TUI application. Use up/down arrow keys to select the unallocated space.
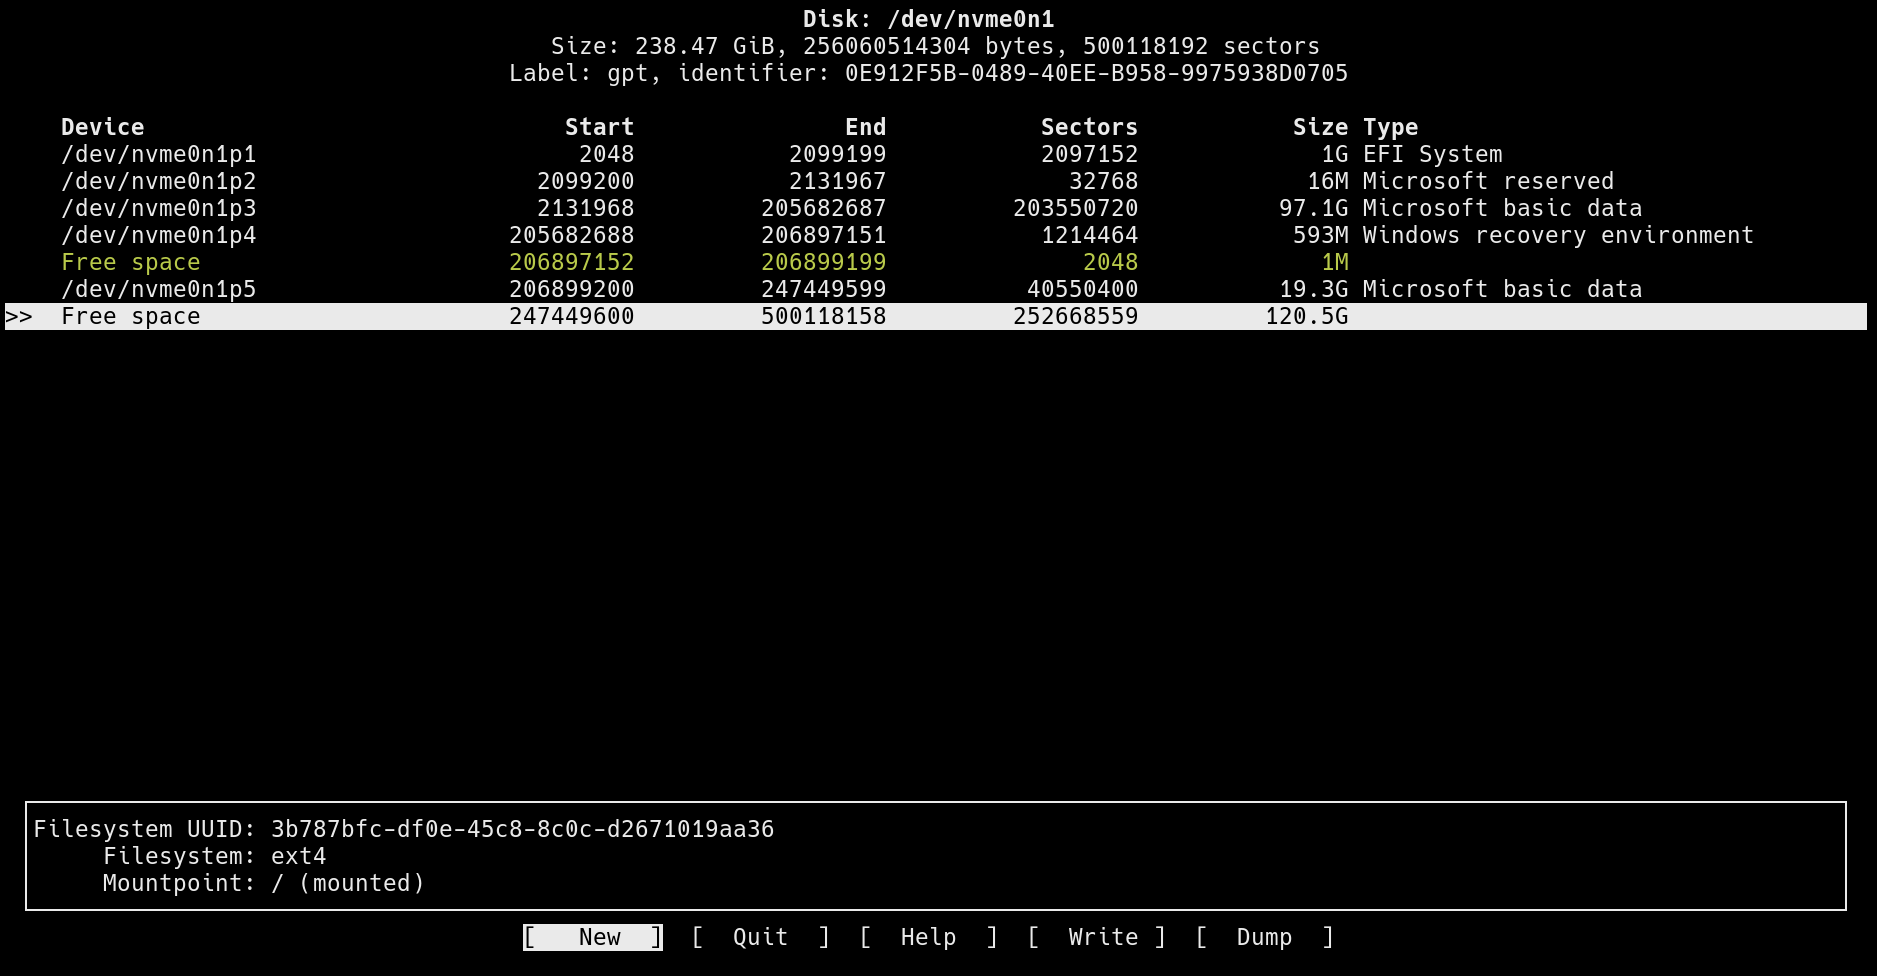
Now use left/right arrow keys to select new and press enter to create a new partition with the remaining space. After you are done partitioning select the Write button and write the changes to disk and Quit cfdisk.
Now the partition should be listed when you run lsblk again.
(Important: you could also use fdisk to create a partition, just make sure to not format the EFI parittion or touch the other partitions)
After creating the root partition, we need to format it with a filesystem type — I’ll make it an ext4 partition.
Run mkfs.ext4 to format the partition with the ext4 filesystem —
$ mkfs.ext4 /dev/nvme0n1p6
(replace nvme0n1p6 with your root partition name)
We could also create a swap partition here if needed, however, a swapfile is usually the better option.
Mount the file systems
The base system is installed on /mnt, which is a mount point that exists in the Arch USB. We’ll mount /mnt to the root partition and create a new directory /mnt/boot in the USB which has the boot partition mounted to it.
You could also use a different path for mounting boot directory. If you do, change it in grub installation command later as well.
Mount the root partition (replace nvme0n1p6 with your root partition) to /mnt
$ mount /dev/nvme0n1p6 /mnt
Mount the boot partition (the one we created in windows, nvme0n1p1 in my case)
$ mount --mkdir /dev/nvme0n1p1 /mnt/boot
Installation
Mirrors
Synchronize the package databases and update the keyring (sometimes keyring can be a issue if the archiso is very old):
$ pacman -Syy archlinux-keyring
Arch linux packages are installed from mirrors defined in /etc/pacman.d/mirrorlist, if the download speed in the above command was slow, it could be an issue related to the mirrors.
We can fix that by updating the mirrors, which you can do either manually or using reflector to automatically update the mirrors.
Install reflector with pacman:
$ pacman -Sy reflector
Backup the default mirrolist:
$ cp /etc/pacman.d/mirrorlist /etc/pacman.d/mirrorlist.bak
Get the latest 6 mirrors sorted by speed and save using reflector:
$ reflector --latest 6 --sort rate --download-timeout 100 --save /etc/pacman.d/mirrorlist
You can also add the -c <Country> flag if you want to, which will only select mirrors from .
Base Install
Use the pacstrap script to install the base and linux packages:
$ pacstrap /mnt base linux linux-firmware base-devel neovim
The above command installs the base group, linux and linux firmware, packages necessary for building and development (base-devel) and neovim (CLI text editor) on the system.
Fstab
Fstab (filesystem table) located in /etc/fstab is a file that keeps track of all the partitions that a distro requires to boot along with their mountpoints.
Generate the fstab file from /mnt and append into /mnt/etc/fstab :
$ genfstab -U /mnt >> /mnt/etc/fstab
Chroot and other configuration
After installing the base group and generating the fstab, we will chroot into the Arch installation and configure some other things like the locale, timezone and bootloader.
Enter the installation using:
$ arch-chroot /mnt
After entering the installation the prompt should change as now you are no longer in the live USB, although installation is not finished yet, you wouldn’t be able to boot until you have setup a bootloader. At this point Arch is technically installed. If you make a mistake or your machine forcefully powers off for some reason, you can continue the installation later. All you need to do is boot into live USB and mount and chroot like before. This can also be handy if you break the installation, since you can always fix the system by just chrooting into it from the live USB.
Update timezone (replace Region/City with your timezone):
[root@archiso]$ ln -sf /usr/share/zoneinfo/Region/City /etc/localtime
(you can use $ ls /usr/share/zoneinfo to find your region and city in case you’re unsure)
Sync system clock to hardware clock:
[root@archiso]$ hwclock --systohc
Generate locale:
[root@archiso]$ locale-gen
Set the LANG variable in the locale.conf file:
[root@archiso]$ echo "LANG=en_US.UTF-8" >> /etc/locale.conf
hostname is a unique name to identify a machine on a network.
Create hostname file and add a hostname:
[root@archiso]$ echo "my-machine" >> /etc/hostname
Give root user a password:
[root@archiso]$ passwd
Follow the instructions and type a password.
Bootloader
Install the bootloader and networking packages:
[root@archiso]$ pacman -S grub efibootmgr os-prober networkmanager wireless_tools wpa_supplicant
grub is the bootloader.
os-prober package is used to detect the other installed operating systems and create their entries in grub.
efibootmgr is a userspace application used to modify the UEFI Boot Manager.
Install grub:
[root@archiso]$ grub-install --target=x86_64-efi --efi-directory=/boot --bootloader-id=GRUB
This installs the grub on /boot which is mounted on nvme0n1p1, our boot partition. If you chose a different mount point for boot partition, replace /boot with your mountpoint (without /mnt).
Enable os-prober on grub:
By default, os-prober is disabled in the grub config, hence it won’t detect Windows. When generating config in next step, you’ll get a warning saying os-prober is disabled. Simply uncomment/add GRUB_DISABLE_OS_PROBER=false in /etc/default/grub.
Generate grub config:
[root@archiso] grub-mkconfig -o /boot/grub/grub.cfg
Here grub will generate the config and write it to grub.cfg. Make sure Linux and Windows both are detected here.
Enable network manager service:
[root@archiso] systemctl enable NetworkManager && exit
Reboot
exit from the chroot, unmount /mnt, and restart the system
$ umount -R /mnt && reboot
If everything went well, then you should now see a grub window on boot.
Post Installation
We haven’t created a user yet, so login with root user and then create a user :
User (with superuser)
Create user with wheel gropu (replace username with name)
[root@alok-pc]$ usermod -mG wheel username
Give a password to user:
[root@alok-pc]$ passwd username
Add user to sudoers file:
Uncomment %wheel ALL=(ALL:ALL) ALL from
[root@alok-pc]$ EDITOR=nvim visudo
save and exit.
Congratulations — you’re now the owner of a dual-booting machine! So far!
Linux is a great operating system with widespread hardware and software support, but the reality is that sometimes you have to use Windows, perhaps due to key apps that won’t run on Linux. Thankfully, dual-booting Windows and Linux is very straightforward—and I’ll show you how to set it up, with Windows 10 and Ubuntu, in this article.
Before you get started, make sure you’ve backed up your computer. Although the dual-boot setup process is not very involved, accidents can still happen. So take the time to back up your important files in case chaos theory comes into play. In addition to backing up your files, consider taking an image backup of the disk as well, though that’s not required and can be a more advanced process.
Prerequisites
To get started, you will need the following five items:
1. Two USB flash drives (or DVD-Rs)
I recommend installing Windows and Ubuntu via flash drives since they’re faster than DVDs. It probably goes without saying, but creating bootable media erases everything on the flash drive. Therefore, make sure the flash drives are empty or contain data you don’t care about losing.
If your machine doesn’t support booting from USB, you can create DVD media instead. Unfortunately, because no two computers seem to have the same DVD-burning software, I can’t walk you through that process. However, if your DVD-burning application has an option to burn from an ISO image, that’s the option you need.
2. A Windows 10 license
If Windows 10 came with your PC, the license will be built into the computer, so you don’t need to worry about entering it during installation. If you bought the retail edition, you should have a product key, which you will need to enter during the installation process.
3. Windows 10 Media Creation Tool
Download and launch the Windows 10 Media Creation Tool. Once you launch the tool, it will walk you through the steps required to create the Windows media on a USB or DVD-R. Note: Even if you already have Windows 10 installed, it’s a good idea to create bootable media anyway, just in case something goes wrong and you need to reinstall it.
4. Ubuntu installation media
Download the Ubuntu ISO image.
5. Etcher software (for making a bootable Ubuntu USB drive)
For creating bootable media for any Linux distribution, I recommend Etcher. Etcher works on all three major operating systems (Linux, MacOS, and Windows) and is careful not to let you overwrite your current operating system partition.

Image by:
Les Pounder, CC-BY-SA 4.0
Once you have downloaded and launched Etcher, click Select image, and point it to the Ubuntu ISO you downloaded in step 4. Next, click Select drive to choose your flash drive, and click Flash! to start the process of turning a flash drive into an Ubuntu installer. (If you’re using a DVD-R, use your computer’s DVD-burning software instead.)
Install Windows and Ubuntu
You should be ready to begin. At this point, you should have accomplished the following:
- Backed up your important files
- Created Windows installation media
- Created Ubuntu installation media
There are two ways of going about the installation. First, if you already have Windows 10 installed, you can have the Ubuntu installer resize the partition, and the installation will proceed in the empty space. Or, if you haven’t installed Windows 10, install it on a smaller partition you can set up during the installation process. (I’ll describe how to do that below.) The second way is preferred and less error-prone. There’s a good chance you won’t have any issues either way, but installing Windows manually and giving it a smaller partition, then installing Ubuntu, is the easiest way to go.
If you already have Windows 10 on your computer, skip the following Windows installation instructions and proceed to Installing Ubuntu.
Installing Windows
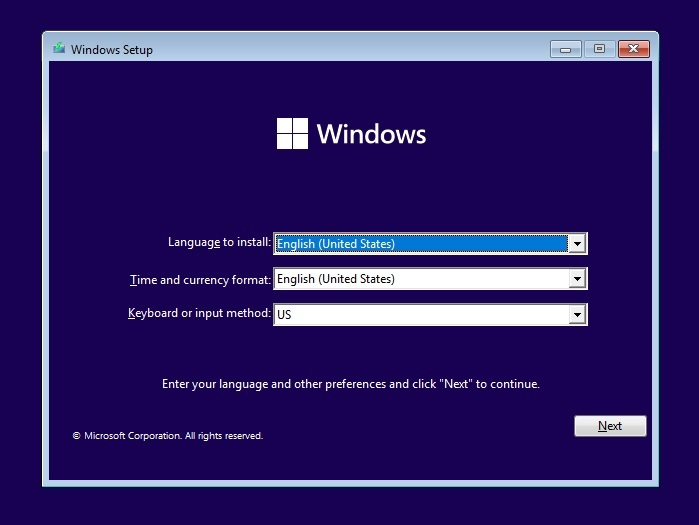
Insert the Windows installation media you created into your computer and boot from it. How you do this depends on your computer, but most have a key you can press to initiate the boot menu. On a Dell PC for example, that key is F12. If the flash drive doesn’t show up as an option, you may need to restart the computer. Sometimes it will show up only if you’ve inserted the media before turning on the computer. If you see a message like, «press any key to boot from the installation media,» press a key. You should see the following screen. Select your language and keyboard style and click Next.

Click on Install now to start the Windows installer.

On the next screen, it asks for your product key. If you don’t have one because Windows 10 came with your PC, select «I don’t have a product key.» It should automatically activate after the installation once it catches up with updates. If you do have a product key, type that in and click Next.

Select which version of Windows you want to install. If you have a retail copy, the label will tell you what version you have. Otherwise, it is typically located with the documentation that came with your computer. In most cases, it’s going to be either Windows 10 Home or Windows 10 Pro. Most PCs that come with the Home edition have a label that simply reads «Windows 10,» while Pro is clearly marked.

Accept the license agreement by checking the box, then click Next.

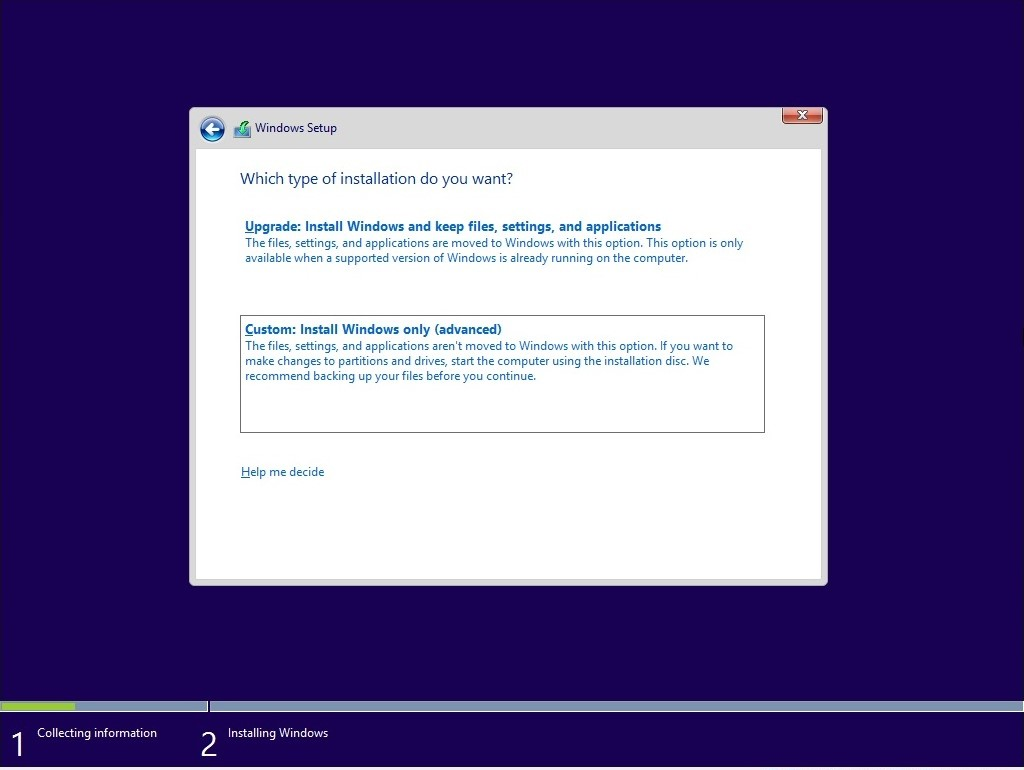
After accepting the agreement, you have two installation options available. Choose the second option, Custom: Install Windows only (advanced).

The next screen should show your current hard disk configuration.

Your results will probably look different than mine. I have never used this hard disk before, so it’s completely unallocated. You will probably see one or more partitions for your current operating system. Highlight each partition and remove it.
At this point, your screen will show your entire disk as unallocated. To continue, create a new partition.

Here you can see that I divided the drive in half (or close enough) by creating a partition of 81,920MB (which is close to half of 160GB). Give Windows at least 40GB, preferably 64GB or more. Leave the rest of the drive unallocated, as that’s where you’ll install Ubuntu later.
Your results will look similar to this:

Confirm the partitioning looks good to you and click Next. Windows will begin installing.

If your computer successfully boots into Windows, you’re all set to move on to the next step.
Install Ubuntu
Whether it was already there or you worked through the steps above, at this point you have Windows installed. Now use the Ubuntu installation media you created earlier to boot into Ubuntu. Insert the media and boot your computer from it. Again, the exact sequence of keys to access the boot menu varies from one computer to another, so check your documentation if you’re not sure. If all goes well, you see the following screen once the media finishes loading:

Here, you can select between Try Ubuntu or Install Ubuntu. Don’t install just yet; instead, click Try Ubuntu. After it finishes loading, you should see the Ubuntu desktop.

By clicking Try Ubuntu, you opt to try out Ubuntu before you install it. Here, in Live mode, you can play around with Ubuntu and make sure everything works before you commit to the installation. Ubuntu works with most PC hardware, but it’s always better to test it out beforehand. Make sure you can access the internet and get audio and video playback. Going to YouTube and playing a video is a good way of doing all of that at once. If you need to connect to a wireless network, click on the networking icon at the top-right of the screen. There, you can find a list of wireless networks and connect to yours.
Once you’re ready to go, double-click on the Install Ubuntu 20.04 LTS icon on the desktop to launch the installer.
Choose the language you want to use for the installation process, then click Continue.

Next, choose the keyboard layout. Once you’ve made your selection, click Continue.
You have a few options on the next screen. You can choose a Normal or a Minimal installation. For most people, Normal installation is ideal. Advanced users may want to do a Minimal install instead, which has fewer software applications installed by default. In addition, you can choose to download updates and whether or not to include third-party software and drivers. I recommend checking both of those boxes. When done, click Continue.

The next screen asks whether you want to erase the disk or set up a dual-boot. Since you’re dual-booting, choose Install Ubuntu alongside Windows 10. Click Install Now.

The following screen may appear. If you installed Windows from scratch and left unallocated space on the disk, Ubuntu will automatically set itself up in the empty space, so you won’t see this screen. If you already had Windows 10 installed and it’s taking up the entire drive, this screen will appear and give you an option to select a disk at the top. If you have just one disk, you can choose how much space to steal from Windows and apply to Ubuntu. You can drag the vertical line in the middle left and right with your mouse to take space away from one and gives it to the other. Adjust this exactly the way you want it, then click Install Now.

You should see a confirmation screen indicating what Ubuntu plans on doing. If everything looks right, click Continue.
Ubuntu installs in the background, but you still have some configuration to do. While Ubuntu tries its best to figure out your location, you can click on the map to narrow it down to ensure your time zone and other things are set correctly.

Next, fill in the user account information: your name, computer name, username, and password. Click Continue when you’re done.

Once the installation finishes, reboot your PC.
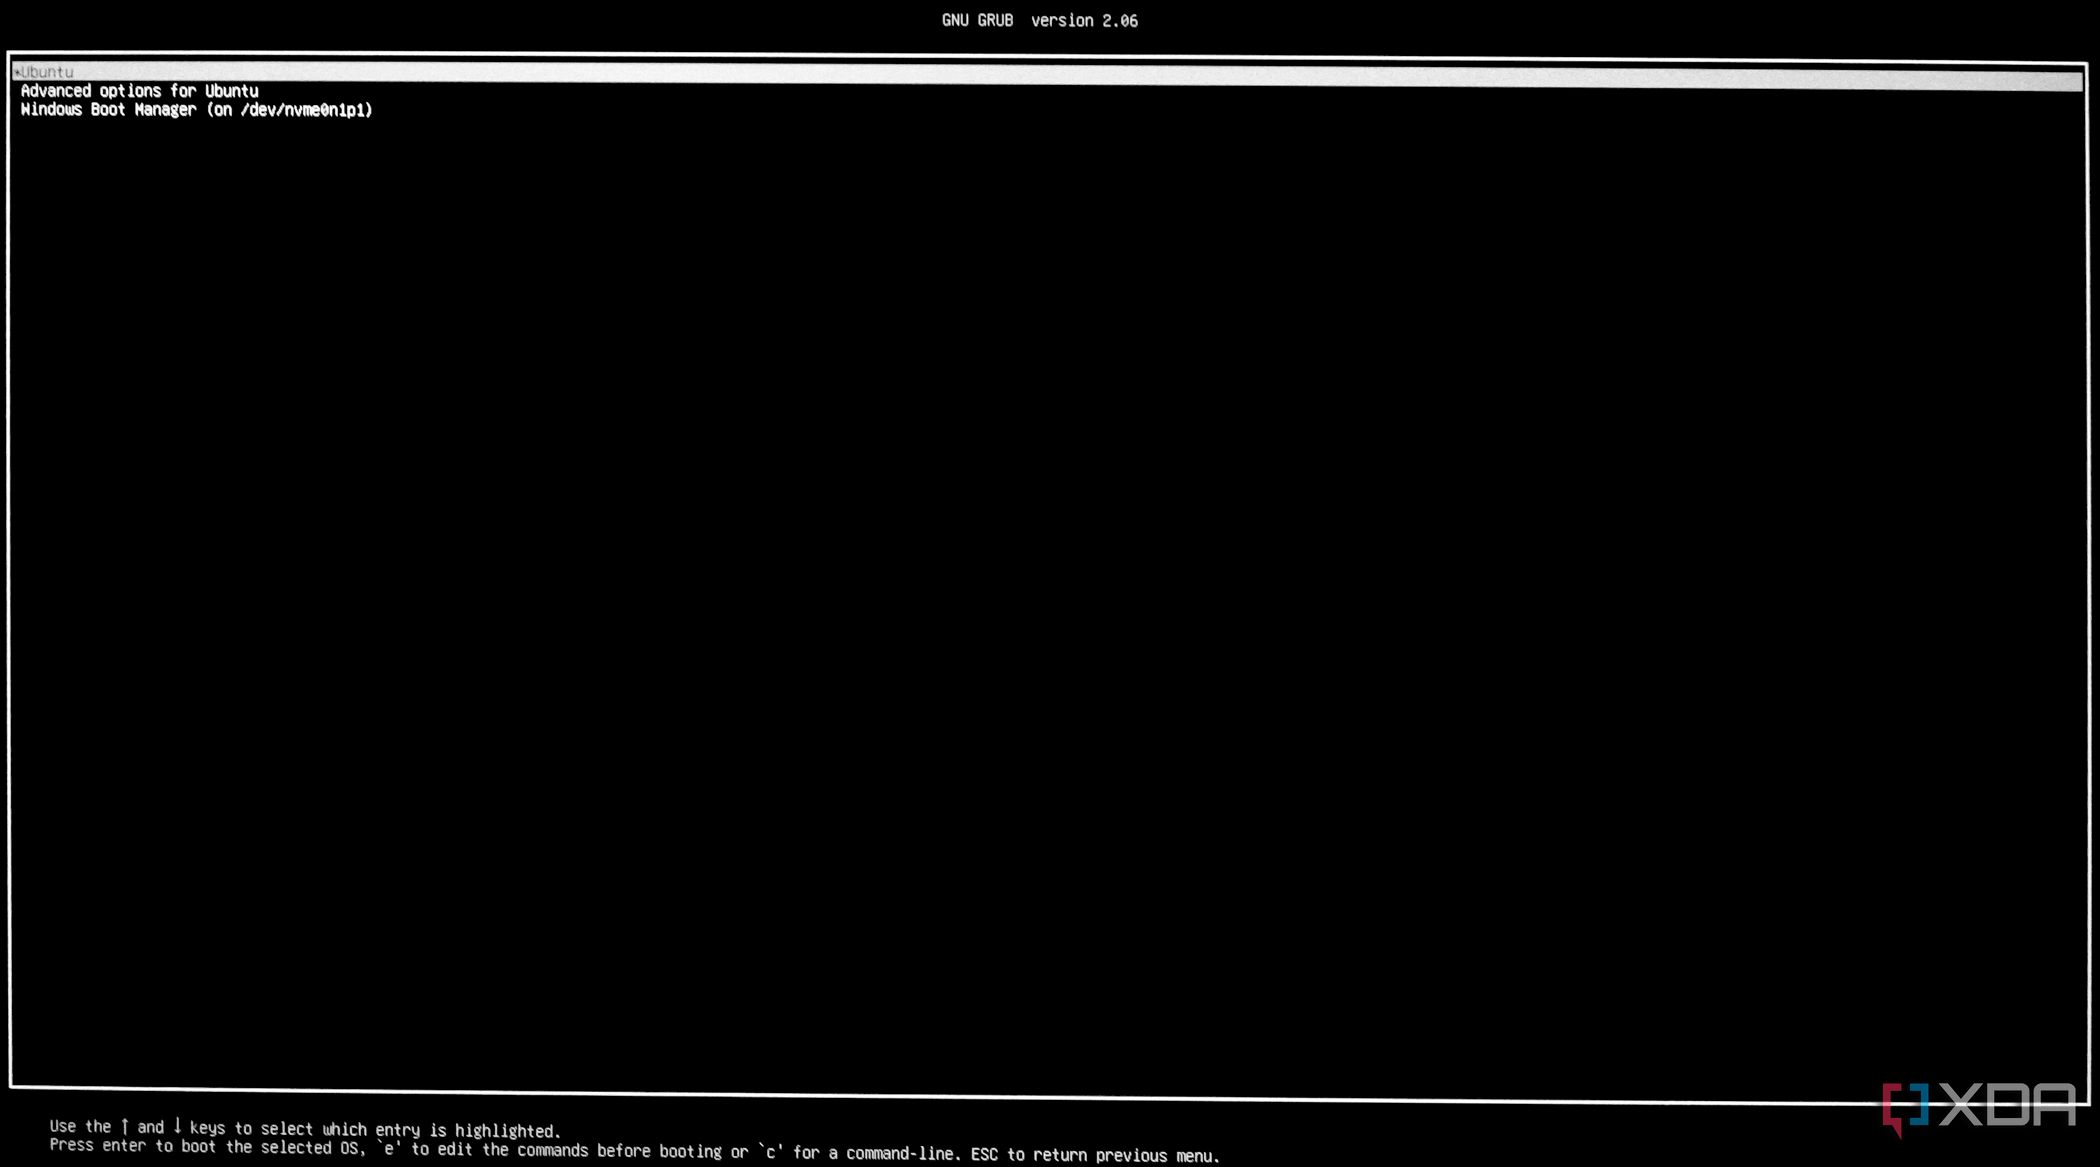
If all went according to plan, you should see a screen similar to this when your computer restarts. Choose Ubuntu or Windows 10; the other options are for troubleshooting, so I won’t go into them.

Try booting into both Ubuntu and Windows to test them out and make sure everything works as expected. If it does, you now have both Windows and Ubuntu installed on your computer.
This article was originally published in 2018 and has been updated by Seth Kenlon.
 This work is licensed under a Creative Commons Attribution-Share Alike 4.0 International License.
For a Microsoft Windows XP version of this article, see 314458.
Summary
This article describes how you can remove the Linux operating system from your computer, and install a Windows operating system. This article also assumes that Linux is already installed on the hard disk using Linux native and Linux swap partitions, which are incompatible with the Windows operating system, and that there is no free space left on the drive.
Windows and Linux can coexist on the same computer. For additional information, refer to your Linux documentation.
More Information
To install Windows on a system that has Linux installed when you want to remove Linux, you must manually delete the partitions used by the Linux operating system. The Windows-compatible partition can be created automatically during the installation of the Windows operating system.
IMPORTANT: Before you follow the steps in this article, verify that you have a bootable disk or bootable CD-ROM for the Linux operating system, because this process completely removes the Linux operating system installed on your computer. If you intend to restore the Linux operating system at a later date, verify that you also have a good backup of all the information stored on your computer. Also, you must have a full release version of the Windows operating system you want to install.
Linux file systems use a «superblock» at the beginning of a disk partition to identify the basic size, shape, and condition of the file system.
The Linux operating system is generally installed on partition type 83 (Linux native) or 82 (Linux swap). The Linux boot manager (LILO) can be configured to start from:
-
The hard disk Master Boot Record (MBR).
-
The root folder of the Linux partition.
The Fdisk tool included with Linux can be used to delete the partitions. (There are other utilities that work just as well, such as Fdisk from MS-DOS 5.0 and later, or you can delete the partitions during the installation process.) To remove Linux from your computer and install Windows:
-
Remove native, swap, and boot partitions used by Linux:
-
Start your computer with the Linux setup floppy disk, type fdisk at the command prompt, and then press ENTER.
NOTE: For help using the Fdisk tool, type m at the command prompt, and then press ENTER.
-
Type p at the command prompt, and then press ENTER to display partition information. The first item listed is hard disk 1, partition 1 information, and the second item listed is hard disk 1, partition 2 information.
-
Type d at the command prompt, and then press ENTER. You are then prompted for the partition number you want to delete. Type 1, and then press ENTER to delete partition number 1. Repeat this step until all the partitions have been deleted.
-
Type w, and then press ENTER to write this information to the partition table. Some error messages may be generated as information is written to the partition table, but they should not be significant at this point because the next step is to restart the computer and then install the new operating system.
-
Type q at the command prompt, and then press ENTER to quit the Fdisk tool.
-
Insert either a bootable floppy disk or a bootable CD-ROM for the Windows operating system on your computer, and then press CTRL+ALT+DELETE to restart your computer.
-
-
Install Windows. Follow the installation instructions for the Windows operating system you want to install on your computer. The installation process assists you with creating the appropriate partitions on your computer.
Examples of Linux Partition Tables
Single SCSI drive
Device    Boot Start End Blocks  Id System
/dev/sda1  *    1    500 4016218 83 Linux native (SCSI hard drive 1, partition 1)
/dev/sda2       501  522 176715  82 Linux swap   (SCSI hard drive 1, partition 2)
Multiple SCSI drives
    Device  Boot Start End Blocks  Id System
/dev/sda1    *    1    500 4016218 83 Linux native (SCSI hard drive 1, partition 1)
/dev/sda2         501  522 176715  82 Linux swap   (SCSI hard drive 1, partition 2)
/dev/sdb1         1    500 4016218 83 Linux native (SCSI hard drive 2, partition 1)
Single IDE drive
    Device  Boot  Start  End  Blocks  Id  System
/dev/hda1    *     1     500  4016218 83  Linux native (IDE hard drive 1, partition 1)
/dev/hda2          501   522  176715  82  Linux swap   (IDE hard drive 1, partition 2)
Multiple IDE drives
    Device   Boot  Start End  Blocks   Id  System
/dev/hda1     *     1    500  4016218  83  Linux native (IDE hard drive 1, partition 1)
/dev/hda2           501  522  176715   82  Linux swap   (IDE hard drive 1, partition 2)
/dev/hdb1           1    500  4016218  83  Linux native (IDE hard drive 2, partition 1)
Also, Linux recognizes more than forty different partition types, such as:
-
FAT 12 (Type 01)
-
FAT 16 > 32 M Primary (Type 06)
-
FAT 16 Extended (Type 05)
-
FAT 32 w/o LBA Primary (Type 0b)
-
FAT 32 w/LBA Primary (Type 0c)
-
FAT 16 w/LBA (Type 0e)
-
FAT 16 w/LBA Extended (Type 0f)
Note that there are other ways to remove the Linux operating system and install Windows than the one mentioned above. The preceding method is used in this article because the Linux operating system is already functioning and there is no more room on the hard disk. There are methods of changing partition sizes with software. Microsoft does not support Windows installed on partitions manipulated in this manner.
Another method of removing an operating system from the hard disk and installing a different operating system is to use an MS-DOS version 5.0 or later boot disk, a Windows 95 Startup disk, or a Windows 98 Startup disk that contains the Fdisk utility. Run the Fdisk utility. If you have multiple drives, there are 5 choices; use option 5 to select the hard disk that has the partition to be deleted. After that, or if you have only one hard disk, choose option 3 («Delete partition or logical DOS drive»), and then choose option 4 («Delete non-DOS partition»). You should then see the non-DOS partitions you want to delete. Typically, the Linux operating system has two non-DOS partitions, but there may be more. After you delete one partition, use the same steps to delete any other appropriate non-DOS partitions.
After the partitions are deleted, you can create partitions and install the operating system you want. You can only create one primary partition and an extended partition with multiple logical drives by using Fdisk from MS-DOS version 5.0 and later, Windows 95, and Windows 98. The maximum FAT16 primary partition size is 2 gigabytes (GB). The largest FAT16 logical drive size is 2 GB. For additional information, click the article number below to view the article in the Microsoft Knowledge Base:
105074 MS-DOS 6.2 Partitioning Questions and Answers
If you are installing Windows NT 4.0 or Windows 2000, the Linux partitions can be removed and new partitions created and formatted with the appropriate file system type during the installation process. Windows allows you to create more than one primary partition. The largest partition that Windows NT 4.0 allows you to create during installation is 4 GB because of the limitations of the FAT16 file system during installation. Also, the 4-GB partitions use 64-KB cluster sizes. MS-DOS 6.x and Windows 95 or Windows 98 do not recognize 64-KB cluster file systems, so this file system is usually converted to NTFS during installation. Windows 2000, unlike Windows NT 4.0, recognizes the FAT32 file system. During the installation of Windows 2000, you can create a very large FAT32 drive. The FAT32 drive can be converted to NTFS after the installation has completed if appropriate.
Need more help?
Want more options?
Explore subscription benefits, browse training courses, learn how to secure your device, and more.
Communities help you ask and answer questions, give feedback, and hear from experts with rich knowledge.