When you want to install Windows on an Intel-based Mac, the first step is to download and install the Apple Bootcamp Driver For Windows. This application will install the necessary Apple-specific support software, and you will need to sign in to your Apple account. You will be prompted to enter a password.
After installing Windows, the installer will install the Boot Camp Control Panel. Once the installation is complete, the Boot Camp Control Panel should appear in the Windows 10 System Tray. Likewise, on macOS, you will find the Startup Disk preference pane. From there, you can change the default operating system and boot drive. When you are done, restart the Mac. The Mac will now display the Windows partition. It will also display a progress bar during the partitioning process.

After the Mac restarts, open File Explorer and look for the Boot Camp folder. From there, click on Show hidden icons to access the Boot Camp folder. Then, select Restart. From here, you can choose to boot into OS X by selecting Show hidden icons and then using the arrow keys. If you are using Windows, you can use the Windows installer to install Windows on your Mac. If you don’t have a Boot Camp driver, you can still use your Mac for Windows by using Mac’s boot menu.
How it works on mac
The Mac Bootcamp Driver for Windows will allow Mac users to install Windows 10 64-bit on their Mac. It contains Windows services, a Windows installer, device driver software, and a Mac OS X application. Once you’ve installed the Bootcamp Driver, your wireless keyboard and mouse should work. If your Mac isn’t running Windows 10, you may have to install the drivers manually.
To install Windows on a Mac, you need to have at least 55 GB of free disk space on your Mac. You’ll also need a 16GB USB flash drive. Once you’ve completed this step, your Mac will automatically reboot. After the installation process has been completed, you should see a list of the devices connected to it.
How to install it manually
To install a Windows driver manually, you must first download the Windows drivers for the operating system. You can also download the drivers through freeware tools like Brigadier and Bootcamp assistant. If you’re unsure of which driver is appropriate for your Mac, you can visit the official Windows website and download the appropriate driver. It should be compatible with your Mac and be installed in less than an hour. You can also install Windows on a Windows computer by using a USB memory stick.
Tom is an enthusiastic Mac user since the Mac Plus and dabbles with Windows. He’s a geek with a reputation for explaining things to people. He has worked as a computer engineer, network manager, and software tester. He’s also a writer. While working as an engineer, Tom has spent many years writing software.
App Name: Bootcamp Driver
Platform: Windows
File Size: 381 MB
When you’ve successfully installed the Windows drivers, you’re ready to install Windows on your Mac. During the installation, you’ll be prompted to install the Windows support software from Apple. Depending on the speed of your internet connection, the process could take two hours or more. Once completed, your Mac will restart into the Windows environment.
Alternatives
Boot Camp drivers can be downloaded from the Apple server using a free utility called Brigadier. This tool has the advantage of downloading original Apple Boot Camp drivers from their servers. It will also install your wireless mouse, keyboard, and graphics drivers. The Boot Camp drivers for Windows 10 also include the camera and graphics drivers, as well as a driver for the camera and graphics. The software also allows you to use your Mac as a Windows PC.
Windows is not compatible with all Macs. You need to meet the system requirements of Windows before you can install it on your Mac using Boot Camp. You can find more information about Mac compatibility requirements on Apple and Microsoft support websites. It is also important to note that some features of the Mac might not work properly in Windows.
Features of bootcamp
=> Free available for download
=> In small size
=> Compaitable with all over OS
Another way to install Windows on your Mac is through emulator software. Parallels is a virtualization software platform that is optimized for Windows and macOS. However, it is not as powerful as VMWare. Before installing Windows on your Mac, you should first figure out what version of Windows your Mac supports and its architecture. This information can help you choose the best edition for your computer.
What is BootCamp in Windows 10?
If you are experiencing ‘BootCamp missing issue’ on Windows 10, then you are in right place for the solution. Here, you will be guided with easy steps/methods to resolve the issue. Let’s starts the discussion.
‘BootCamp’: BootCamp or Boot Camp Assistant is multi boot utility software included with Apple’s MacOS that assists you in installing Microsoft Windows operating system on Intel-based Mac computer. It means you can install Windows 10 OS on your Intel-based Mac computer using BootCamp or Boot Camp Assistant Tool.
When you install Windows 10 OS on your Mac computer using this tool, Windows OS and Apps will have full access to the hardware unlike virtual machines. Once Windows OS successfully installed on Mac, you need to install BootCamp drivers in order to get trackpad and other features working. Boot Camp icon on ‘System Tray’ on your taskbar offers you to quick access to Boot Camp Control Panel.
Boot Camp Control Panel offers you to modify the default startup disk and a couple of keyboard and trackpad settings. Additionally, Boot Camp icon offers you to quick reboot into MacOS X with just few steps. However, several users reported that they faced ‘BootCamp missing from Windows 10’ while they tried to access BootCamp icon or Boot Camp Control Panel on ‘System Tray’ of Windows 10. Some users also reported that after they installed Windows 10 on Mac, they were unable to finish the download for the drivers of Boot Camp because Mac restarted loop, and they can’t go back to Mac because Boot Camp Manager missing issue on Mac. Let’s go for the solution.
How to fix BootCamp missing from Windows 10?
Method 1: Update Boot Camp drivers
This issue can also be occurred due to outdated or corrupted Boot Camp drivers. You can update the Boot Camp drivers in order to fix the issue.
Step 1: Make sure your device is connected to internet. Now, open Boot Camp Assistant folder from ‘Utility’ folder on Mac
Step 2: Make sure ‘Download the Latest Windows Support software from Apple’ option is checked from all the options appeared, and then hit ‘Continue’
Step 3: Insert USB Flash drive to your Mac computer as destination disk and then hit ‘Continue’
Step 4: Enter your Administrator username & password. After that, Boot Camp Assistant should download drivers to your USB flash drive.
Step 5: Once done, close Boot Camp Assistant. Make sure USB is connected to Mac and go to ‘System Preferences > Startup Disk’ and select the Windows Volume icon in the lists of drivers
Step 6: Finally, click on ‘Restart’ to restart the Mac and check if the issue is resolved.
Method 2: Download and install Boot Camp drivers
If Boot Camp driver is missing or corrupted, then you can also try to fix the issue by download and installing the latest drivers.
Step 1: Open your browser and download the latest Boot Camp drivers from official site. Now, open ‘Boot Camp’ folder in Flash drive and install the drivers you downloaded
Step 2: Click on ‘Yes’ and click on ‘Repair to Reinstall’ or ‘Update previously installed Windows support Software’
Step 3: In next window, click on ‘Continue > Yes’ to finish the installation and restart the computer to see the changes.
Method 3: Check if Boot Camp Icon is hidden
Sometimes, ‘BootCamp missing from Windows 10’ issue is occurred if Boot Camp icon is hidden. You can unhide the icon in order to fix the issue.
Step 1: Open ‘Settings’ App in Windows 10 and go to ‘Personalization > Taskbar’
Step 2: Under ‘Notification Area’ section, click ‘Select which icons appear on taskbar’ link and then turn ON ‘Boot Camp Manager’ entry. Once done, please check if the error is resolved.
Method 4: Check if Boot Camp Manager is starting with Windows
Step 1: Press ‘CTRL + SHIFT + ESC’ keys on keyboard to open ‘Task Manager’
Step 2: Click on ‘Startup’ tab, find ‘Boot Camp’ and check if it is not disabled. If disabled, select it and click ‘Enable’
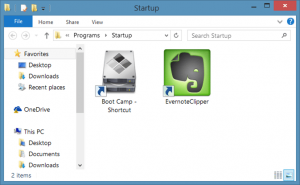
Method 5: Add Boot Camp icon to Taskbar System Tray
If Boot Camp icon is missing on Taskbar System Tray, then you can try to fix the issue by adding Boot Camp icon.
Step 1: Open ‘Control Panel’ in Windows 10 and click on ‘View by’ option to select ‘Small icons’
Step 2: Find and right-click on ‘Boot Camp’ applet, and select ‘Create Shortcut’ to create a shortcut of Boot Camp on Desktop
Step 3: Now, you need to put this shortcut in the Startup folder
Step 4: Press ‘Windows + R’ keys on keyboard, type ‘shell:startup’ in opened ‘Run’ dialog box and hit ‘Ok’ to open ‘Startup’ folder
Step 5: Now, copy or move the shortcut that you have created on desktop to this folder.
Step 6: Once done, restart your computer and check if the error is resolved.
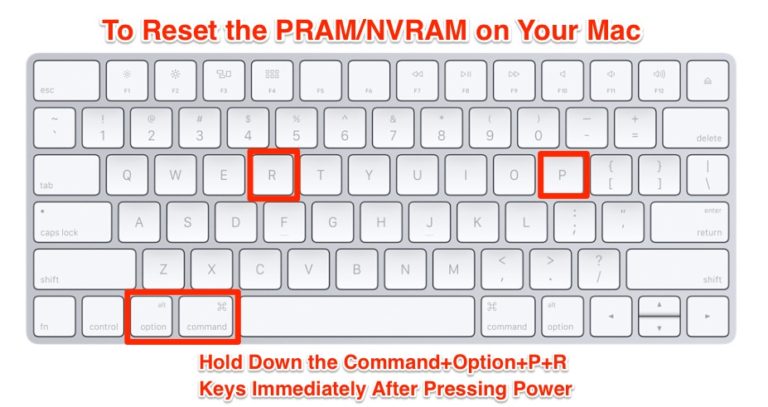
Method 6: Reset PRAM
Step 1: Turn OFF your Mac by pressing ‘Power’ button
Step 2: Turn ON your computer and hit ‘Command + Option + P + R’ keys on keyboard before grey screen appear, and keep holding the keys
Step 3: When you hear the startup sound, you can release the keys. Once done, please check if the issue is resolved.
Conclusion
I am sure this article helped you on How to fix ‘BootCamp missing from Windows 10’ issue with several easy steps. You can read & follow our instructions to do so. That’s all. For any suggestions or queries, please write on comment box below.
From this page you can easily download the latest setup of Bootcamp driver. Basically, Bootcamp driver is a program that enables Macs to run Windows on a Windows OS. You can use the BootCamp software to partition your hard drive and install Windows support software. To install BootCamp driver on Mac, you must have a Mac with Windows installed. Then, you can boot into Windows.
Installing Windows on a Mac
Bootcamp driver allows you to install Windows on your Mac. Bootcamp is a Windows installer software that you can install from a USB memory stick. Once the Windows installation program is on the memory stick, the Mac will reboot. Pressing Alt will allow you to switch back and forth between Windows and macOS.
The Windows installer will ask you to select a partition size and set minimum storage requirements. Make sure to choose a size that is adequate for your needs. If you need to make changes, you can do so later. The Windows installer will then start, and will ask you to select the Boot Camp partition. Once it’s ready, you can follow the onscreen instructions.
==> Download Bootcamp Driver <==
If you’re looking for a way to run Windows without affecting the Mac’s native operating system, you can use a virtual machine. This method is faster than using the traditional Mac boot camp driver, and it allows you to run two operating systems at once. However, you’ll need to make sure you have enough RAM to run both operating systems.
Boot Camp Assistant
If you want to run Windows on your Mac, you can download and install the Boot Camp Assistant. This tool is found in the Utilities folder inside your Applications folder. It will detect your Mac’s current firmware version and download any necessary support software for your Mac.
It will also check the status of your Mac’s power adapter and download the latest Windows drivers and support software. You can then use the disk created by Boot Camp Assistant to install Windows on your Mac. Alternatively, you can also use a USB flash drive or an ISO image downloaded from Apple.
Boot Camp Assistant is not available on all Macs. It is not compatible with M1 or M2 Macs. If you’re on an M1 or M2 Mac, you’ll need to use virtualization software, such as Parallels Desktop. However, note that Parallels Desktop only works with ARM-based Windows, so you’ll need to make sure to install the latest version before installing Boot Camp Assistant.
Partitioning your Mac’s hard drive
Partitioning your Mac’s hard drive is a process that requires you to erase all data from the active drive. Fortunately, it’s not a difficult task. With the help of the Boot Camp Assistant, the process of partitioning your Mac’s hard drive is easy. Once you’ve selected a partition size, you’ll see a list of hard drives connected to your Mac. Select the drive you’d like to partition.
Partitioning your Mac’s hard drive allows you to run different operating systems, including Windows. It divides the hard drive into two separate partitions: one for Mac OS X, the other for Windows. The Windows partition is 32 GB. Make sure you have enough free space on your hard drive to accommodate the partition.
Then, you can click on the «+» icon to create a new partition. Choose the partition size that matches your needs and give it a name. When you are finished, make sure to lock the new partition. Your new partition will appear on your main drive. You can also change the size of the partition later if you need to.
Installing Windows support software
The first step in installing Windows support software with Bootcamp driver is to connect your Mac to an internet connection. Once connected, disable FileVault on your Mac in Security & Privacy or System Preferences. Then, disconnect any USB flash drives that are not necessary and reconnect it to Windows. If the process fails, try again later.
The Windows support software can be downloaded from Apple’s support website. This software is installed on the selected device. It may ask you to enter the administrator password. The software will also change the permissions on your USB flash drive. Once it’s done, you can close Boot Camp Assistant.
You should also make sure that your Mac’s USB drive is formatted as MS-DOS (FAT). To install this software, you will need to connect a 16GB USB flash drive. Make sure that the drive is formatted as MS-DOS so that it will work with Windows. Open the Disk Utility application located in the Applications folder. Choose «Windows Support Software» from the Action menu. Click on «OK» when prompted.
Table of Contents
How to Install Boot Camp Assistant for Windows on Your Mac?
In this guide, you will learn how to install Boot Camp Assistant on your Windows and Mac. Once installed, you can use it to install Windows on your Mac. The first step in using Boot Camp Assistant is to select the Windows ISO file. Navigate to your USB memory stick and choose the Windows ISO file. You will need this file to install Windows. Follow the instructions provided in the installation package to install Windows on your Mac. If you experience any errors during the process, don’t worry! There are some common problems with this program and you can fix them yourself.
Installing Boot Camp Assistant on a Mac:
If you’re a Windows user and want to install Windows on your Mac, you’ll first need to download the Boot Camp Assistant app from Apple’s website. You can find the download link on the Apple support website. After downloading the software, you’ll need to install Windows drivers on your computer. This process can take a few minutes, but it’s definitely worth it. Besides installing Windows drivers, Boot Camp Assistant can also help you uninstall Windows from your Mac.
Despite its name, the Windows installation assistant runs several tasks in parallel. You can select one task at a time, and it will continue to run the next one without stopping. For instance, the Boot Camp Assistant can create a Windows 10 install disk, which will be useful for setting up a new PC. However, to install Windows, you’ll need an ISO image file of Windows 10. You can store the Windows ISO file on your internal Mac hard drive or a USB flash drive.
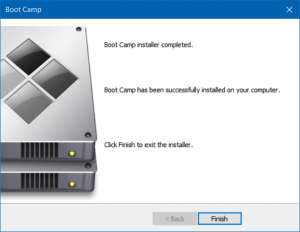
You can install Windows on pre-2015 Macs, but you must have a license key or a fully paid copy of Windows. The most common way to install Windows on a Mac is to use a boot camp disc or flash drive. To do so, follow the instructions on the website. After a few minutes, the Mac will reboot to the final setup screen. If you’d like to make changes to your Windows installation manually, choose Express Setting in the corner. After you’ve successfully installed Windows, you’ll be prompted to create a user account. The Windows installer will install the necessary Apple support software. This software is essential in order for your Mac to work properly with Windows.
How to fix them?
You’ve just installed macOS and have been experiencing errors with the Boot Camp Assistant. Sometimes, the assistant is unable to partition the disk properly. This could be caused by a number of different factors, including Time Machine backups. You should run a disk checker tool, or FSCK, in a command prompt. It will check the system files and repair any corruption in them. If the error persists, you should try a different method.
If you’ve tried all these steps and still encounter the error message, it’s time to reinstall Boot Camp. Occasionally, the software will stop making a copy of the Windows installation files, which you can fix by manually updating both macOS and Windows. First, make sure your Mac has at least 16GB of free space. Then, you can disable FileVault and change the destination of Windows Support software’s save files. Alternatively, download Brigadier and restart the installation process.
If you’ve tried all of the steps so far, but still experience error messages in the Boot Camp Assistant, you may have to reinstall your operating system. Reinstalling Windows 10 in April 2018 may be necessary. If you’re still having problems, try repairing Boot Camp with a reliable mac data recovery tool. When you’ve tried these methods, you may have lost important data. So, if you’ve already installed Windows 10 on your Mac, you may be wondering how to fix boot camp assistant errors.
Using it to install Windows 10 on a Mac:
Using Boot Camp Assistant for Windows to install your new Windows OS on your Mac requires a few steps. First, you must download the Windows 10 ISO file. The download link is available from the Microsoft website. If you are installing a Windows 10 home edition, you should choose the 64-bit version of the installation file. The installation process may take a while, so be patient while it downloads. Once you have successfully downloaded the file, you should restart your Mac and run the setup.
Then, you should choose a product key for your copy of Windows. You can also install Windows without it. The installation process takes about 10 minutes and will copy the window files to the Mac. Once the process is complete, the Mac will restart and prompt you to set up your Windows setup. After Windows installation, you can use the keyboard and mouse, and Cortana. You can also change your language, keyboard layout, and Wi-Fi settings.
After selecting the Windows drive, the next step is to change the Secure Boot setting to Full Security. If you haven’t changed this setting, you should go to the Apple website for instructions. If you change it back to Full Security, it will not affect your ability to start Windows on your Mac. After choosing your new OS, Windows will install its software and prompt you to create a user account. Using Boot Camp Assistant for Windows to install Windows on a Mac is a simple process that anyone can do. However, before installing Windows, it’s important to back up your Mac to an external hard drive.
In this article, we are going to discuss on How to fix BootCamp missing from Windows 10. You will be guided here with easy steps/methods to resolve the issue. Let’s starts the discussion.
‘Boot Camp Assistant’ Software: BootCamp or Boot Camp Assistant is multi boot utility included with Apple Inc. ‘s MacOS that assists you in installing Microsoft Windows operating system on Intel-based Macintosh computer. The utility guides you through non-destructive disk partitioning of hard disk drive or SSD and installation of Windows device drivers for Apple hardware. Boot Camp 6.0 added support for 64-bit versions of Windows 10 while Boot Camp 6.1 is available on MacOS 10.12 Sierra and latter, will only accept new installations of Windows 7 and later.
Boot Camp sits in System Tray of taskbar in Windows 10 once you have successfully installed Windows 10 in your Mac computer using Boot Camp Software. In sort, if you want to access Boot Camp or Boot Camp Control Panel in Windows 10 installed on Mac computer using BootCamp Software, then you can access it through System Tray in taskbar. If you are not aware, Boot Camp Control Panel allows you to change default startup disk and couple of keyboard and trackpad settings.
However, several users reported that they faced BootCamp missing from Windows 10 issue when they tried to access Boot Camp in System Tray of taskbar in Windows 10 computer. They explained the issue is started occurring after installation of Boot Camp in order to install Windows 10 on MacOS based computer.
There could be several reasons behind the issue including the hidden Boot Camp icon in system tray of taskbar, missing/outdated or corrupted Boot Camp drivers or Windows Device Drivers, issue with PRAM in your device, and other issues. It is possible to fix the issue with our instructions. Let’s go for the solution.
How to fix BootCamp missing from Windows 10?
Method 1: Update Boot Camp/Computer drivers
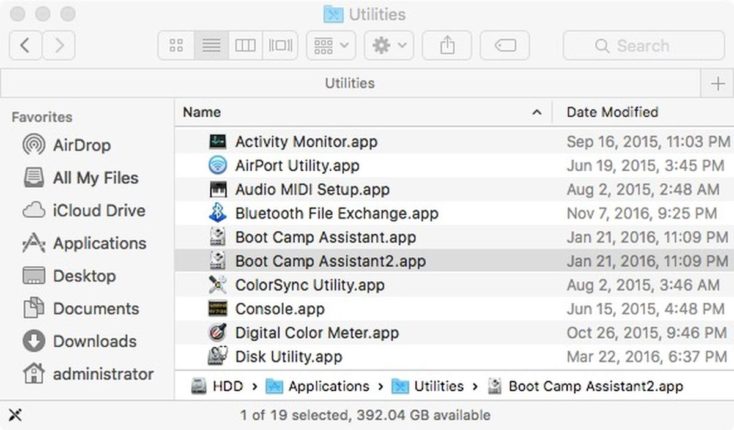
Step 1: Make sure your Mac computer is connected to internet. Now, open ‘Boot Camp Assistant’ from ‘Utility’ folder on Mac. When the assistant window opens deselected all options, but make sure that ‘Download latest Windows Support Software for Apple’ is checked and click ‘Continue’
Step 2: Make sure your USB flash drive is connected as destination disk and click ‘Continue’. Enter administrator username and password, after that, the Boot Camp Assistant should download drivers to your USB flash drive
Step 3: Once download, close ‘Boot Camp Assistant’ window. Make sure your USB is connected to Mac and go to ‘Apple LOGO > System Preferences > Startup Disk’, select the Windows Volume icon in list of drivers and click ‘Restart’ to restart
Step 4: Once downloaded, open ‘Boot Camp’ folder in USB flash drive and install the driver you downloaded. If Boot Camp ask you to make change, click ‘Yes’
Step 5: Click ‘Repair’ to reinstall or update previously installed Windows Support Software
Step 6: Click ‘Continue Anyway’ if message says software didn’t pass Windows LOGO testing, and once installation finished, click ‘Yes’ to restart your computer, and then check if the issue is resolved.
Method 2: Reset PRAM
Many Mac users reported resetting PRAM on Mac resolves the issue. You can try this. Reset PRAM at least three consecutive times.
Step 1: Turn OFF your Mac computer by pressing ‘Power’ button
Step 2: Now, turn ON your computer, and press & hold ‘Command, Option, P and R’ keys on keyboard to restart.
Step 3: Keep holding the keys until your Mac restart. When you hear startup sound, release the keys and keep in mind that some of your settings have been reset. Once done, check if the issue is resolved.
Method 3: Check and Add Boot Camp icon in system tray of taskbar
Sometimes, this issue can be occurred if Boot Camp is just hidden in system tray of your taskbar. You can check and add Boot Camp icon to taskbar system tray in order to fix.
Step 1: Open ‘Control Panel’ in Windows PC via Windows Search Box and go to ‘Boot Camp’ via Search in Control Panel
Step 2: Right-click on Boot Camp applet and select ‘Create Shortcut’ to create and shortcut of Boot Camp on desktop
Step 3: Now, on desktop, press ‘Windows + R’ keys on keyboard, type ‘shell:startup’ and hit ‘Ok’ to open Startup folder, now copy or move the shortcut that you have just created on desktop to Startup folder
Step 4: Once done, restart your computer and check if the issue is resolved.
Fix Windows PC issues with ‘PC Repair Tool’:
‘PC Repair Tool’ is easy & quick way to find and fix BSOD errors, DLL errors, EXE errors, problems with programs/applications, malware or viruses issues, system files or registry issues, and other system issues with just few clicks.
Conclusion
I am sure this post helped you on How to fix BootCamp missing from Windows 10 with several easy steps/methods. You can read & follow our instructions to do so. That’s all. For any suggestions or queries, please write on comment box below.