Этот раздел содержит примечания и подсказки к установке PHP, связанной с
Apache 2.x на системах Microsoft Windows.
Замечание:
Сначала следует прочитать шаги
ручной установки!
Крайне рекомендуется обратиться к »
Документации Apache, чтобы получить базовое представление о сервере
Apache 2.x. Также подумайте о чтении »
Примечаний для Windows для Apache 2.x перед чтением этого руководства.
Загрузите последнюю версию
» Apache 2.x
и подходящую версию PHP. Следуйте
шагам ручной установки
и возвращайтесь, чтобы продолжить интеграцию PHP и Apache.
Существует три способа настроить PHP для работы с Apache 2.x в Windows.
PHP можно запускать как обработчик, как CGI или под FastCGI.
Замечание: Помните, что при указании путей
в конфигурационных файлах Apache под Windows, все обратные слеши, например,
c:\directory\file.ext должны быть изменены на прямые:
c:/directory/file.ext. Для путей с директориями также может понадобиться слеш в конце.
Установка в качестве обработчика Apache
Чтобы загрузить модуль PHP для Apache 2.x, необходимо вставить следующие
строки в файл конфигурации Apache httpd.conf:
Пример #1 PHP и Apache 2.x в качестве обработчика
# до PHP 8.0.0 имя модуля было php7_module
LoadModule php_module "c:/php/php8apache2_4.dll"
<FilesMatch \.php$>
    SetHandler application/x-httpd-php
</FilesMatch>
# укажите путь до php.ini
PHPIniDir "C:/php"
Замечание:
В приведённых выше примерах необходимо подставить фактический
путь к PHP вместо C:/php/. Убедитесь, что
файл, указанный в директивеLoadModule, находился в указанном месте.
Используйте php7apache2_4.dll для PHP 7 или
php8apache2_4.dll для PHP 8.
Запуск PHP как CGI
Настоятельно рекомендуется обратиться к
» Документации Apache CGI
для более полного понимания того, как запускать CGI в Apache.
Чтобы запустить PHP как CGI, файлы php-cgi должны быть помещены в
каталог, обозначенный как каталог CGI с использованием директивы ScriptAlias.
Строку #! необходимо будет поместить в файлы PHP, которые
указывают на расположение бинарного файла PHP:
Пример #2 PHP и Apache 2.x как CGI
#!C:/php/php.exe
<?php
  phpinfo();
?>
Внимание
Используя установку CGI, ваш сервер открыт перед несколькими возможными уязвимостями. Пожалуйста, ознакомьтесь с разделом «Безопасность CGI» чтобы узнать, как можно защитить себя от таких атак.
Запуск PHP под FastCGI
Запуск PHP под FastCGI имеет ряд преимуществ перед запуском как CGI.
Настройка таким способом довольно проста:
Загрузите mod_fcgid с
» https://www.apachelounge.com.
Бинарные файлы Win32 доступны для загрузки с этого сайта. Установите модуль
в соответствии с прилагаемой к нему инструкцией.
Настройте свой веб-сервер, как показано ниже, позаботившись о том, чтобы
скорректировать все пути в соответствии с тем,
как вы провели установку в своей конкретной системе:
Пример #3 Настройка Apache для запуска PHP как FastCGI
LoadModule fcgid_module modules/mod_fcgid.so
# Где находится ваш файл php.ini?
FcgidInitialEnv PHPRC        "c:/php"
<FilesMatch \.php$>
    SetHandler fcgid-script
</FilesMatch>
FcgidWrapper "c:/php/php-cgi.exe" .php
Файлы с расширением .php теперь будут исполняться обёрткой PHP FastCGI.
wolfeh1994 at yahoo dot com 
9 years ago
Please for the love of god, download the threaded version. I spent over an hour trying to figure out why php5apache2.dll could not be found, and while desperately looking through manuals I went into the php 5 structure and found that it doesn't exist in the non-threaded version.
This really could use a mention somewhere other than the PHP 5 structure, like the paragraph to the left of the homepage which talks about which PHP version to choose, or this part of the manual which covers Apache... Anywhere but structure, seriously. I would have never guessed to look there.
ohcc at 163 dot com 
8 years ago
If you come with an error like this: Wrapper xxxx cannot be accessed: blah blah blah when starting Apache.
You have 3 choices to solve this problem. Any one of them would work.
1. Reinstall your applictions in paths that do not contain spaces.
2. Place a backslash before every space in the path set to the FcgidWrapper directive in httpd.conf, like:
FcgidWrapper "C:/Program\ Files/PHPServer/PHP/php-cgi.exe" .php
3. Use mklink (or junction for windows XP/2003) to create a symbol link to the path of php-cgi.exe's containing folder.
run cmd.exe and type this command:
mklink /j C:\php\ "C:\Program Files\PHPServer\PHP".
or this command if you are on Windows XP/2003
junction C:\php\ "C:\Program Files\PHPServer\PHP"
Remember this : you need to download junction.exe to use it. Don't know where to download? Google it.
Then the FcgidWrapper directive should be like this:
FcgidWrapper "C:/php/php-cgi.exe" .php
Don't forget to change the paths above to your working paths.
farinspace 
12 years ago
Running PHP under FastCGI:
Besides the following in your httpd.conf
LoadModule fcgid_module modules/mod_fcgid.so
FcgidInitialEnv PHPRC "c:/php"
AddHandler fcgid-script .php
FcgidWrapper "c:/php/php-cgi.exe" .php
Remember to add the following to the default <Directory "C:/apache/htdocs"> block (or virtual host blocks):
Options ExecCGI
Anonymous 
8 years ago
With Apache 2.4 in Windows, it seems that PHPIniDir directive must come before LoadModule directive to be used. Also, name of the DLL file seems to be php5apache2_4.dll, not php5apache2.dll.
This configuration in httpd.conf works for me (Apache 2.4.10, PHP 5.6.5):
PHPIniDir "C:\PHP"
LoadModule php5_module "c:/php/php5apache2_4.dll"
<FilesMatch \.php$>
SetHandler application/x-httpd-php
</FilesMatch>
mjm at alum dot mit dot edu 
15 years ago
If you use the PHP 5 installer, you'll notice that it uses the wrong type of slash on Windows!
Change C:/Program Files/PHP/" to C:\Program Files\PHP\" and everything works great!
Anonymous 
13 years ago
If anybody here encounters an error regarding PHPIniDir, change PHPIniDir "C:/php/" to PHPIniDir "C:\php\".
Cameron 
12 years ago
Here is yet another aspect of the "faulting module php5ts.dll" crash when trying to start apache.
I installed Apache 2.2.18, Mysql 5.1.57 and PHP 5.2.17 (apache module, VC6 thread-safe - initially with no extensions) on a fresh WinXP SP3 system. The versions chosen were because I was trying to replicate as near as possible apps on my Linux server.
Everything configured and ran properly without php extensions, so I then reran the msi installer and chose the necessary extensions. I reconfigured httpd.conf but apache then just kept crashing.
Eventually I came across the "fix" mentioned elsewhere "copy libmysql.dll to apache folder" and suddenly it worked. But why? I checked and the php installation folder was in the system path. The answer was simply that I had never rebooted. It seems that whatever process controls windows services only reads the path at boot time. I was thrown by assuming that if I started httpd from the command line then it would inherit that path.
Here are a few diagnostic tips that helped me along the way:
Try the CLI command:
php -m
and see that the command line version loads all the modules you asked for.
in php.ini, enable
display_errors = On
and
display_startup_errors = On
The latter pops up a window saying which extension it has trouble loading. Of course it is not perfectly clear, because it says something like 'unable to load "C:\php\ext\php_mysql.dll" - The specified module could not be found'. It lies - it really does find that dll, but it must have failed on the dependency of libmysql.dll.
a solution for simpletons like me 
11 years ago
Installing Apache and PHP on Windows 7 Home Premium on a Gateway NV75S laptop with a quad AMD A6-3400M
All I need to do with these programs is to test my website out on my laptop. I have HTML and PHP files. I do not need MySQL as I use html5 storage.
Getting and installing Apache
1 In your browser go to h t t p : / / h t t p d . a p a c h e . o r g / d o w n l o a d . c g i
(without the spaces)
2 Click on httpd-2.2.22-win32-x86-no_ssl.msi
(this is a self-installing executable file without crypto ... no Secure Socket Layer)
(2.2.22 was the latest version on April 25, 2012)
3 Click on the httpd-2.2.22-win32-x86-no_ssl.msi file after it downloads
(single click on the file tab in Chrome or double click on the actual file in Downloads)
4 Click Next
5 Click I accept the terms in the license agreement
6 Click Next
7 Click Next
8 Type localhost in the top box
9 Type localhost in the middle box
10 Type admin@localhost.com in the bottom box
11 Click Next
12 Click Next
13 Click Next
14 Click Install and wait
15 Cick Yes to allow the program to make changes
16 Click Finish
Testing Apache
1 Type localhost in your browser location box (I use Chrome) or type h t t p : / / l o c a l h o s t
(without the spaces)
2 The message It works! should appear.
Getting and installing PHP
1 In your browser go to h t t p : / / w i n d o w s . p h p . n e t / d o w n l o a d /
(without the spaces)
2 Click on the Installer link under PHP 5.3 (5.3.10) VC9 x86 Thread Safe
(Ignore the Do NOT use VC9 version with apache.org binaries comment on the side panel)
3 Click on the php-5.3.10-Win32-VC9-x86.msi file after in downloads
(single click on the file tab in Chrome or double click on the actual file in Downloads)
4 Click Next
5 Click I accept the terms in the License Agreement
6 Click Next
7 Click Next
8 Click Apache 2.2.x Module
9 Click Next
10 Click Browse
11 Double click Apache Software Foundation
12 Double click Apache 2.2
13 Double click conf
14 Click OK
15 Click Next
16 Click Next
17 Click Install and wait
18 Cick Yes to allow the program to make changes
19 Click Finish
Testing PHP with Apache
1 Open Notepad
2 Type 'left bracket character'?php phpinfo(); ?'right bracket character'
3 Save the file to C:\Program Files (x86)\Apache Software Foundation\Apache2.2\htdocs as test.php
4 Type localhost/test.php in your browser location box (I use Chrome) or type h t t p : / / l o c a l h o s t / t e s t . p h p
5 A table with title PHP Version ... should appear
DONE
compleatguru at gmail dot com 
10 years ago
I am using Windows 8 x64, running Apache 2.2 and php 5.4.20
I found that it is necessary to add System Environment Variable PHPRC=[PHP path], so that php.ini is loaded using your PHP path, instead of C:\Windows.
This is how I do for my laptop
Go to Control Panel\System and Security\System\Advanced System Settings\Environment Variables
Add New System Variable
Name: PHPRC
Value: C:\php-5.4.20
Hope it relieve those who keep having empty string for Loaded Configuration File under phpinfo();
bdav 
11 years ago
After spending few hours finally figured out that PHPINIDir path should be in single quotes and with backslash and php module with double quotes and regular slashes:
PHPIniDir 'c:\apps\php\'
LoadModule php5_module "c:/apps/php/php5apache2_2.dll"
AddHandler application/x-httpd-php .php
Nick 
13 years ago
After using the Windows installer for Apache 2.2 and PHP 5.3.2, and installing PHP as an Apache module (not CGI), Apache would crash and fail to start. There were two problems with the configuration files for Apache and PHP.
First, make sure your Apache configuration file reads something similar to:
LoadModule php5_module "C:/Program Files/PHP/php5apache2_2.dll"
PHPIniDir "C:/Program Files/PHP/"
While other users have disabled some or all of the MySQL extensions to prevent all three from running at the same time, I have all of them enabled. However, I do not have PostgreSQL, so I needed to comment out loading the php_pgsql.dll in my php.ini file, as follows:
;[PHP_PGSQL]
;extension=php_pgsql.dll
This stopped Apache from crashing and started successfully.
a user 
7 years ago
If you are having issues getting the PHPIniDir or LoadModule directives to work and all the suggestions already given do not help, double-check if you are not using fancy quotes around your paths (‘ ’ “ ”).
This happened to me because I copied the statements from a random website. In my text editor the difference was barely noticeable, but to Apache it certainly is!
For example, this will not work:
PHPIniDir “C:/PHP7”
But this will work:
PHPIniDir "C:/PHP7"
ohcc at 163 dot com 
8 years ago
If you come with an error like this: Wrapper xxxx cannot be accessed: blah blah blah when starting Apache.
You have 3 choices to solve this problem. Any one of them would work.
1. Install your applictions in paths that do not contains spaces.
2. Place a backslash before every space in the path set to Wrapper, like:
FctidWrapper "C:/Program\ Files/PHPServer/PHP/php-cgi.exe" .php
3. Use mklink (or junction for windows XP/2003) to create a link to the path you have installed php in.
run cmd.exe and type this command:
mklink /j C:\php\ "C:\Program Files\PHPServer\PHP".
or this command if you are on Windows XP/2003
junction C:\php\ "C:\Program Files\PHPServer\PHP"
Remember this : you have to download online to use this application. Don't know where to download? Go and Google it.
Then the FctidWrapper directive should be like this:
FctidWrapper "C:/php/php-cgi.exe" .php
Don't forget to change the paths above to your working paths.
BuggedApache 
8 years ago
Windows Apache 2.4.12 (x64) PHP 5.6.5 (x64)
If your Apache still outputs code instead of parsing a script. Make sure you put a trailing "\" at the end of the PHPIniDir value and use ONLY "\" in path to PHPIniDir. And "/" in LoadModule. A very subtle "feature" of Apache module. Lost several hours after upgrading to apache x64 to resolve the issue.
httpd.conf
###############################################
PHPIniDir "C:\folder\to\hold\php\"
LoadModule php5_module "C:/folder/to/hold/php/php5apache2_4.dll"
AddHandler application/x-httpd-php .php
###############################################
kynetikmedia at gmail dot com 
9 years ago
****Installed and Working 1- Fell Swoop - UPDATED****
Installed on Windows 8.1 XPS 12 - Dell 8GB RAM 128GB SSD -
Notes - Complications due to Apache latest version causes issues with the PHP handler on install.  Following below will get it run right off the bat.
Getting and installing Apache
1 In your browser go to h t t p : / / h t t p d . a p a c h e . o r g / d o w n l o a d . c g i
(without the spaces) - You will need to go 'Other Files' , 'Binaries' , 'W32', and then your installer MSI will be listed as below.
2 Click on httpd-2.2.25-win32-x86-no_ssl.msi
(this is a self-installing executable file without crypto ... no Secure Socket Layer)
(2.2.25was the latest version on June 4, 2014)
3 Click on the httpd-2.2.25-win32-x86-no_ssl.msi file after it downloads
(single click on the file tab in Chrome or double click on the actual file in Downloads)
4 Click Next
5 Click I accept the terms in the license agreement
6 Click Next
7 Click Next
8 Type localhost in the top box
9 Type localhost in the middle box
10 Type admin@localhost.com in the bottom box
11 Click Next
12 Click Next
13 Click Next
14 Click Install and wait
15 Cick Yes to allow the program to make changes
16 Click Finish
Testing Apache
1 Type localhost in your browser location box (I use Chrome) or type h t t p : / / l o c a l h o s t
(without the spaces)
2 The message It works! should appear.
Getting and installing PHP
1 In your browser go to h t t p : / / w i n d o w s . p h p . n e t / d o w n l o a d /
(without the spaces)
2 Click on the Installer link under PHP 5.3 (5.3.10) VC9 x86 Thread Safe
(Ignore the Do NOT use VC9 version with apache.org binaries comment on the side panel)
3 Click on the php-5.3.10-Win32-VC9-x86.msi file after in downloads
(single click on the file tab in Chrome or double click on the actual file in Downloads)
4 Click Next
5 Click I accept the terms in the License Agreement
6 Click Next
7 Click Next
8 Click Apache 2.2.x Module
9 Click Next
10 Click Browse
11 Double click Apache Software Foundation
12 Double click Apache 2.2
13 Double click conf
14 Click OK
15 Click Next
16 Click Next
17 Click Install and wait
18 Cick Yes to allow the program to make changes
19 Click Finish
Testing PHP with Apache
1 Open Notepad
2 Type 'left bracket character'?php phpinfo(); ?'right bracket character'
3 Save the file to C:\Program Files (x86)\Apache Software Foundation\Apache2.2\htdocs as test.php
4 Type localhost/test.php in your browser location box (I use Chrome) or type h t t p : / / l o c a l h o s t / t e s t . p h p
5 A table with title PHP Version ... should appear
DONE
tmnuwan12 at yahoo dot com 
9 years ago
I am very new to PHP. I was looking to start a Drupal project and spend almost 4 hours to get Apache and Drupal talk each other.
What I found out was there are lots of mismatch in documentation and snapshots.
As I am using Windows I found out following two installation bundles works without any issue.
php-5.3.28-Win32-VC9-x86.msi
httpd-2.2.25-win32-x86-openssl-0.9.8y.msi
Make sure you install your packages directly into into C: drive in Windows machine (If there are spaces in the file paths it would cause issues).
Hope this would help someone.
Bechesa at gmail dot com 
11 years ago
Just a note
It might be important you include the absolute path to the php.ini  file inside the httpd.conf file so that php may load all the module(s).
below is an example
#BEGIN PHP INSTALLER EDITS - REMOVE ONLY ON UNINSTALL
PHPIniDir 'C:\PHP\php.ini'
LoadModule php5_module "c:/php/php5apache2_2.dll"
AddHandler application/x-httpd-php .php
#END PHP INSTALLER EDITS - REMOVE ONLY ON UNINSTALL
OS: windows 2008
webserver: apache2.2
Z Carlos at Fortaleza 
11 years ago
A Thread Safe version should be used if you install PHP as an Apache module. The Non Thread Safe version should be used if you install PHP as a CGI binary.
bradley dot henke at colorado dot edu 
11 years ago
I was able to get apache up and running without any problems. Then I tried installing php and it crashed trying to read "C:/php/php5apache2.dll".
Fixed the problem by switching it to "C:/php/php5apache2_2.dll"
Hope that helps!
Michael 
13 years ago
The value for FcgidWrapper cannot contain spaces..
This won't work:
FcgidWrapper "c:/program files (x86)/php/php-cgi.exe" .php
But this will:
FcgidWrapper "c:/progra~2/php/php-cgi.exe" .php
Steve 
13 years ago
I also had a problem with the PHPIniDir declaration. This is with Apache 2.2 on XP. I had to include a final slash, as in PHPIniDir "C:\Program Files\php\". Apache failed to start if I did not include the slash after php.
gmatwy at gmail dot com 
7 years ago
version
httpd-2.4.23-win32-VC14.zip
php-5.6.26-ts-Win32-VC11-x86.zip
install path c:/wamp/
php path c:/wamp/php
apache path c:/wamp/Apache24
used as Apache handler
modify as below
#below for apache
#modify c:/ to c:/wamp/
#modify ServerName to localhost:80 and remove#
#DirectoryIndex insert index.php
#below for php
#rename file php.ini-production to php.ini
LoadModule php5_module "C:/wamp/php/php5apache2_4.dll"
PHPIniDir "C:/wamp/php/"
AddType application/x-httpd-php .php
AddType application/x-httpd-php .html
AddHandler application/x-httpd-php .php
And things goes well !
nicolas dot grasset at gmail dot com 
14 years ago
Here is how I created a silent install for Apache2.2 and PHP5.2.10 on Windows XP (running on a MacBook Pro):
Download Apache2 and PHP5 installer files in a directory and update the msi file names in the following commands.
To have PHP installer find Apache2, do not forget APACHEDIR!
msiexec /i apache_2.2.11-win32-x86-no_ssl.msi /passive ALLUSERS=1 SERVERADMIN=admin@localhost SERVERNAME=localhost SERVERDOMAIN=localhost SERVERPORT=80 INSTALLDIR=c:\apache
msiexec /i php-5.2.10-win32-installer.msi /qn APACHEDIR=c:\apache INSTALLDIR=c:\php ADDLOCAL=ext_php_mssql,apache22
net stop "Apache2.2"
net start "Apache2.2"
packard_bell_nec at hotmail dot com 
16 years ago
If you install PHP as an Apache CGI binary, you can add:
AddHandler cgi-script .php
into Apache httpd.conf, and add shebang line to every PHP scripts like:
#!php
<?php
phpinfo();
?>
. But adding shebang line has a disadvantage that if you decided to install PHP as an Apache module afterwards, then the shebang line WILL appear in the web page.
In fact, you do NOT need to add shebang line to every PHP script even if you install PHP as an Apache CGI binary, because you can add:
ScriptInterpreterSource Registry-Strict
into Apache httpd.conf, and make the registry file and merge it like:
Windows Registry Editor Version 5.00
[HKEY_CLASSES_ROOT\.php\Shell\ExecCGI\Command]
@="\"C:\\Program Files\\PHP\\php-cgi.exe\""
. Then you will NOT need to change the PHP scripts which do not contain shebang line.
Maw 
10 years ago
Good God finally I was able to make PHP 5.2 work on Apache 2.4. For those still having problems with "You don't have permission to run php-cgi.exe", you must replace "Order allow,deny" and "Allow from all" from the PHP directory block with "Require all granted". They must have changed the format with Apache 2.4 since the old method used to work just fine for me before.
So the usual method of setting up CGI, I'm sure you already know that you should add these 3 lines to httpd.conf:
ScriptAlias /php/ "c:/php/"
AddType application/x-httpd-php .php
Action application/x-httpd-php "/php/php-cgi.exe"
And now add the directory for PHP:
<Directory "c:/php">
AllowOverride None
Options None
Require all granted
</Directory>
Important: Notice that instead of "Order allow,deny" and "Allow from all" added into the PHP directory as usual, I replaced them with "Require all granted" as I mentioned above.
lebovskiy at ua dot fm 
12 years ago
I install httpd-2.2.17-win32-x86-openssl-0.9.8o.msi and after
php-5.3.3-Win32-VC9-x86.msi on WinXP SP3. PHP installation add to httpd.conf next lines:
LoadModule php5_module "C:/PHP/php5apache2_2.dll
"PHPIniDir "C:/PHP"
After it Apache don`t starts. If remove PHPIniDir line Apache starts ok, but C:/PHP/php.ini don`t loaded. So you can`t use any extension (for me it's MySQL).
I uninstall VC9 version and install VC6 (php-5.3.3-Win32-VC6-x86.msi) version. All works fine now.
halmai 
12 years ago
I wanted to install PHP5.3 for Apache2.2 with PostgreSql 9.0 support on WindowsXP. It took me hours to solve it.
The following possible problems occur:
- You should use the VC6-compiled version of php instead of VC9. The later one does not work properly with apache.
- the postgres handler dlls are not working in PHP5.3.
The symptom was a misleading and very confusing error message:
Unable to load dynamic library 'c:\Progra~1\PHP\ext\php_pgsql.dll'
The dll itself was there but when it started to load the other dll (libpq.dll) from the php directory then this caused an error. This error was misinterpreted internally in the above message.
The solution was NOT to use the libpq.dll from php but use it from postgres distribution instead.
For this purpose I inserted the following line into the apache httpd conf:
LoadFile "C:/Progra~1/PostgreSQL/9.0/bin/libpq.dll"
This preloads the dll. When php_pgsql.dll would load his own libpq.dll, then there is the preloaded version of this file in the memory already. This prevents us from using the bad version of dll.
I hope I helped.
Guillermo Tallano 
10 years ago
Hi guys,
In my case, it work right away when I change the version to thread-safe.
I spent some time trying the different things that were posted here and I was kind of lazy about downloading a different version, but once I test it with a thead-safe it started right away. So be sure you try this.
I was on Apache 2.2, XP and php 5.2.17 thread-safe
This is my conf:
LoadModule php5_module "c:/php5/php5apache2_2.dll"
AddHandler application/x-httpd-php .php
#configure the path to php.ini
PHPIniDir 'C:\php5\'
Good luck!
Anonymous 
14 years ago
i followed henke37's way to for the httpd.conf
I added all this at the very end of httpd.conf
# For PHP 5
#load the php main library to avoid dll hell
Loadfile "C:\php-5.2.8-Win32\php5ts.dll"
#load the sapi so that apache can use php
LoadModule php5_module "C:\php-5.2.8-Win32\php5apache2_2.dll"
#set the php.ini location so that you don't have to waste time guessing where it is
PHPIniDir "C:\php-5.2.8-Win32"
#Hook the php file extensions
AddHandler application/x-httpd-php .php
AddHandler application/x-httpd-php-source .phps
Also i didn't use short open tags as they are disabled in
"php.ini-recommended" if you don't change anything
So use this to test
<?php
phpinfo();
?>
NOT
<? phpinfo(); ?> short open tags
added my php directory to the PATH system variable and i start apache manually not as a service
It works for me hope it helps you!
Amaroq 
10 years ago
Like someone else mentioned, on the Windows download page for PHP, ignore the warning about not downloading the VC9 compiled installers for the Apache.org version of Apache.
Whoever wrote that is guaranteeing that people install a PHP that breaks their Apache server. (On Windows 7 anyway.) The installer failed to write the correct path info to httpd.conf, and even after fixing that manually, Apache wouldn't start because of missing dlls.
Ignore that dumb warning and get the newest installer anyway. Everything just plain works with no hassle and no hunting down dll files over google.
Cooldude 
12 years ago
Also had an exception problem when trying to use mysql with apache and php5.
I had to add:
"<my MySQL folder>\bin" folder to path
"<my php folder>\ext" to path
that fixed it
alx dot suvorov at gmail dot com 
5 years ago
For PHP 7 configuration just add these lines to the end of httpd.conf file (of Apache):
PHPIniDir "/alex/apps/php-7.2.3/"
LoadModule php7_module "C:/alex/apps/php-7.2.3/php7apache2_4.dll"
<FilesMatch \.php$>
SetHandler application/x-httpd-php
</FilesMatch>
Here "/alex/apps/php-7.2.3/" is PHP path.
Then:
1. Rename php.ini-development or php.ini-production to php.ini
2. Uncomment / set extension_dir parameter in php.ini
; Directory in which the loadable extensions (modules) reside.
; http://php.net/extension-dir
; extension_dir = "./"
; On windows:
extension_dir = "ext"
You are set. Just re/start Apache server (httpd -k restart).
jangirashok at gmail dot com 
9 years ago
Can anyone tell me: Why PHP + Apache 2.2.x installation is such a big deal. I am a Java Developer and currently I am trying to learn PHP, but I am not able to install PHP and use it the way we use Java. I could use steps mentioned in comments and run home.php from htdocs folder of apache. But, could anyone please tell me DO I HAVE TO PUT EVERY FILE IN THE SAME FOLDER? Can't I make my workbench where I can put a good project hierarchy and use it like other languages. Its horrible. May be my question is little silly, but I need help for sure.
Thanks...
Оглавление
1. Веб-сервер на Windows
2. Как установить Apache на Windows
3. Как установить PHP на Windows
4. Настройка PHP 8
5. Как установить MySQL в Windows
6. Как установить phpMyAdmin в Windows
Заключение
Веб-сервер — это программа, которая предназначена для обработки запросов к сайтам и отправки пользователям страниц веб-сайтов. Самый популярный пример веб-сервера это Apache.
PHP — это язык программирования. Также называется среда для выполнения скриптов, написанных на PHP. В операционной системе, в том числе и Windows, PHP может быть установлен самостоятельно, без веб-сервера. В этом случае программы (скрипты) на PHP можно запускать из командной строки. Но веб-приложения очень часто используют PHP, данный интерпретатор стал, фактически, стандартом веб-серверов и поэтому они почти всегда устанавливаются вместе.
MySQL — это система управления базами данных (СУБД). Это также самостоятельная программа, она используется для хранения данных, поиска по базам данных, для изменения и удаления данных. Веб-приложения нуждаются в постоянном хранилище, поэтому для веб-сервера дополнительно устанавливается и СУБД. Кстати, вполне возможно, что вы слышали про MariaDB — это тоже СУБД. Первой появилась MySQL, а затем от неё ответвилась MariaDB. Для веб-приложений обе эти СУБД являются взаимозаменяемыми, то есть никакой разницы нет. В этой инструкции я буду показывать установку на примере MySQL, тем не менее если вы хотите попробовать новую MariaDB, то смотрите статью «Инструкция по установке веб-сервера Apache c PHP, MariaDB и phpMyAdmin в Windows».
Что касается phpMyAdmin, то это просто скрипт на PHP, который предназначен для работы с базами данных — наглядно выводит их содержимое, позволяет выполнять в графическом интерфейсе такие задачи как создавать базы данных, создавать таблицы, добавлять, изменять и удалять информацию и т. д. По этой причине phpMyAdmin довольно популярен, хотя и не является обязательной частью веб-сервера.
Особенность Apache и других компонентов веб-сервера в том, что их корни уходят в Linux. И эти программы применяют в своей работе основные концепции этой операционной системы. Например, программы очень гибки в настройке — можно выполнить установку в любую папку, сайты также можно разместить в любой папке, в том числе на другом диске, не на том, где установлен сам веб-сервер. Даже файлы журналов можно вынести на третий диск и так далее. У веб-сервера много встроенных модулей — можно включить или отключить их в любом сочетании, можно подключить внешние модули. Можно создать много сайтов на одном веб-сервере и для каждого из них установить персональные настройки. Но эта гибкая настройка выполняется через текстовые файлы — именно такой подход (без графического интерфейса) позволяет описать любые конфигурации
Не нужно этого боятся — я расскажу, какие файлы нужно редактировать и что именно в них писать.
Мы не будем делать какие-то комплексные настройки — наша цель, просто установить веб-сервер на Windows. Тем не менее было бы странно совсем не использовать такую мощь в настройке. Мы разделим сервер на две директории: в первой будут исполнимые файлы, а во второй — данные (файлы сайтов и баз данных). В будущем, когда возникнет необходимость делать резервные копии информации или обновлять веб-сервер, вы поймёте, насколько удобен этот подход!
Мы установим сервер в отдельную директорию. Для этого в корне диска C:\ создайте каталог Server. В этом каталоге создайте 2 подкаталога: bin (для исполнимых файлов) и data (для сайтов и баз данных).
Перейдите в каталог data и там создайте подпапки DB (для баз данных) и htdocs (для сайтов).
Перейдите в каталог C:\Server\data\DB\ и создайте там пустую папку data.
Для работы всех компонентов веб-сервера необходим файл «Visual C++ Redistributable for Visual Studio 2015-2022» — это официальный файл от Microsoft. Чтобы его скачать перейдите по ссылке. После скачивания, запустите этот файл и выполните установку.
Подготовительные действия закончены, переходим к установке компонентов веб-сервера.
Как установить Apache на Windows
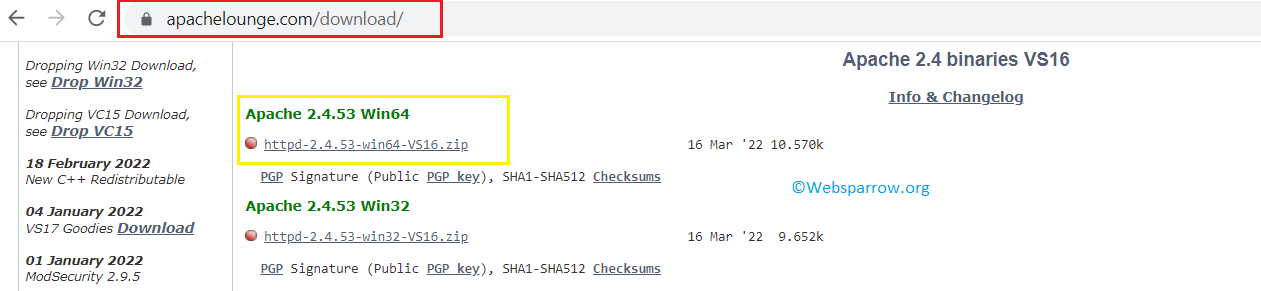
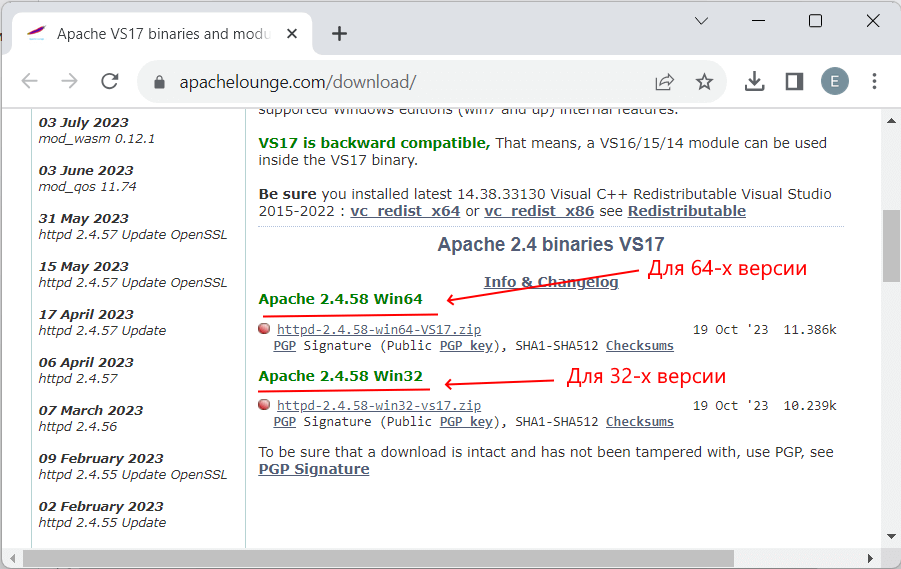
Перейдите на сайт apachelounge.com/download и скачайте .zip архив с веб-сервером:
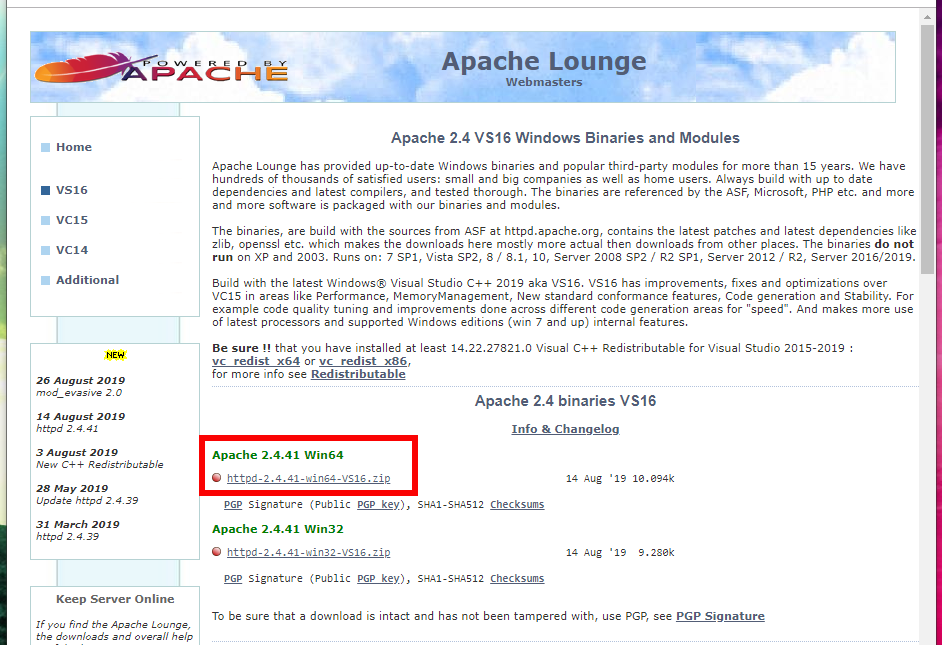
Распакуйте папку Apache24 из этого архива в C:\Server\bin\.
Перейдите в каталог C:\Server\bin\Apache24\conf\ и откройте файл httpd.conf любым текстовым редактором.
В нём нам нужно заменить ряд строк.
Меняем
Define SRVROOT "c:/Apache24"
на
Define SRVROOT "c:/Server/bin/Apache24"
меняем
#ServerName www.example.com:80
на
ServerName localhost
меняем
DocumentRoot "${SRVROOT}/htdocs"
<Directory "${SRVROOT}/htdocs">
на
DocumentRoot "c:/Server/data/htdocs"
<Directory "c:/Server/data/htdocs">
меняем
DirectoryIndex index.html
на
DirectoryIndex index.php index.html index.htm
меняем
    # AllowOverride controls what directives may be placed in .htaccess files.
    # It can be "All", "None", or any combination of the keywords:
    #   AllowOverride FileInfo AuthConfig Limit
    #
    AllowOverride None
на
    # AllowOverride controls what directives may be placed in .htaccess files.
    # It can be "All", "None", or any combination of the keywords:
    #   AllowOverride FileInfo AuthConfig Limit
    #
    AllowOverride All
и меняем
#LoadModule rewrite_module modules/mod_rewrite.so
на
LoadModule rewrite_module modules/mod_rewrite.so
Сохраняем и закрываем файл. Всё, настройка Apache завершена! Описание каждой изменённой директивы вы найдёте на этой странице.
Откройте командную строку (это можно сделать нажав одновременно клавиши Win+x).
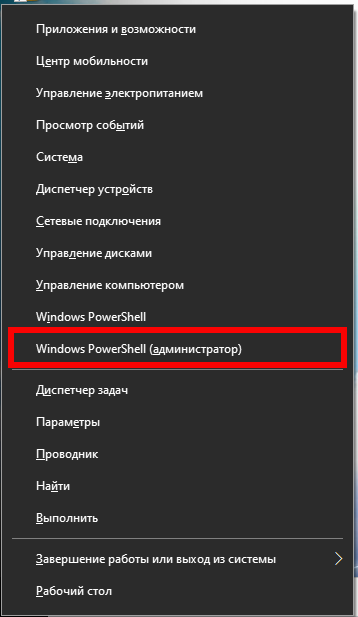
Выберите там Windows PowerShell (администратор) и скопируйте туда:
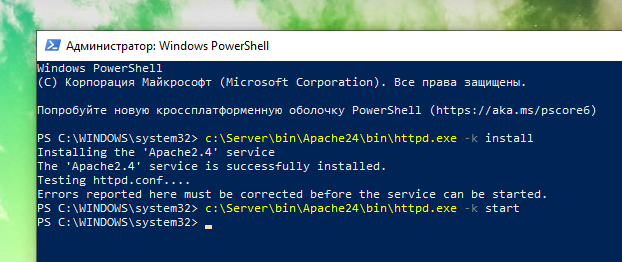
c:\Server\bin\Apache24\bin\httpd.exe -k install
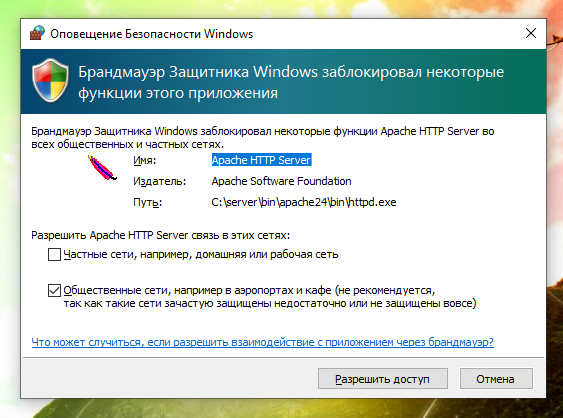
Если поступит запрос от файервола в отношение Apache, то нажмите Разрешить доступ.
Теперь вводим в командную строку:
c:\Server\bin\Apache24\bin\httpd.exe -k start
И нажмите Enter.
Теперь в браузере набираем http://localhost/ и видим следующее:
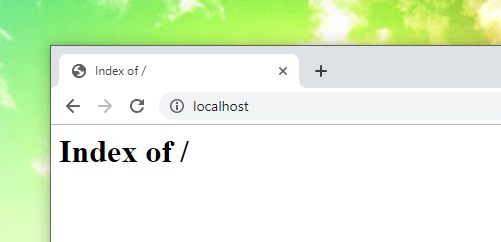
Это означает, что веб-сервер работает. Чтобы увидеть там файлы, добавьте их в каталог c:\Server\data\htdocs\ — это главная папка для данных сервера, где будут размещаться все сайты.
Как установить PHP на Windows
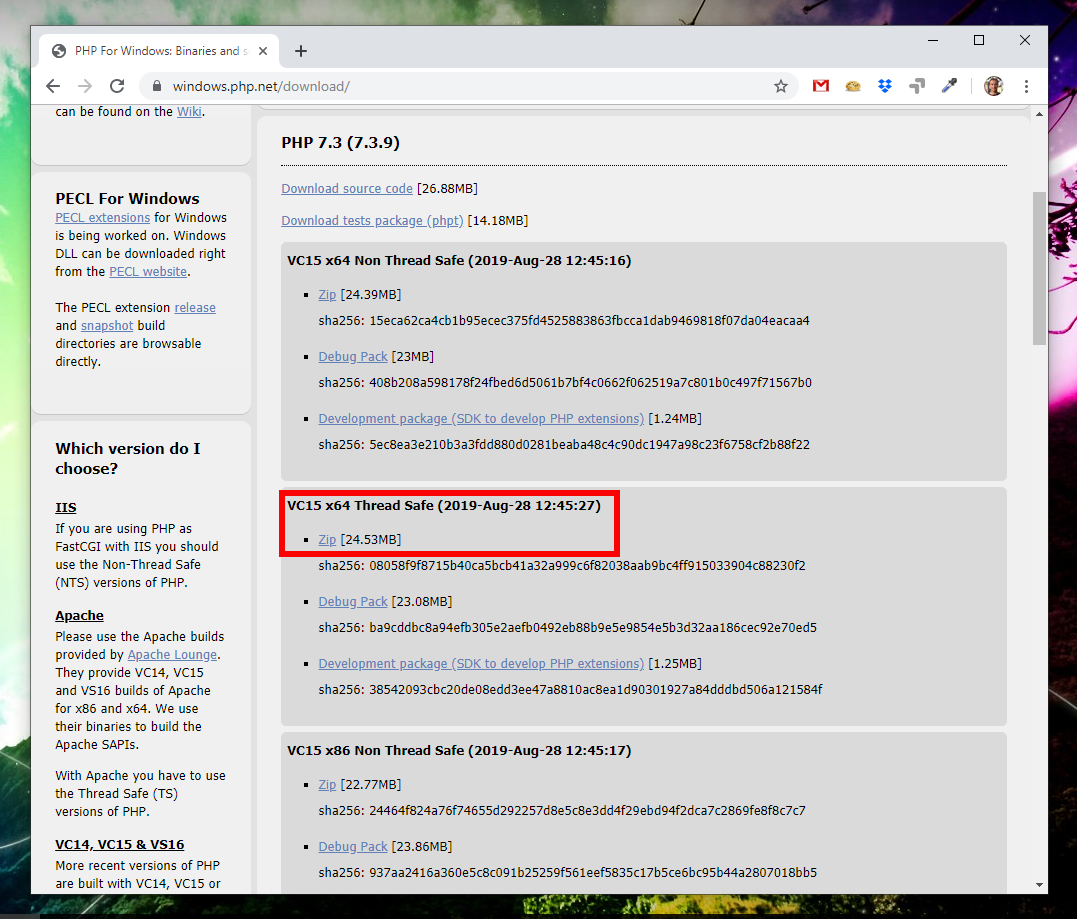
PHP 8 скачайте со страницы windows.php.net/download/. Выберите версию Thread Safe, обратите внимание на битность. Если вы затрудняетесь, какой именно файл скачать, то посмотрите эту заметку.
В папке c:\Server\bin\ создаём каталог PHP и копируем в него содержимое только что скаченного архива.
В файле c:\Server\bin\Apache24\conf\httpd.conf в самый конец добавляем строчки:
PHPIniDir "C:/Server/bin/PHP"
AddHandler application/x-httpd-php .php
LoadModule php_module "C:/Server/bin/php/php8apache2_4.dll"
И перезапускаем Apache:
c:\Server\bin\Apache24\bin\httpd.exe -k restart
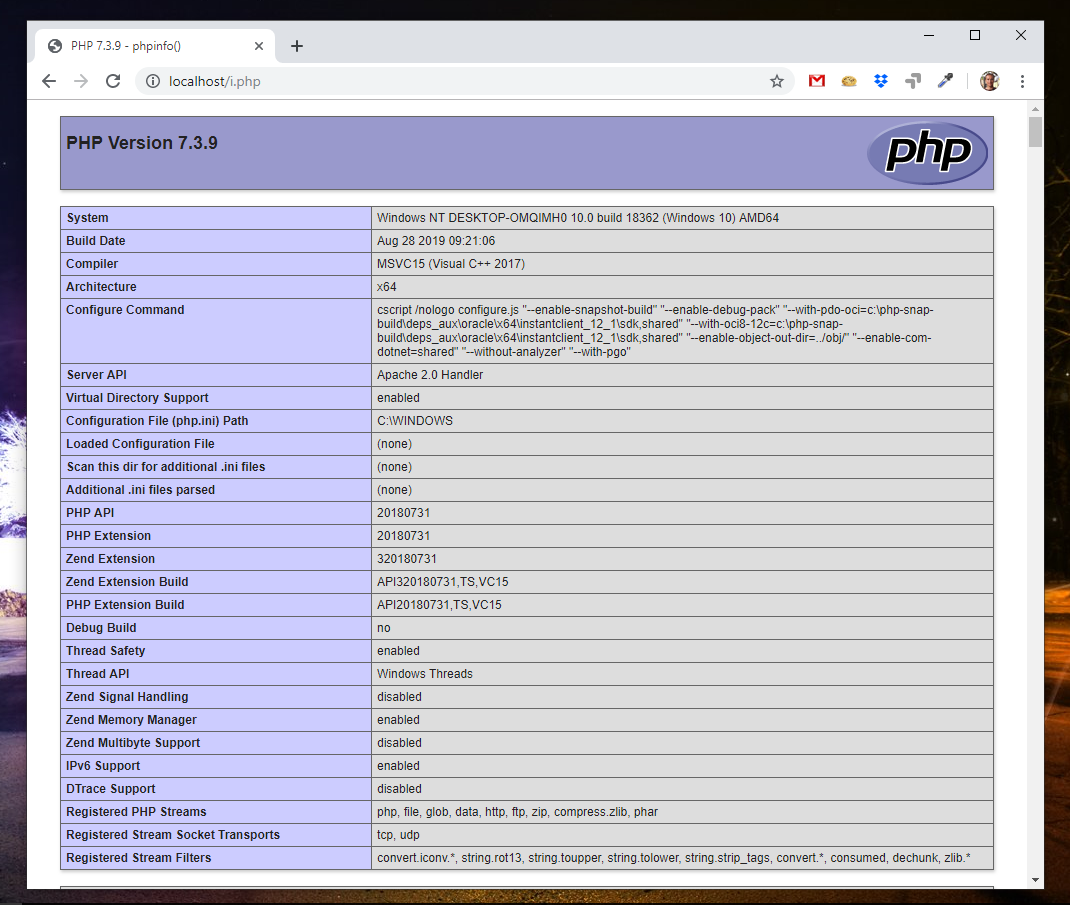
В каталоге c:\Server\data\htdocs\ создаём файл с названием i.php, копируем в этот файл:
<?php
phpinfo ();
В браузере откройте ссылку http://localhost/i.php. Если вы видите что-то похожее, значит PHP работает:
Настройка PHP 8
Настройка PHP происходит в файле php.ini. В zip-архивах, предназначенных для ручной установки и для обновлений, php.ini нет (это сделано специально, чтобы при обновлении случайно не удалить ваш файл с настройками). Зато есть два других, которые называются php.ini-development и php.ini-production. Любой из них, при ручной установке, можно переименовать в php.ini и настраивать дальше. На локалхосте мы будем использовать php.ini-development.
Открываем файл php.ini любым текстовым редактором, ищем строчку
;extension_dir = "ext"
и заменяем её на
extension_dir = "C:\Server\bin\PHP\ext\"
Теперь найдите группу строк:
;extension=bz2
;extension=curl
;extension=ffi
;extension=ftp
;extension=fileinfo
;extension=gd
;extension=gettext
;extension=gmp
;extension=intl
;extension=imap
;extension=ldap
;extension=mbstring
;extension=exif      ; Must be after mbstring as it depends on it
;extension=mysqli
;extension=oci8_12c  ; Use with Oracle Database 12c Instant Client
;extension=odbc
;extension=openssl
;extension=pdo_firebird
;extension=pdo_mysql
;extension=pdo_oci
;extension=pdo_odbc
;extension=pdo_pgsql
;extension=pdo_sqlite
;extension=pgsql
;extension=shmop
и замените её на:
extension=bz2
extension=curl
extension=ffi
extension=ftp
extension=fileinfo
extension=gd
extension=gettext
extension=gmp
extension=intl
extension=imap
extension=ldap
extension=mbstring
extension=exif      ; Must be after mbstring as it depends on it
extension=mysqli
;extension=oci8_12c  ; Use with Oracle Database 12c Instant Client
extension=odbc
extension=openssl
;extension=pdo_firebird
extension=pdo_mysql
;extension=pdo_oci
extension=pdo_odbc
extension=pdo_pgsql
extension=pdo_sqlite
extension=pgsql
extension=shmop
теперь раскомментируйте эту группу строк:
;extension=soap
;extension=sockets
;extension=sodium
;extension=sqlite3
;extension=tidy
;extension=xsl
должно получиться:
extension=soap
extension=sockets
extension=sodium
extension=sqlite3
extension=tidy
extension=xsl
Этими действиями мы включили расширения. Они могут понадобиться в разных ситуациях для разных скриптов. Сохраняем файл и перезапускаем Apache.
c:\Server\bin\Apache24\bin\httpd.exe -k restart
Настоятельно рекомендуется добавить путь до PHP в переменную окружения PATH в Windows.
Также рекомендуется ознакомиться со статьями Что делать если PHP скрипту не хватает времени и памяти. Почему большой файл не загружается на сайт или в phpMyAdmin и Как увеличить память и время для PHP скриптов.
Материалы по дополнительной настройке, в том числе подключение поддержки PERL, Ruby, Python в Apache (только для тех, кому это нужно):
- Как тестировать отправку писем в PHP на Windows
- Настройка веб-сервера Apache для запуска программ Ruby на Windows
- Настройка веб-сервера Apache для запуска программ Perl на Windows
- Как настроить веб-сервер Apache на запуск Python в Windows
Как установить MySQL в Windows
Бесплатная версия MySQL называется MySQL Community Server. Её можно скачать на странице https://dev.mysql.com/downloads/mysql/. На этой же странице есть установщик в виде исполнимого файла, но я рекомендую скачать ZIP-архив.
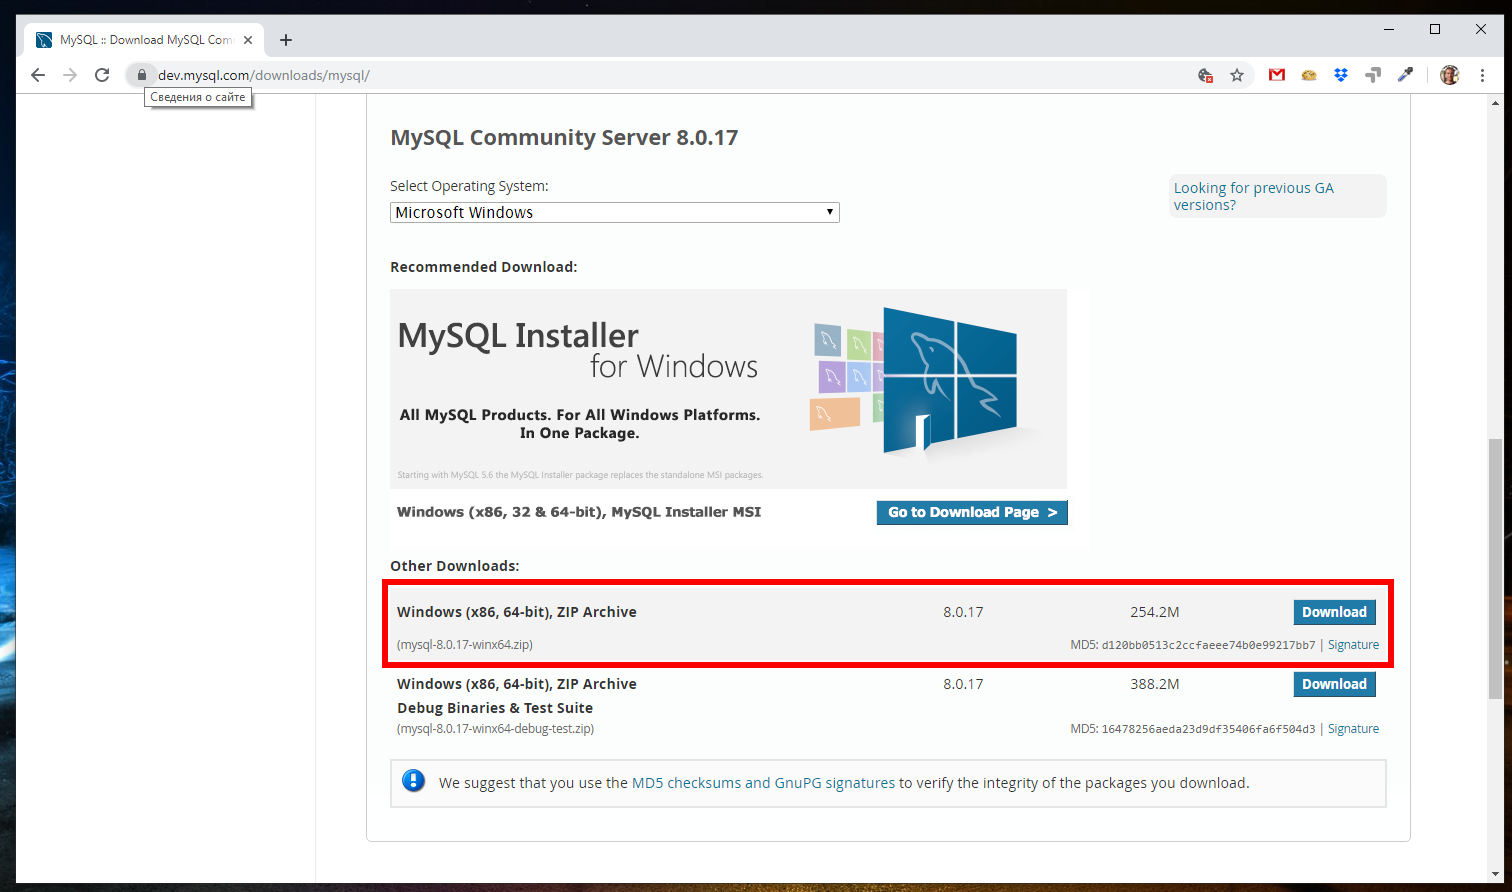
На странице скачивания нам предлагают зарегистрироваться или войти в существующую учётную запись — но это делать необязательно. Достаточно нажать на ссылку «No thanks, just start my download».

В каталог c:\Server\bin\ распаковываем файлы из только что скаченного архива. Распакованная папка будет называться примерно mysql-8.0.17-winx64 (зависит от версии), переименуйте её в mysql-8.0.
Заходим в эту папку и создаём там файл my.ini. Теперь открываем этот файл любым текстовым редактором и добавьте туда следующие строки:
[mysqld]
sql_mode=NO_ENGINE_SUBSTITUTION,STRICT_TRANS_TABLES
datadir="c:/Server/data/DB/data/"
default_authentication_plugin=mysql_native_password
Сохраните и закройте его.
Настройка завершена, но нужно ещё выполнить инициализацию и установку, для этого открываем командную строку от имени администратора и последовательно вводим туда:
C:\Server\bin\mysql-8.0\bin\mysqld --initialize-insecure --user=root
C:\Server\bin\mysql-8.0\bin\mysqld --install
net start mysql
По окончанию этого процесса в каталоге C:\Server\data\DB\data\ должны появиться автоматически сгенерированные файлы.
Теперь служба MySQL будет запускаться при каждом запуске Windows.
Как установить phpMyAdmin в Windows
Сайт для скачивания phpMyAdmin: phpmyadmin.net.
Прямая ссылка на самую последнюю версию: phpMyAdmin-latest-all-languages.zip.
В каталог c:\Server\data\htdocs\ копируем содержимое только что скаченного архива. Переименовываем эту папку в phpmyadmin.
В каталоге c:\Server\data\htdocs\phpmyadmin\ создаём файл config.inc.php и копируем туда:
<?php

/* Servers configuration */
$i = 0;

/* Server: localhost [1] */
$i++;
$cfg['Servers'][$i]['verbose'] = '';
$cfg['Servers'][$i]['host'] = 'localhost';
$cfg['Servers'][$i]['port'] = '';
$cfg['Servers'][$i]['socket'] = '';
$cfg['Servers'][$i]['connect_type'] = 'tcp';
$cfg['Servers'][$i]['auth_type'] = 'cookie';
$cfg['Servers'][$i]['user'] = 'root';
$cfg['Servers'][$i]['password'] = '';
$cfg['Servers'][$i]['nopassword'] = true;
$cfg['Servers'][$i]['AllowNoPassword'] = true;

/* End of servers configuration */

$cfg['blowfish_secret'] = 'kjLGJ8g;Hj3mlHy+Gd~FE3mN{gIATs^1lX+T=KVYv{ubK*U0V';
$cfg['DefaultLang'] = 'ru';
$cfg['ServerDefault'] = 1;
$cfg['UploadDir'] = '';
$cfg['SaveDir'] = '';

?>
В браузере набираем http://localhost/phpmyadmin/
В качестве имя пользователя вводим root. Поле пароля оставляем пустым.
Заключение
Вот и всё — теперь у вас есть свой персональный локальный веб-сервер на своём домашнем компьютере.
Если вдруг у вас что-то не получилось, то скорее всего вы пропустили какой-то шаг или сделали его неправильно — попробуйте всё сделать в точности по инструкции. Если проблема осталась, то ознакомьтесь со справочным материалом «Ошибки при настройке и установке Apache, PHP, MySQL/MariaDB, phpMyAdmin» и если даже он не помог, то напишите о своей ошибке в комментарии.
Большое количество материалов по Apache на русском языке специально для Windows вы найдёте на этой странице.
Примеры материалов, которые могут вам пригодиться в первую очередь:
- Как защитить веб-сервер Apache от взлома в Windows
- Несколько сайтов на Apache
- Apache Forwarding — проброска портов веб-сервера
- Как сделать резервную копию баз данных MySQL (MariaDB) в Windows без phpMyAdmin
- Почему в логах ошибок Apache не сохраняются записи об ошибке 404
- Как в Windows поменять сообщения ошибок Apache
- Как настроить PHP для работы с get_browser (browscap.ini) в Windows
- Файл .htaccess в Apache
- Как обновить Apache на Windows
- Как обновить PHP
- Как обновить MySQL
- Как обновить phpMyAdmin
Связанные статьи:
- Ошибки при настройке и установке Apache, PHP, MySQL/MariaDB, phpMyAdmin (97.9%)
- Установка Apache, PHP, MySQL и phpMyAdmin на Windows XP (60.3%)
- Готовая сборка Apache для Windows XP (60.3%)
- Что делать если PHP скрипту не хватает времени и памяти. Почему большой файл не загружается на сайт или в phpMyAdmin (58.4%)
- Ошибка «Composer detected issues in your platform: Your Composer dependencies require the following PHP extensions to be installed: mysqli, openssl» (РЕШЕНО) (58.4%)
- Почему не работают короткие теги в PHP (RANDOM — 54.2%)
By
Atul Rai |
Last Updated: April 2, 2022
Previous Next
In this tutorial, you will learn how to install and configure Apache 2.4 and PHP 8 on a Windows machine. We all know Apache HTTP Server is an open-source cross-platform and free webserver to run web applications and similarly PHP is a free and open-source scripting language used to develop web applications.
To run the PHP code on a Windows machine, first, you’ll need to install and configure a web server (Apache) that executes the PHP application. And on this page, you will find the step-by-step guide on “How to install Apache 2.4 and PHP 8 on a Windows Machine”.
P.S. Tested with Apache 2.4 and PHP 8.1.4 on a Windows 10 machine.
1. Prerequisites
Download the Apache 2.4.x and PHP 8 from its official websites, extract the downloaded file and move it to the C drive.
1.1 Download Apache 2.4.x – Depending on your system build download the binary zip file accordingly.
1.2 Download PHP 8 – Similarly, depending on your system build download the Thread Safe version of PHP.
Before jumping to the main configuration part, be sure you installed latest 14.31.31103.0 Visual C++ Redistributable Visual Studio 2015-2022 : vc_redist_x64 or vc_redist_x86 software.
2. Install Apache
To install the Apache HTTP Server on a local Windows machine move the downloaded and extracted Apache 2.4 binary files to the C drive and follow the below steps:
Step 2.1: Go to the Apache 2.4 bin directory path C:\Apache24\bin (it might be different in your case) and set it into your system environment variable path.
Step 2.2: Open the command prompt with admin privileges and run the httpd -k install command to install the Apache services.
C:\WINDOWS\system32>httpd -k install
Installing the 'Apache2.4' service
The 'Apache2.4' service is successfully installed.
Testing httpd.conf....
Errors reported here must be corrected before the service can be started.
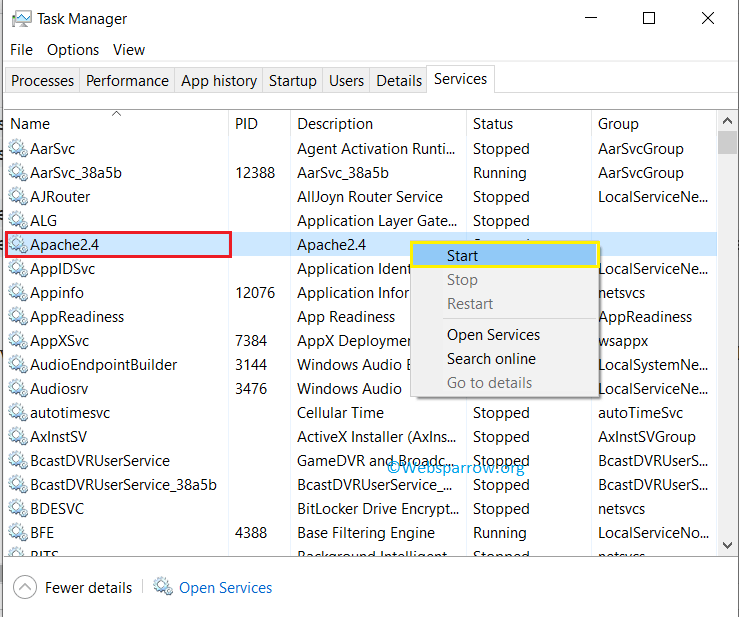
AH00558: httpd: Could not reliably determine the server's fully qualified domain name, using fe80::ccb2:109d:6198:a489. Set the 'ServerName' directive globally to suppress this messageStep 2.3: Start the Apache service with the command httpd -k start or directly through the Task Manager » Services » Search for Apache2.4 » Right-click on the service » Start.
By default, Apache HTTP Server runs on port 80, make sure no other services/servers running on this port.
Step 2.4: Open the web browser and hit the default Apache localhost URL i.e localhost or localhost:80. If everything is configured correctly, you will see the default index.html web page contents and it is located inside the C:\Apache24\htdocs directory.
3. Install PHP 8
The next step is to install PHP 8. To do that, similarly, move the downloaded and extracted PHP 8 binary files to the C drive and follow the below steps:
Step 3.1: Copy the PHP 8 home path i.e C:\php-8.1.4 and set it into your machine environment variable.
Step 3.2: Open the command prompt and type php -v to check whether the path is set correctly or not. If the PHP path is set correctly, it will print the PHP version.
C:\WINDOWS\system32>php -v
PHP 8.1.4 (cli) (built: Mar 16 2022 09:33:31) (ZTS Visual C++ 2019 x64)
Copyright (c) The PHP Group
Zend Engine v4.1.4, Copyright (c) Zend Technologies
4. Configure Apache and PHP
Now it’s time to configure Apache HTTP Server with PHP 8.
Step 4.1: Go to the C:\Apache24\conf directory, inside the conf directory edit the httpd.conf file. Go to the end of the file and add the below configuration because, in Apache, PHP is loaded as a module.
httpd.conf
# Note: Repalce php_module location with your PHP path and
#       if the php8apache2_4.dll is not available,
#		download the non thread safe version of PHP.

LoadModule php_module "C:\php-8.1.4\php8apache2_4.dll"
AddHandler application/x-httpd-php .php
PHPIniDir "C:\php-8.1.4"
Step 4.2: Go to the PHP home directory C:\php-8.1.4, and you will find two configuration files php.ini-development and php.ini-production. Create a copy of php.ini-development and rename it to php.ini
Step 4.3: Again open the httpd.conf file and search for ServerName, uncomment and edit the ServerName with localhost.
httpd.conf
# ServerName gives the name and port that the server uses to identify itself.
# This can often be determined automatically, but we recommend you specify
# it explicitly to prevent problems during startup.
#
# If your host doesn't have a registered DNS name, enter its IP address here.
#
ServerName localhost
And in the same file also search for DirectoryIndex, and append the default index.php file.
httpd.conf
# DirectoryIndex: sets the file that Apache will serve if a directory
# is requested.
#
<IfModule dir_module>
    DirectoryIndex index.html index.php
</IfModule>
Step 4.4: Open the command prompt and run the httpd -t command to validate whether everything is configured correctly, it will return Syntax OK if everything is configured correctly.
C:\WINDOWS\system32>httpd -t
Syntax OK
5. Test the configuration
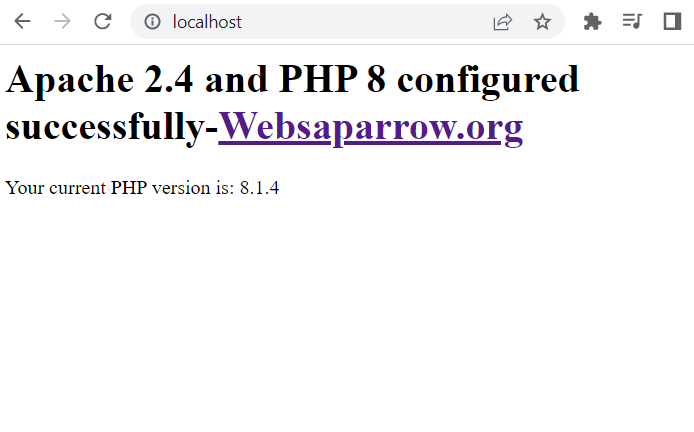
To test the Apache 2.4 and PHP 8 configuration, restart the Apache2.4 service from the Task Manager and rename the index.html file to index.php from the C:\Apache24\htdocs directory and add the below piece of code.
<?php

	echo '<h1>Apache 2.4 and PHP 8 configured successfully-<a href="https://websparrow.org">Websaparrow.org</a></h1>';
	echo ' Your current PHP version is: ' . phpversion();
	header("Refresh:10; url=https://websparrow.org");

 ?>
Open the web browser and hit the localhost in the URL bar, you will get the following details:
References
- Apache HTTP Server Version 2.4 Documentation
- PHP Installation on Windows
Последнее обновление: 26.02.2021
Для работы с PHP нам потребуется веб-сервер. Обычно в связке с PHP применяется веб-сервер Apache. Официальный
сайт проекта — https://httpd.apache.org/. Там же можно найти всю подробную информацию о релизах, скачать исходный код.
Однако официальный сайт не предоставляет готовых сборок для ОС Windows.
Перед установкой Apache следует отметить, что если наша ОС Windows, то в системе должны быть установлен пакет для C++, который можно найти по адресу
для 64-битной и для 32-битной.
Итак, если нашей ОС является Windows, перейдем на сайт http://www.apachelounge.com/, который предоставляет дистрибутивы Apache для Windows:
В подпункте Apache 2.4 binaries VS16 выберем последнюю версию дистрибутива сервера. На странице загрузок мы можем
найти две версии пакета Apache — для 64-битных систем и для 32-битных.
После загрузки пакета с Apache распакуем загруженный архив. В нем найдем папку непосредственно с файлами веб-сервера — каталог Apache24.
Переместим данный каталог на диск C, чтобы полный путь к каталогу составлял C:/Apache24.
Запуск Apache
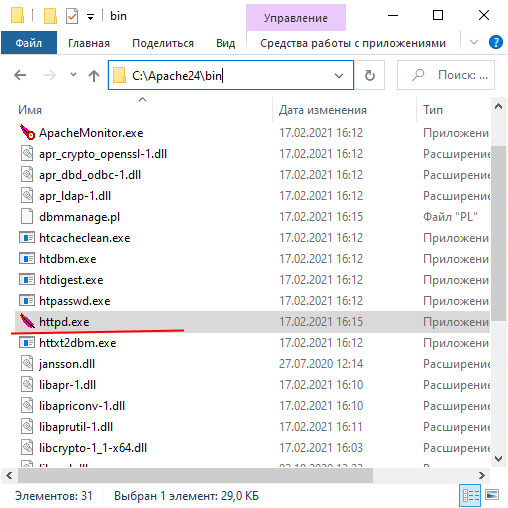
В распакованном архиве в папке bin найдем файл httpd.exe
Это исполняемый файл сервера. Запустим его. Нам должна открыться следующая консоль:
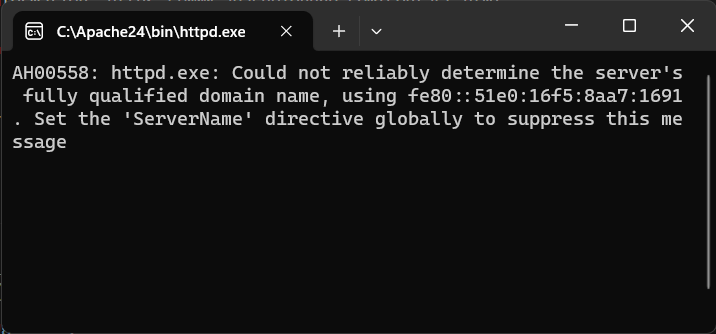
Пока работает это приложение, мы можем обращаться к серверу. Для его тестирования введем в веб-браузере адрес
http:\localhost. После этого веб-браузер должен отобразить следующую страницу:

Эта страница символизирует, что наш веб-сервер работает, и мы можем с ним работать.
Конфигурация веб-сервера
Теперь проведем конфигурацию сервера, чтобы связать его с ранее установленным интерпретатором PHP.. Для этого найдем в папке веб-сервера
в каталоге conf (то есть C:\Apache24\conf ) файл httpd.conf
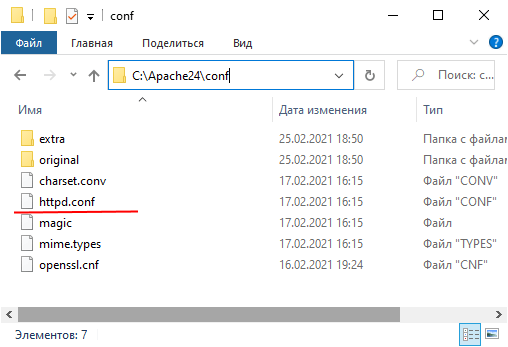
Откроем этот файл в текстовом редакторе. httpd.conf настраивает поведение веб-сервера.
Мы не будем подобно затрагивать его описания, а только лишь произведем небольшие изменения, которые потребуются нам для работы с PHP.
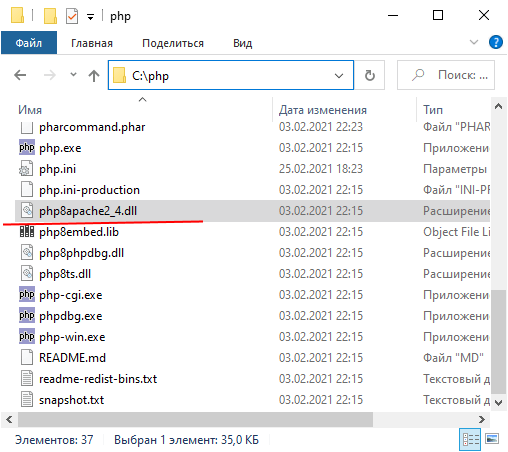
Прежде всего подключим PHP. Для этого нам надо подключить модуль php, предназначенный для работы с apache. В частности, в папке
php мы можем найти файл php8apache2_4.dll:
Для подключения php найдем в файле httpd.conf конец блока загрузки модулей LoadModule
//......................
#LoadModule vhost_alias_module modules/mod_vhost_alias.so
#LoadModule watchdog_module modules/mod_watchdog.so
#LoadModule xml2enc_module modules/mod_xml2enc.so
И в конце этого блока добавим строчки
LoadModule php_module "C:/php/php8apache2_4.dll"
PHPIniDir "C:/php"
Далее укажем место, где у нас будут храниться сайты. Для этого создадим, например, на диске С каталог localhost. Затем найдем в файле httpd.conf
строку
DocumentRoot "${SRVROOT}/htdocs"
<Directory "${SRVROOT}/htdocs">
По умолчанию в качестве хранилища документов используется каталог «c:/Apache24/htdocs». Заменим эту строку на следующую:
DocumentRoot "c:/localhost"
<Directory "c:/localhost">
Изменим пути файлам, в которые будут заноситься сведения об ошибках или посещении сайта. Для этого найдем строку
ErrorLog "logs/error.log"
И заменим ее на
ErrorLog "c:/localhost/error.log"
Далее найдем строку
CustomLog "logs/access.log" common
И заменим ее на
CustomLog "c:/localhost/access.log" common
Таким образом, файл error.log, в который записываются ошибки, и файл access.log, в который заносятся все
данные о посещении веб-сайта, будут располагаться в папке c:/localhost.
Затем найдем строчку:
#ServerName www.example.com:80
И заменим ее на
ServerName localhost
Далее найдем блок <IfModule mime_module>:
<IfModule mime_module>
    #
    # TypesConfig points to the file containing the list of mappings from
    # filename extension to MIME-type.
    #
    TypesConfig conf/mime.types
И под строкой <IfModule mime_module> добавим две строчки:
AddType application/x-httpd-php .php
AddType application/x-httpd-php-source .phps
То есть должно получиться:
<IfModule mime_module>
	AddType application/x-httpd-php .php
	AddType application/x-httpd-php-source .phps
    #
    # TypesConfig points to the file containing the list of mappings from
    # filename extension to MIME-type.
    #
    TypesConfig conf/mime.types
В данном случае мы добавили поддержку для файлов с расширением .php и .phps.
И в конце найдем блок <IfModule dir_module>:
<IfModule dir_module>
    DirectoryIndex index.html
</IfModule>
И заменим его на следующий:
<IfModule dir_module>
	DirectoryIndex index.html index.php
</IfModule>
В данном случае мы определяем файлы, которые будут выполняться при обращении к корню файла или каталога. То есть по сути определяем главные страницы
веб-сайта: index.html и index.php.
Это минимально необходимая конфигурация, которая нужна для работы с PHP.
Теперь наша задача — убедиться, что php подключен и работает правильно. Для этого перейдем в папку c:/localhost, которую мы создали для хранения
файлов веб-сервера, и добавим в нее обычный текстовый файл. Переименуем его в index.php и внесем в него следующее содержание:
<?php
phpinfo();
?>
В данном случае мы создали простейший скрипт, который выводит общую информацию о PHP.
Теперь заново запустим файл httpd.exe и обратимся к этому скрипту, набрав в строке браузера
адрес http://localhost/index.php
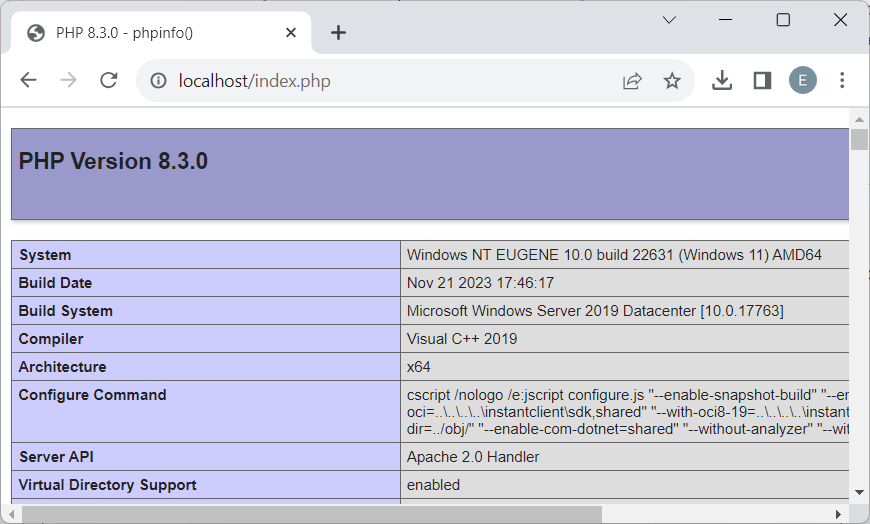
Что тут произошло? При обращении к сайту на локальной машине в качестве адреса указывается http://localhost.
Затем указывается имя ресурса, к которому идет обращение. В данном случае в качестве ресурса используется файл
index.php. И так как в файле httpd.conf в качестве хранилища документов веб-сервера указан каталог C:\localhost, то именно в этом каталоге и будет
веб-сервер будет производить поиск нужных файлов.
И поскольку выше при конфигурировании мы указали, что в качестве главной страницы может использоваться файл index.php, то мы можем также обратиться к
этому ресурсу просто http://localhost/
Таким образом, теперь мы можем создавать свои сайты на php.
Установка веб-сервера в качестве службы
Если мы часто работаем с веб-сервером, в том числе для программиррования на PHP, то постоянно запускать таким образом сервер,
может быть утомительно. И в качестве альтернативы мы можем установить Apache в качестве службы Windows.
Для этого запустим командную строку Windows от имени администратора и установим Apache в качестве службы с помощью команды:
C:\Apache24\bin\httpd.exe -k install
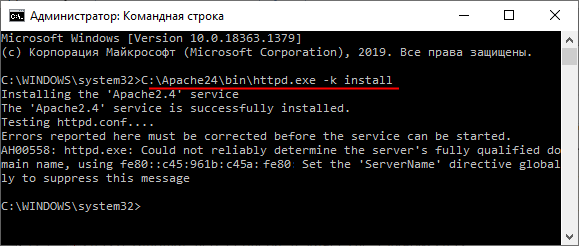
То есть в данном случае прописываем полный путь к файлу httpd.exe (C:\Apache24\bin\httpd.exe) и далее указываем команду на установку службы -k install.
Если установка завершится удачно, то в командная строка отобразит сообщение «The Apache2.4 service is successfully installed». Также будет проведено тестирование сервера.
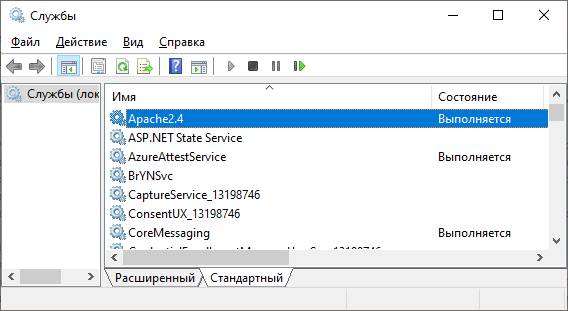
После установки службы убедимся, что она запущена
This article explains how to install PHP 8.2 and Apache 2.4 on Windows 10 or 11 (64-bit).
Linux and macOS users often have Apache and PHP pre-installed or available via package managers. Windows requires a little more effort. The steps below may work with other editions of Windows, PHP, and Apache, but check the documentation of each dependency for specific instructions.
Contents:
- Why PHP?
- Why Install PHP Locally?
- Alternative Installation Options
- Using an all-in-one package
- Using a Linux virtual machine
- Using Windows Subsystem for Linux 2
- Using Docker
- Installing Apache (optional)
- Installing PHP
- Step 1: Download the PHP files
- Step 2: Extract the files
- Step 3: Configure
php.ini - Step 4: Add
C:\phpto thePATHenvironment variable - Step 5: Configure PHP as an Apache module
- Step 6: Test a PHP file
Why PHP?
PHP remains the most widespread and popular server-side programming language on the Web. It’s installed by most web hosts, and has a simple learning curve, close ties with the MySQL database, superb documentation, and a wide collection of libraries to cut your development time. PHP may not be perfect, but you should consider it for your next web application. It’s the language of choice for Facebook, Slack, Wikipedia, MailChimp, Etsy, and WordPress (the content management system which powers almost 45% of the web).
To get your PHP setup blazing fast, check out our free book on improving PHP Performance.
Why Install PHP Locally?
Installing PHP on your development PC allows you to create and test websites and applications without affecting the data or systems on your live server.
Alternative Installation Options
Before you jump in, there may be a simpler installation options…
Using an all-in-one package
All-in-one packages are available for Windows. They contain Apache, PHP, MySQL, and other useful dependencies in a single installation file. These packages include XAMPP, WampServer and Web.Developer.
These packages are easy to use, but they may not match your live server environment. Installing Apache and PHP manually will help you learn more about the system and configuration options.
Using a Linux virtual machine
Microsoft Hyper-V (provided in Windows Professional) and VirtualBox are free hypervisors which emulate a PC so you can install another operating system.
You can install any version of Linux, then follow its Apache and PHP installation instructions. Alternatively, distros such as Ubuntu Server provide them as standard (although they may not be the latest editions).
Using Windows Subsystem for Linux 2
WSL2 is also a virtual machine, but it’s tightly integrated into Windows so activities such as file sharing and localhost resolution are seamless. You can install a variety of Linux distros, so refer to the appropriate Apache and PHP instructions.
Using Docker
Docker creates a wrapper (known as a container) around pre-configured application dependencies such as Apache, PHP, MySQL, MongoDB, and most other web software. Containers look like full Linux Virtual Machines but are considerably more lightweight.
Once you’ve installed Docker Desktop on Windows, it’s easy to download, configure, and run Apache and PHP.
Docker is currently considered the best option for setting up a PHP development environment. Check out SitePoint’s article Setting Up a Modern PHP Development Environment with Docker for a complete guide to setting it up.
Installing Apache (optional)
The following sections describe how to install Apache and PHP directly on Windows.
PHP provides a built-in web server, which you can launch by navigating to a folder and running the PHP executable with an -S parameter to set the localhost port. For example:
cd myproject
php -S localhost:8000
You can then view PHP pages in a browser at http://localhost:8000.
This may be adequate for quick tests, but your live server will use Apache or similar web server software. Emulating that environment as closely as possible permits more advanced customization and should prevent development errors.
To install Apache, download the latest Win64 ZIP file from https://www.apachelounge.com/download/ and extract its Apache24 folder to the root of your C: drive. You’ll also need to install the Visual C++ Redistributable for Visual Studio 2015–2020 (vc_redist_x64); the page has a link at the top.
Open a cmd command prompt (not PowerShell) and start Apache with:
cd C:\Apache24\bin
httpd
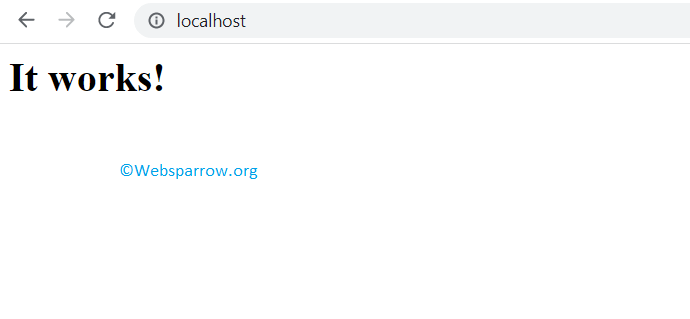
You may need to accept a firewall exception before the server starts to run. Open http://localhost in a browser and an “It works!” message should appear. Note:
C:\Apache24\conf\httpd.confis Apache’s configuration file if you need to change server settings.C:\Apache24\htdocsis the web server’s root content folder. It contains a singleindex.htmlfile with the “It works!” message.
If Apache fails to start, another application could be hogging port 80. (Skype is the prime candidate, and the Windows app won’t let you disable it!) If this occurs, edit C:\Apache24\conf\httpd.conf and change the line Listen 80 to Listen 8080 or any other free port. Restart Apache and, from that point onward, you can load web files at http://localhost:8080.
Stop the server by pressing Ctrl + C in the cmd terminal. The ReadMe file in the ZIP also provides instructions for installing Apache as a Windows service so it auto-starts on boot.
Installing PHP
Install PHP by following the steps below. Note that there’s more than one way to configure Apache and PHP, but this is possibly the quickest method.
Step 1: Download the PHP files
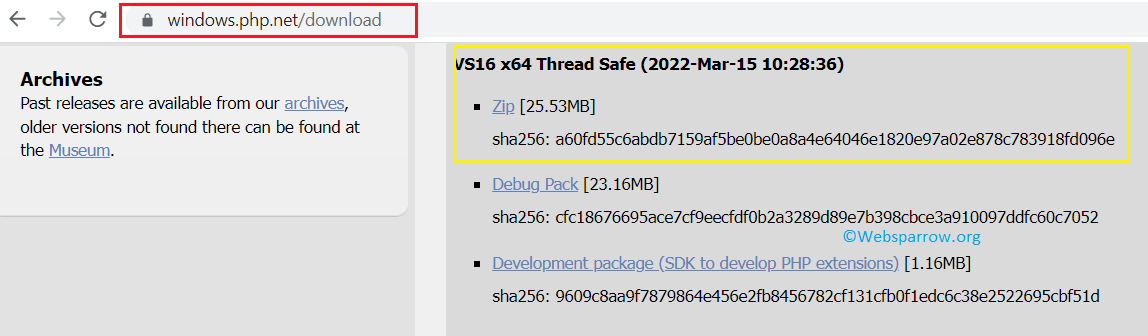
Get the latest PHP x64 Thread Safe ZIP package from https://windows.php.net/download/.
Create a new php folder in the root of your C:\ drive and extract the content of the ZIP into it.
You can install PHP anywhere on your system, but you’ll need to change the paths referenced below if you use anything other than C:\php.
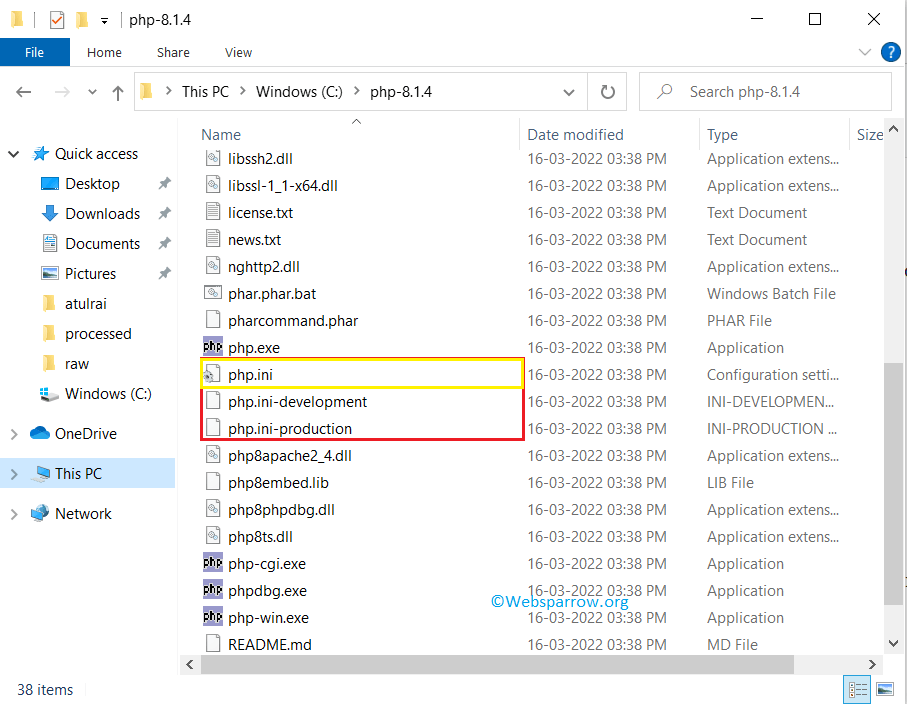
Step 3: Configure php.ini
PHP’s configuration file is php.ini. This doesn’t exist initially, so copy C:\php\php.ini-development to C:\php\php.ini. This default configuration provides a development setup which reports all PHP errors and warnings.
You can edit php.ini in a text editor, and you may need to change lines such as those suggested below (use search to find the setting). In most cases, you’ll need to remove a leading semicolon (;) to uncomment a value.
First, enable any required extensions according to the libraries you want to use. The following extensions should be suitable for most applications including WordPress:
extension=curl
extension=gd
extension=mbstring
extension=pdo_mysql
If you want to send emails using PHP’s mail() function, enter the details of an SMTP server in the [mail function] section (your ISP’s settings should be suitable):
[mail function]
; For Win32 only.
; http://php.net/smtp
SMTP = mail.myisp.com
; http://php.net/smtp-port
smtp_port = 25

; For Win32 only.
; http://php.net/sendmail-from
sendmail_from = my@emailaddress.com
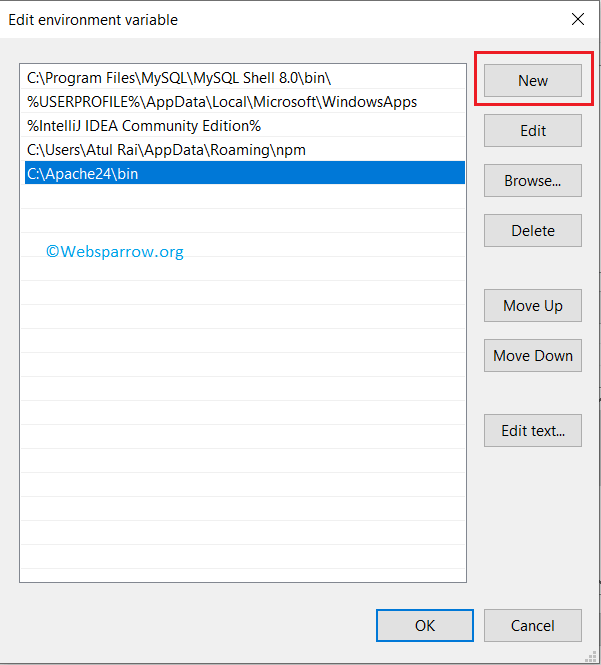
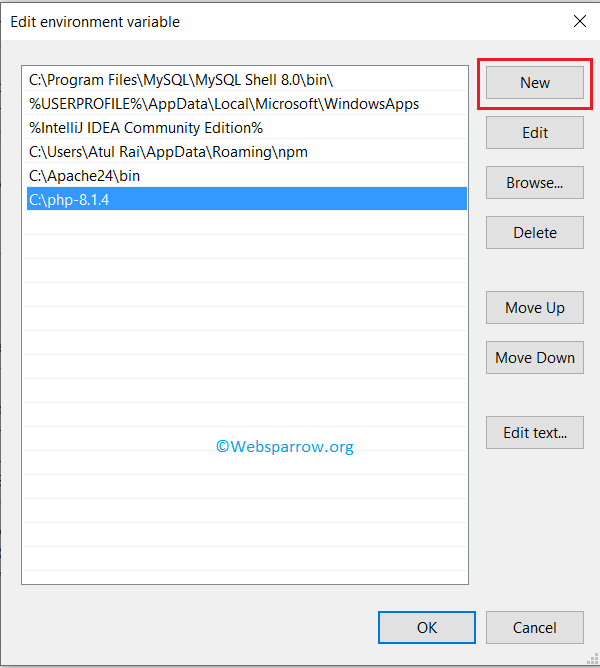
Step 4: Add C:\php to the PATH environment variable
To ensure Windows can find the PHP executable, you must add it to the PATH environment variable. Click the Windows Start button and type “environment”, then click Edit the system environment variables. Select the Advanced tab, and click the Environment Variables button.
Scroll down the System variables list and click Path, followed by the Edit button. Click New and add C:\php.
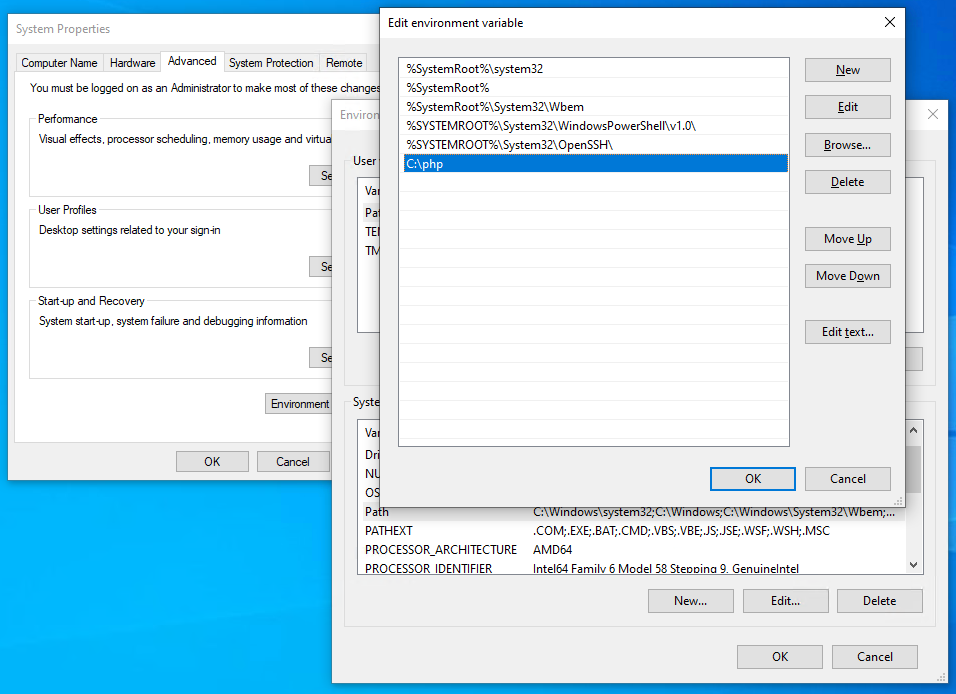
Note that older editions of Windows provide a single text box with paths separated by semi-colons (;).
Now OK your way out. You shouldn’t need to reboot, but you may need to close and restart any cmd terminals you have open.
Step 5: Configure PHP as an Apache module
Ensure Apache is not running and open its C:\Apache24\conf\httpd.conf configuration file in a text editor. Add the following lines to the bottom of the file to set PHP as an Apache module (change the file locations if necessary but use forward slashes rather than Windows backslashes):
# PHP8 module
PHPIniDir "C:/php"
LoadModule php_module "C:/php/php8apache2_4.dll"
AddType application/x-httpd-php .php
Optionally, change the DirectoryIndex setting to use index.php as the default in preference to index.html. The initial setting is:
<IfModule dir_module>
    DirectoryIndex index.html
</IfModule>
Change it to:
<IfModule dir_module>
    DirectoryIndex index.php index.html
</IfModule>
Save httpd.conf and test the updates from a cmd command line:
cd C:\Apache24\bin
httpd -t
Syntax OK will appear … unless you have errors in your configuration.
If all went well, start Apache with httpd.
Step 6: Test a PHP file
Create a new file named index.php in Apache’s web page root folder at C:\Apache24\htdocs. Add the following PHP code:
<?php
phpinfo();
?>
Open a web browser and enter your server address: http://localhost/. A PHP version page should appear, showing all PHP and Apache configuration settings.
You can now create PHP sites and applications in any subfolder of C:\Apache24\htdocs. If you need to work more than one project, consider defining Apache Virtual Hosts so you can run separate codebases on different localhost subdomains or ports.
Further information:
- How to Install Apache
- How to Install MySQL
- MySQL: the Pros and Cons of MyISAM Tables
- MySQL: the Pros and Cons of InnoDB Tables
- How to Use MySQL Foreign Keys for Quicker Database Development
- Book: PHP & MySQL: Novice to Ninja, 7th Edition
- Book: Jump Start PHP Environment, as well as many more books in our library.
Best of luck!