Android is the most feature-rich platform. It has all the options you’ll ever need to control and configure the device however you want. However, some advanced settings are buried deep down. To access them you have to install ADB shell and use it. Today, I will show you how to install ADB on Windows 10.
What is ADB
Android Debug Bridge or more widely knows as ADB shell is a command line tool that helps developers access advanced settings and debug Android apps and system settings. Besides from debugging, you can use ADB shell to back up the android device, install apps on your SD card by default, disable specific features of an app, transfer files, etc. In fact, you can even use ADB to make system level changes.
Generally, ADB is bundled with Android SDK (Software Development Kit). So, if you’ve installed Android SDK then you already have access to the ADB shell on Windows 10 with several other essential tools like Fastboot. However, if you are not a developer and don’t want to install the complete Android SDK package for just one tool that is only used occasionally then you can install ADB on Windows separately. i.e, without installing Android SDK.
Related: How to Run Android Apps on Ubuntu [Natively]
Enable USB Debugging Mode
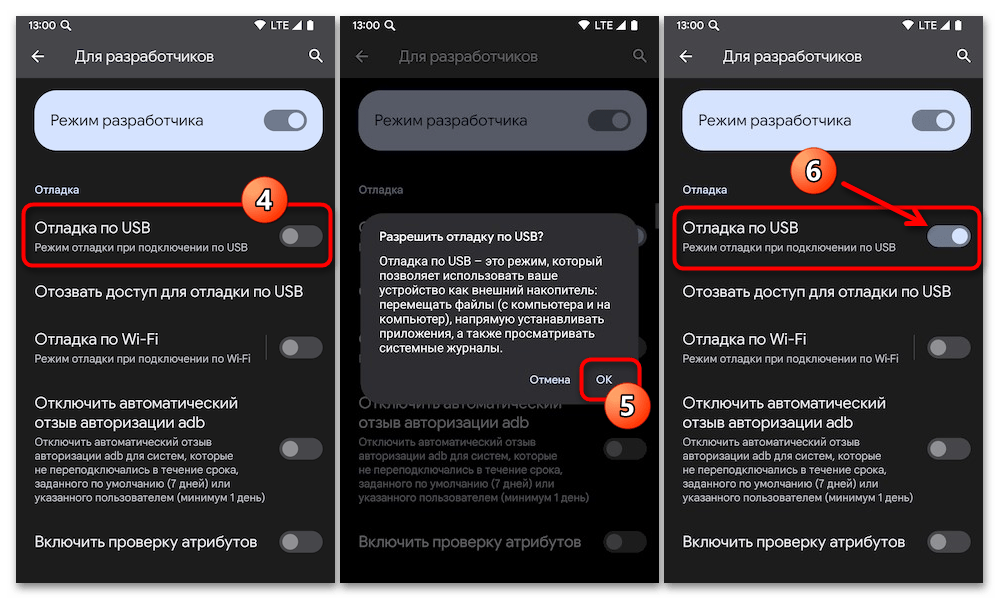
Before installing ADB on Windows 10, you need to configure your Android device to accept the ADB commands. To do that, you have to enable USB debugging mode. Thankfully, it is very easy to do. Just follow the below instructions.
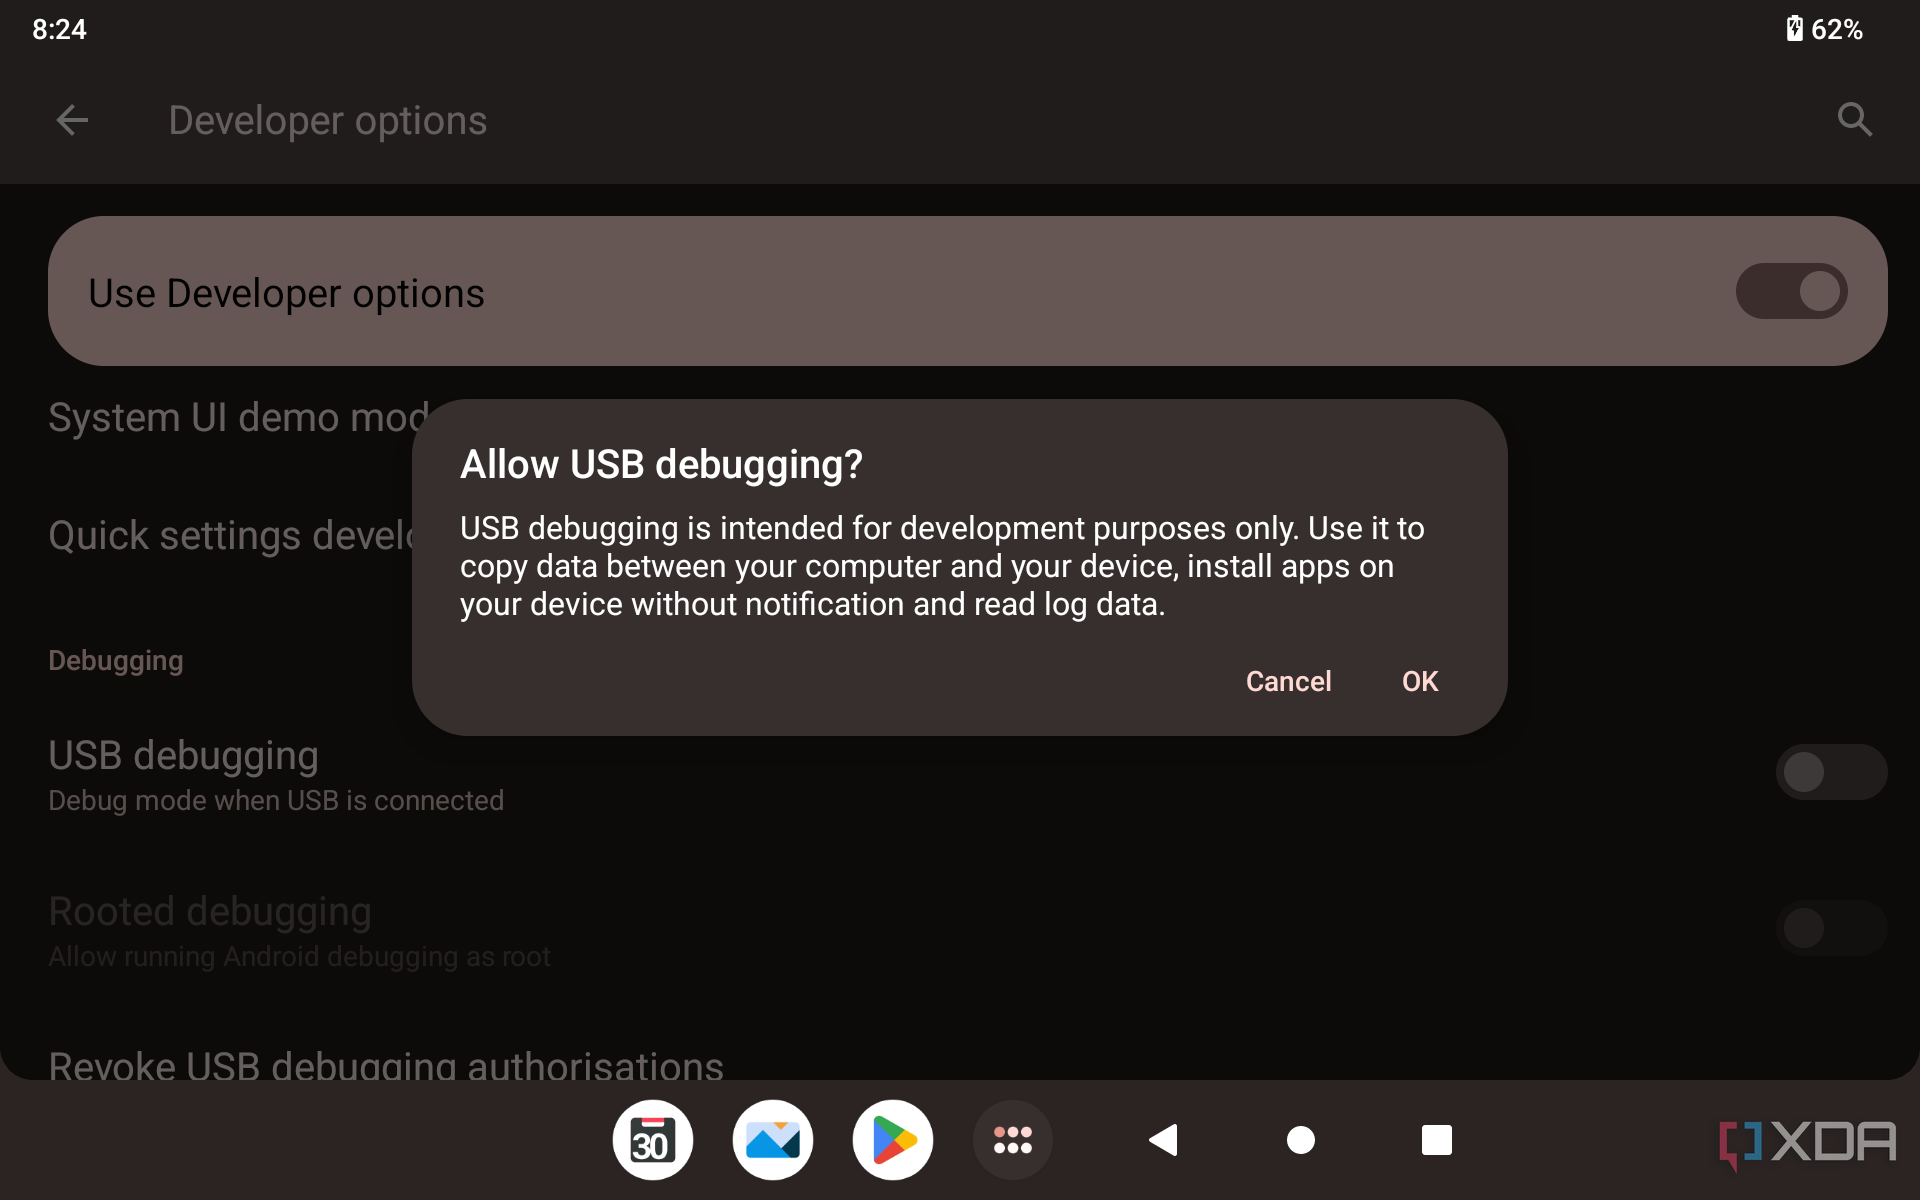
- Launch apps menu and tap on the “Settings” icon.
- Here, scroll down and tap on the option “About“.
- Now, scroll down again and repeatedly tap on the option “Build number” 7 times.
- Go back to the main Settings screen, scroll down and tap on the new option “Developer Options“.
- Here, toggle the button next to USB Debugging option. Tap on the option “Ok” in the confirmation pop-up to enable USB debugging mode.
That’s it, you’ve configured the Android device to receive ADB shell commands. You can now install ADB on Windows 10.
Related: 10 Best Secret Texting Apps for Android (Private Texting Apps for Android)
Note: the same procedure is applicable for older versions of Windows like 7 and 8.
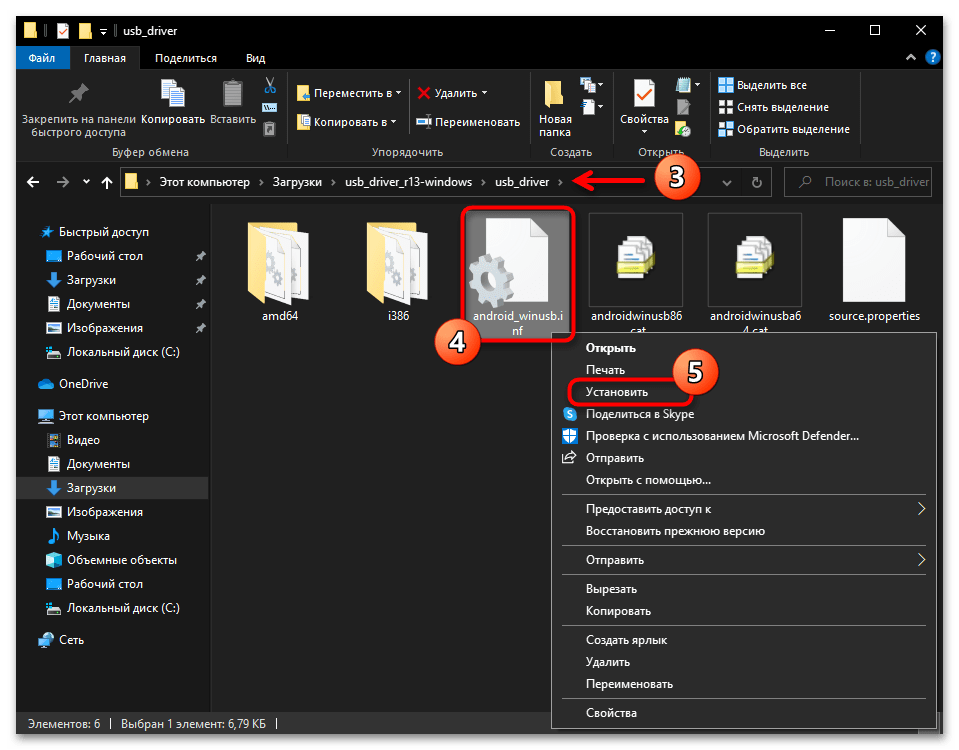
1. To start off, download ADB for Windows from the official Google website.
2. Create a new folder with the name “ADB” in the root of the C drive. Now, extract all the files in the downloaded ZIP file to the folder you just created. This is how it looks like when you are done extracting.

3. Grab a USB data cable and connect your android device to the Windows computer. If prompted, select “file transfer (MTP)” mode.
4. Now, search for “Command Prompt” in the start menu and open it.

5. In the command prompt, use the below command to navigate the ADB installation folder. If you’ve installed ADB folder in some other place then change the command accordingly.
cd c:\ADB

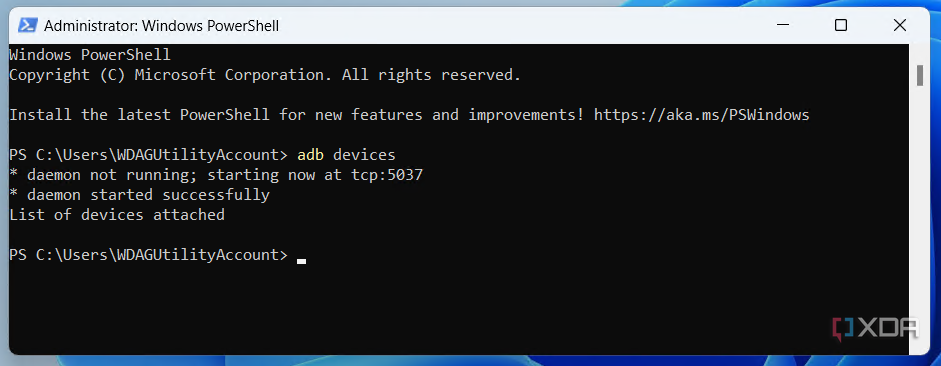
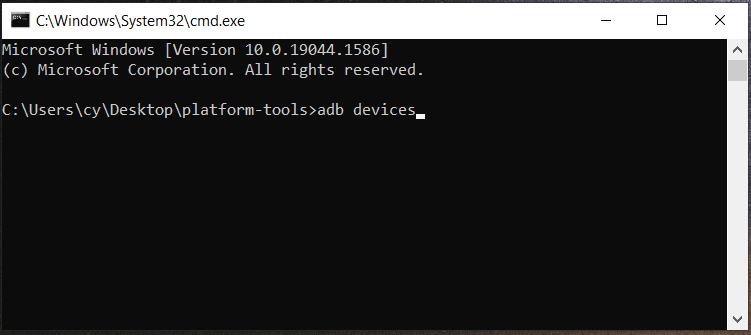
6. Once you are here, execute the following command ADB Daemon.
adb devices
7. As soon as you execute the command, you will see “Allow USB debugging” prompt on your android device screen. Tap on the “Ok” button. Now, your device will be listed in the command prompt.

If you see your device listed then you’ve successfully installed ADB on Windows 10. If not, make sure that the device is properly connected and you have installed android drives on Windows. Generally, you can download android drivers specific to your device on the manufacturer website.
Related: How to Use Multiple Facebook Accounts on Android
Optional: Access ADB from Any Folder
As you can see, with the above method, you have to first navigate to the ADB installation folder if you want to use the ADB shell. This is not so much a problem but an inconvenience. To deal with that, you can add ADB to Windows Path. This allows you to access ADB from any folder or directory.
1. To add ADB to Windows path, search for “View advanced system settings” in the start menu and open it.

2. In this window, click on the button “Environment Variables“.

3. Here select the Path variable under “User variables for Username” and click on the button “Edit“.
Related: How To Disable Auto Media Download Feature In WhatsApp [Android]

4. Now, click on the “New” button.

5. Enter the path to the ADB folder and click on the button “Ok” to save the changes. In my case, the folder path is C:\ADB.

6. Click on the “Ok” on other main windows to save the changes.
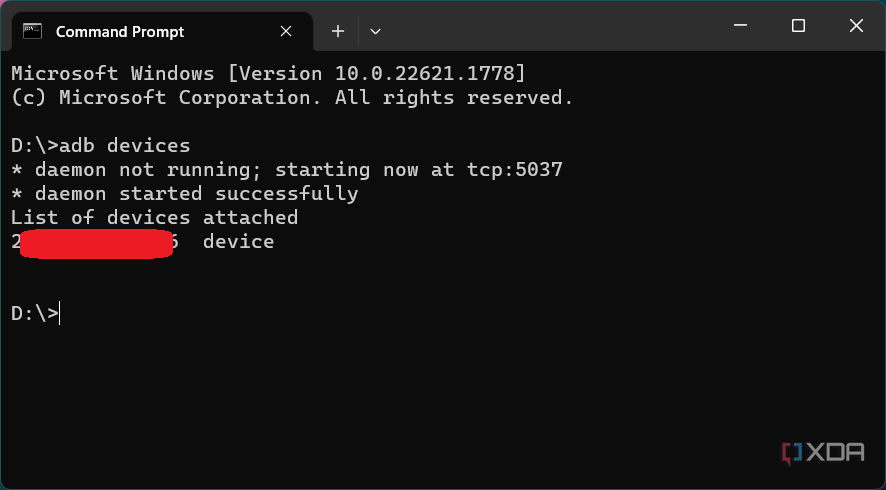
From this point forward, you can access ABD from any folder. As you can see from the below image, I’m starting the ADB daemon from a folder in my E drive.

That’s all there is to do and it is that simple to install ADB on Windows 10 and add ADB to Windows path. If you find this article useful then do read how to disable volume buttons in android and how to hide audiobooks from music players in android.
Comment below sharing your thoughts and experiences about using the above method to install ADB on Windows.
Related: How to Download Android Apps to PC without Installing Any Software [Quick Tip]
Содержание
- Шаг 1: Скачивание и установка
- Шаг 2: Запуск утилиты ADB
- Способ 1: «Командная строка» Windows
- Способ 2: Windows PowerShell
- Дополнительно. Подключение Android-устройства к ADB на ПК
- Вопросы и ответы
Шаг 1: Скачивание и установка
Прежде чем запуск консольной утилиты ADB станет возможным, конечно же, необходимо загрузить и инсталлировать её на компьютер. В действительности, существует множество вариантов получения и развёртывания софта, который обеспечивает функционирование Android Debug Bridge на ПК под управлением Windows 10, а следующая инструкция демонстрирует, как это сделать задокументированным разработчиками технологии Android Debug Bridge, а значит, самым надёжным и эффективным способом.
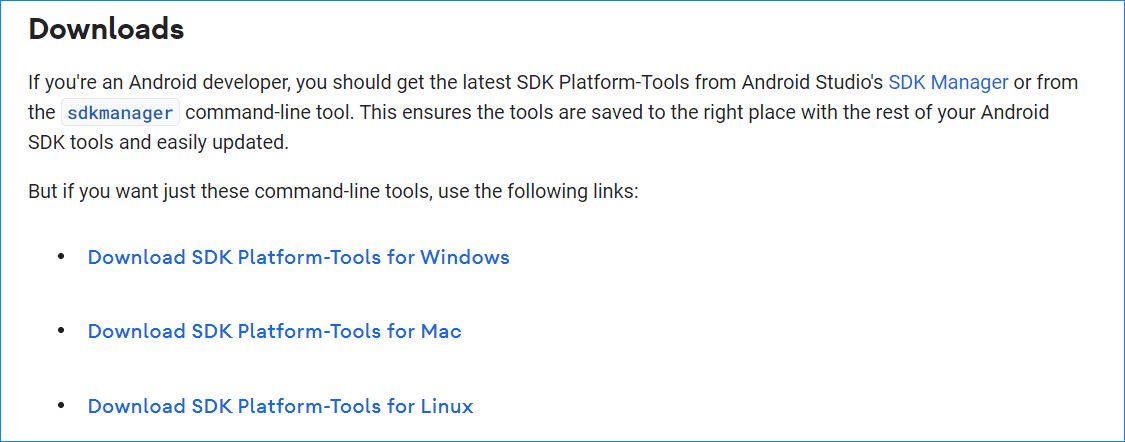
Скачать SDK Platform Tools (ADB и Fastboot) с официального сайта
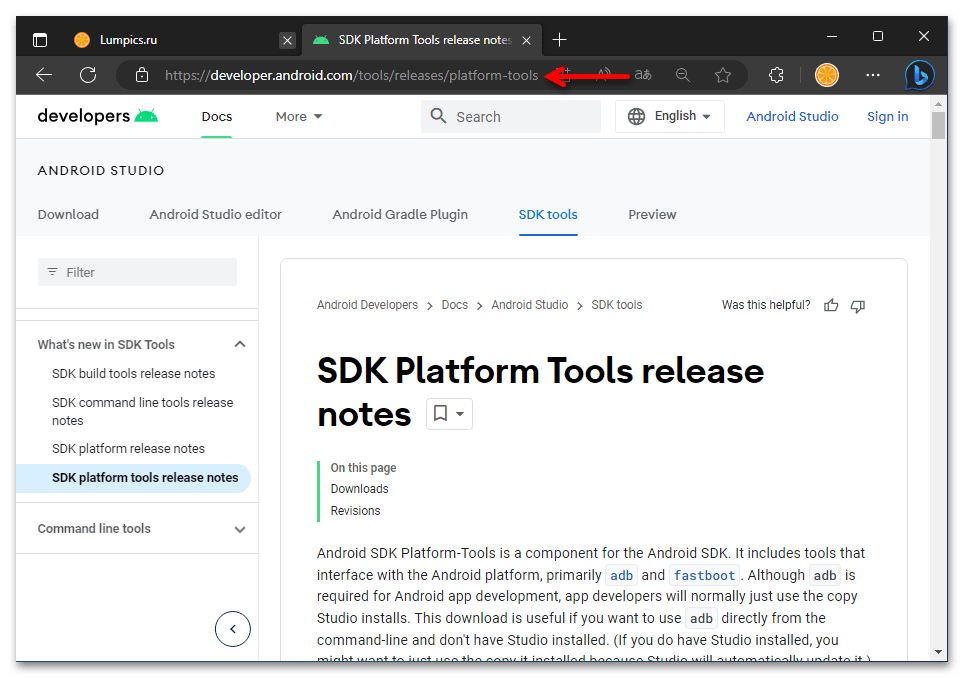
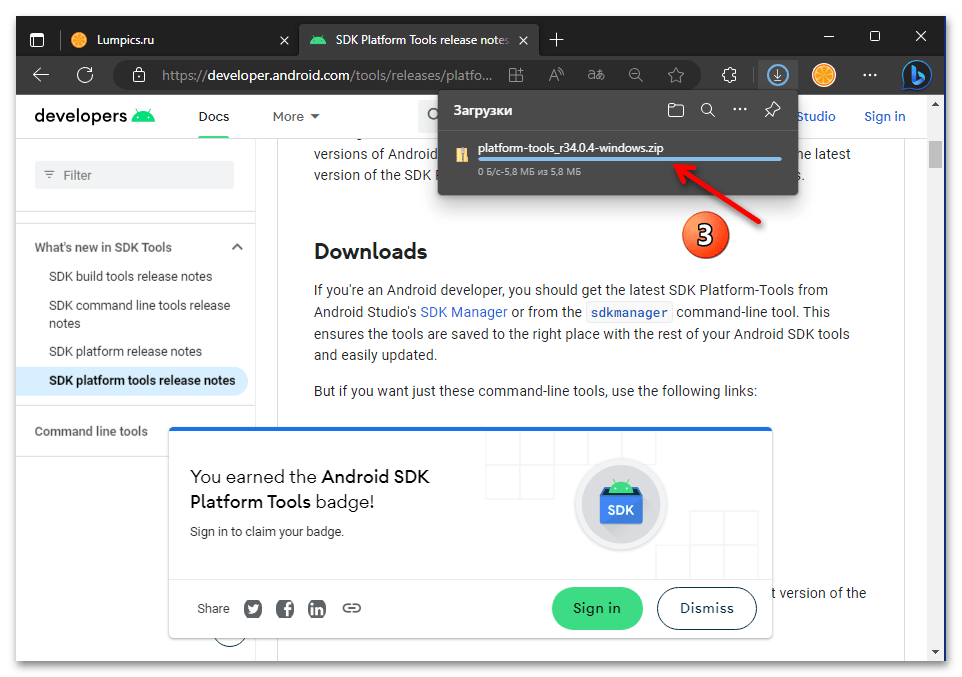
- Перейдите по представленной перед этой инструкцией ссылке. В результате откроется веб-страница с описанием и возможностью загрузки включающего ADB пакета SDK Platform Tools на интернет-ресурсе Android Developers от Google.
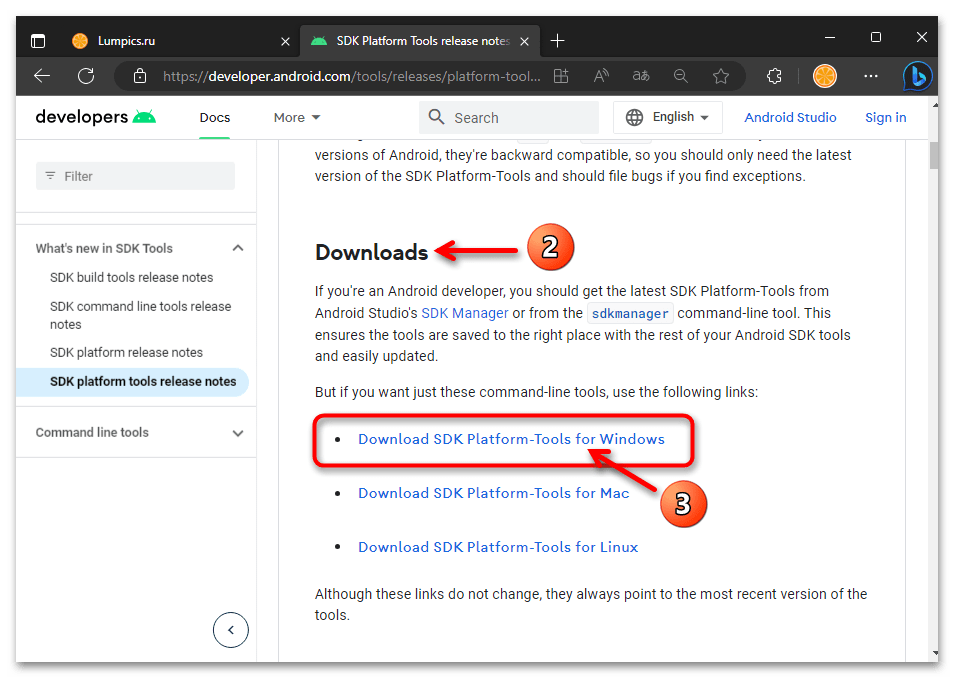
- Переместитесь в раздел веб-страницы «Downloads»,

щёлкните по имеющейся здесь ссылке «Download SDK Platform-Tools for Windows».
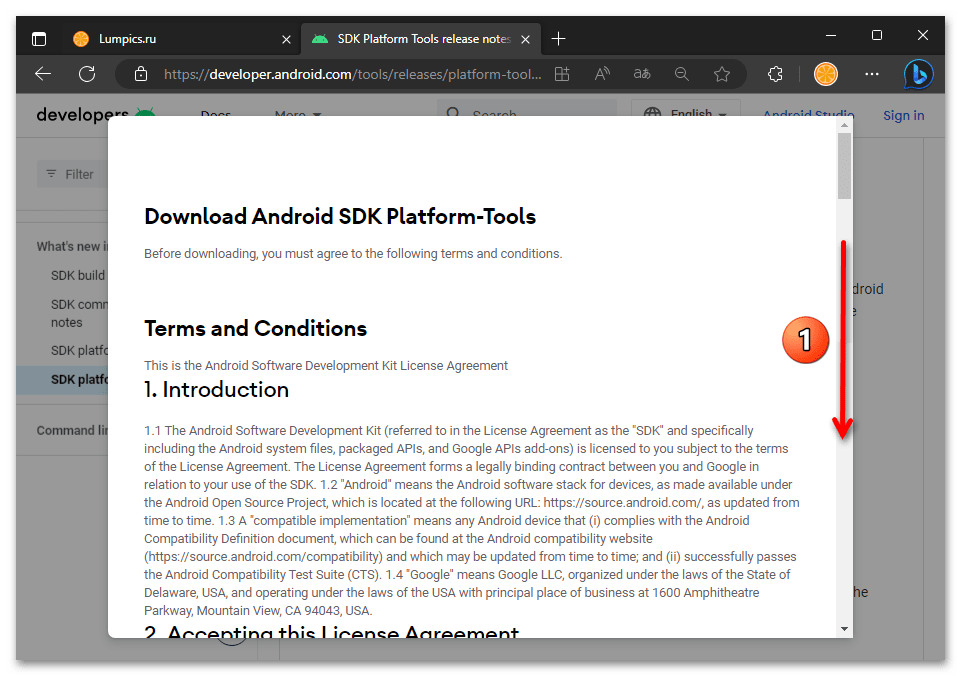
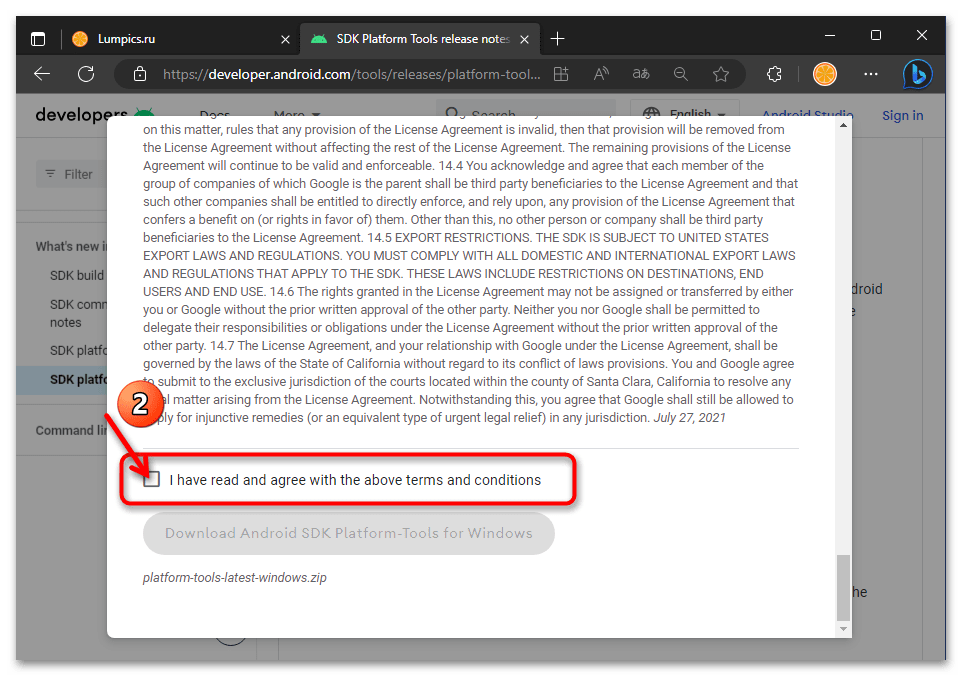
- Прокрутите информацию в отобразившемся поверх веб-страницы окне до конца,

установите отметку в чекбоксе «I have read and agree with the above terms and conditions».
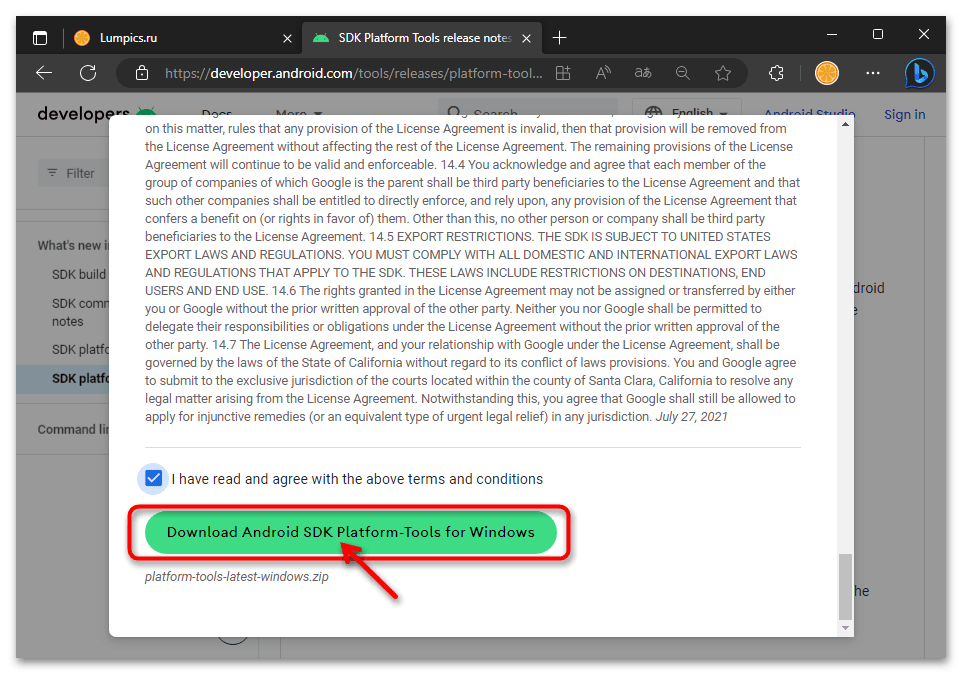
- Нажмите на ставшую активной после выполнения предыдущего шага кнопку «Download Android SDK Platform-Tools for Windows».
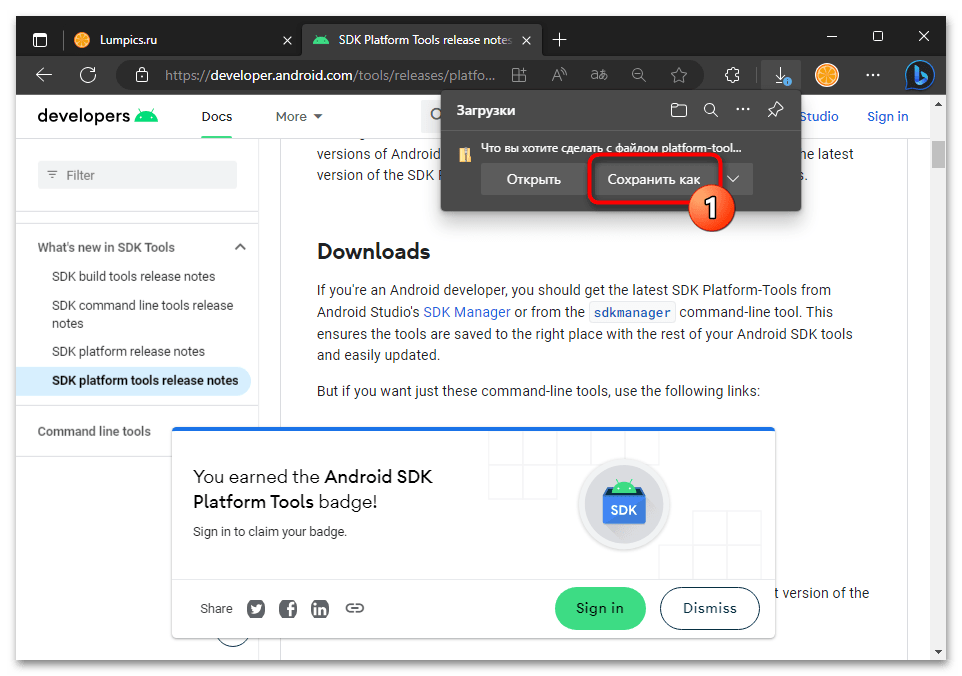
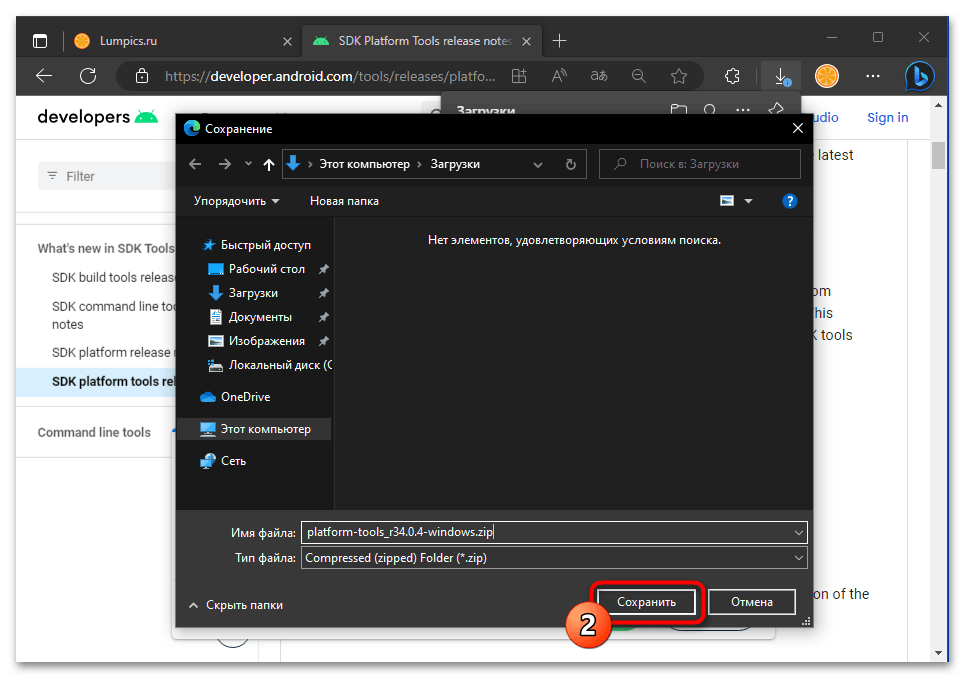
- Если это предполагают настройки браузера, укажите (и запомните) путь сохранения предоставляемого сайтом ZIP-архива на диске компьютера

(по умолчанию будет скачан в системную библиотеку Win 10 «Загрузки»). Подтвердите инициацию получения пакета

и дождитесь окончания этого процесса.
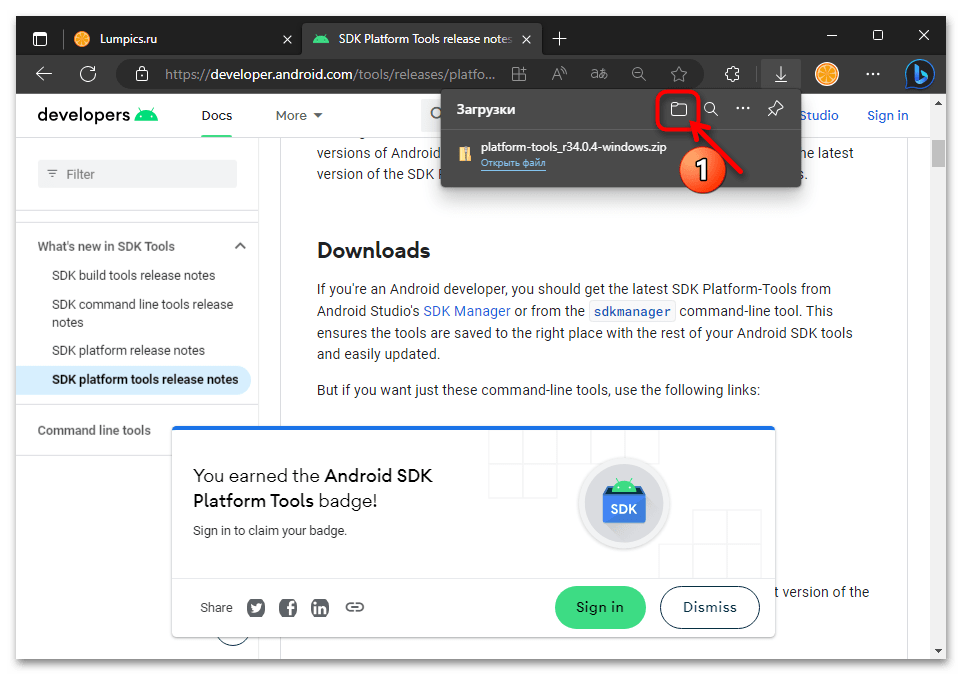
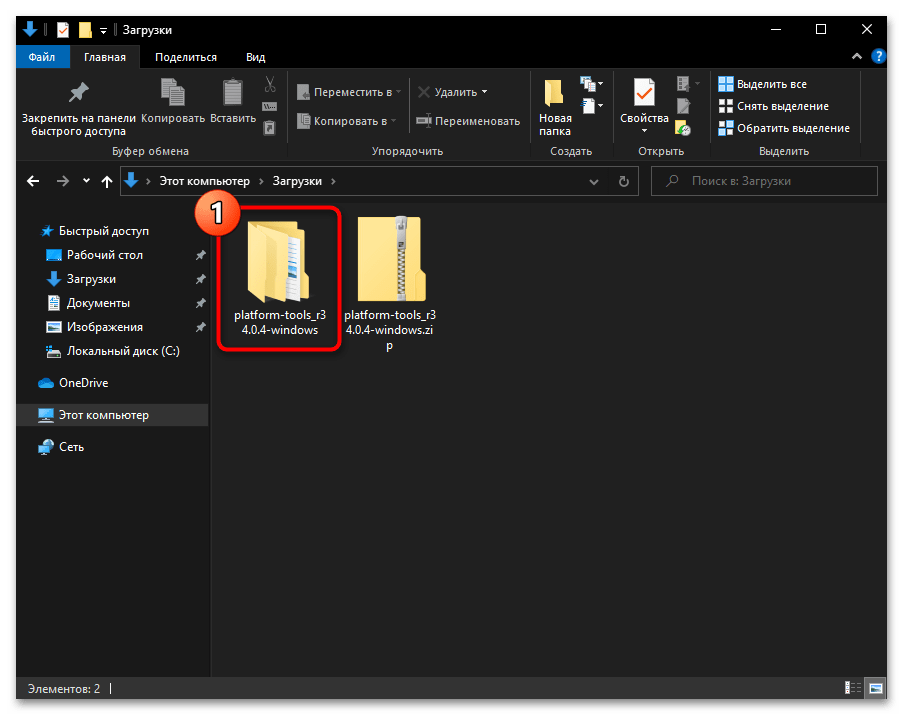
- По завершении скачивания файла platform-tools_rВЕРСИЯ-windows.zip откройте содержащую его папку

в Проводнике Windows.

Читайте также: Запуск «Проводника» в ОС Windows 10
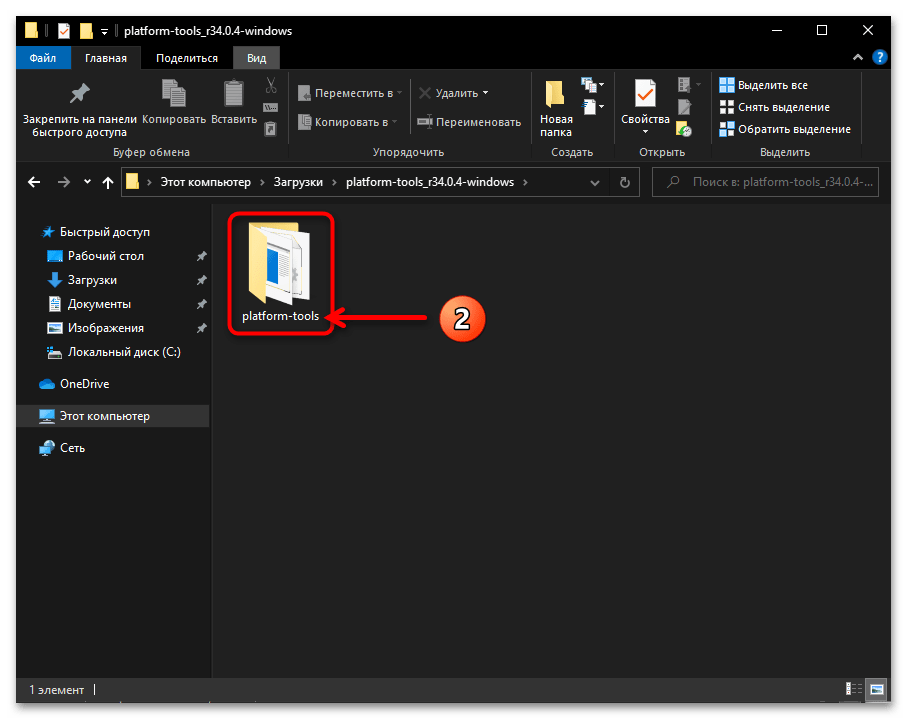
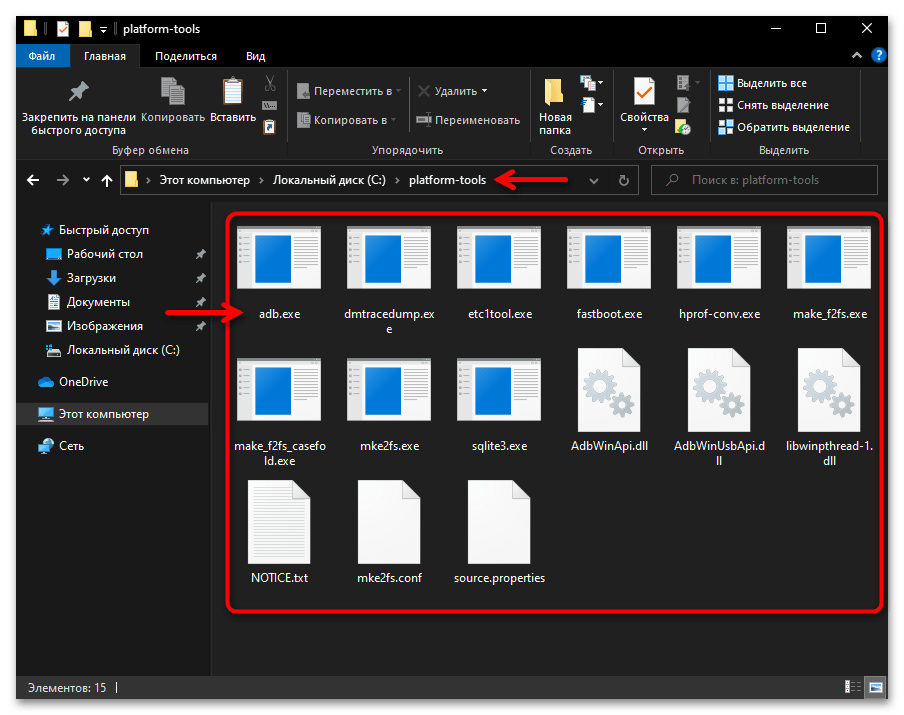
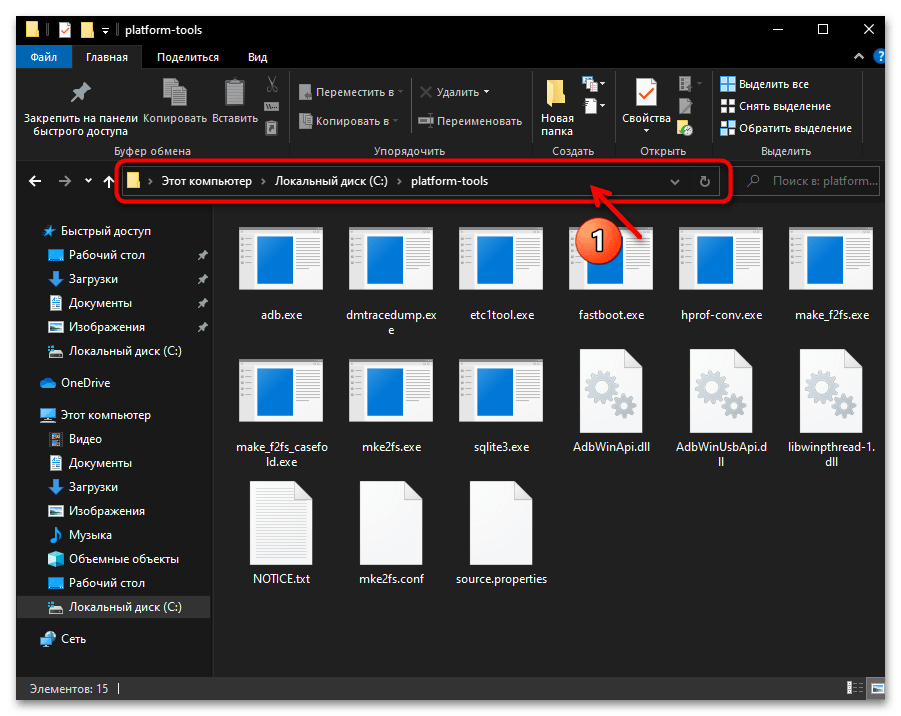
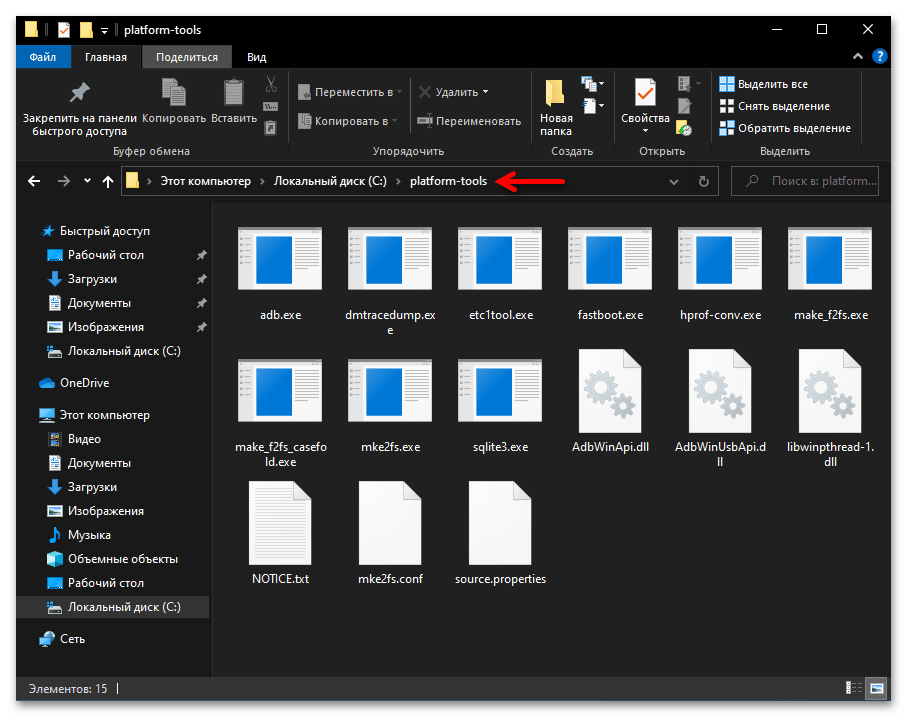
- В результате разархивации пакета SDK Platform Tools образуется директория, которая содержит вложенную папку «platform-tools» –

именно она и является целевой в нашем случае.

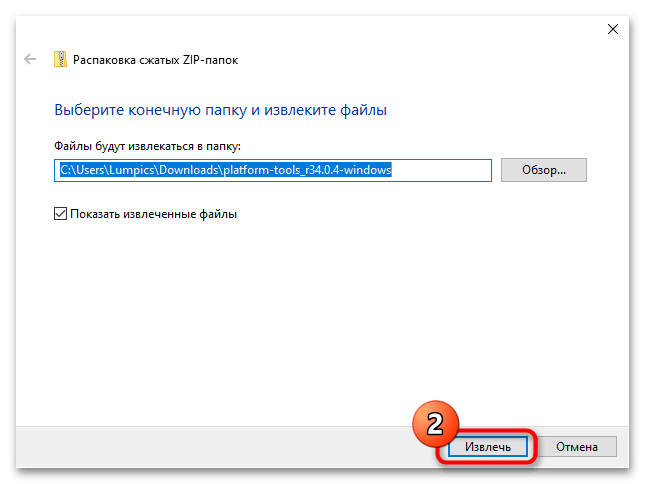
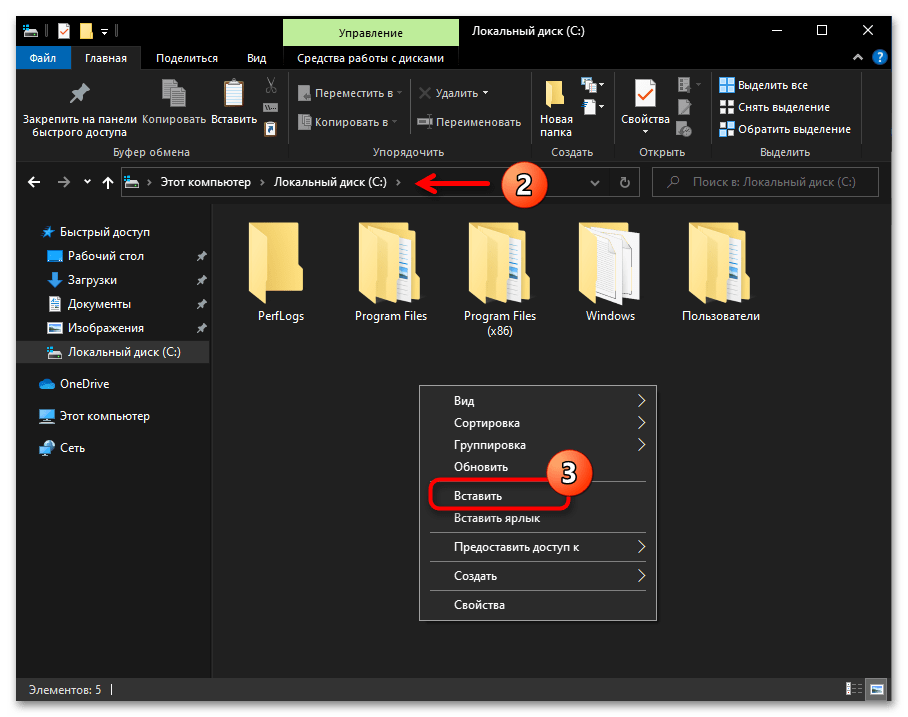
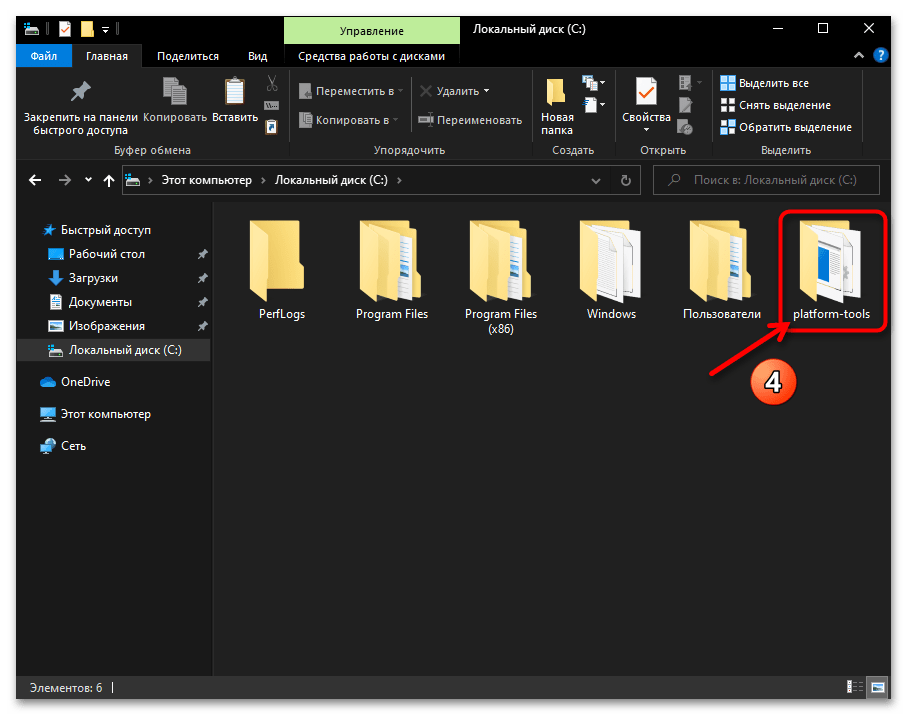
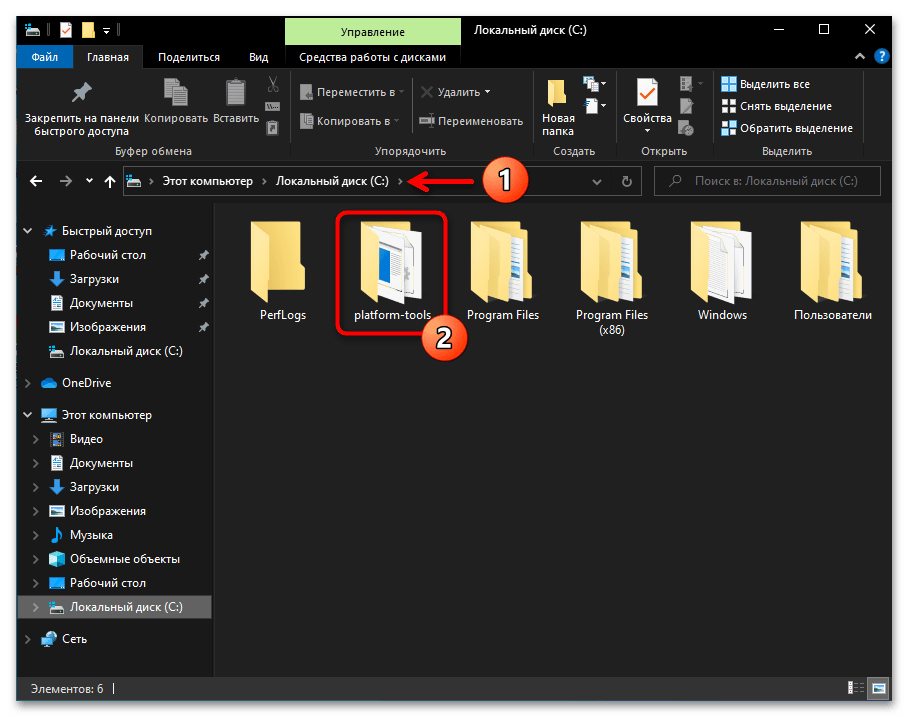
По сути, на этом получение утилиты ADB можно считать завершённым, её уже можно запускать из указанной папки средствами консоли Windows 10 одним из предложенных далее в этой статье способов. При этом, для удобства в дальнейшем, а также полного соответствия рекомендациям разработчиков Android Debug Bridge необходимо скопировать или переместить каталог «platform-tools»

в корень
системного диска ПК (С:).

Кроме прочего, каталог с утилитой ADB можно переименовать по собственному усмотрению (например, сократить наименование или как-то иначе, но не применяя кириллических символов). При таком подходе запомните присвоенное каталогу с утилитой ADB имя, и точно вводите его вместо
platform-toolsпри выполнении дальнейших инструкций из этого материала.


Далее извлеките всё содержимое архива в отдельный каталог. (С этой целью кликните правой кнопкой мыши по наименованию пакета, выберите «Извлечь всё» в открывшемся контекстном меню, подтвердите действие).
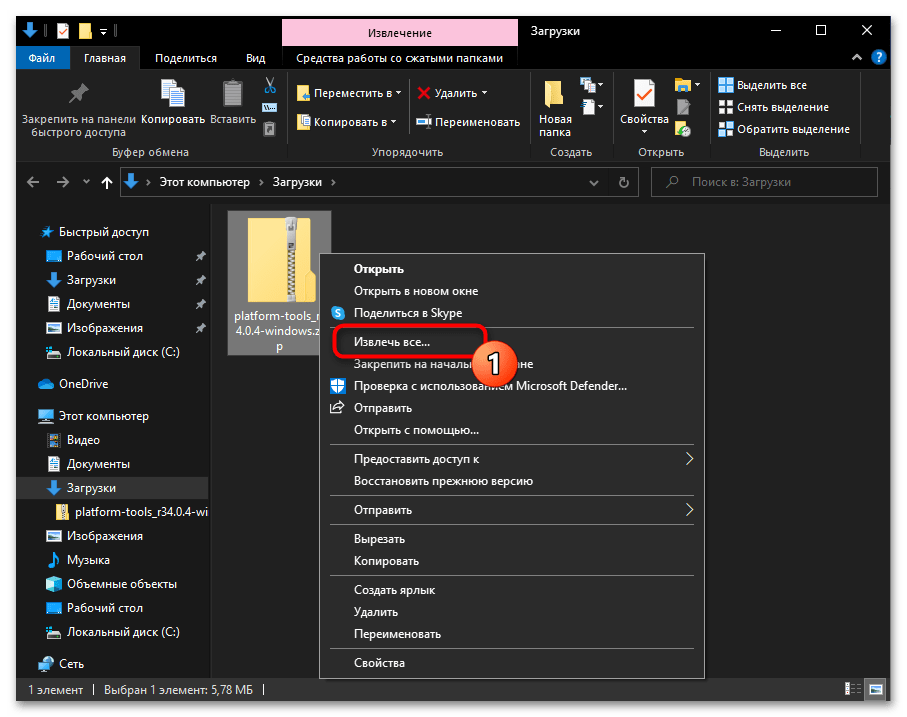
Подробнее: Распаковка ZIP-архивов в ОС Windows 10

Входящие в комплект SDK Platform Tools утилиты (не только рассматриваемая в этой статье ADB, но также Fastboot) в случае с Windows 10 могут быть запущены и эффективно эксплуатироваться в классической «Командной строке», а также её более современном аналоге – консольной оболочке «PowerShell». Далее рассмотрим подробно, как используются оба указанных инструмента для решения нашей задачи.
Способ 1: «Командная строка» Windows
По сути, чтобы получить доступ к функциям утилиты ADB через «Командную строку» Windows, достаточно открыть во второй содержащий компоненты первой каталог («platform-tools»). Практически это реализуемо минимум двумя путями, вы можете использовать тот, который кажется более удобным.
Вариант 1: Консольная команда «cd»
Самый распространённый и привычный большинству метод запуска консольной утилиты ADB заключается в открытии приложения «Командная строка» и переходе через неё в папку с целевым софтом с помощью специализированной текстовой команды:
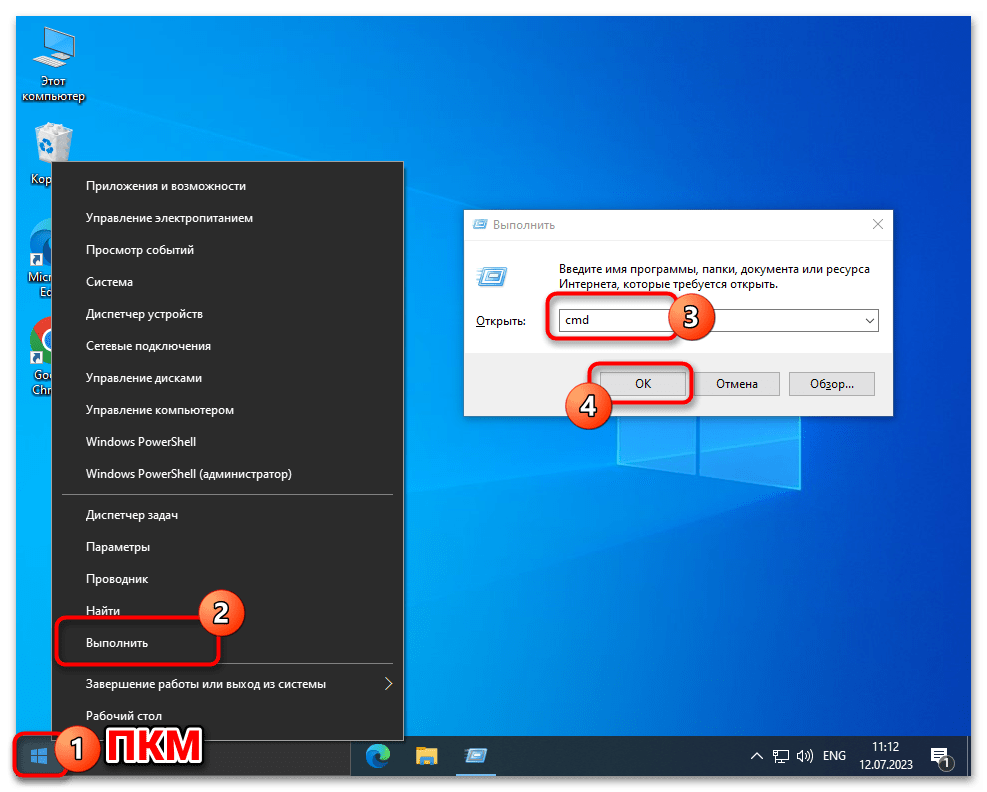
- Любым способом запустите «Командную строку» Виндовс 10. К примеру, и быстрее всего с этой целью можно задействовать оснастку «Выполнить»: нажмите «Windows» + «R» на клавиатуре, введите в поле «Открыть» отобразившегося окошка следующий текст:
cmd
Щёлкните по кнопке «ОK» мышкой или нажмите «Enter».
Подробнее: Открытие «Командной строки» в Windows 10
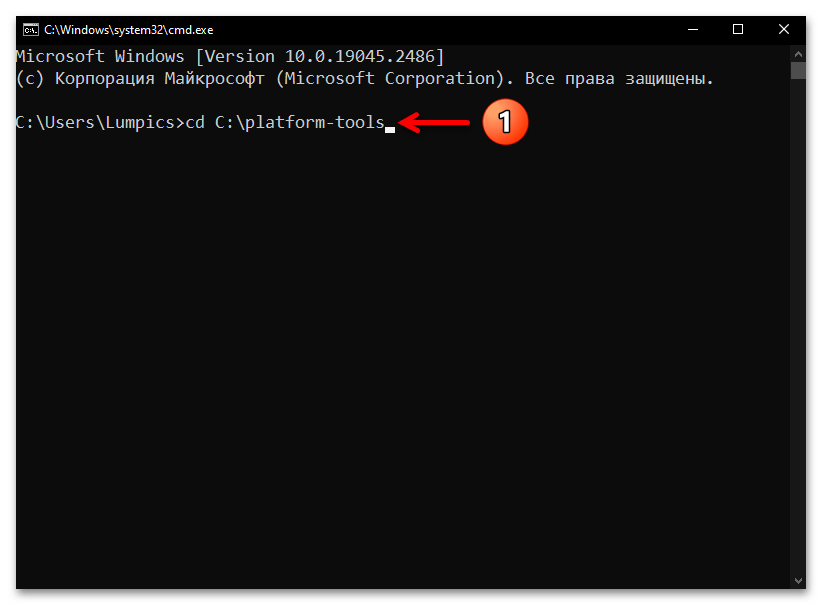
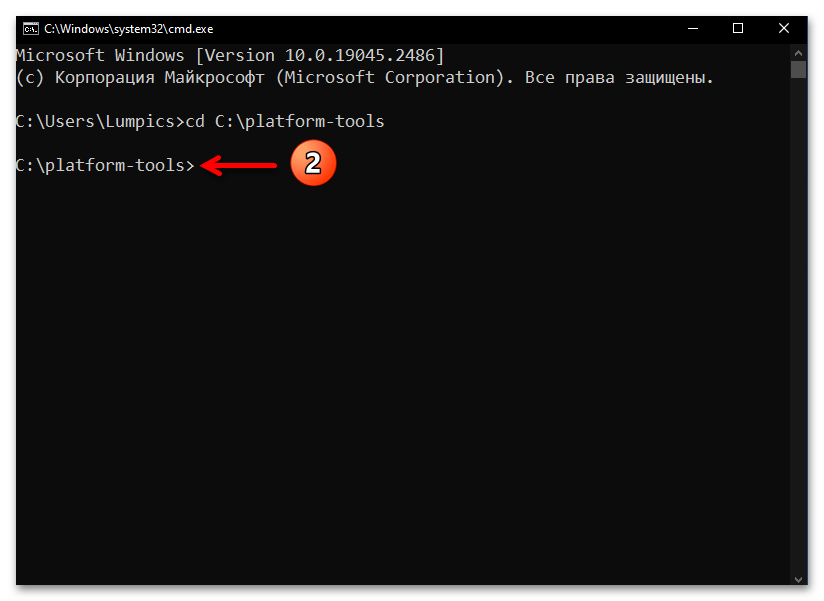
- Введите команду перехода в каталог утилиты ADB – она состоит из указания
cdи затем полного пути к целевой директории на диске компьютера. То есть, если вы точно следовали рекомендациям выше в статье, команда будет следующей:cd C:\platform-tools
Написав команду, отправьте её на выполнение — для этого нажмите «Ввод» на клавиатуре.
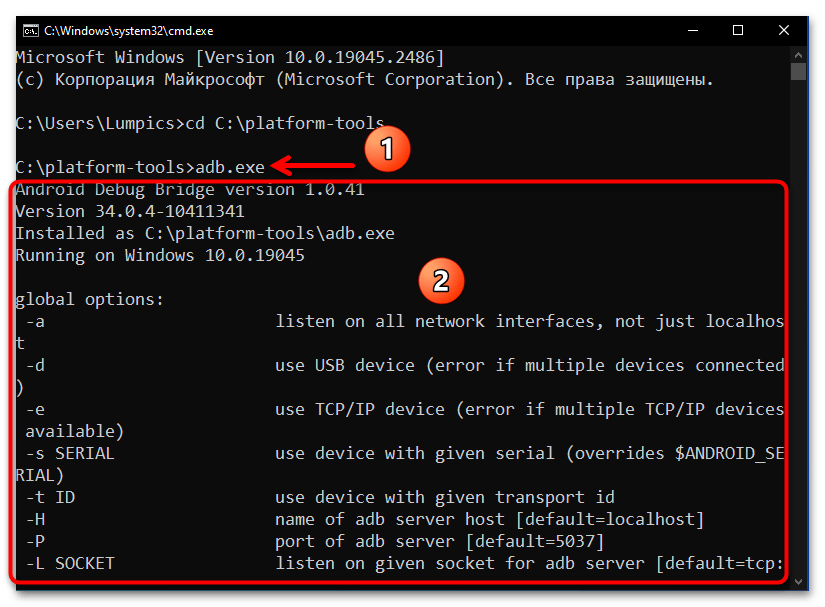
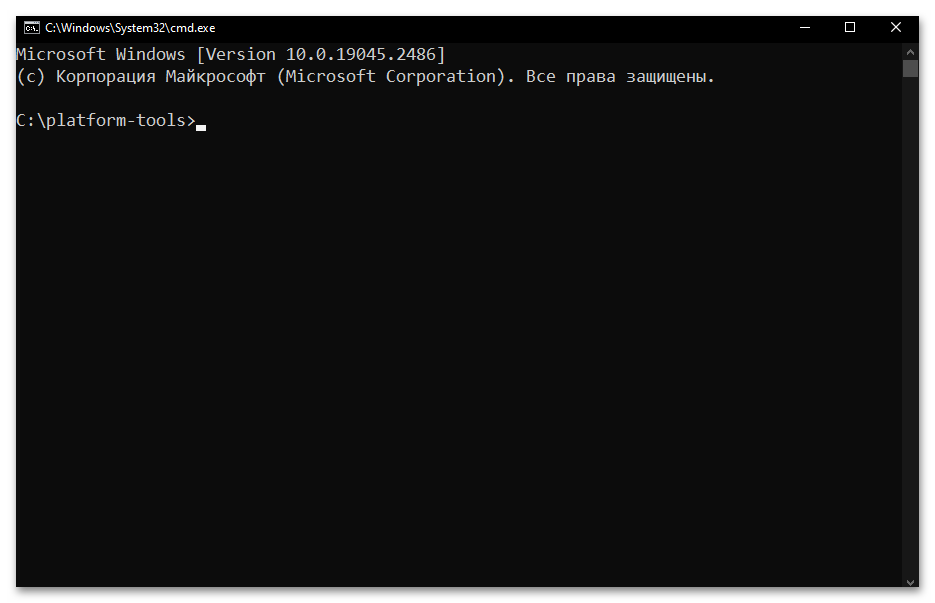
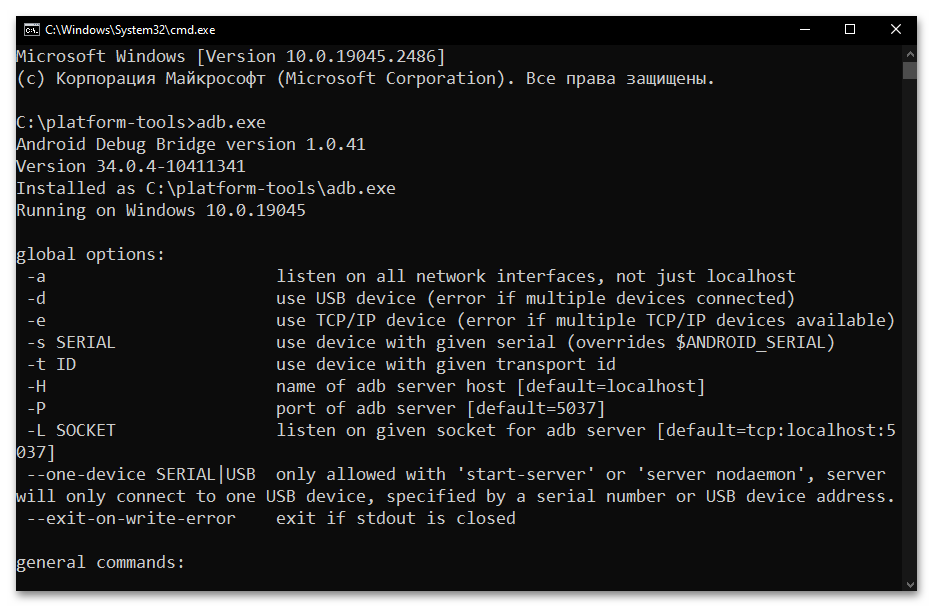
- Фактически всё, далее можно приступать к отправке текстовых команд ADB, — утилита готова к их приёму и обработке. Чтобы удостовериться в том, что отладочный мост введён в эксплуатацию, а также для получения списка основных команд ADB, можно ввести в консоли и отправить на выполнение следующее указание:
adb.exe
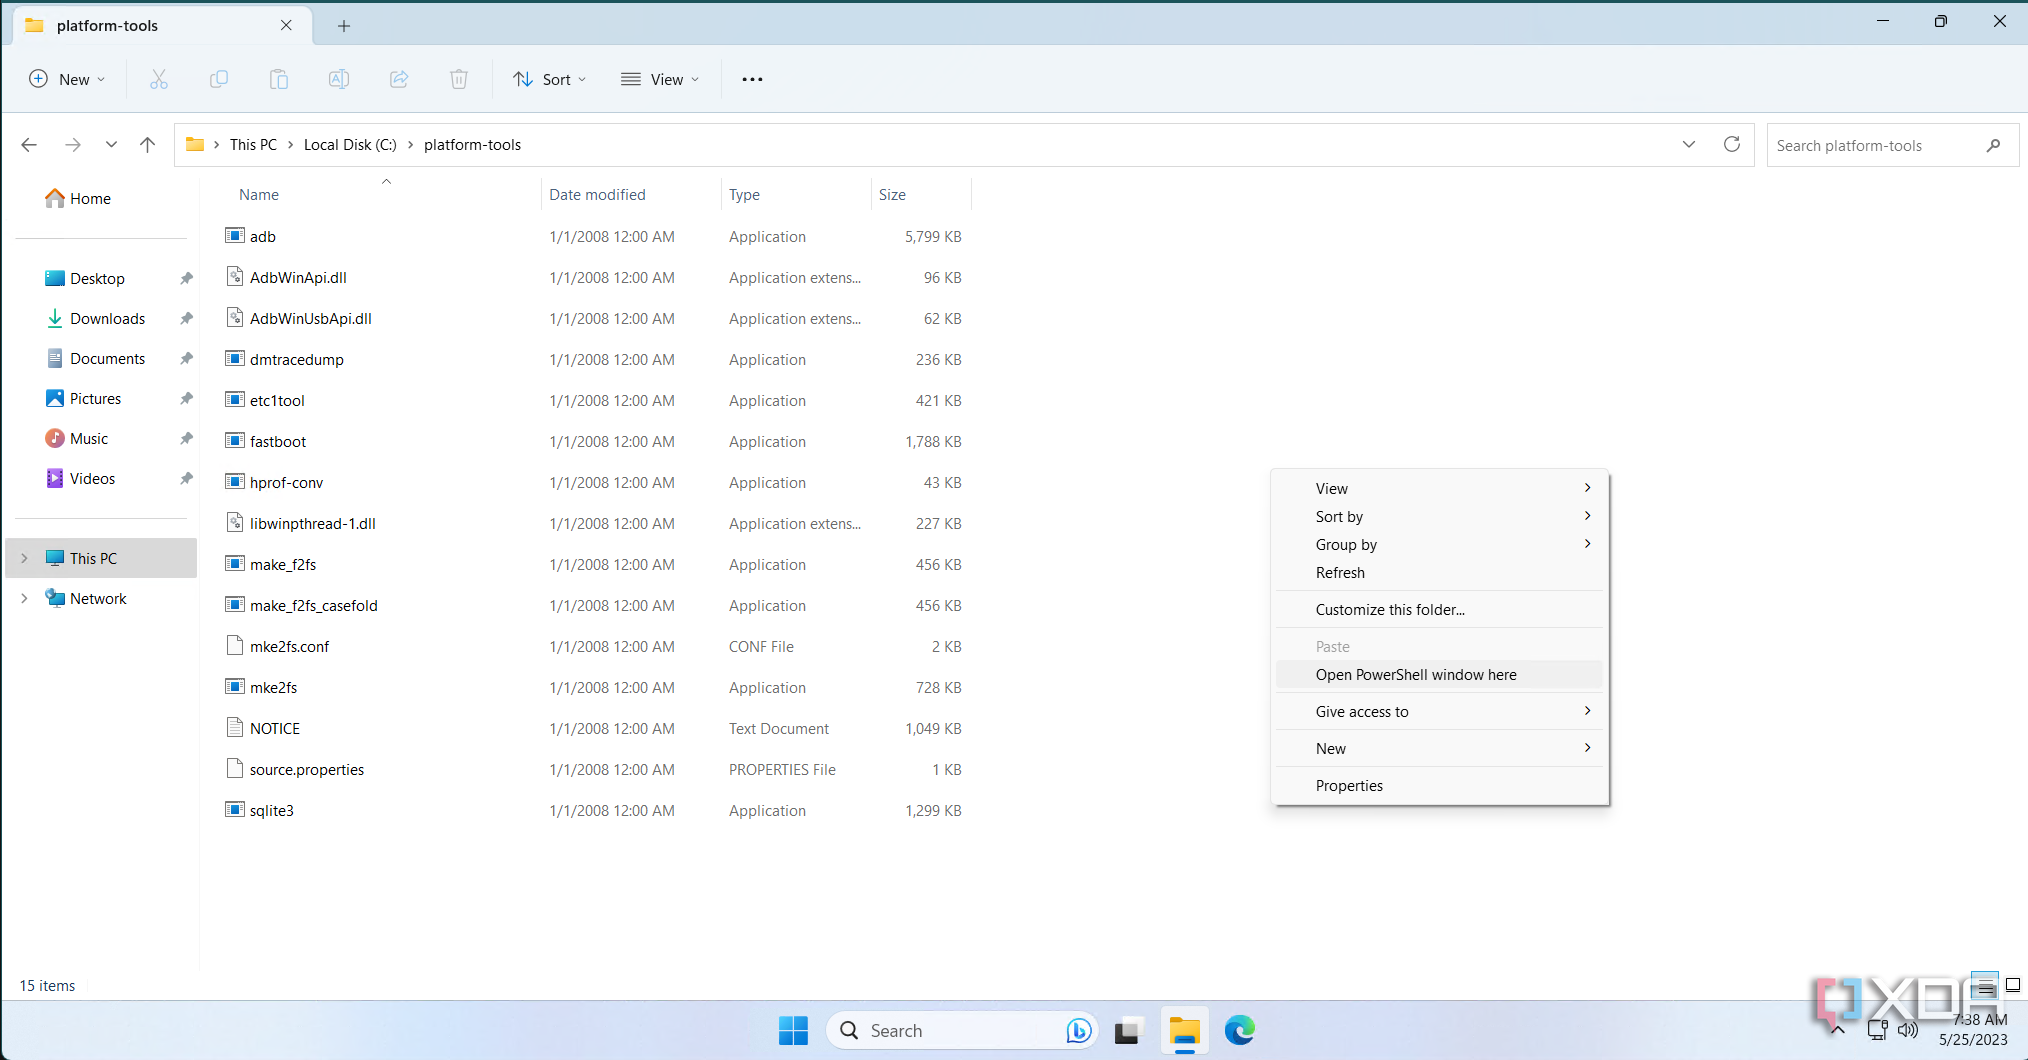
Вариант 2: Средства Проводника Windows
Более удобный и часто выполнимый быстрее, нежели вышеописанный, подход к запуску утилиты АДБ в классической «Командной строке» эксплуатирует возможности системного файлового менеджера Виндовс 10:
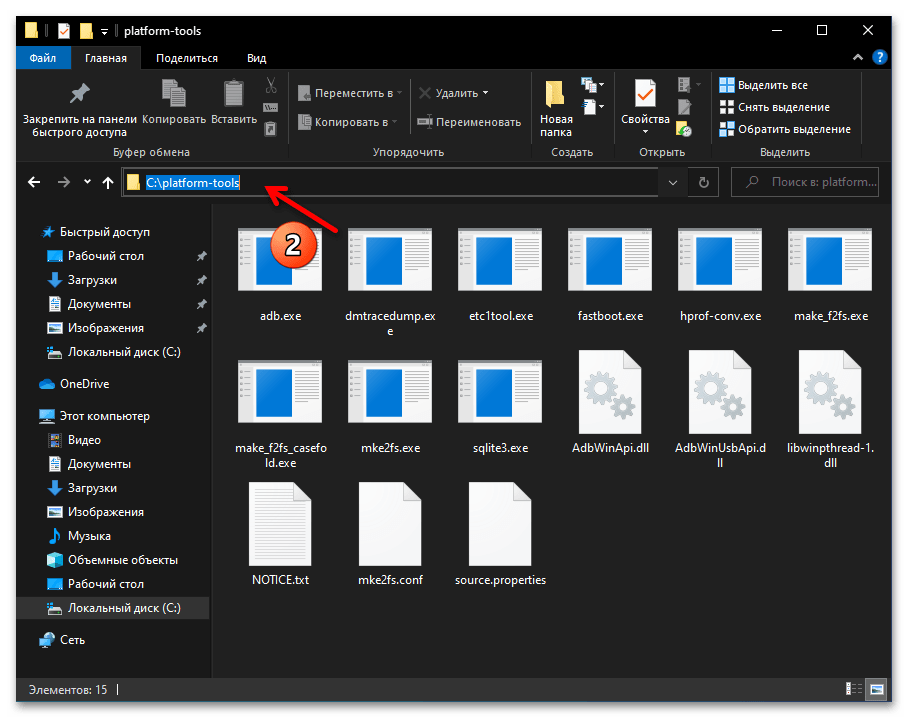
- Откройте Проводник Windows 10, перейдите в каталог ADB («platform-tools»).
- Кликните левой кнопкой мыши в (важно!) свободной от надписей области поля, которое расположено в верхней части окна Проводника и отображает путь

к текущей открытой вами папке.
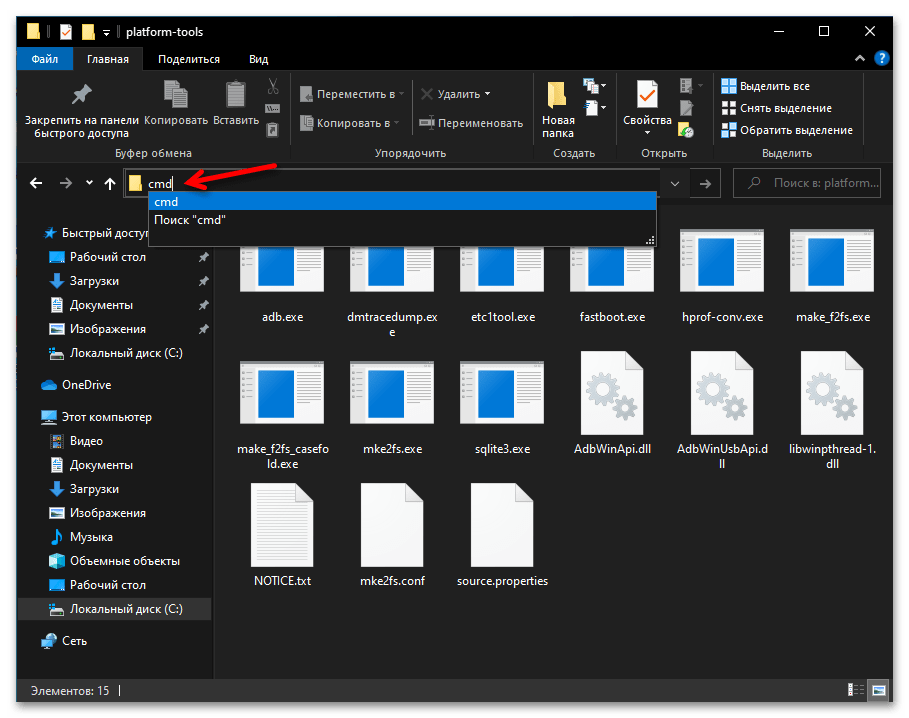
- С клавиатуры введите следующий текст:
cmd - Нажмите «Enter» — в результате запустится «Командная строка» Windows c уже открытой в ней папкой «platform-tools».

На этом наша задача считается решённой, вы можете приступать к вводу в «Командную строку» и отправке на выполнение команд Android Debug Bridge.
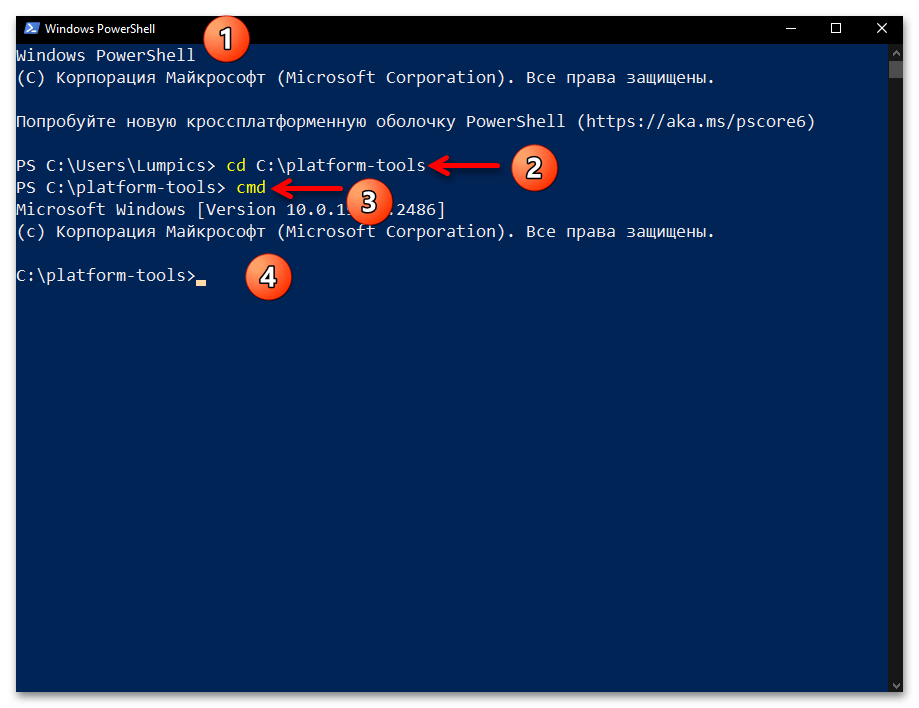
Способ 2: Windows PowerShell
Запуск ADB через поставляемое в комплекте ОС Windows 10 средство PowerShell выполняется не намного сложнее, нежели при использовании классической «Командной строки», а практически реализуется одним из двух нижеописанных путей.
Вариант 1: Консольная команда «cd»
Основной вариант запуска Android Debug Bridge средствами PowerShell фактически повторяет таковой в «Командной строке», — необходимо запустить консоль, а затем с помощью специальной команды открыть в ней каталог с утилитой ADB и сопровождающими её файлами.
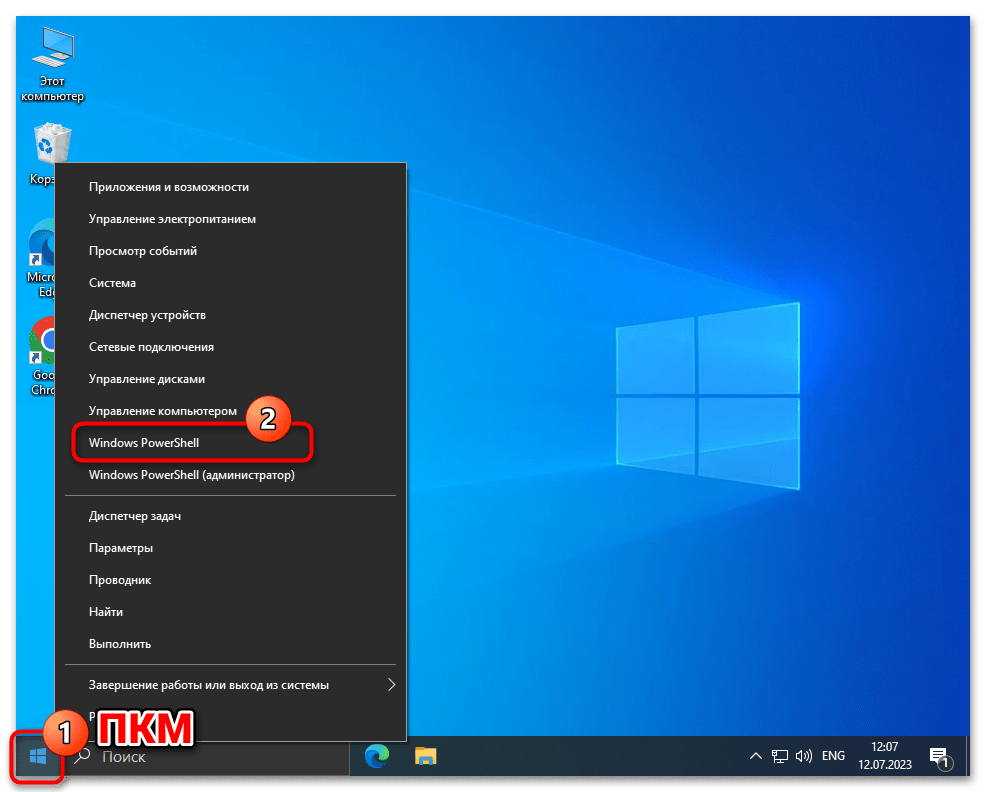
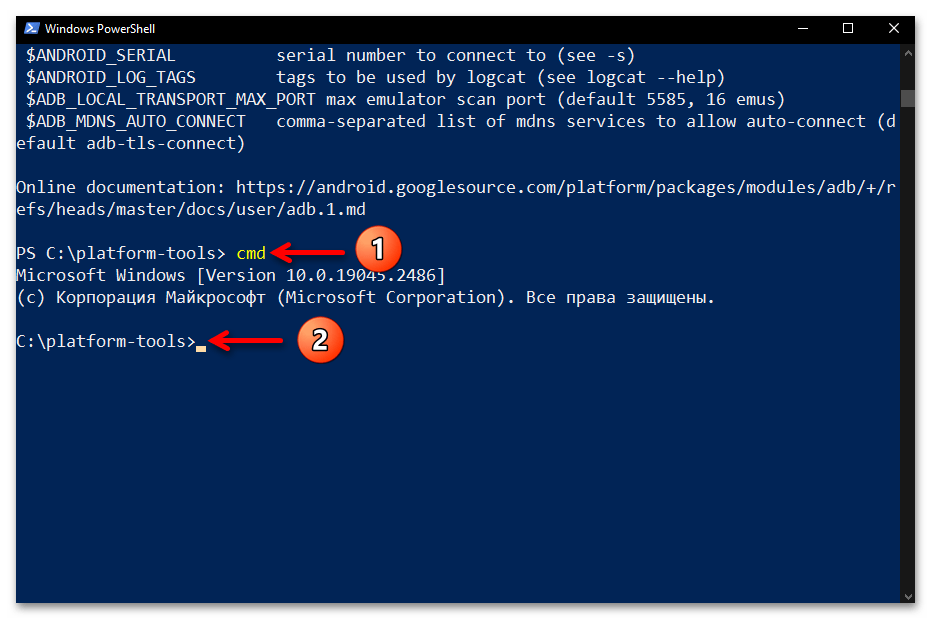
- Откройте консольную оболочку PowerShell. Как и классическую «Командную строку» в Windows 10 это средство можно запустить большим числом способов, а быстрее всего — из меню дополнительных действий кнопки «Пуск» на «Панели задач» операционки: кликните по последней правой кнопкой манипулятора и выберите «Windows PowerShell» в отобразившемся перечне.

Подробнее: Запуск «PowerShell» в ОС Windows 10
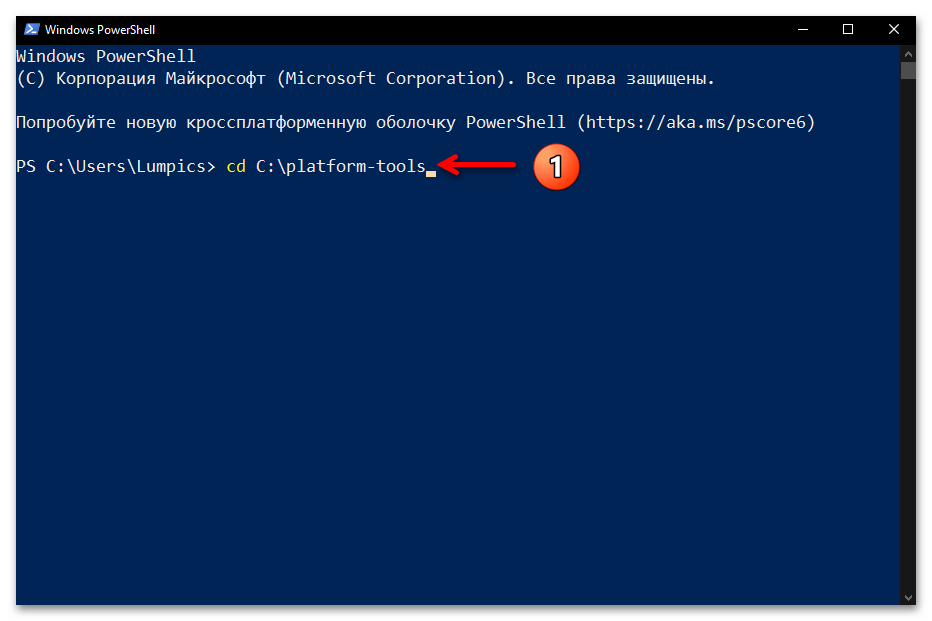
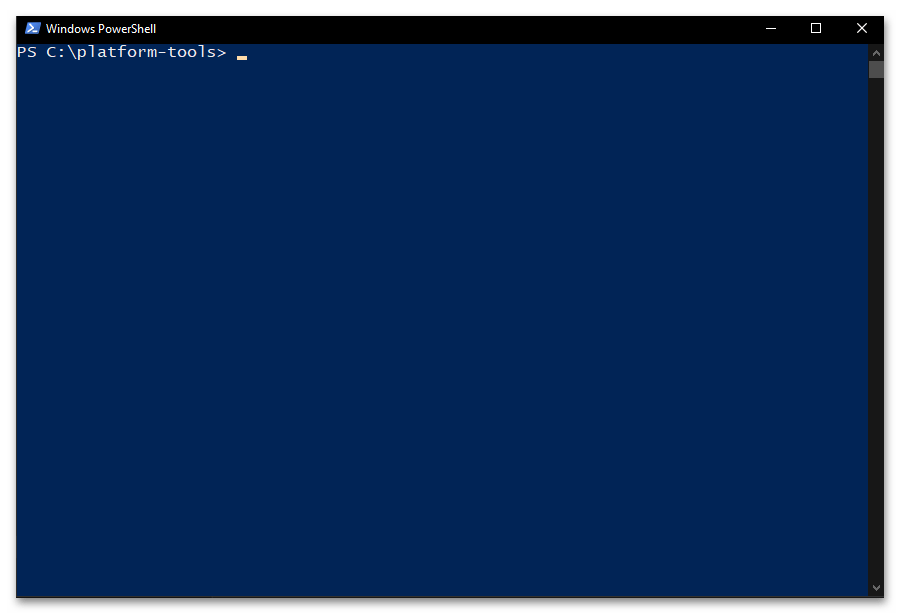
- Введите команду перехода в папку утилиты ADB, — её синтаксис аналогичен рассмотренному выше в этом материале указанию для классической «Командной строки»:
cd C:\platform-tools
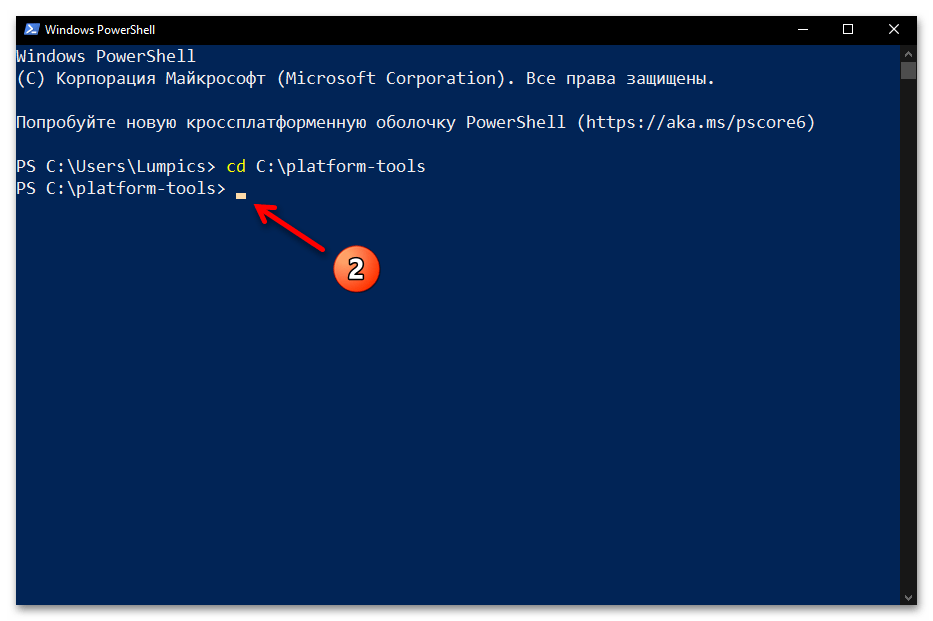
Нажав «Ввод» на клавиатуре, отправьте указание на выполнение консолью.
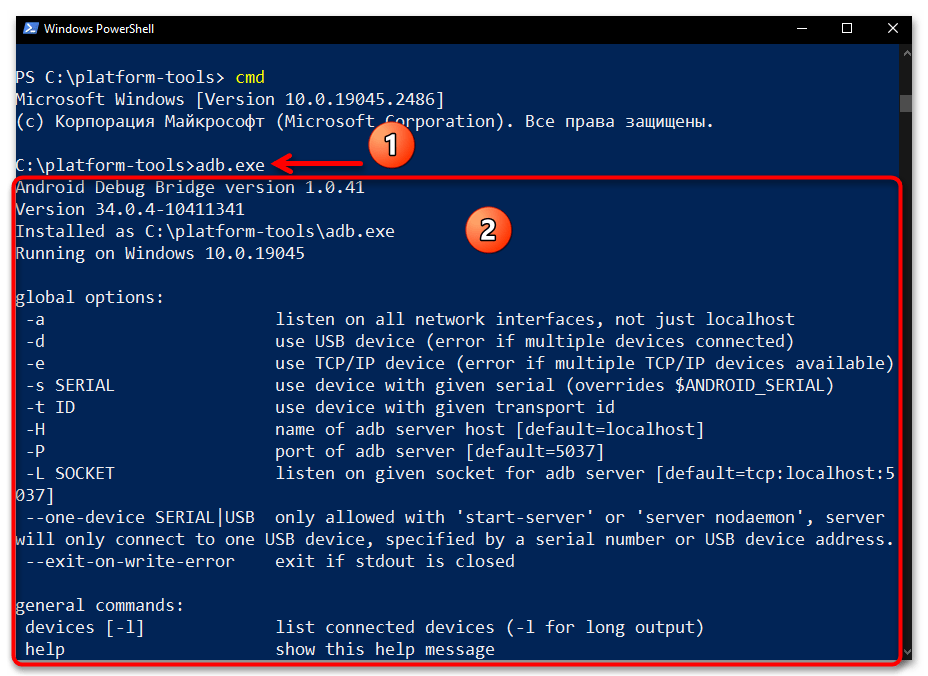
- Собственно, всё — средство ADB готово к выполнению своего предназначения. Дальнейшие ваши действия двухвариантные:
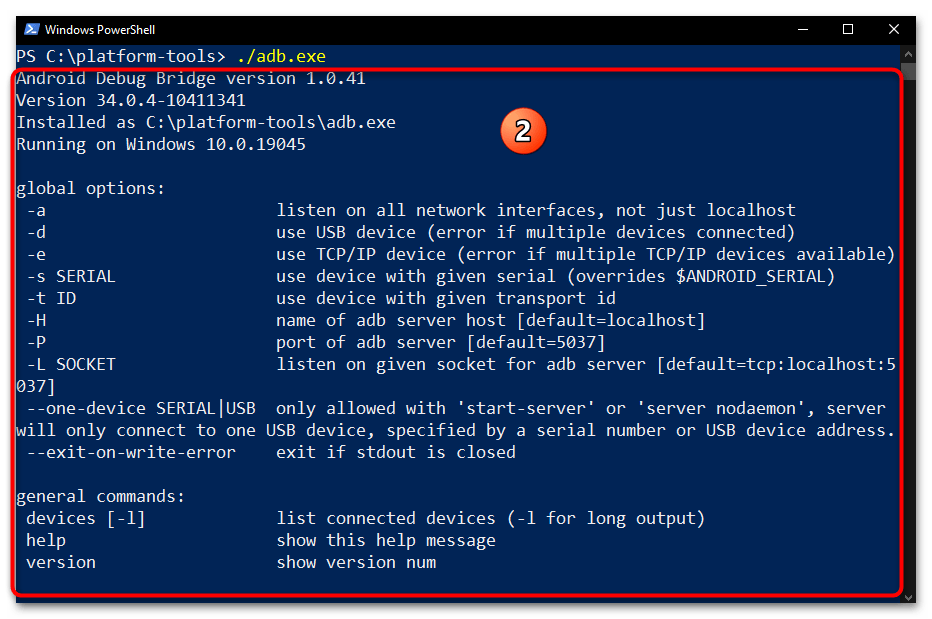
- При запуске ADB-команд в Windows PowerShell по умолчанию перед ними необходимо прописывать префикс
./. То есть, к примеру, чтобы вывести в консоли список основных команд ADB в текущем случае, необходимо отправить на выполнение следующее текстовое указание:./adb.exe
После написания команды и нажатия «Enter» получаем следующий результат:
- Если подставлять
./перед каждой передаваемой средствами ПоверШелл через Андроид Дебаг Бридж командой вы не желаете, то можете перед началом работы открыть себе доступ к «классической» командной строке в современной консольной оболочке. Для этого запустите в PowerShell команду:cmd
Далее отправляйте указания ADB мобильному девайсу c ОС Android без префикса:


- При запуске ADB-команд в Windows PowerShell по умолчанию перед ними необходимо прописывать префикс


Вариант 2: Расширенное контекстное меню папки
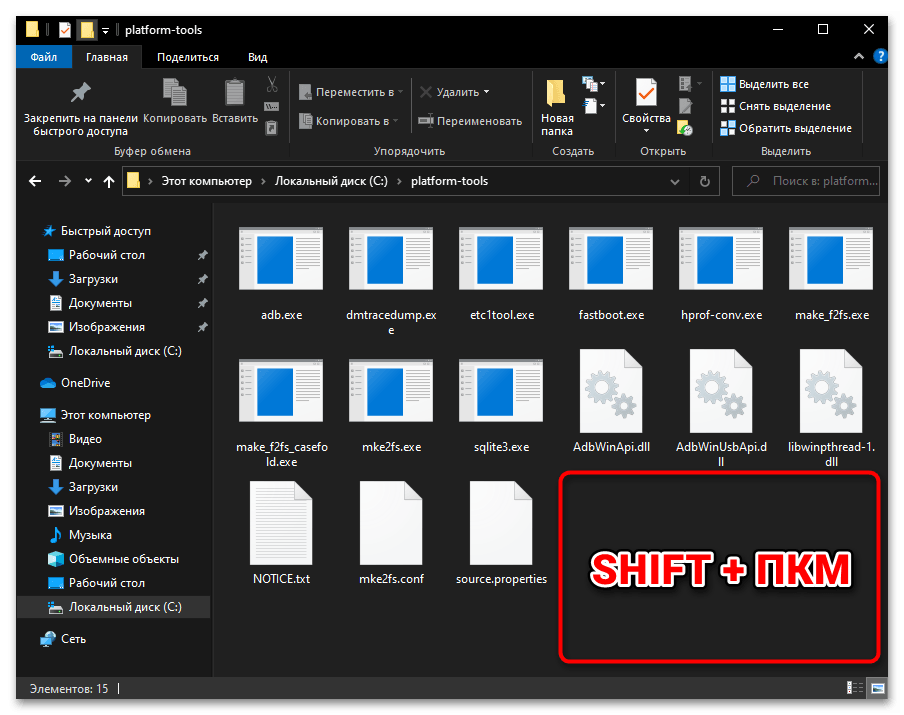
Ещё один метод запуска ADB в консольной оболочке PowerShell реализуется средствами Проводника Windows 10, а его использование часто оказывается более удобным, нежели описанный выше подход.
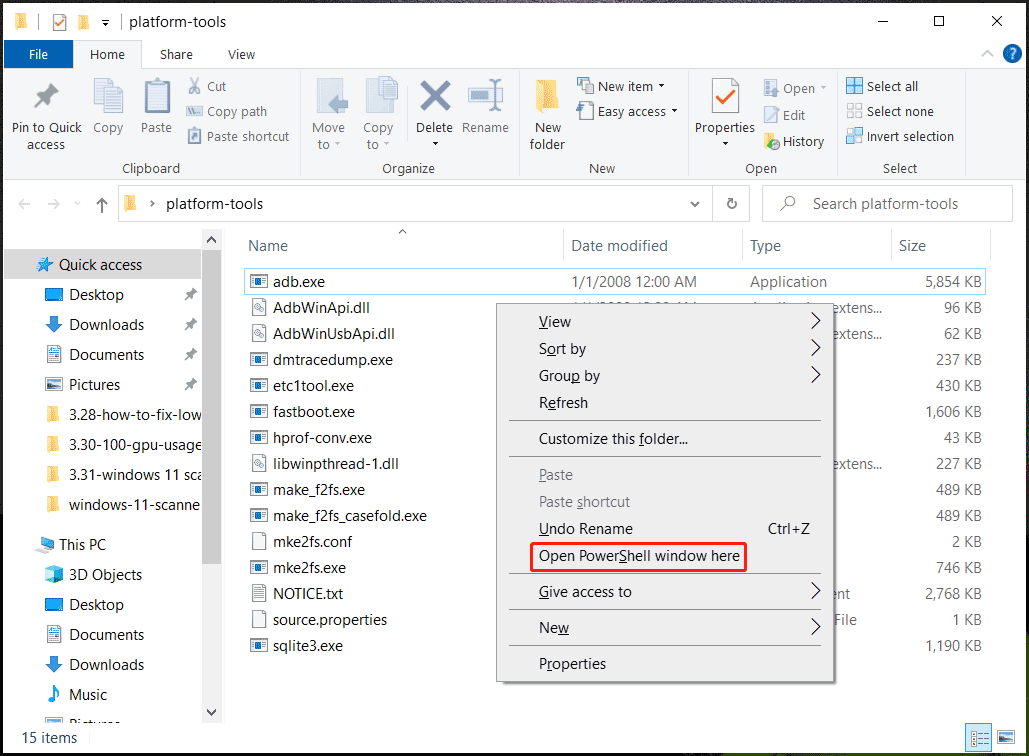
- Перейдите в папку с утилитой ADB через Проводник Win 10.
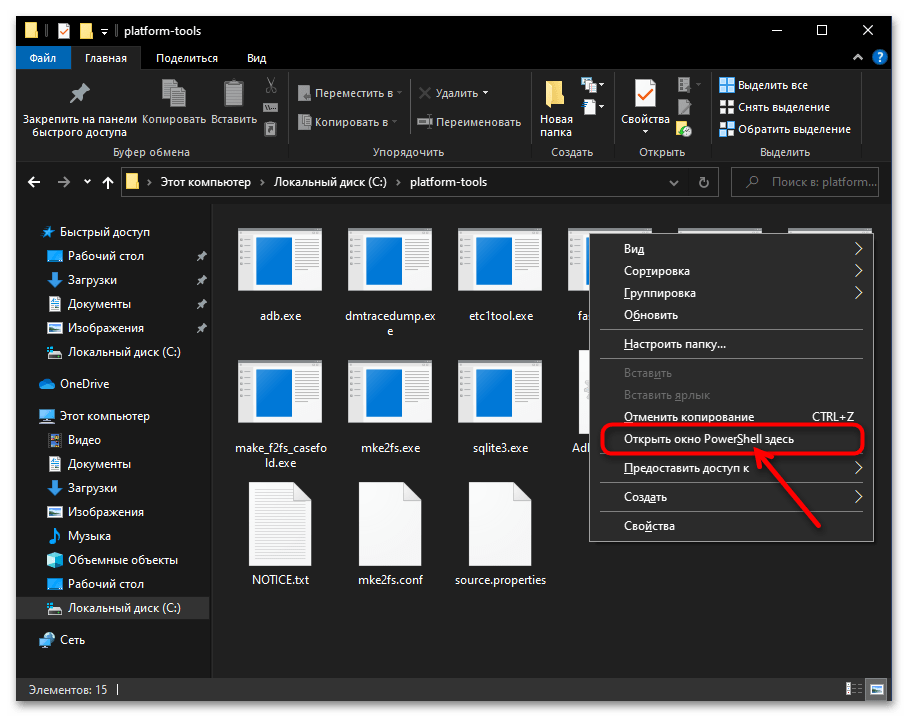
- Нажмите «Shift» на клавиатуре компьютера и, удерживая эту клавишу, щёлкните правой кнопкой манипулятора по свободному от элементов (значков файлов) месту в демонстрирующей содержимое каталога «platform-tools» области окна Проводника.
- По результату вышеописанной манипуляции откроется расширенное контекстное меню папки (после этого можно прекратить воздействие на кнопку «Shift» клавиатуры). В меню выберите пункт «Открыть окно Power Shell здесь».
- Итогом манипуляций станет запуск приложения Windows Power Shell c уже открытым в нём каталогом «platform-tools». На этом наша задача считается решённой, приступайте к вводу и отправке на выполнение команд Android Debug Bridge.

(Принцип здесь тот же, что и при рассмотренном выше варианте запуска утилиты: либо предварительно запустите команду
cmd, а затем отправляйте ADB-команды в их «стандартном» виде; либо подставляйте префикс./перед каждым указанием).

Дополнительно. Подключение Android-устройства к ADB на ПК
Чтобы скачивание, развёртывание и запуск ADB в среде Windows 10 позволили достичь конечных целей своего осуществления, то есть вы получили возможность производить вмешательство в работу системного ПО управляемого ОС Android мобильного девайса с компьютера, чрезвычайно важно правильно подключить смартфон или планшет к консольной утилите. Полный алгоритм выполнения данной операции изложен ниже.
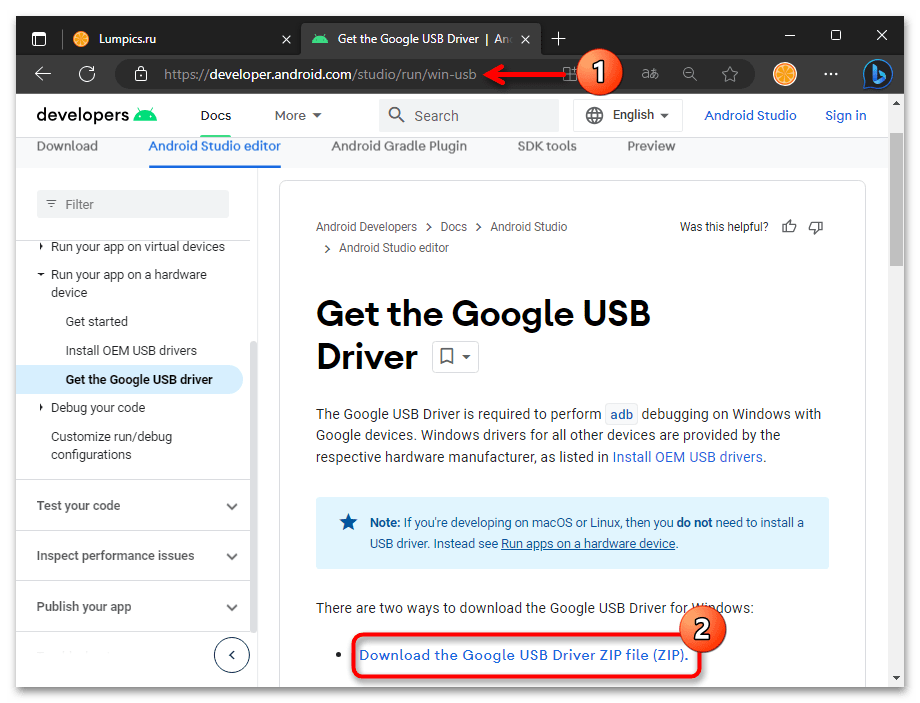
Скачать универсальные драйверы от Google для работы с Android-девайсами через ADB
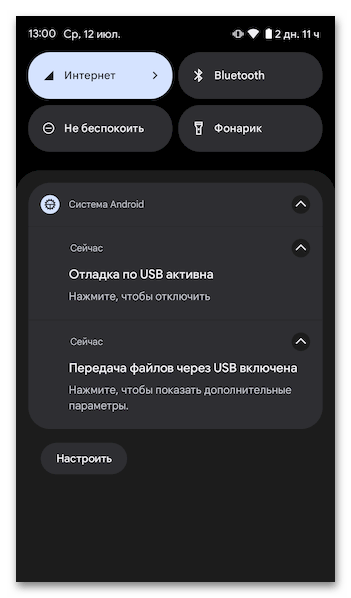
- Прежде чем приступать к выполнению вмешательства в работу системного ПО смартфона или планшета под управлением ОС Android с компьютера через ADB, на мобильном устройстве необходимо активировать особый режим функционирования – «Отладка через USB».

Сделайте это в первую очередь, а подробные инструкции по решению данного вопроса, если они необходимы, вы обнаружите в статьях по следующим ссылкам:
Подробнее:
Как включить «Отладку по USB» на Android-девайсе
Активация режима «Отладка по USB» на смартфонах Xiaomi (Mi, Redmi, POCO) - Подсоедините Андроид-девайс с активированной «Отладкой по ЮСБ» к USB-порту компьютера кабелем.
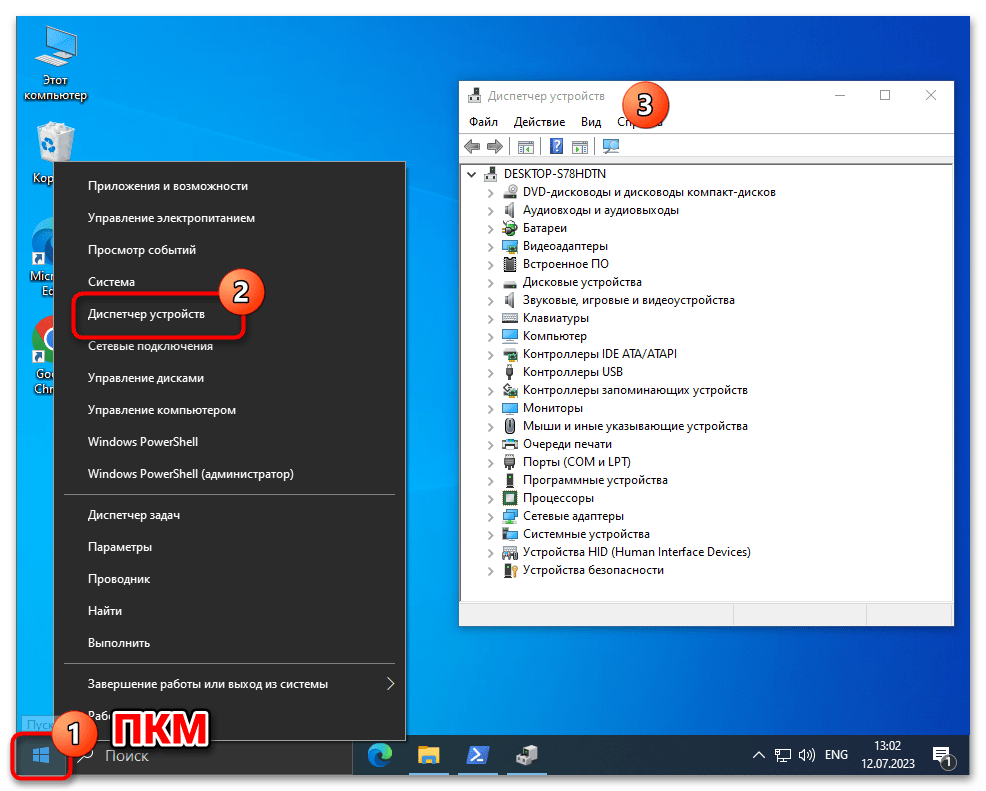
- Далее, например из контекстного меню кнопки «Пуск» на «Панели задач» операционки, откройте «Диспетчер устройств» Windows 10.
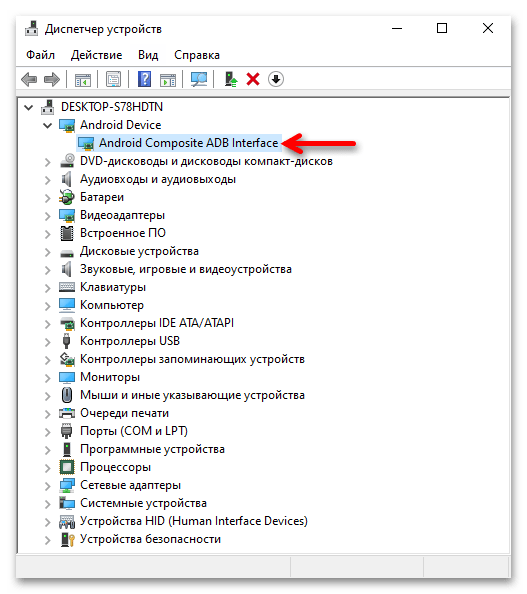
- Убедитесь, что мобильное устройство определилось операционной системой правильно и для него загружен необходимый драйвер. В таком варианте «Диспетчер устройств» отображает категорию «Android Phone», и в ней — запись «Android Composite ADB Interface» (последняя не должна сопровождаться какими-либо отметками, типа восклицательного знака на жёлтом фоне).

Если с определением Android-девайса в «Диспетчере устройств» Windows 10 наблюдаются какие-либо проблемы, чаще всего их следует решать путём установки/переустановки ADB-драйвера.
Читайте также: Инсталляция драйверов для работы с Android-девайсами с ПК
Опять же, в большинстве случаев, самым правильным выбором драйвера для обеспечения сопряжения ПК и Андроид-устройства через АДБ будет универсальный компонент, доступный для скачивания на интернет-ресурсе «Android Developers»

(ссылка доступна перед настоящей инструкцией).
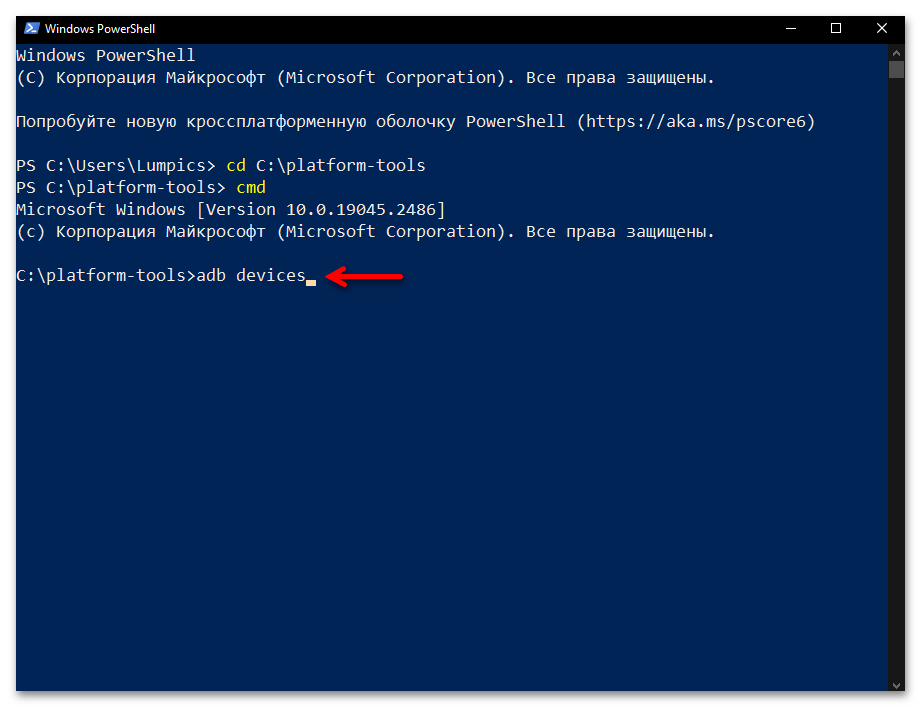
- Запустите утилиту ADB любым из предложенных выше в этом материале способом.

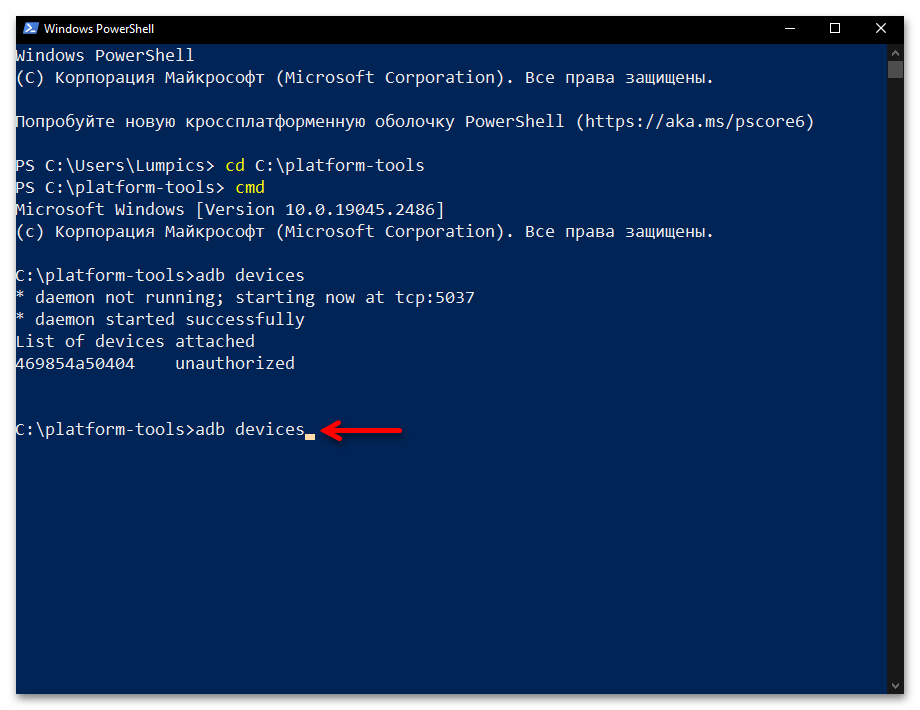
Напишите и отправьте на выполнение консолью Windows 10 следующую команду:
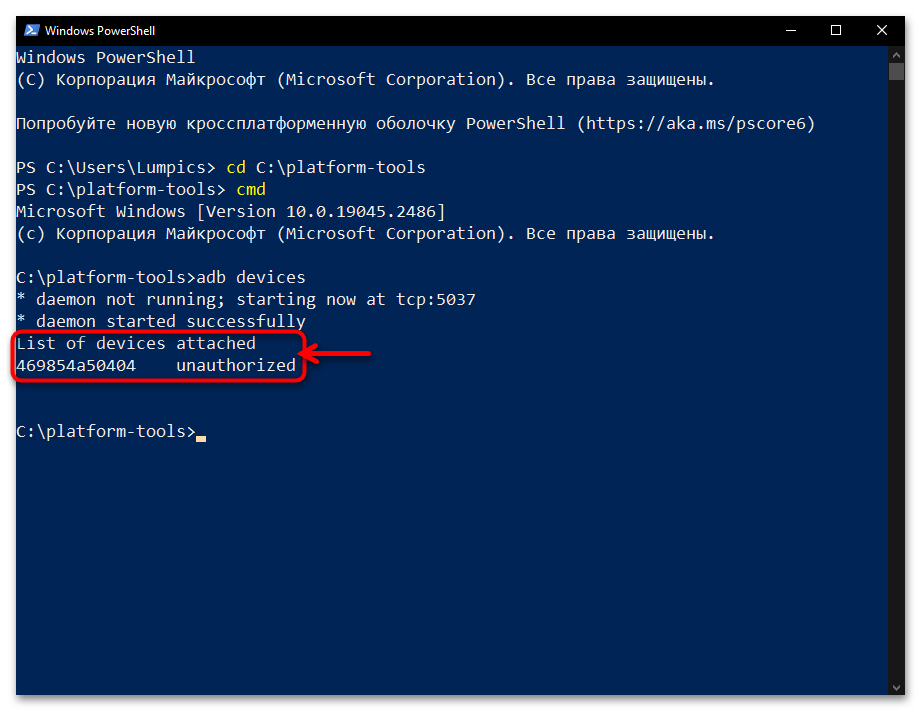
аdb devices - Если сопряжение ПК и мобильного устройства через Android Debug Bridge осуществляется впервые, «Командная строка»/«PowerShell» в ответ на указание из предыдущего пункта инструкции выдаст следующее:
List of devices attached
ID_Android-устройства unauthorized
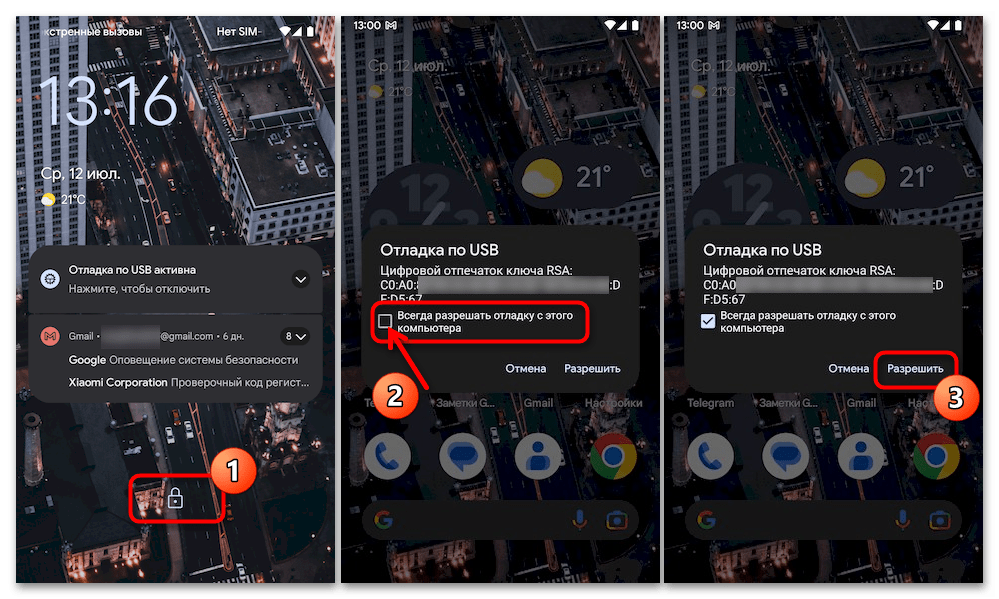
В таком случае, возьмите (не отсоединяя от компьютера) смартфон или планшет, разблокируйте его. Поставьте отметку «Всегда разрешать отладку с этого компьютера» в отображаемом на экране Android-девайса окне «Отладка по USB», а после этого коснитесь кнопки «Разрешить».
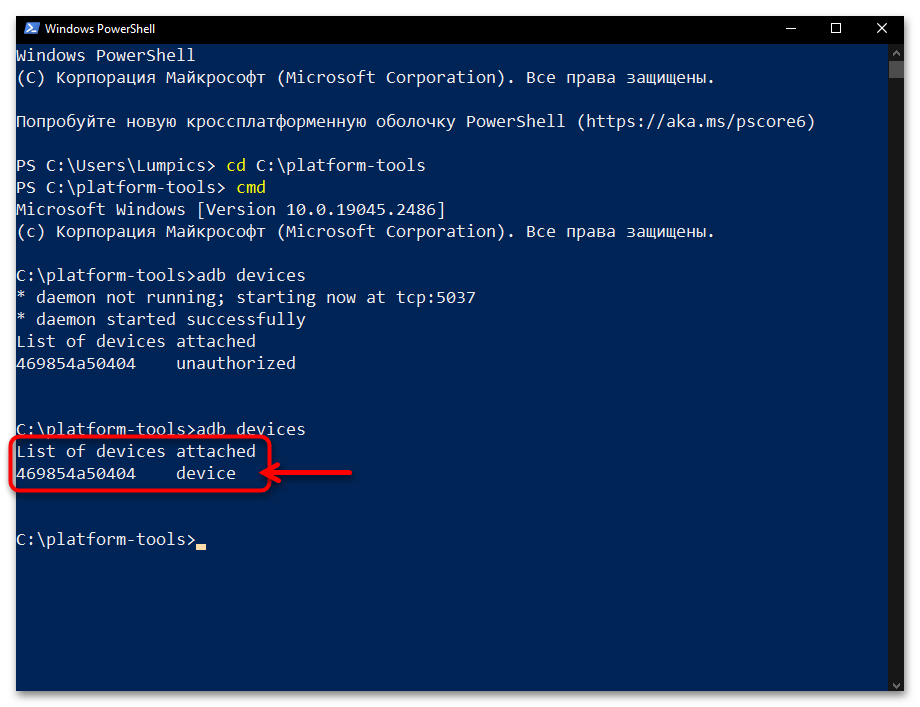
Далее перейдите к окну консоли с запущенной утилитой ADB на компьютере, повторите запуск команды
аdb devices. - Получив в «Командной строке» или «PowerShell» ответ в виде строчки
ID_Android-устройства device, вы можете переходить к непосредственному решению возлагаемых на ADB задач, — смартфон/планшет теперь подключён к утилите правильно и готов к выполнению её (а по сути – ваших) указаний.
Android Debug Bridge (ADB) is an important command line tool for
controlling your Android device from your computer. With
ADB install Windows, you can run many useful commands
to back up data and download .zip files, which you would otherwise do in
custom recovery, unlocking the bootloader on Nexus devices, and many
more uses. It is another app to debug your Android phone.
ADB install Windows machine is relatively simple but comes complex in some incidents for some with setting
up ADB. This guide will cover all about ADB for Windows from start to finish.

ADB on Windows
ADB or Android Debug Bridge comes with Android SDK for developers
and enthusiasts to learn and customize their devices.
Download ADB for Windows along with the Fastboot
utility is part of a platform tool that provides the ability to
modify the system files of the Android device using online commands
through the computer without having root access to the Android
device.
If you are one of us who is passionate or wants to get into Android development and want to learn how to
install ADB driver Windows 10 (Android Debug Bridge). We will go through How to Install ADB Windows 10,
setting up ADB, and how it will help you in your run.
How to Install ADB on Windows?
- Download the ADB Driver ZIP file for Windows.
-
Extract the ZIP file contents to an easily accessible folder (for
example, C:\adb) -
Open Windows Explorer and see where the contents of this ZIP file have
been extracted. -
Then, from the directory of this ADB binary, open the command
prompt.This can be done by clicking the «Open command prompt here»
option and holding Shift and Right-Click in the folder. (See
«PowerShell,»instead of «prompt command,» for some ADB Windows 10
users.) -
Connect your smartphone or tablet using a USB cable to your
computer.Change to «Transfer file(MTP)» mode in USB mode. Some OEMs
may need this or not, but it is best to keep it in this mode for
general compatibility. -
To launch the ADB daemon, enter the command in the Command Prompt
window: ADB devices. -
A prompt to allow or deny USB debugging access should appear on your
phone’s screen. When prompted you want to give USB Debugging access
(and tap the check box if you never want this prompt again). -
Finally, re-enter the step # 6 command. If all was successful, you
should now view the serial number of your device in the command
prompt. Yay! Yay! Yay! Now on your device, you can execute any ADB
command! Start now modding your phone with our extensive tutorial
list!
Some Linux users should know that ADB setup installation on your
computer can be easier. The guide above certainly will work for you, but
you can skip steps 1 and 2 of the above guide with one of the following
commands from Debian or Fedora / SUSE distro.
Can type in the following command for Debian-based Linux users to
install ADB: Sudo apt-get install ADB
The following command can be used to set up Fedora / SUSE-based Linux
users: Sudo yum install android-tools
Supported Windows version
Windows 10 ADB and Fastboot tools have supported different versions of ADB drivers. It has all
support through
Windows;
such as Windows 8 / Windows 7 / Windows 8.1 / Windows 10 for both 32-bit and 64-bit processor types. ADB driver
for
Windows also supports the latest version of Windows 11.
Useful Things you can do with ADB for Windows 10
Once you successfully install ADB Windows 10 on your
computer, you can do many useful things with ADB. The following is just
a small portion of all it can do. You will find that many tools can do
the same in a normal environment, but
ADB installer Windows 10 can do it easily and can play
an essential role in some cases. USB debugging must be enabled!
- Android Backup and Restore with ADB
- Install APK for Android from the computer
- Reboot phone in recovery mode and bootloader
- Convert SD card to internal storage with ADB
How does ADB Download Windows work?
Android Debug Bridge through install ADB on Windows works as a fundamental tool for Android
development. It allows users to make high-level adjustments on
Android devices at the application and system levels. To access
some features of the Android platform, users must use hidden
Android paths and methods. And this is
download ADB Windows that allows you to access
all the available features of Android to change the boundaries
more widely on Android devices.
Those familiar with the Android Debug Bridge (ADB) already know
its benefits. These features allow them to download apps that they
cannot download from the Google Play Store. For example, they can
use ADB to record their phone screen through their computer. The
ADB command line tool allows users to control
Android ADB driver Windows 10 PCs with a USB
cable.
Importance of Fastboot ADB Driver
If you’ve just entered the world of the Android ecosystem, the ADB
driver Windows and Fastboot binaries might be among the main things you
should know. If your sole purpose for using your Android device is to
make calls and send messages, you probably won’t need these drivers. But
the reality is that there are only a limited number of users in this
population. For the vast majority, they want to explore the full
potential of this open source environment.
Useful commands after you install ADB on Windows 10
-
ADB devices — This command shows ADB-supported devices connected
to your system. - ADB reboot — Restarts your device.
-
ADB backup — Helps you create a full backup of your device and
save it to your computer. -
ADB sideload — Helps you to download ROMs and other ZIP files
from your computer to your Android. - ADB pull — Helps you copy files from phone to computer.
-
ADB reboot — Helps to execute quick boot commands by booting
into bootloader mode.

Does setting up ADB support Windows 11?
Yes, it works; you can find ADB for Windows 11. Android Debug Bridge
(ADB) also works on other versions of Windows like
Download ADB for Windows 7 and above. It also works on
Mac and Linux Operating systems.
Is the ADB Windows driver safe to install and use?
Yes, the ADB driver is safe to install and use on your Windows or Mac
computer. It just acts as a bridge between your Windows PC/Mac computer
and Android devices.
ADB for Windows Review
ADB is very useful and with install ADB on Windows, the utility comes full support for all
Android programmers. Actually, if
you’re not yourself, you now understand how to set up
ADB for Windows or Mac and use it with
your Android device. And if you’re new to this, we have listed some of
the common ADB commands above. This allows you to experience Android
like never before.
A step-by-step guide to get you started with the Android Debug Bridge tool.
Quick Links
- What is Android Debug Bridge (ADB)?
- How does ADB work?
- How to set up ADB
- How to use ADB from any directory on your PC or Mac
- Examples of ADB commands
- What else can I do with ADB?
When it comes to smartphone operating systems, Android dominates in global market share. However, several features of Google’s OS can be accessed only through paths and methods that are hidden away from the average user. These have generally been done with the help of some command line Android Debug Bridge (ADB) commands, a tool that Google offers for developers to debug various parts of their applications or the system, but which we can use for all kinds of neat, hidden tricks. A prerequisite to these tricks is installing ADB on your computer. So, in this guide, we will show you how to install ADB on Windows, macOS, and Linux in quick and easy-to-follow steps.
What is Android Debug Bridge (ADB)?
The internal structure of ADB is based on the classic client-server architecture. There are three components that make up the entire process.
- The client, i.e. the PC/Mac/Chromebook you have connected to your Android device. We are sending commands to our device from the computer through the USB cable or wirelessly.
- A daemon (known as «adbd») that runs commands on a device. The daemon runs as a background process on each device.
- A server that manages communication between the client and the daemon. The server runs as a background process on the computer.
How does ADB work?
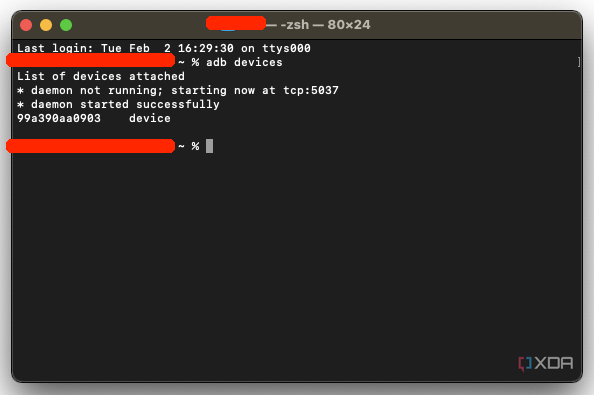
Because there are three pieces that make up ADB (the client, the daemon, and the server), certain pieces to be up and running in the first place. If you have freshly booted the computer (and you don’t have it set up to start the daemon on boot), then you will need it to be running before any communication can be sent to the target Android device. You’ll see the following message in the command prompt or terminal, which will check to make sure the daemon is running.
If the daemon isn’t running, then it will start the process and tell you which local TCP port it has been started on. Once that ADB service has been started, it will continue to listen to that specific port for commands that have been sent by the ADB client. It will then set up connections to all running devices that are attached to the computer (including emulators). This is the moment when you’ll receive the authorization request on the Android device if the computer hasn’t been authorized in the past.
How to set up ADB
Setting up ADB on the computer is just half the equation since you’ll also need to do some things on the smartphone or tablet to accept the ADB commands.
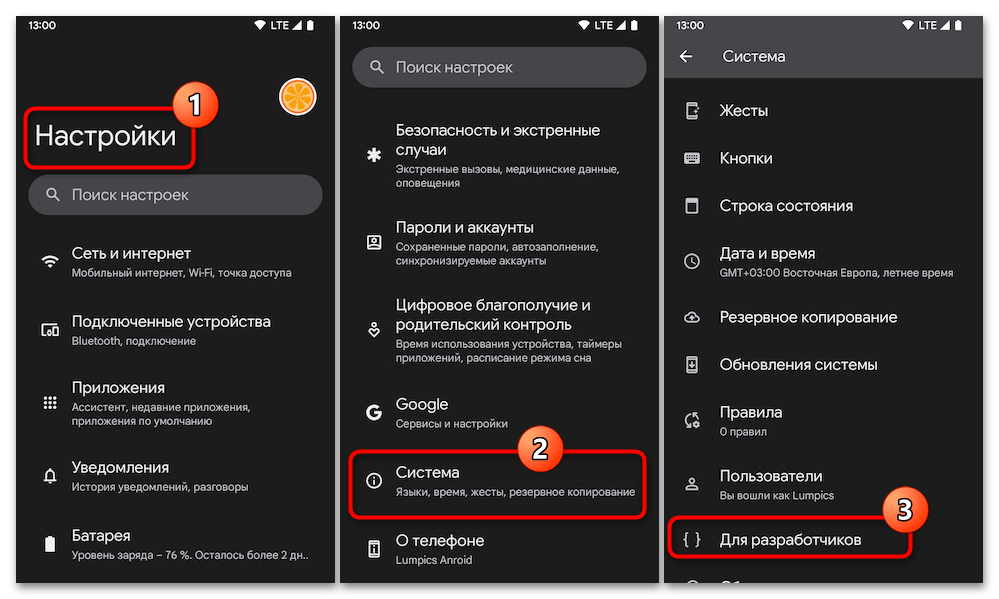
Phone setup
- Launch the Settings application on your phone.
- Tap the About phone option generally near the bottom of the list.
- Depending on the OEM skin, the About phone page may be called something else or buried somewhere else in the Settings app on your device.
- Then tap the Build number option seven times to enable Developer Mode. You will see a toast message when it is done.
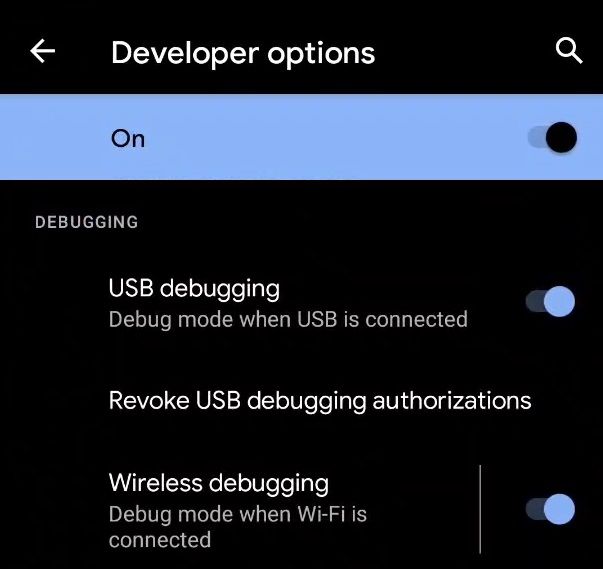
- Now go back to the main Settings screen, and you should see a new Developer options menu you can access.
- On Google Pixel phones and some other devices, you might need to navigate to Settings > System to find the Developer options menu.
- Go in there and enable the USB debugging option.

- You are partially done with the phone setup process. Next up, you will need to scroll below and follow the rest of the instructions for your particular operating system.
How to set up ADB on Microsoft Windows
- Download the Android SDK Platform Tools ZIP file for Windows.
- Extract the contents of this ZIP file into an easily accessible folder (such as C:\platform-tools).
- Open File Explorer and browse to where you extracted the contents of this ZIP file.
- Open up a Command Prompt/Terminal instance from the same directory as this ADB executable. This can be done by holding Shift and right-clicking within the folder and then clicking Open command window here or Open PowerShell window here. Windows 11 users should see Open in Terminal in the right-click context menu without even pressing the Shift button on the keyboard.

- Connect your smartphone or tablet to your computer with a USB cable. Change the USB mode to “file transfer (MTP)” mode. Some OEMs may or may not require this, but it’s best to just leave it in this mode for general compatibility.
- In the Command Prompt/Terminal window, enter the following command to launch the ADB daemon:
adb devices - On your phone’s screen, you should see a prompt to allow or deny USB Debugging access. Naturally, you will want to grant USB Debugging access when prompted (and tap the always allow check box if you never want to see that prompt again).
- Finally, re-enter the command from step 6. If everything was successful, you should now see your device’s serial number in the command prompt/Terminal window.

You can now run any ADB command on your device! Now, go forth and start modding your phone.
Notably, there exist a plethora of CLI package managers for Windows — WinGet, Scoop, and Chocolatey to name a few. In case you use them to install ADB on your PC, you don’t need to manually download and update Google’s Platform Tools. With that said, version compatibility and installation processes might vary across these package managers, so it would be better to consult the respective help manuals and product forums to get support.
How to set up ADB on macOS
- Download the Android SDK Platform Tools ZIP file for macOS.
- Extract the ZIP to an easily accessible location (like the Desktop, for example).
- Open Terminal.
- To browse to the folder you extracted ADB into, enter the following command:
cd /path/to/extracted/folder/For example, you can place the contents on your desktop:
cd /Users/XDA/Desktop/platform-tools/ - Connect your device to your Mac with a compatible USB cable. Change the USB connection mode to “file transfer (MTP)” mode. This is not always required for every device, but it’s best to just leave it in this mode, so you don’t run into any issues.
- Once the Terminal is in the same folder your ADB tools are in, you can execute the following command to launch the ADB daemon:
./adb devices - On your device, you’ll see an Allow USB debugging prompt. Allow the connection.
- Finally, re-enter the command from step 7. If everything was successful, you should now see your device’s serial number in macOS’s Terminal window.

Congratulations! You can now run any ADB command on your device!
While the guide above will certainly work, veteran macOS users can also opt to install ADB on their Macs using an unofficial package manager such as Homebrew or MacPorts. That way, you don’t have to manually update the binaries.
How to set up ADB on Linux
- Download the Android SDK Platform Tools ZIP file for Linux.
- Extract the ZIP to an easily accessible location (like the Desktop, for example).
- Open a Terminal window.
- Enter the following command:
cd /path/to/extracted/folder/ - This will change the directory to where you extracted the ADB files.
- Example:
cd /home/XDA/Desktop/platform-tools/
- Example:
- Connect your device to your Linux machine with your USB cable. Change the connection mode to file transfer (MTP) mode. This is not always necessary for every device, but it’s recommended, so you don’t run into any issues.
- Once the Terminal is in the same folder your ADB tools are in, you can execute the following command to launch the ADB daemon:
./adb devices - Back on your smartphone or tablet device, you’ll see a prompt asking you to allow USB debugging. Go ahead and grant it.
- Finally, re-enter the command from step 8. If everything was successful, you should now see your device’s serial number in the Terminal window output.

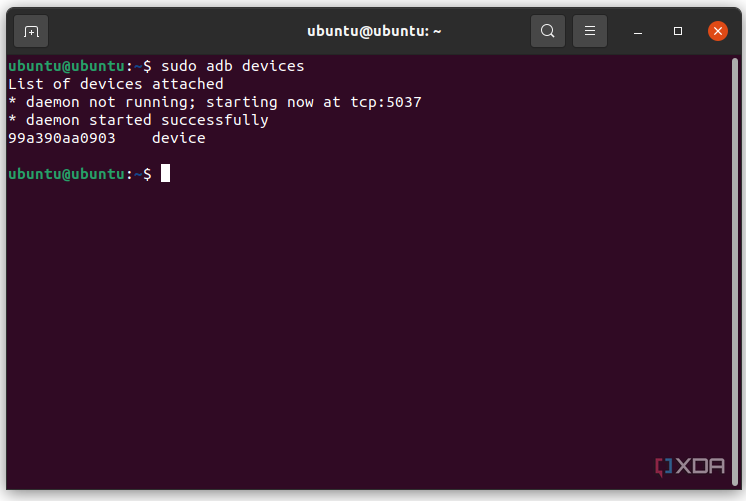
Congrats! You can now run any ADB command on your device!
Linux users should know that there is an easier way to install ADB on their computers. The guide above will certainly work for you, but those who own a mainstream Debian/Ubuntu or Fedora/SUSE-based distro of Linux can skip steps 1 and 2 of the guide above and use one of the following commands:
- Debian/Ubuntu-based Linux users can type the following command to install ADB:
sudo apt-get install android-sdk-platform-tools - Fedora/SUSE-based Linux users can type the following command to install ADB:
sudo dnf install android-tools
However, it is always better to opt for the latest binary from the Android SDK Platform Tools release since the distro-specific packages often contain outdated builds.
How to use ADB from any directory on your PC or Mac
Downloading the ADB executable is the initial step, but power users might want to access it from any folder or directory without navigating back to the original location. Fortunately, the process to do so is quite simple. All you need to do is modify the PATH variable of the host operating system.
The PATH is a powerful environmental variable used by operating systems to specify the location of important executables. For instance, you can type «calc» in the Run prompt of Windows to launch calculator, but not «chrome» to start Google Chrome — simply because the location of the latter isn’t included in the PATH variable.
The OS allows applications as well as end users to change the variable values. This is useful to people using programs/scripts that are dependent on such applications, as the program does not have to attempt to hard code the location. For this particular scenario, adding the ADB executable and other components from Google Platform Tools allows for better organization so that you don’t need to put all of your flashable files in the same folders.
Windows
- Right-click on the Start button (or use the Windows + X keyboard shortcut) and select the System option. You will be greeted with a screen showing some system information.
- Select Advanced system settings from the Related links section under Device specifications.
- Click on the Environment Variables button.
- Look for the variable named «Path» under System variables and double-click it.
- Click Browse and navigate to the folder where you extracted the ADB files (e.g. C:\platform-tools).
- Please ensure before you click Browse that no field is highlighted. If a field is highlighted, you will end up replacing it. Click somewhere in the list that doesn’t contain an entry to ensure that you do not replace a field.
- When you see the folder location is properly listed, click the OK button out of all the Windows you have opened to confirm.
- Sometimes, the graphical shell needs a restart to make the changes take effect. You can simply sign out and sign in again or reboot your PC to force Windows to use the updated PATH settings.
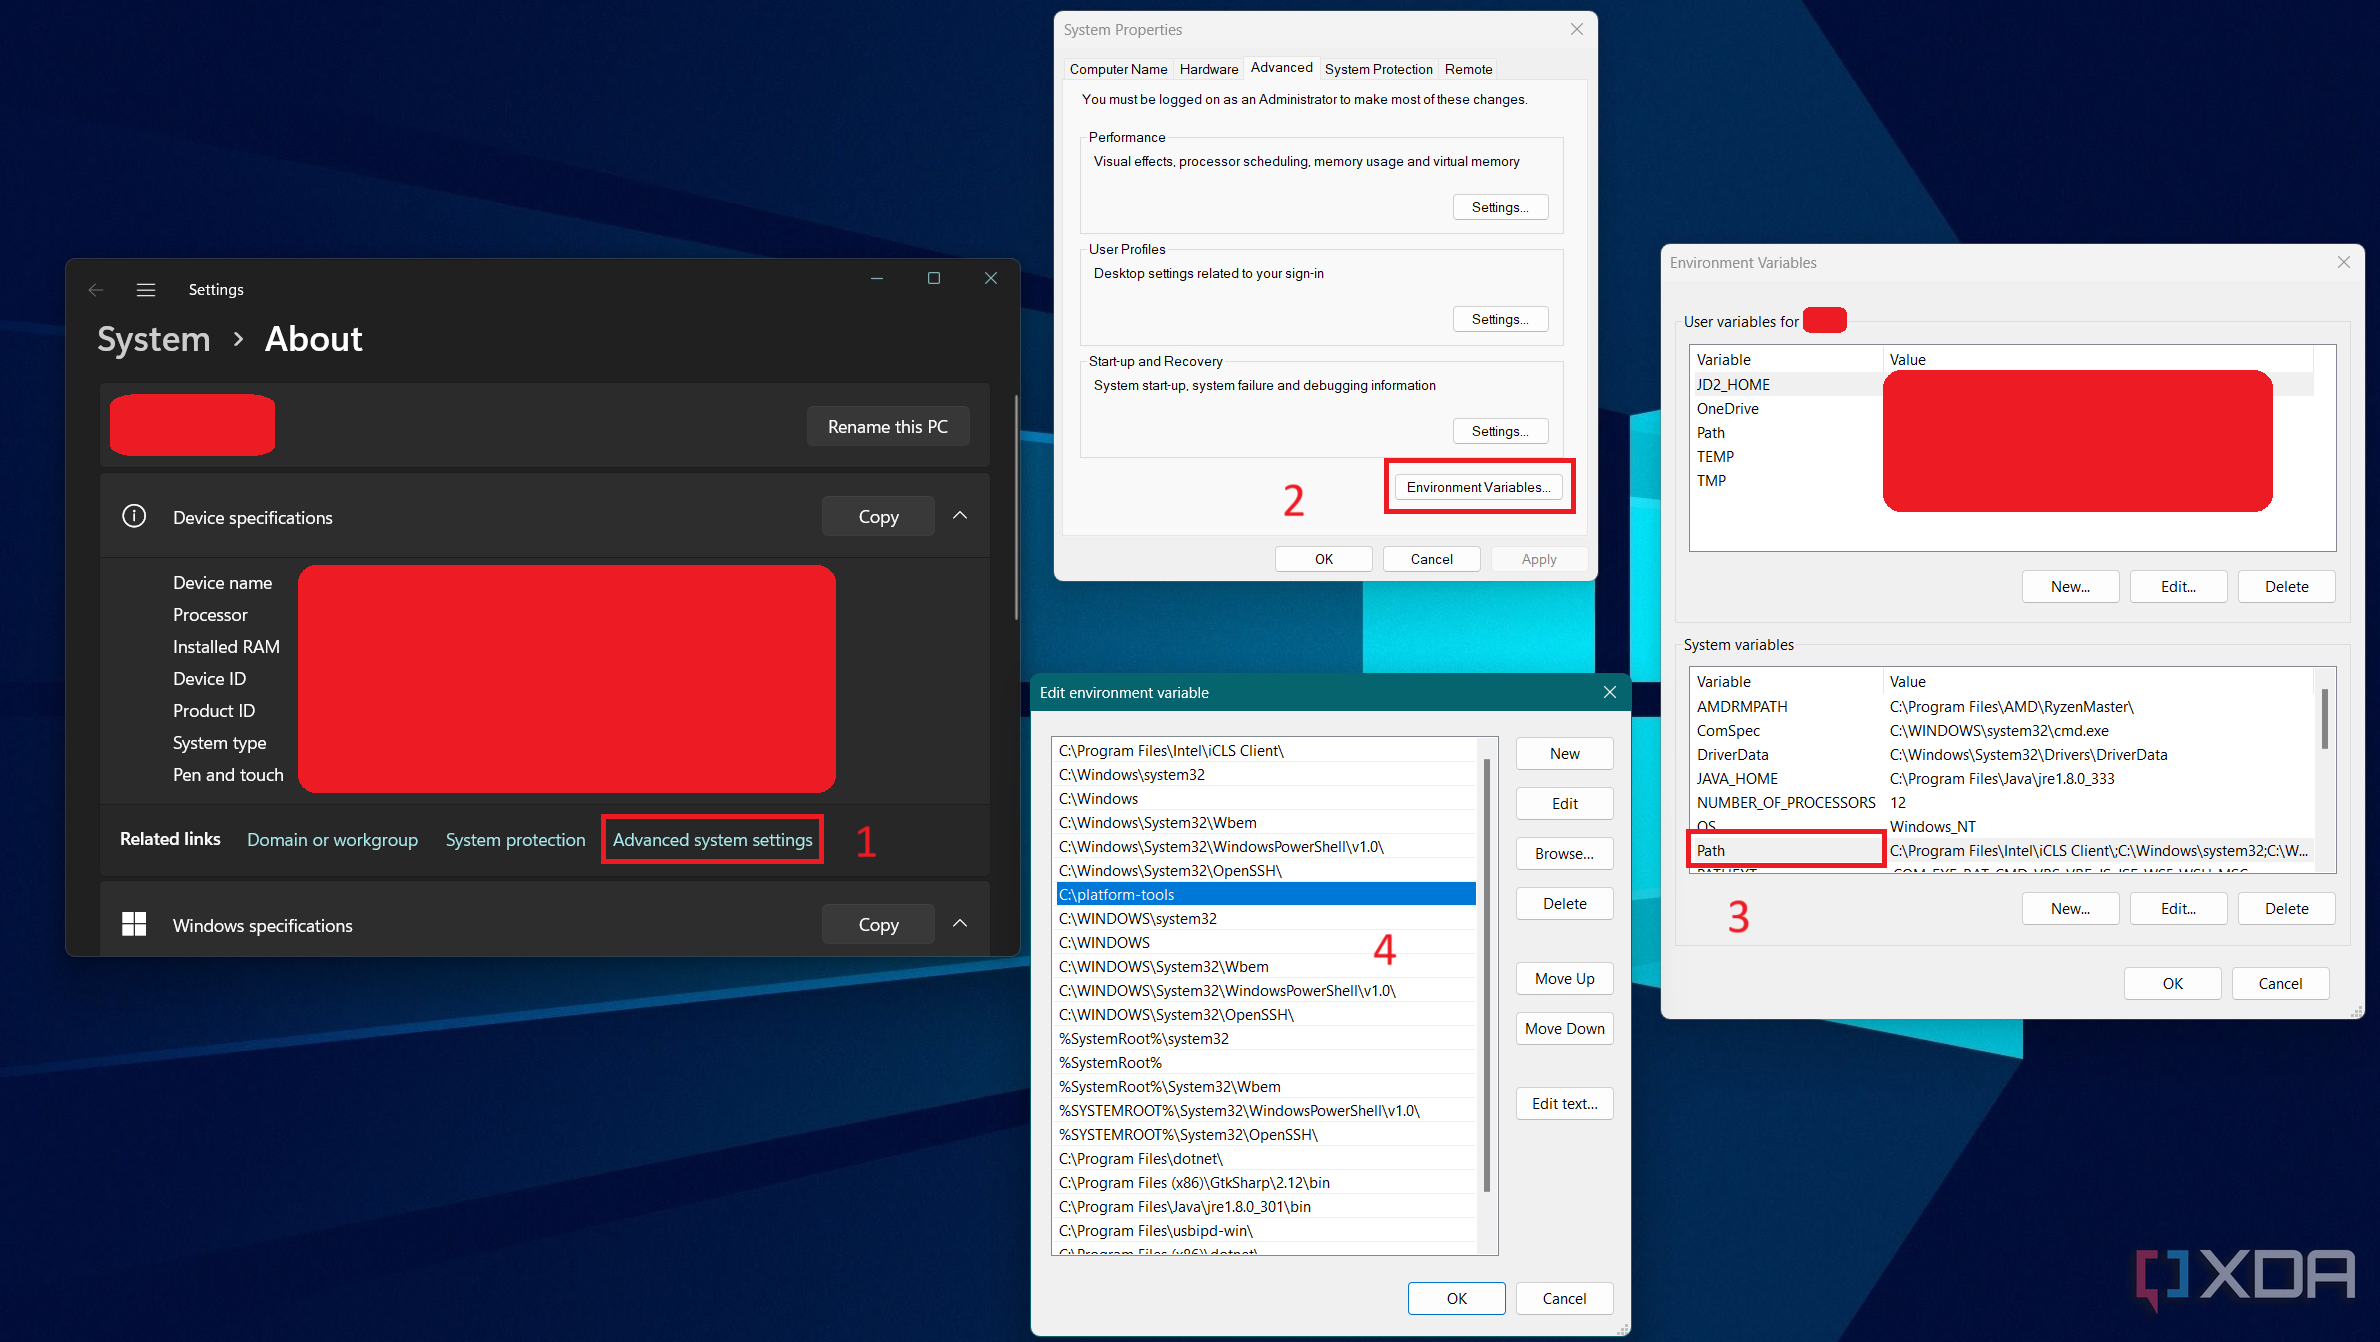
Now start a new terminal or command prompt instance and type adb to verify the location has been added.
In case you use a package manager like Chocolatey to install ADB, it should take care of the PATH variable editing portion as well. As a result, you can skip the above process.
macOS
- Note down the location where you extracted the ADB tools.
- Open the Terminal app and make sure to be in the Home directory:
cd ~
- In case you’re running any macOS version older than Catalina, the default shell should be Bash. For macOS Catalina and newer, the default changed to the Z shell (Zsh). Hence, you need to determine the current shell before changing the PATH variable. Type the following command and press Enter to see the shell your Mac is using:
echo $0
- Depending on the output, create a shell configuration file.
- For Bash:
touch .bash_profile
- For Zsh:
touch .zshrc
- People who are already using custom shell configurations can skip this step.
- For Bash:
- Open the shell configuration file with TextEdit:
- For Bash:
open -e .bash_profile
- For Zsh:
open -e .zshrc
- If you prefer to use nano/pico/vi or any other CLI text editor, you can instead.
- For Bash:
- Adjust the location according to the first step in the following command and add it to the shell configuration file you just opened:
export PATH=$PATH:/path/to/extracted/folder/
For example:
export PATH=$PATH:/Users/XDA/Desktop/platform-tools/
- Save the file and close the TextEdit app. Next, go back to the Terminal app and reload your shell settings.
- For Bash:
source .bash_profile
- For Zsh:
source .zshrc
- For Bash:
- You’re done. Optionally, verify the PATH variable assertions using the following command:
echo $PATH
To test if the process was successful, start a new Terminal instance and type adb.
Keep in mind that if the ADB installation process is performed using a package manager, then you don’t need to modify the PATH variable on your own.
Linux
- Note down the location where you extracted the ADB tools.
- Open the Terminal app and make sure to be in the Home directory:
cd ~
- Due to the fact that most common Linux distributions ship with Bash as their default shell, the next steps will be Bash-specific. You can, of course, consult the documentation of your preferred shell and modify the commands to suit your needs.
- Open the shell configuration file with a text editor:
sudo nano .bashrc
- You can also use other editors like vi or gedit.
- Add the following line to the end of the .bashrc file. Remember to adjust the location according to the first step beforehand.
export PATH=$PATH:/path/to/extracted/folder/
For example:
export PATH=$PATH:/home/xda/platform-tools/
- Be careful editing this file; do not add anything else or change anything else.
- Save the file. Next, go back to the Terminal app and reload your shell settings:
source ~/.bashrc
- Optionally, verify the PATH variable assertions using the following command:
echo $PATH
- And that’s how you can call ADB from anywhere under Linux.
To check, spawn a new Terminal window and type adb (without the quotes).
It is worth mentioning that you don’t need to perform these steps if you prefer to install (and update) ADB using the distro-specific packages.
Special case: How to set up ADB on Windows Subsystem for Linux and ChromeOS
Windows Subsystem for Linux (WSL) offers Windows users a seamless way to run Linux apps. However, the environment has yet to offer full-fledged USB hardware access. As a consequence, ADB under WSL can’t access your Android device, even if you install it using the aforementioned way. Nonetheless, there exists an official workaround, which utilizes the open-source usbipd-win project. To know more, take a look at our tutorial on how to set up USB passthrough in WSL.
For ChromeOS, you need to turn on the built-in Linux development environment first. By default, it offers you a Debian instance. You can then easily set up ADB using the Linux-oriented steps mentioned earlier.
Just to cover all of our bases here, users may need to put a ./ in front of the ADB commands we list in future tutorials, especially when they are using the extracted binaries directly from the Google-provided Platform Tools ZIP. This is something any *nix user (or Windows user running PowerShell/Terminal) will likely know, but again, we want as many people as possible to understand how to do these tweaks for Android no matter how much of your operating system you know.
Optional: How to set up ADB on your browser
The ADB protocol can be implemented using the WebUSB API in order to control Android phones directly from web browsers. Tango (formerly known as Yet Another WebADB) is one such project that allows users to perform most of the functionality provided by ADB right from the web browser without installing any binary. All you need is a web browser that supports the WebUSB API (such as Google Chrome, Microsoft Edge, Firefox, or Vivaldi) and you are good to go.
Optional: How to use ADB over Wi-Fi
Android 11 and higher editions natively support ADB connection over Wi-Fi. This eliminates the need to deal with common USB connection issues and additional steps, such as Android OEM driver installation on Windows.
In order to set up wireless debugging, do the following:
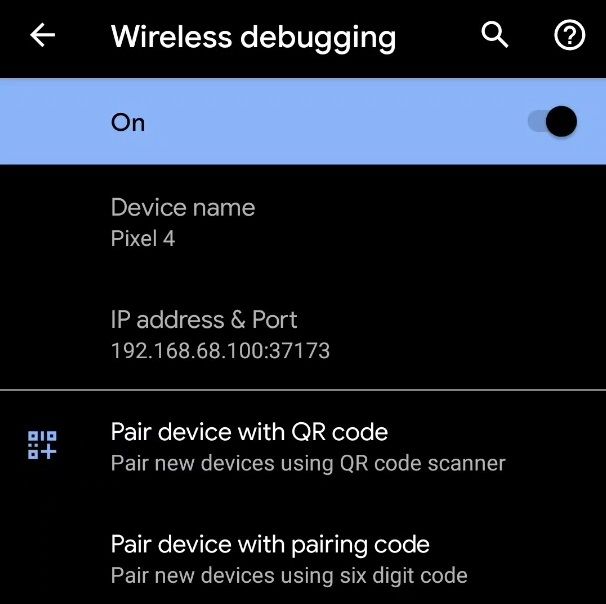
- Make sure that your PC/Mac and the phone are connected to the same wireless network.
- On your phone, go to Developer options under Settings and enable Wireless debugging. On the Allow wireless debugging on this network? popup, select Allow.

- Tap on the Wireless debugging option and select Pair device with pairing code.

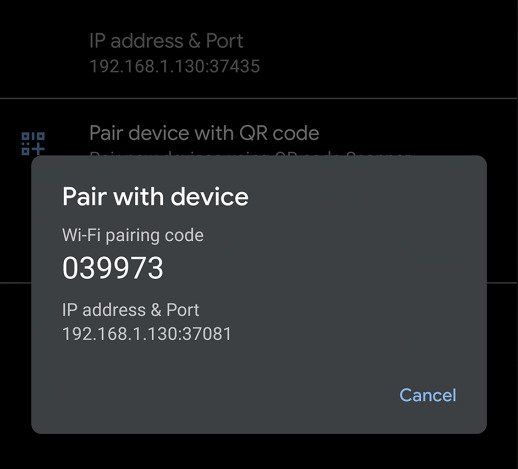
- Take note of the pairing code, IP address, and port number displayed on the phone screen.

- On your PC/Mac, run the following command:
adb pair IP_Address:PortUse the IP address and port number from step 4.
- When prompted, enter the pairing code that you received in step 4. A message should indicate that your device has been successfully paired.
- Next, run the following command on the PC/Mac’s terminal window:
adb connect IP_Address:PortLook at the IP address & Port section under Wireless debugging in step 3 for the IP address and port.
- If everything goes right, then you should see a message like the following:
connected to 192.168.68.100:37173 - Now you’re ready to type whatever ADB shell command you want.
Examples of ADB commands
To check if you have successfully installed ADB, connect your device to your PC/Mac with your USB cable, and run the adb devices command as described above. It should display your device listed in the Command Prompt/PowerShell/Terminal window. If you get a different output, we recommend starting over with the steps.
As mentioned above, you can use ADB to do all sorts of things on an Android device. Some of these commands are built directly into the ADB binary and should work on all devices. You can also open up what is referred to as an ADB Shell that will let you run commands directly on the device. The commands which are run directly on the device can vary from device to device (since OEMs can remove access to certain ones, and also modify ADB behavior) and can vary from one version of Android to the next as well.
Below, you’ll find a list of example commands which you can do on your device:
- Print a list of connected devices:
adb devices - Kill the ADB server:
adb kill-server - Install an application:
adb install <path_to_the_APK_file> - Set up port forwarding:
adb forward tcp:6100 tcp:7100 - Copy a file/directory from the device:
adb pull <path_to_the_remote_object> <path_to_the_local_destination> - Copy a file/directory to the device:
adb push <path_to_the_local_object> <path_to_the_remote_destination> - Initiate an ADB shell:
adb shell
What else can I do with ADB?
Below is a list of XDA tutorials for various devices that detail many applications of ADB commands in order to modify hidden settings, customize OEM features or user interfaces, and much more!
- How to boot into recovery mode using button combos, ADB, and root apps
- How to uninstall carrier/OEM bloatware without root access
- How to debloat your phone (and more) without connecting to a PC
- How to sideload apps on Android TV: APK Install and ADB Sideload methods explained in easy-to-follow steps!
- Control your Android Smartphone from your PC for free with scrcpy
This is just the tip of the iceberg. Don’t forget to check out our ADB commands for every power user tutorial to know more useful tips and tricks for using ADB!
-
Home
-
News
- How to Install ADB (Android Debug Bridge) on Windows 10 & Mac
By Vera | Follow |
Last Updated
“ADB install” may be the topic you may also be interested in. To communicate with a device from your computer with this command-line tool, you need to install ADB on Windows 10 or Mac. How to install ADB? This guide from MiniTool gives you step-by-step instructions.
ADB, also called Android Debug Bridge, is a command-line tool that is mainly for developers to debug apps. Now it is not restricted to developers and you can use it to do some useful things on your PC, for example, backup and restore Android with ADB, ADB install APK for Android from a computer, reboot the phone to Recovery Mode and Bootloader, etc.
To use ABD on your computer, you need to install it first. The following step-by-step guide gives detailed instructions and let’s look through it.
How to Install ADB Windows 10 and Mac
ADB Download Windows 10 and Install
It is not complicated to set up ADB on Windows 10 and see the steps below:
Download SDK Platform-Tools and Unzip It
Step 1: Go to the SDK Platform Tools release notes page and click Download SDK Platform-Tools for Windows to get a ZIP folder.
Step 2: Extract all the contents of this folder on your Windows 10 PC.
Step 3: In the extracted folder, press the Shift key and right-click the space. This can bring a context menu and choose Open PowerShell window here. On some computers, you see Open command window here.
Tip: You can click on the address bar in the extracted folder, type in cmd and press Enter to open Command Prompt.
Enable USB Debugging on Your Android Phone
To use ADB, you need to make sure USB debugging is turned on.
1. Connect your Android phone to the Windows PC via a USB cable. Choose MTP as the connection mode.
2. Type the adb devices command to the CMD or PowerShell command and press Enter. This command can view the list of Android devices communicating with your computer.
3. On your phone’s screen, a prompt pops up to ask you to allow USB Debugging access. Just allow it. You can check the box of Always allow from this computer.
4. After enabling USB debugging, you should execute adb devices again to list your device.
Tip: In addition, there is another way for you to enable USB debugging. After connecting the Android phone to your PC, pick up the phone, go to Settings > About phone, tap on Build number several times to access Developer options, and turn on USB debugging. To know more, refer to this post – What Is USB Debugging & How to Enable/Disable It.
ADB Commands
Now, ADB is successfully installed on your Windows computer. Then, you can run some ADB commands based on your needs. Let’s see some common commands:
- adb install <app name.apk> – install apps programmatically using APK files
- adb reboot recovery – reboot your Android device in recovery mode
- adb reboot bootloader – reboot your Android device to bootloader
- adb shell – start a remote shell with your Android device
- adb pull – move a file from your Android device programmatically
ADB Install Mac via Homebrew
Installing ADB on your Mac is different from the installation on Windows and follow the steps below for this work:
Step 1: Open Terminal and execute the command – ruby -e “$(curl -fsSL https://raw.githubusercontent.com/Homebrew/install/master/install)” to install Homebrew.
Step 2: Install ADB via the command – brew cask install android-platform-tools.
Step 3: Enable USB debugging and start using ADB via the adb devices command.
ADB Driver Install (If Needed)
Sometimes you cannot use ADB properly although you install it on your computer successfully. When getting the error device not found in Windows 10, you need to install an up-to-date ADB driver. Besides, some other ways are also recommended, and refer to this post to know more – How to Fix ADB Device Not Found Error in Windows 10? (4 Ways).
Final Words
How to install ADB on Windows 10 PC or Mac? After reading this post, you find the answer. Just follow the step-by-step guide for an easy ADB installation operation.
About The Author

Position: Columnist
Vera is an editor of the MiniTool Team since 2016 who has more than 7 years’ writing experiences in the field of technical articles. Her articles mainly focus on disk & partition management, PC data recovery, video conversion, as well as PC backup & restore, helping users to solve some errors and issues when using their computers. In her spare times, she likes shopping, playing games and reading some articles.