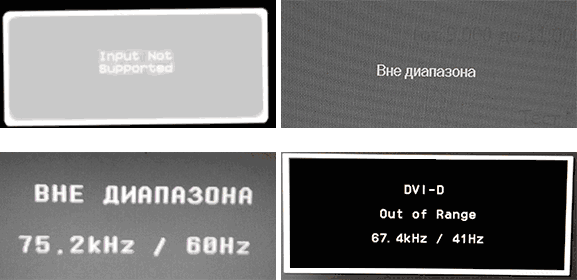
В этой инструкции подробно о том, что делать, если монитор пишет вне диапазона или out of range в различных ситуациях. Схожая тема: Монитор пишет Нет сигнала, No signal или Check signal cable.
- Вне диапазона, вход не поддерживается при запуске игры
- Монитор пишет «Вне диапазона» или «Out of range» при запуске компьютера и Windows
Что делать, если при запуске игры монитор показывает «Вне диапазона» или «Out of range»
Проблема с черным экраном и надписью «Вне диапазона» или «Вход не поддерживается» (на некоторых мониторах изображение может быть, несмотря на сообщение) при запуске игр чаще всего возникает либо после неправильно выставленных параметров графики в игре, либо при использовании игр в виде «репаков», где графика бывает уже сконфигурирована другим человеком, но не подходит для вашего монитора.
Возможные решения проблемы выхода за допустимый диапазон на мониторе в играх:
- Попробуйте нажать клавиши Alt+Enter — в некоторых играх это переводит их из режима полного экрана в оконный режим. В результате изображение вновь появится, и вы сможете изменить параметры графики в игре на такие, которые будут поддерживаться вашим монитором.
- Если среди исполняемых файлов игры есть отдельный файл для запуска настроек графики (посмотрите в папке с .exe файлом игры или в папке игры в меню Пуск), запустите его и установите параметры разрешения, поддерживаемые вашим монитором.
- Поищите (можно использовать поиск в Интернете), где находится файл конфигурации вашей игры и либо удалите его (а лучше — попробовать сначала переместить в другое место, не удаляя), либо откройте в текстовом редакторе и найдите строки, отвечающие за разрешение экрана. Файл обычно имеет расширение .cfg или .ini (но есть и исключение, например, в Сталкере — user.ltx), может иметь слово «Config» в названии. Расположение тоже может быть различным: в папке с исполняемыми файлами игры, в папках пользователя, например: Документы\Rockstar Games\Red Dead Redemption 2\Settings\ или C:\Пользователи\Имя\Saved Games\id Software\DOOM\base
- Также уточните, есть ли возможность запуска конкретной игры с какими-то параметрами, задающими параметры графики или оконный режим, например, Sims 4 можно запустить в оконном режиме с помощью параметра «-w», задать который можно (без кавычек) как в свойствах ярлыка, так, например, и в свойствах игры в Origin. Другие игры часто тоже имеют подобные параметры.
Вне диапазона или Вход не поддерживается при включении компьютера или запуске Windows 10, 8.1 и Windows 7
При сообщении «Вне диапазона», «Вход не поддерживается» и англоязычных аналогов этой надписи на мониторе при включении компьютера, причиной вероятнее всего является неправильно выставленные параметры графики, не соответствующие поддерживаемым режимам вашего монитора. Особенно, если в последнее время вы меняли частоту обновления экрана или разрешение.
Примечание: иногда бывает так, что монитор, согласно характеристикам, должен поддерживать определенную частоту обновления, но, когда вы её устанавливаете вы видите сообщение о том, что сигнал вне диапазона или подобное. В этом случае рекомендую тщательнее ознакомиться с инструкцией: бывает, что высокая частота обновления поддерживается только при подключении через определенные входы, без каких-либо переходников и адаптеров.
В описываемой ситуации есть несколько простых решений, которые могут сработать:
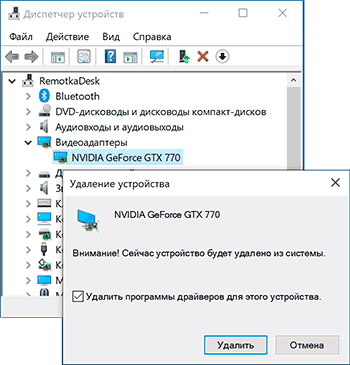
- Если у вас помимо дискретной видеокарты есть интегрированная (выход на материнской плате), вы можете выключить компьютер, подключить монитор к интегрированной видеокарте и снова включить. Скорее всего, изображение появится. После этого с помощью диспетчера устройств удалите драйверы дискретной видеокарты (это в том числе сбросит настройки графики), выключите компьютер, подключите монитор снова к дискретной видеокарте, включите компьютер — вероятнее всего, сообщений Out of range, Input not supported и аналогичных вы больше не увидите: останется лишь снова установить драйверы.
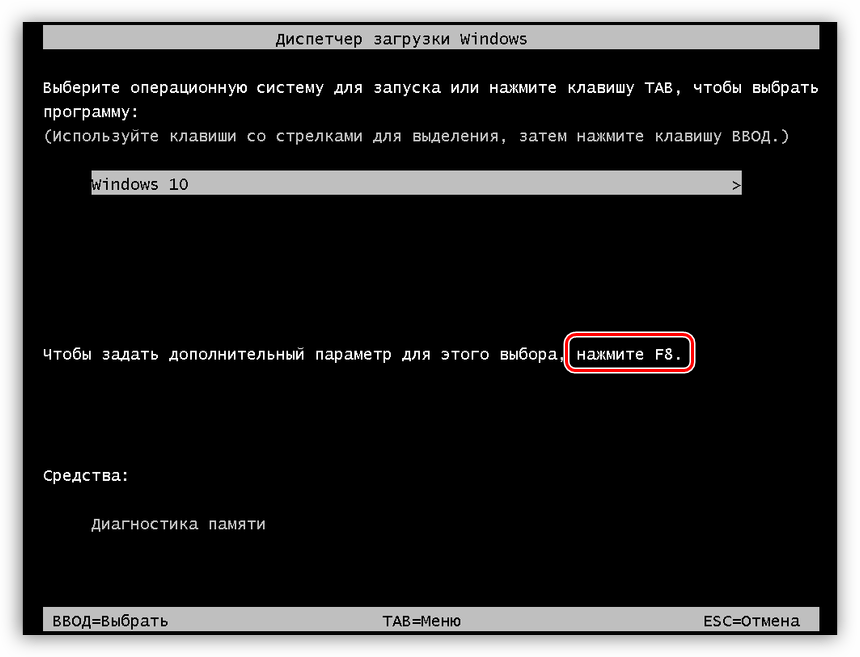
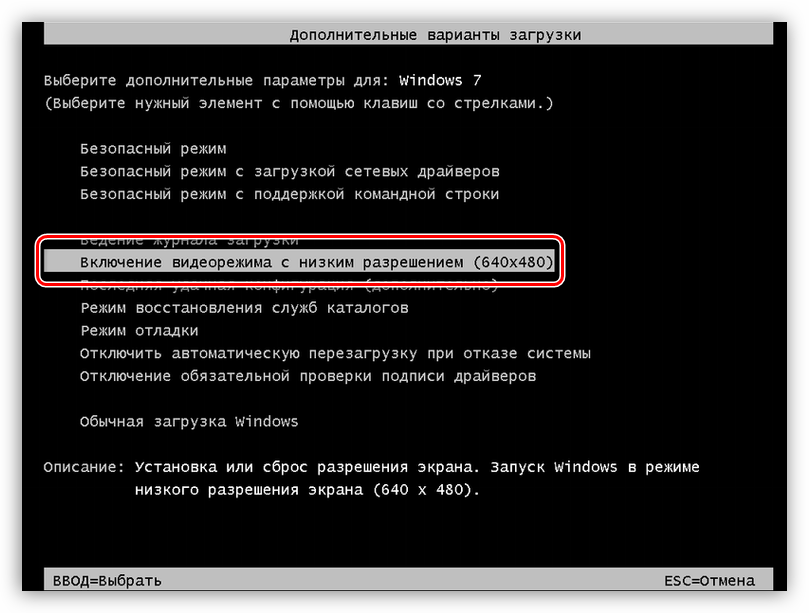
- Если у вас Windows 7, то вероятнее всего сообщение появляется уже непосредственно перед переходом на рабочий стол, а до этого вы видите процесс загрузки. Если это так, то сразу после начала загрузки начните нажимать F8 (или Fn+F8), а затем в меню выберите режим с низким разрешением. В этом режиме вы можете удалить-установить драйверы видеокарты (это сбросит параметры графики), а если у вас есть точки восстановления системы (Панель управления — Восстановление системы), то использовать их.
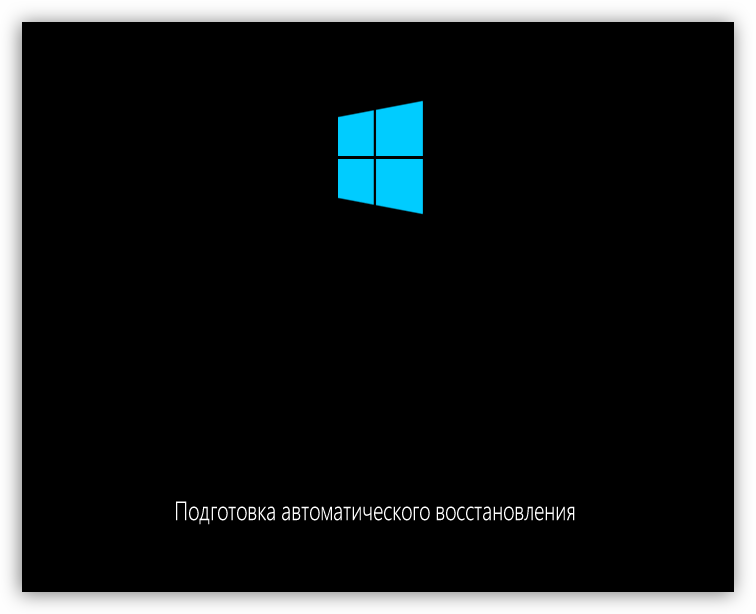
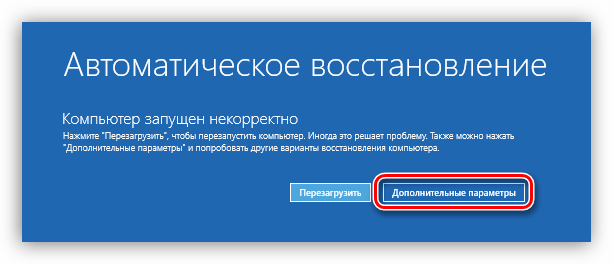
- В случае с Windows 10 после двух неправильных выключений компьютера должна автоматически запуститься среда восстановления системы (с безопасными параметрами графики), где можно попробовать использовать точки восстановления или особые варианты загрузки для запуска системы в безопасном режиме или с низким разрешением.
Еще один вариант для Windows 10 и 8.1, который потребует использовать загрузочную флешку (возможно, придется сделать её на другом компьютере или ноутбуке) с системой с той же разрядностью, что установлена на вашем компьютере:
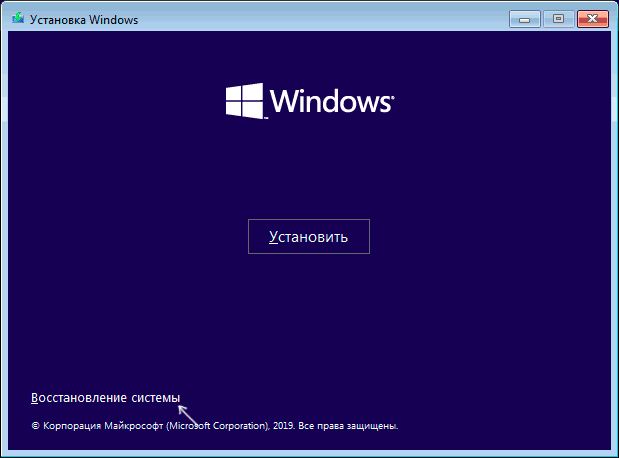
- Загрузите компьютер с загрузочной флешки. На экране после выбора языка внизу слева нажмите «Восстановление системы».
- В открывшейся среде восстановления перейдите в «Поиск и устранение неисправностей», затем — «Восстановление системы» и попробуйте использовать точки восстановления при их наличии.
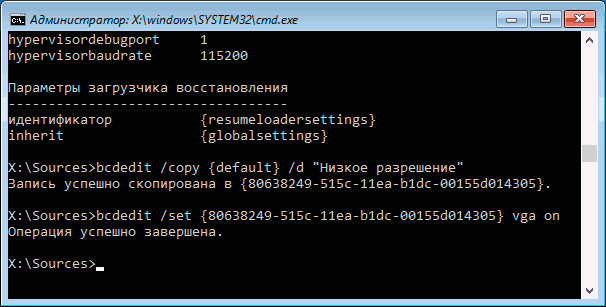
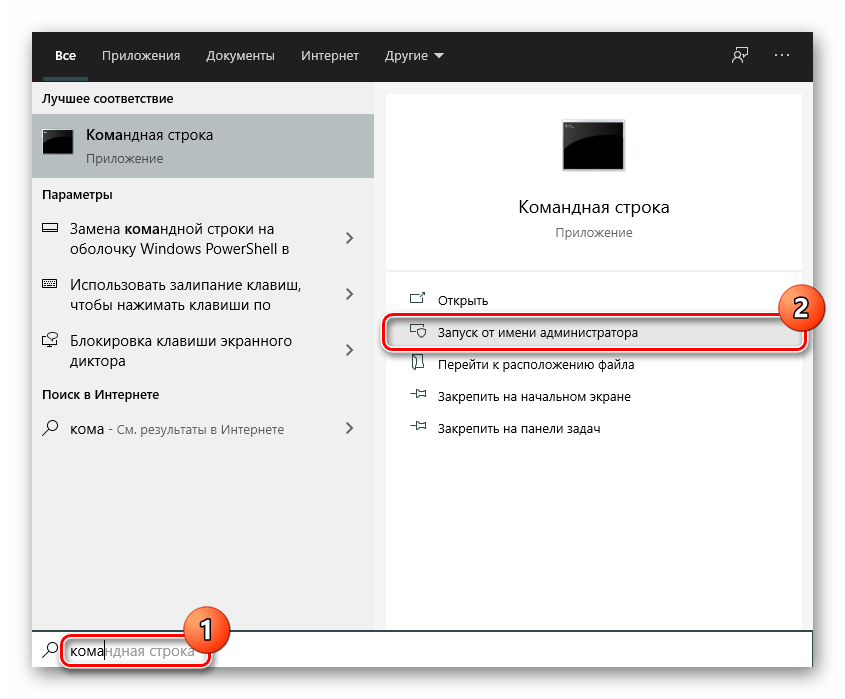
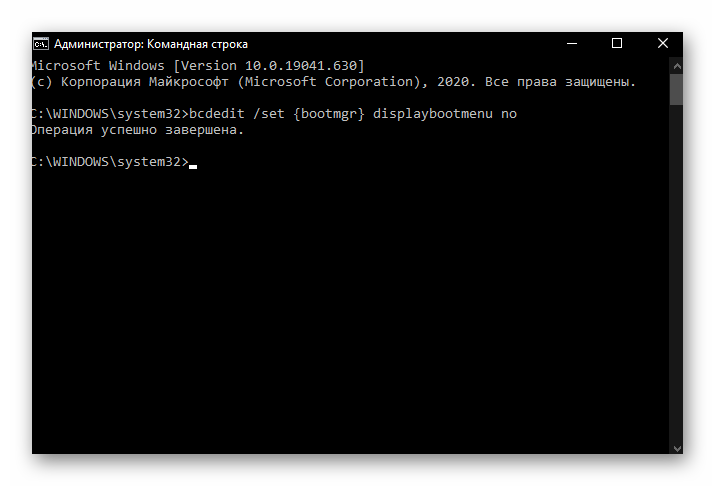
- Если это не сработало, то вновь зайдите в среду восстановления, откройте «Поиск и устранение неисправностей» — «Командная строка».
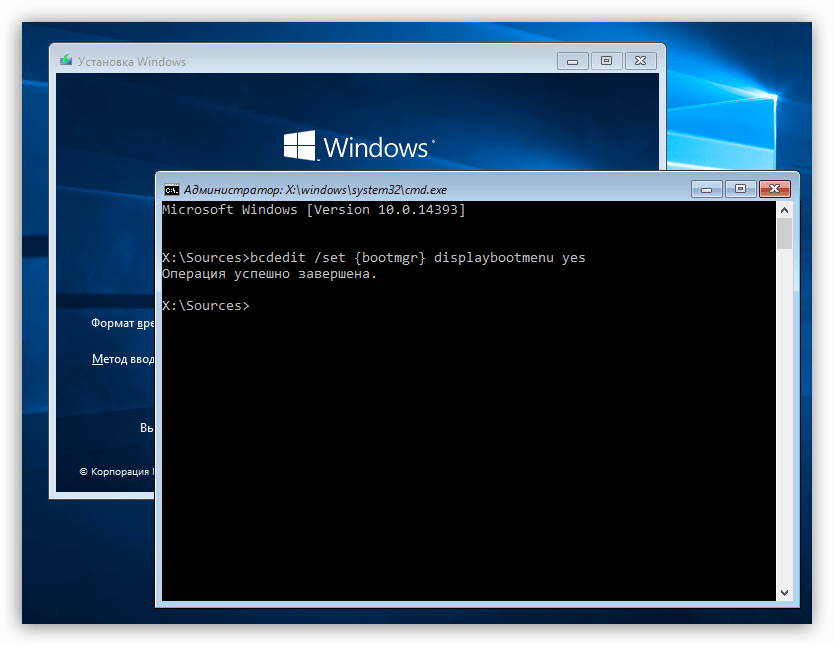
- В командной строке введите команду
bcdedit /copy {default} /d "Низкое разрешение" - После выполнения этой команды вы увидите сообщение, что запись успешно скопирована и уникальный идентификатор GUID в фигурных скобках. Он потребуется в следующей команде:
-
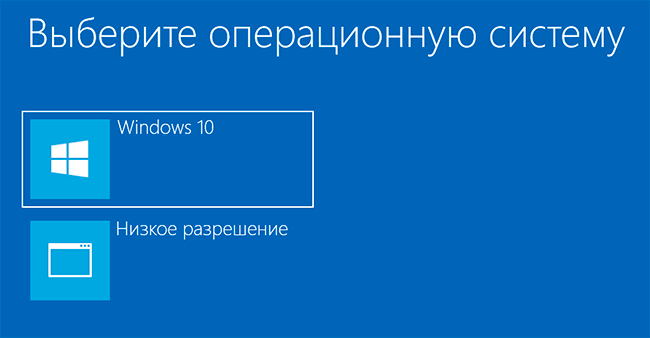
bcdedit /set {отобразившийся GUID} vga on - Закройте командную строку и перезагрузите компьютер, у вас отобразится меню с двумя пунктами, выберите пункт «Низкое разрешение».
- После загрузки в режиме низкого разрешения вы можете проделывать действия с драйверами и параметрами. Самое быстрое решение — полностью удалить драйверы видеокарты и установить заново.
- Перезагрузите компьютер и в меню выберите простую загрузку системы. Чтобы удалить созданный нами пункт меню, нажмите клавиши Win+R, введите msconfig и удалите его на вкладке «Загрузка».
Если ни один метод не помог, а проблема возникает при включении компьютера — попробуйте подключить монитор другим кабелем, а ещё лучше — с помощью других выходов на видеокарте и входов на мониторе при их наличии.
Содержание
- Вариант 1: Ошибка при загрузке операционной системы
- Windows 10 и 8
- Windows 7 и XP
- Вариант 2: Ошибка при запуске игры в Windows
- Вариант 3: Специфические случаи
- Windows 10
- Windows 8, 7, XP
- Вопросы и ответы
Ошибка Input Not Supported обозначает невозможность монитора работать на выбранном пользователем или игрой разрешении. На мониторах Acer, как и других, она возникает либо при включении компьютера, либо при запуске игры.
Вариант 1: Ошибка при загрузке операционной системы
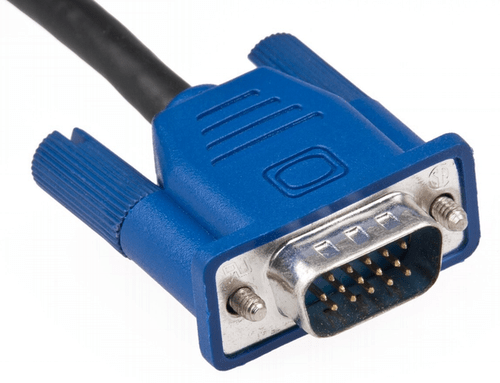
Если Input Not Supported отображается при загрузке Windows, пользователю, скорее всего, придется потратить некоторые усилия для восстановления работоспособности компьютера, поскольку обычный режим операционной системы становится недоступен для внесения необходимых изменений. Однако если ваш монитор подключен через VGA, все исправления сводится к минимальным трудозатратам.
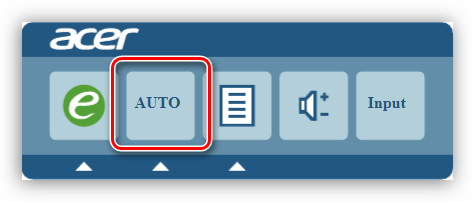
На мониторе достаточно найти либо отдельную кнопку «Auto» и нажать ее, либо сперва раскрыть «Menu» и уже внутри настроек отыскать функцию «Auto». Таким образом вы сбросите все настройки на заводские, и проблема окажется устранена.
При подключении по HDMI / DisplayPort / DVI придется поступать по-другому.
Windows 10 и 8
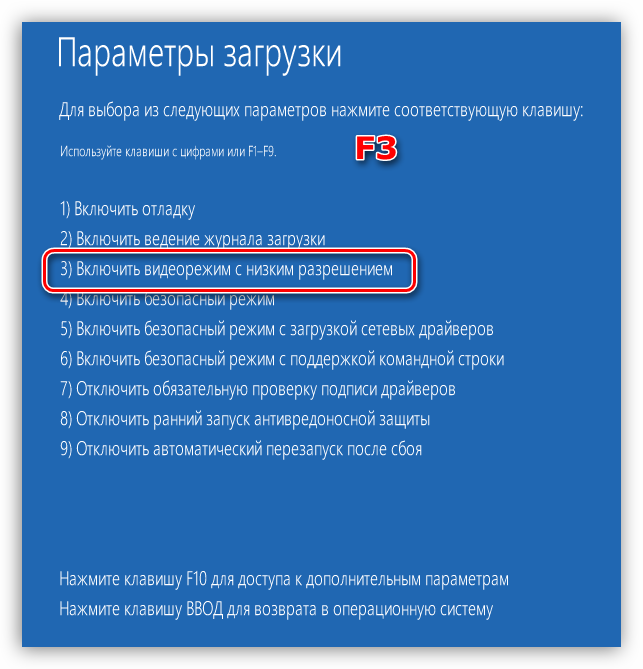
В более современных версиях этой операционной системы инструкция по исправлению ошибки сводится к выполнению следующих действий:
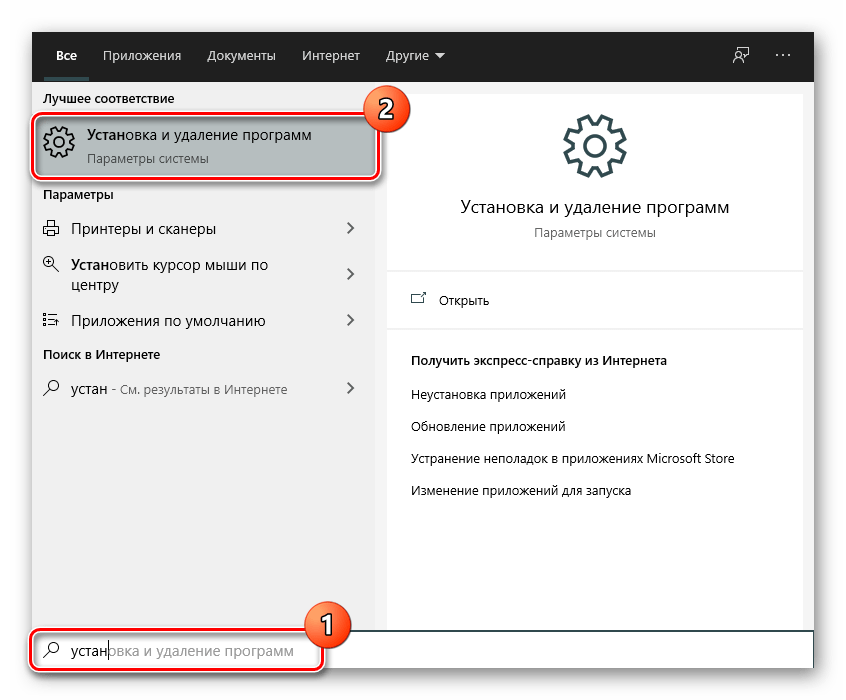
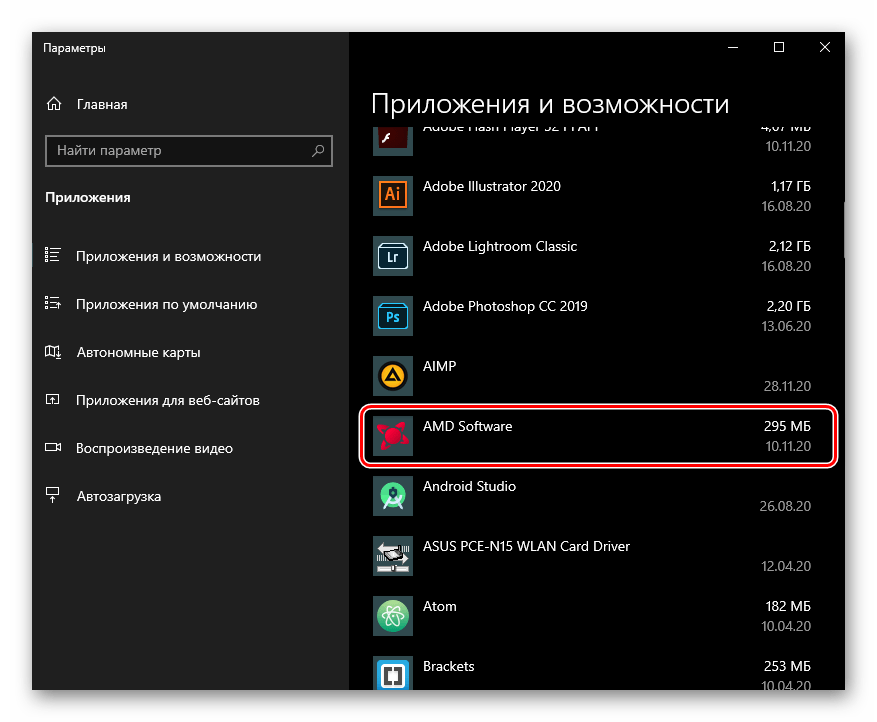
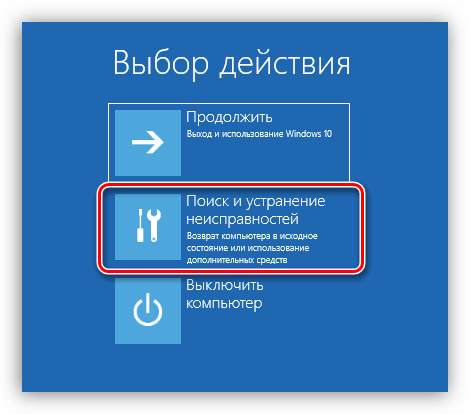
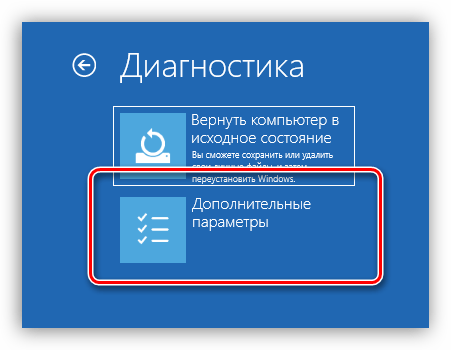
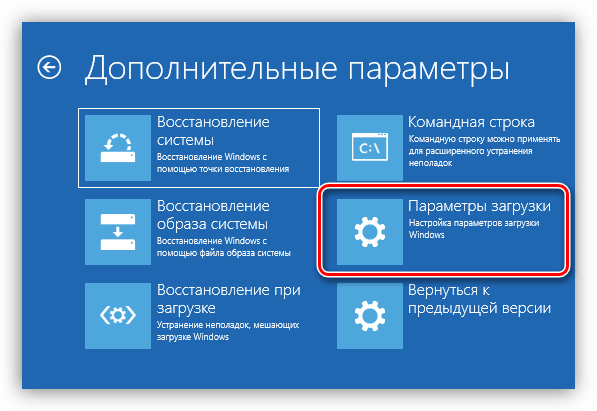
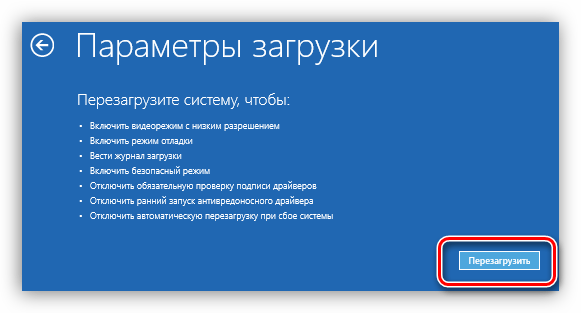
Подробнее: Переустанавливаем драйверы видеокарты
Больше ошибка появляться не должна.
Вызов меню «Параметры загрузки» через загрузочную флешку
Теперь рассмотрим, что же необходимо сделать тем, кому не удается вызвать нужное меню сочетанием клавиш. Обладателям загрузочной флешки остается подключить ее к компьютеру и загрузиться с нее через Boot menu или изменение настроек BIOS.
Подробнее: Настраиваем BIOS для загрузки с флешки
Вызов режима восстановления Windows для открытия меню «Параметры загрузки»
Если у вас нет загрузочной флешки, вы все равно можете попасть в «Параметры загрузки», но для этого понадобится проделать несколько нестандартные действия.
Windows 7 и XP
Если у вас старая операционная система, вызвать меню с дополнительными вариантами загрузки гораздо проще, чем обладателям современных Windows.
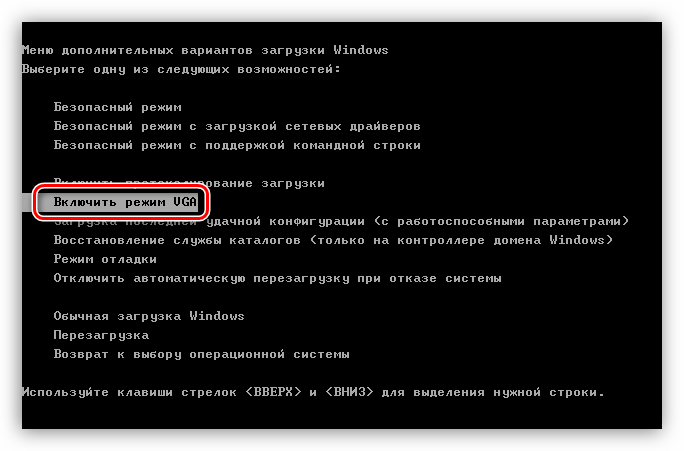
В XP интересующий пункт называется «Включить режим VGA».
Читайте также: Обновляем драйверы видеокарты на Windows 7
Вариант 2: Ошибка при запуске игры в Windows
Появление неполадки Input Not Supported после запуска игры обозначает, что игра пытается использовать параметры видео, несовместимые с вашим монитором, или есть ошибки иного характера.
Подробнее: Как обновить библиотеки DirectX
Вариант 3: Специфические случаи
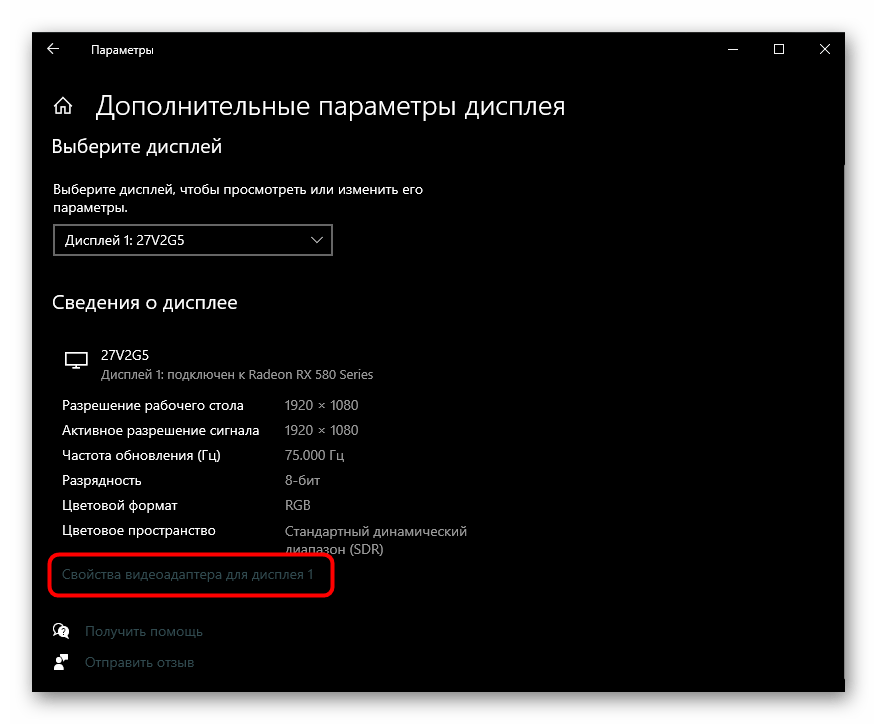
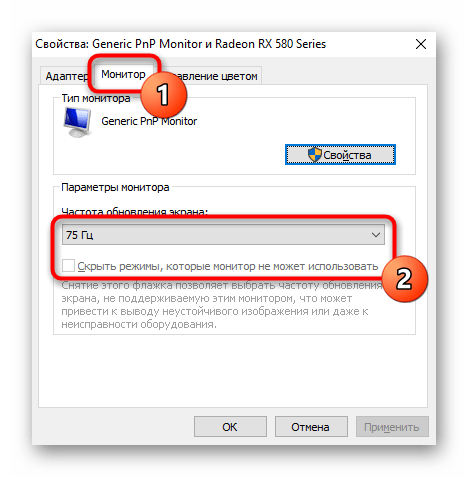
Иногда ошибка Input Not Supported появляется не при тех сценариях, что описано выше, а внезапно или, например, при подключении монитора к ноутбуку по HDMI или другим цифровым портам. В этой ситуации поможет изменение частоты кадров на устройстве, к которому подключен монитор.
Windows 10
В «десятке» принцип изменения частоты кадров следующий:
Windows 8, 7, XP
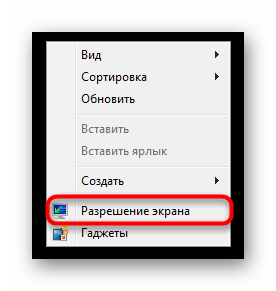
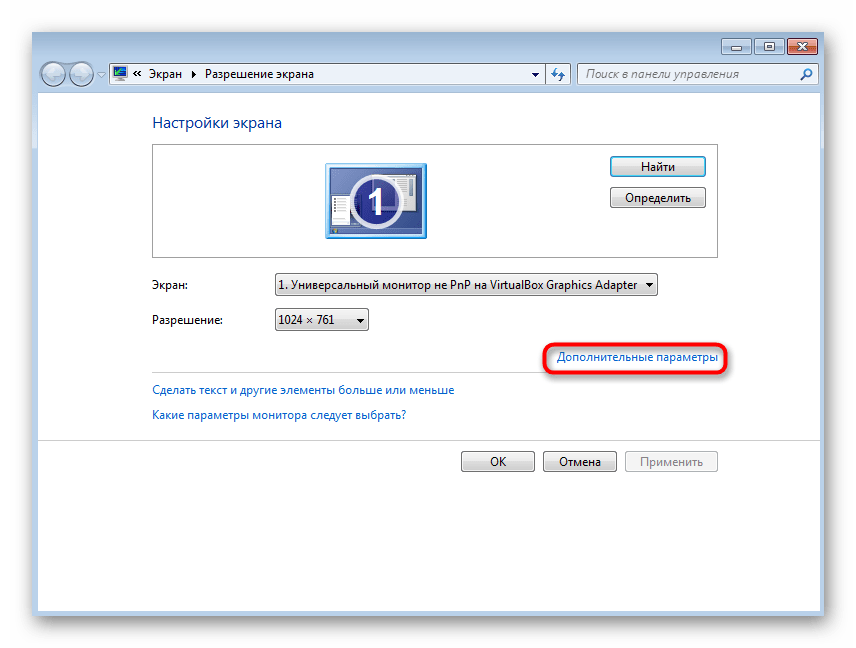
В остальных версиях Windows принцип изменения почти такой же, как в ее последней версии, за небольшими исключениями.
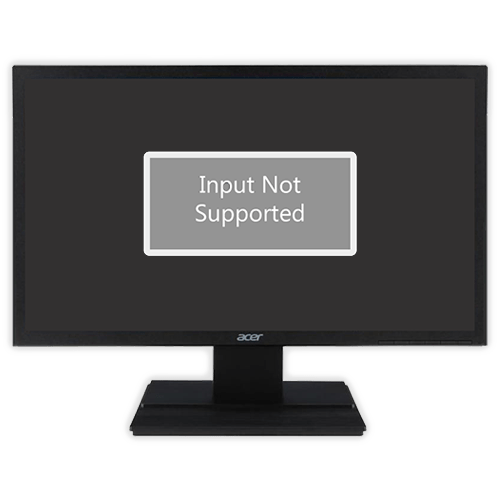
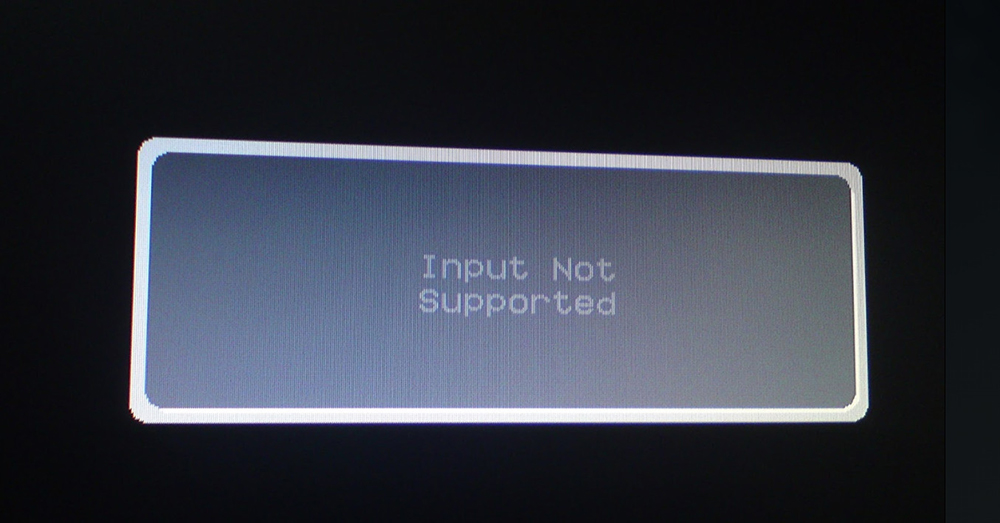
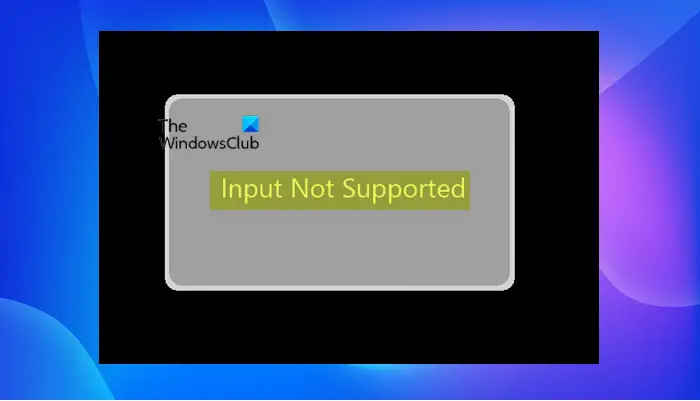
Иногда при запуске системы или какой-то ресурсоёмкой и старой игры вместо нормального изображения внезапно появляется чёрный экран с серой плашкой, на которой написано: Input Not Supported. Т.е., вам дают понять, что продолжать работу невозможно, так как монитор не может показать изображение. Тем не менее как бы устрашающе не выглядело чёрное окно – оно не фатально, есть способы избавиться от этой ошибки.
Устранение ошибки Input not supported.
Почему появляется Input Not Supported
Если вы уже заподозрили в неисправности монитор – напрасно: проблема, скорее, кроется в драйверах, некорректной настройке или попытке игры выставить свои требования к работе видеокарты. Input Not Supported может появиться на мониторах любых фирм: Acer, Asus, Lenovo и т. п. Алгоритм исправления ошибки будет приблизительно одинаковым для всех. Появление серой плашки с надписью о прекращении поддержки ввода означает, что на экране не удаётся показать изображение и при этом соблюсти выставленные пользователем (или другим ПО, или системой) условия разрешения, соотношения сторон, качества и т. д. Это значит, что вы так ничего и не увидите, пока не предпримите попыток для улучшения ситуации, и доступ к обычным функциям компьютера получить не сможете.
Как исправить ошибку
Первым делом проверьте, не нажали ли вы на мониторе какую-нибудь кнопку с набором параметров, помешавших в дальнейшем нормальной загрузке изображения. Особенно это касается стационарных ПК. Уберите все пользовательские настройки, выбрав что-то вроде «Авто» или «Стандарт», переключая клавиши на самом мониторе (они могут быть сбоку или снизу, как, например, у BQ).
Input Not Supported при включении компьютера
Если ошибка настигла вас при включении компьютера, чтобы визуализировать «Десктоп» и получить возможность что-то исправить, нужно перейти в «Безопасный режим» (перезагрузитесь и жмите F8 или другую клавишу, которая указана в вашей версии БСВВ).
Удаление видеодрайвера
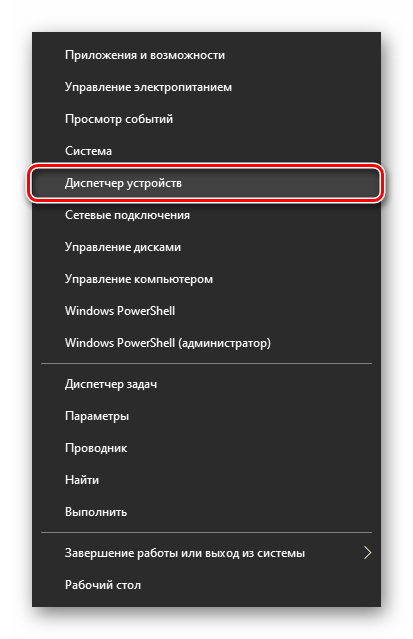
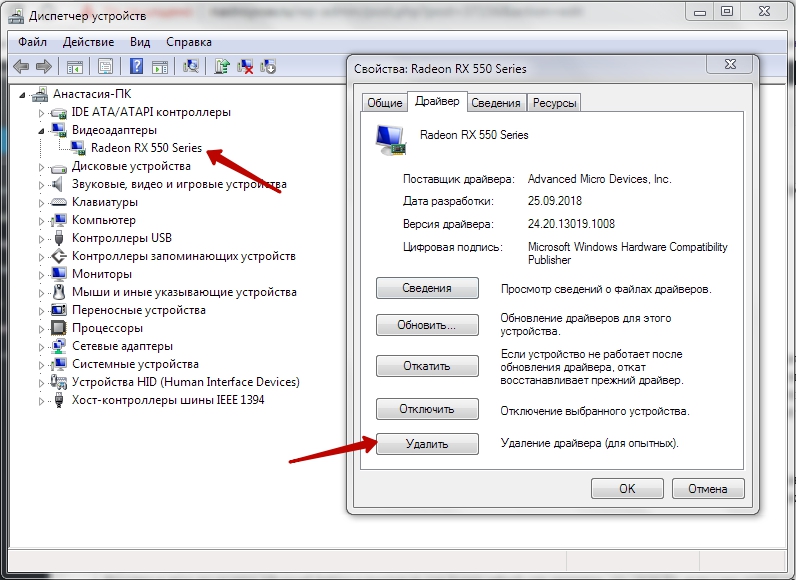
- Теперь нажмите Win+R и в появившейся строке напишите: «devmgmt.msc» (без кавычек), нажмите ОК.
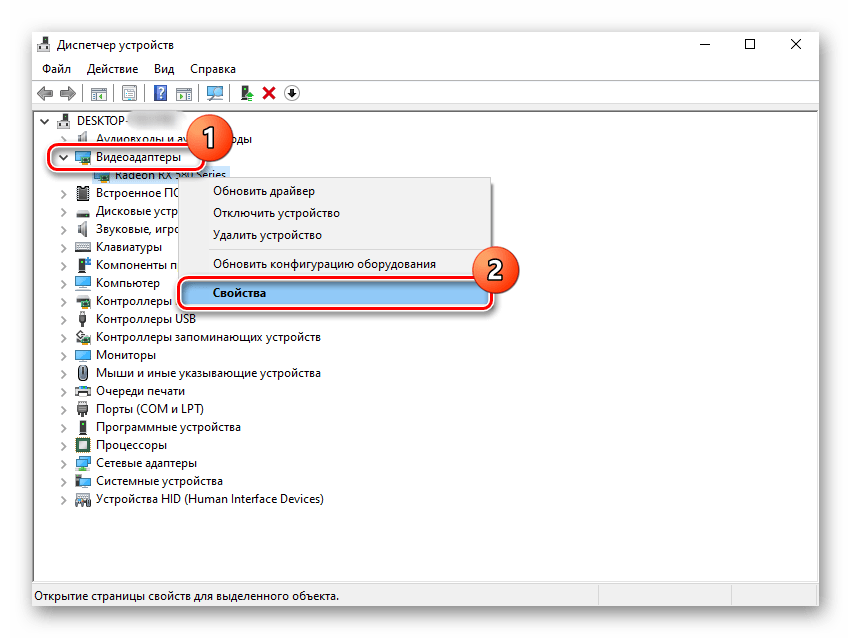
- Поищите в списке установленный графический адаптер и кликните по нему ПКМ, разверните «Свойства».
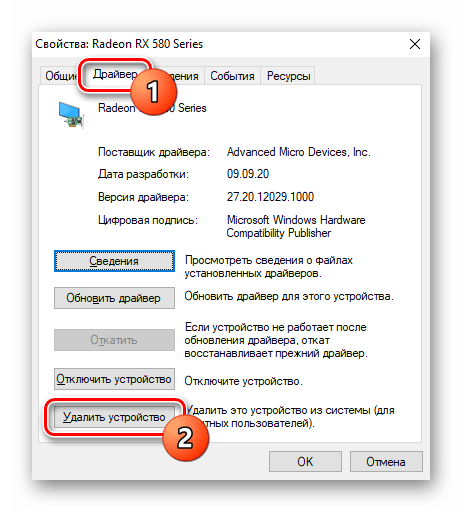
- Здесь нас интересует вкладка, посвященная драйверам.
- Выберите опцию Uninstall и согласитесь с действием.
Таким образом, если ошибка Input Not Supported была следствием странного поведения драйверов, что происходит нередко, делать больше ничего не придется – после перезапуска ОС изображение восстановится. Чтобы ничего из старых и поврежденных файлов не осталось, нужно убрать дополнительное ПО, которое инсталлировалось вместе с драйверами – как правило, это медиаплееры. В общем списке программ их трудно найти, но для этого есть специальные приложения, типа Uninstall Tool. После удаления нужно перезапустить систему в обычном режиме и проверить результат. Система сама установит драйвера заново.
Настройка вывода изображения
Люди, увлечённые играми, часто сами выставляют различные настройки разрешения экрана, чтобы повысить качество отображения игр, в которых композиция выстроена от первого лица. Вышеупомянутая ошибка может появиться при смене монитора или сразу после применения новых параметров.
- Поговорим о том, как это исправить и устранить последствия неверной настройки.
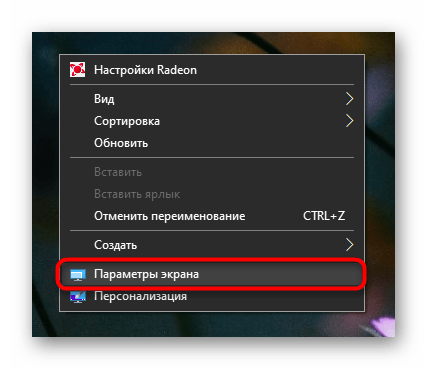
- Кликните в любом свободном месте «Десктопа» ПКМ и выберите Screen Setting.
- Верните ползунок на то место, где есть надпись: «Recommended».
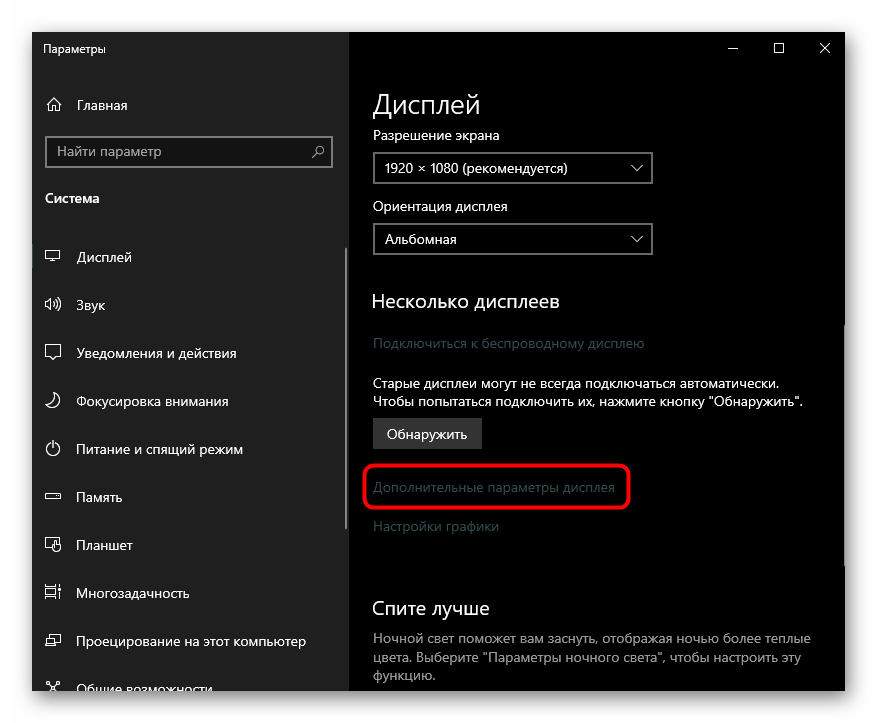
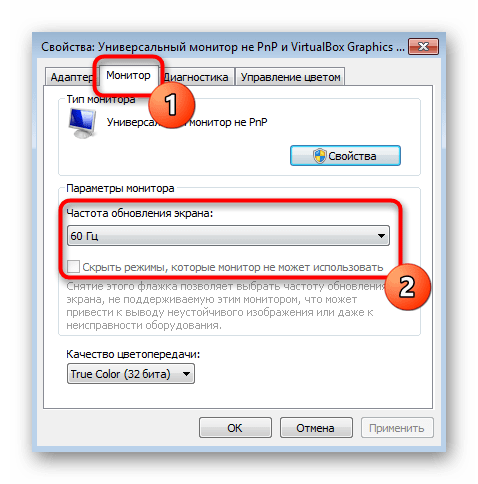
- Находим в этом же окошке Advanced Setting и выставьте для Screen refresh rate значение «75» (или 60, если у вас старая модель, но лучше проверить себя, поискав в интернете достоверные параметры, подходящие к конкретному монитору).
Input Not Supported при запуске игры
Иногда Input Not Supported появляется непосредственно при запуске игры. Дело в том, что на каждой версии Windows установлен пакет API для работы со сложными игровыми мультимедиа, и он мог устареть. В этом случае попробуйте следующее:
- Зайдите на сайт Microsoft и найдите update-пакет для DirectX.
- Скачайте и установите его.
- Перезагрузите ПК и запустите игру еще раз.
Бывает и так, что в дистрибутивах игр содержатся файлы, которые сами меняют разрешение экрана как им заблагорассудится. Чтобы вернуть настройки к стандартному состоянию выполните следующий порядок действий:
- Нажмите «Этот компьютер» — «Диск С».
- Далее «Пользователи» — «Имя пользователя» — папка с названием игры – файл с именем Screen.txt.
- Разверните окно и найдите значения ширины и высоты, а потом задайте рекомендуемые для вашего монитора.
Some PC users on Windows 11 or Windows 10, mostly users that have a multiple monitor setup, are reporting the issue whereby they get the error message Input Not Supported on a black screen after booting up their computer. In this post, we identify the potential culprits as well as provide the most suitable solutions to resolve the issue. This problem is predominantly seen on Acer monitors.
This issue usually occurs mainly due to either of the following reasons;
- Screen resolution is set to the wrong resolution.
- Monitor driver and graphics card driver issues.
If you’re getting the Monitor error message Input not supported on your Windows 11/10 PC, you can try our recommended solutions presented below in no particular order and see if that helps to fix the error on your system.
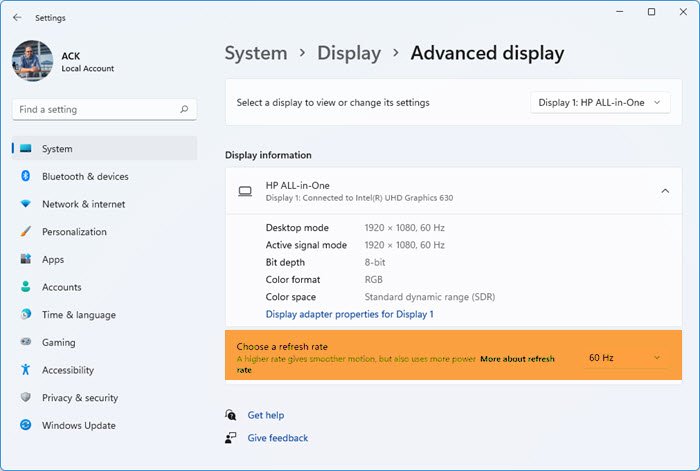
- Change the Screen Resolution and Monitor Refresh Rate
- Update monitor driver and graphics adapter driver
- Run Hardware and Devices Troubleshooter
- Change to Windowed Mode (for Games)
Let’s take a look at the description of the process involved concerning each of the listed solutions.
Before you proceed with the solutions below, make sure the connections between your PC and the monitor are correctly set up. You can perform this task by making sure the end of the HDMI or VGA cable must be snug and secure in the correct port location. Also, keep in mind that a bad cable can interfere with the connection, so to rule out this possibility, you can try a different HDMI or VGA cable as the case may be.
Note: To apply the solutions below, you’ll need to be able to boot and log into your Windows desktop. If you can’t log into your computer, then boot your computer into Safe Mode (if unable, see Cannot boot in Safe Mode). And, you may have to connect your computer to another monitor.
1] Change the Screen Resolution and Monitor Refresh Rate
To apply this solution to resolve the monitor error message Input not supported on your Windows 11/10 PC, you need to boot your computer in Low resolution or VGA mode by enabling low-resolution video in Startup Settings.
Once your PC is in that mode, you can now change the Monitor Refresh Rate and also change the display resolution (if unable, see Can’t change Screen Resolution). You can try changing the resolution other than the recommended resolution if it wasn’t working. You can choose a low resolution and work your way up in order to determine which one works best for you.
Once done, save changes and restart to boot Windows normally and see if the issue in hand is resolved.
Fix: Resolution not supported Monitor error
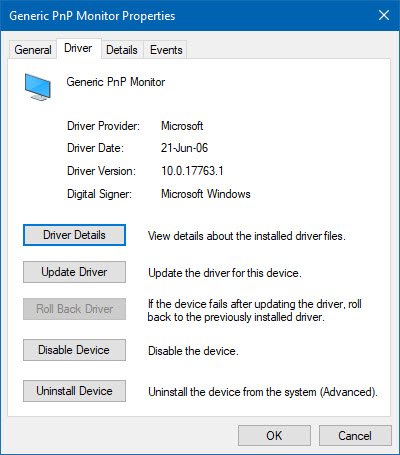
2] Update monitor driver and graphics adapter driver
The issue at hand can occur due to missing or corrupted device drivers (especially the monitor driver and graphics card driver). In this case, to resolve the issue, you can update the graphics adapter and monitor drivers and see if that helps.
- If you have already downloaded the .inf or .sys file for the driver, you can manually update graphics and monitor drivers via Device Manager.
- You can also update the driver via Command Prompt.
- In Windows Update, you can as well get the driver updates on the Optional Updates section
- Or you can download the latest version of the driver from the graphics adapter and monitor hardware manufacturer’s website.
- Another option (usually not recommended) is to automatically update your drivers using any of the free Driver Update software.
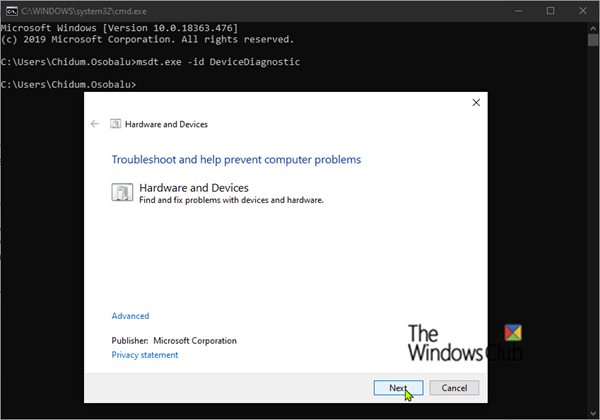
3] Run Hardware and Devices Troubleshooter
Hardware and Devices Troubleshooter is a powerful Windows built-in tool that can be used to find, diagnose and solve your hardware and device issues. Although, after Windows 10 version 1809, it appears the tool has been deprecated. Nevertheless, you can still access this tool on your Windows 11/10 PC.
If neither of the above solutions worked for you, to rule out the possibility of a monitor hardware issue, you can manually check for faulty components if the issue isn’t with the hardware. Otherwise, you may have to consider replacing the monitor.
4] Change to Windowed Mode (for Games)
For PC gamers experiencing the issue in view, there were many reported cases where games fail to launch because the resolution settings set in the game were not supported by the monitor hardware because the game settings are set to a much higher resolution which your monitor cannot support. In this case, to resolve the issue, simply launch the game in Windowed mode in either of the following ways:
- Use Alt+Enter to enter Windowed mode directly.
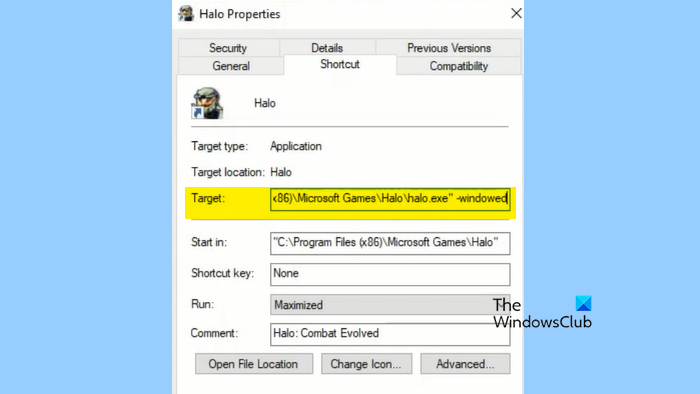
- Add -windowed as a parameter in the shortcut and force it to run. To do this, right-click on the game desktop shortcut and select Properties > Shortcut tab. In the Target field, suffix the -windowed parameter and click Apply > OK.
In Windowed Mode, you can adjust the screen resolution manually by dragging the ends. You can also navigate to Display settings within the game itself and change the resolution accordingly.
In the event you cannot access the game settings, you can try deleting the configuration files (all your preferences regarding the launching of the game might be deleted) of the game via File Explorer on your system. After deleting the files, you can relaunch the game and change the settings from the menu.
For other games, usually, as it applies to widescreen monitors, it might be that the game itself doesn’t support the resolution of your monitor or a case of Stretched Screen display problem. For the former, you can check online for Widescreen fixes usually in the form of different patches you need to install before your game can launch on your system without issues.
However, if nothing worked here, you may have to perform System Restore or uninstall the update if you did a recent update.
Hope you find this post helpful!
Related post: Fix Input Signal Out of Range, Change settings Monitor error
How do I fix Input not supported without a monitor?
Change your display settings by following these steps:
- Locate an empty area on your desktop and right-click it.
- Select the Display settings option to proceed.
- Go to the Resolution settings.
- From the drop-down menu, select the resolution which is recommended for your display.
- Confirm your changes.
Why does my HDMI say not supported?
If you are seeing a not supported message on your TV you will need to adjust the resolution (or image size) of the source picture i.e. DVD player, Xbox, PC or cable box to fit on your HDTV. You can do this through the settings control of that device. The most common resolutions will be 1920 x 1080 also known as 1080p.
How do I fix HDMI not supported?
To fix HDMI not supported issue, you can turn off all the devices. Disconnect the HDMI cable from the monitor and the connected device. If the issue continues, repeat the process but try a different HDMI input on your TV to see if this improves the situation.
How do I fix Input not supported?
Under the monitor name that is having the Input Not Supported error, click Display adapter properties for Display. In the popup pane, click the Monitor tab. In the Screen refresh rate, choose the recommended or default rate in the drop-down menu. Save the changes and restart your computer.
If you are plugging in your HDMI, VGA, or DVI cable for the first time into your monitor or into your second monitor, you might get the Input not Supported message. Therefore, in this article, we will be implementing some solutions and workarounds that will be aimed at getting rid of this message.
Make sure to first read through the causes due to which this error occurs in the first place and also make sure to go through implementing all the solutions one-by-one until one of them fixes the error for you.
What Causes the Input Not Supported Message?
After going through certain fixes, we came to the conclusion that the following must be the paramount reasons behind the occurrence of this error.
- Boot configuration: If the boot configuration from the Bios of the computer hasn’t been properly set, you will see Input Not Supported on monitor. Therefore, we suggest that you try and configure it properly as mentioned in the solution below.
- Hardware Issues: Some hardware issues can also prevent you from being able to properly plug in your second monitor or even your first. Therefore, we suggest that you try and fix them as mentioned below and verify that hardware isn’t holding back your computer.
- Display Configurations: Certain display configurations might also prevent the PC from being able to function properly. Therefore, we suggest that you take another look at the display configuration and check to see if you are able to fix the error.
- GPU installation: GPU installation is also important to properly run your computer but if you haven’t seated it properly, you might run into errors. Therefore, to fix the Input Not Supported error, we suggest that you go through the solutions below to make sure that it is installed properly.
- Keyboard Connection: If you are using an old type of Keyboard connection, you might run into the Input Not Supported error while trying to plug in multiple monitors. Therefore, we suggest that you try and fix this by changing it to a standard USB connection. This particular cause is common with Acer monitors and computers and also while using an HDMI to VGA cable.
Now that you have been taken through almost all of the possible causes, we can finally start implementing the solutions.
How to Get Rid of Input Not Supported Message?
Solution 1: Tweak Boot Options
By using the System Configuration window we will set the base resolution to the lowest and then we can further change it to any resolution we want. For this you need to follow the method listed below:
- In the Windows search bar type in “msconfig” and press “Enter”, in the System Configuration window select the “Boot” tab at the top and then check mark the box for “Base Video” in Boot Options.
Checkmark the Base Video Option - Once checked click on “OK”, exit the window and afterward “Restart” your computer.
- After the reboot your screen will be very “Zoomed In“, to help with that right click on your Desktop and select “Display Settings” from the drop down menu.
- Now in the new window use the drop down menu to change the “Resolution” to the one supported by your new monitor, if you don’t know you can always use the Recommended Resolution.
- When you are done, again open up the “msconfig” window, uncheck the box for “Base Video” and most probably the input not supported windows 10 issue would be rectified.
Solution 2: Boot In Low-Resolution Mode
You can also boot into low resolution mode from the Safe Mode menu. To do this follow these steps:
- Restart your computer using the Start menu, once the “Restart” process begins start spamming the “F8 Key” on your keyboard.
- Once inside the “Startup Settings” menu select “Enable Low-Resolution Video” and boot into it.
Enable Low Resolution Video - When you’re booted into your Windows, follow the steps in “Solution 1” to change your resolution to the recommended settings.
Solution 3: Use Another Monitor
If you’re still having issues trying to get display then you can try connecting a monitor with a higher resolution to your computer, or you can also try connecting it to a TV that supports high resolutions and then check if everything works fine.
Solution 4: Check For Hardware Issues
You should check the “Display Cable” for any breaks, or you can also try connecting to the monitor using other input method like “HDMI” or “Display Port”. You can also use the “USB-C” ports on some laptops as they also support “Data/Display”. Furthermore you can try connecting using several multiple adapters in order to fix acer monitor input not supported issue.
Solution 5: Tweak Your Display Settings
- Right click on any empty area on your Desktop and select “Display Settings” from the drop down menu, in the new window scroll down now to select “Advanced Display Settings”.
- In the Advanced display settings select the monitor causing errors under the “Choose Display” option and then select “Display Adapter Properties For Display X” under Display Information.
Select the Display Adapter Properties Option - In the following window click on the “Monitor” tab and then select the recommended “Screen Refresh Rate” for your monitor under Monitor Settings, once selected “Apply” all the changes made and click on “OK”.
Solution 6: Update Graphics Drivers
Out of date display drivers can also cause input errors so to update your drivers implement these steps:
- In the search bar near the Start menu type in “Device Manager” and press “Enter”, in the Device Manager window expand the section for “Display Adapters”.
- Then right click on your “Graphics Card” and select “Update Driver” from the drop down menu, in the following window then press “Automatically Look For Drivers”.
Update Graphics Driver
Solution 7: Switch Back From Custom Resolutions
If you use any Custom Resolutions for your monitor, you can try disabling them and then check whether it resolve the error or not. To disable custom resolutions in GeForce:
- Right click on your Desktop and select “NVIDIA Control Panel” from the drop down menu, in the new window then select the “Change Resolution” option.
- Now select a “Native Resolution” and then click on “Apply”.
Solution 8: Enable CSM In BIOS
- On your Computer “Boot Screen” press the “BIOS” button displayed at front these keys are usually “F10, F2 or Del”.
- Once inside the BIOS menu navigate to the “Advanced” tab at the top using the arrow keys on your keyboard, in the Advanced tab proceed to the “Boot menu”.
- In the Boot menu locate “Boot/CSM (Compatibility Support Module)” and change it to “Enabled”, once enabled press the “F10” keys to save all the changes and “Restart” your computer afterward.
Enable Compatibility Service Module
Solution 9: Change Your Game Display Settings to Windowed Mode
If you launch a game and have the no Input not supported error, don’t worry you can still play your game if you switch to Windowed mode and then change your resolution. You can try pressing the “Alt + Enter” keys in game to directly switch to windowed mode.
Or
You can add a –windowed to the shortcut of your game file by using this method:
- Right click on the “Game.exe” shortcut on your Desktop and select “Properties” from the drop down menu.
- In the target window then add “–windowed” at the end of the target, make sure you do not rename anything else in there.
- Once done “Save” your changes and close the window.
Solution 10: Delete the Game Configuration File
You can also reset your game settings by deleting the Configuration files from documents. Simply go to your Game folder in My Documents and delete the Config file inside.
Solution 11: Replace the PS2 Keyboard With USB
Somehow if you disconnect the PS2 Keyboard and instead connect a USB keyboard input not supported on monitor acer error might get solved instantly, do try this as it worked for quite a lot of users.
Solution 12: Set the Game To Run At Native Resolution
In this solution we set Warcraft III to run at Native Resolution. To do this proceed with the steps below:
- Open up the “RUN” dialog box using the “Window + R” keys, in the address bar then type in “Regedit” and press “Enter”.
Typing “regedit” - Now navigate to the following address in the left pane:
HEKY_CURRENT_USER > Software > Blizzard Entertainment > Warcraft III
- Then select “Video” and afterward double click on “resheight”.
- Change the “Binary” to “Decimal” and then set the screen height you wish.
- Now double click “rewidth” and repeat the same step.
- Once done “Save” all the changes made and close the Registry window.
Solution 13: Re-install Your GPU
- Disconnect the “Monitor” completely from your computer, now remove the side panel of your case and remove the “GPU” carefully.
Remove Graphics Card - Now after a few seconds reinstall your GPU and “Boot” your computer with the monitor not connected.
- After a few minutes plug in your Monitor back and check if it displays anything.
Solution 14: Replace the CMOS Battery
The CMOS battery in your MOBO saves all the BIOS settings and configurations, removing this battery for some time can help fix any BIOS errors:
- On your “MOBO” remove the “CMOS Battery” carefully and put it aside for a few minutes, then press the “Power” button on your PC to drain out all left out energy.
- After a few minutes plug the CMOS battery back in and “Power ON” your computer.
Follow the solutions indexed above in order to get through the error successfully but if you continue to face any sort of bug don’t hesitate to Contact Us here and we’ll further look into the issue for you.
Alan is a hardcore tech enthusiast that lives and breathes tech. When he is not indulged in playing the latest video games, he helps users with technical problems that they might run into. Alan is a Computer Science Graduate with a Masters in Data Science.
