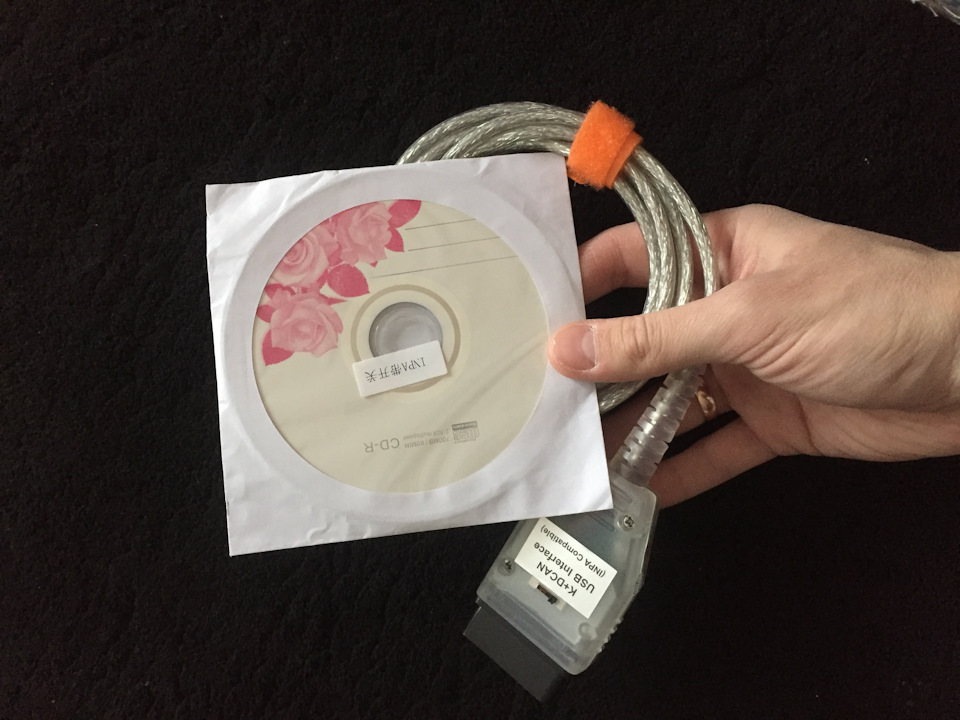
Всем привет!))
Буквально вчера мне пришел мой шнурок из поднебесной. 3 недели ждал))
Покупал у этого китайца. за 647р.
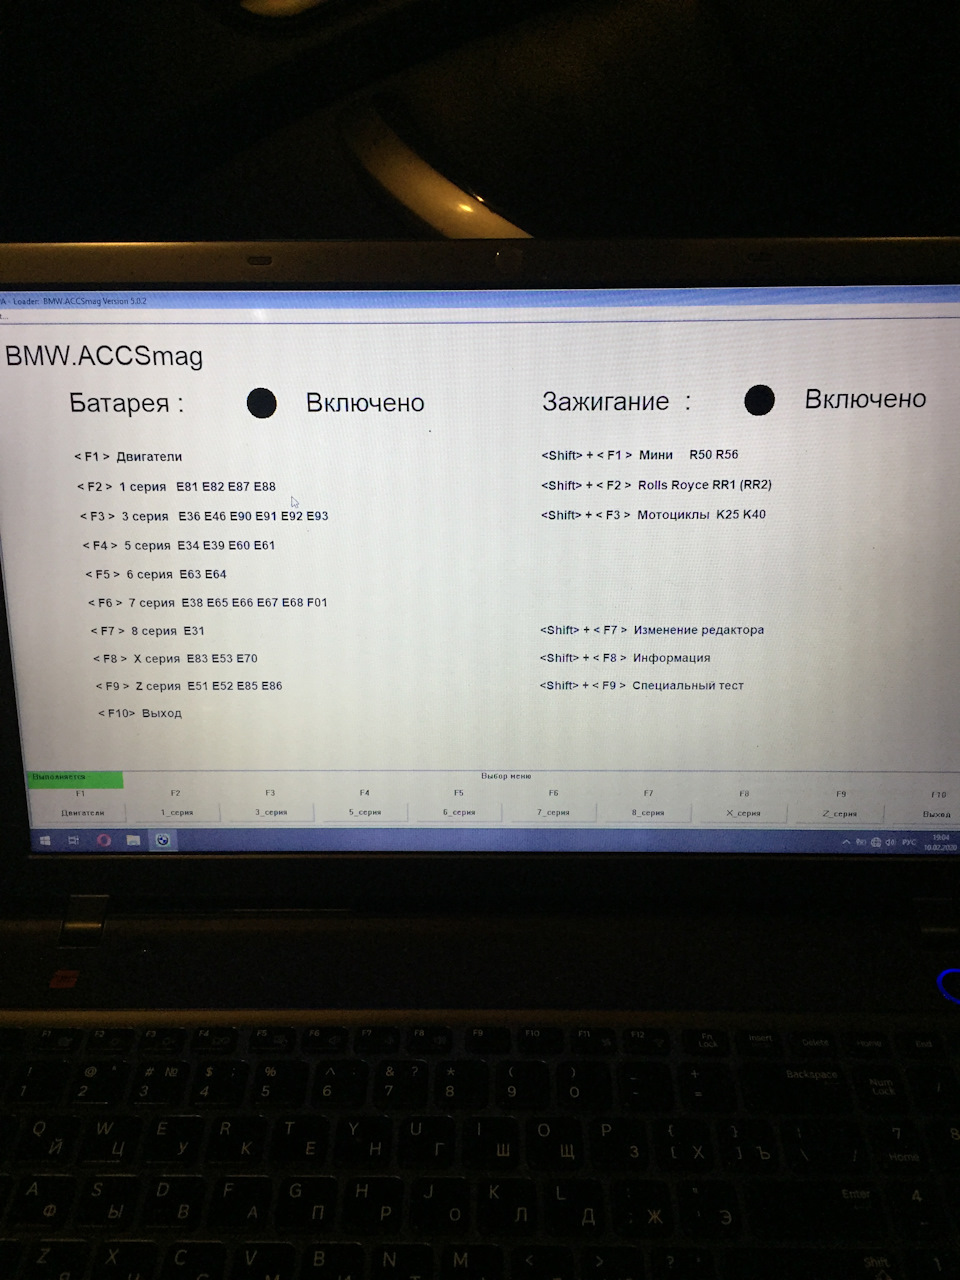
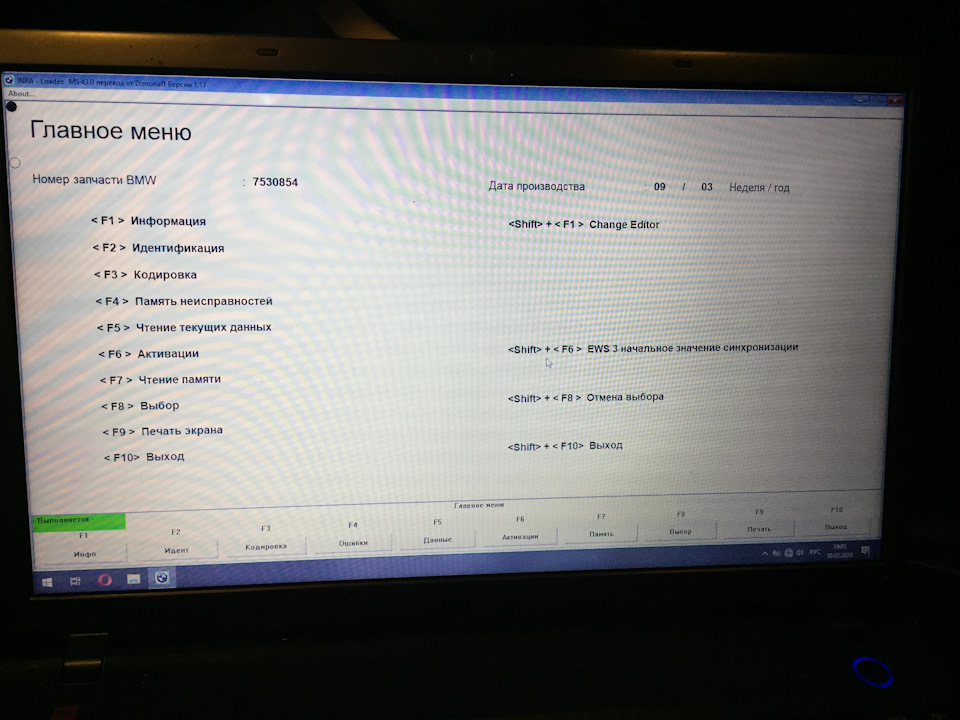
Но до этого я воевал с INPA и 10 виндой. Кое как примерно за денек я смог установить ее на свою 10 винду.
Скачивал и устанавливал INPA вот у этих ребят BMW CREW Это их группа в ВК.
Там у них в описании ссылка на их Яндекс диск с Инпой Русифицированной. Все рабочее а главное без вирусни.
Все очень толково объяснили, Спасибо им за это огромное!))
Но скачать это было пол дела. Проблема заключалась в том что они на видео устанавливают Инпу на виндовс XP, а у меня была 10. Информации о том как установить Инпу на вин. 10 на видео почти нет! Как действовал я. Оказывается на видне 10 есть такая функция как открыть файл в совместимости с любой виндой предыдущих версий. Я просто все установочники открывал в совместимости с вин.XP ( Пакет обновления 3) нажимаете на ярлычок правой кнопкой мыши выбираете Свойства=> вкладка Совместимость => ниже где режим совместимости ставите галочку, и выбираете window 7
И все у вас при спокойненько устанавливается в последовательности как на видео. Но потом на одном из этапов установки вылезла ошибка что не найден какой то из файлов, кажется этого MSCOMCTL.OCX, я думал все капец. Искал искал решение проблемы, нашел этот видос.
Так же из минусов это то, что NCS- эксперт на вин.10 не будет работать. В процессе установке когда нужно будет устанавливать пакет обновления Рефрешер2005, нужно будет установить все обновления кроме NCS-эксперт
Иначе установка дальше не пойдет, у меня по крайней мере не пошла…
И УРА следующий файлик начал устанавливаться!
Короче говоря с горем пополам все заработало)))
Моей радости вчера просто не было предела. Я был очень доволен тем что сделал. Теперь я буду знать все о своем Иксе:))
Надеюсь эта запись кому нибудь да когда нибудь поможет))
Всем спасибо! Подписывайтесь! Ставьте Лайки! И до Встречи)))
Цена вопроса: 647 ₽
Today we will share a fast and convenient way to install BMW Standard tools for the INPA K+DCAN usb interface.
Download the software archives:
INPA
Driver for the k+dcan cable itself
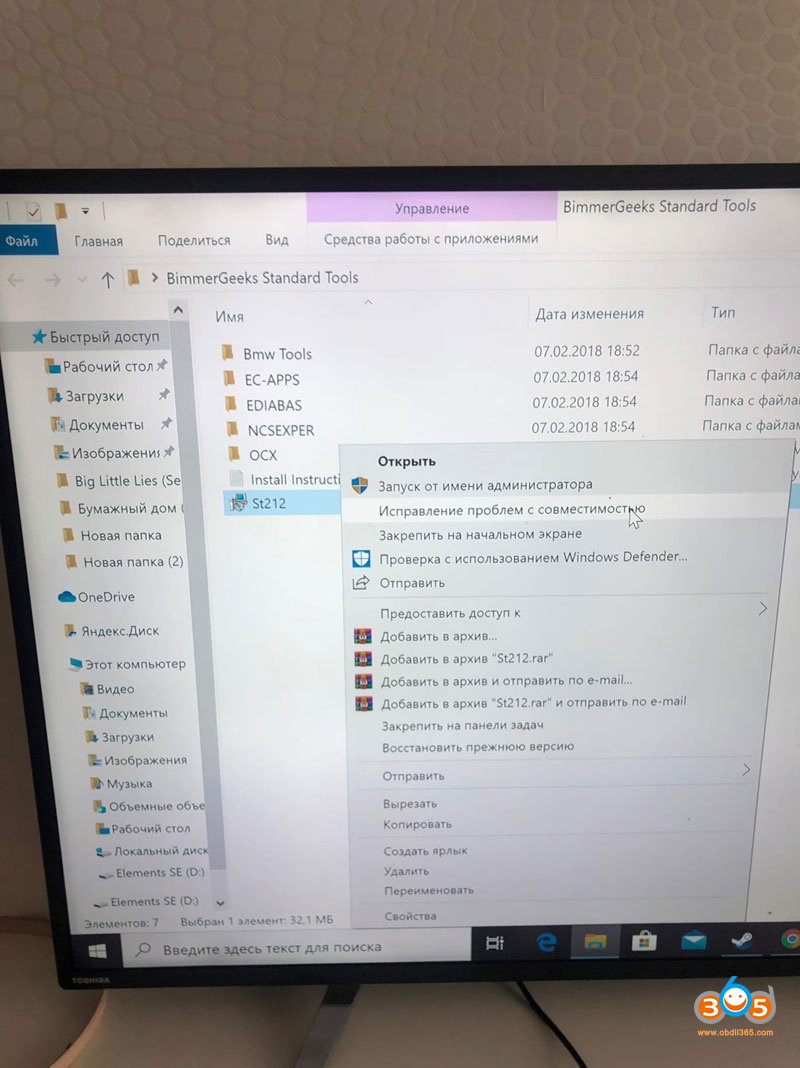
Unzip BimmerGeeks Standard Tools. In the folder we find St212.exe, right click on it and select “fix compatibility issues”
The system may swear, then repeat the action again or click the program check and the installation will proceed. By default, the installation will go to disk c. Leave it like that. Then transfer to wherever you like.
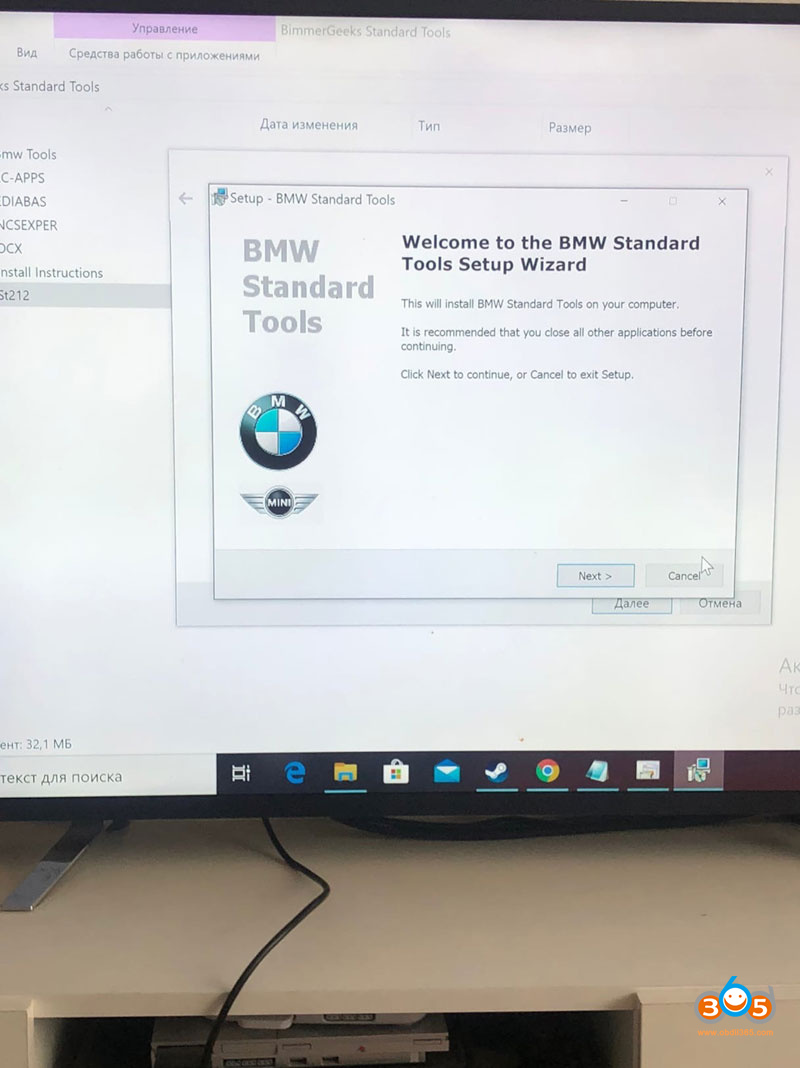
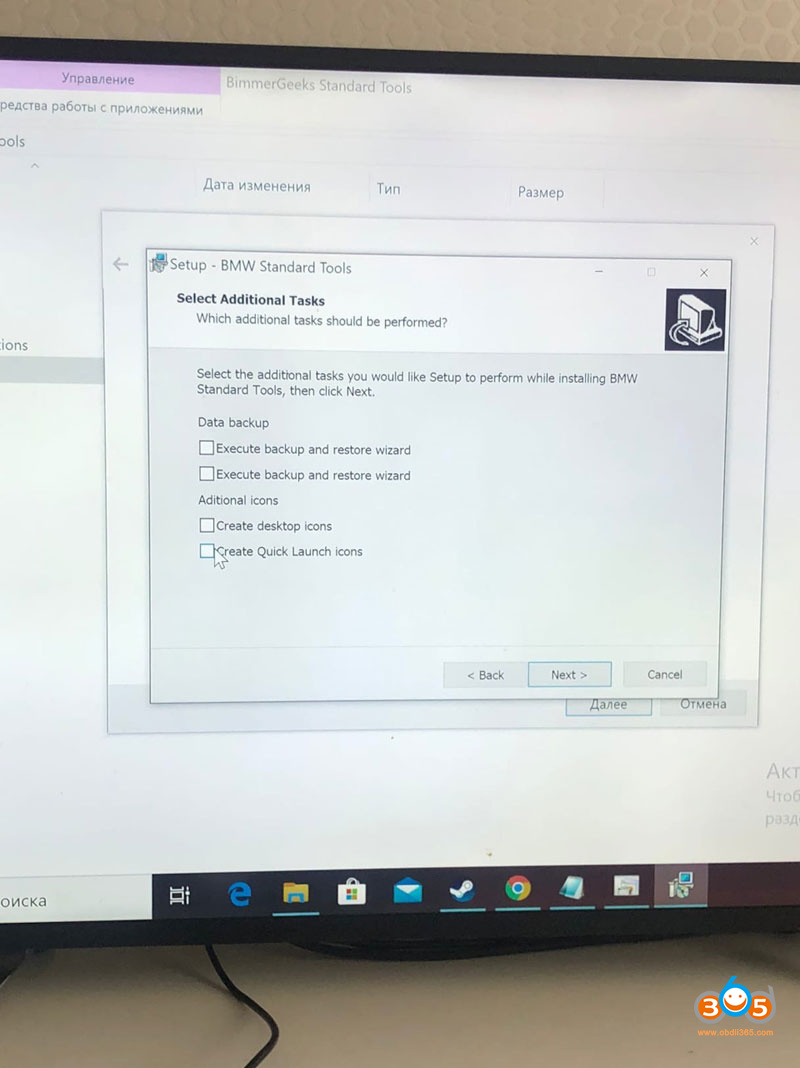
During installation, click next and leave everything by default, except for the window where they offer to create a backup and shortcuts on the desktop, then we uncheck all the boxes.
At the end of the installation, we are offered to reboot the system, we refuse. Installation completed.
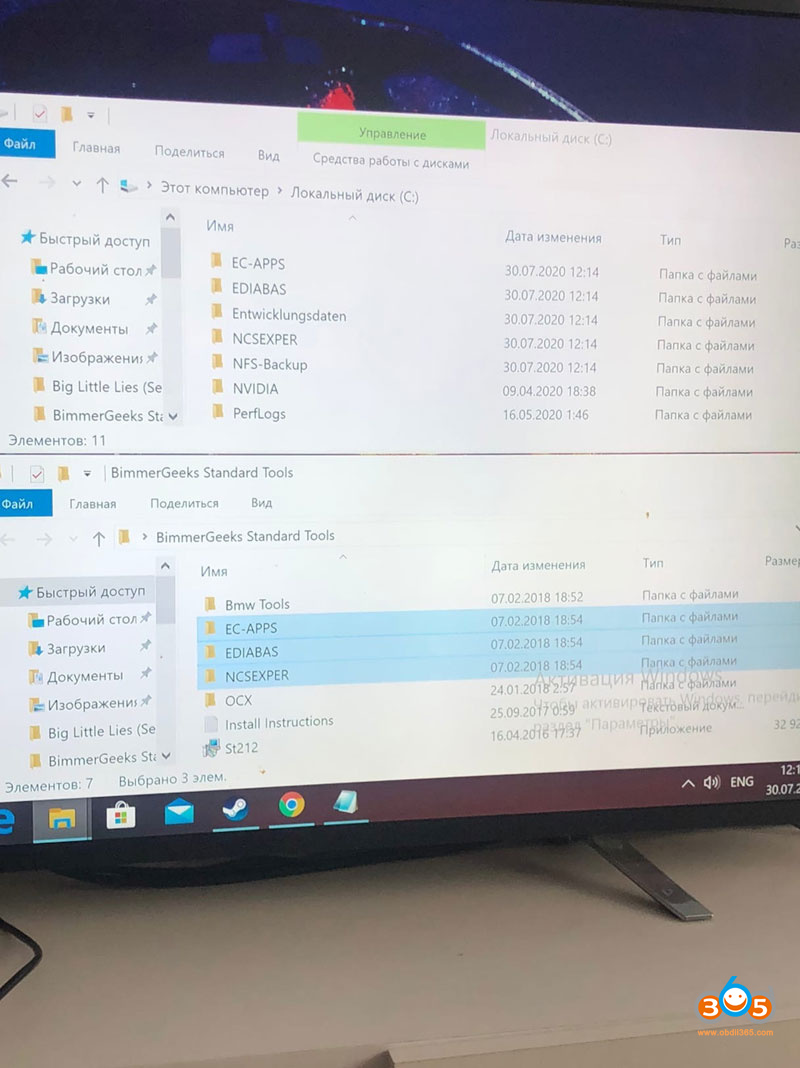
Next, go to drive C: there we find the EC-APPS, EDIABAS & NCSEXPER folders and replace them with the EC-APPS, EDIABAS & NCSEXPER folders from the BimmerGeeks Standard Tools archive.
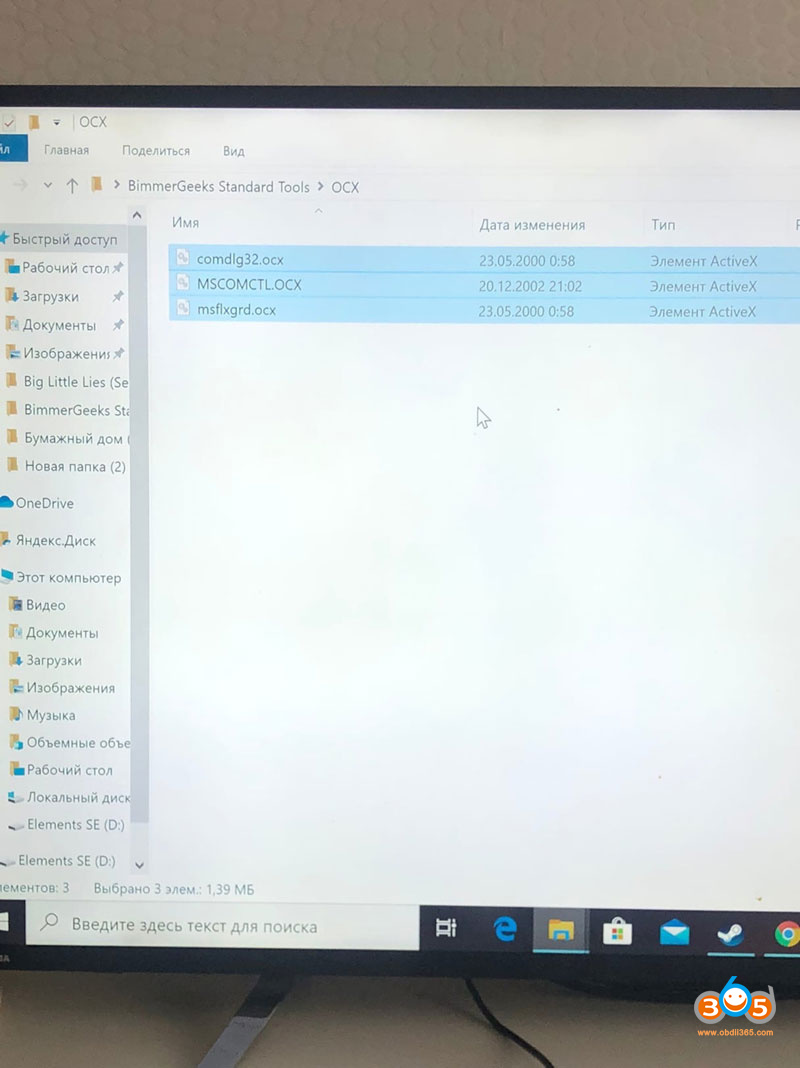
Next, in the BimmerGeeks Standard Tools archive, we find the OCX folder, there we find 3 files and copy them to C:\Windows\Syswow64 with a replacement.
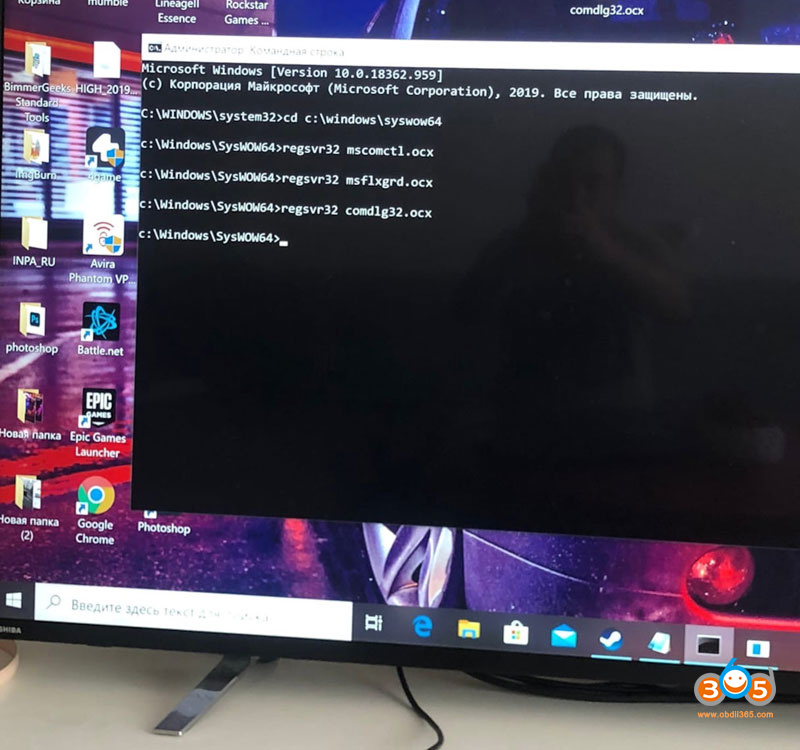
Now we need to open a command. To do this, in the windows search, enter cmd, click on the command prompt shortcut with the right mouse button and run it as an administrator.
At the command line, type cd c:\windows\syswow64
(Press Enter)
regsvr32 mscomctl.ocx
(Press Enter and wait for the message “Registration was successful”)
regsvr32 msflxgrd.ocx
(Press Enter and wait for the message “Registration was successful”)
regsvr32 comdlg32. ocx
(Press Enter and wait for the message “Registration was successful”)
It should look like this:
Place the BMW icon from the BimmerGeeks Standard Tools folder on your desktop. Labels for all software are inside.
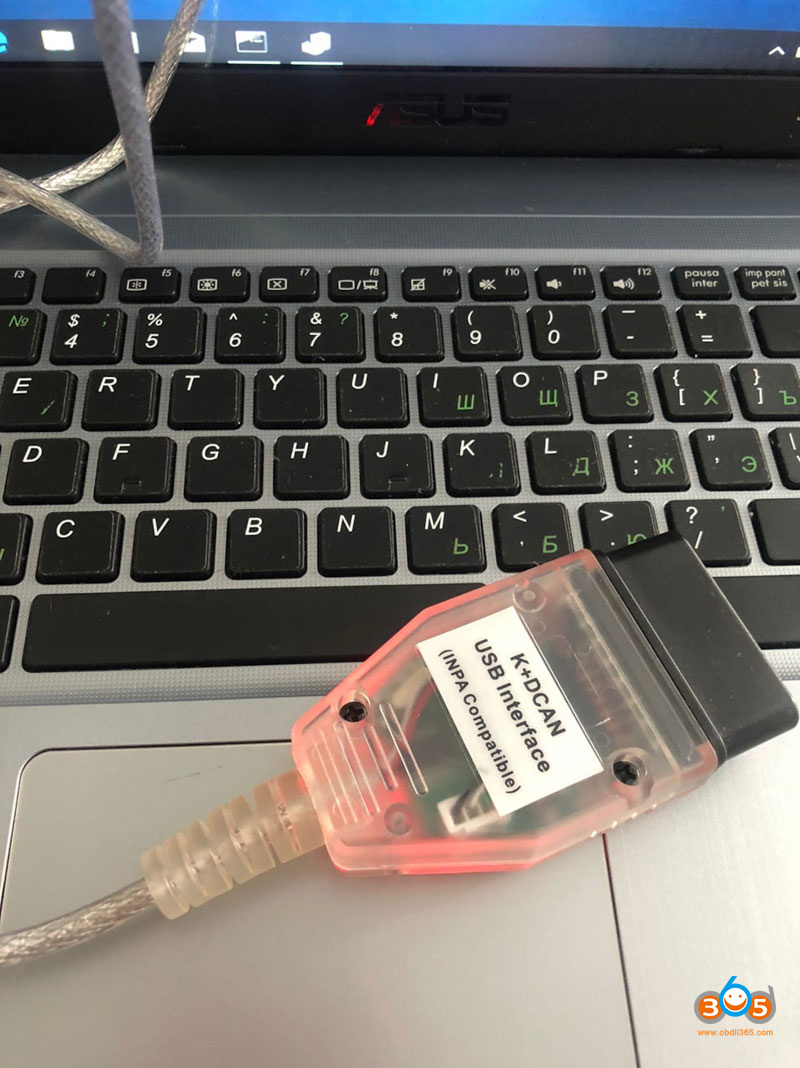
Next, we need to configure our INPA K+DCAN cable, go to the device manager. Open the Ports tab (COM and LTP) Select USB Serial port (COM3) go to properties, advanced parameters and change COM3 to COM1 and response time (ms) to 1. You may need to install the driver, then unzip the archive with the driver to any convenient place, in the port settings, click update driver and specify the path to the folder.

This method of installing INPA on a Windows 10 laptop seemed to be the most convenient and fast.
Read also: Download and Install INPA on WinXP/Win7/Win8/Win10
Шаблонов: 9: index (default), Scrolling (default), Ads (default), Portal (default), Display (default), GenericControls (default), GenericControls (default), TopicRating (default), SimTopics (default).
Дополнительных шаблонов: 18: init, html_above, adsheaders_above, body_above, adsindex_above, scrolling_above, portal_above, bar_above, simtopics_above, main, simtopics_below, bar_below, portal_below, scrolling_below, adsindex_below, body_below, adsheaders_below, html_below.
Языковых файлов: 26: SPortal.english (default), SPortal.russian-utf8 (default), SPortal.english (default), index+Modifications.english (default), index+Modifications.russian-utf8 (default), TopicRating/.english (default), TopicRating/.russian-utf8 (default), Optimus.english (default), Optimus.russian-utf8 (default), SimTopics.english (default), SimTopics.russian-utf8 (default), Ads.english (default), Ads.russian-utf8 (default), SPortal.russian-utf8 (default), Post.english (default), Post.russian-utf8 (default), SimpleTickers.english (default), SimpleTickers.russian-utf8 (default), SearchFocus.english (default), SearchFocus.russian-utf8 (default), Stats.english (default), Stats.russian-utf8 (default), hs4smf.english (default), hs4smf.russian-utf8 (default), hs4smf.english (default), hs4smf.russian-utf8 (default).
Файлов стилей: 4: portal (default), gpbp (default), editor (default), rating (default).
Подключено файлов: 70 — 1656KB. (показать)
Попаданий в кэш: 15: 0,00074 сек. для 152 786 байт (показать)
Запросов в БД: 41.
[Показать запросы]
Установка программного пакета BMW Standard Tools 2.12.0 и драйвера
для диагностического адаптера BMW INPA K+DCAN.
Системные требования: Windows: 7, 8, 8.1, 10 32/64 Bit
1. Скачиваем пакет программ BMW Standard Tools 2.12.0 вместе с обновлением UPDATE V3 по ссылке:
https://autoelectric.pro/Programs/BMW_Standard_Tools_2.12.0_and_UPDATE_V3.zip
(Если ссылка не открывается, скопируйте и откройте её в браузере)
2. Разархивируем скаченный архив в удобное для вас место.
3. Запускаем инсталлятор INSTAL BMW_Standard_Tools_Setup_2.12.0.exe (Если программный пакет BMW Standard Tools уже установлен, то для того чтобы переустановить его необходимо предварительно выполнить деинсталяцию установленного пакета BMW Standard Tools, для этого в поиске Windows нужно найти приложение «Unistal BMW Standart Tools» и зпустить его.)
Для Windows 10, перед запуском инсталлятора, необходимо убедиться, что установлена совместимость с Windows 7, а также то, что запуск производится от имени администратора. Для этого нужно кликнуть правой клавишей мыши по файлу инсталлятора и в контекстном мену выбрать Свойства затем Совместимость , и если отсутствует, то установить Запускать программу в режиме совместимости с: → Windows 7 и
Запускать эту программу от имени администратора и после этого нажать OK .


4. Выбираем .English. Затем жмём .OK .
5. Выбираем Next >
6. Выбираем .I accept the agreement (я принимаю условия соглашения), затем Next >
7. Выбираем Next >
8. Оставляем всё как есть. Выбираем Next >
9. Оставляем всё как есть. Выбираем Next >
10. Оставляем всё как есть. Выбираем Next >
11. Оставляем всё как есть. Выбираем Next >
12. Оставляем всё как есть. Выбираем Next >
13. Оставляем всё как есть. Выбираем Next >
14. Оставляем всё как есть. Выбираем Next >
15. Выбираем STD:OBD , затем Next >
16. Выбираем номер COM port от 1 до 9, который мы будем использовать для подключения адаптера BMW INPA K+DCAN. Выбранный COM порт не должен быть занят другими устройствами (это можно проверить в диспетчере устройств). В нашем примере мы выбрали Com3, вы можете выбрать любой другой номер от 1 до 9, при необходимости этот номер можно будет потом изменить. Далее устанавливаем галочку USB to serialadapter и затем нажимаем Next >
17. Выбираем Install .
18. Затем последовательно одно за другим появляются 4-ре окна. В каждом из них выбираем Skip
19. Запускается процесс инсталляции. Ждём завершения установки.


20. После завершения установки предлагается перезагрузить компьютер. Перезагрузка необходима для корректной установки программы! Выбираем Yes, restart the computer now. (да, перезагрузить компьютер сейчас) и затем Finish
21. После успешной установки пакета программ BMW Standard Tools 2.12.0 на рабочем столе должны появиться ярлыки программ, входящих в данный пакет.
22. Далее запускаем BMW_Standard_Tools_2.12.0_UPDATE_V3.exe программу обновления пакета программ BMW Standard Tools 2.12.0 (которая была извлечена из скаченного нами архива вместе с папкой UPDATE_DISK_C, без которой данная программа работать не будет):
23. Выбираем язык Русский и затем Обновить BMW Standard Tools 2.12.0.
24. Ждём завершения обновления.
25. После успешного обновления появляется сообщение “Обновление завершено!”. Нажимаем X. в верхнем правом углу, чтобы закрыть программу.
Внимание! Если не удалось обновить BMW Standard Tools 2.12.0 с помощью программы BMW_Standard_Tools_2.12.0_UPDATE_V3.exe (например, на windows XP) в этом случае обновление можно сделать вручную с помощью папки UPDATE_DISK_C, которая сопровождает данную программу.
Для этого нужно выполнить следующую последовательность действий:
Скопировать содержимое папки ..\UPDATE_DISK_C\COMMON\ на диск C:\ с заменой всех существующих файлов (на скриншотах приводится пример копирования с помощью программы Total Commander)
Скопировать содержимое папки ..\UPDATE_DISK_C\RUSSIAN\ на диск C:\ с заменой всех существующих файлов.
26. Переходим к настройке адаптера BMW INPA K+DCAN. Подключаем адаптер к USB порту компьютера и при необходимости устанавливаем драйвера с диска, который идёт в комплекте с вашим адаптером. Если у вас установлен Windows 10, то установка драйверов скорей всего не потребуется. Если же по какой-либо причине у вас нет драйверов для вашего адаптера, то вы можете их установить, используя папку C:\EDIABAS\Hardware\OBD\Virtual Port Drivers, которая появиться после обновления, в 99% случаев эти драйвера должны подойти. Если у вас установлены драйвера, то адаптер должен определиться в “диспетчере устройств”. Самый быстрый способ запустить “диспетчер устройств”, это нажать на клавиатуре сочетание клавиш [Win + Pause] и в появившемся окне в верхнем левом углу выбрать “диспетчер устройств”.
27. Запускаем “диспетчер устройств”, раскрываем список Порты (COM и LPT). (если нет подключенных устройств этого списка может и не быть) и при подключенном адаптере и остановленных драйверах адаптер должен определиться как виртуальный COM port . В нашем конкретном случае адаптер BMW INPA K+DCAN определился как USB Serial Port (COM4). (в вашем случае адаптер может определиться под другим номером COM)
28. Щёлкаем правой клавишей мыши по значку USB Serial Port (COM4). (в вашем случае может быть другой номер) и затем выбираем Свойства.
29. Выбираем вкладку Port Settings. (Настройки порта) и затем Advanced….
30. В появившемся окне нас интересуют только два параметра. .COM Port Number:. (номер COM-порта) и
.Latency Timer (msec):. (таймер задержки).
31. Для того чтобы адаптер BMW INPA K+DCAN работал совместно с пакетом программ BMW Standard Tools 2.12.0 номер COM порта под которым определился адаптер в “диспетчере устройств” должен совпадать с номером COM порта, который мы выбрали при установке программного пакета BMW Standard Tools 2.12.0. Так как при установке BMW Standard Tools 2.12.0 мы выбрали Com3 (в вашем случае это могло быть любое другое число от 1 до 9), то необходимо изменить номер COM порта адаптера BMW INPA K+DCAN в “диспетчере устройств”. В нашем случае мы меняем COM Port Number. c .COM4. на СOM3. (в вашем случае это могут быть другие номера).
32. Если вы хотите узнать или изменить номер COM порта установленный для работы программного пакета BMW Standard Tools 2.12.0, то для этого нужно открыть файл C:\EDIABAS\Bin\obd.ini в текстовом редакторе (например “блокнот”). В нашем случае .Port=Com3., так как этот номер мы выбирали в момент установки BMW Standard Tools 2.12.0 (в вашем случае это может быть другой номер, который вы выбрали сами). При необходимости вы можете, изменить этот номер на любой другой в пределах от 1 до 9, главное чтобы он совпадал с номером COM порта в “диспетчере устройств” для адаптера BMW INPA K+DCAN
33. Далее нужно обязательно установит время .Latency Timer (msec):. равное
1 mseс.. Это необходимо для стабильной работы адаптера. Затем жмём .OK.
34. В нашем случае после изменения номера COM порта с 4 на 3 в “диспетчере устройств” адаптер должен определятся как USB Serial Port (COM3). (в вашем случае это может быть другой номер). Теперь можно закрыть “диспетчер устройств” и перейти к проверке адаптера.
Важно! Если вы подключаете адаптер BMW INPA K+DCAN к другому USB разъёму, то он может определиться под другим номером COM порта. Проверьте в “диспетчере устройств” , что адаптер, подключенный к другому USB разъёму, определяется под нужным номером, если номера не совпадают, то измените его через свойства COM порта. То же самое может быть и при подключение другого аналогичного адаптера BMW INPA K+DCAN, он может так же определиться под другим номером COM порта, даже если в данном USB разъёме другой адаптер определялся под нужным номером COM порта. В этом случае так же выберете нужный номер COM порта через свойства COM порта.
35. Приступаем к тестированию. Подключаем адаптер BMW INPA K+DCAN к USB порту компьютера и к OBD разъёму автомобиля. Включаем полностью зажигание и запускаем программу INPA (Если у вас отсутствует ярлык на рабочем столе, то её можно запустить, выбрав путь C:\EC-APPS\INPA\BIN\INPALOAD.exe). Должны “загореться чёрным” индикаторы Battery:. и Ignition:. при условии, что правильно установлен пакет программ BMW Standard Tools 2.12.0, адаптер BMW INPA K+DCAN исправен, корректно установлены драйвера, правильно выполнены все настройки, а так же исправны разъёмы USB и OBD.


This is a DIY solution from a K+DCAN user, who succeeds in setup Standard Tools 2.12 on Windows 10 x64 (64-bit.) that is never qualified by the BMW Group and is considered an experimental platform.
Tools tested with:
Windows 10 64-bit Home
K+DCAN cable from China
(Warning for bad K+DCAN cable!!!)

I recommend starting with a fresh Windows 10 installation in order to collect the necessary INPA 5.0.2 scripts and configuration files that you will require once you have installed BMW Standard Tools 2.12.
When installing Windows 10, I suggest disabling as many of its controversial data collection tools as possible…caveat emptor !!


On this screen, make sure that you scroll down to access the error and diagnostic data collection setting.


The INPA 5.0.2 download is packaged in a RAR archive. I recommend first downloading the open source 7-Zip archive manager to extract its contents.
http://www.7-zip.org/
Downloading and installing 7-Zip is self explanatory:

Click on the 7-Zip icon on the Windows taskbar to bring 7-Zip to the foreground (in focus) and then click Install.


INPA 5.0.2 can be found here (this site is located in China and download speeds are very slow):
http://www.sinodownloads.com/down/download/ecutool/350517-inpa%20k+can.rar
If you are using the Firefox browser, you may receive a warning similar to the one below.

Per Norton Safe Web (https://safeweb.norton.com/), six files on the site were found to be infected. INPA 5.0.2 is not amongst them:

Once the RAR archive 350517-inpa k+can.rar is downloaded, right click on the file. Click on 7-Zip and then I suggest clicking on Extract to “350517-inpa k+can“. 7-Zip will create a folder in the same location as the RAR archive with the same name. In this example, the RAR archive was downloaded to my Downloads folder (C:Users[Username]Downloads).


7-Zip extracted the contents of the RAR archive to the folder C:Users[Username]Downloads350517-inpa k+can.

Navigate to the folder C:Users[Username]Downloads350517-inpa k+caninpa. Copy the 01_Step1, 02_Step_2, and 03_Step_3 folders to the root of your C: drive (C:). This is necessary as the old (circa Windows 95) InstallShield 5.50.126.0 (SETUP.EXE) used to install the software has trouble with long filenames and deep folder hierarchies.


Navigate to the folder C:Users[Username]Downloads350517-inpa k+caninpa1_Step1. Copy the EC-APPS folder to the root of your C: drive. (C:)

Navigate to the folder C:1_Step1NFSEntpacktdisk1. Double-click on the SETUP.EXE file to begin the installation process.

When this screen appears, be sure to select Windows XP. For all other selections, accept the default and click Weiter which is German for “further.”

regsvr32 will fail to register two Windows ActiveX controls.

Click on OK and then click on the large red circle with a white X at the bottom of the screen to see the second regsvr32 error.

Click on OK to acknowledge the second error.

Bring the OBDSetup.exe window into focus by clicking on it. Notice the blue lines around the edge which indicate it is in focus. Press any key to exit OBDSetup.exe. Don’t be concerned about any registry key warnings, this installation of EDIABAS will never be used.

When prompted to reboot, select Nein for “No” and then click on Beenden or “End” to exit the installation program.

Navigate to the folder C:2_Step_2INSTALL. Double-click on the Instprog.exe file to continue the installation process.

Click OK.

Select English and click Continue.

Click Continue.


Select BMW Group Rectification programs UK and click Continue.

Under EDIABAS 6.4.3, select Update, under INPA 5.0.1, select Update, and under NCS expert 3.0.8, select Complete. Verify that the language is set to English metric. Click Continue.

Click Continue.

The archive contents will be extracted.

Click End.

Close the File Explorer window.

Navigate to the folder C:3_Step_3INSTALL. Double-click on the Instprog.exe file to continue the installation process.

Click OK.

Select English and click Continue.


Select BMW Group Rectification programs UK and click Continue.

Under INPA 5.0.1, select Update, under NCS expert 3.0.8, select Update. Verify that the language is set to English metric. Click Continue.


The archive contents will be extracted.

Click End.

Close the File Explorer window.

Navigate to the folder C:Users[Username]Downloads350517-inpa k+caninpa. Copy the INPA.INI file to the INPA CFGDAT folder located in C:EC-APPSINPACFGDAT and overwrite the existing file.


You now have the INPA scripts and configuration files that you’ll need to get the latest version of INPA (5.0.6) up and running. Copy the the INPA CFGDAT and SGDAT folders to a USB thumb drive. They are located in the folder C:EC-APPSINPA. You will need these two folders to complete the BMW Standard Tools 2.12 installation process. Once you have these two folders, you will never need to install INPA 5.0.2 again.

ADDITIONAL FILES NEEDED TO COMPLETE THE REMAINDER OF THE INSTALLATION PROCESS
A link to BMW Standard Tools 2.12 can be found in xxxjecxxx’s NCS-Expert DIY (1st. post):
http://www.e90post.com/forums/showthread.php?t=451145
A link to the English 32-bit version of NCS-Expert can be found in GenePoole’s thread (1st. post):
http://www.e90post.com/forums/showth…3#post13879183
The NCS-Expert profiles are attached to this post:
http://www.e90post.com/forums/showpo…postcount=4476
SP Daten 50.2 can be found in this thread (1st. post):
http://www.e90post.com/forums/showthread.php?t=882353
I suggest downloading the above mentioned files and saving them to the same USB thumb drive that you copied the INPA CFGDAT and SGDAT folders to.
Blow away your previous installation of Windows and start over with a fresh install. INPA 5.0.2 and friends made changes to the Windows registry, etc. Now that you have the two folders needed to bootstrap INPA 5.0.6, it’s best to reinstall Windows.
Once Windows has been reinstalled, prepare to plug in your K+DCAN cable. From this point on, it is important that you always plug the K+DCAN cable into the same USB port as originally inserted prior to each use.
When the K+DCAN cable is initially inserted for the first time, ensure that your system has Internet network connectivity. Windows Update will silently install the latest FTDI drivers needed for the K+DCAN cable to function properly.
Depress the Windows logo key to display the Start menu. In the Start menu search box type the following and depress Enter to launch Device Manager:
Code:
device

When Device Manager opens, click on the arrow to the left of “Ports (COM & LPT)” to expand the Ports device tree. Double-click on “USB Serial Port (COM3)” to open the USB Serial Port properties.

Click on the Port Settings tab and then click Advanced to display the Advanced Settings for COM3.

Change the COM Port Number to COM1 and the Latency Timer to 1 msec and click OK. Click OK again to close the USB Serial Port properties.

The USB Serial Port should be set to COM1. Close Device Manager.

In this example, Standard_Tools_Setup_2.12.exe was copied from a USB thumb drive to my Downloads folder (C:Users[Username]Downloads). Right click on the file and select Troubleshoot compatibility.

Click Try recommended settings.

Click Test the program…


Click Next to begin the installation. For all other selections, accept the default and click Next.

When prompted to select additional tasks, de-select the Execute backup and restore wizard selections under Data backup. You don’t have an existing installation of BMW Standard Tools to backup. Click Next.

Click OK to acknowledge that the backup wizard has been deactivated.

When the Hardware Interface Settings screen appears, select USB to serial adapter. Click Next.

When prompted to restart, select No, I will restart the computer later. Click Finish to return to the Program Compatibility Troubleshooter.


Select Yes, save these settings for this program.

Select Close the troubleshooter.

Restart your system.
Please note: This section of the DIY could be improved for neophyte Windows users. It assumes that you understand command line syntax. In this context, X: denotes an unknown drive letter (i.e. the USB thumb drive that you saved your INPA CFGDAT and SGDAT folders to.) For example, if in Windows File Explorer under This PC your USB thumb drive is denoted as Drive E:, then you should use E: instead.
Code:
C:Users808>copy E:CFGDAT*.ENG C:EC-APPSINPACFGDAT /v
14 file(s) copied.
If you chose to store the CFGDAT folder in another folder named MyStuff, then you would have to include MyStuff in the source path.
Code:
C:Users808>copy E:MYSTUFFCFGDAT*.ENG C:EC-APPSINPACFGDAT /v
14 file(s) copied.
The drive letter and path to the source file(s) is dependent on where you stored the files.
Depress the Windows logo key to display the Start menu. In the Start menu search box type the following and right click on the Command Prompt Desktop app. Select Run as administrator to open a Command Prompt window:
Code:
cmd

When the User Account Control dialog box appears, select Yes to allow the Windows Command Processor to make changes to your computer.
Copy the Windows ActiveX control MSFLXGRD.OCX to C:WINDOWSSYSTEM32 and manually register it:
Code:
C:WINDOWSsystem32>copy C:EDIABASBINMSFLXGRD.OCX . /v
C:WINDOWSsystem32>regsvr32 MSFLXGRD.OCX

Copy the Windows ActiveX control RICHTX32.OCX to C:WINDOWSSYSTEM32 and manually register it:
Code:
C:WINDOWSsystem32>copy C:EDIABASBINRICHTX32.OCX . /v
C:WINDOWSsystem32>regsvr32 RICHTX32.OCX

Overwrite the INPA initialization file in the C:EC-APPSINPACFGDAT folder with the INPA.INI from your saved CFGDAT folder.
Code:
C:>copy X:CFGDATINPA.INI C:EC-APPSINPACFGDAT /v /y
1 file(s) copied.
Copy the INPA scripts and configuration files from your saved CFGDAT and SGDAT folders.
Code:
C:>copy X:CFGDAT*.ENG C:EC-APPSINPACFGDAT /v
14 file(s) copied.
C:>copy X:SGDAT*.IPO C:EC-APPSINPASGDAT /v
468 file(s) copied.
C:>copy X:SGDAT*.SRC C:EC-APPSINPASGDAT /v
11 file(s) copied.
C:>copy X:SGDAT*.TXT C:EC-APPSINPASGDAT /v
2 file(s) copied.
Copy the group files from the SP Daten E89 folder to C:EDIABASECU.
Code:
C:>copy X:E89ECU*.GRP C:EDIABASECU /v
80 file(s) copied.
Import your daten files into WinKFP using this guide (steps 2-8):
http://www.e90post.com/forums/attach…8&d=1375758759
Create a C:NCSEXPERDATENE89 folder and copy the contents of the E89DATEN folder into it.
Code:
C:>mkdir C:NCSEXPERDATENE89
C:>copy X:E89DATEN*.* C:NCSEXPERDATENE89 /v
430 file(s) copied.
Copy the contents of the E89SGDAT folder to C:NCSEXPERSGDAT.
Code:
C:>copy X:E89SGDAT*.* C:NCSEXPERSGDAT /v
224 file(s) copied.
Go to the E89DATEN directory and execute the LADEN.BAT script.
Code:
C:>cd X:E89DATEN
X:E89DATEN>laden.bat
You’ll receive errors at the end of the script due to the missing C:EC-APPSCARSERVER directory, ignore them. When the cmd.exe dialog box appears, click on Continue.


Install the patched 32-bit NCS Expert.
Example:
Code:
rename C:NCSEXPERBINNCSEXPER.EXE NCSEXPER.OLD
rename C:NCSEXPERCFGDATNCSEXPER.TXT NCSEXPER.GER
copy NCSEXPER.EXE C:NCSEXPERBIN /v
copy NCSEXPER.TXT C:NCSEXPERCFGDAT /v
Copy the NCS Expert profiles to the C:NCSEXPERPFL folder.
Example:
Code:
copy *.PFL C:NCSEXPERPFL /v
Copy the NFS INFO.GER file to avoid a nuisance error in WinKFP.
Example:
Code:
cd C:EC-APPSNFSDATAGDATEN
copy INFO.GER INFO.ENG /v
Your done, enjoy!


NOTE: this is a user solution from www.e90post.com/forums, just for sharing