Всем добрый день) данная запись больше для себя, чтобы не забыть что и как устанавливать))
Из названия все понятно о чем пойдет речь, да и подобных записей на просторах драйва полным полно…
Будем устанавливать BMW Standard Tools 2.12 (INPA 5.0.6, EDIABAS 7.3, NCSExpert 4.0.1) он наиболее хорошо подходит для диагностики всей Е-серии с 1996 года.
Скачиваем с сайта RuTracker.ORG архив —BMW Standart Tools 2.12
На территории РФ данный сайт заблокирован провайдерами, поэтому скачиваем через удаленный доступ или другими способами которые можете посмотреть Здесь… У меня же получилось скачать через opera mini.
После скачивания:
Получаем папку INPA.
Запускаем INPA\Standard_Tools_Setup 2.12\Standard_Tools_Setup_2.12.exe. Устанавливаем с настройками по умолчанию.
Внимание! Те, если ставите на Win8/8.1 или Win10, установку нужно запускать в режиме совместимости с Win7 или WinXPSP3. Иначеполучитеошибку «Only Windows NT4.0 and Windows XP are supported».
После окончания установки заменяем файл C:\NCSEXPER\BIN\NCSEXPER.exe одноименным файлом из папки INPA\Standard_Tools_Setup 2.12. На 32 и 64 битах эта новая версия работает одинаково хорошо.
Итак, оболочка программ установлена, можно наполнять их данными.
Наполняем INPA.
Находим файл INPA\BMWGROUP.ENG.iso. Распаковываем его архиватором, например, WinRar. Получаем одноименную папку.
Теперь идем в в эту папку — INPA\BMWGROUP.ENG.
— Папку CFGDAT — копируем в C:\EC-APPS\INPA
— В папке BMWGROUP.ENG есть файлик INPA.ini — копируйте в C:\EC-APPS\INPA\CFGDAT
— Из папки BMWGROUP.ENG\ENGLISH IPO — все файлики копируй в C:\EC-APPS\INPA\SGDAT
— Из папки BMWGROUP.ENG\ENGLISH SGBD все файлы в C:\EDIABAS\Ecu
Наполняем NCSExpert. Идем в папку INPA\ISTAP 2.45 для обновления NCS Inpa, полученную распаковкой одноименного .iso файла.
— Идем в папку ECU и копируем файлы в /ediabas/ecu (замещаем существующие файлы новыми).
— Идем в папку sgdat и копируем все файлы в /NCSEXPER/SGDAT (замещаем существующие файлы новыми).
— Идем в папку Daten и копируем все содержимое /NCSEXPER/DATEN
— Можно обновить данные до еще более новой версии, если будем использовать NCS с машинками еще моложе. Идем в папку INPA\ISTA 2_48_0 NCS INPA и копируем папки оттуда в /NCSEXPER/DATEN/
Для удобства работы можно менять язык меню NCS и INPA. Идем в папку INPA\INPA_RU\INPA RUS.
Для NCS:
— Копируем файлик NCSEXPER.TXT в папку C:\NCSEXPER\CFGDAT\.
Для руссификации INPA:
— Папку BIN копируем сюда c:\EC-APPS\INPA\ с полной заменой всех файлов
— Папку CFGDAT копируем сюда c:\EC-APPS\INPA\ с полной заменой всех файлов
— Папку SGDAT копируем сюда c:\EC-APPS\INPA\ с полной заменой всех файлов
Качаем драйверы шнурка отсюда (должно подойти на WIN 7, 8, 10 x32 и x64): www.ftdichip.com/Drivers/…00%20WHQL%20Certified.zip
Внимание! Качаем драйверы не новее, чем версия 2.10! Новые драйверы распознают китайские неоригинальные чипы и скидывают PID устройства на 0! В результате получаем испорченный шнурок.
Если включен Windows Update — отключаем его, не даем винде ставить драйверы по умолчанию, потому что есть шанс, что автоматом поставятся именно плохие драйверы.
Распаковываем драйверы. Втыкаем шнурок, видим диалог, что драйверы не найдены и не были установлены.
Идем в диспетчер устройств и видим неопознанное устройство. Жмем на нем правой клавишей мыши — обновить драйверы. В появившемся диалоге жмем, что выбираем файлы с компьютера и указываем папку, в которую распаковали скачанный архив.
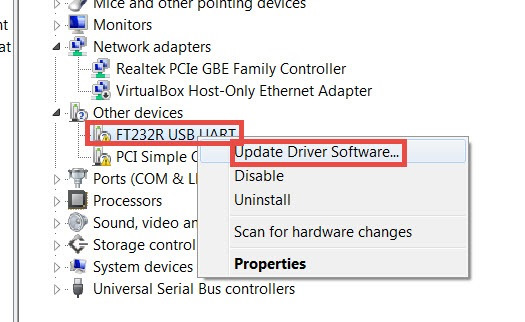
Драйверы устанавливаются, закрываем окошко. И снова выскакивает сообщение, что для нового устройства драйверы установлены не были! Дело в том, что появляется второе устройство. Для него тоже обновляем драйвера, указывая ту же папку.
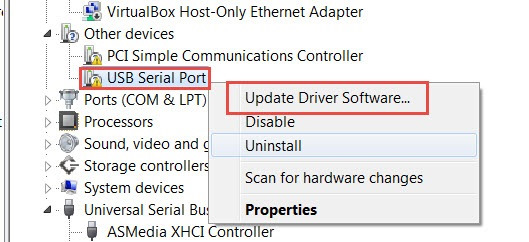
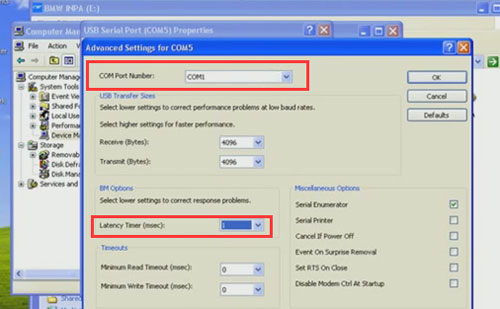
Теперь настраиваем порт. В том же диспетчере устройств вызываем свойства порта.
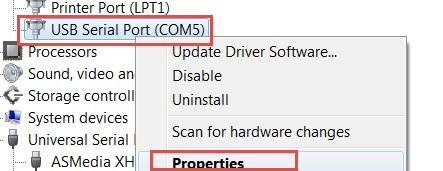
Идем во вкладку настройка порта, жмем на кнопку дополнительных настроек и выставляем значения, как на картинке.
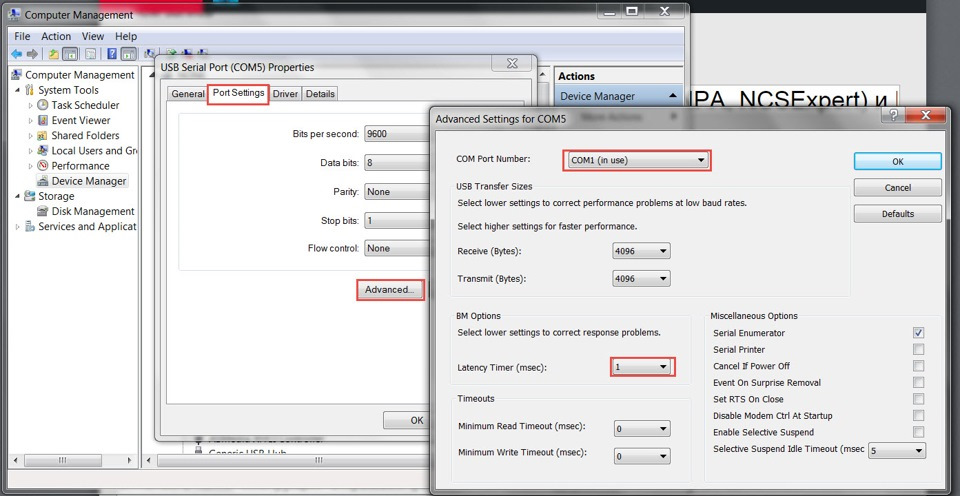
настройки порта
Вообще, можно выбирать любой номер порта. Главное, чтобы здесь в настройках и при установке Standard Tools были указаны одинаковые значения. У меня при установке программы был выбран COM1, он не был занят, поэтому в настройках я выбрал тоже COM1.
Теперь идем в C:\EDIABAS\BIN, находим файлик obd.ini и копируем его в C:\Windows.
Установка драйверов и настройка порта завершена
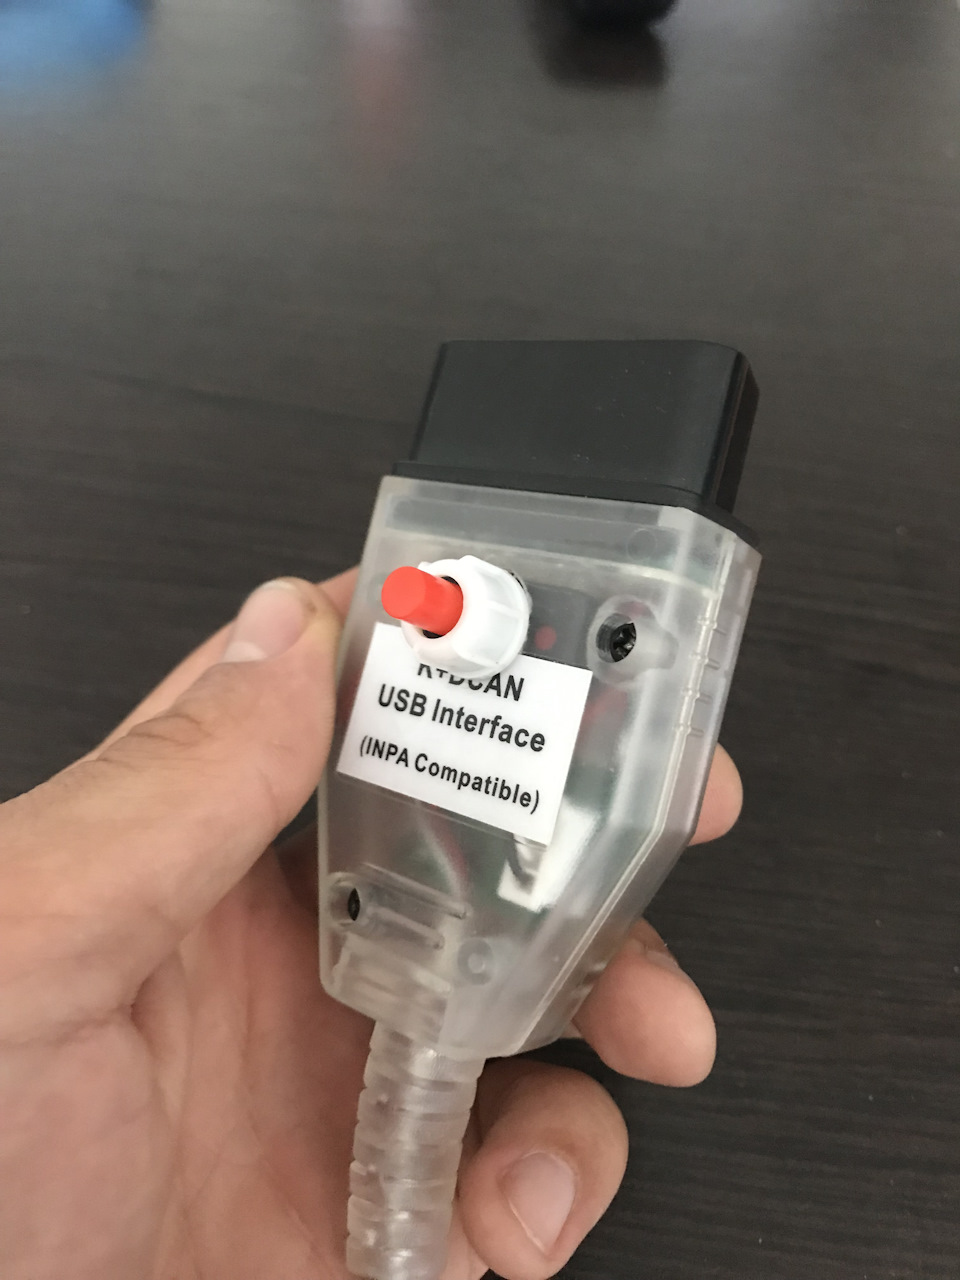
При диагностике у многих видит только мотор и коробку, необходимо замкнуть 7 и 8 pin шнурка, ну или сразу покупать с переключателем. я же при заказе на али лох@нулся и пришлось потом дома паять переключатель, так как хочу чтобы у меня и более новые модели еще читались
После того как INPA успешно работает начинаем установку Rheingold
Скачиваете .rar архив. Берем отсюда torrent файлик rheingold
Чтобы открыть его скачиваем последнюю версия WinRar — здесь
NET Framework 4.0 или 4.5. Качаем отсюда и ставим —Тынц
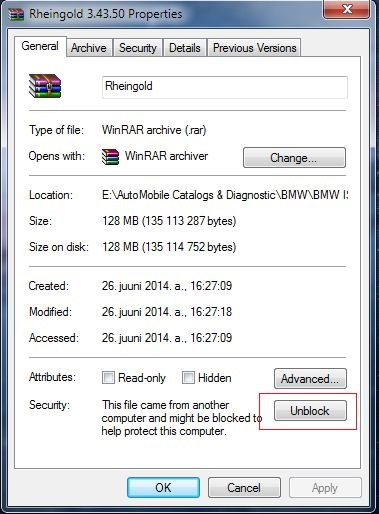
Берем наш архив, кликаем правой кнопкой мыши -> свойства. В свойствах жмем разблокровать
Распаковываем в C:\Program Files (x86) для 64bit или C:\Program Files для 32bit. Папку называем Rheingold для удобства.
Идем в только что распакованную папку с программой и поочередно устанавливаем vcredist_x86.exe и vs90_piaredist.exe.
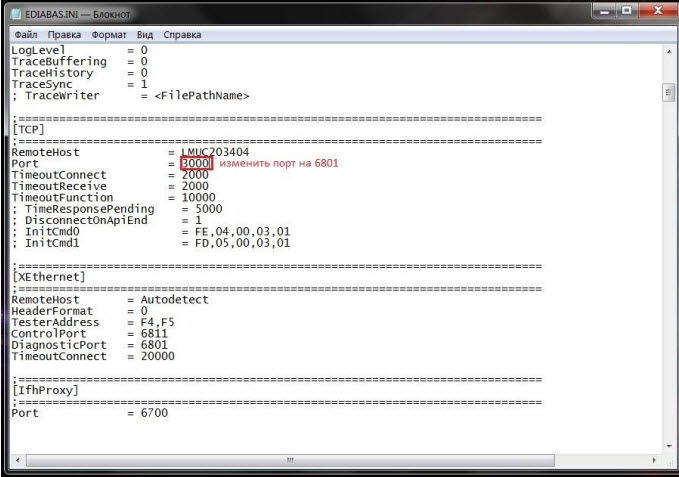
Прописываем порт 6801 в c:\ediabas\bin\ediabas.ini.
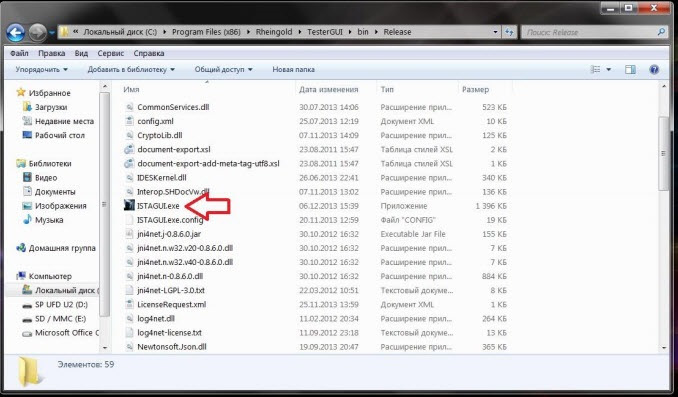
Все! Мы можем запускать программу. Ее местонахождение Rheingold/TesterGUI/bin/Release/ISTAGUI.exe.
Запчасти на фото: 112013
По поводу лицензии, программа у меня ничего не запрашивала и сразу запустилась.
А так же чтобы удобнее было диагностировать, чтобы все блоки видело в салоне можно использовать один из способов, для того чтобы это реализовать

Всем ровных дорог и полных баков)
How-to: install BMW INPA 5.0.6 software on Windows 7 or Windows 8 32 bit or 64 bit to get it to work with a K+DCAN cable.
Software version: INPA 5.0.6
Operation system:
Windows 7 32 or 64 bit
Windows 8 32 or 64 bit
Installation tips and guides:
STEP 1: INSTALLING BMW STANDARD TOOLS
STEP 2: INSTALLING INPA
STEP 3: INSTALLING NCSEXPERT IN ENGLISH
STEP 4: INSTALLING & CONFIGURATING DCAN INPA CABLE
STEP 5: CHANGING THE OBD.INI
STEP 6: SPDATEN FILES
In detail…
STEP 1: INSTALLING BMW STANDARD TOOLS
Download and install BST 212
Since BST (BMW Standard Tools) was designed for Win XP 32bit operating
Systems, users have faced issues with tools like WinKFP and NCSExpert since Win
7 64bit systems have been introduced. Running in XP compatibility mode just
wasn’t enough. Presenting you with several errors or not running at all. Only
solution was to install on a XP system or like me… XP VMware. Well that all
changed with BST 2.12 which works on 32 or 64bit systems.
WIN 7/8, 32/64bit OS
STEP 2: INSTALLING INPA software
(will need it after coding certain modules such as DME for CAS
or EWS Alignment)
Download and install my version of INPA 5.06 with Fxx Support by simply
replacing the existing folders with the folders provided in the
Replace C:\EC-Apps\INPA
Replace C:\EDIABAS
STEP 3: INSTALLING NCSEXPERT IN ENGLISH
Download and install NCSEXPER32_ENG.zip
Copy and replace contents in the .zip file with contents in C:\NCSEXPER\BIN. Now
NSCExpert is in English but you will find the Hot Keys do not work. This is a bug a
fellow MHH member discovered and haven’t really worked on trying to fix it so for
the time being just click on the F# key with your mouse.
Not done yet with NCSExpert. Need to import profiles to NCSExpert. How? well
download the PFL.zip and copy and replace all contents from PFL.zip
to [b]C:\NCSExpert\PFL. (you will also find a lot more PFL’s by searching for
NCSExpert profiles in Google)
Now you have a working WinKFP and NCSExpert with profiles loaded on your PC
we can continue to Step 4.
STEP 4: INSTALLING & CONFIGURATING DCAN INPA CABLE
Configure your DCAN/INPA cable. If you followed my steps correctly than your
EDIABAS should already be configured to STD:OBD for use with the INPA cable. If
not you can download ediabas-konfigurator from here if it is not already in
your C:\EDIABAS\Ediabas-Konfigurator folder. This tool allows you to easily
change the ediabas.ini to your desired interface. So if you are switching
from INPA to E-Sys you could use this to switch from STD:OBD to ENET.
Now to set your COM Port we must first find which COM port is being used for
your cable.
Connect your cable to your PC (some may require a 12v supply to power the
cable)
Allow the device drivers to install (for best driver use the driver that came with
your cable. If not then let windows install the best suitable driver for it)
Navigate to Control Panel, Device Manager, and scroll to Ports (COM & LPT)…look at the pic

So in my case it’s COM5. So we need to change this in the obd.ini file located in
the c:\ediabas\bin folder. But first lets make some changes to the cable.
Right click on your INPA cable driver for example mine is labelled “USB Serial
Port” and click on properties. Now in the property window click on the advanced
tab.

Now every driver is different but the important part is the settings such as latency
timer and received and transmit bytes. See pic bellow for the ideal settings. You
may also change the COM port number here as well for tutorial I left it at 5. Once
your changes are done we can proceed by clicking OK to accept the changes. No
close all windows to return to the desktop.

STEP 5: CHANGING THE OBD.INI
Navigate to C:\EDIABAS\BIN and find file obd.ini and open it with an editor such
as notepad.
First 3 lines will look like this…
[OBD]
Port=Com1
Hardware=USB
So we need to change the Port to reflect our INPA cable which in our case is COM
port 5. So change it to look like this…
[OBD]
Port=Com5
Hardware=USB
When done click File -> Save and exit out.
Very important to remember which USB port you connected your cable to as
plugging it into a different USB port will allocate the INPA cable to a different
COM port and neither tool will see the cable until the original USB port is used
again or changed in device manager and obd.ini as mentioned above.
Now to test if your cable installed correctly. Plug it into the vehicle’s OBD port and
open INPA. You should look like this…
If not follow the above steps again and correct your error.
STEP 6: SPDATEN FILES
Download and install SPDaten files of your choice (always recommend the latest)
in this case it is 51.2. Once downloaded you can now follow the instructions
provided bellow labelled “How_to_start_WinKFP.pdf” this will explain how to
import the SPDaten files to WinKFP.
Edit to update:
For NCSExpert to install or update the daten files, copy the files from SP-daten-
E##\daten to the C:\NCSEXPER\DATEN\E##\ (where E## is whatever chassis
you’re updating). You will also want to copy the files from SP-daten-
E##\SGDAT to C:\NCSEXPER\SGDAT (they’re not separated into different chassis
in NCS Expert, so you just want to copy and paste everything to that directory.
Overwrite everything it asks about). Then copy the files from SP-daten-E##\ECU
to C:\EDIABAS\ECU
After copying the daten files to c:\NCSEXPER\DATEN\E## copy the following files
to the following locations:
copy C:\NCSEXPER\DATEN\E##\*.000 C:\NCSEXPER\DATEN\
copy C:\NCSEXPER\DATEN\E##\*.DAT C:\NCSEXPER\DATEN\
copy C:\NCSEXPER\DATEN\E##\*.ASC C:\NCSEXPER\DATEN\
http://www.obdexpress.co.uk/wholesale/new-bmw-inpa-kcan-with-ft232rq-chip-with-switch-expressuk.html
(Visited 1,590 times, 1 visits today)
One of my blog readers sent the e-mail to ask how to install BMW INPA software on win7/win 8/win10.I searched and found the solution provided by forum members.
Some BMW INPA Source You Need:
BMW INPA 6.4.3 Software Free Download
How To Install BMW Ediabas/INPA On Win XP/Vista
BMW Standard Tools 2.12 Free Download
SP Daten50.2 download here
https://mega.nz/#F!nshRWaLA!NbXQSw7903FIt0JdU81zCA
BMW INPA Win XP Pro Installation:
Step 1 – Prepare the laptop
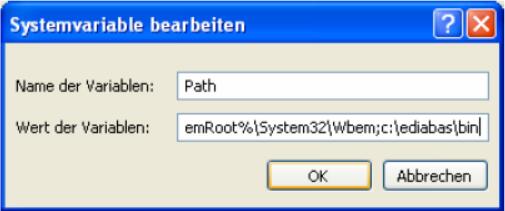
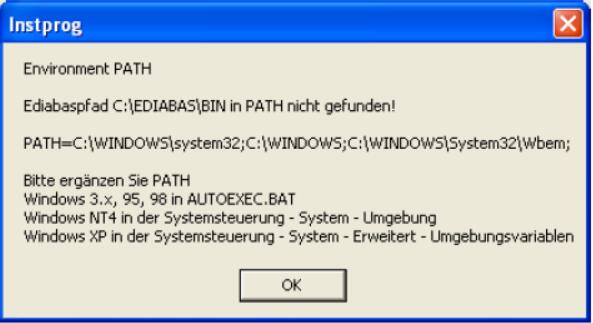
First, you have to make a tiny change to the Windows environment variables. This is less scary than it sounds. INPA relies on a file called API.DLL being in a folder that is set in the Windows “path” so you need to add the EDIABAS folder to the path variable, like this:
1. Go to control panel, select Classic View and open the “System” item
2. Choose “Advanced” and then “Environment Variables”
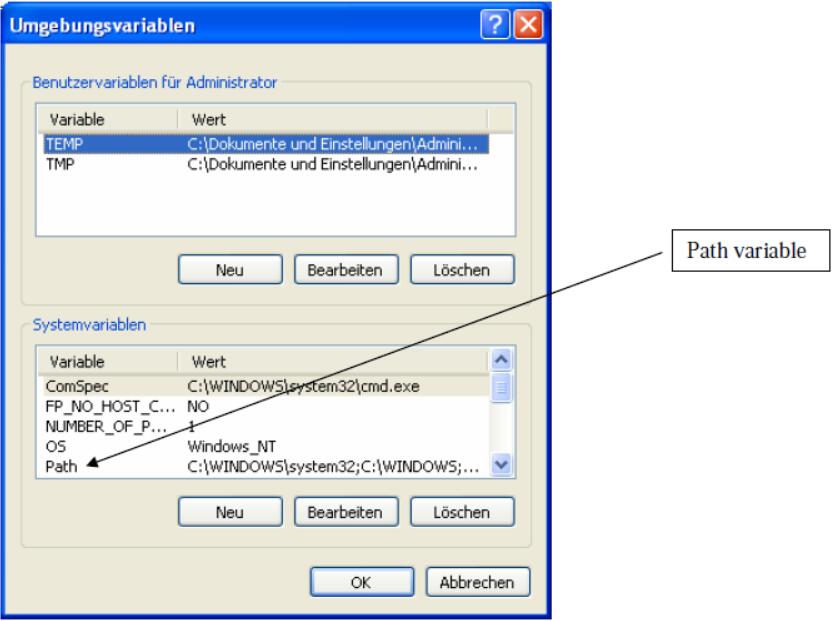
3. You’ll see a system variable called “Path” – double-click this
4. In the “Variable value:” box, add “;c:\ediabas\bin” to the end of the list of folders – e.g:
%SystemRoot%\system32;%SystemRoot%;%SystemRoot%\System32\Wbem;c:\ediabas\bin
5. OK OK OK until the system window and control panel are gone
6. Reboot (important so that Windows picks up the change to the path)
Step 2 – Install the software
The installation is pretty intuitive. I had some problems trying to install the entire suite of programs, but was successful when I kept the install to INPA and EDIABAS. These two allow me to do what I want to the car so I don’t need the others. I also had some problems
installing from hard disk (rather than CD) but only on one laptop, not the other.
1. Unzip the package, either onto laptop directly or onto CD (I used CD so I could move it on to my old XP laptop easily)
2. Run the Instprog.exe program from the \INSTALL\ folder
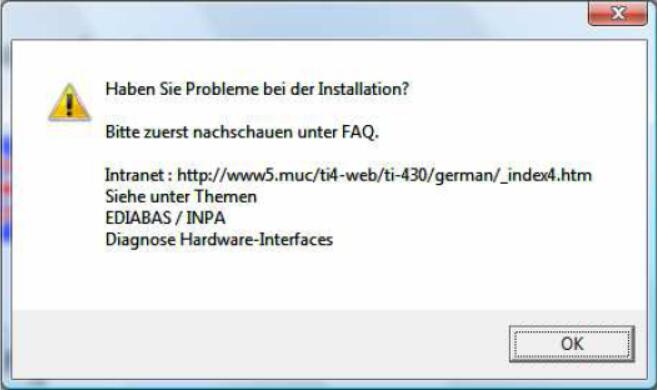
3. OK the warning message:
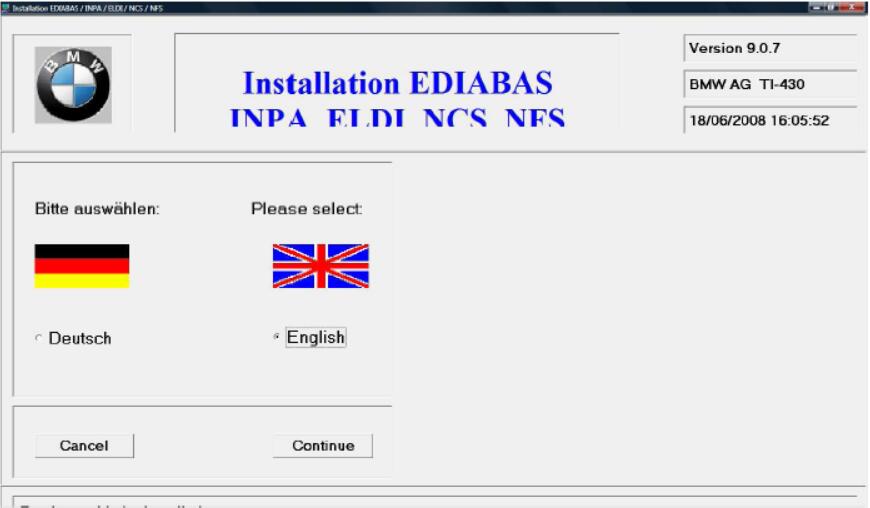
4. Choose English and click continue
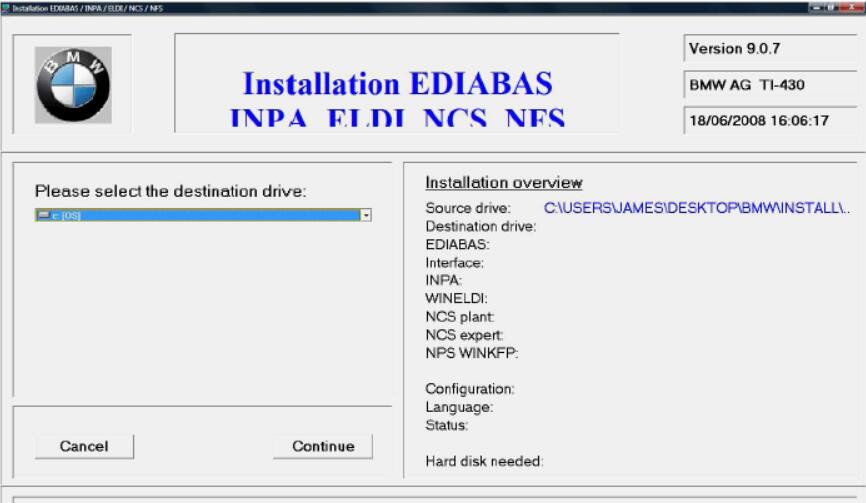
5. Select the drive to install to and click continue
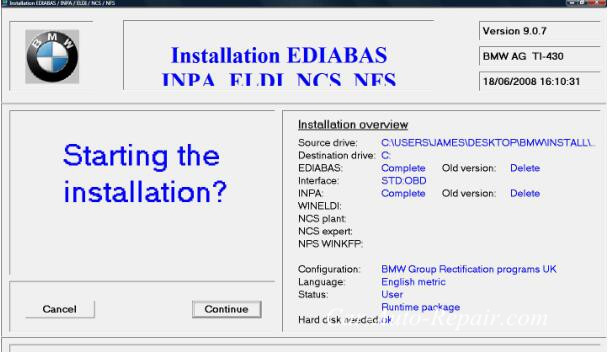
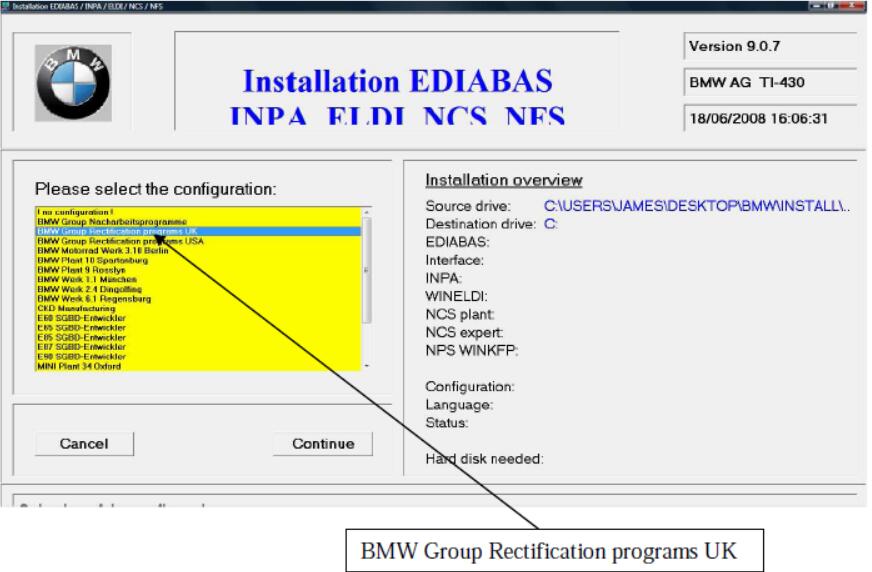
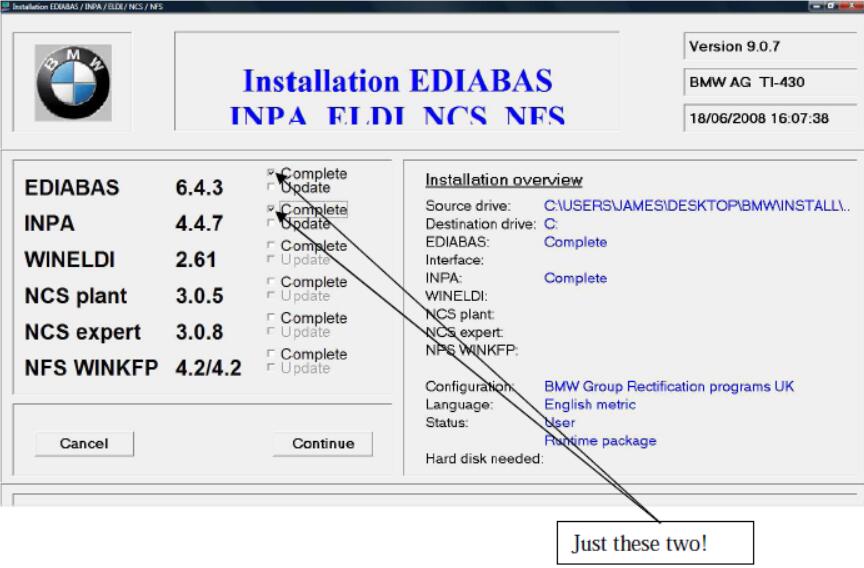
6. Select configuration “BMW Group Rectification programs UK” and click continue (this selection makes INPA run in English which is kind of useful!)
7. Select “complete” for EDIABAS and INPA and click continue (ignore WINELDI / NCS /NFS)
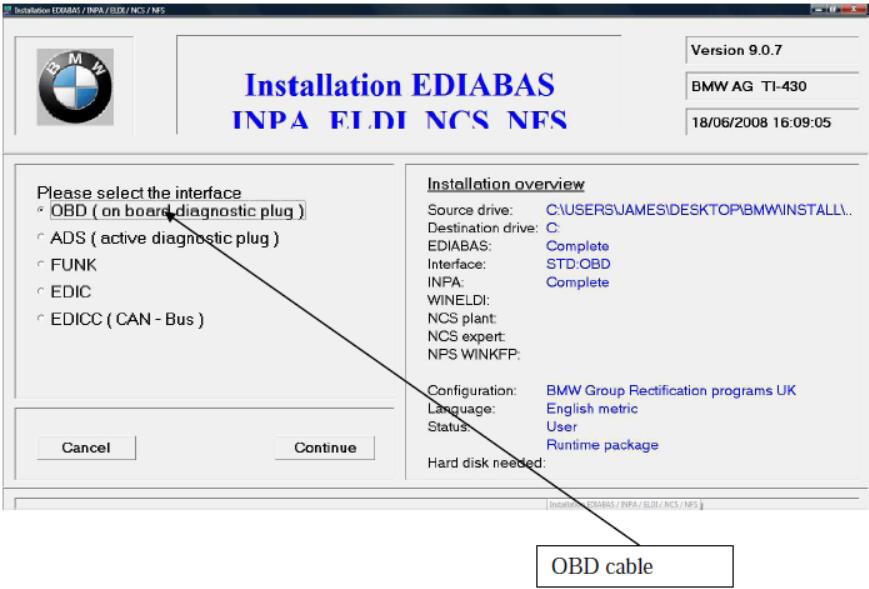
8. Select the interface cable type (the ones on eBay are “OBD” cables)
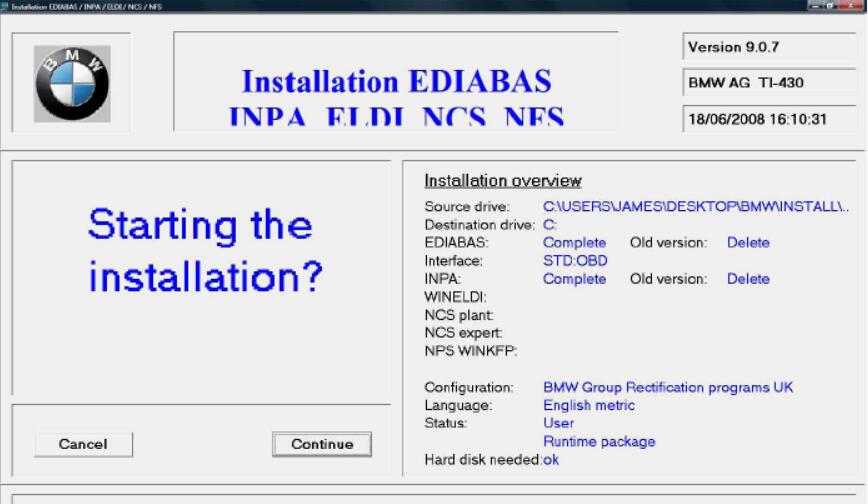
9. Confirm that you want to start the install (if you’ve previously tried and failed to install, it might ask you whether to delete or rename the existing install – choose Delete)
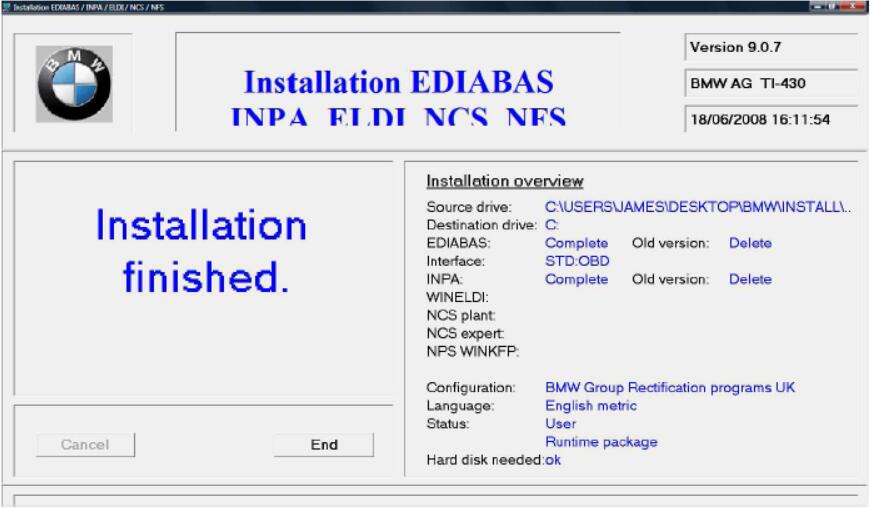
10. You should get an “installation finished” message
11. If you didn’t do the “path” setup I described in step 1, you will get another message. You HAVE to do Step 1 for it to work.
If you try to run it now, it still won’t work because of some duff registry settings. You need one final step to get it sorted!
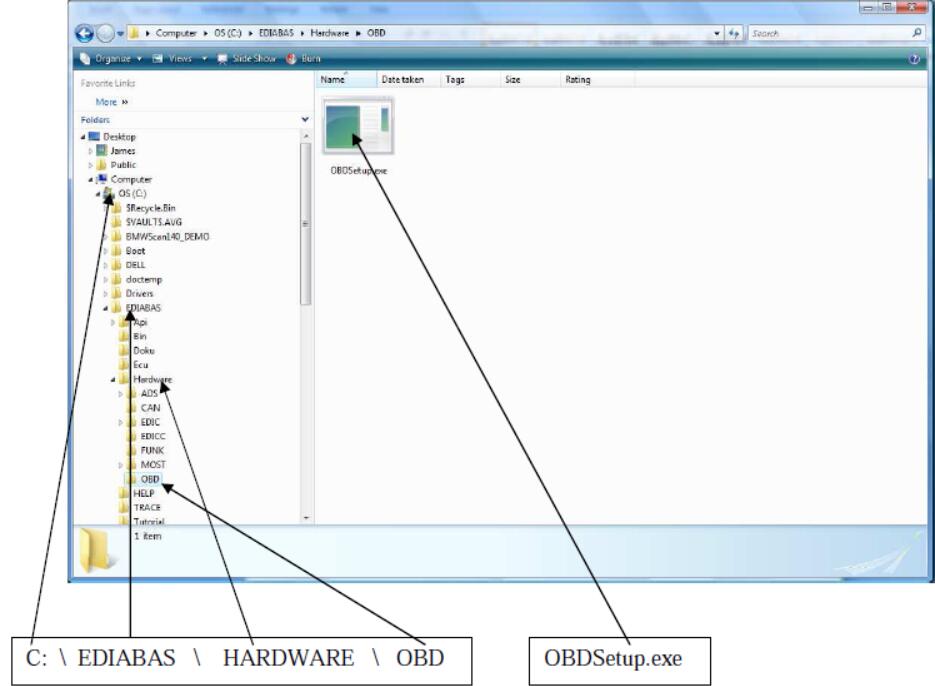
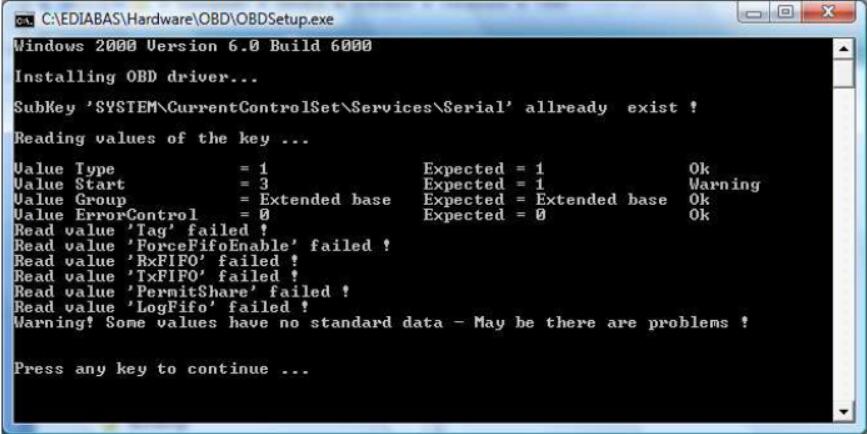
12. Once the install is finished, there will be a folder on your laptop called c:\ediabas\hardware\obd and inside it will be a program called OBDSetup.exe – you need to run this. You can just search for OBDSetup.exe using Windows search.
You will see this screen when you run it:
BMW INPA Win7 Installation Guide:
Method 1 BMW INPA work on Win7 32 bit
This DIY was tested with Windows 7 Home Premium Service Pack 1 (SP1) running on a circa 2008 Lenovo S10 netbook with a K+DCAN cable from one stop electronics.com. My netbook is used solely for coding and as such this DIY assumes that your computer is dedicated to this purpose as well.
I recommend starting with a fresh 32-bit Windows 7 installation in order to collect the necessary INPA 5.0.2 configuration files that you will need after installing BMW Standard Tools 2.12. I suggest disabling Windows Update automatic updates during the Windows 7 installation process. After entering your product key, the following screen will pop up security message.
Select “Ask me later”, this will prevent Windows 7 from automatically installing any updates.
If your installing from pre-SP1 Windows 7 media, I highly recommend that you manually install two Microsoft updates:
System Update Readiness Tool (KB947821):
http://www.microsoft.com/en-us/downl…s.aspx?id=3132
Windows 7 Service Pack 1 (KB976932):
http://www.microsoft.com/en-us/downl…s.aspx?id=5842
During testing pre-SP1 Windows 7 no longer displayed a mouse pointer after successfully installing EDIABAS & WinKFP and rebooting the system.
INPA 5.0.2 can be found here:
INPA-EDIABAS full English Edition
Installation Guide
Follow steps 2 through 6 of the installation guide. During the EDIABAS & WinKFP install (step 3), select Windows XP (this is not mentioned in the installation guide.) For all other selections, accept the default and click Weiter which is German for “further.”
The very first time you attempt to install EDIABAS & WinKFP (step 3), regsvr32 will fail to register two Windows ActiveX controls. This is normal, upon re-installation everything will work properly.
Click on OK and then click on the large red circle with a white X at the bottom of the screen to see the second regsvr32 error.
Click on OK to acknowledge the second error.
Press any key to exit the EDIABAS OBD setup program. Don’t be concerned about any registry key warnings, this installation of EDIABAS will never be used.
When prompted to reboot, select Nein for “No” and then click on Beenden or “End” to exit the installation program. Go to Control Panel and uninstall the program.
Once you have uninstalled the program, reinstall it. On the second attempt, the ActiveX controls will register properly.
This time, select Ja for “Yes” and reboot.
Even with SP1 installed, on occasion the system will no longer display a mouse pointer after rebooting the system at this point. If this happens, depress the Windows logo key (on some keyboards it may have an icon of a house instead) to display the Start menu. Depress the right arrow key once and then depress Enter to initiate a proper shutdown. When powered back on, the system should have a functional mouse pointer.
Continue with steps 4-6 in the installation guide.
At the completion of step 5, the Windows Program Compatibility Assistant may appear. Click on “This program installed correctly.”
At this point you could optionally install the latest EDIABAS/INPA update (ES-76) from FAL’s EA-90X distribution. I don’t recommend doing so as the latest INPA scripts are in German and not necessary for coding. Installation of the ES-76 update is outside of the scope of this DIY.
You now have the base INPA scripts and configuration files that you’ll need to get the latest version of INPA (5.0.6) up and running. Copy the the INPA CFGDAT and SGDAT folders to removable media for safe keeping. They are located in C:\EC-APPS\INPA.
If your curious, INPA 5.0.2 is operable at this point. If you were to install the K+DCAN drivers from Windows Update, set the cable to COM1, etc. the battery and ignition clamps are working properly.
That’s cool, but INPA 5.0.2 and friends are not totally compatible with the latest SP Daten files (i.e. 50.2), so let’s move on to installing BMW Standard Tools 2.12.
Links to BMW Standard Tools 2.12 and NCS Expert profiles can be found in this post:
http://www.e90post.com/forums/showpo…postcount=4476
SP Daten 50.2 can be found in this thread:
http://www.e90post.com/forums/showthread.php?t=882353
Blow away your previous installation of Windows and start over with a fresh install. INPA 5.0.2 and friends made changes to the Windows registry, etc. Now that we have the two folders needed to bootstrap INPA 5.0.6, it’s best to reinstall Windows. If your installing from pre-SP1 Windows 7 media, don’t forget to install the System Update Readiness Tool (KB947821) and Windows 7 Service Pack 1 (KB976932.) In addition, because this will hopefully be your final re-installation of Windows I suggest that you manually install one additional Microsoft update:
Microsoft .NET Framework 4.5.1:
http://www.microsoft.com/en-us/downl….aspx?id=40779
When the K+DCAN cable is initially plugged in, Windows will indicate that the device driver was not successfully installed.
Click on the white box circled above when it appears to change the driver update settings.
Click on “Change setting.”
Select “Always install the best driver software from Windows Update” then click on “Save Changes.”
Windows Update will install the latest FTDI drivers needed for the one stop electronics.com K+DCAN cable. Notice that the FTDI driver has defaulted to USB Serial Port COM3. You need to change this to COM1. Click on “Close.”
Click on the Windows Start button to display the Start menu. In the Start Search box type the following command and depress Enter to launch Device Manager:
Code:
mmc devmgmt.msc
When Device Manager opens, click on the arrow to the left of “Ports (COM & LPT)” to expand the Ports device tree. Double-click on “USB Serial Port (COM3)” to open the device properties.
Click on the “Port Settings” tab and then click on the “Advanced” button to display the Advanced Settings for COM3.
Change the COM Port Number to COM1 and the Latency Timer to 1 msec and click “OK.”
The USB Serial Port should be set to COM1. Close Device Manager.
Install BMW Standard Tools 2.12. Accept the defaults and click “Next.”
When prompted to select additional tasks, de-select the “Execute backup and restore wizard” selections under Data backup. You don’t have an existing installation of BMW Standard Tools to backup. Click “Next.”
Click “OK” to acknowledge that the backup wizard has been deactivated.
When the Hardware Interface Settings screen appears, select “USB to serial adapter” then click “Next.”
Click “Finish” to complete the BMW Standard Tools setup and restart your computer.
Please note: This section of the DIY could be improved for neophyte Windows users. It assumes that you understand command line syntax. In this context, X: denotes an unknown drive letter (i.e. the USB thumb drive that you saved your INPA CFGDAT and SGDAT folders to.) For example, if in Windows Explorer under Computer your USB thumb drive is denoted as Drive E:, then you should use E: instead.
Code:
C:\Users\808>copy E:\CFGDAT\*.ENG C:\EC-APPS\INPA\CFGDAT /v14 file(s) copied.
If you chose to store the CFGDAT folder in another folder named MyStuff, then you would have to include MyStuff in the source path.
Code:
C:\Users\808>copy E:\MYSTUFF\CFGDAT\*.ENG C:\EC-APPS\INPA\CFGDAT /v14 file(s) copied.
The drive letter and path to the source file(s) is dependent on where you stored the files.
Click on the Windows Start button to display the Start menu. In the Start Search box type the following command. Right click on the Windows Command Processor (cmd) under Programs and select Run as administrator.
Code:
cmd
When the User Account Control dialog box appears, select Yes to allow the Windows Command Processor to make changes to your computer.
Copy the Windows ActiveX control MSFLXGRD.OCX to C:\WINDOWS\SYSTEM32 and manually register it.
Copy the Windows ActiveX control RICHTX32.OCX to C:\WINDOWS\SYSTEM32 and manually register it.
Overwrite the INPA initialization file in the C:\EC-APPS\INPA\CFGDAT folder with the INPA.INI from your saved CFGDAT folder.
Code:
C:\>copy X:\CFGDAT\INPA.INI C:\EC-APPS\INPA\CFGDAT /v /y1 file(s) copied.
Copy the INPA scripts and configuration files from your saved CFGDAT and SGDAT folders.
Code:
C:\>copy X:\CFGDAT\*.ENG C:\EC-APPS\INPA\CFGDAT /v14 file(s) copied.C:\>copy X:\SGDAT\*.IPO C:\EC-APPS\INPA\SGDAT /v468 file(s) copied.C:\>copy X:\SGDAT\*.SRC C:\EC-APPS\INPA\SGDAT /v11 file(s) copied.C:\>copy X:\SGDAT\*.TXT C:\EC-APPS\INPA\SGDAT /v2 file(s) copied.
Copy the group files from the SP Daten E89 folder to C:\EDIABAS\ECU.
Code:
C:\>copy X:\E89\ECU\*.GRP C:\EDIABAS\ECU /v80 file(s) copied.
Import your daten files into WinKFP using this guide (steps 2-8):
WinKFP Import.pdf
Create a C:\NCSEXPER\DATEN\E89 folder and copy the contents of the E89\DATEN folder into it.
Code:
C:\>mkdir C:\NCSEXPER\DATEN\E89C:\>copy X:\E89\DATEN\*.* C:\NCSEXPER\DATEN\E89 /v430 file(s) copied.
Copy the contents of the E89\SGDAT folder to C:\NCSEXPER\SGDAT.
Code:
C:\>copy X:\E89\SGDAT\*.* C:\NCSEXPER\SGDAT /v224 file(s) copied.
Go to the E89\DATEN directory and execute the LADEN.BAT script.
Code:
C:\>cd X:\E89\DATENX:\E89\DATEN>laden.bat
You’ll receive errors at the end of the script due to the missing C:\EC-APPS\CARSERVER directory, ignore them.
Install the patched 32-bit NCS Expert from this thread:
http://www.e90post.com/forums/showthread.php?t=832476
Example:
Code:
rename C:\NCSEXPER\BIN\NCSEXPER.EXE NCSEXPER.OLDrename C:\NCSEXPER\CFGDAT\NCSEXPER.TXT NCSEXPER.GERcopy NCSEXPER.EXE C:\NCSEXPER\BIN /vcopy NCSEXPER.TXT C:\NCSEXPER\CFGDAT /v
Copy the NCS Expert profiles to the C:\NCSEXPER\PFL folder.
Example:
Code:
copy *.PFL C:\NCSEXPER\PFL /v
Your done, enjoy!
Method 2 work on Win7 64 bit
This method share by sergeantash on bimmerforums.co.uk forum
I have been trying to find clear instructions on how to achieve this installation successfully over the past few months, I kept giving up due to confusion, frustration, misleading threads and bad information. However, after much research, I have finally got it working and hope to help others searching for solutions. I can’t guarantee that this is absolutely perfectly described but the process below worked in my case, hopefully it’ll get you up and running too.
My specific use is to diagnose codes on my E46 M3 (2004) and so I can confirm that it works fully with this car. If someone wishes to take screenshots, I’ll add them to the guide.
Assumptions and Clarifications
This setup/installation DOES work on Windows 7 64bit.
This setup/installation DOES NOT require VM/Virtual Machine images.
This setup/installation DOES work on an E46 (my car).
This setup/installation DOES give you INPA and EDIABAS 6.4.7 and 5.0.2.
This setup/installation DOES NOT give you NCS Expert or anything other than above mentioned.
This guide assumes that you have a basic knowledge of Windows, Control Panel and Device Manager.
1. Buy a cable
I purchased a USB cable from EBay, it came with software but I didn’t use it and instead used online resources that I downloaded for which I’ll provide links. The cable I purchased is a USB to OBD2 connector that plugs into your BMW to the right hand side of the steering wheel, in the foot-well area.
This is the specific cable that I purchased and that I can confirm works:
BMW Diagnostic Software Cable lead Ediabas Inpa
2. Download the software
There are many sources on the internet for INPA/EDIABAS, some seem to work, others do not – I used these specific downloads and they worked perfectly:
** UNFORTUNATELY THE DOWNLOAD LINKS ARE NO LONGER AVAILABLE – BUT I WILL SEE WHAT I CAN DO **
If for any reason the above links are missing/broken, PM me and I’ll see what I can do. Thank you to whomever is hosting the above files and I hope that you do not mind me providing these links.
3. Setup/Configure your OBD2 USB Cable
Put the DVD that arrived with the cable into the DVD drive on your PC.
Plug in the cable into a USB port on your computer, you must ONLY use this USB port from here-on for this cable. If your computer is connected to the internet it should automatically search and install in the USB cable drivers. If your computer does NOT automatically detect the cable, you may need to use ‘Device Manager’ to manually update/select the driver.
Once installed, go to Control Panel -> System -> Then click on the Hardware tab, then click on Device Manager.
Locate the entry ‘USB Serial Port’ in the ‘Ports’ section of Device Manager. It should read ‘USB Serial Port (COMX)’.
Right-click on the above and select ‘Properties’, then click on the ‘Port Settings’ Tab and then click on ‘Advanced’.
Change the ‘Com Port Number’ entry to ‘COM1’.
Change the ‘Latency Timer (msec)’ to ‘1’.
Click on ‘OK’ and close all the windows, restart your PC to confirm all the changes.
4. Install INPA/EDIABAS 6.4.3 and 4.4.7
Extract the contents of the downloaded file ‘INPA-6.4.3-full.rar’ and you’ll find a .NRG file. This is a CD image that you’ll need to either burn to a CD or extract to a folder using a tool such as ISOBuster.
Once extracted, go into the following folder ‘/REFERENZ/INSTALL/’, right-click on ‘INSTPROG.exe’ and select ‘Properties’, click on the Compatibility tab and change the dropdown to Windows XP SP3 as the Compatibility Mode, also tick ‘Run As Administrator’, then click ‘Ok’, then double-click the file to run the installation.
Select ‘English’ as the language and click ‘Next’.
Select ‘Next’ until asked for ‘Configuration’, scroll to ‘BMW Group Rectification Programs UK’, click ‘Next’.
Tick the option ‘Complete’ for all of the options shown.
Select ‘Next’ and allow the installation to start.
After a minute or so, installation will complete, close the Window.
5. Verify environment variables
Go into Control Panel -> System -> Advanced System Settings.
Select ‘Environment Variables’ and then verify that the System Variables ‘TMP’ and ‘TEMP’ both contain the path ‘C:\EDIABAS\Bin’ within the ‘Value’ string – for instance “C:\Windows\Temp;C:\EDIABAS\Bin”.
6. Prepare Installation Files
Extract the contents of the downloaded file ‘INPA_502_Updated.rar’.
You’ll use the contents of this archive during the next three steps.
7. Install BMW Tools
From the above extracted file set, find the file ‘Step 1_ Install BMW Tools.exe’, right-click on it and select ‘Properties’.
Click on the Compatibility tab and change the dropdown to Windows XP SP3 as the Compatibility Mode, also tick ‘Run As Administrator’, then click ‘Ok’
Double-click on the above file to start the installation.
Set the Destination Path C:\BMW Tools (Don’t change this path) -> ‘Install’ -> ‘OK’.
Select ‘English’ -> ‘Continue’ -> ‘Continue’.
Select ‘C:’ -> ‘Continue’.
Select ‘Skip’ -> ‘Next’
Accept the defaults for programs to update, then click ‘Next’.
Select ‘Com1’, ‘OBD’ and ‘USB to Serial Adapter’ -> ‘Continue’ -> ‘Continue’.
The installation will begin and complete.
8. Install INPA/EDIABAS 6.4.7 and 5.0.2
From the above extracted file set, double-click the file ‘Step 2_ Install INPA.exe’.
The Destination Path should be ‘C:\temp’, leave as it is and click ‘Next’.
Choose ‘English’ and select ‘Continue’ and ‘Continue’.
Select ‘C:\’ and then ‘Continue’.
Select ‘BMW Group Rectification Programs UK’ and click ‘Continue’.
Tick ‘Update’ for all options where not grayed out, then ‘Continue’.
Select ‘OBD’, then ‘Continue’ and ‘Continue’.
The installation will begin and complete.
9. Install OBD Setup
From the above extracted file set, double-click the file ‘Step 3_Final Update.exe’.
The Destination Path should be left as it is, then select ‘Install’.
Select ‘Yes to all’.
Once completed, the window will close itself.
10. Complete Installation
From the above extracted file set, double-click the file ‘serial port.reg’.
When prompted, select ‘Yes’ and ‘Yes’. You will receive confirmation that your registry has been updated.
Locate the file ‘C:\EDIABAS\Bin\obd.ini’ and copy this file into your Windows folder.
Edit the file ‘C:\EC-APPS\INPA\CFGDAT\INPA.INI’ in Notepad, locate the section that starts with ‘//F3’, remove the slashes at the beginning of the three lines of text, and amend any instance of ‘F10’ to ‘E46’.
In theory, you’ll now have an INPA icon on your desktop and Start Menu – right-click on it, select ‘Troubleshoot Compatibility’, it’ll select ‘Windows XP SP3’, click ‘Next’ and ‘Save’. This step isn’t necessarily required, however it apparently provides a little more stability for the application.
Now, with your interface connected via the USB port (remember NOT to plug the cable into any port other than the port that you originally configured the cable with) – and the other end connected to your car, fire up INPA and hopefully you’ll have a working diagnosis tool
Apologies for any inaccuracies, please do PM me and I’ll make corrections, but to my knowledge the above is the exact process that I used to get mine up and running.
Finally, I’d like to thank FAL for his help/assistance with getting my setup fully working
Procedures of BMW INPA Install on WIN10:
Method 1:
INPA/EDIABAS Windows 10 64-bit Installation Guide
share by perishalive92 from bimmerforums.com
NOTE: I am NOT responsible for any damage YOU do to your car or computer. INPA will work with few select things for an E38 such as restting adaptations, diagnostics, code reading, etc. NCS Expert will NOT run on a 64-bit operating syetm. If you have a 32-bit version of Windows 10, please feel free to try ECS Expert and let me know if it works!
I have NOT tried INPA with any other bmw models. Please feel free to comment your success on other models!!
Should you get ANY errors or pop-ups during any phase of the installation, ignore them. INPA will still install.
Pre-Installation
1.Download all required files and programs,as listed below. Also you should have the K+DCAN cable in your posession(link provided below).
2.Extract the INPA.rar to your desktop. You will be left with INPA folder.
3.Extract INPAcable.rar to your desktop. You will be left with INPA cable folder.
Installation – Phase 1
1.Open INPA cable folder and move the top four folders (step1, step2, step3 and driver) to Windows(C folder of your PC.
2.Whilst in Windows(C, open 01_Step1 folder and copy EC-APPS over to your Windows(C drive.
3.Go back to 01_Step1 folder and open the NFS folder. Open Entpackt folder. Open disk 1, find SETUP.exe and right-click it. Goto Properties/Compatibility and set it to run in compatibilty mode for Windows XP (Service Pack 3). Also, check the box for Run as Administrator. Hit Apply then Ok.
4.Double-click SETUP.exe to launch.
5. Once window pops up, select Windows XP. Click Weiter (it means Next).
6.Click Weiter 3 more times. Make sure User Mode is selected. Click weiter.
7.Make sure top choice is selected (1 Parametri……). Click Weiter.
8.Ensure OBD is selected. Press weiter. Ensure Kein API-TRACE. Click weiter. Ensure Kein IFH-TRACE is selected. Click weiter.Ensure Komfort(.IPO) is selected. Press weiter.
9.Press OK. Let install. Press ok, and again. Press any key to continue.
10.Select Ja,Computer jetzt neu starten. Click Breeden. This will restart your PC as needed.
Phase 2
1.Goto Windows(C/02_Step_2/INSTALL and right click on Instprog. Set it up to run in compatibility mode as mentioned in Phase1, step 3. Then double-click to launch.
2.Press OK if prompted. Select Enlgish then press weiter.
3.Press continue and continue again. Ensure destination is under C:
4. Press continue. Select BMW Group Rectification programs UK. (NOT USA) Press continue.
5.Check off all white boxs. There will be 2 update and 1 complete that needs to be checked. Press continue, and again. You may get error. ignore it. Otherwise, press End.
6.Restart your PC once more manually.
Phase 3
1.Goto Windows(C/03_Step_3/INSTALL and right click on Instprog. Set it up to run in compatibility mode as mentioned in Phase1, step 3. Then double-click to launch.
2.Press OK if prompted. Select Enlgish then press weiter.
3.Press continue and continue again. Ensure destination is under C:
4. Press continue. Select BMW Group Rectification programs UK. (NOT USA) Press continue.
5.Under INPA 5.0.1, check off Update. Under NCS Expert 3.0.8, check off Complete. Press continue.
6.Click on Rename. In the box, type the number 1 and press continue, and again. You might gett error. Ignore it. IF prompted, press End.
Phase 4
1.Plug in your K+DCAN cable. You will from now on use ONLY that port.
**Windows 10 will autoatically update the driver IF needed. Windows 10 also already has a serial function. This is all we need to modify.**
2.In your search box (lower left of screen next to Windows button), type “Device Manager”. Click on the top option.
3.Once in Device Manager, locate Ports(COM & LPT) and click on the little plus sign next to it. It should now show USB Serial Port (COMx) under Ports(COM & LPT). **The little ‘x’ is in place of whatever number you have the cable plugged into).
4.Right-click on USB Serial Port (COMx) and click Properties.
5.Goto Port Settings tab. Click Advanced. Change the COM Port Number to COM1.
6.Change Latency Timer from 16 to 1. Press ok. Press ok again. Close Device Manager.
7.Goto Windows(C/Driver_D_CAN_USB and double-click OBDSetup.exe. Press Enter.
Phase 5
1.Go into Control Panel/System/Advanced System Settings/Environment Variables.
2.Ensure that System Variables TMP and TEMP both contain the path C:\EDIABAS\Bin.
3.If not, manually add it in. Example: C:\Windows\Temp;C:\EDIABAS\Bin
4.the ‘;’ is important to seperate paths. Please ensure you put that in there then add in the rest.
Phase 6
1.From Desktop, open INPA folder then open the second INPA folder. Right click on Step_1_Install_BMW_Tools and click Poperties. Goto Compatibilty and run the program in compatibility mode for Windows 7. Also, run as administrator. Click Apply then ok. Doulbe-click to launch.
2.Enusre destination path is C:\BMW Tools , if it is not change it to that.
3.Press Install. You will get an error. Press ok.
4.Goto Windows(C/BMW Tools/Programminstallation and right-click on setup.exe. Set it up for compatibility mode as stated in Phase 1, step 3.
5.double-click to launch. Select English, press ok. Press Next. Accept and press next. Press next again and again.Ensure the installation destination is C:\EDIABAS, click next.Ensure installation destination is C:\EC-APPS\NFS,click next.Ensure installation destination is C:\EC-APPS\INPA, click next.Ensure installation destination is C:\NCSEXPER, click next.Ensure start menu folder is BMW Standard Tools. click next.
6.You do NOT have to perform the data backup if not desired. I didn’t. Uncheck box if not wanting data backup and click next.Ensure hardware-interface setting is STD:OBD and click next.Ensure COM port for serial OBD is Com1. Check the box for USB to serial adapter. click next. Click Install. If any errors, ignore them.
Phase 7
1.Goto Desktop/INPA/INPA and right-click the file ‘Step 2_ Install INPA.exe’.Set up for compatibility as mentioned in Phase 6,step 1.
2.The Destination Path should be ‘C:\temp’, leave as it is and click ‘Next’.
3.Choose ‘English’ and select ‘Continue’ and ‘Continue’.
4.Select ‘C:\’ and then ‘Continue’.
5.Select ‘BMW Group Rectification Programs UK’ and click ‘Continue’.
6.Tick ‘Update’ for all options where not grayed out, then ‘Continue’.
7.Select ‘OBD’, then ‘Continue’ and ‘Continue’.
8.The installation will begin and complete.
Phase 8
1.Goto Desktop/INPA/INPA and right-click the file ‘Step 3_ Final Update.exe’.Set up for compatibility as mentioned in Phase 6,step 1.
2.The Destination Path should be left as it is, then select ‘Install’.
3.Select ‘Yes to all’.
4.Once completed, the window will close itself.
Phase 9
1.Goto Desktop/INPA/INPA and double-click the file ‘serial port.reg’.
2.When prompted, select ‘Yes’ and ‘Yes’. You will receive confirmation that your registry has been updated.
3.Locate the file ‘C:\EDIABAS\Bin\obd.ini’ and copy this file into your Windows folder.
4.Edit the file ‘C:\EC-APPS\INPA\CFGDAT\INPA.INI’ in Notepad, locate the section that starts with ‘//F3’, remove the slashes at the beginning of the three lines of text, and amend any instance of ‘F10’ to ‘E46’.
**Step 4 is only needed if you are working on an E46. Otherwise, ignore this step!
In theory, you will not have INPA on your desktop. Right-click it and set up compatibility mode as mentioned in Phase 1, step 3. Double click to launch.
Method 2:
Install the drivers for INPA K+D-CAN cable (version with FTDI FT232RL chip only).
Disconnect from the Internet because it is possible that the drivers are installed from Windows Update (if you want to use the latest home FTDICHIP then disconnect or reinstall) why run the executable CDM 21216_setup.exe; It is compatible with 64-bit versions of Windows 7, If necessary, you can download the latest version according to the OS on the siteFTDICHIP
http://www.ftdichip.com/Drivers/VCP.htm
This is an interface / cable VCP (Virtual COM Port) so there are two features and therefore an installation in 2 phases if done manually
1 – Cable driver
2 – VCP driver if using the automatic executable (.exe) offered on the site, then the 2 self install a result it’s easier and without going through the Device Manager => then plug the INPA cable into a USB port NOTE WELL PORT IDENTIFY THIS CAR ALONE WILL WORK AFTER SETTING IT WILL THEREFORE ALWAYS CONNECT THE CABLE ON THE PORT in Device Manager there will be a new entry: “COM and LPT ports” / sérial USB Port (COM3) eg for now Then you must configure the port that will emulate the virtual COM port 9 (eg. Default for Ediabas 7.3 patched) but it’s tune to your install Open Device Manager, choose COM Ports / USB serial port / port settings / advanced / set “COM 9” and the latency to “1” finally install BMW Standard Tools, all versions are not compatible with win 7 and 64-bit architectures, so use the BMW STD Tools version 2.12, which includes a recent version INPA 5.0.6 and 7.3.0 Ediabas.
(Visited 1,041 times, 1 visits today)
BMW Inpa — программа для диагностики и настройки автомобилей BMW
Что такое BMW Inpa?
BMW Inpa — это программа, которая позволяет подключаться к бортовому компьютеру автомобиля BMW и получать информацию о его состоянии, ошибках, параметрах работы и т.д. С помощью BMW Inpa можно также изменять некоторые настройки автомобиля, например, активировать или деактивировать функции, сбросить сервисные интервалы, адаптировать датчики и многое другое.
BMW Inpa имеет ряд преимуществ перед другими программами для диагностики и настройки автомобилей BMW. Вот некоторые из них:
- Обновляется регулярно и добавляет новые возможности и поддержку новых моделей.
- BMW Inpa поддерживает большинство моделей BMW, выпущенных с 1995 года по настоящее время.
- Содержит подробную документацию и справку по каждой функции и коду ошибки.
- Имеет простой и понятный интерфейс на русском языке, который позволяет легко найти нужную функцию или параметр.
- BMW Inpa работает с разными типами адаптеров и кабелей, включая K+DCAN, K-Line, ADS и др.
Где скачать BMW Inpa?
Если вы хотите скачать BMW Inpa и использовать ее для своего автомобиля, вы можете найти ссылку на скачивание чуть ниже. Однако, перед тем как скачать BMW Inpa, убедитесь, что вы имеете подходящий адаптер и кабель для подключения к автомобилю, а также драйверы для них. Также рекомендуется скачивать BMW Inpa с проверенных источников, чтобы избежать вирусов и нежелательных программ.
.txt файл с инструкциями по использованию находится внутри.
Скачать BMW Inpa 5.06
It’s a full BMW INPA software for F and E series models. Wish this helps.

Free download
BMW Standard Tools and INPA 5.0.6
https://mega.nz/#F!atxDATqT!r6SO9Wu75GuDJmpbTTO48Q (It is share by forum member,can not promise 100% work on your laptop and unknown security)
INPA 5.0.2 software
http://www.uobdii.com/wholesale/bmw-inpa-k-can-with-ft232rq-chip.html(Here it’s INPA software with K+CAN,it tested by our engineer,can 100% work. )
BMW Standard Tools 2.12 – Install First

- Includes (EDIABAS v.7.30, Tool32 v.4.03, INPA v.5.06, WinKFP v.5.31 & NCS Expert v.4.01).
INPA_Fxx_v.2 – Install Second
- Copy INPA_Fxx_v.2 folder to C:\EC-Apps\INPA_Fxx_v.2 and EDIABAS to C:\EDIABAS overriding existing EDIABAS Folder.
- Run INPALOAD.exe from INPA_Fxx_v.2 BIN folder (C:\EC-Apps\INPA_Fxx_v.2\BIN\INPALOAD.exe).
- Note: DISABLE WINDOWS FIREWALL ANY ANY VIRUS SOFTWARE.
- Note: For Exx connection, you will need to change EDIABAS.ini file to “INTERFACE = STD:OBD” and edit OBD.ini Com Port settings accordingly to match you PC’s Com Port settings.
And here are some related contents about BMW INPA:
BMW E46 steering angle sensor calibration with INPA or BMW Scanner 1.4.0
BMW INPA works on 2008 E60 M5 error vehicle not identified (Solved)
INPA vs ISTA+: ISTA+ better, INPA easier
How cheap INPA K+DCAN Cable reset BMW E46 airbag light?
How I use INPA software to Code BMW E90 Injector
BMW INPA Installation Guide:
BMW INPA Window XP Installation Guide
BMW INPA Window 7/8 Installation Guide
BMW INPA Window 10 Installation Guide
BMW INPA Window XP Installation Guide
Prepare:
Before installing, delete all version of INPA-ADS from your computer.
For example: rename INPA into “_INPA”, EDIABAS into “_EDIABAS” etc.
Insert CD to disk E:\ and open it, there will be a file named “INPACANinstall” which will guide you how to install in detail.
Step1: Open “01_Step1” file in the root of CD disk and copy folder “EC-APPS” onto disk C:\
Step2: Run the file “01_Step1\NFS\Entpackt\disk1\SETUP.EXE”
Choose “Windows XP” and click next
Choose “User Mode” and click next
Choose 1 Parametrieren einer neuen Konfiguration ohne Daten
->OBD
-> “Kein API-TRACE”
-> “Kein IFH-TRACE”
-> “Komfort(.IPO)” and click next
Then press any key to continue
This step Complete
! RE-BOOT YOUR COMPUTER
Step3: Run the file “02_Setup2\INSTALL\Instprog.exe”
-Choose English, press continue
-While choosing the HDD disk C:\ for initial setup, do not change, the installation must be on drive C:\ only, press continue
-Choose configuration “BMW Group Rectification Programs UK” and press continue
-Activate all spare boxes with:
EDIABAS 6.4.3 – UPDATE
INPA 5.0.1- UPDATE
NCS Expert 3.0.8 – Complete
-Press continue to start installation and press End to exit the installation
Step4: Run the file “03_Setup3\INSTALL\Instprog.exe”
-Choose English, press continue, press continue again
-While choosing the HDD disk C:\ for initial setup, do not change, the installation must be on drive C:\ only, press continue
-Choose configuration “BMW Group Rectification Programs UK” and press continue
-Activate all spare boxes with:
INPA 5.0.1- UPDATE
NCS Expert 3.0.8 – UPDATE
-Press continue to start installation and press End to exit the installation
Step5:
Find the file C:\EC-APPS\INPA\CFGDAT named “inpa.ini” and replace it with the file “inpa.ini” that is in the root directory of CD disk
Step6: Plug the adapter into spare USB-Port and install drivers manually
Copy the “Driver_D_CAN_USB” file onto disk C:\
Choose install from a list of specific location
Select the folder “Driver_D_CAN_USB”
You may install the same driver again
Complete driver installation
Then Change the number of COM-port to the value from 2 to 4, also change the value of Latency Timer from 16 to 1.
Step7: open disk C:\EDIABAS\BIN\Ediabas.ini
In the file “EDIABAS.ini”
“Interface = STD:OBD” must be choosen
Step8: in the file C:\Windows\OBD.INI, put the number of USB-COM-port to the value that you remember in step 3….
For the detail information please check this article:Install BMW INPA software on Win XP
BMW INPA Window 7/8 Installation Guide:
STEP 1: INSTALLING BMW STANDARD TOOLS
Download and install BST 212
Since BST (BMW Standard Tools) was designed for Win XP 32bit operating Systems, users have faced issues with tools like WinKFP and NCSExpert since Win 7 64bit systems have been introduced. Running in XP compatibility mode just wasn’t enough. Presenting you with several errors or not running at all. Only solution was to install on a XP system or like me… XP VMware. Well that all changed with BST 2.12 which works on 32 or 64bit systems.
WIN 7/8, 32/64bit OS
STEP 2: INSTALLING INPA software
(will need it after coding certain modules such as DME for CAS or EWS Alignment)
Download and install my version of INPA 5.06 with Fxx Support by simply
replacing the existing folders with the folders provided in the
Replace C:\EC-Apps\INPA
Replace C:\EDIABAS
STEP 3: INSTALLING NCSEXPERT IN ENGLISH
Download and install NCSEXPER32_ENG.zip
Copy and replace contents in the .zip file with contents in C:\NCSEXPER\BIN. Now NSCExpert is in English but you will find the Hot Keys do not work. This is a bug a fellow MHH member discovered and haven’t really worked on trying to fix it so for the time being just click on the F# key with your mouse.Not done yet with NCSExpert. Need to import profiles to NCSExpert. How? well download the PFL.zip and copy and replace all contents from PFL.zip to [b]C:\NCSExpert\PFL. (you will also find a lot more PFL’s by searching for NCSExpert profiles in Google)
Now you have a working WinKFP and NCSExpert with profiles loaded on your PC we can continue to Step 4.
STEP 4: INSTALLING & CONFIGURATING DCAN INPA CABLE
Configure your DCAN/INPA cable. If you followed my steps correctly than your EDIABAS should already be configured to STD:OBD for use with the INPA cable. If not you can download ediabas-konfigurator from here if it is not already in your C:\EDIABAS\Ediabas-Konfigurator folder. This tool allows you to easily change the ediabas.ini to your desired interface. So if you are switching from INPA to E-Sys you could use this to switch from STD:OBD to ENET.
Now to set your COM Port we must first find which COM port is being used for your cable.
Connect your cable to your PC (some may require a 12v supply to power the cable) Allow the device drivers to install (for best driver use the driver that came with your cable. If not then let windows install the best suitable driver for it) Navigate to Control Panel, Device Manager, and scroll to Ports (COM & LPT)…look at the pic
So in my case it’s COM5. So we need to change this in the obd.ini file located in the c:\ediabas\bin folder. But first lets make some changes to the cable.Right click on your INPA cable driver for example mine is labelled “USB Serial Port” and click on properties. Now in the property window click on the advanced tab.
Now every driver is different but the important part is the settings such as latency timer and received and transmit bytes. See pic bellow for the ideal settings. You may also change the COM port number here as well for tutorial I left it at 5. Once your changes are done we can proceed by clicking OK to accept the changes. No close all windows to return to the desktop.
STEP 5: CHANGING THE OBD.INI
Navigate to C:\EDIABAS\BIN and find file obd.ini and open it with an editor such as notepad.
First 3 lines will look like this…
[OBD]
Port=Com1
Hardware=USB
So we need to change the Port to reflect our INPA cable which in our case is COM port 5. So change it to look like this…
[OBD]
Port=Com5
Hardware=USB
When done click File -> Save and exit out. Very important to remember which USB port you connected your cable to as plugging it into a different USB port will allocate the INPA cable to a different COM port and neither tool will see the cable until the original USB port is used again or changed in device manager and obd.ini as mentioned above.
Now to test if your cable installed correctly. Plug it into the vehicle’s OBD port and open INPA. You should look like this…
If not follow the above steps again and correct your error.
STEP 6: SPDATEN FILES
Download and install SPDaten files of your choice (always recommend the latest) in this case it is 51.2. Once downloaded you can now follow the instructions provided bellow labelled “How_to_start_WinKFP.pdf” this will explain how to import the SPDaten files to WinKFP.
Edit to update:
For NCSExpert to install or update the daten files, copy the files from SP-daten- E##\daten to the C:\NCSEXPER\DATEN\E##\ (where E## is whatever chassis you’re updating). You will also want to copy the files from SP-daten-E##\SGDAT to C:\NCSEXPER\SGDAT (they’re not separated into different chassis in NCS Expert, so you just want to copy and paste everything to that directory.
Overwrite everything it asks about). Then copy the files from SP-daten-E##\ECU to C:\EDIABAS\ECU
After copying the daten files to c:\NCSEXPER\DATEN\E## copy the following files to the following locations:
copy C:\NCSEXPER\DATEN\E##\*.000 C:\NCSEXPER\DATEN\
copy C:\NCSEXPER\DATEN\E##\*.DAT C:\NCSEXPER\DATEN\
copy C:\NCSEXPER\DATEN\E##\*.ASC C:\NCSEXPER\DATEN\
BMW INPA Windows 10 Installation:
The only requirement for this install is Windows XP through Windows 10, 32 or 64 bit version and a working KDCAN cable. Instead of writing a lengthy detail in this post, I generated the instructions that’s included in link below.
If this install has assisted you in achieving a working set up, please click the appreciate link, thanks!
Download:https://www.mediafire.com/folder/a7jvirbs559ib/Software
NOTE:
For everyone who’s having issues setting the default folders, it is because some of the downloads excludes “empty” folders. Therefore, make sure your folder structure on the C drive are as follows (if you’re missing a particular folder, create an empty one):
C:\EC-APPS\INPA:
BIN
CFGDAT
DEMO
DOKU
english
english.met
HELP
PRT
SGDAT
source
C:\EC-APPS\NFS:
BATCH
BIN
CFGDAT
DATA
DOKU
FORMAT
KMMDAT
SGDAT
TRACE
WORK
C:\EDIABAS:
API
BIN
DOKU
ECU
HARDWARE
HELP
SIM
TRACE
TUTORIAL
C:\NCSEXPER:
BIN
CFGDAT
DATEN
PFL
SGDAT
STDAT
TAB
VERPLATZ
WORK
Follow this guide to know which family to select:
