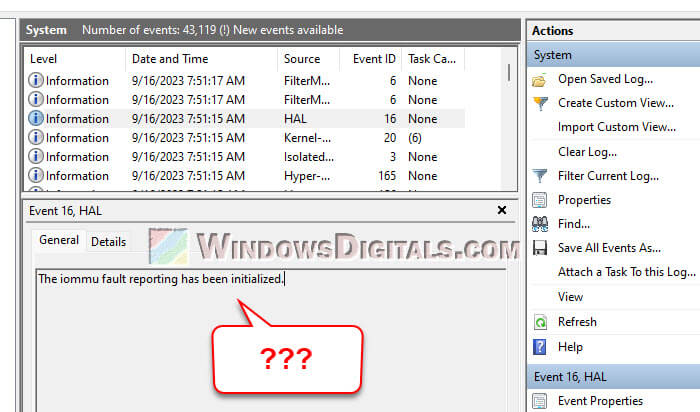
If you’ve looked into the Event Viewer in Windows 11/10, specifically under Windows Logs > System, you might have come across an “Information” event labeled as “Event 16, HAL” with the description “The iommu fault reporting has been initialized.” This message can be confusing, raising questions like what it means and whether it’s an indicator of potential issues. This article aims to clear up this particular event, explaining its meaning and if users should be worried about its presence in their system logs.
Also see: Windows 11/10 Computer Blue Screen When Idle (Fix)
What is IOMMU and Fault Reporting?
To comprehend the message “The iommu fault reporting has been initialized,” it’s crucial to first understand what IOMMU is. IOMMU stands for Input-Output Memory Management Unit, a vital component in modern computing systems. Its primary function is to handle and manage memory requests from peripheral devices, like graphics cards or network cards, to the main system memory.
The importance of IOMMU stems from its ability to:
- Virtualize devices: In a virtualized environment, multiple operating systems run concurrently on a single physical machine. IOMMU aids in mapping memory between these virtual machines and the actual hardware, ensuring smooth and secure operations.
- Enhance system security: By isolating device access and controlling which parts of memory a device can read or write to, IOMMU prevents potential unauthorized access to sensitive memory regions.
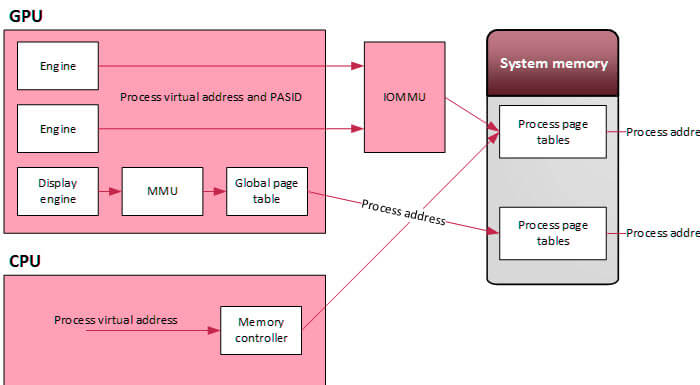
Fault reporting, on the other hand, is a mechanism within the IOMMU that detects and notifies the system of any abnormalities or “faults” during memory transactions. The initialization of this reporting signifies that the system is now equipped to monitor and log such faults, allowing for better diagnosis of system issues.
Linked issue: The system has rebooted without cleanly shutting down first
Why is this event important?
While “The iommu fault reporting has been initialized” might seem like a routine system message, it carries significance for several reasons:
- System stability and security: As previously mentioned, IOMMU plays a pivotal role in ensuring that peripheral devices interact securely with the system’s main memory. By initializing fault reporting, the system is better prepared to identify and log any unexpected or unauthorized memory transactions. This can be crucial in preempting potential hardware malfunctions or security breaches.
- Diagnostics and troubleshooting: For IT professionals and savvy users, the initialization of IOMMU fault reporting offers a diagnostic tool. In the case of system instability, crashes, or unexplained behavior, these logs can help pinpoint the root cause. It becomes especially important in environments that rely heavily on virtualization.
- Ensuring optimal function of virtual machines (VMs): VMs rely on the IOMMU to function seamlessly. The initialization of fault reporting ensures that if any issues arise related to memory mapping between VMs and hardware, they are promptly reported, allowing for swift resolution.
Related resource: How to Reduce Hardware Reserved Memory in Windows 11/10
What to do when you encounter this event?
When you see the “The iommu fault reporting has been initialized” message in the Event Viewer, it’s an informational message. This means:
- The system has successfully set up the IOMMU’s fault reporting mechanism.
- The system is ready to detect and report any memory access anomalies by peripheral devices.
For most users, encountering the “The iommu fault reporting has been initialized” message in the Event Viewer doesn’t necessitate any action. It’s an informational event, signaling that a system process is functioning as it should. However, if you’re curious or troubleshooting:
- Review related logs: After clicking on the event, the bottom pane in Event Viewer will provide more details. Look for any accompanying warnings or errors in proximity to this event.
- Update hardware drivers: Outdated drivers can sometimes conflict with IOMMU operations. Regularly checking for and installing the latest drivers for your hardware components can preempt potential issues.
- Consult IT help: If you suspect that the event is tied to a larger system problem, or if you observe related errors or warnings, it might be beneficial to consult with an IT professional or knowledgeable friend.
Related concern: Why is my memory usage so high when nothing is running?
Common misconceptions and frequently asked questions
When you encounter technical jargon or system messages, it’s natural to have questions or misconceptions. Let’s address some of these to clear up any concerns or confusion you might have regarding the “The iommu fault reporting has been initialized” event.
- Is this event a sign of an error or malfunction? No, the event is informational and indicates that a particular system process related to IOMMU fault reporting has been set up successfully.
- Do I need to take any action when I see this event? Generally, no action is needed. However, if you’re experiencing system issues and are troubleshooting, this event might be one of many you review.
- Is this event exclusive to Windows 11/10? While you might see this event in Windows 11/10, IOMMU and its associated fault reporting could be present in Windows Server or other operating systems, albeit with different logging mechanisms and messages.
Summary
In short, the “”Event 16, HAL: The iommu fault reporting has been initialized” event you’re seeing is simply Windows notifying that it has initialized the fault reporting related to the IOMMU. This is typically an informational event and doesn’t suggest any errors or problems with your system. If your system is running fine and you don’t notice any issues, you can generally ignore such informational events.
You will find solutions to HAL_IOMMU_INTERNAL_ERROR Blue Screen of Death error in Windows 10 here. This BSOD issue having bugcheck value 0x000001D9 leads the desktop to freeze and hang. Frequent Reboot of PC also occurs when this stop error appears.
HAL IOMMU INTERNAL ERROR in Windows 10 mostly happens because of corrupt, old and incompatible device drivers. Conflicts between similar applications and malware infection are also the main reasons for this BSOD. Furthermore, if the system runs with memory problems, low disk space, problematic areas in HDD, corrupted Windows Image files it can face the error. In the below section, we will be discussing some effective and proven workarounds that can potentially help to resolve HAL_IOMMU_INTERNAL_ERROR BSOD in Windows 10. See the list of workarounds first –
Here is how to fix HAL_IOMMU_INTERNAL_ERROR BSOD in Windows 10 –
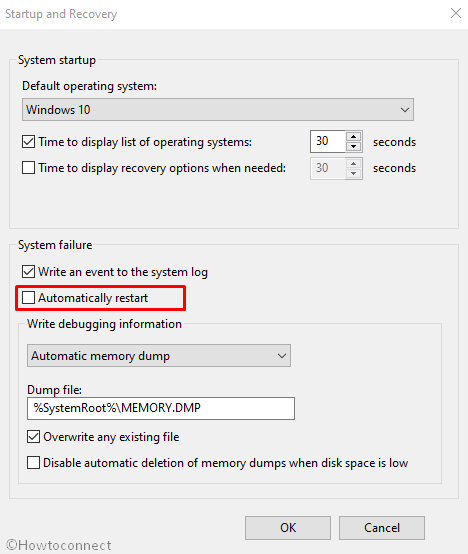
1] Disable Automatic Restart
With a confirmed HAL_IOMMU_INTERNAL_ERROR BSOD, Windows PC will have a tendency to perform Automatic restarting. This will be the most annoying problem you could ever come across. Unless this gets a fix, you cannot deploy other resolutions as well. Therefore, this solution comes at the top of the priority. Disabling the Automatic Restarting is not a complex job and you can proceed in the below steps –
Step-1: Navigate to the Desktop area after saving the running programs. Use Win+D hotkey press together and head to the place immediately.
Step-2: Right click on This PC icon. Choose Properties option from there to allow opening the System window.
Step-3: When it is visible on the screen, select Advanced system settings from the left side of the window.
Step-4: As the System Properties wizard appears, click on Advanced tab.
Step-5: Scroll a little down in the tab and reach Startup and Recovery section. When you see the Settings option here, hit it straightway.
Step-6: After a new wizard appears, go to its System failure part and uncheck the box for “Automatically restart”
Step-7: Lastly, select the Ok to save these changes.
Now windows will not go for rebooting automatically. Hence, there will be enough opportunity for you to deploy the upcoming resolutions and resolve the issue accordingly.
2] Resolve all the Memory problems including poor areas in RAM
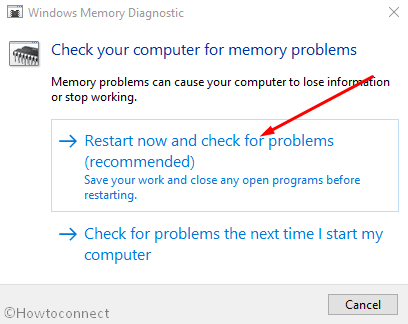
Windows can suffer from memory issue due to wrong allocation of it and the presence of poor segments in the RAM. With these sorts of problems in the Windows, BSOD errors like HAL_IOMMU_INTERNAL_ERROR commonly occur. Luckily, we have the Windows Memory Diagnostic to deal with these troubles and fix the errors. Let’s proceed to the handy utility in the below process –
- Press Windows and S keys and invoke Taskbar Search.
- In the empty text box located here, type “Memory” and wait for results to load finally.
- Select Windows Memory Diagnostic Desktop app from the results to proceed.
- Select the option “Restart now and check for problems (recommended)”.
- Then windows will prepare for the first cycle of rebooting.
- Subsequently, you will find blue screen upfront detecting memory issues with the rate of progress in percentage.
- When the info shows 100%, windows will Restart for the second time.
- Finally, you can check the diagnosis report in the Notification area of the System Tray.
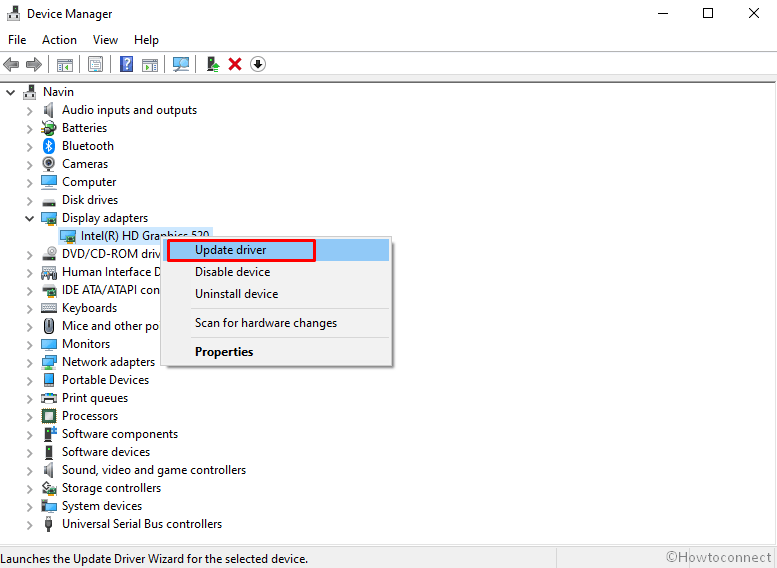
3] Update Drivers to fix HAL_IOMMU_INTERNAL_ERROR BSOD
HAL_IOMMU_INTERNAL_ERROR BSOD is the result of outdated and corrupt device drivers mostly. Every time we come across a critical issue, they play a greater role there. We really should not allow such a driver on the computer which is old and defective. The Windows Device Manager is a top-notch app in this regard and it shows them with a yellow accent if needs to be updated. To accomplish the workaround, move with below steps –
- Right click on Start menu and choose Run to invoke the window.
- In the text box provided here, write devmgmt.msc and eventually hit Enter key.
- Device Manager will hit on display and you have to watch closely in the console for any exclamation marks in the device’s list.
- Prior to expanding the device, right click on the drivers having Yellow warning icon on it.
- Select Update driver option and follow the other guidelines coming to display until these all get updated.
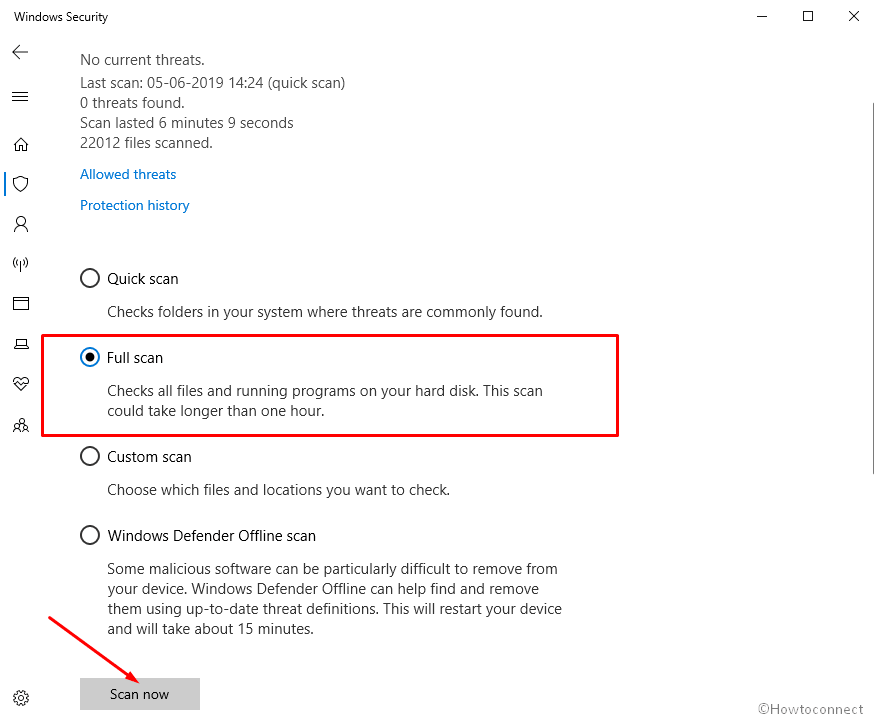
4] Detect the Malware in Full System and dismiss them using Windows Security
All over the web, Malware is present and often it exists in disguise. You can be easy prey to them after making a visit to a website or clicking link coming in emails. Sometimes inserting a USB can also be risky. Once they get entrance to the system, cause the necessary files to be removed or infected. As a result, many issues come up including HAL_IOMMU_INTERNAL_ERROR. You can avoid this malignant consequence by making regular scanning in Windows security. The default tool can also dismiss all the threats in the most effective way. Follow the below guidelines to complete the task –
- Click on Show hidden icon arrow from the right side of the taskbar.
- Select Shield icon from there and let the system open Windows Security app.
- Moving on to the App, select Virus & threat protection option.
- Now, click on Scan options link to reveal available methods.
- Check the radio button allocated for Full scan and then select Scan now option.
- After the detection gets over, you will be shown a result. If there is any malware present, hit Clean threats option located here.
- Go to the next page, among three options, select Remove first and then Start actions to dismiss all these viruses.
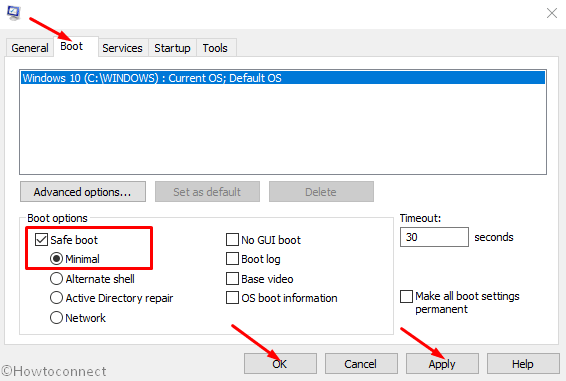
5] Load the Basic Programs only by Booting Device in Safe Mode
In all critical times, Booting in the Safe Mode came out as savior in Windows 10 including previous versions. In this startup procedure, the device starts with only the basic processes and hence, the problems get resolved immediately. Let’s give this renowned utility an attempt following below instructions –
Step#-1: Invoke Run dialog by pressing Win+R hotkeys together.
Step#-2: In the provided typing box, write msconfig using the keyboard and select System Configuration Desktop app once visible.
Step#-3: In the App UI, jump to Boot tab and straightway get at its second half.
Step#-4: Here, you can see the Boot options area. Now, check the box before Safe Boot and activate all the grayed out options.
Step#-5: Hit the radio button before Minimal option and proceed forward.
Step#-6: Select Apply button first and then Ok to save these changes.
Step#-7: Get inside of the Safe Mode on the further move.
6] Use Windows Blue Screen Troubleshooter to solve HAL_IOMMU_INTERNAL_ERROR
Since HAL IOMMU INTERNAL ERROR causes serious damages to the system, Microsoft technicians came up with a built-in tool for resolving this issue effectively. The utility named Blue Screen Troubleshooter and it is accessible through the settings app. Proceed with the below instructions to deploy the tool –
- Open Windows Settings app by pressing Win+I hotkeys altogether.
- From the app UI, head to Update & Security tile and eventually click on it.
- When the page loads completely, choose Troubleshoot located in the left pane, and jump on the adjacent side.
- Reach out to Blue Screen there and expand it by clicking.
- Hit Run the Troubleshooter option from the extended pane.
The utility will now detect and fix all the Stop errors. In the end, there should not be any HAL_IOMMU_INTERNAL_ERROR in the system.
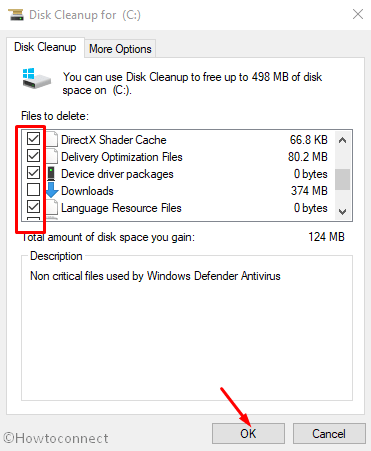
7] Delete the temporary and junk files from storage and make more space in it
Temporary files as stored in the Hard Disk, once grow bigger will occupy huge space in it. The ultimate result is, the storage runs in low space and operation gets slow down. In the process, HAL_IOMMU_INTERNAL_ERROR also hitched up. Using Disk Cleanup tool can be thoroughly beneficial to delete the junks in one platform. Here is how to proceed –
- Open Run dialog box.
- In the search box provided, type cleanmgr and press Enter from keyboard.
- A small popup window will float in and ask you to choose preferable Drive to run a cleanup. Select C: by doing a click on dropdown menu and then press Enter.
- Disk Cleanup Utility will come ahead slowly after calculating the space it can make free from the drive.
- When the wizard appears, come down to the bottom and click on Clean up system files.
- Once again, that small popup window will appear asking for the desired drive. Choose C: like before and press Enter key.
- When Disk Cleanup for C: comes ahead, reach Files to delete area.
- Check all the boxes available here and keep Downloads as it was.
- Hit Ok button and let the Cleanup start.
- Wait until this process ends automatically as this might take several minutes.
8] Disconnect external Hard drives to fix HAL_IOMMU_INTERNAL_ERROR
Some people come across HAL_IOMMU_INTERNAL_ERROR BSOD when an additional Hard Drive joins the system. Good news folks, Issue resolved easily as well just after disconnecting the external USB or other peripheral only. Follow the below guidelines and give a momentarily pause by disconnecting –
- Isolate all the Hardware accessories including the External HDD.
- Keep them at a separate and safe location to avoid damage.
- Now, restart the windows in the usual method.
- After completing the rebooting when you can see Desktop, make a check for the error.
- If resolved properly, start connecting them one after another.
- At this moment after connecting all, launch the web browser from windows.
- Visit Maker’s Webpage for each and Download the Latest drivers.
- Install the drivers in windows to use easily.
9] Settle up the bad areas present in Hard Disk
Prolonged use causes to form problematic areas inside a Disk Drive. When this happens, the system runs in various problems including HAL_IOMMU_INTERNAL_ERROR. The Disk Checking Utility comes handy to resolve these sectors automatically. See the method in detail –
- Press Win+S to call in Taskbar search and type cmd.exe. When Command Prompt appears in the result, right click on it.
- Choose “Run as Administrator” and also select “Yes” Once UAC prompts for your consent.
- In the Black Elevated Prompt, type following syntax and parameters –
chkdsk C: /f /r /x
- Press the Enter button when you have finished typing. This process will take a little longer as we have added three more notations instead of chkdsk only which would show disk status only.
- After the task is finished, Restart the device and upon coming back to operation, check if there is an error present.

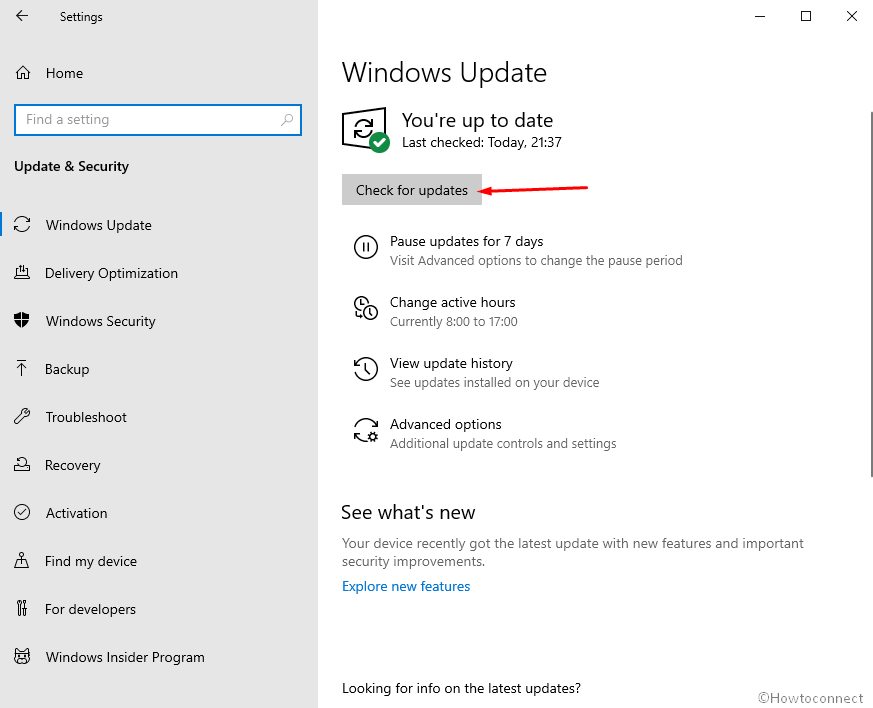
10] Install available Update Patches to solve HAL IOMMU INTERNAL ERROR
Any update patch contains fixing of existing bugs, quality improvements, the introduction of latest features. Installing these will give the OS a big blow and strength to fight vulnerabilities like HAL IOMMU INTERNAL ERROR. An Outdated Windows 10 is prone to get affected always. Follow the below guidelines to install them –
- Manage to Load the Settings page of Update & Security as shown in the above workaround.
- Select Windows Update available in the left pane.
- Navigating to the corresponding right, click on Check for updates link ignoring “You’re up to date” dialogue.
- Upon finishing the downloading, click on Install.
- Reboot the Windows once asked and update the OS.
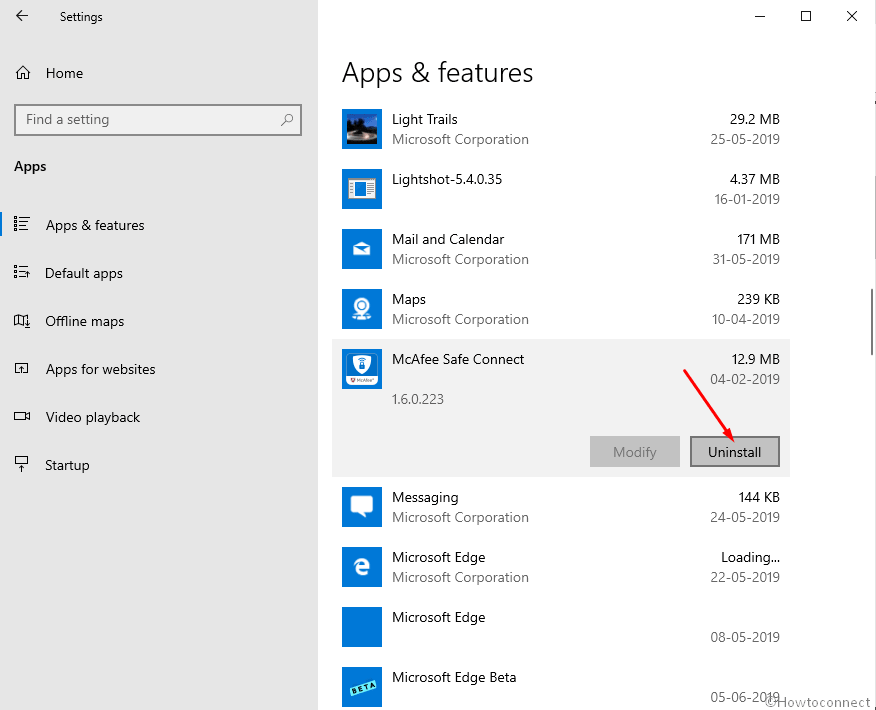
11] Uninstall similar programs to eliminate conflicts
Having the same applications often become risky they tend to collide with one another. Meanwhile, the necessary OS files get eradicated and HAL_IOMMU_INTERNAL_ERROR evolves. In these cases, uninstalling comes ahead first. When we remove one of these, the action reduces the risk of collision between them. Follow the below guidelines to uninstall an App –
- Access Windows Settings app using any convenient method stated above.
- When on the Home page, roll the cursor to Apps and click on it eventually.
- On the next page after appears, choose Apps & features on the left wing and shift to the right.
- Once all the Apps be visible, reach out to applications colliding with each other.
- Select each and hit Uninstall option from the expanded pane.
- If User Account Control prompts for authentication, select Yes to proceed.
- Follow the on-screen guidelines until finally removed.
- Restart the device and once powers up next, do check for the error in the system.
- If resolved, you can Launch Microsoft Store and Download the deleted app again.
12] Undo recent changes by System Restore
Performing a System Restore directs you back to the state where you were. We often install an app or uninstall some for the necessity of work. These actions leave marks in Windows Registry and when they go wrong, HAL IOMMU INTERNAL ERROR is imminent. Therefore, to Undo these changes, perform the below tasks –
- Open the Taskbar search (commonly Win+S) using any of the above instructions.
- Type rstrui in the text area and hit the Enter button.
- Once the System Restore Wizard appears on the screen, select Next.
- From the consequent page, click on Show more restore points and reveal all the points you have created beforehand.
- Choose the last one in the list and click on Next.
- After the following page cuts your view, click Finish.
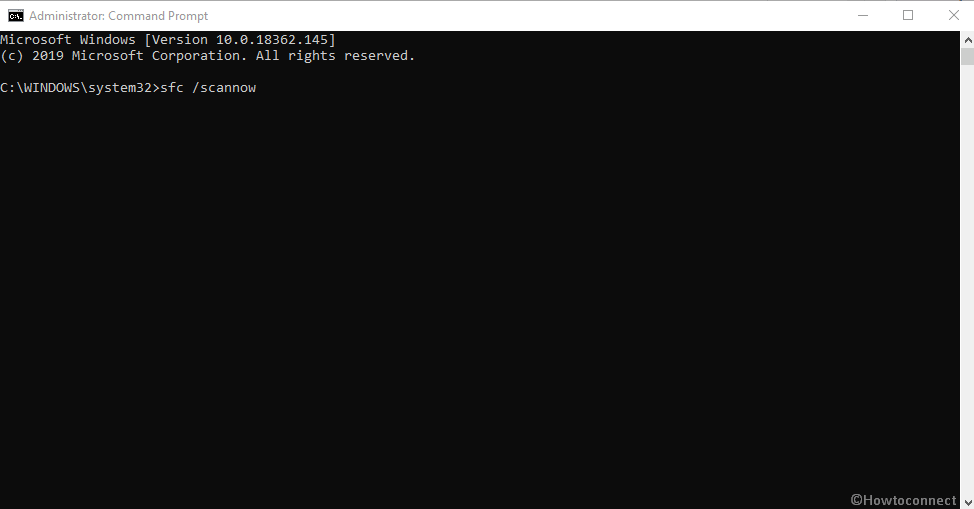
13] Recover missing DLL files and corrupted resources using System File Checker
So many vulnerabilities occur in Windows 10 and sometimes in worst extent, system resources are erased. In the same way, DLL files often go missing. When these cases happen, HAL_IOMMU_INTERNAL_ERROR BSOD comes in. System File Checker comes handy to fix these components once executed in the Elevated Command Prompt. To access the utility, follow the below instructions –
- Open the Taskbar search by pressing on Win+S keys.
- In the search box given here, type cmd.exe and select Run as administrator from the right flyout.
- After User Account Control asks for your consent, provide approval by choosing Yes.
- On the Black Elevated Command Prompt window, type underneath code and hit Enter key –
sfc /scannow
- System File Checker will be activated and start detecting file corruption and missing DLL ones. Fixing will also start automatically.
- Though this process is a little time-consuming, do not terminate abnormally and let it end by itself. After all these files are okay, there should not be any.
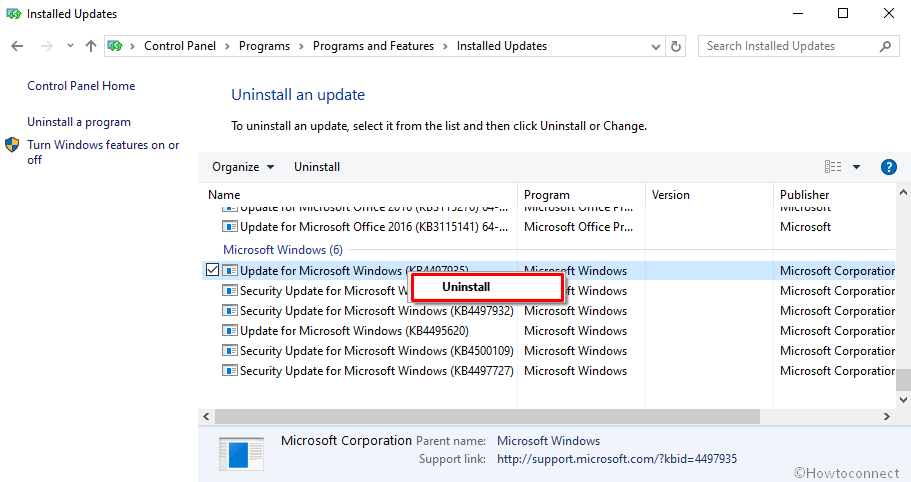
14] Uninstall the troublesome Windows Update
Sometimes Windows update creates the Blue screen HAL IOMMU INTERNAL ERROR. Uninstalling the files will be enough as to resolve the issue or prevent it. To complete the task, move with the following guidelines –
- Press Windows key.
- Once Start menu becomes visible on display, choose Gear cog.
- From App UI, move ahead to Update & Security and click on it.
- From the following page after loaded, select Windows Update and shift to the corresponding side.
- Click on View update history link.
- Select Uninstall updates and let a window unroll from Control Panel.
- Reach the last received patch and do a right click on it.
- Select Uninstall and follow on-screen instructions until they get removed completely.
15] Remove all the Third Party Anti-Virus Programs
In virus issues, you might have used a free anti-virus solution as a safeguard. This is okay until Windows Security arrives. Since the tool is the default for Windows 10 and also very effective, there is no need of using a third party program in this regard. Moreover, most of these programs, due to conflict, often cause HAL_IOMMU_INTERNAL_ERROR BSOD. Therefore, if you have such applications, uninstall using the following guidelines –
- Type appwiz.cpl in the Windows search and Enter
- Select Third Party Anti-virus app in the list.
- Hit Uninstall option visible at the top ribbon.
- Next steps will be as shown in the display until it gets uninstalled completely.
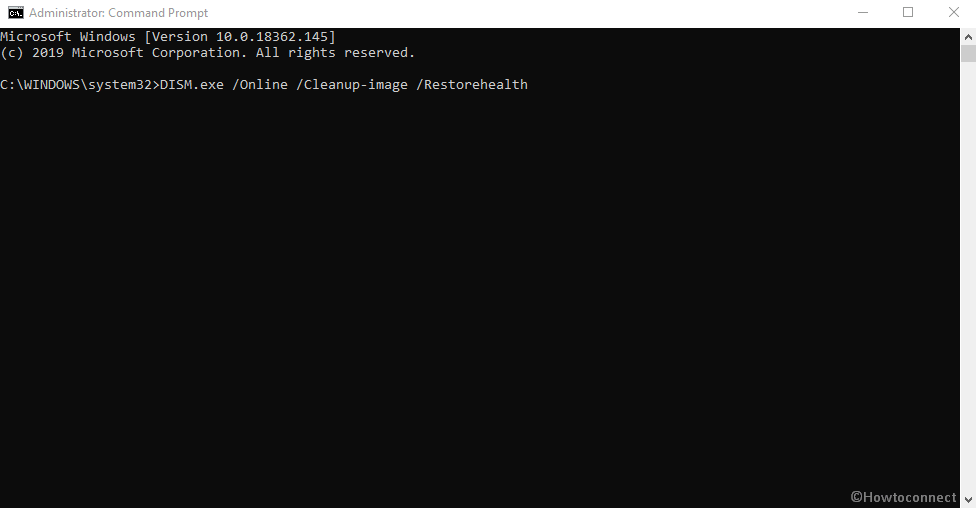
16] Run the DISM tool in Command Prompt for fixing defective Windows image files
When Windows Image files fall into corruption, it might cause HAL_IOMMU_INTERNAL_ERROR. As a fix, DISM tool will be the best-suited utility. Here is the procedure –
- Rght click on Taskbar and select Task Manager from the appearing menu.
- From the app once loaded fully, select File located at the top left corner.
- Choose Run new task when seen and let Run dialog appear.
- In the empty writing field, cmd and move down later on.
- Mark the checkbox below the Open saying “Create this task with administrative privileges”.
- After Pressing Enter key, you will be straightaway guided to Elevated Command Prompt.
- At the black window, type following command where a cursor winks –
DISM.exe /Online /Cleanup-image /Restorehealth
- Hit Enter key and let the Tool fix corrupt Windows image files. The process may be lengthy, wait until it gets over automatically.
- When ends, Restart the windows and after coming back to operation, check if the error resolved.
Till this point, we have elaborated almost all the effective resolutions hoping to resolve HAL IOMMU INTERNAL ERROR in Windows 10. Hopefully, the issue is no more prevalent in your system and you are working smoothly. If the issue still persists, we can suggest only the last resort – Reinstalling Windows 10. This will be the ultimate solution to all the existing problems and if done accurately, no issue will be evolving next.
Methods:
1] Disable Automatic Restart
2] Resolve all the Memory problems
3] Update Drivers
4] Detect the Malware in Full System
5] Load the Basic Programs only by Booting Device in Safe Mode
6] Use Windows Blue Screen Troubleshooter
7] Delete the temporary and junk files
8] Disconnect external Hard drives
9] Settle up the bad areas present in Hard Disk
10] Install available Update Patches
11] Uninstall similar programs to eliminate conflicts
12] Undo recent changes by System Restore
13] Recover missing DLL files and corrupted resources using System File Checker
14] Uninstall the troublesome Windows Update
15] Remove all the Third Party Anti-Virus Programs
16] Run the DISM tool
That’s all!!
Repair any Windows problems such as Blue/Black Screen, DLL, Exe, application, Regisrty error and quickly recover system from issues using Reimage.
Краткий вопрос:
Как включить intel_iommuнастройку в ядре Linux? Я запускаю хост Debian, используя загрузчик grub2. Документация, которую я видел, говорит «редактировать» /boot/grub/menu.lst, что, похоже, относится только к grub 1.x, поскольку у меня нет этого файла.
Насколько я понимаю (и последний вариант, который я могу придумать), изменение этого параметра загрузки может избавить от следующего сообщения об ошибке в /var/log/kern.log
Длинный вопрос:
Предоставление гостевой ОС прямого доступа к видеокарте
Недавно я понял, что через устройство PCI-Express можно передавать гостевые ОС, работающие в Virtualbox. Круто, подумал я! У меня есть две видеокарты NVIDIA Quadro FX (с подключенным мостом SLI, который, я надеюсь, не вызывает горя), и я хотел бы выделить вторую гостевую видеокарту для гостевой ОС, чтобы я мог использовать функции OpenGL в Photoshop et al.
NVIDIA продает эту конфигурацию » SLI Multi-OS «, которую я в основном хотел настроить целую вечность, но я не хочу тратить слишком много на программное обеспечение для виртуализации (экстремальная рабочая станция Parallels), когда я был с удовольствием пользуюсь VirtualBox уже много лет.
Хост-система
Я использую linux-3.5.0-19 из репозиториев Debian, на достаточно высокопроизводительном оборудовании для рабочих станций (суперкомпьютер Asus P6T7 WS mobo с чипсетом Intel ICH10R и процессором Xeon W3680) и хотел бы включить поддержку IOMMU в ядре желательно без компиляции.
BIOS
В настройках BIOS у меня включена поддержка VT-x и VT-d. Я не видел ничего, что конкретно упоминало бы IOMMU.
Подключение устройства PCI
Это было приятно удивительно просто! Официальная документация VirtualBox находится здесь . То, что я сделал, что я нашел менее двусмысленным, было открыть nvidia-settings, выбрать дополнительную видеокарту и записать идентификатор шины («PCI: 5: 0: 0» в моем случае). Затем из командной строки хоста:
(Когда я впервые запустил это, произошла ошибка, поскольку VirtualBox эмулировал набор микросхем PIIX; в нем говорилось, что сквозной канал PCI работает только с наборами микросхем ICH9. Поэтому я изменил набор микросхем на ICH9 в настройках системы VirtualBox VM и включил гостевую систему. чтобы установить необходимые новые драйверы. Перезагружаемся позже, и все работает нормально, поэтому я закрыл гостя и повторно выполнил команду.)
Выводов не было, и меня почти сразу же вернули в командную строку.
Использование хоста GPU от гостя
Прежде чем включить гостя, я сначала перезагрузил хост-машину, на случай, если что-то недокументированное должно было произойти в ядре, с помощью virtualbox-dkms. Поскольку я sudoвыполнил предыдущую команду без привилегий, я сомневаюсь, что какие-либо изменения были сделаны.
Когда я в следующий раз запустил гостя, Центр обновления Windows начал делать свое дело и автоматически обнаружил и установил правильные драйверы NVIDIA. Пока все выглядит хорошо. Прежде чем я смог использовать устройство, мне пришлось перезагрузить гостя …
проблема
Теперь, когда драйверы видеокарты установлены на гостевой системе и подключено устройство PCI, я не могу попасть на рабочий стол Windows. Я попадаю на экран входа в Windows, затем после входа в систему экран зависает, просто говоря: «Добро пожаловать», рядом с ним стоит кружащийся, но не синий кружок.
В /var/log/kern.log, последние сообщения отпечатанные являются: —
Есть идеи, как это исправить?
ОБНОВИТЬ:
Теперь у меня есть загрузка ядра intel_iommu=on, но все еще не работает полностью. После перезагрузки хоста, гость запускается, входит в систему, и все выглядит так, как было до запуска чего-либо из этого. Моя вторая видеокарта ничего не выводит.
В диспетчере устройств рядом с устройством Quadro FX стоит восклицательный знак, а в свойствах устройства указан код ошибки 12 с сообщением «Это устройство не может найти достаточно свободных ресурсов». Дальнейшее описание на technet.microsoft.com .
В журнале ядра хоста это выглядит многообещающе:
Если я запускаю гостевую ОС второй раз, не перезагружая хост, дисплей снова зависает на этапе «Добро пожаловать». Это определенно завершает этап входа в систему, так как я мог бы использовать ярлыки Windows для выключения машины без принудительного выключения ..
Теперь у меня нет идей … Есть предложения, чтобы это заработало? Любую дополнительную информацию, которую я могу предоставить?
UPDATE2:
dmesg содержит еще несколько интересных ошибок, но я не знаю, что я могу с ними сделать:
You will find solutions to HAL_IOMMU_INTERNAL_ERROR Blue Screen of Death error in Windows 10 here. This BSOD issue having bugcheck value 0x000001D9 leads the desktop to freeze and hang. Frequent Reboot of PC also occurs when this stop error appears.
HAL IOMMU INTERNAL ERROR in Windows 10 mostly happens because of corrupt, old and incompatible device drivers. Conflicts between similar applications and malware infection are also the main reasons for this BSOD. Furthermore, if the system runs with memory problems, low disk space, problematic areas in HDD, corrupted Windows Image files it can face the error. In the below section, we will be discussing some effective and proven workarounds that can potentially help to resolve HAL_IOMMU_INTERNAL_ERROR BSOD in Windows 10. See the list of workarounds first –
Here is how to fix HAL_IOMMU_INTERNAL_ERROR BSOD in Windows 10 –
1] Disable Automatic Restart
With a confirmed HAL_IOMMU_INTERNAL_ERROR BSOD, Windows PC will have a tendency to perform Automatic restarting. This will be the most annoying problem you could ever come across. Unless this gets a fix, you cannot deploy other resolutions as well. Therefore, this solution comes at the top of the priority. Disabling the Automatic Restarting is not a complex job and you can proceed in the below steps –
Step-1: Navigate to the Desktop area after saving the running programs. Use Win+D hotkey press together and head to the place immediately.
Step-2: Right click on This PC icon. Choose Properties option from there to allow opening the System window.
Step-3: When it is visible on the screen, select Advanced system settings from the left side of the window.
Step-4: As the System Properties wizard appears, click on Advanced tab.
Step-5: Scroll a little down in the tab and reach Startup and Recovery section. When you see the Settings option here, hit it straightway.
Step-6: After a new wizard appears, go to its System failure part and uncheck the box for “Automatically restart”
Step-7: Lastly, select the Ok to save these changes.
Now windows will not go for rebooting automatically. Hence, there will be enough opportunity for you to deploy the upcoming resolutions and resolve the issue accordingly.
2] Resolve all the Memory problems including poor areas in RAM
Windows can suffer from memory issue due to wrong allocation of it and the presence of poor segments in the RAM. With these sorts of problems in the Windows, BSOD errors like HAL_IOMMU_INTERNAL_ERROR commonly occur. Luckily, we have the Windows Memory Diagnostic to deal with these troubles and fix the errors. Let’s proceed to the handy utility in the below process –
- Press Windows and S keys and invoke Taskbar Search.
- In the empty text box located here, type “Memory” and wait for results to load finally.
- Select Windows Memory Diagnostic Desktop app from the results to proceed.
- Select the option “Restart now and check for problems (recommended)”.
- Then windows will prepare for the first cycle of rebooting.
- Subsequently, you will find blue screen upfront detecting memory issues with the rate of progress in percentage.
- When the info shows 100%, windows will Restart for the second time.
- Finally, you can check the diagnosis report in the Notification area of the System Tray.
3] Update Drivers to fix HAL_IOMMU_INTERNAL_ERROR BSOD
HAL_IOMMU_INTERNAL_ERROR BSOD is the result of outdated and corrupt device drivers mostly. Every time we come across a critical issue, they play a greater role there. We really should not allow such a driver on the computer which is old and defective. The Windows Device Manager is a top-notch app in this regard and it shows them with a yellow accent if needs to be updated. To accomplish the workaround, move with below steps –
- Right click on Start menu and choose Run to invoke the window.
- In the text box provided here, write devmgmt.msc and eventually hit Enter key.
- Device Manager will hit on display and you have to watch closely in the console for any exclamation marks in the device’s list.
- Prior to expanding the device, right click on the drivers having Yellow warning icon on it.
- Select Update driver option and follow the other guidelines coming to display until these all get updated.
4] Detect the Malware in Full System and dismiss them using Windows Security
All over the web, Malware is present and often it exists in disguise. You can be easy prey to them after making a visit to a website or clicking link coming in emails. Sometimes inserting a USB can also be risky. Once they get entrance to the system, cause the necessary files to be removed or infected. As a result, many issues come up including HAL_IOMMU_INTERNAL_ERROR. You can avoid this malignant consequence by making regular scanning in Windows security. The default tool can also dismiss all the threats in the most effective way. Follow the below guidelines to complete the task –
- Click on Show hidden icon arrow from the right side of the taskbar.
- Select Shield icon from there and let the system open Windows Security app.
- Moving on to the App, select Virus & threat protection option.
- Now, click on Scan options link to reveal available methods.
- Check the radio button allocated for Full scan and then select Scan now option.
- After the detection gets over, you will be shown a result. If there is any malware present, hit Clean threats option located here.
- Go to the next page, among three options, select Remove first and then Start actions to dismiss all these viruses.
5] Load the Basic Programs only by Booting Device in Safe Mode
In all critical times, Booting in the Safe Mode came out as savior in Windows 10 including previous versions. In this startup procedure, the device starts with only the basic processes and hence, the problems get resolved immediately. Let’s give this renowned utility an attempt following below instructions –
Step#-1: Invoke Run dialog by pressing Win+R hotkeys together.
Step#-2: In the provided typing box, write msconfig using the keyboard and select System Configuration Desktop app once visible.
Step#-3: In the App UI, jump to Boot tab and straightway get at its second half.
Step#-4: Here, you can see the Boot options area. Now, check the box before Safe Boot and activate all the grayed out options.
Step#-5: Hit the radio button before Minimal option and proceed forward.
Step#-6: Select Apply button first and then Ok to save these changes.
Step#-7: Get inside of the Safe Mode on the further move.
6] Use Windows Blue Screen Troubleshooter to solve HAL_IOMMU_INTERNAL_ERROR
Since HAL IOMMU INTERNAL ERROR causes serious damages to the system, Microsoft technicians came up with a built-in tool for resolving this issue effectively. The utility named Blue Screen Troubleshooter and it is accessible through the settings app. Proceed with the below instructions to deploy the tool –
- Open Windows Settings app by pressing Win+I hotkeys altogether.
- From the app UI, head to Update & Security tile and eventually click on it.
- When the page loads completely, choose Troubleshoot located in the left pane, and jump on the adjacent side.
- Reach out to Blue Screen there and expand it by clicking.
- Hit Run the Troubleshooter option from the extended pane.
The utility will now detect and fix all the Stop errors. In the end, there should not be any HAL_IOMMU_INTERNAL_ERROR in the system.
7] Delete the temporary and junk files from storage and make more space in it
Temporary files as stored in the Hard Disk, once grow bigger will occupy huge space in it. The ultimate result is, the storage runs in low space and operation gets slow down. In the process, HAL_IOMMU_INTERNAL_ERROR also hitched up. Using Disk Cleanup tool can be thoroughly beneficial to delete the junks in one platform. Here is how to proceed –
- Open Run dialog box.
- In the search box provided, type cleanmgr and press Enter from keyboard.
- A small popup window will float in and ask you to choose preferable Drive to run a cleanup. Select C: by doing a click on dropdown menu and then press Enter.
- Disk Cleanup Utility will come ahead slowly after calculating the space it can make free from the drive.
- When the wizard appears, come down to the bottom and click on Clean up system files.
- Once again, that small popup window will appear asking for the desired drive. Choose C: like before and press Enter key.
- When Disk Cleanup for C: comes ahead, reach Files to delete area.
- Check all the boxes available here and keep Downloads as it was.
- Hit Ok button and let the Cleanup start.
- Wait until this process ends automatically as this might take several minutes.
8] Disconnect external Hard drives to fix HAL_IOMMU_INTERNAL_ERROR
Some people come across HAL_IOMMU_INTERNAL_ERROR BSOD when an additional Hard Drive joins the system. Good news folks, Issue resolved easily as well just after disconnecting the external USB or other peripheral only. Follow the below guidelines and give a momentarily pause by disconnecting –
- Isolate all the Hardware accessories including the External HDD.
- Keep them at a separate and safe location to avoid damage.
- Now, restart the windows in the usual method.
- After completing the rebooting when you can see Desktop, make a check for the error.
- If resolved properly, start connecting them one after another.
- At this moment after connecting all, launch the web browser from windows.
- Visit Maker’s Webpage for each and Download the Latest drivers.
- Install the drivers in windows to use easily.
9] Settle up the bad areas present in Hard Disk
Prolonged use causes to form problematic areas inside a Disk Drive. When this happens, the system runs in various problems including HAL_IOMMU_INTERNAL_ERROR. The Disk Checking Utility comes handy to resolve these sectors automatically. See the method in detail –
- Press Win+S to call in Taskbar search and type cmd.exe. When Command Prompt appears in the result, right click on it.
- Choose “Run as Administrator” and also select “Yes” Once UAC prompts for your consent.
- In the Black Elevated Prompt, type following syntax and parameters –
chkdsk C: /f /r /x
- Press the Enter button when you have finished typing. This process will take a little longer as we have added three more notations instead of chkdsk only which would show disk status only.
- After the task is finished, Restart the device and upon coming back to operation, check if there is an error present.
10] Install available Update Patches to solve HAL IOMMU INTERNAL ERROR
Any update patch contains fixing of existing bugs, quality improvements, the introduction of latest features. Installing these will give the OS a big blow and strength to fight vulnerabilities like HAL IOMMU INTERNAL ERROR. An Outdated Windows 10 is prone to get affected always. Follow the below guidelines to install them –
- Manage to Load the Settings page of Update & Security as shown in the above workaround.
- Select Windows Update available in the left pane.
- Navigating to the corresponding right, click on Check for updates link ignoring “You’re up to date” dialogue.
- Upon finishing the downloading, click on Install.
- Reboot the Windows once asked and update the OS.
11] Uninstall similar programs to eliminate conflicts
Having the same applications often become risky they tend to collide with one another. Meanwhile, the necessary OS files get eradicated and HAL_IOMMU_INTERNAL_ERROR evolves. In these cases, uninstalling comes ahead first. When we remove one of these, the action reduces the risk of collision between them. Follow the below guidelines to uninstall an App –
- Access Windows Settings app using any convenient method stated above.
- When on the Home page, roll the cursor to Apps and click on it eventually.
- On the next page after appears, choose Apps & features on the left wing and shift to the right.
- Once all the Apps be visible, reach out to applications colliding with each other.
- Select each and hit Uninstall option from the expanded pane.
- If User Account Control prompts for authentication, select Yes to proceed.
- Follow the on-screen guidelines until finally removed.
- Restart the device and once powers up next, do check for the error in the system.
- If resolved, you can Launch Microsoft Store and Download the deleted app again.
12] Undo recent changes by System Restore
Performing a System Restore directs you back to the state where you were. We often install an app or uninstall some for the necessity of work. These actions leave marks in Windows Registry and when they go wrong, HAL IOMMU INTERNAL ERROR is imminent. Therefore, to Undo these changes, perform the below tasks –
- Open the Taskbar search (commonly Win+S) using any of the above instructions.
- Type rstrui in the text area and hit the Enter button.
- Once the System Restore Wizard appears on the screen, select Next.
- From the consequent page, click on Show more restore points and reveal all the points you have created beforehand.
- Choose the last one in the list and click on Next.
- After the following page cuts your view, click Finish.
13] Recover missing DLL files and corrupted resources using System File Checker
So many vulnerabilities occur in Windows 10 and sometimes in worst extent, system resources are erased. In the same way, DLL files often go missing. When these cases happen, HAL_IOMMU_INTERNAL_ERROR BSOD comes in. System File Checker comes handy to fix these components once executed in the Elevated Command Prompt. To access the utility, follow the below instructions –
- Open the Taskbar search by pressing on Win+S keys.
- In the search box given here, type cmd.exe and select Run as administrator from the right flyout.
- After User Account Control asks for your consent, provide approval by choosing Yes.
- On the Black Elevated Command Prompt window, type underneath code and hit Enter key –
sfc /scannow
- System File Checker will be activated and start detecting file corruption and missing DLL ones. Fixing will also start automatically.
- Though this process is a little time-consuming, do not terminate abnormally and let it end by itself. After all these files are okay, there should not be any.
14] Uninstall the troublesome Windows Update
Sometimes Windows update creates the Blue screen HAL IOMMU INTERNAL ERROR. Uninstalling the files will be enough as to resolve the issue or prevent it. To complete the task, move with the following guidelines –
- Press Windows key.
- Once Start menu becomes visible on display, choose Gear cog.
- From App UI, move ahead to Update & Security and click on it.
- From the following page after loaded, select Windows Update and shift to the corresponding side.
- Click on View update history link.
- Select Uninstall updates and let a window unroll from Control Panel.
- Reach the last received patch and do a right click on it.
- Select Uninstall and follow on-screen instructions until they get removed completely.
15] Remove all the Third Party Anti-Virus Programs
In virus issues, you might have used a free anti-virus solution as a safeguard. This is okay until Windows Security arrives. Since the tool is the default for Windows 10 and also very effective, there is no need of using a third party program in this regard. Moreover, most of these programs, due to conflict, often cause HAL_IOMMU_INTERNAL_ERROR BSOD. Therefore, if you have such applications, uninstall using the following guidelines –
- Type appwiz.cpl in the Windows search and Enter
- Select Third Party Anti-virus app in the list.
- Hit Uninstall option visible at the top ribbon.
- Next steps will be as shown in the display until it gets uninstalled completely.
16] Run the DISM tool in Command Prompt for fixing defective Windows image files
When Windows Image files fall into corruption, it might cause HAL_IOMMU_INTERNAL_ERROR. As a fix, DISM tool will be the best-suited utility. Here is the procedure –
- Rght click on Taskbar and select Task Manager from the appearing menu.
- From the app once loaded fully, select File located at the top left corner.
- Choose Run new task when seen and let Run dialog appear.
- In the empty writing field, cmd and move down later on.
- Mark the checkbox below the Open saying “Create this task with administrative privileges”.
- After Pressing Enter key, you will be straightaway guided to Elevated Command Prompt.
- At the black window, type following command where a cursor winks –
DISM.exe /Online /Cleanup-image /Restorehealth
- Hit Enter key and let the Tool fix corrupt Windows image files. The process may be lengthy, wait until it gets over automatically.
- When ends, Restart the windows and after coming back to operation, check if the error resolved.
Till this point, we have elaborated almost all the effective resolutions hoping to resolve HAL IOMMU INTERNAL ERROR in Windows 10. Hopefully, the issue is no more prevalent in your system and you are working smoothly. If the issue still persists, we can suggest only the last resort – Reinstalling Windows 10. This will be the ultimate solution to all the existing problems and if done accurately, no issue will be evolving next.
Methods:
1] Disable Automatic Restart
2] Resolve all the Memory problems
3] Update Drivers
4] Detect the Malware in Full System
5] Load the Basic Programs only by Booting Device in Safe Mode
6] Use Windows Blue Screen Troubleshooter
7] Delete the temporary and junk files
8] Disconnect external Hard drives
9] Settle up the bad areas present in Hard Disk
10] Install available Update Patches
11] Uninstall similar programs to eliminate conflicts
12] Undo recent changes by System Restore
13] Recover missing DLL files and corrupted resources using System File Checker
14] Uninstall the troublesome Windows Update
15] Remove all the Third Party Anti-Virus Programs
16] Run the DISM tool
That’s all!!
Repair any Windows problems such as Blue/Black Screen, DLL, Exe, application, Regisrty error and quickly recover system from issues using Reimage.
If you’ve looked into the Event Viewer in Windows 11/10, specifically under Windows Logs > System, you might have come across an “Information” event labeled as “Event 16, HAL” with the description “The iommu fault reporting has been initialized.” This message can be confusing, raising questions like what it means and whether it’s an indicator of potential issues. This article aims to clear up this particular event, explaining its meaning and if users should be worried about its presence in their system logs.
Also see: Windows 11/10 Computer Blue Screen When Idle (Fix)
What is IOMMU and Fault Reporting?
To comprehend the message “The iommu fault reporting has been initialized,” it’s crucial to first understand what IOMMU is. IOMMU stands for Input-Output Memory Management Unit, a vital component in modern computing systems. Its primary function is to handle and manage memory requests from peripheral devices, like graphics cards or network cards, to the main system memory.
The importance of IOMMU stems from its ability to:
- Virtualize devices: In a virtualized environment, multiple operating systems run concurrently on a single physical machine. IOMMU aids in mapping memory between these virtual machines and the actual hardware, ensuring smooth and secure operations.
- Enhance system security: By isolating device access and controlling which parts of memory a device can read or write to, IOMMU prevents potential unauthorized access to sensitive memory regions.
Fault reporting, on the other hand, is a mechanism within the IOMMU that detects and notifies the system of any abnormalities or “faults” during memory transactions. The initialization of this reporting signifies that the system is now equipped to monitor and log such faults, allowing for better diagnosis of system issues.
Linked issue: The system has rebooted without cleanly shutting down first
Why is this event important?
While “The iommu fault reporting has been initialized” might seem like a routine system message, it carries significance for several reasons:
- System stability and security: As previously mentioned, IOMMU plays a pivotal role in ensuring that peripheral devices interact securely with the system’s main memory. By initializing fault reporting, the system is better prepared to identify and log any unexpected or unauthorized memory transactions. This can be crucial in preempting potential hardware malfunctions or security breaches.
- Diagnostics and troubleshooting: For IT professionals and savvy users, the initialization of IOMMU fault reporting offers a diagnostic tool. In the case of system instability, crashes, or unexplained behavior, these logs can help pinpoint the root cause. It becomes especially important in environments that rely heavily on virtualization.
- Ensuring optimal function of virtual machines (VMs): VMs rely on the IOMMU to function seamlessly. The initialization of fault reporting ensures that if any issues arise related to memory mapping between VMs and hardware, they are promptly reported, allowing for swift resolution.
Related resource: How to Reduce Hardware Reserved Memory in Windows 11/10
What to do when you encounter this event?
When you see the “The iommu fault reporting has been initialized” message in the Event Viewer, it’s an informational message. This means:
- The system has successfully set up the IOMMU’s fault reporting mechanism.
- The system is ready to detect and report any memory access anomalies by peripheral devices.
For most users, encountering the “The iommu fault reporting has been initialized” message in the Event Viewer doesn’t necessitate any action. It’s an informational event, signaling that a system process is functioning as it should. However, if you’re curious or troubleshooting:
- Review related logs: After clicking on the event, the bottom pane in Event Viewer will provide more details. Look for any accompanying warnings or errors in proximity to this event.
- Update hardware drivers: Outdated drivers can sometimes conflict with IOMMU operations. Regularly checking for and installing the latest drivers for your hardware components can preempt potential issues.
- Consult IT help: If you suspect that the event is tied to a larger system problem, or if you observe related errors or warnings, it might be beneficial to consult with an IT professional or knowledgeable friend.
Related concern: Why is my memory usage so high when nothing is running?
Common misconceptions and frequently asked questions
When you encounter technical jargon or system messages, it’s natural to have questions or misconceptions. Let’s address some of these to clear up any concerns or confusion you might have regarding the “The iommu fault reporting has been initialized” event.
- Is this event a sign of an error or malfunction? No, the event is informational and indicates that a particular system process related to IOMMU fault reporting has been set up successfully.
- Do I need to take any action when I see this event? Generally, no action is needed. However, if you’re experiencing system issues and are troubleshooting, this event might be one of many you review.
- Is this event exclusive to Windows 11/10? While you might see this event in Windows 11/10, IOMMU and its associated fault reporting could be present in Windows Server or other operating systems, albeit with different logging mechanisms and messages.
Summary
In short, the “”Event 16, HAL: The iommu fault reporting has been initialized” event you’re seeing is simply Windows notifying that it has initialized the fault reporting related to the IOMMU. This is typically an informational event and doesn’t suggest any errors or problems with your system. If your system is running fine and you don’t notice any issues, you can generally ignore such informational events.
Question The iommu fault reporting has been initialized.
-
Thread starterSadz_Mas
-
Start date
You should upgrade or use an alternative browser.
![]()
-
#1
![]()
-
- Jun 12, 2015
-
- 63,224
-
- 5,775
-
- 168,090
-
#2
Input-Output Memory Management Unit
https://en.wikipedia.org/wiki/Input–output_memory_management_unit
Seems to tie into USB devices, especially Bluetooth mice — could be a conflict with wifi
seems to be linked to a bugcheck
Can you follow option one on the following link — here — and then do this step below: Small memory dumps — Have Windows Create a Small Memory Dump (Minidump) on BSOD — that creates a file in c windows/minidump after the next BSOD
- Open Windows File Explore
- Navigate to C:\Windows\Minidump
- Copy the mini-dump files out onto your Desktop
- Do not use Winzip, use the built in facility in Windows
- Select those files on your Desktop, right click them and choose ‘Send to’ — Compressed (zipped) folder
- Upload the zip file to the Cloud (OneDrive, DropBox . . . etc.)
- Then post a link here to the zip file, so we can take a look for you . . .
![]()
-
#3
![]()
-
- Jun 12, 2015
-
- 63,224
-
- 5,775
-
- 168,090
-
#4
Try running DDU in safe mode and reinstall GPU drivers.
How To — How to perform a CLEAN install of your video card drivers.
![]()
forums.tomshardware.com
![]()
![]()
-
- Jun 12, 2015
-
- 63,224
-
- 5,775
-
- 168,090
-
#6
Looking further, I don’t think that message is reason for error, it just occurs at startup. Its not an error.
what events happen before the event 41(63)?
what are specs of the PC?
your discord links don’t work.
how long you run 2 different sticks together?
https://www.userbenchmark.com/UserRun/52380933
do you freeze up using just the 16gb stick?
![]()
-
#7
My pc specs are:
Processor-AMD RYZEN 5 5600X
GPU-GTX 1060 6GB
RAM-CORSAIR C18 3600MHZ RAM (16,8)
MOTHERBOARD-ASUS TUF B550 GAMING PLUS
STORAGE-NVME SSD 250GB
I have been using these ram sticks for about three months havent faced any issues before idk what is the issue
![]()
-
- Jun 12, 2015
-
- 63,224
-
- 5,775
-
- 168,090
-
#8
it probably means cause is hardware
Ryzen 5 5600X
Asus TUF Gaming B550 Gaming (Which BIOS?) appears to be dated 25th Feb 2022
24gb ram
1 x 16gb CMK16GX4M1Z3600C18
1 x 8gb CMK8GX4M1Z3600C18
GPU — GTX 1060
SSD — WD SN750 250gb
how long you used 2 sticks together?
what PSU do you have?
![]()
-
#9
![]()
-
- Jun 12, 2015
-
- 63,224
-
- 5,775
-
- 168,090
![]()
-
#11
![]()
-
- Jun 12, 2015
-
- 63,224
-
- 5,775
-
- 168,090
-
#12
I have found age doesn’t really mean a lot when it comes to parts, they can die anytime from 0 to 10 years.
Prime will take a while so I would run it overnight.
if it finishes before you wake up, it will create a file called stress.txt in the folder its installed in.
![]()
-
#13
![]()
-
- Jun 12, 2015
-
- 63,224
-
- 5,775
-
- 168,090
-
#14
can you look in reliability history at the days it goes blank? it might show errors here.
I don’t know if the freeze is the GPU drivers or the NVMe
what brand NVMe is it?
![]()
-
#15
![]()
-
- Jun 12, 2015
-
- 63,224
-
- 5,775
-
- 168,090
![]()
![]()
-
- Jun 12, 2015
-
- 63,224
-
- 5,775
-
- 168,090
-
#18
can you look in reliability history at the days it goes blank?
it might show errors here. since windows isn’t freezing completely. you can move mouse around, and hear noise. So its just the GPU?
passes memtest
drives seem okay
ddu doesn’t fix it
latest sane bios (there is a beta)
![]()
![]()
-
- Jun 12, 2015
-
- 63,224
-
- 5,775
-
- 168,090
-
#21
got latest version of armory’?
no real signs there. the windows shutdowns probably result of you turning PC off to get picture back.
No sign its the gpu driver
41(63) happens after the restart, its a reaction to the shutdown. So you would need to look at events in the moments before it happens, as they probably relate to previous shutdown.
![]()
![]()
-
- Jun 12, 2015
-
- 63,224
-
- 5,775
-
- 168,090
![]()
![]()
-
- Jun 12, 2015
-
- 63,224
-
- 5,775
-
- 168,090
-
#25
any extra USB devices?
any USB WIFI cards?
any speakers?
any old parts that have always worked fine before?
possible USB is tripping off screen, as the part of system that controls Graphics is also responsible for wifi and and USB. They can all mess with each other.
if windows isn’t seeing a conflict it makes it hard to figure out cause. All we have is symptoms.
I would be tempted to just run with 16gb of ram and just see if it makes any difference.
Similar threads
- Advertising
- Cookies Policies
- Privacy
- Term & Conditions
You will find solutions to HAL_IOMMU_INTERNAL_ERROR Blue Screen of Death error in Windows 10 here. This BSOD issue having bugcheck value 0x000001D9 leads the desktop to freeze and hang. Frequent Reboot of PC also occurs when this stop error appears.
HAL IOMMU INTERNAL ERROR in Windows 10 mostly happens because of corrupt, old and incompatible device drivers. Conflicts between similar applications and malware infection are also the main reasons for this BSOD. Furthermore, if the system runs with memory problems, low disk space, problematic areas in HDD, corrupted Windows Image files it can face the error. In the below section, we will be discussing some effective and proven workarounds that can potentially help to resolve HAL_IOMMU_INTERNAL_ERROR BSOD in Windows 10. See the list of workarounds first –
Here is how to fix HAL_IOMMU_INTERNAL_ERROR BSOD in Windows 10 –
1] Disable Automatic Restart
With a confirmed HAL_IOMMU_INTERNAL_ERROR BSOD, Windows PC will have a tendency to perform Automatic restarting. This will be the most annoying problem you could ever come across. Unless this gets a fix, you cannot deploy other resolutions as well. Therefore, this solution comes at the top of the priority. Disabling the Automatic Restarting is not a complex job and you can proceed in the below steps –
Step-1: Navigate to the Desktop area after saving the running programs. Use Win+D hotkey press together and head to the place immediately.
Step-2: Right click on This PC icon. Choose Properties option from there to allow opening the System window.
Step-3: When it is visible on the screen, select Advanced system settings from the left side of the window.
Step-4: As the System Properties wizard appears, click on Advanced tab.
Step-5: Scroll a little down in the tab and reach Startup and Recovery section. When you see the Settings option here, hit it straightway.
Step-6: After a new wizard appears, go to its System failure part and uncheck the box for “Automatically restart”
Step-7: Lastly, select the Ok to save these changes.
Now windows will not go for rebooting automatically. Hence, there will be enough opportunity for you to deploy the upcoming resolutions and resolve the issue accordingly.
2] Resolve all the Memory problems including poor areas in RAM
Windows can suffer from memory issue due to wrong allocation of it and the presence of poor segments in the RAM. With these sorts of problems in the Windows, BSOD errors like HAL_IOMMU_INTERNAL_ERROR commonly occur. Luckily, we have the Windows Memory Diagnostic to deal with these troubles and fix the errors. Let’s proceed to the handy utility in the below process –
- Press Windows and S keys and invoke Taskbar Search.
- In the empty text box located here, type “Memory” and wait for results to load finally.
- Select Windows Memory Diagnostic Desktop app from the results to proceed.
- Select the option “Restart now and check for problems (recommended)”.
- Then windows will prepare for the first cycle of rebooting.
- Subsequently, you will find blue screen upfront detecting memory issues with the rate of progress in percentage.
- When the info shows 100%, windows will Restart for the second time.
- Finally, you can check the diagnosis report in the Notification area of the System Tray.
3] Update Drivers to fix HAL_IOMMU_INTERNAL_ERROR BSOD
HAL_IOMMU_INTERNAL_ERROR BSOD is the result of outdated and corrupt device drivers mostly. Every time we come across a critical issue, they play a greater role there. We really should not allow such a driver on the computer which is old and defective. The Windows Device Manager is a top-notch app in this regard and it shows them with a yellow accent if needs to be updated. To accomplish the workaround, move with below steps –
- Right click on Start menu and choose Run to invoke the window.
- In the text box provided here, write devmgmt.msc and eventually hit Enter key.
- Device Manager will hit on display and you have to watch closely in the console for any exclamation marks in the device’s list.
- Prior to expanding the device, right click on the drivers having Yellow warning icon on it.
- Select Update driver option and follow the other guidelines coming to display until these all get updated.
4] Detect the Malware in Full System and dismiss them using Windows Security
All over the web, Malware is present and often it exists in disguise. You can be easy prey to them after making a visit to a website or clicking link coming in emails. Sometimes inserting a USB can also be risky. Once they get entrance to the system, cause the necessary files to be removed or infected. As a result, many issues come up including HAL_IOMMU_INTERNAL_ERROR. You can avoid this malignant consequence by making regular scanning in Windows security. The default tool can also dismiss all the threats in the most effective way. Follow the below guidelines to complete the task –
- Click on Show hidden icon arrow from the right side of the taskbar.
- Select Shield icon from there and let the system open Windows Security app.
- Moving on to the App, select Virus & threat protection option.
- Now, click on Scan options link to reveal available methods.
- Check the radio button allocated for Full scan and then select Scan now option.
- After the detection gets over, you will be shown a result. If there is any malware present, hit Clean threats option located here.
- Go to the next page, among three options, select Remove first and then Start actions to dismiss all these viruses.
5] Load the Basic Programs only by Booting Device in Safe Mode
In all critical times, Booting in the Safe Mode came out as savior in Windows 10 including previous versions. In this startup procedure, the device starts with only the basic processes and hence, the problems get resolved immediately. Let’s give this renowned utility an attempt following below instructions –
Step#-1: Invoke Run dialog by pressing Win+R hotkeys together.
Step#-2: In the provided typing box, write msconfig using the keyboard and select System Configuration Desktop app once visible.
Step#-3: In the App UI, jump to Boot tab and straightway get at its second half.
Step#-4: Here, you can see the Boot options area. Now, check the box before Safe Boot and activate all the grayed out options.
Step#-5: Hit the radio button before Minimal option and proceed forward.
Step#-6: Select Apply button first and then Ok to save these changes.
Step#-7: Get inside of the Safe Mode on the further move.
6] Use Windows Blue Screen Troubleshooter to solve HAL_IOMMU_INTERNAL_ERROR
Since HAL IOMMU INTERNAL ERROR causes serious damages to the system, Microsoft technicians came up with a built-in tool for resolving this issue effectively. The utility named Blue Screen Troubleshooter and it is accessible through the settings app. Proceed with the below instructions to deploy the tool –
- Open Windows Settings app by pressing Win+I hotkeys altogether.
- From the app UI, head to Update & Security tile and eventually click on it.
- When the page loads completely, choose Troubleshoot located in the left pane, and jump on the adjacent side.
- Reach out to Blue Screen there and expand it by clicking.
- Hit Run the Troubleshooter option from the extended pane.
The utility will now detect and fix all the Stop errors. In the end, there should not be any HAL_IOMMU_INTERNAL_ERROR in the system.
7] Delete the temporary and junk files from storage and make more space in it
Temporary files as stored in the Hard Disk, once grow bigger will occupy huge space in it. The ultimate result is, the storage runs in low space and operation gets slow down. In the process, HAL_IOMMU_INTERNAL_ERROR also hitched up. Using Disk Cleanup tool can be thoroughly beneficial to delete the junks in one platform. Here is how to proceed –
- Open Run dialog box.
- In the search box provided, type cleanmgr and press Enter from keyboard.
- A small popup window will float in and ask you to choose preferable Drive to run a cleanup. Select C: by doing a click on dropdown menu and then press Enter.
- Disk Cleanup Utility will come ahead slowly after calculating the space it can make free from the drive.
- When the wizard appears, come down to the bottom and click on Clean up system files.
- Once again, that small popup window will appear asking for the desired drive. Choose C: like before and press Enter key.
- When Disk Cleanup for C: comes ahead, reach Files to delete area.
- Check all the boxes available here and keep Downloads as it was.
- Hit Ok button and let the Cleanup start.
- Wait until this process ends automatically as this might take several minutes.
8] Disconnect external Hard drives to fix HAL_IOMMU_INTERNAL_ERROR
Some people come across HAL_IOMMU_INTERNAL_ERROR BSOD when an additional Hard Drive joins the system. Good news folks, Issue resolved easily as well just after disconnecting the external USB or other peripheral only. Follow the below guidelines and give a momentarily pause by disconnecting –
- Isolate all the Hardware accessories including the External HDD.
- Keep them at a separate and safe location to avoid damage.
- Now, restart the windows in the usual method.
- After completing the rebooting when you can see Desktop, make a check for the error.
- If resolved properly, start connecting them one after another.
- At this moment after connecting all, launch the web browser from windows.
- Visit Maker’s Webpage for each and Download the Latest drivers.
- Install the drivers in windows to use easily.
9] Settle up the bad areas present in Hard Disk
Prolonged use causes to form problematic areas inside a Disk Drive. When this happens, the system runs in various problems including HAL_IOMMU_INTERNAL_ERROR. The Disk Checking Utility comes handy to resolve these sectors automatically. See the method in detail –
- Press Win+S to call in Taskbar search and type cmd.exe. When Command Prompt appears in the result, right click on it.
- Choose “Run as Administrator” and also select “Yes” Once UAC prompts for your consent.
- In the Black Elevated Prompt, type following syntax and parameters –
chkdsk C: /f /r /x
- Press the Enter button when you have finished typing. This process will take a little longer as we have added three more notations instead of chkdsk only which would show disk status only.
- After the task is finished, Restart the device and upon coming back to operation, check if there is an error present.
10] Install available Update Patches to solve HAL IOMMU INTERNAL ERROR
Any update patch contains fixing of existing bugs, quality improvements, the introduction of latest features. Installing these will give the OS a big blow and strength to fight vulnerabilities like HAL IOMMU INTERNAL ERROR. An Outdated Windows 10 is prone to get affected always. Follow the below guidelines to install them –
- Manage to Load the Settings page of Update & Security as shown in the above workaround.
- Select Windows Update available in the left pane.
- Navigating to the corresponding right, click on Check for updates link ignoring “You’re up to date” dialogue.
- Upon finishing the downloading, click on Install.
- Reboot the Windows once asked and update the OS.
11] Uninstall similar programs to eliminate conflicts
Having the same applications often become risky they tend to collide with one another. Meanwhile, the necessary OS files get eradicated and HAL_IOMMU_INTERNAL_ERROR evolves. In these cases, uninstalling comes ahead first. When we remove one of these, the action reduces the risk of collision between them. Follow the below guidelines to uninstall an App –
- Access Windows Settings app using any convenient method stated above.
- When on the Home page, roll the cursor to Apps and click on it eventually.
- On the next page after appears, choose Apps & features on the left wing and shift to the right.
- Once all the Apps be visible, reach out to applications colliding with each other.
- Select each and hit Uninstall option from the expanded pane.
- If User Account Control prompts for authentication, select Yes to proceed.
- Follow the on-screen guidelines until finally removed.
- Restart the device and once powers up next, do check for the error in the system.
- If resolved, you can Launch Microsoft Store and Download the deleted app again.
12] Undo recent changes by System Restore
Performing a System Restore directs you back to the state where you were. We often install an app or uninstall some for the necessity of work. These actions leave marks in Windows Registry and when they go wrong, HAL IOMMU INTERNAL ERROR is imminent. Therefore, to Undo these changes, perform the below tasks –
- Open the Taskbar search (commonly Win+S) using any of the above instructions.
- Type rstrui in the text area and hit the Enter button.
- Once the System Restore Wizard appears on the screen, select Next.
- From the consequent page, click on Show more restore points and reveal all the points you have created beforehand.
- Choose the last one in the list and click on Next.
- After the following page cuts your view, click Finish.
13] Recover missing DLL files and corrupted resources using System File Checker
So many vulnerabilities occur in Windows 10 and sometimes in worst extent, system resources are erased. In the same way, DLL files often go missing. When these cases happen, HAL_IOMMU_INTERNAL_ERROR BSOD comes in. System File Checker comes handy to fix these components once executed in the Elevated Command Prompt. To access the utility, follow the below instructions –
- Open the Taskbar search by pressing on Win+S keys.
- In the search box given here, type cmd.exe and select Run as administrator from the right flyout.
- After User Account Control asks for your consent, provide approval by choosing Yes.
- On the Black Elevated Command Prompt window, type underneath code and hit Enter key –
sfc /scannow
- System File Checker will be activated and start detecting file corruption and missing DLL ones. Fixing will also start automatically.
- Though this process is a little time-consuming, do not terminate abnormally and let it end by itself. After all these files are okay, there should not be any.
14] Uninstall the troublesome Windows Update
Sometimes Windows update creates the Blue screen HAL IOMMU INTERNAL ERROR. Uninstalling the files will be enough as to resolve the issue or prevent it. To complete the task, move with the following guidelines –
- Press Windows key.
- Once Start menu becomes visible on display, choose Gear cog.
- From App UI, move ahead to Update & Security and click on it.
- From the following page after loaded, select Windows Update and shift to the corresponding side.
- Click on View update history link.
- Select Uninstall updates and let a window unroll from Control Panel.
- Reach the last received patch and do a right click on it.
- Select Uninstall and follow on-screen instructions until they get removed completely.
15] Remove all the Third Party Anti-Virus Programs
In virus issues, you might have used a free anti-virus solution as a safeguard. This is okay until Windows Security arrives. Since the tool is the default for Windows 10 and also very effective, there is no need of using a third party program in this regard. Moreover, most of these programs, due to conflict, often cause HAL_IOMMU_INTERNAL_ERROR BSOD. Therefore, if you have such applications, uninstall using the following guidelines –
- Type appwiz.cpl in the Windows search and Enter
- Select Third Party Anti-virus app in the list.
- Hit Uninstall option visible at the top ribbon.
- Next steps will be as shown in the display until it gets uninstalled completely.
16] Run the DISM tool in Command Prompt for fixing defective Windows image files
When Windows Image files fall into corruption, it might cause HAL_IOMMU_INTERNAL_ERROR. As a fix, DISM tool will be the best-suited utility. Here is the procedure –
- Rght click on Taskbar and select Task Manager from the appearing menu.
- From the app once loaded fully, select File located at the top left corner.
- Choose Run new task when seen and let Run dialog appear.
- In the empty writing field, cmd and move down later on.
- Mark the checkbox below the Open saying “Create this task with administrative privileges”.
- After Pressing Enter key, you will be straightaway guided to Elevated Command Prompt.
- At the black window, type following command where a cursor winks –
DISM.exe /Online /Cleanup-image /Restorehealth
- Hit Enter key and let the Tool fix corrupt Windows image files. The process may be lengthy, wait until it gets over automatically.
- When ends, Restart the windows and after coming back to operation, check if the error resolved.
Till this point, we have elaborated almost all the effective resolutions hoping to resolve HAL IOMMU INTERNAL ERROR in Windows 10. Hopefully, the issue is no more prevalent in your system and you are working smoothly. If the issue still persists, we can suggest only the last resort – Reinstalling Windows 10. This will be the ultimate solution to all the existing problems and if done accurately, no issue will be evolving next.
Methods:
1] Disable Automatic Restart
2] Resolve all the Memory problems
3] Update Drivers
4] Detect the Malware in Full System
5] Load the Basic Programs only by Booting Device in Safe Mode
6] Use Windows Blue Screen Troubleshooter
7] Delete the temporary and junk files
8] Disconnect external Hard drives
9] Settle up the bad areas present in Hard Disk
10] Install available Update Patches
11] Uninstall similar programs to eliminate conflicts
12] Undo recent changes by System Restore
13] Recover missing DLL files and corrupted resources using System File Checker
14] Uninstall the troublesome Windows Update
15] Remove all the Third Party Anti-Virus Programs
16] Run the DISM tool
That’s all!!
Repair any Windows problems such as Blue/Black Screen, DLL, Exe, application, Regisrty error and quickly recover system from issues using Reimage.
| Автор | Сообщение | |||
|---|---|---|---|---|
|
||||
|
Member Статус: Не в сети |
Краткое введение При бесплатном обновлении с Windows 7/8.1 на Windows 10 активация привязывается к Вашему железу. Минимальные системные требования • Процессор:Не менее 1 ГГц или SoC Ссылка на ISO образы Windows 10 c сайта Microsoft (Выбираете просто Windows 10 — это самая стандартная версия, включает Pro и Home x32&x64, остальные урезанные…) https://www.microsoft.com/ru-ru/software-download/windows10ISO/ https://www.microsoft.com/ru-ru/accessi … s10upgrade FAQ Активация в Windows 10 После обновления с Windows 7 или 8.1 для корректной работы Windows 10 желательно переустановить основные драйвера в системе на актуальные версии. Обновление драйверов чипсета на последнюю версию может помочь устранить ошибки в системном журнале Windows, если таковые имеются.
При бесплатном обновлении с Windows 7/8.1 на Windows 10 активация привязывается к Вашему железу. Новый ключ при этом не выдаётся, в обновлённой системе пропишется один из общих ключей. Обновляться можно как через резервирование обновления и Windows Update, так и с помощью Media Creation Tool, образ скачивается тот же. Статьи на тему Подробный обзор и тест операционной системы Microsoft Windows 10 Secure Boot, загрузка с USB или «Как запустить установку Win10…» https://forums.overclockers.ru/viewtopic.php?p=14423950#p14423950 Опять старая песня о способе установки 10-ки второй системой… Ну сколько можно… © Makc1968 Оставляете все настройки в BIOS, а также не отключаете никакие диски — ставите 10-ку, загрузившись с её установочного носителя. В результате у вас должно появиться меню с выбором системы для загрузки. Если приоритетной или последней перед перезагрузкой была 7-ка, то этот выбор ОС будет в старом классическом стиле с белыми буквами на чёрном фоне и перемещаемой полоской выбора. Если же в дефолте загрузка 10-ки или вы перезагружаетесь с 10-ки, то выбор ОС будет на голубом фоне, названия ОС будут в «плитках», курсор мыши вроде бы доступен — уже не помню. Если перезагрузиться с 10-ки и снова её выбрать, получив выбор ОС на голубом фоне, то происходит обычная дальнейшая загрузка 10-ки. Если же выбрать 7-ку, то сначала произойдёт автоматическая перезагрузка компьютера, а потом 7-ка будет сразу загружаться без каких-либо запросов. Все это справедливо при безупречной работе Win 10. Если будут проблемы с загрузкой, то и Windows 7 Вы загрузить не сможете. Решение проблемы с повреждённым хранилищем 10-ки и ошибкой DISM. http://forums.overclockers.ru/viewtopic.php?p=13760671#p13760671 Костыль для 125% масштабирования (проблема с замыливанием некоторых окон) © Alex_Smile У кого стоит Масштабирование х125% (не стандартное х100%) и проблема с замыливанием некоторых окон! В этой теме обсуждаются технические вопросы Обсудить нетехнические вопросы, обсудить шпионаж новой ОС, пофлеймить, сравнить с Windows XP (7, 8, 8.1…) и просто поболтать можно здесь Любой флейм или попытка спровоцировать холивар в теме приведут к ЖК и запрету на участие в теме. Нарушение запрета — к бану. Ссылки на образы или места, где их можно достать, считаются нарушением п. 3.17 правил конференции, если только идентичный образ не был выложен официально Microsoft в открытый (не требующий регистрации, ключей или подписок) доступ. То же самое касается и ключей. Последний раз редактировалось 4e_alex 21.08.2017 15:07, всего редактировалось 53 раз(а). |
| Реклама | |
|
Партнер |
|
Igor1966 |
|
|
Member Статус: Не в сети |
охохох… Даже пожертвовал ресурсом SSD в виде стирания/записи 1 Гб! ffa1978 писал(а): нет не удалится хз, может Майкрософт для меня выпустили особенную винду, с их сайта всегда качаю… ffa1978 писал(а): swapfile через реестр отдельно отключается даже не знаю, где… сам удаляется. |
")
|
Evgen100 |
|
|
Member
Статус: Не в сети |
В общем манал я эти материнки от Гигабайта через колено, может будет кому-то полезно. На прошлой неделе приятель обновил своё железо. 1. Инициализован отчет об ошибке IOMMU. WHEA предупреждения по КД, две первые только при запуске ОС. Решил таким образом: #77 Добавлено спустя 33 минуты 2 секунды: Цитата: Не удается найти описание для идентификатора события 56 из источника Application Popup. Вызывающий данное событие компонент не установлен на этом локальном компьютере или поврежден. Установите или восстановите компонент на локальном компьютере. Если событие возникло на другом компьютере, возможно, потребуется сохранить отображаемые сведения вместе с событием. К событию были добавлены следующие сведения: ACPI Ресурс сообщения существует, но сообщение не найдено в таблице сообщений И это на свежей системе. Я как понимаю 56 возникает только на платах от Бомжебайта. |
|
Agiliter |
|
|
Member Статус: Не в сети |
Систему после замены оборудования начисто ставили? Вдруг это всё таки программная проблема. И не пытайтесь системе подсунуть дрова через программы которые их ищут за вас. Они конечно иногда полезные, но могут и подсунуть «совместимый» драйвер, который на самом деле не работает. |
|
Evgen100 |
|
|
Member
Статус: Не в сети |
Agiliter писал(а): Систему после замены оборудования начисто ставили? Вдруг это всё таки программная проблема. И не пытайтесь системе подсунуть дрова через программы которые их ищут за вас. Они конечно иногда полезные, но могут и подсунуть «совместимый» драйвер, который на самом деле не работает. Да, ставил 21H2, 21H1 — в обеих ОС эти проблемы. Проблем нет только в 11 винде (но я думаю, там по сути они просто не логируются), но в ней у знакомого не работает управление в Battlefield V Agiliter писал(а): Что-то я сомневаюсь, что проблема в плате Ну это не первая сборка с подобными ошибками и именно на платах от Гиги, такие же проблемы были на 410 плате с 10100F, а там я решал проблему с ошибкой TPM даунгрейдом биоса, где TPM вообще нет (нет устройства — нет проблем Agiliter писал(а): И не пытайтесь системе подсунуть дрова Так я поставил старые дрова от PCI порта от майков. Agiliter писал(а): Есть конечно некоторая вероятность что просто кусок цп дохлый Тогда бы код события был 19 и сообщение о ядре процессора, а здесь конкретно код события 17, а это уже PCI Express, где айди оборудования указывал на накопитель SSD (который заведомо исправен). |

 ).
).|
Agiliter |
|
|
Member Статус: Не в сети |
Я бы пробовал ставить систему с заведомо отключённым TPM. А вот виртуализацию можно не трогать. Сильно сомневаюсь что с ней есть проблемы. |
|
Capushon |
|
|
Member Статус: Не в сети |
Evgen100 писал(а): Я то знаю, что делаю, с 2005 года Тогда зачем связываешься с платами Гигабайт? |
|
Agiliter |
|
|
Member Статус: Не в сети |
А ещё есть вероятность, что система не в чистом UEFI. TPM требует именно чистый UEFI без котсылей для корректной работы. Последний раз редактировалось Agiliter 11.12.2021 22:11, всего редактировалось 1 раз. |
|
Evgen100 |
|
|
Member
Статус: Не в сети |
Agiliter писал(а): Я бы пробовал ставить систему с заведомо отключённым TPM Да там изначально оно и было отключено (ибо вообще небыло TPM в биосе F3, потом обновил до F5). Добавлено спустя 1 минуту 14 секунд: Capushon писал(а): Тогда зачем связываешься с платами Гигабайт? Так это не я покупал, у меня железо на AMD. Сижу и решаю проблемы с этими косяками, потому что попросили. Добавлено спустя 59 секунд: Agiliter писал(а): что манипуляции с TPM потенциально опасны Да не, я уже перешивал биос с установленной ОС на этой плате (и новую и старую прошивку накидывал заново). |
|
Agiliter |
|
|
Member Статус: Не в сети |
Тогда можно было пойти от обратного, обновить биос, убедиться что чистый UEFI без костылей совместимости, включить TPM, поставить ОС. Не нормально, что система считает, что TPM есть ли его в биос отключили. На моей AM4 от гигабайт даже при попытке включить tpm на живой системе ОС его не находит, только если систему переставить с ним. |

|
Capushon |
|
|
Member Статус: Не в сети |
Evgen100 писал(а): у меня железо на AMD Как-будто это лучше… |
|
Evgen100 |
|
|
Member
Статус: Не в сети |
Capushon писал(а): Как-будто это лучше… Чел что ты несёшь… |
|
Agiliter |
|
|
Member Статус: Не в сети |
Чукча не читатель, он даже не понял, что проблема на интел. |
|
Evgen100 |
|
|
Member
Статус: Не в сети |
Agiliter писал(а): Не нормально, что система считает, что TPM есть ли его в биос отключили. Да TPM не особо то человеку и нужен (вообще не нужен по сути). Что касается ошибки 56 — единственное, что я понял, она вызывается из прошивки биос (привязывается к какому-то ПО от гиги, хотя всё что с мамкой шло установлено) и идентификатор ACPI с кодом 2 сигнализирует как-раз таки что с подачей питания мамки какие-то косяки. |
|
Agiliter |
|
|
Member Статус: Не в сети |
Решил таким образом: Кстати говоря здесь ошибка. IOMMU это виртуализация ввода вывода. (AMD-Vi \ Intel VT-d или просто IOMMU)Это НЕ виртуализация ЦП. Хотя на некоторых платах есть только один переключать для обоих типов виртуализации. Цитата: всё что с мамкой шло установлено Никогда это барахло не надо ставить от любого производителя. Максимум поставить то без чего нельзя получить доступ к настройкам, настроить и удалить. Часто это причина головной боли и утечки ресурсов. Особенно весело если там работает ПО постояно считывающие какой-нибудь проблемный датчик. Помню на одной из плат ASUS такая ерунда была. Со временем все ресурсы забивал один чёртов датчик ASUS. В HWiNFo не просто так по-умолчанию всякие, часто потенциально проблемные, датчики выключены по-умолчанию. |
|
Evgen100 |
|
|
Member
Статус: Не в сети |
Agiliter писал(а): Никогда это барахло не надо ставить от любого производителя Это да. Но было нужно проверить, действительно ли какое-то ПО из комплектации гиги влияет на эту ошибку. Как оказалось нет. |
|
Capushon |
|
|
Member Статус: Не в сети |
Agiliter писал(а): он даже не понял, что проблема на интел Всё «он» понял, посто интересно… ) |
|
Agiliter |
|
|
Member Статус: Не в сети |
Capushon |
|
Capushon |
|
|
Member Статус: Не в сети |
Agiliter писал(а): Какой-то у вас очень ограниченный опыт ковыряния систем. У меня ограниченный опыт получения проблем и топтания по граблям, вызванного следствием глупости сталкивания с дешёвым барахлом за 3 копейки. А так всё отлично, включая работу встроек ) |
|
Agiliter |
|
|
Member Статус: Не в сети |
Тогда вы идеальный клиент. Видимо не пытались на относительно старых интел использовать аппаратный кодировщик встройки когда вывод идёт через другую карту. Никогда не проверяли а работает ли на ней в принципе аппаратное декодирование или какое-то ускорение. Не пытались использовать встройку для ускорения чего-нибудь помимо вылизанных под неё продуктов. Не читали ченджлоги и не открывали в хроме страничку about:gpu (можете там сразу CTRL+F и intel сделать). |
—
Кто сейчас на конференции |
|
Сейчас этот форум просматривают: нет зарегистрированных пользователей и гости: 13 |
| Вы не можете начинать темы Вы не можете отвечать на сообщения Вы не можете редактировать свои сообщения Вы не можете удалять свои сообщения Вы не можете добавлять вложения |