![]()
Сообщение от KuperPN

В partition wizard добавил галку на использование разделов guid, выставил загрузку с ssd uefi, но загружает по-прежнему с жёсткого диска.
Варианты.
1. Система х32 или х64?
2. Раздел есть EFI есть, но не известно есть ли на нём загрузочные файлы. И загрузку выбираете с этого диска или с Windows Boot Manager? В загруженной 10-ке открыть ком.строку от имени администратора, ввести diskpart и следующие команды
Кликните здесь для просмотра всего текста
| Bash | ||
|
Diskpart завершит работу, ком.строка останется открытой в ней выполнить
Код
bcdboot J:\windows /s M: /f UEFI
Команду можно скопировать и вставить в ком.строку. Должно будет появиться сообщение, что файлы загрузки созданы. Перезагрузиться и пробовать загрузку с SSD или через Windows Boot Manager. В BIOS должн быть включен режим загрузки UEFI and Legacy в разных его вариациях.
Если система х32, то эти команды можно не пробовать, так как бесполезно.
3.
![]()
Сообщение от KuperPN
Затем попробовал установить чистую винду на ssd ради проверки — всё нормально запустилось, но мне нужно перенести саму систему со всеми надстройками,
Можно было на раздел с новой системой развернуть бэкап старой системы (остальные разделы не трогать) и старая ОС должна была загрузиться. Какая разметка была на SSD после чистой установки системы, не проверяли?
4. Временно систему с SSD можно загружать из ОС с HDD. 10-ку на HDD через меню Пуск перезагрузить удерживая зажатой клавишу Shift. После перезагрузки Диагностика -> Дополнительные параметры -> Командная строка. В командной строке ввести
и нажать Enter. Будет произведён поиск операционных систем. Когда система будет найдена ввести y (Да) и нажать Enter.
Note that in the BIOS settings, under System status, it says «Not present» for the entry M.2/SATA Port 5, although there is definitely an M.2 drive present
Your new 970 EVO is an NVMe drive which connects through PCIe; it is not a SATA device and does not consume a SATA port. (Most M.2 slots are dual-purpose and accept both SATA and PCIe devices.)
Your old Samsung XP941, meanwhile, was a SATA drive (although it is unclear to me whether it directly used the M.2 SATA interface, or whether it was a PCIe device which had its own SATA controller).
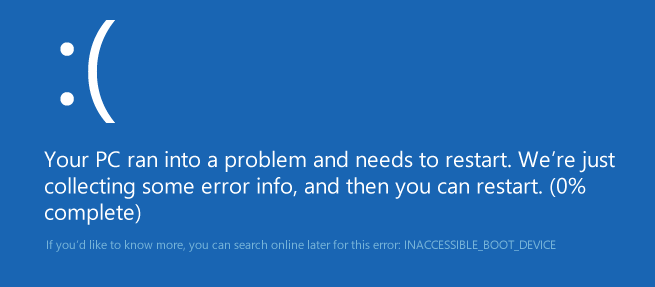
Now when I try to boot from it, Windows gives me blue screen with stop code «Inaccessible Boot Device»
Windows automatically removes storage unused drivers from the early-boot process – if you had the OS installed on a SATA device then only the SATA driver (e.g. StorAhci) is enabled for «boot start», while the NVMe driver is deferred to a later phase (and the same for IDE, SCSI, etc.).
One way to «fix» this is to boot Windows from your old SSD again and run the command:
sc.exe config stornvme start= boot
This will activate the Windows’ built-in NVMe driver during the early boot phase. Once that’s done, re-clone the system to the new SSD. (Note that rebooting may cause Windows to deactivate the driver again.)
In the BIOS, Boot Mode is set to Legacy + UEFI as for UEFI only, the new drive does not show. I’ve set the drive as first boot option
This is not a problem, but you should probably think about converting the OS and disk to UEFI boot mode; recent Windows 10 versions come with an mbr2gpt.exe tool for that. On modern firmwares, there’s a chance that native UEFI boot will be a little faster. Newest Intel PCs no longer support legacy mode at all.
(Note that in UEFI, «boot options» generally aren’t whole drives, but OS-defined entries.)
 A few weeks ago I received a 1TB Western Digital Black SN750 M.2 SSD, boasting an impressive 3470 MB/s read speed on the packaging. I already had a SATA SSD installed in my gaming/photo editing PC. Nevertheless, those specs got me to pick up a screwdriver and install the new M.2 SSD. The physical installation is dead simple: remove graphics card, install M.2 SSD, reinstall graphics card. I wasn’t really looking forward to a full reinstallation of Windows 10 though. There’s just too many applications, settings and licenses on that system that I didn’t want to recreate or re-enter. Instead, I wanted to clone Windows 10 from SATA SSD to M.2 SSD.
After a little bit of research, I ended up with Macrium Reflect, which is freeware disk cloning software. Long story short: I cloned the old SSD to the M.2 SSD, rebooted from the M.2 SSD, and… was greeted with a variety of errors. The main recurring error was Inaccessible Boot Device, however in my troubleshooting attempts I saw many more errors.
UEFI vs BIOS

While googling for solutions, many solutions mentioned the bootrec.exe, bcdedit.exe and diskpart commands to solve the boot issues. In the end however, my problem had more to do with the difference between BIOS and UEFI, and how storage devices are addressed. I’m still not 100% sure why, so feel free to comment below!
I was running a really old BIOS, and never properly set it up when I initially installed Windows 10 many years ago. In that old BIOS, my storage devices were set to Legacy mode instead of UEFI. This is probably because it ran Windows 7 or 8 a few years ago; or just because I never changed it from the default mode. What this in effect means is that my old SATA SSD was formatted with MBR instead of GPT (it’s a partitioning scheme). It also means that my Windows 10 installation had a “system partition” instead of an “EFI system partition”. There is a important distinction here.
All this meant I could clone and play around with bootrec and bcdedit all day long, but it wasn’t going to solve my problem. I kept getting Inaccessible Boot Device errors, the bootrec and bcdedit commands didn’t find my Windows installation, and changing drive letters with diskpart didn’t do anything either. So what did enable me to clone clone Windows 10 from SATA SSD to M.2 SSD? I had to upgrade to a UEFI Windows 10 installation, with a GPT partition style! Fortunately, that’s not as hard as it sounds.
Preparations: backup and unplug other drives
First of all, the mandatory disclaimer. Commands in this post have the potential to ruin your installation. If there’s anything important on your drives, make a backup. I’m not to blame if you lose data.
Next up, unplug other drives. I have a 6TB WD Red drive in there as well, so I unplugged that to make sure I wasn’t going to accidentally format it. Leave the PC cover off, because you might be unplugging and connecting drives a few times.
It also helps if you have another system/laptop and a few 4-8GB USB sticks nearby, so you can create a few tools that will help along the way. I created a Windows 10 Recovery Drive and (on advice of a dear friend), created a CloneZilla USB stick.
A quick check to see if this post applies to your situation is to open disk manager (right-click the Windows “start” button, choose disk management). Locate your old SATA SSD drive, right click the drive and choose properties. Navigate to the volumes tab. In the Partition style field, you should see Master Boot Record (MBR). If you already see GUID Partition Table (GPT), this fix might not apply to you. Do continue reading if your curious though… 😉
Convert from MBR to GPT
A UEFI system will only boot from a GPT drive. So I had to convert my existing SATA SSD that housed my Windows 10 installation from MBR to GPT. Fortunately, with Windows 10 Creators Edition, that’s fairly simple. Open up the Windows Settings, go to Updates & Settings, select Recovery. Find Advanced startup, and restart your system. This will cause your Windows 10 system to reboot into the advanced startup mode, which (among other options) gives you a command prompt.

Once rebooted, navigate through the options until you get a command prompt. In there, run diskpart to verify the correct drive number:

In this screenshot, you can see that Disk 0 is my old 500GB SATA SSD and Disk 1 is my new 1TB NVMe M.2 SSD. The old SSD is not GPT partitioned, the new SSD is indeed GPT style (because I played around with it during troubleshooting).
So we need to convert disk 0. Exit diskpart, and run the following command: mbr2gpt /validate

Check two things: that the command is pointing to the right drive, and that the validation completes successfully. If it doesn’t point to the right disk immediately, you can adjust the command to mbr2gpt /validate /disk:0 to force it to run on disk 0. Of course, substitute the disk number for your own configuration.
If this all works, convert the drive with mbr2gpt /convert (or mbr2gpt /convert /disk:0):

Check for errors (hopefully, none). What this mbr2gpt does (Microsoft KB article) is:
- Change the partitioning style to GPT
- Create a new EFI system partition
- Create new boot files in this new EFI system partition. This is the key thing that will ultimately allow you to boot from the M.2 drive and avoid the boot device inaccessible error!
Afterwards, run diskpart again to verify the partition style has indeed changed to GPT. Mine has, so we are ready to continue. Exit out of the command line interface and power down your system. Do not just reboot, because we need to switch to UEFI mode.
Change Legacy BIOS mode to UEFI
Power the system back on again and enter the BIOS. Each BIOS is different, so check your manual for your specific procedure. In my Gigabyte BIOS, it looks like this:

The left is MBR, the right is UEFI. I could have left CSM Support enabled and manually toggled the boot device to UEFI, but Windows 10 doesn’t require CSM Support so I disabled it entirely.
Save your settings and exit the BIOS. You should now cleanly boot into your old Windows 10 installation from your old SATA SSD. Verify all your files are still there, maybe even reboot a second time to verify everything is working as intended. Once you’re happy you haven’t broken anything, it’s time to FINALLY clone Windows 10 from SATA SSD to M.2 SSD!
Cloning your SATA SSD to the M.2 SSD
To clone the old SATA SSD to the M.2 SSD, you can use a multitude of tools. Macrium Reflex and Clonezilla are both freeware; Macrium has a nice GUI, Clonezilla is a little bit more oldskool. On my final clone I used clonezilla. Mostly because it’s a bit faster, but also because my Windows 10 install is completely shut down during the clone. Pick whichever you like.
Alright, here we go! pic.twitter.com/mRFUcvV60k
— Jon Klaus (@JonKlaus) March 22, 2019
Once the clone is completed, power down your system. You want to unplug your old SATA SSD, as having two boot disks with identical Windows installations could have pretty spectacular results. And not in a positive sense!
Once the SATA SSD is unplugged, power the system back on again. If needed, change the BIOS settings to boot from the NVMe M.2 SSD. If you are lucky, that installation might boot straight away. In my case, I was back to the dreaded Inaccessible Boot Device blue screen of death (BSOD). Let the PC loop through this blue screen routine for three times, after which it will automatically boot into the Advanced Startup settings to help you fix things. Navigate to the Command Line Prompt again; all the other troubleshooting options didn’t do much in my case.
Even though the MBR2GPT command already recreated the boot files, they will need to be changed again due to the disk clone. What we are going to do now is recreate the boot files manually with the bcdboot command. First, run the diskpart command again to verify drive letters:

In my case, C is the Windows 10 installation (check the 464GB size) and E is the EFI system partition (473MB in size). This is important for the next command.
Now, exit out of diskpart and run the following command: bcdboot c:\windows /s e: /f UEFI
![]()
This creates new boot files pointing to your C:\windows installation, deposits them on the E: drive (which is the EFI System partition), and ensures it’s in the UEFI format. Pretty much everything that I covered earlier in the post. Alright! Exit the command line interface again, and reboot. No need to power down now, since the BIOS is already in UEFI mode and the NVMe M.2 SSD is the only device attached. The system should now start your Windows 10 installation cleanly, although the first boot might take a second or two longer.
Actually, while typing this, E: might not be the right partition in this case, as it’s the OEM partition (see partition sizes in the pictures below). Most likely you will not have to use the /s and /f switches in the bcdboot command; try for yourself. Nevertheless, it worked!
Resize your partition
Wait, we’re not there yet! My SATA SSD was only 500GB, and the new M.2 one is 1TB. So this is wrong:

For this last step, it’s best to use AOMEI Partition Assistant. This is because, as you can see in the disk layout, the OEM partition is right next up to the C: drive. This blocks any expansions of said C: drive.

What we’re going to do is move the OEM partition to the far right, and extend the C: volume.

If you click proceed, AOMEI Partition Assistant will boot into a Windows PE environment, perform the necessary actions and return you to Windows 10. Check the new capacity…

Voila, you’re done! Clone Windows 10 from SATA SSD to M.2 SSD succeeded!
Update 02-2021: People commented on this post with various suggestions, alterations or other advice if this manual does not 100% fit your case. Have a look at them at the bottom of this page!
Now, for the WD_Black SN750 NVMe M.2 SSD speeds…
Well, see for yourself 😉

Again, a few disclaimers, before the entire benchmarking internet falls on top of me. For the first half of the benchmark, my system was still half loading and synchronizing files. Plus it’s still an old Windows 10 install, so far from optimized. For one, my NVMe drivers are still Windows default, which might affect speed. Also, not every motherboard is the same. I’ve got a 4-lane PCIe 3.0 bus, so that’s good, but some other boards might be quicker. Nevertheless, please take the numbers in this benchmark with not just a grain of salt, but a truck full of salt. They are mostly for “wow, this is much quicker than SATA-600!”-purposes.
I myself am pretty happy with the speeds. Over 3GB/s sequential read, with over 2.2GB/s sequential write. Random throughputs ranging from 100.000 to 300.000+ IOps. In real life: the system feels a fair bit more responsive compared to the ol’ SATA SSD. Job done!
[Disclaimer: Western Digital gave me the 1TB WD Black SN750 NVMe M.2 SSD at Storage Field Day 18. They did not request anything in return. The sole reason I wrote this post is because it took a frustrating amount of time to clone my OS to the new M.2 SSD, and I want to avoid other people from going through the same ordeal.]
 В этой инструкции пошагово о том, как исправить ошибку INACCESSIBLE_BOOT_DEVICE при загрузке Windows 10 в разных ситуациях — после сброса системы, обновления БИОС, подключения другого жесткого диска или SSD (или переносе ОС с одного на другой диск), изменения структуры разделов на диске и в других ситуациях. Есть очень похожая ошибка: синий экран с обозначением ошибки NTFS_FILE_SYSTEM, она может решаться теми же способами.
Начну с первого, что следует проверить и попробовать в этой ситуации, прежде чем пробовать исправить ошибку другими способами: отключите все дополнительные накопители (включая карты памяти и флешки) от компьютера, а также убедитесь, что ваш системный диск стоит первым в очереди загрузки в BIOS или UEFI (причем для UEFI это может быть даже не первый жесткий диск, а пункт Windows Boot Manager) и попробуйте перезагрузить компьютер. Дополнительная инструкция по проблемам загрузки новой ОС — Не запускается Windows 10.
Также, если вы что-то подключали, чистили или делали подобные действия внутри вашего ПК или ноутбука, обязательно проверьте все подключения жестких дисков и SSD к питанию и SATA интерфейсам, иногда также может помочь переподключение диска к другому SATA порту.
INACCESSIBLE_BOOT_DEVICE после сброса Windows 10 или установки обновлений
Один из сравнительно простых для исправления вариантов появления ошибки INACCESSIBLE_BOOT_DEVICE — после сброса Windows 10 в исходное состояние или же после установки обновлений системы.
В этом случае можно попробовать достаточно простой вариант решения — на экране «Компьютер запущен некорректно», который обычно появляется вслед за сообщением с указанным текстом после сбора информации об ошибки, нажмите кнопку «Дополнительные параметры».

После этого выберите «Поиск и устранение неисправностей» — «Параметры загрузки» и нажмите кнопку «Перезагрузить». В результате компьютер перезагрузится с предложением запустить компьютер в различных вариантах, выберите пункт 4, нажав клавишу F4 (или просто 4) — Безопасный режим Windows 10.

После того, как компьютер загрузится в безопасном режиме. Просто снова перезагрузите его через Пуск — Завершение работы — Перезагрузка. В описываемом случае возникновения проблемы это чаще всего помогает.
Также в дополнительных параметрах среды восстановления присутствует пункт «Восстановление при загрузке» — удивительным образом, в Windows 10 он порой умудряется решить проблемы с загрузкой даже в сравнительно непростых ситуациях. Обязательно попробуйте, если предыдущий вариант не помог.
Windows 10 перестала запускаться после обновления БИОС или сбоя питания
Следующий, часто встречающийся вариант ошибки запуска Windows 10 INACCESSIBLE_BOOT_DEVICE — сбой настроек БИОС (UEFI), имеющих отношение к режиму работы SATA накопителей. Особенно часто проявляется при сбоях питания или после обновления БИОС, а также в тех случаях, когда у вас села батарейка на материнской плате (что приводит к самопроизвольному сбросу настроек).
Если у вас есть основания предполагать, что именно это послужило причиной проблемы, зайдите в БИОС (см. Как зайти в БИОС и UEFI Windows 10) вашего компьютера или ноутбука и в разделе настройки SATA-устройств, попробуйте поменять режим работы: если там установлено IDE, включите AHCI и наоборот. После этого сохраните настройки БИОС и перезагрузите компьютер.
Диск был поврежден или изменилась структура разделов на диске
Сама по себе ошибка INACCESSIBLE_BOOT_DEVICE говорит о том, что загрузчик Windows 10 не нашел или не смог получить доступ к устройству (диску) с системой. Это может происходить вследствие ошибок файловой системы или даже физических проблемах с диском, а также вследствие изменения структуры его разделов (т.е. если, например, вы каким-то образом разбивали диск уже при установленной системе с помощью Acronis или чего-то еще).
И в том и в другом случае вам следует загрузиться в среде восстановления Windows 10. Если у вас есть возможность запустить «Дополнительные параметры» после экрана с ошибкой, откройте эти параметры (это и есть среда восстановления).
Если такой возможности нет, используйте диск восстановления или загрузочную флешку (диск) с Windows 10 для запуска среды восстановления с них (если таковые отсутствуют, их можно сделать на другом компьютере: Создание загрузочной флешки Windows 10). Подробно о том, как использовать установочный накопитель для запуска среды восстановления: Диск восстановления Windows 10.
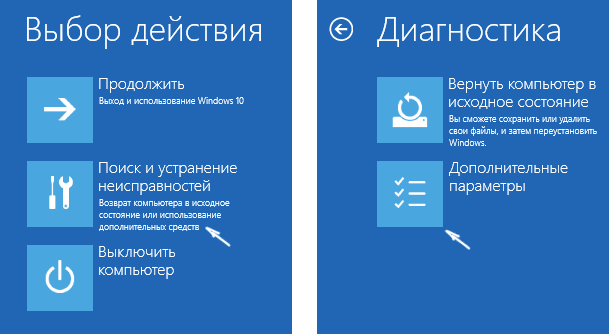
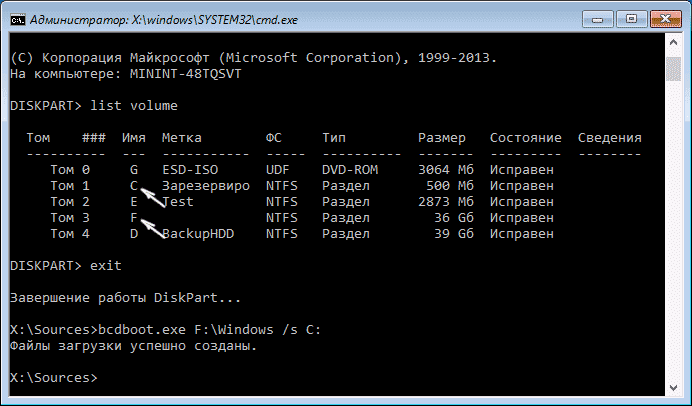
В среде восстановления перейдите к «Поиск и устранение неисправностей» — «Дополнительные параметры» — «Командная строка». Следующий шаг — узнать букву системного раздела, которая на данном этапе, вероятнее всего, будет не C. Для этого в командной строке введите:
- diskpart
- list volume — после выполнения этой команды обратите внимание на Имя тома с Windows, это и есть нужная нам буква раздела. Также стоит запомнить имя раздела с загрузчиком — зарезервированного системой (или EFI-раздела), он еще пригодится. В моем примере будет использоваться диск C: и E: соответственно, у вас могут быть другие буквы.
- exit
Теперь, если есть подозрения, что диск был поврежден, запустите команду chkdsk C: /r (здесь C — буква вашего системного диска, которая может быть другой) нажмите Enter и ожидайте завершения ее выполнения (может затянуться надолго). Если ошибки будут найдены, они будут исправлены автоматически.
Следующий вариант — на тот случай, если вы предполагаете, что ошибка INACCESSIBLE_BOOT_DEVICE может быть вызвана вашими действиями по созданию и изменению разделов на диске. В этой ситуации используйте команду bcdboot.exe C:\Windows /s E: (где C — раздел с Windows, который мы определили ранее, а E — раздел с загрузчиком).
После выполнения команды попробуйте перезагрузить компьютер снова в обычном режиме.
Среди дополнительных способов, предложенных в комментариях — при возникновении проблемы при переключении режимов AHCI/IDE предварительно удалить драйвер контроллера жесткого диска в диспетчере устройств. Возможно, в этом контексте будет полезно Как включить режим AHCI в Windows 10.
Если ни один способ исправить ошибку INACCESSIBLE_BOOT_DEVICE не помогает
Если же ни один из описанных способов не помог исправить ошибку и Windows 10 все так же не запускается, на данный момент времени могу рекомендовать лишь переустановку системы или сброс с использованием установочной флешки или диска. Для выполнения сброса в данном случае, используйте следующий путь:
- Загрузитесь с диска или флешки Windows 10, содержащей ту же редакцию ОС, что у вас установлена (см. Как поставить загрузку с флешки в БИОС).
- После экрана выбора языка установки, на экране с кнопкой «Установить» внизу слева выберите пункт «Восстановление системы».
- После загрузки среды восстановления нажмите «Поиск и устранение неисправностей» — «Вернуть компьютер в исходное состояние».
- Следуйте указаниям на экране. Подробнее про сброс Windows 10.
К сожалению, в том случае, когда рассматриваемая в данном руководстве ошибка имеет своей причиной проблемы с жестким диском или разделами на нем, при попытке выполнить откат системы с сохранением данных, вам могут сообщить о том, что сделать этого нельзя, только с их удалением.
Если данные на жестком диске критичны для вас, то желательно позаботиться об их сохранности, например, переписав куда-либо (если разделы доступны) на другом компьютере или, загрузившись с какого-либо Live накопителя (например: Запуск Windows 10 с флешки без установки на компьютер).
You should upgrade or use an alternative browser.
-
#1
I’ve spent the last 7 days trying to clone my SATA SSD to my new NvMe SSD in the hours after work.
So my problem is:
My cloned NvMe won’t boot, it throws BSOD «INACCESSIBLE_BOOT_DEVICE».
A fresh install works, but I really need it to be cloned for various reasons.
Now, the real thing is, I’ve tried a lot of possibilities and fixes all over the place.
Things I tried:
- Cloning with various different software
- Cleaning drivers before clone
- Removing peripherals before cloning
- Migrating OS through paid AOMEI partition assistant(I paid U$50 just to do this)
- Cloning by sector
- Repairing boot
- Fixing BCD(this one i tried a lot, manually setting data, copying, repairing)
- BCD doctor
- Various combinations of cloning
- Various combinations of BCD fixing in command prompt, and thrid party software
- Using diskpart to recrate the EFI partition
- Various bootable boot repair software
- The steps in this thread: https://forums.tomshardware.com/thr…zMvSTT02XZsFxh-KeJHyCNYmDjQshCEeb3IgiSreQO_J8
- A couple more things that I don’t remember
OK, so my specs are:
Currently working: SATA SSD Sandisk A400 240GB
New NvMe I’m trying to boot into: WD WDS100T2B0C-00PXH0
I have reasons to suspect the problem is in my SATA SSD’s system BCD, but I don’t have a lot of knowledge in this area obviously. As far as I can tell,
my BCD is a mess, but it works in the old SSD.
I’ll be forever in debt ofthe good souls that will(if possible) make this work.
I really need this clone.
I’d rather sell the new NvMe SSD than do a clean windows 10 install.
I have my reasons, but I won’t let go of my current install.
Last edited:
-
M
Mr.Spock
install the NVMe and remove the original SATA, boot off the USB — restore from the external.
Since your SSD is a WD you can use their OEM Acronis to do this (dl from their site)
Well, the source is booting up right, I’m currently using it right now.
But you’re right, I probably need to fix it’s BCD, but I’m not quite sure how to.
Tried a couple fixes but none made a differencePS: I used AOMEI Boot repair tool in source before cloning
![]()
-
- Mar 16, 2013
-
- 166,778
-
- 15,641
-
- 184,590
-
#2
-
#3
BIOS ver:
E7A39AMS.2NR
What motherboard is this going in?
![]()
-
- Mar 16, 2013
-
- 166,778
-
- 15,641
-
- 184,590
-
#4
-
#5
When trying to boot after the clone, is this new drive the only one in the system?
Yes it is.
At a couple of cloning tries I got BSOD 0xc00000e but in the majority of the tries it’s «INACCESSIBLE_BOOT_DEVICE».
One of the reasons for me to believe it’s a BCD problem, is the fact that the currently working SATA SSD has 2 windows boot manager entries, one of them throws BSOD the other one works.
In the new NvMe both throw inaccessible boot device error
![]()
-
- Mar 16, 2013
-
- 166,778
-
- 15,641
-
- 184,590
-
#6
Yes it is.
At a couple of cloning tries I got BSOD 0xc00000e but in the majority of the tries it’s «INACCESSIBLE_BOOT_DEVICE».
One of the reasons for me to believe it’s a BCD problem, is the fact that the currently working SATA SSD has 2 windows boot manager entries, one of them throws BSOD the other one works.In the new NvMe both throw inaccessible boot device error
Cloning a config that doesn’t work quite right just results in a clone that doesn’t work quite right.
You need to fix the source first.
-
#7
Cloning a config that doesn’t work quite right just results in a clone that doesn’t work quite right.You need to fix the source first.
Well, the source is booting up right, I’m currently using it right now.
But you’re right, I probably need to fix it’s BCD, but I’m not quite sure how to.
Tried a couple fixes but none made a difference
PS: I used AOMEI Boot repair tool in source before cloning
Last edited:
-
- Dec 8, 2019
-
- 1,295
-
- 164
-
- 6,090
-
#8
install the NVMe and remove the original SATA, boot off the USB — restore from the external.
Since your SSD is a WD you can use their OEM Acronis to do this (dl from their site)
Well, the source is booting up right, I’m currently using it right now.
But you’re right, I probably need to fix it’s BCD, but I’m not quite sure how to.
Tried a couple fixes but none made a differencePS: I used AOMEI Boot repair tool in source before cloning
Similar threads
- Advertising
- Cookies Policies
- Privacy
- Term & Conditions