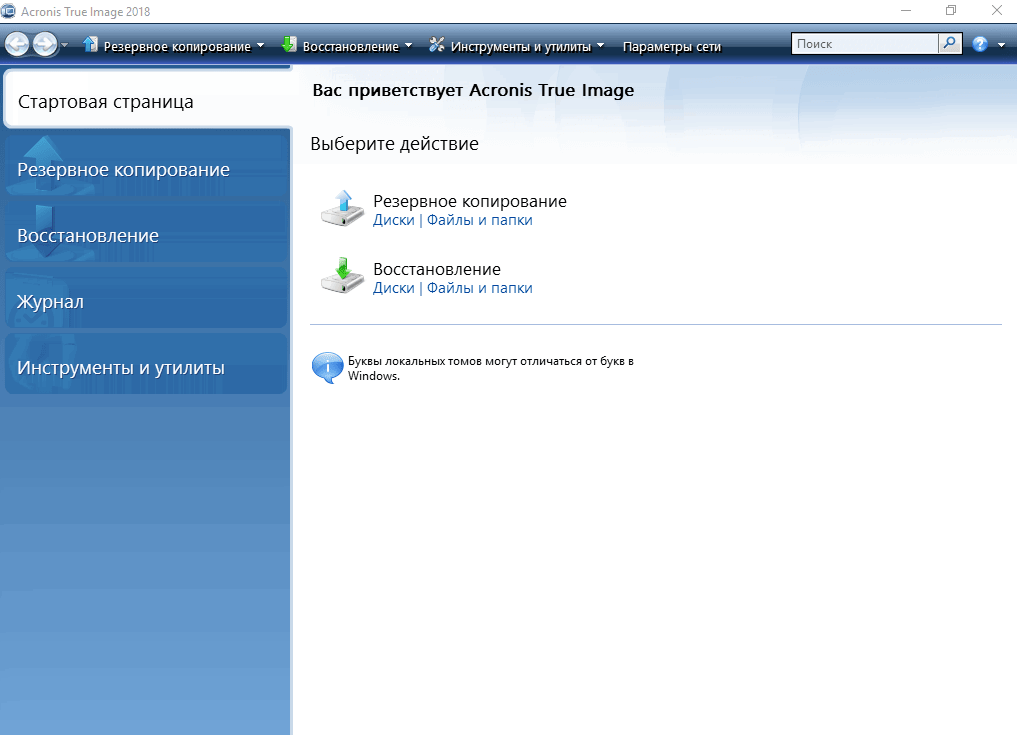
Здравствуйте, господа! Это инструкция по установке Windows 10 на iMac 2011 года. Ввиду окончания поддержки, актуальность этих моноблоков сходит на нет. А это значит, что свежие программы не поставить, а скоро так вообще — никакие 🤨
Статья основана на опыте наших инженеров с iMac 21.5″ 2011, а инструкция рассчитана на уверенного пользователя. Скорее всего точная модель iMac роли не играет, главное 2011 год выпуска.
Главные проблемы
- Продать его выгодно уже не выйдет. Ок! Сделаем Upgrade и он снова будет в строю. Хорошо, но какой смысл в быстрой работе без программ?
- Свежую macOS официально не поставишь. Ок! Пропатчим установщик macOS и установим систему насильно, но драйверов на видеокарты (у нас 6700M) AMD Radeon этих лет нет и, видимо, не предвидится. Вывод: через костыли ставить macOS смысла нет;
- Windows 10 официально не поддерживается (только iMac с 2012 года). Ок! Установить таки винду можно, но BootCamp (драйвера Apple) не существует для десятки, но через командную строку можно поставить «родной» BootCamp;
- Нет звука в Windows 10. Никакие драйвера ситуацию не выправляют, так как звуковое устройство неправильно определяется в системе, либо вообще отсутствует в списках. Эта печаль вытекает из проблемы совместимости в режиме EFI (UEFI на обычных ПК). Беда оказалась одна из самых сложных и с ней борются владельцы iMac 2011 года по всему миру, а на GitHub даже есть отдельная ветка! Адекватного лекарства не было, пока наши мастера не разгадали загадку! 😎
P.S. Скорее всего мы не первые, но внятной инструкции не нашли.
Как мы побороли гадость со звуком
Собака оказалась зарыта в инициализации устройств прошивкой EFI (BIOS iMac). iMac умеет грузиться в обычный и режим совместимости. Кстати, для Windows 10 «родной» режим тоже EFI\UEFI и загрузка с диска с таблицей GPT. Но так как в обычном режиме устройства определяются неправильно, надо заставить iMac установить Windows в режиме совместимости на диск с MBR. А iMac упорно грузится через EFI.
Мы прошли первый этап установки десятки на виртуальной машине c простым BIOS и MBR-диском. Не дав начаться после перезагрузки второму этапу (установка основных устройств), сняли образ с виртуалки и вуаля — осталось лишь продолжить установку на реальном iMac 🤓
Upgrade
Чтобы iMac не тупил на Windows 10, как последняя скотина, мы заменили старый и медленный HDD диск на новый SanDisk SSD Plus на 480 Гб. Также расширили оперативную память до 16 гигов. Мини-апгрейд 😊
А как же Windows 7?
Возможность официально установить Windows 7 есть, но её поддержка закончилась в начале 2020 года, а это значит тихо-мирно кончатся и программы, как это было с Windows XP. Ставить хорошую, но заведомо устаревшую систему 2009 года рождения, не хотелось бы.
Установка Windows 10
Стандартно Windows 10 ставится с флешки, но это не наш случай.
Простой метод
Установка Windows 10 с DVD-диска. Загрузка с болванки заставит iMac использовать Legacy BIOS Boot Mode. К сожалению, по каким-то причинам работает 50 на 50. Если у вас таки получился этот трюк, то переходите сразу к установке BootCamp 😏
Второй метод. Как делали мы
Мы подготовили готовый образ с Windows 10 Home для iMac 2011. Система чистая неломаная с сайта Microsoft с обновлениями по 2020 год.
Качаем с нашего яндекс-google диска:
- Образ Windows 10 для iMac 2011
- BootCamp для iMac 2011
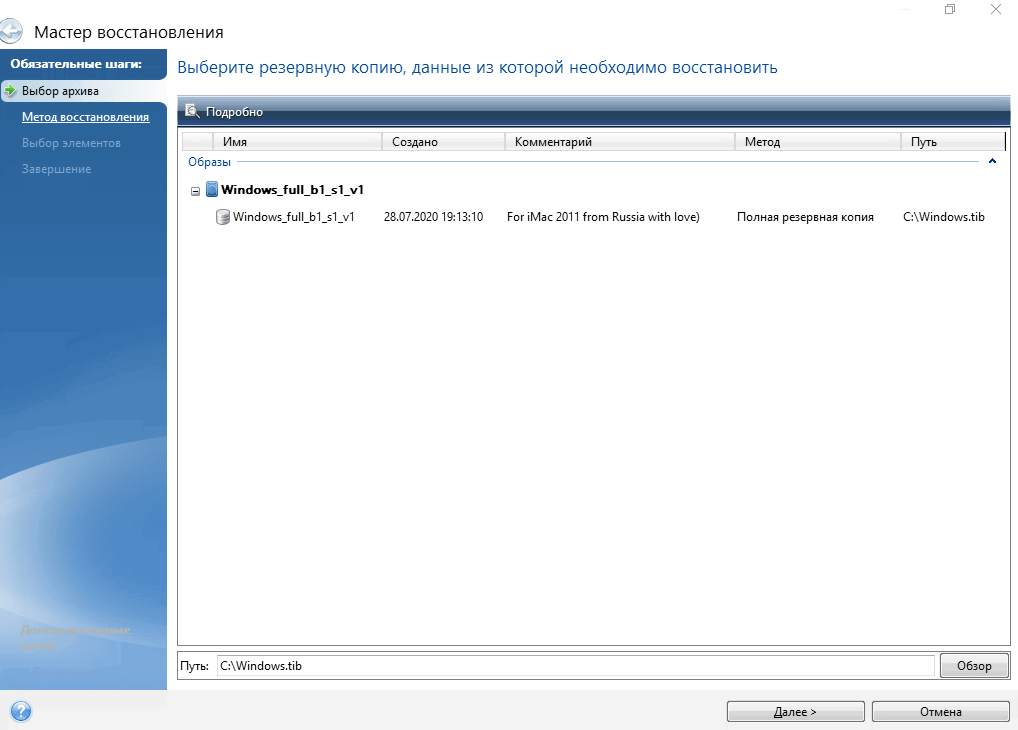
Образ необходимо распаковать на диск iMac через прогу Acronis True Image (образ создан в версии 2018 года). Проще всего это сделать, загрузившись в какой-нибудь LiveCD\LiveUSB. К примеру, WinPE 10-8 Sergei Strelec содержит всё необходимое и грузится с флешки.
Если вы тоже делаете апгрейд и ставите SSD, то образ можно залить заранее (при наличии ПК) и пропустить часть с LiveCD 😉
Важно!
После запуска LiveCD на iMac, в диспетчере дисков убедитесь, что диск со схемой разделов MBR, а не GPT. Заходим в свойства диска -> Тома -> Стиль раздела. Если тут GPT, то жмём правой кнопкой на диск и конвертируем его в MBR. Можно использовать любую другую прогу для работы с дисками.
Инструкция по развёртыванию образа
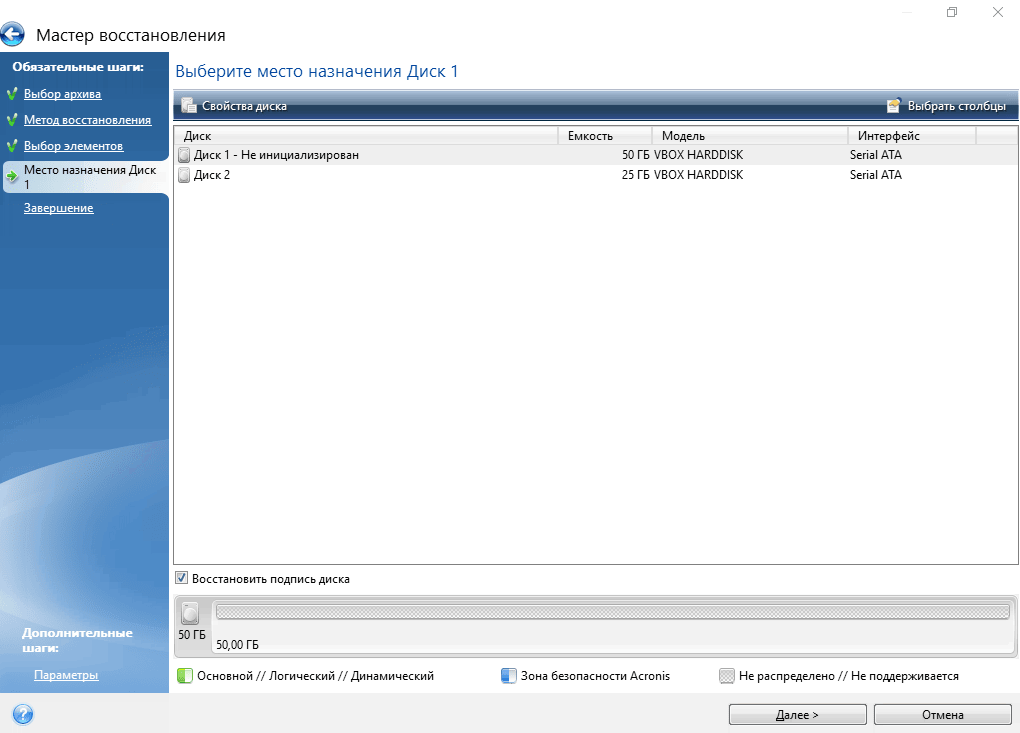
- В Acronis True Image выбираем действие «Восстановление -> Диски»

- Выбираем наш образ-архив
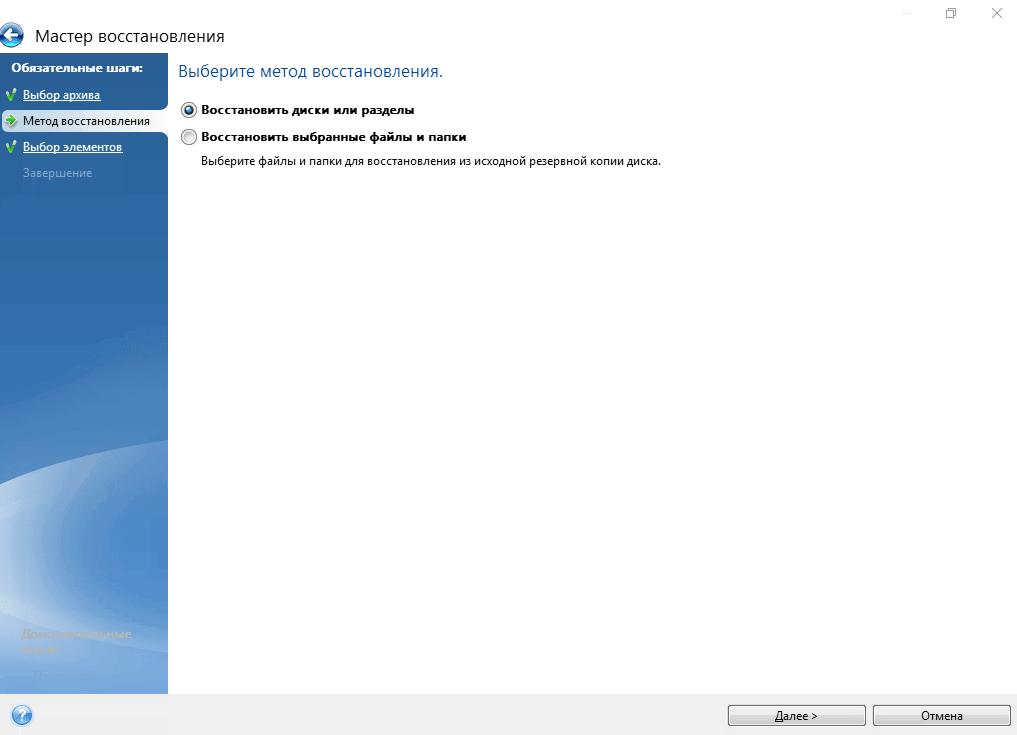
- Метод восстановления «Восстановить диски и разделы»
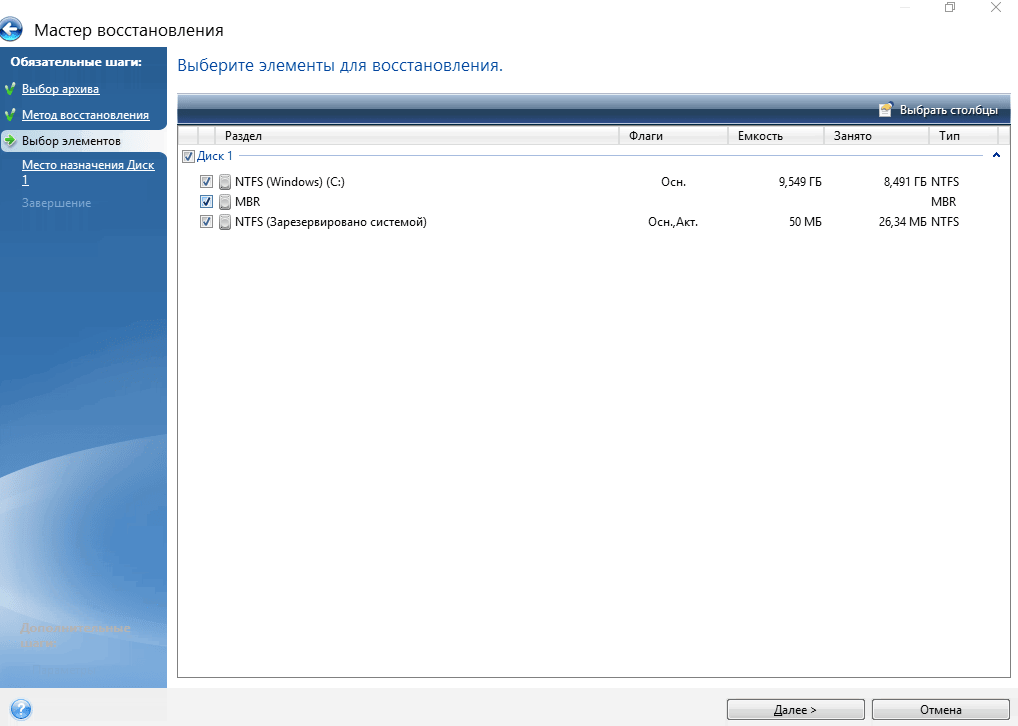
- Ставим галочку на «Диск 1», чтобы выбрались все галочки
- Выбираем целевой диск iMac. В нашем случае это SSD. Скриншот для примера
- Проверяем, всё ли правильно выбрали и жмём «Приступить»
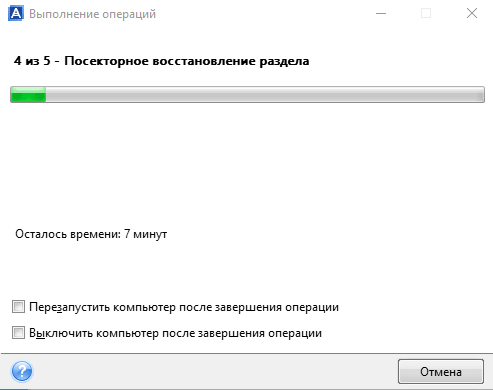
- Ждём окончания операции. Обычно 5-10 минут 🤓

Далее убеждаемся в диспетчере дисков, что диск не изменился на GPT, должен быть MBR! Объединяем диск С и свободное пространство через пункт меню «Расширить том…»

В правой колонке выбираем всё свободное пространство и жмём далее
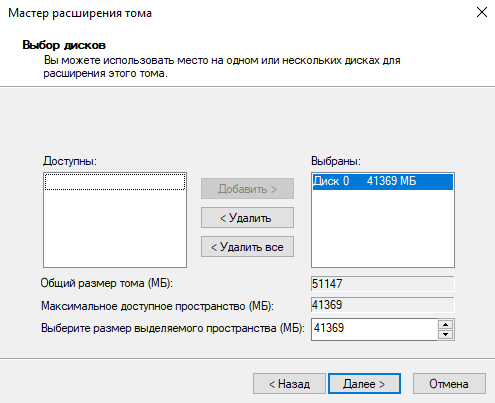
На диске должно остаться два раздела, как на картинке:

Выключаем iMac и отключаем его от электросети на 30 секунд. Отключаем все носители. Включаем iMac. Должна начаться (продолжиться) установка Windows 10.
Дожидаемся окончания установки Windows, всё как обычно.
Важное дополнение о разделе GPT
Многие столкнулись с проблемой, когда после перезагрузки диск превращается формат GPT и установка проходит неправильно. Один из посетителей блога поборол эту гадость и скинул нам видео в группу ВК, за что ему огромная благодарность 😘
Установка BootCamp
BootCamp устанавливается через командную строку. Распаковываем архив в удобное место, к примеру на диск С. Запускаем командную строку от имени администратора и стартуем файл по пути:
C:\BootCamp\Drivers\Apple\BootCamp.msi
Далее последует обычная установка драйверов и предложение перезагрузить iMac. Первый запуск может быть долгим! Если в течение 5 минут красуется чёрный экран, то выключите-включите iMac. Такое может быть.
Подробная инструкция по установке BootCamp
При успешном исходе, звук, регулировка яркости и горячие клавиши на клавиатуре должны работать.
В видео присутствует мат, а ещё оно вертикальное, простите 😳
Wi-Fi и звук! BlueTooth мышь и клавиатура, горячие клавиши и регулировка яркости
Косяки
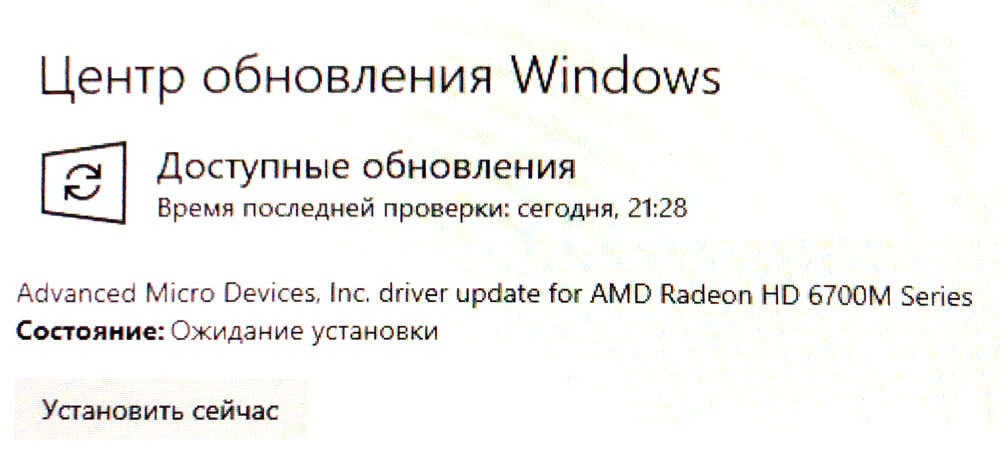
- При первом обновлении Windows скорее всего обновит драйвера на видеоадаптер, в итоге экран может потемнеть и не вернуться обратно.
Подождите 10 минут. Если iMac не отдуплится, то жёcтко выключите-включите его. В дальнейшем таких траблов замечено не было 😋 - Если у вас беспроводные мышь и клавиатура от Apple, то Bluetooth выключать нельзя! Отвалятся и придётся искать проводную мышь, чтобы включить Bluetooth). Изредка мышь и клава глючат. Как вылечить мы не нашли, с чем связано непонятно, происходит редко и жить не мешает
Нюансы
- Не только Apple, но и Microsoft нормально не поддерживают устройства, выпущенные в 2011 году. Это касается не только iMac, но и обычных компов и ноутбуков. На них можно встретить отвал тачпада или USB портов, отсутствие звука, глюки видеокарты и т.п. неприятности. Это связано с переходом на новый тип прошивки в 2012 году — UEFI;
- Microsoft может в любой момент выпустить обновление и всё обгадить весь мёд;
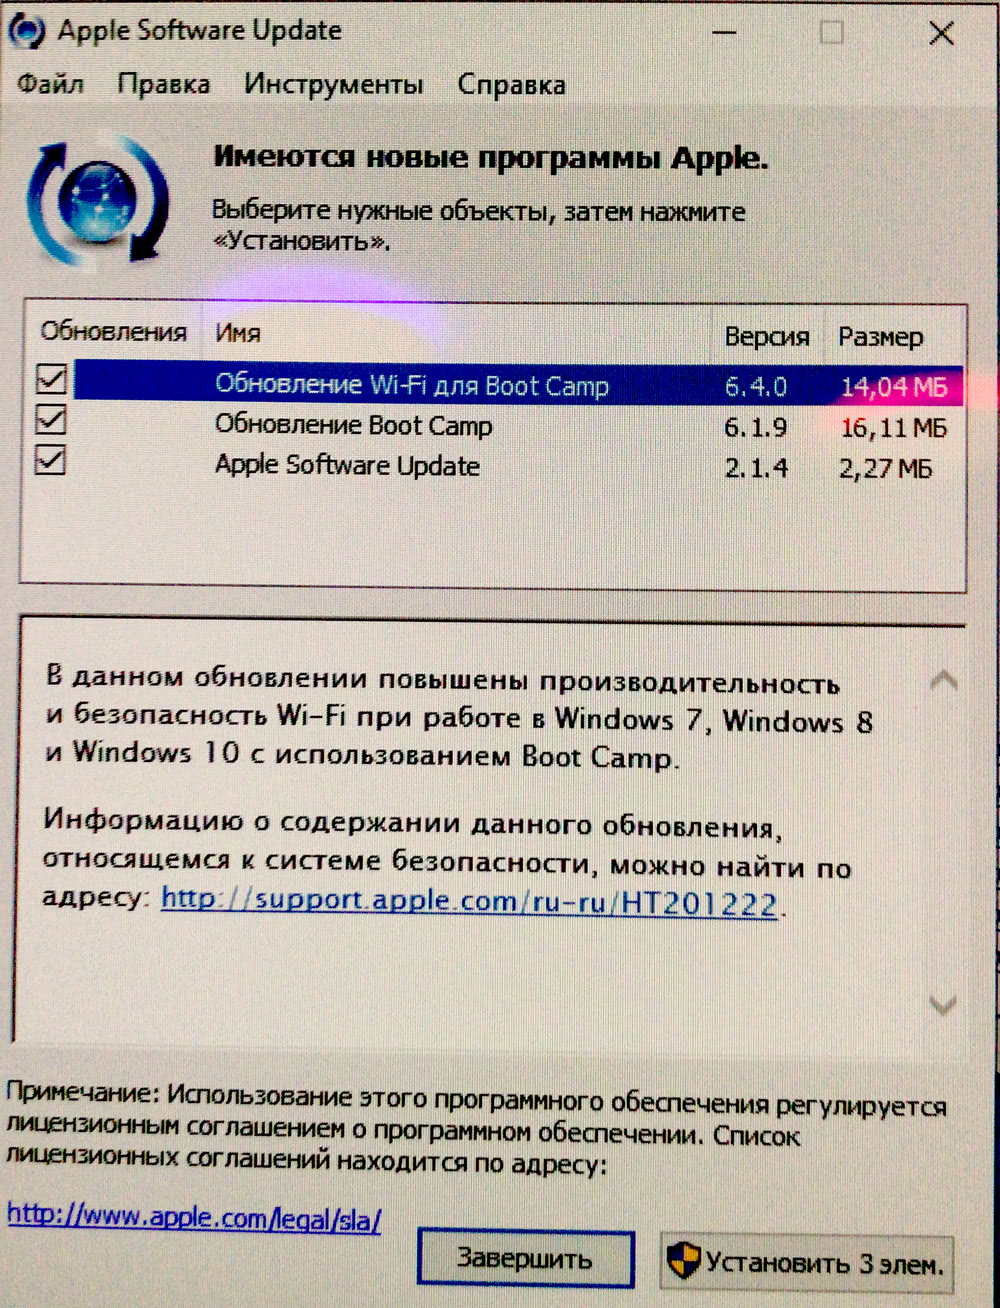
- В состав BootCamp входит утилита Apple Software Update. Через неё обновляются ПО и драйвера от Apple. Прога нашла обновления, но мы не рискнули 🙄
Итого
Считаем, что Upgrade и установка свежей Windows 10 — единственно верное решение, если хотите продлить жизнь iMac ещё на 3-5 лет. Да, это не новый iMac, но работает шустро и не тупит, а цена затеи несоизмеримо меньше 😊
Можем всё сделать за вас! 😎 Выезд на дом или в сервисе -> Установка Windows на Mac
Apple has released support for bootcamping Windows 10, but only on 2012 Macs and later. Despite not being supported. it is possible to install Windows 10 on earlier iMacs and it seems to run quite well.
IMPORTANT: Unplug all external and physical hard drives (where possible) that you won’t be installing to to avoid accidentally erasing them. Also make note of which drives and partitions remain (e.g. System and Storage hard drives), and be super careful to not erase the wrong one.
RECOVERY: If you nuke your machine, restore your time machine backup. Instructions here.
Requirements
- A mid-2011 iMac or similar running OSX El Capitan
- An 8GB or larger USB drive
- An ISO containing Windows 10 (I used Windows 10 Enterprise)
- 50GB free disk space, 100GB recommended
Step 1: Disable El Capitan’s System Integrity Protection
El Capitan ships with a new OS X feature: System Integrity Protection (SIP), also known as «rootless» mode. This reduces the attack surface for malware that relies on modifying system files by preventing any user, whether with system administrator («root») privileges or not from modifying a number of operating system directories and files.
It is necessary to disable OSX’s System Integrity Protection so you can modify the Bootcamp Utility in the next step.
- Restart your Mac.
- Before OS X starts up, hold down Command-R and keep it held down until you see an Apple icon and a progress bar. Release. This boots you into Recovery.
- From the Utilities menu, select Terminal.
- At the prompt type exactly the following and then press Return:
csrutil disable - Terminal should display a message that SIP was disabled.
- From the menu, select Restart.
Once you have finished installing Windows you should enable SIP again by following the same steps but run csrutil enable instead.
Step 2: Modify Bootcamp to allow creation of a bootable USB
For some reason Apple decided that if your Mac has an optical drive, there could be no reason you need to Bootcamp off a USB. If you’re like me, you haven’t touched an optical disk in a few years and prefer the ease and speed of using a USB flash drive instead.
- Find out your Macs Model Identifier and Boot ROM Version:
- Open Terminal and run
system_profiler SPHardwareDataType. Note down the values. - My mid-2011’s Model Identifier was «iMac12,2» and the Boot ROM Version was «IM121.0047.B23».
- Open terminal and navigate to /Applications/Utilities/Boot Camp Assistant.app/Contents
- Change directory:
cd /Applications/Utilities/Boot Camp Assistant.app/Contents - Show files in directory:
ls
- The file we are going to edit is the Info.plist file.
- Make a backup of this file by running:
sudo cp Info.plist Info.plist.bak - You will need to enter your OSX user account password.
- If you get the error saying cp: Info.plist.bak: Operation not permitted, SIP is still enabled, please refer to step 1.
- Open the Info.plist in your favorite text editor, to keep this guide simple, I’ll use nano.
sudo nano Info.plist
- You want to edit FOUR things:
- Add your Boot ROM Version to DARequiredROMVersions
- Delete the word «Pre» from UEFIModels and add your Model Identifier
- Delete the word «Pre» from USBBootSupportedModels and add your Model Identifier
- Remove your model from Win7OnlyModels (if it’s there)
- Close and save the file by pressing
Ctrl+xfollowed byyon your keyboard. - The last step is to do a code sign. Boot Camp Assitant will not run if it’s been edited. You need to resign it. Open Terminal (use spotlight to find it) and type this:
sudo codesign -fs - /Applications/Utilities/Boot\ Camp\ Assistant.app- It will probably ask for your password. Then it will say you need to download a developer tool from Apple. Agree to download it. (You don’t need to install the whole X-Code, if it asks.) Once its been installed (it’s automatic), you need to go BACK to Terminal and run that command again. This time it will work.
Step 3: Download the Bootcamp Windows Support Software
This download will contain the Windows drivers you will need to run Windows on your Mac. Windows 10 will install and run without them but not very well and a lot of hardware either won’t work, or won’t work very well until you install the drivers.
- Open Boot Camp Assistant from Applications -> Utilities
- Click continue at the introduction, if you completed step 2 correctly, you should see three options.
- Create a Windows 7 or later version install disk
- Download the latest Windows support software from Apple
- Install Windows 7 or later version
- Choose none of three options, instead:
- From the Actions menu select Download Windows Support Software
- Select your Macs Desktop or Downloads folder as the destination for the download
- The download is 1.35GB so may take a few minutes
Step 4: Create the bootable Windows 10 USB
- Open Boot Camp Assistant from Applications -> Utilities
- Click continue at the introduction, and check the box in Create a Windows 7 or later version install disk. Ensure no other boxes are checked and click continue.
- If you have not already done so, insert the USB flash drive you want to burn the Windows 10 image to. Remember that any data on the USB drive you select will be erased.
- Continue the wizard, selecting the Windows 10 ISO file when prompted.
- After completing the wizard you will have your bootable Windows 10 installer USB.
- Copy the folder you downloaded in in Step 3 containing the Bootcamp Windows Support Software to root of USB flash drive.
Step 5: Create the bootcamp partition
You can do this using the Bootcamp Assistant, but it does reboot and attempt to boot from the optical drive as soon as it completes. I prefer to use the OSX Disk Utility instead.
- Open Disk Utility from Applications -> Utilities
- Choose your internal hard drive and select the Partition button along the top.
- Click the + button and create a new partition by shrinking the existing one.
- Create the new disk with at least 40GB disk space, I would recommend 60GB or higher.
- Name the partition BOOTCAMP and format using MS-DOS (FAT).
- Click Apply, this will take a few minutes, be patient.
Step 6: Delete the Hybrid MBR
During step 5, OSX tried to be helpful by converting our legal GPT disk partition into a hybrid MBR partition, which makes OSX see the disk as GPT and Windows it as MBR. Windows 10 requires a GPT disk when using EFI boot, so we need to revert this change using a tool called GPT fdisk (gdisk).
If this step is not completed you will get this error when installing Windows 10:
Windows cannot be installed to this disk. The selected disk is not of the GPT partition style
To avoid this:
- Download GPT fdisk from its Sourceforge page and install it. You will probably get a warning that it’s not a signed application, if you do open OSX System Preferences -> Security and Privacy -> General and you should see a note down the bottom about the application you just tried to open with an offer to open it again.
- Find the device number for the internal hard disk:
- Open Disk Utility from Applications -> Utilities
- Choose your internal hard drive (not one of the partitions) and note down the Device, it’s probably disk0.
- Open Terminal from Applications -> Utilities
- Launch gdisk on your internal hard disk by running
sudo gdisk /dev/disk0, if your internal hard disk was not disk0 in the previous step, replace disk0 with what it was here. - Type
pto view the partition table to verify you’re working on the correct disk. You should see the BOOTCAMP partition we created in Step 5. If not, typeqto quit without saving your changes and double check the device number. - Type
xto enter the experts’ menu. - Type
nto create a fresh protective MBR. Note that gdisk won’t confirm a change; it’ll just show you a new experts’ prompt. - Type
wto save your changes. You’ll be asked to confirm this action. Do so.
Note this action also requires OSX SIP to be disabled, if you get permission errors, make sure you have completed Step 1.
Step 7: Install Windows
- Reboot your Mac with the bootable Windows 10 Installer USB plugged in.
- Before OS X starts up, just after you hear the startup sound, repeatedly press and hold down the Option (or Alt key if your using a Windows keyboard) for a second or two until you see the boot selection options.
- You should see an option to boot from a USB device labelled «EFI Boot», choose this one.
- The Windows 10 installation will now start, follow the steps, selecting Custom Installation.
- On the screen where you select your partition be careful, ensure you select the «BOOTCAMP» partition you created earlier before proceeding with installation.
- Windows will restart 4 or so times during installation. Be ready to hold down the Options / Alt key after each reboot, but instead of selecting the USB device named «EFI Boot» select the newly created hard disk labelled the «EFI Boot» instead to ensure the installation continues smoothly. This is the same method you will use to choose between booting into OSX or booting into Windows once setup is complete.
- Finish installing Windows until you get to the desktop.
Step 8: Install the Bootcamp Windows Support Software
The Bootcamp Windows Support Software should be on the Windows 10 installer USB you created earlier.
- Open Windows Explorer and go to the USB drive
- Unless you renamed the folder, open WindowsSupport -> Bootcamp -> setup.exe.
- This will install all the required drivers and the bootcamp utility for Windows.
Step 9: Re-Enable El Capitan’s System Integrity Protection
See Step 1.
Issues
The drivers installed as part of the Bootcamp Windows Support Software work well, WiFi, Graphics, External Monitors, Webcams and Bluetooth are all working. Audio was the only immediately noticable issue, though strangely the audio provided through my 2008 Apple Cinema display works without issue.
Mid-2011 iMac Audio Does Not Work
I could not get the iMac built in sound to work on Windows 10, despite the webcam working. I tried a few things that did not work:
- Downloaded and installed Bootcamp 6.
- Tried the Cirrus 4206BCNZ audio drivers for Windows 8 as suggested might work.
As my external Apple Cinema display’s audio was working it was not to much of an issue for me to deal with, but if anyone finds a solution please let me know.
Sources & Acknowledgements
- Dual Booting on an iMac 27″ Mid 2011
- How to modify System Integrity Protection in El Capitan
- Enable Bootcamp to install from usb for OSX
- Windows detects GPT disk as MBR in EFI boot
В сети есть разные способы (например, 1, 2, 3) как установить Windows 10 через bootcamp на старые macbook или imac, но мне все эти танцы не нравятся совсем. Мне не хочется вообще ничего редактировать (по 1 можно почитать как правится Info.plist в программу Boot Camp Assistant), просто заниматься своими делать и время от времени обращать внимание на iMac.
К слову, если вы в лоб установите Windows 10 на старый mac, то как минимум получите не работающий звук или блютус, как максимум — хаотичные BSOD в моём случае (думаю, что из-за не совместимости драйверов).

Способ, который описан более чем краток, наверное, затратен по времени, но работает без проблем и не требует от вас больших усилий.
1. Устанавливаете старую версию MacOS, в моём случае 10.8.5 Mountain Lion. Образ берется с торрентов, потому что восстановление через интернет на старых маках не работает, поскольку версия MacOS для загрузки слишком стара. Флешку делаете загрузочной через DiskMakerX (выберите версию для Mountrain Lion). Запускать старую версию DiskMakerX лучше всего с такой же старой версии MacOS, потому что из Mojave или Catalin программа выдаёт ошибки, которые не лечатся рекомендуемыми действиями и корректно не работает.
2. Устанавливаете Windows 8.1, записав образ на диск. В моём iMac был DVD-привод и так проще, т.к. записать корректно работающую флешку мне не удалось ни разу — iMac через alt просто не видел их все. пробовал разный софт под windows, macos, linux — толку ноль. Разбираться не особо хотелось. Если нет DVD-дисковода, найдите USBшный или же пробуйте мануал как подключить образ винды в MacOS через DaemonTools Lite.
После завершения установки Windows 8.1, устанавливаем драйвера, рекомендуемые Apple — Bootcamp 5.0.5033.
3. Обновляете установленную MacOS 10.8.5 до последней поддерживаемой вашим устройством. В моём случае это High Sierra. Скачиваем по ссылке через Mac App Store, а после того, как обновление завершится устанавливаем все доступные обновления ОС.
4. Загружаем «Помощник по обновления до Windows 10» и следуем инструкциям на экране. После нескольких перезагрузок дело сделано — перед вами работающая Windows 10.
Через «Обновление Windows» в дополнительных обновлениях обновите драйвера, рекомендуюемые Microsoft. У вас останется один не опознанный Bluetooth-контроллер, берите этот драйвер и с помощью 7-zip обновите через диспетчер устройств.


5. Зайдите в Пуск и найдите утилиту обновления программ Apple.
Сначала установите обновление только для bootcamp. после чего установите обновление для остальных компонентов. Всё вместе сразу обновить не получится — будет ошибка.
Если не нравится как работает датчик освещенности, то можно использовать старую утилиту mControl
6. Через утилиту BootCamp в Windows 10 установите загрузку Windows при включении iMac.

-
#1
Hi all,
The following site said that I’ve missed out by just 6 months, that my Mid-2011 iMac CANNOT run Windows 10. I’m wondering if this is an absolute rule or is it one of those recommended performance things?
https://support.apple.com/en-au/HT204990#models
-
#2
I suspect it could get difficult to continue. Apple might not have created the drivers for your specific Mac. And without drivers, something is bound to not work.
-
#4
Yeah, I found this link and it doesn’t sound good! Audio cuts out, to name one problem.
https://gist.github.com/oznu/8796d08d73315483c3b26e79a8e3d350
MS itself has been sunsetting Windows 10 support for hardware lately too. It’s a continuation of the computer software and hardware industry’s policy of forced obsolescence. The best solution is to use a virtual machine like Parallels or VMWare . Instead of relying solely on Apple Bootcamp drivers the VM application developers work to ensure compatibility between the latest releases of Windows, your current MacOS and your Mac hardware.
Last edited:
-
#5
MS itself has been sunsetting Windows 10 support for hardware lately too. It’s a continuation of the computer software and hardware industry’s policy of forced obsolescence. The best solution is to use a virtual machine like Parallels or VMWare . Instead of relying solely on Apple Bootcamp drivers the VM application developers work to ensure compatibility between the latest releases of Windows, your current MacOS and your Mac hardware.
That sounds encouraging. Have you heard of instances where the Mid-2011 actually ran Win 10?
-
#6
That sounds encouraging. Have you heard of instances where the Mid-2011 actually ran Win 10?
Even MacBooks from 2006 run Windows 10
-
#7
Even MacBooks from 2006 run Windows 10
Love it! I’ll have to watch again in the morning when my brain is working.
-
#9
Hi all,
The following site said that I’ve missed out by just 6 months, that my Mid-2011 iMac CANNOT run Windows 10. I’m wondering if this is an absolute rule or is it one of those recommended performance things?
https://support.apple.com/en-au/HT204990#models
It is totally possible and actually quite easy. I don’t know why so many people are having a huge problem doing this but there is no code or special program or anything necessary. Ill make a tutorial based on my experience. Took an hour total on my 2011 imac to install windows 7, upgrade to 10. now It even plays fortnite quite well on respectable settings!
-

Win10-on-2011-iMac.png
1.1 MB · Views: 2,317
-
#10
It is totally possible and actually quite easy. I don’t know why so many people are having a huge problem doing this but there is no code or special program or anything necessary. Ill make a tutorial based on my experience. Took an hour total on my 2011 imac to install windows 7, upgrade to 10. now It even plays fortnite quite well on respectable settings!
Fantastic news! I look forward to your tutorial.
-
#11
Fantastic news! I look forward to your tutorial.
While you are waiting for the tutorial check out the video I made on YouTube. It shows Fortnite being played rather well, exiting out to windows 10, and then booting back to High Sierra, with system into.
-
#12
That sounds encouraging. Have you heard of instances where the Mid-2011 actually ran Win 10?
I’ve heard of people installing Windows 10 on very old PC hardware going back to before 2005 but I’m not sure what computer hardware the latest Win 10 releases support. I use Parallels on my Mac Mini mid-2011 with MacOS High Sierra 10.13.6 and it runs Windows 10 Pro just fine. but it sounds like there might be ways you can install it using bootcamp. I think you can also not use MacOS at all and install and run it natively on older Macs without MacOS like you would any computer but I don’t have details about how to do that.
Last edited:
-
#13
Okay here is the tutorial. keep in mind, this is from my experience with my setup. I was using Mac OS High Sierra.
What you’ll need:
-Windows 7 64bit ISO*
-Blank Single Layer DVD-R*(Cannot be dual layer, or RW)
* — If you already have a retail Windows 7 or burned version, you don’t need the first items
-USB Flash Drive
-Bootcamp Drivers V. 4.0.4033 ( https://support.apple.com/kb/DL1630?viewlocale=en_US&locale=en_US )
-Windows Media Creation tool for Windows 10
Valid Windows 10 Key or VLK (Volume License Key)
VLK will not let you activate Windows 10 but it will allow you to install. A quick websearch will help you.
Step 1
Locate or download your Windows 7 ISO File
Insert your blank media into the SuperDrive
Right click your ISO and select burn image to disc
I selected 4X speed because the machine is older and it helps with ensuring a smooth finished product.
Step 2
Download the proper Bootcamp Driver Package from the link I posted above
Insert your USB Drive, and open Disk Utility
Format USB to FAT32
Take your Bootcamp Driver Package and drag it right onto your USB Drive
Eject USB Drive for later
Step 3
Open your Bootcamp Assistant by simply typing it in Spotlight Search
Click Next
Make sure only the bottom box is checked (Install Windows 7)
You don’t need to download the Bootcamp Drivers because we already have them on our USB
Insert your Windows 7 DVD
Click Next, and select the size of the partition you would like
Finish and go through the installation Process of Windows 7
MAKE SURE YOU SELECT THE «BOOTCAMP» PARTITION TO INSTALL.
IF IT SAYS IT CANNOT BE INSTALLED THERE, SIMPLY HIT FORMAT THEN NEXT.
There will be reboots and it may say «Press Any Key….» Just let it be. Don’t press.
On install skip key for now, unless you have one.Step 4
After you have installed and setup windows 7, remove the DVD, and insert your USB Drive with the Bootcamp Drivers.
In the bootcamp folder, locate bootcamp.exe, right click and install as administrator.
Once the process has completed, restart the computer again. It should automatically boot to Windows for now until you change that yourself, or use the Option Key at bootup.
Step 5
Remove the USB Drive. We are done with it.
You can now connect to the internet. Go to https://go.microsoft.com/fwlink/?LinkId=691209 to download the Media Creation tool we will use to install Windows 10.
Run the file and «Upgrade Now» when it prompts you to decide.
It will take some time to download.
Again, Follow the Installation through and use either your own key, the VLK, or if you already had a valid Windows 7 Key it will upgrade you for free.
if you happen to get a BSOD in Windows 10, Run Windows Update. This happened to me. I got a few here and there in the beginning, and it ironed out, and as you can see im playing graphic intensive games right now through it.
I Hope this helps!
-
#14
**Update** if you have an AMD graphics card in your iMac I found a site that has some amazing drivers that have been compiled for all legacy iMacs (2013 and earlier).
-
#15
Hi all,
The following site said that I’ve missed out by just 6 months, that my Mid-2011 iMac CANNOT run Windows 10. I’m wondering if this is an absolute rule or is it one of those recommended performance things?
https://support.apple.com/en-au/HT204990#models
Okay here is how you can do it. First thing I installed a 240GB SATA SSD (Kingston) and the superdrive was shot so I replaced it.
Last night I performed a successful Win 10 pro x64 1809 on iMac mid 2011 27 inch (i7 / 16 GB RAM / AMD Radeon graphics)
I know there are so many people wondering how to do it and make it work right (I can confirm that this way I came up with is the easiest) so I will break it down:
1) I installed the new HDD, held ALT to boot, partitioned the drive and did internet install of MacOS and updates
2) I then went in to Bootcamp and made the drivers for Windows 7on a USB flash drive
3) Inserted my Windows 7 Ultimate DVD into the drive for it to create the BOOTCAMP partition (if you try to install 10 from a DVD you get the can not install old versions of windows warning)
4) After partitioning drive and making the USB drive with the Win 7 drivers then the mac will reboot. Hold ALT down to bring up the startup options. I hit EJECT on the keyboard and removed the 7 disk
5) Inserted Windows 10 x86/x64 DVD (I have both versions on a dual layer DVD from Microsoft its an 8 GB ISO roughly but any windowss 10 disc should work)
6) Select boot from Windows (DVD Icon) — it does take it about 30 seconds from ejecting the DVD to see the new disc
6.5) Make sure you have a legit Windows 10 product key because it will come up first asking for it — though you can install it anyways without but will need to activate later. I also recommend having an ethernet cable plugged in (and internet access) when setting up Windows 10
7) Windows 10 bootloader shows up, press any key to boot from DVD
 when you get to the partitioning screen, delete the BOOTCAMP partition (usually is number 4) and then create a new partition there and then install Windows
9) Having then getting to the desktop open Device Manager. This is where it gets tricky. The AMD Radeon driver can be obtained from Microsoft automatically but other drivers are a no for the most part
10) Insert your bootcamp drivers USB into the mac and then with device manager you can update driver software manually — point it to the drivers folder on the flash drive and so for Audio use the cirrus logic driver — it will work, install all other drivers related to your system. Note that the Intel Chipset drivers for the C200 series that came wont work for the system (using installer method) but you can still install them anyways from the folder. The only driver that does not work is the Broadcom Bluetooth driver. I downloaded it from Dell of all places and their driver worked perfectly.
Anyways, now you will have a perfectly working copy of Win 10 x64 on your mac with no driver issues.


-
#16
Thank you! I’m archiving this for when I tackle my iMac and convert stuff. I’m currently studying my ComptiaA+ so will hopefully recognise more implications of these moves when I’ve finished the OS components of the 902. Cheers!
-
#17
Thank you! I’m archiving this for when I tackle my iMac and convert stuff. I’m currently studying my ComptiaA+ so will hopefully recognise more implications of these moves when I’ve finished the OS components of the 902. Cheers!
Awesome. This methid of mine works on older macs too only difference is some drivers but still easy to find them.. Cheers! And good luck on A+
-
#18
Windows 10 will run on literally anything. I’m gonna post what I always post when I see these kinds of threads…
Bootcamp is completely unnecessary, intel macs are just PCs with apple logos. Windows 10 will install and figure out all the drivers on it’s own. Worst case scenario a multitouch trackpad might need bootcamp for «full features» to work. This isn’t Windows 98 where we need to rely on manufacturers for drivers. Half the time the PC’s manufacturer site has an older version than windows does. And that is absolutly true for bootcamp. If I install windows on a mac I just get drivers from intel, nvidia or AMD, ect.
-
#19
Sound nice..
I have a late 2009 imac.
put in my win 10 USB stick
Boot and hold ALT.
Choose to boot from USB and win 10 will aut. install…
No problem there.
WIN 10 runs for weeks…
BUT if I put imac on internet it become some update or whatever… and the screen goes black.
Seems that win 7 has to be on before win 10 will work.
Win 10 don’t have to be activated.
If it’s okay to have «this windows is not activatd» in the right corner.
There is almost no diff. between a license version or one without.
Last edited:
-
#20
WIN10 driver issue solved.
Used this guide…
Italian but just look at video.
What he do is to ignore videocard updates.
-
#21
My only problem left is some missing drivers and how to control fans. Not that fans runs on high. But on mac os i had this fan control which is nice.
-

image.png
41.7 KB · Views: 510

-
#22
Great advice on the installation of windows guys.
I have an Imac 27 2011 I7 with 16 GB Ram, Nvidia 675mx (4gb) gpu and 2x 256Gbm SSDs. I’m running Catalina os and now with this Windows 10, Both on there own SSD. I did it a little different but using a dual layer disk (windows 10 Home x64) has installed well.
i did start with Catalina then use bootcamp to make USB drives for windows 10 then leaving the USB in my machine i installed windows 10 from startup using option key then selected EFI option of windows. Let it install and on restart it installed my Bootcamp drivers automatically. Very happy at this time with it all, will update if requested.
-
#23
Sound nice The extra USB drive is using the SATA from built in DVD drive?
So you created a USB with win 10 and bootcamp drivers from your MAC cataline OS?
Could you describe the process how you create win10 USB key?
-
#24
I didn’t think imac 2011 could even run Catalina?
-
#25
I didn’t think imac 2011 could even run Catalina?
Depends on the graphic cards installed. dosdude1 has a tool!
Установка Windows 10 на iMac 2011 года может быть небольшим вызовом, но это возможно. Вот несколько шагов, которые могут помочь вам в этом процессе.
1. Сначала вам понадобится загрузочный диск или флэш-накопитель с установочным образом Windows 10. Вы можете скачать официальный образ ISO с веб-сайта Microsoft.
2. Затем подключите флэш-накопитель к вашему iMac и перезагрузите компьютер, удерживая клавишу «Option» при запуске. Выберите флэш-накопитель в качестве источника загрузки.
3. После загрузки выберите свою языковую настройку и нажмите «Далее». Затем перейдите к разделу «Установить» и выберите «Пользовательские параметры установки».
4. Создайте раздел для установки Windows 10 на вашем iMac и выберите его в качестве места установки. Продолжайте установку, следуя указаниям на экране.
5. После завершения установки Windows 10 настройте ее в соответствии с вашими предпочтениями и установите необходимые драйверы для вашего iMac с помощью официального сайта Apple.
УСТАНОВКА WINDOWS 11 НА MAC (Intel)
Установка Windows 10 iMac 21 Mid 2010 A1311 BootCamp
Как установить Windows 7/ Windows 8 на Macbook PRO, AIR, iMac
Ставим Windows 7 на Mac в качестве второй ОС
Ставим Windows на Mac без Boot Camp
Установить и настроить Windows 10 на Mac (старые iMac, Macbook, Mac mini без bootcamp)