Windows 11 offers a new set of icons and themes, bringing a beautiful and bright appearance to the user experience. If you use Ubuntu but still have a strong affection for Windows 11, let ItsmeIT install windows 11 theme on Ubuntu 22.04 to make Ubuntu 22.04 look like Windows 11.
To begin, you need to download the necessary tools by using GIT to clone the repository. If you already have it installed, you can skip this step. Additionally, to make Ubuntu 22.04 look like Windows 11, you will also need to install the Gnome Tweak Tool and the shell package. Please use the commands below to do so.
sudo apt install git
sudo apt install gnome-shell-extension-manager gnome-shell-extensions gnome-shell-extension-prefs
Step 1: Install Windows 11 icon on Ubuntu 22.04
cd /tmp
git clone https://github.com/yeyushengfan258/Win11-icon-theme.git
cd Win11-icon-theme/
./install.sh -a
Step 2: Install Windows 11 theme on Ubuntu 22.04
cd /tmp
git clone https://github.com/vinceliuice/Fluent-gtk-theme.git
cd Fluent-gtk-theme
./install.sh
After successfully installing the Windows 11 icon and theme on Ubuntu 22.04, you can now locate and open the “Tweak” application. Once opened, select “Icon and Applications” as shown in the screenshot below (provided by ItsmeIT). Feel free to customize it according to your preferences.

Step 3: Download Windows 11 wallpaper and install Font
When install windows 11 theme on Ubuntu 22.04, images and fonts are indispensable. To download Windows 11 FULL HD 4K wallpaper you can click on the link to download Windows 11 Wallpaper light background or Windows 11 Wallpaper dark .
Next, to install Font Windows 11 on Ubuntu 22.04 you can run the following commands in turn:
cd /tmp
git clone https://github.com/mrbvrz/segoe-ui-linux.git
cd segoe-ui-linux
./install.sh

Step 4: Make Ubuntu 22.04 look like Windows 11
Now look for “extension” in the menu and open the “Extension Manager” tool like the screenshot:

Continue to find and enable “User Themes”:

Continue to click on the “Browse” tab, find and install 2 Extensions, “Dash to pannel” and “Arcmenu”.

Click on “Installed” tab after “dash to pannel” and “Arcmenu” have been successfully installed.
Customize Dash to pannel:
Then find and click to open “Dash to Panel.” If it is turned off, continue by clicking on the settings icon (a gear-shaped circle). Here, you can customize and install the Windows 11 theme on Ubuntu 22.04 to make it look like Windows 11. You can choose modes such as showing buttons, icons, or adjusting left, center, or right alignment.
In this tutorial ItsmeIT tweaked the following:
- Left box: Monitor Center
- Taskbar: Monitor Center
- Show Applications button: Ẩn

Switch to the “Style” tab here you can adjust the font size and spacing for the Icons.

Switch to the “Behavior” tìm “Disable show overview on startup”.
Switch to the “Fine-Tune” tab where you can adjust the font size and spacing for the Fonts.

Open Extensions again and click “Installed” then enable “Arc menu” if it is off.
Click on the settings icon (circular gear) then select the tab “Menu -> Menu layout -> Modern Menu Layout” and select “Enterprise” or any layout you like.

Go back and select “Menu visual Appearance,” then adjust the “Menu size” according to your preference, just like in the screenshot provided by ItsmeIT.

Click back and select “Fine Tune” then find and disable “Alphabetize ‘All Programs’ Category”.
Tab “Menu button”: Adjust padding to 5, Icon size 34. Then click “Browser” and select 1 Icon you like. Or choose “Custom Icon” and download the logo-windows11.png file instead.

And here is the final result, looks quite similar to Windows 11.

Above are the detailed instructions to install Windows 11 theme on Ubuntu 22.04, allowing you to have a new experience when you are bored with the default Ubuntu appearance. Additionally, you can click to refer to the installation of the most beautiful themes available for Linux/Ubuntu.
Windows 11 is making headlines out there and you might want to try out its look and feel without leaving Linux. You can theme Linux to look like Windows 11, rather than run Windows 11 on top of Linux. If you’re looking to make Linux look like Windows 11, you’re in the right place.
Let’s begin.
Make Linux Look Like Windows 11
If you want your Linux PC or the Ubuntu system to look and feel like Windows 11, there are some tools you need. KDE Plasma is one of such tools and that is what we are using here today. Let’s begin with the step-by-step guide to convert Linux into Windows 11.
- Install KDE Plasma on Linux
- Install KDE Windows 11 Theme
- Create Windows 11 Taskbar on Linux (KDE Plasma)
- Create Windows 11 Tray Icons on Linux
- Get Windows 11 Start Menu on Linux (KDE Plasma)
Step 1: Install KDE Plasma on Linux
While most Linux desktop environments are pretty customizable, some are more customizable than others. KDE Plasma gives you the freedom to customize the look and feel of your computer, especially if you are a Linux user.
For this tutorial, we’ll be using the Plasma desktop. Plasma desktop is available on all Linux distros. Ubuntu even has an official flavor called Kubuntu, which ships with KDE Plasma desktop instead of GNOME.
If you’re not familiar with KDE Plasma, you can follow the link below to learn more about it and how to install it on Ubuntu.
- Install KDE Plasma Desktop on Ubuntu Linux: Complete Guide
Step 2: Install KDE Windows 11 Theme
KDE Plasma is not just about some themes. You can get complete control over the look and feel of the operating system the way you want. However, it does also give you the option to simply install a KDE theme that takes care of everything.
The global theme changes your desktop shell’s theme, layout, font, cursor, icons, etc. Let’s see how you can install Windows 11 theme in KDE.
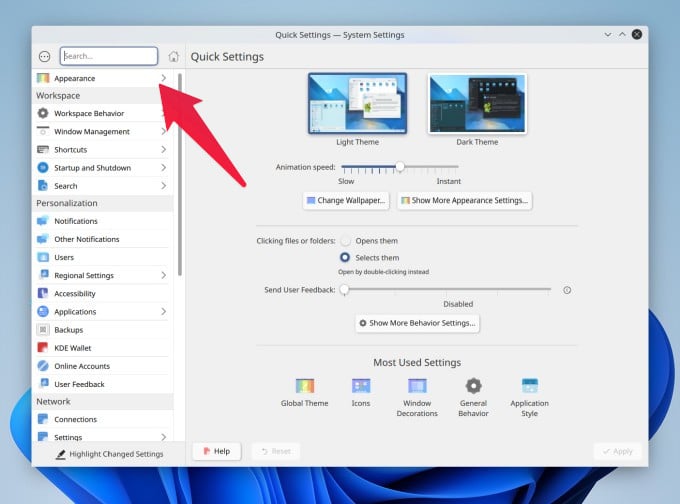
- Open the System Settings app.

- Click Appearance from the left column.
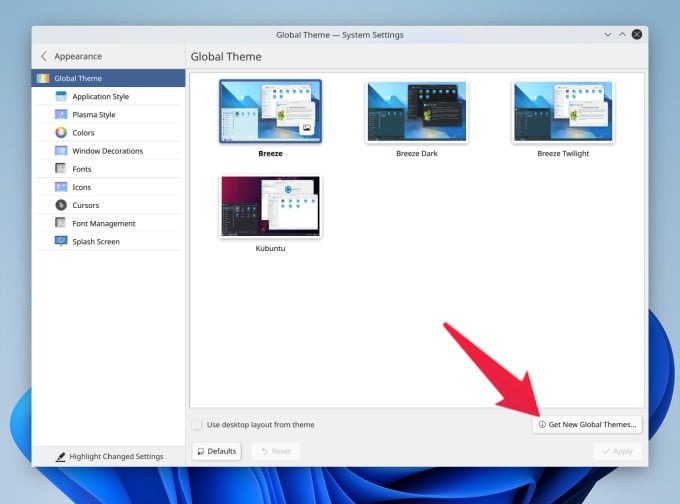
- On the bottom right, click on the button that says Get New Global Themes…
- Use the search bar at the top to look for the Fluent round theme.

- Click on the Install button that appears when you bring the cursor over the search result.
- Select from Dark or Light theme options.
- During installation, enter your password when asked.
- Once the theme is installed, click on the Use button on the theme.

As soon as you click the button, you’ll notice your entire desktop will change its looks and layout to mimic Windows 10. To make it look like Windows 11, we simply need to bring the taskbar icons to the center and make sure the only visible system tray icons are Wi-Fi, Battery, and Sound.
The Fluent round Global theme is a great choice to create a Windows 11 theme, but it uses its own fluent design-inspired icons. They are, in my opinion, much better than even the original Windows 11 icons. However, if you like the yellow folders and more Windows-like icons, they’re also easy to get.
You can find the Cursors and Icons section on the left column. Once you select any, you can download new cursors or Icons by clicking the button in the bottom right.
There are quite a few options to choose from, but the PlasmaXLight icon theme and Win 10 cursor theme come closest to mimicking Windows 11.
Related: How to Share Clipboard Data Between Android and Ubuntu (Linux)
Step 3: Create Windows 11 Taskbar on Linux (KDE Plasma)
Now that your system has the Windows theme and icons, all that remains is to recreate the Windows 11 taskbar on Linux. Well, technically, we will only be recreating the look and feel of the Windows 11 Taskbar.
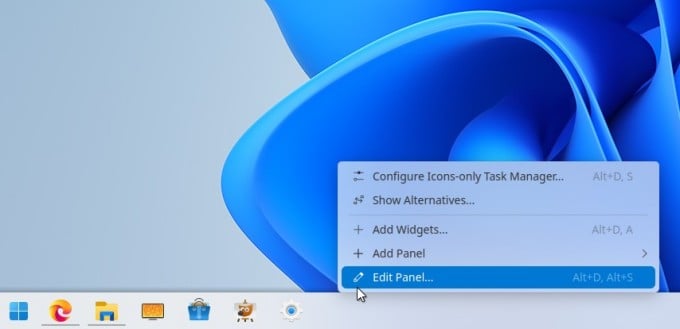
- Right-click on the KDE Panel at the bottom of the desktop.

- Select Edit panel… from the context menu.

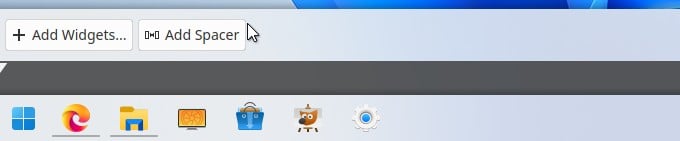
- Next, click on the Add spacer button twice.
- Click and drag the spacers to each side of the icons.
Related: Move Windows 11 Taskbar Icons to Left or Center
Step 4: Create Windows 11 Tray Icons on Linux
As you’ll notice, the above step brings the icons to the center of the taskbar. Next, we need to take care of the System tray.
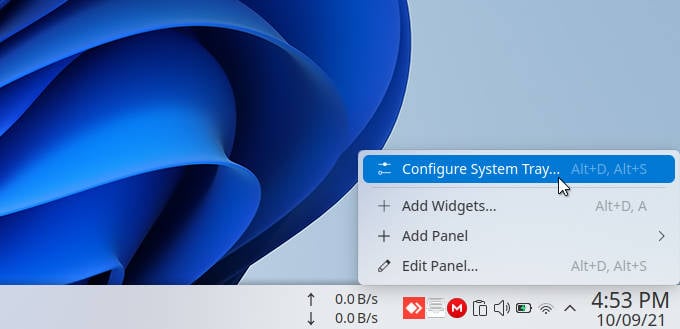
- Right-click on the chevron (up) icon at the start of the system tray.
- Select Configure System tray…
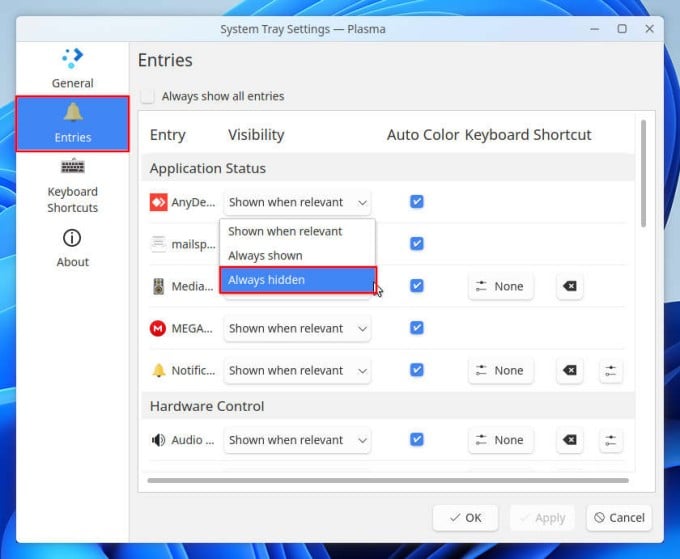
- Select Entries on the left.

- On the right, click on the drop-down menu next to each system tray icon that you want to hide and select Always hidden.
- Click OK when done.

When you’re done, you should have a Windows 11 Taskbar look-alike, that is in fact a lot more customizable than anything on Windows will ever be. I like to keep the clipboard icon always visible for easy access, apart from the Wi-Fi, Battery, and Sound icons. You can access all hidden icons by clicking on the chevron (up) icon on the System tray.
Related: How to Switch Between Speakers and Headphones in Windows 11
The Taskbar is complete, but Windows is also known for the Start menu. While the Start menu has undergone many changes, it has been there for a very long time. Windows 11 brings a new Start menu as well. Getting it on KDE Plasma is rather easy.
- Right-click anywhere on the desktop.

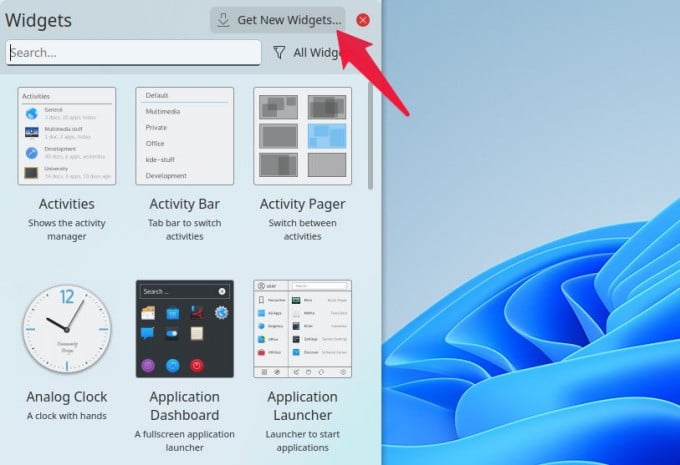
- Select + Add widgets…

- On the Widgets panel, click Get new widgets.
- Search for OnzeMenu or Menu 11.
- Install either of the two by clicking on the Install button on them.
- Once installed, you now have to place the widget.

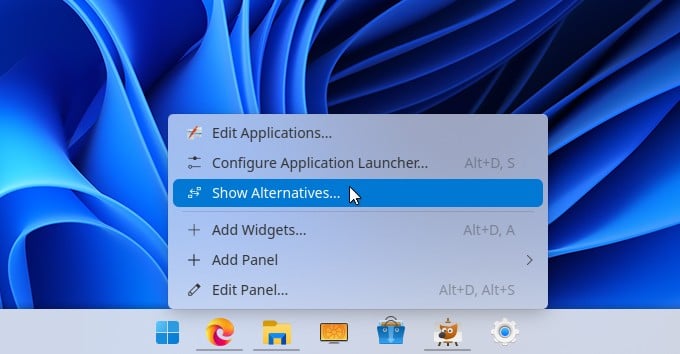
- Right-click on the Start menu button on the Taskbar.
- Select Show alternatives.

- From the alternatives list, select the widget you installed.
- Click on the Switch button.

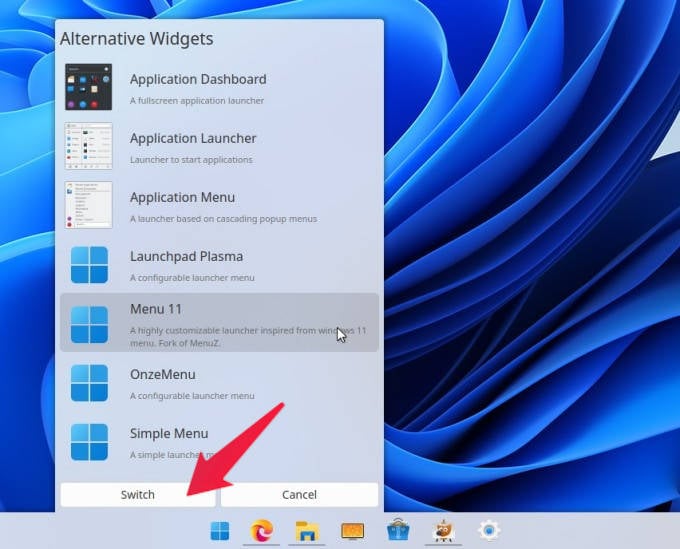
If you’re wondering about the differences between the two widgets, there aren’t many obvious ones. Menu 11 has smaller app icons but is more customizable, while Onzemenu gives you bigger icons and a better out-of-the-box experience.
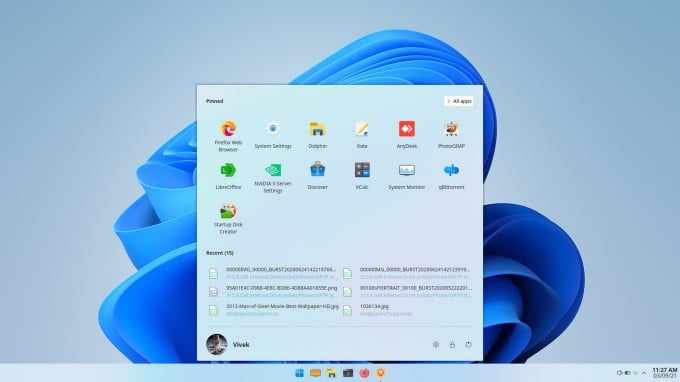
The Taskbar and Start Menu are basically all there is on a Windows 11 Desktop. So, now that you have a Windows 11 Taskbar on Linux and the Start Menu, your Windows 11 desktop setup is complete. Just put up the default Windows 11 wallpaper, and you can make Linux look like Windows 11 even more.
Related: Missing the Windows 10 Start Menu in Windows 11? Here’s How to Get Classic Windows 10 Start Menu
If you are new to KDE Plasma, it might be a good idea to explore the Appearance section of the Settings more, and you can further enhance this KDE Windows 11 theme. You can get such Windows 11 like the look and feel in your Linux computer with KDE Plasma.
Disclosure: Mashtips is supported by its audience. As an Amazon Associate I earn from qualifying purchases.
![]()
Windows 11 (and indeed many Microsoft products) now use the ‘Fluent’ design system — but you don’t have to switch to Windows or lock into its ecosystem to enjoy it.
Prolific Linux design champ Vince Liuice — his portfolio is impressive — has made an icon set for Linux desktops that draws inspiration from Redmond’s fancy ‘acrylic’ aesthetic.
The result is ‘Fluent‘, a striking Linux icon set that looks quite unlike anything else currently available. It won’t appeal to everyone’s tastes but Fluent is an interesting alternative to increasingly 2D, flat icons.
Layering, opacity, colour, and shadow are used to create glyphs that are eminently recognisable and also somewhat physical in look, with dimension and a sense of materialness.
![]()
Fluent’s icon coverage is nowhere near as expansive as the Papirus icon set (but no wonder; Papirus has been around for a long time). Still, all of Ubuntu’s core apps (ones not installed as Snaps) use restyled Fluent icons, as do a handful of third party apps I have installed (though again, not Snap apps).
I particularly like this theme’s symbolic icons. These thin, line-art pictographs perfectly compliment the fuller, richer, and more colourful icons used for apps. Fluent offers two symbolic styles are available regular and a rounder variant.
Fluent’s symbolic icons look much sharper to my eyes than Yaru or Adwaita’s equivalents. And against a lighter background (yes, light themes still exist 🤭) they look especially effective.
To see just how well the thin symbolic icons match the intricate acrylic ones here’s a a screenshot from my desktop (which also features Dash to Dock and Arc Menu extensions and Vince Liuice’s WIP ‘Colloid’ GTK and Shell theme, if anyone is wondering):
On to the “controversy” aspect.
I’m aware as I write this post that some folks will take issue with me for highlighting an icon set inspired (however interpretively) from a proprietary OS. GTK themes and icon packs that mimic the look of Windows, Android, iOS, et al divide opinion. While I don’t agree with all of them, I can appreciate the arguments against them.
However, I want to emphasis that I’m not here to tell you what you should or shouldn’t be using. Me writing a post about anything isn’t the same as me saying “you MUST use it”. I simply spotlight options. Things you can choose to use, or not — and if not, at least you’re aware the option exists.
So if an icon set inspired by Microsoft’s OS is not for you, you don’t have to install it. There are plenty of other great icon sets for Linux to choose from. Just keep in mind that other folks aren’t partisan about their eye candy, while others find familiar icons, themes, and layouts help them to adapt to using open source technologies.
Back to Fluent.
If you want to try this set out on your own desktop you download the Fluent icon theme from GitHub. I recommend GitHub mainly because it always ensures you get the latest version, direct from source. Plus, the .zip available from here includes an installer script, which is handy (though don’t run scripts blindly; always give them a quick read through to understand what they do).
Finally, you can use the Tweaks tool to change icon theme in Ubuntu.
If you give it a go, feel free to share your screenshots of it down in the comments. I’m particularly interested to see how the set works on non-GNOME desktops.