A Virtual Private Network (VPN) is used to securely create a tunnel for data between your local computer to a remote server. On Windows Server 2019, you can configure a VPN to provide network access to connected clients and allow connected devices to communicate securely.
This guide explains how to set up a fresh Windows Server 2019 as an L2TP over IPSec, or a PPTP VPN, using the routing and remote access feature. Layer 2 Tunneling Protocol (L2TP) with IPSec offers robust encryption for connections to the server. On the other hand, the Point to Point Tunneling Protocol (PPTP) is simple to deploy but not as secure.
To set up the VPN server, we shall use the built-in Routing and Remote access feature, which offers a graphic interface to configure remote networking features such as Dial-up, LAN routing, NAT, and VPN.
Requirements
-
Deploy a Windows Server 2019 Instance on Vultr
-
Remotely connect to the server and log in as an Administrator
Create a New VPN User
For the VPN service to work well, it must authenticate with a valid user account to the server. So, you need to create a new user on the server.
Click Tools under server manager and select Computer Management from the drop-down list to create a new user.
Once the computer management window pops up, expand Local Users and Groups from the left pane and right-click Users to select New User on the sub-menu.

Under the New User dialog box, enter a username, full name, and password for the VPN user, then click create and close the window.

The new user will now be listed on the list of active server users, right-click on the new user and select properties.
Under the user properties window, navigate to the Dial-in tab and click Allow access under Network Access Permission. Click OK for changes to take effect.

Install the Routing and Remote Access Features
Procedure 1: Through Server Manager
From the Windows start menu, open Server Manager, click Manage, then select Add Roles and Features from the drop-down list.
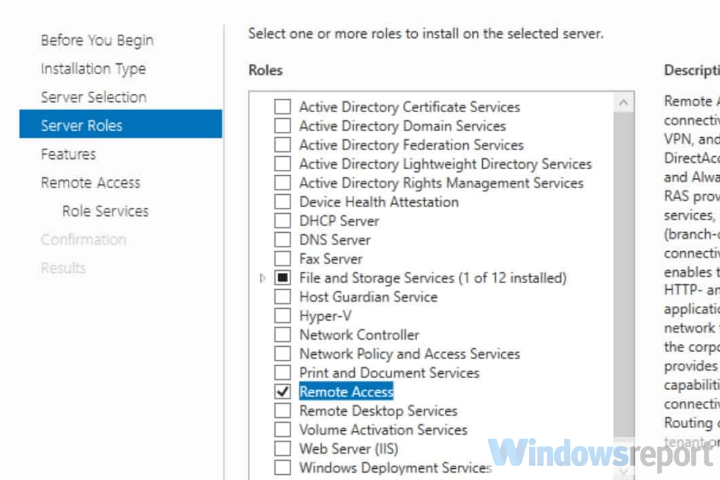
From the open window, click next and select Role-based or feature based installation, then select your server from the pool. Select Remote Access, Remote Access Administration from the list of server roles.

Next, select DirectAccess and VPN (RAS) and Routing from the features list, then click to Install IIS, which is required for remote access to work well.

Procedure 2: Using Windows PowerShell
You can also install Remote Access from Windows Powershell.
From the Windows start menu, open an Administrative Powershell, then install Remote access by pasting the following code to the console.
Install-WindowsFeature RemoteAccess

Install-WindowsFeature DirectAccess-VPN -IncludeManagementTools

Install-WindowsFeature Routing -IncludeManagementTools


Your output should be similar to:


PS C:\Users\Administrator> Install-WindowsFeature RemoteAccess

>> Install-WindowsFeature DirectAccess-VPN -IncludeManagementTools

>> Install-WindowsFeature Routing -IncludeManagementTools


Success Restart Needed Exit Code      Feature Result

------- -------------- ---------      --------------

True    No             Success        {Remote Access}

True    No             Success        {RAS Connection Manager Administration Kit...

True    No             Success        {Routing}
Configure Routing and Remote Access
Open Server Manager and click Tools on the top toolbar. From the drop-down list, select Remote Access Management.

In the open Routing and Remote Access window, right click on your server name just below Server status, then select Configure and Enable Routing and Remote Access from the drop-down menu.
Now, select Custom configuration to configure remote access manually.

Select VPN Access and NAT as services you want to enable on your server, click next to finish the configuration, and start the service.

Setup a PPTP VPN
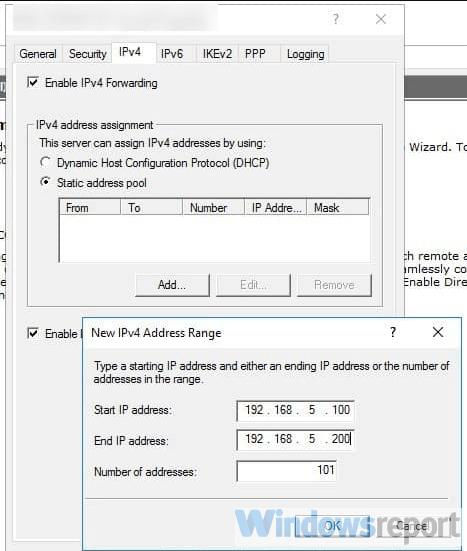
Now that Remote Access is running, you can set up your PPTP VPN. To get started, you must assign connected clients** static IP Addresses to avoid possible connection issues. To do this, right-click on your server under the Routing and Remote Access window and select Properties from the drop-down list.

Click IPV4 in the Open Window, then select Static address pool. Now, click Add to craft a new IP Address range from the open pop-up window. In this guide, we use the range 10.0.0.1 to 10.0.0.50, and the server will automatically calculate the number of available addresses.

Click OK to save your static IP Address configuration. You will be prompted to restart Routing and Remote Access for changes to apply; simply click OK.
Configure NAT and enable PPTP
We need to configure Network Address Translation (NAT) for connected clients to use the Internet. On the left pane of the same routing and remote access window, expand the IPv4 options under your server. Right-click on NAT and select New Interface.

Under the open dialog window, select Public interface and enable NAT on the interface.
Next, navigate to Services and Ports and click VPN Gateway (PPTP) from the drop-down list.

Click Edit to set a Private address for the VPN service, change the current address 0.0.0.0 to 127.0.0.1, and click OK to save.

Finally, click OK to save all changes, then right-click on your server from the left pane and click Restart under the All Tasks sub-menu.

This will restart routing and remote access services making your server ready for incoming VPN connections.
Configure Windows Firewall to accept Incoming PPTP VPN Connections
Click Tools from the Windows server manager and select Windows Defender Firewall with Advanced Security from the drop-down list.
Under the open Windows Defender Firewall with Advanced Security window, select Inbound Rules on the left pane, then click New Rule on the right pane.

In the open new Inbound rule wizard, click Predefined and select Routing and Remote Access from the list.

Under predefined rules, choose Routing and Remote Access (PPTP-In), click next to allow the connection, then finish for the new Firewall rule to be applied and test your new PPTP VPN server.

Test your PPTP VPN
Using your personal computer (PC) or Smartphone, go to Networks, Add a new VPN and select PPTP as the VPN type. Then, enter the VPN username and password created earlier to connect.
In this guide, we cover and test the PPTP VPN on a Windows 10 PC. To get started, click the start menu and search for Control Panel, then, click Network and Internet.
Under Network and Internet, open the Network and Sharing Center and click Set up a new connection or network.

Under the open window, select Connect to a workplace and click Use my Internet connection (VPN).
Then, enter your server’s public IP Address (Check your Vultr server dashboard), assign the connection a name, and click create.

Now, on the left pane, click Change adapter settings, then right click your created VPN interface and select Properties.

Under the pop-up, click Security, then choose Point to Point Tunneling Protocol (PPTP) under Type of VPN.
Finally, under Allow these protocols, select CHAP and MS-CHAP v2, then click OK to apply changes.

Your new VPN is configured successfully. Click the network connection icon on the taskbar, select your VPN on the list and click Connect to enter the VPN username and password created earlier to establish a connection to your new PPTP VPN server.

Setup L2TP with IPSEC
Open server manager, click Tools, and open Remote Access Management, then right-click your server on the left pane to select Properties from the drop-down list.
Under server properties, navigate to the Security tab, and click Allow custom IPSec policy for L2TP/IKEv2 connection to enter your new pre-shared key.
In this guide, we use 12345678, choose something stronger, then navigate to IPV4 to set a static address pool and click OK to apply changes.

Keep note of the pre-shared key (PSK) since it will be required for every user establishing a connection to the VPN server.
From the left pane, expand the IPV4 sub-menu and right-click on NAT, then select New Interface. If you set PPTP earlier, click NAT and edit the existing interface you already created.
Navigate to the Services and Ports tab and select VPN Gateway [L2TP/IPSec], then click edit to change the private address from 0.0.0.0 to 127.0.0.1. Click OK to save changes and restart remote access from the left pane under All Tasks.
This will restart Routing and Remote Access, then save the applied L2TP configurations.
Allow L2TP Connections through Windows Firewall
Open Windows Defender with Firewall, select inbound rules and add a new rule. Select Predefined and from the list, choose Routing and remote access.
Under Predefined rules, select Routing and Remote Access [L2TP-In] and click next.

Finally, allow the connection and click Finish to apply the new Firewall rule.
Connect and Test Your L2TP VPN server
In this guide, we test the new L2TP with IPSec VPN on a mac. To get started, open System Preferencesand click Network.
Under the Network Preferences window, click the + sign and select VPN under the Interface dialog box. Then, choose L2TP with IPSec as the VPN Type and assign your connection a name.

Click create, then enter your public server IP Address (server address) and username (Account name). Next, click Authentication Settings to enter your account password and Pre-shared key (Shared secret) created earlier.

Next, click Advanced and select Send all Traffic over VPN Connection, then click Apply, and finally click Connect to establish a connection with your new L2TP VPN server.

Conclusion
You have set up a VPN on your Windows server 2019 instance; you can choose to create both PPTP and L2TP VPNs with different users connecting through your server without any limitations.
For every connected device, they will be able to access the Internet through your server and interact with other connected computers.
Have a private connection on Windows Server 2019 using top VPN software
by Aleksandar Ognjanovic
Aleksandar’s main passion is technology. With a solid writing background, he is determined to bring the bleeding edge to the common user. With a keen eye, he always… read more
Updated on
- Windows Server 2019 supports VPN connections. But you have to go through a bit of trouble to set it up and allow VPN access.
- Discover three easy steps for setting up a VPN on Windows Server 2019 without too complicated processes.
- You don’t have to install any software tools since you can use the server’s built-in settings.
- In any case, you should rely on privacy software for more advanced technologies and security.
Using a VPN on a Windows Server has a lot of advantages.
It allows users in a small environment to access remote clients or firewalls to Windows Server.
If you’re here to discover the exact steps for installing a VPN on Windows Server 2019, here’s everything you need to know.
Does Windows Server have a built-in VPN?
Affirmative, you can set up a VPN on Windows Server using the right protocols. Plus, there are certain versions that allow this operation
More exactly, it’s possible to use a VPN connection on a Windows Server 2019 and get increased privacy for your server.
In order to set up a VPN connection on this Windows Server edition, you have to use L2TP or PPTP VPN protocols.
How can I set up a VPN on Windows Server 2019?
1. Install Remote Access using Server Manager
- Open Server Manager
- Go to Manage > Add Roles and Features Wizard
- Check the Remote Access box and click Next
- At Role Services, check the DirectAccess and VPN (RAS) box and click Next
- Click Install
- Once setup is over, you might have to restart the server
An alternative solution is to install and configure Remote Access using PowerShell.
2. Set up the VPN
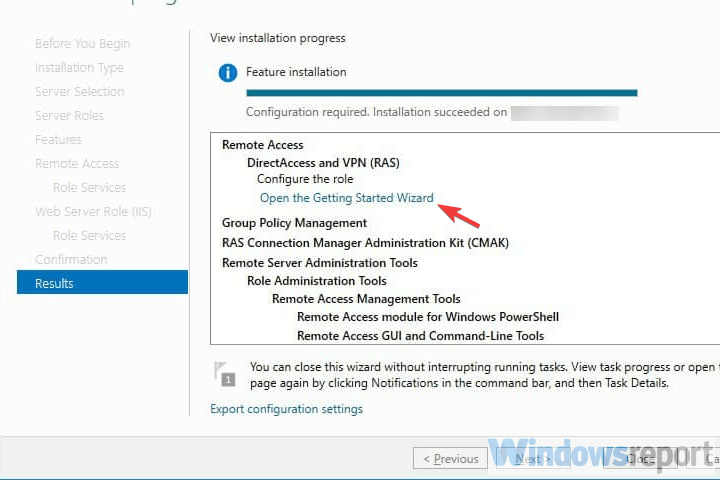
- Click on the Open the Getting Started Wizard
- Choose Deploy VPN only
- In the Routing and Remote Access Management Console, right-click on the Server name
- Select Configure and Enable Routing and Remote Access from the context menu
- Choose Custom configuration and click Next
- Select VPN access
- Start the VPN service
You shouldn’t stumble upon any issues at this stage if you use the dedicated wizard.
3. Configure VPN access
Finally, the only thing remaining is to configure the VPN User and Network Access. You have to open and forward ports from the firewall to the Windows Server.
Depending on the protocol you use, here are the ports you should open:
- For PPTP: 1723 TCP and Protocol 47 GRE (also known as PPTP Pass-through)
- For L2TP over IPSEC: 1701 TCP and 500 UDP
- For SSTP: 443 TCP
If you don’t have a DHCP server, you can set a static IPv4 address pool. This can be done by following the steps below:
- Firstly, make sure all users have Remote access enabled
- Open the Properties panel of your VPN server
- Click on the IPv4 tab and enable Static address pool
- Click Add and add the same static IP address from the same Server subnet
- How to Manually Set Up a VPN on Windows 11
- How To Fix VPN Blocking AirPlay [3 Working Solutions]
- Fix GTA Online Not Working with VPN [5 Tested Methods]
How does VPN work on Windows Server?
Setting up a VPN on a Windows Server implies technical knowledge, so you have to learn how to configure it on your PC.
In a few words, you need to initially create a new VPN user and then set up routing and remote access features.
Here you have the required setup names and technologies you can use for securing your Windows Server:
- Windows Server 2019 VPN setup L2TP
- Windows Server 2019 VPN Ikev2 setup
- Windows Server 2019 SSTP VPN setup
- Windows Server 2019 PPTP VPN setup
- setup IPSec VPN Windows Server 2019
In conclusion, you can install a VPN on your Windows Server 2019 in three easy steps: setting up Remote Manager using Server Manager or PowerShell, installing the VPN, and managing VPN access permissions.
In case you need a fresh OS install, simply download Windows Server 2019 right away! Plus, join our VPN Troubleshooting Hub for additional guides.
If you experienced any technical difficulties, please let us know by dropping a comment in the section below.
![]()
Skip to content
![]()
How to install VPN on Windows Server 2019 using Routing and Remote Access
-
View Larger Image


In this blog article we are discussing about How to install and configure a VPN on Windows Server 2019 using Routing and Remote Access server role. A VPN is short form of virtual private network, which gives us a privacy, anonymity and security over public internet. A VPN service masks our ISP IP so your online actions are virtually untraceable. A VPN can also be used to connect computers to isolated remote computer networks that is usually inaccessible, by using the Internet or another intermediate network. Another Use of VPN is the client computers can browse websites through VPN server even if they are in the restricted internal network.
Routing and Remote Access Service is a Windows proprietary server role, that supports remote user or site-to-site connectivity by using virtual private network (VPN) or dial-up connections. So using RRAS we can convert a regular Windows Server as VPN server. Microsoft RRAS server and VPN client supports PPTP, L2TP/IPSec, SSTP and IKEv2 based VPN connection.
By default the VPN connections are made using PPTP which is a VPN Point-to-Point Tunnelling Protocol. We can also convert our VPN server to support SSTP. The PPTP protocol connection are established over TCP port 1723. PPTP also uses GRE and it supports encryption keys up to 128-bits. PPTP is a very fast VPN protocol and very easy to setup. Its supported by most operating systems like windows, Mac and Linux PC and android and IOS mobile devices.
System Configuration We Used.
Used Windows server 2019 which is covert as a VPN SSTP server.
Used Windows 10 client PC for connecting to Windows VPN server 2019.
Another thing is we are settings up VPN on windows server 2019 which only have one Network interface and its configured with Static Public IP address not NAT enabled. So this blog article can be implemented on Most of VPS ( Virtual Private Server) provided by Hosting Providers or with the Cloud Windows VMs.
Since its a VPS server, we only have RDP access using the VPS public IP address. So lets get started.
Here I have divided the whole steps in to different parts. Lets get started. Even though we are performing the install on Windows server 2019, you can refer this article for Windows server 2016 and windows server 2012.
Part:1 Install Remote Access Server role on Windows Server 2019
Log into the Windows Server 2019 > Click Windows Start Icon >> Click Server Manager.

Click Add Roles And Features

Click Next

Choose the Installation Type as ” Role based or feature based installation and click Next.

From Server selection, choose “select a server from the server pool” and click Next.

From Server Role choose ” Remote Access” and click Next.

Leave Features section as it is and click Next.

Click Next on Remote Access section.

Under Role Services choose “Direct Access and VPN (RAS) and Routing and click Next. A popup window will appear for confirming the features that need to be installed for Direct Access and VPN. Confirm it by clicking “Add Features”.


Under Web Server Role (IIS) Section click Next.

Under IIS Role services section leave the default one and Click Next.

Under Final Confirmation section click Install.

The Remote Access server role install will start automatically and normally it will get completed with in few Minutes. Once the installation succeeded click close.

Part:2 Create Additional Loopback Network Adaptor On Windows Server 2019
Its for skipping the error while running Configuring Remote Access Wizard and the error will be like below.
Less than two network interfaces were detected on this machine. For standard VPN server configuration at least two network interfaces need to be installed. Please use custom configuration path instead.
Under Server Manager click Tools >> Computer Management.

From Computer Management window Click Device Manager >> Click VM name from Right side.

Under Actions tab >> Click “Add legacy Hardware”

A add Hardware wizard will open and click Next.

Choose option ” Install the hardware that I manually select from a list ” and click Next.

Choose “Network Adaptors” and click Next.

Choose “Microsoft” as Manufacturer and ” Microsoft KM-TEST Loopback Adaptor ” as Model. Click Next.

Confirm the Install by clicking Next.

Once the install got completed close the install wizard by clicking Finish.

Now, we can confirm the new network adaptor install from the Computer Management panel itself. For that click Device Manager >> Click VM name >> Expand Network Adaptors, there we can see the newly added LoopBack Network adaptor available.

Part:3 Configuring Remote Access Service on VPN Server.
From Server Manager Choose Remote Access >> Right click the Server name >> Choose Remote Access Management.

Under “Direct Access And VPN” Click “Run the Remote Access Setup Wizard”

The Configure remote Access wizard will open Click “Deploy VPN only”

In the Routing and Remote Access Console , right click server name and choose ” configure and Enable routing and remote access ” option.

Click Next on Routing and Remote access server setup wizard.

Choose Virtual private network( VPN) access and NAT option. Click Next.

In the select Network Interface section, choose the network adaptor where our public IP configured and click Next.

In the IP address Assigned section, choose ” from a specified range of address” and Click Next. Here we are trying to define the private IP address that server give to remote VPN click PC after successful connection.

Click New button.

Give the starting and ending private IP range in the corresponding fields. Click Ok. We are giving IPs starting from 192.168.3.150 to 192.168.3.160.

Now we will see the assigned range and click Next.

In the Do you want to setup this server to work with a radius server question section, select “No, use Routing and Remote Access to authenticate connection requests” and Click next.

Click Finish on Completing the Routing and Remote Access server setup wizard.

Click Ok.

This completes the configuration of Routing and Remote Access Server. Now we can see a green up arrow next to server hostname and which shows the Routing and Remote access server service started successfully.

Part:4 Allow Remote Access to our VPN server through Public Network Adaptor.
For maintain the access to the VPN server over remote desktop we need to allow the remote access port over our public network adaptor itself through routing and remote access properties section. Otherwise we will loss the access to the server through remote desktop because we only have one Network interface available on server for both VPN traffic and for the remote access.
In the Routing and Remote Access Manager , Expand Server name >> Expand IPv4 >> Choose NAT >> Right Click Our Public Network Adaptor and choose Properties.

Select ” Remote Access” , A pop up window will appear, in the Private Address filed give our server public IP address and click OK. After that click Apply and OK.
If you have different RDP port, you need to create a new allow rule by clicking add option.


Part:5 Allow VPN remote access for the Users.
In this part we are giving a existing user on VPN server for remote access. Then only if we give the logins of these server users to remote VPN clients, they can successfully connect to server through VPN.
Go to the Computer Management Section >> Expand Local users and Groups >> Choose Users >> Right click a user where we wish to give VPN access and choose properties.

Under “Dial- In” tab >> Choose “Allow Access”. Click Apply and Ok.

Part:6 Allow VPN ports on Windows Firewall.
In this part we are allowing the ports used by the VPN server for communication on windows firewall. Otherwise the remote VPN clients won’t be able to communicate with the VPN server. Below are the ports we need to allow in VP server firewall.
- For PPTP: 1723 TCP and Protocol 47 GRE (also known as PPTP Pass-through
- For L2TP over IPSEC: 1701 TCP and 500 UDP
- For SSTP: 443 TCP
Now issue below power shell commands to allow ports in windows firewall.
Now if we look at the windows firewall inbound section , we can see the ports are allowed.


This Completes the PPTP VPN server setup on Windows server 2019. Now Lets Proceed with the Remote VPN Client on Windows 7 PC setup and Try to Establish a VPN server connection.
Step:7 Test VPN Connection.
Open Network and Sharing Center of your local PC/Laptop. Click on ‘Set up a new Connection or Network‘. Please note the screenshots are from a Windows 7 PC.

Click on Connect to a workplace.

Click on Use my Internet connection (VPN)

Enter IP address of VPN server (External network’s Primary/static IP which has Internet connection) and click on next.

Enter the user login details of VPN server, the user we created in VPN server or existing one with enabled VPN access and click on Connect.

Now you can see the client machine is trying to connect to the VPN server. Normally the connections are established using PPTP protocol. After successful connection, you can see a new VPN network adapter is created in Client PC Network adapters section.
If you right click on the VPN Network adapter and select “Properties” , you can see many tabs with different settings. Below are the default settings of my Client PC VPN network Adapter.
Refer below screenshots if you have any issues with VPN connection from client side.


Two other ways to confirm the VPN connection is successful is go back to VPN server 2019 and Open Routing and Remote Access Manager >> From there Expand our server name >> Choose Remote Access client, and in the right side we can see a active connection.

Another option to confirm the successful VPN connection is , open a browser in Windows 7 PC and search the what is my IP and it will show the public ISP IP as VPN server IP. Which means all the internet traffic from client side is routing through our VPN server.

This Concludes the settings up PPTP VPN on Windows server 2019. I hope this blog article is informative. Leave your thoughts in the comment box.
If you are Looking to Convert our PPTP VPN to support SSTP refer our below article.
Share This Story, Choose Your Platform!
By admin|2021-12-16T10:40:29+00:00December 24th, 2017|Windows|
Related Posts
9 Comments
-

Maximiliano Ramos
August 27, 2020 at 1:54 am — ReplyHello. I followed this guide to create a VPN network from my clients to our server, but despite all the configurations have been properly completed, the clients are not able to connect nor by SSTP SSL or PPTP. They will not reach out the server public ip address.
Is it possible to get some assistance to get this working?Thanks in advance.
-
admin
August 27, 2020 at 5:17 am — ReplyOkay, we can together find out what causing the issue. Email me the details and error.
-
Mark Fogel
October 13, 2021 at 12:48 pm — ReplyHi thanks for the guide, I have a successful connection to the VPN server however I am unable to connect to anything beyond. Is this a routing issue? Any idea what I should look out for?
Many Thanks,
-
admin
October 13, 2021 at 5:14 pm — ReplyHi Mark, Most probably routing issue. My suggestion is check your local network settings from your PC and make sure there is no Network conflict.
-
-
Tom Phillips
December 3, 2021 at 7:54 pm — ReplyHi,
How do I set this up with machine that is behind our company firewall and is configured with private IP address (access to internet and internal resources). So, basically I can’t configure public IP on this server, we need to use NAT, Firewall public IP -> Windows VPN server private IP. Also, can I use any private IP address for “Address range assignment” or do IPs need to be in the same network as the servers NIC? Thanks, 1st time trying to set this up.-
admin
December 3, 2021 at 8:48 pm — Replyokay, try to choose your private interface which is connected to your Firewall public IP while selecting interface and see if that works.
Also you can use any private IP range in the IP address Assigned section.
-
-
Jason
March 16, 2022 at 11:59 pm — ReplyAwesome guide, the only one I found that works!!
Keep up the good work. -
Aris Repolles
July 29, 2022 at 8:25 am — ReplyHi can you help about VPN connection on the server 2019. i already follow you guide but i enconter an error 807. can you help me?. thank you
-
Aris Repolles
July 29, 2022 at 8:26 am — ReplyHi, can you help with VPN connection on the server 2019? i already follow your guide but i encounter an error 807. can you help me?. thank you


Page load link
Go to Top
A Virtual Private Network (VPN) is used to securely create a tunnel for data between your local computer to a remote server. On Windows Server 2019, you can configure a VPN to provide network access to connected clients and allow connected devices to communicate securely.
This guide explains how to set up a fresh Windows Server 2019 as an L2TP over IPSec, or a PPTP VPN, using the routing and remote access feature. Layer 2 Tunneling Protocol (L2TP) with IPSec offers robust encryption for connections to the server. On the other hand, the Point to Point Tunneling Protocol (PPTP) is simple to deploy but not as secure.
To set up the VPN server, we shall use the built-in Routing and Remote access feature, which offers a graphic interface to configure remote networking features such as Dial-up, LAN routing, NAT, and VPN.
Requirements
-
Deploy a Windows Server 2019 Instance on Vultr
-
Remotely connect to the server and log in as an Administrator
Create a New VPN User
For the VPN service to work well, it must authenticate with a valid user account to the server. So, you need to create a new user on the server.
Click Tools under server manager and select Computer Management from the drop-down list to create a new user.
Once the computer management window pops up, expand Local Users and Groups from the left pane and right-click Users to select New User on the sub-menu.
Under the New User dialog box, enter a username, full name, and password for the VPN user, then click create and close the window.
The new user will now be listed on the list of active server users, right-click on the new user and select properties.
Under the user properties window, navigate to the Dial-in tab and click Allow access under Network Access Permission. Click OK for changes to take effect.
Install the Routing and Remote Access Features
Procedure 1: Through Server Manager
From the Windows start menu, open Server Manager, click Manage, then select Add Roles and Features from the drop-down list.
From the open window, click next and select Role-based or feature based installation, then select your server from the pool. Select Remote Access, Remote Access Administration from the list of server roles.
Next, select DirectAccess and VPN (RAS) and Routing from the features list, then click to Install IIS, which is required for remote access to work well.
Procedure 2: Using Windows PowerShell
You can also install Remote Access from Windows Powershell.
From the Windows start menu, open an Administrative Powershell, then install Remote access by pasting the following code to the console.
Install-WindowsFeature RemoteAccess

Install-WindowsFeature DirectAccess-VPN -IncludeManagementTools

Install-WindowsFeature Routing -IncludeManagementTools


Your output should be similar to:


PS C:UsersAdministrator> Install-WindowsFeature RemoteAccess

>> Install-WindowsFeature DirectAccess-VPN -IncludeManagementTools

>> Install-WindowsFeature Routing -IncludeManagementTools


Success Restart Needed Exit Code      Feature Result

------- -------------- ---------      --------------

True    No             Success        {Remote Access}

True    No             Success        {RAS Connection Manager Administration Kit...

True    No             Success        {Routing}
Configure Routing and Remote Access
Open Server Manager and click Tools on the top toolbar. From the drop-down list, select Remote Access Management.
In the open Routing and Remote Access window, right click on your server name just below Server status, then select Configure and Enable Routing and Remote Access from the drop-down menu.
Now, select Custom configuration to configure remote access manually.
Select VPN Access and NAT as services you want to enable on your server, click next to finish the configuration, and start the service.
Setup a PPTP VPN
Now that Remote Access is running, you can set up your PPTP VPN. To get started, you must assign connected clients** static IP Addresses to avoid possible connection issues. To do this, right-click on your server under the Routing and Remote Access window and select Properties from the drop-down list.
Click IPV4 in the Open Window, then select Static address pool. Now, click Add to craft a new IP Address range from the open pop-up window. In this guide, we use the range 10.0.0.1 to 10.0.0.50, and the server will automatically calculate the number of available addresses.
Click OK to save your static IP Address configuration. You will be prompted to restart Routing and Remote Access for changes to apply; simply click OK.
Configure NAT and enable PPTP
We need to configure Network Address Translation (NAT) for connected clients to use the Internet. On the left pane of the same routing and remote access window, expand the IPv4 options under your server. Right-click on NAT and select New Interface.
Under the open dialog window, select Public interface and enable NAT on the interface.
Next, navigate to Services and Ports and click VPN Gateway (PPTP) from the drop-down list.
Click Edit to set a Private address for the VPN service, change the current address 0.0.0.0 to 127.0.0.1, and click OK to save.
Finally, click OK to save all changes, then right-click on your server from the left pane and click Restart under the All Tasks sub-menu.
This will restart routing and remote access services making your server ready for incoming VPN connections.
Configure Windows Firewall to accept Incoming PPTP VPN Connections
Click Tools from the Windows server manager and select Windows Defender Firewall with Advanced Security from the drop-down list.
Under the open Windows Defender Firewall with Advanced Security window, select Inbound Rules on the left pane, then click New Rule on the right pane.
In the open new Inbound rule wizard, click Predefined and select Routing and Remote Access from the list.
Under predefined rules, choose Routing and Remote Access (PPTP-In), click next to allow the connection, then finish for the new Firewall rule to be applied and test your new PPTP VPN server.
Test your PPTP VPN
Using your personal computer (PC) or Smartphone, go to Networks, Add a new VPN and select PPTP as the VPN type. Then, enter the VPN username and password created earlier to connect.
In this guide, we cover and test the PPTP VPN on a Windows 10 PC. To get started, click the start menu and search for Control Panel, then, click Network and Internet.
Under Network and Internet, open the Network and Sharing Center and click Set up a new connection or network.
Under the open window, select Connect to a workplace and click Use my Internet connection (VPN).
Then, enter your server’s public IP Address (Check your Vultr server dashboard), assign the connection a name, and click create.
Now, on the left pane, click Change adapter settings, then right click your created VPN interface and select Properties.
Under the pop-up, click Security, then choose Point to Point Tunneling Protocol (PPTP) under Type of VPN.
Finally, under Allow these protocols, select CHAP and MS-CHAP v2, then click OK to apply changes.
Your new VPN is configured successfully. Click the network connection icon on the taskbar, select your VPN on the list and click Connect to enter the VPN username and password created earlier to establish a connection to your new PPTP VPN server.
Setup L2TP with IPSEC
Open server manager, click Tools, and open Remote Access Management, then right-click your server on the left pane to select Properties from the drop-down list.
Under server properties, navigate to the Security tab, and click Allow custom IPSec policy for L2TP/IKEv2 connection to enter your new pre-shared key.
In this guide, we use 12345678, choose something stronger, then navigate to IPV4 to set a static address pool and click OK to apply changes.
Keep note of the pre-shared key (PSK) since it will be required for every user establishing a connection to the VPN server.
From the left pane, expand the IPV4 sub-menu and right-click on NAT, then select New Interface. If you set PPTP earlier, click NAT and edit the existing interface you already created.
Navigate to the Services and Ports tab and select VPN Gateway [L2TP/IPSec], then click edit to change the private address from 0.0.0.0 to 127.0.0.1. Click OK to save changes and restart remote access from the left pane under All Tasks.
This will restart Routing and Remote Access, then save the applied L2TP configurations.
Allow L2TP Connections through Windows Firewall
Open Windows Defender with Firewall, select inbound rules and add a new rule. Select Predefined and from the list, choose Routing and remote access.
Under Predefined rules, select Routing and Remote Access [L2TP-In] and click next.
Finally, allow the connection and click Finish to apply the new Firewall rule.
Connect and Test Your L2TP VPN server
In this guide, we test the new L2TP with IPSec VPN on a mac. To get started, open System Preferencesand click Network.
Under the Network Preferences window, click the + sign and select VPN under the Interface dialog box. Then, choose L2TP with IPSec as the VPN Type and assign your connection a name.
Click create, then enter your public server IP Address (server address) and username (Account name). Next, click Authentication Settings to enter your account password and Pre-shared key (Shared secret) created earlier.
Next, click Advanced and select Send all Traffic over VPN Connection, then click Apply, and finally click Connect to establish a connection with your new L2TP VPN server.
Conclusion
You have set up a VPN on your Windows server 2019 instance; you can choose to create both PPTP and L2TP VPNs with different users connecting through your server without any limitations.
For every connected device, they will be able to access the Internet through your server and interact with other connected computers.
Have a private connection on Windows Server 2019 using top VPN software
by Aleksandar Ognjanovic
Aleksandar’s main passion is technology. With a solid writing background, he is determined to bring the bleeding edge to the common user. With a keen eye, he always… read more
Updated on August 29, 2022
Reviewed by
Edgar Nicov

Since the dial-up Internet era, Edgar was interested in online resources. From forums to e-commerce websites, he started digging into how those resources could generate revenue. Today he… read more
- Windows Server 2019 supports VPN connections. But you have to go through a bit of trouble to set it up and allow VPN access.
- Discover three easy steps for setting up a VPN on Windows Server 2019 without too complicated processes.
- You don’t have to install any software tools since you can use the server’s built-in settings.
- In any case, you should rely on privacy software for more advanced technologies and security.
Using a VPN on a Windows Server has a lot of advantages.
It allows users in a small environment to access remote clients or firewalls to Windows Server.
If you’re here to discover the exact steps for installing a VPN on Windows Server 2019, here’s everything you need to know.
Does Windows Server have a built-in VPN?
Affirmative, you can set up a VPN on Windows Server using the right protocols. Plus, there are certain versions that allow this operation
More exactly, it’s possible to use a VPN connection on a Windows Server 2019 and get increased privacy for your server.
In order to set up a VPN connection on this Windows Server edition, you have to use L2TP or PPTP VPN protocols.
How can I set up a VPN on Windows Server 2019?
1. Install Remote Access using Server Manager
- Open Server Manager
- Go to Manage > Add Roles and Features Wizard
- Check the Remote Access box and click Next
- At Role Services, check the DirectAccess and VPN (RAS) box and click Next
- Click Install
- Once setup is over, you might have to restart the server
An alternative solution is to install and configure Remote Access using PowerShell.
2. Set up the VPN
- Click on the Open the Getting Started Wizard
- Choose Deploy VPN only
- In the Routing and Remote Access Management Console, right-click on the Server name
- Select Configure and Enable Routing and Remote Access from the context menu
- Choose Custom configuration and click Next
- Select VPN access
- Start the VPN service
You shouldn’t stumble upon any issues at this stage if you use the dedicated wizard.
3. Configure VPN access
Finally, the only thing remaining is to configure the VPN User and Network Access. You have to open and forward ports from the firewall to the Windows Server.
Depending on the protocol you use, here are the ports you should open:
- For PPTP: 1723 TCP and Protocol 47 GRE (also known as PPTP Pass-through)
- For L2TP over IPSEC: 1701 TCP and 500 UDP
- For SSTP: 443 TCP
If you don’t have a DHCP server, you can set a static IPv4 address pool. This can be done by following the steps below:
- Firstly, make sure all users have Remote access enabled
- Open the Properties panel of your VPN server
- Click on the IPv4 tab and enable Static address pool
- Click Add and add the same static IP address from the same Server subnet
- Best VPN for Windows 10 [Out of 25 Tested in 2023]
- Cisco AnyConnect Authentication Failed: How to Fix it
- This Content Cannot be Selected at This Time [PS4 Fix]
How does VPN work on Windows Server?
Setting up a VPN on a Windows Server implies technical knowledge, so you have to learn how to configure it on your PC.
In a few words, you need to initially create a new VPN user and then set up routing and remote access features.
Here you have the required setup names and technologies you can use for securing your Windows Server:
- Windows Server 2019 VPN setup L2TP
- Windows Server 2019 VPN Ikev2 setup
- Windows Server 2019 SSTP VPN setup
- Windows Server 2019 PPTP VPN setup
- setup IPSec VPN Windows Server 2019
In conclusion, you can install a VPN on your Windows Server 2019 in three easy steps: setting up Remote Manager using Server Manager or PowerShell, installing the VPN, and managing VPN access permissions.
In case you need a fresh OS install, simply download Windows Server 2019 right away! Plus, join our VPN Troubleshooting Hub for additional guides.
If you experienced any technical difficulties, please let us know by dropping a comment in the section below.
Your connection is not secure — websites you visit can find out your details:

- Your IP Address:
loading

Companies can sell this information, alongside your location and internet provider name, and profit from it by serving targeted ads or monitoring your data usage.
We recommend Private Internet Access, a VPN with a no-log policy, open source code, ad blocking and much more; now 79% off.
![]()
Newsletter
In this article we will show you how to install and set up a VPN server with Windows Server 2022. We will go through the setup step by step.
This article is based on the article VPN Server with Windows Server 2019 (RAS) and has been updated for Windows Server 2022.
To access the corporate network and access corporate resources while on the road, there is rarely any way around a VPN. A virtual private network is one of the dial-up and connection options of a remote access server (RAS). Since modem and ISDN dial-up connections are rather extinct today, these systems are almost only used for VPN dial-ups. Nowadays, integrated solutions from firewall providers such as Juniper, Cisco, Unfiy and others are often used for this purpose.
As a basis for my installation I take a VM with 2 vCPU and 4 GB Ram, for the few VPN connections that are needed here this is perfectly sufficient.
Here’s another warning for safety
This is for my test environment, accordingly the security requirements are not as high as for an enterprise RAS server. For companies, I recommend a hardened reverse proxy in a DMZ, for example a Kemp Loadmaster, which still provides some security. Also, multi-factor authentication should be considered.
You should also think about the structure in advance. RAS implementations range from very simple to highly complex. It is important to find the right one for you.
Operating system installation
After installing Windows Server 2022, the system should first be provided with the latest updates. Start with the installation of the server role “Remote Access”, which includes not only the RAS services with VPN protocols such as PPTP, DirectAccess, SSTP and L2TP/Ipsec, but also a reverse proxy for web applications or a routing service. You should not install the latter as well.
 4")
You must select which of the 3 function types you want to use in the role services. Select “DirectAccess and VPN (RAS)” here.
 5")
After the selection, the required dependencies are displayed. Please confirm them.
 6")
No further configuration is required for easy installation.
Advertisements

 7")
Start the installation and restart the server if necessary. A restart should not actually be necessary.
After installing the roles, the “First Steps Wizard” must be executed.
 9")
For most scenarios, a VPN connection is perfectly adequate. In addition, DirectAccess also brings IPv6 dependencies with it. So for now, we will only deal with VPN.
 11")
The “Routing and RAS” console opens, which has not changed since Windows Server 2008.
 13")
Right-click on the server and select “Configure and activate routing and RAS”.
 15")
Click on “Next” in the setup wizard
 17")
In the next step you have to specify more precisely which scenario you want to set up. Next, I choose the “Custom Configuration” because “RAS (Dial-up or VPN)” expects certain requirements that we do not need.
 19")
In the next step, select “VPN access”
 21")
In the next step, you complete the configuration selection.
 23")
Confirm the message to start the service.
Afterwards, the VPN protocols can be configured.
 25")
Configuration of the VPN protocols
Supported protocols
- PPTP (Point-to-Point Tunneling Protocol) the first implementation was in Windows NT 4.0. Communication takes place via port 1723 TCP and the protocol 47 GRE. PPTP is widely used, but is no longer secure enough today, see also Microsoft security recommendation 2743314.
- L2TP (Layer 2 Tunneling Protocol) which is used by Microsoft together with IPsec. Communication takes place via port 1701 TCP and 500 UDP.
- IKEv2 (actually “Internet Key Exchange V 2”, but here a synonym for IPsec, IP Security). Communication takes place via port 500 and 4500 UDP.
- SSTP (Secure Socket Tunneling Protocol), a Microsoft own protocol based on port 443 TCP. Thus, it gets through all firewalls as long as the HTTPS tunnel is not broken. The protocol requires a functional SSL tunnel. Disadvantage: only available on Microsoft devices.
Protocol selection
The choice of protocols depends on several factors. Each protocol has strengths and weaknesses.
For me personally, the best thing about SSTP is that it works everywhere. Even in free hotel WLANs, which actually only allow VPN in paid WiFi. The disadvantage is that I need a valid certificate from a trusted CA with a public revocation list. This rules out most internal certification authorities, because they do not have public spear lists. Alternatively, a regkey can be set in the client so that this is ignored. SSTP is also only supported by Microsoft operating systems.
PPTP is too insecure for most people, but is supported by almost all end devices.
L2TP is compatible with most devices, depending on the configuration. But in this configuration is the tricky part.
The same applies to IKEv2 / IPsec, depending on the type of authentication, there is quite a bit of work to be done here.
Basic configuration of the protocol ports
The wizard initially created 2 ports for each protocol, except for PPPoE, which only has one. Depending on the selection of protocols and the expected connections, I would disable unused ports or add new ones. With Windows Server 2022, the number of standard ports has been significantly reduced; with previous versions, up to 128 ports were created.
 27")
To do this, right-click on “Ports” and select “Properties”.
 29")
In my case, I switch off the protocols I don’t need and reduce the ports to 1. For the protocols I do need, I leave the number of ports at 2, which is enough for me.
 31")
Configuration of the IP address ranges
The clients that connect remotely need a private IP address. The DHCP server in the network can be used for this, or a static range can be assigned. This is managed by the RAS server.
Firewall configuration
Since the RAS server is not located in the DMZ and does not have a public IP address, port forwarding must be set up on the firewall for the ports of the selected protocols. It is important that the RAS server has a static IP address or a DHCP reservation.
Assigning rights for users
It is also important that the users have the necessary rights for remote access.
 33")
Read also our article: SSTP VPN with Let’s Encrypt certificates.
Часто нам нужен удаленный (через интернет) доступ к нашей сети или серверу. Или объединить две локальных сети физически находящихся в разных местах используя общедоступные сети, например интернет. Простой способ это реализовать VPN (Virtual Private Network «виртуальная частная сеть»).
Простыми словами это частная сеть по верх общедоступной сети (интернет). Можно себе это представить как тунель между двумя устройствами. А для безопасности передаваемых данных используется шифрование.

В этой статье мы настроим VPN Server на Windows Server 2019. Сервер к которому будут подключаться клиенты для доступа к нашей сети. Мы будем использовать протокол L2TP для создания туннеля и IPSec для шифрования трафика. Для этого протокола нам не потребуется специального клиента, его поддержка уже есть в Windows и Android.
Установка службы.
- Откройте Диспетчер серверов .
- Выберите Управление> Мастер добавления ролей и компонентов .
- Установите флажок « Удаленный доступ » и нажмите «Далее».
- В разделе «Службы ролей» установите флажок « DirectAccess и VPN (RAS) » и нажмите Далее .
- Наконец, нажмите Установить . Это может занять некоторое время, и это требует перезагрузки сервера.


После установки роли Удаленный доступ ее следует настроить, проще всего это сделать, нажав на значок с желтым треугольником в Диспетчере серверов и выбрать в появившемся списке пункт Запуск мастера начальной настройки.


Настройки — Особая конфигурация — VPN
- Выбираем наш сервер. Правой кнопкой мыши переходим в Настроить.
- Выбираем особая конфигурация.
- VPN.


Теперь нужно настроить свойства подключения по L2TP:
- Выбираем наш сервер. Правой кнопкой мыши переходим в Свойства.
- Безопасность и вводим Общий Ключ для IPSec . Можно использовать и сертификаты.
- Переходим во вкладку IPv4 и вводим пул адресов который будет выдаваться клиентам.
- Отключаем IPv6.


На этом настройка VPN в целом завершена. Осталось только разрешить пользователю подключаться по VPN :
- Администрирование — Управление компьютером — Пользователи
- Выбираем пользователя — Свойство — Входящие звонки.


Ошибка в тексте? Выделите её и нажмите «Ctrl + Enter»
This blog post is a step by step guide how to install and configure VPN on Windows Server 2019. The blog post shows you how you can easily set up a VPN server for a small environment, branch office, or for a hosted server scenario. This VPN (Virtual Private Network) server allows you to connect from remote clients or firewalls to the Windows Server.
I already did a similar post for other versions of Windows
- How to Install VPN on Windows Server 2008 R2
- How to Install VPN on Windows Server 2012
- How to Install VPN on Windows Server 2012 R2
- How to Install VPN on Windows Server 2016
To install VPN access to a Windows Server 2019, simply follow this step by step guide:
Install Remote Access Role
First, install the “Remote Access” via Server Manager or PowerShell.
Open Server Manager and select Add Roles and Features
Select the Remote Access Role and click next through the wizard.
On the step Role Services, select the DirectAccess and VPN (RAS)
On the final step, select install to install the Remote Access role.
This might requires a reboot of the server.
Install and Configure VPN on Windows Server 2019
After you have successfully installed, now you can start the wizard to install and configure the VPN server in Windows Server 2019.
After the features are installed, which can take a while to finish, you see the link for the Getting Started Wizard. Click on “Open the Getting Started Wizard“.
This opens a new wizard which will help you to configure the server. On the first screen, select “Deploy VPN only“.
This opens the Routing and Remote Access Management Console
Right click on the Server name and click on “Configure and Enable Routing and Remote Access“.
On the new wizard select “Custom configuration“.
Select “VPN Access“.
After you have click finish, you can now start the Routing and Remote Access service.
Configure VPN Access Users and Network
If you have a firewall between the internet and your Windows Server you have to open the following Firewall port sand forward them to your Windows Server:
For PPTP: 1723 TCP and Protocol 47 GRE (also known as PPTP Pass-through)
For L2TP over IPSEC: 1701 TCP and 500 UDP
For SSTP: 443 TCP
After the installation Users have to be enabled for Remote Access to connect to your VPN Server. On a standalone server this can be done in the Computer Management MMC, in a domain environment this can be done in the user properties of an Active Directory user.
If you don’t have a DHCP Server in your environment, you have to add a static IP address pool. This is often needed if you have a single server hosted at a service provider. In the properties of your VPN server, you can click on the IPv4 tab and enable and configure the “Static address pool”.
You now have to add an IP address from the same subnet as your static address pool to the network interface of your server so that users can access the server.
I hope this helps you to set up a VPN server in a small environment, lab, or hosted server. You can find more information about Windows Server in the Microsoft Docs.
Tags: DirectAccess, Install VPN Server on Windows Server, Microsoft, Remote Access, Virutal Private Network, VPN, VPN Server, Windows Server, Windows Server 2019, Windows Server 2019 VPN, Windows VPN Last modified: July 7, 2019
About the Author / Thomas Maurer

Thomas works as a Senior Cloud Advocate at Microsoft. He engages with the community and customers around the world to share his knowledge and collect feedback to improve the Azure cloud platform. Prior joining the Azure engineering team, Thomas was a Lead Architect and Microsoft MVP, to help architect, implement and promote Microsoft cloud technology.
If you want to know more about Thomas, check out his blog: www.thomasmaurer.ch and Twitter: www.twitter.com/thomasmaurer
On Windows Server 2019, a virtual private network (VPN) is a convenient method to allow users to access resources using an encrypted connection from a remote location and through the internet.
Typically, organizations use VPN to extend their private network to allow employees to work from home or another remote location to access files, apps, intranet websites, printers, and other resources through a public network as if they were directly connected into the company’s network.
The way you set up a VPN server hasn’t really changed in many years, which means that the same instructions to configure a virtual private network on Windows Server 2019 applies to older versions, including Windows Server 2016, 2012 R2, and older versions. If you have a Windows 10 device, you can use the “Incoming Connection” feature to set up a VPN server to connect remotely to your home network to access your computer’s files and peripherals, and even other computers in the network.
In this guide, you’ll learn the steps to set up a VPN server on Windows Server 2019.
- How to add VPN role feature on Windows Server
- How to set up VPN server on Windows Server
- How to allow VPN connections through firewall on Windows Server
- How to allow users access through VPN on Windows Server
- How to set up port forwarding on router to enable VPN access
- How to set up a VPN connection on Windows 10
- How to set up a VPN server on Windows 10
How to add VPN role feature on Windows Server
To add the Routing and Remote Access role to set up a VPN server on Windows Server 2019, use these steps:
-
Open Start.
-
Search for Server Manager and click the top result to open the utility.
-
Click the Manage menu button from the top-right corner and select the Add Roles and Features option.

Windows Server add roles option -
Click the Next button.
-
Select the Role-based or feature-based installation option.

Role-based or feature-based installation option -
Click the Next button.
-
Choose the Select a server from the server pool option.
-
Select the server name.
Select destination server option -
Click the Next button.
-
Check the Remote Access option.
Remote access server role option -
Click the Next button.
-
Click the Next button again.
-
Click the Next button one more time.
-
Check the DirectAccess and VPN (RAS) option.
DirectAcess and VPN RAS option -
Click the Add features button.
-
Click the Next button.
-
Click the Next button again.
-
Click the Next button one more time.
-
Click the Install button.
Windows Server 2019 install VPN server option -
Click the Close button.


Once you complete the steps, the VPN server module will install on the device, and you can proceed to configure the remote access feature.
To configure a VPN server on Windows Server 2019, use these steps:
-
Open Start.
-
Search for Server Manager and click the top result to open the utility.
-
Click the Manage menu button from the top-right corner and select the Routing and Remote Access option.

Windows Server 2019 Routing and Remote Access option -
Right-click the server name and select the Configure and Enable Routing and Remote Access option.

Configure and Enable Routing and Remote Access -
Select the Custom configuration option.

Custom configuration option -
Click the Next button.
-
Check the VPN access option.
Windows Server 2019 VPN access option -
Click the Next button.
-
Click the Finish button.
-
Click the Start service button.
-
Right-click the server name and select the Properties option.
Windows Server 2019 VPN properties option -
Click the IPv4 tab.
-
Under the “IPv4 address assignment” section, check the Static address pool option (recommended).

VPN server static address pool option Quick note: If you have DHCP server configured, you can use the Dynamic Host Configuration Protocol (DHCP) option to handle the distribution addresses. However, if you want to control the access to the network, or you don’t have a DHCP server, then the static pool option is your best option. When using this option, make sure to assign an IP range it won’t assign to other devices in the local network.
-
Click the Add button.
-
Specify a start IP address.
-
Specify an end IP address.
VPN address range setup -
Click the OK button.
-
Click the Apply button.
-
Click the OK button.
-
Right-click “Remote Access Logging & Policies” and select the Launch NPS option.
Windows Server 2019 launch NPS -
Select the Network Policies option from the left pane.

Network Policies -
Double-click the Connections to Microsoft Routing and Remote Access server policy.
-
Under the “Access Permission” section, select the Grant access. Grant access if the connection request matches this policy option.

Connection to VPN policy -
Click the Apply button.
-
Click the OK button.
-
Double-click the Connections to other access servers policy.
-
Under the “Access Permission” section, select the Grant access. Grant access if the connection request matches this policy option.
Connection to other server policy -
Click the Apply button.
-
Click the OK button.
-
Close the Network Policy Server console.


After you complete the steps, the VPN server will be created on Windows Server 2019, but you’ll still need to configure the users who are allowed to connect, and you need to configure the firewall to allow connections.
Windows Server 2019, 2016, 2012 R2 and older versions include more options to set up a more secure and advanced VPN server. In this guide, we’re only covering the fast and secure way to get started with the remote access feature.
How to allow VPN connections through firewall on Windows Server
While configuring the Routing and Remote Access feature on Windows Server should automatically open the necessary Windows Firewall ports, you want to make sure the firewall is properly configured.
To allow VPN connections through the firewall on Windows Server 2019, use these steps:
-
Open Start on Windows Server 2019.
-
Search for Allow an app through Windows Firewall, and click the top result to open the experience.
-
Click the Change settings button.
-
Scroll down and make sure Routing and Remote Access is allowed on Private and Public.

-
click the OK button.

After you complete the steps, the Windows Server VPN server should be able to receive connections remotely from other computers.
How to allow users access through VPN on Windows Server
To allow users access through the virtual private network, use these steps:
-
Open Start.
-
Search for Server Manager and click the top result to open the utility.
-
Select the Active Directory Users and Computers option.
Quick note: If you don’t have Active Directory configured on your server, select the Computer Management option, expand the Local Users and Groups branch from the left pane.
-
Click on Users from the left pane.
-
Double-click the user you want allow remote access.
-
Click the Dial-in tab.
-
Under the “Network Access Permission” section, select the Allow access option.

Windows Server 2019 enable user VPN access -
Click the Apply button.
-
Click the OK button.

Once you complete the steps, you may need to repeat the steps to enable other users to access the network using a VPN connection.
These instructions show you the steps to allow remote access on each user individually. If you need to configure access for a lot users, you can also create a group to configure VPN access for users more easily.
How to set up port forwarding on router to enable VPN access
To be able to connect through a public network (such as the internet) to the VPN server, you’ll need to forward port 1723 (Point to Point Tunneling Protocol (PPTP)) to allow VPN connections.
Here are the instructions that will help you set up port forwarding on a router. You can also visit your router’s manufacturer website for more assistance to configure Port Forwarding.
In addition to the forwarding the required port, you’ll also need to know the public IP address assigned to you by your Internet Service Provider (ISP). You will need this information to contact your VPN server remotely.
To find out if your current public IP address, open your web browser, and using any search engine, perform a search for “What’s my IP”, and your information will appear in the first result.
If the network uses a dynamic public IP address, which can change at any time, then you’ll need to configure DDNS (Dynamic Domain Name System) in your router to avoid having to configure the VPN setup every time your public IP address changes.
Here are the instructions that will help you set up DDNS on your router. You can also visit your router’s manufacturer website for additional help to configure DDNS.
How to set up a VPN connection on Windows 10
After setting up the VPN server on Windows Server 2019, you’ll need to configure the devices that will be accessing your local network remotely. You can set up any device, including your desktop, laptop, tablet, and even phone (for example, Android and iPhone). Here are the instructions to set up a VPN connection on Windows 10.
After adding a VPN connection on your computer, you have to adjust the settings with these steps:
-
Open Control Panel.
-
Click on Network & Internet.
-
Click on Network and Sharing Center.
-
Click the Change adapter settings link from the left pane.
-
Right-click the VPN adapter and select the Properties option.

-
In the General tab, make sure you’re using the correct domain you created while configuring DDNS — or at least you’re using the correct public IP address.

-
Click on the Security tab.
-
Under “Type of VPN,” select the Point to Point Tunneling Protocol (PPTP) option.
-
Under “Data encryption,” select the Maximum strength encryption (disconnect if server declines) option.
-
Click the OK button.
-
Click on the Networking tab.
-
Uncheck the Internet Protocol Version 6 (TCP/IPv6) option.
-
Check the Internet Protocol Version 4 (TCP/IPv4) option.
-
Select the Internet Protocol Version 4 (TCP/IPv4) option.
-
Click the Properties button.
-
Click the Advanced button.

-
Clear the Use default gateway on remote network option.

Important: We’re disabling this option to prevent your web traffic to go through the remote connection, which can slow down your internet connection. However, if you’re looking to access the internet through a VPN connection, then don’t change this last setting.
-
Click the OK button.
-
Click the OK button again.
-
Click the OK button once more.
-
Open Settings.
-
Click on Network & Internet.
-
Click on VPN.
-
Select the VPN connection option and click the Connect button.

Windows 10 remote connection using VPN


Once you complete the steps, the device should be able to connect to VPN server from a remote location.

azure in nepali, best video in server 2019, how to configure clustering, how to configure remote access server in windows server 2019, how to configure ssl vpn on windows server 2019, how to make server in nepali, how to manage server in nepali, ikev2 vpn on windows server, l2tp vpn on windows server 2019, MCSE in 2019 Server nepali IT system engineers, mcse in damak, netwoking in nepali, network world inc, okhrabo suryaa, server in nepali, Technical in nepali
how to Configure IKEv2 / SSTP / L2TP VPN on windows server 2019
#MCSE #networkworldinc
by Prof. Okhrabo Suryaa
for MCSE / IT Systems Engineering / IT Officers Students
IIS Server in Windows server 2019
MCSE Video in nepali
How To configure Server in nepali
Nepali technical channel
IT Systems Engineer for nepali
Free video on windows server
online mcse in nepali
source
windows server

Ikev2 Vpn With Windows Server 2019
Personal Growth and Self-Improvement Made Easy: Embark on a transformative journey of self-discovery with our Ikev2 Vpn With Windows Server 2019 resources. Unlock your true potential and cultivate personal growth with actionable strategies, empowering stories, and motivational insights. Server vpn i39ve off always a is workstation firewall- configured forwarded all been are to I39ve in configure environment- ports on this firewalls 2019- authority- windows needed a software i39ve ikev2 nps server the router ras turned test certificates all server trying server for on in and testing an
How To Setup Ikev2 Ipsec Mschapv2 Vpn On Windows Server 2019 Super User
How To Setup Ikev2 Ipsec Mschapv2 Vpn On Windows Server 2019 Super User
You can use ikev2 as a virtual private network (vpn) tunneling protocol that supports automatic vpn reconnection. ikev2 allows the security association to remain unchanged despite changes in the underlying connection. in this document prerequisites devices joined to a domain device not joined to a domain troubleshooting. How to setup ikev2 ipsec mschapv2 vpn on windows server 2019 ask question asked 10 months ago modified 10 months ago viewed 3k times 0 the google appreantly removed other vpn options such as pptp from vpn setup. with pptp there are tons of easy guide to setup your vpn on windows server.

Configure Ikev2 Site To Site Vpn With Windows Server 2016 2019 Youtube
Configure Ikev2 Site To Site Vpn With Windows Server 2016 2019 Youtube
In this section, we’ll configure remote access to allow ikev2 vpn connections and to deny connections from other vpn protocols. we’ll also assign a static ip address pool for the issuance of ip addresses to connecting authorized vpn clients. note instead of ikev2, you can also choose to use sstp. In ikev2 vpn connections, the default setting for ikev2 cryptographic settings are: encryption algorithm: des3 integrity, hash algorithm: sha1 diffie hellman group (key size): dh2 these settings aren’t secure for ike exchanges. to secure the connections, update the configuration of vpn servers and clients by running vpn cmdlets. vpn server. Step 1: update system step 2: install remote access role step 3: configure routing and remote access step 4: configure vpn properties step 5: configure nat step 6: restart routing and remote access step 7: configure windows firewall step 8: create vpn user step 9: connecting vpn clients. step 10: monitoring vpn. Currently routing information from a windows 2019 server through the vpn to access the server. i can’t see windows networking as being a viable option to replace the vpn server but was wondering if anyone has had any luck using any other vpn software to get a vpn server with ikev2 and a pre shared running without many issues. spice (7) reply (4).

Vpn Ikev2 Certificate Error But Sstp Successfully Connects Windows 10
Vpn Ikev2 Certificate Error But Sstp Successfully Connects Windows 10
Step 1: update system step 2: install remote access role step 3: configure routing and remote access step 4: configure vpn properties step 5: configure nat step 6: restart routing and remote access step 7: configure windows firewall step 8: create vpn user step 9: connecting vpn clients. step 10: monitoring vpn. Currently routing information from a windows 2019 server through the vpn to access the server. i can’t see windows networking as being a viable option to replace the vpn server but was wondering if anyone has had any luck using any other vpn software to get a vpn server with ikev2 and a pre shared running without many issues. spice (7) reply (4). I’ve been trying to configure an ikev2 always on vpn on a windows server 2019. i’ve configured the ras server, nps server, and certificates authority. i’ve forwarded all needed ports in router firewall. all server workstation software firewalls are turned off for testing (this is in a test environment). Configuring site to site vpn using windows server 2016 2019 routing and remote access.
Ikev2 Vpn With Windows Server 2019
Ikev2 Vpn With Windows Server 2019
how to create ikev2 vpn tunnel with windows server 2019 and windows 10. how to configure ikev2 sstp l2tp vpn on windows server 2019 #mcse #networkworldinc by prof. okhrabo suryaa configuring site to site vpn using windows server 2016 2019 routing and remote access. vpn #windowsserver #michelevese facciamo chiarezza sugli scenari vpn, vediamo perché oggi è un argomento così in voga sia video series on advance networking with windows server 2019: this video tutorial provide complete information to deploy and nciptandani 2019 03 configure vpn for client access ikev2 . if you are frustrated since #l2tp pptp is gone after miui 13 update, or after your phone’s tablet’s device’s android version windows 11 provides an in built option to configure and manage vpn connections from the settings app, which you can use to a comprehensive guide on how to setup a ikev2 vpn connection on your windows 10 system brought to you by securevpn.pro how to add ikev2 vpn on windows 10 with certificate. professor robert mcmillen shows you how to install, configure and troubleshoot an l2tp setup on a windows 2019 and 2016
Conclusion
After exploring the topic in depth, it is clear that the post delivers helpful knowledge about Ikev2 Vpn With Windows Server 2019. Throughout the article, the author demonstrates a deep understanding on the topic. Notably, the discussion of X stands out as a key takeaway. Thank you for reading the post. If you need further information, please do not hesitate to reach out via email. I look forward to your feedback. Moreover, below are a few similar content that you may find useful: