В данной статье представлена инструкция по развертыванию простейшего VPN-сервера на базе Windows Server 2012 R2. По моему личному мнению поднимать VPN на базе Windows можно в случае использования небольшой офисной сети с потребностью удаленного подключения для нескольких сотрудников. В случае же организации VPN между филиалами компании с достаточно обширной инфраструктурой, следует использовать технологию DirectAccess либо VPN на базе аппаратных решений (например Cisco).
Перейдем к установке и настройке:
- Открываем Server Manager — Dashboard, нажимаем «Add roles and features» (Рис.1):

Рис.1.
2. Выбираем «Role-based or feature-based installation» и нажимаем Next (Рис.2):

Рис.2.
3. Далее попадаем на страницу выбора сервера (в моем случае он один), выбираем сервер и нажимаем Next (Рис.3):

Рис.3.
4. Далее выбираем роль «Remote Access» и нажимаем Next (Рис.4):

Рис.4.
5. На последующий страницах мастера нажимаем два раза Next. В окне выбора служб ролей (Select role services) выбираем «DirectAcces and VPN (RAS)». Откроется окно «Add features», нажимаем кнопку «Add Features» (Рис.5 и 6):

Рис.5.

Рис.6.
6. Затем откроется окно «Web Server Role», нажимаем Next (Рис.7):

Рис.7.
7. В окне «Select role services» нажимаем Next (Рис.8):

Рис.8.
8. В окне подтверждения нажимаем Install (Рис.9):

Рис.9.
9. После окончания установки нажимаем «Open the Getting Started Wizzard» (Рис.10):

Рис.10.
10. Откроется окно «Configure Remote Access», нажимаем «Deploy VPN only» (Рис.11):

Рис.11.
11. Откроется консоль «Routing and Remote Access». Нажимаем правой кнопкой мыши на нашем сервер и выбираем «Configure and Enable Routing and Remote Access» (Рис.12):

Рис.12.
12. Откроется мастер настройки, нажимаем Next (Рис.13):

Рис.13.
13. В окне Configuration выбираем «Remote Access (dial-up orVPN)» и нажимаем Next (Рис.14):

Рис.14.
14. На следующей странице выбираем VPN и нажимаем Next (Рис.15):

Рис.15.
15. Далее выбираем сетевой адаптер, имеющий доступ в Интернет и нажимаем Next (Рис.16):
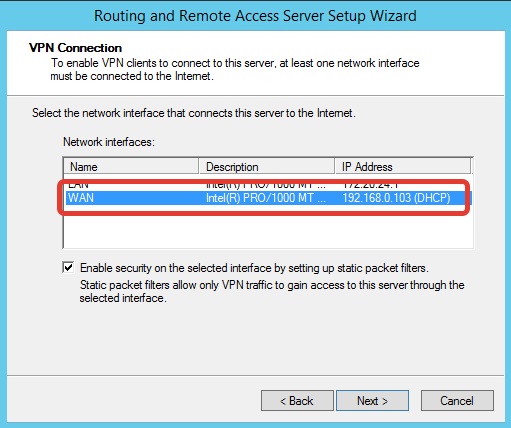
Рис.16.
16. В следующем окне можно выбрать, каким образом будут выдаваться IP-адреса vpn-клиентам: с помощью DHCP или из специального пула, выбираем второй вариант и нажимаем Next (Рис.17):

Рис.17.
18. В окне «Address Range Assignment» нажимаем кнопку New (Рис.18):

Рис.18.
19. Задаем начальный и конечный адреса диапазона и нажимаем Ок (возвращаемся на предыдущую страницу и нажимаем Next (Рис.19):

Рис.19.
20. Далее выбираем метод аутентификации клиентов: с помощью RRAS или RADIUS. Выбираем первый вариант и нажимаем Next (Рис.20):

Рис.20.
21. После успешной настройки нажимаем Finish (Рис.21):

Рис.21.
22. Если нам нужен VPN PPTP, то настройки на этом завершены. Если нам нужен VPN L2TP, в консоли «Routing and Remote Access» открываем свойства нашего сервера (Рис.22):

Рис.22.
23. На вкладке Securuty задаем «Preshared Key» (ставим галку «Allow custom IPsec policy for L2TP/IKEv2 connection») (Рис.23):

Рис.23.
24. Далее в консоли RRAS открываем свойства портов, выбираем «WAN miniport (L2TP)» и ограничиваем количество портов (Рис.24):

Рис.24.
25. Чтобы дать пользователю доступ к VPN, открываем свойства нужного нам пользователя и переходим на вкладку Dial-in, в разделе Network Access Permission выбираем «Allow Access» и нажимаем Apply (Рис.25):

Рис.25.
26. Также необходимо открыть следующие порты на фаерволе:
- PPTP TCP — 1723
- L2TP — UDP порт 1701
- IKE — UDP порт 500
- IPSec ESP — UDP порт 50
- IPSec NAT-T — UDP порт 4500
- SSTP — TCP 443
Успехов!
VPN provides secure access to organizations’ internal data and applications to clients and devices that are using the Internet.
To properly implement and support a VPN environment within your organization, you must understand how to select a suitable tunnelling protocol, configure VPN authentication, and configure the server role to support your chosen configuration.
As in previous versions of Windows Server, there are two types of VPN connection available in Windows Server 2012 R2 :
• Remote access
• Site-to-site
Remote Access VPN Connections
Remote access VPN connections enable your users who are working offsite, such as at home, at a customer site, or from a public wireless access point, to access a server on your organization’s private network by using the infrastructure that a public network, such as the Internet, provides.
Site-to-Site VPN Connections
Site-to-site VPN connections, which are also known as router-to-router VPN connections, enable your organization to establish routed connections between separate offices or with other organizations over a public network while helping to maintain secure communications. A routed VPN connection across the Internet logically operates as a dedicated wide area network (WAN) link. When networks connect over the Internet, a router forwards packets to another router across a VPN connection. To the routers, the VPN
connection operates as a data-link layer link.
So in my post this time, lets go through a simple step how you can implement VPN in your infrastructure and for this demo purposes, i will continue using the same VM that i had for my DirectAccess implementation.
Please do refer to my previous DirectAccess post on what kind of VM’s that i use to implement this VPN.
Step by Step : Implementing Basic DirectAccess in Windows Server 2012 R2
For more information about VPN / Remote Access, please do log in to : http://technet.microsoft.com/en-us/library/dn383589.aspx
Lets get started with our VPN configuration.
1st, lets review some of the Routing & Remote Access settings and do dome some changes on the RRAS.
1 – Log in to LON-RTR server, open Server Manager, click Tools and then click Remote Access Management Console…

2 – In the Remote Access Management Console, click DirectAccess and VPN, and from the Actions pane, under the VPN section, click Enable VPN…

3 – In the Enable VPN box, click OK…

4 – Verify that the configuration was applied successfully and then click Close…

5 – Next, switch to Server Manager, click Tools and then click Routing and Remote Access…

6 – Next, in the Routing and Remote Access console, expand LON-RTR, right-click ports, click Properties…

7 – Verify that 128 ports exist for SSTP, IKEv2, PPTP, and L2TP, then double-click WAN Miniport (SSTP)…

8 – In the Maximum ports box, type 5, and then click OK…

9 – In the Routing and Remote Access message box, click Yes…

10 – Repeat the same step no.8 & 9 for IKEv2, PPTP, and L2TP, then click OK…

11 – Next, right-click LON-RTR (local), click Properties…

12 – In the General tab, verify that IPv4 Remote access server is selected…

13 – Next, click Security, and then verify that Certificate 131.107.0.10 is selected for SSL Certificate Binding, and then click Authentication Methods…

14 – In the Authentication Methods box, verify that EAP is selected as the authentication protocol and then click OK…

15 – Next, click the IPv4 tab, and then verify that the VPN server is configured to assign IPv4 addressing by using Dynamic Host Configuration Protocol (DHCP), click OK to close the Properties interface…

2nd, before we proceed, please make sure that you verify the certificate requirements for IKEv2 and SSTP in LON-RTR Server…
1 – In LON-RTR Server, open MMC, click File and then click Add/Remove Snap-in…

2 – In the Add/Remove Snap-in interface, click Certificates, click Add, select Computer account, and then click Next…

3 – Click Local computer and then click Finish…

4 – To close the Add or Remove Snap-in, click OK…

5 – Next, expand Certificates (Local Computer), expand Personal, and then click Certificates.
— Notice that certificate 131.107.0.10, this certificate is for Server Authentication (this is required for Secure Socket Tunneling Protocol (SSTP) and Internet Key Exchange version 2 (IKEv2) VPN connectivity).

3rd, its time now for us to configure the Remote Access Server…
1 – Still in the LON-RTR server, open Server Manager, on the Tools menu, click Network Policy Server. ..

2 – In the Network Policy Server console, expand Policies, and then click Network Policies.
– Right-click the policy at the top & bottom of the list, and then click Disable…

3 – Next, in the navigation pane, right-click Network Policies, and then click New…

4 – In the New Network Policy wizard, in the Policy name box, type Adatum VPN Policy, then in the Type of network access server list, click Remote Access Server(VPN-Dial up), and then click Next…

5 – On the Specify Conditions interface, click Add…

6 – In the Select condition interface, click Windows Groups, and then click Add…

7 – In the Windows Groups interface, click Add Groups…

8 – Type IT, and then click OK (you can choose your own group that you prefer)…

9 – In the Windows Groups interface, verify that ADATUM\IT is listed, and then click OK…

10 – In the Specify Conditions interface, click Next…

11 – In the Specify Access Permission interface, click Access granted, and then click Next…

12 – On the Configure Authentication Methods interface, make sure that you clear the Microsoft Encrypted Authentication (MSCHAP)
check box, and then to add EAP Types, click Add…

13 – On the Add EAP Types interface, select Microsoft Secured password (EAP-MSCHAP v2), and then click OK…

14 – repeat the same step above but this time choose Microsoft: Smart Card or other certificate, then click Next…

15 – On the Configure Constraints interface, click Next…

16 – On the Configure Settings interface, click Next…

17 – On the Completing New Network Policy interface, click Finish…

Till this step, we’ve successful modified the remote access server configuration to provide VPN connectivity.
4th, so now lets verify our VPN connectivity in our Windows 8.1 client…
1 – On the Windows 8.1 client PC, open Network and Sharing Center, then click Set up a new connection or network…

2 – Next, on the Choose a connection option interface, click Connect to a workplace, and then click Next…

3 – On the How do you want to connect? interface, click Use my Internet connection (VPN)…

4 – On the Connect to a Workplace interface, click I’ll set up an Internet connection later…

5 – In the Internet address box, type 131.107.0.10 (LON-RTR IP Address)…
— In the Destination name box, type HQ VPN, select Allow other people to use this connection checkbox, and then click Create…

6 – Next, right-click HQ VPN connection and select Properties…

7 – In the HQ VPN Properties, click the Security tab, select Allow these protocols, ensure that Microsoft CHAP version 2 (MSCHAP
v2) is selected, and then click OK…

8 – Next, right click HQ VPN, and then click Connect…

9 – In the Network list, under HQ VPN, click connect…

10 – In the sign-in dialog box, type the domain user from IT department and then click OK…

11 – Verify that you are connected to Adatum by using a PPTP connection, right click HQ VPN and then click Status…


Orait, that all for now, we’ve connected to HQ VPN successfully…
box, type Pa$$w0rd, and then click OK.

Contents
- 1 Windows Server 2012r2 Vpn Ikev2 Hardening Rras Service It S A Passion
- 2 Windows Server 2012 Vpn Ikev2
- 2.1 Conclusion
- 2.1.1 Related image with windows server 2012r2 vpn ikev2 hardening rras service it s a passion
- 2.1.2 Related image with windows server 2012r2 vpn ikev2 hardening rras service it s a passion
- 2.1 Conclusion
Explore the Wonders of Science and Innovation: Dive into the captivating world of scientific discovery through our Windows Server 2012r2 Vpn Ikev2 Hardening Rras Service It S A Passion section. Unveil mind-blowing breakthroughs, explore cutting-edge research, and satisfy your curiosity about the mysteries of the universe. Always defined ikev2- vpn on a powershell the root Certificate and ignore in powershell the windows set choose one this as different result failed running define selection- vpn shown certification from using vpnauthprotocol authority to certificate when clients will the 10 may here- ipsec administrator connections command
Windows Server 2012r2 Vpn Ikev2 Hardening Rras Service It S A Passion
Windows Server 2012r2 Vpn Ikev2 Hardening Rras Service It S A Passion
Setup ikev2 vpn with windows server 2012 r2 posted by davidenco on jun 27th, 2017 at 6:29 am windows server i want to replace our pptp vpn with an ikev2 vpn for use with our windows and ios clients. however i cannot find a simple tutorial that explains what to do step by step. 1 routing and remote access on windows server 2012r2 offers poor quality of encryption strength in standard installation. of you set up vpn connection based on ikev2, then you can check that connection is set up with weak algorithms: get netipsecmainmodesa (at client computer) des3 ??? sha1 ??? wtf? let’s harden rras service.

How To Set Up And Configure Rras Vpn Access On A Windows Server 2012 R2
How To Set Up And Configure Rras Vpn Access On A Windows Server 2012 R2
For vpn servers that run windows server 2012 r2 or later, you need to run set vpnserverconfiguration to configure the tunnel type. these settings are effective for all ikev2 vpn connections. powershell set vpnserverconfiguration tunneltype ikev2 custompolicy on an earlier version of windows server, run set vpnserveripsecconfiguration. As a prologue to discuss some common issues with vpn on windows server 2012 r2 essentials, let us first glance through the default routing and remote access (rras) settings. you may also find the specifics about these settings on technet . Certificate selection. when running the powershell command set vpnauthprotocol to define the root certification authority, powershell may ignore the administrator defined certificate and choose a different one, as shown here. this will result in failed ipsec vpn connections from windows 10 always on vpn clients using ikev2. Choose windows (built in) for the vpn provider, provide a descriptive name for the connection, enter the name or ip address of the vpn server, and then click save. add a vpn connection. click on the test vpn connection and then click connect. establish a vpn connection. enter domain credentials when prompted and click ok.
Windows Server 2012 Vpn Ikev2
Windows Server 2012 Vpn Ikev2
windows server 2012 üzerinde ikev2 vpn bağlantısı yapıyoruz. ekremaras configuring site to site vpn using windows server 2016 2019 routing and remote access. how to create ikev2 vpn tunnel with windows server 2019 and windows 10. windows server setup sstp or ikev2 vpn on server please see first: youtu.be lwzihoawu2c this video follows on this video walks through configuring a virtual network adapter needed to install remote access services on windows server 2012 this video tutorial will help you to install vpn using rras in windows server. get in touch with us for your hosting queries: how to configure ikev2 sstp l2tp vpn on windows server 2019 #mcse #networkworldinc by prof. okhrabo suryaa in this video, we are going to talk about virtual private network (vpn) and what it can do for us using windows server. we will in this video i am going to show you how to install and configure remote access vpn on windows server 2012 r2. tips and
Conclusion
Having examined the subject matter thoroughly, it is clear that the post offers helpful insights regarding Windows Server 2012r2 Vpn Ikev2 Hardening Rras Service It S A Passion. From start to finish, the writer presents a wealth of knowledge on the topic. Especially, the section on X stands out as a highlight. Thanks for taking the time to the post. If you have any questions, please do not hesitate to contact me via the comments. I look forward to hearing from you. Moreover, below are a few similar content that might be useful:
Posted by davidenco 2017-06-27T13:29:20Z
I want to replace our PPTP VPN with an IKEv2 VPN for use with our Windows and iOS clients. However I cannot find a simple tutorial that explains what to do step-by-step.
Can anyone share any instructions on setting up an IKEv2 VPN on Windows Server 2012 R2?
Thanks.

3 Replies
-

Justin1250
This person is a verified professional.
mace
-
It’s windows Server 2012 — I’ve found a few articles related to this question, however I feel It may just be easier to contact the vendors for an installation manual.
-


lock
This topic has been locked by an administrator and is no longer open for commenting.
To continue this discussion, please ask a new question.
Read these next…
Which network diagram (SAN to LAN) would you say is correct?
Networking
Which is best practice and why? Is it done one way over the other to avoid potential issues or is it just good housekeeping . . . or both?Edit for context . . . To the left — 3-node Hyper-V failover cluster connected to shared dual-controller storage via …
What kind of logs, data, or tooling do you have that need better visibility?
Windows
Hey,
I was part of a mass lay off awhile back, I am looking for work and
solutions to keep me busy while I continue to apply for jobs. Before I
was laid off I put together a small app that aggregated a lot of data
from GitLab with a simple sea…
Snap! — Keyboard Hat, Emotional AI, US High-Speed Trains, Astronaut Wears Prada
Spiceworks Originals
Your daily dose of tech news, in brief.
Welcome to the Snap!
Flashback: October 6, 1942: Photocopying Patented (Read more HERE.)
Bonus Flashback: October 6, 1992: US-Russia Human Spaceflight Agreement (Read more HERE.)
You need to hear…
Time Clocks
Hardware
We’re looking for a solution that would allow clients who participate in certain services to punch in and punch out on a time clock with a PIN versus fingerprint or prox card. We’d prefer the solution to be entirely local versus cloud based. We did look…
Alternative to Sophos central
Security
Hi there, I am a Sophos partner and currently have clients that run Sophos Essentials on their work machines — and it looks like our licenses are due for expiry soon. Would you guys suggest any alternative vendors that offer the same functionality as Soph…


Posted: 09/21/2020 in Uncategorized
Routing And Remote Access on Windows Server 2012R2 offers poor quality of encryption strength in standard installation.
Of you set up VPN connection based on IKEv2, then you can check that connection is set up with weak algorithms:
Get-NetIPsecMainModeSA (at client computer)

DES3 ??? SHA1 ??? wtf?
Let’s harden RRAS service.
At Windows Server 2012R2 side:
Add those registry entries::

Windows Registry Editor Version 5.00
[HKEY_LOCAL_MACHINE\SYSTEM\CurrentControlSet\Services\RemoteAccess\Parameters\IKEV2\IKEv2CustomPolicy]
"IntegrityMethod"=dword:00000002
"EncryptionMethod"=dword:00000004
"CipherTransformConstant"=dword:00000005
"AuthTransformConstant"=dword:00000002
"DHGroup"=dword:00000003
"PfsGroup"=dword:000000031
Restart RRAS service / Windows Server 2012R2
on client (ex. Windows 10) modify existing connection in powershell:
Set-VpnConnectionIPsecConfiguration -AuthenticationTransformConstants SHA256128 -CipherTransformConstants AES256 -DHGroup Group14 -EncryptionMethod AES256 -IntegrityCheckMethod SHA256 -PfsGroup PFS2048 -ConnectionName "<name of existing connection vpn>"

possible settings in registry:

documentation:
https://docs.microsoft.com/en-us/openspecs/windows_protocols/ms-rrasm/a6ab2fc2-be4e-430e-8099-9b065fa98822
https://docs.microsoft.com/en-us/openspecs/windows_protocols/ms-rrasm/10f3a637-ab9c-49fe-b819-a5337ad54098