IJ Network Scanner Selector EX for Windows Download – Selector EX Menu and Setting Screen IJ Network Scanner EX enables you to find the scanners or printers to generally be applied for scanning or printing above a community from your personal computer or maybe the operation panel.
After set up, IJ Community Scanner EX seems from the notification area around the desktop.
Note
- If the icon is not displayed in the notification area on the desktop, follow the procedure below to start.
-
Windows 8.1/Windows 8:
Click IJ Network Scanner Selector on the Start screen.
If IJ Network Scanner Selector is not displayed on the Start screen, select the Search charm, then search for “IJ Network Scanner Selector EX.”
-
Windows 7/Windows Vista/Windows XP:
From the Start menu, click All Programs > Canon Utilities > IJ Network Selector EX> IJ-Network-Scanner-Selector-EX.
-
Important
- If you cannot scan over a network, download and upgrade to the latest MP Drivers from our website.
- While IJ Scanner Selector EX is enabled, it periodically transmits packets to check whether it can communicate with your scanner or printer over the network. When using the computer in a network environment other than the one used to set up your scanner or printer, disable IJ Network Scanner Selector EX.
Get Complete Tutorial
Canon IJ Network Scan Utility EX for Windows and MAC OS
Download Canon IJ Network Tool Version 4.4.1 for Intel Mac OS X 10.5/10.6
Download IJ Network Driver Ver. 2.5.7 / Network Tool Ver. 2.5.7 for Windows
- Canon IJ Network Scan Utility for Windows
- Download Support for Windows Vista 32bit/64bit, Windows XP SP2/SP3/Windows XP x64 & Windows 2000/Size: 1918.33 Kb
- Canon IJ Scan Utility MAC OS
- Download Ver. 2.1.6 Support for Mac (OS X 10.7/10.8/10.9/10.10/10.11)
IJ Network Scanner Selector EX Download — OS Windows Only
IJ Network Scanner Selector EX for Windows Download — Selector EX Menu and Setting Screen IJ Network Scanner EX enables you to find the scanners or printers to generally be applied for scanning or printing above a community from your personal computer or maybe the operation panel.
Price:
0.0
Price Currency:
USD
Operating System:
Windows, Mac OS X 10.5, Mac OS X10.6
Application Category:
SoftwareApplication
Outline
This file is the LAN driver for Canon IJ Network. With this set up, you can print from the Canon IJ Network printer that is connected through a network.
Update History
[Ver.2.5.7]
— Windows 8.1 has been added as a supported OS.
— Windows 8 has been added as a supported OS.
[Ver.2.5.6]
— The problem that The license, etc. has been incorrectly displayed in some languages has been rectified.
[Ver.2.5.5]
— Officially supports Windows 7.
System requirements
Windows 8.1(32bit)
Windows 8.1(64bit)
Windows 8(32bit)
Windows 8(64bit)
Windows 7(32bit)
Windows 7(64bit)
Windows Vista(32bit)
Windows Vista(64bit)
Windows XP SP2 or later
Windows XP x64 Edition
Windows 2000 Professional SP4 or later
Caution
1. In the environment where the Firewall software operates, as the printer detection using LAN communication is inhibited, the setup may not be completed.
Preventive action:
Disable the Firewall setting temporarily, or close the Firewall software, then, perform the setup. In each case, disconnect the network from the Internet first.
2. When using of IJ Network Tool under Windows Vista 64bit version, the following message may be displayed at the setup: New Port could not be created.
Preventive action:
Cancel the setup once, then retry the setup after restarting the computer.
Setup instruction
Download / Installation Procedures
1. Click the link, select [ Save ], specify «Save As», then click [ Save ] to download the file.
Memo :
If you select [ Run ] ( or [ Open ] ) instead of [ Save ], the file will be automatically installed after it is saved.
2. The downloaded file will be saved in the specified place in the self-extracting form ( .exe format ).
3. Double-click the downloaded EXE file to decompress it, then installation will start automatically.
Disclaimer
All software, programs (including but not limited to drivers), files, documents, manuals, instructions or any other materials (collectively, “Content”) are made available on this site on an «as is» basis.
Canon Singapore Pte. Ltd., and its affiliate companies (“Canon”) make no guarantee of any kind with regard to the Content, expressly disclaims all warranties, expressed or implied (including, without limitation, implied warranties of merchantability, fitness for a particular purpose and non-infringement) and shall not be responsible for updating, correcting or supporting the Content.
Canon reserves all relevant title, ownership and intellectual property rights in the Content. You may download and use the Content solely for your personal, non-commercial use and at your own risks. Canon shall not be held liable for any damages whatsoever in connection with the Content, (including, without limitation, indirect, consequential, exemplary or incidental damages).
You shall not distribute, assign, license, sell, rent, broadcast, transmit, publish or transfer the Content to any other party. You shall also not (and shall not let others) reproduce, modify, reformat, disassemble, decompile or otherwise reverse engineer or create derivative works from the Content, in whole or in part.
You agree not to send or bring the Content out of the country/region where you originally obtained it to other countries/regions without any required authorization of the applicable governments and/or in violation of any laws, restrictions and regulations.
By proceeding to downloading the Content, you agree to be bound by the above as well as all laws and regulations applicable to your download and use of the Content.
Canon IJ Network Scanner Selector EX2 Download– IJ Network Scanner Selector EX2 is one way that allows you to select a scanner or printer that will be used to scan or print over a network from your computer or the Operation panel.
After you perform the installation process, it will appear IJ Network scanner Selector EX2 in the notification area on the desktop.
Important note
- If you cannot scan through the network, then be sure to download and upgrade to the latest MP Drivers from this site.
- While IJ Network scanner Selector EX2 is on, it will periodically transmit the packet to check whether it can communicate with the scanner or printer over your network. When using a computer in a network environment other than the one used to set up your scanner or printer, then be sure to Disable IJ Network scanner Selector EX2.
Other Notes
- If the icon does not appear on the notification on the desktop, follow the procedure below to get started.
- Windows 10:
From the Start menu, please click Canon Utilities –> select IJ Network scanner Selector EX2.
- Windows 8.1 and Windows 8:
Click on IJ Network scanner Selector EX2 on the start screen.

If IJ Network scanner Selector EX2 does not appear on the Start screen, select the search charm, then locate IJ Network scanner Selector EX2.
- Window 7/Windows Vista:
From the Start menu, click All Programs –> Canon Utilities –> IJ Network scanner Selector EX2 –> IJ Network scanner Selector EX2.
Menu
Displays the menu when you right-click on IJ Network scanner Selector EX2 in the notification area on your desktop.
Disable Canon IJ Network Scanner Selector EX2 or enable Canon IJ Network Scanner Selector EX2
To enable or disable IJ Network scanner Selector EX2.
When you disable Canon IJ Network Scanner Selector EX2, you will not be able to scan the network from the Operation panel.
Important
When using a model you cannot use to scan over a network from the Operation panel, you will not be able to scan using the operation panel even if this setting is enabled.
Settings
- The scan from the PC settings screen appears.
About
- Displays the version information of the IJ Network scanner Selector EX2.
In the dialog box, you can change the language used in the application. The changes will be reflected after restarting the computer.
Out
- Exit IJ Network scanner Selector EX2; (Enabled) or (disabled) will disappear from the notification area on the desktop.
Scan from the PC settings screen
Please click Right on the icon from the notification area on the desktop, then select Settings… To display the scan from the PC settings screen.
Your scanner or printer should be selected with IJ Network Scanner Selector EX2 before scanning the network.
Scanner
A scanner or printer MAC address that can be used over a network is displayed.
Please select one scanner or printer model, and Selecting a scanner or printer automatically allows scanning from the operation panel.
Instructions
Open this guide.
Scan from operation panel settings
The scan from the Operation Panel setting screen appears, and you can select three scanners and printers in total for scanning from the Operation panel. You can scan items using the scanner operation panel or the printer chosen and send scanned images to your computer over the network.
Important
When using a model, you cannot scan over the network from the Operation panel, the model does not appear in the scanner, and this setting is unavailable. See Also: Canon Pixma TS8350a Driver.
Note
If your scanner or printer doesn’t appear, please check the following, click OK to close the screen, reopen it, and try selecting again.
- MP Drivers Installed
- Your scanner or printer’s network settings are complete after installing the MP Drivers.
- Network communication between your scanner or printer and the computer is enabled.
If the problem is still not resolved, click Home to return to your model’s top page of the online manual and search for “network communication problems. “
You don’t need to use IJ Network scanner Selector EX2 software when scanning via USB. Refer to Uninstalling IJ Network scanner Selector EX2 To remove it.
Uninstalling IJ Network Scanner Selector EX2
Follow the procedure below to uninstall IJ Network scanner Selector EX2 on your Mac or Windows.
Important Notes
You can’t scan over the network after uninstalling IJ Network scanner Selector EX2 from your PC.
Please Sign in to a user account with administrator privileges.
- Click Control Panel –> Program –> programs and features.
- Select Canon IJ Network Scanner Selector EX2 –> click Uninstall/Change.
Note
- If the user Account Control screen appears –> Click Continue –> Click Yes
- After the uninstall is complete –>, click OK.
Note
When the message prompts you to restart the computer appears –> click OK to restart your computer.

IJ Network Scanner Selector EX 2 Download– IJ Network Scanner Selector EX allows you to select a scanner or printer to be used to scan or print over a network from your computer or the Operation panel.
For you who want to do IJ Network scanner Selector EX2 settings can follow the steps from the menu screen
IJ Network Scanner Selector EX2 allows you to select a scanner or printer to be used to scan or print over a network from your computer or the Operation panel.
- Canon IJ Network Tool Install
- Canon MG2900 IJ Scan Utility
Once you are done installing, then IJ Network scanner Selector EX2 will appear in the notification area on the desktop.
Important
- If you are unable to scan the network, download and upgrade to the latest MP Drivers from our website.
- Once IJ Network scanner Selector EX2 is enabled, it will periodically transmit the packet to check whether it can communicate with your scanner or printer over the network. When using a computer in a network environment other than the one used to set up your scanner or printer, disable IJ Network scanner Selector EX2.
Note
- If the icon does not appear in the notification area on the desktop, follow the procedure below to get started.
Windows 10:
- From the Start menu, click Canon Utilities > IJ Network scanner Selector EX2.
Windows 8.1/Windows 8:
- Then please click IJ Network scanner Selector EX2 on the start screen.
- If IJ Network scanner Selector EX2 is not displayed on the Start screen, select the search charm, and then locate “IJ Network scanner Selector EX2 “.
Window 7/Windows Vista:
- From the Start menu screen, please click All > programs Canon Utilities > IJ Network scanner Selector EX2 > IJ Network scanner Selector EX2.
Menu
- Displays the menu when you right-click (IJ Network Scanner Selector EX2) in the notification area on the desktop.
- Please feel free to Disable Canon IJ Network scanner Selector EX2/enable Canon IJ Network scanner Selector EX2
Enable or disable IJ Network scanner Selector EX2. - When you select Disable Canon IJ Network scanner Selector EX2, you will not be able to scan the network from the Operation panel.
- Enabled:, defects:
Important
- When using a model that you cannot scan over the network from the Operation panel, you cannot scan using the operation panel even if this setting is enabled.
- Settings…
- The scan-from-PC settings screen appears. You can choose the model you want to use.
About
- Displays the version information.
- In the dialogue box that appears, you can change the language used in the application. The changes will be reflected after restarting the computer.
- Out
Exit IJ Network scanner Selector EX2; (Enabled) or (disabled) disappears from the notification area on the desktop.
Scan-from-PC settings screen
- Right-click the icon from the notification area on the desktop, then select Settings… To display the scan-from-PC settings screen.
- Your scanner or printer should be selected with IJ Network Scanner Selector EX2 before scanning over the network.
Scanner
- A scanner or printer MAC address that can be used over a network is displayed.
- In this case, you can select one scanner or printer per model. Selecting a scanner or printer automatically allows scanning from the operation panel.
Instructions
- Open this guide.
- Scan-from-operation panel settings
- The scan-from-Operation Panel setting screen appears. After this scan process you can select up to three scanners and printers in total
- for scanning from the Operation panel. You can scan items using the scanner operation panel or the selected printer, and send scanned images to your computer over the network.
Important
- When using a model that you cannot scan over the network from the Operation panel, the model does not appear in the scanner and this setting is unavailable.
- Scan-from-operation-panel Settings screen
- Click Scan-from-operation-panel settings on the scan-from-PC settings screen to display the scan-from-Operation Panel Settings screen.
Scanner
- A scanner or printer MAC address that can be used over a network is displayed.
- You can select up to three scanners and the entire printer at the same time. Selecting a scanner or printer automatically allows scanning from the operation panel.
Instructions
- Open this guide.
Important
- When using a model that cannot be scanned over the network from the Operation panel, the scan-from-operation panel setting may appear on the scan-from-PC settings screen; However, this setting is not available.
Note - In case if your scanner or printer occurs, then check the following, click OK to close the screen, then reopen and try to select again.
MP Drivers Installed
- Your scanner or printer’s network settings are complete after installing the MP Drivers
- Network communication between your scanner or printer and the computer is enabled
- If the problem is still not resolved, click Home to return to the top page of the online manual for your model and search for “network communication problems. “
Please note that if you do not need to use this software when scanning via USB. Refer to “Uninstall IJ Network scanner Selector EX2 ” File then to remove it. You can scan via USB even if IJ Network scanner Selector EX2 is not removed.
To uninstall IJ Network scanner Selector EX2, then please follow the procedure below to uninstall IJ Network scanner Selector EX2 from your computer.
Important
- You cannot scan over the network after uninstalling IJ Network scanner Selector EX2.
- Sign in to a user account with administrator privileges.
- Please click Control Panel > Program > programs and features.
- Select Canon IJ Network scanner Selector EX2, and then click Uninstall/Change.
Note
- If the user Account Control screen has appeared, then please click Continue.
- Click Yes when the confirmation message appears.
- After the uninstall is complete, click OK.
Note
- When the message prompts you to restart the computer appears, click OK to restart your computer.
IJ Network Scanner Selector EX 2 Download
Outline
This file is the LAN driver for Canon IJ Network. With this set up, you can print from the Canon IJ Network printer that is connected through a network.
Update History
[Ver.2.5.7]
— Windows 8.1 has been added as a supported OS.
— Windows 8 has been added as a supported OS.
[Ver.2.5.6]
— The problem that The license, etc. has been incorrectly displayed in some languages has been rectified.
[Ver.2.5.5]
— Officially supports Windows 7.
System requirements
Windows 8.1(32bit)
Windows 8.1(64bit)
Windows 8(32bit)
Windows 8(64bit)
Windows 7(32bit)
Windows 7(64bit)
Windows Vista(32bit)
Windows Vista(64bit)
Windows XP SP2 or later
Windows XP x64 Edition
Windows 2000 Professional SP4 or later
Caution
1. In the environment where the Firewall software operates, as the printer detection using LAN communication is inhibited, the setup may not be completed.
Preventive action:
Disable the Firewall setting temporarily, or close the Firewall software, then, perform the setup. In each case, disconnect the network from the Internet first.
2. When using of IJ Network Tool under Windows Vista 64bit version, the following message may be displayed at the setup: New Port could not be created.
Preventive action:
Cancel the setup once, then retry the setup after restarting the computer.
Setup instruction
Download / Installation Procedures
1. Click the link, select [ Save ], specify «Save As», then click [ Save ] to download the file.
Memo :
If you select [ Run ] ( or [ Open ] ) instead of [ Save ], the file will be automatically installed after it is saved.
2. The downloaded file will be saved in the specified place in the self-extracting form ( .exe format ).
3. Double-click the downloaded EXE file to decompress it, then installation will start automatically.
Disclaimer
All software, programs (including but not limited to drivers), files, documents, manuals, instructions or any other materials (collectively, “Content”) are made available on this site on an «as is» basis.
Canon Singapore Pte. Ltd., and its affiliate companies (“Canon”) make no guarantee of any kind with regard to the Content, expressly disclaims all warranties, expressed or implied (including, without limitation, implied warranties of merchantability, fitness for a particular purpose and non-infringement) and shall not be responsible for updating, correcting or supporting the Content.
Canon reserves all relevant title, ownership and intellectual property rights in the Content. You may download and use the Content solely for your personal, non-commercial use and at your own risks. Canon shall not be held liable for any damages whatsoever in connection with the Content, (including, without limitation, indirect, consequential, exemplary or incidental damages).
You shall not distribute, assign, license, sell, rent, broadcast, transmit, publish or transfer the Content to any other party. You shall also not (and shall not let others) reproduce, modify, reformat, disassemble, decompile or otherwise reverse engineer or create derivative works from the Content, in whole or in part.
You agree not to send or bring the Content out of the country/region where you originally obtained it to other countries/regions without any required authorization of the applicable governments and/or in violation of any laws, restrictions and regulations.
By proceeding to downloading the Content, you agree to be bound by the above as well as all laws and regulations applicable to your download and use of the Content.
Outline
This file is a driver for Canon IJ multifunction printers.
You can install the following items of the software:
MP Drivers: The driver for Canon IJ multifunction printer.
IJ Scan Utility: The software that allows you to easily scan photos, documents, etc.
IJ Network Tool: The software that performs the setup for printing in the network connection.
IJ Scanner Selector EX: The software that performs the setup for scanning in the network connection.
Update History
[Ver.1.02]
— Windows 11 has been added as a supported OS.
— Windows 10 has been added as a supported OS.
— Windows 8.1 has been added as a supported OS.
— The Catalog File signed by Microsoft has been updated.
[Ver.1.01]
1.Windows 8 has been added as a supported OS.
2.IJ Scan Utility v1.0.1
— The following problem has been rectified:
When [Compress scanned images upon transfer] is turned on, the scan function sometime does not work.
System requirements
Windows 11
Windows 10 (32bit)
Windows 10 (64bit)
Windows 8.1(32bit)
Windows 8.1(64bit)
Windows 8(32bit)
Windows 8(64bit)
Windows 7(32bit)
Windows 7(64bit)
Windows Vista SP1 or later(32bit)
Windows Vista SP1 or later(64bit)
Windows XP SP3 or later
Caution
Printer Driver:
1.[Windows 10/11]
Some of the settings (such as borderless printing) in the OS standard print settings screen are not valid. the settings in the Printer printing Preferences window are valid. Make settings in Printer printing Preferences when necessary.
2.[Windows 10/11]
Layout printing from the OS standard print settings screen may not be performed as expected in Some instances.
In such cases, open the Printer Printing Preferences window and change the paper size accordingly.
3.With Internet Explorer 11, a web site containing Japanese may not be printed properly. In Windows Update, update the OS and Internet Explorer to the latest version.
Scanner Driver:
1.If the OS is upgraded with the scanner driver remained installed, scanning by pressing the SCAN button on the Printer may not be performed After the upgrade. in such cases, re-install the scanner driver.
2.When MP Driver installation was stopped by the following acts with the screen awaiting connection, install it again. The installation is not completed even if plugged-in the USB cable again or turned-on the power supply again.
— To cancel the installation.
— To plugged-out the USB cable.
etc,
3.The scan from the scan button of the printer does not work when the connection is changed from the network connection to the USB connection. Install MP Driver again, and change the connection method.
IJ Network Scanner Selector EX:
1.The scan from the scan button of the printer does not work while a printer is connected in a network.
Setup instruction
Download / Installation Procedures
1. Click the link, select [ Save ], specify «Save As», then click [ Save ] to download the file.
Memo :
If you select [ Run ] ( or [ Open ] ) instead of [ Save ], the file will be automatically installed after it is saved.
2. The downloaded file will be saved in the specified place in the self-extracting form ( .exe format ).
3. Double-click the downloaded EXE file to decompress it, then installation will start automatically.
Uninstall Procedures
If needed, you can uninstall this program using the Control Panel.
Note :
The steps below are for Windows 7. This procedure may be different for other OSes.
1. On the Start menu, click Control Panel, and then, under Programs click Uninstall a Program
2. A page will open with a list of installed programs. Double click on the program that you want to uninstall.
3. Click «Yes» then «OK», this will complete the uninstallation process.
Disclaimer
All software, programs (including but not limited to drivers), files, documents, manuals, instructions or any other materials (collectively, “Content”) are made available on this site on an «as is» basis.
Canon Marketing (Philippines) Inc., and its affiliate companies (“Canon”) make no guarantee of any kind with regard to the Content, expressly disclaims all warranties, expressed or implied (including, without limitation, implied warranties of merchantability, fitness for a particular purpose and non-infringement) and shall not be responsible for updating, correcting or supporting the Content.
Canon reserves all relevant title, ownership and intellectual property rights in the Content. You may download and use the Content solely for your personal, non-commercial use and at your own risks. Canon shall not be held liable for any damages whatsoever in connection with the Content, (including, without limitation, indirect, consequential, exemplary or incidental damages).
You shall not distribute, assign, license, sell, rent, broadcast, transmit, publish or transfer the Content to any other party. You shall also not (and shall not let others) reproduce, modify, reformat, disassemble, decompile or otherwise reverse engineer or create derivative works from the Content, in whole or in part.
You agree not to send or bring the Content out of the country/region where you originally obtained it to other countries/regions without any required authorization of the applicable governments and/or in violation of any laws, restrictions and regulations.
By proceeding to downloading the Content, you agree to be bound by the above as well as all laws and regulations applicable to your download and use of the Content.
IJ Network Scanner Selector EX for Windows Download – Selector EX Menu and Setting Screen IJ Network Scanner EX enables you to find the scanners or printers to generally be applied for scanning or printing above a community from your personal computer or maybe the operation panel.
After set up, IJ Community Scanner EX seems from the notification area around the desktop.
Note
- If the icon is not displayed in the notification area on the desktop, follow the procedure below to start.
-
Windows 8.1/Windows 8:
Click IJ Network Scanner Selector on the Start screen.
If IJ Network Scanner Selector is not displayed on the Start screen, select the Search charm, then search for “IJ Network Scanner Selector EX.”
-
Windows 7/Windows Vista/Windows XP:
From the Start menu, click All Programs > Canon Utilities > IJ Network Selector EX> IJ-Network-Scanner-Selector-EX.
-
Important
- If you cannot scan over a network, download and upgrade to the latest MP Drivers from our website.
- While IJ Scanner Selector EX is enabled, it periodically transmits packets to check whether it can communicate with your scanner or printer over the network. When using the computer in a network environment other than the one used to set up your scanner or printer, disable IJ Network Scanner Selector EX.
Get Complete Tutorial
Canon IJ Network Scan Utility EX for Windows and MAC OS
Download Canon IJ Network Tool Version 4.4.1 for Intel Mac OS X 10.5/10.6
Download IJ Network Driver Ver. 2.5.7 / Network Tool Ver. 2.5.7 for Windows
- Canon IJ Network Scan Utility for Windows
- Download Support for Windows Vista 32bit/64bit, Windows XP SP2/SP3/Windows XP x64 & Windows 2000/Size: 1918.33 Kb
- Canon IJ Scan Utility MAC OS
- Download Ver. 2.1.6 Support for Mac (OS X 10.7/10.8/10.9/10.10/10.11)
IJ Network Scanner Selector EX Download — OS Windows Only
IJ Network Scanner Selector EX for Windows Download — Selector EX Menu and Setting Screen IJ Network Scanner EX enables you to find the scanners or printers to generally be applied for scanning or printing above a community from your personal computer or maybe the operation panel.
Price:
0.0
Price Currency:
USD
Operating System:
Windows, Mac OS X 10.5, Mac OS X10.6
Application Category:
SoftwareApplication
Описание
Периферийные устройства от компании Canon являются одними из самых востребованных аппаратов. Они демонстрируют высокое качество печати и сканирования. Для калибровки сканирования и настройки техники официальный производитель разработал программу IJ Scan Utility. Она доступна на русском языке и распространяется бесплатно.
Утилита IJ Scan имеет довольно аскетичный интерфейс. Все функции размещены в одном небольшом окне. В верхней части находятся режимы сканирования: фото, документ, автоматический и др. С их помощью вы сможете повысить качество изображений или совместить две картинки в одну — данный режим также присутствует в верхней части.
Кроме повышения качества сканирования IJ Scan Utility выполняет диагностику аппарата в случае ошибки и самостоятельно устанавливает драйвера на ПК. Для этого сначала подключите устройство к компьютеру по USB кабелю, а затем запустите утилиту. Программа совместима с МФУ и сканерами компании Canon, включая модельный ряд PIXMA и ScanGear.
Особенности программы IJ Scan Utility 2.5.7:
- Выбор режима сканирования
- Автоматическая установка драйверов
- Диагностика устройств
- Наличие русской локализации
- Совместимость с Windows XP и выше
Скриншот

Скачать IJ Scan Utility
Для полного комплекта мы рекомендуем вам также скачать Flash Drive Information Extractor (утилита которая отображает полную информацию о флешках).
- IJ Network Scanner Selector EX, Scan Utility Download for Windows, Mac OS
Canon ScanGear Drivers when your device is installed, the IJ Network Scanner selector EX start automatically enable scanning over a network from a PC or panel operation of the scanner.
Scanner
Bonjour Service name/MAC address scanner, a printer that can be used over a network, you can also select up to three scanners, printers Total at the same time, it also automatically enables scanning of the operating panel.
Following these steps is to change the settings so that without having to start the IJ Scanner selector EX automatically.
Note
Make sure that the IJ Network Scanner Selector EX can be set to not start automatically, if IJ Network Scanner Selector EX is not running, then the user cannot transfer images scanned from the operating panel to the computer over the network.
- Please select System Preferences… from the Apple
- Click Users/groups from the system
- Select the username of the current user, select Login items
- Mac OS X v. 10.6. x, please click my account from the system, then Your user name is from my Account
- Select Login items
- Select the IJ Network Scanner Selector EX, Click
- Be sure to confirm that the IJ Network Scanner Selector EX hidden
- Please restart the computer
Canon IJ Network Scan Utility / Canon IJ Network Scan Utility EX for Windows, Mac OS
Download ↔ IJ Network Scanner Selector (Windows) – Windows Vista 32bit / Vista 32bit 64bit / Windows XP SP2 / SP3 / Windows XP x64 / Windows 2000
Download ↔ IJ Network Scanner Selector EX Download Ver. 2.1.6 (Mac) – OS X El Capitan v10.11 / OS X Yosemite v10.10 / OS X Mavericks v10.9 / OS X Mountain Lion v10.8 / OS X Lion v10.7
How to Setup – IJ Network Scanner Selector EX Menu and Setting Screen
To further follow the steps to resolve the IJ Scanner Selector EX start problem automatically, change the settings, go to complete tutorial

Contact Us
General Questions
Please e-mail us for any questions or feedback about our website. canon-print.com/contact
Параметры сетевого сканирования
Можно подключить сканер или принтер к сети, чтобы использовать его с нескольких компьютеров или сканировать изображения на определенный компьютер.
![]() Внимание!
Внимание!
- Несколько пользователей не могут сканировать одновременно.
![]() Примечание.
Примечание.
- Заблаговременно настройте параметры сети сканера или принтера, следуя инструкциям на нашем веб-сайте.
- В случае сетевого подключения сканирование занимает больше времени, чем при USB-подключении.
Настройте следующие параметры для разрешения сканирования по сети.
Выбор сканера или принтера
С помощью программы IJ Network Scanner Selector EX укажите сканер, который нужно использовать. Указав сканер, можно выполнять сканирование по сети с компьютера или панели управления.
![]() Внимание!
Внимание!
-
Если продукт, который нужно использовать, было изменено с помощью программы IJ Network Scanner Selector EX, то изменится также продукт, используемый при сканировании с помощью программы IJ Scan Utility. Продукт, используемый при сканировании с панели управления, тоже изменится.
Если сканер или принтер не выбран в программе IJ Scan Utility, убедитесь, что он выбран, с помощью программы IJ Network Scanner Selector EX.
Дополнительные сведения см. в разделе «Меню и экран настройки программы IJ Network Scanner Selector EX2».
- Чтобы выполнить сканирование с панели управления, сначала укажите сканер или принтер с помощью программы IJ Network Scanner Selector EX.
-
Убедитесь, что программа IJ Network Scanner Selector EX активна.
Если программа IJ Network Scanner Selector EX запущена, в области уведомлений на рабочем столе появляется значок
 (IJ Network Scanner Selector EX2). Щелкните , чтобы также проверить скрытые значки.Примечание.
-
Если значок не отображается в области уведомлений на рабочем столе, для запуска выполните следующую процедуру.
-
Windows 11/Windows 10:
В меню Пуск (Start)щелкните (Все приложения (All apps) >) Canon Utilities > IJ Network Scanner Selector EX2.
-
Windows 8.1:
Щелкните IJ Network Scanner Selector EX2 на начальном экране.
Если программа IJ Network Scanner Selector EX2 не отображается на экране «Пуск», нажмите чудо-кнопку Поиск (Search), затем введите «IJ Network Scanner Selector EX2».
-
Windows 7:
В меню Пуск (Start) щелкните Все программы (All Programs) > Canon Utilities > IJ Network Scanner Selector EX2 > IJ Network Scanner Selector EX2.
В области уведомлений на рабочем столе появится значок, и появится экран «Параметры сканирования с ПК». В этом случае перейдите к шагу 3.
-
-
-
В области уведомлений рабочего стола щелкните правой кнопкой мыши
(IJ Network Scanner Selector EX2) и выберите Настройки… (Settings…).Отобразится экран «Параметры сканирования с ПК».
-
Выберите сканер или принтер в разделе Сканеры (Scanners).
Обычно после настройки сети MAC-адрес сканера или принтера уже выбран. В этом случае не нужно выбирать его вновь.
Внимание!- Если в сети присутствует несколько сканеров, появятся названия нескольких моделей. В таком случае можно выбрать один сканер для каждой модели.
-
Щелкните OK.
 (
( , чтобы также проверить скрытые значки.
![]() Примечание.
Примечание.
- Сканер, выбранный на экране «Параметры сканирования с ПК», будет автоматически выбран и на экране «Параметры сканирования с панели управления».
Чтобы выполнить сканирование в программе IJ Scan Utility с помощью сканера или принтера, подключенного к сети, укажите сканер или принтер в программе IJ Network Scanner Selector EX, затем выполните описанные ниже шаги, чтобы изменить состояние подключения между сканером или принтером и компьютером.
-
Запустите программу IJ Scan Utility.
-
Выберите «Canon XXX series Network» (где «XXX» — название модели) для параметра Сканер (Scanner).
-
Щелкните
Параметры… (Settings…), чтобы использовать другой подключенный к сети сканер. -
Щелкните
(Общие параметры), а затем щелкните Выберите (Select) в пункте Название продукта (Product Name).Отобразится экран «Параметры сканирования с ПК» программы IJ Network Scanner Selector EX.
Выберите сканер, который нужно использовать, и нажмите кнопку OK.
-
В диалоговом окне Параметры (Общие параметры) (Settings (General Settings)) щелкните OK.
Снова отобразится главный экран IJ Scan Utility. Теперь можно сканировать по сети.

 (Общие параметры), а затем щелкните
 Настройка сканирования с панели управления
Можно настроить параметры сканирования на панели управления.
![]() Внимание!
Внимание!
-
Заранее настройте программу IJ Scan Utility для использования сканера или принтера через подключение к сети.
- Настройка сканирования с помощью программы IJ Scan Utility
-
Убедитесь, что программа IJ Network Scanner Selector EX активна.
Если программа IJ Network Scanner Selector EX запущена, в области уведомлений на рабочем столе появляется значок
(IJ Network Scanner Selector EX2). Щелкните , чтобы также проверить скрытые значки.Примечание.-
Если значок не отображается в области уведомлений на рабочем столе, для запуска выполните следующую процедуру.
-
Windows 11/Windows 10:
В меню Пуск (Start)щелкните (Все приложения (All apps) >) Canon Utilities > IJ Network Scanner Selector EX2.
-
Windows 8.1:
Щелкните IJ Network Scanner Selector EX2 на начальном экране.
Если программа IJ Network Scanner Selector EX2 не отображается на экране «Пуск», нажмите чудо-кнопку Поиск (Search), затем введите «IJ Network Scanner Selector EX2».
-
Windows 7:
В меню Пуск (Start) щелкните Все программы (All Programs) > Canon Utilities > IJ Network Scanner Selector EX2 > IJ Network Scanner Selector EX2.
В области уведомлений на рабочем столе появится значок, и появится экран «Параметры сканирования с ПК». В этом случае перейдите к шагу 3.
-
-
-
В области уведомлений рабочего стола щелкните правой кнопкой мыши
(IJ Network Scanner Selector EX2) и выберите Настройки… (Settings…).Отобразится экран «Параметры сканирования с ПК».
-
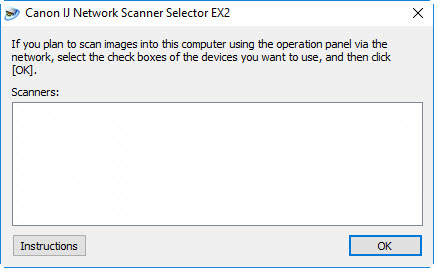
Щелкните Параметры сканирования с панели управления (Scan-from-Operation-Panel Settings).
Появится экран «Параметры сканирования с панели управления».
-
Выберите сканер или принтер в разделе Сканеры (Scanners) и нажмите кнопку OK.
Выберите MAC-адрес сканера или принтера.
Примечание.- Если к сети подключено несколько сканеров, можно выбрать до трех сканеров.
-
На экране «Параметры сканирования с ПК» щелкните OK.
![]() Примечание.
Примечание.
-
Если сканер или принтер не отображается на экране, проверьте выполнение следующих условий и нажмите кнопку OK, чтобы закрыть экран, затем откройте его снова и повторно осуществите выбор.
- Драйверы MP Drivers установлены
- Настройка параметров сети сканера или принтера завершается после установки программы MP Drivers
- Сетевое подключение между сканером или принтером и компьютером включено
Если проблема не устранена, см. раздел Проблемы сетевого взаимодействия.
IJ Network Scanner Selector EX2 allows you to select the scanners or printers to be used for scanning or printing over a network from your computer or the operation panel.
After installing the MP Drivers for your printer, IJ Network Scanner Selector EX2 appears in the notification area on the desktop.
 Important
- If you cannot scan over a network, download and upgrade to the latest MP Drivers from our website.
- While IJ Network Scanner Selector EX2 is enabled, it periodically transmits packets to check whether it can communicate with your scanner or printer over the network. When using the computer in a network environment other than the one used to set up your scanner or printer, disable IJ Network Scanner Selector EX2.
 Note
Note
-
If the icon is not displayed in the notification area on the desktop, follow the procedure below to start.
-
Windows 10:
From the Start menu, click All apps > Canon Utilities > IJ Network Scanner Selector EX2.
-
Windows 8.1/Windows 8:
Click IJ Network Scanner Selector EX2 on the Start screen.
If IJ Network Scanner Selector EX2 is not displayed on the Start screen, select the Search charm, then search for «IJ Network Scanner Selector EX2«.
-
Windows 7/Windows Vista:
From the Start menu, click All Programs > Canon Utilities > IJ Network Scanner Selector EX2 > IJ Network Scanner Selector EX2.
-
Menu
Displays a menu when you right-click ![]() (IJ Network Scanner Selector EX2) in the notification area on the desktop.
(IJ Network Scanner Selector EX2) in the notification area on the desktop.
- Disable Canon IJ Network Scanner Selector EX2 / Enable Canon IJ Network Scanner Selector EX2
-
Enables or disables IJ Network Scanner Selector EX2.
When you select Disable Canon IJ Network Scanner Selector EX2, you will not be able to scan over a network from the operation panel.
Enabled:
, Disabled: Important- When using a model with which you cannot scan over a network from the operation panel, you cannot scan using the operation panel even if this setting is enabled.
- Settings…
- The Scan-from-PC Settings screen appears. You can select the model you want to use.
- About
-
Displays the version information.
In the displayed dialog box, you can change the language to be used in the application. The change will be reflected after restarting the computer.
- Exit
- Exits IJ Network Scanner Selector EX2; (Enabled) or (Disabled) disappears from the notification area on the desktop.
Scan-from-PC Settings Screen
Right-click the icon from the notification area on the desktop, then select Settings… to display the Scan-from-PC Settings screen.
Your scanner or printer must be selected with IJ Network Scanner Selector EX2 before scanning over a network.
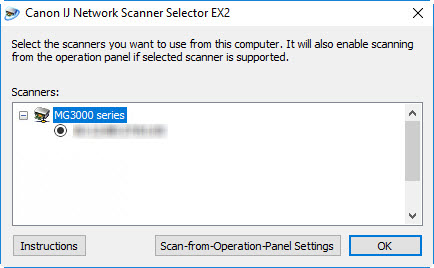
- Scanners
-
MAC addresses of the scanners or printers that can be used over the network are displayed.
You can select one scanner or printer per model. Selecting a scanner or printer automatically enables scanning from the operation panel.
- Instructions
- Opens this guide.
- Scan-from-Operation-Panel Settings
-
The Scan-from-Operation-Panel Settings screen appears. You can select up to three scanners and printers in total for scanning from the operation panel. You can scan items using the operation panel of the selected scanner or printer, and send the scanned images to your computer over a network.
Important- When using a model with which you cannot scan over a network from the operation panel, that model does not appear in Scanners and the setting is not available.
- When using a model with which you cannot scan over a network from the operation panel, that model does not appear in Scanners and the setting is not available.
Scan-from-Operation-Panel Settings Screen
Click Scan-from-Operation-Panel Settings in the Scan-from-PC Settings screen to display the Scan-from-Operation-Panel Settings screen.
- Scanners
-
MAC addresses of the scanners or printers that can be used over the network are displayed.
You can select up to three scanners and printers in total at the same time. Selecting a scanner or printer automatically enables scanning from the operation panel.
- Instructions
- Opens this guide.
Important
- When using a model with which you cannot scan over a network from the operation panel, Scan-from-Operation-Panel Settings may appear in the Scan-from-PC Settings screen; however, the setting is not available.
Note
-
If your scanner or printer does not appear, check the following, click OK to close the screen, then reopen it and try selecting again.
- MP Drivers is installed
- Network settings of your scanner or printer is completed after installing the MP Drivers
- Network communication between your scanner or printer and computer is enabled
- MP Drivers is installed