Содержание
- 1 Как создать FTP-сервер в Windows 10
- 1.1 Включить FTP в Windows 10
- 1.2 Настроить FTP-сервер Windows 10
- 1.3 Разрешить FTP-сервер через брандмауэр Windows
- 1.4 Настройте маршрутизатор для разрешения внешних подключений
- 1.5 Как получить доступ к FTP-серверу с любого компьютера
- 1.6 Скачать и загрузить файлы, папки на FTP-сервер
Ищете настройку Windows 10 FTP-сервер поделиться и получить доступ к файлам по сети? Вот этот пост мы обсуждаем Как создать FTP-сервер в Windows 10 и 8.1. Также вы узнаете, как обмениваться файлами с сервером Access через FTP и как вы можете получить к нему доступ через LAN и WAN из любой точки мира. И Вы можете предоставить доступ к своему FTP-сайту, ограничив пользователей именем пользователя / паролем или анонимным доступом. Это зависит от цели FTP сервер в вашей внутренней или внешней сети.
FTP обозначает протокол передачи файлов Полезная функция для передачи файлов между клиентским компьютером и FTP-сервером. Это как вы разделяете некоторые папки файлов на настроенном FTP сервер на номер порта, и пользователь может читать и записывать файлы по протоколу FTP из любого места. И большинство браузеров поддерживают протокол FTP, поэтому мы можем получить доступ к FTP-серверам через браузер.
Например, ftp: // YOURHOSTNAME или IP-адрес.
Как создать FTP-сервер в Windows 10
В отдельных словах, имеющих FTP сервер Во внутренней или внешней сети всегда легко и быстро обмениваться и получать доступ к файлам по сети. Windows 10 и 8.1 поставляются со встроенной функцией FTP-сервера в функциях Internet Information Service, которую необходимо установить перед использованием. В этом разделе мы рассмотрим, как настроить FTP-сервер на Windows 10. И Использование WinSCP в качестве клиента Windows для подключения к FTP-серверу. Также есть некоторые бесплатные FTP клиенты доступно, с помощью которого вы можете передавать файлы между вашим ПК и удаленными серверами.
Включить FTP в Windows 10
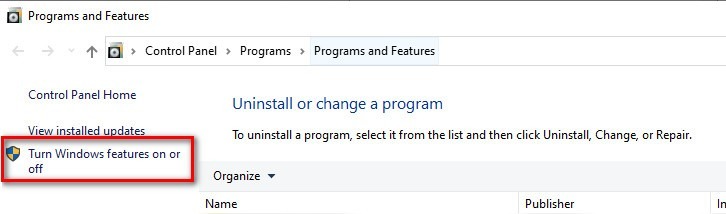
Для того, чтобы настроить FTP сервер на windows Сначала компьютер, нам нужно включить функцию FTP и IIS. Для этого нажмите Windows + R, введите appwiz.cpl и нажмите клавишу ввода. Это откроет Программы и компоненты, здесь нажмите «Включить или отключить функции Windows», как показано на рисунке ниже.
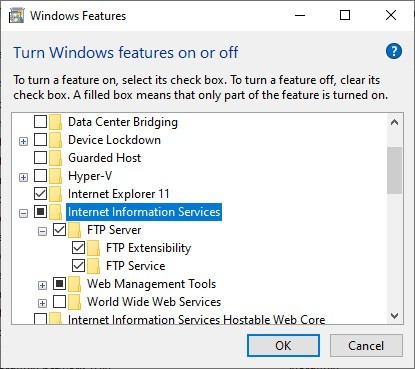
Если IIS не был установлен ранее на конкретном компьютере с Windows 10 или 8.1, вам необходимо установить и другие функции IIS (как показано стрелками). На скриншоте ниже приведены действительные требования для работы FTP-сервера в Windows 8 / 8.1 (необходимо установить все отмеченные функции). Нажмите OK, чтобы установить выбранные функции. Это займет некоторое время для установки функций, дождитесь завершения.
 Настроить FTP-сервер Windows 10
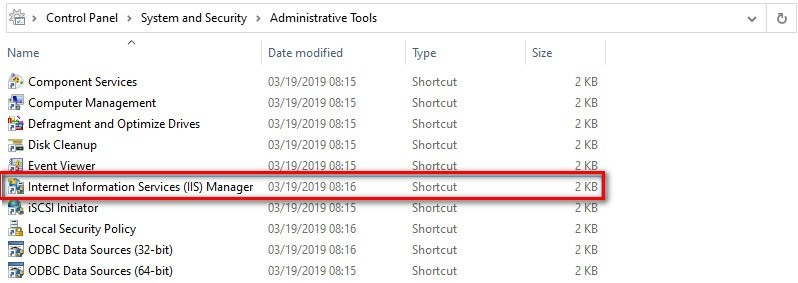
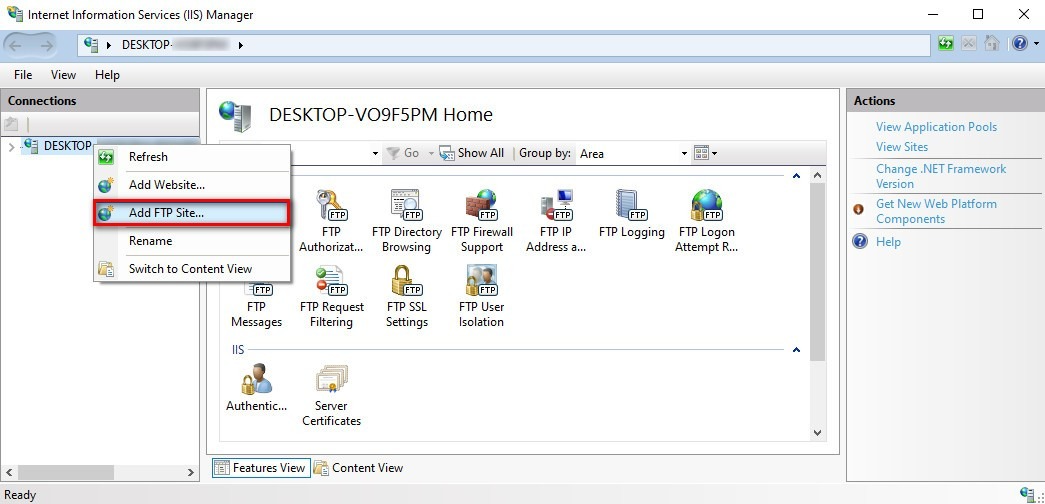
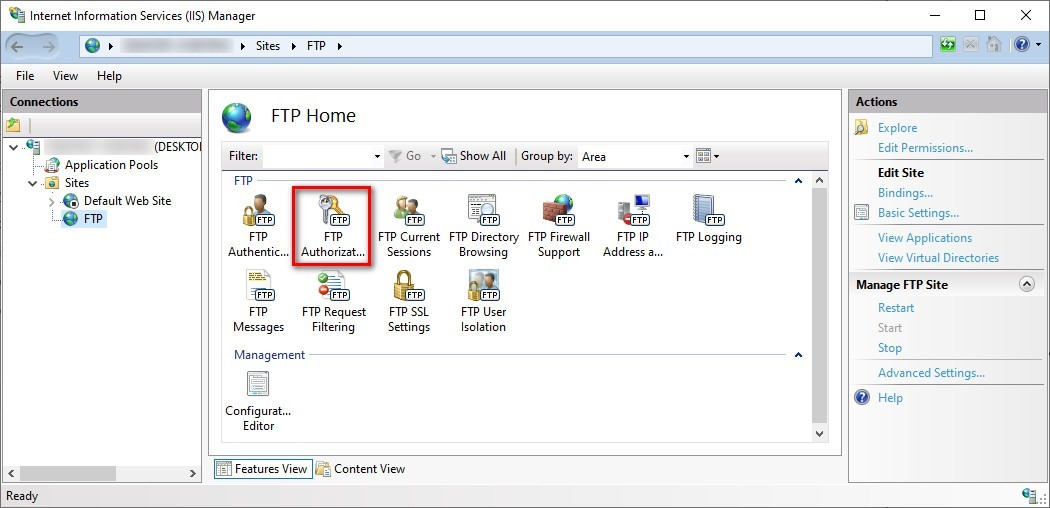
Теперь, когда установка завершена, откройте «Диспетчер служб IIS» из Панели управления \ Все элементы панели управления \ Администрирование. Затем разверните сайты, щелкните правой кнопкой мыши на них и ‘Добавить FTP сайт».
 Добавить FTP сайт
Замечания: Я создал папку под названием «Windows101tricks FTP Share» (которой мы собираемся поделиться через FTP-сервер) на диске C, прежде чем перейти к этому шагу.
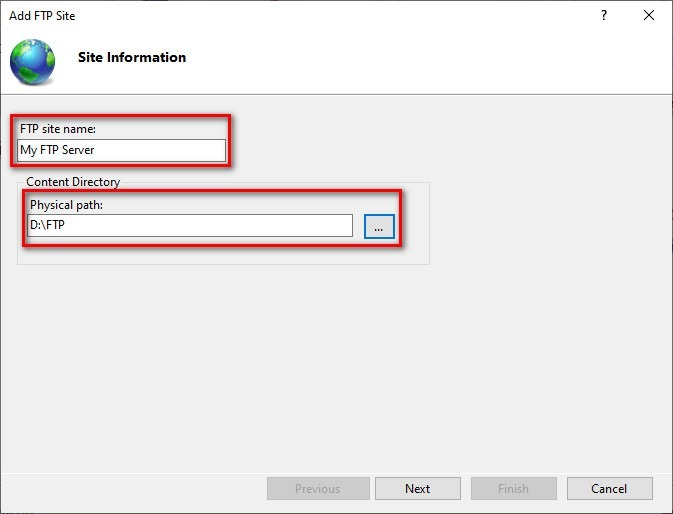
Дайте имя для FTP-сайта и просмотрите локальную папку, которой вы хотите поделиться с другими через FTP-сервер.
 Назовите FTP-сервер и выберите физический путь
На следующем экране вам нужно выбрать IP-адрес локального компьютера из выпадающего списка. Я надеюсь, что вы уже настроили статический IP для компьютера. И оставил номер порта 21 в качестве номера порта по умолчанию для FTP-сервера.
Под опцией SSL выберите No SSL, чтобы установить соединение без SSL-сертификата. В производственной среде для настройки профессионального FTP-сервера вам может потребоваться включить SSL, для которого требуется сертификат.
 На следующем экране вы можете установить права доступа пользователей к FTP-сайту. Здесь вам необходимо решить, каким образом другие будут получать доступ к общему ресурсу FTP, а кому будут доступны только чтение или чтение. Доступ для записи.
Давайте предположим, что этот сценарий
Если вы хотите, чтобы определенные пользователи имели права на чтение и запись, очевидно, что они должны ввести для него имя пользователя и пароль. Другие пользователи могут получить доступ к FTP-сайту без какого-либо имени пользователя или пароля для просмотра только контента, это называется доступом анонимных пользователей. Теперь нажмите Готово.
 Разрешить FTP-сервер через брандмауэр Windows
Если на вашем компьютере запущен брандмауэр Windows, функция безопасности заблокирует все подключения, пытающиеся получить доступ к FTP-серверу. Используйте шаги ниже, чтобы пропустить FTP-сервер через брандмауэр. Для этого откройте Панель управления \ Все элементы панели управления \ Брандмауэр Windows. И нажмите ссылку Разрешить приложение или функцию через брандмауэр Windows.
(Замечания: В настоящее время брандмауэры управляются антивирусным приложением, поэтому вам нужно либо настроить / разрешить FTP оттуда, либо отключить защиту брандмауэра на своем антивирусе)
 Разрешить приложение или функцию через брандмауэр Windows
Теперь нажмите кнопку «Настройки изменений». Выберите FTP-сервер и убедитесь, что он включен в частной и публичной сети. Нажмите ОК. На этом этапе вы сможете использовать свой любимый FTP-клиент для подключения вновь созданного FTP-сервера из локальной сети.
 Разрешить FTP-сервер через брандмауэр Windows
Настройте маршрутизатор для разрешения внешних подключений
Теперь нам нужно настроить маршрутизатор и открыть порт TCP / IP номер 21, чтобы разрешить подключения к вашему ПК. Так что ваш FTP-сервер может быть доступен из Интернета, и вы можете получить к нему доступ из любого места. Здесь найдите шаги для настройки большинства маршрутизаторов. (Для получения более подробных инструкций по переадресации портов TCP / IP, посетите веб-сайт поддержки производителя вашего маршрутизатора.)
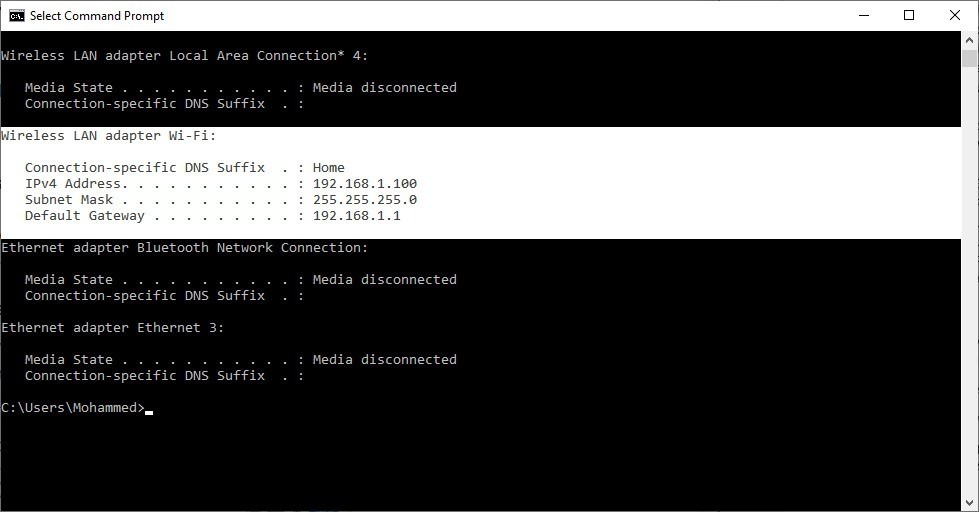
Сначала откройте командную строку, введите команду IPCONFIG и нажмите клавишу ввода, чтобы узнать адрес шлюза по умолчанию (IP-адрес маршрутизатора)
 проверьте IP-адрес и шлюз по умолчанию
Запишите IP-адрес шлюза по умолчанию, который является IP-адресом вашего маршрутизатора. Как правило, это частный адрес в диапазоне 192.168.x.x. Например, 192.168.1.1 или 192.168.2.1.
Теперь откройте веб-браузер по умолчанию. В адресной строке введите IP-адрес маршрутизатора и нажмите Enter. Войдите с учетными данными маршрутизатора.
 Найдите раздел Переадресация портов — обычно вы найдете эту функцию в настройках WAN или NAT.
Создайте новую переадресацию портов, которая включает следующую информацию:
- Наименование услуги: Вы можете использовать любое имя. Например, FTP-сервер.
- Порт ярости: Вы должны использовать порт 21.
- TCP / IP-адрес ПК: Откройте командную строку, введите IPCONFIG, а IPv4-адрес — это TCP / IP-адрес вашего ПК.
Теперь примените новые изменения и сохраните новые конфигурации маршрутизатора.
Как получить доступ к FTP-серверу с любого компьютера
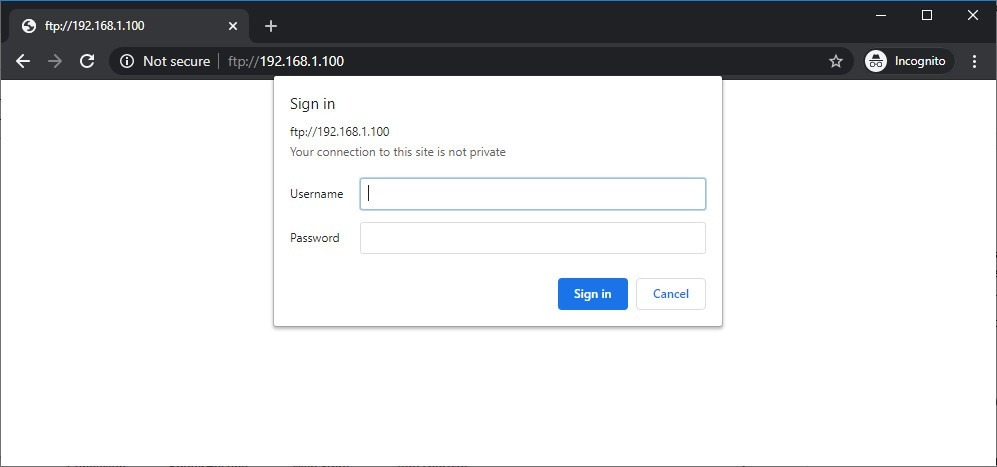
Вот самый быстрый способ протестировать ваш FTP-сервер после настройки брандмауэра и переадресации порта 21 на маршрутизаторе. Откройте веб-браузер по умолчанию и в адресной строке введите IP-адрес своего ПК с Windows 10 в формате FTP-ссылки и нажмите Enter. Адрес должен выглядеть так: FTP://192.168.1.199. или ваш публичный адрес. Будет запрошена аутентификация. Введите системное имя пользователя и пароль для доступа к файлам, которыми вы поделились в общей папке FTP.
 Чтобы получить доступ к FTP-серверу из другого места / сети, вам необходимо ввести статический IP-адрес (предоставленный вашим интернет-провайдером). Например, ваш статический IP-адрес 11.03.68.445, затем вам нужно использовать ftp://11.03.68.445 или ваш ftp: // ваше локальное имя хоста.
Скачать и загрузить файлы, папки на FTP-сервер
Кроме того, вы можете использовать стороннее приложение, например (FileZilla), для загрузки и выгрузки файлов управления, папок между клиентским компьютером и FTP-сервером. Доступно несколько бесплатных FTP-клиентов, вы можете использовать любой из них для управления вашим FTP-сервером:
FireFTP: расширение FTP-клиента браузера Firefox
FileZilla: FTP-клиент для Windows
Cyberduck: FTP-клиент доступен для Windows
WinSCP: бесплатный SFTP, FTP, WebDAV, Amazon S3 и SCP-клиент с открытым исходным кодом для Microsoft Windows
Например, я использую WinSCP, просто скачав и установив приложение. потом
 Откройте WinSCP, введите данные FTP-сервера. Имя пользователя — это имя пользователя FTP-сервера Windows, а пароль — пароль Windows-сервера FTP. щелчок Сохранить WinSCP устанавливает соединение и выводит список всех файловых папок, доступных для скачивания. Левое боковое окно на вашем компьютере, а правое — это FTP-сервер.
- Перетаскивание файлов слева направо скопирует перемещение файла на FTP-сервер
- Перетаскивание файлов справа налево скопирует перемещение файла на клиентский компьютер
Это все, что вы успешно настроили FTP-сервер на Windows 10 компьютер. Кроме того, эти шаги (настройка FTP-сервера) применимы к компьютерам под управлением Windows 8.1, 8 и Windows 7. И после настройки вы можете получить доступ к общей папке из любого места. Есть какие-либо вопросы, предложения не стесняйтесь обсуждать в комментариях ниже. Также читайте в нашем блоге: 5 твиков для исправления проблем с медленной загрузкой или запуском windows 10.
Just because running servers and Windows 10 don’t exactly mix doesn’t mean you can’t get something set up. If you’re planning to set up an FTP server to transfer files over the network but don’t want to switch to a server edition or a Linux distro, this guide is for you. There are many reasons why you may want to start an FTP server. One of the most common reasons for a private FTP server is transferring large files without paying a lot for cloud storage fees.
With small files, using cloud storage services like Google Drive makes sense, but as the size of the files you want to transfer increases, the prices rise quickly. That’s when you should think about taking the time to turn your Windows 10 into an FTP. Here, I’ll show you how to do that before revealing a much easier way to get it done.

Windows 10 VPS Hosting
Get yourself an efficient Windows 10 VPS for remote desktop, at the cheapest price out there. FREE Windows 10 running on NVMe SSD storage and high-speed internet.
Check Out Windows 10 VPS Plans
Steps to Create an FTP Server in Your Windows 10
- Activate IIS on Windows 10
- Configure an FTP Server on Windows 10
- Configure Windows Firewall for an FTP Server
- Enable Port Forwarding on your Route
Windows 10 can turn into an FTP server without additional software. But this tool is disabled by default and you need to enable it first.
To create an FTP server in Windows 10 you need to enable a Windows utility called Internet Information Services. Microsoft created the IIS to support HTTP, HTTPS, FTP, FTPS, and SMTP, among other protocols.
How to Activate IIS on Windows 10?
To activate IIS on Windows 10, follow these steps:
Step 1: Open the launch section
Press ‘WinKey + R’.

Step 2: Type appwiz.cpl
Type in “appwiz.cpl” and press Enter.
appwiz.cpl
Step 3: Turn Windows features
From the left-hand panel, click on “Turn Windows features on or off.”
Step 4: Internet Information Services
Then find ‘Internet Information Services’ and expand it.
Step 5: FTP Server
Check the ‘FTP Server’ and expand it.
Step 6: FTP Extensibility
Check the ‘FTP Extensibility’.
Step 7: Web Management Tools
Check the ‘Web Management Tools’.
Step 8: Confirm changes
Click OK.
Windows will proceed to install the tools. Then you can configure your server.
How to Configure an FTP Server on Windows 10?
Now that the IIS is enabled, we need to configure the server. To configure an FTP server on Windows 10, follow these steps:
Step 1: Open the search box
Press ‘WinKey + S’.
Step 2: Search Administrative Tools
Search for and open ‘Windows Administrative Tools’.
Step 3: Open IIS
Double-click on ‘Internet Information Services (IIS) Manager’.
Step 4: Select computers name
From the left-hand panel, right-click on your computer’s name.
Step 5: Add FTP site
Click on the ‘Add FTP site’.
Step 6: Fill FTP site name
Type in a name for your FTP server in the ‘FTP site name’ field.
Step 7: Choose a folder
Choose a folder as the physical path of your FTP directory.
Step 8: Assign an IP address to your FTP.
You can assign an IP address and port to your FTP in the next step. You can leave them the way they are.
Step 9: SSL Status
If you use the FTP server as a test and security isn’t an issue, you can choose No SSL and proceed. Otherwise, you need to choose Require SSL. You can use Comodo’s SSL management tool to create an SSL certificate.
Step 10: Configure FTP
configure an FTP server on Windows 10
Step 11: chooses Basic
On the authentication section, choose ‘Basic’.
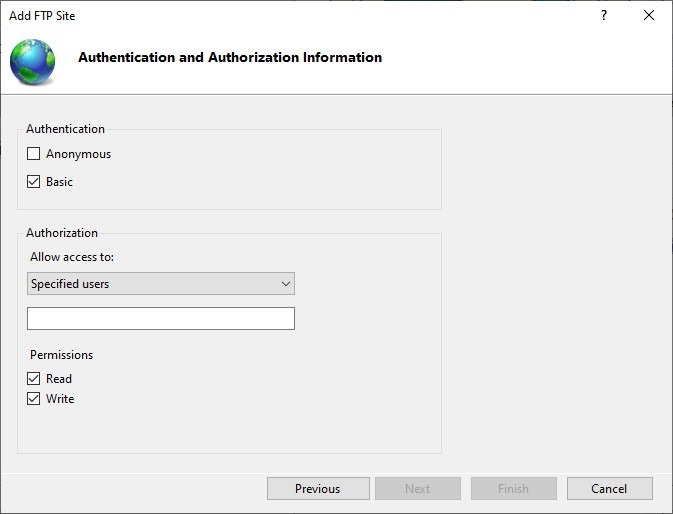
Step 12: Allow Access
Set ‘Allow Access to’ on ‘Specified users’.
Step 13: Enter your information
Type your name or your Microsoft account’s email address in the field below.
Step 14: Set permissions
Give yourself permission to Read and Write.
Step 15: Finish
Click on Finish.
Now you have an FTP server on your Windows.
Windows 10 VPS Hosting
Get yourself an efficient Windows 10 VPS for remote desktop, at the cheapest price out there. FREE Windows 10 running on NVMe SSD storage and high-speed internet.
Check Out Windows 10 VPS Plans
How to Configure Windows Firewall for an FTP Server?
By default Windows Firewall blocks all FTP access. To fix this you need to take the steps below:
Step 1: open the search box
Press ‘WinKey + S’ and type-in Windows Firewall.
Step 2: Allow an app or feature through Windows Firewall
Click on ‘Allow an app or feature through Windows Firewall’ from the left-hand menu.
Step 3: Change settings
Click on ‘Change settings’.
Step 4: Find FTP Server
Find ‘FTP Server’ in the list and check-mark public and private.
Step 5: Confirm changes
Click OK.
This lets you establish a local connection. Of course, if you want to access the server over the internet, you need to open the ports on your router.
How to Enable Port Forwarding on your Route?
Your FTP server needs port 21 open to connect to other computers on the internet. There are different ways to open a port on a router. Here is how it works on an Asus router:
Step 1: Search for cmd box
Press ‘Winkey + S’ and type in ‘cmd’.
Step 2: Open cmd
Open ‘Command Prompt’.
Step 3: Select ipconfig
Type in ‘ipconfig’ and press Enter.
Step 4: Write the Default Gateway
Write the Default Gateway number down. (Normally, it’s 192.168.1.1)
Step 5: Browser
Open your web browser.
Step 6: Type the Gateway
Type the Default Gateway number on the address bar and press Enter.
Step 7: Sign in to the control panel
Sign in to your router’s control panel.
Step 8: Choose WAN
Choose ‘WAN’ from the left-hand menu.
Step 9: Create a new port
Create a new port forwarding with the following setup:
- Give your item a name under ‘Service Name’
- Port Range: 21
- Local IP: Use the IPv4 address on the ‘ipconfig’ command explained above.
- Local Port: 21
- Protocol: TCP
Step 10: Apply changes
Click on Apply.
Create an FTP Server in Windows 10 with Username and Password
The method above gives access to you or other users on the computer. But how can you make users log in with their username and password to access your FTP? The answer is to add a generic user with user-password authentication.
To add a user with a username-password authentication, follow these steps:
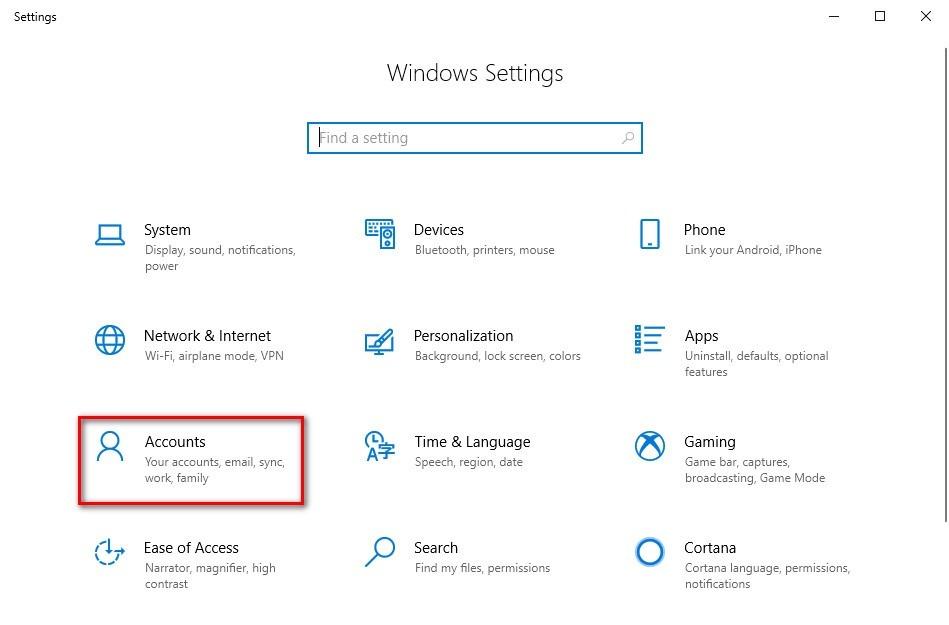
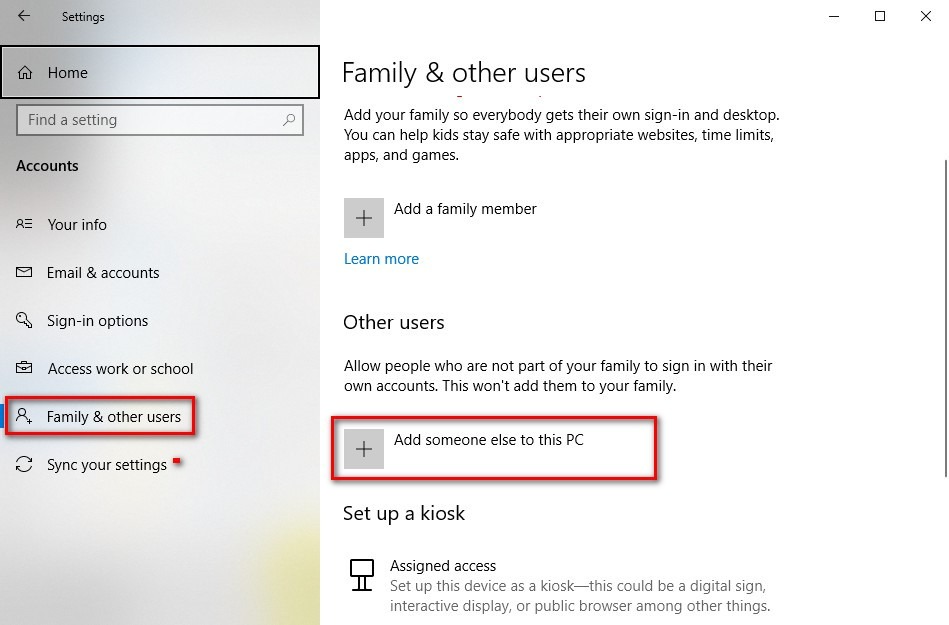
1- Go to Settings.
2- Choose Accounts.
3- Go to “Family & other users”.
4- Click ‘Add someone else to this PC’.
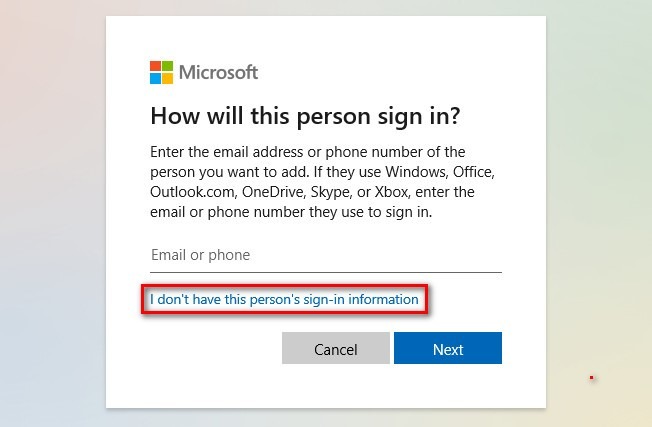
5- On the new window, choose ‘I don’t have this person’s sign-in information’.
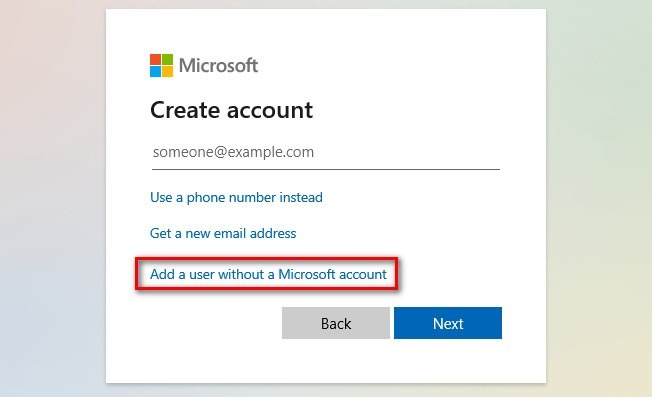
6- Click on ‘Add a user without Microsoft account’.
7- Choose a username and password and fill in the security questions.
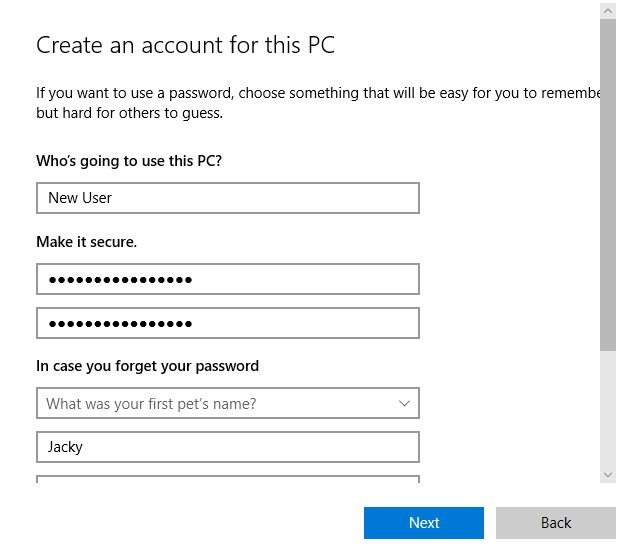
8- Click Next.
9- Now go again to ‘Windows Administrative Tools > Internet Information Services (IIS) Manager’.
10- Select your site from the left-hand panel.
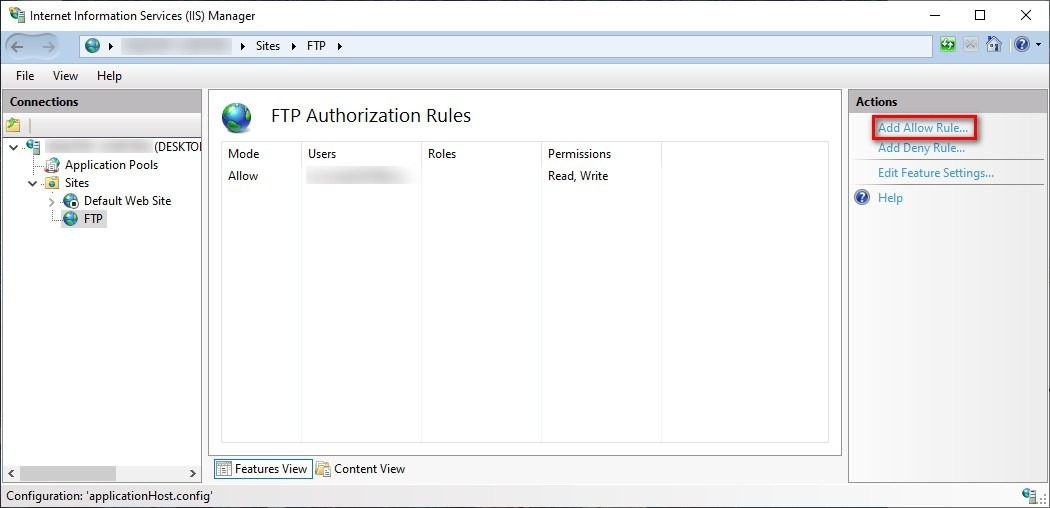
11- Click on ‘FTP authorization rules’.

12- From the right-hand panel, choose ‘Add Allow Rule’.
13- Choose Specified users and add the username you chose above.
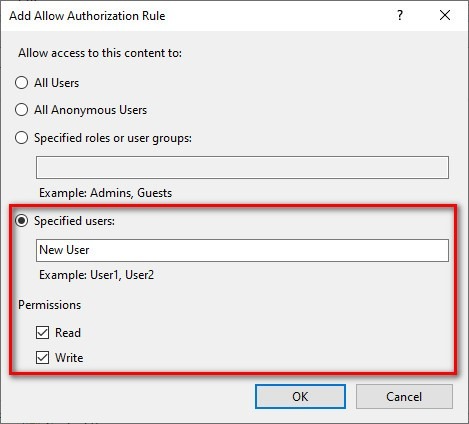
14- Give them the permissions you want.
15- Click OK.
Now you need to add permission to the FTP folder as well. To do so:
- Go to the FTP folder.
- Right-click and choose ‘Properties’.
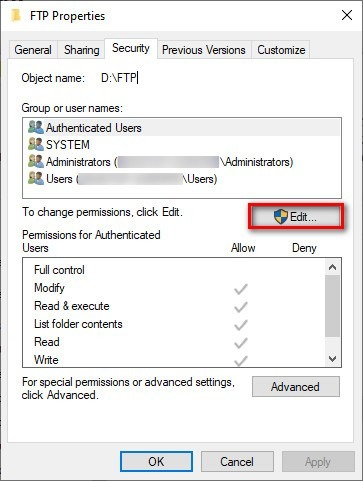
- Go to the ‘Security’ tab.

- Choose Edit, then Add.
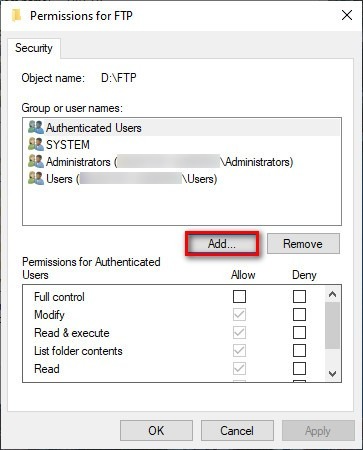
- Type-in the username in the ‘Enter the object…’ section and click Check Names.

- Click OK.
- Select the user and give them the permissions they need.
- Click OK.
Now you can use the username and password to access your FTP.
How to Create Multiple FTP Accounts on Windows 10?
To create another account, you need to take the same steps as above and then specify the Email Address of the new user.
To create multiple FTP accounts on Windows 10:
Step 1: Setting
Go to ‘Settings’.
Step 2: Choose accounts
Click on Accounts.

Step 3: Select Family
Go to Family & other users.
Step 4: Add someone else
Click ‘Add someone else to this PC’.

Step 5: Create an account
Add their Microsoft account or click on “I don’t have this person’s…” to create an account for them.
Step 6: Select (IIS) Manager
Go to ‘Windows Administrative Tools > Internet Information Services (IIS) Manager.
Also Read: How to install IIS on Windows 10?
Step 7: Select your website
Select your site from the left-hand panel.
Step 8: FTP authorization
Click on ‘FTP authorization rules.
Step 9: Add Allow Rule
From the right-hand panel choose ‘Add Allow Rule’.

Step 10: Add username
Choose Specified users and add the username you chose above.

Step 11: Access permissions
Give them the permissions you need.
Step 12: Apply changes
Click OK.
Now you need to add permission to the FTP folder as well. To do so:
- Go to the FTP folder.
- Right-click and choose ‘Properties’.
- Go to the ‘Security’ tab.
- Choose Edit, then Add.
- Type in the username in the ‘Enter the object…’ section and click Check Names.
- Click OK.
- Select the user and give them the permissions they need.
- Click OK.
How to Connect to an FTP Server on Windows 10?
Now that you have created your FTP server and configured it correctly, it’s time to connect and test your server out. If you have a client such as FileZilla, you can connect to the server. But also you can take the steps below using your web browser:
Step 1: Browser
Open your browser.
Step 2: Type IP address
Type in your IPv4 address with ftp:// at the beginning.
Step 3: Enter credentials
Enter your credentials to log in.

Step 4: Download files
Here you can see your files. To download or change the files remotely you can use FileZilla.
What are my Windows 10 FTP Server Credentials?
By default, you add your Windows account as the main FTP account. This means your Microsoft email and password are your credentials. Read the instructions on setting up user authentication above to use a more independent method. Or use a different account by adding another account to your FTP as I explained before.
Windows 10 VPS Hosting
Get yourself an efficient Windows 10 VPS for remote desktop, at the cheapest price out there. FREE Windows 10 running on NVMe SSD storage and high-speed internet.
Check Out Windows 10 VPS Plans
Conclusion
As you probably guessed from how long the article was, launching a successful FTP server on Windows 10 is not a short and sweet process. It is, of course, easy, but it takes many steps, and in the end, Windows 10 will not give you the best FTP performance possible. The most obvious way to set up a decent FTP server is to use a Linux server distro. For a lot of us, dual-booting our computer and entering a completely new environment will be out of the question. But I did promise that I’d reveal a much easier way, and that’s getting a VPS. A VPS is ideal for launching an FTP server with just the right resources. Plus, you can install a Linux distro or even a Windows Server edition with just a few clicks, allowing you to make the most of your FTP server without forcing you to switch your PC over to Linux. Cloudzy offers Linux VPS plans on top-tier hardware with super-fast bandwidth and connection speed. So, stop by and find out how our VPS can help with your FTP.
As long as the two computers have an Internet connection, the File Transfer Protocol (FTP) can be used to send files from one machine to another via an Internet connection. FTP is a client-server networking protocol that allows users to download web pages, data, and programs from other services. It is possible for the user to download the data to their own computer.
Using a desktop Windows 10 operating system, we will show you how to setup and configure an FTP server without using any third-party software like FileZilla Server or Ocean FTP Server. You can also check out our guides on how to setup FTP server using third-party software and setting up using the cloud FTP service.
Using Windows 10 to Install FTP Server Components
Let’s start by creating an FTP directory. FTP clients should be able to access the files and folders in this folder. On your PC, you can create it wherever you want, whether it’s on the desktop or elsewhere.

Press the Windows key + R to open the Run window once you are finished creating a directory. To open the Command prompt, type cmd and click OK. Now type ipconfig and press Enter. This would show you your IP address and default gateway IP.

In order to configure the FTP server we will need IIS(Internet Information Services) components, so go to the Control Panel and then go to Program and Features.

In the Program and Features window toggle down to Turn Windows features on or off, now click on Internet Information Services and expand the FTP server node. Click on the checkboxes for Internet Information Services, Web Management Tools, World Wide Web Services, FTP Service and FTP Extensibility. Click on OK to install the selected services. Close the box when installation is complete.
Configuring an FTP site on Windows 10
Now we will create a new FTP site and configure it. Go to Internet Information Services (IIS) from Administrative Tools in the Control Panel.

Now look at the menu on the left and expand the root. A default site is already made. So, right click on SItes and click on Add FTP site.

Now give a name to your FTP site and select the location where you want your site to be. The default is C:\inetpub\ftproot
You can now see a new window, which shows site binding and SSL settings. For now we have selected no SSL, but it’s better to use the Require SSL option. Binding IP Address is unassigned, so click on the dropdown and select your IP address.

This is followed by selecting basic authentication parameters and allowing certain users access. When installing Windows 10, you either created a new user or used an existing one. So, input the user name and pick the appropriate permissions to begin the installation process.

Select the same settings as above. You should be able to see your FTP site in the Windows web server’s tree.
Setting Firewall Rules for FTP server
It is not possible to connect remotely to your FTP site as Windows Defender Firewall with Advanced Security settings blocks it. Windows Firewall must be configured to allow FTP access. Navigate to WindowsDefenderFirewall in the Control Panel and allow access to the FTP.

Configuring an FTP Account in Windows 10
Afterwards, we need to create an FTP user or group to whom you may grant access to the server. You may do this by launching the Computer Management console. Click on Users or Groups in the right-hand menu to see the options. New users are created by using the right mouse button.

Now add another user. The next step is to enter the username and password for the account. Passwords are required for all FTP users. Select Create and your FTP user will be created.

Click on FTP Authorization rules on the newly created site in IIS.

Your Windows FTP permissions are displayed here for your convenience. We need a new regulation. When you right-click on an empty area, you can add an allow rule by selecting Specific users and then adding the newly-created user.

Selected the appropriate permissions and clicked OK to complete the process.

Assigning the option “All Anonymous Users” allows anonymous users to access your FTP server. The data on our server could not be altered by anonymous users; you must select read-only access.
In the NTFS security settings of the folder, we need to add this user. To add a freshly formed user, right click the FTP-folder on your local disc and select Properties.
Check to see whether you have the user chosen in your settings. Users are granted Full Control in our scenario. Depending on your situation, you’ll need to pick the appropriate permissions. If you want to save your work, click Apply and then OK to finish.

Configure FTP User Isolation
If you want to isolate each FTP user by their own folder, you’ll need to set up an FTP user isolation. Therefore, each distant user has their own ftp-directory, with no access to the files of other users.

Go to your FTP site’s settings and click the FTP User Isolation checkbox to achieve this. Save the changes by selecting the Username directory.

Add a virtual directory by right-clicking on the FTP site and selecting the Add Virtual Directory option.

Fill in the Alias and Physical Path fields with your user’s name (establish a separate users’ subdirectory in the root FTP folder on your local disc before you begin) and click Save.
How to Connect to an FTP Server in Windows 10?
We are now ready to connect to the FTP server. We’ll start by connecting from a LAN.
Use a different computer on the same network to see whether there is any FTP activity. The following instructions should be entered into the PowerShell command line to verify the FTP server on your Windows 10 computer:
					# Testing FTP Network Port connection
Test-NetConnection -ComputerName yourWin10FTPcomputer -Port 21
					# Now test FTP access
ftp 192.168.1.251
Your FTP site can be accessed using the built-in File Explorer in Windows 10. Type FTP:/ and the machine’s local IP address and you’ll be good to go. Click on “Enter” to enter your login and password. Enter the username and password and click OK. Over the LAN, we have access to the user’s FTP account.
FTP server’s folder content should be visible. Uploading and downloading files through FTP is now possible.
Adding FTP Site to the Windows 10 Network Location List
FTP files and folders can be permanently accessed by connecting your FTP site to your Windows Network Locations.
Right-click in the window and pick the Add a network location option in File Explorer.

Select the option shown below.

Specify your ftp server address in the following format (ftp://your_ftp). Now check the box logon Anonymous with either a blank password or your FTP username. Add the name of your connection and then click Next > Finish. You should see your FTP server listed in the list of Network Locations.


Looking for configuring Windows 10 FTP server to share and access files over the network? Here in this post, we discuss How to create FTP server in windows 10 and 8.1. Also, show you How to share files to Access Via FTP server and how you can access it via LAN and WAN from anywhere anyplace. And You can give access to your FTP site by restricting users with username/password or anonymous access. It depends on the purpose of the FTP server on your internal or external network.
FTP stands for file transfer protocol, a useful feature to transfer files between the client machine and the FTP Server. It’s like you share some File folders on the configured FTP server on a port number, And a user can read and write files through the FTP protocol from anywhere. And most browsers support FTP protocol so we can access the FTP servers through the browser.
For example, ftp : // YOURHOSTNAME or IP address.
Contents
- 1 How to create FTP server in windows 10
- 1.1 Enable FTP in windows 10
- 1.2 Configure FTP Server Windows 10
- 1.3 Allow an FTP server through Windows Firewall
- 1.4 Configure the Router to Allow external connections
- 1.5 How to Access an FTP server from any PC
- 1.6 Download and Upload files, Folders On FTP server
Having an FTP server on the internal or external network is always easy and faster to share and access files over the network. Windows 10 and 8.1 come with a built-in FTP server feature under Internet Information Service features that need to be installed before use. In this section, we walk through how to set up FTP Server on Windows 10. And Using WinSCP as a windows client to connect to FTP Server. Also, there are some free FTP clients available by which you can transfer files between your PC and remote servers.
Enable FTP in windows 10
To configure the FTP server on a Windows computer first, we need to Turn on FTP And IIS Features.
- Press Windows + R, keyboard shortcut type appwiz.cpl and click ok.
- This will open Programs and Features,
- here click on ‘Turn Windows features on or off’ as shown image below.
Note: If IIS was not installed earlier on a particular Windows 10 or 8.1 computer, you need to install other features of IIS too (as shown by arrow marks). See the below screenshot for the actual requirements to run the FTP server on Windows 10 (All ticked features need to be installed).
- Press OK to install the selected features.
- This will take some time to install the features, wait until complete.

Configure FTP Server Windows 10
Now After installation is completed, you need to configure the FTP server following the steps below.
- Open Control Panel\All Control Panel Items\Administrative Tools
- Then double click on Internet Information Services (IIS) Manager
- The IIS manager opens, here Expand the sites, right-click on it and click Add FTP Site.

Note: I have created a folder called ‘windows101tricks FTP Share’ (Which we are going to share through the FTP server ) on C drive before reaching this step.

- Give a name for the FTP site and browse the local folder you want to share with others through the FTP server.

- You need to select the local computer’s IP address from the drop-down box on the next screen. I hope you have already set up static IP for the computer.
- And left port number 21 as the default port number of the FTP server.
- Under the SSL option, select No SSL to make the connection without an SSL certificate.
- In a production environment for a professional FTP server setup, you may need to enable SSL, which requires a certificate.

- In the next screen, you can set permission for users to access the FTP site.
- Here you need to decide how others will be accessing the FTP share and who will be having Read-only or Read & Write access.
Let’s assume this scenario
If you want specific users to have read and write access, so obviously they must type a username and password for it. Other users can access the FTP site without any username or password to view the content only, it’s called anonymous user access. Now click Finish.

Allow an FTP server through Windows Firewall
If you have Windows Firewall running on your computer, then the security feature will block any connections trying to access the FTP server. Use the steps below to allow the FTP server through the firewall.
- Open Control Panel\All Control Panel Items\Windows Firewall.
- Click the Allow an app or feature through the Windows Firewall link.
Note: Nowadays, firewalls manage by an Antivirus application, So either you need to configure/Allow FTP from there or Disable Firewall protection on your Antivirus

- Now Click the Changes settings button.
- Select FTP Server and make sure to allow it on a Private and Public network.
- Click OK.
At this point, you should be able to use your favorite FTP client to connect your newly created FTP server from your local network.

Configure the Router to Allow external connections
Now We need to Configure on Router and open TCP/IP port number 21 to allow connections to your PC. So That your FTP server can be reachable from the internet and you can access it from anywhere. Here find the steps to configure most routers. (For more specific instructions to forward TCP/IP ports, you should check your router’s manufacturer support website.)
- First Open the command prompt, type the command ipconfig and hit the enter key.
- Find out and note down the Default Gateway address (Router IP address)
Typically, it’s a private address in the 192.168.x.x range. For example, 192.168.1.1 or 192.168.2.1.

- Now Open your default web browser.
- On the address bar, enter the router’s IP address and press Enter.
- Sign in with your router credentials.

Find the Port Forwarding section – usually, you’ll find this feature under the WAN or NAT settings.
Create a new port forwarding that includes the following information:
- Service name: You can use any name. For example, FTP-Server.
- Port rage: You must use port 21.
- PC’s TCP/IP address: Open Command Prompt, type ipconfig, and the IPv4 address is your PC’s TCP/IP address.
Now Apply the new changes, and save the new router configurations.
How to Access an FTP server from any PC
Here’s the quickest way to test your FTP server after configuring the firewall and forwarding port 21 on your router.
- Open your default web browser.
- In the address bar, type your Windows 10 PC IP address, on an FTP link format, and press Enter.
- The address should look like this: FTP://192.168.1.199. or your public address.
- This will ask for Authentication Type your system Username and password to access the files you shared on the FTP share folder.

To access the FTP server from Different locations/Networks, you need to type the Static IP (provided by your internet provider). For example, if your Static IP is 11.03.68.445, you need to use ftp://11.03.68.445 or your ftp://your local hostname.
Download and Upload files, Folders On FTP server
You can also use third-party applications like (FileZilla) to Download Upload, and manage files, and Folders between the client machine and FTP Server. There are multiple free FTP Clients available you can use any of them to manage your FTP server:
FireFTP: Firefox browser FTP Client extension
FileZilla: an FTP Client available for Windows
Cyberduck: FTP Client available for Windows
WinSCP: A free and open-source SFTP, FTP, WebDAV, Amazon S3 and SCP client for Microsoft Windows
For example, I am using WinSCP.
- First, download and install the application.
- Open WinSCP, then Input the FTP Server details.
- Username is the FTP Server Windows username. The password is FTP Server Windows password & Click Save The WinSCP establishes a connection and list out all files and folders available for download.

The left side windows in your machine and the right side is the FTP Server.
- Drag files from left to right will copy the file and move to FTP SERVER.
- Drag files from the Right to left will copy the file and move to the Client machine.
That’s all you have successfully configured the FTP server on windows 10 computers. Also, these steps (setup FTP server) are applicable to Windows 8.1, 8 and Windows 7 computers.
Also read:
- How to install Kali Linux on Windows 10 subsystem (Step by step guide)
- Does Windows 10 Printer keep going offline? Let’s make it online.
- Solved: Can’t print documents, Printer Driver is unavailable in Windows 10
- How to fix DNS Server not Responding On Windows 10/8.1/7
- Windows 10 won’t shut down after update? Here’s How To Fix It!
Documentation » Using WinSCP » Guides » Other »
You may want to install a secure FTP server on Windows either as standalone file storage or to have means of editing your website hosted on IIS (Internet Information Services) web server. In both cases, you can use an optional FTP Server component of the IIS. It can be installed standalone or along with a Web Server.1
- Installing FTP Server
- On Windows Server 2022, Windows Server 2019, Windows Server 2016 and Windows Server 2012
- On Windows Server 2008 R2
- On Windows Desktop (Windows 11, Windows 10, Windows 8, Windows 7 and Windows Vista)
- Opening IIS Manager
- Creating Certificate for the FTPS Server
- Servers behind external Firewall/NAT
- Windows Firewall Rules
- Restarting FTP Service
- Adding FTP Site
- To a Web Site
- Standalone FTP Site
- Connecting to Your FTPS Server
- Further reading
Installing FTP Server
On Windows Server 2022, Windows Server 2019, Windows Server 2016 and Windows Server 2012
- In Windows Server Manager go to Dashboard and run Manage > Add Roles and Features.
Advertisement
- In Add Roles and Features wizard:
- Proceed to Installation Type step and confirm Role-based or feature-based installation.
- Proceed to Server Roles step and check Web Server (IIS) role. Note that it is checked already, if you had IIS installed as a Web Server previously. If your are prompted to install IIS Management Console tool, confirm it.
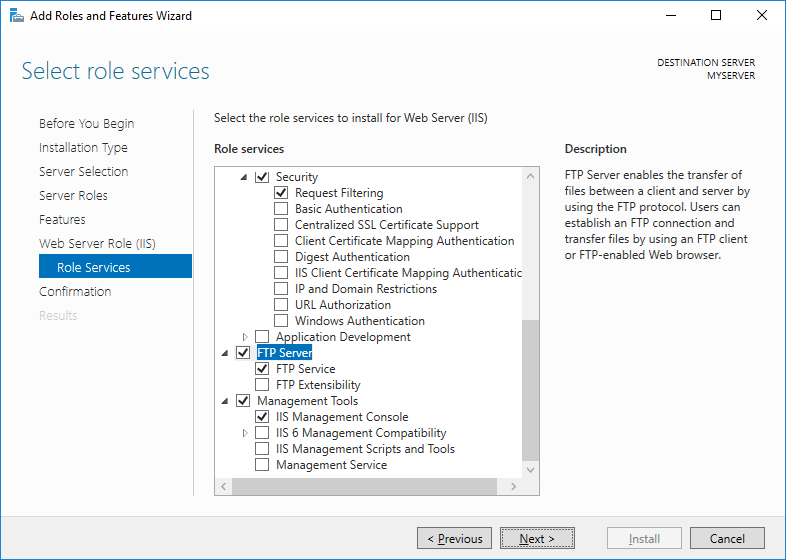
- Proceed to Web Server Role (IIS) > Role Services step and check FTP Server role service. Uncheck Web Server role service, if you do not need it.
- Proceed to the end of the wizard and click Install.
- Wait for the installation to complete.
Advertisement
Skip to the next step.
On Windows Server 2008 R2
If you do not have IIS installed yet:
- In Windows Server Manager go to Roles node and in Roles Summary panel click Add Roles.
- In Add Roles wizard:
- Proceed to Server Roles step and check Web Server (IIS) role.
- Proceed to Role Services step and check FTP Server > FTP Service role service. Uncheck Web Server role service, if you do not need it. Make sure Management Service > IIS Management Console role service is checked.
- Proceed to the end of the wizard and click Install.
- Wait for the installation to complete.
If you have IIS installed already (i.e. as a Web Server):
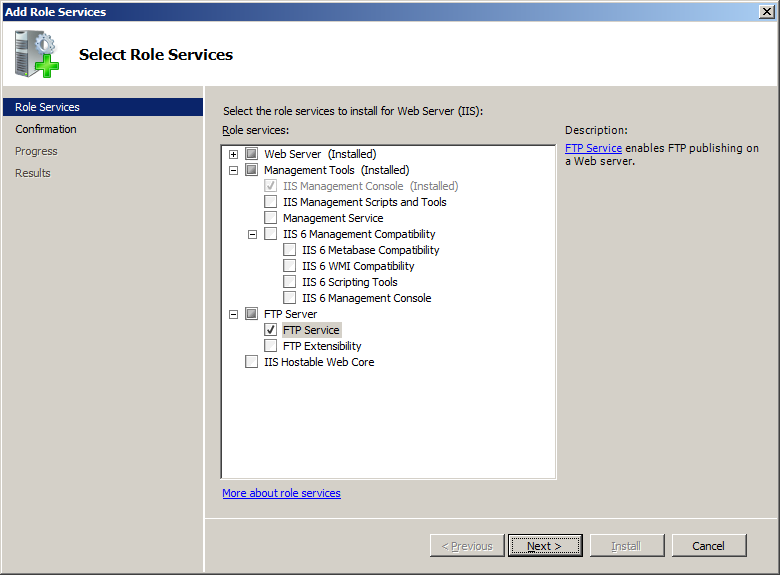
- In Windows Server Manager go to Roles node and in Web Server (IIS) > Role Services panel click Add Role Services.
- In Add Role Services wizard:
- Check FTP Server > FTP Service role service.
- Make sure that Management Service > IIS Management Console is checked.
- Confirm with Next button.
- Proceed to the end of the wizard and click Install.
- Wait for the installation to complete.
Advertisement
Skip to the next step.
On Windows Desktop (Windows 11, Windows 10, Windows 8, Windows 7 and Windows Vista)
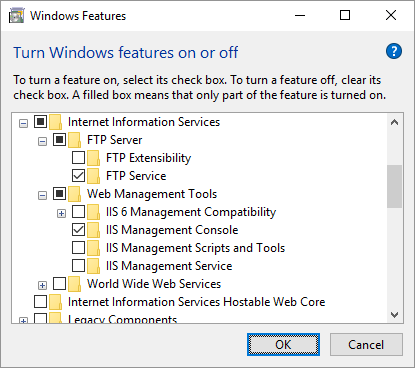
- Go to Control Panel > Programs > Programs and Features > Turn Windows features on or off.
- On a Windows Features window:
- Expand Internet Information Services > FTP Server and check FTP Service.
- Expand Internet Information Services > Web Management Tools and check IIS Management Console, if it is not checked yet.
- Confirm with OK button.
- Wait for the installation to complete.
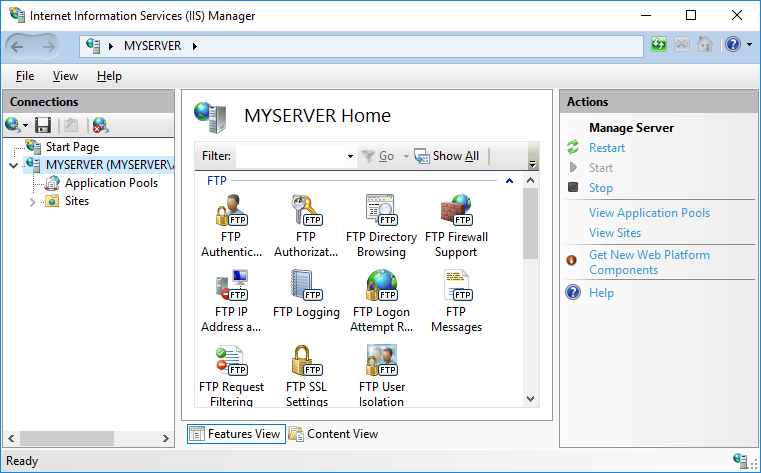
Opening IIS Manager
- Go to Control Panel > System and Security > Administrative Tools (Windows Tools on Windows 11) and open Internet Information Services (IIS) Manager.
- Navigate to your Windows server node.
Advertisement
Creating Certificate for the FTPS Server
You need a TLS/SSL certificate to secure your FTP server. Ideally, you should acquire the certificate from a certificate authority.
You may also create a self-signed certificate locally, but in such case users of your FTPS server will be warned, when connecting to the server.
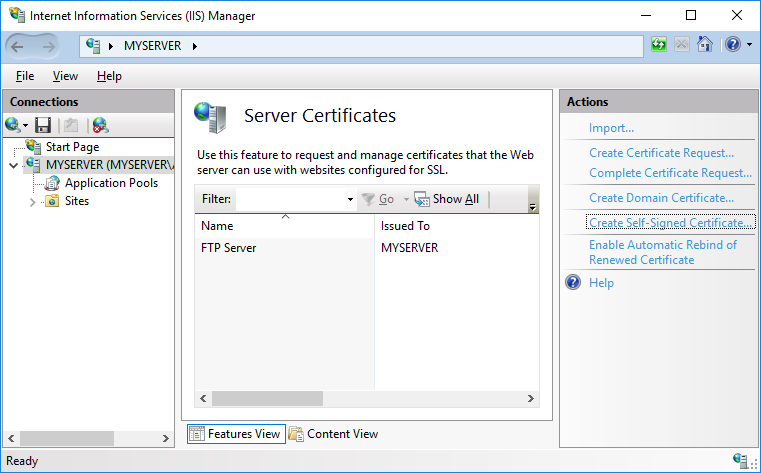
To create the self-signed certificate:
- In IIS Manager, open IIS > Server Certificates.
- Click on Create Self-Signed Certificate action.
- Specify a certificate name (e.g. “FTP Server”) and submit with OK.
Self-signed certificates created by old versions of IIS Manager do not work with FTPS clients that check for key usage violations.2 To create a certificate with a correct key usage, use New-SelfSignedCertificate PowerShell as an Administrator:
New-SelfSignedCertificate -FriendlyName "FTP Server" -CertStoreLocation cert:\localmachine\my -DnsName ftp.example.com
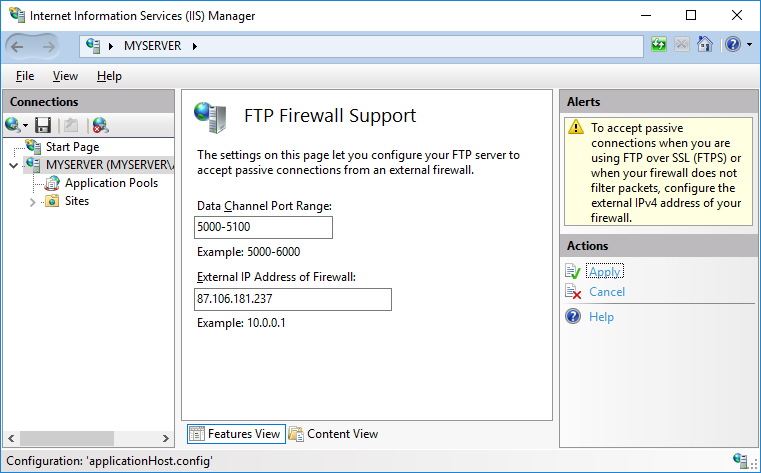
Servers behind external Firewall/NAT
If your server is behind an external firewall/NAT, you need to tell the FTP server its external IP address, to allow passive mode connections.
- In IIS Manager, open FTP > FTP Firewall Support.
- Specify your server’s external IP address.
For Microsoft Azure Windows servers you will find the external IP address in Public IP address section of the virtual machine page.
When behind an external firewall, you need to open ports for data connections (obviously in addition to opening an FTP port 21 and possibly an implicit TLS/SSL FTP port 990). You won’t probably want to open whole default port range 1024-65535. In such case, you need to tell the FTP server to use only the range that is opened on the firewall. Use a Data Channel Port Range box for that. Any time you change this range, you will need to restart FTP service. Learn how to open ports on Microsoft Azure.
Advertisement
Click Apply action to submit your settings.
Some external firewalls are able to monitor FTP control connection and automatically open and close the data connection ports as needed. So you do not need to have whole port range opened all the time, even when not in use. This won’t work with the secure FTPS as the control connection is encrypted and the firewall cannot monitor it.
Windows Firewall Rules
An internal Windows firewall is automatically configured with rules for the ports 21, 990 and 1024-65535 when IIS FTP server is installed.
The rules are not enabled initially on some versions of Windows.3 To enable or change the rules, go to Control Panel > System and Security > Windows Defender Firewall4 > Advanced Settings > Inbound Rules and locate three “FTP server” rules. If the rules are not enabled, click on Actions > Enable Rule.
Restarting FTP Service
While the internal Windows firewall is automatically configured to open FTP ports when FTP server is installed, this change does not seem to apply, until FTP service is restarted. The same is true for changing data channel port range.
To restart FTP service go to Control Panel > System and Security > Administrative Tools (Windows Tools on Windows 11) and open Services. Locate Microsoft FTP Service and click Restart service.5
Adding FTP Site
To a Web Site
If you want to add FTP server to manage your existing web site remotely, locate your web site node in IIS Manager and:
- Click Add FTP Publishing action.
- In Add FTP Site Publishing wizard:
- On an initial Binding and SSL Settings step, select Require SSL to disallow non-encrypted connections and select your certificate.
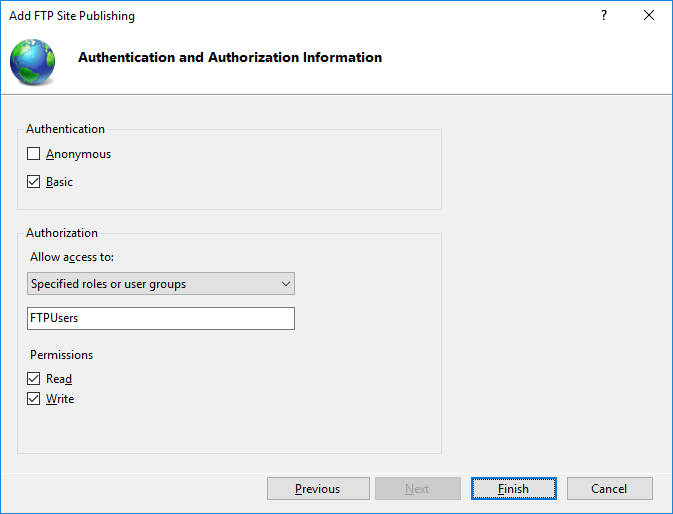
- On Authentication and Authorization Information step, select Basic authentication and make sure Anonymous authentication is not selected. Select which users (Windows accounts) you allow to connect to the server with what permissions. You can choose All users or select only some. Do not select Anonymous users.
- Submit with Finish button.
Advertisement
Your secure FTPS server is now running and can be connected to.
Standalone FTP Site
If you want to add a standalone FTP server to store/exchange files, locate Sites node (folder) of your Windows server in IIS Manager and:
- Click Add FTP Site action.
- In Add FTP Site wizard:
- On an initial Site Information step, give a name to your FTP site (if it’s the only site you are going to have, simple “FTP site” suffice) and specify a path to a folder on your server’s disk that is going to be accessible using FTP.
- On a Binding and SSL Settings step, select Require SSL to disallow non-encrypted connections and select your certificate.
- On Authentication and Authorization Information step, select Basic authentication and make sure Anonymous authentication is not selected. Select which users (Windows accounts) you allow to connect to the server with what permissions. You can choose All users or select only some. Do not select Anonymous users.
- Submit with Finish button.
Your secure FTPS server is now running and can be connected to.
Connecting to Your FTPS Server
For connecting to a Microsoft Azure Windows instance, see a specific guide.
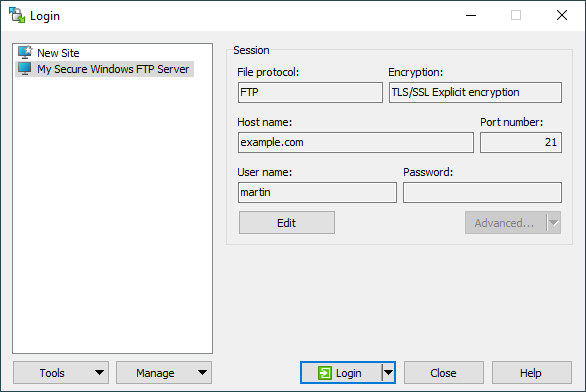
Start WinSCP. Login Dialog will appear. On the dialog:
- Select FTP protocol and TLS/SSL Explicit encryption.
- Enter your Windows server hostname to Host name field. Avoid using an IP address to allow WinSCP to verify that the hostname matches with host the server’s certificate was issued to (not applicable to self-signed certificates).
- Specify username and password for Windows account you want to connect with (when using domain accounts, you need to specify a full username with format
domain\username). - You may want to save your session details to a site so you do not need to type them in every time you want to connect. Press Save button and type site name.
- Press Login to connect.
- If you are using self-signed certificate, you will be prompted to accept it.
Advertisement
Further reading
- Installing secure FTP server on Microsoft Azure using IIS;
- Installing SFTP/SSH Server on Windows using OpenSSH;
- Upload files to FTP server or SFTP server;
- Automate file transfers (or synchronization) to FTP server or SFTP server.
Last modified: by martin – Currently locked by: 84.17.42.40