Продолжая серию разъяснительных инструкций, в нашей статье сегодня речь пойдет о том, что это за программа igfxEM.exe, для чего она нужна, как убрать данный объект из автозапуска Windows, а также, как уменьшить влияние на быстродействие компьютера связанного процесса. Не теряя времени, давайте переходить дальше и разбираться со всеми этими и некоторыми другими сопутствующими моментами.
Приведенная ниже инструкция будет актуальной для любых версий операционных систем от Microsoft. Это, например: Windows XP, 7,8 или 10.
Содержание
- Что это за программа?
- Как исправить проблему
- Перезапуск процесса
- Удаление из автозапуска
- Проверка ПК на вирусы
- Очистка диска и реестра ОС
- Обновление видеодрайвера Intel
- Видеоинструкция
- Вопросы и ответы
Что это за программа?
Файл igfxEM.exe является исполняемым модулем графического драйвера для устройств Intel. Само по себе название — это аббревиатура от фразы Intel Graphics Executable Main Module. Поэтому если отвечать на вопрос, нужна ли данная программа на вашем компьютере, то с уверенностью можно сказать — да. Естественно, если на ПК используется аппаратное обеспечение от Intel. Процесс igfxEM Module в диспетчере задач операционной системы относится к приложению Intel® Common User Interface.
Но порой случается так, что данный официальный драйвер может вызывать ошибки операционной системы либо чрезмерно нагружать ПК или ноутбук. Происходит это в следующих случаях:
- Драйвер устарел, но используется на новом аппаратном обеспечении.
- ПО от Intel повреждено вирусами.
- Вы установили неофициальную версию драйвера.

Во всех случаях необходимо исправлять ситуацию путем применения одного из методов, показанных ниже.
Перед тем как вы перейдете дальше, рекомендуем предварительно очистить компьютер от различного скопившегося со временем мусора. Для этого можно выбрать одну из программ, предназначенных для таких целей.
Как исправить проблему
Итак, для того чтобы устранить любые ошибки, возникающие из-за файла igfxEM.exe, рассмотрим несколько действенных вариантов.
Перезапуск процесса
Если ошибка временна и вызвана неправильной работой драйвера именно в данный момент, мы можем просто выполнить перезагрузку процесса, остановив его, а потом заново запустив. Делается это следующим образом:
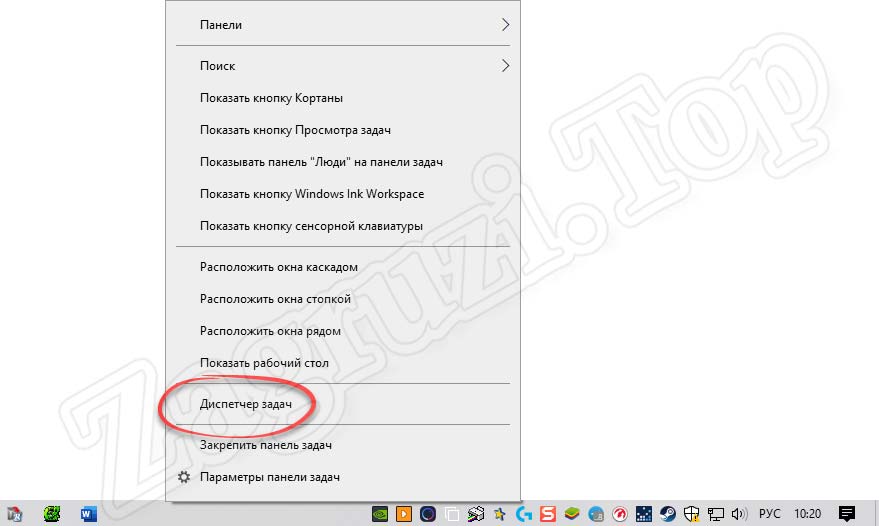
- Сначала мы вызываем диспетчер задач, произведя правый клик мышью по пустому месту панели задач Windows. В данном случае пример показан на операционной системе последнего поколения, однако, в случае с Семеркой и другими ОС все делается похожим образом. В контекстном меню выбираем пункт запуска диспетчера задач.
- Когда нужное нам приложение откроется, находим тот процесс, который вызывает ошибку. Производим правый клик мыши на объекте с названием igfxEM после чего из контекстного меню выбираем пункт перезапуска.
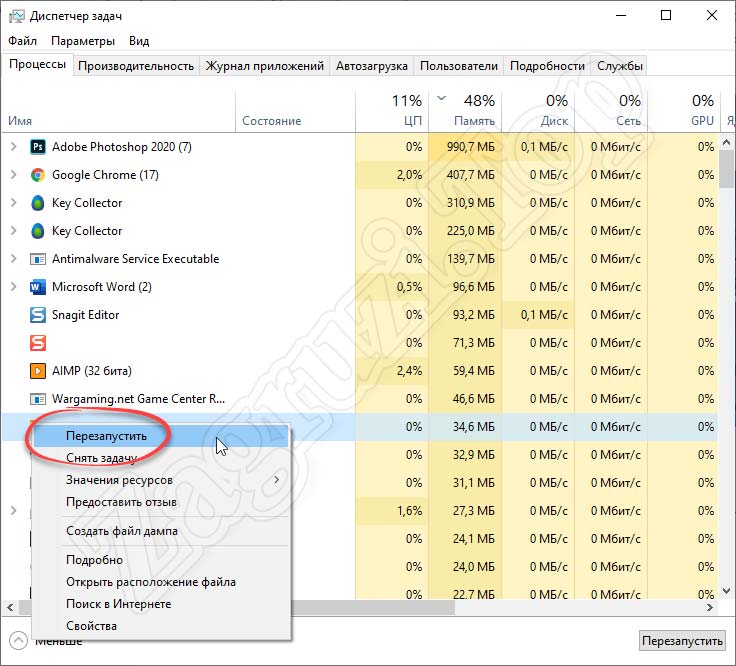
- В некоторых случаях пункт перезапуска попросту отсутствует. Если и в вашем случае имеется такая ситуация, выбираем ссылку с названием «Снять задачу».
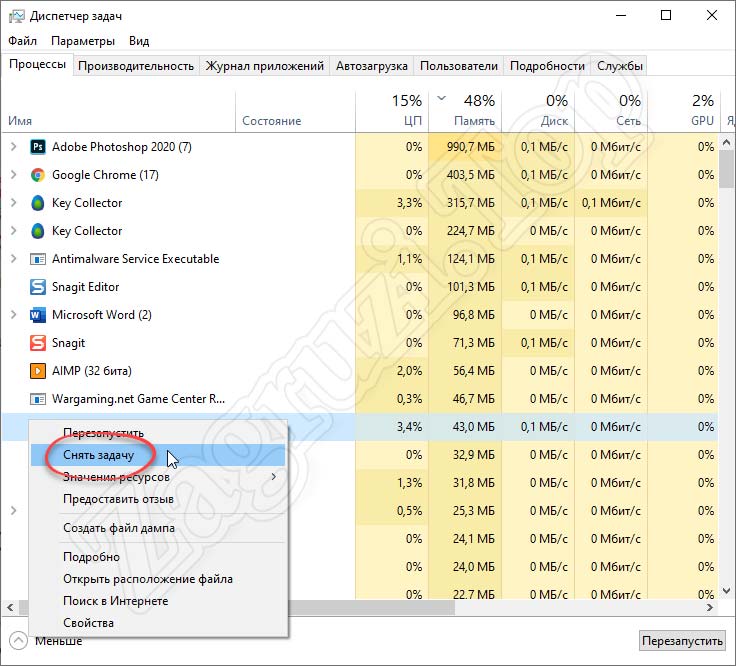
После этого необходимо перезагрузить компьютер, и тогда процесс, который мы принудительно завершили, вновь запуститься в автоматическом режиме. Таким образом он и будет перезагружен.
Внимание: перед принудительным завершением процесса обязательно закройте все программы и сохраните их данные!
Удаление из автозапуска
Если ситуация не исправилась и компонент драйвера Intel HD-графики продолжает выдавать сбой, мы можем просто убрать объект из автозапуска Windows. Для этого нам понадобится:
- Как и в предыдущем случае, запускаем диспетчер задач, произведя правый клик мышью по пустому месту панели задач.
- Переходным во вкладку «Автозагрузка». Дальше находим процесс, который хотим отключить. Делаем правый клик мышью и из появившегося контекстного меню выбираем пункт, который мы отметили на скриншоте ниже.
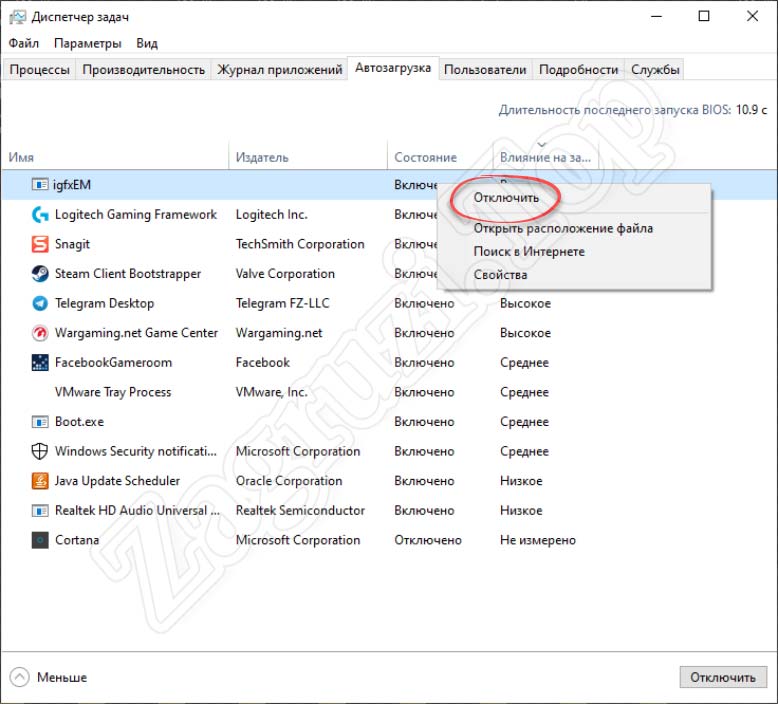
После следующей перезагрузки компьютера данный процесс уже не будет стартовать в автоматическом режиме. Соответственно, ошибка, которую вызывал файл igfxEM.exe, исчезнет.
Проверка ПК на вирусы
Если вариант, описанный выше привел к тому, что видеоадаптер от Intel на вашем компьютере или ноутбуке начал работать неправильно, верните отключенный объект в автозапуск. Давайте попробуем исправить ситуацию другими методами. Например, проверим наш ПК на наличие вредоносного программного обеспечения:
Ниже мы показали очистку компьютера от вирусов именно при помощи штатного защитника Windows 10. Вы можете использовать любое другое антивирусное ПО, ведь там все делается похожим образом.
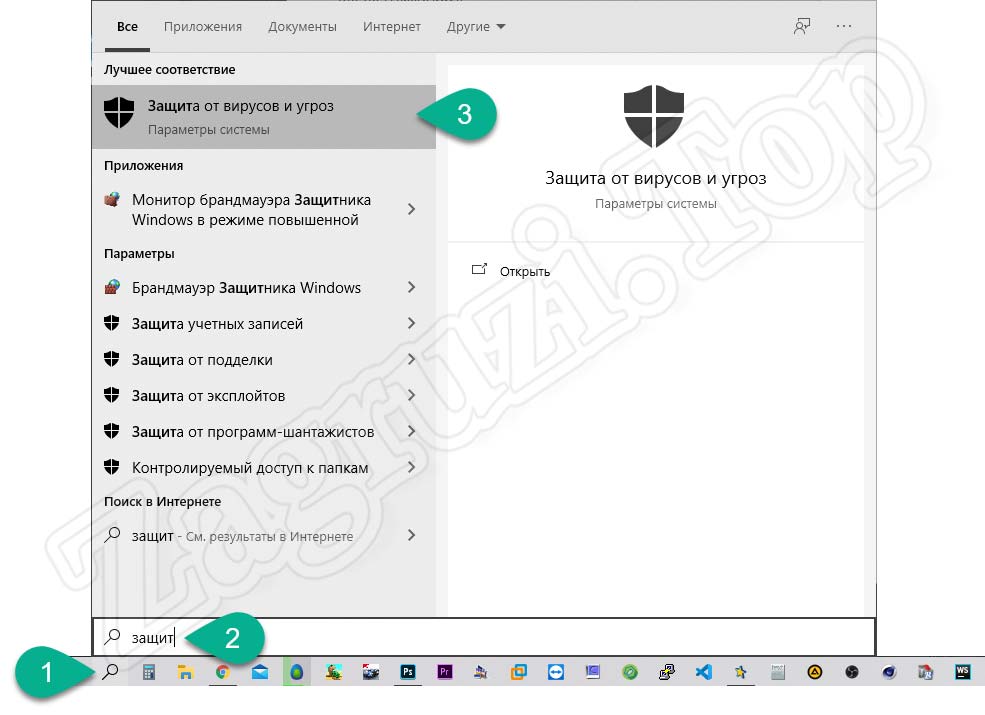
- Изначально мы запускаем наш антивирус. Для этого достаточно воспользоваться поисковым инструментом, прописать название искомого приложения, а потом кликнуть по нему в появившейся выдаче.
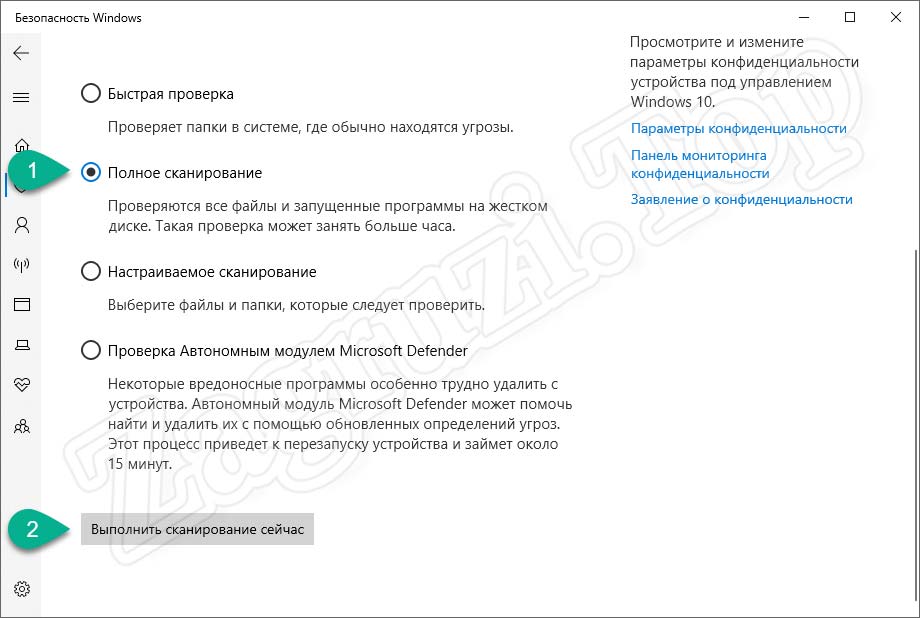
- Когда защитник Windows 10 запустится, мы кликаем по ссылке с названием «Параметры сканирования».
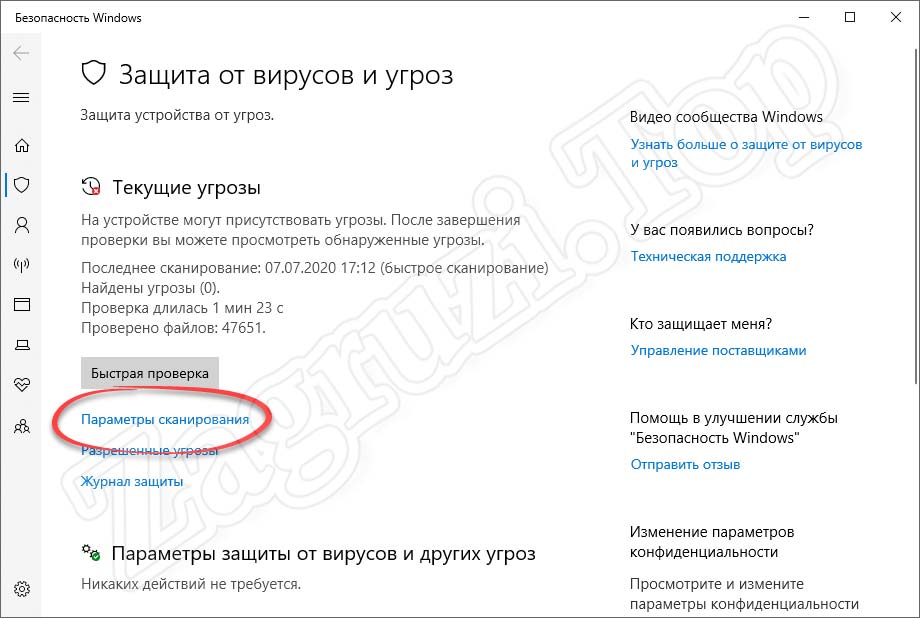
- Теперь переключаем режим поиска в полное сканирование, а затем запускаем процесс, кликнув по кнопке с надписью «Выполнить сканирование сейчас».
- Начнется проверка компьютера и параллельное удаление всех обнаруженных в ее ходе угроз. Ждем завершения процесса.
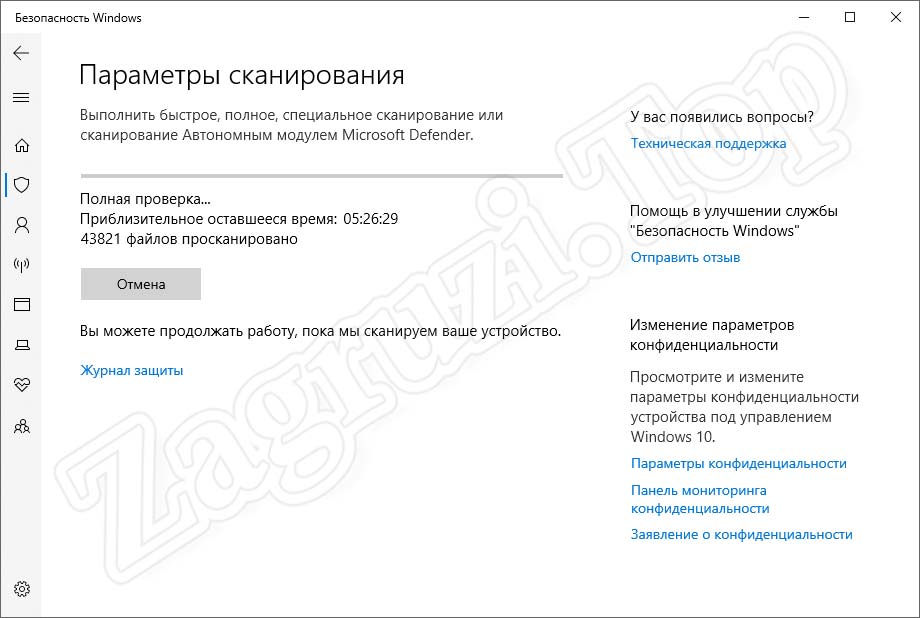
Длительность сканирования компьютера и ноутбука зависит от его производительности, а также объема дисковой подсистемы. В нашем случае это заняло более 5 часов. Для того чтобы ускорить данный процесс, мы рекомендуем не трогать компьютер, закрыть все программы, также сохранить их данные.
Для максимально полного обнаружения и устранения всех угроз необходимо использовать дополнительное программное обеспечение. В специальной инструкции на нашем сайте рассмотрены лучшие из таких утилит.
Очистка диска и реестра ОС
Также, в некоторых случаях, когда файл igfxEM.exe вызывает какие-либо ошибки, нам может помочь банальная очистка накопителя компьютера, а также его реестра. Давайте разберемся, как это правильно реализовать:
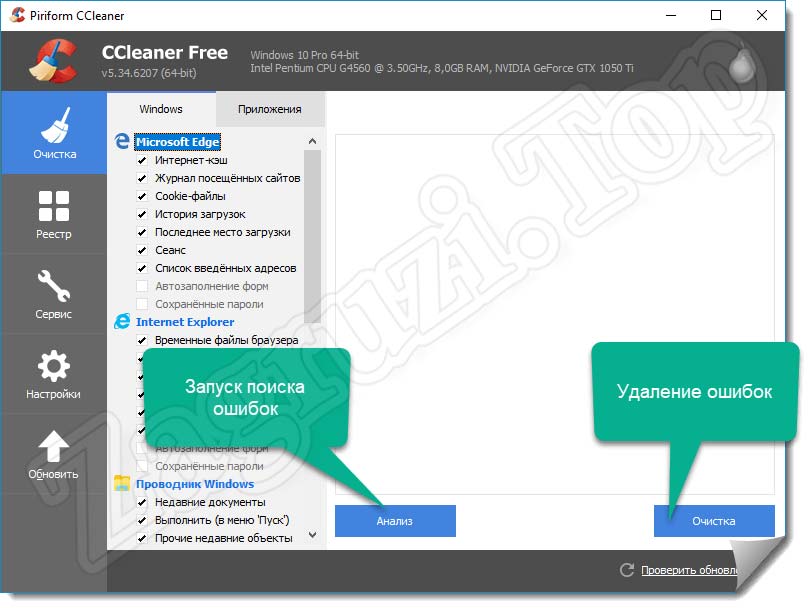
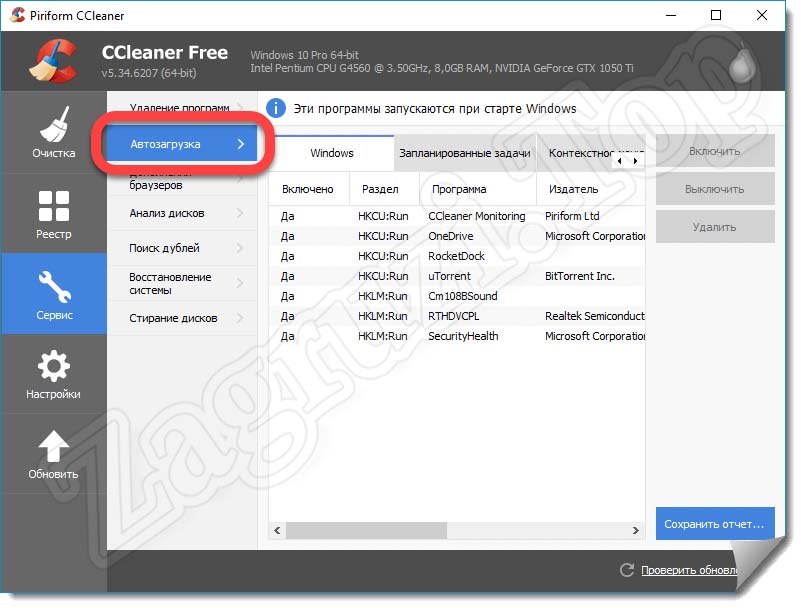
- Сначала нам понадобится скачать, а потом и установить специальное приложение, которое называется CCleaner. Прочитайте подробную пошаговую инструкцию по этому поводу. На этой же страничке вы найдете кнопку для бесплатного скачивания последней официальной версии утилиты на русском языке. После того как программа будет получена, в левой ее части переключитесь к разделу «Очистка». В правой половине жмем кнопку анализа, дожидаемся завершения процесса, а потом кликаем по кнопке очистки найденных результатов.
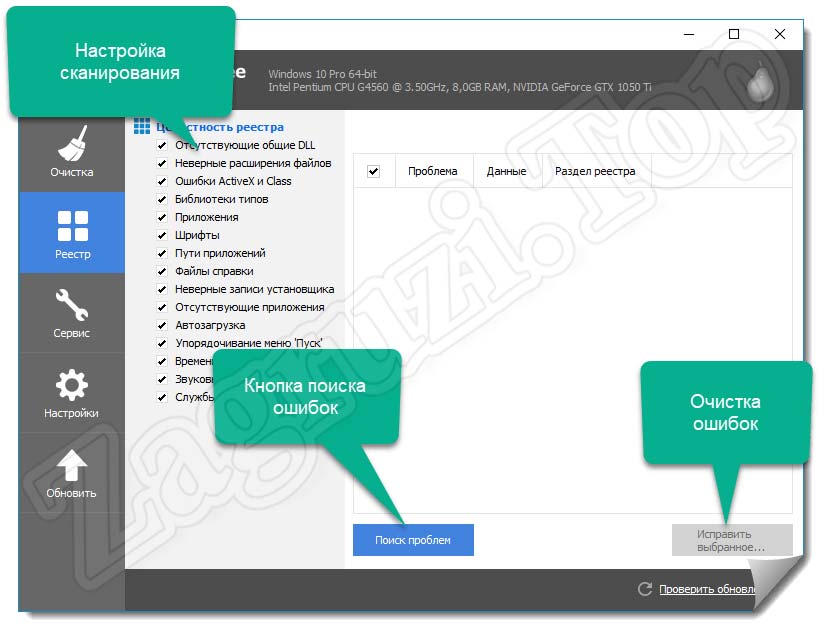
- Второй этап использования данного приложения заключается в очистке системного реестра Windows. Нам понадобится переключиться на соответствующую вкладку в левой части окна, а потом кликнуть по кнопке с надписью «Поиск проблем». Когда таковые будут обнаружены, мы исправляем их одновременно, выбрав кнопку, находящуюся в правой части окна.
- Дополнительным плюсом данной утилиты является тот факт, что она в расширенном режиме способна работать с автозапуском операционной системы от Microsoft. Тут мы можем оперировать не только приложениями, но также и контекстным меню, запланированными задачами, плагинами в браузерах и так далее.
Теперь, когда наш компьютер тщательно очищен от вирусов, мы можем перезагружать его и проверять, продолжает ли процесс igfxEM нагружать ПК, либо вызывать какие-то сбои. Если да, то лучшее, что мы можем сделать, это переустановить драйвер Intel, скачав его последнюю версию с официального сайта производителя.
Обновление видеодрайвера Intel
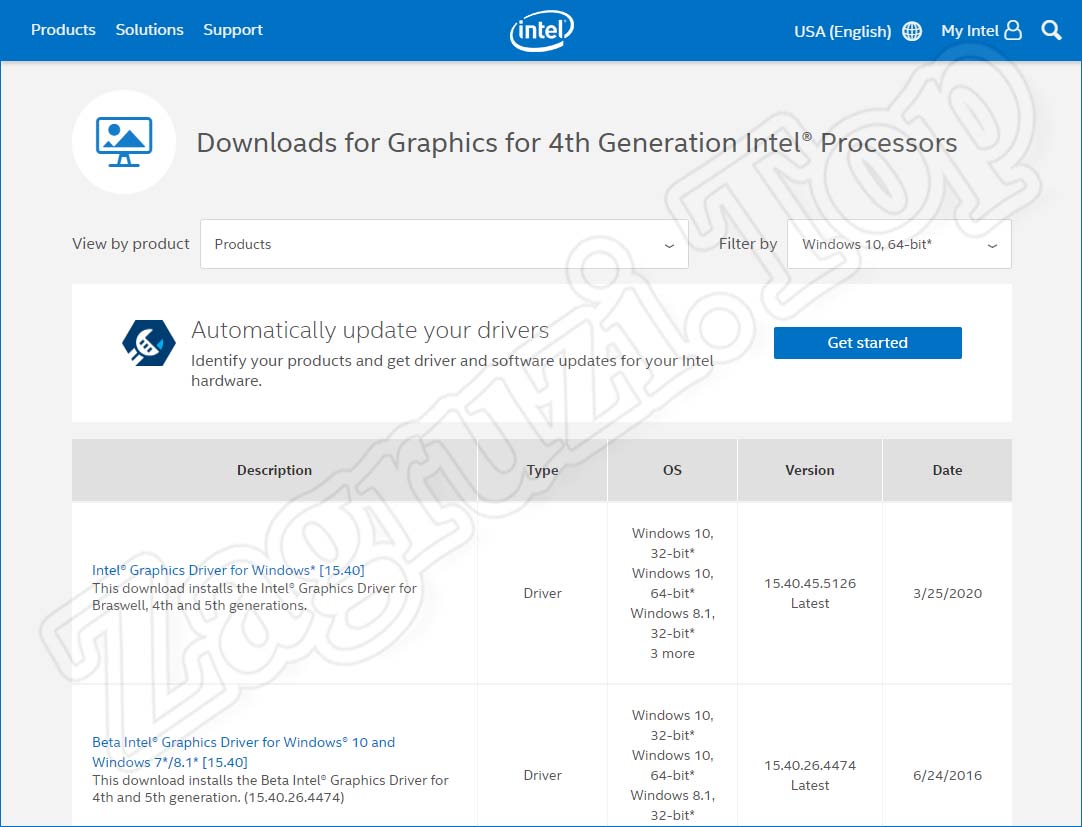
Итак, для того чтобы обновить драйвер на последнюю версию для вашего компьютера, необходимо перейти на официальный сайт Intel, а потом произвести несколько несложных манипуляций:
- В первую очередь мы должны выбрать версию своего графического адаптера. Дальше указываем операционную систему, выбрав соответствующее значение в выпадающем списке, находящемся в правой части окна. Когда необходимое аппаратное обеспечение будет обнаружено, выбираем верхнюю версию драйвера, кликнув по ссылке в его названии.
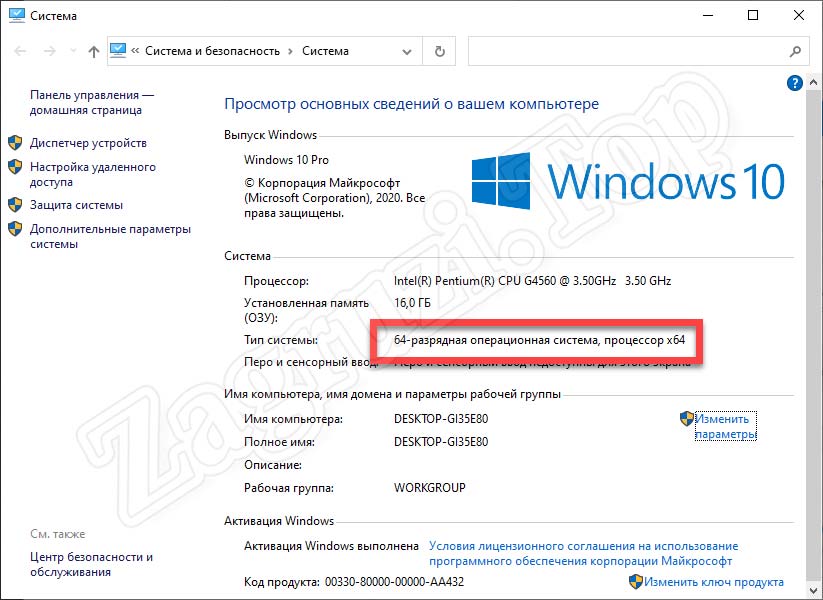
- Кстати, для того чтобы определить разрядность вашей операционной системы, достаточно воспользоваться сочетанием горячих клавиш [knopka]Win[/knopka] + [knopka]Pause[/knopka] на клавиатуре. В результате откроется небольшое окошко, в котором мы увидим архитектуру ОС.
- Дальше переходим непосредственно к скачиванию драйвера, кликнув по кнопке, которая появится на следующей страничке официального сайта Intel.

- Устанавливаем драйвер, запустив полученный исполняемый файл.
Остается только перезагрузить наш компьютер и проверить, исчезла ли ошибка, которая появлялась при старом драйвере.
Видеоинструкция
Для того чтобы вам было легче понять всю суть описываемого в статье процесса, просмотрите обучающий ролик по данной теме.
Вопросы и ответы
На этом мы свою инструкцию заканчиваем, а вам посоветуем приступать к делу и разбираться с проблемой, которая мешает нормально работать на компьютере. Если в ходе работы что-то пойдет не так или возникнут дополнительные сложности, обратитесь с ними в комментарии. Немного ниже вы найдете приспособленную для этого форму обратной связи.
( 4 оценки, среднее 4.75 из 5 )

Для чего нужен процесс igfxem module?
Многие пользователи операционной системы Windows, открыв диспетчер задач, обращают внимание на наличие там некого процесса под названием igfxem module, исполняемым файлом которого является igfxEM.exe. В данной статье мы разберемся с данным процессом, с его назначением и происхождением.
Откуда он появился?
Прежде всего отметим, что данный процесс можно обнаружить на компьютерах и ноутбуках с процессором фирмы Intel. А точнее на процессорах данной марки со встроенной графикой intel hd graphics. На amd платформе его быть не должно.
Процесс igfxem module является частью драйвера для встроенной в процессор Intel видеокарты. Если быть точнее, то он отвечает за работу Intel® HD Graphics Driver Common User Interface, который является интерфейсом управления и натройки встроенной графики Intel.
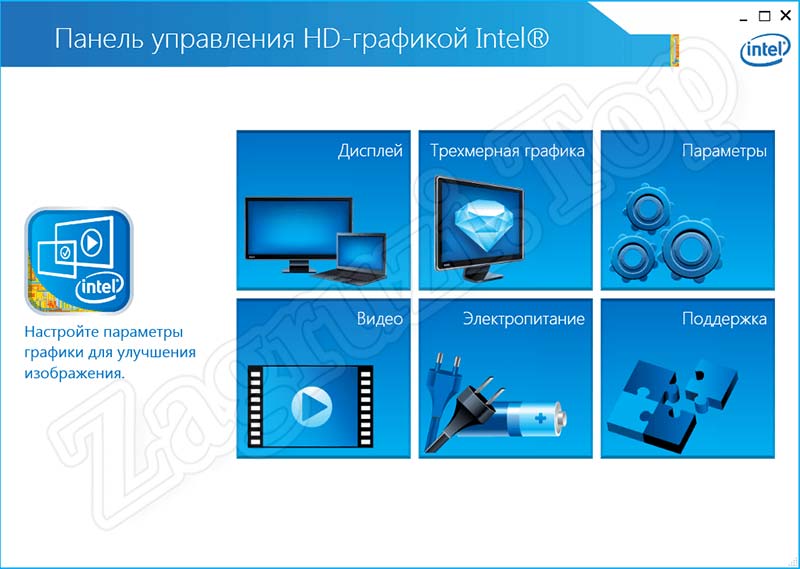
С ним вы сталкиваетесь, когда вы на рабочем столе жмете правой кнопкой мыши и в открывшемся контекстном меню выбираете “Графические характеристики” с синим значком Intel, то открывается окно настройки параметров изображения, которое выводится встроенной в ваш процессор Intel видеокартой.
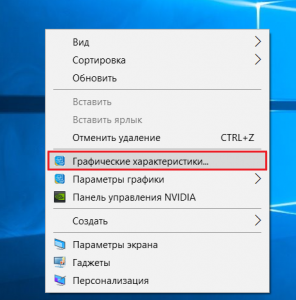
Вход в настройки графики Intel через контекстное меню рабочего стола windows

Запуск интерффейса управления графикой Intel
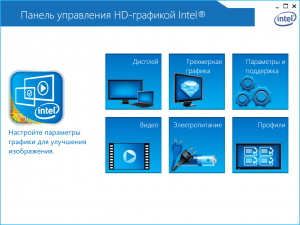
Панель управления графикой Intel
Вывод
Процесс igfxem module является частью драйверов на встроенную в процессор Intel видеокарту. Появляется сразу после установки на нее драйверов. Не является вирусной программой и не рекомендуется к удалению или блокировке, несмотря на то, что даже без этого процесса видеокарта должна работать в штатном режиме.
When you power on your Windows computer, there’s a lot that goes on behind the scenes, even before the operating system boots. Some programs stored on the motherboard get everything in the computer ready to start the OS. Other programs on the OS ensure that changes and settings made to your computer before you shut it down remain the same upon restart.
One such program is the Intel Graphics Executable Main Module, shortly called the IgfxEM module. It’s an integral part of the Windows operating system and usually, it runs in the background without affecting your PC’s performance.
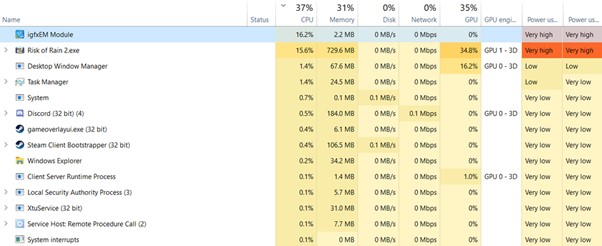
However, there are instances when this graphics module constitutes a nuisance. We’ve seen complaints and reports of the IgfxEM process using high CPU resources, raising CPU temperature, and other abnormalities.
In this explainer, we’ll walk you through what the IgfxEM Module is, what it does, and how to determine if it is safe for your PC or not. We’ll also show you how to fix problems relating to the IgfxEM.exe process.
igfxEM.exe is the executable file and component of the Intel Graphic Executable Main Module. You’ll find the igfxEM.exe process running in the background if your PC uses an Intel graphics card. Some NVIDIA and AMD graphics card drivers also use this executable file.
When you change your PC’s screen resolution, for example, igfxEM.exe acts as a middleman between your graphics card and your PC’s display interface. It communicates your action to the graphics card, changes the screen resolution, and makes sure the new resolution stays the same—even when you power off your PC.
The igfxEM process also works collaboratively with your PC’s graphics cards to modify keyboard shortcuts and other display-related configurations like screen rotation.
High CPU Usage: Is the igfxEM Module Safe?
Although the igfxEM.exe file is important to keep some features of your PC running smoothly, it’s not a core Windows 10 system file. It’s designed and developed by Intel Corporation but also digitally verified/signed by Microsoft. This certifies the igfxEM.exe as a genuine file.
However, the genuineness of the file doesn’t totally guarantee its safety. If for some reason, the igfxEM.exe process continues to consume CPU resources, then it becomes unsafe for the health of your computer. There’s also the issue of malware impersonation.
The safety of igfxEM.exe is relative to two things: the file’s digital certification and its behavior on your computer. In summary, the following factors are responsible for igfxEM.exe high CPU usage:
- When the igfxEM module conflicts with other software or background processes.
- When malware or virus camouflages/imitates the igfxEM.exe file to cause harm to your PC.
In the next section, we’ll show you how to check if you have the genuine igfxEM.exe file installed on your computer.
Is Your IgfxEM.exe File Genuine?
The igfxEM.exe file comes bundled with the Intel graphics suite. This means that it’s automatically installed alongside your PC’s graphics driver. However, if the process is malfunctioning, you should check if the file is genuine or if malware is hiding under the guise of the igfxEM executable file.
- Type igfxem in the Windows Search box, right-click igfxem (or IgfxEM.exe) in the search result, and select Open file location.

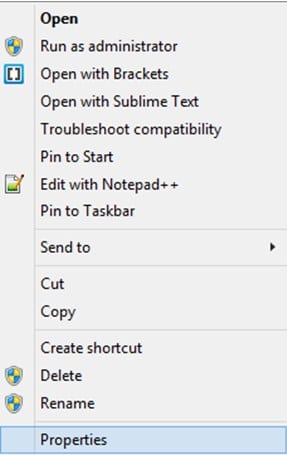
- Right-click on igfxem.exe and select Properties from the context menu.
- Go to the Digital Signatures tab and check the Signature list table.
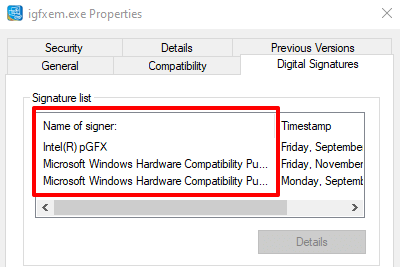
If Intel (or Intel Corporation) and Microsoft are the digital signatories, you have nothing to worry about. Otherwise, the igfxem.exe file on your PC is not genuine and most likely malware. You should delete it ASAP.
Troubleshooting igfxEM.exe Errors
There are several factors that trigger the igfxEM.exe file to throw error messages, consume large virtual memory, or use high CPU resources. Luckily, there are also a handful of ways to curb its excesses.
1. Force Stop the igfxEM Module
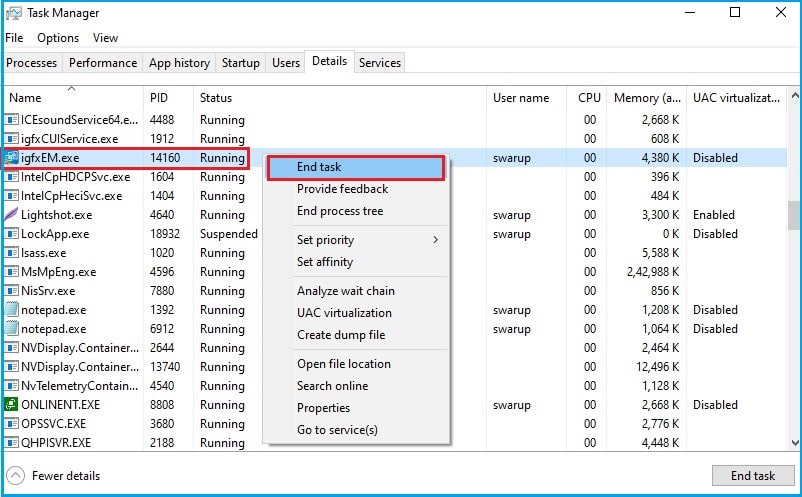
This is by far the quickest (and easiest) way to put a rogue igfxEM module in order. Launch the Windows Task Manager (press Ctrl + Shift + Esc), right-click the igfxEM module, and select End task.
You can also reduce the CPU usage of the IgfxEM module by closing other unnecessary applications that are active in the background. Try the next solution if the process initiates itself (i.e. if it comes back on automatically) and continues to overburden your PC’s CPU or memory.
2. Update Your Graphics Card Driver
The igfxEM.exe process may malfunction if your computer’s graphics card driver is out of date. You can check if an update for the Intel graphics card is available using the Windows Device Manager.
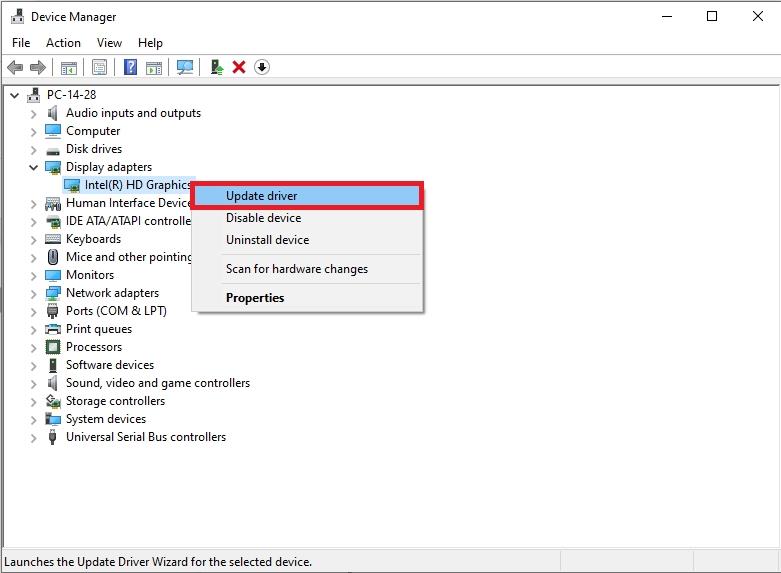
Right-click the Start button and select Device Manager. Expand the Display adapters section and right-click on your graphics card’s adapter and select Update Driver or Update Driver Software.

Select Search automatically for update driver software. The Device Manager will search your computer and the internet for the latest graphic card driver software available for your device. So make sure you’re connected to the internet before you proceed.
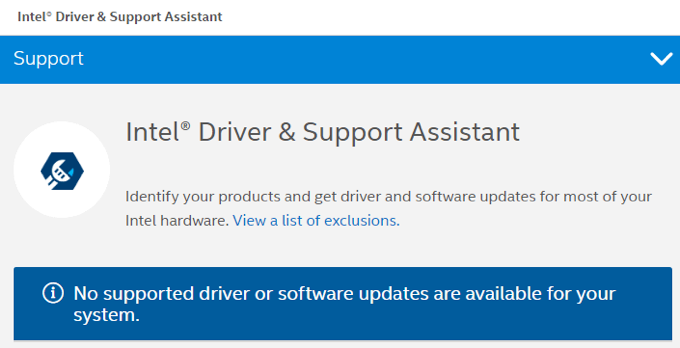
If the Device Manager doesn’t find an update for the driver, you can use Intel’s Driver & Support Assistant (Intel DSA). The tool is a little more reliable for updating Intel graphic drivers. Head to Intel’s support page, download the Driver & Support Assistant setup file, and install it on your computer.
Connect your PC to the internet and launch the app. That’ll redirect you to a resource page where you’ll find driver and software updates available for your computer.
3. Disable the IgfxEM Process
If your graphics driver is up-to-date but the problem continues, try disabling IgfxEM.exe using the System Configuration tool.
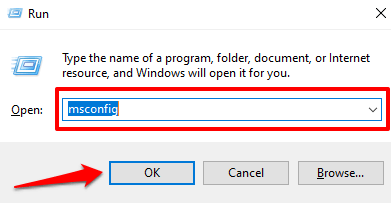
1. Launch the Windows Run box (Windows key + R). Type msconfig into the dialog box and click OK.
2. Navigate to the Services tab.
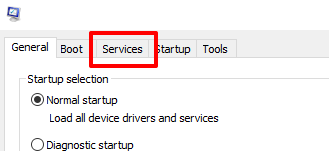
3. Scroll through the list of services and uncheck the igfxEM Module.
4. Click Apply and then OK to proceed.
4. Scan for Malware and Viruses
Viruses and malware can cause an unreasonable spike in CPU usage for certain processes. Run a virus scan using the Windows Defender or trusted third-party antivirus software. Refer to our tutorial on how to thoroughly scan a Windows 10 PC for viruses and malware.
TL;DR: The IgfxEM Module Can Be Both Safe and Unsafe
The IgfxEM allows your PC’s graphics card to function to its fullest potential. When it works correctly, you have nothing to worry about. However, if you notice that the module consumes too much CPU space, make sure you check that it’s digitally signed and verified—not malware in disguise.
If it’s malware, use a virus or malware scanner to remove it from your PC. Otherwise, follow the recommended troubleshooting solutions to reduce its CPU usage.
When working on a device, we are unsure how it processes data or gives us an output. Be it a simple calculation, font change, or screen resolution. Any such task is handled by a program designed by their respective vendors.
One such application that works on Windows 10/11 is the IgfxEM module. IgfxEM module is responsible for display and screen resolution settings. We will discuss this module’s functionality and features in detail.
IgfxEM module or a driver is designed by Intel Corporation, and its primary usage is to act as a bridge between graphics device and computer interface.
It processes all given commands by the system GUI; process and saves them in real-time. For example: change screen resolution and keep those settings intact on the next launch after the restart.
Although this tool is designed by Intel and is mainly used (or seen) on a device with Intel HD as a graphics processing unit, it is also seen on machines with NVIDIA and AMD GPUs.
Being IgfxEM module designed by a third party, this file is not a Windows critical resource, and even without this exe file on the machine. Windows can work as expected.
As we are now aware of the IgfxEM module, let’s talk about whether it is a genuine file or not.
Is the IgfxEM Module File Genuine?
In most Windows attacks, hackers attack system files or applications that run on the device. So, just by looking at the name, we cannot be 100% sure about a file is real or fake.
This can also stand true for the IgfxEM module, and we should find a way to check and validate its legality; here is how below:
- Go to the search bar on Windows 10/11 and type “igfxem” -> right-click and select the open file location. This will open the installer file location folder with the igfxem.exe file in it.
- In this step, do a right-click on the igfxem.exe and select properties; The properties will display all information about that particular file. Tap on Digital Signatures and look through the signature list.
- IgfxEM file is developed by Intel and is digitally verified and signed by Intel and Microsoft. Hence if you see their name in the signature list, the exe file is authentic. In other cases, if a file is compromised or modified in any way, the signature list will say “unable to verify”.
- If you see other cases that we discussed in step 3, then it is highly likely that the file is not genuine, and you should delete it as soon as possible.
Please be aware that deleting the IgfxEM module won’t cause any significant issue to the PC. It is not a system file, but an addon used by Intel and other GPU manufacturers to enhance Windows performance and interact with base Windows 10/11 OS.
But what if it is consuming a high CPU and causing performance issues, and before removing it, you would like to stop it? In this case, we’ll first close the program and then move to the next step to remove it.
How to Disable the IgfxEM Module?
There are two ways to disable the igfxem.exe module:
- Using Task Manager:
- To kill the igfxem.exe process running on the PC, the user can press CTRL+ALT+DEL keys on the keyboard and select Task Manager from the option list.
- Go to the Processes tab and look for igfxem.exe module -> right-click and select End task.
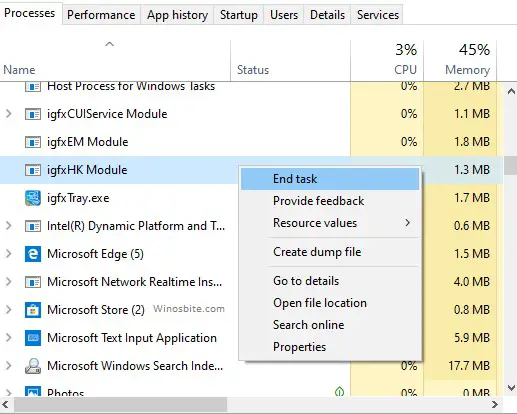
3) The above step will close the IgfxEM application immediately.
- Using Windows Services:
Users can disable the program using Windows services responsible for igfxem.exe to load with Windows 10/11 OS.
- Go to the search bar on Windows 10/11 and type “services.msc” -> enter
- In services window, look for igfxem process -> right-click -> properties
- From Startup type -> select Disabled -> apply and ok to save
- The above step will immediately disable the IgfxEM services from running on the Windows 10/11 OS.
Even disabling the IgfxEM module using the above step doesn’t solve the problem. We have to try removing the application from the system itself as a last resort.
Please be informed that removing the IgfxEM module won’t break the system but only slows down due to resources not being able to transfer from Intel or GPU to Windows OS. This issue can be overcome by reinstalling the module back once removed.
How to Uninstall the IgfxEM Module?
- Go to the search bar on Windows 10/11 and type “control panel” -> enter
- From the program list, locate Intel Graphics Driver, select the application, and click on uninstall from the top left-hand side.
- The application will be removed from the system to clean rest over files, close all windows and restart the computer.
If the user has uninstalled the application and now looking for a safe way to install the application back, then here is the step-by-step process to install the IgfxEMmodule below:
How to Install IgfxEM Module on Windows 10/11
- As we know IgfxEM module is designed by Intel Corporation; then, we should be looking for a way to get this file from the Intel Download Center section here.
- The above link will list the IgfxEM module based on different generations of Intel processors. Users can look into their system config using the msinfo command in the Run window and download the correct file.
- Double click on the downloaded file to run. The exe file will try to reinstall the IgfxEM file back into the system. After the installation process is complete, it may ask the user to restart the OS to adapt to the new changes.

- After completing the above step, check how the newly installed IgfxEM module works and its health or behaviour.
Users can go to Task Manager -> look for igfxem.exe module and observe the CPU/GPU and memory usages for some time.
If everything seems normal and doesn’t cause any problem, it can be assured that a correct IgfxEM file is now configured.
In today’s internet-connected device, any device or file can get compromised and cause such issues. Have you encountered any such problems on your device? How did you solve it? Do let us know in the comment section below.
The output of computer images primarily depends on data processing by the graphics card. However, if my laptop doesn’t have a graphics card, how does it output images? This is entirely dependent on the igFXem.exe module – it manages the kernel display.
When you try to change your PC’s screen resolution, the igfxEM.exe acts as the middleman between the graphics card and the PC’s display interface. It communicates the action to the graphics card that changes the resolution. Hence, when you note any error you can try to resolve it by checking the igFXem.exe application.
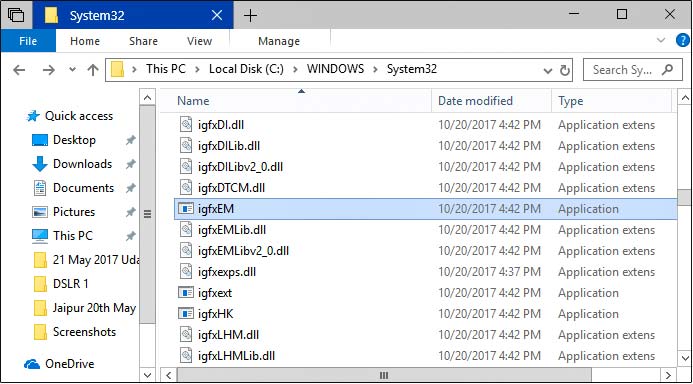
Graphics executable module is the Intel core display driver class process. This module is located in
C: \ Windows \ System32 \ igfxEM.exe
Additionally, it runs with igFXhk.exe, for computers that do not have a separate graphics card image output. You need to fix the igfxEM.exe application driver to prevent high CPU usage.
How to update the graphics card drivers
The igfxEM.exe process may not work well if your graphics card is an outdated drive. First, check if there is an update for the Intelgraphics card through the device manager.
Step 1: Click on the Windows button + S, search for device manager.
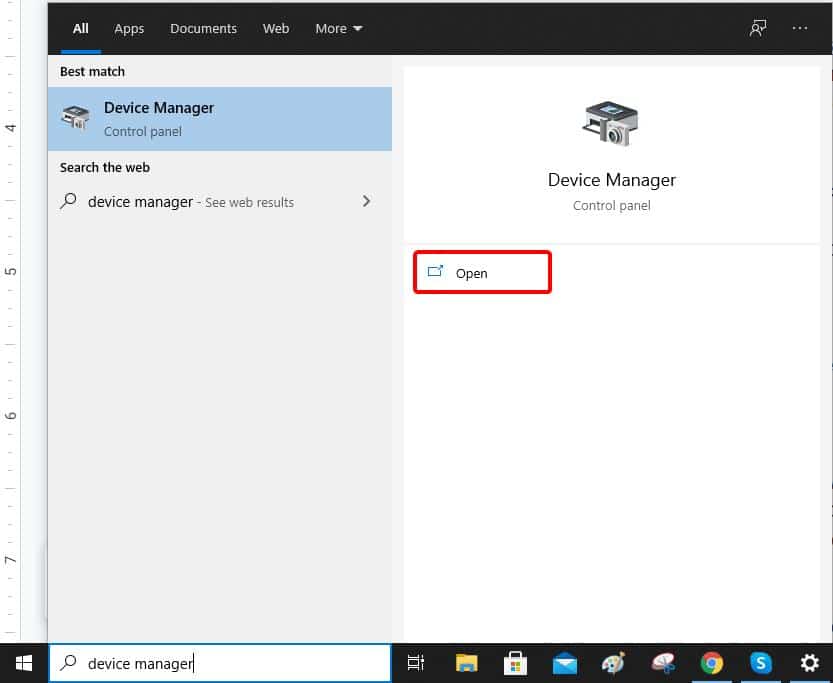
Step 2: On the Device Manager window, search for “display adapters”.
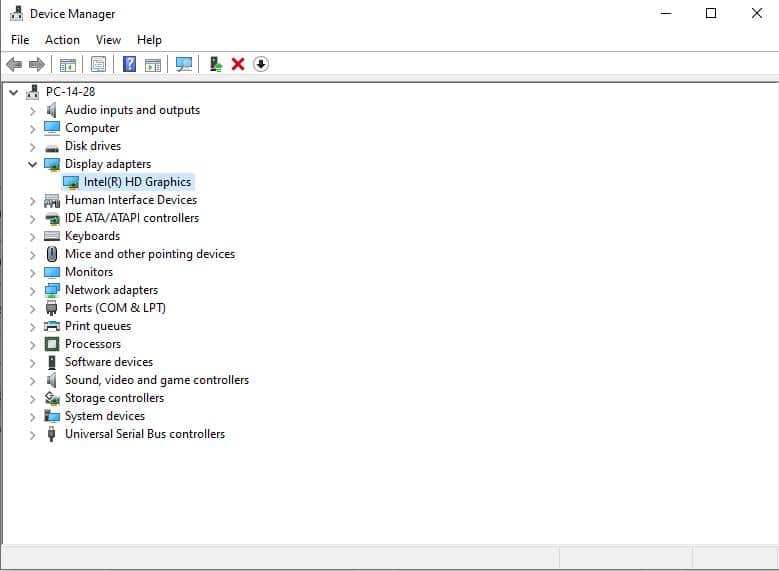
Step 3: On the driver files, right-click and select “Update Driver software”. This automatically updates the network.
Alternatively, download the specific graphics card driver from its official website and install it.
How to restart the IgfxEm process
In this, you will need to stop the process in the task manager.
Step 1: Press Ctrl + Shift + ESC to go to the Task Manager
Step 2: In the Details tab or Processes tab, find igfxEM.exe.
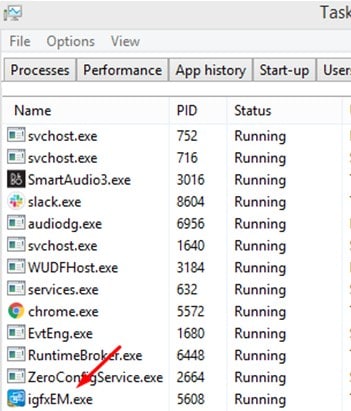
Step 3: Click on it and select End task. Alternatively, just right-click and click “End Task”.
You can then restart your computer. Doing this will help to reduce CPU usage and disable the file.
How to disable igfxEM.exe application
This is how you can disable the IgfxEM.exe process.
Step 1: Click the Windows + R button.
Step 2: On the run command prompt, input “msconfig”.
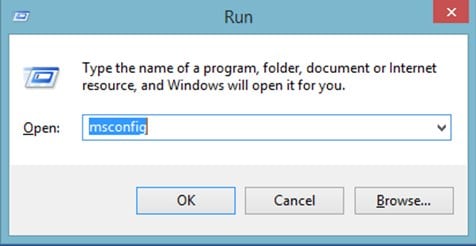
Step 3: On the services tab, uncheck the igfxEM.exe module.

Step 4: Click Apply then OK.
Scan for viruses
Trojans are always your computer’s enemy. They can hide in the IgfxEM.exe process and take up CPU resources. If Windows Defender does not scan, you are advised to use better scanning software to clean up. If it is a virus or malware, it can increase CPU usage. Reimage is great scanning software that you can use on your PC. However, you need to buy a product key to use it.
Step 1: First, Download Reimage software product from its official website. Install it on your PC.
Step 2: After it installs, it will scan your computer to check all the elements.

Step 3: It will then show you all the issues on your computer.
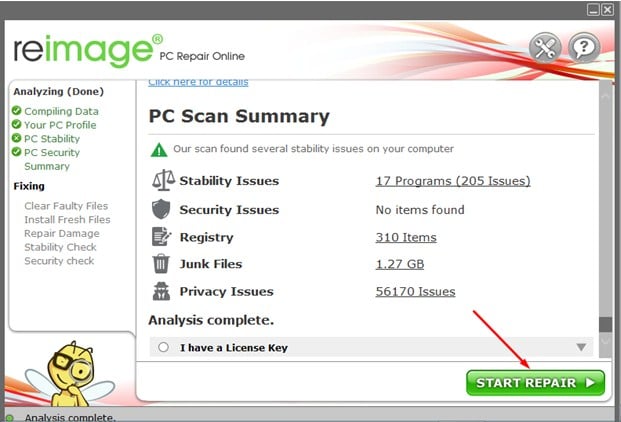
Step 4: Click on the start repair button to resolve the issues.
Step 5: Once the repair is done, restart your computer.
This will help to remove any malicious files on your computer.
How do I check my digital signature
Now that a virus can disguise itself as a process, to ascertain its legitimacy, verify its digital signature
Step 1: Open Task manager using Ctrl + Shift + Esc.
Step 2: On the details tab or processes tab, search for igfxEM.exe.
![]()
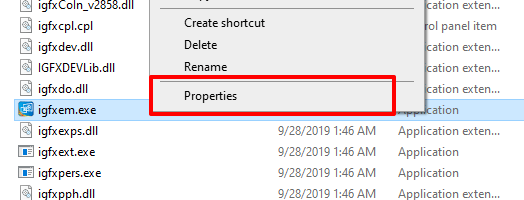
Step 3: Right-click on the file and click “open file location”.
Step 4: It will redirect you to the location. Right-click on the igfxEM.exe file, and select “Properties” on the drop-down menu.
Step 5: Click on the Digital Signatures tab.
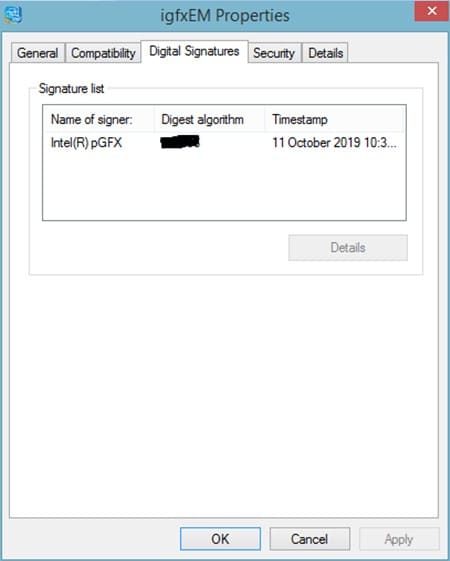
Step 6: Check whether the “name of Signer” is Microsoft Intel. This will guide you on whether the application drive is legit.If it is not, it is advisable to remove it.
Can I disable igfxEM.exe?
You can disable the system without problems and the graphics card will not be affected. However, if your computer does not have a separate graphics card; but is integrated with the CPU, it may cause graphics output failure.
These are the best ways that you can use to prevent the IgfxEM.exe process from bringingmemory, CPU issue, or disk usage issue. It also does other important graphic card features. It runs in the background without affecting other processes. Always be wary when there isa hardware issue or software issue.