
Fix: Boot into Safe Mode
- 1. Insert the disc and reboot the system.
- 2. Press any key to boot from the DVD.
- 3. Choose your keyboard layout.
- 4. Click Repair your computer at the Install now screen.
- 5. Click Troubleshoot.
- 6. Click Advanced options.
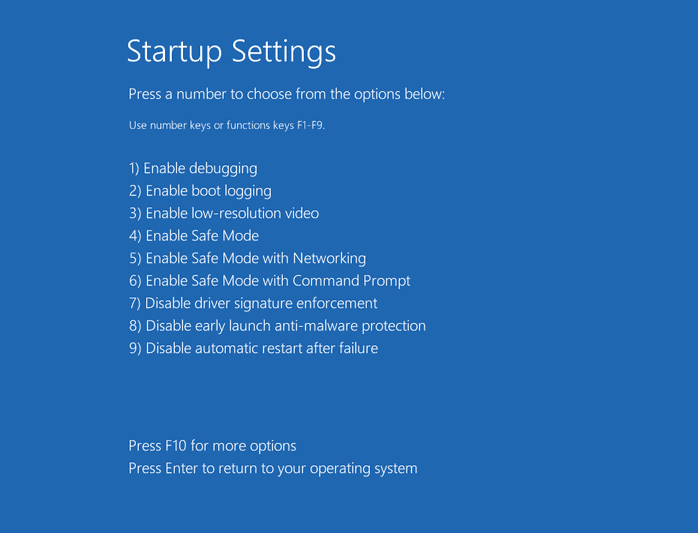
- 7. Click Startup Settings.
- 8. Click Restart…
7 Fixes to Stuck in Windows 7 Startup Repair Loop
«My computer keeps running Startup Repair during every startup and I can’t boot it normally. I tried running Startup Repair multiple times but I’m still getting the same problem. Startup Repair won’t seriously automate repair at all. I got stuck in an infinite loop.»
Follow the fixes to troubleshoot your Windows Startup Repair loop.
| Workable Solutions | Step-by-step Troubleshooting |
|---|---|
| Fix 1. Disable Startup Repair | Restart your computer > wait for your BIOS to complete POST > tapping F8…Full steps |
| Fix 2. Run CHKDSK Command | Boot Windows from the bootable device > navigate to «Repair your computer» option…Full steps |
| Fix 3. Run Bootrec | Open Command Prompt > type those following commands…Full steps |
| Fix 4. Perform System Restore | Boot Windows from the bootable device > click «Troubleshoot > System Restore»…Full steps |
| Fix 5. Delete Problematic File | Access Command Prompt again and enter the following command: cd C:\Windows\…Full steps |
| Fix 6. Restore Windows Registry | In the Windows Boot Options menu, choose «Troubleshoot >Advanced Options»…Full steps |
| Fix 7. Check Device Partition | In Command Prompt, type bcdedit and press «Enter». Find device partition and..Full steps |
1 — Windows 7 Startup Repair Infinite Loop Error Details
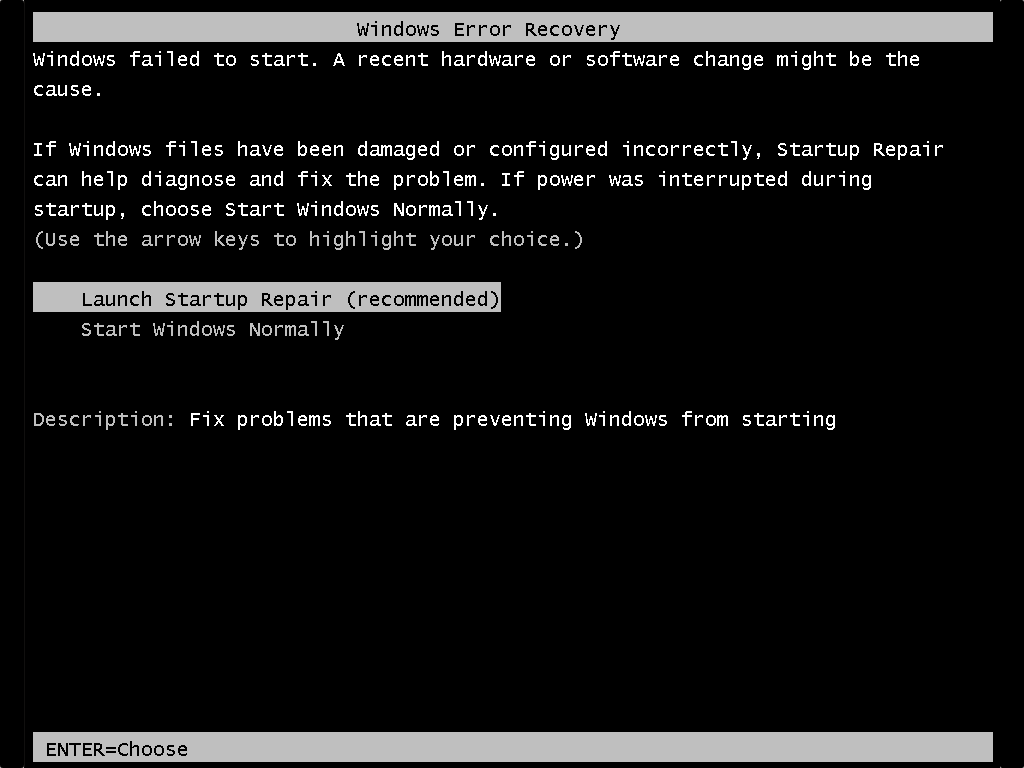
Windows Error Recovery

Windows failed to start. A recent hardware or software change might be the
cause.

If Windows files have been damaged or configured incorrectly, Startup Repair
can help diagnose and fix the problem. If power was interrupted during
startup, choose Start Windows Normally.
(Use the arrow keys to highlight your choice.)

    Launch Startup Repair (recommended)
    Start Windows Normally

Description: Fix problems that are preventing Windows from starting
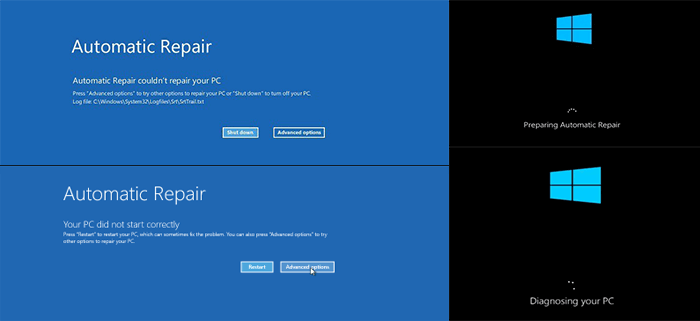
Startup Repair will fail to load, launch but fail to repair, or run and claim repairs have been executed. Your PC will continue to attempt to endlessly start Startup Repair each boot. In Windows 8, Windows 8.1 and Windows 10 this is called Automatic Repair:
2 — Startup Repair Error Symptoms
Unexpected PC shutdown, virus, malware, driver issues, damaged BDC settings, corrupted boot partition, blue screen of death as well as a black screen of death on reboot, all those factors account for Windows startup problems.
As the ‘Windows error recovery’ suggests, Start Repair should automatically fix the abnormal Windows startup. However, when you choose the recommended option, you’ll only confront 2 facts:
1. Startup Repair takes a reasonably long time to load or launch.
2. Startup Repair immediately runs, but the repairing process never finishes.
In both situations, on each reboot, your PC will continuously attempt to call Startup Repair for the fix, meanwhile getting stuck in a Startup Repair loop that never ends
3 — Troubleshoot Windows Automatic Startup Repair Infinite Loop Error with 7 Fixes
A clean Windows installation is a guaranteed fix for Windows Startup Repair, which takes forever but costs a complete data loss. So, is there another option to recover from an infinitely looping Startup Repair without reinstalling Windows?
We gave the possible fixes from easy to complex, from safe to risky. You’d better try them sequentially.
- Important
- The essential tool for most of the fixing methods:
- A corresponding Windows installation media, let it be a bootable USB drive, CD, or DVD disc.
Fix 1. Disable Automatic Startup Repair to Fix Startup Repair Loop
You should try to disable the automatic restart. Although it could not solve the boot error, it can stop the endless restart.
Step 1. Restart your computer.
Step 2. Wait for your BIOS to complete POST (the screen with your manufacturer logo and/or system information).
Step 3. Quickly begin tapping F8 repeatedly until you see the list of boot options.
Step 4. Choose «Disable automatic restart on system failure».
Step 5. Press «Enter» and wait for your PC to boot.

Fix 2. Run CHKDSK Command to Check and Repair Drive Errors
This helps check or even repair the drives to tackle file system corruption.
Step 1. Boot Windows from the bootable device. (If you cannot boot, use Windows 7 installation CD.)
Step 2. Navigate to the «Repair your computer» option and select «Command Prompt».
Step 3. In the Command Prompt window, type chkdsk /r c: and press «Enter». (c represents the drive where Windows is installed)
Step 4. Click «Y» so that the next time the system restarts, the CHKDSK utility can check the disk errors and try to fix them. Restart the system and let CHKDSK check hard drive errors and repair.
Run CHKDSK Alternative Tool to Repair Device
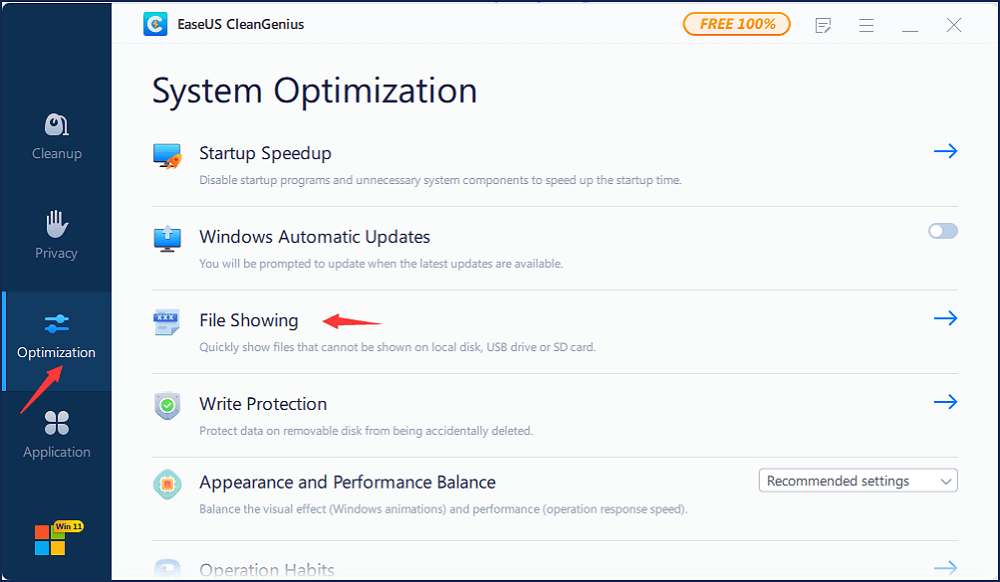
Download EaseUS CleanGenius and install it on your computer. Let’s start checking and refixing file system error on your device now.
Step 1. Click «File Showing» to enter the next step.
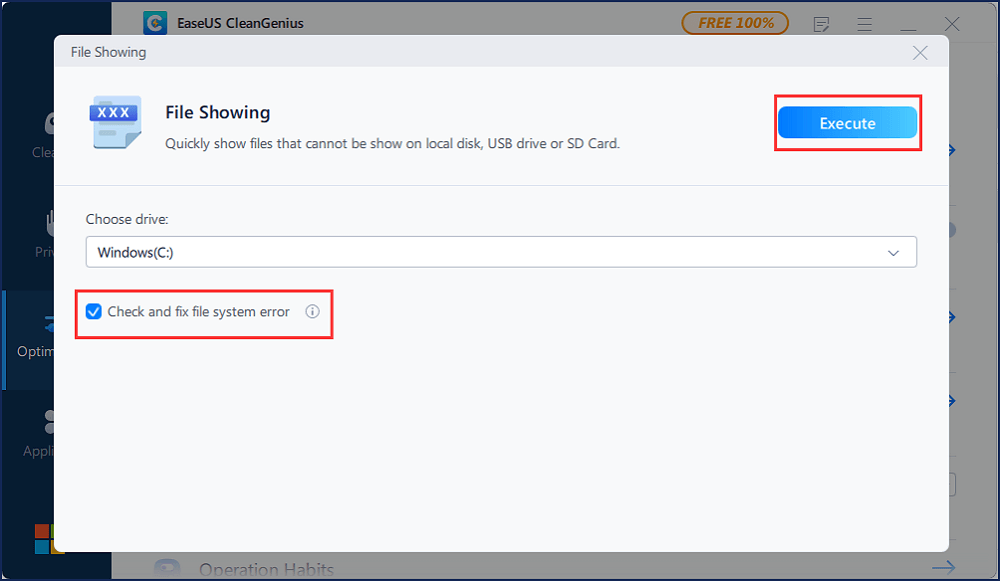
Step 2. Choose the target device and tick the box of «Check and fix file system error». Click «Execute» to start fixing the problematic device.
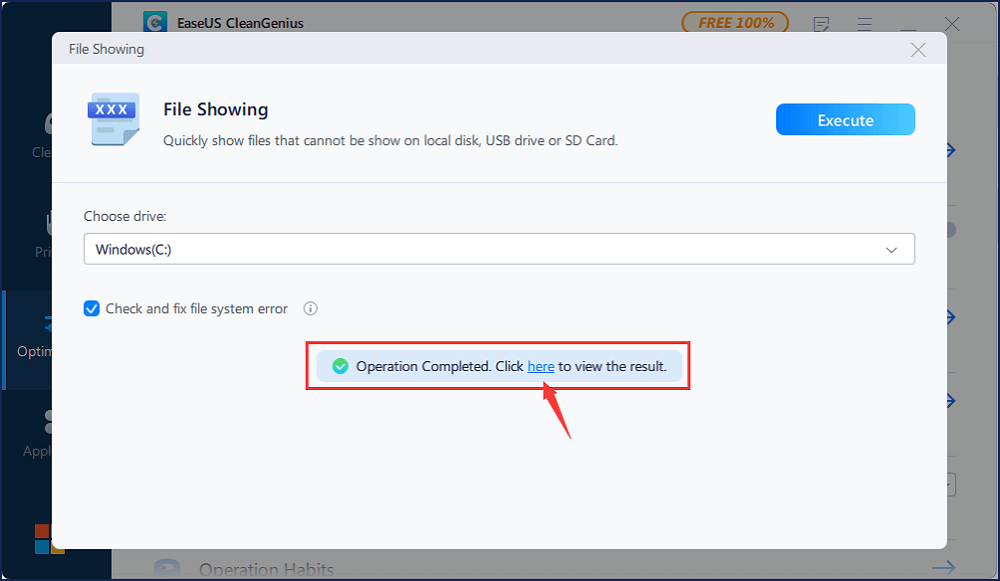
Step 3. When the fixing process completes, click «here» to open and use your device.
Fix 3. Run Bootrec to Fix Damaged or Corrupted BCD Settings
The startup repair loop could also happen if the bootloader installation or configuration comes with some errors. You could solve this error by following the steps below.
Step 1. In the same way open Command Prompt as the second fix did.
Step 2. In the Command Prompt window, type those following commands and press «Enter».
bootrec /fixmbr
bootrec /fixboot
bootrec /rebuildbcd
Step 3. Restart the system and let bootrec repair MBR.
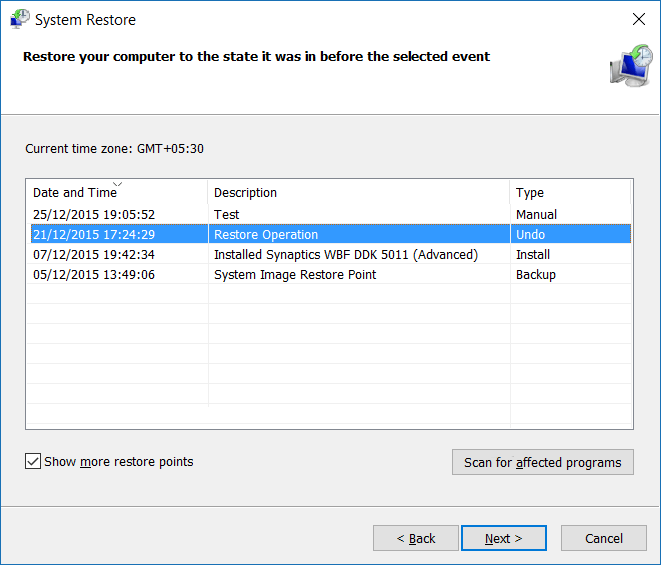
Fix 4. Perform System Restore to Solve Windows Startup Repair Loop
The System Protection is enabled by default, and you can use it to restore your computer to an earlier state to fix your problem.
Step 1. Boot Windows from the bootable device.
Step 2. Click «Troubleshoot > System Restore».
Step 3. Follow the wizard instructions to continue the process. Choose a restore point before the date when the Automatic Startup Repair loop error happened.
Fix 5. Delete the Problematic File to Resolve Startup Repair
Step 1. Access Command Prompt again and enter the following command:
cd C:\Windows\System32\LogFiles\Srt
SrtTrail.txt
Step 2. Then, you could see «Boot critical file c:\windows\system32\drivers\tmel.sys is corrupt.» Type the following command:
cd c:windowssystem32drivers
delvsock.sys
Restart your PC. If these steps can not help, try the following troubleshooting steps.
Fix 6. Restore Windows 10 Registry to Fix Repair Loop
Step 1. In the Windows Boot Options menu, choose «Troubleshoot >Advanced Options>Command Prompt».
Step 2. In Command Prompt, type the following command and then hit «Enter».
cd C:\windows\system32\logfiles\srt\
Change your drive letter according to your needs.
Step 3. Type txt to open the file in notepad.
Step 4. Press «Ctrl + O». Select «All files» from file type and navigate to C:\windows\system32.
Step 5. Right-click CMD and select «Run as administrator». Type the following command and press «Enter».
cd C:\windows\system32\config
Step 6. Backup those files by renaming Default, Software, SAM, System, and Security files to .bak. Type the following command one by one and hit «Enter»:
rename DEFAULT DEFAULT.bakrename SAM SAM.bak
rename SECURITY SECURITY.bak
rename SOFTWARE SOFTWARE.bak
rename SYSTEM SYSTEM.bak
copyc:\windows\system32\config\RegBack c:\windows\system32\config
Step 7. Restart your PC to check if you have solved the error.
Fix 7. Check Device Partition and Osdevice Partition
Sometimes, if your device partition values aren’t correct, you will get stuck in the startup repair loop. Follow the steps below to check the device partition and os device partition and fix your error.
Step 1. In Command Prompt, type bcdedit and press «enter».
Step 2. Find device partition and os device partition values. Make sure their values are correct and set to the correct partition.
Windows is preinstalled on C partition only, and the correct value is C. Enter the following commands and press «Enter» after each one if the value isn’t set to C.
bcdedit /set {default} device partition=c:
bcdedit /set {default} osdevice partition=c:
After that, reboot the PC and fix the Windows startup repair loop.
Additional Fix — Boot into Safe Mode in Windows 7/8/10
Often booting into Safe Mode and uninstalling recently installed device drivers or software may fix the Automatic Repair loop error. To boot into Safe Mode of a Windows 7, 8, 8.1, or 10 system, you need to have the original DVD or USB. If you do not have the installation disc, follow the guide from Microsoft to create a Windows Installation Media. Then enter Safe Mode:
Step 1. Insert the disc and reboot the system.
Step 2. Press any key to boot from the DVD.
Step 3. Choose your keyboard layout.
Step 4. Click Repair your computer at the Install now screen. Choose «Troubleshoot > Advanced options > Startup Settings«.
Enter a Safe Mode option (Safe Mode, Safe Mode with Networking, and Safe Mode with Command Prompt).
How to Recover Data After Fixing Startup Repair Infinite Loop
Besides a clean install of the Windows operating system, the fixes for users to get rid of an endless startup repair loop, including system restore and PC factory resetting, will also result in part of computer data loss.
It’s not the end of the day, and a third-party EaseUS data recovery tool perhaps can salvage your data. For example, EaseUS Data Recovery Wizard can recover data after formatting, deleting, PC resetting, system refreshing, and more. And You deserve a try and see if the software helps find your lost data.
You get 7 ways to get rid of the Startup Repair Windows 7 loop, no matter whether you have an installation disc or not. Don’t worry if the windows 7/8/10 startup repair is taking forever, and you cannot stop or cancel it. Also, you can get back lost data after you have fixed the error with EaseUS data recovery software.
Get the fix for the infinite Startup Repair loop error for the following Windows versions: Windows Vista, Windows 7, Windows 8 or Windows 8.1.
This error prevents you from accessing anything on your computer and presents an endless loop of loading Startup Repair without end.
About “Startup Repair in Infinite Loop”
The following information on this error has been compiled by NeoSmart Technologies, based on the information gathered and reported by our global network of engineers, developers, and technicians or partner organizations.
Symptom 1: Computer attempts to enter Startup Repair continuously
Every time the PC is restarted, before Windows begins to load a message is displayed indicating that “Windows failed to start,” and offering an option to “Launch Startup Repair (recommended)” from a variation of the Advanced Boot Options menu as shown below:
Windows Error Recovery
Windows failed to start. A recent hardware or software change might be the
cause.
If Windows files have been damaged or configured incorrectly, Startup Repair
can help diagnose and fix the problem. If power was interrupted during
startup, choose Start Windows Normally.
(Use the arrow keys to highlight your choice.)
Launch Startup Repair (recommended)
Start Windows Normally
Description: Fix problems that are preventing Windows from starting
Startup Repair will then either fail to load, launch but fail to repair, or run and claim repairs have been executed — however your PC will continue to attempt to endlessly start Startup Repair each boot.
On Windows 8 and Windows 8.1 this is called Automatic Repair:
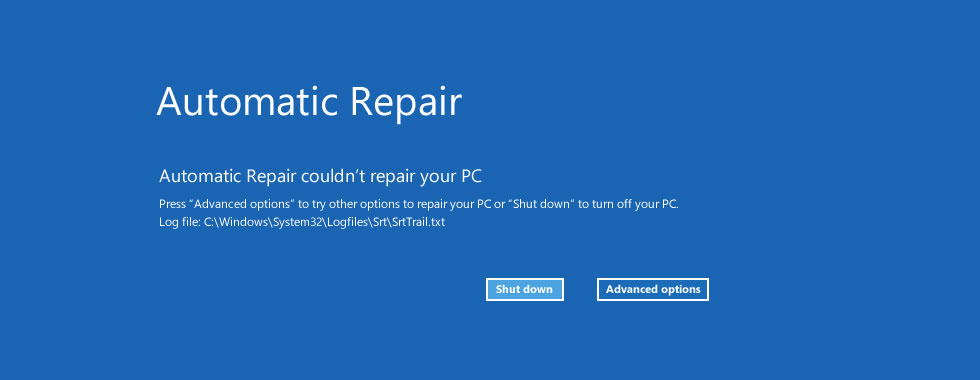
Automatic Repair

Automatic Repair couldn't repair your PC

Press "Advanced options" to try other options to repair your PC or "Shut down" to turn off your PC.
Log file: C:\Windows\System32\Logfiles\Srt\SrtTrail.txt

Shut down | Advanced options
The Log file path can be different.
Causes of this error
This error has been known to occur as a result of one or more of the following:
Cause #1: Damaged or corrupted BCD settings
Bootsector viruses and other malware that targets the bootloader or the booting chain can cause errors in the bootloader settings and state that result in an infinite loop of Startup Repair.
The virus may then block Startup Repair from either launching or carrying out its repairs successfully. A failed Windows Update or Automatic Update can also sometimes leave the Boot Configuration Data (BCD) in an inconsistent or non-working state.
Cause #2: Corrupted boot partition
On Windows 7 and above, Windows by default creates a separate 100 MiB NTFS partition at the start of the drive, reserved for core bootloader files and BCD configuration.
An unsafe shutdown, sudden power loss, hard disk failure, or a blue screen of death during writes to the boot partition can leave your system in an inconsistent state, unable to boot and infinitely cycling into the Startup Repair.
Cause #3: Blue Screen of Death on reboot
It is possible that every other time Windows attempts to boot, a BSOD occurs.
Recent versions of Windows are configured to hide this fact from the user and silently reboot.
(In the experience of the researchers at NeoSmart Technologies, there is almost never a good reason for doing this. Microsoft is hoping that a reboot will fix your PC and so Windows decides to hide the blue screen and reboot, endlessly and in vain.
A much more intelligent solution would be for Windows to keep track of whether or not this blue screen resulted in a silent and automatic reboot last time, and if so, show it so the user can see what’s going on.)
A BSOD during boot up will trigger a version of the Advanced Boot Options menu to be shown on next reboot prompting the user to select “Repair Your Computer,” ultimately causing the endless loop of Startup Repair.
Guaranteed Fix: Use Easy Recovery Essentials
Easy Recovery Essentials is guaranteed to fix the “endless repair computer loop” error automatically using its built-in Automated Repair option. EasyRE is currently available for Windows XP, Vista, 7, 8, Windows 10, and Windows 11 and can be downloaded and created on any PC.
- Download Easy Recovery Essentials. Make sure to note your Windows version (XP, Vista, 7, 8, 10, or Windows 11) before you download EasyRE. This guide can help you identify what version of Windows you have installed.
- Burn the image. Follow these instructions on how to burn the bootable ISO image very carefully, as making a bootable CD can be tricky! Alternatively, these instructions explain how to create a bootable EasyRE recovery USB stick/drive.
- Boot up your PC from the Easy Recovery Essentials CD or USB you created.
- Once EasyRE is running, choose the “Automated Repair” option and click Continue.

Choose “Automated Repair” in Easy Recovery Essentials
- After EasyRE scans your computer’s drives, identify and select the drive letter for your Windows installation from the list, and then click on the Automated Repair button to begin.
Choose the drive associated with the Windows installation you’re trying to repair.
- Easy Recovery Essentials will start analyzing the selected drive for problems. EasyRE will test for and attempt to automatically correct errors with the disk, partition, bootsector, filesystem, bootloader, and registry. No intervention is required, as EasyRE’s repair is fully automated:
Easy Recovery Essentials searches for errors and makes corrections to the selected Windows installation.
- Once the process is complete, EasyRE will report its findings. Click on the Restart button to reboot your PC and test the changes.
- The “endless repair computer loop” error should now be fixed as your PC begins to load:


You can download Easy Recovery Essentials from here.
Fixes for Infinite Loop of Startup Repair on Windows Vista, 7
Windows Setup CD/DVD Required!
Some of the solutions below require the use of the Microsoft Windows setup CD or DVD. If your PC did not come with a Windows installation disc or if you no longer have your Windows setup media, you can use Easy Recovery Essentials for Windows instead. EasyRE will automatically find and fix many problems, and can also be used to solve this problem with the directions below.
Fix #1: Run chkdsk on the boot volume
The command line chkdsk tool ships with Windows and can be used to check (and sometimes repair) your drives for filesystem corruption. More information about how chkdsk operates and how it works can be found in our knowledgebase. The following steps will launch the command line option from Startup Repair on the Windows setup disc and use the chkdsk utility.
Unable to boot into the Windows setup CD?
See our guide on setting up a PC to boot from the CD or DVD for troubleshooting and more detailed instructions.
- Insert your Windows installation DVD into your PC’s CD-ROM drive,
- Fully power down your PC, and make sure it has fully shut off,
- Power up your PC,
- Press any key when you see “Press any key to boot from CD or DVD..”
- Click the link titled “Repair your computer” in the bottom-lefthand corner, after first selecting your language and keyboard options.

- Wait for Startup Repair to scan your PC for Windows installations, then select your install from the list it shows:

- Choose “Command Prompt” from the list of available recovery options to begin:


Once the command prompt is launched, enter the following to use the System File Checker to check your installation for corrupted, invalid, or deleted system files. If the previous page showed that your Windows installation has a drive letter other than C:\, make sure to use that below!
chkdsk C: /f
chkdsk will begin scanning your drive for problems, fixing them if it is able to, and reporting its progress when done.
Checking file system on C:
The type of the file system is NTFS.
Volume label is Windows 7.

CHKDSK is verifying files (stage 1 of 5)...
259072 file records processed.
....
Windows has finished checking your disk.
Fix #2: Disable Automatic Restart
This option lets you get the exact and complete error message accompanying the Blue Screen of Death by disabling the Automatic Restart option of Windows. Note: this will not fix the boot error you are experiencing in and of itself, but should provide more information that may prove critical in solving the underlying problem.
The option to disable automatic restart on system failure is available from the Advanced Boot Options menu at startup. The instructions below will trigger this behavior, more detailed instructions on disabling automatic restart on system failure are also available in our knowledgebase.
- Restart your computer
- Wait for your BIOS to complete POST (the screen with your manufacturer logo and/or system information)
- Quickly begin tapping F8 repeatedly, until you see the list of boot options
- Choose “Disable automatic restart on system failure”
- Press Enter and wait for your PC to boot.
Fix #3: Manually attempt to rebuild the BCD
Problems booting up Windows can often be traced back to errors in the bootloader installation or configuration. Rebuilding your PC’s master boot record (MBR), partition bootsectors, and boot configuration data (BCD) can fix various problems with the BOOTMGR bootloader.
You can rebuild the BCD using bootrec.exe, a tool built found in the Windows Recovery Environment. Follow these steps:
- Insert your Windows installation DVD into your PC’s CD-ROM drive,
- Fully power down your PC, and make sure it has fully shut off,
- Power up your PC,
- Press any key when you see “Press any key to boot from CD or DVD..”
- Click the link titled “Repair your computer” in the bottom-lefthand corner, after first selecting your language and keyboard options.
- Wait for Startup Repair to scan your PC for Windows installations, then select your install from the list it shows:
- Choose “Command Prompt” from the list of available recovery options to begin:
- Once the command line has launched, type in the following commands in the Command Prompt and hit Enter after each command:
bootrec /fixmbr
bootrec /fixboot
bootrec /rebuildbcd
Unable to boot into the Windows setup CD?
See our guide on setting up a PC to boot from the CD or DVD for troubleshooting and more detailed instructions.
BCD not getting rebuilt?
There is an entire entry in our wiki dedicated to advanced manual repair of the bootloader that can also be followed, if necessary.
Fixes for Automatic Repair Loop in Windows 8
Windows Setup CD/DVD Required!
Some of the solutions below require the use of the Microsoft Windows setup CD or DVD. If your PC did not come with a Windows installation disc or if you no longer have your Windows setup media, you can use Easy Recovery Essentials for Windows instead. EasyRE will automatically find and fix many problems, and can also be used to solve this problem with the directions below.
Fix #1: Boot into Safe Mode
Often booting into Safe Mode and uninstall recently install device drivers or software may fix the Automatic Repair loop error.
To boot into Safe Mode of a Windows 8 or 8.1 system, you need to have the original DVD or USB. If you don’t have it, go to Fix with Easy Recovery Essentials.
- Insert the disc and reboot the system
- Press any key to boot from the DVD
- Choose your keyboard layout
- Click Repair your computer at the Install now screen
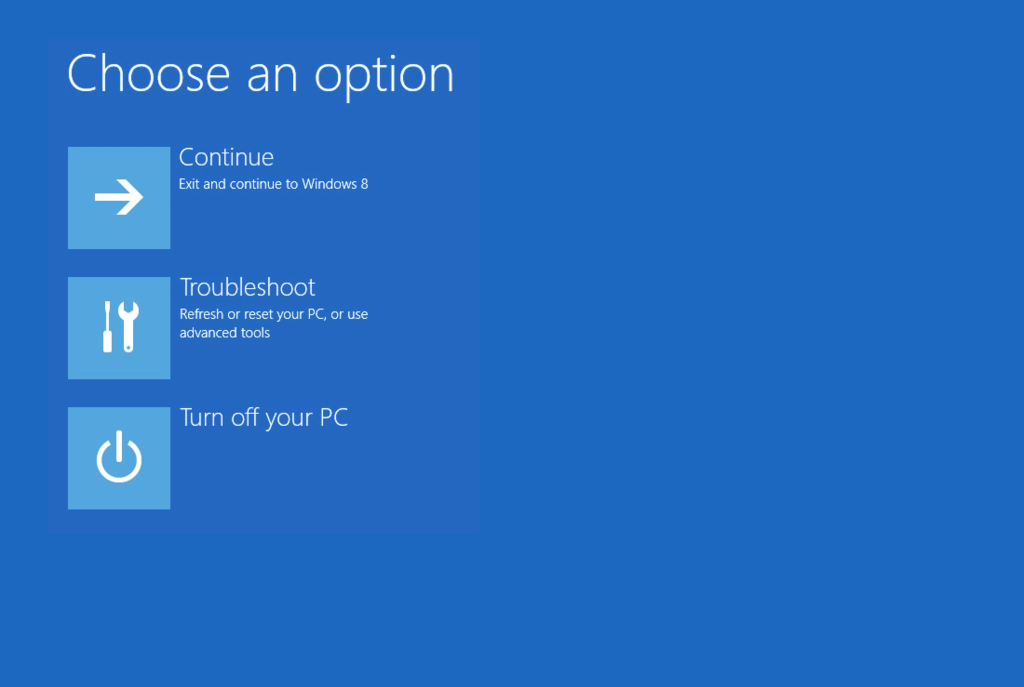
- Click Troubleshoot
- Click Advanced options
- Click Startup Settings
- Click Restart
- Press F4 to boot into Safe Mode

If booting your system in Safe Mode doesn’t solve the error, go to Fix #2: Run bootrec.
Fix #2: Run bootrec
Running the bootrec utility to rebuild the BCD might fix the error. To run bootrec.exe on Windows 8 or 8.1, follow these steps:
- Insert the original Windows 8/8.1 install DVD or USB
If you don’t have the installation DVD or USB, go to Fix Automatic Repair Loop with Easy Recovery Essentials.
- Click Repair your computer
- Click Troubleshoot and then Advanced options
- Click Command Prompt
- When Command Prompt loads, type these commands:
bootrec /fixmbr
bootrec /fixboot
bootrec /rebuildbcd
- Press Enter after each command
- When the last command –
bootrec /rebuildbcd– finished the process, typeexitand restart your computer
Fix #3: Run chkdsk
The chkdsk utility might fix the Automatic Repair Loop on Windows 8 and Windows 8.1 systems
To access it, follow the same steps as the Fix #2: Run bootrec to reach Command Prompt:
- Click Troubleshoot > Advanced options > Command Prompt
- When Command Prompt loads, type these commands:
chkdsk /r
- Press Enter
Fix #4: System Restore
To access System Restore, follow the same steps as Fix #2: Run bootrec to reach the Advanced Options screen:
- Click Troubleshoot

Troubleshoot in Windows 8 recovery options screen
- Click System Restore
- Follow the wizard instructions to continue the process. Choose a restore point before the date when the Automatic Repair loop error appeared.
More Information
Linked Entries
- chkdsk
- bootrec
- Advanced Boot Options menu
Support Links
- Easy Recovery Essentials for Windows – our repair and recovery disk.
It’s an easy-to-use and automated diagnostics disk. It’s available for Windows 8, Windows 7 and Windows Vista. It’s also available for Windows XP and Windows Server.
Read more at Windows Recovery Disks.
- The NeoSmart Support Forums, member-to-member technical support and troubleshooting.
- Get a discounted price on replacement setup and installation discs: Windows Vista, Windows 7, Windows 8.
Applicable Systems
This Windows-related knowledgebase article applies to the following operating systems:
- Windows Vista (all editions)
- Windows 7 (all editions)
- Windows 8 (all editions)
- Windows 8.1 (all editions)
- Windows Server 2008 (all editions)
- Windows Server 2012 (all editions)
Propose an edit
I have a Windows 7 (64-bit) virtual machine that I primarily remote desktop into. Sometimes on boot something goes wrong and it displays the following DOS screen:
                             Windows Error Recovery
Windows Failed to start. A recent hardware of software change might be the cause.

If Windows files have been damaged or configured incorrectly, Startup Repair can help diagnose and fix the problem. If power was interrupted during startup, choose Start Windows Normally.
(Use the arrow keys to highlight your choice.)

 * Launch Startup Repair (recommended)
 * Start Windows Normally
The default option is Launch Startup Repair (which happens automatically after 30 seconds). How can I set it so that this never happens, and it always tries to Start Windows Normally?
asked Jun 21, 2011 at 1:43
![]()
1
Do this command:
bcdedit /set {current}
bootstatuspolicy ignoreallfailures
Similar is
bcdedit /set {default}
bootstatuspolicy ignoreallfailures
They can be the same if you are booted into the default load, so default would equal current.
For more information, the relevant Google search is «disable Windows Error Recovery» (minus the quotes).
answered Jun 21, 2011 at 2:06
![]()
KCotreauKCotreau
25.5k5 gold badges48 silver badges72 bronze badges
A better solution would be to implement the following line for the BCDedit.
bcdedit /set {default} bootstatuspolicy ignoreshutdownfailures
This way, only shutdown failures will be ignored and the system won’t go in to recovery mode. Recovery mode will still be available when the machine fails to boot properly and encounters other errors.
answered Jul 22, 2013 at 20:13
![]()
Tsevg9Tsevg9
811 silver badge2 bronze badges
At the command prompt enter the following:
bcdedit /set {default} recoveryenabled No
This will disable Startup Repair from automatically booting when there is a problem.
However, beware:
You’ll have to get back into Windows as Admin to re-enable it. Just change the No to Yes in the above command
Credit to ‘busterh’ in this SevenForums.com thread
![]()
answered Jul 28, 2012 at 0:42
![]()
You must log in to answer this question.
Not the answer you’re looking for? Browse other questions tagged
.
Not the answer you’re looking for? Browse other questions tagged
.
I can’t make it to Windows Login Screen, please help. Here is a walkthrough of what I see:
-I press the Power Button to Turn on the Laptop
-HP «Invent» Logo Shows with ESC Menu Option at Bottom Left of Screen
—WINDOWS ERROR RECOVERY Message Appears «Windows failed to start. A recent Hardware of Software change might be the cause. If windows files have been damaged or configured incorrectly, Startup repair can help diagnose the problem. If Power was interrupted during startup, choose to start windows normally»
with options:
- Launch Startup Repair (Recommened)
- Start Windows Normally
- 1. IF I choose to START WINDOWS NORMALLY
the «Starting Windows» Screen Appears with the animated red, green, blue, yellow, windows graphic. This screen stays up for about 1 minute and then takes me back to WINDOWS ERROR RECOVERY black screen.
2. IF I choose LAUNCH STARTUP REPAIR (RECOMMENDED)
A load screen appears «Windows Is Loading Files». 10 seconds later the screen goes black (but still lit) for nearly a minute. A low pixel blue windows background appears along with cursor.
Next the RECOVERY MANAGER window pops up with options:
- -I need help immediately
- -I’d like to identify any problems
- -I’d like to take precautions
3. The only available option, not blacked out is I’d like to identify any problems: «Run Computer Checkup«
4. I highlight «Run Computer Checkup», click NEXT and new screen gives me only 1 of 3 options
- Launch Check Disk for the Windows Partition (blacked out)
- Launch Check Disk for the Recovery Partition (blacked out)
- Open A Command Prompt
5. I highlight «Open A Command Prompt«, Click NEXT:
A Black command prompt window (Administrator:X:\Windows\System32\Cmd.exe) appears:
In the box: Microsoft Windows [Version 6.1.7600]
X:\Windows\RM>
NOW WHAT?
6. If I now EXIT, a pop up «Do you wish to exit Recovery Manager and reboot?»
-I click OK
7. BACK to WINDOWS ERROR RECOVERY screen
ANY HELP WOULD BE APPRECIATED, I cannot access a recovery point, I’d like to not have to FACTORY RESET… fingers crossed.
Thank You!