Windows Installation Options
Dependencies
Swift has the following general dependencies:
- Git (used by Swift Package Manager)
- Python1 (used by the debugger — LLDB)
Swift on Windows has the following additional platform specific dependencies:
- Windows SDK (provides the Windows headers and import libraries)
- Visual Studio (provides the Visual C++ SDK/Build Tools for additional headers)
Developer Mode
In order to develop applications, particularly with the Swift Package Manager, you will need to enable developer mode. Please see Microsoft’s documentation for instructions about how to enable developer mode.
Installation via Windows Package Manager
Windows Package Manager (aka WinGet) comes pre-installed with Windows 11 (21H2 and later). It can also be found in the Microsoft Store or be installed directly.
-
Install required dependencies:
winget install --id Git.Git -e
winget install --id Python.Python.3.9 -e
winget install --id Microsoft.VisualStudio.2022.Community --exact --force --custom "--add Microsoft.VisualStudio.Component.Windows11SDK.22000 --add Microsoft.VisualStudio.Component.VC.Tools.x86.x64"
Start up a new command-line shell (eg. Command Prompt, Windows PowerShell) and install the Python library
six. -
Install Swift:
winget install --id Swift.Toolchain -e
Installation via Scoop
Scoop is a command-line installer for Windows. It can be installed through the following PowerShell commands.
# Optional: Needed to run a remote script the first time
Set-ExecutionPolicy RemoteSigned -Scope CurrentUser
# Command for installing Scoop
Invoke-RestMethod get.scoop.sh | Invoke-Expression
-
Install general dependencies:
scoop bucket add versions
scoop install python310
Start up a new command-line shell (eg. Command Prompt, Windows PowerShell) and install the Python library
six. -
Install platform dependencies:
The platform dependencies cannot be installed through Scoop as the install rules cannot install all required components. They will be installed through the Visual Studio installer.
This code snippet must be run in a traditional Command Prompt (
cmd.exe).curl -sOL https://aka.ms/vs/17/release/vs_community.exe start /w vs_community.exe --passive --wait --norestart --nocache --add Microsoft.VisualStudio.Component.Windows11SDK.22000 --add Microsoft.VisualStudio.Component.VC.Tools.x86.x64 del /q vs_community.exe -
Install Swift:
Traditional Installation
The traditional installation process is required for Swift older than 5.4.2.
Swift has been tested with Visual Studio 2019. You will need to install Visual Studio with the following components. The installer for Swift is available in the Download section. The toolchain on Windows is typically installed to %SystemDrive%\Library\Developer\Toolchains.
The following Visual Studio components are required:
| Component | Visual Studio ID |
|---|---|
| MSVC v142 — VS 2019 C++ x64/x86 build tools (Latest) | Microsoft.VisualStudio.Component.VC.Tools.x86.x64 |
| Windows 10 SDK (10.0.17763.0)2 | Microsoft.VisualStudio.Component.Windows10SDK.17763 |
The following additional Visual Studio components are recommended:
| Component | Visual Studio ID |
|---|---|
| Git for Windows | Microsoft.VisualStudio.Component.Git |
| Python 3 64-bit (3.7.8) | Component.CPython.x64 |
The following additional Visual Studio component is suggested:
| Component | Visual Studio ID |
|---|---|
| C++ CMake tools for Windows | Microsoft.VisualStudio.Component.VC.CMake.Project |
After Visual Studio and the required components are installed:
-
Download a latest Swift release (5.9) or development snapshot installer.
-
Run the package installer.
Support Files
This is only required for versions older than 5.4.2.
You must run the following commands using x64 Native Tools for VS2019 Command Prompt as administrator.
The x64 Native Tools for VS2019 Command Prompt sets up the necessary environment variables to find the system headers.
Administrator permission is required to modify the Visual Studio installation.
In order to make the Windows SDK accessible to Swift, it is necessary to deploy a few files into the Windows SDK.
copy /Y %SDKROOT%\usr\share\ucrt.modulemap "%UniversalCRTSdkDir%\Include\%UCRTVersion%\ucrt\module.modulemap"
copy /Y %SDKROOT%\usr\share\visualc.modulemap "%VCToolsInstallDir%\include\module.modulemap"
copy /Y %SDKROOT%\usr\share\visualc.apinotes "%VCToolsInstallDir%\include\visualc.apinotes"
copy /Y %SDKROOT%\usr\share\winsdk.modulemap "%UniversalCRTSdkDir%\Include\%UCRTVersion%\um\module.modulemap"
Because it is installing the files into the Visual Studio image, the files will need to be copied each time Visual Studio is updated.
Repairing after Visual Studio Updates
This is only required for versions older than 5.9.0.
If Visual Studio is updated, you may have to repair the installation. For versions older than 5.4.2, reinstall support files as mentioned above. For newer versions, see Microsoft’s instructions for repairing installed programs.
Code Signing on Windows
The following commands must be run in PowerShell.
-
Install GPG from GnuPG.org
-
If you are downloading Swift packages for the first time, import the PGP keys into your keyring:
$ gpg.exe —keyserver hkp://keyserver.ubuntu.com `
          —receive-keys `
          'A62A E125 BBBF BB96 A6E0  42EC 925C C1CC ED3D 1561' `
          '8A74 9566 2C3C D4AE 18D9  5637 FAF6 989E 1BC1 6FEA'
or:
$ wget https://swift.org/keys/all-keys.asc -UseBasicParsing | Select-Object -Expand Content | gpg.exe —import -Skip this step if you have imported the keys in the past.
-
Verify the PGP signature.
The
.exeinstaller for Windows are signed using GnuPG with one of the keys of the Swift open source project. Everyone is strongly encouraged to verify the signatures before using the software.First, refresh the keys to download new key revocation certificates, if any are available:
$ gpg.exe —keyserver hkp://keyserver.ubuntu.com —refresh-keys SwiftThen, use the signature file to verify that the archive is intact:
$ gpg.exe —verify swift-<VERSION>-<PLATFORM>.exe.sig
...
gpg: Good signature from "Swift Automatic Signing Key #3 <swift-infrastructure@swift.org>"
If
gpgfails to verify because you don’t have the public key (gpg: Can’t check signature: No public key), please follow the instructions in Active Signing Keys below to import the keys into your keyring.You might see a warning:
gpg: WARNING: This key is not certified with a trusted signature!
gpg:          There is no indication that the signature belongs to the owner.
This warning means that there is no path in the Web of Trust between this key and you. The warning is harmless as long as you have followed the steps above to retrieve the key from a trusted source.
If gpg fails to verify and reports “BAD signature”, do not run the downloaded installer. Instead, please email swift-infrastructure@forums.swift.org with as much detail as possible, so that we can investigate the problem.
AppCode
News
Swift on Windows in CLion
Hi,
You may have heard that Swift is now available on Windows. We’ve been following this development closely, and we’ve decided to make it possible to use the Swift plugin in CLion on Windows. It’s now available in CLion 2021.1 EAP (211.6556.10). Let’s take a look!
Prerequisites
Install all the required and recommended components from the official Getting Started guide (note that you need the Swift 5.4 toolchain for Windows).
Add the following items to the system PATH variable:
-
%SystemDrive%\Program Files (x86)\Microsoft Visual Studio\Shared\Python<version>(required forlldband swift REPL) -
%SystemDrive%\Library\Developer\Platforms\Windows.platform\Developer\Library\XCTest-development\usr\bin(required for XCTest)
Grant your user the “Create symbolic links” permission in the local security policies using this guide (see this forum thread for details).
Finally, run CLion with the Swift plugin installed and create a sample project.
Indexing
The initial indexing can take a long time, since we have no caches bundled for Swift toolchains on Windows. Subsequent indexing should be much faster.
Debug
Debugging does not currently work because of several lldb issues (such as SR-14243). We hope that they will be fixed soon and we will be able to add debugging support in the future.
Build and run
You can build and run your project on Windows in CLion just as you would on Linux or macOS:
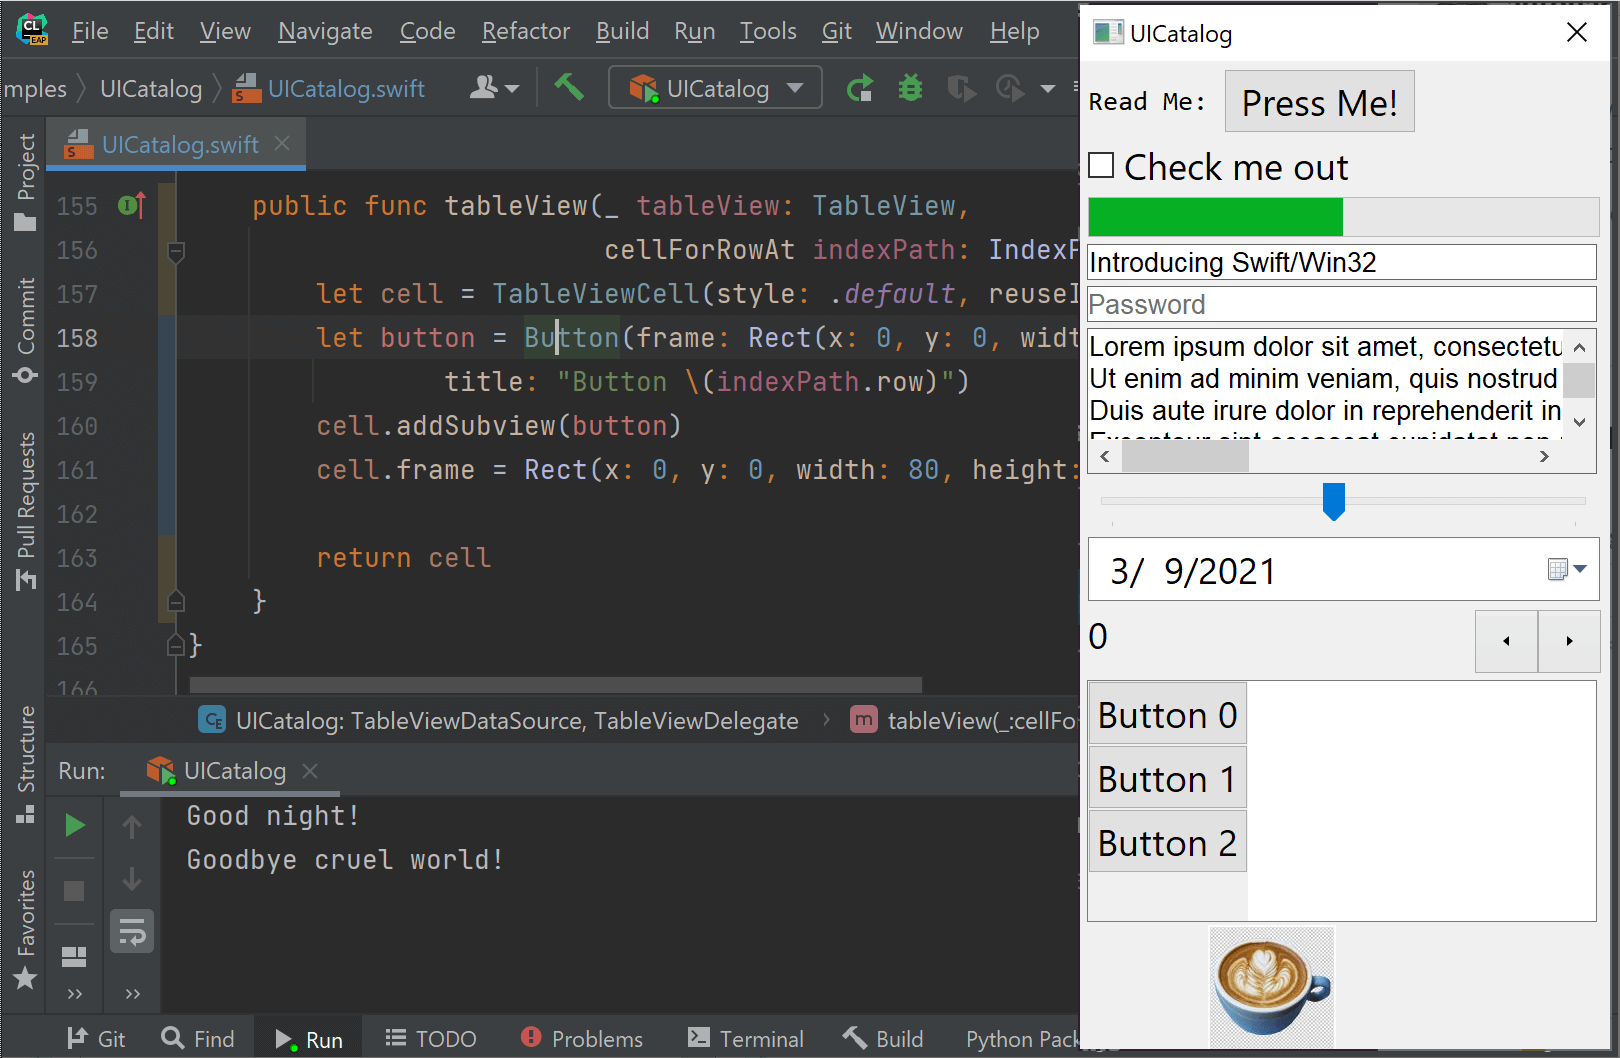
Run configurations are created automatically, and test configurations also work.
Code Assistance
Code assistance works just like it does on macOS and Linux:
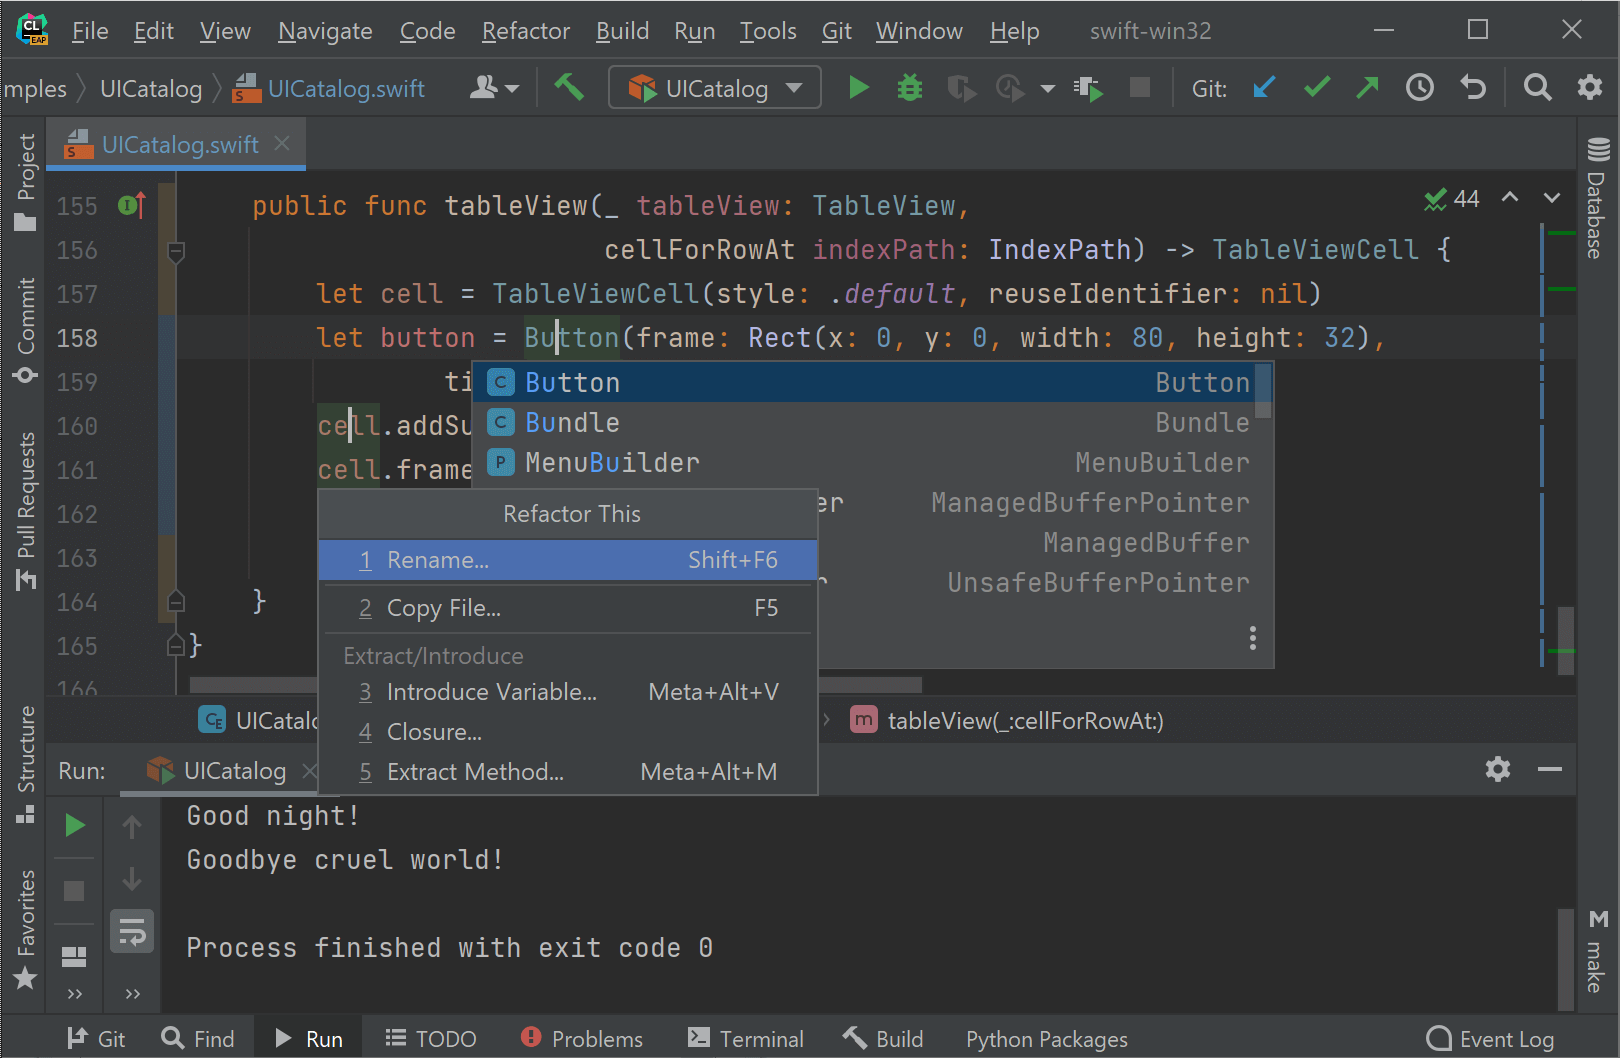
That’s it for now! Stay tuned and keep an eye on this ticket (and related ones) for further updates.
Your AppCode team
JetBrains
The Drive to Develop
Subscribe to Blog updates
Swift is a programming language created by Apple and used for building iOS, macOS, Apple TV, and Apple Watch apps. Because Apple products are so dominant in many markets, the rise of Swift has been phenomenal and has led to a number of top/best Swift IDE products finding their way to market. And whether you work for one of the many Swift services or a Swift development company, you will need to have the right tools to make developing with Swift easier.
Which tools? For most developers, that means either a full-blown IDE or a solid text editor built with programming in mind. Fortunately, there are plenty of options available. But which is right for you? Let’s take a look at some of the more important Swift IDEs and text editors available so you can decide which tool is best suited for your style of development and your workflow.
Why Choosing The Right Integrated Development Environment is Important
You might be asking yourself, Why? Aren’t all IDEs and text editors created equal? Not even remotely. Although you might find a baseline of features in most of the Swift IDEs and text editors, some offer additional features, have a better-designed UI, or may only be available for a specific operating system.
Ultimately, however, it’s important that you understand the benefits of using a good IDE or text editor, which include:
- Code editing automation – this can help ensure you’re following the rules for the Swift language and can automatically write certain portions of your code.
- Syntax highlighting – this makes certain your code is seen with different colors used as cues to make it more readable and give you instant feedback on what you’ve created (especially if you’ve injected errors).
- Intelligent code completion – this makes it even easier to write because the IDE will auto-complete certain parts of your code (such as closing tags).
- Refactoring support – this goes a long way to help make your code more efficient without changing core functionality.
- Local build automation – this makes it possible to use repeatable development tasks such as compilation, testing, and debugging).
One thing to keep in mind, however, is that the difference between an editor and an IDE is considerable. Where editors make it possible to write your code, they are limited in what they can do beyond that singular function.
Swift Code Editor vs. Swift IDE: What’s The Difference?
You may be asking yourself what exactly is the difference between an editor and an IDE? Simply put, an editor is a tool with a single purpose, to help you write code. That’s all it does. An IDE, on the other hand, can contain a host of features that are built in to help you create an entire development workflow.
So, an editor makes it possible for you to write code and an IDE makes it possible for you to write, compile, debug, test, and run your code.
How to Choose the Right IDE or Code Editor for Swift
How do you choose the right IDE or editor or IDE for Swift? Here’s a list of things to consider:
- Single Tool or Multiple Tools: Are you looking for a single tool to help you write code or a platform that will help you from start to finish? Your company or team may already have a build/test/deploy platform, so you might only have the option to choose the right editor that meets your needs.
- Cost: Cost might also be a factor. There are both free and paid IDEs and editors available. If budget is a problem, you might only look at the free options.
- Open- or Closed-Source: You might also consider whether a tool is open-source or not. If you have a tendency to want to alter the tools you use, open-source is the way to go.
- Operating System: The operating system you use will also be a factor in your selection. Although Swift is used for the Apple ecosystem, it doesn’t mean you are relegated to only developing on macOS. You’ll want to make sure to find an IDE or editor that’s available to the operating system you use.
- Plugins and Libraries: You might also want to consider which IDEs and editors are extendable with plugins and/or libraries. At some point, you might need to add a feature to your tool of choice. If you’re working with an IDE or editor that doesn’t offer plugins or additional libraries, you might find yourself limited in what you can do.
- Compiling on non-macOS Platforms: One thing to keep in mind is that, in order to compile Swift on non-macOS operating systems, you’ll most likely have to download a specific toolchain to make it work. If taking those extra steps is beyond your pay grade, your best bet would then be to only work with macOS and macOS-native IDEs and editors.
Now that you know what to consider to make the best choice for you, let’s take a look at some of the top IDEs and editors available.
The 5 Top IDEs & Text Editors For Swift Developers
Let’s take a look at the best IDEs and editors for the Swift programming language. One thing to keep in mind is that most of these tools can be used for multiple languages, so they are not limited to Swift.
#1 Visual Studio Code
Visual Studio Code is a free, open-source IDE, created and distributed by Microsoft, that can work with numerous languages. And thanks to an installable extension, the IDE also supports Swift.
Visual Studio Code is one of the most widely-used, cross-platform, free IDEs on the market. It can be installed on Linux, macOS, and Windows, and offers tons of extensions to make it work exactly how you want.
Key Features // Product Highlights
- One-stop-shop IDE that makes it easier to write, navigate, and debug your code.
- Outstanding debug tools.
- Includes command line tools.
- Git Integration.
- Quick language mode switching.
- Highly customizable.
- Plenty of keyboard shortcuts for a more efficient workflow.
- Zen Mode hides all UI elements, so you can focus on your code.
- Split view makes it easier to multitask.
- Status Bar gives you instant visualization of errors and other issues.
- Plenty of tools for collaboration on projects.
- Thousands of available extensions.
Pros/Cons of Visual Studio Code
| PROS | CONS |
| Great User Interface. | Can consume battery quickly. |
| Shows errors as you write. | Application error messages can be a bit ambiguous. |
| Easy to modify the IDE to meet your needs. | Debugging can be somewhat confusing. |
| Very stable. | Settings can be challenging to navigate. |
#2 CodeRunner
CodeRunner is another outstanding IDE that supports Swift. Unlike Visual Studio Code, CodeRunner is neither free, open-source, nor cross-platform. In fact, CodeRunner is only available to macOS. CodeRunner does support multiple languages (so you can use it for Swift or other programming needs) and was built on the principle of running code, regardless of language, instantly.
CodeRunner also makes it easy to work with multiple projects (even in different languages) with little to no setup. CodeRunner is not an expensive IDE and can be had for just $19.99.
Key Features // Product Highlights
- Write and run in almost any language.
- Breakpoints make it considerably easier to debug your code.
- Live errors and linting to help keep your code free from errors.
- Built-in text editor with syntax highlighting and code completion.
- Documentation sidebar.
- File navigator.
- Custom key bindings.
- Vim mode.
- Regular expression find.
- Scriptable editor.
Pros/Cons of CodeRunner
| PROS | CONS |
| Fast | Not so great with very large projects |
| Supports numerous languages | Developer is slow to update. |
| Easily installed from the macOS App Store | Doesn’t play well with Adobe Creative Cloud |
| Intelligent autofill is very accurate | Only available for macOS |
| Includes plenty of code templates | No remote debugging tools |
#3 XCode
XCode is Apple’s IDE and is one of the most widely-used IDEs for developing Mac, iPhone, iPad, Apple Watch, and Apple TV applications. If macOS is your development operating system of choice, XCode might well be the best IDE option on the market.
Given that XCode was developed specifically for creating apps for the Apple ecosystem, you can be sure it includes full support for everything related to Swift. And, in typical Apple fashion, the UI is fantastic. And with the latest release, XCode is 30% lighter than previous iterations, so it performs considerably better. XCode is also available for both Intel and Apple Silocon hardware.
Key Features // Product Highlights
- Advanced code completion
- Code folding
- Syntax highlighting
- Message bubbles for warnings, errors, and context-sensitive information
- Built-in terminal
- Improved parallelism builds projects 25% faster
Pros/Cons of XCode
| PROS | CONS |
| User-friendly interface | Only available for macOS |
| Ability to test app, regardless of the target device | Error display can get overwhelming |
| Multiple schemes for different tasks | No tab autocomplete |
| Free to use | Large footprint (30+ GB) |
| Initial setup can be challenging to some | |
| Can consume a lot of system resources |
#4 Atom Editor
Atom is a text editor that was designed specifically for programming. Atom is cross-platform and includes all the features you could need for a code editor. Atom also happens to be one of the most widely recommended editors on the market.
Atom runs on Electron and includes integration for HTML, JavaScript, CSS and Node.js but can easily be expanded with a robust extension ecosystem.
Key Features // Product Highlights
- Packages and themes
- Find and replace
- Built-in package manager
- Built-in file system browser
- Cross-platform
- Multi-plane UI
- Smart autocompletion
Pros/Cons of Atom
| PROS | CONS |
| Easy remote collaboration | Doesn’t have a built-in sync tool |
| Highly customizable | Lack of documentation |
| Lightweight and intuitive | Steep learning curve |
| Great community support | No mathematical or data analytic tools |
| Color-coded syntax | No self-correcting for linting errors |
#5 Sublime Text
Sublime Text is another code editor that can be installed and used on multiple operating systems. One thing that is very handy with this tool is that it’s not only useful for code but also for prose and other types of documents. Thanks to that feature, you can not only write your code but also your documentation.
The one thing you need to know about Sublime Text is that, in order to work with Swift, you must install the Swift-Sublime-Package via the Package Control tool. Sublime Text can be installed on both Intel and Apple Silicon-based hardware. You can try Sublime for free, but for continued usage, you’ll have to buy one of the following licenses:
- Sublime Text: $80
- Sublime Merge: $80
- Sublime Text & Merge Bundle: $152
Key Features // Product Highlights
- GPU Rendering
- Context-aware autocomplete
- Tab multi-select
- Vastly improved syntax highlighting
- Auto Indentation
- File Type Recognition
- Sidebar
- Macros
- Plug-in and Packages
Pros/Cons of Sublime Text
| PROS | CONS |
| User-friendly interface | No auto-recognition of code type |
| Exhaustive code searches | Requires other tools to run code |
| Customizable code schemes | Poor Git integration |
| Very lightweight | File comparison is hard to use |
| Great for working with large datasets |
Conclusion
So long as you are using Swift best practices, any one of the above tools will serve you well. Just remember, if you want a do-everything application, you’ll want to stick with an IDE. If your only concern is writing code, a text editor is a great place to start. Choose wisely, and these tools will do a great job of helping you work efficiently and effectively.
Swift является одним из самых популярных языков программирования, который широко используется для разработки мобильных приложений для платформы iOS. Однако, по умолчанию Swift поддерживает только macOS и Linux, что делает программирование на Windows невозможным. Но не стоит отчаиваться, потому что есть несколько способов, которые позволят вам все же создавать приложения на Swift на Windows.
Первый и самый простой способ — использовать виртуальную машину. Вы можете установить виртуальную машину, такую как VirtualBox или VMWare, на вашем компьютере под управлением Windows и настроить в ней экземпляр macOS. После этого вы сможете установить и использовать Xcode и Swift на этом виртуальном экземпляре macOS.
Второй способ — использовать онлайн-сервисы. Существуют сервисы, которые предоставляют виртуальные машины с предустановленным macOS, на которых вы можете создавать приложения на Swift. Вы можете получить доступ к этим сервисам через веб-браузер на своем компьютере под управлением Windows и использовать их для разработки и тестирования приложений.
Наконец, третий способ — использовать альтернативные среды разработки и фреймворки. Например, существуют инструменты, такие как Perfect, Kitura и Vapor, которые предоставляют среду разработки и фреймворк для создания приложений на Swift в среде Windows. Хотя эти инструменты не поддерживают все функции Swift и Xcode, они все же позволяют разрабатывать приложения на Swift на Windows.
Содержание
- Подготовка к программированию на Swift на Windows
- Установка необходимых инструментов
- Конфигурация окружения для работы с Swift на Windows
- 1. Установите LLVM и Clang
- 2. Скачайте Swift
- 3. Настройте переменные среды
- 4. Проверьте установку
- Основы программирования на Swift на Windows
- Разработка приложения на Swift на Windows
- Тестирование и отладка программы на Swift на Windows
- Вопрос-ответ
- Можно ли программировать на Swift на Windows?
- Какой инструмент нужен для программирования на Swift на Windows?
- Какие среды разработки подходят для программирования на Swift на Windows?
Подготовка к программированию на Swift на Windows
Программирование на Swift на Windows может показаться сложной задачей, так как Swift является языком, разработанным Apple и предназначенным для создания приложений для их операционных систем, таких как iOS, macOS и tvOS. Однако, с использованием некоторых инструментов и ресурсов, вы можете начать программировать на Swift на Windows.
Вот несколько шагов, которые помогут вам подготовиться к программированию на Swift на Windows:
- Установка виртуальной машины
- Установка Xcode
- Выбор среды разработки на Windows
- Изучение основ Swift
- Проекты и практика
Для запуска операционной системы macOS на Windows вам потребуется установить виртуальную машину. Некоторые популярные варианты включают Oracle VirtualBox и VMWare Workstation. После установки виртуальной машины, вам понадобится загрузить образ macOS.
После установки виртуальной машины с macOS, вам нужно будет загрузить и установить Xcode, интегрированную среду разработки (IDE) для создания приложений на Swift. Xcode доступен в Mac App Store.
Хотя невозможно напрямую разрабатывать на Swift на Windows, вы можете выбрать альтернативную среду разработки, которая поддерживает Swift, такую как Visual Studio Code или AppCode. Эти среды разработки могут предоставить вам функциональность для написания и отладки кода на Swift.
Прежде чем начать программирование на Swift, важно изучить основы языка. Существуют множество руководств, учебников и курсов в Интернете, которые помогут вам изучить основы Swift. Вы можете использовать онлайн-ресурсы, такие как Swift.org и Swift Playgrounds, чтобы получить доступ к материалам для обучения.
Начните с создания небольших проектов на Swift и постепенно углубляйтесь в язык. Практика играет важную роль в освоении программирования на Swift, поэтому старайтесь регулярно создавать новые проекты, решать задачи и разрабатывать свои навыки.
Следуя этим шагам и уделяя время изучению и практике, вы сможете приступить к программированию на Swift на Windows.
Установка необходимых инструментов
Для программирования на Swift в операционной системе Windows, вам потребуются следующие инструменты:
- Swift Toolchain: Это комплект инструментов, включающий компилятор Swift, библиотеки и другие необходимые файлы.
- IDE: Среда разработки интегрированная среда разработки (IDE) является неотъемлемой частью процесса разработки в Swift. Рекомендуется использовать Xcode, который является официальной IDE для разработки на Swift.
| Шаг | Действие |
|---|---|
| 1 | Загрузите Swift Toolchain с официального сайта Swift |
| 2 | Установите среду разработки Xcode с официального сайта Apple |
| 3 | После установки Xcode, откройте его и прочитайте и примите лицензионное соглашение |
| 4 | Настройте путь к файлам инструментов Swift в операционной системе Windows |
| 5 | Проверьте правильность установки и настройки, выполнив небольшую тестовую программу на Swift |
После успешной установки Swift Toolchain и настройки IDE, вы будете готовы начать программировать на Swift в операционной системе Windows.
Конфигурация окружения для работы с Swift на Windows
Swift — это язык программирования, который изначально был разработан для создания приложений под операционную систему iOS. Однако, с появлением Swift.org и открытым исходным кодом, стало возможным запускать Swift на различных платформах, в том числе и на Windows.
Для работы с Swift на Windows необходимо выполнить несколько шагов для конфигурации окружения:
1. Установите LLVM и Clang
LLVM (Low-Level Virtual Machine) — это семейство компиляторов с открытым исходным кодом, а Clang — это компилятор языка C++ совместимый с LLVM. Для работы с Swift на Windows вам нужно установить LLVM и Clang.
2. Скачайте Swift
Скачайте предварительно собранный компилятор Swift для Windows с официального сайта Swift.org. Загрузите архив с исполняемыми файлами и распакуйте его в любое удобное место.
3. Настройте переменные среды
Откройте «Системные свойства» на вашем компьютере, перейдя в «Панель управления» -> «Система» -> «Дополнительные параметры системы». Нажмите на кнопку «Переменные среды» и в разделе «Системные переменные» найдите переменную «Path». Нажмите на кнопку «Изменить» и добавьте путь к папке, где вы распаковали Swift.
4. Проверьте установку
Откройте командную строку и введите команду «swift —version». Если установка прошла успешно, то должна отобразиться версия Swift и соответствующая информация.
| Действие | Команда |
|---|---|
| Сборка проекта | swift build |
| Запуск проекта | swift run |
| Тестирование проекта | swift test |
Теперь ваше окружение готово для работы с Swift на Windows. Вы можете начать создавать и запускать свои Swift-проекты!
Основы программирования на Swift на Windows
Swift — язык программирования, разработанный компанией Apple. Изначально предназначенный для создания приложений под операционные системы iOS, macOS, watchOS и tvOS, сейчас Swift используется также для разработки серверных приложений и программного обеспечения для Windows.
Для программирования на Swift на Windows вам потребуются следующие инструменты:
- Swift for Windows — это неофициальная среда разработки для языка Swift на операционной системе Windows. Вы можете найти его на официальном сайте проекта и загрузить последнюю версию.
- IDE (среда разработки) — для написания кода на Swift на Windows вы можете использовать любой текстовый редактор, такой как Sublime Text или Visual Studio Code. Однако рекомендуется использовать Xcode, официальную среду разработки от Apple, которая доступна только для macOS. Вы можете установить Xcode на виртуальную машину с macOS или использовать удаленный доступ к macOS.
После установки необходимых инструментов вы можете начать программировать на Swift на Windows. Вот некоторые основные понятия и конструкции языка, с которыми вам стоит ознакомиться:
- Переменные и константы — в Swift вы можете объявлять переменные с помощью ключевого слова
varи константы с помощью ключевого словаlet. Например:
var age = 25
let name = "John"
- Типы данных — Swift имеет несколько встроенных типов данных, таких как
Int(целые числа),Double(числа с плавающей запятой),String(строки) и другие. Вы также можете создавать свои собственные типы данных. Например:
var age: Int = 25var weight: Double = 70.5
var name: String = "John"
- Условные выражения — в Swift вы можете использовать условные выражения
if,else ifиelseдля принятия решений в зависимости от значения переменной или условия. Например:
var isAdult = trueif isAdult {
print("Вы совершеннолетний")
} else {
print("Вы несовершеннолетний")
}
- Циклы — в Swift вы можете использовать циклы
forиwhileдля многократного выполнения определенного блока кода. Например:
for i in 1...5 {print(i)
}
var counter = 0
while counter < 5 {
print(counter)
counter += 1
}
Это лишь небольшой обзор основ программирования на Swift на Windows. Существуют и другие важные концепции, такие как функции, массивы, структуры и классы, с которыми вам будет полезно ознакомиться, чтобы успешно программировать на Swift. Удачи в изучении языка!
Разработка приложения на Swift на Windows
Создание приложений на языке Swift на платформе Windows может быть сложной задачей, так как Swift в первую очередь предназначен для разработки приложений на платформе macOS и iOS. Однако существуют некоторые способы, которые позволяют разрабатывать приложения на Swift на Windows:
- Использование онлайн-инструментов, таких как IBM Swift Sandbox или Repl.it.
- Установка виртуальной машины, на которой можно запустить macOS и затем использовать Xcode для разработки приложений на Swift.
- Использование сторонних рамок работы со Swift, таких как Perfect или Vapor.
Каждый из этих методов имеет свои преимущества и ограничения. Использование онлайн-инструментов позволяет быстро начать разработку приложения на Swift без необходимости устанавливать дополнительные программы или операционные системы. Однако онлайн-инструменты могут быть ограничены по функциональности и недоступны в офлайн-режиме.
Установка виртуальной машины может быть более сложным и требует больше времени и ресурсов, но позволяет разрабатывать приложения на Swift с использованием полноценной среды разработки Xcode. Этот метод также предоставляет доступ ко всем возможностям Swift и возможность запускать приложения на эмуляторе iOS.
Использование сторонних рамок работы со Swift, таких как Perfect или Vapor, позволяет разрабатывать серверные приложения на языке Swift, которые могут работать на платформе Windows. Эти рамки предоставляют средства для разработки и развертывания приложений на Swift на серверах Windows.
| Метод | Преимущества | Ограничения |
|---|---|---|
| Использование онлайн-инструментов | Быстрый старт в разработке, не требуется установка дополнительных программ | Ограниченная функциональность, работает только в онлайн-режиме |
| Установка виртуальной машины | Полноценная среда разработки Xcode, возможность запуска на эмуляторе iOS | Сложная установка, требуется дополнительное железо и ресурсы |
| Использование сторонних рамок работы со Swift | Разработка серверных приложений на Swift на платформе Windows | Ограничен функциональностью, не позволяет создавать клиентские приложения для iOS |
В зависимости от ваших потребностей и возможностей выберите метод, который наилучшим образом соответствует вашим требованиям по разработке приложений на Swift на платформе Windows. Удачной разработки!
Тестирование и отладка программы на Swift на Windows
При разработке программы на Swift на Windows, важно уделять внимание тестированию и отладке, чтобы убедиться в корректности работы и обнаружить и исправить ошибки в программном коде. Существуют различные инструменты и подходы, которые помогут в проведении этих процессов.
Для тестирования программы на Swift можно использовать различные фреймворки, такие как XCTest или Quick/Nimble. Создание и запуск тестов позволяет проверить корректность работы отдельных частей программы, а также обнаружить и исправить ошибки и неполадки.
Для отладки программы на Swift на Windows можно использовать инструменты IDE (Integrated Development Environment), такие как Xcode или Visual Studio Code. Они обеспечивают удобную среду для пошагового выполнения кода, наблюдения за значениями переменных, анализа стека вызовов и других операций, которые помогают обнаружить и исправить ошибки.
Кроме того, для отладки программы на Swift на Windows можно использовать логирование. Вставка в код команды, которая выводит значения переменных или другую нужную информацию в консоль, помогает анализировать работу программы и выявлять проблемные моменты.
Важно также тестировать программу на разных вводных данных и с различными сценариями использования. Это поможет обнаружить возможные ошибки или ситуации, которые могут привести к некорректной работе программы. Тестирование на разных операционных системах и различных версиях Swift также является важным шагом для обеспечения корректности работы программы на Windows.
Итак, тестирование и отладка программы на Swift на Windows являются неотъемлемой частью разработки программного кода. Они позволяют проверить корректность работы программы, обнаружить и исправить ошибки, а также улучшить качество и надежность программы.
Вопрос-ответ
Можно ли программировать на Swift на Windows?
Да, можно программировать на Swift на Windows, но это не является официальной поддерживаемой платформой. Существует несколько способов запустить Swift на Windows, например, с помощью различных инструментов и сред разработки.
Какой инструмент нужен для программирования на Swift на Windows?
Для программирования на Swift на Windows вам понадобится компилятор Swift, такой как Swift for Windows. Этот инструмент позволяет вам запускать и тестировать код Swift на Windows без необходимости использовать macOS.
Какие среды разработки подходят для программирования на Swift на Windows?
Есть несколько сред разработки, которые подходят для программирования на Swift на Windows, например, Visual Studio Code, Atom и AppCode. Вы можете настроить эти среды разработки для работы с Swift и использовать их для создания, отладки и запуска кода на Windows.
Learn how to get started with the Swift Programming Language in Windows.
To be honest, although may not want to work totally with this language on this environment to create applications or something like that, you may find very useful the fact of programming in this language in a Windows environment just for learning purposes of the language itself and its syntax. It’s worth to mention that not everyone can afford the purchase of an apple device to work with this language, so if you are one of those that work in a windows environment and you may like to introduce yourself to the Swift Language, then you have found the correct article to get started with.
The Swift Language is a high-performance system programming language with a very clean and modern syntax, that offers seamless access to existing C and Objective-C code and frameworks, being memory safe by default. Although inspired by Objective-C and many other languages, Swift is not itself a C-derived language. As a complete and independent language, Swift packages core features like flow control, data structures, and functions, with high-level constructs like objects, protocols, closures, and generics. Swift embraces modules, eliminating the need for headers and the code duplication they entail. The open source SwiftForWindows project provides an easy-to-use development environment for Swift programming for Windows applications. The project works with the Swift compiler for Cygwin, MSVC, MinGW.
In this article, we’ll show you an easy way to get started with the programming with the Swift Language in a Windows Environment.
1. Download SwiftForWindows compiler
As first step, you need to download the installer of Swift For Windows from the releases page of the project at Github here. The installer file size is around 110MB and you will be the one who decides where to install it. By default, it’s installation path is at C:/Swift. Now you need to understand how the project works, after installing Swift For Windows, you will basically have at your disposition an executable that works as a compiler, it offers a graphical user interface that allows you to select the swift source file that you want to compile:
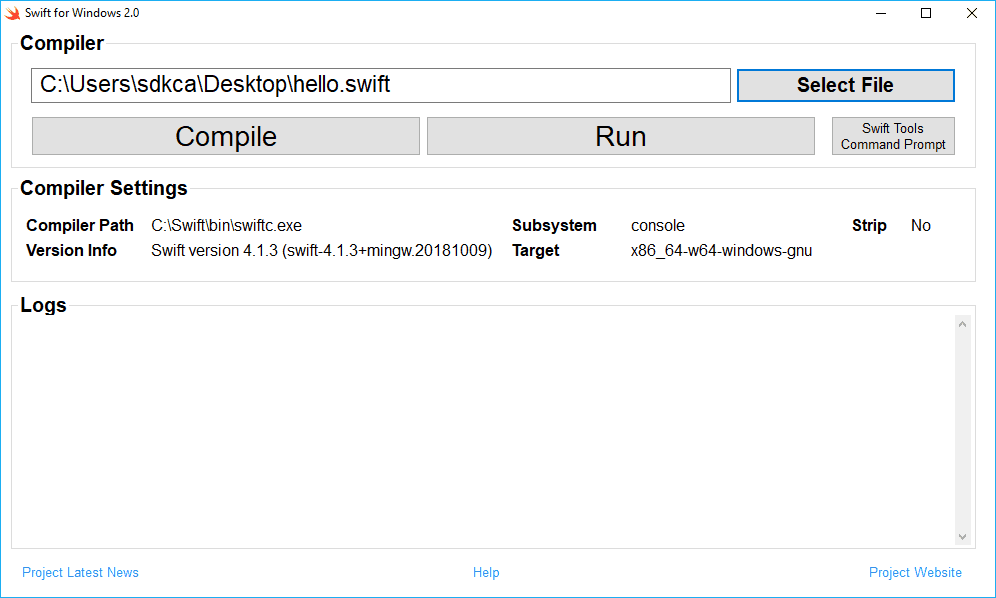
You need to compile the file before running it, so if your code is valid and you click on Compile, you will be able to run it with the Run button, which normally will open a command prompt with the output of your code if there’s any of course. For more information about this project, please visit the official repository at Github here.
2. Testing the compiler
To get started with the compiler, let’s write some code ! Create a file somewhere on your system namely hello.swift. This file will have the following code inside:
print("Hello World !")To define the file that the compiler should compile, click on Select File. This will open the system filebrowser and will allow you to select a file, select the file we’ve just created. The steps to run your Swift code on this environment is the following:
- Click on Compile
- If the compilation succeeds, click on Run
With the code that we wrote on our hello.swift file, the output will be:
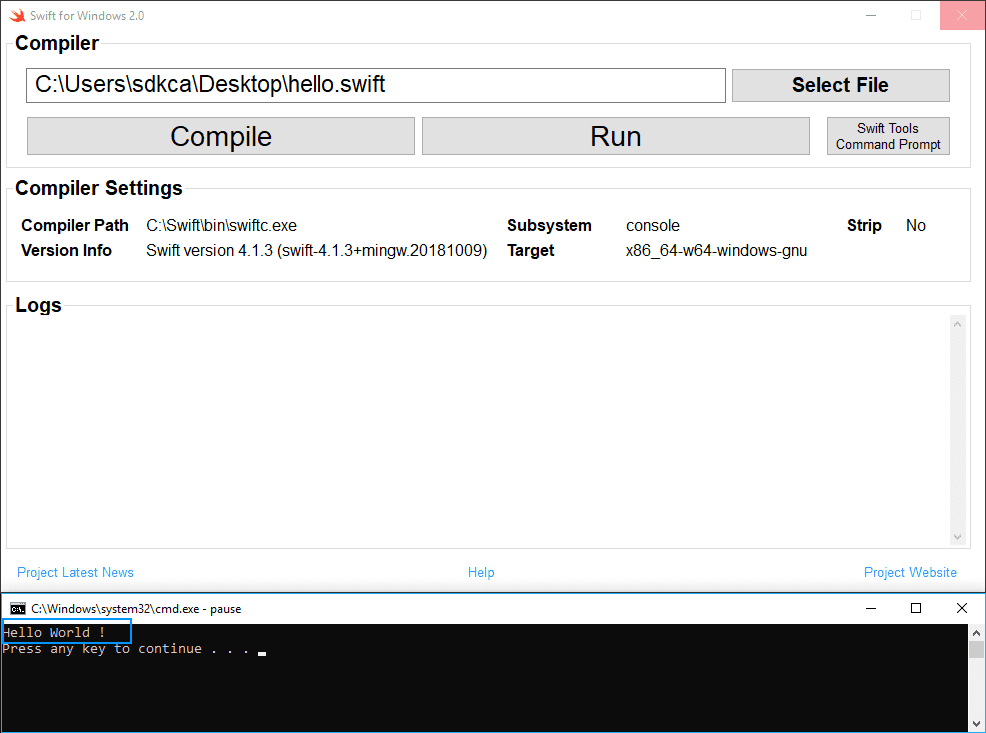
Note that while the command prompt with the output of your Swift Code is opened, the compiler tool will be blocked, so be sure to close the cmd window before trying to compile again. However, not everything in the life is printing hello world on every new programming language that you learn! You may want to get started with more complex code, for example the fibonacci series. Create a new file namely fibonacci.swift and paste the following code:
class FibIterator : IteratorProtocol {
var (a, b) = (0, 1)
func next() -> Int? {
(a, b) = (b, a + b)
return a
}
}
let fibs = AnySequence{FibIterator()}
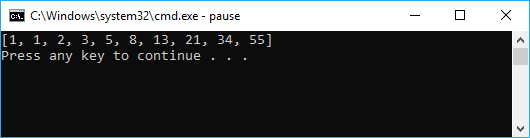
print(Array(fibs.prefix(10)))Compile it and run it. As expected, the output will be:
About the logs
During the compilation, the compiler will have a log that is displayed directly in the application. This log contains the warnings, notes or errors of the code that is being compiled. You will not always get a Successfully compiled message in the output, so you will need to pay attention to the other kind of messages in the log. Note that once you Run the compiled code (which means your application compiled succesfully, as long as there’s not an older version of your program), the log will be removed, so check it immediately after trying to compile. As on every sane compiler, you will get the line and character where the exception/warning occurs.
Errors
The compiler will be able to deal with errors during the compilation, for example with the following code that should display the date in the output:
let date = Date()
let calendar = Calendar.current
let components = calendar.dateComponents([.year, .month, .day], from: date)

let year =  components.year
let month = components.month
let day = components.day

print(year)
print(month)
print(day)
Will throw the following errors (error: use of unresolved identifier 'Calendar' and 'Date'):
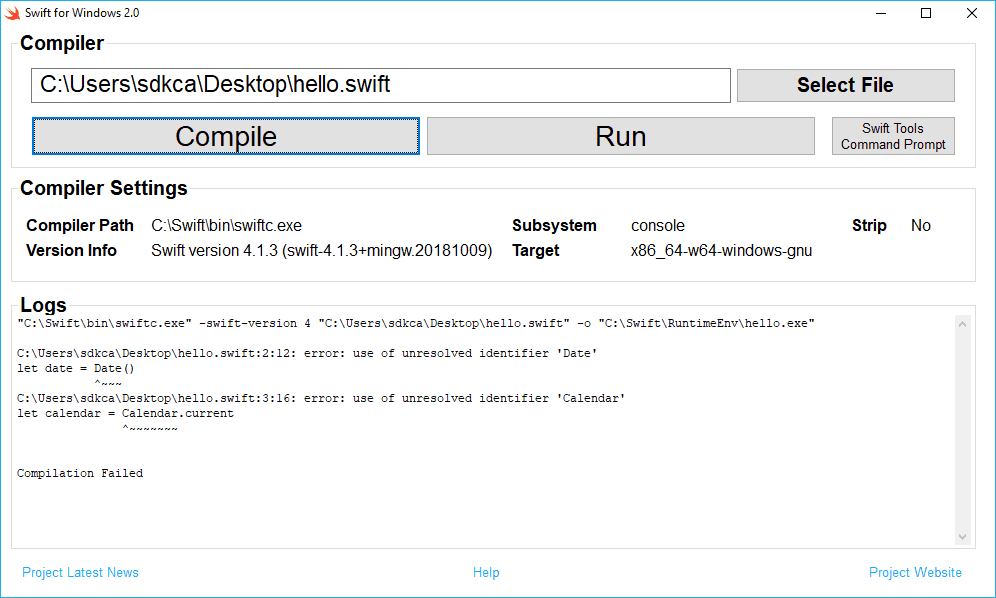
This error in our code is cause by the missing import statement at the beginning of our code ‘import Foundation‘, the functional snippet is shown in the warnings area.
Warnings
The compiler will display warnings as well, if we fix our previous snippet importing the Foundation namespace, our code will compile succesfully:
import Foundation

let date = Date()
let calendar = Calendar.current
let components = calendar.dateComponents([.year, .month, .day], from: date)

let year =  components.year
let month = components.month
let day = components.day

print(year)
print(month)
print(day)
However, we’ll get some warnings and notes:
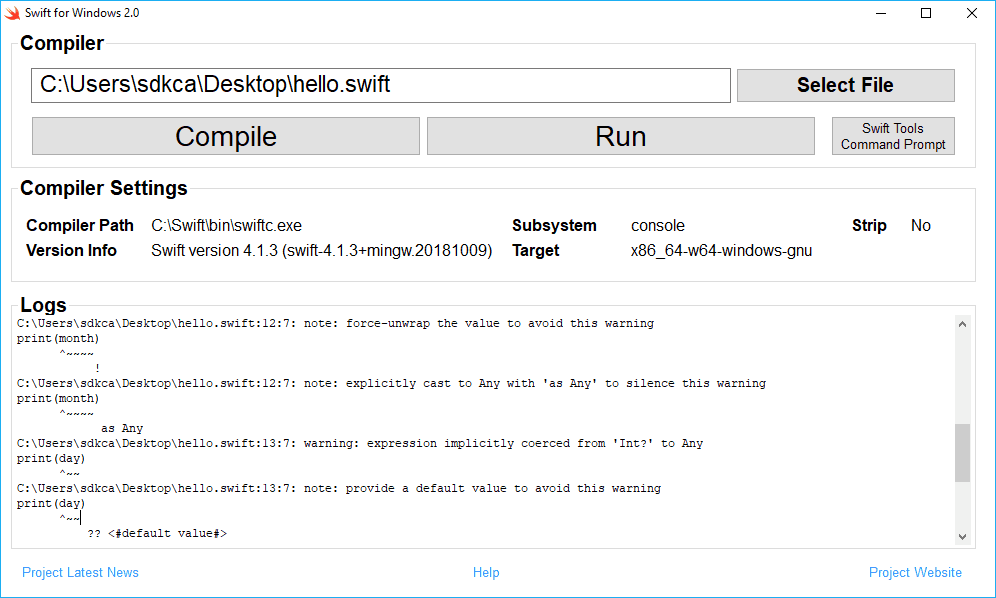
- warning: expression implicitly coerced from ‘Int?’ to Any. This warnings is triggered cause of the print function, that requires a set of Any parameters. String is a Any. In this case the compiler is telling you that it implicitly coerced the optional string into an Any object (by transforming the String value in Optional(value)).
- note: force-unwrap the value to avoid this warning. When an object is optional and you want to access one of its methods or properties, you will need to ‘unwrap’ it.
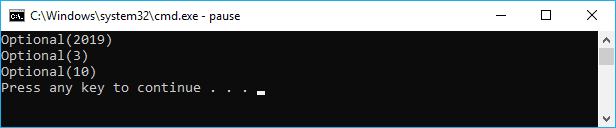
The output of our running code will be:
In conclusion, you can see how easily it is to get started with the Swift programming language or at least with its syntax in Windows. Notice that as there’s no official API that exposes how to do specific things in Windows, like opening a File browser, a program or related, this project is made entirely for strict learning purposes of the language in a different environment.
Happy coding !