Error iastora.sys is a blue screen of death error and it primarily occurs when you install a new feature update on your computer. After it appears, you will find it difficult to update your existing apps, install new updates, or sometimes even a blue screen. At times, you may receive an error message that reads – DRIVER_IRQL_NOT_LESS_OR_EQUAL (iaStorA.sys) or SYSTEM_SERVICE_EXCEPTION (iaStorA.sys).
In this quick guide, we will discuss what possibly could have triggered this issue and nine possible solutions to this BSOD error.

What causes this iaStorA.sys Error in Windows 11/10?
This error normally appears when the Intel IRST or IDE ATA/ATAPI drivers are not working or have become obsolete on your PC. In addition to these, recent third-party app installation(s), and missing/damaged system files may also result in this error code.
In order to overcome this issue, you may update all your device drivers, uninstall the problematic software, or update. Make sure to run the SFC command to repair missing and corrupted system files on your PC. If none of these fixes help and you do have a system restore point, you may revert your device back to an earlier working point. In case you haven’t created any restore point, all you can do is perform a clean installation of Windows 11/10 on your computer.
- Remove the IRST drivers
- Update the Intel Rapid Storage Technology Driver
- Uninstall buggy applications
- Disable the background Running Services
- Delete Windows.old folder
- Run sfc/scannow command
- Use System Restore Point
- Clean Install Windows 10
Here are the stepwise workarounds to resolve this blue screen error iastora.sys on Windows 11/10 PC –
If you don’t receive the login screen, it becomes really difficult to attempt the below-troubleshooting guides. Boot into your device under Safe Mode and then apply the below fixes in the same order as discussed below.
1] Remove the IRST drivers
In case, this BSOD error iastora.sys is frequently appearing and thus can’t update the Windows, the IRST driver may be the possible reason. It is thereby recommended to uninstall the related IRST drivers to solve this error. Here’s how to apply this fix –
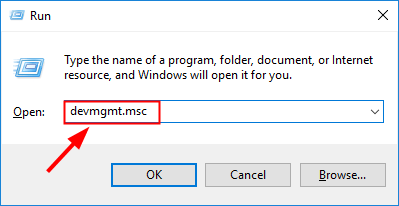
- Right-click on the Windows icon and choose Run.
- Type devmgmt.msc then tap OK to launch Device Manager.
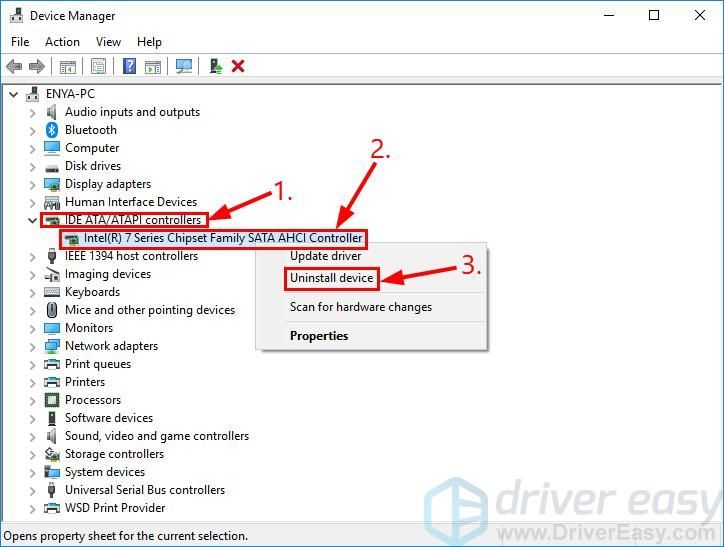
- Henceforth, expand IDE ATA/ATAPI controllers section by clicking on the “>” sign.
- Right-click next on each driver separately and select the Uninstall device option from the context menu.

- Repeat this process systematically until each driver under IDE is removed.
Note: There is no need to re-install the IDE ATA/ATAPI controllers again. This is because they will auto-install themselves during the next Windows 10 update.
- Once you have successfully uninstalled all the ATA/ATAPI controllers, Restart your system to save the changes made so far.
2] Update the Intel Rapid Storage Technology (IRST) drivers
If you still are getting the BSOD error iastora.sys, there may be corrupt or outdated IRST drivers. All you require is to then update this with the latest version. Here are the steps-
- Click on the Search icon and type Device Manager in the text box, and hit the well-matched option.
- Next, locate and right-click on the Intel Rapid Storage Technology (Intel RST) driver from the list.
- Again, select the Update driver option using the context menu.
- Now, press the “Search automatically for updated driver software“ button and let it download the latest version.
- Once the task is over, Reboot your PC and try updating your Windows.
3] Uninstall buggy applications
Sometimes faulty software like third-party anti-virus, or lately installed apps may also cause this error iastora.sys on your PC. If that’s the case, try uninstalling the external apps one by one and find the culprit program. I hope doing this resolves the blue screen error on your computer.
- Press Win and I hotkey together to launch Settings.
- Here, select Apps thereafter Apps & Features from the left pane.
- Switch to the corresponding right pane, scroll downward, and select the lately installed app.
- Thereupon, hit the Uninstall button followed by Uninstall again to confirm the changes.

- Once you remove the app successfully, Restart your system normally.
4] Disable the background running Services
The services running in the background may also at times cause this BSOD error iastora.sys on your PC. If that’s the case, you better disable all such services from running in the background. Here’s how to perform this task –
- Press Win & R hotkey together to launch the Run dialog.
- Type msconfig in the text area henceforth hit the OK button.
- When the System Configuration window appears, hit the Services tab.
- Move to the lower pane and mark the Hide all Microsoft Services checkbox.
- Here, click on the Disable all button then OK to confirm the changes.

- Now go back to the System and update your Windows 10 PC.
- Once you perform the above steps, reboot your system and re-enable all the services using the above process.
5] Delete Windows.old folder
After Upgrading the OS, a new folder “Windows.old” appears by default in the root directory. This keeps the record of the previous OS files. This may arise some bugs like BSOD error iastora.sys on the Desktop. To solve this problem, you need to delete Windows.old folder by following these steps –
- Right-click on the Windows icon and select Run from the Power menu.
- When the dialog appears, type cmd in the text area and simultaneously hit Ctrl+Shift and Enter key.

- The Command Prompt will then launch having administrative privileges.
- Next, execute the following codes. Make sure to hit the Enter key at the end of each code.
attrib -r -a -s -h C:Windows.old /S /D
RD /S /Q %SystemDrive%windows.old
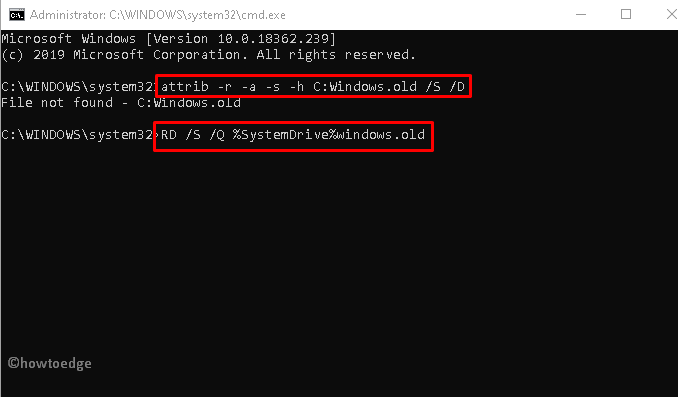
- After you finish the above steps, Restart your system to save the changes made so far.
6] Run SFC Utility
The System File Checker is another utility command of Windows 10 to fix various core file issues. This code identifies the corrupt system files and repairs the same. Here’s how to proceed-
- Launch the Start Menu then type Command Prompt.
- When the matching result appears, right-click on it and choose Run as administrator.
- If UAC prompts, tap Yes.
- Type sfc /scannow near the blinking cursor and then press the Enter key.

- This is a time-consuming process, so wait accordingly.
- Make sure to restart your PC once the above process completes.
7] Use System Restore Point
If you continue receiving the BSOD error iastora.sys interruption, you should better use the backup image of system files. This solution is applicable only when you have previously created a System Restore Point. Here are the steps to follow-
- Click on the Search icon and type System Restore Point. Double-click on the matching result.
- Under the System Protection window, select the System Restore button afterward Next on the succeeding page.

- Further, select the recently created Restore Point from the list. See the Snapshot below-
- Now click on Scan for affected programs to detect any faults in this file, followed by Next.

- Moving ahead tap Finish to confirm the changes.
- At last, Restart your system.
Most probably, you won’t see this interrupting BSOD error iastora.sys on your Windows Machine.
8] Clean install Windows 10
Even after applying all the above fixes, if the BSOD error iastora.sys still persists, you must install the latest feature update on your computer. To perform this task, you must download the Media Creation Tool or update Windows via the Installation Agent.
If you don’t have the Windows Setup file, follow these steps to get one –
- Open Microsoft Windows 10 download page.
- When the window appears, click on the Download tool now button to save the setup file.

- After you download the setup file, double-click on the same to start the installation. Next, check the “I Agree” option to accept Microsoft’s terms and conditions.
- Subsequently, enable the checkbox against Create Installation Media (USB flash drive, DVD, or ISO file) for another PC then Next to proceed.
- Now select your preferred language, architect, and edition. Henceforth, deactivate Use the recommended option for this PC option followed by the Next button.

- Succeeding that choose the USB flash drive radio button then Next again.
- At last, click on the Finish button to complete the process. Once over, Reboot your PC.
What is Error iaStorA.sys?
IaStorA.sys is basically a driver file and is found under the C:\Windows\System32\drivers folder. This driver works in line with Intel Rapid Storage Technology and allows communication between your PC and hardware or other connected devices.
What does Intel Rapid Storage technology do?
Intel Rapid Storage Technology is a Windows-based application and it runs to improve the overall performance and reliability of your Windows PC. This technology is in general equipped with SATA disks for desktop, mobile, or other server platforms.
Processors
Intel® Processors, Tools, and Utilities
- Intel Community
- Product Support Forums
- Processors
- IaStore.sys BSOD Windows 11 Setup
More actions
- Subscribe to RSS Feed
- Mark Topic as New
- Mark Topic as Read
- Float this Topic for Current User
- Bookmark
- Subscribe
- Mute
- Printer Friendly Page
I have a functional i9 (7900) processor system running Windows 10. When I try to upgrade to Windows 11, the setup program fails with the stop code:
DRIVER_IRQL_NOT_LESS_OR_EQUAL iastoreE.sys
I have ensured that the driver in question is current. Is there a Windows 11 version that I can try?
The motherboard is an ASUS X299-A.
- iastore.sys
- Windows 11
-
All forum topics -
Previous topic -
Next topic
4 Replies
Hello @BetaV
Thank you for posting on the Intel® communities.
In order to review this further, could you please confirm the following information?
1- What is the exact model of the processor? Do you mean Intel® Core™ i9-7900X X-series Processor?
2- Please provide more details about the steps that you are following to upgrade to Windows* 11? Do you mean you are trying to install Windows* 11 over an existing installation of Windows 10? What is the «setup program» that you are using?
3- When you said: «I have ensured that the driver in question is current«. What specific driver do you mean? (graphics driver? SSD driver? Intel® RST? etc?)
4- Exact model of the ASUS* «X299-A» motherboard and BIOS version:
Best regards,
Andrew G.
Intel Customer Support Technician
No, I didn’t get an answer. I decided to rebuild the system from scratch. This cost me three days (so far) of work.
I was trying to upgrade an existing Windows 10 system running on an Intel Core i9-7900X on an Asus X299-A running their most current BIOS. After repeated attempts, Windows 11 setup failed to install or use the iastoreE.sys device driver (supplied by Intel). As suggested, I downloaded the driver from the Intel site but this didn’t fix anything. This problem (that ASUS could not solve) cost me over a month of time as I waited for them to research a solution for the problem they were able to reproduce. Their “solution” was to give up on the update and install Windows 11 after having cleared the partitions on the M.2 boot drive.
I have worked with Intel since 1986 to support your efforts to interact with Microsoft. I’m sorely disappointed that this problem could not have been resolved in a more timely manner.
As it is, the system is back up and running.
Hello BetaV
Thank you for your response.
We understand that you have solved the problem after rebuilding the system from scratch and the system is back up and running. Thank you for taking the time to share feedback on how you fixed the issue, hopefully, this may help other users experiencing similar behavior.
iastoreE.sys is part of Intel® Rapid Storage Technology. We understand that the system has an Intel® Core™ i9-7900X X-series Processor, its Code Name is Skylake which refers to Intel’s 6th Generation Processors. It is worth noting that for Intel® Optane memory/Intel® RST products, drivers compatible with Windows® 11 are only available for 8th Generation Processors and newer. For more details, you may refer to this article: Is Intel® Optane™ Memory Supported on the Windows 11* OS?
We will proceed to close this request now. If you need any additional information, please submit a new question as this thread will no longer be monitored.
Best regards,
Andrew G.
Intel Customer Support Technician
![]()
-
All forum topics -
Previous topic -
Next topic
Community support is provided during standard business hours (Monday to Friday 7AM — 5PM PST). Other contact methods are available here.
Intel does not verify all solutions, including but not limited to any file transfers that may appear in this community. Accordingly, Intel disclaims all express and implied warranties, including without limitation, the implied warranties of merchantability, fitness for a particular purpose, and non-infringement, as well as any warranty arising from course of performance, course of dealing, or usage in trade.
For more complete information about compiler optimizations, see our Optimization Notice.
Попробуйте наш инструмент устранения неполадок
Выберите операционную систему
Выберите язык програмирования (опционально)
‘> 
Если вы продолжаете получать случайные синие экраны с iaStorA.sys (с кодом остановки DRIVER_IRQL_NOT_LESS_OR_EQUAL , Kmode_exception_not_handled и т.п.) в последнее время вы не одиноки. Многие пользователи сообщили то же самое. К счастью, это легко исправить…
Оба исправления ниже работают для Windows 10 , 8.1 и 7 . Возможно, вам не придется пробовать оба; просто работайте, пока не избавитесь от этого iaStorA.sys не удалось синий экран смерти проблема.
- Удалите драйверы IRST
- Обновите драйверы IRST
Исправление 1. Удалите драйверы IRST.
Этот Ошибка iaStorA.sys проблема в основном связана с Intel RST (технология быстрого хранения) , приложение для Windows для повышения производительности компьютера (в частности, неправильное использование драйверов IRST). Итак, сначала мы можем попробовать удалить их, чтобы посмотреть, поможет ли это решить проблему.
Для этого:
- На клавиатуре нажмите клавиша с логотипом Windows и р в то же время, затем введите devmgmt.msc в коробку и нажмите Войти .

- Дважды щелкните на IDE ATA / ATAPI . Затем щелкните правой кнопкой мыши на КАЖДЫЙ ПУНКТ ниже и нажмите Удалить устройство .
- Перезагрузите компьютер и посмотрите, iaStorA.sys проблема была исправлена. Если да, то поздравляю! Но если проблема не исчезнет, попробуйте Исправить 2 , ниже.
Исправление 2: Обновите драйверы IRST
Эта проблема также может возникнуть, если на вашем компьютере установлены неправильные или устаревшие драйверы IRST. Поэтому вам следует обновить драйверы IRST, чтобы увидеть, решит ли он проблему.Если у вас нет времени, терпения или навыков работы с компьютером для обновления драйверов вручную, вместо этого вы можете сделать это автоматически с помощью Водитель Easy .
Driver Easy автоматически распознает вашу систему и найдет для нее подходящие драйверы.Вам не нужно точно знать, на какой системе работает ваш компьютер, вам не нужно рисковать, загружая и устанавливая неправильный драйвер, и вам не нужно беспокоиться о том, чтобы сделать ошибку при установке. Driver Easy справится со всем .
Вы можете автоматически обновлять драйверы с помощью СВОБОДНЫЙ или Pro версия Driver Easy. Но с версией Pro требуется всего 2 клика (и вы получаете полную поддержку и 30-дневную гарантию возврата денег):
1) Скачать и установите Driver Easy.
2) Запустите Driver Easy и нажмите Сканировать сейчас кнопка. Driver Easy просканирует ваш компьютер и обнаружит проблемы с драйверами.
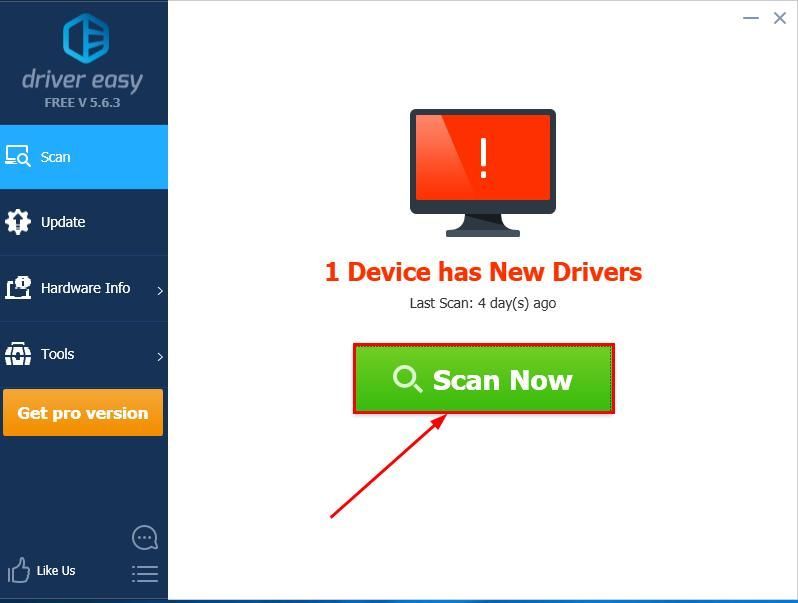
3) Нажмите Обновить все для автоматической загрузки и установки правильной версии всех драйверов, которые отсутствуют или устарели в вашей системе (для этого требуется Pro версия — вам будет предложено выполнить обновление, когда вы нажмете «Обновить все»).
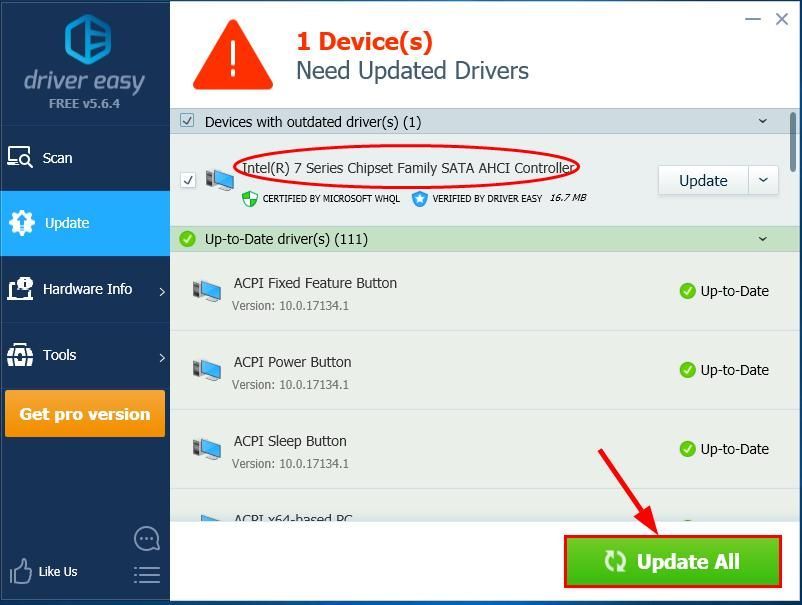
4) Перезагрузите компьютер и, надеюсь, проблема с iaStorA.sys решена.
Вот и все — два простых способа избавиться от мерзкого синего экрана смерти ( iaStorA.sys не удалось) проблема. Надеюсь, что статья соответствует своей цели, и не стесняйтесь оставлять нам комментарии ниже, если у вас есть дополнительные вопросы или идеи, которыми вы можете поделиться с нами. 🙂
Download Windows Speedup Tool to fix errors and make PC run faster
If you get the Blue Screen error on Windows 11/10 saying that iaStorAVC.sys failed, here are some tips to help you get rid of this issue. You need to follow all of them one after one to troubleshoot this BSOD, which is related to Intel Rapid Storage Technology.

To fix iaStorAVC.sys Blue Screen on Windows 11/10, follow these steps:
- Install or update IRST driver
- Remove and reinstall IRST driver
- Restart Intel Rapid Storage Technology service
- Enable AHCI
To learn more about these steps, continue reading.
1] Install or update IRST driver
If you are using an Intel chipset, it is recommended to install the Intel Rapid Storage Technology driver on your computer. It helps you establish a connection between your chipset and hard drive, which is one of the most important components. Although modern-day computers may not need this driver, it is highly recommended to install the driver on your PC. However, if you have already installed it a long time back, it is suggested to check for updates. If you recently installed a Windows Update, and the system broke after that, you can search for pending updates and install them accordingly.
You may use download, install, and update Intel Drivers with Intel Driver & Support Assistant.
2] Remove and reinstall IRST driver
As this Blue Screen error occurs mainly for the Intel Rapid Storage Technology driver, it is recommended to remove it once. If an internal conflict is blocking your system from running the IRST driver on your PC, you won’t be able to use your PC without any error.
That is why you can remove the IRST driver from your PC using the Device Manager. For that, do the following:
- Press Win+X to open WinX menu.
- Select Device Manager.
- Expand the Disk drives section.
- Right-click on the driver and select the Uninstall device option.
- Confirm the change.
- Insert the motherboard installation media.
- Install the Intel Rapid Storage Technology driver.
After that, you should not have any problems.
3] Restart Intel Rapid Storage Technology service
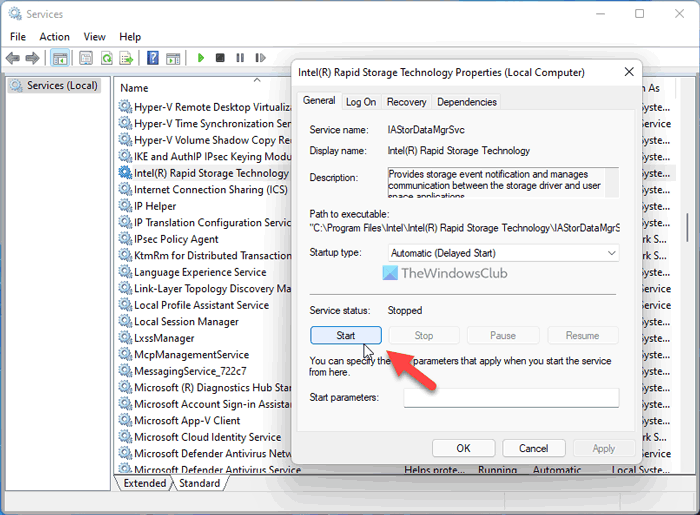
To run the IRST on your PC, a service runs in the background. It is called the Intel Rapid Storage Technology service. If it is stopped due to any reason, there is a chance of getting such an error. Therefore, follow these steps to verify if the service is running or not:
- Search for services and click on the individual search result.
- Double-click on the Intel Rapid Storage Technology service.
- Select Automatic from the drop-down list.
- Click the Start button.
However, if it was already running, you need to click the Stop button first.
4] Enable AHCI
If you have an old PC, you may get this problem due to not having the AHCI enabled. In that case, you can follow this guide to enable AHCI in Windows after installation to get rid of this problem.
UPDATE: The Intel Rapid Storage Technology and Intel Optane Memory applications have reached End of Life. It is best to update drivers via System manufacturers website or Windows Update now.
Related: Intel Rapid Storage Technology Service not working
How do I fix iaStorA.sys?
It is pretty straightforward to fix the iaStorA.sys BSOD error on Windows 11 and Windows 10. You can fix it by updating the Intel Rapid Storage Technology driver or Intel SATA/AHCI driver. However, if that doesn’t work, you can fix it by removing and reinstalling the same driver. For your information, you can do it with the help of the Device Manager.
How do I change my iaStorA.sys driver?
It is not possible to change the Intel Rapid Storage Technology driver on Windows 11/10 if you are using an Intel chipset. However, it is possible to update the driver if an update is pending. In that case, you need to download the update from the official manufacturer’s website. However, if you haven’t installed the driver, you need to find it on the CD given to you while purchasing the chipset.
That’s all! Hope this guide helped.
Read: Fix High CPU usage by IAStorDataSvc on Windows.
When he is not writing about Microsoft Windows or Office, Sudip likes to work with Photoshop. He has managed the front end and back end of many websites over the years. He is currently pursuing his Bachelor’s degree.
BSOD errors are one of the most painful things for Windows users and it is our bad luck that even the new Windows 11 is prone to these. The iaStorA.sys is one such BSOD error that is now being encountered by Windows 11 users too. BSOD errors are indications that your PC has encountered a fatal system error that can be due to software crashes or some kind of hardware fault. Talking specifically about the iaStorA.sys BSOD error, it comes with two kinds of error messages:
- DRIVER_IRQL_NOT_LESS_OR_EQUAL (iaStorA.sys) or
- SYSTEM_SERVICE_EXCEPTION (iaStorA.sys).
If you’re not aware of that then let me tell you that these errors point towards Intel Rapid Storage Technology (IRST) which is a driver file that helps to improve the performance and reliability of your SATA Disk-driven PC.
If you are also fed up with frequent encounters with this BSoD error here in this fixing guide I am going to share various ways to fix it. The methods described in this guide are also applicable to Windows 10 hence if you are encountering iaStorA.sys BSOD on Windows 10 this guide will be helpful for you as well.
As I have already told you that this error is related to some kind of issue with the Intel Rapid Storage Technology (IRST). But besides this, there can be other reasons too. For instance, there can be some unwanted background process running on the PC, any third-party app conflicting with the system, or maybe a corrupted Windows system file.
Based on this, here are the possible solutions to fix the iaStorA.sys BSOD error.
1. Close Background Services and Update your Windows
With the belief that there are some unusual and unnecessary background services running on your PC, stopping them can definitely help. Here’s how to do it.
1. Press Win + R to open the Run dialog box. Now enter msconfig and click OK.

2. This will open the System Configuration window on your PC. Switch to the Services tab and checkmark the Hide all Microfot Services option.

3. Now click on Disable all button and click on OK.

4. Next, search and open Settings and go Windows Update.
5. Click on the Check for Update button and if there is any pending update available, install it by following the on-screen instructions.

6. Finally, Restart your PC.
2. Reinstall Intel Rapid Storage Technology (IRST) Drivers
There can be some issues with the current IRST drivers installed on your PC. Hence removing and fresh installing the drives can solve the issue. Here’s the procedure to do so.
1. Search and open Device Manager.

2. Expand the IDE ATA/ATAPI controller section, right-click on the driver, and click on Uninstall device.

3. Uncheck the Delete the driver software for this device option and click on the Uninstall button. If there are multiple drivers listed under the IDE ATA/ATAPI controller section, make sure to uninstall all of them using the same procedure.
4. Restart your PC and again open the Device Manager.
5. Make sure our PC is connected to the internet and click on the Scan for hardware changes option in the Device Manager window. This will make Windows look for drivers on the next boot and install them automatically.

3. Update Intel Rapid Storage Technology (IRST) drivers
Since the issue is related to the Intel Rapid Storage Technology, updating its drivers is definitely a best practice to stay away from software-related glitches. Here’s how can update the IRST drivers.
1. Open a web browser like Google Chrome or Microsoft Edge and head over to the Intel IRST webpage.
2. From the version drop-down menu, select the latest version of IRST.

3. Now scroll down to the Available Downloads section and click on the download button saying Download setuprst.exe

4. Accept the terms to begin the downloading of the drivers.

5. Once downloaded, open the downloaded setuprst.exe file and install the drivers by following the on-screen instructions.
6. Finally, restart your PC.
4. Remove the Windows.old folder
When Windows receives a big system update, it automatically creates a folder with the name Windows.old, containing the files of the old Windows OS.
While this is to make sure you don’t lose any data, if there is any bug or corrupted file in there, it can cause the iaStorA.sys BSOD issue. Hence you should delete that folder.
Here are the steps.
1. Search and open Command Prompt as administrator.

2. Now execute the following commands in Command Prompt one by one:
3. Executing the above commands will delete Windows.old folder from your PC. Now just perform a restart of your PC and see if the issue is fixed.
5. Remove Suspicious 3rd-Party Apps
There can be some 3rd-party apps that are installed on your PC and are in conflict with the IRST drivers or the rest of the Windows OS. If you have a suspicion about any of the apps or if there is an app that is not from a reliable source, then you can try uninstalling that.
1. Open Settings by pressing Win + I on the keyboard.
2. Now go to Apps > Apps & features.

4. Scroll down and click on the three-dot menu next to the app that is under suspension and select Uninstall. Here I have demonstrated the step with the example of the NOX app.

5. Click on Uninstall again for final confirmation and follow the on-screen instructions to uninstall the app completely.
6. Finally, restart the PC.
6. Revert Back to the Previous Windows Restore Point
If you were not able to fix the iaStoreA.sys BSOD error then you should try rolling back to the previous Windows restore point where there was no such BSOD issue. But please note that this fix is only applicable to those Windows users who have previously created a System Restore Point.
1. Search and open the Create a Restore Point option.

2. Thsi will open the Switch to the System Properties Window. Switch to System Protection tab and click on the System Restore… button.

3. You will now be on the System Restore window. Click on Choose a different restore point option and hit on Next. You can also select the Recommended Restore if you want.

4. Now select the Restore Point and click on the Scan for affected programs button in order to detect the corrupt files on your system.
5. Again click on Next.

6. Finally, click on Finish and restart your PC.
7. Reset your Windows PC
Finally, if nothing works, the last try that you do is reset your Windows PC. This will delete the system files and folder and hence it is advised to back up your data.
Resetting the PC will restore all the system files, applications, and settings to their default state. Here’s how to reset Windows 11.
1. Open Windows Settings. You can press Win + I on your keyboard.
2. Now go to System > Recovery.

3. Under the Recovery options section click on the Reset PC button.

4. On the Reset this PC window, choose either of the options. I would advise you to select the Keep my files option to prevent the data loss.

5. Now, follow the on-screen instructions to complete the resetting process.
Here comes the end of this fixing guide and I am hoping that you have fixed the iaStorA.sys BSOD error on your Windows PC. This is definitely a quite frustrating error like any other BSoD error but it should be gone with simple fixes like updating or re-installing the IRST drivers.
But if not, you should bring your attention to the 3rd-party apps and also look for pending Windows updates. Lastly, if nothing works, then you can either restore to a previous System Restore Point, reset the PC or can perform a clean re-install of the Windows OS.
Also Read:
- How to Disable/Uninstall Your Phone App on Windows
- 2 Ways to Disable Lock Screen in Windows 11
- How to Fix 0x80888002 Update Error in Windows 11
- 3 Ways to Run File Explorer as Administrator in Windows
- 9 Ways to Fix 0x80070003 Windows Update Error