Компьютерные ошибки — обычное явление, и, хотя некоторые ошибки относительно безопасны, некоторые ошибки, такие как ошибки «Синего экрана смерти», могут быть более серьезными. Ошибки, такие как IO1_INITIALIZATION_FAILED, приведут к сбою Windows 10 и перезагрузке вашего компьютера, поэтому крайне важно исправить эти ошибки как можно скорее.
Исправить ошибку IO1 INITIALIZATION FAILED BSoD
Содержание:
- Обновите драйверы и Windows 10
- Запустите средство устранения неполадок BSOD
- Запустите сканирование SFC
- Запустите DISM
- Проверьте жесткий диск
- Отключить или удалить проблемное программное обеспечение
- Использовать командную строку
- Измените режим контроллера диска с RAID или AHCI на SATA / ATA
- Проверьте ваше оборудование
Решение 1. Обновите драйверы и Windows 10
Драйверы являются неотъемлемой частью каждой операционной системы, поскольку они позволяют вашему компьютеру использовать ваше оборудование. В случае, если определенный драйвер не работает должным образом или если у него есть проблемы с совместимостью с Windows 10, вам придется обновить его, чтобы избежать ошибки BSoD. Чтобы обновить драйвер, вам просто нужно посетить веб-сайт производителя оборудования и загрузить последние версии драйверов для вашего устройства. Важно обновить как можно больше драйверов, поэтому обязательно загрузите драйверы для материнской платы, набора микросхем и всех других основных компонентов. Кроме того, вы также можете использовать Диспетчер устройств для загрузки всех необходимых драйверов, но обычно лучше загружать драйверы вручную напрямую от производителя.
Загрузка драйверов важна, но более важно поддерживать Windows 10 в актуальном состоянии с последними обновлениями. Многие обновления приносят новые функции и улучшения безопасности, но самое главное, эти обновления исправляют многие ошибки и проблемы совместимости с определенным оборудованием и программным обеспечением. Поскольку аппаратная и программная совместимость является частой причиной ошибок BSoD, таких как IO1_INITIALIZATION_FAILED, вы можете понять, почему важно регулярно обновлять Windows 10.
Обновлять драйверы автоматически
Поиск драйверов самостоятельно может занять много времени. Поэтому мы советуем вам использовать инструмент, который сделает это автоматически. Использование автоматического средства обновления драйверов, безусловно, избавит вас от необходимости поиска драйверов вручную и всегда будет поддерживать вашу систему в курсе последних версий драйверов.
Модуль обновления драйверов Tweakbit (одобрен Microsoft и Norton Antivirus) поможет вам автоматически обновлять драйверы и предотвратить повреждение ПК, вызванное установкой неправильных версий драйверов. После нескольких испытаний наша команда пришла к выводу, что это наиболее автоматизированное решение.
Вот краткое руководство о том, как его использовать:
- Загрузите и установите TweakBit Driver Updater
- После установки программа начнет сканирование вашего компьютера на наличие устаревших драйверов автоматически. Driver Updater проверит установленные вами версии драйверов по своей облачной базе данных последних версий и порекомендует правильные обновления. Все, что вам нужно сделать, это дождаться завершения сканирования.
- По завершении сканирования вы получите отчет обо всех проблемных драйверах, найденных на вашем ПК. Просмотрите список и посмотрите, хотите ли вы обновить каждый драйвер по отдельности или все сразу. Чтобы обновить один драйвер за раз, нажмите ссылку «Обновить драйвер» рядом с именем драйвера. Или просто нажмите кнопку «Обновить все» внизу, чтобы автоматически установить все рекомендуемые обновления.
Примечание. Некоторые драйверы необходимо устанавливать в несколько этапов, поэтому вам придется нажимать кнопку «Обновить» несколько раз, пока не будут установлены все его компоненты.
Решение 2. Запустите средство устранения неполадок BSOD
Если обновление драйверов не завершило работу, давайте попробуем встроенный инструмент устранения неполадок Windows 10. Этот инструмент предназначен для решения различных системных проблем, включая проблемы BSOD. Таким образом, это также может быть полезно при устранении ошибки IO1_INITIALIZATION_FAILED.
Вот как запустить встроенный инструмент устранения неполадок Windows 10:
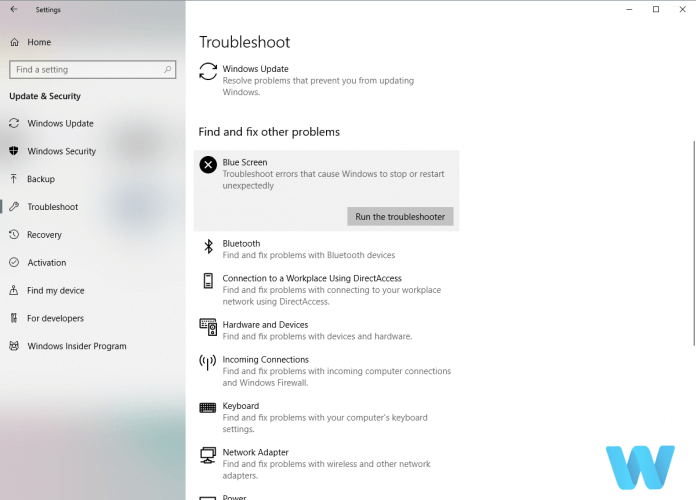
- Откройте приложение «Настройки» и перейдите в раздел « Обновление и безопасность ».
- Выберите « Устранение неполадок» в меню слева.
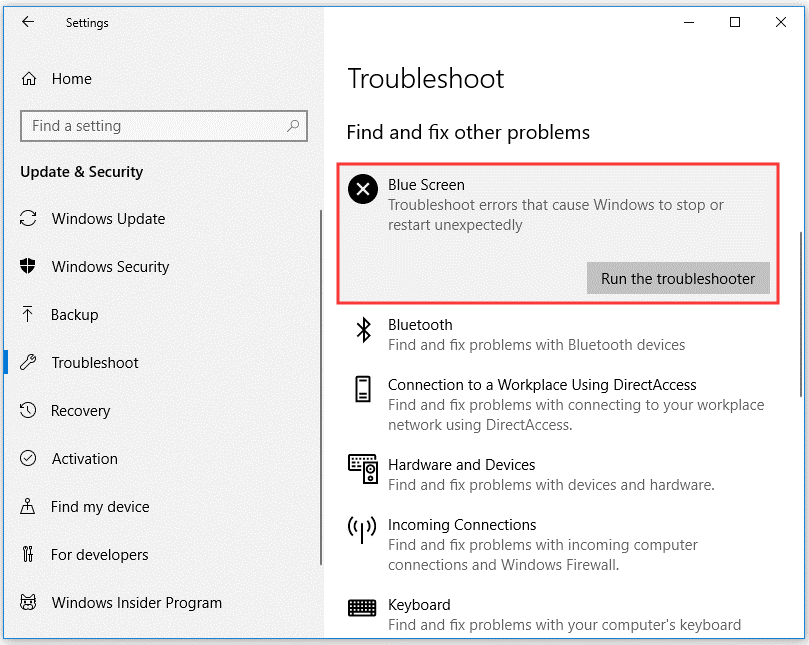
- Выберите BSOD на правой панели и нажмите Запустить средство устранения неполадок.
- Следуйте инструкциям на экране для устранения неполадок.
Решение 3 — Запустите сканирование SFC
Другой инструмент устранения неполадок, который мы собираемся попробовать здесь, — это сканирование SFC. Проверка системных файлов — это инструмент командной строки, который в основном просматривает вашу систему в поисках потенциальных проблем. Если поврежденный системный файл является проблемой, этот инструмент автоматически восстановит его, и проблема будет решена.
Вот как запустить сканирование SFC в Windows 10:
- Перейдите в Поиск, введите cmd и откройте командную строку от имени администратора.
- Введите следующую строку и нажмите Enter: SFC / SCANNOW
- Подождите, пока процесс не закончится (это дольше).
- Если инструмент найдет поврежденный системный файл, он автоматически восстановит его.
- Теперь закройте командную строку и перезагрузите компьютер.
Решение 4 — Запустите DISM
И третье средство устранения неполадок, которое мы собираемся попробовать здесь, это DISM. Этот инструмент повторно развертывает образ системы и устраняет возможные проблемы на этом пути. Таким образом, возможно, что запуск DISM также разрешит ошибку IO1_INITIALIZATION_FAILED.
Мы расскажем вам как о стандартной, так и о процедуре, которая использует установочный носитель ниже:
- Стандартный способ
- Щелкните правой кнопкой мыши Пуск и откройте командную строку (администратор).
- Вставьте следующую команду и нажмите Enter:
-
- DISM / Online / Cleanup-Image / RestoreHealth
-
- Подождите, пока сканирование не закончится.
- Перезагрузите компьютер и попробуйте обновить снова.
- С установочного носителя Windows
- Вставьте установочный носитель Windows.
- Щелкните правой кнопкой мыши меню «Пуск» и выберите в меню «Командная строка» («Администратор»).
- В командной строке введите следующие команды и нажмите Enter после каждого:
- dism / online / cleanup-image / scanhealth
- dism / online / cleanup-image / restorehealth
- Теперь введите следующую команду и нажмите Enter:
- DISM / Online / Cleanup-Image / RestoreHealth /source:WIM:X:SourcesInstall.wim:1 / LimitAccess
- Обязательно измените значение X с буквой подключенного диска при установке Windows 10.
- После завершения процедуры перезагрузите компьютер.
Решение 5 — Проверьте жесткий диск
Если ваш жесткий диск поврежден, проблемы с BSOD более чем возможны. Чтобы устранить сомнения, вы должны запустить chkdsk, который сканирует все ваши разделы и решает потенциальные проблемы (если это возможно). Так что, если виновник IO1_INITIALIZATION_FAILED — поврежденный жесткий диск, этот инструмент, скорее всего, решит проблему.
Вот как запустить команду chkdsk в Windows 10:
- Войдите в расширенный запуск (перезагрузите компьютер, удерживая клавишу Shift).
- Выберите « Устранение неполадок»> «Дополнительные параметры».
- Выберите Командная строка из списка параметров.
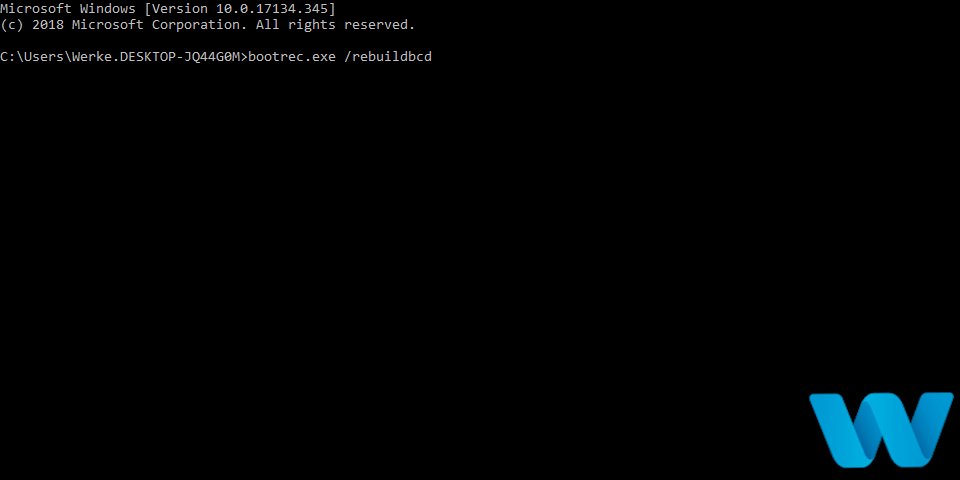
- Когда появится командная строка, введите следующие строки и нажмите Enter после каждой строки, чтобы запустить ее:
- bootrec.exe / rebuildbcd
- bootrec.exe / fixmbr
- bootrec.exe / fixboot
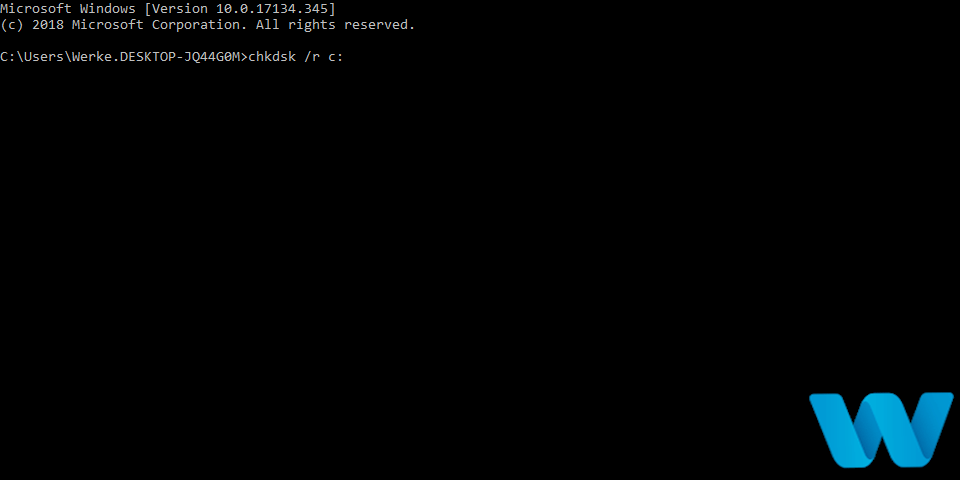
- Некоторые пользователи также рекомендуют запускать дополнительные команды chkdsk. Для выполнения этих команд вам необходимо знать буквы дисков для всех разделов жесткого диска. В командной строке вы должны ввести следующее (но не забудьте использовать буквы, которые соответствуют разделам вашего жесткого диска на вашем ПК):
- chkdsk / rc:
- c hkdsk / rd:
Это только наш пример, так что имейте в виду, что вы должны выполнять команду chkdsk для каждого раздела жесткого диска, который у вас есть.
- Перезагрузите компьютер и проверьте, решена ли проблема.
Решение 6. Отключите или удалите проблемное программное обеспечение
Определенное программное обеспечение может иметь проблемы с Windows 10, и это может быть частой причиной ошибки BSoD. Чтобы исправить эту ошибку, важно найти и удалить проблемное программное обеспечение. Иногда проблема может быть вызвана недавно установленной или обновленной программой, поэтому вам нужно найти проблемное программное обеспечение и удалить его.
- ЧИТАЙТЕ ТАКЖЕ: Исправлено: ошибка «Исключение доступа» в Windows 10
Стоит отметить, что антивирусное программное обеспечение является распространенной причиной всех видов ошибок BSoD, включая IO1_INITIALIZATION_FAILED, поэтому рекомендуется удалять любые сторонние антивирусные программы. Удаление антивирусного программного обеспечения может не решить проблему, поскольку антивирусные программы, как правило, оставляют определенные файлы и записи реестра после их удаления. Чтобы полностью удалить определенный антивирус, вам нужно скачать специальный деинсталлятор. Многие антивирусные компании имеют эти инструменты на своих веб-сайтах, поэтому обязательно загрузите один из них для своей антивирусной программы.
Вы также можете решить эту проблему, отключив все приложения и службы. Для этого выполните следующие действия:
- Нажмите Windows Key + R и введите msconfig. Нажмите Enter или нажмите OK.

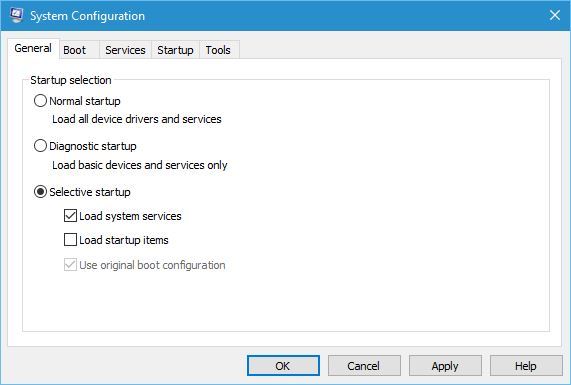
- Откроется окно конфигурации системы. Выберите Выборочный запуск и снимите флажок Загружать элементы запуска.
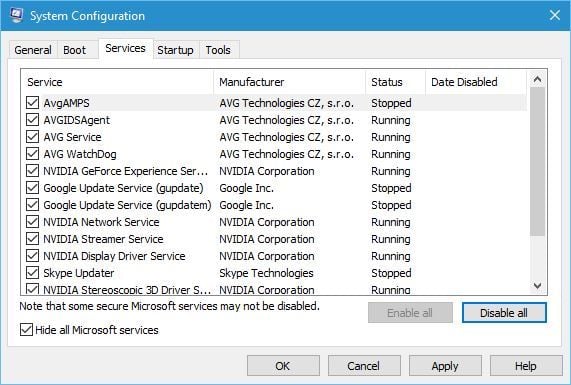
- Перейдите на вкладку « Услуги ». Установите флажок Скрыть все службы Microsoft и нажмите кнопку Отключить все.
- Нажмите Apply и OK, чтобы сохранить изменения.
- Нажмите Ctrl + Shift + Esc, чтобы запустить диспетчер задач.
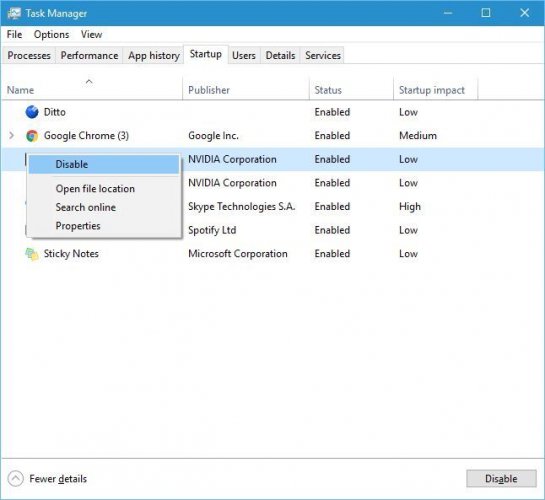
- Когда откроется диспетчер задач, перейдите на вкладку « Автозагрузка ». Щелкните правой кнопкой мыши каждую запись в списке и выберите « Отключить» в меню.
- Перезагрузите компьютер.


Как только ваш компьютер загрузится, проверьте, правильно ли работает ваш компьютер. Если ошибок BSoD нет, возможно, ваша проблема вызвана одним из отключенных приложений. Теперь вам нужно повторить те же шаги и включить приложения одно за другим, пока вы не найдете тот, который вызывает эту ошибку.
Решение 7. Используйте командную строку
Немногие пользователи сообщили, что им удалось решить эту проблему с помощью командной строки. Для этого выполните следующие действия:
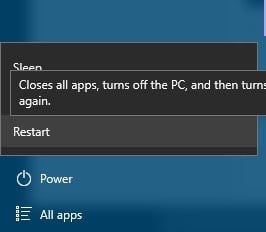
- Перезагрузите компьютер во время загрузки. Повторяйте этот шаг, пока не начнется процесс автоматического восстановления. Кроме того, вы можете просто удерживать Shift на клавиатуре и нажать кнопку « Перезагрузить».
- Выберите « Устранение неполадок»> «Дополнительные параметры»> «Командная строка».
- Когда откроется командная строка, введите следующие строки и нажмите Enter после каждой строки:
- cd / dc: windowssystem32config
- по умолчанию
- Del Sam
- дель безопасность
- Del Software
- дель система
- копия c: windowsrepairdefault
- копия c: windowsrepairsam
- копия c: windowsrepairsecurity
- копия c: windowsrepairsoftware
- копия c: windowsrepairsystem
- Выход
Теперь перезагрузите компьютер и проверьте, решена ли проблема.
Решение 8. Измените режим контроллера диска с RAID или AHCI на SATA / ATA
Если вы установили режим Disk Controller на RAID или AHCI, но у вас нет необходимых драйверов для него, вы можете получить ошибку IO1_INITIALIZATION_FAILED. Чтобы решить эту проблему, вам нужно установить режим контроллера диска на SATA / ATA. Для этого вам необходимо войти в BIOS и изменить необходимые настройки. Для получения подробных инструкций обязательно ознакомьтесь с руководством по материнской плате.
Решение 9 — Проверьте ваше оборудование
Если проблема не устранена, это может быть связано с неисправным или недавно установленным оборудованием. Если вы недавно установили новое оборудование, обязательно удалите его или замените. Кроме того, проверьте, правильно ли работает ваше оборудование. Ошибки такого типа часто возникают из-за проблем с ОЗУ или материнской платой, поэтому сначала проверьте эти компоненты. Чтобы найти причину проблемы, обязательно проведите подробный анализ вашего оборудования.
Ошибка IO1_INITIALIZATION_FAILED может вызвать проблемы, но, как и многие другие ошибки BSoD, эта, скорее всего, вызвана неисправным оборудованием. Перед заменой оборудования обязательно попробуйте другие решения из этой статьи.
- Читайте также: исправить ошибку Dxgkrnl.sys в Windows 10
by Milan Stanojevic
Milan has been enthusiastic about technology ever since his childhood days, and this led him to take interest in all PC-related technologies. He’s a PC enthusiast and he… read more
Updated on
- The IO1_INITIALIZATION_FAILED Windows 10 error crashes your system and restarts your PC.
- It’s important to update your drivers to avoid getting a stop code initialization_failed error.
- Note that glitchy hardware components can easily lead to Io1_initialization_failed on a Windows 10 boot.
- Find below a few general but useful Command Prompt scans that will help detect and correct system errors such as this one.

Computer errors are a common occurrence, and while some issues are relatively harmless, certain ones such as Blue Screen of Death errors can be more severe.
For example, IO1_INITIALIZATION_FAILED, will crash Windows 10 and restart your PC.
Therefore it’s crucial to fix these problems as soon as you can, considering the fact that no issue is always resolved with the easiest troubleshooting step.
Use the solutions in this article to fix this issue.
How can I fix a Windows 10 io1_initialization_failed issue?
- Update your drivers and Windows 10
- Run the BSOD Troubleshooter
- Run the SFC scan
- Run DISM
- Check the hard drive
- Disable or remove the problematic software
- Use Command Prompt
- Change Disk Controller mode from RAID or AHCI to SATA/ATA
- Check your hardware
1. Update your drivers and Window 10
Drivers are an integral part of every operating system since they allow your PC to utilize your hardware.
In case a certain driver isn’t working properly or it has compatibility issues with Windows 10, you’ll have to update it in order to avoid getting BSoD errors.
To update a driver, you just need to visit your hardware manufacturer’s website and download the latest drivers for your device.
It’s important to update as many drivers as you can, so be sure to download drivers for your motherboard, chipset, and every other major component.
Alternatively, you can also use Device Manager to download all the necessary drivers, but it’s usually better to download the drivers manually directly from the manufacturer.
Downloading drivers is important, but it’s more important to keep Windows 10 up-to-date with the latest updates.
How we test, review and rate?
We have worked for the past 6 months on building a new review system on how we produce content. Using it, we have subsequently redone most of our articles to provide actual hands-on expertise on the guides we made.
For more details you can read how we test, review, and rate at WindowsReport.
Many updates bring new features and security improvements, but most importantly, these updates fix many bugs and compatibility issues with certain hardware and software.
Since hardware and software compatibility is the common cause for BSoD errors such as IO1_INITIALIZATION_FAILED, you can see why it’s important that you update Windows 10 on a regular basis.
Update drivers automatically
Searching for drivers on your own can be time-consuming. So, we advise you to use a tool that will do this for you automatically.
Using an automatic driver updater will certainly save you from the hassle of searching for drivers manually, and it will always keep your system up-to-date with the latest drivers.
⇒ Get Outbyte Driver Updater
2. Run the BSoD Troubleshooter
- Open the Settings app and go to Update & Security section.
- Select Troubleshoot from the menu on the left.
- Select BSoD from the right pane and click Run the troubleshooter.

- Follow the instructions on the screen to complete the troubleshooter.
Note: If you are running on update version 1809 or later you will need to access the BSoD troubleshooter on the Microsoft website, go to the bottom of the page and answer the questions available there for possible fixes.
Does the troubleshooter fail to load with an error? Follow this useful guide and fix it in just a couple of simple steps.
3. Run the SFC scan
- Go to Search, type cmd, and open Command Prompt as Administrator.
- Enter the following line and press Enter: sfc/scannow

- Wait until the process finishes.
- If the tool finds a corrupt system file, it will automatically repair it.
- Now, close the Command Prompt and restart your computer.
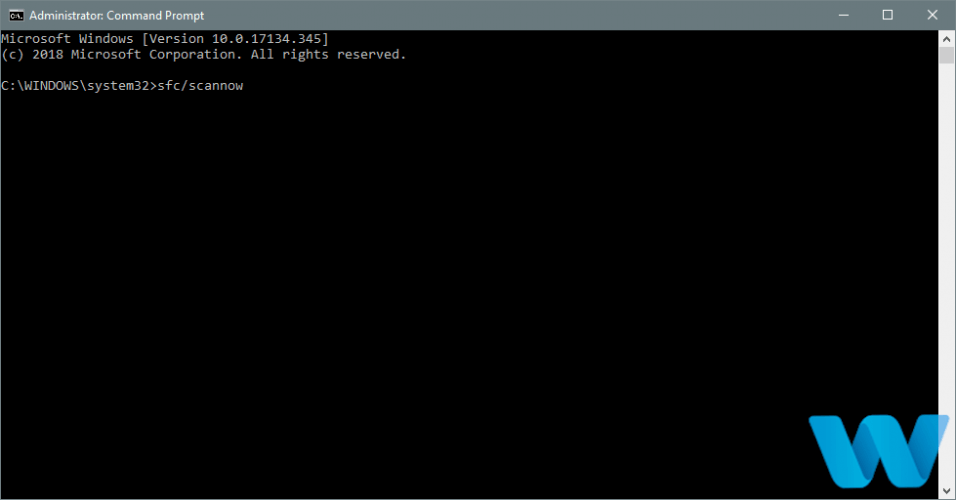
The System file checker is a command-line tool that basically scans through your system searching for potential issues. If a corrupted system file is a problem, this tool will automatically repair it, and the problem will be resolved.
If you’re having trouble accessing Command Prompt as an admin, then you better take a closer look at this guide.
4. Run DISM
- The standard way
- Right-click Start and open Command Prompt (Admin).
- Paste the following command and press Enter:
DISM /Online /Cleanup-Image /RestoreHealth
- Wait until the scan is finished.
- Restart your computer and try updating again.

The DISM tool re-deploys the system image and resolves potential issues along the way. So, it’s possible that running DISM will also resolve the IO1_INITIALIZATION_FAILED error.
Does it seem that everything is lost when DISM fails on Windows? Check out this quick guide and get rid of the worries.
- With the Windows installation media
- Insert your Windows installation media.
- Right-click the Start menu and, from the menu, choose the Command Prompt (Admin).
- In the command line, type the following commands and press Enter after each:
dism /online /cleanup-image /scanhealthdism /online /cleanup-image /restorehealth
- Now, type the following command and press Enter:
DISM /Online /Cleanup-Image /RestoreHealth /source:WIM:X:SourcesInstall.wim:1 /LimitAccess
- Make sure to change an X value with the letter of the mounted drive with Windows 10 installation.
- After the procedure is finished, restart your computer.
5. Check the hard drive
- Enter the Advanced Startup (Restart your computer while holding the Shift key).
- Choose Troubleshoot > Advanced Options.
- Select Command Prompt from the list of options.
- When Command Prompt appears, enter the following lines and press Enter after each line in order to run it:
bootrec.exe /rebuildbcd
bootrec.exe /fixmbrbootrec.exe /fixboot
- Some users are also suggesting that you need to run additional chkdsk commands as well. To perform these commands, you need to know drive letters for all your hard drive partitions. In Command Prompt you should enter the following (but remember to use the letters that match your hard drive partitions on your PC):
chkdsk /r c:chkdsk /r d:This is just our example, so keep in mind that you have to perform chkdsk command for every hard drive partition that you have.
- Restart your computer and check if the issue is resolved.
If your hard drive is damaged, BSoD issues are more than possible. To eliminate the doubt, you should run the chkdsk, which scans all your partitions and resolves potential problems (if possible). So if the culprit of the IO1_INITIALIZATION_FAILED is a corrupt hard drive, this tool will likely resolve the problem.
6. Disable or remove the problematic software
- Press Windows Key + R and enter msconfig. Press Enter or Click OK.

- System Configuration window will open. Select Selective startup and uncheck Load startup items.

- Navigate to Services tab. Check Hide all Microsoft services and click the Disable all button.
- Click Apply and OK to save changes.
- Press Ctrl + Shift + Esc to start Task Manager.
- When Task Manager opens, navigate to Startup tab. Right-click each entry on the list and choose Disable from the menu.

- Restart your computer.

Once your computer boots, check if your PC is working properly. If there are no BSoD errors, your problem is probably caused by one of the disabled applications. Now you need to repeat the same steps and enable applications one by one until you find the one that is causing this error.
Certain software might have issues with Windows 10 and that can be a common cause for BSoD error. In order to fix this error, it’s important to find and remove the problematic software.
Sometimes problems can be caused by a recently installed or updated program, therefore you need to locate the problematic software and remove it.
It’s worth mentioning that antivirus software is the common cause for all sorts of BSoD errors, including IO1_INITIALIZATION_FAILED, therefore it’s advised to remove any third-party antivirus programs.
Uninstalling the antivirus software might not fix the problem since antivirus programs tend to leave certain files and registry entries once you remove them. To completely remove a certain antivirus you need to download a dedicated uninstaller.
Many antivirus companies have these tools on their websites, so be sure to download one for your antivirus program.
Can’t open Task Manager? Don’t worry, we’ve got the right solution for you.
7. Use Command Prompt
- Restart your computer while it boots. Repeat this step until Automatic Repair process starts. Alternatively, you can just hold Shift on your keyboard and click the Restart button.

- Choose Troubleshoot > Advanced options > Command Prompt.
- Once the Command Prompt opens, enter the following lines and press Enter after each line:
cd /d c:windowssystem32configdel defaultdel samdel securitydel softwaredel systemcopy c:windowsrepairdefaultcopy c:windowsrepairsamcopy c:windowsrepairsecuritycopy c:windowsrepairsoftwarecopy c:windowsrepairsystemexit
Now restart your computer and check if the issue is resolved. If you get stuck on the Automatic repair loop, don’t worry. We’ll throw you this amazing lifeline.
8. Change Disk Controller mode from RAID or AHCI to SATA/ATA
If you set your Disk Controller mode to RAID or AHCI, but you don’t have the necessary drivers for it, you might get an IO1_INITIALIZATION_FAILED error. To fix this problem you need to set the Disk Controller mode to SATA/ATA.
To do this, you’ll need to enter BIOS and change the necessary settings. For detailed instructions be sure to check your motherboard manual.
Accessing BIOS seems too big of a task? Let us make things easier for you with the help of this amazing guide.
9. Check your hardware
If the problem persists, it might be due to faulty or recently installed hardware. If you installed any new hardware recently, be sure to remove it or replace it. In addition, check if your hardware is working properly.
These types of errors are often caused by RAM or motherboard issues, so be sure to check those components first. To find the cause of the problem be sure to perform a detailed examination of your hardware.
IO1_INITIALIZATION_FAILED error can cause you problems, but just like many other BSoD errors, this one is most likely caused by faulty hardware. Before you replace your hardware, be sure to try other solutions from this article.
Don’t hesitate to reach in the comments section below for any other questions or suggestions that you may have.
![]()
Skip to content
Как убрать IO1_INITIALIZATION_FAILED (0x00000069)?
Как убрать « IO1_INITIALIZATION_FAILED» ( 0x00000069)?
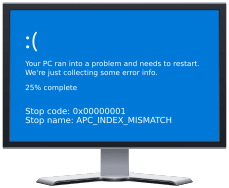
На компьютере или ноутбуке под управлением Windows появился «синий экран смерти»? После появления сообщения «
IO1_INITIALIZATION_FAILED» (
0x00000069) система перезагружается? Ищите как исправить
0x00000069: «
IO1_INITIALIZATION_FAILED»?
Как просмотреть информацию об ошибках, исправить ошибки в Windows 10, 8 или 7
Причины появления ошибки
- На жестком диске компьютера или ноутбука не достаточно места. Для правильной работы ОС Windows 10 на системном диске должно быть свободно 2 — 10 ГБ.
- На компьютер был установлен не совместимый BIOS или прошивка была повреждена.
- Установлены не совместимые с ОС драйвера устройств.
- Реестр Windows был поврежден или удален. Возможно в результате очистки были удалены системные ключи реестра.
- Ативирусное программное обеспечение или компьютерные вирусы могут заблокировать системные файлы или удалить важные ключи реестра.
- В результате ошибок в работе программы для резервного копирования.
- В результате обновления ОС Windows.
Актуально для ОС: Windows 10, Windows 8.1, Windows Server 2012, Windows 8, Windows Home Server 2011, Windows 7 (Seven), Windows Small Business Server, Windows Server 2008, Windows Home Server, Windows Vista, Windows XP, Windows 2000, Windows NT.
Вот несколько способов исправления ошибки «
IO1_INITIALIZATION_FAILED»:
Восстановите удаленные файлы
Часто появление BSoD ошибок приводит к утери важных файлов. Блокировка файлов компьютерными вирусами, ошибки в работе программ для резервного копирования, повреждение или перезапись системных файлов, ошибки файловой системы или наличие битых секторов диска – это не далеко полный список причин удаления данных.
Исправление соответствующих ошибок восстановит работоспособность устройства, но не всегда восстановит повреждённые или утерянные файлы. Не всегда имеется возможность устранить ту или иную ошибку без форматирования диска или чистой установки операционной системы, что также может повлечь за собой утерю файлов.
Загрузите бесплатно и просканируйте ваше устройство с помощью Hetman Partition Recovery. Ознакомьтесь с возможностями программы и пошаговой инструкцией.
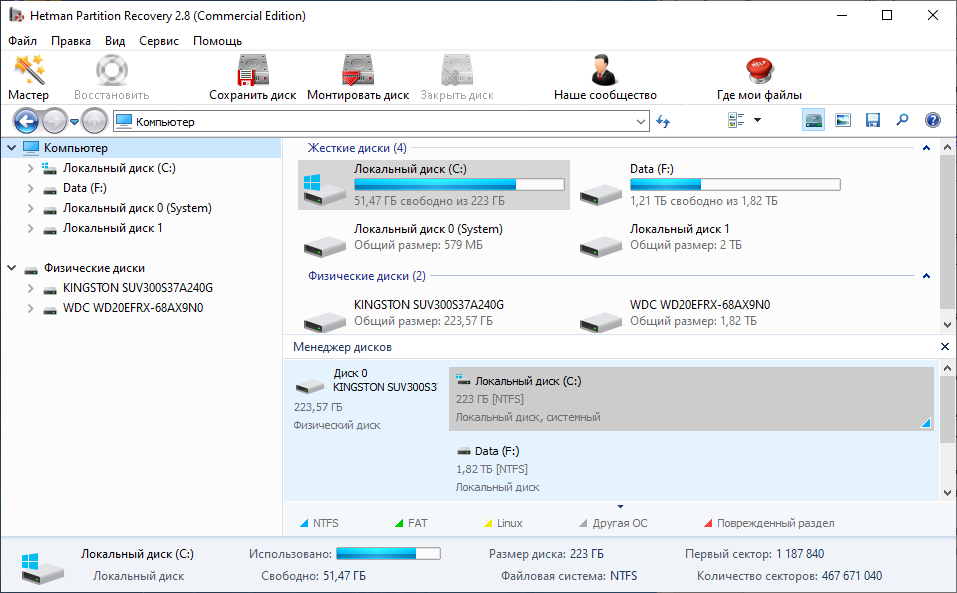
Программа для восстановления данных
Запустите компьютер в «безопасном режиме»
Если ошибка «IO1_INITIALIZATION_FAILED» (0x00000069) возникает в момент загрузки Windows и блокирует любую возможность работы с системой, попробуйте включить компьютер в «безопасном режиме». Этот режим предназначен для диагностики операционной системы (далее ОС), но функционал Windows при этом сильно ограничен. «Безопасный режим» следует использовать только если работа с системой заблокирована.
Чтобы запустить безопасный режим сделайте следующее:
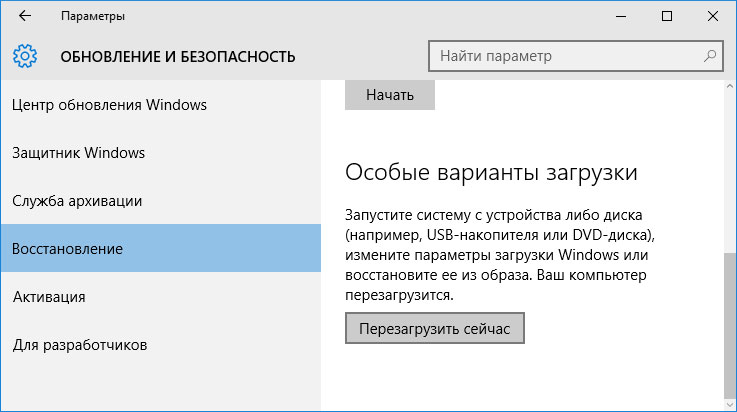
- Перейдите в меню Пуск и выберите Параметры.
- В открывшемся окне параметров перейдите в меню Обновление и Безопасность и выберите раздел Восстановление.
- В разделе Восстановление найдите Особые варианты загрузки и нажмите кнопку Перезагрузить сейчас.
- После этого Windows перезагрузится и предложит выбрать следующее действие. Выберите Поиск и устранение неисправностей.
- В меню Поиск и устранение неисправностей кликните на Дополнительные параметры, далее — Параметры загрузки.
- Далее Windows уведомит вас о том, что компьютер можно перезагрузить с использованием дополнительных параметров загрузки. Укажите — Включить безопасный режим. Нажмите Перезагрузить.
- После перезагрузки выберите Включить безопасный режим нажав клавишу F4.
Как загрузить Windows в безопасном режиме
Обновите драйвер через Диспетчер устройств
Вы установили новое аппаратное обеспечение на компьютере? Возможно вы начали использовать новое USB-устройство с вашим компьютером. Это могло привести к ошибке «IO1_INITIALIZATION_FAILED». Если вы установили драйвер устройства используя диск, который поставляется вместе с ним, или использовали драйвер не c официального сайта Microsoft, то причина в нем. Вам придется обновить драйвер устройства, чтобы устранить эту проблему.
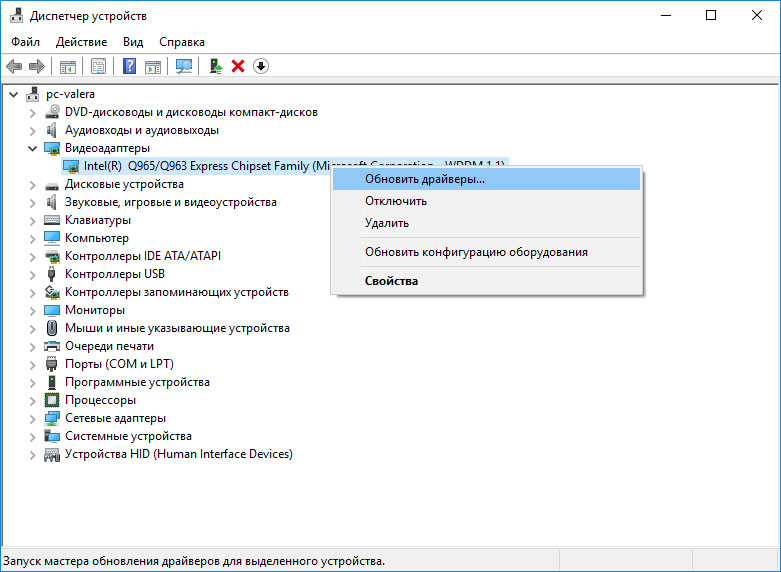
Вы можете сделать это вручную в диспетчере устройств Windows, для того выполните следующие инструкции:
- Нажмите кнопку Windows, затем введите диспетчер устройств с клавиатуры.
- Выберите Диспетчер устройств из списка.
- Просмотрите список категорий устройств, нажмите на стрелочку рядом с категорией вашего нового устройства. Драйвер может быть отмечен желтым треугольником.
- Кликните правой кнопкой мыши на имя устройства и нажмите Обновить драйвер.
- Далее откроется окно Мастера обновления драйверов с двумя опциями:
- Автоматический поиск обновленных драйверов. Windows проверит наличие наиболее подходящего драйвера для этого устройства в автоматическом режиме.
- Выполнить поиск драйверов на этом компьютере. Используйте эту опцию, что бы самостоятельно указать ОС файлы драйвера.
Перезагрузите компьютер после установки драйвера.
Используйте sfc /scannow для проверки всех файлов системы
Повреждение или перезапись системных файлов может привести к ошибке «IO1_INITIALIZATION_FAILED». Команда sfc находит поврежденные системные файлы Windows и заменяет их.
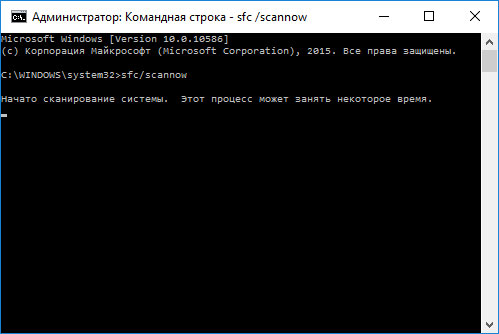
- Нажмите кнопку Windows, затем введите cmd с клавиатуры.
- Правой кнопкой мышки кликните на CMD и запустите от имени администратора.
- В окне командной строки введите sfc /scannow и нажмите Enter.
Этот процесс может занять несколько минут.
Как восстановить системные файлы Windows 10

Проверьте диск с Windows на наличие ошибок командой chkdsk c: /f
Возможно к синему экрану с «IO1_INITIALIZATION_FAILED» привела ошибка файловой системы или наличие битых секторов диска. Команда CHKDSK проверяет диск на наличие ошибок файловой системы и битых секторов. Использование параметра /f заставит программу автоматически исправлять найденные на диске ошибки, а параметр /r позволяет найти и «исправить» проблемные сектора диска. Для запуска следуйте инструкциям:
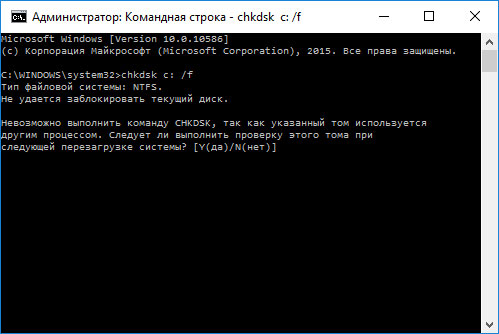
- Нажмите кнопку Windows, затем введите CMD с клавиатуры.
- Правой кнопкой мышки кликните на CMD и запустите от имени администратора.
- В окне командной строки введите chkdsk c: /f и нажмите Enter (используйте ту букву диска, на котором установлена ОС).
Дождитесь окончания процесса и перезагрузите компьютер.
Используйте режим совместимости со старой версией Windows
Отключите лишние программы из автозагрузки Windows
Программное обеспечение, вызывающее «IO1_INITIALIZATION_FAILED» (0x00000069), может быть прописано в автозагрузку Windows и ошибка будет появляться сразу после запуска системы без вашего участия. Удалить программы из автозагрузки можно с помощью Диспетчера задач.

- Загрузитесь в Безопасном режиме.
- Кликните правой кнопкой мышки на Панели задач, затем на пункте Диспетчер задач.
- Перейдите на вкладку Автозагрузка.
- Чтобы убрать ту или иную программу из автозагрузки выберите её из списка и отключите, нажав кнопку Отключить в правом нижнем углу окна.
Обратитесь в поддержку Microsoft
Microsoft предлагает несколько решений удаления ошибки «голубого экрана». «IO1_INITIALIZATION_FAILED» (0x00000069) можно убрать с помощью Центра обновления или обратившись в поддержку Windows.
- Перейдите на сайт технической поддержки Microsoft.
- Введите код и сообщение об ошибке в поисковую строку и следуйте найденным рекомендациям.
- Если вы не найдете готового решения, то задайте вопрос в сообществе — возможно вам ответит сертифицированный системный администратор.
Установите последние обновления системы
С обновлениями Windows дополняет базу драйверов, исправляет ошибки и уязвимости в системе безопасности. Загрузите последние обновления, что бы избавиться от ошибки «IO1_INITIALIZATION_FAILED» (0x00000069).
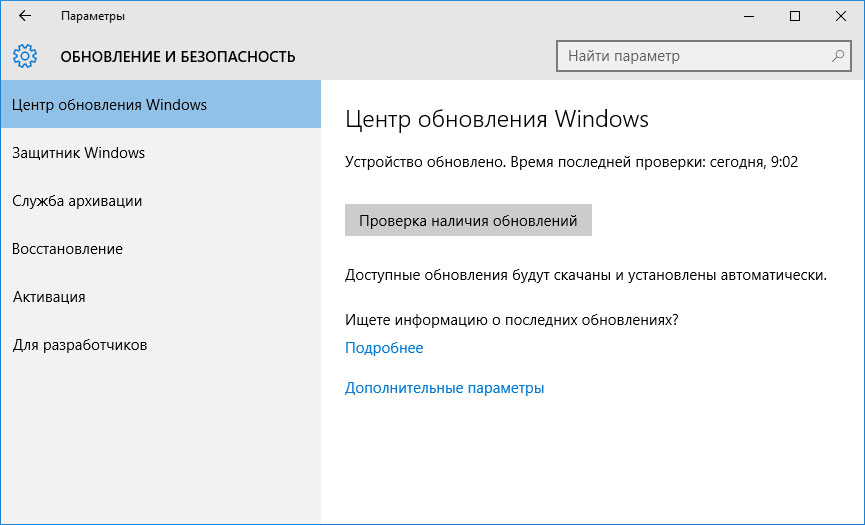
Запустить Центр обновления Windows можно следующим образом:
- Перейдите в меню Пуск и выберите Параметры.
- В окне Параметров перейдите в меню Обновление и Безопасность.
- Для установки последних обновлений Windows нажмите кнопку Проверка наличия обновлений и дождитесь окончания процесса их поиска и установки.
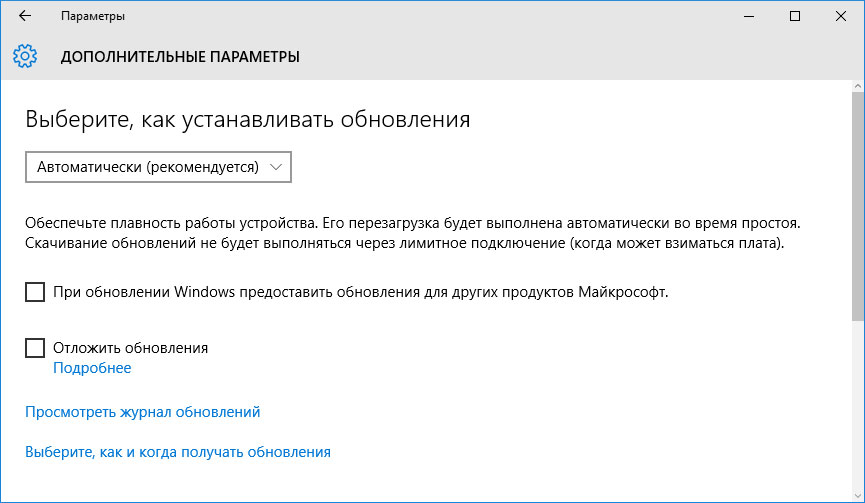
Рекомендуется настроить автоматическую загрузку и установку обновлений операционной системы с помощью меню Дополнительные параметры.
Чтобы включить автоматическое обновление системы необходимо запустить Центр обновления Windows:
- Перейдите в меню Пуск и выберите Параметры.
- В окне Параметров перейдите в меню Обновление и Безопасность и выберите подменю Центр обновления Windows. Для установки последних обновлений Windows нажмите кнопку Проверка наличия обновлений и дождитесь окончания процесса их поиска и установки.
- Перейдите в Дополнительные параметры и выберите, как устанавливать обновления — Автоматически.
Запустите проверку системы на вирусы
«Синий экран смерти» с ошибкой «IO1_INITIALIZATION_FAILED» 0x00000069 может вызывать компьютерный вирус, заразивший систему Windows.
Для проверки системы на наличие вирусов запустите установленную на компьютере антивирусную программу.
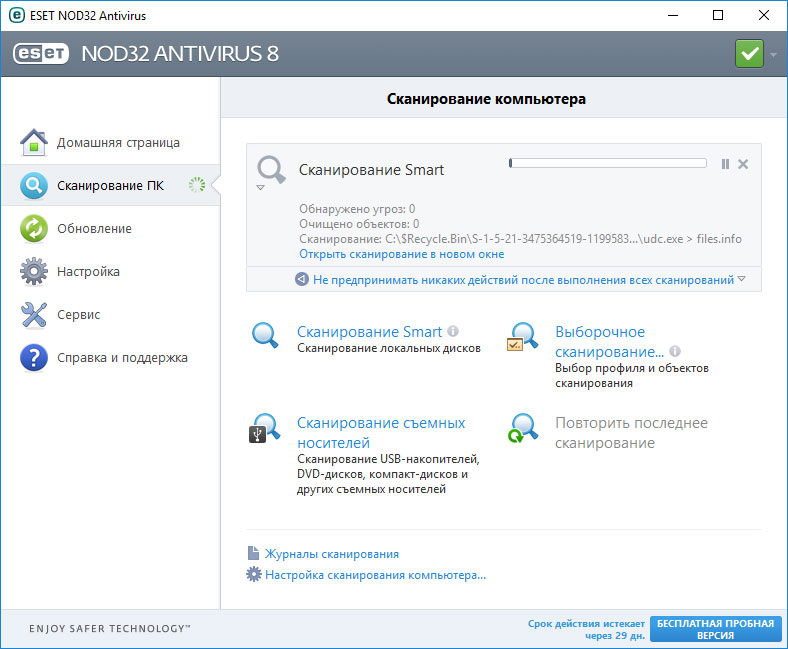
Современные антивирусы позволяют проверить как жесткие диски, так и оперативную память. Выполните полную проверку системы.
Выполните проверку оперативной памяти
Неполадки с памятью могут привести к ошибкам, потере информации или прекращению работы компьютера.
Прежде чем проверять оперативную память, отключите её из разъёма на материнской плате компьютера и повторно вставьте в него. Иногда ошибка IO1_INITIALIZATION_FAILED» вызвана неправильно или не плотно вставленной в разъём планкой оперативной памяти, или засорением контактов разъёма.
Если предложенные действия не привели к положительному результату, исправность оперативной памяти можно проверить средствами операционной системы, с помощью средства проверки памяти Windows.
Запустить средство проверки памяти Windows можно двумя способами:
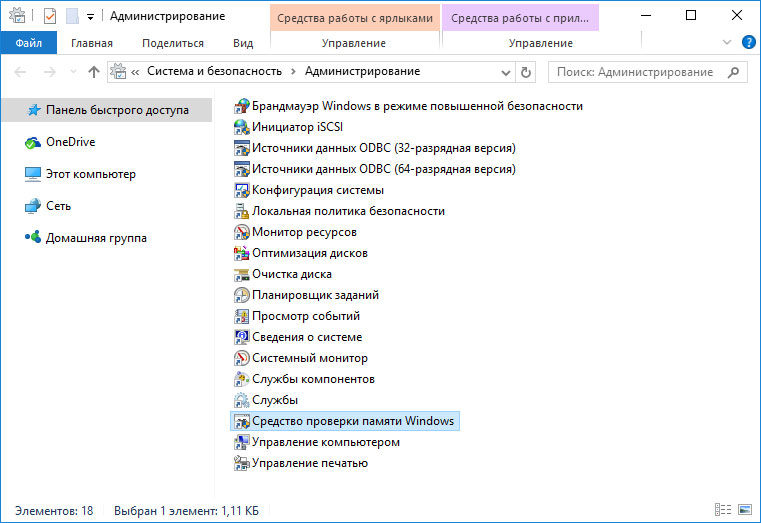
- С помощью Панели управления:

Перейдите в Панель управления / Система и безопасность / Администрирование. Запустите приложение Средство проверки памяти Windows.
- С помощью средства Выполнить:

Запустите средство Выполнить с помощью комбинации клавиш Windows + R. Наберите mdsched и нажмите Enter. После чего откроется средство проверки Windows.
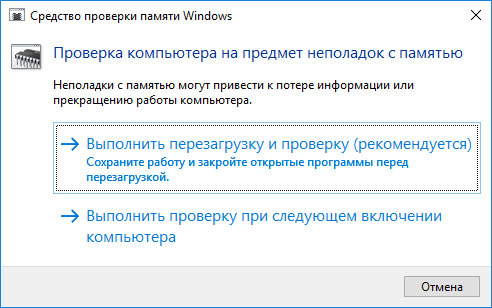
Для начала проверки выберите один из предлагаемых вариантов, проверка оперативной памяти в соответствии с которым будет запущена после перезагрузки компьютера.
Если в результате проверки будут определены ошибки, исправить которые не представляется возможным, то такую память необходимо заменить (замене подлежит модуль памяти с неполадками).
Выполните «чистую» установку Windows
Если не один из перечисленных методов не помог избавиться от IO1_INITIALIZATION_FAILED», попробуйте переустановить Windows. Для того чтобы выполнить чистую установку Windows необходимо создать установочный диск или другой носитель с которого планируется осуществление установки операционной системы.
Загрузите компьютер из установочного диска. Для этого может понадобиться изменить устройство загрузки в BIOS или UEFI для более современных компьютеров.
Следуя пунктам меню установщика укажите диск, на который вы хотите установить Windows. Для этого понадобится отформатировать его. Если вас не устраивает количество или размер локальных дисков, их можно полностью удалить и заново перераспределить.
Помните, что форматирование, удаление или перераспределения дисков удалит все файлы с жесткого диска.
После указания диска для установки Windows запуститься процесс копирования системных файлов и установки операционной системы. Во время установки от вас не потребуется дополнительных действий. В течении установки экран компьютера будет несколько раз гаснуть на непродолжительное время, и для завершения некоторых этапов установки компьютер будет самостоятельно перезагружаться.
В зависимости от версии Windows на одном из этапов от вас может понадобиться выбрать или внести базовые параметры персонализации, режим работы компьютера в сети, а также параметры учётной записи или создать новую.
После загрузки рабочего стола чистую установку Windows можно считать законченной.
Примечание. Прежде чем приступить к выполнению чистой установки Windows заранее побеспокойтесь о наличии драйверов ко всем установленным устройствам и сохранности ваших файлов. Загрузите и сохраните драйвера на отдельный носитель информации, а для важных данных создайте резервную копию.
Как сбросить Windows 10 к исходному состоянию
Как сбросить Windows 10, 8, 7 если компьютер не загружается
Blue Screen of death (BSOD) errors are one of the most harmful errors encountered by PCs because these errors only occur when there is some serious hardware, driver, or software problem. One of the most reported BSOD errors by users is I01 initialization failure.

This error can appear while starting the PC, upgrading the operating system to the latest version or casually doing routine work on Windows 10. Most of the BSOD errors occur if the initialization of the I/O system failed or due to some issues with the hardware components of the PC. The frequent occurrence of this error can result in system corruption, so it is crucial to fix this error to prevent any further damage to the system. Users usually end up with the following notification on their PC’s screen:
Pre-requisites:
We will recommend you opt for the following steps before proceeding towards solutions. These workarounds will fix some minor but critical issues of your system that may be a cause of the error under discussion and will surely help the users to choose the best-suited solution to the BSOD error in their system, from the next section. The possible workarounds are given below:
- Repair Corrupt Files: To avoid the BSOD error due to damaged system files, try to repair or restore them by the given steps:
Open “Command Prompt” > type “DISM.exe /Online /Cleanup-image /Restorehealth” > Press “Enter”.
Again, type “sfc /scannow” > Press “Enter”. - Repair Hard Drive Errors: It is better to run a hard drive repair mechanism to eliminate this possible cause of the error. To repair the hard drive errors, follow these steps:
Open “Command Prompt” > type “chkdsk/r C:” > press “Enter”.
Again, run the check disk command for the rest of the available disk drives. - Run Malware Scan: Sometimes malware can halt the Windows functions and cause BSOD error, as discussed in causes. Follow these steps to scan the system for malware: Windows Security>Virus and Threat Protection>Quick Scan.
- Update Windows: BSOD error due to outdated operating systems is something that can be solved by updating Windows with the latest security patches and feature updates. These updates fix many bugs and compatibility issues with certain hardware and software. Update your Windows following these steps:
Open “Settings”> “Update & Security” > “Windows Update” > “Check for updates”. - Update Drivers: Whenever Windows operating system is updated, your old drivers can conflict with the new operating system and can cause BSOD errors. That is why keeping them updated is mandatory. To update the particular device driver:
Open “Device Manager” > Expand “Display Adapters” >Select “device”> Right-click and select “Update Driver Software”. - Unplug Extra Hardware: Remove all external storage devices such as drives, docks, or any hardware you might have plugged into your device that you are not using currently.
Now let us jump to the solutions provided by our technical team. These solutions are based on thorough online research and user feedback.
Solution 1: Run Windows Built-in BSOD Troubleshooter
In case none of the above-mentioned workarounds fixed the error, let us try Windows 10’s Built-in BSOD Troubleshooter. This tool is specifically designed to resolve various system issues including the BSOD errors. It runs a security scan that is not limited to Windows and its components only, it also analyzes Motherboard BIOS and its firmware (as per the latest addition in Windows). Therefore, it is most likely going to help you to solve the problem under consideration. Follow the steps given below to run the BSOD troubleshooter:
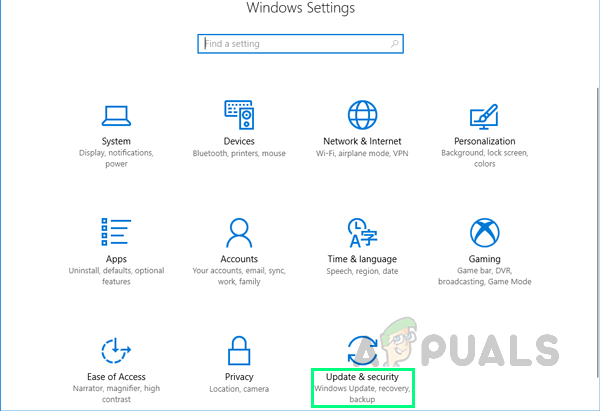
- Click Start > Settings Icon > Update & Security. This will open a window that contains Windows update-related settings i.e., Windows Security, Backup, Troubleshoot, etc.

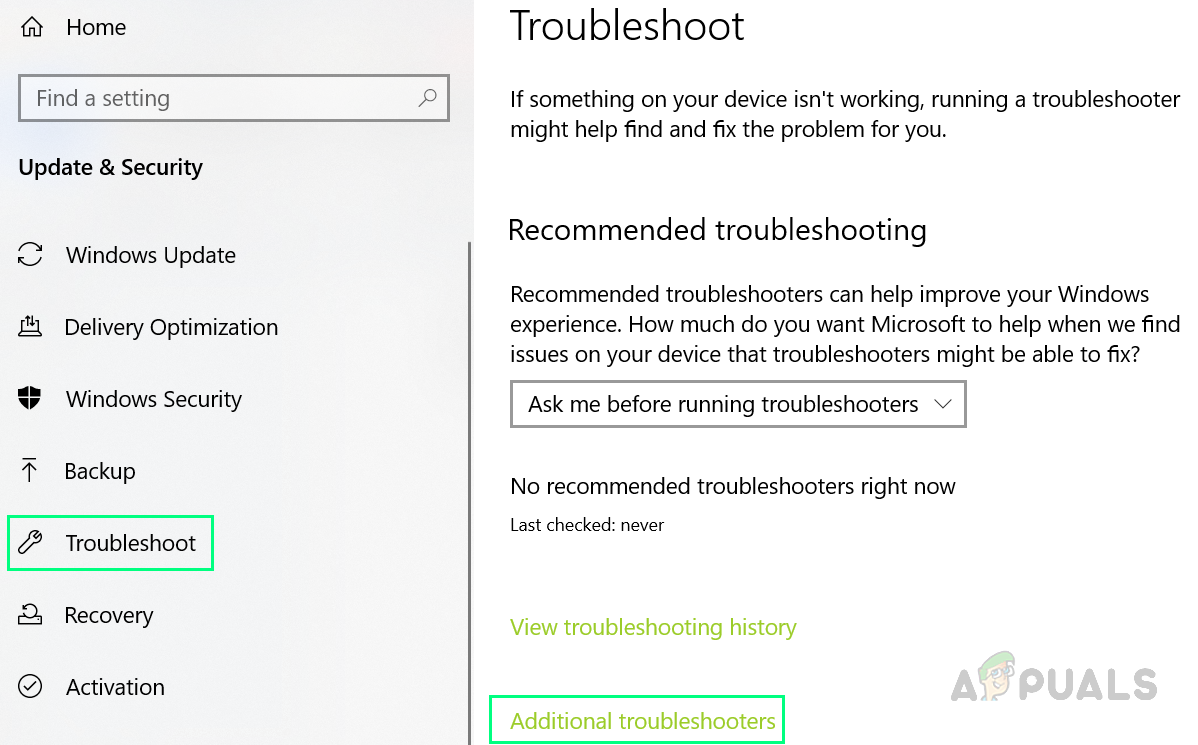
Opening Windows Update & Security Settings - Click Troubleshoot > Additional troubleshooters. This will take you to Windows troubleshooting options for different categories i.e., Internet Connections, Windows Update, Printer, etc.

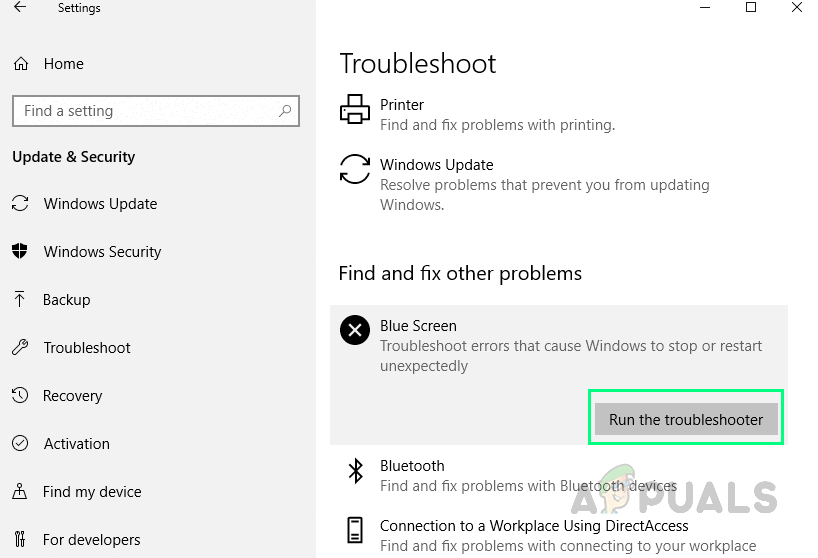
Opening Windows Additional Troubleshoot Options - Click Blue Screen > Run the troubleshooter. This will run a Windows BSOD troubleshooter that will try to resolve things automatically. Follow the on-screen instructions to complete the troubleshooting process. It will indicate the root cause of the BSOD error i.e., whether it is the software or hardware problem causing the error. This process may take a few minutes therefore, wait until it gets finished.

Running Blue Screen Troubleshooter
If you are running on Windows Update Version 1809 or later then you will have to access the Blue Screen Online Troubleshooter, the latest addition on the Microsoft website. It helps beginner users troubleshoot their Blue Screens and fix the error automatically. To do so follow the given steps:
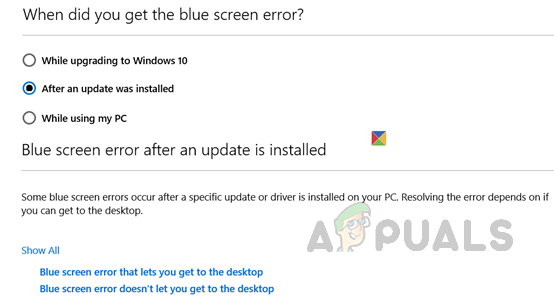
- Open the Online BSOD Troubleshooter on Microsoft Official Page. You will simply see a wizard with different options that indicate when did you get the Blue screen error.

Opening Online BSOD Troubleshooter - Now you have multiple options to play with:
If you select While upgrading to Windows 10, you will be asked to revert back to your previous Windows version.
If you select After an update was installed, you will be asked to check for updates or remove newly installed hardware.
If you select While using my PC, some helpful suggestions will be offered if you can get to your desktop, as well as, if you are unable to access the desktop. - Select the best-suited option according to the situation and follow up the given instructions and steps to fix the problem. Despite all the procedures offered by Microsoft, if the blue screen error persists then move to the next solution.
Solution 2: Rebuild MBR & BCD
The Master Boot Record is a key part of the startup system of your PC. It contains all the essential information about the disk partitions of computers and helps load the operating system. Without a properly functioning MBR, your PC will not work and show blue screen errors. BCD or Boot Configuration Data contains boot configuration parameters on how to start your operating system. Rebuilding MBR & BCD will help your PC to start normally without any errors. This solution proved to be helpful for a lot of users online and it is also recommended by Microsoft Technical Experts. To rebuild the MBR and BCD, follow these steps:
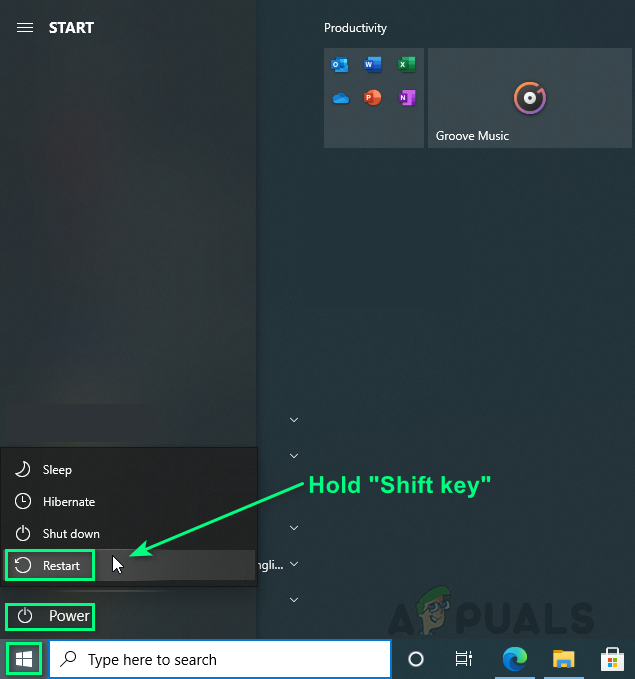
- Click Start, Power Icon, and then click on the Restart option while holding the Shift key on your keyboard. This will allow your PC to enter “Windows Startup Repair” options after it boots up.

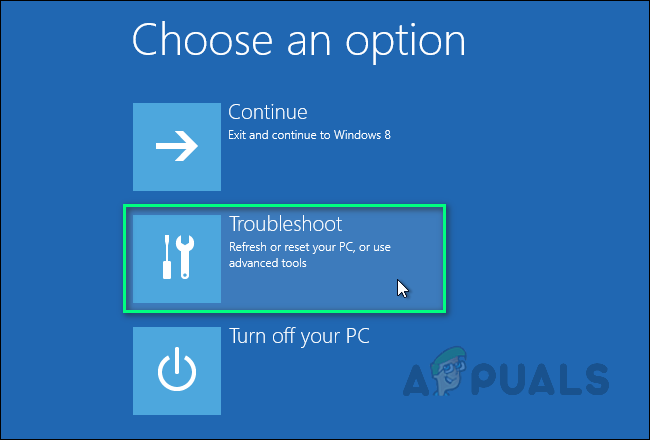
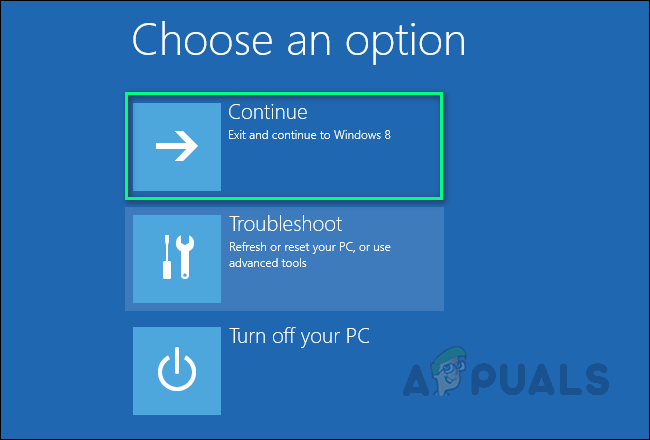
Custom Restart to Enter Windows Startup Repair Mode - The Windows bootup process will get interrupted by displaying a list of options on the screen to choose from. Select the Troubleshoot option. This will open a window to provide you with two different options to either reset the PC or access the advanced options to resolve the issue.

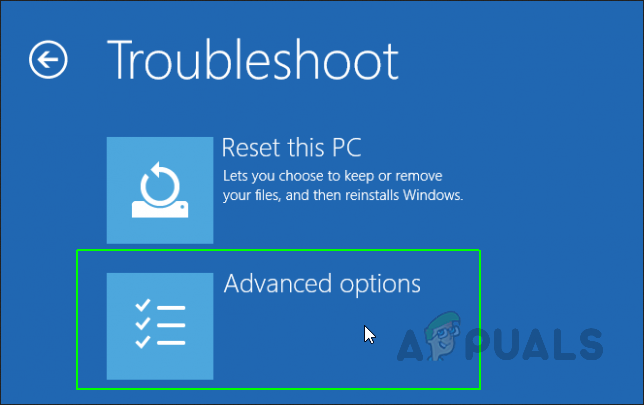
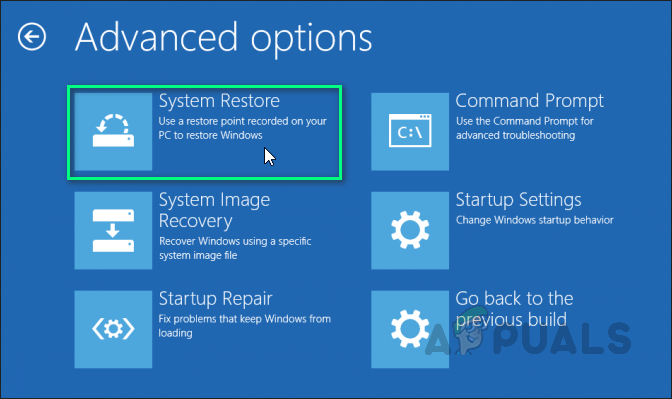
Opening Troubleshoot Options - Click Advanced options to open a window with different categories of available options for rectifying the error i.e., System Restore, Startup Repair, Command Prompt, etc.

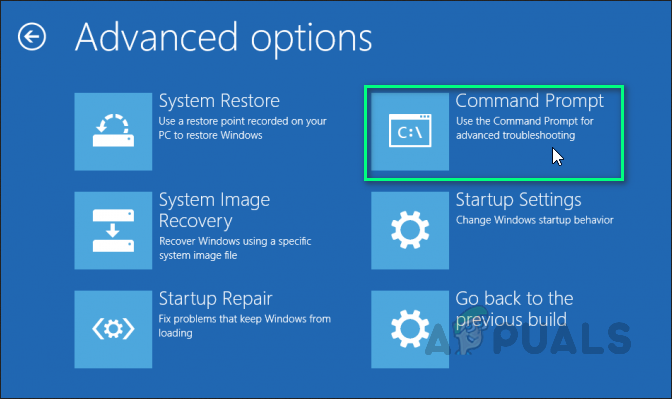
Opening Advanced Options - Select the Command Prompt option. It will open the Windows automation tool that is part of the Windows operating system to automate methods & commands for certain actions.

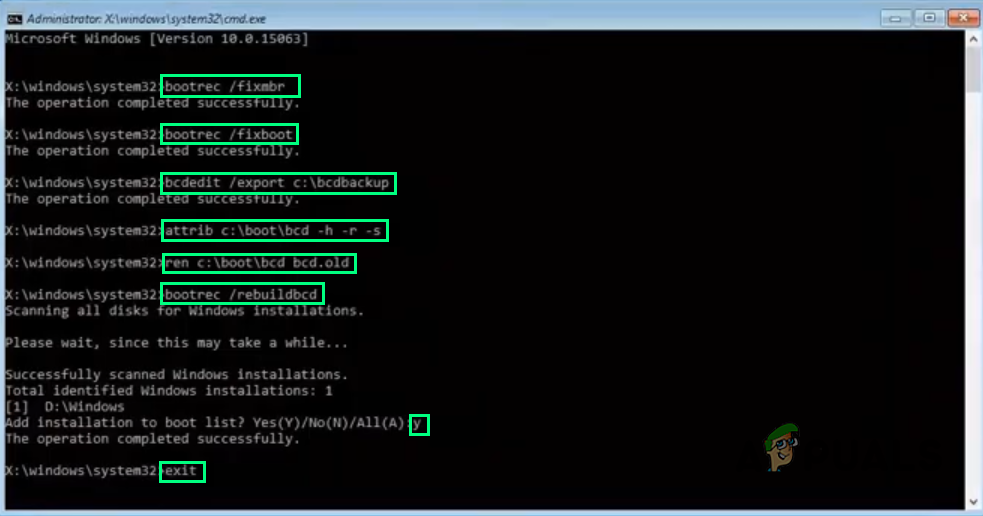
Opening Command Prompt - Now type the following commands in Command Prompt and press Enter after every command:
bootrec /fixmbr

bootrec /fixboot

bcdedit /export c:\bcdbackup

attrib c:\boot\bcd -h -r -s

ren c:\boot\bcd bcd.old

bootrec /rebuildbcd and then y

exit

Rebuilding MBR & CBR Using Commands - Now click Continue to restart your PC and check if the issue is resolved. If this solution did not work for you and you are still facing the error under consideration then the only option left is to reset/restore your PC which is covered in the last solution, solution 3.
Restarting PC
Solution 3: Restore/Reset PC
This solution has two parts: restoring the PC and resetting it. If the blue screen error started to occur recently, it is quite possible that the issue was created by a change that your system has experienced recently. Therefore, an easy fix would be to restore your PC to an earlier “System Restore Point” where there was no issue in the first place.
This is only possible if you had created a “System Restore Point” for your PC or not. In case, you hadn’t created one then you have no option left but to reset your PC. A reset removes the corrupted or problematic copy of Windows from your device and then replaces it with a fresh copy of Windows. It wipes out all programs & apps, reinstalls Windows, along with the built-in Windows apps (such as the Start menu, Settings, Mail, Calendar, and Microsoft Edge), fixing the error under consideration.
Hence follow the solution procedure according to either of the two situations:
Have a System Restore Point:
- Click Start, Power Icon, and then click on the Restart option while holding the Shift key on your keyboard. This will allow your PC to enter “Windows Startup Repair” options after it boots up.
- The Windows bootup process will get interrupted by displaying a list of options on the screen to choose from. Select the Troubleshoot option. This will open a window to provide you with two different options to either reset the PC or access the advanced options to resolve the issue.
- Select Advanced options > System Restore. This will open a window where you will have to select your Microsoft Account in which you have saved the “System Restore Point”.
Opening System Restore Option - Select your Microsoft Account. This will open the next window automatically where you need to choose your keyboard layout from the available options.

Selecting Microsoft Account - Choose your Keyboard layout from the given options and click Continue. A window will pop up, click Next. Note that system restore does not affect any of your data and documents but the recently installed programs might be uninstalled.
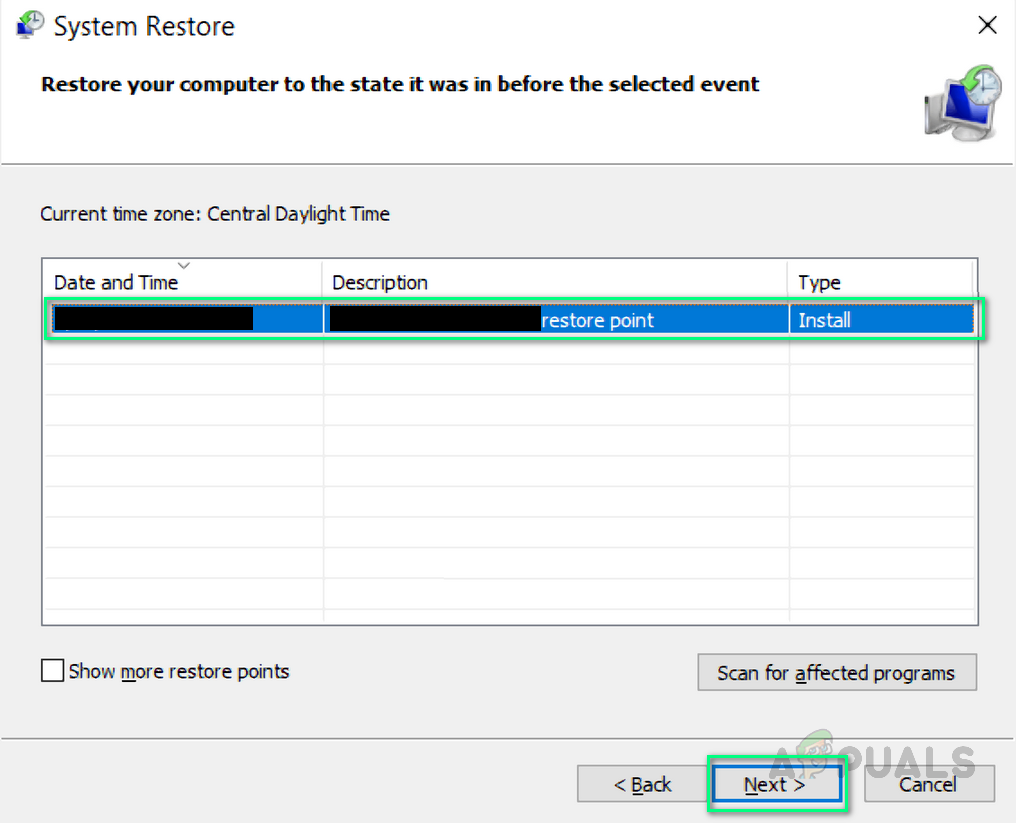
- Now select your Latest System Restore Point from the given options and select Next.

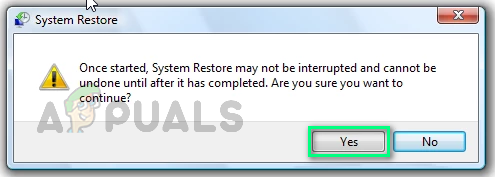
Selecting the Latest System Restore Point - A confirmation window will pop up, click Yes to start the system restore process. Your computer will be restored to the state it was in, right when the respective System Restore Point was created. The procedure will take time so wait until it gets finished.

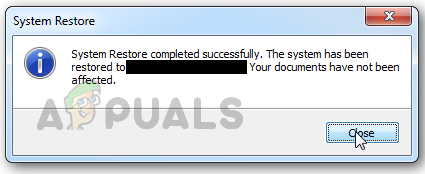
Confirming System Restore Action - Once the process is completed, a notification will pop up. Finally, click on the Close option to successfully complete the System Restoration Process. Restarted your computer normally and you no longer will receive any BSOID issues.

Exiting System Restore Process Window
Doesn’t Have a System Restore Point:
- Click Start, Power Icon, and then click on the Restart option while holding the Shift key on your keyboard. This will allow your PC to enter “Windows Startup Repair” options after it boots up.
- The Windows bootup process will get interrupted by displaying a list of options on the screen to choose from. Select the Troubleshoot option. This will open a window to provide you with two different options to either reset the PC or access the advanced options to resolve the issue.
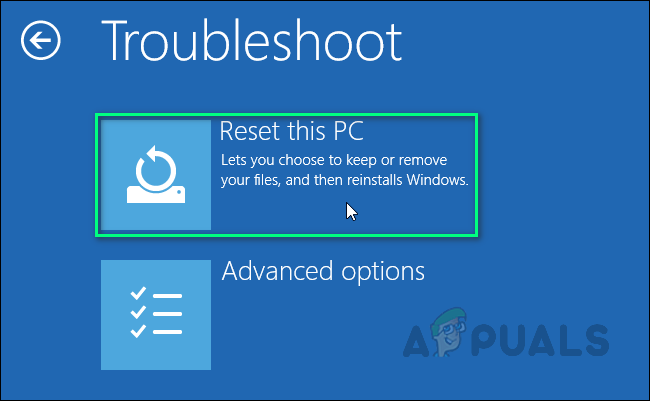
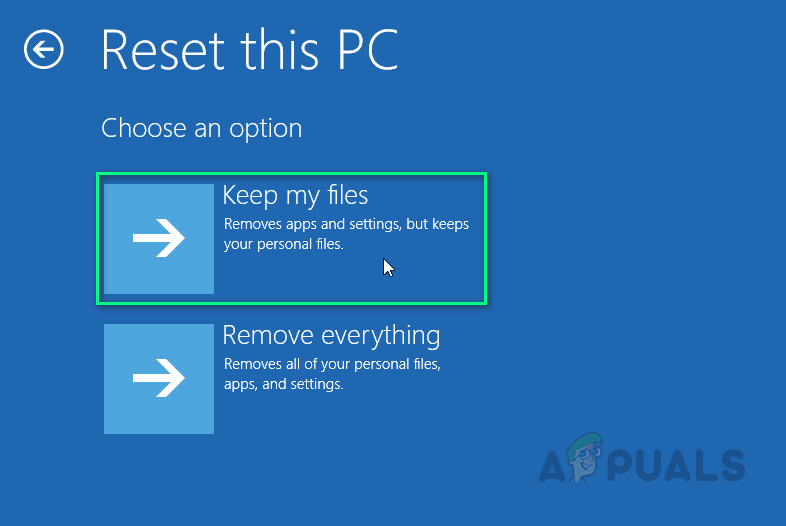
- Select Reset this PC. It will provide you with two different options before starting the reset process.

Selecting Reset This PC Option - Choose the Keep my files option if you want to keep your personal data and files. Otherwise, go with the Remove everything option.

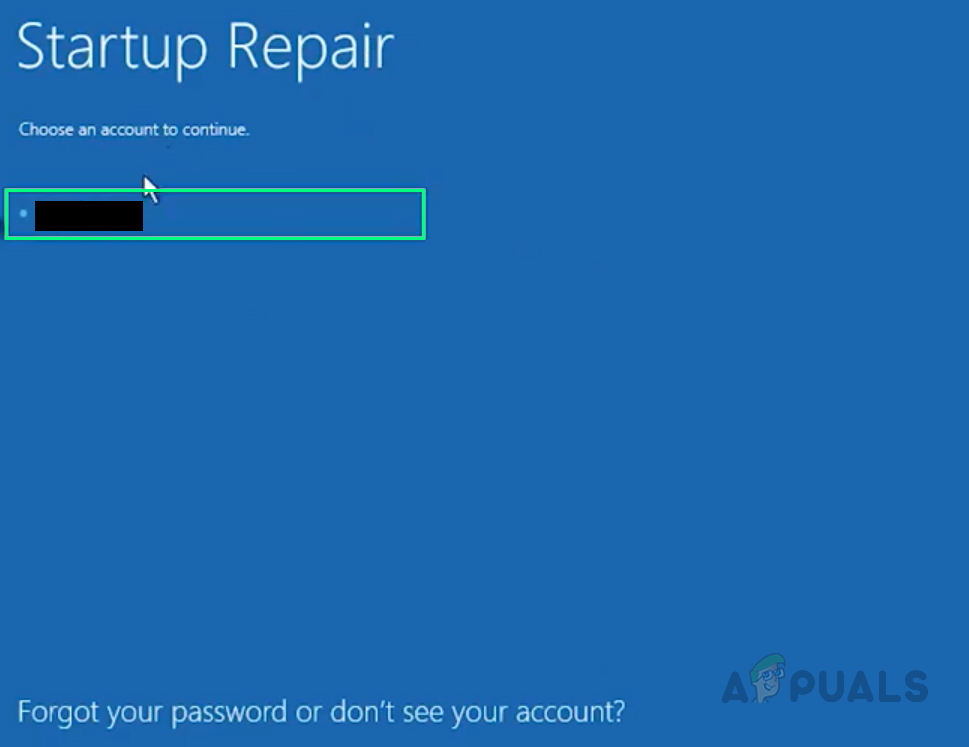
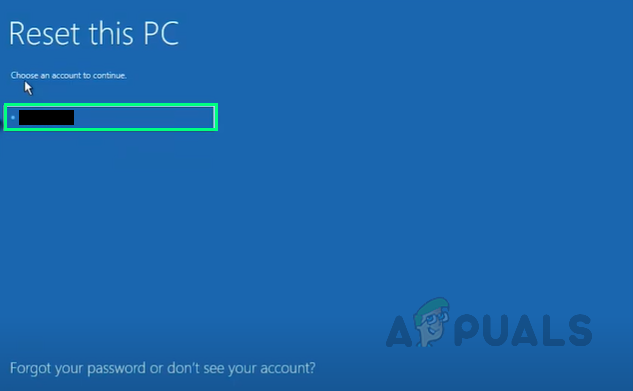
Selecting Keep My Files Method - Then select your Account and type in your password. In case you do not have a password then simply press Continue on the next window.

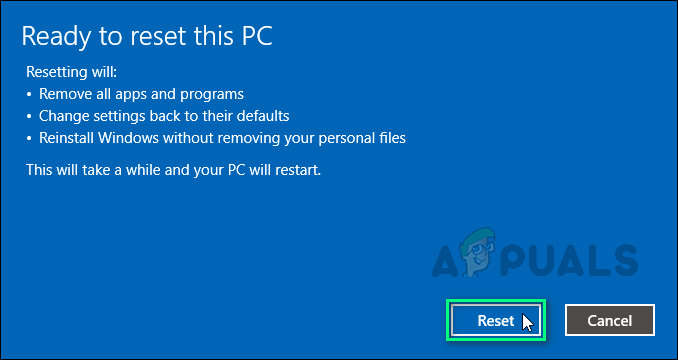
Selecting Microsoft Account - Now, select the Reset option and wait for Windows 10 to reset. Do not unplug or turn off your computer as the process will take time. Once the computer has successfully been reset, your problem should be permanently fixed.

Resetting PC

Kevin Arrows
Kevin Arrows is a highly experienced and knowledgeable technology specialist with over a decade of industry experience. He holds a Microsoft Certified Technology Specialist (MCTS) certification and has a deep passion for staying up-to-date on the latest tech developments. Kevin has written extensively on a wide range of tech-related topics, showcasing his expertise and knowledge in areas such as software development, cybersecurity, and cloud computing. His contributions to the tech field have been widely recognized and respected by his peers, and he is highly regarded for his ability to explain complex technical concepts in a clear and concise manner.
-
Home
-
Partition Manager
- How to Fix IO1 Initialization Failed BSOD in Windows 10
By Linda | Follow |
Last Updated
Sometimes, you may get IO1_INITIALIZATION_FAILED BSOD while turning on your computer. If so, you can read this post, in which MiniTool offers you methods to solve this BSOD. You can try them one by one.
If You Can Boot into Windows or Safe Mode
When you encounter the IO1 Initialization Failed BSOD, if you can boot into Windows or Safe Mode later, you can use the following methods to resolve the BSOD problem.
1. Set useplatformclock to True
- Press the Windows
- Type “cmd” and right-click Command Prompt from the search result. Then, select Run as administrator.
- In the command prompt window, type bcdedit /enum command to see whether the useplatformclock is set to true. If it is not true, you can set it to true by typing bcdedit /set useplatformclock true and pressing the Enter
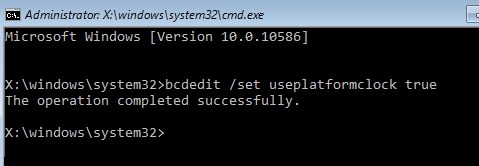
This method will make sure HPET (High Precision Event Timer) is on. If this method fails to solve the problem, just try the next one.
2. Run DISM
- Open Command Prompt and run it as administrator in the same way.
- In the command prompt window, type the following commands in turn “exe /Online /Cleanup-image /Scanhealth” “exe /Online /Cleanup-image /Restorehealth“.
This will repair system files to solve the problem. If it also fails, just go on to the next method.
3. Run BSOD Troubleshooter
- Click on the Startbutton and go to Settings > Updates & Security > Troubleshoot.
- Scroll down the right panel to find Blue Screen. Click it to expand.
- Click Run the Troubleshooterto trigger the blue-screen troubleshooting process.
4. Run Error Checking
- Open File Explorerand highlight This PC.
- Right-click a drive like c or d drive, and then choose the Properties
- Skip to the Toolstab and click the Check Then, scan the drive to check and repair bad sectors.
This method will repair errors in partitions.
5. Update Driver
- Press “Windows + X” keys and then select Device Managerin the pop-up menu to open Device Manager.
- Expand all the categories individually to find outdated or faulty drivers which are marked with a yellow warning sign.
- Right click the faulty driver and select Update driver.
- Select Search automatically for updated driver softwarein the pop-up window.
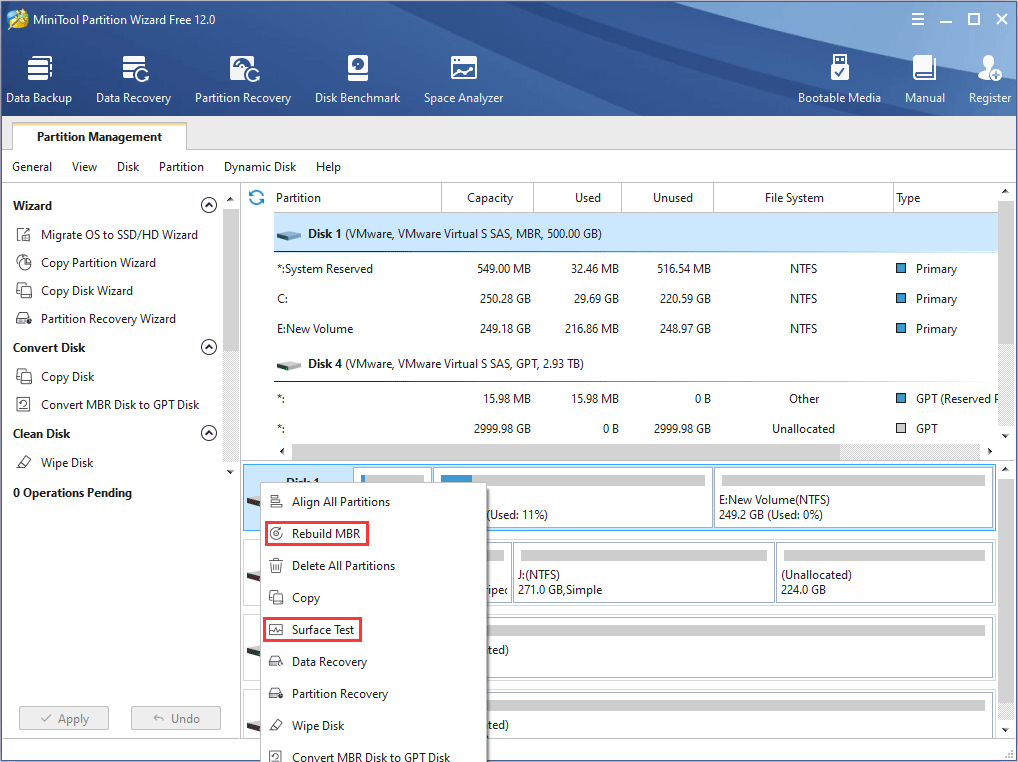
6. Use MiniTool Partition to Fix MBR and Make a Surface Test
MiniTool Partition Wizard FreeClick to Download100%Clean & Safe
- Click the above button free download MiniTool Partition Wizard.
- Launch this software and go to its main interface.
- Right click the disk and choose Rebuild MBR to fix the MBR.
- Right click the disk and choose Surface Test to see whether there are bad sectors on the disk.
If You Can’t Boot into Windows or Safe Mode
If you can’t boot into Windows or Safe Mode, you can try the following methods to solve the problem.
1. Run SFC
- Enter WinRE. If you don’t know how to do that, please refer to this post: How to Use Recovery Options on Windows 10.
- Navigate to Troubleshoot > Advanced options > Command Prompt.
- Type “sfc /scannow” and press Enter
2. Run CHKDSK
In the Command Prompt window, type CHKDSK *: /f and press Enter. Please note that “*” represents the drive letter of the specific drive that you want to scan and fix, and you should replace it accordingly.
3. Rebuild MBR
In the Command Prompt, type the following commands in turn:
- bootrec /fixmbr
- bootrec /fixboot
- bootrec /rebuildbcd
About The Author

Position: Columnist
Linda has been working as an editor at MiniTool for 5 years. She is always curious about computer knowledge and learns it crazily. Her articles are simple and easy to understand. Even people who do not understand computer can gain something. By the way, her special focuses are disk management, data recovery and PDF editing.