Get the Reddit app
Scan this QR code to download the app now
Or check it out in the app stores
Go to HyperX
r/HyperX
r/HyperX
Welcome to the HyperX Family. No matter who you are or how you play – We’re All Gamers.
Members
Online
•
by
Professional_Lunch51
Hyperx NGenuity won’t install
Software
So ive installed the Hyperx NGenuity about 10+ times and it still wont work. Its not installing even though it says it is. Not in my files either.
Top Posts
-
Reddit
reReddit: Top posts of May 2, 2021
-
Reddit
reReddit: Top posts of May 2021
-
Reddit
reReddit: Top posts of 2021
Explore our expert’s solutions for this issue
by Milan Stanojevic
Milan has been enthusiastic about technology ever since his childhood days, and this led him to take interest in all PC-related technologies. He’s a PC enthusiast and he… read more
Updated on
- HyperX Cloudset and HyperX Predator SSD seem to cause some trouble when used on Windows 10.
- If you’ve experienced similar issues, you will need to reinstall the headset driver to start resolving them.
- Make sure to follow the steps described in the guide in an orderly manner to ensure an efficient troubleshooting process.
XINSTALL BY CLICKING THE DOWNLOAD
FILE
HyperX is a famous gaming hardware series that includes memories, SSDs, headsets, and peripherals. But many recently reported encountering problems with HyperX in Windows 10.
Issues with HyperX devices can arise for several reasons, and it’s generally tricky to identify the underlying cause.
So, in the following sections, we will walk you through what’s causing HyperX problems in Windows 10 and the solutions for each.
Why is my HyperX not working?
When the HyperX device is not working on the computer, it’s essential to identify the type of device you are facing issues with.
For instance, if it’s a headphone, misconfigured sound settings, outdated or corrupt drivers, or improper connections are to blame.
Several users also reported that the HyperX mic is not working, in which case, you would have to check the connections, be it a wired or wireless microphone.
Besides, certain services and processes are supposed to run on the computer to function the connected devices effectively. And in their absence, you are bound to encounter issues.
What to do if HyperX Cloud 2 mic is not working?
Many users reported that HyperX Cloud 2 mic is not working on Windows 11 and 10, but this issue can be quickly resolved. First, set the microphone as the primary device and verify if that resolves the problem.
You may update the audio driver or the ones specific to the HyperX Cloud 2 mic if it doesn’t. Besides, if you have third-party apps running that could modify the sound settings, disable or uninstall them to fix the HyperX problems in Windows 10.
If the microphone keeps resetting to 0 volume, you may run the audio troubleshooter or disable apps from taking control of the HyperX Cloud 2 mic.
Does HyperX need drivers?
Yes, HyperX needs drivers, as is the case with any device. But things are a lot more effortless and streamlined with HyperX.
Users don’t need to add the drivers manually; instead, they are automatically fetched and installed as soon as the HyperX device is connected. This is why you wouldn’t be able to find HyperX driver updates online.
How we test, review and rate?
We have worked for the past 6 months on building a new review system on how we produce content. Using it, we have subsequently redone most of our articles to provide actual hands-on expertise on the guides we made.
For more details you can read how we test, review, and rate at WindowsReport.
Also, it’s best that you download HyperX NGENUITY software to customize compatible devices. In addition to that, it will also ensure that the devices work fine.
How do I fix HyperX issues on Windows 10?
1. Reinstall the headset driver
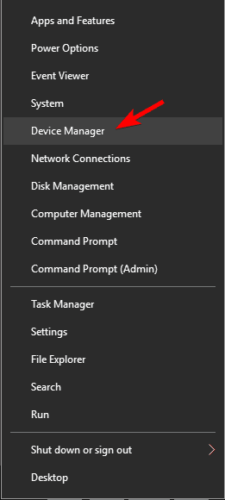
- Press Windows + X to open the Power User menu, and choose Device Manager from the list.

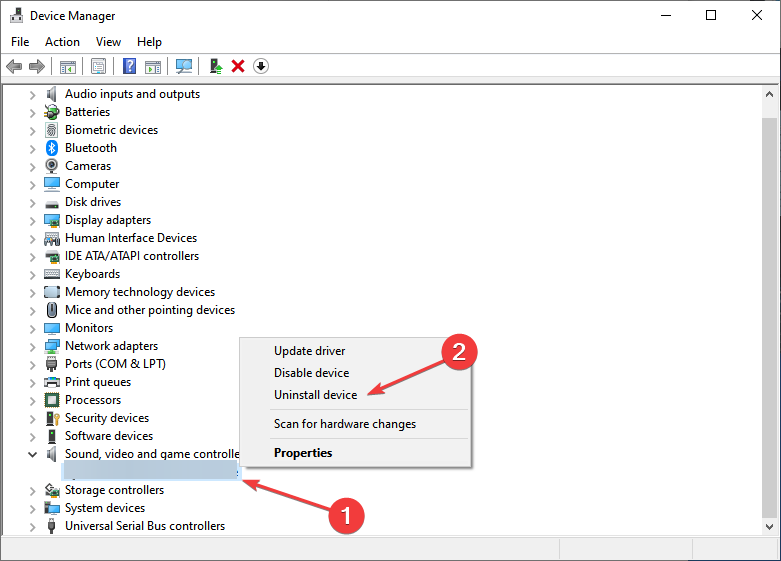
- Locate your HyperX audio device, right-click on it, and choose Uninstall device.

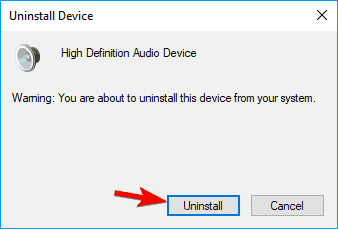
- A warning dialog will appear. Click on Uninstall to remove the device.

- Once done, unplug your headset and then restart your PC.
- After your PC restarts, reconnect the headset, and the driver for it should be installed automatically.
You might have to repeat this process several times before your headset starts working.
Drivers allow your PC to work with the hardware. Therefore, any driver-related issue will cause problems. That is why reinstalling the drivers will most likely solve the problem immediately.
Update drivers automatically
If the previous method doesn’t fix the issue, we recommend you use a dedicated tool. Downloading and installing drivers manually is a process that carries the risk of getting the wrong driver installed, which may lead to severe malfunctions in your system.
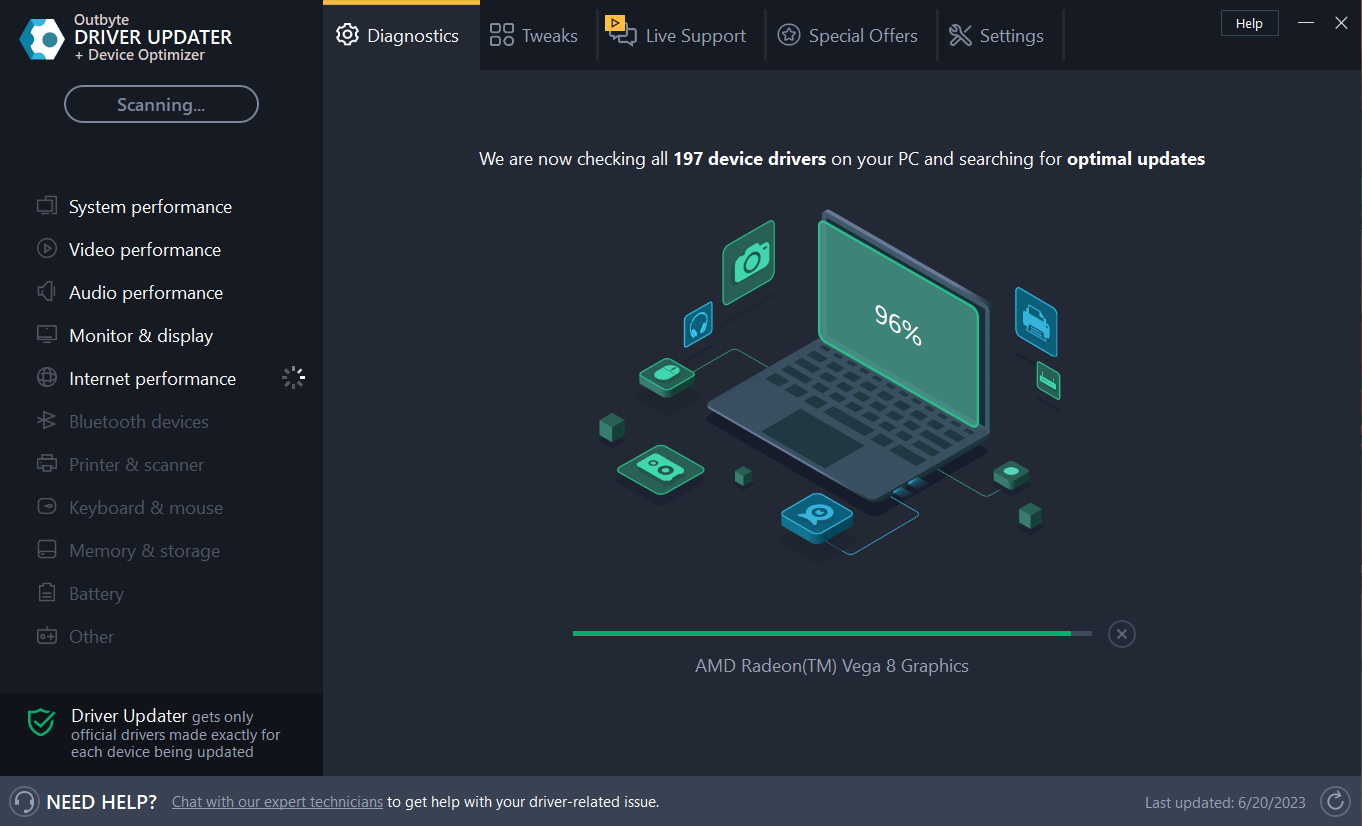
So the safest and easiest way to update drivers on a Windows computer is by using a third-party tool. We strongly recommend Outbyte Driver Updater.
It scans your system, automatically identifies each device on your computer, and matches it with the latest driver versions from an extensive online database.
Drivers can then be updated in batches or one at a time without you having to make any complex decisions in the process.

Outbyte Driver Updater
Update all your audio outdated drivers with just a few clicks..
2. Make sure that your microphone is unmuted
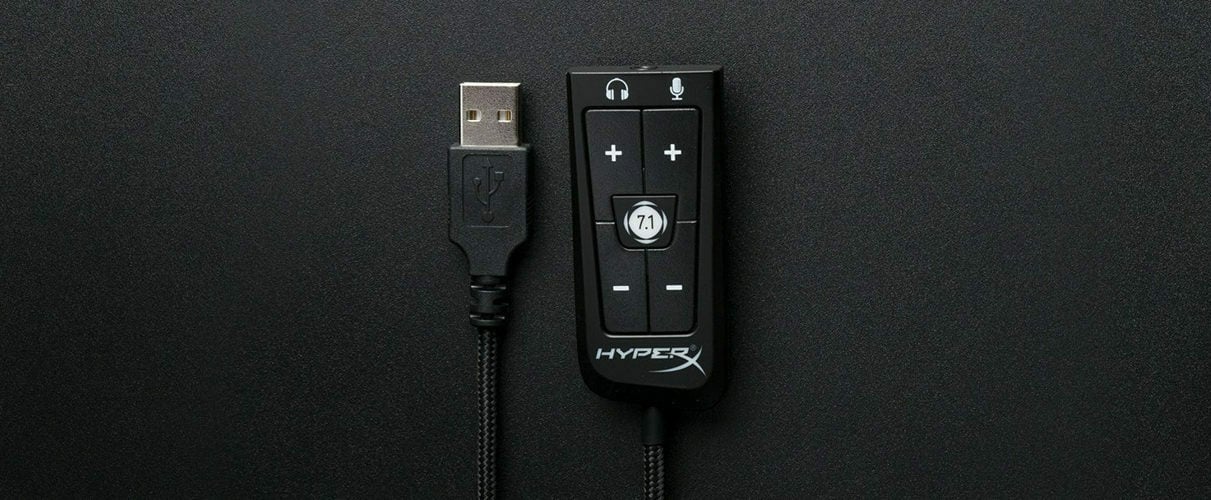
Some users mentioned that they were unable to adjust the microphone volume. The solution to this problem is relatively simple: you have to check the USB dongle that comes with the gaming headset.
There’s a small Mute switch on it, so make sure to press it to unmute the microphone. After doing that, the problem should disappear. It’s worth mentioning that the USB dongle also has its microphone control keys, so adjust the volume of your microphone from here.
Lastly, double-check if the headset is correctly connected to the USB dongle. To fix this problem, firmly connect your headset to the USB dongle and check if that solves the HyperX headset not working issue on Windows 10.
Also, find out what to do if other headsets are not working in Windows 10.
3. Connect your headset to a different USB port
HyperX Cloud II is a USB headset, meaning many USB-related problems can affect it. For example, although the USB 3.0 standard is gaining popularity, several users reported that this headset isn’t working correctly with this USB version.
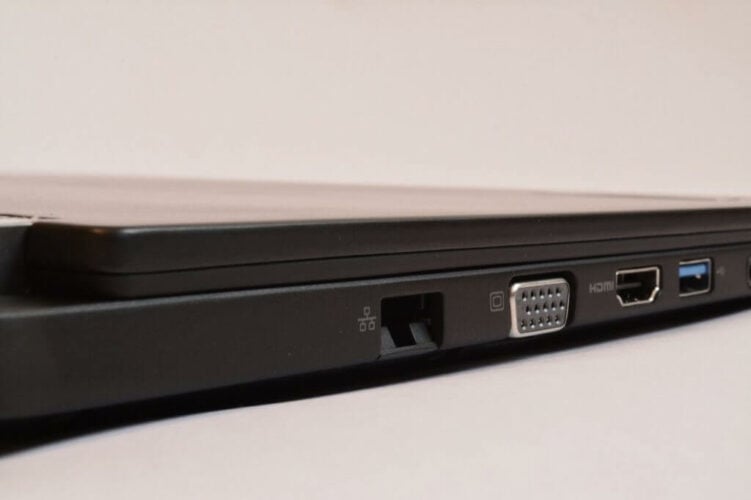
So instead of using USB 3.0, try to connect your headset to a USB 2.0 port and check if that solves the issue. In addition, some users suggest you use the ports on the back of your computer instead of the front ones, which are more likely to be faulty.
4. Check your audio device settings
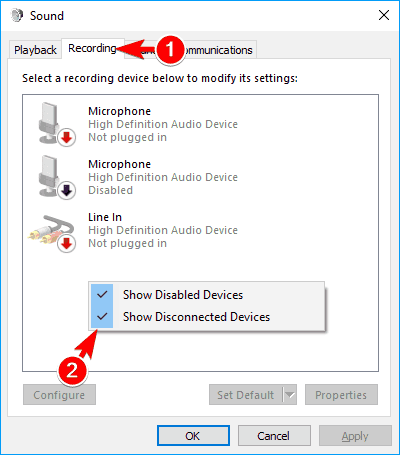
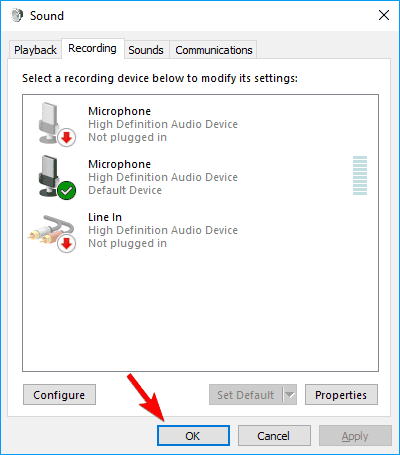
- Press Windows + S, enter Change system sounds in the text field, and choose the relevant search result from the menu.

- Go to the Recording tab, right-click the empty space, and check the Show Disabled Devices and Disconnected Devices options.

- Now locate your microphone, right-click on it, and choose Enable from the menu.
- Click on OK to save changes.


Some users also suggested deactivating and reactivating the microphone to fix this problem. You can easily do it by choosing Disable and Enable from the Sound window.
5. Use the sound troubleshooter
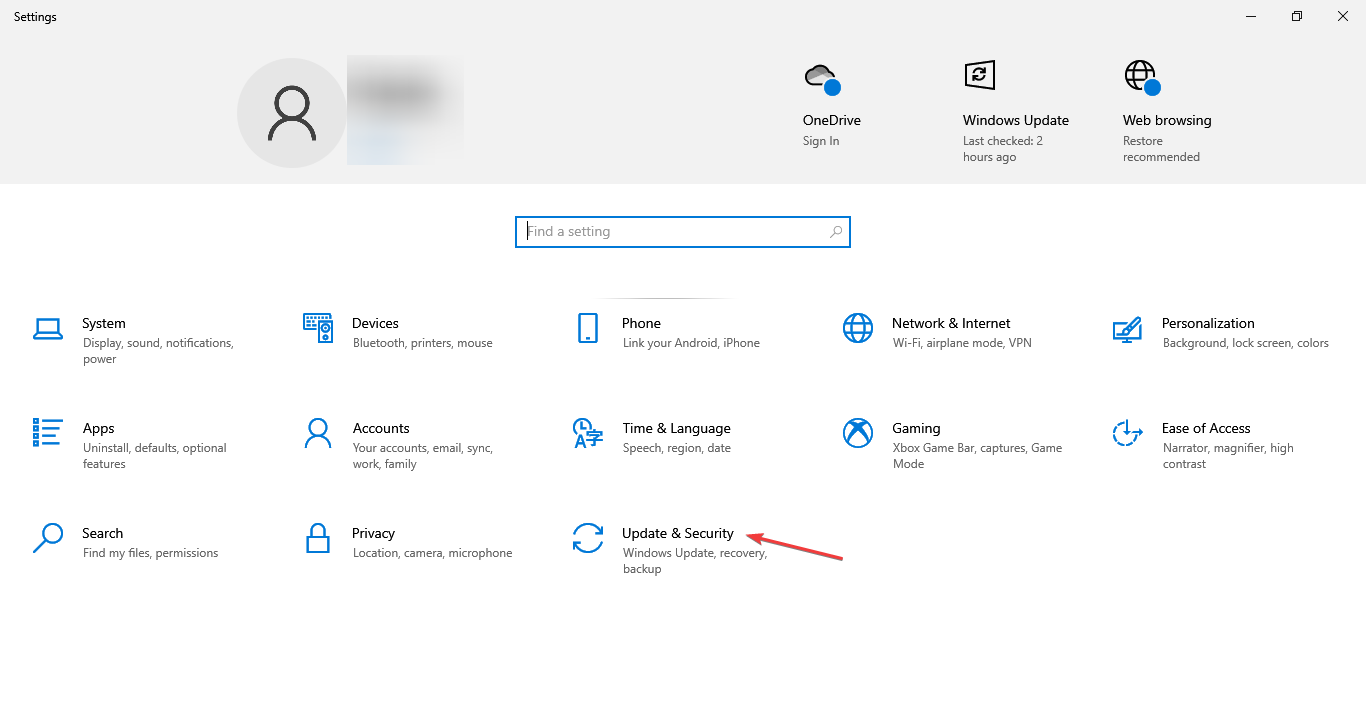
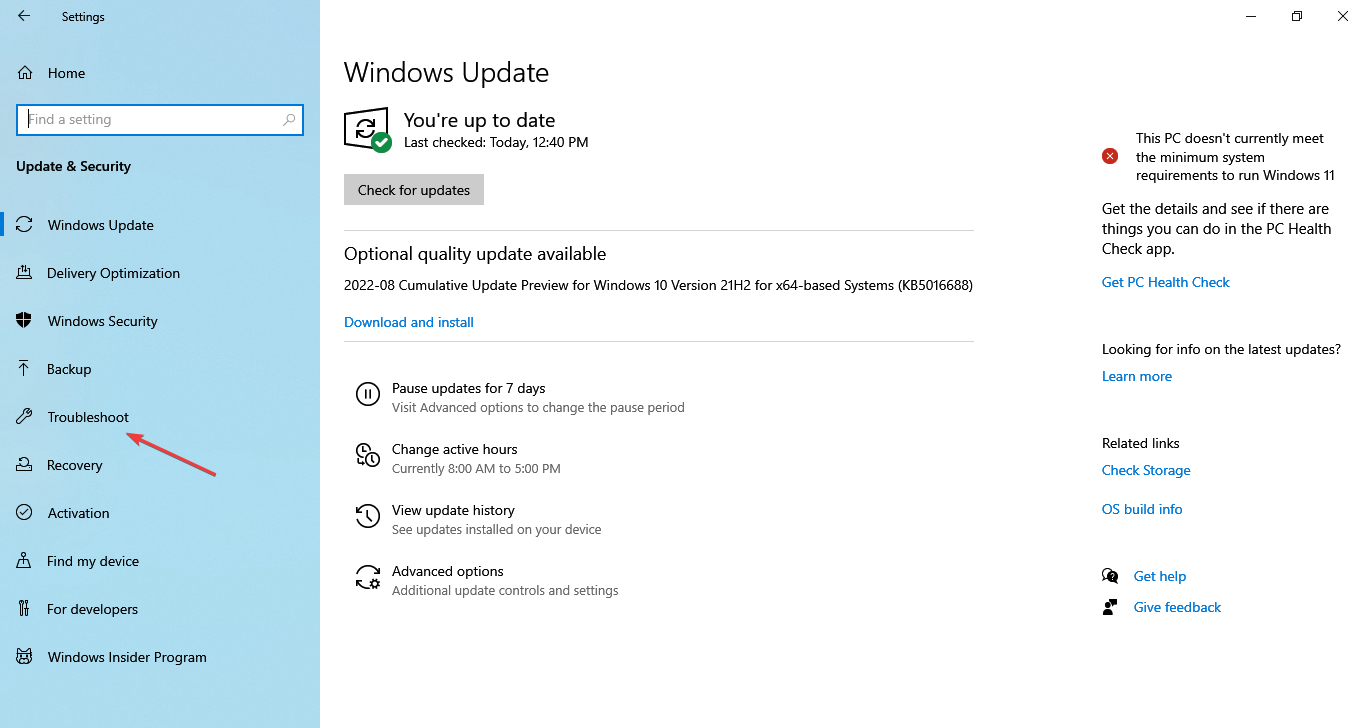
- Press Windows + I to open the Settings app, and click on the Update & Security section.

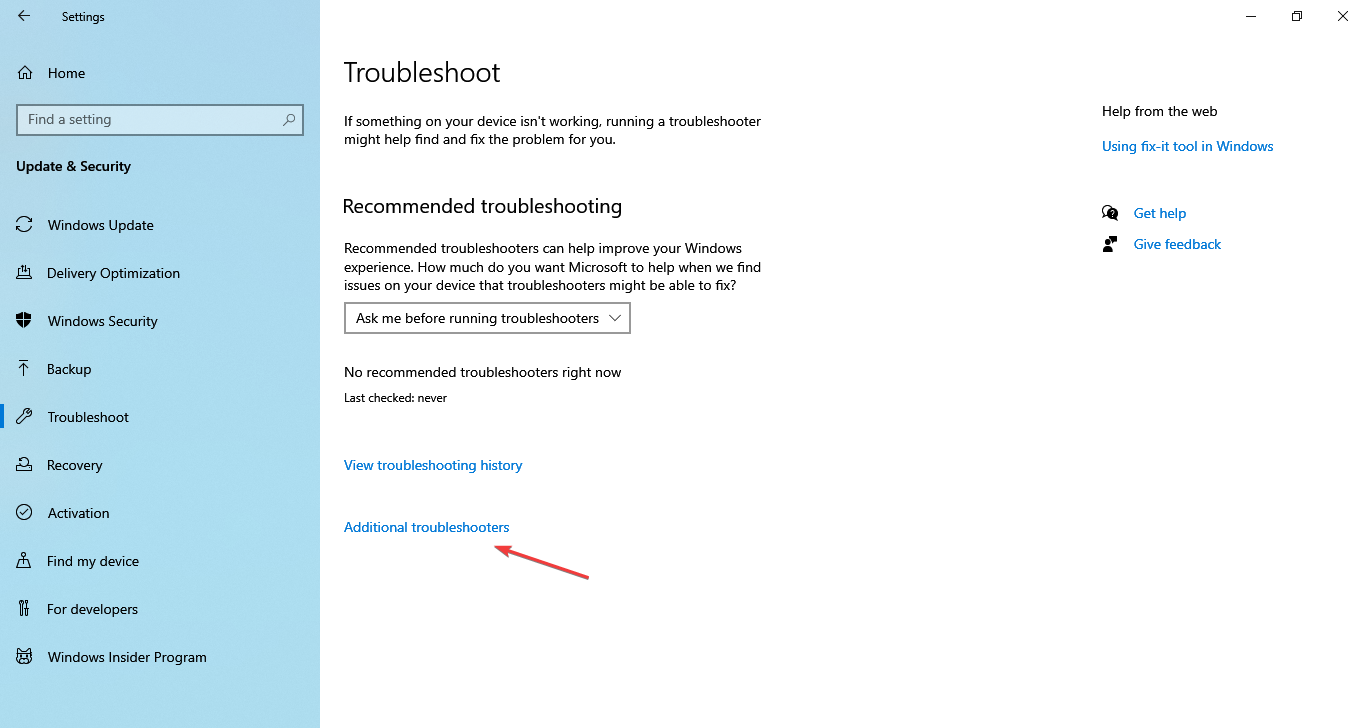
- Choose Troubleshoot from the navigation pane on the left.
- Click on Additional troubleshooters here.
- Now select Recording Audio and click on the Run the troubleshooter button.
- Follow the on-screen instructions and choose the relevant response when prompted to complete the troubleshooting process.
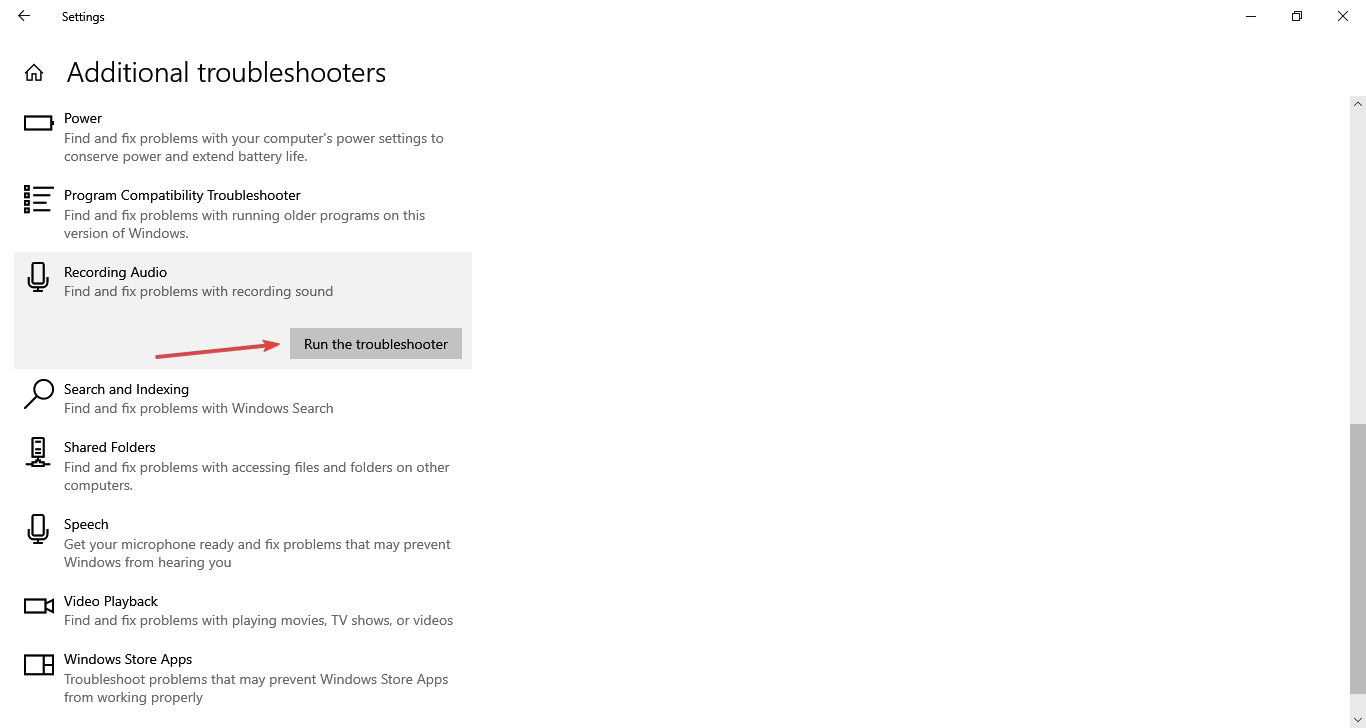
Running the built-in troubleshooter is probably one of the simplest methods to fix HyperX problems in Windows 10. But remember that it would only work if Microsoft has acknowledged the issue and a solution is available.
- Internal microphone not working in Windows 10/11 [HP]
- FIX: Microphone not working in Windows 11
- Fix: This Alias Cannot be Added to Your Account Error on Windows 11
6. Update the firmware
If you’re having microphone problems with your HyperX Cloud II headphones, you might be able to fix them by upgrading the firmware since it’s critical for the effective functioning of the device.
Note that firmware update is an advanced procedure, and it can cause irreversible damage to your headphones if not done right, so exercise caution.
If you intend to update it, download the firmware update for HyperX Cloud II from the official support website. The updates for other devices, too, can be found on the support website.
7. Try using an audio splitter
Users reported that the microphone wasn’t recognized on their HyperX Cloud Stinger headphones. They mentioned one might be able to circumvent this problem by using an audio splitter.
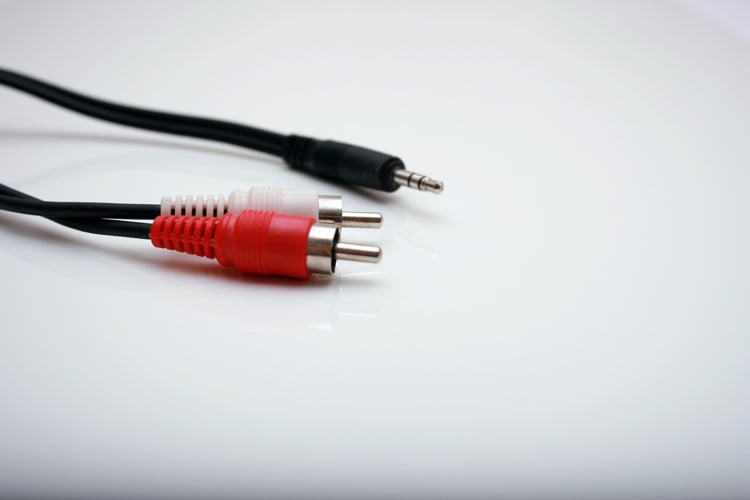
This small device comes with two 3.5mm ports, one for audio and one for the microphone. This isn’t the best solution, but it’s a decent workaround, so you might want to try it if you’re having problems with the HyperX Cloud Stinger headset in Windows 10.
8. Update the drivers
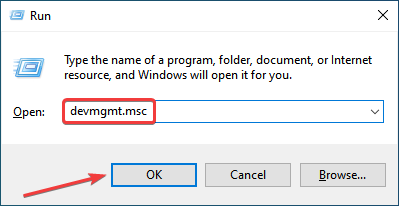
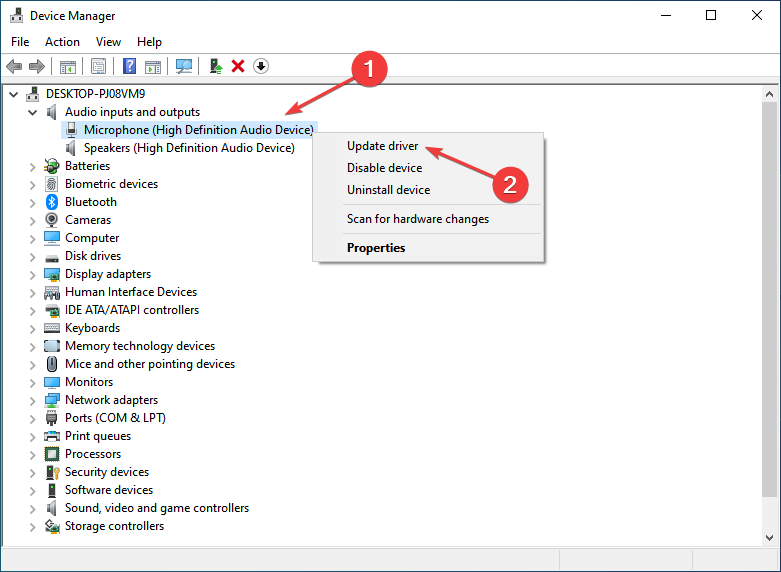
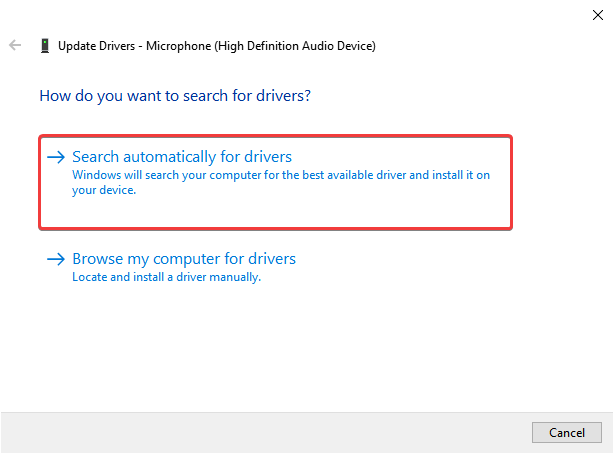
- Press Windows + R to launch the Run command, enter devmgmt.msc in the text field, and click OK to open the Device Manager.

- Locate your audio driver, right-click it and choose Update driver.

- Select Search automatically for drivers.

- Windows will now check for driver updates and install new drivers.
- After the new driver is installed, restart your PC.
We have to mention that Device Manager is the simplest way to update your audio drivers but not necessarily the most efficient one. Usually, Device Manager doesn’t download the latest drivers, which can be a problem. And
To ensure you have the latest drivers, download these from the motherboard or sound card manufacturer’s official website.
Better yet, use the dedicated tool recommended in the first solution, Outbyte Driver Updater, and you’ll surely get the correct components in no time.
9. Use the remote control to adjust the microphone
Some HyperX headsets have a remote control that allows you to control your microphone or adjust your audio.
Using the remote control, you can adjust your headset’s microphone sensitivity, so be sure to do that.
Few users reported that this method solved the problem for them. If the previous ones didn’t help, try this one.
10. Check your headset wires
If you’re having any problems with the HyperX headset in Windows 10, you might be able to fix them by checking the cable. In some cases, your cable is damaged, and you might be able to fix it by taping the affected area.
To verify if the cable is the culprit, you might want to try the headset on a different PC and check if the same appears. If it does, you now know what’s causing the problem and its solution.
How can I fix HyperX problems on Windows 11?
The solutions remain the same with Windows 11 as they were for Windows 10. However, a couple of additional measures you may undertake are as follows:
- Look for applications that might control the Bluetooth functionality or the sound settings and uninstall them.
- If the problem started after updating the OS, revert to the previous version.
- Performing a system restore might do the trick.
- Disable apps from accessing the microphone.
- As a last resort, you may reset Windows 11 to factory settings.
Is there software for HyperX?
There are a series of software that allows you to customize some of HyperX’s features. A good example is the HyperX NGENUITY software that is available for download in Microsoft Store
HyperX series offers a great range of gaming hardware, but as you may have noticed, some of its products have had problems in Windows 10. Though the solutions are simple, you should have them working in no time.
Also, find out how to optimize the PC for gaming and run even the most resource-hungry games seamlessly.
If you have any other suggestions or questions, don’t hesitate to leave them in the comments section below, and we’ll be sure to take a look.
![]()
You can also be interested in these:
- HP Pavilion gaming desktop TG01-2170M PC
- How to fix “HPDM.framework” will damage your computer on Mac?
- HP acquires HyperX for 425Mil
- HP X24i gaming monitor full review
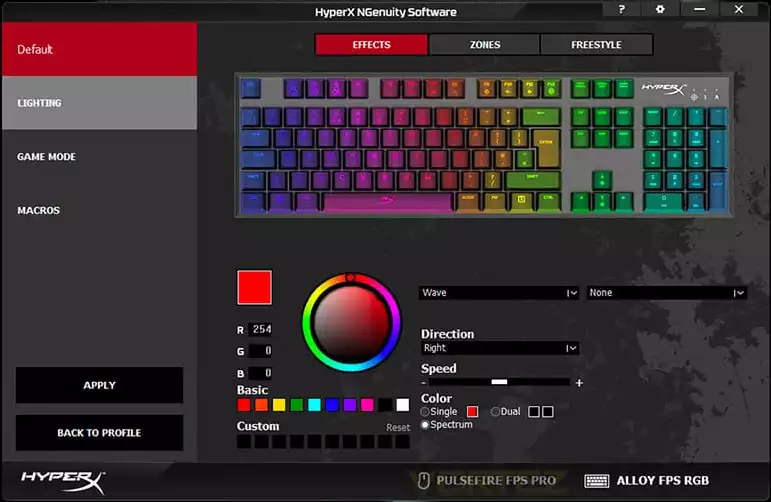
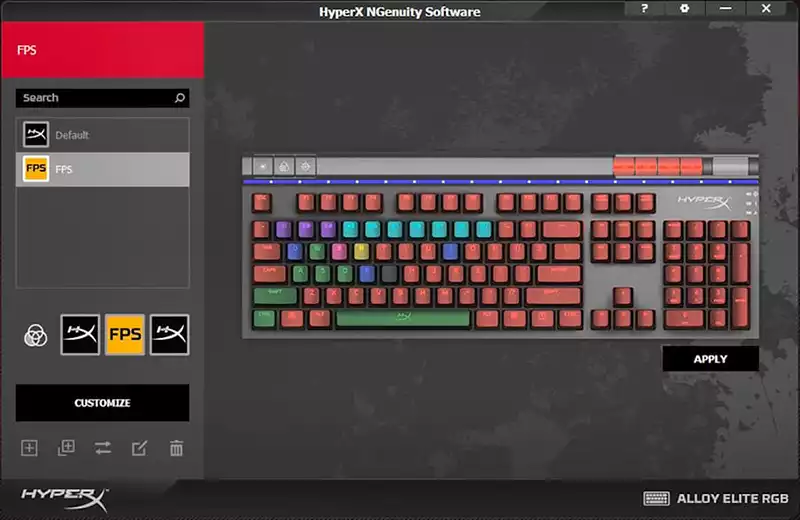
Your Hyperx Ngenuity software should allow you to customize the lighting on all of your compatible Hyperx products. If it’s not allowing you to make adjustments, save profiles, or there are other issues, then what’s the point in having a customizable product in the first place.
You want to get the most of your Hyperx products and create cool lighting shows, designs, and be able to switch between whatever you want, whenever you want. Unfortunately, in some situations, the Hyperx Ngenuity software isn’t working as expected or at all, so we’re going to run through how to fix it right now.
Is your Hyperx Ngenuity software not working? Fix it here and get back to enjoying the products.
Start with basic troubleshooting
Sometimes you need to start with the basics of troubleshooting to make sure it’s not something easy to fix when your hyperx keyboard software is not working or other Hyperx product:
- Use a different USB port; check if the device now shows up. If possible, use a USB 3.0 port.
- Remove any USB hubs or KVM switches that you may be using to see if that is causing issues.
- Reboot the system so everything starts fresh and anything that has failed gets a restart.
- Verify if other peripheral device software is interfering or registering the device, it may need to be disabled.
- Update your HyperX Ngenuity software to the latest version from the Microsoft store.
If none of this helps, then it’s time to move on to other troubleshooting steps.
Is your product compatible with Hyperx Ngenuity?
If you upgraded your Hyperx Ngenuity software or it auto-updated, then maybe you’re using hardware that is no longer supported by the newest software. Check the compatibility list here.
If you can’t find your device on that list, you may need to downgrade to an older version of the software and consider upgrading your hardware at some point.
Only install this older version if you can’t find your product; if you use this version with newer software, then you may miss out on newer bug fixes or enhancements.
Have you installed an incompatible software package?
One of the first things to check is whether you’ve installed an incompatible software package that is interfering with the operation of the Hyperx Ngenuity software.
- NGenuity (legacy release)
- Gigabyte RGB Fusion 2.0
- MSI Afterburner 2
- Valorant (Game)
- Windows 10 App Defender Smartscreen
- Software that blocks cheating in games can interfere in general.
- Check any other software you have installed that manages your hardware devices.
If you need to run these programs, then you may need to disable them when not in use.
Check recent changes in hardware and software
Have you recently installed any new hardware or software? If something new is in your system, then it may be interfering with your HyperX Ngenuity software and causing it not to work, so you should consider uninstalling it to see if the issue is fixed.
Then you’ll need to review online to see if there are any fixes or any updated software/patches to resolve the issue with the incompatible software or hardware.
Uninstall Hyperx Ngenuity software
Instead of upgrading your Hyperx Ngenuity software to get it working, you can perform a full uninstall and get rid of any %AppData% that is being left behind. The benefit of this over an upgrade is that you’re starting fresh; there are no leftover files interfering or %AppData% that could be a problem with leftover and old configuration that is causing problems.
Uninstall HyperX Ngenuity Software by right-clicking on it and selecting uninstall, following the prompts, and completing the process.
Go to your search bar, type %AppData%, then look for anything to do with Ngenuity or Hyperx and delete all the folders containing those names.
To remove any Hyperx Ngenuity registry entries, you can go to the same search bar, type regedit, go into the HKLMSoftware path, and remove anything that says Hyperx and Ngenuity.
Once fully uninstalled, reboot your computer and then reinstall the latest version of Hyperx Ngenuity software that supports your hardware.
Total failure and nothing worked
Unfortunately, in some situations, you’ve just gotten yourself into too big of a mess with installing software, modifying components, upgrading software, and making changes, then the Hyperx Ngenuity software STILL doesn’t work. It’s time to consider a complete reinstall of your OS and reinstall your software.
Hopefully, you’ve split your OS onto a separate drive, so a reinstall doesn’t require much effort or backups of any of your files not specifically related to your OS.
Many customers have found that after too many modifications, especially hardware and software upgrades, the Hyperx Ngenuity software breaks, which is a failure in the software to handle changes, but you need to work around it.
So is your Hyperx Ngenuity software not working still? If all else fails and your hyperx ngenuity software is not working, you can contact the support team by email or calling them. Details to contact the support team can be found here.
They’ll run through some further troubleshooting and walk you through getting your system and hardware set up as expected. If there is a bug or other issue, then they can log that with their development team to be released in a future software release.
If they’re unable to get the Hyperx Ngenuinity software working, then it may be time to consider returning your hardware for a refund, as it’s a little pointless to have it when it’s not working.
Conclusion
The Hyperx Ngenuity software allows you to perform some fun and entertaining actions with your hardware, but the software does not have a great reputation at the moment due to the number of issues that people find with poor interactions with other software and upgrades requiring a complete reinstall.
The software is still considered beta after almost a year, so making any changes can break the software. Consider setting restore points on your system or making reinstalls fast and easy.
More stories like this
- HP Pavilion gaming desktop TG01-2170M PC
- How to fix “HPDM.framework” will damage your computer on Mac?
- HP acquires HyperX for 425Mil
- HP X24i gaming monitor full review
- How to connect Airpods to HP laptop
- Full honest HP OfficeJet 3830 review
Explore our expert’s solutions for this issue
by Milan Stanojevic
Milan has been enthusiastic about technology ever since his childhood days, and this led him to take interest in all PC-related technologies. He’s a PC enthusiast and he… read more
Published on September 7, 2022
Reviewed by
Vlad Turiceanu

Passionate about technology, Windows, and everything that has a power button, he spent most of his time developing new skills and learning more about the tech world. Coming… read more
- HyperX Cloudset and HyperX Predator SSD seem to cause some trouble when used on Windows 10.
- If you’ve experienced similar issues, you will need to reinstall the headset driver to start resolving them.
- Make sure to follow the steps described in the guide in an orderly manner to ensure an efficient troubleshooting process.
XINSTALL BY CLICKING THE DOWNLOAD FILE
This software will repair common computer errors, protect you from file loss, malware, hardware failure and optimize your PC for maximum performance. Fix PC issues and remove viruses now in 3 easy steps:
- Download Restoro PC Repair Tool that comes with Patented Technologies (patent available here).
- Click Start Scan to find Windows issues that could be causing PC problems.
- Click Repair All to fix issues affecting your computer’s security and performance
- Restoro has been downloaded by 0 readers this month.
HyperX is a famous gaming hardware series that includes memories, SSDs, headsets, and peripherals. But many recently reported encountering problems with HyperX in Windows 10.
Issues with HyperX devices can arise for several reasons, and it’s generally tricky to identify the underlying cause.
So, in the following sections, we will walk you through what’s causing HyperX problems in Windows 10 and the solutions for each.
Why is my HyperX not working?
When the HyperX device is not working on the computer, it’s essential to identify the type of device you are facing issues with.
For instance, if it’s a headphone, misconfigured sound settings, outdated or corrupt drivers, or improper connections are to blame.
Several users also reported that the HyperX mic is not working, in which case, you would have to check the connections, be it a wired or wireless microphone.
Besides, certain services and processes are supposed to run on the computer to function the connected devices effectively. And in their absence, you are bound to encounter issues.
What to do if HyperX Cloud 2 mic is not working?
Many users reported that HyperX Cloud 2 mic is not working on Windows 11 and 10, but this issue can be quickly resolved. First, set the microphone as the primary device and verify if that resolves the problem.
You may update the audio driver or the ones specific to the HyperX Cloud 2 mic if it doesn’t. Besides, if you have third-party apps running that could modify the sound settings, disable or uninstall them to fix the HyperX problems in Windows 10.
If the microphone keeps resetting to 0 volume, you may run the audio troubleshooter or disable apps from taking control of the HyperX Cloud 2 mic.
Does HyperX need drivers?
Yes, HyperX needs drivers, as is the case with any device. But things are a lot more effortless and streamlined with HyperX.
Users don’t need to add the drivers manually; instead, they are automatically fetched and installed as soon as the HyperX device is connected. This is why you wouldn’t be able to find HyperX driver updates online.
Also, it’s best that you download HyperX NGENUITY software to customize compatible devices. In addition to that, it will also ensure that the devices work fine.
How do I fix HyperX issues on Windows 10?
1. Reinstall the headset driver
- Press Windows + X to open the Power User menu, and choose Device Manager from the list.
- Locate your HyperX audio device, right-click on it, and choose Uninstall device.
- A warning dialog will appear. Click on Uninstall to remove the device.
- Once done, unplug your headset and then restart your PC.
- After your PC restarts, reconnect the headset, and the driver for it should be installed automatically.
You might have to repeat this process several times before your headset starts working.
Drivers allow your PC to work with the hardware. Therefore, any driver-related issue will cause problems. That is why reinstalling the drivers will most likely solve the problem immediately.
Update drivers automatically (suggested)

If the previous method doesn’t fix the issue, we recommend you use a dedicated tool. Downloading and installing drivers manually is a process that carries the risk of getting the wrong driver installed, which may lead to severe malfunctions in your system.
So the safest and easiest way to update drivers on a Windows computer is by using a third-party tool. We strongly recommend DriverFix.
It scans your system, automatically identifies each device on your computer, and matches it with the latest driver versions from an extensive online database.
Drivers can then be updated in batches or one at a time without you having to make any complex decisions in the process.

DriverFix
Update all your audio outdated drivers with just a few clicks and your HyperX Cloud II heaset will work like a charm afterward.
2. Make sure that your microphone is unmuted
Some users mentioned that they were unable to adjust the microphone volume. The solution to this problem is relatively simple: you have to check the USB dongle that comes with the gaming headset.
There’s a small Mute switch on it, so make sure to press it to unmute the microphone. After doing that, the problem should disappear. It’s worth mentioning that the USB dongle also has its microphone control keys, so adjust the volume of your microphone from here.
Lastly, double-check if the headset is correctly connected to the USB dongle. To fix this problem, firmly connect your headset to the USB dongle and check if that solves the HyperX headset not working issue on Windows 10.
Some PC issues are hard to tackle, especially when it comes to corrupted repositories or missing Windows files. If you are having troubles fixing an error, your system may be partially broken.
We recommend installing Restoro, a tool that will scan your machine and identify what the fault is.
Click here to download and start repairing.
Also, find out what to do if other headsets are not working in Windows 10.
3. Connect your headset to a different USB port
HyperX Cloud II is a USB headset, meaning many USB-related problems can affect it. For example, although the USB 3.0 standard is gaining popularity, several users reported that this headset isn’t working correctly with this USB version.
So instead of using USB 3.0, try to connect your headset to a USB 2.0 port and check if that solves the issue. In addition, some users suggest you use the ports on the back of your computer instead of the front ones, which are more likely to be faulty.
4. Check your audio device settings
- Press Windows + S, enter Change system sounds in the text field, and choose the relevant search result from the menu.
- Go to the Recording tab, right-click the empty space, and check the Show Disabled Devices and Disconnected Devices options.
- Now locate your microphone, right-click on it, and choose Enable from the menu.
- Click on OK to save changes.
Some users also suggested deactivating and reactivating the microphone to fix this problem. You can easily do it by choosing Disable and Enable from the Sound window.
5. Use the sound troubleshooter
- Press Windows + I to open the Settings app, and click on the Update & Security section.
- Choose Troubleshoot from the navigation pane on the left.
- Click on Additional troubleshooters here.
- Now select Recording Audio and click on the Run the troubleshooter button.
- Follow the on-screen instructions and choose the relevant response when prompted to complete the troubleshooting process.
Running the built-in troubleshooter is probably one of the simplest methods to fix HyperX problems in Windows 10. But remember that it would only work if Microsoft has acknowledged the issue and a solution is available.
- Internal microphone not working in Windows 10/11 [HP]
- FIX: Microphone not working in Windows 11
- Device Manager Has Multiple Processors? Here’s What to Do
- PC Slow After Windows Update? Here Are 8 Ways to Fix That
6. Update the firmware
If you’re having microphone problems with your HyperX Cloud II headphones, you might be able to fix them by upgrading the firmware since it’s critical for the effective functioning of the device.
Note that firmware update is an advanced procedure, and it can cause irreversible damage to your headphones if not done right, so exercise caution.
If you intend to update it, download the firmware update for HyperX Cloud II from the official support website. The updates for other devices, too, can be found on the support website.
7. Try using an audio splitter
Users reported that the microphone wasn’t recognized on their HyperX Cloud Stinger headphones. They mentioned one might be able to circumvent this problem by using an audio splitter.
This small device comes with two 3.5mm ports, one for audio and one for the microphone. This isn’t the best solution, but it’s a decent workaround, so you might want to try it if you’re having problems with the HyperX Cloud Stinger headset in Windows 10.
8. Update the drivers
- Press Windows + R to launch the Run command, enter devmgmt.msc in the text field, and click OK to open the Device Manager.
- Locate your audio driver, right-click it and choose Update driver.
- Select Search automatically for drivers.
- Windows will now check for driver updates and install new drivers.
- After the new driver is installed, restart your PC.
We have to mention that Device Manager is the simplest way to update your audio drivers but not necessarily the most efficient one. Usually, Device Manager doesn’t download the latest drivers, which can be a problem. And
To ensure you have the latest drivers, download these from the motherboard or sound card manufacturer’s official website.
Better yet, use the dedicated tool recommended in the first solution, DriverFix, and you’ll surely get the correct components in no time.
9. Use the remote control to adjust the microphone
Some HyperX headsets have a remote control that allows you to control your microphone or adjust your audio.
Using the remote control, you can adjust your headset’s microphone sensitivity, so be sure to do that.
Few users reported that this method solved the problem for them. If the previous ones didn’t help, try this one.
10. Check your headset wires
If you’re having any problems with the HyperX headset in Windows 10, you might be able to fix them by checking the cable. In some cases, your cable is damaged, and you might be able to fix it by taping the affected area.
To verify if the cable is the culprit, you might want to try the headset on a different PC and check if the same appears. If it does, you now know what’s causing the problem and its solution.
How can I fix HyperX problems on Windows 11?
The solutions remain the same with Windows 11 as they were for Windows 10. However, a couple of additional measures you may undertake are as follows:
- Look for applications that might control the Bluetooth functionality or the sound settings and uninstall them.
- If the problem started after updating the OS, revert to the previous version.
- Performing a system restore might do the trick.
- Disable apps from accessing the microphone.
- As a last resort, you may reset Windows 11 to factory settings.
Is there software for HyperX?
There are a series of software that allows you to customize some of HyperX’s features. A good example is the HyperX NGENUITY software that is available for download in Microsoft Store
HyperX series offers a great range of gaming hardware, but as you may have noticed, some of its products have had problems in Windows 10. Though the solutions are simple, you should have them working in no time.
Also, find out how to optimize the PC for gaming and run even the most resource-hungry games seamlessly.
If you have any other suggestions or questions, don’t hesitate to leave them in the comments section below, and we’ll be sure to take a look.
![]()
Newsletter
HyperX’s NGenuity software provides an easy way to get the most out of your HyperX gaming headset and make audio tweaks on the fly.
However, if you’re having trouble getting the software to detect your headset, you might need to do some troubleshooting in order to get things working properly again.
This guide will help you fix HyperX NGenuity not detecting headset so that you can get back to gaming and chatting with friends.
Hope you will be able to solve the problem by the end of the article. If you don’t, you will probably need to change your headset.
Uninstall and reinstall
This is normally a simple fix, but you may have to uninstall it more than once. If that’s the case, simply delete anything involving HyperX from your computer and device manager, restart your computer and try again.
After uninstalling and reinstalling the software solves the issue, then you do not need to go through the article. This should solve any issues with detecting your headset. If it does not, then you need to follow the steps below.
Disconnect everything and try again
This will also eliminate possible problems with a cluttered system. For example, if you’re using an external hard drive that is connected to your PC, disconnect it and try again. If it still doesn’t work, then you may need to replace that hard drive.
Also, make sure any firewalls or security programs aren’t stopping any of your headsets from working properly on your computer.
You can temporarily disable them to see if they are interfering with other programs on your computer but only do so for troubleshooting purposes.
While you have some things disconnected from your PC, open up Device Manager by going to Control Panel and then Device Manager. Check to see if there are any yellow exclamation points next to any devices.
If there are, right-click on those devices and select Update Driver Software… Next, select Search automatically for updated driver software.
Reboot your computer after installing new drivers. Run HyperX NGenuity again and check if your headset works now.
Update your drivers
This step is not always necessary but can still be done. To find out which drivers you need to update, go to Device Manager. Look for the Sound, Video, and Game Controllers category and expand it.
Right-click on any one of them and select Update Driver Software. Follow on-screen instructions until you are told that the driver is up to date or further action is required.
Go back and right-click again on Audio Device (if available) or Motherboard Integrated Audio Device (in case of no audio device) then select Uninstall.
Once uninstalled reboot your computer, and reinstall the driver downloaded from the official site of the hardware manufacturer.
Reboot your computer
Sometimes, it’s easier to reboot than go through all of your settings. When you turn your computer back on, Windows may automatically detect and install new hardware. If not, press F8 when you see Starting Windows and select Safe Mode with Networking.
Once your system boots into Safe Mode, restart again normally and plug in your headset to ensure that Windows recognizes it as an input device. You can also try uninstalling and reinstalling your audio drivers if nothing else works.
Plug the headset into another port
If you have an external device (flash drive, etc.) plugged into your computer via a USB port, remove it and try plugging in your headset to another USB port.
If it works with a different port, then you know that one of your ports isn’t working correctly. Make sure you update drivers for any devices and switch out suspect ports for new ones if possible.
If the headset still doesn’t work after trying all of these things, Use a dedicated USB port on the computer: This can be a tricky fix but worth a shot if nothing else is working.
Connect the headset to another computer
If you’re still unable to connect your headset with NGenuity, try connecting it to another computer.
If you’re able to use your headset without any problems on another computer, there may be a problem with your software.
You can try updating those or contacting customer support for assistance. If using another computer doesn’t work either, contact customer support and they should be able to help you troubleshoot further.
Also read: PS4 USB Headset No Sound Issue Solved
Conclusion
You may be facing the problem of HyperX NGenuity Not Detecting Headset. You should try these various fixes mentioned above and hopefully trying these, you can make your headset work again.
The most significant one will be restarting your computer and it will solve the issue in most cases. But if it does not and as well as trying the above fixes does not work for you.
Then you probably need to get your headsets changed.
Let me know if you got your issue resolved. If you really did, do let me know in the comments section.
Содержание
- Проблемы HyperX в Windows 10 [ЛУЧШИЕ РЕШЕНИЯ]
- Проблемы HyperX в Windows 10 [ЛУЧШИЕ РЕШЕНИЯ]
- Как я могу исправить проблемы HyperX в Windows 10?
- Исправление — HyperX Cloud для Windows 10
- Исправление — HyperX Predator для Windows 10

Проблемы HyperX в Windows 10 [ЛУЧШИЕ РЕШЕНИЯ]
HyperX — известная серия игрового оборудования, которая включает в себя память, SSD, гарнитуры и периферийные устройства. Эта серия довольно популярна среди геймеров, но пользователи сообщили о некоторых проблемах с ней в Windows 10, поэтому сегодня мы собираемся показать вам, как решить эти проблемы.
Как я могу исправить проблемы HyperX в Windows 10?
Исправление — HyperX Cloud для Windows 10
Решение 1. Убедитесь, что ваш микрофон не включен
Пользователи сообщали о проблемах с игровой гарнитурой HyperX Cloud II, и, по их словам, им не удалось отрегулировать громкость микрофона. Решение этой проблемы довольно простое, и вам просто нужно проверить USB-ключ, который поставляется с игровой гарнитурой.
На USB-ключе имеется небольшой переключатель отключения звука, поэтому, если у вас возникли проблемы с микрофоном, обязательно включите его, нажав переключатель отключения звука. После этого проблема должна исчезнуть.
Стоит отметить, что USB-ключ также имеет свои собственные клавиши управления микрофоном, поэтому не забудьте отрегулировать громкость микрофона с помощью USB-ключа.
Наконец, дважды проверьте, правильно ли подключена гарнитура к USB-ключу. Чтобы устранить эту проблему, обязательно надежно подключите гарнитуру к USB-ключу и проверьте, решает ли это проблему.
Если в Windows 10 есть более одной проблемы с USB-гарнитурой, мы рекомендуем вам ознакомиться с этой полной статьей , в которой подробно рассматриваются многочисленные проблемы.
Решение 2. Подключите гарнитуру к другому USB-порту.
HyperX Cloud II — это USB-гарнитура, поэтому на нее могут влиять многие проблемы, связанные с USB. Несмотря на то, что стандарт USB 3.0 набирает популярность, несколько пользователей сообщили, что эта гарнитура не работает должным образом с USB 3.0.
Вместо того чтобы использовать USB 3.0, попробуйте подключить гарнитуру к порту USB 2.0 и проверить, решает ли это проблему.
USB 3.0 обеспечивает высокую скорость передачи , и ваша гарнитура не может отправить достаточно данных, чтобы полностью использовать USB 3.0, поэтому при использовании соединения USB 2.0 у вас не возникнет проблем с потерей качества или задержкой.
Кроме того, некоторые пользователи предлагают использовать порты на задней панели компьютера, а не на передней панели.
Иногда передние порты могут иметь проблемы с подключением, но порты на задней панели встроены в вашу материнскую плату , поэтому у вас не возникнет проблем с подключением.
Решение 3. Проверьте настройки аудиоустройства
Если у вас все еще есть проблемы с гарнитурой HyperX Cloud II, вы можете решить их, проверив настройки аудиоустройства. Прежде чем вы сможете это сделать, вы должны убедиться, что ваша гарнитура правильно подключена.
После этого вам необходимо сделать следующее:
- Нажмите Windows Key + S и введите звук . Выберите Звук из меню.

- Перейдите на вкладку « Запись » и щелкните правой кнопкой мыши пустое место. Установите флажок « Показать отключенные устройства» и « Показать отключенные устройства» .
- Теперь найдите свой микрофон, щелкните его правой кнопкой мыши и выберите « Включить» в меню.
- Нажмите Apply и OK, чтобы сохранить изменения.


Некоторые пользователи также предлагают отключить и снова включить микрофон, чтобы решить эту проблему. Для этого откройте окно « Звук» и перейдите на вкладку « Запись ».
Щелкните правой кнопкой мыши по микрофону и выберите « Отключить» в меню. После этого просто включите микрофон снова и проверьте, решает ли это проблему.
Решение 4. Использование средства устранения неполадок звука
Иногда эта ошибка может появляться, если ваша звуковая конфигурация неверна. Однако вы можете легко решить эту проблему, запустив средство устранения неполадок со звуком.
Сделав это, ваш компьютер проверит наличие проблем со звуком и попытается устранить их автоматически. Запуск средства устранения неполадок довольно прост, и вы можете сделать это, выполнив следующие действия:
- Нажмите клавишу Windows + I, чтобы открыть приложение «Настройки» .
- Перейдите в раздел « Обновление и безопасность ».
- Выберите Устранение неполадок в меню слева. Теперь выберите « Запись звука» и нажмите « Запустить средство устранения неполадок» .
- Следуйте инструкциям на экране для завершения процесса устранения неполадок.


Вы также можете запустить средство устранения неполадок из панели управления. Для этого выполните следующие действия:
- Нажмите Windows Key + S и войдите в панель управления . Выберите Панель управления из меню.
- После открытия панели управления перейдите в раздел « Устранение неполадок ».
- В окне « Устранение неполадок» нажмите « Просмотреть все» в меню слева.
- Выберите Запись аудио из списка.
- Когда откроется окно устранения неполадок, нажмите Далее .
- Следуйте инструкциям для устранения неполадок.


Вы не можете открыть панель управления? Посмотрите на это пошаговое руководство, чтобы найти решение.
Запуск средства устранения неполадок — не самое эффективное решение, но немногие пользователи сообщили, что оно решило проблему для них, поэтому обязательно попробуйте его.
Решение 5. Переустановите драйвер гарнитуры.
Если у вас возникла проблема с наушниками HyperX Cloud II, попробуйте переустановить аудиодрайверы. Драйверы позволяют вашему ПК работать с вашим оборудованием, поэтому любая проблема, связанная с драйверами, вызовет проблемы с вашим оборудованием.
Пользователи сообщили, что они исправили эту проблему, переустановив свои драйверы, и вы можете сделать это, выполнив следующие действия:
- Нажмите Windows Key + X, чтобы открыть меню Win + X. Выберите диспетчер устройств из списка.
- Когда откроется диспетчер устройств , найдите аудиоустройство HyperX , щелкните его правой кнопкой мыши и выберите « Удалить устройство» .
- Появится диалоговое окно с предупреждением. Нажмите на Удалить, чтобы удалить драйвер.
- После удаления драйвера отключите гарнитуру и перезагрузите компьютер.
- После перезагрузки ПК подключите гарнитуру, и драйвер должен быть установлен автоматически.


По словам пользователей, вам, возможно, придется повторить этот процесс несколько раз, прежде чем гарнитура начнет работать.
Обновлять драйверы автоматически (рекомендуется)
Если предыдущий метод не устранил проблему, мы рекомендуем вам использовать специальный инструмент. Загрузка и установка драйверов вручную — это процесс, который несет в себе риск установки неправильного драйвера, что может привести к серьезным сбоям в работе вашей системы.
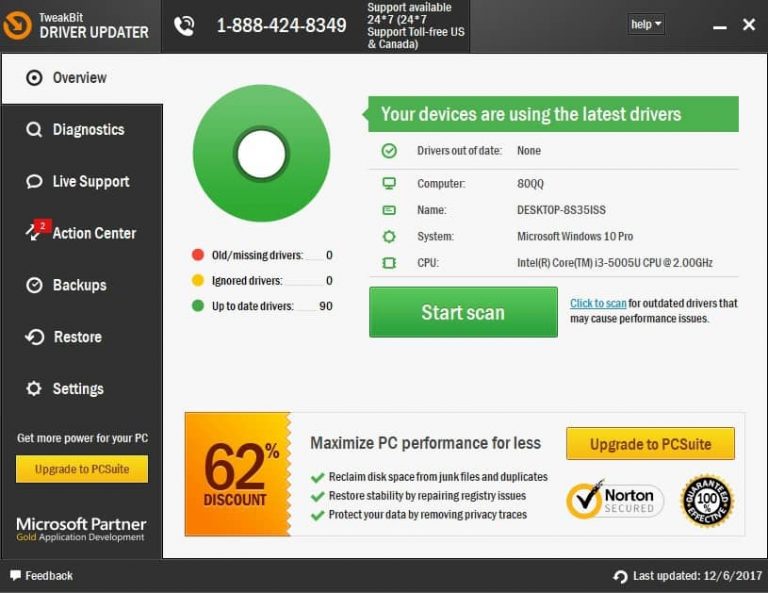
Более безопасный и простой способ обновления драйверов на компьютере с Windows — использование автоматического инструмента. Мы настоятельно рекомендуем инструмент обновления драйверов Tweakbit.
Он автоматически идентифицирует каждое устройство на вашем компьютере и сопоставляет его с последними версиями драйверов из обширной онлайн-базы данных. Затем драйверы могут обновляться партиями или по одному, не требуя от пользователя принятия каких-либо сложных решений в процессе.
Вот как это работает:
-
- Загрузите и установите TweakBit Driver Updater
- После установки программа начнет сканирование вашего компьютера на наличие устаревших драйверов автоматически. Driver Updater проверит установленные вами версии драйверов по своей облачной базе данных последних версий и порекомендует правильные обновления. Все, что вам нужно сделать, это дождаться завершения сканирования.
- По завершении сканирования вы получите отчет обо всех проблемных драйверах, найденных на вашем ПК. Просмотрите список и посмотрите, хотите ли вы обновить каждый драйвер по отдельности или все сразу. Чтобы обновить один драйвер за раз, нажмите ссылку «Обновить драйвер» рядом с именем драйвера. Или просто нажмите кнопку «Обновить все» внизу, чтобы автоматически установить все рекомендуемые обновления.
Примечание.Некоторые драйверы необходимо устанавливать в несколько этапов, поэтому вам придется нажимать кнопку «Обновить» несколько раз, пока не будут установлены все его компоненты.
- Загрузите и установите TweakBit Driver Updater

Отказ от ответственности : некоторые функции этого инструмента не являются бесплатными.
Решение 6 — Обновите прошивку
Если у вас проблемы с микрофоном в наушниках HyperX Cloud II, вы можете исправить их, обновив прошивку. Обновления прошивки могут исправить некоторые проблемы, поэтому вы можете рассмотреть возможность обновления прошивки.
Мы должны предупредить вас, что обновление встроенного программного обеспечения является сложной процедурой и может привести к необратимому повреждению ваших наушников, поэтому будьте особенно осторожны.
Чтобы обновить прошивку наушников, перейдите на веб-сайт HyperX для загрузки прошивки и инструкций. Еще раз, обновление прошивки может привести к необратимому повреждению ваших наушников, поэтому вы обновляете их на свой страх и риск.
Решение 7. Попробуйте использовать аудио-разветвитель
Пользователи сообщили, что микрофон не был распознан в наушниках HyperX Cloud Stinger. По их словам, вы можете обойти эту проблему, используя аудио-разветвитель .
Это небольшое устройство, которое поставляется с двумя портами 3,5 мм, один для аудио и один для микрофона. После подключения гарнитуры к сплиттеру они смогли без проблем использовать микрофон.
Это не лучшее решение, но это достойный обходной путь, поэтому вы можете попробовать его, если у вас возникли проблемы с гарнитурой HyperX Cloud Stinger.
Решение 8 — Обновите ваши драйверы
По словам пользователей, у них были некоторые проблемы с наушниками HyperX Cloud в Skype. Другие пользователи не могли слышать их во время звонков в Skype, но им удалось решить проблему путем обновления своих аудиодрайверов.
Для этого выполните следующие простые шаги:
- Откройте диспетчер устройств .
- Когда диспетчер устройств запускается, найдите свой аудиодрайвер. Щелкните правой кнопкой мыши и выберите « Обновить драйвер» .
- Выберите Поиск автоматически для обновления программного обеспечения драйвера .
- Теперь Windows проверит обновления драйверов и установит новые драйверы.
- После установки нового драйвера перезагрузите компьютер.


Мы должны отметить, что Диспетчер устройств — это самый простой способ обновления ваших аудиодрайверов, но он не самый эффективный. Обычно диспетчер устройств не загружает последние версии драйверов, и иногда это может быть проблемой.
Если вы хотите убедиться, что у вас установлены последние версии драйверов, вам необходимо загрузить драйверы аудио от производителя материнской платы или звуковой карты. После установки последних версий драйверов проверьте, сохраняется ли проблема.
Решение 9 — Используйте пульт дистанционного управления для настройки микрофона
Некоторые гарнитуры HyperX поставляются с пультом дистанционного управления, который позволяет управлять микрофоном или регулировать звук. С помощью пульта дистанционного управления вы также можете настроить чувствительность микрофона для вашей гарнитуры, поэтому обязательно сделайте это.
Немногие пользователи сообщили, что этот метод решил проблему для них, поэтому обязательно попробуйте.
Решение 10 — Проверьте провода гарнитуры
Если у вас возникли проблемы с гарнитурой, вы можете исправить их, проверив кабель. В некоторых редких случаях может случиться, что ваш кабель поврежден, но вы можете починить его, приклеив поврежденную область.
Чтобы убедиться, что ваш кабель является проблемой, вы можете попробовать гарнитуру на другом ПК и проверить, появляется ли та же проблема.
Исправление — HyperX Predator для Windows 10
Решение — обновить драйверы чипсета
Если у вас проблемы с твердотельным накопителем HyperX Predator, вы можете исправить их, обновив драйверы чипсета. Ваш чипсет отвечает за связь со всеми устройствами, подключенными к вашему ПК, поэтому всегда полезно обновлять драйверы.
Для обновления драйверов вашего чипсета вам необходимо скачать их с сайта производителя вашей материнской платы. Просто найдите модель вашей материнской платы и загрузите необходимые драйверы для нее.
После установки последних версий драйверов проблема с вашим SSD должна быть решена. Пользователи также сообщили, что обновление драйверов Rapid Storage Technology устранило проблему для них, поэтому обязательно попробуйте это.
Серия HyperX предлагает отличное игровое оборудование, но, как вы можете видеть, некоторые проблемы с ним могут возникать в Windows 10. Если вы используете гарнитуру или твердотельный накопитель HyperX, обязательно попробуйте некоторые решения из нашей статьи.
Если у вас есть какие-либо другие предложения или вопросы, не стесняйтесь оставлять их в разделе комментариев ниже, и мы обязательно их рассмотрим.
Источник
Содержание
- Как установить hyperx ngenuity на виндовс 7
- HyperX NGENUITY Software (BETA)
- Часто задаваемые вопросы
- Популярные вопросы
- Связаться со службой технической поддержки
- Как установить hyperx ngenuity на виндовс 7
- HyperX NGENUITY Software (BETA)
- Часто задаваемые вопросы
- Популярные вопросы
- Связаться со службой технической поддержки
- Как установить hyperx ngenuity на виндовс 7
- HyperX NGENUITY Software (BETA)
- Часто задаваемые вопросы
- Популярные вопросы
- Связаться со службой технической поддержки
- HyperX NGENUITY (BETA)
- Преимущества
- Ключевые характеристики
- Все возможности персонализированной настройки у вас под рукой
- Создание и сохранение макросов и привязок кнопок
- Расширенная персонализированная настройка разрешения DPI
- Персонализированный игровой режим
- Устройства, совместимые с HyperX NGENUITY (BETA)
- Как установить hyperx ngenuity на виндовс 7
- HyperX NGENUITY Software (BETA)
- Frequently Asked Questions
- Featured Questions
- Contact Technical Support
Как установить hyperx ngenuity на виндовс 7
Версия вашего веб-браузера устарела. Обновите браузер для повышения удобства работы с этим веб-сайтом. https://browser-update.org/update-browser.html
UK, we are now selling direct!
HyperX NGENUITY Software (BETA)
Часто задаваемые вопросы
Популярные вопросы
Ниже приведены советы по устранению неполадок. Если эти советы не помогут решить проблему, обратитесь в службу технической поддержки по телефону, в чате или по электронной почте.
Шаг 1. Используйте другой порт USB, проверьте, не будет ли обнаружено устройство. При возможности используйте порт USB 3.0.
Шаг 2. Проверьте, нет ли USB-концентратора или переключателя KVM между ПК и периферийными устройствами.
Шаг 3. Проверьте, нет ли в системе какого-либо ПО для управления RGB-подсветкой или периферийными устройствами.
Шаг 4. Выполните полное выключение ПК (удерживая нажатой клавишу Shift, выберите команду «Завершить работу») и перезапустите его.
Шаг 5. Выполните обновление до последней версии NGENUITY (Beta). FAQ: HX-001001-NG-117
Хотя могут существовать и другие приложения, о которых мы не знаем, ниже приводится список программного обеспечения, которое может конфликтовать с NGENUITY.
Связаться со службой технической поддержки
Questions about a Kingston product you already own? Ask a Kingston expert.
Техническая поддержка по электронной почте
Complete a short form for prompt resolution
Источник
Как установить hyperx ngenuity на виндовс 7
Версия вашего веб-браузера устарела. Обновите браузер для повышения удобства работы с этим веб-сайтом. https://browser-update.org/update-browser.html
HyperX NGENUITY Software (BETA)
Часто задаваемые вопросы
Популярные вопросы
Ниже приведены советы по устранению неполадок. Если эти советы не помогут решить проблему, обратитесь в службу технической поддержки по телефону, в чате или по электронной почте.
Шаг 1. Используйте другой порт USB, проверьте, не будет ли обнаружено устройство. При возможности используйте порт USB 3.0.
Шаг 2. Проверьте, нет ли USB-концентратора или переключателя KVM между ПК и периферийными устройствами.
Шаг 3. Проверьте, нет ли в системе какого-либо ПО для управления RGB-подсветкой или периферийными устройствами.
Шаг 4. Выполните полное выключение ПК (удерживая нажатой клавишу Shift, выберите команду «Завершить работу») и перезапустите его.
Шаг 5. Выполните обновление до последней версии NGENUITY (Beta). FAQ: HX-001001-NG-117
Хотя могут существовать и другие приложения, о которых мы не знаем, ниже приводится список программного обеспечения, которое может конфликтовать с NGENUITY.
Связаться со службой технической поддержки
Questions about a Kingston product you already own? Ask a Kingston expert.
Техническая поддержка по электронной почте
Заполните короткую форму для быстрого ответа
Позвонить в службу технической поддержки
Рабочие дни 9:00 – 18:00 (Московское время)
Источник
Как установить hyperx ngenuity на виндовс 7
Версия вашего веб-браузера устарела. Обновите браузер для повышения удобства работы с этим веб-сайтом. https://browser-update.org/update-browser.html
USA, we are now selling direct!
HyperX NGENUITY Software (BETA)
Часто задаваемые вопросы
Популярные вопросы
Ниже приведены советы по устранению неполадок. Если эти советы не помогут решить проблему, обратитесь в службу технической поддержки по телефону, в чате или по электронной почте.
Шаг 1. Используйте другой порт USB, проверьте, не будет ли обнаружено устройство. При возможности используйте порт USB 3.0.
Шаг 2. Проверьте, нет ли USB-концентратора или переключателя KVM между ПК и периферийными устройствами.
Шаг 3. Проверьте, нет ли в системе какого-либо ПО для управления RGB-подсветкой или периферийными устройствами.
Шаг 4. Выполните полное выключение ПК (удерживая нажатой клавишу Shift, выберите команду «Завершить работу») и перезапустите его.
Шаг 5. Выполните обновление до последней версии NGENUITY (Beta). FAQ: HX-001001-NG-117
Хотя могут существовать и другие приложения, о которых мы не знаем, ниже приводится список программного обеспечения, которое может конфликтовать с NGENUITY.
Связаться со службой технической поддержки
Questions about a Kingston product you already own? Ask a Kingston expert.
Техническая поддержка по электронной почте
Заполните краткую форму для отправки запроса по электронной почте.
Источник
HyperX NGENUITY (BETA)
HyperX NGENUITY — это мощное и интуитивно понятное программное обеспечение, предоставляющее для вас возможность персонализировать ваши совместимые продукты HyperX. Задавайте привязки кнопок, пишите и сохраняйте макросы, а также выполняйте персонализированную настройку подсветки: HyperX NGENUITY предоставляет вам такой уровень управления, какой вы хотите. Кроме того, данное ПО поставляется с библиотекой преднастроек — вы можете быстро устанавливать их и сразу приступать к игре. Просмотреть совместимые продукты
Возникли проблемы при доступе к Microsoft Store? Скачайте тут.

Преимущества
Ключевые характеристики

Все возможности персонализированной настройки у вас под рукой
Легкая настройка подсветки и эффектов.

Создание и сохранение макросов и привязок кнопок
Одним нажатием клавиши можно выполнять функции нескольких и вы также можете назначать кнопки для каждого нужного вам действия.

Расширенная персонализированная настройка разрешения DPI
Сделайте управление с помощью мыши настолько точным, насколько вам нужно.

Персонализированный игровой режим
Вы можете выбирать, какие клавиши должны отключаться при нажатии кнопки игрового режима.
Устройства, совместимые с HyperX NGENUITY (BETA)

Побеждайте с оригинальными модулями памяти с RGB-подсветкой.
No products were found matching your selection
Источник
Как установить hyperx ngenuity на виндовс 7
Your web browser is out of date. Update your browser now for better experience on this site. https://browser-update.org/update-browser.html
USA, we are now selling direct!
HyperX NGENUITY Software (BETA)
Frequently Asked Questions
Featured Questions
Please see below for trouble-shooting tips. If the following tips do not resolve, feel free to contact technical support via telephone, chat or email for assistance.
Step 1. User another USB port, check if the device shows up. Use a USB 3.0 port if possible.
Step 2. Check if there is a USB hub or KVM switch in between the PC and the peripherals
Step 3. Check any RGB control SW or peripherals control SW.
Step 4. Shift-Shutdown the PC and restart
Step 5. Update to the latest NGENUITY (Beta) version FAQ: HX-001001-NG-117
Although there may be additional application that we are not aware of, below is a list of software that may conflict with NGENUITY.
* Gigabyte RGB Fusion 2.0 (has been improved. Now only memory module products have conflicts.)
**The crashes are caused by RivaTuner Statistics Server, and NGENUITY isn’t the only software affected. To stop the crashes, make sure to use the latest MSI Afterburner, version 4.6.3 Beta 2 Build 15840, which comes with the latest version of RTSS, ver v7.3.0. If you’re still experiencing crashes, try opening RTSS and adding an individual Application Profile for NGENUITY, setting the On-Screen Display Support to OFF, Application Detection Level to None, then go into Setup and Reset Cache. This should stop RTSS from doing Direct3D injection with NGENUITY. FAQ: HX-001001-NG-115
Contact Technical Support
Questions about a Kingston product you already own? Ask a Kingston expert.
Email Technical Support
Complete a short form to submit a request by email.
Источник