Попробуйте наш инструмент устранения неполадок
Выберите операционную систему
Выберите язык програмирования (опционально)
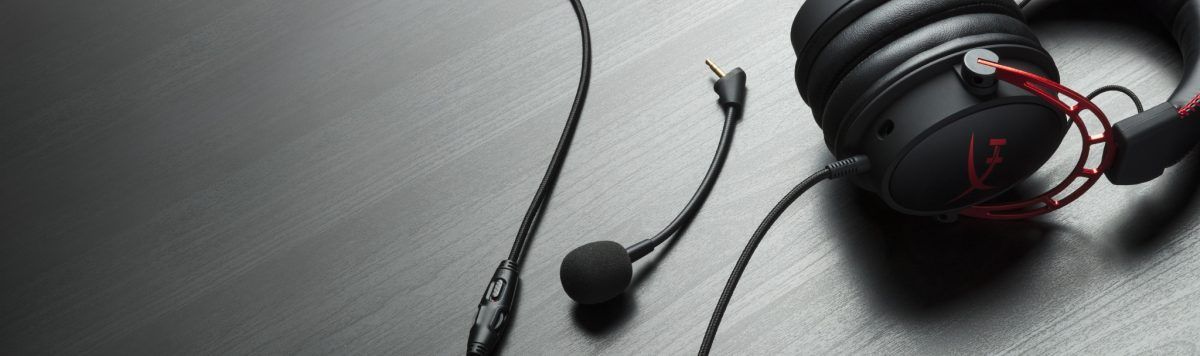
Как прямое продолжение Cloud II, HyperX Cloud Alpha добавляет множество новых и захватывающих вещей, и это звучит нейтрально, динамично и чисто. Если у вас возникли проблемы с микрофоном HyperX Cloud Alpha, не волнуйтесь. Многие пользователи сообщают об одной и той же проблеме, и ее можно быстро и легко исправить.
Попробуйте эти исправления
- 1. Проверьте соединения.
- 2. Устранение неполадок микрофона гарнитуры HyperX.
- 3. Разрешите доступ к микрофону.
- 4. Обновите аудиодрайвер.
- 5. Измените настройки микрофона.
1. Проверьте соединения.
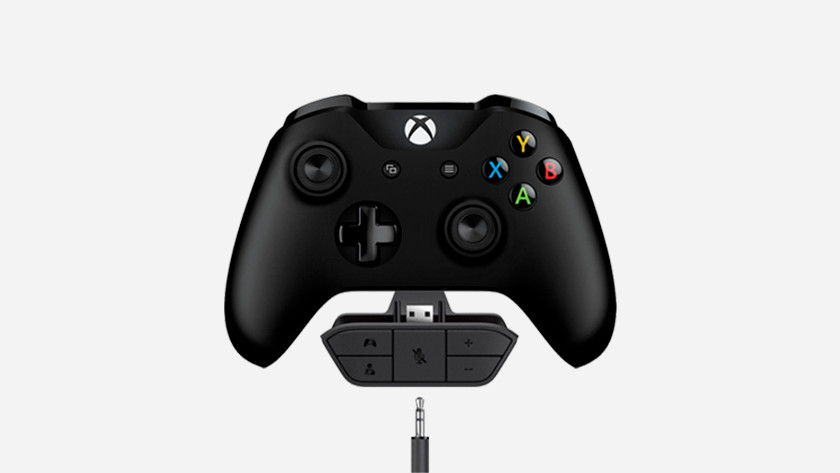
Поскольку HyperX Cloud Alpha поставляется со съемным микрофоном, важно плотно вставить разъем съемного кабеля, чтобы обеспечить полное подключение (вам действительно нужно вставить его в гарнитуру). Кроме того, убедитесь, что микрофон не отключен, и увеличьте громкость до максимального уровня. Это последнее исправление для многих пользователей.

Если вы используете HyperX Cloud Alpha на Xbox One, вам понадобится адаптер. Убедитесь, что кнопка отключения звука не активна, и используйте кнопки на адаптере для регулировки звука и громкости микрофона. Затем перейдите в Настройки , и перейдите к Аудио чтобы убедиться, что микрофон включен. (Cloud Alpha S совместим только с ПК и PS4.)
Если у вас возникнут проблемы с оборудованием, вы всегда можете использовать встроенное средство устранения неполадок Windows. Это поможет вам исправить мелкие проблемы.
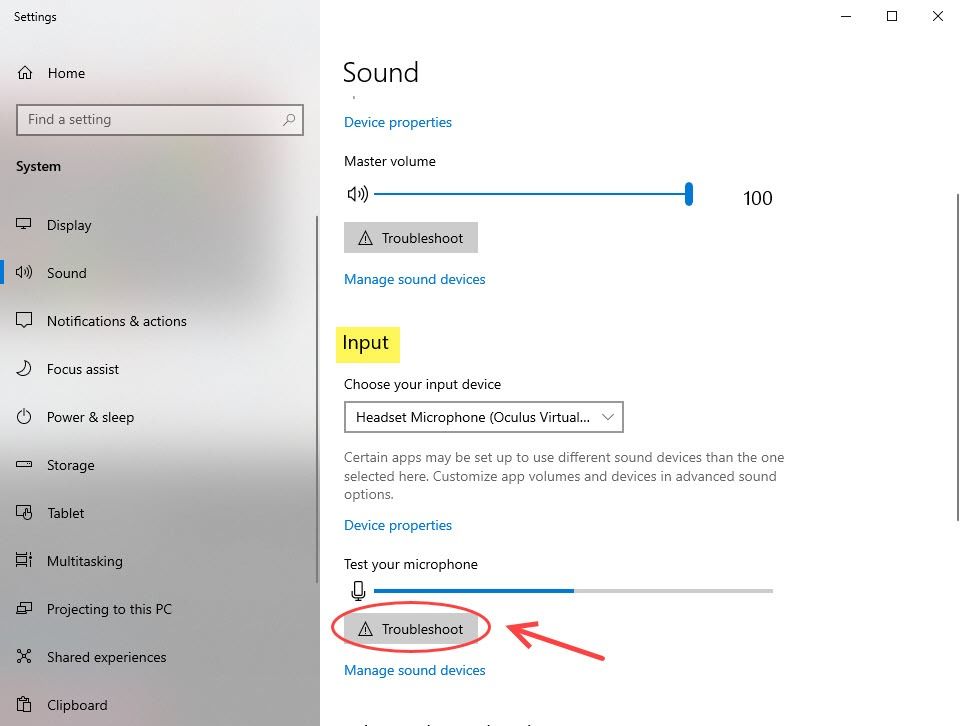
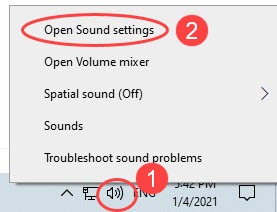
- Щелкните правой кнопкой мыши кнопку динамика в правом нижнем углу и выберите Открыть настройки звука .

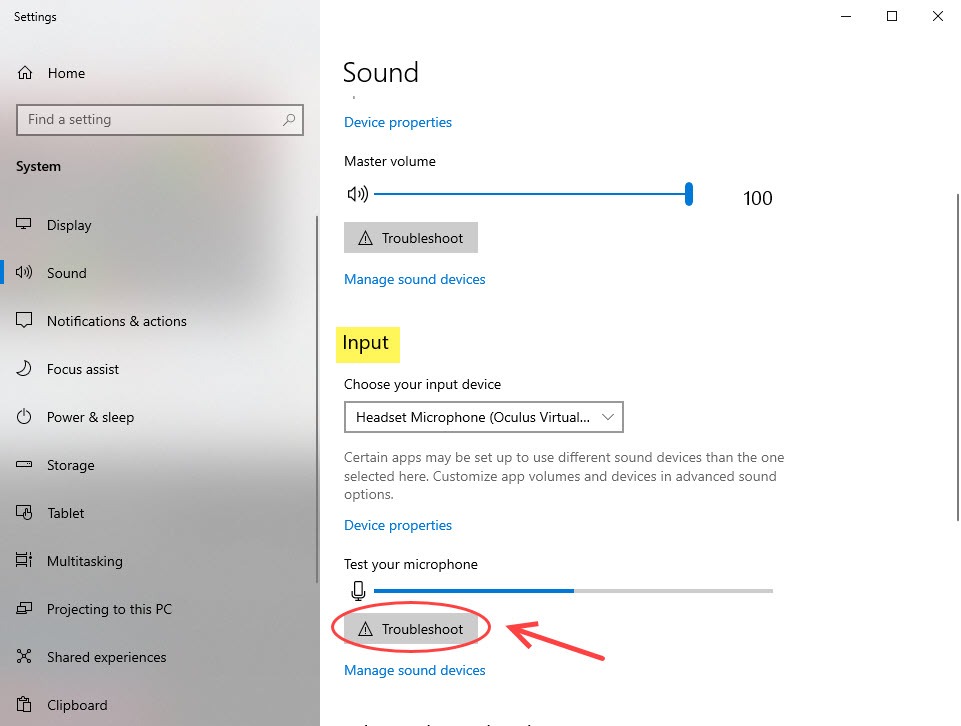
- Под Вход , выберите правильное устройство ввода (HyperX Cloud Alpha) и нажмите Устранение неполадок .
- Следуйте инструкциям на экране и дождитесь завершения.

3. Разрешите доступ к микрофону.
Ваш микрофон HyperX Cloud Alpha не работает, возможно, это связано с настройками микрофона на вашем ПК. Чтобы решить эту проблему, вы можете проверить настройки конфиденциальности своего микрофона и убедиться, что приложение, которое вы используете, имеет доступ к вашему микрофону.
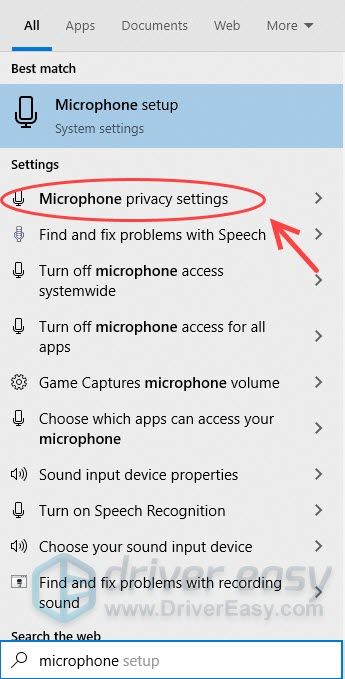
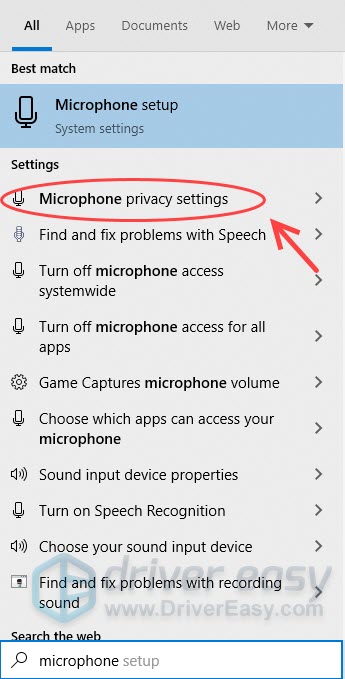
- На клавиатуре нажмите Окна клавиша с логотипом, чтобы вызвать окно поиска, и введите микрофон .
- Выбирать Настройки конфиденциальности микрофона из списка результатов.
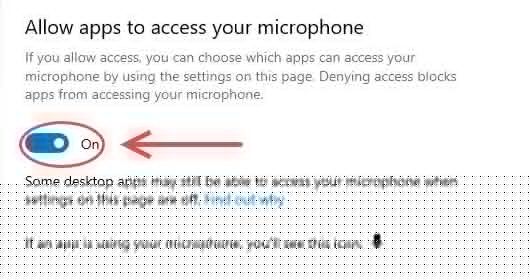
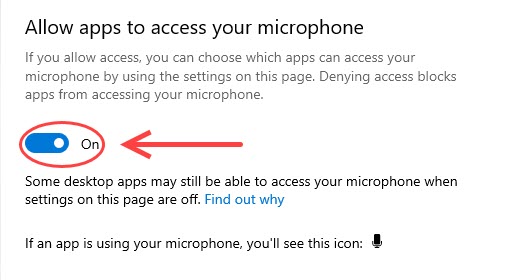
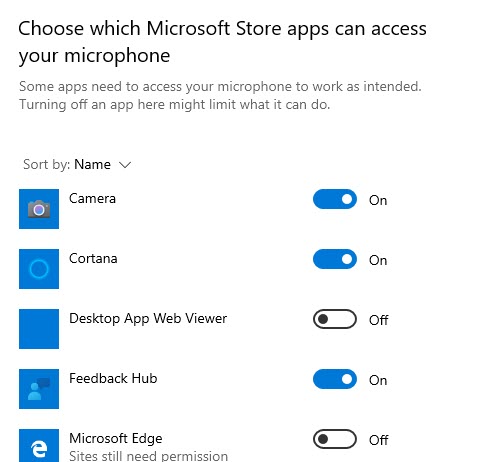
- Под Разрешить приложениям доступ к вашему микрофону вкладку, убедитесь, что переключатель находится в На положение, чтобы другие приложения могли использовать ваш микрофон.
- Прокрутите вниз, чтобы выбрать, какое приложение может получить доступ к вашему микрофону, и убедитесь, что он настроен для всех приложений, которые вам нужны.
- Теперь проверьте, работает ли ваш микрофон с приложением, которое вы используете.

4. Обновите аудиодрайвер.
Если аудиодрайвер неисправен или устарел, вы, вероятно, столкнетесь с проблемой неработающего микрофона HyperX Cloud Alpha. Чтобы ваша игровая гарнитура работала с максимальной эффективностью, вам следует установить последнюю версию аудиодрайвера.
Вы можете обновить аудиодрайвер двумя способами: вручную или автоматически.
Вручную — Вы можете найти самый последний драйвер для драйверов звуковой карты, например Realtek или NVIDIA загрузите последний драйвер, совместимый с вашей версией Windows, и установите его шаг за шагом.
Автоматически — Если у вас нет времени, терпения или компьютерных навыков для обновления аудиодрайвера вручную, вместо этого вы можете сделать это автоматически с помощью Водитель Easy . Driver Easy автоматически распознает вашу систему и найдет правильный драйвер для вашей гарнитуры и вашей версии Windows, а также правильно загрузит и установит их:
- Скачать и установите Driver Easy.
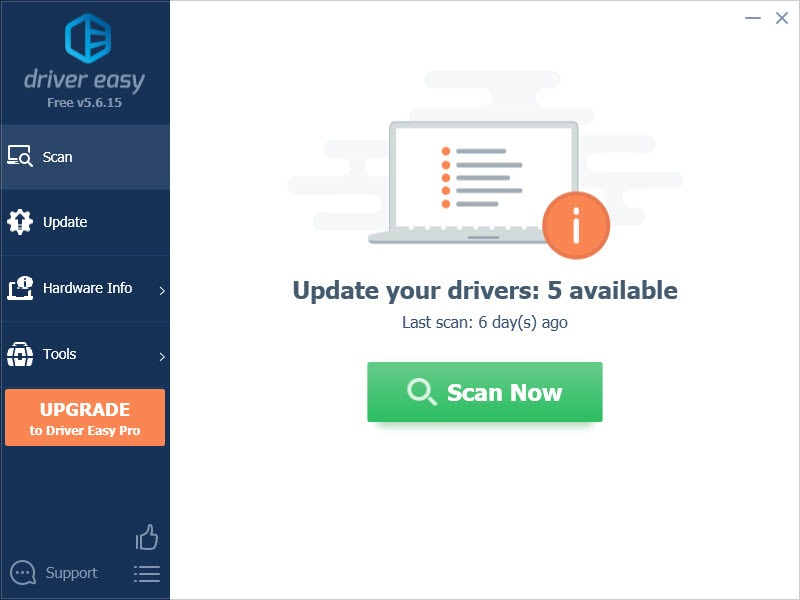
- Запустите Driver Easy и щелкните Сканировать сейчас кнопка. Затем Driver Easy просканирует ваш компьютер и обнаружит все проблемные драйверы.
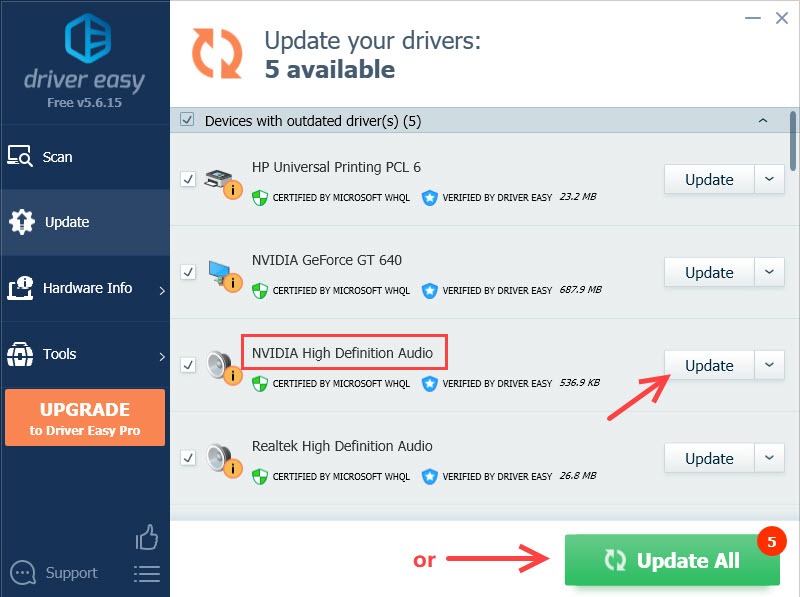
- Щелкните значок Обновлять рядом с отмеченным драйвером звуковой карты, чтобы автоматически загрузить правильную версию этого драйвера, затем вы можете установить ее вручную (это можно сделать в БЕСПЛАТНОЙ версии).
Или нажмите Обновить все для автоматической загрузки и установки правильных версий всех драйверов, которые отсутствуют или устарели в вашей системе. (Для этого требуется Pro версия который поставляется с полной поддержкой и 30-дневной гарантией возврата денег. Вам будет предложено выполнить обновление, когда вы нажмете «Обновить все».)
- Перезагрузите компьютер, чтобы изменения вступили в силу.

Профессиональная версия Driver Easy поставляется с полной технической поддержкой.
Если вам нужна помощь, пожалуйста, свяжитесь с нами. Служба поддержки Driver Easy в support@letmeknow.ch .
5. Измените настройки микрофона.
Обычно Windows может автоматически обнаруживать ваш микрофон и устанавливать его в качестве устройства ввода по умолчанию после подключения наушников. Но иногда вам нужно установить его как устройство по умолчанию вручную:
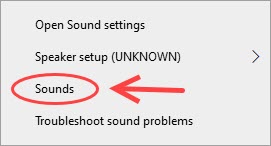
- Щелкните правой кнопкой мыши значок звука в правом нижнем углу рабочего стола и выберите Звуки .
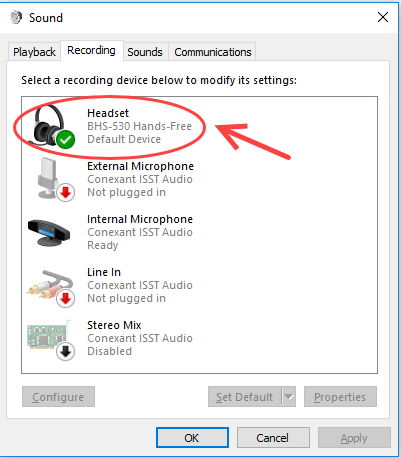
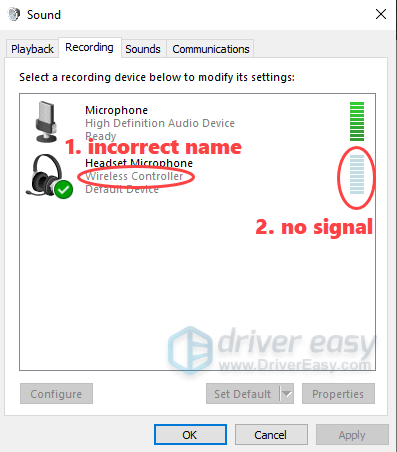
- Перейти к Запись вкладка и убедитесь, что ваш Микрофон гарнитуры установлен как устройство по умолчанию. Если нет, выберите наушники и нажмите Установить по умолчанию .
- Кроме того, убедитесь, что на нем правильно отображается название вашего наушника и подаются сильные сигналы. Если ваши наушники отображаются как нечто другое, что-то не так с настройками вашего микрофона, поэтому вам следует повторно подключить гарнитуру.
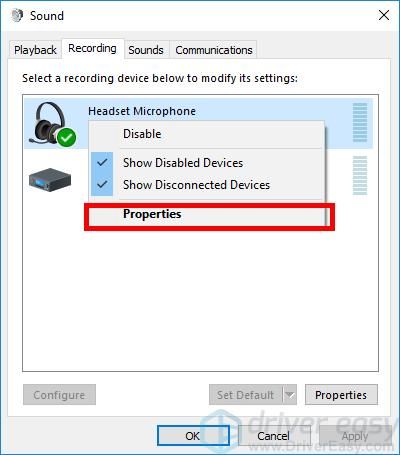
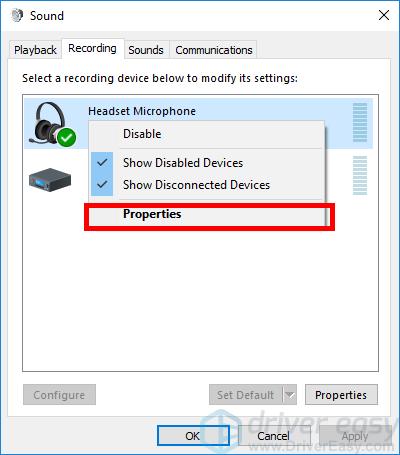
- Если отображаемое имя и сигнал нормальные, щелкните правой кнопкой мыши Микрофон гарнитуры и нажмите Характеристики .
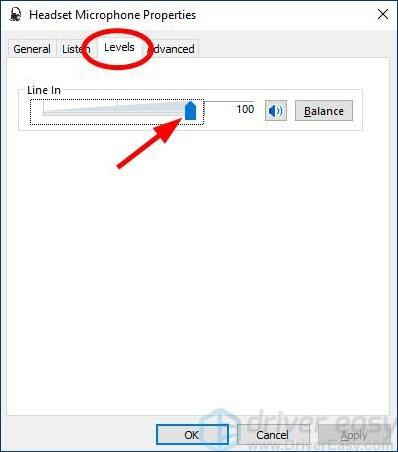
- Щелкните значок Уровни вкладку, затем перетащите ползунок громкости к самому большому значению (100).
- Нажмите хорошо чтобы применить изменения, а затем щелкните хорошо в последнем окне.


Теперь проверьте, работает ли ваш HyperX Cloud Alpha сейчас. Если нет, вы можете проверить настройки игры, чтобы убедиться, что они не конфликтуют с вашим микрофоном HyperX.
Надеюсь, вы решили, что проблема с неработающим микрофоном HyperX Cloud Alpha уже решена. Если эти методы не работают для вас, вы можете связаться с Поддержка HyperX или верните гарнитуру.
As a direct follow-up to Cloud II, HyperX Cloud Alpha adds a whole bunch of new and exciting things, and it sounds neutral, dynamic, and clean. If you’re having problems with the HyperX Cloud Alpha microphone, don’t worry. Many users are reporting the same issue, and it can be fixed quickly and easily.
Try these fixes
- 1. Check the connections
- 2. Troubleshoot the HyperX headset microphone
- 3. Allow access to the microphone
- 4. Update your audio driver
- 5. Change your microphone settings
1. Check the connections
Since HyperX Cloud Alpha comes with a detachable microphone, so it’s important to firmly insert the detachable cable plug to ensure full connectivity (you really need to push it into the headset). Also, make sure not to mute the Mic, and increase the volume to the max level. This is the final fix for many users.
If you’re using HyperX Cloud Alpha on Xbox One, you’ll need an adapter. Make sure the Mute button is not active, and use the buttons on the adapter to adjust the sound and microphone volume. Then go to Settings, and go to Audio to make sure the microphone is on. (The Cloud Alpha S is only compatible with PC and PS4.)

2. Troubleshoot the HyperX headset microphone
If you run into hardware issues, you can always use Windows inbuilt troubleshooter. This will help you fix minor problems.
- Right-click the Speaker button on the bottom right side, and choose Open Sound Settings.

- Under Input, choose the right input device (HyperX Cloud Alpha) and click Troubleshoot.

- Follow the on-screen instructions and wait till this gets finished.
3. Allow access to the microphone
Your HyperX Cloud Alpha mic not working might be caused by microphone settings on your PC. To fix this issue, you can check your microphone privacy settings and make sure the app you’re using can access your microphone.
- On your keyboard, press the Windows logo key to invoke the Search box and type microphone.
- Select Microphone Privacy Settings from the results list.
- Under the Allow Apps To Access Your Microphone tab, ensure that the toggle is in the On position so that other apps can use your microphone.

- Scroll down to choose which app can access your microphone, and make sure that you have it set for all the apps you want.

- Now check if your mic is working for the app you’re using.
4. Update your audio driver
If the audio driver is faulty or outdated, you’re likely to encounter the HyperX Cloud Alpha microphone not working problem. To keep your gaming headset work to its best performance, you should install the latest audio driver.
There are two ways you can update the audio driver: manually or automatically.
Manually – You can search for the most recent driver for your sound cards drivers such as Realtek or NVIDIA download the latest driver that is compatible with your Windows version, and install it step by step.
Automatically – If you don’t have the time, patience or computer skills to update your audio driver manually, you can, instead, do it automatically with Driver Easy. Driver Easy will automatically recognize your system and find the correct driver for your headset, and your Windows version, and it will download and install them correctly:
- Download and install Driver Easy.
- Run Driver Easy and click the Scan Now button. Driver Easy will then scan your computer and detect any problem drivers.

- Click the Update button next to the flagged sound card driver to automatically download the correct version of that driver, then you can manually install it (you can do this with the FREE version).
Or click Update All to automatically download and install the correct version of all the drivers that are missing or out of date on your system. (This requires the Pro version which comes with full support and a 30-day money back guarantee. You’ll be prompted to upgrade when you click Update All.)

- Restart your computer for the changes to take full effect.
The Pro version of Driver Easy comes with full technical support.
If you need assistance, please contact Driver Easy’s support team at support@drivereasy.com.
5. Change your microphone settings
Normally, Windows can automatically detect your microphone and set it as the default input device once your headphone is plugged into. But sometimes you’ll need to set it as the default device manually:
- Right-click on the sound icon in the lower-right corner of your desktop, and select Sounds.

- Go to the Recording tab, and make sure your Headset Microphone is set as the default device. If not, select your headphone and click Set Default.

- Also, make sure it displays your headphone name correctly and shows strong signals. If your headphone is shown as something else, there’s something wrong with your mic settings, so you should re-connect your headset.

- If the display name and signal is normal, right-click Headset Microphone and click Properties.

- Click the Levels tab, then drag the volume slider towards the largest value (100).

- Click OK to apply the changes, and then click OK on the last window.

Now check if your HyperX Cloud Alpha is working now. If not, you can check your game settings to make sure that it is not conflicting with your HyperX mic.
Hopefully, you have solved the HyperX Cloud Alpha mic not working issue by now. If these methods don’t work for you, you can contact HyperX support or return your headset.
5
5 people found this helpful
Available in other languages
Si votre HyperX Cloud Alpha micro ne fonctionne pas comme prévu, lisez notre article pour trouver une solution.
If you have purchased a HyperX Cloud Alpha headset with a mic to enhance your gaming experience, then probably it is one of the wisest decisions that you have made. This device portrays the best sound quality without lag while speaking through the mic. However, if you are facing issues with the microphone as if your friends are not able to hear you at all or with delay, then this guide will help you resolve the HyperX Cloud Alpha microphone not Working on Windows 10.
Different Methods To Fix HyperX Cloud Alpha Microphone Not Working On Windows 10
There are a few troubleshooting methods recommended on gaming forums by experts that can help you to fix the HyperX Cloud Alpha mic not Working on Windows 10. You do not have to try all the methods and make sure to check if the issue has been resolved after trying each step. This way you can discard the remaining steps after the issue HyperX Cloud Alpha Mic has been fixed.
Assuming that all the connections are properly plugged in and the volume settings are turned on to maximum, let us start with the troubleshooting process.
Method 1: Troubleshoot Mic
Microsoft has inculcated a series of troubleshooters that help fix issues automatically by following the on-screen instructions. Here are the steps to run the Mic troubleshooter on Windows 10:
Step 1: Make a right-click on the Speaker icon in the bottom right of the taskbar and then choose Open Sound Settings from the context menu.
Step 2: The Sound settings window will open where you have chosen HyperX Cloud Alpha Mic under Choose Your Input Device and then click on the Troubleshoot.
Step 3: Click on Next and Windows will automatically troubleshoot the Cloud Alpha microphone issue on your system.
Method 2: Allow Access To Microphone
To ensure security and privacy on your Windows 10 PC, Microsoft has enabled certain policies that require external devices to acquire appropriate permission before being able to function optimally. Having said so, the next troubleshooting step involves granting the apps installed access to the Cloud Alpha microphone. Here are the steps to accomplish that:
Step 1: Type ‘Microphone’ on the search box located in the left bottom corner of the taskbar.
Step 2: From the results displayed, click on Microphone Privacy Settings.

Step 3: When the new settings window opens, switch the toggle button labeled as Allow Apps To Access Your Microphone, towards the right and it will turn on.

Step 4: Finally, scroll down and choose the apps that should be allowed to use the Hyper X Cloud Alpha mic. Turn on the toggle switch individually for each app.

Step 5: Check if the issue of Hyper X Cloud Alpha mic not working on Windows 10 has been resolved.
Method 3: Alter Mic Settings
Now that your Hyper X Cloud Alpha mic has been allowed access, and you have run the Microsoft troubleshooter too but without getting a resolution. It is time to alter the current Mic settings and fix the Hyper X Cloud Alpha mic not working in Windows 10. Here are the steps to achieve this:
Step 1: Just as in the previous method, make a right-click on the Speaker icon in the taskbar near the date and click on Sounds this time from the context menu.
![]()
Step 2: A small Sounds dialog box will open where you have to choose the Recordings tab. This will display all the audio-related devices connected to your system and you have to click on Hyper X Cloud Alpha mic and then click on Set Default at the bottom right of the window.

Note: Make sure that when the Cloud Alpha microphone is set as default, it displays the correct name with high signal strength.
Step 3: Make a right-click on Hyper X Cloud Alpha mic and then choose Properties. Now, click on the Levels tab and ensure that the volume slider is 100%.

Step 4: Close all windows by clicking on Apply followed by OK to ensure all the changes you have made will take effect.
Note: Do not click on X at the upper right corner to close the window without clicking on Apply and OK.
This will help to resolve Hyper X Cloud Alpha mic not working in Windows 10
Method 4: Update Audio Drivers
The final troubleshooting recommended by many gaming experts is to update the drivers of your system especially the Audio driver. Drivers are small programs developed to establish communication between the hardware and software. Hence, it is very important to keep your drivers updated to ensure smooth and flawless functioning of your PC. There are two ways to update your drivers:
Option 1: Update Drivers Manually
To update drivers manually, you must identify the make and model number of your sound card and then visit the device manufacturer’s official website. Next, search for your device drivers on the website and download them. The process concludes with either extracting the file or executing it and installing the driver on your system. The two most common sound cards used are:
RealTek
Nvidia
You can click on them if your sound card is one of them to open the official support website on your default browser.
Option 2: Automatic Update

The second option which is rather very convenient and saves time and effort is to update your drivers automatically using Smart Driver Care. This application scans your computer’s hardware and the existing drivers and then searches for the most compatible drivers available on the internet. It also identifies any missing and corrupt drivers and replaces them as well. Here are the steps to use Smart Driver Care on your PC:
Step 1: Click the button below to initiate a download of the Smart Driver Care app,

Step 2: Once the download is complete, install the app and launch it open.
Step 3: To begin the scan of driver issues, click on the Start Scan Now button.

Step 4: A list of driver issues will be displayed on your screen.
Step 5: Locate your Sound Card among the list of driver issues and then click on the Update driver link beside it.

Once your sound driver is updated, restart your computer and check if the Hyper X Cloud Alpha mic not working in Windows 10 has been resolved.
The Final Word On HyperX Cloud Alpha Microphone Not Working In Windows 10
These troubleshooting steps are sufficient to resolve any mic and sound issues in your PC. If the issue is not resolved then try the HyperX Cloud Alpha Microphone on another device to determine if it is a hardware issue. Updating drivers is a trustworthy method and seemed to have resolved many such similar issues. Use Smart Driver Care to ease the driver updating process and save time and effort.
Follow us on social media – Facebook, Twitter, and YouTube. For any queries or suggestions, please let us know in the comments section below. We would love to get back to you with a solution. We regularly post tips and tricks, along with answers to common issues related to technology.
Если вы приобрели гарнитуру HyperX Cloud Alpha с микрофоном для улучшения игрового процесса, то, вероятно, это одно из самых мудрых решений, которые вы приняли. Это устройство обеспечивает наилучшее качество звука без задержек при разговоре через микрофон. Однако, если у вас возникли проблемы с микрофоном, как будто ваши друзья не могут вас слышать вообще или с задержкой, то это руководство поможет вам решить, что микрофон HyperX Cloud Alpha не работает в Windows 10.
На игровых форумах эксперты рекомендуют несколько методов устранения неполадок, которые могут помочь вам исправить микрофон HyperX Cloud Alpha, не работающий в Windows 10. Вам не нужно пробовать все методы и обязательно проверьте, была ли проблема решена после пробуя каждый шаг. Таким образом, вы можете отказаться от оставшихся шагов после устранения проблемы с HyperX Cloud Alpha Mic.
Предполагая, что все соединения правильно подключены и настройки громкости включены на максимум, давайте начнем с процесса устранения неполадок.
Метод 1. Устранение неполадок микрофона
Microsoft внедрила серию средств устранения неполадок, которые помогают автоматически устранять проблемы, следуя инструкциям на экране. Вот шаги, чтобы запустить средство устранения неполадок микрофона в Windows 10:
Шаг 1. Щелкните правой кнопкой мыши значок динамика в правом нижнем углу панели задач, а затем выберите «Открыть настройки звука» в контекстном меню.
Шаг 2: Откроется окно настроек звука, в котором вы выбрали HyperX Cloud Alpha Mic в разделе «Выберите устройство ввода», а затем нажмите «Устранение неполадок».
Шаг 3. Нажмите «Далее», и Windows автоматически устранит проблему с микрофоном Cloud Alpha в вашей системе.
Метод 2: разрешить доступ к микрофону
Чтобы обеспечить безопасность и конфиденциальность на вашем ПК с Windows 10, Microsoft включила определенные политики, которые требуют, чтобы внешние устройства получали соответствующие разрешения, прежде чем они смогут работать оптимально. При этом следующий шаг по устранению неполадок включает предоставление установленным приложениям доступа к микрофону Cloud Alpha. Вот шаги для этого:
Шаг 1. Введите «Микрофон» в поле поиска в левом нижнем углу панели задач.
Шаг 2: В отображаемых результатах нажмите «Настройки конфиденциальности микрофона».
Шаг 3. Когда откроется новое окно настроек, переместите переключатель с надписью «Разрешить приложениям доступ к вашему микрофону» вправо, и он включится.
Шаг 4: Наконец, прокрутите вниз и выберите приложения, которым должно быть разрешено использовать микрофон Hyper X Cloud Alpha. Включите тумблер индивидуально для каждого приложения.
Шаг 5. Убедитесь, что проблема с микрофоном Hyper X Cloud Alpha, не работающим в Windows 10, решена.
Метод 3: изменить настройки микрофона
Теперь, когда вашему микрофону Hyper X Cloud Alpha разрешен доступ, и вы также запустили средство устранения неполадок Microsoft, но без разрешения. Пришло время изменить текущие настройки микрофона и исправить микрофон Hyper X Cloud Alpha, не работающий в Windows 10. Вот шаги для этого:
Шаг 1. Как и в предыдущем методе, щелкните правой кнопкой мыши значок динамика на панели задач рядом с датой и выберите «Звуки на этот раз» в контекстном меню.
Шаг 2: Откроется небольшое диалоговое окно «Звуки», в котором вы должны выбрать вкладку «Записи». Это отобразит все связанные со звуком устройства, подключенные к вашей системе, и вы должны нажать на микрофон Hyper X Cloud Alpha, а затем нажать на Установить по умолчанию в правом нижнем углу окна.
Примечание. Убедитесь, что когда микрофон Cloud Alpha установлен по умолчанию, он отображает правильное имя с высоким уровнем сигнала.
Шаг 3. Щелкните правой кнопкой мыши микрофон Hyper X Cloud Alpha и выберите «Свойства». Теперь перейдите на вкладку «Уровни» и убедитесь, что ползунок громкости установлен на 100%.
Шаг 4: Закройте все окна, нажав «Применить», а затем «ОК», чтобы убедиться, что все внесенные вами изменения вступят в силу.
Примечание. Не нажимайте «X» в правом верхнем углу, чтобы закрыть окно, не нажимая «Применить» и «ОК».
Это поможет решить, что микрофон Hyper X Cloud Alpha не работает в Windows 10.
Метод 4: обновите аудиодрайверы
Последний этап устранения неполадок, рекомендуемый многими игровыми экспертами, – это обновить драйверы вашей системы, особенно аудиодрайвер. Драйверы – это небольшие программы, разработанные для установления связи между оборудованием и программным обеспечением. Следовательно, очень важно обновлять драйверы, чтобы обеспечить бесперебойную и безупречную работу вашего ПК. Есть два способа обновить драйверы:
Вариант 1. Обновите драйверы вручную
Чтобы обновить драйверы вручную, необходимо указать марку и номер модели звуковой карты, а затем посетить официальный веб-сайт производителя устройства. Затем найдите драйверы для своего устройства на веб-сайте и загрузите их. Процесс завершается либо извлечением файла, либо его запуском и установкой драйвера в вашей системе. Две наиболее распространенные звуковые карты:
RealTek
Nvidia
Вы можете щелкнуть по ним, если ваша звуковая карта является одной из них, чтобы открыть официальный сайт поддержки в браузере по умолчанию.
Вариант 2: автоматическое обновление
Второй вариант, который довольно удобен и экономит время и силы, – это автоматическое обновление драйверов с помощью Smart Driver Care. Это приложение сканирует оборудование вашего компьютера и существующие драйверы, а затем ищет наиболее совместимые драйверы, доступные в Интернете. Он также определяет любые отсутствующие и поврежденные драйверы и заменяет их. Вот шаги, чтобы использовать Smart Driver Care на вашем ПК:
Шаг 1. Нажмите кнопку ниже, чтобы начать загрузку приложения Smart Driver Care,
Шаг 2: После завершения загрузки установите приложение и запустите его.
Шаг 3: Чтобы начать сканирование драйверов, нажмите кнопку «Начать сканирование сейчас».
Шаг 4: На вашем экране отобразится список проблем с драйверами.
Шаг 5: Найдите свою звуковую карту в списке проблем с драйверами и щелкните ссылку «Обновить драйвер» рядом с ней.
После обновления звукового драйвера перезагрузите компьютер и убедитесь, что микрофон Hyper X Cloud Alpha не работает в Windows 10.
Последнее слово об альфа-микрофоне HyperX Cloud, не работающем в Windows 10
Этих действий по устранению неполадок достаточно, чтобы решить любые проблемы с микрофоном и звуком на вашем компьютере. Если проблема не решена, попробуйте использовать микрофон HyperX Cloud Alpha на другом устройстве, чтобы определить, является ли это проблемой оборудования. Обновление драйверов – надежный метод, который, похоже, решил многие подобные проблемы. Используйте Smart Driver Care, чтобы упростить процесс обновления драйверов и сэкономить время и силы.
По любым вопросам или предложениям, пожалуйста, дайте нам знать в разделе комментариев ниже. Мы будем рады предложить вам решение. Мы регулярно публикуем советы и рекомендации, а также ответы на общие вопросы, связанные с технологиями.
Gaming enthusiasts already know how good the HyperX Cloud Alpha gaming headset is. It’s one of the most popular and best gaming headsets in the eyes of the pros. It’s a comfortable fit, features amazing sound quality, and gives you lots of audio options. But sometimes, users complain about the mic not working properly.
Are you experiencing operational issues with your mic? Is it causing you lost gaming time? If so, we simply can’t have that! So, let’s take a look at all the options to fix HyperX Cloud Alpha Mic not working as it should.
Fixing HyperX Cloud Mic – First Things First

Over 80% of complaints about the HyperX mic are due to one simple issue that’s ridiculous when you mention it – the cord you use to connect the headset not being pushed in properly. So, the first thing you need to do is push the cord in to make sure it’s connected.
You need to push it until no point of the connector outside the port should be visible. Now test the mic to see if it works. 80% of you should be pretty happy right now. But what about the remaining 20%?
Your mic may have accidentally been muted without your knowledge. Check the mic mute button before doing anything else, and then test your mic again. The last thing you can do is check the headphone’s 4-pole jack plug to ensure all the mic-in and audio-out jacks are properly connected to your PC or laptop.
Is Windows Accessing Your Headphone Mic?
One reason why it’s not working could be your Windows system can’t access HyperX Cloud Alpha Mic. This is a common issue that can cause operation problems for both the mic and headphones. Please follow the following process to troubleshoot this issue…
- Go to Windows PC settings.
- Choose Privacy > Microphone.
- Select the ‘Change’ button in the ‘Allow access to the microphone on this device’ section.
- Toggle it to turn on.
- Toggle on the ‘Allow apps to access your microphone’ setting.
Now you can test the mic to see if it works. If not, then it’s time to move on…
Do My Drivers Need Updating?
Incompatible drivers can cause a multitude of issues with all gaming headset varieties, and this is not a problem reserved only for HyperX Cloud Alpha mics. Manually or automatically updating the drivers could have your microphone working again in no time at all. Follow these steps to manually or natively update HyperX Cloud Alpha drivers.
- Open your Control Panel (press ‘Start’ and search or open the run box with Control+R and then type ‘control’ and enter).
- Search for the ‘Sound’ option in your control panel by finding the large icon and clicking on it.
- Choose the ‘Playback’ option.
- Look for your headphones, right-click and choose ‘Properties’ from the box.
- Find the ‘Controller Information’ tab and select ‘Properties’ underneath it.
- Select ‘Change Settings.’
- Go to the ‘Driver’ tab and choose the ‘Update Driver’ option.
- Then click on the ‘Search automatically for updated driver software’ choice.
There’s a good chance that you already have the latest drivers installed on your computer. If not, and you receive that message, you will need to visit the HyperX website to find the latest Cloud Alpha drivers. Follow their instructions to download the new drivers.
Always remember that you need to reboot your PC when making these types of updates on your system. Test your mic, and if it still doesn’t work, you can move onto the next phase of how to fix HyperX Cloud Alpha mic not working.
Should I Check My Mic Settings?

Checking the microphone settings on your PC or laptop could be the answer to your prayers. And at this point, you are probably on your hands and knees pointing towards the heavens.
The issue could simply be that your microphone levels are too low, and your headphones are not the problem. In some cases, the mic could be disabled without you even realizing it. So follow these steps to potentially fix this issue…
- Open your Control Panel and find the ‘Sound’ settings once again.
- This time choose the ‘Recording’ tab.
- Right-click on an empty part of the page and check the ‘Show Disconnected Devices’ and the ‘Show Disabled Devices’ sections.
- If your headphones appear at this point, you should right-click and choose the ‘Enable’ button.
- Right-click again and check the ‘Set as Default Device’ option.
- Right-click one last time and choose the ‘Properties’ tab.
- Choose the ‘Levels’ tab and check the volume sliders. Set them to full volume to test your mic. Don’t worry because you can always reset them at a lower volume level later.
Do I Have Hardware Issues?
If you’ve completed all these steps and still your HyperX Cloud Alpha microphone doesn’t work, you probably have some hardware issues. A common problem is damaged male jack connectors going into the headset. Test your headset on your phone to see if the mic works on another device. If the mic works with your phone, the connector isn’t damaged.
A great feature of the HyperX headset is the cable is detachable, so it can easily be replaced instead of replacing the entire headset. If the cord and the jack are both fine, the problem is with the port. You’ll then need to replace the ports if damaged.
But if you do happen to have another set of headphones with a 3.5mm jack, plug them in your PC to see if they work. The 3.5mm ports on PCs can deteriorate quickly over a couple of years. If your mic works on a laptop or phone but doesn’t on your PC, the culprit is the ports.
Looking for a Great Gaming Headset?
We can help with that. So, check out our in-depth reviews of the Best Gaming Headsets for Big Heads, the Most Comfortable Gaming Headsets, the Best Xbox One Headsets, the Best PC Gaming Headsets, the Best Razer Gaming Headsets, and the Best Gaming Headset you can buy in 2023.
You may also enjoy our reviews of the Best Headphones with Microphone, the Best Wireless Gaming Headsets, the Best Wireless PlayStation 4 Headsets, and the Best Nintendo Switch Gaming Headsets currently on the market.
Fix HyperX Cloud Alpha Mic Not Working – Final Thoughts
We hope you found a solution to fix your HyperX headset mic issues. The HyperX Cloud Alpha Headset is one of the most desirable and prestigious gaming headsets in the marketplace. But if you can’t use the mic properly, then it’s rendered almost useless.
The good news is that most of these issues are easily fixed if you follow my advice. But please remember that the issue could also be with your Windows sound settings. So don’t throw your headphones away without going through the entire troubleshooting process.
Until next time, game on.
Abby Andrade is a frequent contributor to OldTimeMusic. OldTimeMusic, your go-to source for music insights since 1998. We’re a passionate community of music enthusiasts and talented instrument players, sharing the meanings and emotions behind songs, highlighting the best tracks and albums in music history, as well as providing the latest music news and instrument tips.