Hyper-V is Microsoft’s virtualization platform. It is available on Windows Server operating systems and Microsoft has also added the Hyper-V functionality to Windows 8.1, Windows 10, and Windows 11.
Unfortunately, the Hyper-V feature is only available in Windows 10 Professional, Enterprise, and Education editions. You can’t install it on Windows 10 Home edition by default.
However, using the steps in this article, we’ll show you how to enable Hyper-V in the Windows 10 Home edition.
Table of contents
- Does Your System Support Virtualization?
- Enable Virtualization in Firmware/BIOS
- Install Hyper-V in Windows 10 Home
- How to Enable Hyper-V on Windows 10 (Pro, Enterprise, Education)
- Enable Hyper-V from Optional Features
- Enable Hyper-V from Command Prompt
- Enable Hyper-V from Windows PowerShell
- How to Disable Hyper-V in Windows 10 (Home, Pro, Enterprise, Education)
- Closing Thoughts
Does Your System Support Virtualization?
Before moving forward, we need to check if our system supports virtualization. Hardware virtualization is required for Hyper-V to function correctly. Otherwise, you can use other virtualization platforms like Virtualbox and VMWare.
There are four basic requirements for Hyper-V to be installed on a Windows 10 computer:
- VM Monitor Mode Extensions
- Virtualization enabled in firmware
- Second Level Address Translation (SLAT)
- Data Execution Prevention
All four of these requirements can be easily checked through a Command Prompt cmdlet. Run the following cmdlet in an elevated Command Prompt and obtain the results on the four requirements:
systeminfoThis will generate a list, and you will find the section “Hyper-V Requirements” at the end of the list containing the details of the 4 requirements, as in the image below:
 1")
If these requirements are met, the results will display “Yes.” However, if you find that “Virtualization Enabled In Firmware” states “No,” you need to enable it using the guide below.
Enable Virtualization in Firmware/BIOS
Most modern computers support all the requirements of Hyper-V. But some systems have virtualization disabled from BIOS. You can go to the BIOS setup computer at the startup and enable Virtualization using the following steps:
-
Restart your computer and enter the BIOS setup using the hotkey.
-
Here, look for the “Virtualization” tab and click on it, or use the arrow keys on the keyboard to highlight it and press Enter.
-
Now enable Virtualization.
 2")
Enable virtualization from BIOS -
Now save the new settings and exit BIOS. The system will now reboot normally.
 2")
When it reboots, continue with the following steps to install and enable Hyper-V.
Install Hyper-V in Windows 10 Home
Note: Since Windows Home edition comes without Hyper-V, you must first install it. If you have the Pro, Education, or Enterprise editions, then you may skip this step and proceed to the next section of this article. To check which edition you have, type in winver in the Run Command box and obtain your operating system’s details.
Follow the steps below to install and enable Hyper-V in Windows 10 Home:
-
Download Hyper-V Installer by clicking on the following link:
Hyper-V installer and enabler for Windows 10 Home (317 bytes, 35,747 hits)
-
Once downloaded, right-click on the file and select Run as Administrator from the context menu. This will trigger the installation script.
 4")
Run as admin -
If prompted with a UAC, click Yes.
Click Yes on User Access Control It may take some time to complete the installation. Please let it complete without interruption.
-
Once complete, press Y to continue.
Press Y to continue The computer will now reboot and update.
 4")
 5")
 6")
Once rebooted, Hyper-V will have installed and automatically enabled on your Windows Home.
How to Enable Hyper-V on Windows 10 (Pro, Enterprise, Education)
The method given above automatically enables Hyper-V as well as installing it on a Windows Home. However, if you are running Windows Pro, Education, or Enterprise edition, then you can enable Hyper-V using any one of the following methods.
Enable Hyper-V from Optional Features
Since Hyper-V is an optional feature that one can enable when needed, you can enable it from the Optional Features applet. Here is how:
-
Open the Optional Features applet by typing in optionalfeatures in the Run Command box.
 7")
Open the Optional Features applet -
Now look for the “Hyper-V” option from the list and check the box next to it. Then click Ok.
 8")
Enable Hyper V from Optional Features -
You will now see a window applying the changes. Click Close when it is done.
 9")
Close installation window
 7")
 8")
 9")
Hyper-V will now be installed and enabled. You can now access the Hyper-V manager by searching for it in the search box in the taskbar or through the Start menu.
 10")
Alternatively, you can also use the other 2 command-line methods to enable Hyper-V on Windows 10.
Enable Hyper-V from Command Prompt
Follow these steps to enable Hyper-V using the DISM command tool in the Command Prompt:
-
Run the following cmdlet in an elevated Command Prompt:
DISM /Online /Enable-Feature /All /FeatureName:Microsoft-Hyper-VEnable Hyper V from Command Prompt -
When asked, enter Y to restart the computer:
Enter Y
 11")
 12")
The computer will now restart, When it does, Hyper-V should be enabled successfully.
Enable Hyper-V from Windows PowerShell
If you’d rather prefer to use Windows PowerShell, here is how to enable Hyper-V:
-
Run the following cmdlet in an elevated PowerShell:
Enable-WindowsOptionalFeature -Online -FeatureName Microsoft-Hyper-V-AllEnable Hyper V using PowerShell -
When asked, enter Y and hit Enter to restart the computer:
Enter Y When the computer reboots, Hyper-V will have installed successfully.
 13")
 14")
These are the 3 methods to enable Hyper-V in Windows 10, provided that the hardware is supported and Hyper-V is installed.
How to Disable Hyper-V in Windows 10 (Home, Pro, Enterprise, Education)
If you don’t want this functionality on your computer, you can always disable it. There are three ways to disable it:
-
From Optional Features
-
Open the Optional Features applet by typing in optionalfeatures in the Run Command box.
Open Optional Features applet -
Uncheck the box next to Hyper-V and click Ok.
 16")
Disable Hyper-V from Optional Features -
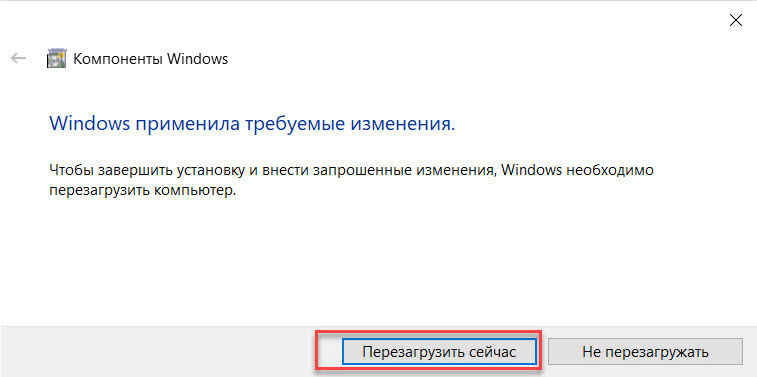
When done, click Restart now to finalize the changes.
Restart PC
-
-
From Command Prompt
Run the following cmdlet in an elevated Command Prompt to disable Hyper-V:
DISM /Online /Disable-Feature /FeatureName:Microsoft-Hyper-V-allIf asked for a reboot, enter Y for Yes.
Disable Hyper V from Command Prompt -
From PowerShell
Run the following cmdlet in an elevated PowerShell to disable Hyper-V:
Disable-WindowsOptionalFeature -Online -FeatureName Microsoft-Hyper-V-AllIf asked for a reboot, enter Y for Yes.
Disable Hyper V from Windows PowerShell
 16")
 17")
 18")
 19")
Closing Thoughts
Sometimes Hyper-V is very useful even for home users. It can be used to test and evaluate new software without hurting the host system. But there are times when enabling virtualization support or installing Hyper-V is not recommended.
Hyper-V requires some system resources to run its virtual machines. For example, if you have 4 GB RAM, you won’t be able to give any resources to the virtual machine. So it would not be wise to enable Hyper-V functionality.
For what purpose do you want to enable Hyper-V functionality on your Windows 10 Home computer? Please share your thoughts in the comments below.
В данной статье показаны действия, с помощью которых можно включить или отключить виртуализацию (компонент) Hyper-V в операционной системе Windows 10.
Hyper-V позволяет запускать несколько операционных систем в виде виртуальных машин в Windows. Компонент Hyper-V можно включить или отключить несколькими способами, в их числе консоль Windows PowerShell, утилита командной строки DISM (средство обслуживания образов развертывания и управления ими), а также используя графический интерфейс панели управления.
Прежде чем включить компонент Hyper-V, необходимо проверить следующие требования:
- Windows 10 Корпоративная, Профессиональная или для образовательных учреждений
- 64-разрядный процессор с поддержкой преобразования адресов второго уровня (SLAT)
- Процессор должен поддерживать технологии виртуализации (Intel VT-x или AMD-V)
- На компьютере должно быть установлено не менее 4ГБ оперативной памяти
Также необходимо проверить, включены ли технологии виртуализации в BIOS/UEFI.
Содержание
- Как включить и отключить через Windows PowerShell
- Управление Hyper-V с помощью DISM
- Активация в окне «Компоненты Windows»
Как включить и отключить через Windows PowerShell
Компонент Hyper-V можно включить используя консоль Windows PowerShell.
Чтобы включить компонент Hyper-V, откройте консоль Windows PowerShell от имени администратора и выполните следующую команду:
Enable-WindowsOptionalFeature -Online -FeatureName Microsoft-Hyper-V -All

Для завершения установки выполните перезагрузку компьютера.
Для того чтобы отключить компонент Hyper-V, откройте консоль Windows PowerShell от имени администратора и выполните следующую команду:
Disable-WindowsOptionalFeature -Online -FeatureName Microsoft-Hyper-V-All

Для завершения операции отключения компонента Hyper-V, необходимо перезагрузить компьютер.
Управление Hyper-V с помощью DISM
Чтобы включить компонент Hyper-V используя DISM, запустите командную строку от имени администратора и выполните следующую команду:
dism.exe /Online /Enable-Feature:Microsoft-Hyper-V-All

Для завершения операции перезагрузите Windows
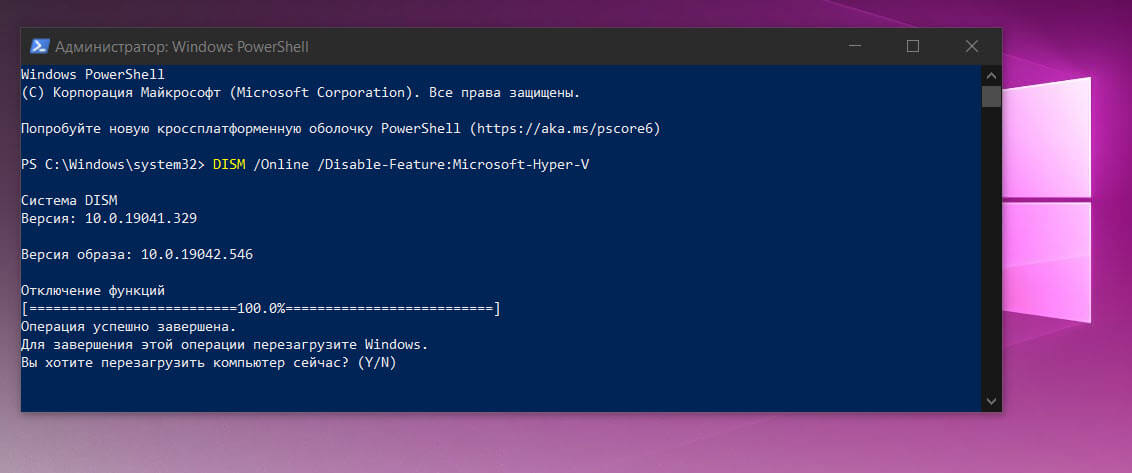
Чтобы отключить компонент Hyper-V используя DISM, запустите командную строку от имени администратора и выполните следующую команду:
dism.exe /Online /Disable-Feature:Microsoft-Hyper-V-All

Для завершения операции перезагрузите Windows.
Активация в окне «Компоненты Windows»
Чтобы включить компонент Hyper-V в окне «Компоненты Windows», нажмите сочетание клавиш ![]() + R и в открывшемся окне Выполнить введите (скопируйте и вставьте) OptionalFeatures и нажмите клавишу Enter ↵.
+ R и в открывшемся окне Выполнить введите (скопируйте и вставьте) OptionalFeatures и нажмите клавишу Enter ↵.

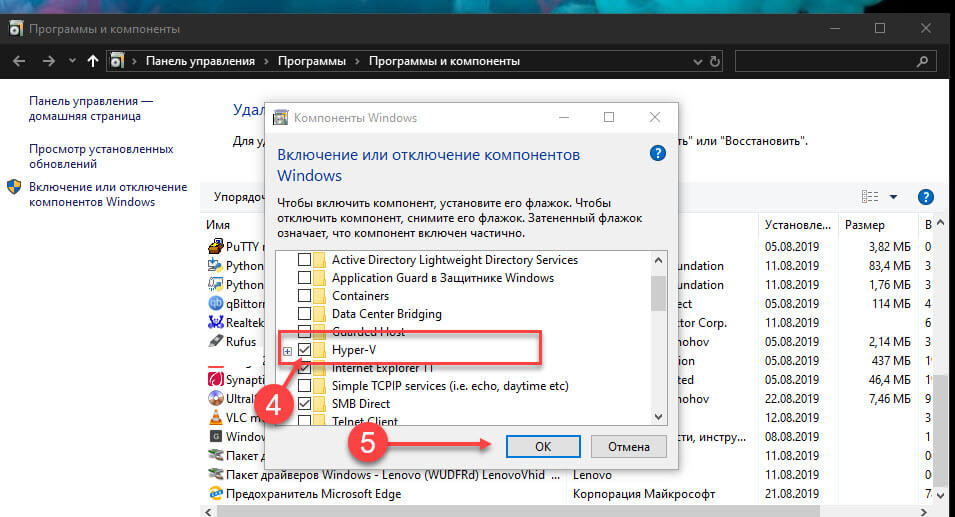
В открывшемся окне «Компоненты Windows» выберите Hyper-V и нажмите кнопку OK.

После завершения установки вам будет предложено перезапустить компьютер.

Чтобы отключить компонент Hyper-V, окне «Компоненты Windows» отключите Hyper-V и нажмите кнопку OK.

После завершения установки вам будет предложено перезапустить компьютер.

Используя рассмотренные выше действия можно включить или отключить компонент Hyper-V.
Хотите установить и запустить Linux или более раннюю версию операционной системы Windows на виртуальной машине используя компьютер с Windows 10? Вы будете рады узнать, что вам не нужно стороннее программное обеспечение для виртуализации (например, VirtualBox) для установки и запуска Linux или других операционных систем на Windows 10.
В Windows 10 встроенный инструмент Hyper-V, позволяет создавать и запускать виртуальные машины, которые поддерживают все выпуски операционных систем Linux, FreeBSD и Windows.
ВАЖНО: Если вы думаете о добавлении Microsoft Hyper-V в Windows 10 Home, это невозможно, поскольку опция доступна только в Windows 10 Pro или бизнес-версиях с 64-разрядными процессорами, поддерживающими виртуализацию, и не менее 4 ГБ ОЗУ.
- Требования Hyper-V
- Windows 10 Профессиональная, Корпоративная или Education
- 4 ГБ или больше оперативной памяти
- 64-битный процессор
- Поддержка CPU для расширения режима VM Monitor (VT -c на процессорах Intel)
Проверьте, поддерживает ли ваш компьютер Hyper-V
Хотя Hyper-V является встроенной функцией, по умолчанию она не включена. Вам нужно включить функцию Hyper-V вручную, чтобы иметь возможность использовать ее. Windows 10 предлагает несколько способов включить функцию Hyper-V. Вы можете включить его с помощью панели управления, PowerShell или DISM.
В этом руководстве вы узнаете, как включить Microsoft Hyper-V для настройки и запуска виртуальных машин в Windows 10. Кроме того, вы также узнаете, как отключить эту функцию, если она больше не нужна. Выполните приведенные ниже инструкции, чтобы включить \ отключить Hyper-V в Windows 10.
Включить Hyper-V с помощью параметров Windows 10
Чтобы включить виртуализацию в Windows 10, выполните следующие действия:
Шаг 1: Откройте Параметры Windows, самый быстрый способ нажать клавиши Win I
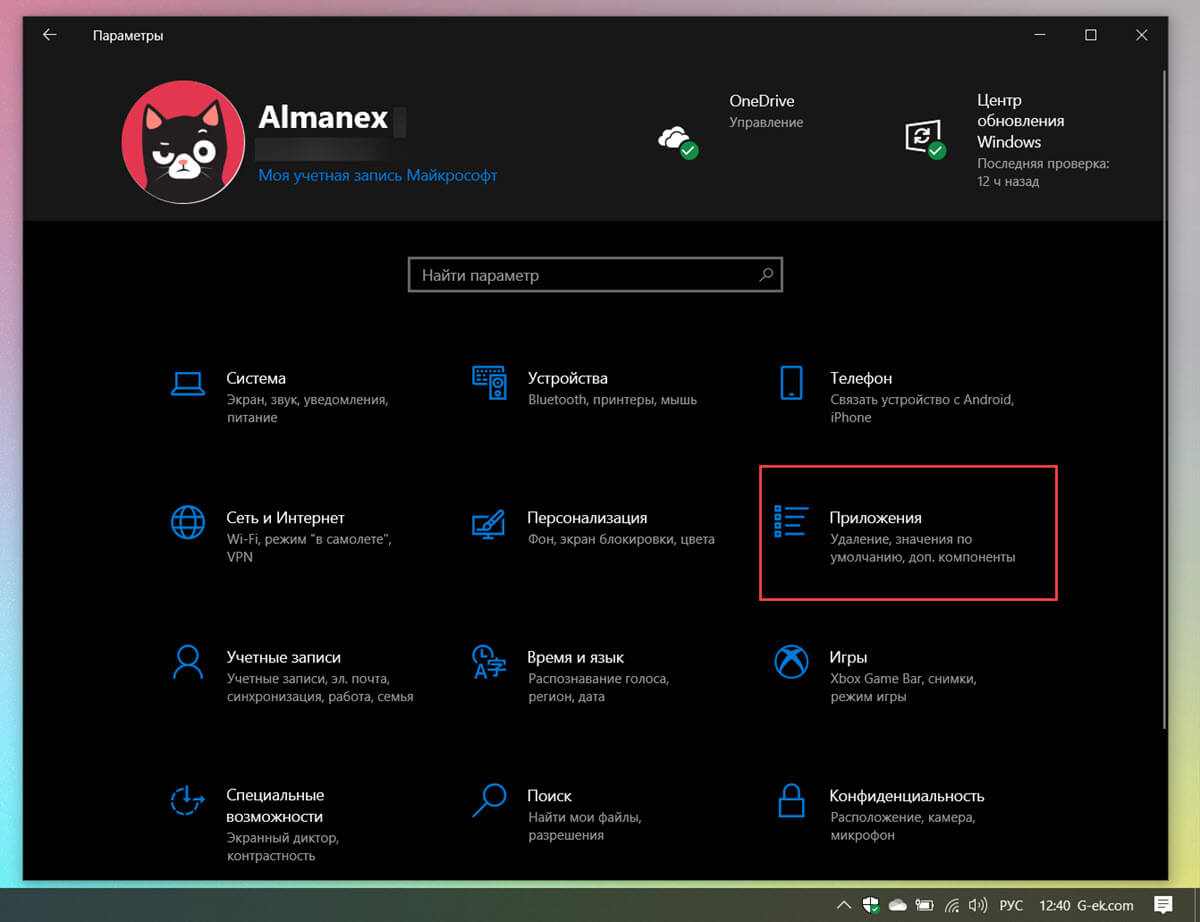
Шаг 2: Нажмите плитку «Приложения».
Шаг 3: Перейдите в раздел «Приложения и возможности».
Шаг 4: В разделе «Сопутствующие параметры» выберите «Программы и компоненты».
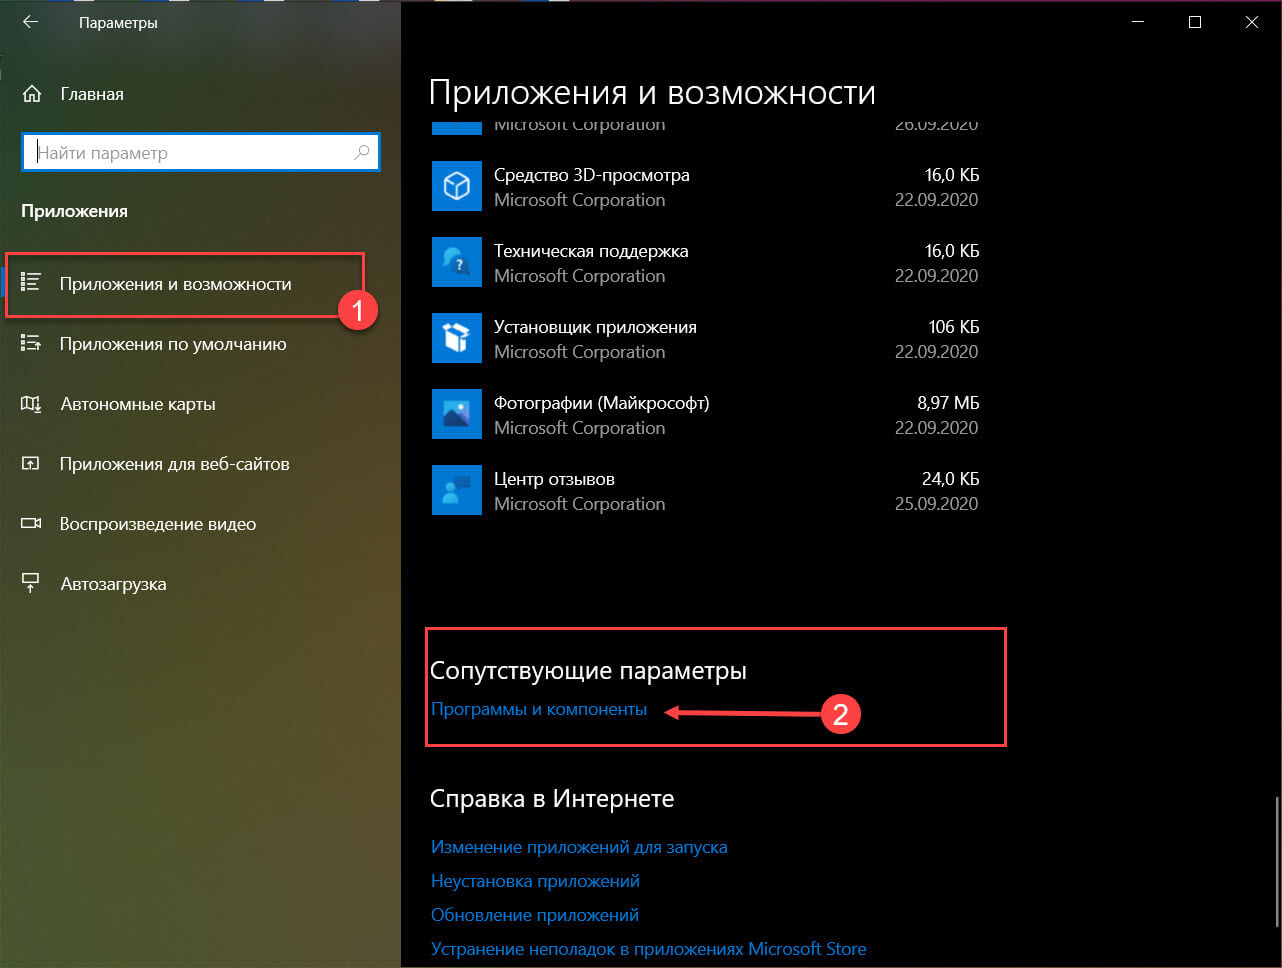
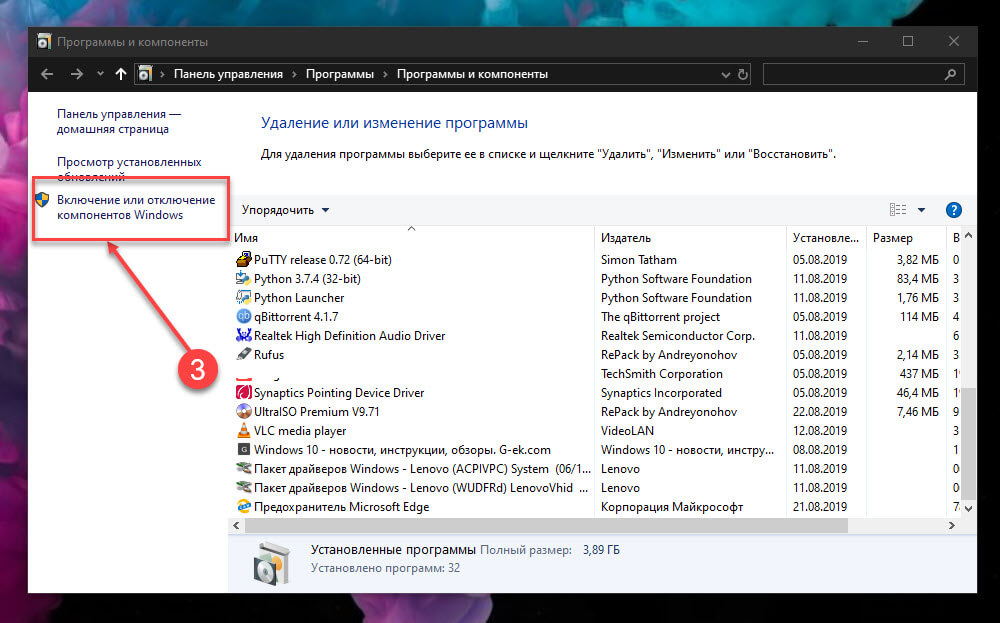
Шаг 5: На левой панели кликните параметр «Включить или отключить компоненты Windows».
Шаг 6: Отметьте опцию Hyper-V.
Подсказка: если параметр недоступен, вероятно, в процессоре устройства отключена виртуализация или функция не поддерживается. Вы можете включить Intel VT-x / EPT или AMD-V / RVI, в BIOS или UEFI на вашем компьютере.
Шаг 7: Нажмите кнопку «ОК».
Шаг 8: Нажмите кнопку «Перезагрузить сейчас».
После выполнения этих шагов стек виртуализации Windows 10 будет установлен вместе с приложением «Диспетчер Hyper-V» для настройки и запуска виртуальных машин.
Включить Hyper-V с помощью Панели управления
Шаг 1: Введите appwiz.cpl в поле поиска «Пуск / панель задач», а затем нажмите клавишу Enter, чтобы открыть окно «Программы и компоненты».
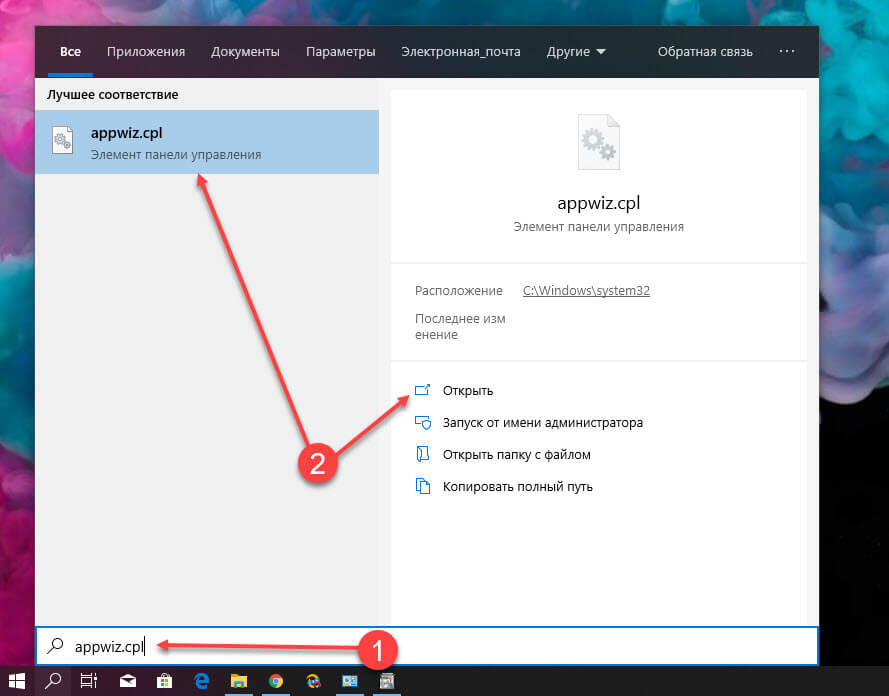
Шаг 2: В левой панели окна нажмите ссылку «Включение или отключение компонентов Windows». При нажатии на ссылку откроется окно Компоненты Windows.
Шаг 3: Здесь найдите запись Hyper-V. Установите флажок рядом с записью и нажмите кнопку «ОК».
Вас могут попросить перезагрузить компьютер для завершения установки.
Включить Hyper-V с помощью PowerShell
Шаг 1: Откройте PowerShell от имени администратора.
Шаг 2: В окне PowerShell скопируйте и вставьте следующую команду:
Enable-WindowsOptionalFeature -Online -FeatureName Microsoft-Hyper-V -All
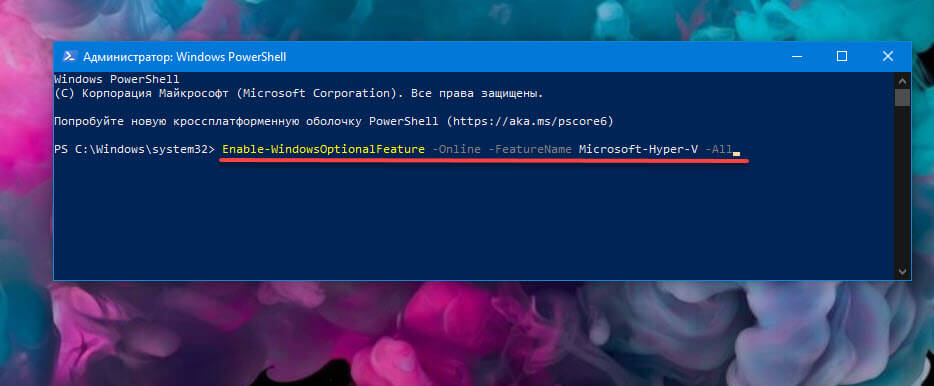
Шаг 3: Нажмите клавишу Enter, чтобы запустить команду.
После завершения установки перезагрузите компьютер.
Включить Hyper-V с помощью командной строки и DISM
Шаг 1: Запустите командную строку от имени администратора.
Шаг 2: Скопируйте и вставьте следующую команду в окне командной строки и нажмите клавишу Enter:
DISM /Online /Enable-Feature /All /FeatureName:Microsoft-Hyper-V
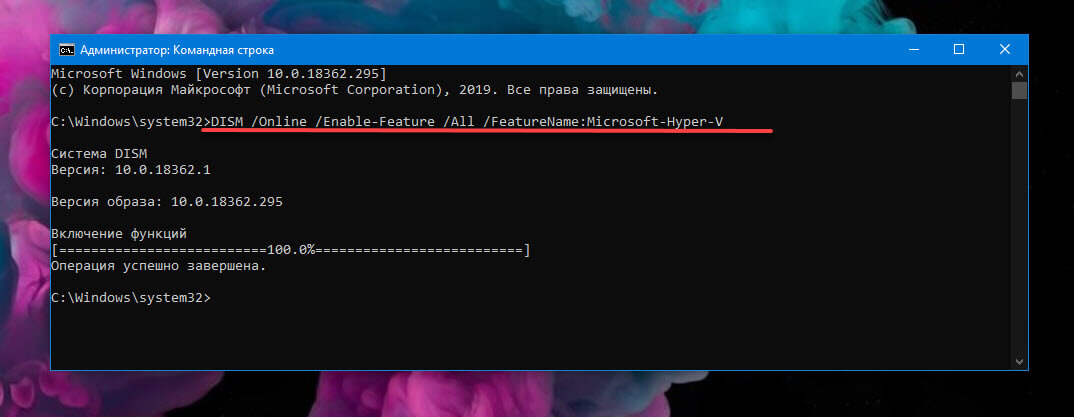
Шаг 3: После завершения установки перезагрузите компьютер.
Отключить Hyper-V с помощью параметров Windows 10
Чтобы отключить функцию виртуализации Hyper-V, выполните следующие действия:
Шаг 1: Откройте приложение «Параметры».
Шаг 2: Нажмите плитку «Приложения».
Шаг 3: Перейдите в раздел «Приложения и возможности».
Шаг 4: В разделе «Сопутствующие параметры» выберите «Программы и компоненты».
Шаг 5: На левой панели кликните параметр «Включить или отключить компоненты Windows».
Шаг 6: Снимите флажок с Hyper-V.

Шаг 7: Нажмите кнопку «ОК» и «Перезагрузить сейчас».
После выполнения этих шагов компоненты виртуализации будут отключены на вашем устройстве.
Отключить Hyper-V с помощью PowerShell в Windows 10
Чтобы отключить Hyper-V с помощью команды PowerShell, выполните следующие действия:
Шаг 1: Откройте «Пуск» и начните набирать PowerShell.
Шаг 2: Кликните правой кнопкой мыши верхний результат и выберите параметр «Запуск от имени администратора».
Шаг 3: Введите следующую команду и нажмите Enter:
DISM /Online /Disable-Feature:Microsoft-Hyper-V
Шаг 4: Введите Y, чтобы перезагрузить компьютер.
После выполнения этих шагов диспетчер Microsoft Hyper-V и его дополнительные компоненты будут удалены.
Все!
On Windows 10, Hyper-V is a virtualization technology that installs the necessary elements and interface to create virtual machines to run other instances of Windows 10, Windows 8.1, Windows 7, or another operating system, including Linux distributions isolated from the main installation on your device.
The only caveat is that to use virtual machines on your computer, you must enable Hyper-V manually, but it’s something that can be easily done through the Settings app or PowerShell.
If you’re thinking on adding Microsoft Hyper-V to Windows 10 Home, it won’t be possible since it’s only available on Windows 10 Pro or business editions with 64-bit processors that support virtualization and at least 4GB of RAM.
In this guide, you’ll learn the steps to enable Microsoft Hyper-V to set up and run virtual machines on Windows 10. In addition, you’ll also learn the steps to disable the feature when is no longer needed.
- Enable Hyper-V using Settings on Windows 10
- Enable Hyper-V using PowerShell on Windows 10
- Disable Hyper-V using Settings on Windows 10
- Disable Hyper-V using PowerShell on Windows 10
Enable Hyper-V using Settings on Windows 10
To enable virtualization on Windows 10, use these steps:
-
Open Settings.
-
Click on Apps.
-
Click on Apps & features.
-
Under the “Related settings” section, click the Programs and Features option.

Apps & features Programs and Features option -
Click the Turn Windows features on or off option from the left pane.

Turn Windows Features on or off option -
Check the Hyper-V option.

Enable Microsoft Hyper-V on Windows 10 Quick tip: If the option isn’t available, then it’s likely that the device’s processor has virtualization disabled, or it doesn’t have the feature. You can enable Intel VT-x/EPT or AMD-V/RVI by accessing the BIOS or UEFI firmware on your machine.
-
Click the OK button.
-
Click the Restart now button.


Once you complete the steps, the Windows 10 virtualization stack will install along with the Hyper-V Manager application to set up and run virtual machines.
Enable Hyper-V using PowerShell on Windows 10
To enable Hyper-V using PowerShell, use these steps:
-
Open Start.
-
Search for PowerShell, right-click the top result, and select the Run as administrator option.
-
Type the following command and press Enter:
DISM /Online /Enable-Feature /All /FeatureName:Microsoft-Hyper-V

Enable Hyper-V using PowerShell -
Type Y to restart your computer.

After you complete the steps, Hyper-V Manager and its additional components will install on your computer.
Disable Hyper-V using Settings on Windows 10
To disable the Hyper-V virtualization feature, use these steps:
-
Open Settings.
-
Click on Apps.
-
Click on Apps & features.
-
Under the “Related settings” section, click the Programs and Features option.
Apps & features Programs and Features option -
Click the Turn Windows features on or off option from the left pane.
Turn Windows Features on or off option -
Clear the Hyper-V option.

Disable Hyper-V on Windows 10 -
Click the OK button.
-
Click the Restart now button.

Once you complete the steps, the virtualization components will be disabled from your device.
Disable Hyper-V using PowerShell on Windows 10
To disable Hyper-V using a PowerShell command, use these steps:
-
Open Start.
-
Search for PowerShell, right-click the top result, and select the Run as administrator option.
-
Type the following command and press Enter:
DISM /Online /Disable-Feature:Microsoft-Hyper-V

PowerShell disable Hyper-V command -
Type Y to restart your computer.

After you complete the steps, the Microsoft Hyper-V Manager and its additional components will disable on Windows 10.
We may earn commission for purchases using our links to help keep offering the free content. Privacy policy info.
All content on this site is provided with no warranties, express or implied. Use any information at your own risk. Always backup of your device and files before making any changes. Privacy policy info.
Virtualization is a process through which you can run various instances and operating systems in a computer system virtually, without any effect on the primary operating system.
In Windows 10 operating system, you can easily enable virtualization. Windows 10 supports native hardware virtualization.
Virtualization on Windows is known as Hyper-v, and through Hyper-v, you can create and run multiple instances.
You can install another Windows operating system and do whatever test you want to do without messing with the primary window system.
You must know hardware and software requirements before enabling Windows 10 Virtualization.
Must Read:- How To Install WordPress On A Windows Local Computer?
Minimum System Requirements for Virtualization
| OS | Windows Server 2016 & above, Windows 10 PRO, Enterprise & Education |
| Architecture (Intel vt & AMD v) | x64 Bit with SLAT (Second Level Address Translation) |
| RAM | 4 GB Minimum |
Virtualization (Hyper-V) Compatability Check
In Windows, there are some easy ways to check, is that your Windows Laptop or PC supports virtualization or not? First, using CMD prompt or PowerShell, the second one is Windows programs and features, and lastly, the third one is the BIOS setting.
BIOS Virtualization should support your Windows PC, nor you can’t enable the Hyper-V feature. But you can still run multiple OS through Virtual Box; check out the article.
Execute the following command through CMD prompt or PowerShell
systeminfoCheck if your Windows PC or Laptop supports virtualization by executing a simple command on CMD prompt or PowerShell.

You can see all details about Virtualization. If you have already enabled Virtualization on your PC through BIOS or pre-enabled by the manufacturer, you will see this particular message.
Hyper-V Requirements: A hypervisor has been detected. Features required for Hyper-V will not be displayed.Check Windows Program and Features
Search ‘program’ on windows search, and you will see ‘Turn Windows features on or off.’ Open and now you can see the Hyper-V features as shown in the image below.

Keep in mind this feature will be available in limited editions of the Windows Operating System.
Open Task Manager For Virtualization
When you open the Windows PC task manager, it will show Virtualization enabled or not in the CPU section under the performance tab.

Enable Virtualization On Windows PC Step-By-Step
Enabling Virtualization Technology on your Windows PC is very simple, and you need to follow the exact steps. Before enabling Virtualization, you should know the minimum requirements and what is the specification of your computer.
At present, most Intel and AMD processors support Virtualization, so check the following method to check Virtualization’s compatibility above.
STEP – 1. Enable Virtualization on BIOS
While most recent PCs and Laptops support hardware virtualization and enable hardware virtualization, you need to open your BIOS setting.
So reboot your computer; while rebooting (during black screen), you should press the manufacturer’s distinct key set. The key should be ‘Esc,’ ‘F1’, ‘F2’, ‘F9’, ‘F10’, ‘F12’, or ‘DEL’ key. I have mentioned all different manufacturer official links for BIOS setup in the references section.

STEP – 2. Enable Hyper-V Through Setting
Search ‘Program and features’ or ‘Windows features’ on search, then click on the first result ‘Turn Windows features on and off.’

Select Hyper-V and click on ‘Ok,’ and it will take a little time to update.
Optional Method To Enable Virtualization In Windows 10
You can use Windows PowerShell and CMD prompt to enable the Hyper-V feature on your Windows 10 operating system. Once you have enabled Hyper-V using the Windows features tool, then no need to execute the command.
Enable Hyper-V using PowerShell
- Open PowerShell as Administrator
- Execute the following command
Enable-WindowsOptionalFeature -Online -FeatureName Microsoft-Hyper-V -AllAfter installation is completed, reboot the system.
Note:- You should enable virtualization on BIOS before executing the command.
Enable Hyper-V using with CMD prompt & DISM
The Deployment Image Servicing and Management tool (DISM) enables Windows features while the OS runs.
- Open Windows CMD prompt as Administrator.
- Execute the following command
DISM /Online /Enable-Feature /All /FeatureName:Microsoft-Hyper-VOpen Hyper-V Manager
Once you have successfully installed Hyper-V on your system, you should reboot and then check the Windows Administrator Tools folder by clicking ‘Start’ there, and you will find the Hyper-V manager.

You can now create multiple Virtual Machines and run them simultaneously, without affecting your primary WIndows operating system.

Want to install Ubuntu on Hyper-V? Check out the step-by-step tutorial.
FAQs About Enabling VT on Windows
How to Enable Intel VT-x in Your Computer’s BIOS or UEFI Firmware?
Most recent PCs and Laptop comes with hardware virtualization features. In case if you have an older Intel CPU-based computer, you should check out the BIOS setting. Entering the BIOS setting, reboot your PC, and while on the black screen, you should press ‘Esc,’ ‘F1’, ‘F2’, ‘F9’, ‘F10’, ‘F12’, or ‘DEL’ key (one of the key).
What do I do if my laptop is not capable of Virtualization?
In case if your PC or Laptop does not support Virtualization, then you can install VirtualBox. It’s open-source and supports x86 and x64 bit operating systems.
How do I enable virtualization without UEFI?
Most of the recent PCs come with UEFI boot, and Windows 10 comes with a UEFI bootable system. Earlier Windows 10 or Windows 8 operating systems, PCs come with legacy BIOS systems. If that time your system was supported Intel vt-x, then you should use one of those keys ‘Esc,’ ‘F1’, ‘F2’, ‘F9’, ‘F10’, ‘F12’, or ‘DEL’ to enter the BIOS settings and then enable Intel vt-x.
How to enable or disable Hardware Virtualization in Windows 10?
Open the BIOS setting, and you will see the Virtualization option, and if it is enabled, you can disable using the keyboard’s left and right arrow keys.
How to view the status of hardware virtualization?
Open Windows Task Manager and click on CPU under the performance section then you can see the status of hardware virtualization.
What are the 3 types of virtualization?
1. Server virtualization, 2. Virtual Desktop Infrastructure (VDI), and 3. Application virtualization.
There are other types of virtualization available, like Network and Storage virtualization.
Is it safe to enable virtualization?
It depends on your CPU, but if you want to install another operating system or want to test some specific application while using your primary os, you need virtualization. In virtualization, your CPU will emulate an isolated environment for a specific application or operating system.
Conclusion
If you want to enable Hyper-v on your Windows computer, you can adopt the above method. But keep in mind that your computer needs to support hardware virtualization. We have also given the above method by checking.
If your computer hardware does not support virtualization, you can use open-source software such as VirtualBox.