- Remove From My Forums
-
Вопрос
-
Hi, I just updated my win10 from 1703 to 1709 yesterday, and found my virtual win10 in Hyper-v detects no sound device. The vitual win10 vhdx files contain both ver 1703 and 1709. It
was fine in 1703, sound card works before updated to 1709, and it is sad that the producer no longer support their PCI sound cards with new driver.My pc hardware: P55 motherboard, i5-750 cpu, one pci sound card with a third part driver «MlVTMon.exe»
which auto start after boot. I disable the original sound card of motherboard in bios.Any way to fix?
Download Windows Speedup Tool to fix errors and make PC run faster
If Hyper-V Audio is not working in Windows 11 then this post may be able to help you resolve the issue. Hyper-V is Microsoft’s virtualization solution for Windows. It allows users to run various operating systems as virtual machines on Windows. But recently, users have been complaining about Hyper-V audio not working in Windows 11. Fortunately, following these methods can help you fix it.

How do I enable Hyper-V in Windows 11 single language?
Hyper-V is an optional feature included by default in the Windows operating system. However, you’ll need to enable it first on your system. Here’s how:
Open a new Notepad file.
Copy and paste the following script and run it.
pushd "%~dp0"
dir /b %SystemRoot%\servicing\Packages\*Hyper-V*.mum >hyper-v.txt
for /f %%i in ('findstr /i . hyper-v.txt 2^>nul') do dism /online /norestart /add-package:"%SystemRoot%\servicing\Packages\%%i"
del hyper-v.txt
Dism /online /enable-feature /featurename:Microsoft-Hyper-V -All /LimitAccess /ALL
pause
Now click on File > Save as, type hyperv.bat in the name field and click on Save.
Navigate to the location where the file was saved, right-click on it and select Run as administrator.
The Command Prompt will now open and start installing Hyper-V on your device. Once the procedure completes, it’ll ask you to restart the system, type Y to proceed. After your device restarts, Hyper-V will be enabled on your device.
If Hyper-V Audio is not working in Windows 11 then try restarting your virtual machine and device and see if it helps. You can also try using a different audio output device and see. Still, if the issue persists, try these tested methods:
- Run Playing Audio Troubleshooter
- Restart Windows Audio Service
- Configure Remote Desktop Settings
- Run Hyper-V Manager as an Admin
- Update Audio Drivers
Now let us see these in detail.
1] Run Playing Audio Troubleshooter
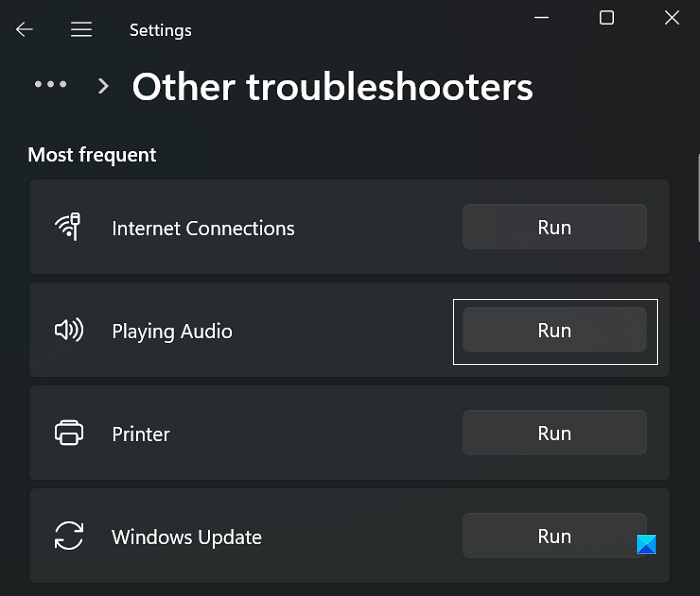
Before getting started with different methods to fix this issue, run Microsoft’s built-in Audio troubleshooter. Here’s how:
- Press Windows Key + I to open Settings.
- Scroll down and select Troubleshoot > Other Troubleshooters.
- Click on Run beside Playing Audio.
- Once the process is complete, restart your device to see if the error has been resolved.
2] Restart Windows Audio Service
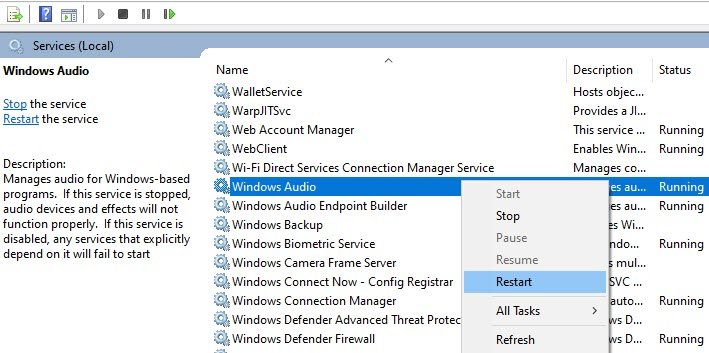
Windows Audio Service is a vital component that managers and enables sound for any application on the Windows operating system. Restarting this service can sometimes help fix audio issues. Here’s how:
- Press the Windows key, type Services and click on open.
- Search for the Windows Audio Service.
- Right-click on the service and select Restart.
3] Configure Remote Desktop Settings
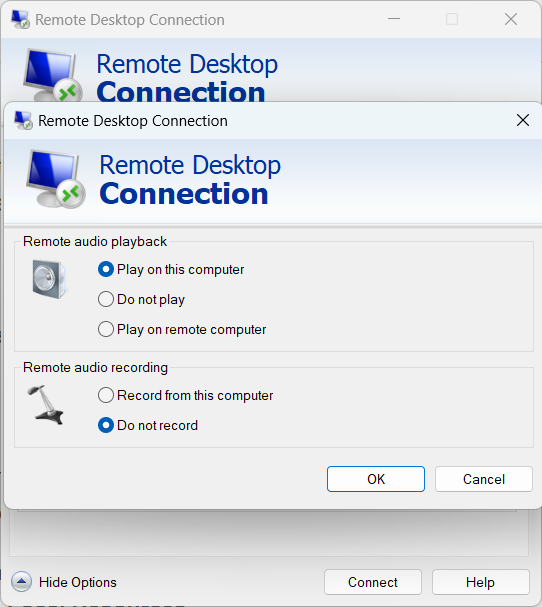
Misconfigured remote audio settings can sometimes be responsible for why audio isn’t working in Hyper-V. Modify these settings and check if the error gets fixed. Here’s how:
- Press the Windows key, search for Remote Desktop Connection, and click on Open.
- Click on Show Options and navigate to Local Resources.
- Under Remote Audio, click on Settings.
- Select Play on this computer under Remote Audio playback and click on Ok to save changes.
4] Run Hyper-V Manager as an Admin
Right-click on the Hyper-V Manager.exe shortcut file on your device and select Run as an administrator option. See if it helps.
5] Update Audio Drivers
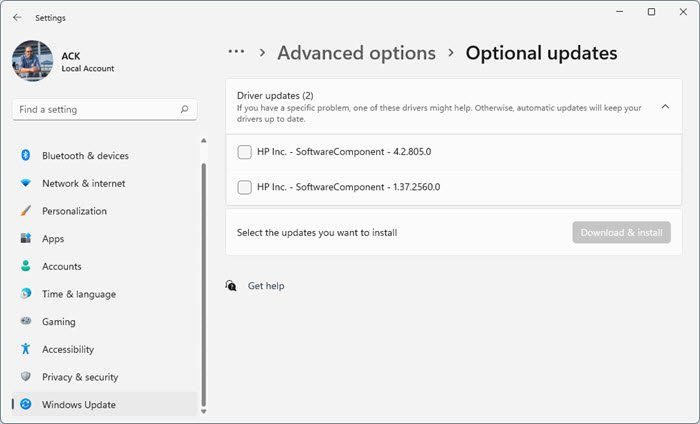
Outdated or corrupted drivers can also be responsible for why Hyper-V audio is not working. Update your Audio drivers and check if the issue gets fixed. Here’s how you can do it:
- Open Settings and navigate to Settings > Update & Security > Windows Update.
- Right under it, look for a clickable link— View optional updates.
- Under Driver Updates, a list of updates will be available, which you can choose to install if you are facing an issue manually.
Alternatively, you could download and install Audio drivers from the manufacturer’s website.
Read: Hyper-V No internet access in Windows
How do I fix Hyper-V on Windows 11?
Hyper-V requires a 64-bit Windows 11/10/8 system that has at least 4GB RAM and SLAT or Second Level Address Translation. SLAT is a feature of the CPU. It is also called RVI or Rapid Virtualization Indexing. Intel refers to it as EPT or Extended Page Tables and AMD as Nested Page Tables. So check if your computer supports Hyper-V.
Shubham is a graduate in Information Technology who likes to write about Windows Troubleshooting as well as Gaming Tips. He’s always engaged with new tech and gadgets. When not writing, he enjoys reading books, watching movies, and exploring new technologies.
According to various reports from users whenever they run Windows OS (Windows 11 or Windows 10) using Hyper V, the volume icon shows a cross mark over it. Further, if they click on the same icon the volume indicator is grayed out.

Also, if they open Device Manager “Audio inputs and outputs” entry is missing which confirms that no Audio output device is installed in OS running on Hyper V.
If you landed on this blog post, then you’re facing the Hyper V No Sound or Audio issue, right? Fortunately, there’s a quick workaround to fix this issue. Here’s what you need to do:
To add or enable sound or audio in Hyper-V virtual machine, you need to run virtual machine in Hyper V in Enhanced session mode.
For that, click on the View icon available on the Hyper V Manager menu and select Enhanced Session.

Instantly, virtual machine will restart automatically. Fix – Login Option Missing in Hyper-V Enhanced Session
After that, you need to login using Microsoft account details. This time you will see a regular Sound or audio icon on the taskbar. Also, if you click on the same icon, you will be able to control volume.
As simple as that!
Is the solution covered in this blog post help you in fixing Hyper V No Sound or No Audio Output Device is Installed? Let me know in the comments.
As an independent platform, it takes a lot of effort to create and curate quality content daily. Our content is totally funded by users like you.
Therefore, if you find information on this website useful, we kindly ask for your support in maintaining the longevity of our platform. If each person who benefits from our website contributes, we can secure a brighter future for our website.
Donate on Paypal or Buy us a coffee if you find the information shared in this blog post useful. Mention ‘Coffee’ in the Subject. So that I can thank you


Viney Dhiman, the mind behind GeekerMag, is a seasoned content writer with over 12 years of experience. Specializing in simplifying complex tech concepts, he covers Windows OS, Android, iOS, web apps, and product reviews. His work can be found on popular tech websites like Gizmodo and The Verge, and he has been interviewed by the Microsoft Edge team.
Hyper-V – это виртуальная машина, встроенная в операционную систему Windows 10, которая позволяет пользователям создавать и запускать другие операционные системы или приложения на своем компьютере. Однако, по умолчанию виртуальные машины в Hyper-V не имеют поддержки звука, что может быть проблемой для некоторых пользователей.
В данной статье мы рассмотрим, как включить звук в виртуальных машинах Hyper-V и решить другие проблемы, связанные с аудио. Для начала, мы покажем вам, как проверить настройки виртуальной машины и убедиться, что звук включен.
Примечание: перед тем, как включать звук, важно убедиться, что у вас установлены все необходимые драйверы аудиоустройства и система настроена правильно.
Если звук все еще не работает, мы предоставим несколько способов решения данного вопроса. Рассмотрим вопросы, связанные с отсутствием звука во виртуальной машине Hyper-V, возможными проблемами с аудиоустройством и предлагаемыми решениями.
Содержание
- Зачем нужен Hyper-V в Windows 10?
- Создание виртуальной машины
- Тестирование программного обеспечения
- Изоляция отказоустойчивых окружений
- Разработка и отладка приложений
Зачем нужен Hyper-V в Windows 10?
Вот несколько причин, почему вы можете использовать Hyper-V в Windows 10:
- Тестирование и разработка: Hyper-V позволяет создавать и запускать виртуальные машины с различными операционными системами для тестирования приложений и программного обеспечения без необходимости иметь отдельные физические компьютеры для каждой среды.
- Изоляция: Виртуальные машины в Hyper-V работают в изолированных средах, что обеспечивает безопасность и защиту данных.
- Управление ресурсами: С помощью Hyper-V вы можете легко управлять ресурсами каждой виртуальной машины, включая процессор, память и дисковое пространство.
- Консолидация: Hyper-V позволяет объединить несколько серверов в одном физическом компьютере, что экономит пространство и энергию.
Hyper-V в Windows 10 предлагает различные возможности для создания и управления виртуальными машинами, что делает его полезным инструментом для разных целей, от тестирования и разработки до консолидации сред.
Создание виртуальной машины
Для создания виртуальной машины в Hyper-V в Windows 10 необходимо выполнить следующие шаги:
- Откройте меню «Пуск», найдите и выберите «Панель управления».
- В «Панели управления» найдите и выберите «Установка и удаление программ» или «Программы и компоненты».
- В разделе «Системные параметры» найдите и выберите «Включение или отключение компонентов Windows».
- В открывшемся окне найдите и выберите «Гипервизор платформы Windows», а затем нажмите «ОК».
- После завершения установки гипервизора перезагрузите компьютер.
- После перезагрузки откройте «Пуск» и найдите «Hyper-V Manager».
- В меню «Hyper-V Manager» выберите «Действия» и «Подключиться к серверу».
- В поле «Имя компьютера» введите «localhost» или IP-адрес компьютера, на котором установлен Hyper-V, а затем нажмите «Подключиться».
- В «Hyper-V Manager» выберите свой компьютер в списке серверов и нажмите «Правый щелчок мыши».
- Выберите «Контекстное меню» и «Новая» и «Виртуальная машина».
- Следуйте инструкциям мастера для создания виртуальной машины, указывая необходимые параметры, такие как имя и расположение виртуальной машины, количество памяти и процессоров и т. д.
- После завершения создания виртуальной машины вы сможете запустить ее, выбрав ее в «Hyper-V Manager» и нажав «Правый щелчок мыши» и «Запуск».
Теперь у вас есть виртуальная машина в Hyper-V в Windows 10, готовая к использованию.
Тестирование программного обеспечения
Для тестирования программного обеспечения часто используется виртуальная машина с операционной системой, на которой работает тестируемая программа. В Windows 10 можно использовать Hyper-V для создания и настройки виртуальной машины.
Тестирование программного обеспечения включает в себя несколько типов тестов, включая функциональное тестирование, тестирование производительности, тестирование безопасности и тестирование совместимости. Каждый из этих типов тестов имеет свои особенности и набор методов, но их цель одна – гарантировать, что программа работает правильно и соответствует требованиям пользователей.
В процессе тестирования программного обеспечения могут возникнуть различные проблемы, такие как отсутствие звука. Если вы столкнулись с этой проблемой в Hyper-V в Windows 10, вам понадобится решить ее, чтобы удовлетворить требования программы. Существует несколько способов включить звук в Hyper-V в Windows 10, включая настройки виртуальной машины, настройки звука в операционной системе хоста и настройки звука в самой виртуальной машине.
В данной статье мы разберем несколько проблем, связанных с звуком в Hyper-V в Windows 10, и предложим решения для их исправления.
Изоляция отказоустойчивых окружений
Hyper-V в Windows 10 предоставляет возможность создания отказоустойчивых окружений, позволяющих изолировать и защитить виртуальные машины от внешних воздействий. Это особенно полезно в случае выполнения задач, требующих высокой надежности и стабильности исполнения.
Для достижения изоляции отказоустойчивых окружений в Hyper-V рекомендуется использовать следующие подходы:
- Изолированная виртуализация: создание виртуальных машин, работающих в изолированном окружении, обеспечивающем полную изоляцию от остальных виртуальных машин и хост-системы. В этом случае каждая виртуальная машина имеет собственный набор ресурсов и операционную систему, а также собственное ядро виртуализации.
- Cluster Shared Volumes: использование совместно используемых дисковых ресурсов с несколькими узлами кластера Hyper-V. Это позволяет повысить отказоустойчивость и возможность масштабирования, а также обеспечивает способность поддерживать работоспособность в случае выхода из строя одного узла.
- Live Migration: перемещение запущенных виртуальных машин между физическими серверами без прерывания их работы. Это позволяет обеспечить отказоустойчивость при обслуживании и масштабировании кластера Hyper-V.
Использование изоляции отказоустойчивых окружений в Hyper-V позволяет повысить надежность и безопасность работы виртуальных машин, обеспечивая стабильность выполнения задач и защиту от нежелательного влияния внешних факторов.
Разработка и отладка приложений
Для разработки и отладки приложений с использованием Hyper-V в Windows 10 необходимо выполнить следующие шаги:
1. Включить Hyper-V:
Чтобы включить функцию Hyper-V, необходимо перейти в «Панель управления», затем выбрать «Программы» и «Включение или отключение компонентов Windows». Затем нужно установить флажок напротив Hyper-V и нажать «ОК». После этого компонент Hyper-V будет установлен и можно будет начать создавать виртуальные машины.
2. Создать виртуальную машину:
После включения Hyper-V можно начать создавать виртуальные машины для разработки и отладки приложений. Для этого нужно перейти в меню «Гипервизор Hyper-V» и выбрать «Создать виртуальную машину». Затем нужно указать необходимый объем оперативной памяти, размер виртуального жесткого диска и другие настройки.
3. Установить операционную систему:
После создания виртуальной машины необходимо установить операционную систему. Для этого нужно выбрать образ ISO или установочный диск и следовать инструкциям на экране.
4. Настроить сеть:
Для разработки и отладки приложений может потребоваться настройка сети в виртуальной машине. Необходимо создать виртуальный коммутатор или настроить существующий, чтобы виртуальная машина могла подключаться к интернету или сетевому ресурсу.
5. Запустить виртуальную машину и разрабатывать приложения:
После всех настроек нужно запустить виртуальную машину и начать разрабатывать и отлаживать приложения в этой изолированной среде. Виртуализация Hyper-V позволяет легко изменять настройки виртуальной машины, создавать снимки состояния и другие операции, что упрощает процесс разработки и отладки.
Использование Hyper-V в Windows 10 значительно облегчает разработку и отладку приложений, позволяя разработчикам создавать изолированные виртуальные среды с необходимыми ресурсами и инструментами для разработки.
Hyper-V, the virtualization technology from Microsoft, can run multiple Operating Systems on top of a single physical machine. I was using Hyper-V on Windows 11 and noticed that there was no sound in the virtual machine (VM) I was running on Hyper-V.
I wanted to record some audio on the VM but got the following error:
No audio device is installed.

If I go to the Device Manager, I can’t find any sound devices.
This issue can be frustrating, especially if you need to use audio for your work. Fortunately, there are some steps you can take to fix Hyper-V no sound issues on Windows 10, Windows 11, and Windows Server with Hyper-V installed.
Fixing No Audio or Sound in Hyper-V
Hyper-V comes with a feature called Enhanced Session Mode. This feature lets users use the local system resources of the physical machine in the virtual machine. This includes, but is not limited to, a keyboard, mouse, printer, sound, etc. We will need to enable the Enhanced Session feature to enable sound on the Virtual Machine. Here are the steps involved:
-
Start the Virtual Machine with Hyper-V Manager.

Start VM in Hyper V -
Once Windows has started and you get to the Sign in screen, click on the View Menu and select Enhanced Session.

Enhanced Session menu -
This will enable enhanced session mode for your VM.

Enhanced Session enabled Please note that it may take a few minutes for the mode to enable itself. Please be patient and let the system finish its configuration. The system will ask you to reconnect to the VM again.
-
Click Connect to restart the connection.

Connect to the VM again


One of my observations is that you need to enable enhanced session mode every time you start the VM. This is cumbersome, but I can’t find any settings in Hyper-V to automate this. If you know of any tips, please let me know in the comments below.
Another thing to make sure of is to check and update all the sound drivers on your host machine (physical machine). Since Hyper-V only relays the system sound to the remote VM, the audio must work on the physical machine to make it work on the VM.
I can’t find Enhanced Session under View Menu
If you don’t have the Enhanced Session option under the View menu, this is probably because the Enhanced Session Policy is not enabled for your Hyper-V software. Here’s how you can enable the Enhanced Session Policy:
-
Open Hyper-V Manager.

Hyper V Manager -
Right-click the Hyper-V host in the left pane and select Hyper-V Settings.
Hyper V Host Machine Settings -
Click the Enhanced Session Mode Policy under User in the left pane.

Enhanced Session Mode -
Check the “Allow enhanced session mode” checkbox.
Enable Enhanced Session Mode Checkbox -
Click OK for the changes to take effect.


I’m using Linux on the Virtual Machine. What should I do?
Unfortunately, the enhanced mode is only supported for Windows. If you are running any other Operating System, you will need to go through a lengthy process of enabling sound and other local resources in the VM. I found a useful comment on Reddit to fix the issue if you are using Fedora or any other RedHat-based Operating System. Here’s the comment:
Sound on Hyper-V is painful as it requires an xrdp sink. Fedora has moved to PipeWire + Wayland by default, meaning that you will need to go through a lot of trouble to make it work (use Xorg, revert to pulseaudio and compile / install a pulseaudio module by hand: https://github.com/neutrinolabs/pulseaudio-module-xrdp/wiki/Build-on-Fedora). Can’t you use VMWare Workstation or VirtualBox instead?
No sound in Hyper-V VM : Fedora (reddit.com)
These are some steps you can take to fix Hyper-V no sound issues on Windows. Hopefully, they will help you enjoy a better audio experience on your virtual machines. If you have any questions or feedback, please leave a comment below.