Задача: Как на Hyper-V on Server 2012 R2 Std установить виртуальную машину с осью Windows 7 x64
Давненько я не работал в виртуализации, базирующейся на Windows в частности Hyper-V, все больше на VMware. В этой организации у меня план — это перенести виртуальные машины из Hyper-V в ESXi и сделать это как можно безболезненно. Сейчас я хочу вспомнить как создается виртуальная машина под Hyper-V через Hyper-V Manager (Version 6.3.9600.16384)
Шаг №1: Подключаюсь по RDP к системе, на которой поднята роль Hyper-V с правами Domain Admins
on logon srv-virtual01 (Login: aolloadm, Group: Domain Admins)
Шаг №2: Запускаю оснастку Hyper-V Manager
Win + X - Control Panel - Administrative Tools - Hyper-V Manager и вижу все виртуальные машины которые есть
Шаг №3: Создаю виртуальную машину через оснастку Hyper-V Manager
(Actions) SRV-VIRTUAL01 - New - Virtual Machine…
Do not show this page again:отмечаем галочкой
нажимаем Next
(Specify Name and Location)
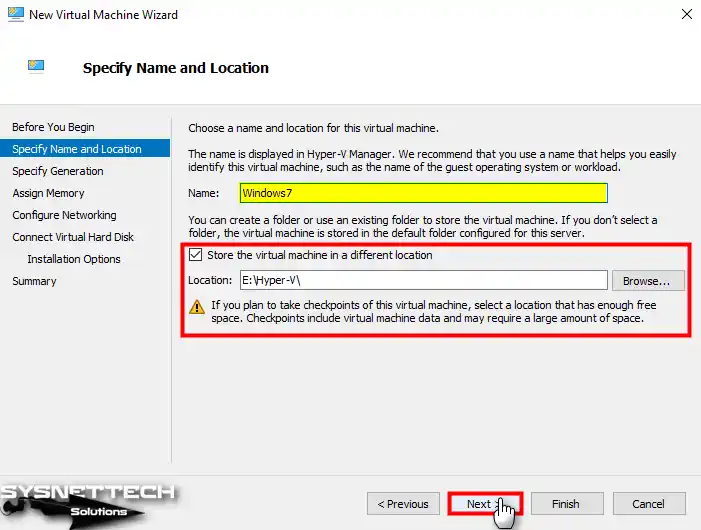
Name: srv-w7x64aStore the virtual machine in a different location:отмечаюLocation: D:\Hyper-V\VM conf\
нажимаем Next
(Specify Generation)
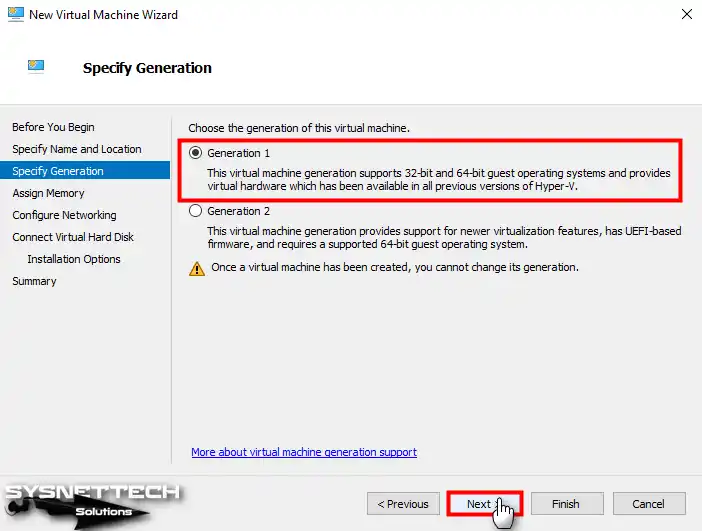
Choose the generation of this virtual machine:выбираюGeneration 2
нажимаем Next
(Assign Memory)
Startup memory: 4096 MB
нажимаем Next
(Configure Networking)
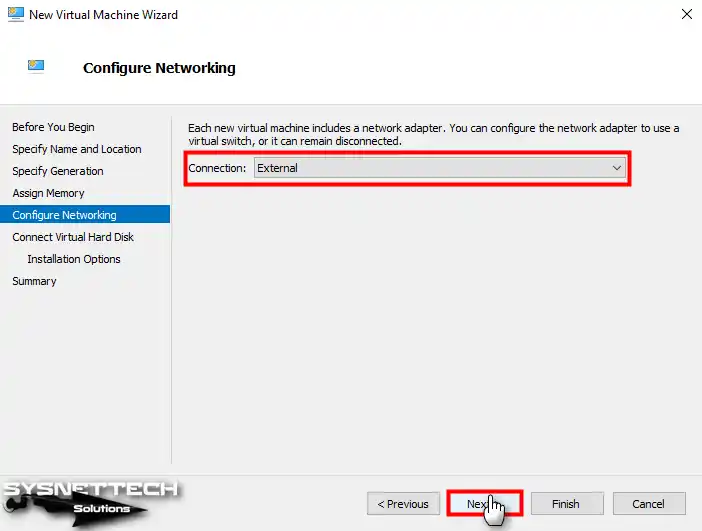
Connection:выбираюHyper-V
нажимаем Next
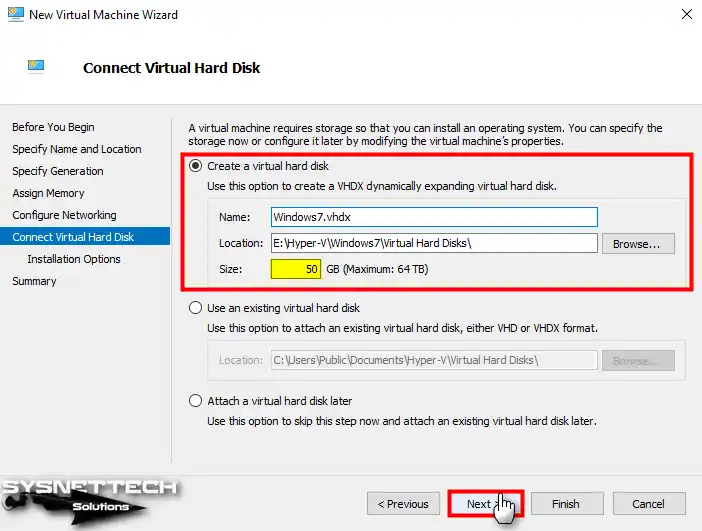
(Connect Virtual Hard Disk) выбираю Create a virtual hard disk
Name: srv-w7x64a.vhdxLocation: D:\Hyper-V\VHD\Size: 50 Gb
нажимаем Next
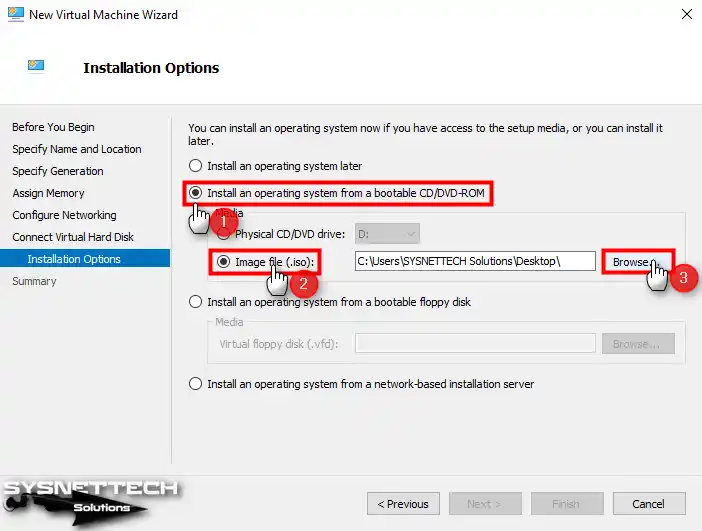
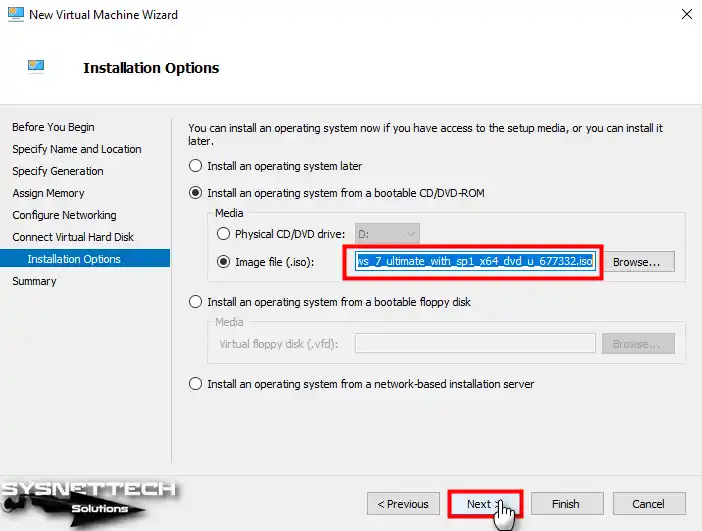
(Installation Options) выбираю Install an operating system from a bootable image file
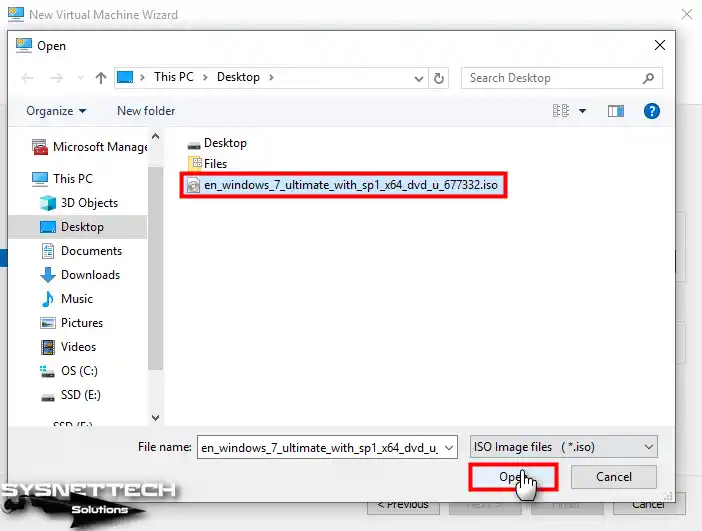
Image file (.iso): C:\soft\нажимаю наBrowse…и выбираюSW_DVD5_Win_Pro_7w_SP1_64BIT_Russian_-2_MLF_X17-59431.isoи нажимаюOpen
нажимаем Next
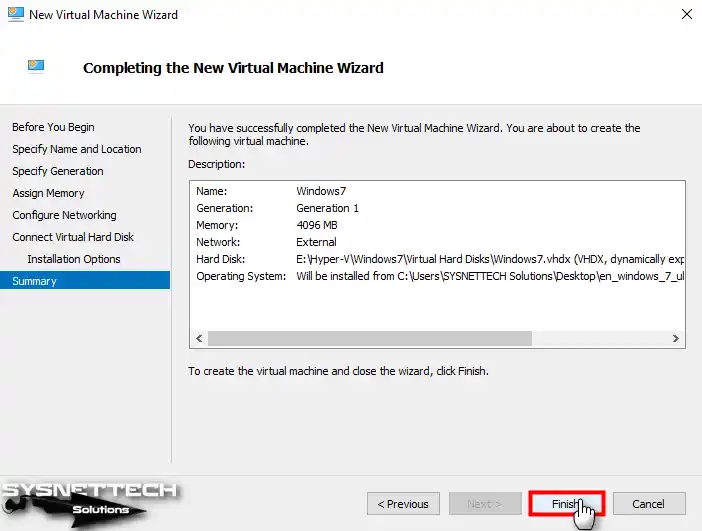
(Summary) нажимаем Finish
Шаг №4: Через правый клик мышью на VM выбираю Start, а потом Connect
и я получаю
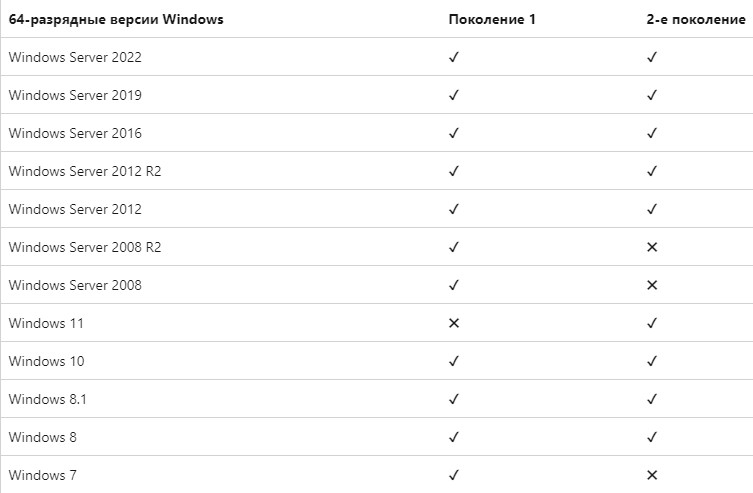
анализ какую генерацию для создаваемой виртуальной машины выбирать вышел на таблицу
(https://learn.microsoft.com/ru-ru/windows-server/virtualization/hyper-v/plan/should-i-create-a-generation-1-or-2-virtual-machine-in-hyper-v#windows-guest-operating-system-support)
в следующей таблице показано, какие 64-разрядные версии Windows можно использовать в качестве гостевой операционной системы для виртуальных машин поколения 1 и 2.
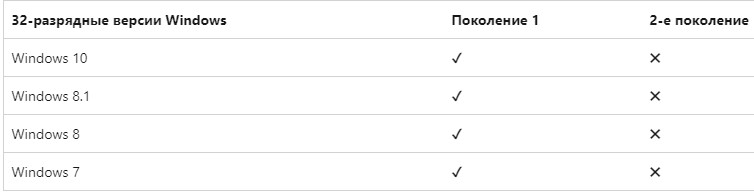
в следующей таблице показано, какие 32-разрядные версии Windows можно использовать в качестве гостевой операционной системы для виртуальных машин поколения 1 и 2.
Итого, с учетом данных выше, переделываю виртуальную машину на Generation 1, запускаю, подключаюсь и в окне наблюдаю привычный процесс инсталляции операционной системы (проделываю вручную)

Важно, что установщик видит диск

у меня наследие от предыдущего системного администратора в виде тормоза сервера (S5000VSA, RAM = 20Gb (667MHz из 8 слотов), CPU = 1 (Intel Xeon CPU E5420 @ 2.50GHz) на котором развернуто самое главное в компании: Домен контроллер, Шлюз Remote Desktop Gateway. Я хочу это вынести на мощное железо.
Итого система установлена.
Шаг №5: Устанавливаю в систему Integration Services Setup disk:
При открытой консоли виртуальной машины srv-w7x64a, нажимаю Action — и выбираю Insert Integration Services Setup Disk, открываю "Мой компьютер" — и через правый клик на носителе выбираю "Install Hyper-V Integration Services" (D:\support\x64\setup.exe), проследовав за шагами мастера получаю сообщение об установленной версии Hyper-V

Нажимаю OK, увы не все так хорошо, опять ошибка
"An error has occurred: One of the update processes returned error code -2146762487"

Увы, побороть ошибку я пока не смог, а может и не нужно.
Шаг №6: Скачиваю пакет KB3063109 для Windows 7 x64, распаковываю его внутри развернутой виртуальной машины и устанавливаю устройства указав распакованный каталог:
Win + R -> cmd.exe
|
bcdedit.exe /set loadoptions DDISABLE_INTEGRITY_CHECKS bcdedit.exe /set TESTSIGNING ON shutdown /r /t 3 |
и после успешно из распакованного архива установил некоторые драйвера.
И вот теперь по сути я успешно установил Windows 7 x64 как виртуальную машину на Hyper-V и могу использовать.
Пока на этом все. С уважением автор блога Олло Александр aka ekzorchik.
In this article, we will examine how to set up Windows 7 on a new virtual machine using Microsoft’s Hyper-V virtualization software on the Windows 10 64 Bit operating system.
How to Install Windows 7 on a Virtual Machine using Hyper-V
Windows 7 was released on October 22, 2009, for both personal and business computers, with the development of Microsoft’s previous system, Windows Vista.
Microsoft’s Windows 7 system is the most popular operating system in the world, which maximizes the user experience, supports installation on almost any computer.
Compared to previous XP and Vista versions of Windows, Windows 7 provides a lot of conveniences for users to create network connections. It also supports better power saving of host computers and provides convenience for users to create interactive content such as video, music.
Although this wonderful operating system of Microsoft was terminated on January 14, 2020, many people or institutions still use it today. Microsoft has officially notified users that the system may be vulnerable to security vulnerabilities as it ended support.
While it is better to install and experience Win7 on a physical computer, it may be safer to install and run it on virtual machines.
Therefore, you can protect your host computer from system vulnerabilities by running Win7 in a VM by activating Hyper-V, the free virtualization software built into Windows 10.
How to Create a New VM for Windows 7
After installing Hyper-V on your host computer, you must first create a correct virtual computer for the Win7 operating system and then configure its settings correctly for installation performance.
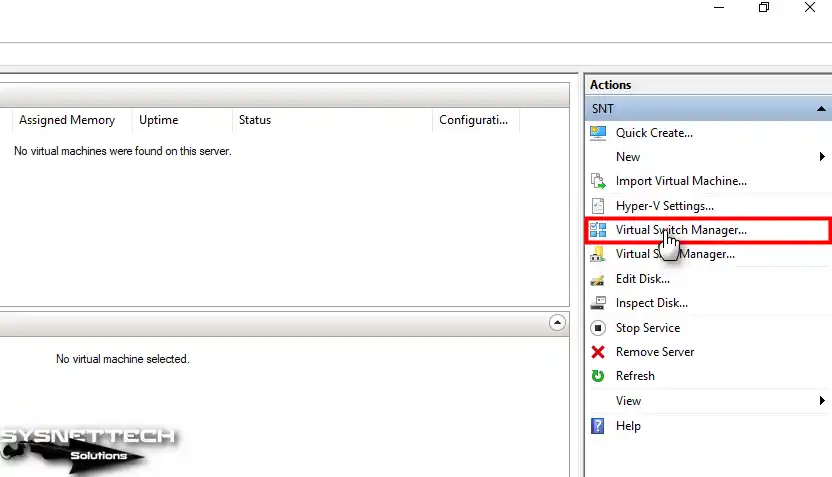
Step 1
First of all, before creating a VM with Hyper-V, it is recommended to create an External Switch using the Virtual Switch Manager tool. Because VMs use Default Switch, which uses NAT connection by default, and this adapter can often cause problems for VMs to access the local network and the Internet.
Click Virtual Switch Manager in the Actions section on the right side of the Hyper-V program.
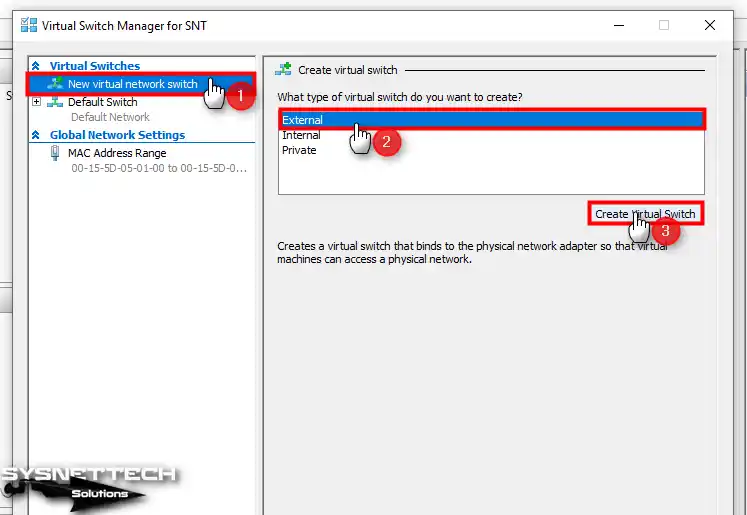
Step 2
Select New Virtual Network Switch / External on Virtual Switch Manager, and then click the Create Virtual Switch button.
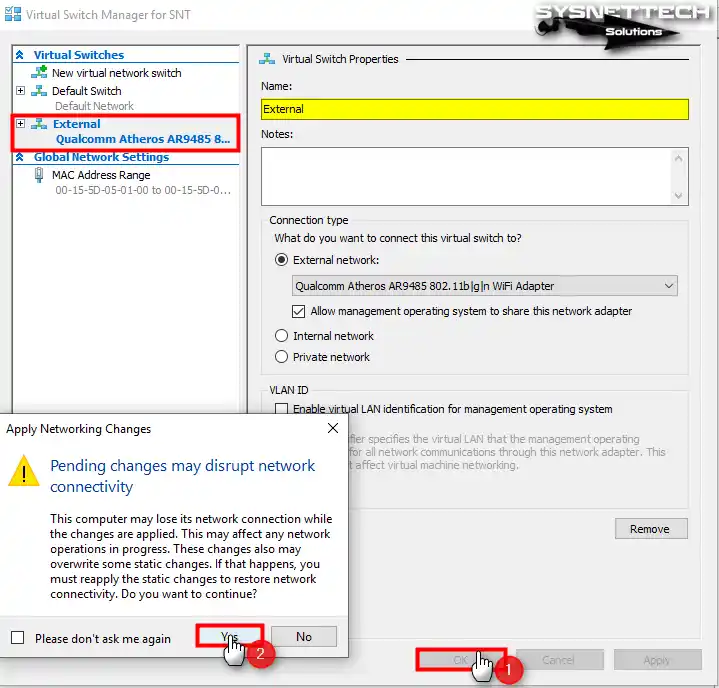
Step 3
After creating the External Switch, type a name for your external network in the Name field and configure the External Network setting as your host’s network adapter connecting to the Internet.
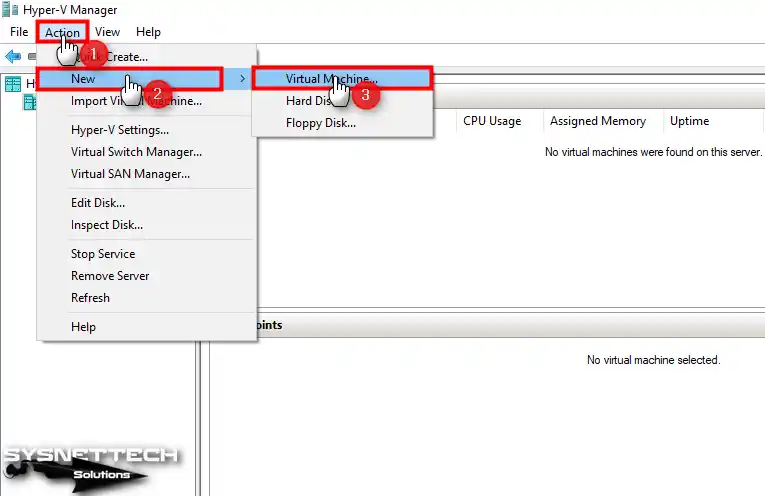
Step 4
Click Action / New / Virtual Machine from the tool menu to start the virtual machine creation wizard.
Step 5
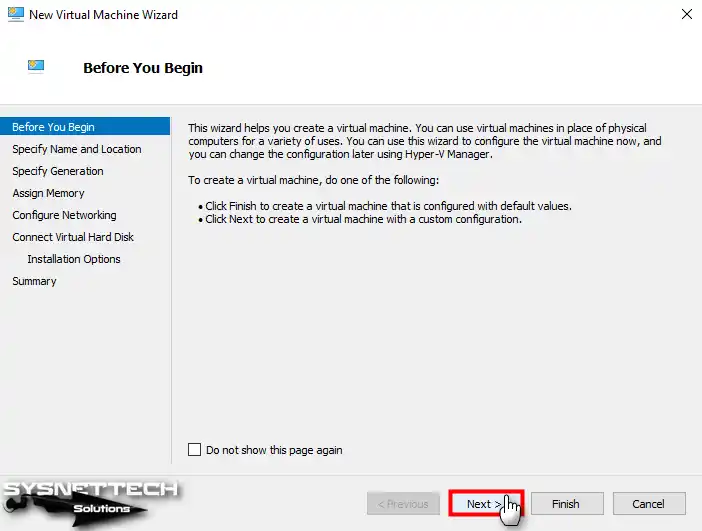
In the Before You Begin window, you are presented with two installation options. First, if you click Finish directly here, a virtual machine will be created automatically. Second, the Next option is provided to create the VM manually and better configure its settings.
Since it would be more convenient to manually configure some important settings of the virtual computer, such as Generation type, click Next to continue.
Step 6
Write down the name of the virtual operating system that you will install on your host, and you may also want to back up the VM to an external disk so as not to overfill the capacity of your host disk. Therefore, in Location, you can specify the location where the VM will be stored.
Step 7
When you set the Generation type of the guest operating system to 1, you will have enabled BIOS firmware that supports older systems. If you are going to install a newer operating system such as Windows 10, you can enable UEFI firmware by selecting Generation 2.
Step 8
You may need to configure the virtual memory size for the VM according to the hardware capabilities of your host computer. Also, if you are going to run multiple VMs simultaneously on your host, you can enable Dynamic Memory to create better RAM memory allocation between VMs. Thus, more memory will be allocated by the hypervisor to the virtual PC that needs more memory.
If you are going to run a single virtual PC on your host, you do not need to enable this feature, and configuring a fixed RAM size will be better for performance. Therefore, type a suitable memory size according to your host RAM capacity and click Next.

Step 9
Select the External Switch you created for the network adapter of the Windows 7 virtual machine and continue.
Step 10
In the Virtual HDD configuration window, you can see that the disk size of 127 GB is configured by default. Configure the size of the virtual disk to 50 GB or higher, depending on what you do on the VM.
Step 11
To install the ISO file on the VM in the installation options window, first, enable the Install an operating system from a bootable CD/DVD-ROM option, then the Image File option, and finally, click the Browse button to specify the location of the file to add a Windows 7 ISO file to the VM.
Step 12
Select and add an image file you downloaded before or the ISO file you downloaded to your computer from the link here.
Step 13
After adding the Microsoft Windows 7 Ultimate SP1 x64 ISO file to the VM, click Next.
Step 14
You can see the changes you have made on the virtual computer in the Summary window, which is the final stage. If there is a setting you want to change in the VM, you can go back to the previous settings or close the window.
Step 15
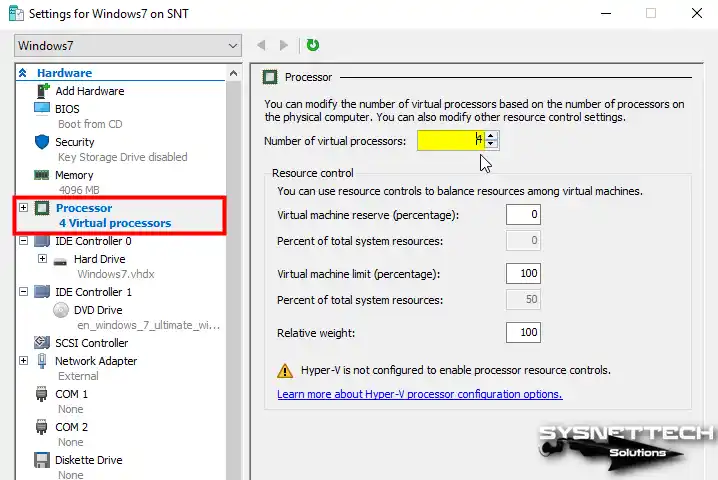
After preparing the VM, open its settings and configure the number of virtual processors according to the power of your host CPU.
Step 16
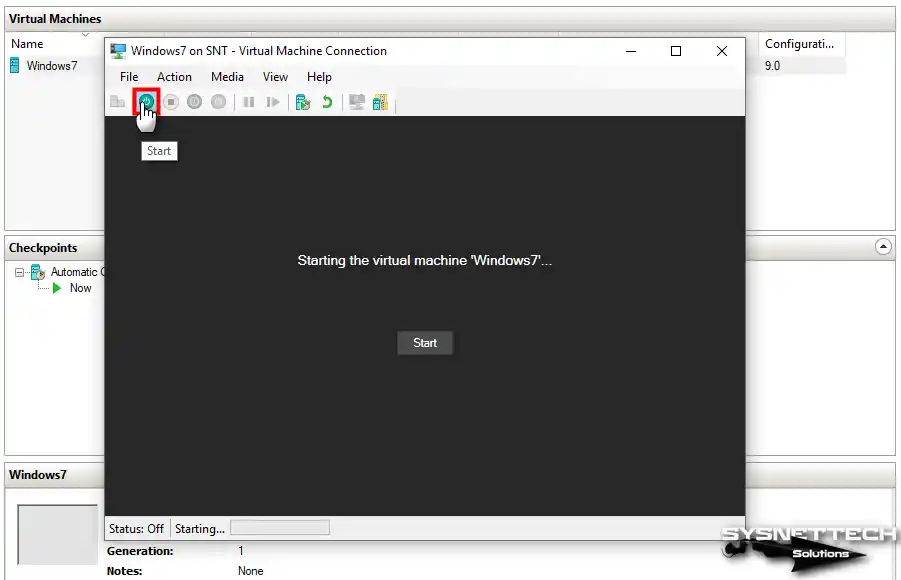
Connect to the Windows 7 virtual computer with the right button / Connect and then click the Start button to launch the system setup.
How to Install Windows 7
Installing Windows 7 with Hyper-V is similar to installing on a physical computer in the real world. Therefore, you can also perform the operations after this step on a physical computer.
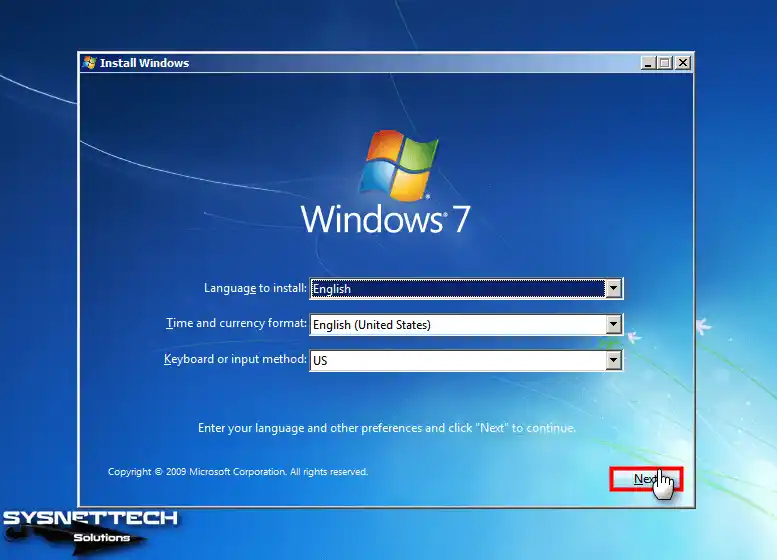
Step 1
After running the virtual PC, you will see it booted with the ISO image. When the Windows 7 setup screen opens, select your system display language, keyboard layout, and time zone and click Next.
Step 2
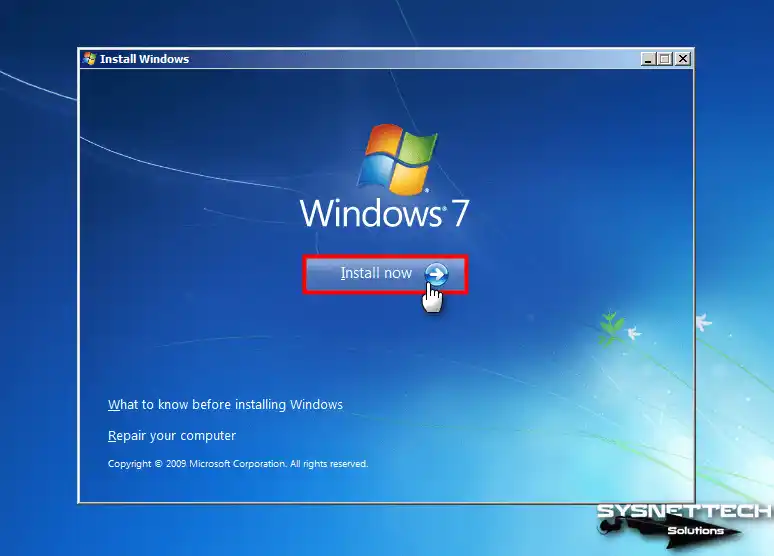
On this screen, you can get more information about the installation, repair your system, or start the Windows installation by clicking Install Now.
Step 3
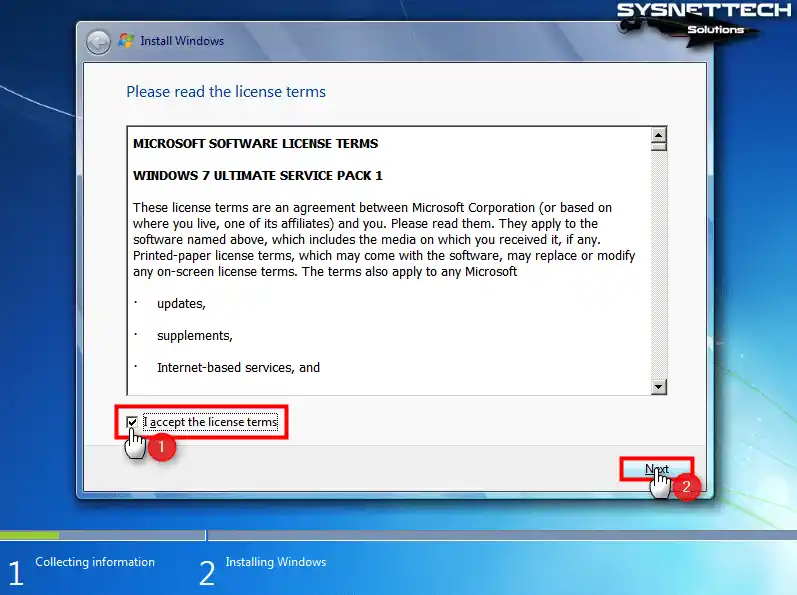
Confirm the license agreement of the Microsoft Windows 7 Ultimate Service Pack 1 operating system and click Next.
Step 4
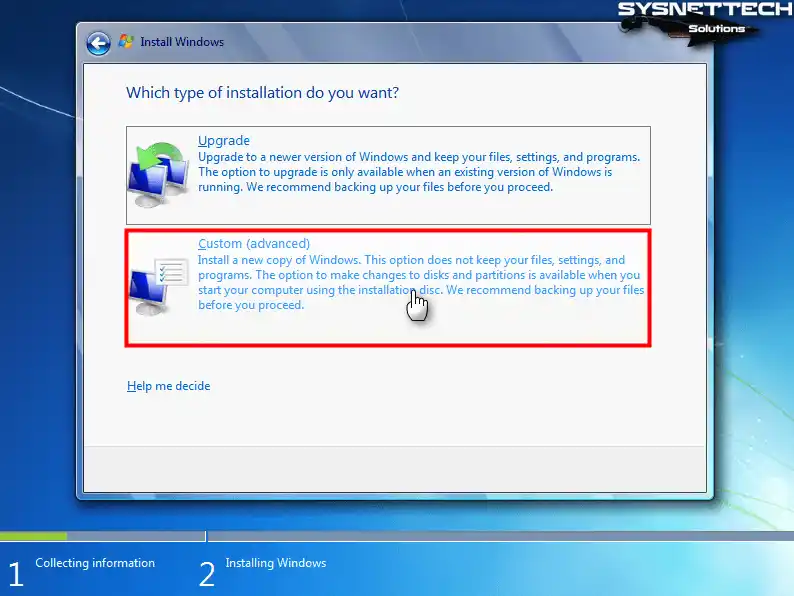
An older version of Windows must be installed on the VM before you can upgrade to a newer version of Windows. To install Windows 7 from scratch, click Custom (Advanced) and continue.
Step 5
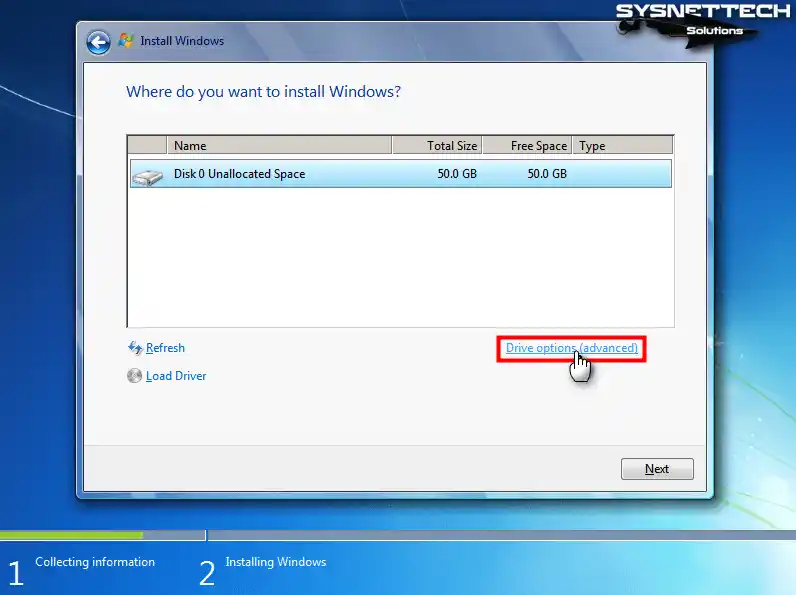
Click Drive Options to create a new partition on the virtual disk.
Step 6
Select Disk 0 Unallocated Space and click New, then click Apply to confirm the automatically allocated disk space.
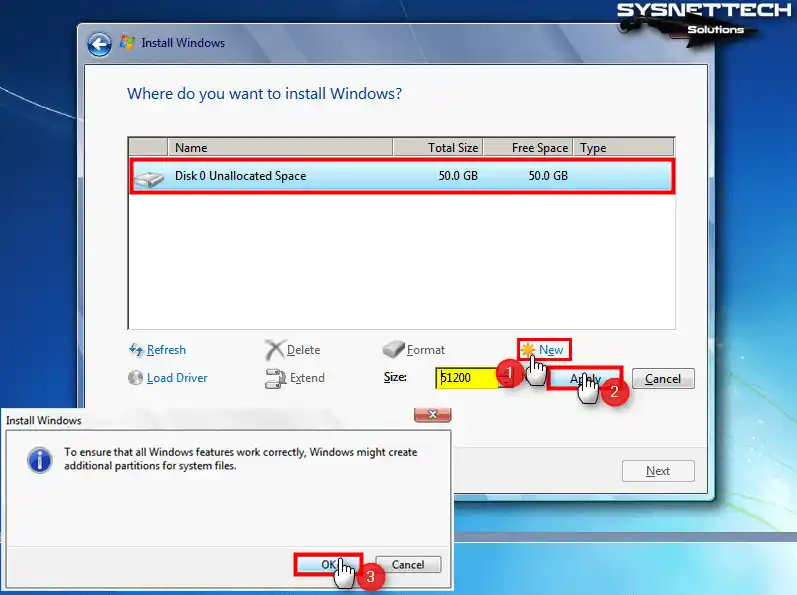
Step 7
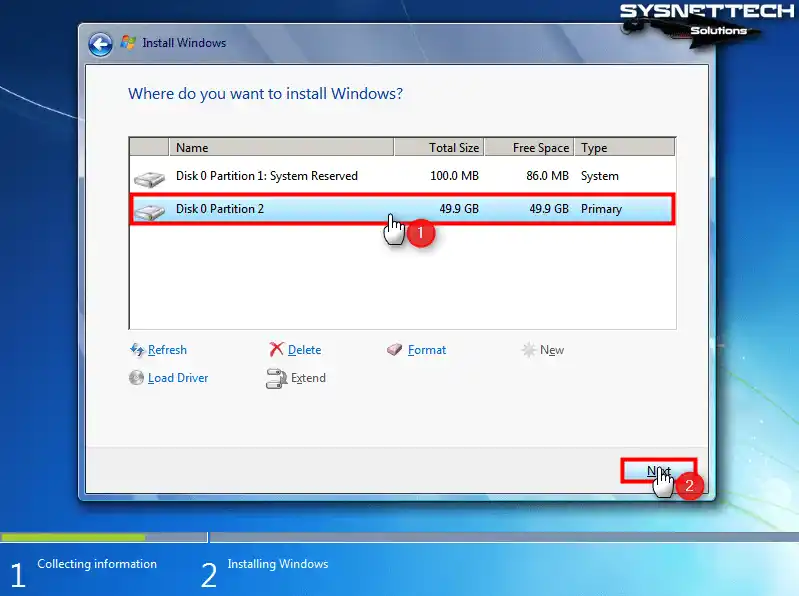
Select Disk 0 Partition 2 where you will install Windows and click Next.
Step 8
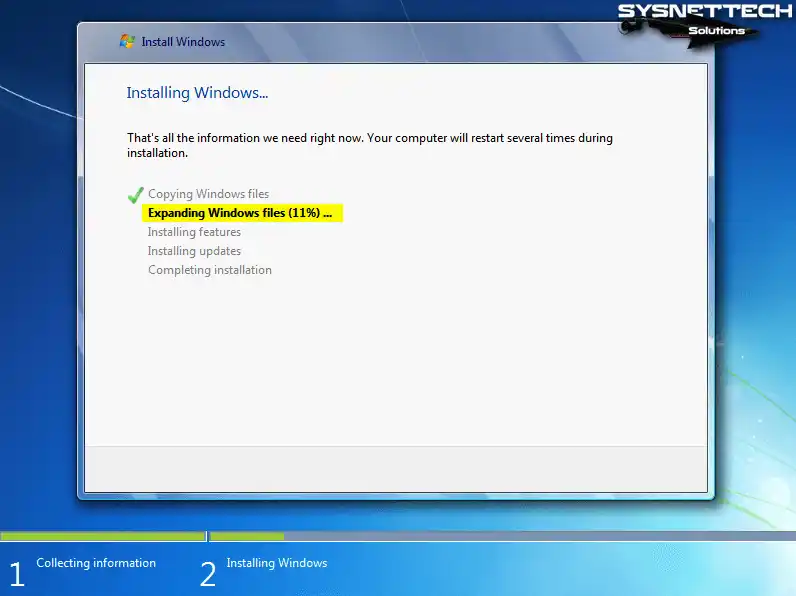
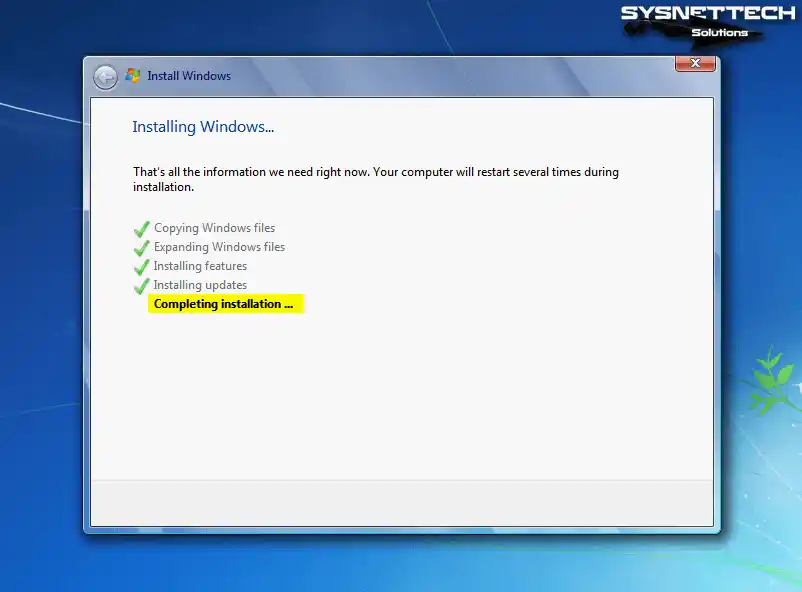
Wait while the setup wizard expands the Windows system files.
Step 9
After the Windows 7 system files are copied, restart your guest system.

Step 10
After your guest operating system restarts, the installation will continue for a while.
Step 11
When your virtual PC restarts again, this time, type your user and computer name to be different from other PCs in your network.
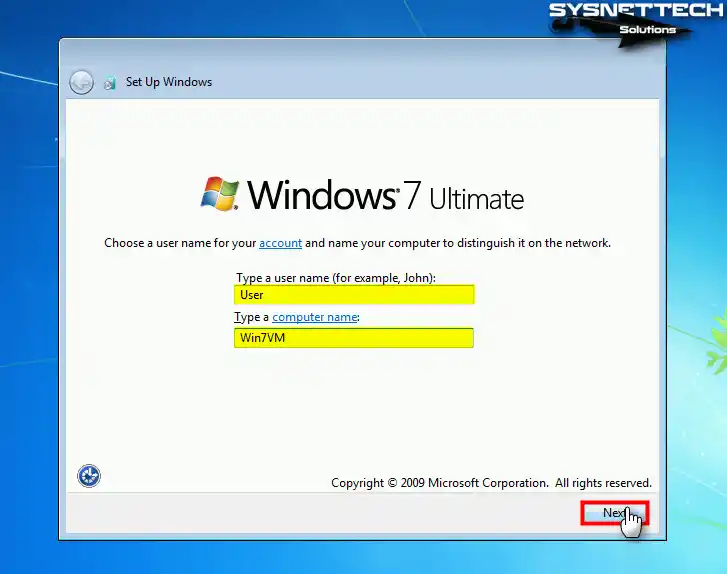
Step 12
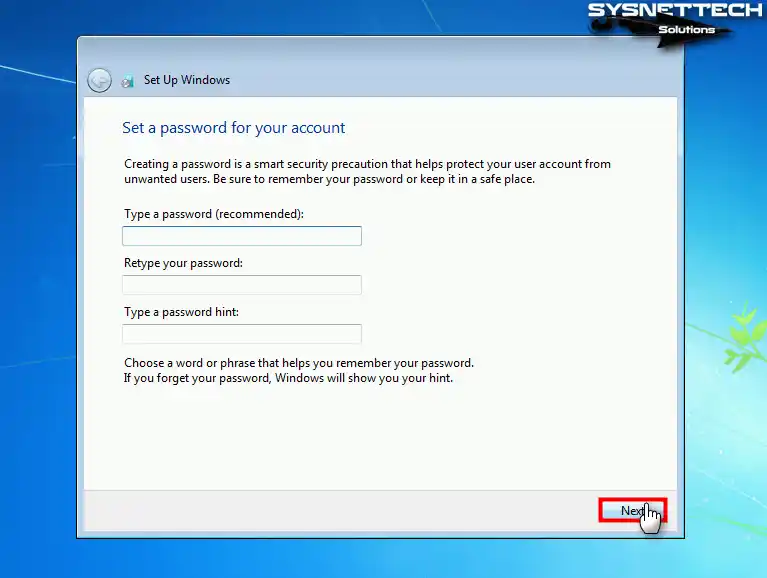
If you want to protect your personal virtual machine from unwanted users, create a memorable password for your user account.
Step 13
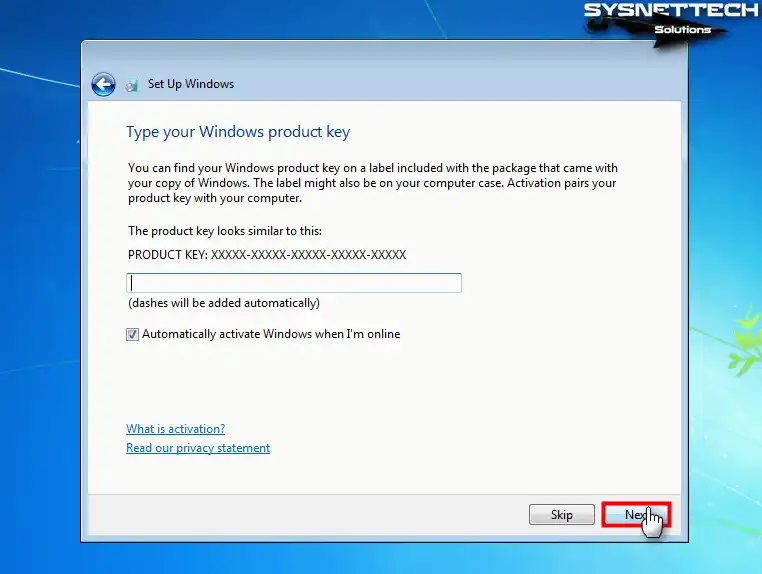
Type your Windows 7 product key and if you want Windows to be activated automatically when you are online, select the relevant option and click Next.
Step 14
If you want to enable the update service so that Windows can protect your computer, select Use Recommended Settings.

Step 15
Configure the time zone of your guest operating system according to the country you live in and click Next.

Step 16
Configure the current location where you will use your virtual computer as home, work, or public.

Step 17
After installing Windows 7 on your virtual machine, you can find out the system version by executing the winver command in the Run window.

How to Test Internet Connection
You can access your local network and the Internet using both the External Switch and the Default Switch adapter in the VM. Because the Default Switch uses NAT, it will not have an IP address from the range of IP addresses used in your local network.
When you use an External Switch, your virtual machine will receive an IP address from the DHCP server that automatically distributes IP addresses on your physical network.
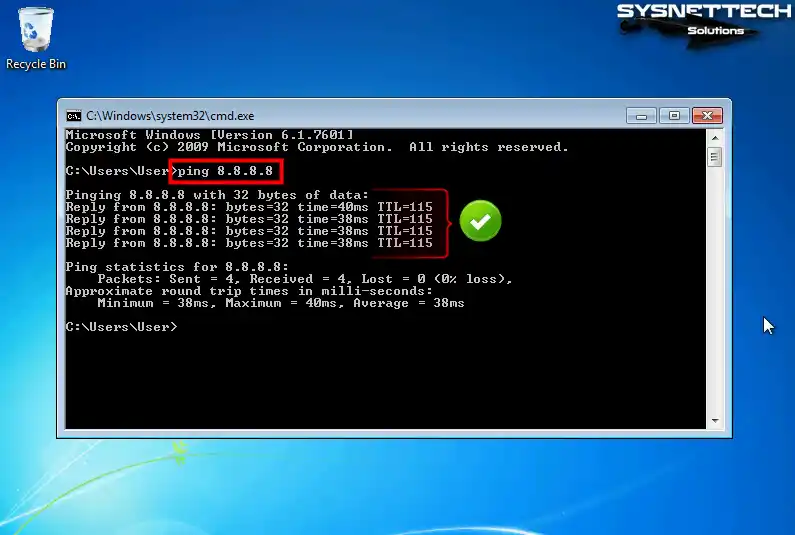
Step 1
To check if your virtual system can access the Internet, ping the Google servers by executing the ping 8.8.8.8 command at the CMD prompt.
Step 2
If you can ping Google servers, check that you can access the homepage via Internet Explorer.
How to Use VM in Full-Screen Resolution using Remote Desktop Connection
When you install older distributions of Windows with Hyper-V, you may not be able to use the full-screen resolution and you may not be able to hear system sounds. This is because Enhanced Session is not supported on older systems.
Even if you enable Guest Services in the VM’s settings, the advanced session feature is not active. To solve this problem, you can use the VM in full-screen resolution and hear system sounds by using Remote Desktop Connection on the host.
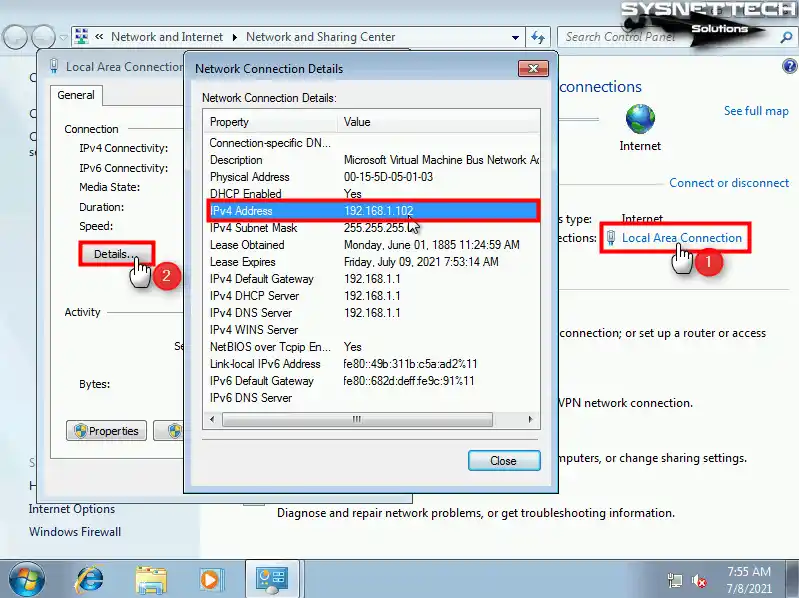
Step 1
In order to use the remote desktop tool, you need to check the IP address that the virtual machine gets from the DHCP server.
Right-click on the network connection in the right corner of the taskbar, open Network and Sharing Center and click on Local Area Connection, then click Details in the window that opens and check the IP address in the IPv4 Address section of the Network Connections Details.
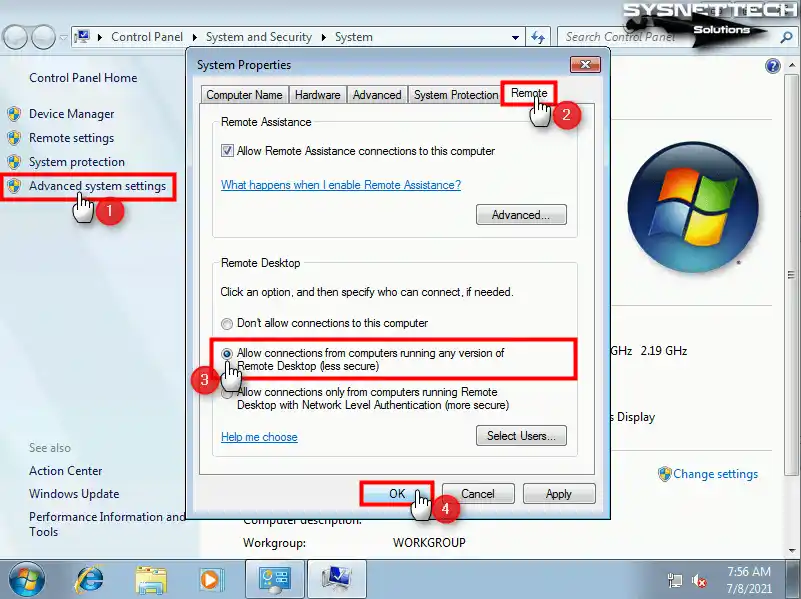
Step 2
Once you know the IP address you need to configure the permissions on the VM for the remote desktop connection. Right-click on my computer, click Properties and click Advanced System Settings in the system properties window, and then select “Allow connections from computers running any version of Remote Desktop (less secure)” on the Remote tab and click OK.
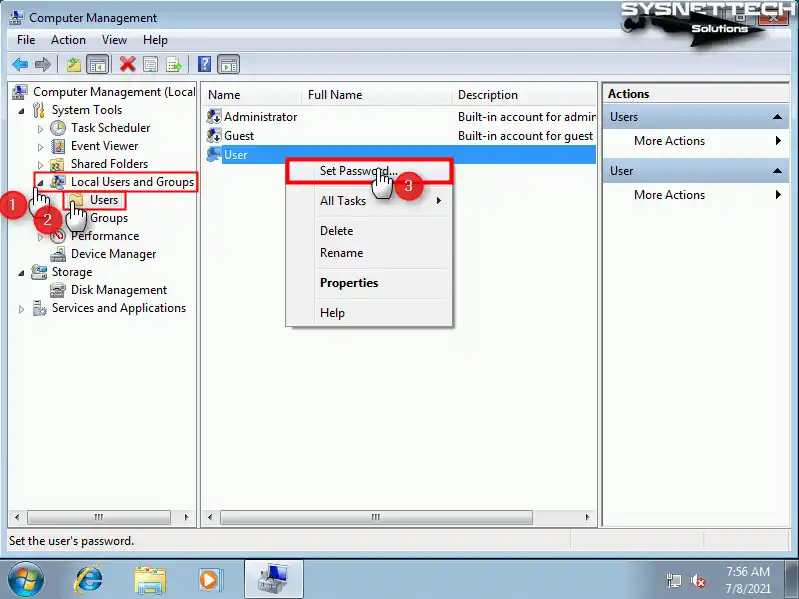
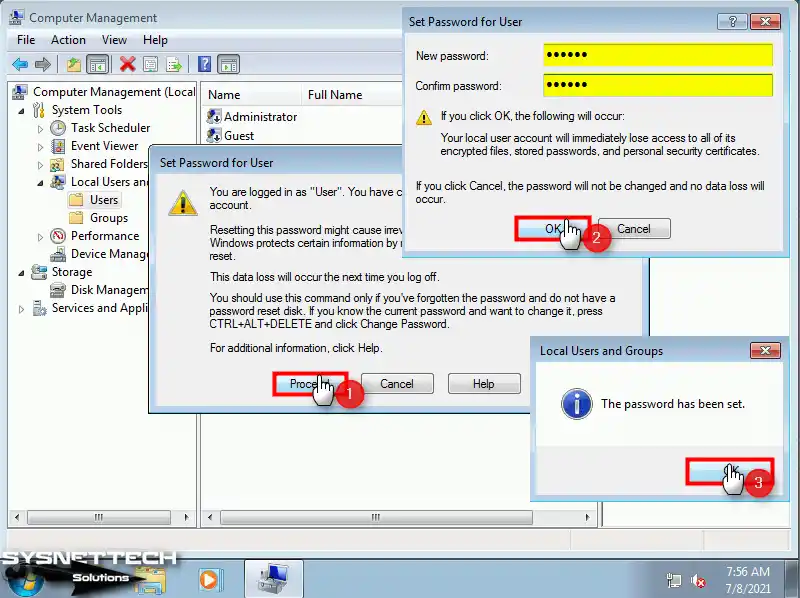
Step 3
Finally, to create a password for the user account so that you can establish a remote desktop connection to the virtual machine, right-click on My Computer and click Manage from the pop-up options.
Click Local Users and Groups / Users in the Computer Management window and right-click on User from the user accounts listed on the right and click Set Password.
Step 4
After clicking the Proceed button in the window that opens, create a new password for your user account in the Set Password for User window and click OK.
Step 5
Start the Remote Desktop Connection tool on your host operating system.
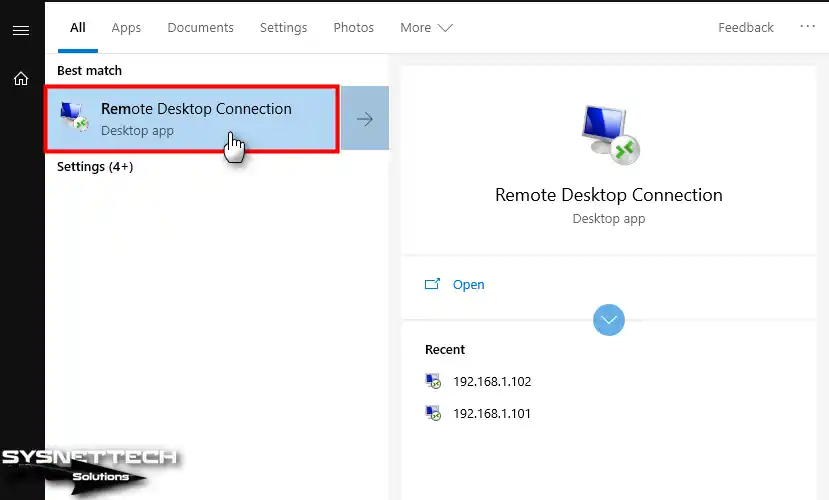
Step 6
Type the IP address of the guest operating system and click Connect.

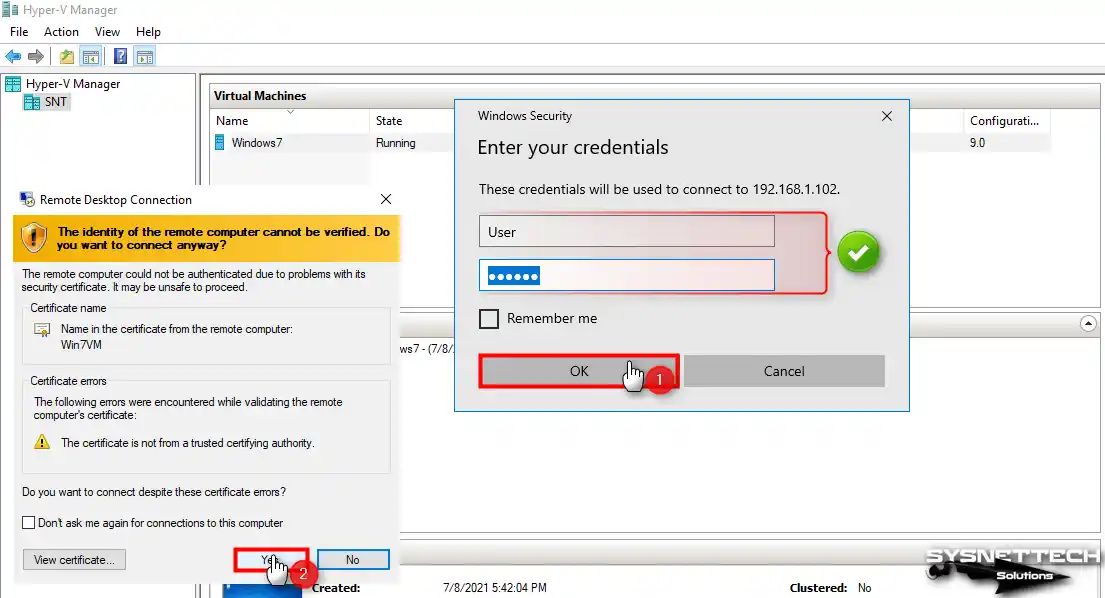
Step 7
Type the guest system’s credentials and click OK, then click Yes in the warning window reporting the certificate error.
Step 8
After establishing a remote desktop connection to the virtual computer, you can see that the audio device is operational and the screen resolution is used in full-screen mode.

How to Use USB Flash Memory in Virtual Machine
The simplest way to transfer files between a virtual machine running in Hyper-V and the host is to use a USB flash drive. Because in some host systems, establishing a network connection and sharing folders can be difficult.
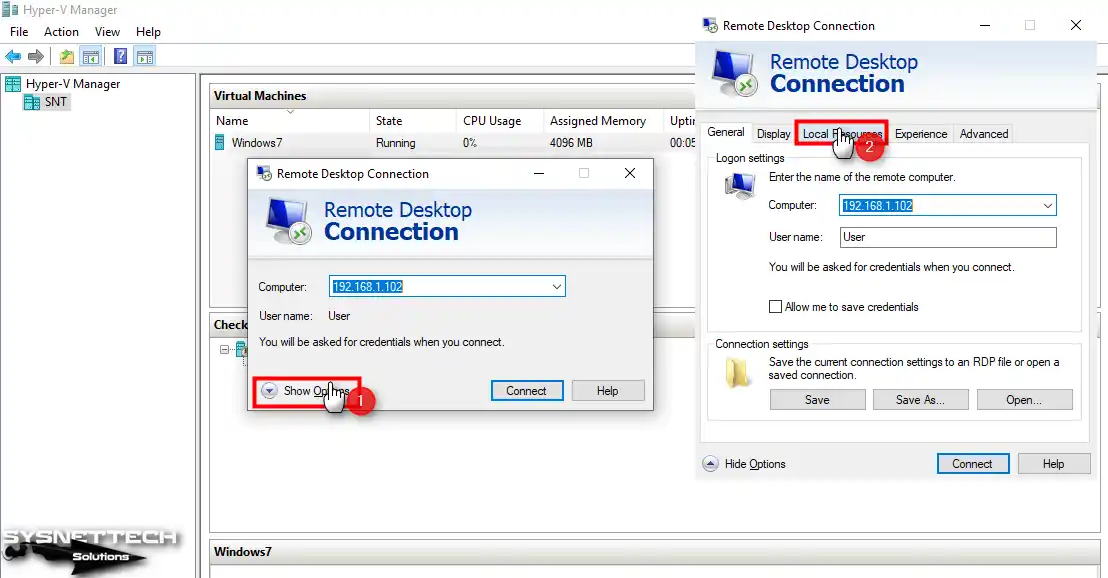
Step 1
Open Remote Desktop Connection again on your host and this time click Show Options and then click Local Resources tab in advanced settings.
Step 2
After clicking More in local resources, tick your flash memory from the devices under Local Devices and Resources / Drives and click OK.
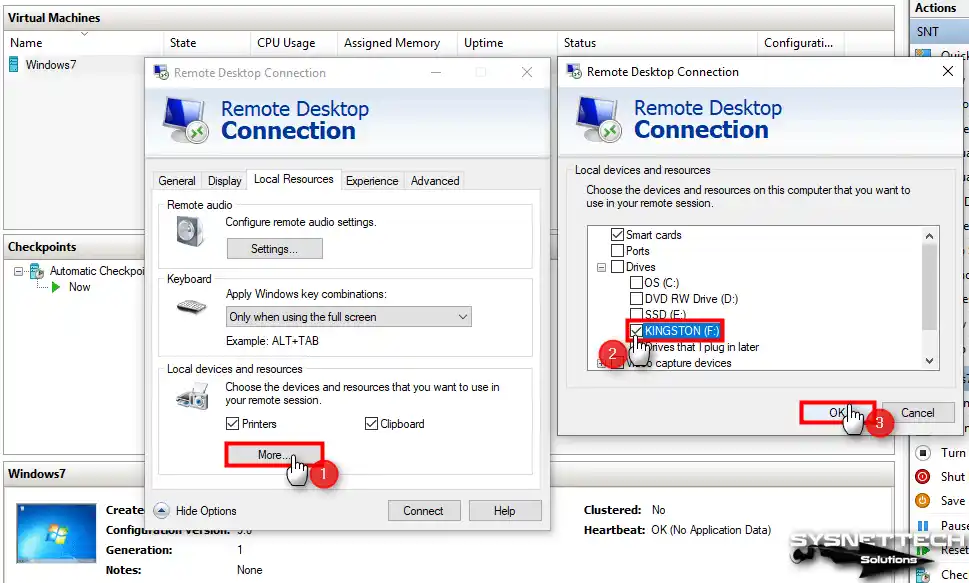
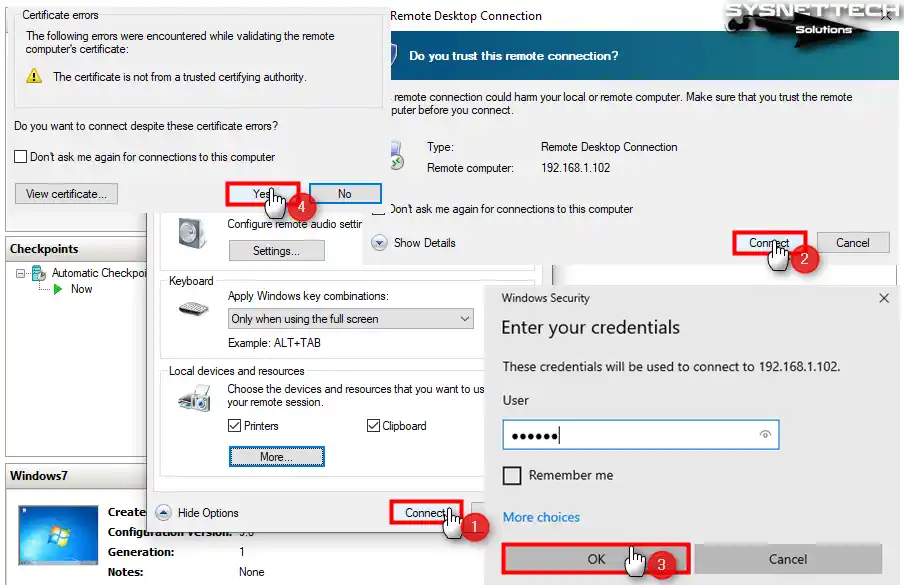
Step 3
Click Connect after selecting the USB stick and click Connect again in the trust remote connection window. Re-enter the Guest OS’s credentials and connect to the VM after confirming the certificate error.
Step 4
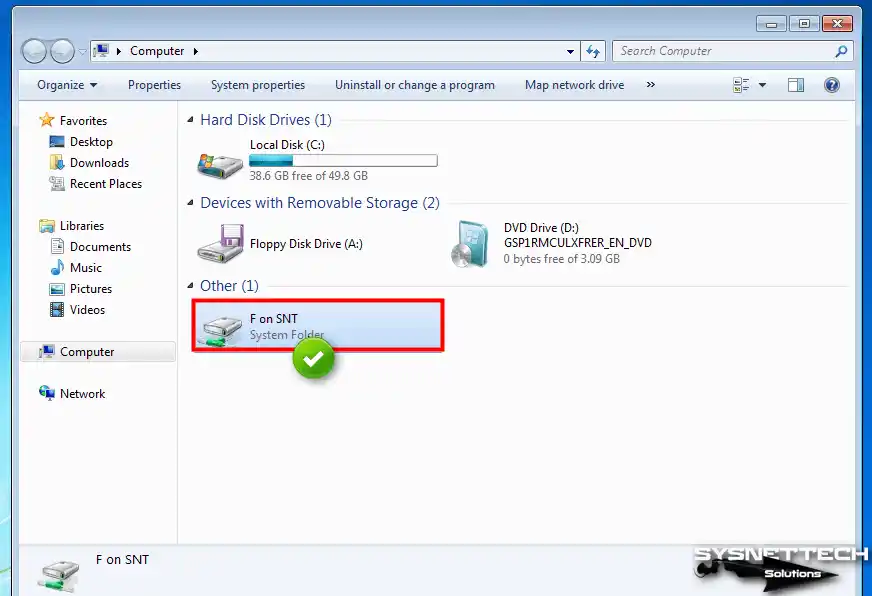
After opening My Computer on the guest system, check that the flash memory is visible in Other.
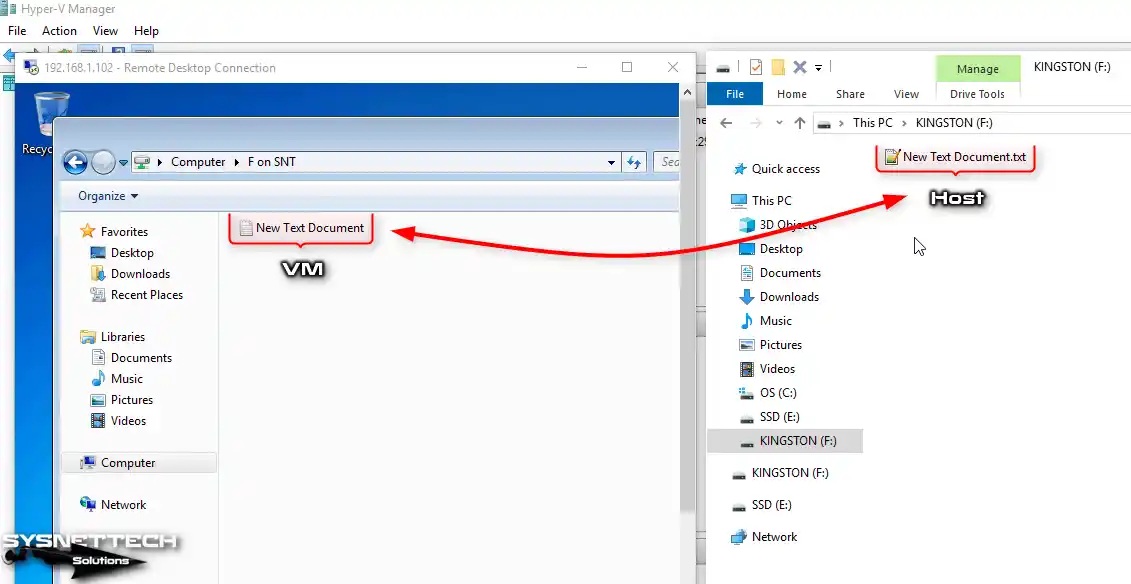
Step 5
As soon as you create a file or folder in the USB memory inserted in your host, you can see that the files created on the remote desktop connection.
Video
Related Articles
♦ How to Install Windows 10 using Hyper-V
♦ How to Install Ubuntu using Hyper-V
♦ How to Install Windows XP using Hyper-V
♦ How to Install Windows 8/8.1 using Hyper-V
♦ How to Install Windows Vista using Hyper-V
Hyper-V — это гипервизорная платформа для виртуализации операционной системы, разработанная Microsoft. Однако она не входит в стандартный набор функций Windows 7, и ее установка требует некоторых дополнительных действий.
Установка Hyper-V может быть полезна для разработчиков программного обеспечения и системных администраторов, которым необходимо виртуализировать другие операционные системы и приложения для тестирования и отладки. В этой пошаговой инструкции будет рассмотрен процесс установки Hyper-V на компьютере под управлением Windows 7.
Шаг 1: Проверьте операционную систему
Перед тем как установить Hyper-V, убедитесь, что ваш компьютер работает под управлением 64-битной версии Windows 7 Professional, Enterprise или Ultimate. Версии Home и Starter не поддерживают Hyper-V.
Шаг 2: Проверьте аппаратную совместимость
Для установки Hyper-V ваш компьютер должен поддерживать технологию виртуализации, такую как Intel VT или AMD-V. Проверьте настройки BIOS вашего компьютера, чтобы убедиться, что эта функция включена. Если функция виртуализации не поддерживается или выключена, вам может потребоваться обновить BIOS или выполнить другие действия, указанные в документации производителя компьютера.
Шаг 3: Установите обновление KB958830
Перед установкой Hyper-V необходимо скачать и установить обновление KB958830. Это обновление добавляет функциональность Hyper-V в Windows 7. Вы можете скачать его с официального сайта Microsoft или воспользоваться Windows Update.
Начав с этих трех шагов, вы будете готовы начать установку Hyper-V на компьютере под управлением Windows 7. После установки вы сможете виртуализировать операционные системы и приложения, тестировать их работоспособность и упрощать свою работу как разработчику или системному администратору.
Содержание
- Подготовка к установке Hyper-V на Windows 7
- Проверка совместимости вашего компьютера
- Скачивание и установка необходимых компонентов
- Установка Hyper-V на Windows 7
- Запуск мастера установки Hyper-V
- Выбор компонентов для установки
- Конфигурация и настройка Hyper-V на Windows 7
- Вопрос-ответ
- Можно ли установить Hyper-V на Windows 7 Home Premium?
Подготовка к установке Hyper-V на Windows 7
Перед тем как начать установку Hyper-V на операционную систему Windows 7, вам потребуются следующие компоненты и системные требования:
- Windows 7 Professional, Enterprise или Ultimate
- Процессор с поддержкой виртуализации (Intel VT или AMD-V)
- Минимум 4 ГБ оперативной памяти
- Свободное пространство на жестком диске для установки Hyper-V
Также перед установкой рекомендуется выполнить следующие действия:
- Сделать резервную копию всех важных данных.
- Удалить все ненужные программы и файлы для освобождения места на диске.
- Обновить операционную систему до последней версии.
- Отключить антивирусное программное обеспечение временно.
Кроме того, убедитесь, что ваш компьютер соответствует минимальным системным требованиям, приведенным выше. Если ваша версия Windows 7 не поддерживает Hyper-V или ваш процессор не имеет встроенной поддержки виртуализации, установка не будет возможна.
Проверка совместимости вашего компьютера
Перед установкой Hyper-V на Windows 7 необходимо убедиться, что ваш компьютер соответствует системным требованиям. Вот некоторые проверки, которые вы должны выполнить:
- Операционная система: Убедитесь, что ваш компьютер работает на операционной системе Windows 7 Professional, Enterprise или Ultimate. Hyper-V не поддерживается в версиях Home Basic, Home Premium и Starter.
- Процессор: Проверьте, что ваш процессор поддерживает виртуализацию. Для этого зайдите в BIOS компьютера и убедитесь, что опция «Виртуализация» или «VT-x» включена.
- Память: Убедитесь, что у вас достаточно оперативной памяти для работы виртуальных машин. Рекомендуется иметь не менее 4 ГБ ОЗУ для удобной работы в Hyper-V.
- Жесткий диск: Проверьте, что у вас есть достаточно свободного места на жестком диске для установки Hyper-V. Рекомендуется иметь не менее 50 ГБ свободного пространства.
- Видеокарта: Проверьте, что у вас имеется совместимая видеокарта. Hyper-V не требует особых графических возможностей, но для удобства работы может быть полезно иметь поддержку аппаратного ускорения.
Если ваш компьютер соответствует системным требованиям, вы можете приступить к установке Hyper-V на Windows 7.
Скачивание и установка необходимых компонентов
Прежде чем установить Hyper-V на операционную систему Windows 7, вам потребуется скачать и установить несколько дополнительных компонентов. В этом разделе описаны все необходимые шаги для получения этих компонентов.
- Откройте браузер и перейдите на официальный сайт Microsoft.
- Навигируйте до раздела «Скачать» или «Downloads».
- Введите в поисковой строке «Windows Virtual PC» и нажмите Enter.
- Выберите версию Windows Virtual PC, соответствующую вашей операционной системе (32-бит или 64-бит).
- Нажмите кнопку «Скачать» или «Download» и сохраните исполняемый файл на вашем компьютере.
- Повторите шаги 3-5 для компонента «Windows XP Mode».
- После завершения скачивания запустите установку каждого компонента по очереди.
- Во время установки Windows Virtual PC и Windows XP Mode следуйте инструкциям на экране.
- После завершения установки всех компонентов перезагрузите компьютер, если вам будет предложено это сделать.
Теперь вы готовы к установке Hyper-V на вашу операционную систему Windows 7. В следующем разделе будет описан процесс установки и настройки Hyper-V.
Установка Hyper-V на Windows 7
Hyper-V является виртуализационной программой, запускающейся на операционной системе Windows 7. Эта технология позволяет создавать и управлять виртуальными машинами, что предоставляет гибкость для разработки и тестирования приложений, а также для обеспечения безопасности и изоляции данных.
- Убедитесь, что у вас установлена версия Windows 7 Professional, Enterprise или Ultimate. Hyper-V не поддерживается на Windows 7 Home Basic, Home Premium или Starter.
- Откройте «Меню Пуск» и выберите «Панель управления».
- В окне «Панель управления» найдите раздел «Программы» и выберите «Включение или отключение компонентов Windows».
- Появится окно «Компоненты Windows». Прокрутите его до раздела «Hyper-V».
- Поставьте галочку рядом с «Hyper-V» и нажмите «OK».
- Система начнет устанавливать Hyper-V. Это может занять некоторое время, и может потребоваться перезагрузка компьютера.
- После перезагрузки ваш компьютер будет готов к использованию Hyper-V.
Теперь у вас есть возможность создавать и управлять виртуальными машинами на вашем компьютере под управлением Windows 7. Используйте эту мощную технологию для разработки, тестирования и обеспечения безопасности вашего программного обеспечения.
Запуск мастера установки Hyper-V
После установки пакета обновления Windows 7 Service Pack 1 и установки платформы .NET Framework 4.5 можно приступить к установке Hyper-V на операционную систему Windows 7.
Для запуска мастера установки Hyper-V выполните следующие шаги:
- Откройте меню «Пуск» и выберите «Панель управления».
- В окне «Панель управления» найдите раздел «Программы» и щелкните на ссылке «Включение или отключение компонентов Windows».
- В открывшемся окне «Компоненты Windows» найдите раздел «Hyper-V» и отметьте его галочкой.
- Нажмите «ОК», чтобы закрыть окно «Компоненты Windows».
- Подождите несколько минут, пока процесс установки Hyper-V завершится.
- Перезагрузите компьютер, чтобы изменения вступили в силу.
После перезагрузки компьютера Hyper-V будет полностью установлен на операционную систему Windows 7. Теперь вы сможете создавать и запускать виртуальные машины с помощью Hyper-V.
Выбор компонентов для установки
При установке программы Hyper-V на операционную систему Windows 7 необходимо выбрать компоненты, которые будут установлены. В данном разделе мы рассмотрим доступные компоненты и возможности их настройки.
Перед началом установки Hyper-V рекомендуется выполнить ряд предварительных действий:
- Убедитесь, что ваш компьютер соответствует минимальным системным требованиям для работы с Hyper-V.
- Запустите обновления операционной системы и установите все доступные обновления и патчи.
- Создайте резервную копию важных данных на компьютере.
При установке Hyper-V вы можете выбрать из следующих компонентов:
- Hyper-V Hypervisor – главный компонент Hyper-V, основной гипервизор, который позволяет создавать и управлять виртуальными машинами.
- Virtual Machine Management Tools – набор инструментов для управления виртуальными машинами, включающий в себя Hyper-V Manager, Virtual Machine Connection, и другие утилиты.
- Windows Hypervisor Platform – платформа, обеспечивающая взаимодействие между операционной системой Windows и гипервизором Hyper-V.
- Hyper-V Services – службы Hyper-V, включающие в себя виртуальную сеть, миграцию виртуальных машин, проверку целостности и другие функции.
По умолчанию выбраны все компоненты для установки. Если вы не планируете использовать конкретный компонент, вы можете снять галочку с соответствующего поля. При этом будут установлены только необходимые компоненты.
Важно отметить, что установка платформы Windows Hypervisor и служб Hyper-V является обязательными для работы гипервизора Hyper-V.
Конфигурация и настройка Hyper-V на Windows 7
Hyper-V — гипервизор от компании Microsoft, который позволяет создавать и управлять виртуальными машинами на операционной системе Windows. Данная статья расскажет о том, как установить и настроить Hyper-V на компьютере под управлением Windows 7.
- Проверка системных требований:
- Убедитесь, что ваш компьютер работает на 64-битной версии Windows 7.
- В BIOS должна быть включена виртуализация процессора. Проверьте это в настройках BIOS.
- У вас должен быть процессор с поддержкой аппаратной виртуализации (VT-x или AMD-V).
- Установка Hyper-V:
- Откройте «Панель управления», выберите «Программы» и затем «Включение или отключение компонентов Windows».
- В появившемся окне найдите «Hyper-V» и установите флажок рядом с ним.
- Нажмите «OK» и дождитесь завершения установки. При необходимости потребуется перезагрузка компьютера.
- Настройка Hyper-V:
- После перезагрузки компьютера откройте «Hyper-V Manager» через меню «Пуск».
- В окне «Hyper-V Manager» выберите «Connect to Server» на панели действий.
- Оставьте параметр «Local Computer» и нажмите «OK».
- Теперь вы можете создавать и управлять виртуальными машинами через «Hyper-V Manager».
Поздравляем! Вы успешно установили и настроили Hyper-V на Windows 7. Теперь вы можете создавать и управлять виртуальными машинами на вашем компьютере.
Важно: Установка Hyper-V может потребовать определенных привилегий и доступа к административным правам. Убедитесь, что у вас есть соответствующие разрешения для выполнения указанных выше действий.
Вопрос-ответ
Можно ли установить Hyper-V на Windows 7 Home Premium?
Нет, нельзя установить Hyper-V на Windows 7 Home Premium. Hyper-V является компонентом Windows, доступным только в профессиональных и более высоких версиях операционной системы Windows 7, таких как Professional, Enterprise и Ultimate.
I work as a desktop administrator in an enterprise shop that has used LANDesk for imaging. When i first started, we had over 140 images to maintain. The images where supposed to be updated every three months.
I started working on a solution to build what some refer to as a golden or master image. LANDesk uses HII (Hardware independent imaging) and provisioning to deploy images and install applications. I will tell you that i did not have much luck completing this goal using LANDesk. A lot of the issue with LANDesk is there is very little documentation or training unless you attend a boot camp.
I started to implement MDT (Microsoft Deployment toolkit) in our shop to deploy thin images in a .wim format captured from a physical device to different devices with a short learning curve.
Since then I have begun using a server 2008 R2 server with Hyper-V to build a thin image to build and maintain our images. I did not start with Hyper-V, I started with VMWare Workstation 8 and found a few issues, then moved to Virtual box and found that there are a lot of great features and even more issues than workstation 8.
This example is in a Production environment with Windows AIK, Microsoft Deployment Toolkit installed on a technicians Computer/Server 2008R2 with Hyper-V enabled.
Create a virtual machine with a 40 — 50 GB VHD.
Attach a Lite Touch ISO to the DVD drive.
boot and run the task sequence to install a out of the box installation of a windows client.
At the setup screen when prompted for user name, hit CTR+Shift+F3 to enter audit mode in windows 7.
Make required changes to the default user profile.
Map a network drive back to the deployment share and start the litetouch.wsf script.
Run the sysprep and capture sequence for the OS.
( I do not capture the image using MDT, It works just fine. The issue is that it will generally take at least four times the amount of time that it would take to capture the computer if using the server to mount the virtual harddrive and use imagex.exe to capture the image from a command line.)
In Microsoft deployment toolkit, I will then import the image and create a Task sequence where i can use Selection profiles to install required applications and inject the required drivers.
If this is a large deployment, I wil then sysprep the computer using a custom unattend.xml and capture it using landesk. This may be the process until i figure out how to have multiple pxe reps on the same subnet.
Even just using MDT, the days of inserting installation media to isntall an os on a computer. Then install the correct drivers, updates and so on are long gone. Now these can all be loaded independently into Microsoft deployment toolkit where you can select the os, the required drivers, have the updates installed at setup and be ready to make any required changes that can or are not worth scripting. Now I only maintain a total of twelve vm’s that we use for our images. Any time that we get a new device i can have it ready for deployment within two hours and only takes me about ten to fifteen minutes to build the task sequence and select the required applications.
Let me know if you have any questions.
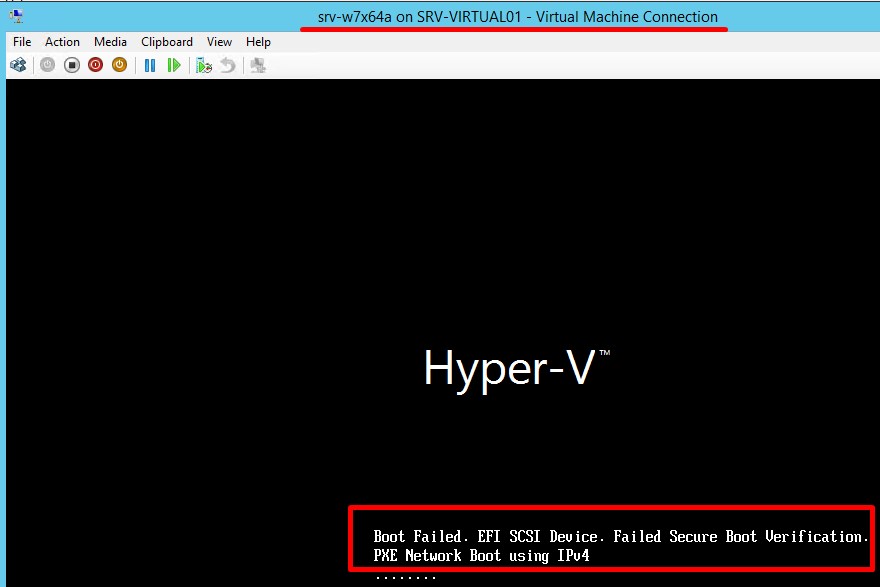
With the new features of Hyper-V in Server 2012 R2 one of those is the Generation 2 VM. There is a lot to be said on this topic but here is a caveat when using Gen2 VM’s for systems older then Windows 8 or Server 2012.
Let’s start with a spoiler:
It doesn’t work for Windows 7 SP1!
If you create a VM the first question will be: a Generation 1 or Generation 2 VM

As you can see it cannot be changed…well it can 😉 (see http://blogs.technet.com/b/jhoward/archive/2013/11/06/hyper-v-generation-2-virtual-machines-part-8.aspx and http://blogs.technet.com/b/jhoward/archive/2013/11/14/hyper-v-generation-2-virtual-machines-part-10.aspx)
So you create a Gen2 VM and want to install Windows 7. Well oké, the installation is going fine. UEFI gets recognized. Everything is good. Then comes the restart…

Hmm not so good. But this is to be expected. Windows 7 does not support Secure Boot! This will be turned off:

Now we try again and see this:

And here is stays, forever.
In the Hyper-V management console we see a lot of CPU Usage so it is doing something 😉

So WHY is this? Windows 7 DOES support UEFI boot. After a search I found this:
Q: Why doesn’t Microsoft support 64-bit Windows 7 or Windows Server 2008 R2 as a guest operating system in generation 2 virtual machines?
A: Certainly it is true that Windows 7 support UEFI, the first requirement for generation 2 virtual machines. However, Windows 7 has a hardware dependency on a Programmable Interrupt Controller (PIC) which is not present in generation 2 virtual machines. Even if Secure Boot is disabled, an attempt to install Windows 7 will result in an apparent hang at “Starting Windows” shortly after boot, consuming high CPU utilization. A similar effect to this will be seen if attempting a network install from a WDS server which has a Windows 7 era boot PE image – network boot will appear to hang as well. For that reason (along with the keyboard issue in Windows 8 PE) I strongly recommend any WDS server are upgraded to the Windows 8.1 PE boot image.
That is pretty clear, NO Windows 7 Generation 2 VM in Hyper-V!
P.S. DO try this with Windows 8.1 – it is incredibly FAST J