Hyper-V is Microsoft’s virtualization platform. It is available on Windows Server operating systems and Microsoft has also added the Hyper-V functionality to Windows 8.1, Windows 10, and Windows 11.
Unfortunately, the Hyper-V feature is only available in Windows 10 Professional, Enterprise, and Education editions. You can’t install it on Windows 10 Home edition by default.
However, using the steps in this article, we’ll show you how to enable Hyper-V in the Windows 10 Home edition.
Table of contents
- Does Your System Support Virtualization?
- Enable Virtualization in Firmware/BIOS
- Install Hyper-V in Windows 10 Home
- How to Enable Hyper-V on Windows 10 (Pro, Enterprise, Education)
- Enable Hyper-V from Optional Features
- Enable Hyper-V from Command Prompt
- Enable Hyper-V from Windows PowerShell
- How to Disable Hyper-V in Windows 10 (Home, Pro, Enterprise, Education)
- Closing Thoughts
Does Your System Support Virtualization?
Before moving forward, we need to check if our system supports virtualization. Hardware virtualization is required for Hyper-V to function correctly. Otherwise, you can use other virtualization platforms like Virtualbox and VMWare.
There are four basic requirements for Hyper-V to be installed on a Windows 10 computer:
- VM Monitor Mode Extensions
- Virtualization enabled in firmware
- Second Level Address Translation (SLAT)
- Data Execution Prevention
All four of these requirements can be easily checked through a Command Prompt cmdlet. Run the following cmdlet in an elevated Command Prompt and obtain the results on the four requirements:
systeminfoThis will generate a list, and you will find the section “Hyper-V Requirements” at the end of the list containing the details of the 4 requirements, as in the image below:
 1")
If these requirements are met, the results will display “Yes.” However, if you find that “Virtualization Enabled In Firmware” states “No,” you need to enable it using the guide below.
Enable Virtualization in Firmware/BIOS
Most modern computers support all the requirements of Hyper-V. But some systems have virtualization disabled from BIOS. You can go to the BIOS setup computer at the startup and enable Virtualization using the following steps:
-
Restart your computer and enter the BIOS setup using the hotkey.
-
Here, look for the “Virtualization” tab and click on it, or use the arrow keys on the keyboard to highlight it and press Enter.
-
Now enable Virtualization.
 2")
Enable virtualization from BIOS -
Now save the new settings and exit BIOS. The system will now reboot normally.
 2")
When it reboots, continue with the following steps to install and enable Hyper-V.
Install Hyper-V in Windows 10 Home
Note: Since Windows Home edition comes without Hyper-V, you must first install it. If you have the Pro, Education, or Enterprise editions, then you may skip this step and proceed to the next section of this article. To check which edition you have, type in winver in the Run Command box and obtain your operating system’s details.
Follow the steps below to install and enable Hyper-V in Windows 10 Home:
-
Download Hyper-V Installer by clicking on the following link:
Hyper-V installer and enabler for Windows 10 Home (317 bytes, 35,747 hits)
-
Once downloaded, right-click on the file and select Run as Administrator from the context menu. This will trigger the installation script.
 4")
Run as admin -
If prompted with a UAC, click Yes.
Click Yes on User Access Control It may take some time to complete the installation. Please let it complete without interruption.
-
Once complete, press Y to continue.
Press Y to continue The computer will now reboot and update.
 4")
 5")
 6")
Once rebooted, Hyper-V will have installed and automatically enabled on your Windows Home.
How to Enable Hyper-V on Windows 10 (Pro, Enterprise, Education)
The method given above automatically enables Hyper-V as well as installing it on a Windows Home. However, if you are running Windows Pro, Education, or Enterprise edition, then you can enable Hyper-V using any one of the following methods.
Enable Hyper-V from Optional Features
Since Hyper-V is an optional feature that one can enable when needed, you can enable it from the Optional Features applet. Here is how:
-
Open the Optional Features applet by typing in optionalfeatures in the Run Command box.
 7")
Open the Optional Features applet -
Now look for the “Hyper-V” option from the list and check the box next to it. Then click Ok.
 8")
Enable Hyper V from Optional Features -
You will now see a window applying the changes. Click Close when it is done.
 9")
Close installation window
 7")
 8")
 9")
Hyper-V will now be installed and enabled. You can now access the Hyper-V manager by searching for it in the search box in the taskbar or through the Start menu.
 10")
Alternatively, you can also use the other 2 command-line methods to enable Hyper-V on Windows 10.
Enable Hyper-V from Command Prompt
Follow these steps to enable Hyper-V using the DISM command tool in the Command Prompt:
-
Run the following cmdlet in an elevated Command Prompt:
DISM /Online /Enable-Feature /All /FeatureName:Microsoft-Hyper-VEnable Hyper V from Command Prompt -
When asked, enter Y to restart the computer:
Enter Y
 11")
 12")
The computer will now restart, When it does, Hyper-V should be enabled successfully.
Enable Hyper-V from Windows PowerShell
If you’d rather prefer to use Windows PowerShell, here is how to enable Hyper-V:
-
Run the following cmdlet in an elevated PowerShell:
Enable-WindowsOptionalFeature -Online -FeatureName Microsoft-Hyper-V-AllEnable Hyper V using PowerShell -
When asked, enter Y and hit Enter to restart the computer:
Enter Y When the computer reboots, Hyper-V will have installed successfully.
 13")
 14")
These are the 3 methods to enable Hyper-V in Windows 10, provided that the hardware is supported and Hyper-V is installed.
How to Disable Hyper-V in Windows 10 (Home, Pro, Enterprise, Education)
If you don’t want this functionality on your computer, you can always disable it. There are three ways to disable it:
-
From Optional Features
-
Open the Optional Features applet by typing in optionalfeatures in the Run Command box.
Open Optional Features applet -
Uncheck the box next to Hyper-V and click Ok.
 16")
Disable Hyper-V from Optional Features -
When done, click Restart now to finalize the changes.
Restart PC
-
-
From Command Prompt
Run the following cmdlet in an elevated Command Prompt to disable Hyper-V:
DISM /Online /Disable-Feature /FeatureName:Microsoft-Hyper-V-allIf asked for a reboot, enter Y for Yes.
Disable Hyper V from Command Prompt -
From PowerShell
Run the following cmdlet in an elevated PowerShell to disable Hyper-V:
Disable-WindowsOptionalFeature -Online -FeatureName Microsoft-Hyper-V-AllIf asked for a reboot, enter Y for Yes.
Disable Hyper V from Windows PowerShell
 16")
 17")
 18")
 19")
Closing Thoughts
Sometimes Hyper-V is very useful even for home users. It can be used to test and evaluate new software without hurting the host system. But there are times when enabling virtualization support or installing Hyper-V is not recommended.
Hyper-V requires some system resources to run its virtual machines. For example, if you have 4 GB RAM, you won’t be able to give any resources to the virtual machine. So it would not be wise to enable Hyper-V functionality.
For what purpose do you want to enable Hyper-V functionality on your Windows 10 Home computer? Please share your thoughts in the comments below.
Hyper-V – это платформа Microsoft для виртуализации. Она доступна в операционных системах Windows Server, но Microsoft добавила функциональность Hyper-V в Windows 8.1 и Windows 10.
К сожалению, функция Hyper-V доступна только в выпусках Windows 10 Professional и Enterprise. По умолчанию вы не можете установить его в Windows 10 Home Edition. Однако, следуя инструкциям в этой статье, мы покажем вам, как включить Hyper-V в Windows 10 Home edition.
[contents]
Содержание
- Поддерживает ли ваша система виртуализацию?
- Включение Hyper-V на Windows 10 Home
- Отключение (удаление) Hyper-V из Windows 10 Home
Поддерживает ли ваша система виртуализацию?
Прежде чем двигаться вперед, нам нужно проверить, поддерживает ли наша система виртуализацию. Аппаратная виртуализация требуется для правильной работы Hyper-V. В противном случае вы можете использовать другие платформы виртуализации, такие как Virtualbox и VMWare.
Для установки Hyper-V на компьютер с Windows 10 существует четыре основных требования:
- Расширения режима VM Monitor.
- Виртуализация включена в прошивке.
- Трансляция адресов второго уровня.
- Предотвращение выполнения данных.
Вы можете проверить все эти требования, открыв командную строку (Выполнить -> cmd) и запустив команду systeminfo. Вы можете проверить раздел требований Hyper-V.

Большинство современных компьютеров поддерживают все требования Hyper-V. Но в некоторых системах виртуализация отключена в BIOS. Вы можете перейти к компьютеру с настройкой BIOS при запуске и включить виртуализацию.

Включение Hyper-V на Windows 10 Home
Для установки и включения Hyper-V на Windows 10 Home нужно выполнить следующие действия:
Загрузите Hyper-V Enabler здесь: Hyper-V installer and enabler for Windows 10 Home (317 bytes, 3,997 hits)
После загрузки щелкните файл правой кнопкой мыши и выберите «Запуск от имени администратора». Это запустит скрипт установки. Для завершения установки может потребоваться некоторое время. Пожалуйста, не прерывайте установку.

После завершения нажмите Y, чтобы продолжить. Система перезагрузится.

Вы увидите экран обновлений Windows после перезагрузки.

После перезапуска вы можете проверить, отображается ли параметр Hyper-V в дополнительных функциях Windows. Чтобы проверить, перейдите в Выполнить > optionalfeatures. Вы найдете инструменты управления Hyper-V и Hyper-V.

Вы можете выполнить поиск Hyper-V в меню «Пуск», чтобы начать создавать виртуальные машины на домашнем компьютере с Windows 10.

Отключение (удаление) Hyper-V из Windows 10 Home
Если вам не нужна эта функция на вашем компьютере, вы всегда можете отключить ее. Есть два способа для удаления:
- Перейдите в Выполнить > optionalfeatures. Откроется окно «Дополнительные функции».
- Снимите отметку с инструментов управления Hyper-V.
- Перезагрузите компьютер.
Вы также можете сделать это с помощью командной строки:
PowerShell
Disable-WindowsOptionalFeature -Online -FeatureName Microsoft-Hyper-V -All
Command Prompt
DISM /Online /Disable-Feature /All /FeatureName:Microsoft-Hyper-V
Иногда Hyper-V очень полезен даже для домашних пользователей. Его можно использовать для тестирования и оценки нового программного обеспечения без ущерба для хост-системы. Но бывают случаи, когда включение поддержки виртуализации или установка Hyper-V не рекомендуется.
Hyper-V требует некоторых системных ресурсов для запуска своих виртуальных машин. Например, если у вас 4 ГБ ОЗУ, вы не сможете выделить какие-либо ресурсы для виртуальной машины. Поэтому было бы неразумно включать функциональность Hyper-V.
Для каких целей вы хотите включить функциональность Hyper-V на своем домашнем компьютере с Windows 10? Пожалуйста, поделитесь своими мыслями в комментариях ниже.
5
2
голоса
Рейтинг статьи
Enable Hyper-v on windows 10 Home edition
Raw
hyperV.bat
This file contains bidirectional Unicode text that may be interpreted or compiled differently than what appears below. To review, open the file in an editor that reveals hidden Unicode characters.
Learn more about bidirectional Unicode characters
| pushd «%~dp0« | |
| dir /b %SystemRoot%\servicing\Packages\*Hyper-V*.mum >hyper-v.txt | |
| for /f %%i in (‘findstr /i . hyper-v.txt 2^>nul‘) do dism /online /norestart /add-package:«%SystemRoot%\servicing\Packages\%%i« | |
| del hyper-v.txt | |
| Dism /online /enable-feature /featurename:Microsoft-Hyper-V -All /LimitAccess /ALL | |
| pause |
Raw
hyperV.md
1. Follow Windows 10 Hyper-V System Requirements in microsoft website:
https://learn.microsoft.com/en-us/virtualization/hyper-v-on-windows/reference/hyper-v-requirements
Microsoft mentions that windows 10 home cannot have hyper v enabled even though all the other requirements are fullfilled. This didnot hold true for me. I followed the following steps.
2. Run powershell or command prompt as administrator. input: systeminfo
3. Scroll to the bottom and check if hyper-v requirements is all confirmed as YES. If it is YES go ahead with next step.

4. Create a new file and name it whatever with .bat extension (i choose hyperv.bat) and copy the code above and save it anywhere (i choose desktop).
5. Now run this file (.bat script) as an administrator. Follow the prompts and after a restart, hyper v should be enabled now and you can access hyper-v manager from strat menu.
Enjoy ! 

Sign up for free
to join this conversation on GitHub.
Already have an account?
Sign in to comment
Hyper-V is a Microsoft-owned Windows Hypervisor platform (Type-1) that allows users to run virtual machines with high performance. However, if you are using Windows 10 Home Edition, then you will not have the “Hyper-V” option in the “Turns Windows feature on or off” to run virtual computers because it is available only for Windows 10 Professional, Education, and Enterprise Editions (know the difference). However, still, there is a way to easily download, install and enable the Hyper-V feature on Windows 10 Home using the command line.
Requirements:
- Windows 10 Home OS
- Administrator access
- Virtualization must be enabled in BIOS to create VMs
- Active Internet connection
Although, in modern systems Virtualization is enabled in BIOS by default, however, to confirm it, just right-click on Taskbar and select Task manager ⇒ Performance and find whether it is on or off.


Well, if you don’t want to use Hyper-V then try out some other best third-party Virtual machine creator software programs.
Steps to Activate Hyper-v Feature on Windows 10 Home
Here are the simple steps that we can follow to download and install Hypervisor using a Command-line script.
1. Script to download Hyper v for Windows 10 home
There is a code available on Github that allows users to automate the process of downloading and enabling the Hyper-V feature. Here is that
pushd "%~dp0"
dir /b %SystemRoot%\servicing\Packages\*Hyper-V*.mum >hyper-v.txt
for /f %%i in ('findstr /i . hyper-v.txt 2^>nul') do dism /online /norestart /add-package:"%SystemRoot%\servicing\Packages\%%i"
del hyper-v.txt
Dism /online /enable-feature /featurename:Microsoft-Hyper-V -All /LimitAccess /ALL
pause
What we have to do is – Right-click on the Desktop and select Text Document. A new file will be created, now open it and paste the above code in that. After that rename that file to Hyper-V Enabler.bat
Alternative- However, to make all this easy for you, we already have created this bat file that you can download directly using this link.
2. Run Hyper-V Enabler Batch file
Once you downloaded or created a Batch file with the given code by yourself on your Desktop. Right-click on that and select “Run as Administrator“.

3. Feature installation will start
As we run the Batch file, it will open a Command prompt to run the code saved in it. Make sure you have an active internet connection on your system to download files required to install and activate Hyper-V on Windows 10 Home. This will take some time depending upon your network speed.
4. Restart your Windows 10 System
Once the installation is complete, the Hyper-v will automatically get enabled on your system. Thus, to make changes into effect, the system will ask you to restart it. Simply type Y on your command terminal and press the Enter key.

5. Run Hyper-V Manager on Windows 10 home
Let’s check whether this Microsoft Windows Hypervisor feature is on our system or not. For that, in the search box type- Turn Windows features on or off, as its icon appears, click to open it.

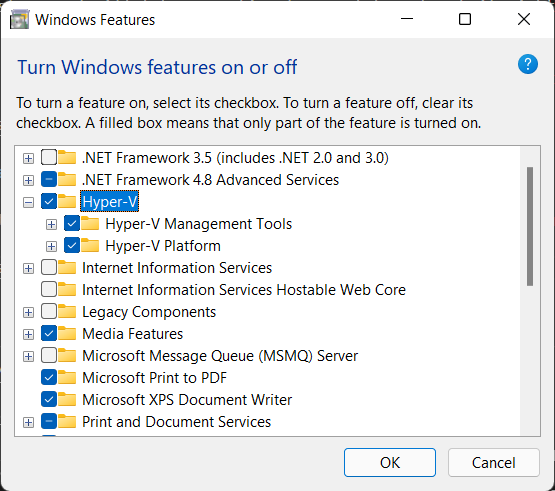
There scroll and find -Hyper-V and make sure all its tools are checked as shown in the above screenshot, if not already, and then hit the OK button.
Now, we know this free Microsoft virtualization software is on our system, it’s time to run it and start creating virtual machines.
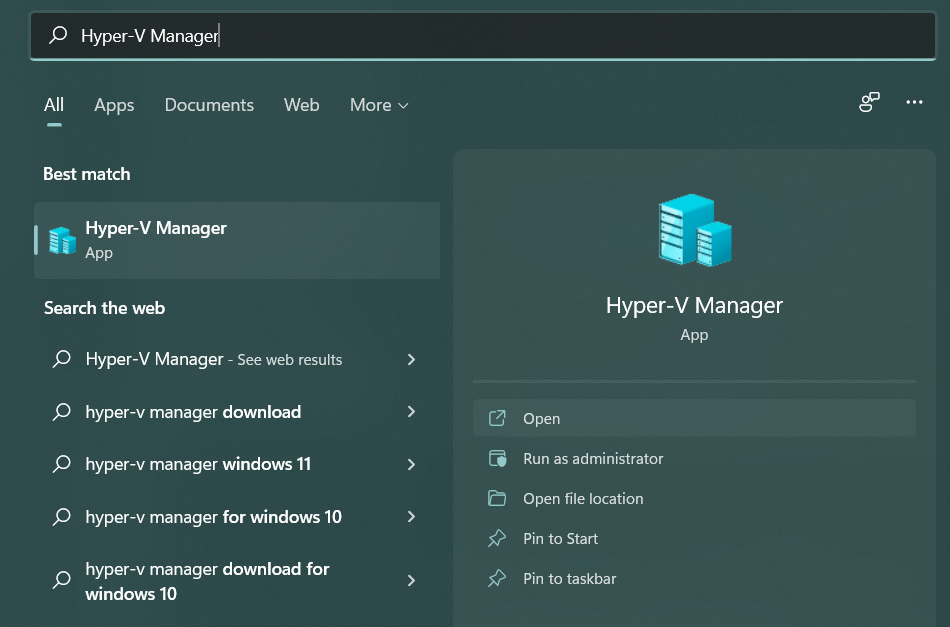
Go to Windows 10 Search box again or simply press the Win key on your keyboard and this time type- Hyper-V, click on its icon when appears.
Alternatively, we can use a command to run Hypervisor- open CMD or the RUN box (shortcut key- Win key + R) and type – virtmgmt.msc

6. Create a Virtual Machine
- To create a virtual machine in Hyper-V Manager, right-click on the connected server and select the New option.

- Click on the Next button and give some name to your virtual machine. For example Ubuntu.
- Choose the Generation for your Virtual machine. If the operating system you want to install supports 32-bit or 64-bit and requires legacy BIOS features then go for Generation 1. Whereas for the latest features and only 64-bit with UEFI boot supported OS users can go for Generation 2. However, you can leave the default selection as it is if you are not sure about this.
- Assign the amount of RAM or Memory you want to use.
- Configure Network. For that select the Default Switch from the Drop-down box. If you don’t have then first create one.
- Select the Size of Virtual Disk.
- Assign the ISO file of the OS you want to install.

To get a step by step guide you can see our article- How to use hyper-v to install Linux Virtual machine on Windows 10
7. Uninstall or Disable Hyper-V feature on Windows 10 Home
Hyper-V is not compatible completely with other Type- 2 virtualizers, even though the latest version of Vmware and Virtualbox can run along with it, there will be a huge performance issue. Thus, if you are planning to use Vmware player or Virtualbox on Windows 10 Home, then first, Deactivate the Hyper-V.
To uninstall this feature, we need to uncheck it from the “Turns Windows features on or off” section. To open it you can either find it from the Search box of Windows 10 or simply press Win Key + R to open the RUN box and type- optionalfeatures.exe

Now uncheck the box given for Hyper-v.

7.1 Command line to disable windows virtualization feature (optional)
If you want then can use a very straightforward method that is either using command prompt or PowerShell command line-
On Powershell run this
Disable-WindowsOptionalFeature -Online -FeatureName Microsoft-Hyper-V-All
Whereas on Command prompt, use this one-
dism.exe /Online /Disable-Feature:Microsoft-Hyper-V-All
7.2 Restart your system
To make sure the hypervisor feature gets disabled completely, now restart your system. This uninstalls it completely.
7.3- In case you want to enable it again (optional)
In the future if you want to enable Microsoft Hypervisor again then you don’t need to run the Batch file this time, just got Windows Features and select it. Or use the command line-
Powershell
Enable-WindowsOptionalFeature -Online -FeatureName Microsoft-Hyper-V
CMD
DISM /Online /Enable-Feature /All /FeatureName:Microsoft-Hyper-V
Also See- Hyper-V vs VirtualBox: A basic comparison
Closing thoughts
Well, this was the quick way to use the Microsoft Windows hypervisor on Windows 10 Home edition. In case you are facing any problem while enabling it, let’s know, the comment section is all yours…
Windows 10/11 Home edition doesn’t come with Hyper-V by default, if you try to enable it from «Turn on Windows features» option from control panel you would not find Hyper-V listed.
This is because Hyper-V is a Professional and Enterprise edition feature, but it is possible to enable it from the command line.
Enable Hyper-V from command line
We’re going to use the Windows Terminal so make sure you install it from the Windows Store.
Step 1. Check Minimum System Requirements
Your PC should support Hardware virtualisation for Hyper-V to work.
If you do not have hardware virtualisation, you will need to use an alternative such as VirtualBox or VMware Workstation Player.
Note: Many Windows 10 PCs—and all PCs that come preinstalled with Windows 11—already have virtualization enabled, so you may not need to follow these steps.
For Windows 10, run the followind command in the terminal
Get-ComputerInfo -property "HyperV*"
You should get the below output
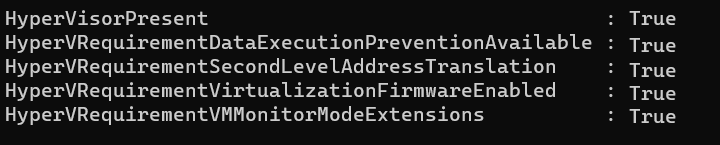
This means that your PC supports hardware virtualisation.
Step 2. Enable Hyper-V
Create a file on your PC called «enable-hyperv.bat» and paste the following code in it.
pushd "%~dp0"
dir /b %SystemRoot%\servicing\Packages\*Hyper-V*.mum >hyper-v.txt
for /f %%i in ('findstr /i . hyper-v.txt 2^>nul') do dism /online /norestart /add-package:"%SystemRoot%\servicing\Packages\%%i"
del hyper-v.txt
Dism /online /enable-feature /featurename:Microsoft-Hyper-V -All /LimitAccess /ALL
pause
Now run the batch file as an administrator, as shown below. 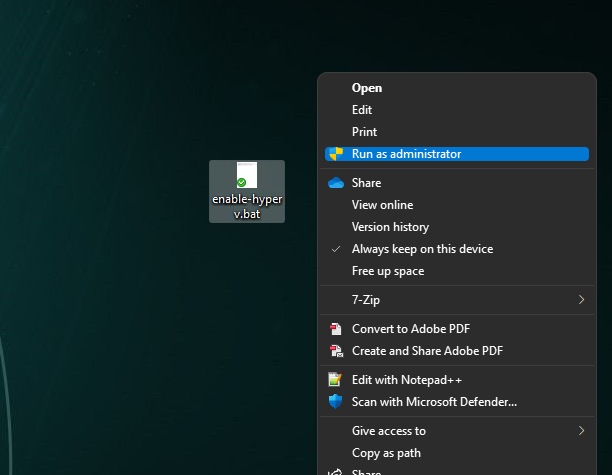
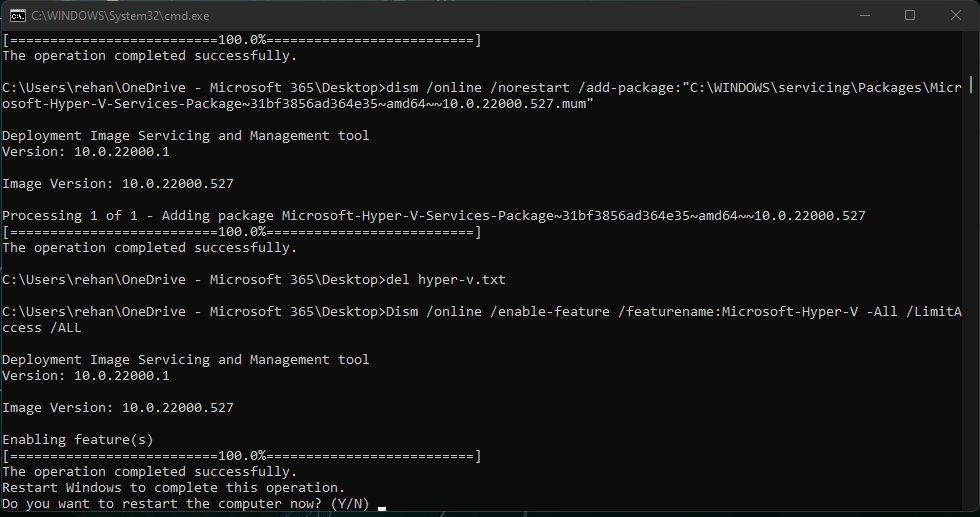
This will go through several steps and will take some time to complete. Though it might seem it’s repeating the same steps, let it complete without interruption.
Once the process is complete, you should see the following message asking for confirmation to reboot your PC. Press Y to reboot.
Step 3. Check if Hyper-V is enabled
Open your teminal and run optionalfeatures to see the status of Windows features. You should be able to see a Hyper-V feature listed now.
Starting Hyper-V Manager
Go to the start menu and search for Hyper-V, open the Hyper-V Manager.
From here you can start creating VMs, creating a new VM, or even creating a new VM template.
For a quick start, follow this guide to installing Ubuntu on Hyper-V