Windows 8 introduced the first incarnation of Hyper-V for the desktop. It’s the same core hypervisor as the Hyper-V that ships with the server SKUs, minus a few features. Like its big brother on the server side, Windows 10 brings several new features to the desktop.
What is Client Hyper-V?
Client Hyper-V is an edition of Hyper-V that is geared toward desktop environments that could be thought of as “Hyper-V Lite”. It shares most of Hyper-V’s features and even brings some of its own. Highlights:
- Type 1 hypervisor: A type 1 hypervisor is a complete kernel and performs direct hardware control. This means that when you enable Hyper-V in Windows 10, the physical hardware boots to Client Hyper-V, not your root Windows 10 installation. Client Hyper-V then starts up your pre-existing root Windows 10 environment as the management operating system. A management operating system is known as the “root partition” or “partition 0” or the “parent partition” in other hypervisors’ terminologies. It is a virtual machine, but it also has the special ability to exert control over the hypervisor. Contrast this with type 2 hypervisors, which are applications that run inside a normal host operating system and do not have direct access to hardware nor any control over the management operating system. Almost all other desktop-oriented hypervisors are type 2.
- Guest interaction: Interoperability with guest operating systems is a crucial component for a desktop-oriented hypervisor. Client Hyper-V offers:
- Sharing and mapping of most host hardware
- Copy/paste of files from host-to-guest and vice versa (supported guests only)
- Copy/paste of clipboard content from host-to-guest and vice versa (supported guests only)
- RemoteFX: Windows 10 brings support for some RemoteFX features into Client Hyper-V. Most importantly, the full functionality of your graphics adapter will be made available to guests for both 2D and 3D acceleration.
- Connected Standby: If your management operating system goes to sleep, your guests will be OK. When you resume, they will be exactly where they left off.
- Linux guests: Client Hyper-V directly supports the same guest operating systems that Hyper-V does. This does not necessarily exclude other Linux distributions, but your mileage may vary.
- Fully virtualized environment: That phrase could be taken to mean a great many things, but what I mostly intend to convey is that whether or not a specific operating system is directly supported as a guest does not indicate whether or not it will function. Hyper-V’s virtual machines are complete x86/AMD64 environments. If an operating system would otherwise run in that environment (most importantly, on your physical CPU’s architecture), then it will almost certainly operate under Hyper-V. Without direct support, however, it may run poorly.
- Secure environment: Client Hyper-V provides the same security offerings as Hyper-V:
- Secure boot: If Client Hyper-V doesn’t recognize the boot signature in the guest operating system, it won’t start it. This provides solid protection against root kits.
- Shielded VMs: The topic of Shielded VMs is very large and won’t be covered in detail in this article. Essentially, if you are concerned that someone copying the files of your virtual machine to their own local machine is of concern, you have options.
- Storage Live Migration: You can move a virtual machine from one physical storage location to another without taking it offline.
- Run VMs from remote storage: Your virtual machines can be stored locally, which is the most typical configuration. You can also run virtual machines from SMB and iSCSI storage.
- Full-screen support: You can run Client Hyper-V guests within a window, allow them to consume an entire screen, or have them consume all screens on a multi-monitor system. Unfortunately, there is no native way to use only a subset of screens in a multi-monitor setup.
- Nested virtualization: Need to test detailed environments on Client Hyper-V? No problem! As long as you’ve got sufficient hardware, you can run Hyper-V and Client Hyper-V within Hyper-V. The software does not impose any limitations on depth.
- Containers. Hyper-V Containers are also available with Client Hyper-V.
- Network Address Translation in the virtual switch. One place that Microsoft’s desktop hypervisor has consistently lagged behind the competition is its guest networking capabilities. One thing that it has sorely lacked is the ability to perform NAT operations for guests. That meant that you had to have an available IP address on the existing network for each Client Hyper-V guest. Client Hyper-V in Windows 10 will provide network address translation (NAT) services for its guests. This especially comes in handy when you’ve got a wireless adapter that just won’t work with the virtual switch.
What Features does Client Hyper-V Lack in Comparison to Hyper-V?
Most of the features that are “missing” in Client Hyper-V are not especially useful in a desktop-oriented hypervisor environment anyway.
- Live Migration and Shared Nothing Live Migration: Windows 10 can’t be clustered, so it’s only natural that Live Migration wouldn’t be supported. Shared Nothing Live Migration would have its uses, but it’s not available.
- Hyper-V Replica: Windows 10 can’t participate as a member in Hyper-V Replica. This particular feature is intended for server-side disaster recovery, so it makes sense that it’s not available in Client Hyper-V.
- Advanced networking functionality: The only advanced networking available for Client Hyper-V guests is NAT. There is no teaming in the host, not the standard LBFO configuration or switch-embedded teaming (SET).
- Advanced hardware functionality: virtual fiber channel and some SR-IOV features are not available. The hardware that these features apply to are almost never found in desktop-grade equipment.
Licensing and Client Hyper-V
We’ve produced extensive work around licensing and Hyper-V with articles, eBooks, and webinars. None of them have meaningfully touched on Client Hyper-V. Simply put, a Windows 10 license provides for exactly one instance, period. It does not contain any guest instance rights whatsoever. If you want to run a guest instance of Windows 10, then you must purchase another license to cover that instance. If you wish to run any Windows Server guests on Windows 10, you must license the hardware to cover those instances in accordance with the new per-core rules. Linux distributions will follow their distributors’ rules.
Uses for Client Hyper-V
The benefits of server virtualization are quite clear. They generally center around the fact that server hardware is typically underutilized. That’s usually not the case for client hardware. Desktop and laptop computers don’t usually have as many resources as server computers before you consider cutting them up. CPU is usually the only resource with significant capacity to spare, and even that doesn’t have much availability for some users. So, why would you want to split up limited resources on your desktop system? Here are a few reasons:
- Software development: Software developers have many reasons to use virtualization.
- Sandbox environment: If you’re writing systems-level programs, it’s usually not a good idea to allow a bug to cripple the computer that you’re developing on. Checkpoints and kernel isolation alleviate this concern. I particularly like using virtual machines for developing Windows installer packages. Recent versions of Visual Studio rely on Client Hyper-V for testing mobile device applications.
- Multi-OS targeting: Whatever version of Windows you’re running, almost no developers can guarantee that their users will have the same. Having virtual machines on your desktop allow you to quickly verify that your application runs the same on different operating systems and different bitnesses (32- vs. 64-bit).
- Systems administration: Systems administrators have many uses for virtualization on the desktop, even though many suffer in silence without realizing that there are solutions to many of their daily headaches.
- Proper security levels. You know that you are supposed to run in a lowered security environment so that your administrative account isn’t signed in all of the time. You also know that it’s much easier to say than it is to do, especially since even some of Microsoft’s tools don’t work appropriately with Run As. Using virtualization on your desktop allows you to be signed in with multiple accounts simultaneously without the headaches of Run As.
- User access testing. Another oft-overlooked usage is testing privilege levels for non-administrative accounts. For instance, you can create a test account with the same membership as one of your domain users to test that account’s ability to connect to certain resources. Run As can only take you so far. Logging into a virtual instance with alternative credentials without interrupting anything else that you’re doing is an invaluable capability.
- Application testing. Software developers may test their software to some degree, but you need to know how it’s going to interact in your environment before pushing it out to your users.
- Security operations: A virtual machine provides a great many opportunities for information security workers:
- Sandbox environment: If you’re not certain if something is malicious software, build an environment that it’s free to destroy. Virtual machines present a wonderful walled garden. You can place suspect material inside a VHDX, mark it read-only, then attach it to your checkpointed test virtual machine. If it turns out to be malicious, you can revert the checkpoint or just delete the virtual machine outright.
- Penetration testing: Build a duplicate of your production environment inside Client Hyper-V instances and hack away. Obviously, there are cons as well as pros to testing against a duplicate of your production environment instead of the actual environment, but this is a good place to start.
- Forensics labs: Most computer forensic tasks need to be performed on the impacted system(s), but sometimes you need a place to tear into a chunk of code or a data file. Virtual machines provide the perfect environment.
- Down-level environments: Windows 7 Pro and Enterprise shipped with “Windows XP Mode”, a pre-built Windows XP environment that ran under the built-in Virtual PC type 2 hypervisor. We lost that free virtualized instance along with Virtual PC in Windows 8, but Client Hyper-V still provides the base capability to run down-level operating systems. Unfortunately, Windows XP isn’t on the supported list for Client Hyper-V in Windows 10, but it does work (slowly). Between the defunct Windows XP and the current Windows 10 are four versions of Microsoft’s desktop operating system. There are any number of reasons that you might need one of those environments, at least on a part-time or temporary basis. Client Hyper-V might be exactly what you need.
- Demonstrations: If you need to demonstrate software or software environments and your simple laptop instance isn’t adequate, you can build very complex structures within Client Hyper-V for use on the road.
Client Hyper-V Requirements
With Windows 10, Client Hyper-V and the server-based Hyper-V have the same hardware requirements. Client Hyper-V is not available in every Windows 10 SKU.
- Windows 10 Professional, Enterprise, or Education editions. Windows 10 Home edition does not contain Hyper-V, nor do any of the various mobile SKUs.
- Hardware-assisted virtualization. Intel calls it “VT-x”, AMD calls it “AMD-V”. Most BIOSs usually just have a simple option to enable virtualization features. This technology has been commonplace for long enough that most functional systems will support it.
- Data execution prevention. An old malware technique involves placing malicious code into a data segment and then directing the CPU to execute it. Data execution prevention forces the system to rigidly respect data segments as not being executable. Intel calls theirs “XD” and AMD calls theirs “NX”. Microsoft unifies them as “DEP”. BIOSs will have various labels that are generally easy to identify. This technology also enough years to be ubiquitous. It’s also typically enabled by default, so you can almost always simply expect it to be present.
- 4GB of memory. I’m not certain if there is a hard check in place for this condition, but your experience would likely be fairly miserable if you’ve got less.
- VM Monitor Mode extensions. Intel names theirs “VT-c”. I don’t believe that AMD has any particular name for it. This is a new requirement over Client Hyper-V in Windows 8.x. Even though the name is somewhat foreign to many people, you usually won’t have difficulty providing it. It’s not quite as common as DEP and hardware-assisted virtualization, though. If Client Hyper-V won’t run on your system, this might be why.
- Second-level Address Translation. Second-level Address Translation (SLAT) has been commonplace on CPUs for several generations. It has always been a requirement for Client Hyper-V. It is an always-on native feature of CPUs and there is no activity to enable or disable it. Check your CPU’s specification sheet to determine if it has SLAT support.
- (For nested virtualization) Intel VT-x and EPT technology. I don’t know the technical (or perhaps political) details, but AMD users are not welcome in Hyper-V’s nested virtualization world. You need an Intel chip with these technologies available and enabled.
You can quickly and easily verify if you can run Hyper-V on your current system by opening an elevated command or PowerShell prompt and running systeminfo . Look toward the end of the output for the following section:

System Info Hyper-V Check
Enabling Client Hyper-V
Client Hyper-V ships as a Windows 10 component, so you don’t “install” it, per se. You enable it.
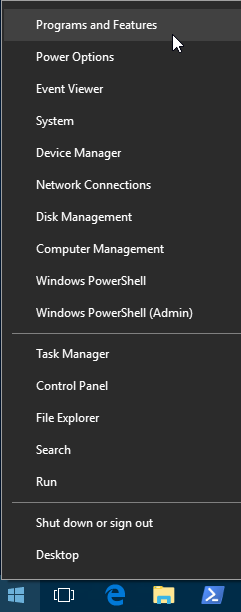
- Right-click on the Start button (or press Win+[X]) and select Programs and Features.

WinX Menu
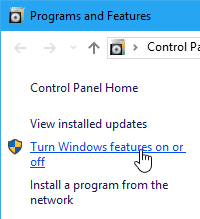
- In the Programs and Features window, click Turn Windows features on or off. If UAC is on, you’ll need to confirm switching to administrative mode.

Programs and Features
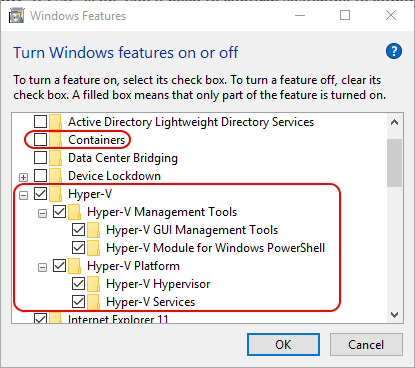
- Choose the Hyper-V options that best suit your intent. The only required item is Hyper-V Hypervisor but it will be difficult to do anything with if you don’t enable the other components as well. This article isn’t going to discuss Containers, but those are enabled here as well, as shown in the screenshot.

Client Hyper-V Features
- After clicking OK, you’ll need to restart the computer.
Fewer steps are required to enable Client Hyper-V in PowerShell. In an elevated prompt:
Enable-WindowsOptionalFeature -Online -FeatureName Microsoft-Hyper-V-All
If you’re looking to install a subset of the components from within PowerShell, our earlier article has greater detail.
Using Client Hyper-V
I want to reiterate that, as a type 1 hypervisor, Client Hyper-V is always running. You do not need to start the hypervisor and there is no service that you can go look at or start or stop. There is the Hyper-V Virtual Machine Management service (VMMS.exe), but, as its name explicitly states, it is a management service. Without it, you as the administrator cannot interact with Client Hyper-V, but it is still there and doing its job.
Management Tools
There are three built-in tools that you’ll use to interact with Client Hyper-V:
- PowerShell. PowerShell is the most thorough way to manage with Hyper-V. You can start it within an elevated standard command prompt by typing PowerShell and pressing [Enter]. I tend to dig it out of the Start menu and pin it to the taskbar.
- Hyper-V Manager. Hyper-V Manager is not as robust as PowerShell for management, but it is adequate. It is also helpful for connecting to virtual machines’ consoles. Hyper-V Manager can be found in Administrative Tools. I tend to pin this to the Start menu. You must Run As Administrator if you are logged in with a non-administrative account.
- Virtual Machine Connection. This tool can be invoked within Hyper-V Manager by right-clicking on a virtual machine and clicking Connect. You can also enter vmconnect into any elevated prompt (including the Cortana local search). You will need to Run As Administrator. Once it opens, you can pick the virtual machine that you want to connect to from the drop-down.
It’s worth reiterating that you must always interact with Hyper-V using elevated prompts or graphical applications opened with Run As Administrator. VMConnect is kind enough to tell you when you don’t have sufficient permissions, but most other tools will be silent. For instance, running Get-VM as a non-administrator will simply return nothing, even when virtual machines are present and operational. Hyper-V Manager’s virtual machine list will also be empty.
Configuring Client Hyper-V
I’m not going to take you through every option available for Client Hyper-V, but I’m going to touch on the biggest points. Client Hyper-V works perfectly well immediately after you enable it and reboot, so it’s really just a matter of putting a few final touches on it.
To get started, open up Hyper-V Manager. In Windows versions past, you could simply open the Start menu and start typing “Hyper-V Manager” and after a few keystrokes, the built-in search tool would find it. This still works for most people, but many have encountered a bug where Cortana struggles to find things on the local computer. That went away for me after a few updates but the suggestions that I found to fix it directly did not work for me. If you find the “Windows Administrative Tools” group in the Start menu, Hyper-V Manager is there. I suggest pinning it to the Start menu or something similar so that you can easily reach it later.
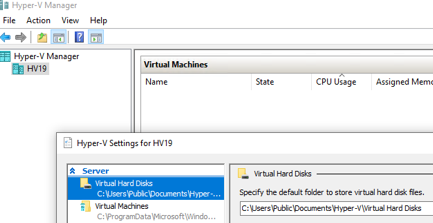
Once you have Hyper-V Manager open, it should already have your local computer selected. Right-click on it and click Hyper-V Settings. If that option isn’t available, you didn’t Run as administrator.
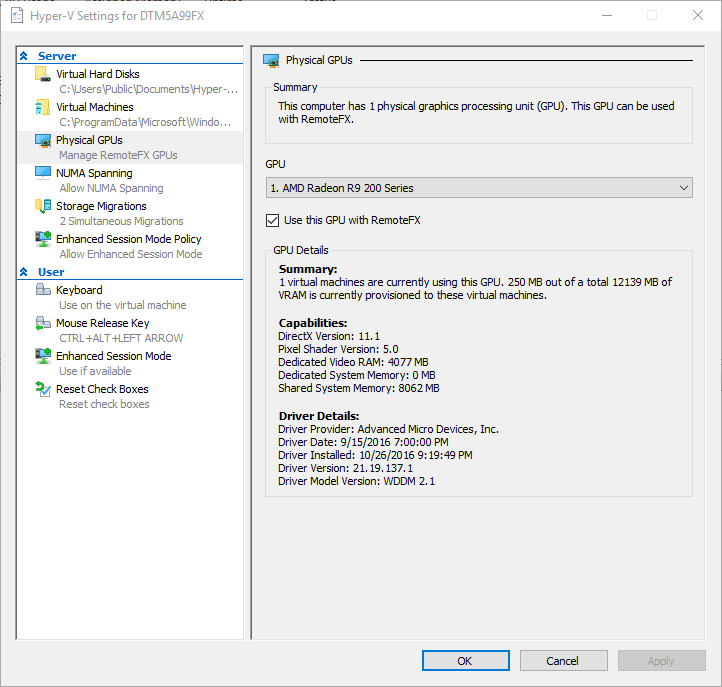
A screenshot of the window that you’ll see is below. I’ve changed it to the Physical GPU tab so that you can see that RemoteFX is functioning and has automatically selected the video adapter. Sift through the other tabs and check that items are set as you expect. Feel free to change things as suit your needs. I would recommend keeping Enhanced Session Mode enabled everywhere you find it, or you’ll lose some host/guest interaction capabilities with your virtual machines. If you’re not certain about a setting, the best thing to do is leave it alone.
Basic Configuration
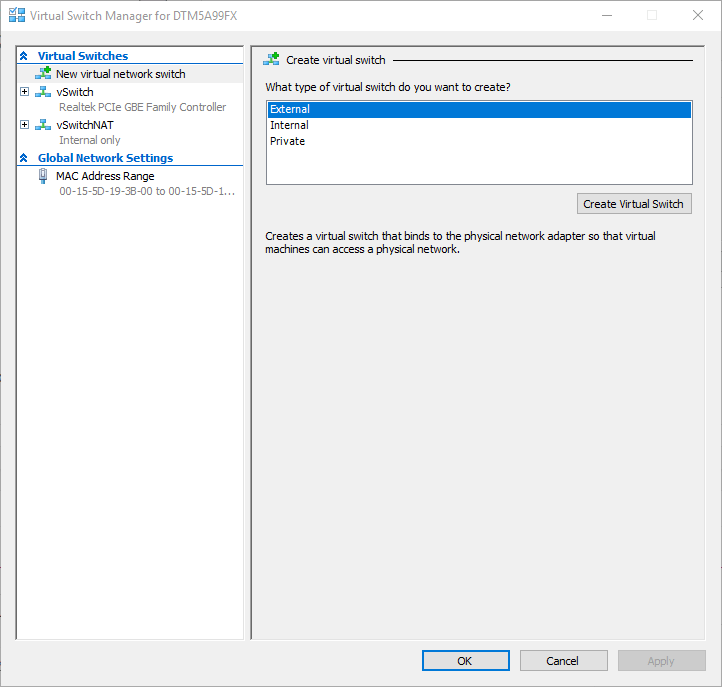
Once you’re finished there, right-click on the local computer again and click Virtual Switch Manager. Make certain that, on the right side, the selected type is External and click Create Virtual Switch.
Starting Virtual Switch Manager
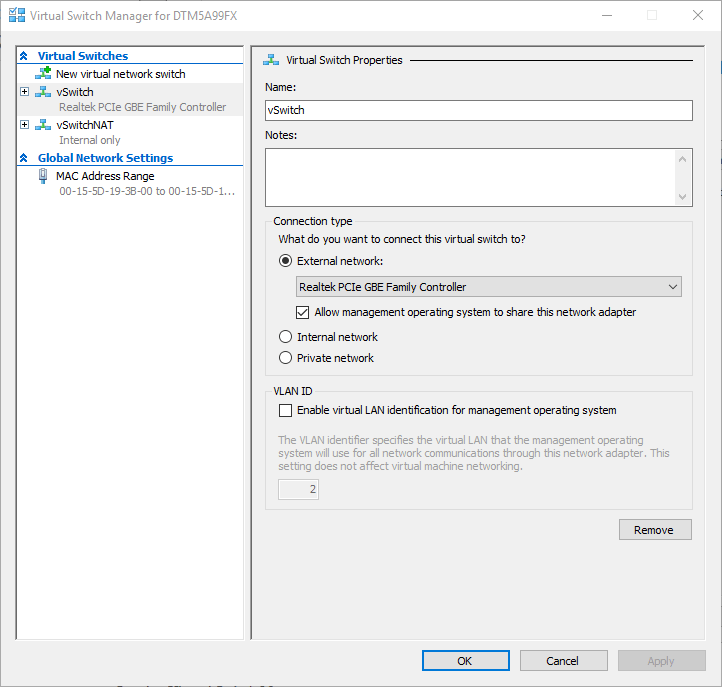
Set the following options on the new virtual switch page:
- Name the virtual switch. There is no need to get fancy with this. Use something that you can remember and that you can type. Future you will thank you.
- Next to the External network dot, choose the physical network adapter that will host the virtual switch. You may need to look in your network adapter list if it’s not obvious which is which.
- Unless you have multiple virtual network adapters, leave Allow management operating system to share this network adapter. If you don’t, the physical adapter that you choose will be able to connect virtual machines to the physical network, but you’ll have to manually create a virtual NIC for the management operating system (that’s the Windows 10 installation that’s running Client Hyper-V) to continue using the physical network (or come back in here and check the box).
- If your management operating system currently participates in a VLAN, check the Enable virtual LAN identification for the management operating system and enter the necessary VLAN ID in the text box. If you’re at home using regular home networking equipment, you’ll definitely want to skip this box. If you’re connected to commercial-grade equipment at work and don’t already know what to do, it’s highly likely that you will skip this configuration. Otherwise, talk to your network administrator.
Virtual Switch Manager
When you’re done with setting up the virtual switch and you OK out, you might lose connectivity for a few moments while the networking settles down. It needs to recreate your networking stack on a new virtual adapter, so expect that to take a bit of time.
If you connected to a wireless network adapter, you might face some difficulties. You wouldn’t be the first. I do not personally have much expertise in addressing these problems but your odds of finding suitable resolution are not great. Usually, it either works in the beginning or it never works at all. You can try updating drivers. If you just can’t get it to work, never fear! You can follow the steps in the next section to create a NAT network so that you don’t need a virtual switch on top of the physical adapter.
Configuring NAT Networking in Client Hyper-V
This process has changed several times since the feature was introduced in a technical preview of Client Hyper-V and a lot of the currently available instructions are wrong. Even Get-Help for New-VMSwitch shows options that don’t work. The following instructions were tested and known good for Client Hyper-V on Windows 10 build 14393.447 (run “winver” from the Start menu).
As with many things in Windows, there is more than one way to make this all happen. There is only a single step that absolutely requires PowerShell, which means that I’m going to counsel you to do the whole thing in PowerShell. You can do all the other steps in the GUI if you prefer. So, I’ll start with a basic outline of the steps, then I’ll show you the PowerShell that can make it happen:
- Determine what network range you want your NAT network to be. You only get a single NAT network on a Client Hyper-V system.
- Create an internal virtual switch.
- On the management operating system’s adapter for the internal virtual switch from step 2, assign an IP that will function as the router IP on that network that you thought up in step 1.
- Create the NAT network (PowerShell only).
- Attach virtual machine(s) to the virtual switch that you created in step 2 on the network that you created in step 1 using the IP that you assigned in step 3 as the router.
- Assign IPs from within the guest operating systems.
Be mindful of step 6. Client Hyper-V does not contain a DHCP server and will not distribute addresses for that NAT network. In case you were about to ask, no, Client Hyper-V does not support DHCP relay, either. You must either create a virtual machine running DHCP in that network or you must manually assign IPs. I’d go with the latter.
Here are steps 2-4 in PowerShell for the network 192.168.100.0/24 (192.168.100.1 through 192.168.100.254):
New-VMSwitch -SwitchName vSwitchNAT -SwitchType Internal
New-NetIPAddress -InterfaceAlias 'vEthernet (vSwitchNAT)' -IPAddress 192.168.100.1  -PrefixLength 24
New-NetNat -Name vSwitchNAT -InternalIPInterfaceAddressPrefix 192.168.100.0/24
The first line creates an internal virtual switch named “vSwitchNAT” (could be done in Hyper-V Manager, as you saw above). An internal switch allows the host operating system and guest operating systems to use the same virtual switch, which, by definition, means that a virtual adapter will be automatically created for the management operating system. When such a virtual adapter is automatically created, its name is always in the format of vEthernet (name of the virtual switch), so I know that this one will be named “vEthernet (vSwitchNAT)”. If you name your virtual switch differently, use that name on your second line. I have also decided to pick the first valid IP in the network that I created, hence the 192.168.100.1 (this could be done in network connections). Note that I do not give it any routing information, such as a default gateway. The third line creates the NAT network. It will see the adapter with IP 192.168.100.1 and automatically treat it is as the router for that network.
Now, I just need to connect virtual machines to it. On the properties for a virtual machine, I do exactly that:
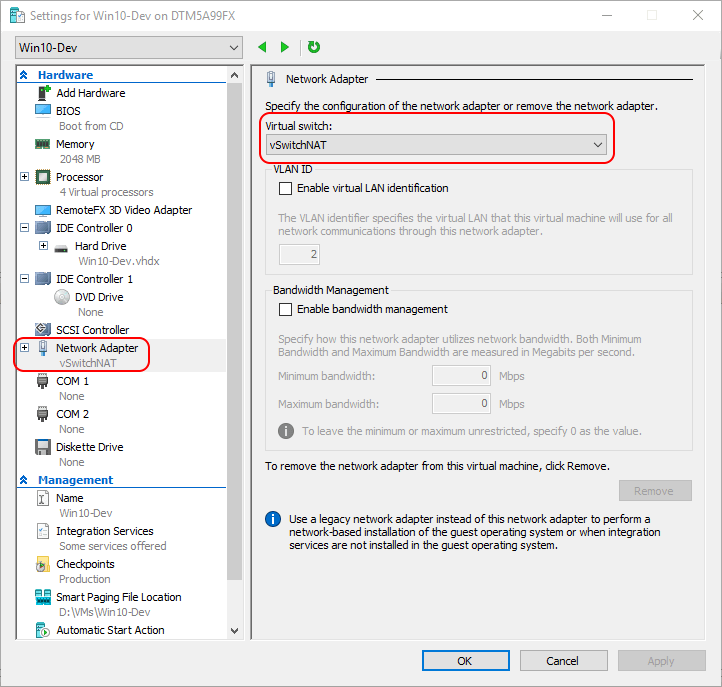
Select NAT Switch
I finish up by accessing the guest’s networking and giving it an IP on that network and using the host management adapter as the default gateway:
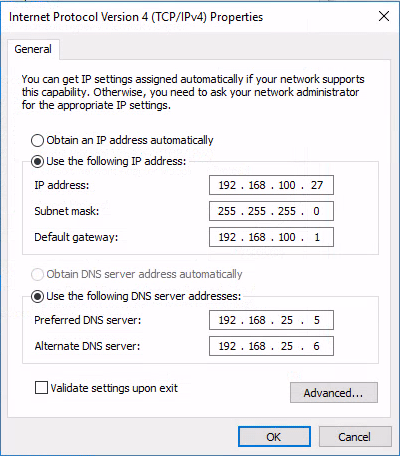
NAT Client IPv4
NAT in Windows 10 has more capability than what I’ve shown you, but this should be enough for most. Start on the NAT PowerShell page for more information.
Continuing On…
There are a great many other things that I could show you, much more than would fit in a simple blog post. If this is your first time using Client Hyper-V, or any Hyper-V, spend some time kicking the tires. Begin by right-clicking your host in Hyper-V Manager and clicking New and Virtual Machine. The wizard should be easy enough to follow. Once your new VM is created, right-click on it and click Connect. That’s VMConnect. You’ll find the start and stop controls. You’re now on your way to being a Client Hyper-V guru!
Возникла необходимость удаленного управления сервером с запущенной ролью Hyper-V с компьютера под управлением Window 10 (личный ноутбук), который не состоит в домене. Чтобы такая схема заработала, нужно выполнить следующие настройки на стороне сервер-гипервизора и клиента.
- Настройка сервера Hyper-V
- Настройка клиента Windows 10 для подключения к серверу Hyper-V
- Удаленное подключение из Windows 10 к Hyper-V
Содержание:
Настройка сервера Hyper-V
На сервере Hyper-V (Windows Server 2016) нужно включить удаленное управление PowerShell Remoting и открыть соответствующие порты на файерволе. Включаем службу WinRM командой
Enable-PSRemoting
Теперь нужно разрешить подключение со всех клиентов (из публичных сетей в той же самой локальной подсети) и разрешить передавать и получать CredSSP:
Enable-PSRemoting -SkipNetworkProfileCheck -Force
Enable-WSManCredSSP -Role Server
Включим правило межсетевого экрана WinRM-HTTP-In-TCP-Public.
Set-NetFirewallRule -Name "WinRM-HTTP-In-TCP-Public" -RemoteAddress Any
Проверьте удаленную доступность порта WinRM (TCP 5985) на сервере
Test-NetConnection -ComputerName target_name -Port 5985
Настройка клиента Windows 10 для подключения к серверу Hyper-V
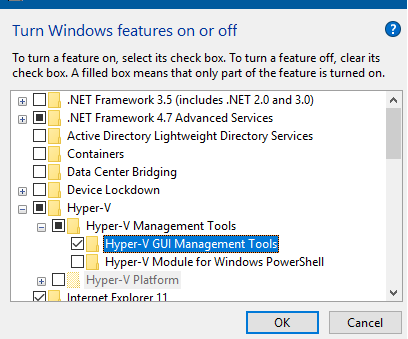
В первую очередь на компьютере с Windows 10 нужно установить консоль управления Hyper-V. Для этого в панели управления в разделе программ нужно нажать кнопку Turn windows features on or off и в разделе Hyper-V-> Hyper-V Management Tools -> выбрать Hyper-V GUI Management Tools.
Проверьте, что тип сетевого подключения у вас установлен на Private.
Откройте консоль PowerShell с правами администратора и выполните следующие команды:
Enable-PSRemoting
Set-Item WSMan:\localhost\Client\TrustedHosts -Value "Hyper-V-FQDN"
Enable-WSManCredSSP -Role client -DelegateComputer "Hyper-V-FQDN"

Тем самым мы добавили наш сервер в список доверенных и разрешили аутентификацию CredSSP.
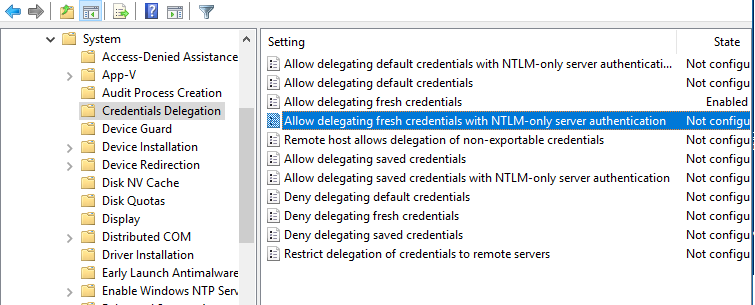
Теперь в редакторе локальной групповой политики (gpedit) нужно включить NTLM аутентификацию на недоменных компьютерах. Перейдите в раздел Computer Configuration > Administrative Template > System > Credentials Delegation и включите политику Allow delegating fresh credentials with NTLM-only server authentication, добавьте в нее строку wsman/Hyper-V-FQDN.
Удаленное подключение из Windows 10 к Hyper-V
На компьютере Windows 10 откройте консоль Hyper-V Manager, щелкните ПКМ по “Hyper-V Manager” и выберите Connect to Server… Введите имя сервера и отметьте галку Connect as another user и укажите имя пользователя с правами на сервере Hyper-V.
После этого, консоль должна отобразить список ВМ, запущенных на хосте Hyper-V.
Hyper-V is a Microsoft-owned Windows Hypervisor platform (Type-1) that allows users to run virtual machines with high performance. However, if you are using Windows 10 Home Edition, then you will not have the “Hyper-V” option in the “Turns Windows feature on or off” to run virtual computers because it is available only for Windows 10 Professional, Education, and Enterprise Editions (know the difference). However, still, there is a way to easily download, install and enable the Hyper-V feature on Windows 10 Home using the command line.
Requirements:
- Windows 10 Home OS
- Administrator access
- Virtualization must be enabled in BIOS to create VMs
- Active Internet connection
Although, in modern systems Virtualization is enabled in BIOS by default, however, to confirm it, just right-click on Taskbar and select Task manager ⇒ Performance and find whether it is on or off.


Well, if you don’t want to use Hyper-V then try out some other best third-party Virtual machine creator software programs.
Steps to Activate Hyper-v Feature on Windows 10 Home
Here are the simple steps that we can follow to download and install Hypervisor using a Command-line script.
1. Script to download Hyper v for Windows 10 home
There is a code available on Github that allows users to automate the process of downloading and enabling the Hyper-V feature. Here is that
pushd "%~dp0" dir /b %SystemRoot%\servicing\Packages\*Hyper-V*.mum >hyper-v.txt for /f %%i in ('findstr /i . hyper-v.txt 2^>nul') do dism /online /norestart /add-package:"%SystemRoot%\servicing\Packages\%%i" del hyper-v.txt Dism /online /enable-feature /featurename:Microsoft-Hyper-V -All /LimitAccess /ALL pause
What we have to do is – Right-click on the Desktop and select Text Document. A new file will be created, now open it and paste the above code in that. After that rename that file to Hyper-V Enabler.bat
Alternative- However, to make all this easy for you, we already have created this bat file that you can download directly using this link.
2. Run Hyper-V Enabler Batch file
Once you downloaded or created a Batch file with the given code by yourself on your Desktop. Right-click on that and select “Run as Administrator“.

3. Feature installation will start
As we run the Batch file, it will open a Command prompt to run the code saved in it. Make sure you have an active internet connection on your system to download files required to install and activate Hyper-V on Windows 10 Home. This will take some time depending upon your network speed.
4. Restart your Windows 10 System
Once the installation is complete, the Hyper-v will automatically get enabled on your system. Thus, to make changes into effect, the system will ask you to restart it. Simply type Y on your command terminal and press the Enter key.

5. Run Hyper-V Manager on Windows 10 home
Let’s check whether this Microsoft Windows Hypervisor feature is on our system or not. For that, in the search box type- Turn Windows features on or off, as its icon appears, click to open it.

There scroll and find -Hyper-V and make sure all its tools are checked as shown in the above screenshot, if not already, and then hit the OK button.
Now, we know this free Microsoft virtualization software is on our system, it’s time to run it and start creating virtual machines.
Go to Windows 10 Search box again or simply press the Win key on your keyboard and this time type- Hyper-V, click on its icon when appears.
Alternatively, we can use a command to run Hypervisor- open CMD or the RUN box (shortcut key- Win key + R) and type – virtmgmt.msc

6. Create a Virtual Machine
- To create a virtual machine in Hyper-V Manager, right-click on the connected server and select the New option.

- Click on the Next button and give some name to your virtual machine. For example Ubuntu.
- Choose the Generation for your Virtual machine. If the operating system you want to install supports 32-bit or 64-bit and requires legacy BIOS features then go for Generation 1. Whereas for the latest features and only 64-bit with UEFI boot supported OS users can go for Generation 2. However, you can leave the default selection as it is if you are not sure about this.
- Assign the amount of RAM or Memory you want to use.
- Configure Network. For that select the Default Switch from the Drop-down box. If you don’t have then first create one.
- Select the Size of Virtual Disk.
- Assign the ISO file of the OS you want to install.

To get a step by step guide you can see our article- How to use hyper-v to install Linux Virtual machine on Windows 10
7. Uninstall or Disable Hyper-V feature on Windows 10 Home
Hyper-V is not compatible completely with other Type- 2 virtualizers, even though the latest version of Vmware and Virtualbox can run along with it, there will be a huge performance issue. Thus, if you are planning to use Vmware player or Virtualbox on Windows 10 Home, then first, Deactivate the Hyper-V.
To uninstall this feature, we need to uncheck it from the “Turns Windows features on or off” section. To open it you can either find it from the Search box of Windows 10 or simply press Win Key + R to open the RUN box and type- optionalfeatures.exe

Now uncheck the box given for Hyper-v.

7.1 Command line to disable windows virtualization feature (optional)
If you want then can use a very straightforward method that is either using command prompt or PowerShell command line-
On Powershell run this
Disable-WindowsOptionalFeature -Online -FeatureName Microsoft-Hyper-V-All
Whereas on Command prompt, use this one-
dism.exe /Online /Disable-Feature:Microsoft-Hyper-V-All
7.2 Restart your system
To make sure the hypervisor feature gets disabled completely, now restart your system. This uninstalls it completely.
7.3- In case you want to enable it again (optional)
In the future if you want to enable Microsoft Hypervisor again then you don’t need to run the Batch file this time, just got Windows Features and select it. Or use the command line-
Powershell
Enable-WindowsOptionalFeature -Online -FeatureName Microsoft-Hyper-V
CMD
DISM /Online /Enable-Feature /All /FeatureName:Microsoft-Hyper-V
Also See- Hyper-V vs VirtualBox: A basic comparison
Closing thoughts
Well, this was the quick way to use the Microsoft Windows hypervisor on Windows 10 Home edition. In case you are facing any problem while enabling it, let’s know, the comment section is all yours…
Introduction
I know it’s hard to believe, but there are situations where you must use Windows as the host machine for development purposes. In an ideal world, we can use VirtualBox on a Hyper-V-enabled host without performance downgrade. But we don’t live in a perfect world (unless you have money to buy VMware), so we’ll have to work with what we got.
If you still want to play games on your Windows host, use WSL2, and run a full GNU/Linux environment, you should give Hyper-V a shot.
You can learn more about Microsoft Hyper-V from the following links:
- What Is Hyper-V Manager and How Does It Work?
- Introduction to Hyper-V on Windows 10
System Requirements
Hyper-V is available in 64-bit version of Windows 10 Pro, Enterprise, and Education.
Hyper-V requires Second Level Address Translation (SLAT) — present in Intel and AMD’s current generation of 64-bit processors.
You can run 3 or 4 basic virtual machines on a host that has 4GB of RAM, though you’ll need more resources for more virtual machines.
On the other end of the spectrum, you can also create large virtual machines with 32 processors and 512GB RAM, depending on your physical hardware.
Although this document does not provide a complete list of Hyper-V compatible hardware, the following items are necessary:
- 64-bit Processor with Second Level Address Translation (SLAT).
- CPU support for VM Monitor Mode Extension (VT-x on Intel CPUs, AMD-V on AMD CPUs).
- Minimum of 4 GB memory. As virtual machines share the memory with the Hyper-V host, you will need to provide enough memory to handle the expected virtual workload.
The following items will need to be enabled in the system BIOS:
- Virtualization Technology — may have a different label depending on motherboard manufacturer.
- Hardware Enforced Data Execution Prevention.
(Source: https://docs.microsoft.com/en-us/virtualization/hyper-v-on-windows/reference/hyper-v-requirements)
Enabling Hyper-V and Hyper-V Manager
- Enable the virtualization technology config supported by your motherboard and CPU (via the BIOS/UEFI settings).
- Create a new
.batfile with the following script and run it as admin.
pushd "%~dp0"
dir /b %SystemRoot%\servicing\Packages\*Hyper-V*.mum >hv.txt
for /f %%i in ('findstr /i . hv.txt 2^>nul') do dism /online /norestart /add-package:"%SystemRoot%\servicing\Packages\%%i"
del hv.txt
Dism /online /enable-feature /featurename:Microsoft-Hyper-V -All /LimitAccess /ALL
pause
- Reboot your PC.
- Open the «Turn Windows features on or off» panel and ensure that the «Hyper-V» feature is checked.

- If everything went right, your system should be able to use the «Hyper-V Manager» and «Hyper-V Quick Create» app.

- Create a new virtual machine.
(Source: https://www.xda-developers.com/how-to-install-hyper-v-windows-11-home/)
And that is it!
For your next steps, considering reading these articles:
- Create Virtual Machine with Hyper-V on Windows 10
- How to use Windows 10 RemoteFX with GPU acceleration and sound in Hyper-v
- How to Create Hyper-V Virtual Machine: Complete Walkthrough
- Running GPU passthrough for a virtual desktop with Hyper-V
Если вы развернули роль Hyper-V на редакции Windows, в которой отсутствует графический интерфейс (Windows Server Core или Microsoft Hyper-V Server) вы можете использовать для управления серверов и виртуальными машинами команды PowerShell из модуля Hyper-V. Для более комфортного управления виртуальными машинами предпочтительно использовать графически интерфейс консоли Hyper-V Manager или веб интерфейс Windows Admin Center (WAC). В этой статье мы покажем, как установит и настроить удаленное управление гипервизором Microsoft с помощью консоли диспетчера Hyper-V в не-доменном окружение (рабочей группе).
В данном примере мы покажем, как удаленно подключиться к серверу Hyper-V (на Windows Server 2022/2019/2016/2012 R2 или Win 11/10/8.1) с рабочей станции с Windows 10 Pro x64 с помощью консоли Hyper-V Manager. Проверьте, что хост с ролью Hyper-V и ваша рабочая станция находятся в одной рабочей группе (WORKGROUP).
Сначала нужно разрешить удаленное управление на хосте Hyper-V. Если роль Hyper-V развернута на Server Core или Microsoft Hyper-V Server, запустите утилиту
sconfig.cmd
, перейдите в раздел 4 — Remote Management и разрешите удаленное управление.
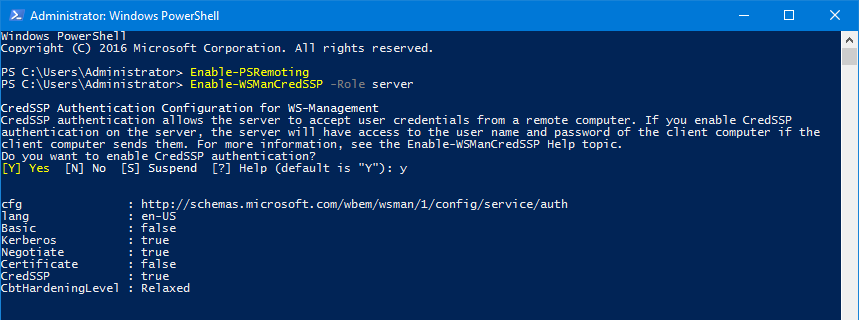
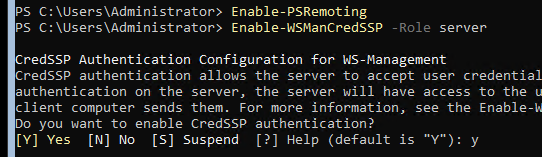
Затем в консоли PowerShell настройте службу WinRM и разрешите аутентификацию CredSSP:
Enable-PSRemoting
Enable-WSManCredSSP -Role server
Если вы включили WinRM с помощью команды Enable-PSRemoting, это автоматически создаст необходимые правила в Microsoft Defender Firewall.
Можете проверить доступность порта WinRM (TCP 5985) на сервере с клиента с помощью команды:
Test-NetConnection -ComputerName 192.168.21.30 -Port 5985
Теперь нужно выполнить ряд настроек на клиентского компьютера с Windows 10, с которого вы планируете управлять вашим сервером Hyper-V.
Установите консоль Диспетчер Hyper-V. Для этого откройте консоль Turn Windows Features on or off (выполните команду optionalfeatures). В открывшемся окне разверните раздел Hyper-V и отметьте для установки Hyper-V GUI Management Tools.

Также установить клиент Hyper-V Manager с помощью PowerShell:
Enable-WindowsOptionalFeature -Online –FeatureName Microsoft-Hyper-V-Management-Clients
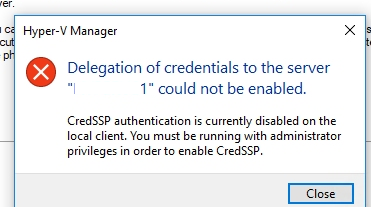
Если прямо сейчас попытаться подключиться к хосту Hyper-V, появится ошибка:
CredSSP authentication is currently disabled on the local client. You must be running with administrator privileges in order to enable CredSSP.
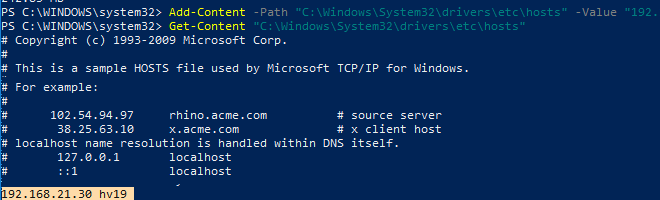
Чтобы хост Hyper-V был доступен с клиента по имени, нужно добавить соответствующую запись в файл hosts (C:\Windows\System32\drivers\etc\hosts) на клиентском компьютере.
Можно добавить запись в файл hosts с помощью PowerShell:
Add-Content -Path "C:\Windows\System32\drivers\etc\hosts" -Value "192.168.21.30 hv19"
В файле hosts должна появится такая строка:
192.168.21.30 hv19
Теперь нужно добавить имя Hyper-V сервера в доверенные узлы:
Set-Item WSMan:\localhost\Client\TrustedHosts -Value "hv19"
Теперь сохраните пароль учетной записи администратора Hyper-V, которую вы будете использовать для подключения в диспетчер учетных записей Windows:
cmdkey /add:hv19 /user:Administrator /pass:HVpa66w0ddr
Если вы не хотите использовать сохраненный пароль, можно подключаться к Hyper-V с интерактивным запросом учетных данных:
runas /user:hv19\Administrator /netonly "mmc virtmgmt.msc"
Проверьте, что для вашего сетевого подклюений в Windows 10 назначен Public профиль сети:
Get-NetConnectionProfile|select InterfaceAlias,NetworkCategory
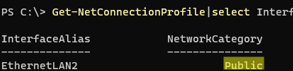
Если команда вернет, что для подключения назначен тип сети Public, его нужно сменить на Private:
Set-NetConnectionProfile -InterfaceAlias "EthernetLAN2" -NetworkCategory Private
Теперь включите аутентификацию CredSSP на клиенте и укажите адрес сервера, которому вы доверите делегировать ваши учетные данные:
Enable-WSManCredSSP -Role client -DelegateComputer "hv19"
Подтвердите добавление
y
->
Enter
.
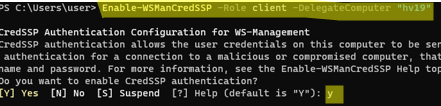
Это также изменит настройки локальной политики Allow delegating fresh credentials.
Теперь нужно разрешить NTLM аутентификацию на недоменном компьютере. Для этого:
- Запустите редактор локальной групповой политики
gpedit.msc
; - Перейдите в раздел Local Computer Policy -> Computer Configuration -> Administrative Templates -> System -> Credentials Delegation;
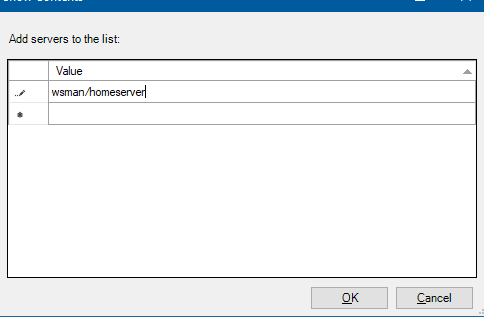
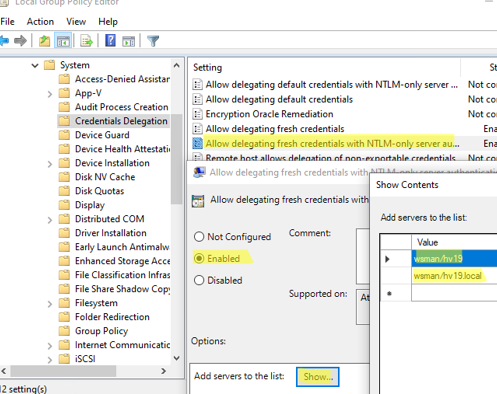
- Включите параметр политики Allow Delegating Fresh Credentials with NTLM-only Server Authentication;
- Потом нажмите кнопку Show и добавьте два значения для имени вашего сервера Hyper-V (в нашем примере это hv19):
wsman/hv19
и
wsman/hv19.local

- Закройте консоль редактора и обновите настройки групповых политик компьютера:
gpupdate /force
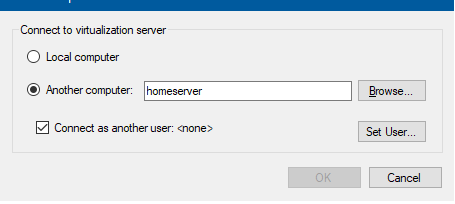
Теперь можно подключиться к удаленному хосту с ролью Hyper-V. Откройте консоль Hyper-V Manager (
virtmgmt.msc
) и выберите Connect to Server. Введите имя вашего сервера Hyper-V. 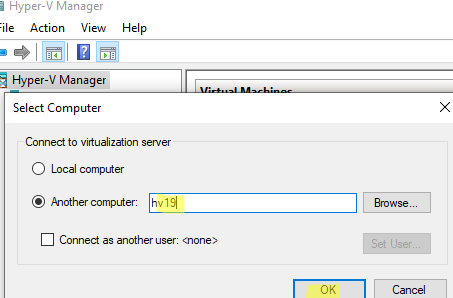
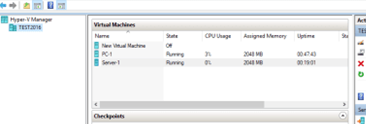
Если вы все сделали правильно, консоль должна подключится к серверу Hyper-V и отобразить список зарегистрированных виртуальных машин.
Теперь вы можете управлять настройками Hyper-V Server, создавать/включать/выключать, импортировать/экспортировать виртуальные машины Hyper-V из графической консоли.