С целью лучше понять работу беспроводной сети в RouterOS — Mikrotik в данной заметке собрал полное описание основных разделов и параметров интерфейса Wireless.
Слева выбираем Wireless, попадаем в основное меню Wireless Tables.
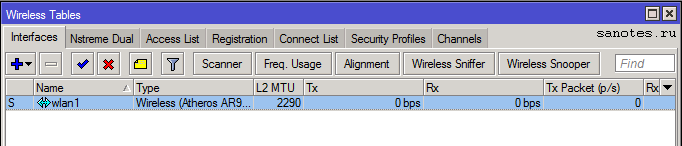
На вкладке Interfaces, по мимо существующего беспроводного интерфейса Atheros AR92xx можно создавать виртуальные точки доступа (Virtual AP), создать интерфейс объединяющий два беспроводных интерфейса в один (Nstream Dual) или WDS интерфейс для подключения к другой точке доступа.
Кроме прочего имеются такие полезные опции как сканер беспроводных сетей (Scanner), оценка состояния загруженности эфира и выбора оптимальной частоты (Freq. Usage), юстировка антенны (Alignment), беспроводной сниффер (Wireless Sniffer), мощный сканер wi-fi-устройств, базовых станций и их SSID (Wireless Snooper).
Сначала рассмотрим параметры основного беспроводного интерфейса Wireless (Atheros 11N) c назначенным именем wlan1.
I) Interfaces
Вкладка «General» (основные настройки)
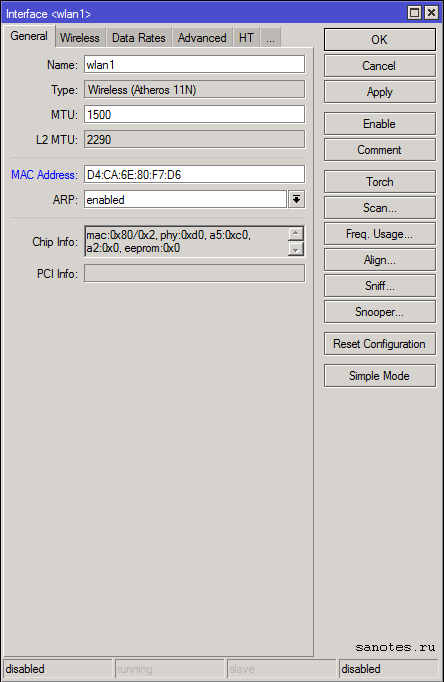
Name — имя интерфейса;
Type — тип wireless интерфейса;
MTU — maximum transmission unit — максимальный размер полезного блока данных одного пакета, который может быть передан протоколом без фрагментации. По умолчанию: 1420;
L2 MTU — MTU для L2;
MAC Address — mac-адрес;
ARP (Address Resolution Protocol) — протокол определения адреса, предназначенный для определения MAC-адреса по известному IP-адресу;
Chip Info — служебная информация о радиокарте;
PCI Info — Информация о шине PCI;
Вкладка «Wireless» (Advanced Mode)
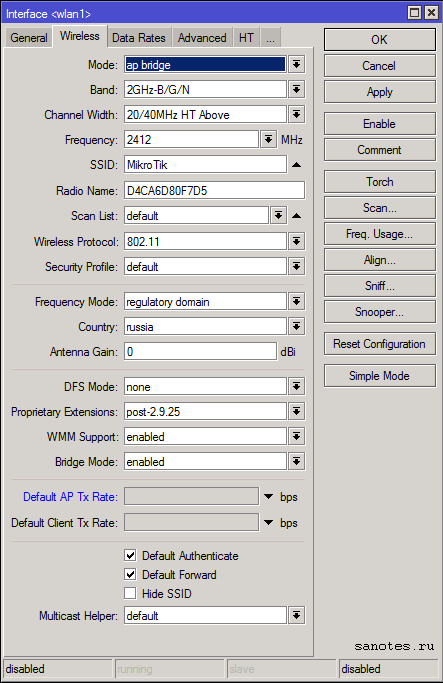
Mode — ap bridge — основной режим работы точки доступа как «прозрачный». По умолчанию стоит просто bridge — режим прозрачного радиомоста, при котором возможно подключение только одного клиента;
Band — стандарт и режим работы беспроводной сети. b/g/n — указывает на скорость беспроводной сети. b — До 11 Мбит/с., g — до 54 Мбит/с, n — до 600 Мбит/с.;
Channel Width — характеристики используемой полосы частот. Возможные значения: 5MHz, 10MHz, 20MHz, 20/40MHz HT Above (с расширением полосы вверх по частоте), 20/40MHz HT Below (с расширением полосы вниз по частоте);
Frequency — основная частота или преднастроенный канал;
SSID — название сети;
Radio Name — Название устройства беспроводной сети. Отображается, например, при сканировании эфира другими устройствами или в таблице регистрации беспроводных устройств на удаленном устройстве;
Scan List — рабочий диапазон частот. В этом диапазоне Mikrotik производит сканирование эфира, мониторинг загрузки каналов и т.д..
Возможные значения:
— «default» — рабочий диапазон определяется настройками региона;
— Фиксированная частота (например, 5180) в MHz;
— Полоса частот «от» и «до» (например, 5150-5250) в MHz;
— Канал или скан-лист, настроенный на вкладке Wireless Tables — Channels;
Wireless Protocol — протокол беспроводной связи. Возможные следующие значения.
— any — любой поддерживаемый (автовыбор);
— 802.11 — только стандартные протоколы 802.11abgn. Обычно используется для совместимости с оборудованием других производителей;
— nstreme — «фирменный» протокол Mikrotik, характеризующийся высокой скоростью потока данных в одну сторону (RX или TX);
— nv2 — «фирменный» протокол Mikrotik, характеризующийся высокой скоростью при работе в дуплексе или работе в режиме PtMP (точка-многоточка);
— nv2 nstreme — автовыбор из «фирменных» протоколов;
— nv2 nstreme 802.11 — автовыбор протокола из перечисленных;
— unspecified — то же, что и «any»;
— Security Profile — профиль безопасности, настраивается в Wireless Table — Security Profiles;
Frequency Mode — региональные ограничения.
— regulatory-domain — ограничение доступных каналов (частот) и максимальной мощности передатчика в соответствии с законодательством выбранного региона;
— manual-txpower — аналогично, но без ограничения максимальной мощности;
— superchannel — тестовый режим, доступны все каналы (частоты), поддерживаемые радиокартой, а также максимальная поддерживаемая мощность;
Country — Выбор региона. Для каждых стран мира по стандарту 802.11 были сделаны разные частотные диапазоны с разным количеством каналов;
Antenna Gain — коэффициент усиления антенны в dBi. При использовании внешней антенны желательно делать поправку на потери в кабеле и разъемах;
DFS Mode — динамический выбор частоты (Dynamic Frequency Selection) из списка частот, указанных в Scan List. Возможные варианты:
— none — DFS отключен;
— no radar detect — выбор частоты с наименьшим количеством обнаруженных сетей;
— radar detect — выбор частоты с наименьшим количеством обнаруженных сетей и ее использование в том случае, если в течение 60 секунд не было обнаружено сигналов радара. Если такой сигнал был обнаружен — продолжить поиск на других частотах;
Proprietary Extensions — режим совместимости со старыми версиями RouterOS (до версии 2.9.25). «post-2.9.25» выключен, «pre-2.9.25» включен;
WMM Support — поддержка Wi-Fi Multimedia. Принимает значение включение / выключено;
Bridge Mode — разрешение использовать режим station bridge (настройка активна только в режимах AP);
Default AP TX Rate и Default Client TX Rate — ограничение скорости со стороны AP для подключений и со стороны клиента соответственно, которых нет в Access List (бит/сек., 0 — без ограничений);
Default Authenticate — для режимов AP данный параметр определяет, принимать ли подключения от клиентов, которых нет в Access List. Для клиентских режимов — подключаться ли к AP, которых нет в Access List;
Default Forward — разрешать ли маршрутизацию клиентам, которых нет в Access List;
Hide SID — скрывать имя сети;
Multicast Helper — механизм диагностики проблем широковещательных рассылок. Имеет смысл использовать только при режимах AP, если клиенты работают в режиме station bridge. Возможны варианты:
— disabled — отключен. Мультикаст-пакеты отправляются без изменений;
— full — все MAC-адреса мультикаста изменить на юникаст и отправить в таком виде;
— default — аналогично «disabled»;
Вкладка «Data Rates»
Здесь задаются настройки канальных скоростей (оставляем по умолчанию. default);
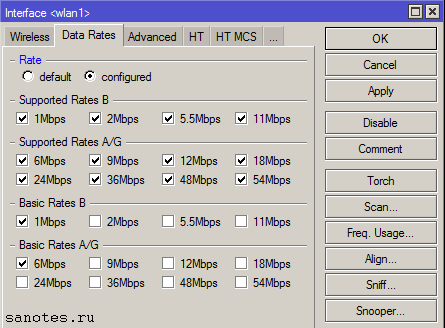
Supported Rates — канальные скорости, которые поддерживаются беспроводным интерфейсом;
Basic Rates — канальные скорости, на которые передается служебный трафик;
Вкладка «Advanced» (дополнительные настройки)
Area — позволяет создать группу и включить беспроводные устройства в нее (по аналогии с доменом), а затем использовать определенные правила для этой группы и всех входящих в нее устройств, вместо того, чтобы создавать отдельные правила для каждого устройства. Значение area транслируется точками доступа вместе с SSID и другой идентификационной информацией об устройстве;
Max Station Count — Максимально возможное количество подключенных клиентов, включая WDS-подключения. Актуально, только для режимов AP;
Distance — Максимальная допустимая дистанция беспроводного линка. Значения:
— dynamic — автонастройка;
— indoor — работа внутри помещения;
— расстояние в километрах. При указании этого параметра вручную, рекомендуется указывать не точное расстояние между устройствами (по картам или GPS), а значение, больше на 10-20% такого расстояния;
Noise Floor Threshhold — порог соотношения сигнал/шум (dB). Фактически это значение минимального SNR для беспроводного подключения. Если характеристики подключения хуже этого значения, подключение не будет установлено (или будет разорвано). Данная функция работает только на чипсетах производства Atheros, начиная с AR5212 и более новых;
Periodic Calibration — периодическая калибровка линка. Значения default и enable включают эту опцию, если задан интервал в поле Calibration Interval. Значение disabled отключает эту функцию. Данная функция работает только на чипсетах производства Atheros;
Calibration Interval — периодичность проведения рекалибровки (dd:mm:ss). При значении 00:00:00 рекалибровка отключена;
Burst Time — время (в микросекундах) — в течение которого может непрерывно производиться передача данных. Данная функция работает только на чипсетах AR5000, AR5001X, AR5001X+;
Hw. Retries — количество попыток отправки пакета до того, как отправка будет признана неудачной. В случае превышения этого значения, скорость соединения с удаленным устройством будет понижена, после чего снова будут предприняты попытки передачи пакета. Если была достигнута минимальная скорость соединения, но пакет не был передан, попытки передачи приостанавливаются на время, указанное в параметре On Fail Retry Time. После этого снова будут предприняты попытки передачи пакета до тех пор, пока не истечет время, указанное в параметре Frame Lifetime, либо удаленное устройство не будет отключено по превышению параметра Disconnect Timeout;
Hw. Fragmentation Treshold — задает максимальный размер фрагмента пакета данных, передающихся по WiFi. Большие пакеты будут разбиваться на такие фрагменты для увеличения надежности и скорости связи;
Hw. Protection Mode — режим защиты фреймов;
Hw. Protection Treshold — настройка режима защиты фреймов;
Frame Lifetime — см. «Hw. Retries»;
Adaptive Noise Immunity — режим адаптивной подстройки некоторых параметров приемника для минимизации интерференции и влияния шумов на качество сигнала. Работает только на чипах Atheros AR5212 и более новых;
Preamble Mode — Использование преамбулы. Варианты:
— long — только длинная преамбула;
— short — только короткая;
— both — оба варианта;
Allow Shared Key — разрешает подключение клиентов с открытым ключем WEP;
Disconnect Timeout — См. «Hw. Retries»;
On Fail Retry Time — См. «Hw. Retries»;
Update Stats Interval — интервал времени, через который будут обновляться статистические данные беспроводных клиентов (скорость соединения, CCQ и т.п.);
Вкладка «HT»
Здесь задаются основные настройки приёмников и передатчиков.
HT Tx Chain и HT Rx Chain — разрешение отправки/приёма данных (Tx/Rx). В случае если у вашего устройства радиомодуль, например MIMO R2T2, состоящий из двух приемопередатчиков, которые подключены к разным антеннам (или к одной антенне с двумя различными поляризациями), то эти настройки позволяют, например, осуществлять передачу через одну антенну, а получить данных через другую (или через различные поляризации одной антенны);
Antena Mode — разные режимы работы антены. В режиме antena a работают (Антена 1,2,3), в режиме antena b работают (Антена 1,2,внешняя антена), в режиме tx-a/rx-b работают Антена 2, внешняя антена, в режиме rx-a/tx-b работает Антена 1, внешняя антена;
HT AMSDU Limit — максимальный размер агрегированного пакета AMSDU (Aggregated Mac Service Data Unit);
HT AMSDU Treshold — максимальный размер фрейма, который может быть включен в пакет AMSDU. Агрегация может значительно увеличить пропускную способность линка, особенно при большом количестве мелких пакетов, но в то же время увеличить время задержки, в случае потери пакетов из-за повторной передачи агрегированного пакета. Включение AMSDU также увеличивает нагрузку на процессор;
HT Guard Interval — защитный интервал. При использовании вне помещения рекомендуется всегда ставить long;
HT AMPDU Priorities — приоритеты пакетов, которые будут посланы с использованием механизма AMPDU (Aggregated Mac Protocol Data Unit). Рекомендуется использовать только для пакетов с высоким приоритетом, так как отправка большого количества пакетов через AMPDU приводит к увеличению времени задержки и повышению нагрузки;
Вкладка «WDS» (Wireless Distribution System)
Технология WDS, позволяет расширить зону покрытия беспроводной сети путем объединения нескольких WiFi точек доступа в единую сеть без необходимости наличия проводного соединения между ними;
WDS Mode — тип WDS-моста. Возможны значения Disabled — выключено, dynamic — автоматическое добавление WDS интерфейсов при подключении клиентов, dynamic mesh — позволяет клиенту перемещаться между wi-fi точками без обрыва связи, static — означает что для соединения в режиме WDS на обоих точках необходимо прописывать MAC адреса удалённых точек, static mesh — по аналогии с dynamic mesh, позволяет клиенту перемещаться между wi-fi точками без обрыва связи, на которых заранее были прописаны mac-адреса;
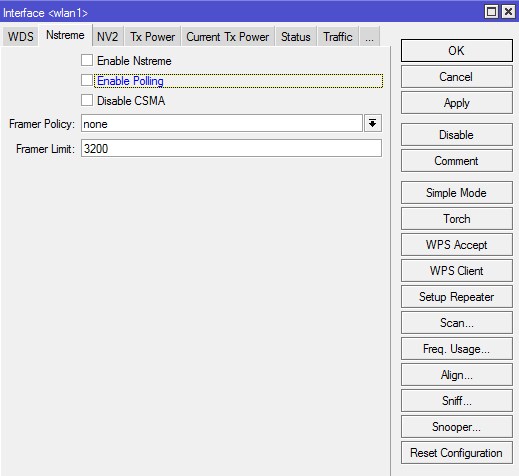
Вкладка «Nstreme»
На этой вкладке задаются настройки поллингового (polling «опрос готовности устройств») протокола. Поллинговый протокол в основном используется для передачи данных в беспроводных сетях на большие расстояния. Для этого используется механизм циклического опроса клиентов сети друг за другом, чтобы узнать есть ли у них данные для передачи по радиоканалу. Если такие данные есть то устройству предоставляется разрешение на их передачу. Все другие устройства в это время молчат. Если при опросе у клиента нет данных для передачи то происходит опрос следующего клиента и так далее по очереди.

Enable Nstreme – включает фирменный» (проприетарный) поллинговый протокол Mikrotik;
Enable Polling – включает динамический опрос подключенных клиентов;
Disable CSMA – отключает режим контроля несущей и обнаружения коллизий;
Framer Policy – выбирает режим упаковки маленьких пакетов в большие. Оптимальное значение – Dynamic Size;
Framer Limit – размер пакета, оптимальное значение 3200;
Вкладка «Tx Power» (Advanced)
В этой вкладке производится настройка мощности Wi-Fi передатчика.
default — режим по умолчанию — мощность выбирается из специальной таблицы в памяти роутера MikroTik;
card rates — мощность подбирается по специальному алгоритму, который использует значение мощности, установленное пользователем;
manual — для каждой скорости можно вручную указать мощность передачи;
all rates fixed — для всех скоростей используется один уровень мощности, установленный пользователем. Этот режим не рекомендуется использовать, поскольку на высоких скоростях могут возникать ошибки передачи данных, перегреваться и выходить из строя чипы роутера;
Для ручной установки мощности передачи рекомендуется использовать режим card rates. При использовании в помещениях нет смысла использовать большие значения.
Вкладка «Current Tx Power» — здесь отображаются текущие настройки мощности Wi-Fi передатчика произведенные на вкладке Tx Power.
Вкладка «Status»
На этой вкладке отображаются параметры подключения, которые помогут оценить качество работы соединения «точка-точка», и сделать корректировку настроек в случае необходимости.
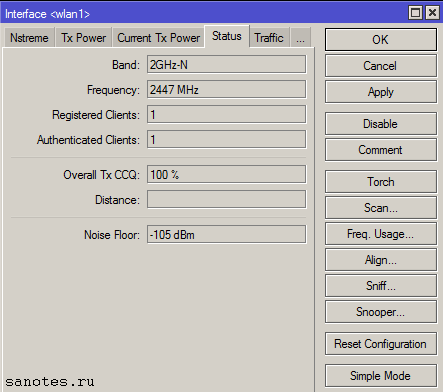 Band – частота, на которой работает базовая станция;
Frequency – частота, на которой соединился клиент;
Registered Client — количество зарегистрированных клиентов (устройств);
Authenticated Clients — количество (устройств) прошедших аутентификацию;
Overall Tx CCQ – усреднённый CCQ (качество канала на передачу/прием) только на передачу Tx. На базовой станции он показывает усреднённые значения по качеству передачи на всех подключившихся wi-fi клиентах;
Distance — расстояние до противоположной точки;
Noise Floor – шум на этой частоте со стороны клиента. Нормальным значением шума считается -95 и более. Если значение шума -90, то связь будет нестабильной. В этом случае нужно перейти на более свободную от помех частоту или уменьшить ширину канала;
Вкладка «Traffic»
Статистика по трафику. Сколько получено/отдано и.т.д.
II) Nstream Dual
Следующая вкладка меню Wireless Tables — Nstream Dual которая понадобится, если требуется увеличить скорость передачи данных по радио каналу за счет объединения двух беспроводных интерфейсов в один. Один интерфейс настраивается на прием данных, другой на передачу.
III) Access List
Далее идет вкладка Access List где можно разрешить или запретить определенным клиентам доступ к wi-fi сети по mac-адресу.
 IV) Registration
Для этого сначала на вкладке Registration необходимо обнаружить клиента, затем скопировать его mac-адрес, перейти на вкладку Access List и указать его в поле MAC Address.
 MAC Address – MAC адрес устройства;
Interface – интерфейс к которому будет производится подключение;
Signal Strength Range – диапазон уровня сигнала, при котором возможно подключение;
AP Tx Limit – ограничение скорости этого подключения;
Client Tx Limit — ограничение скорости клиента;
Authentication – возможность авторизации. Если убрать галочку, устройство с этим MAC адресом, не сможет подключиться к вашей сети;
Forwarding – возможность обмена информацией с другими участниками локальной сети. Если убрать галочку с этого пункта, то пользователь этого устройства не будет иметь доступа к общим сетевым ресурсам;
Private Key – возможность установки персонального ключа шифрования для устройства с данным MAC адресом;
Private Pre Shared Key – персональный ключ шифрования;
Time – а в этом разделе, можно указать временной диапазон, в рамках которого будет возможно подключение этого устройства;
Чтобы включить возможность доступа по правилам Access List, на вкладке Interfaces, необходимо открыть свойства беспроводного интерфейса, где на вкладке Wireless, убрать галочку с параметра Default Authenticate.

На вкладке Registration отображается информация от подключенных к wifi устройствах, с указанием интерфейсов, к которым они подключены.
V) Connect List
На вкладке Connect List задаются правила для доступа к базовым станциям.
VI) Security Profile
На вкладке Security Profiles — профиль безопасности, где задаются ключи, пароли для доступа к сети и настраивается авторизация при помощи внешних сервисов, таких как Radius.
 Открываем профиль по умолчанию.
 Вкладка «General»
Name — имя профиля;
Mode — режим шифрования, возможные варианты:
— dynamic keys — использовать WPA;
— static keys optional — использовать WEP, для шифрования и дешифрования, а также получать и отправлять незашифрованные данные;
— static-keys-required — использовать WEP, не принимать и не отправлять незашифрованные данные;
-none — не использовать шифрование;
Authentication-types – методы авторизации, для подключения устройств к точке доступа старых устройств необходимо добавить поддержку WPA;
Unicast-ciphers — одноадресное шифрование между точкой доступа и клиентом;
— tkip — протокол целостности временного ключа в протоколе защищённого беспроводного доступа. Не безопасно оставлять только tkip. Используется для поддержки старых устройств, скорость которых может быть не более 54Мбит/сек. Рекомендуется включать в связке с aes-ccm или не использовать вовсе;
— aes ccm — протокол блочного шифрования 802.11i с кодом аутентичности сообщения (MIC) и режимом сцепления блоков и счётчика. Создан на базе AES для замены TKIP;
Group-ciphers — многоадресное и широковещательное шифрование;
WPA-Pre-Shared Key – ключ для подключения к точки доступа по методу WPA(пароль на Wi-Fi);
WPA2-Pre-Shared Key – ключ для подключения к точки доступа по методу WPA2(пароль на Wi-Fi);
Suplicant Indentity — идентификация, используется как атрибут «Имя» в Radius;
Group Key Update — Как часто точка доступа будет обновлять ключ шифрования WPA, WPA2;
Managment Protection — защита от атак деаутентификации и клонирования MAC-адреса. Возможные значения: disabled — защита управления отключена, allowed — разрешить использовать защиту, если это поддерживается удаленным клиентом, required — требуется, установить связь только с клиентами поддерживающими Managment Protection, для клиентов, установить связь только с точками доступа поддерживающими Managment Protection;
Managment Protection Key — ключ защиты Managment Protection;
Вкладка «Radius»
Авторизация при помощи Radius сервера.
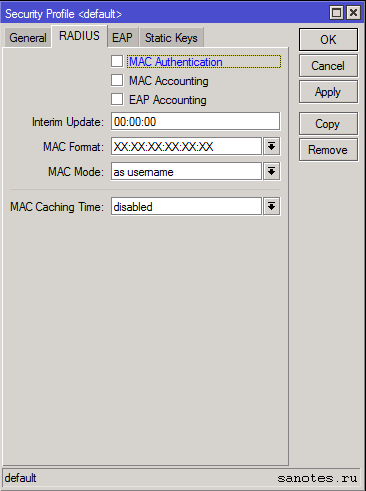 MAC Authentication — авторизация по mac-адресу;
MAC Accounting;
EAP Accounting;
Interim Update — интервал времени через который точка доступа, повторно запрашивает информацию об аккаунте с Radius сервера;
MAC Format — формат записи mac-адреса;
MAC Mode — запрашивать данные авторизации как пользователь (as username) или как пользователь и пароль (as username and password);
MAC Caching Time — промежуток времени через который точка доступа будет кэшировать ответы аутентификации;
Вкладка «EAP»
EAP — расширяемый протокол аутентификации используемый в беспроводных сетях и соединениях точка-точка;
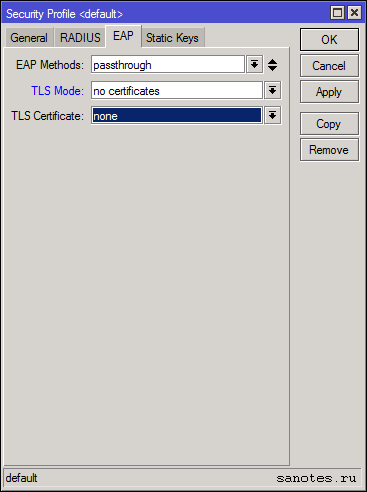
EAP Methods — метод EAP-аутентификации, passthrough или EAP-TLS;
TLS Mode — режим TLS, проверка сертификата (verify certificate), не проверять сертификат (don’t verify certificate ), не использовать сертификат (no certificate);
TLS certificate — сертификат TLS;
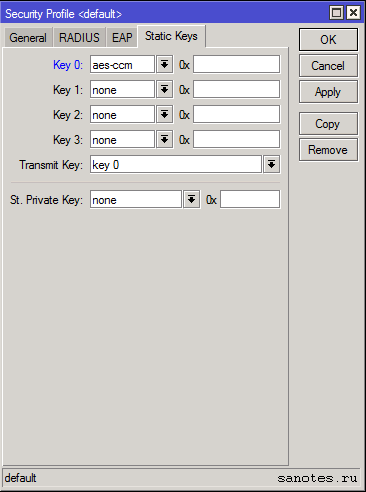
Вкладка «Static Keys»
Данный раздел актуален если используется static keys optional и static-keys-required на вкладке «General».
Начинаю цикл статей про настройку Wi-Fi в Mikrotik. Так как тема довольно обширная охватить одной статьей ее не реально, поэтому будет несколько связанных публикаций, которые можно будет отфильтровать по разделу «Wireless».
В первой статье я опишу ВСЕ пункты, которые есть в настройке wlan-интерфейса в режиме Advanced Mode. Все остальные настройки будут описаны в следующих статьях. Описание буду проводить на самом распространенном маршрутизаторе Микротик для дома и офиса — RouterBoard 951G-2HnD с версией RouterOS самой новой на время написания статьи — 6.38rc38.
В зависимости от модели роутера некоторые функции и настройки могут появляться или пропадать, так же это касается и версии RouterOS — это нужно учитывать при прочтении. Я же попытался описать наиболее полные параметры. При настройке я часто обращался в гугл для выискивания значения того или иного параметра, мне попадалось много статей. В одних описаны сами параметры, но без рекомендаций по их установке. В других — только рекомендации, без объяснений. Тут я попытался написать и значения установок и рекомендации для настройки. По-возможности описал почему именно так нужно устанавливать, а не иначе. Значения описанные в этой статье подходят для настройки роутера для дома и малого офиса с небольшой нагрузкой и небольшое количество устройств. Что является самым распространенным применением точки доступа Mikrotik. Все рекомендации по значениям параметров я выделил курсивом или жирным. Данная статья подразумевает, что человек уже настраивал Wi-Fi в Микротик, но хотел бы получить больше информации по доступным параметрам и их значениям.
И так, начнем — заходим в wireless и входим в наш интерфейс wlan1.

Выбираем режим Advanced Mode.
Вкладка General

Name — Название интерфейса.
Рекомендую задавать имя типа «wlan1_office3», где office3 — ваш идентификатор. Так удобней отслеживать очередность интерфейсов.
Type — Информационное поле. Тип wireless-интерфейса и в скобках модель wireless-карты.
MTU (maximum transmission unit) — максимальный размер полезного блока данных одного пакета, который может быть передан протоколом без фрагментации. MTU определяет размер фрейма при передаче блока данных на канальном уровне сети. Когда IP хочет отослать блок данных большего размера происходит его фрагментация (разбиение). Для fast- и gigabit-ethernet сетей по умолчанию это 1500 байт.
Значение оставляем по-умолчанию — 1500.
Actual MTU — Информационное поле. (Actual MTU = configured MTU on physical interface — protocols overhead.). Фактически Actual MTU — это значение MTU на интерфейсе минус накладные расходы протоколов. Например туннель GRE имеет накладных расходов на 24 байт, значит Actual MTU будет MTU — 24 байта.
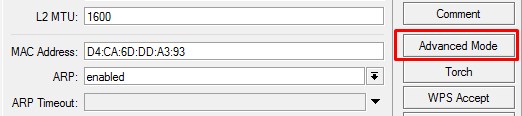
L2 MTU — MTU для L2. MTU (обычный) — это размер IP-пакетов а L2 MTU — это размер кадров Ethernet (без заголовка с MAC адресом).
Значение оставляем по-умолчанию — 1600.
MAC Address — MAC-адрес wireless-интерфейса.
Если вам не требуется изменять MAC беспроводного интерфейса — значение оставляем по-умолчанию.
ARP (Address Resolution Protocol) — протокол определения адреса, предназначенный для определения MAC-адреса по известному IP-адресу. Значения:
- Disabled — на ARP запросы от клиентом на этом интерфейсе маршрутизатор отвечать не будет. Клиентам нужно будет добавлять статические записи ARP. Например, IP и MAC — адреса маршрутизатора должны быть добавлены к рабочим станциям Windows с помощью команды arp типа «C:\> arp -s 10.5.8.254 00-aa-00-62-c6-09».
- Enabled — Режим по-умолчанию. Протокол ARP будет обнаружен автоматически. Новые динамические записи будут добавлены в таблицу ARP.
- Local-Proxy ARP — позволяет маршрутизатору отвечать на ARP-запросы, даже если целевой IP-адрес находится в той же IP-подсети, откуда ARP-запрос поступил. Данная настройка может пригодится, если мы хотим, чтобы трафик в рамках одного широковещательного домена шёл через интерфейс нашего маршрутизатора.
- Proxy ARP — Техника использования ARP-протокола, позволяющая объединить две не связанные на канальном уровне сети в одну. Хосты, находящиеся в этих сетях, могут использовать адреса из одной IP-подсети и обмениваться трафиком между собой без использования маршрутизатора (как им кажется). Такое поведение может быть полезным, например, если вы используете туннели (PPP, PPPoE, PPTP) и клиенты этих туннелей должны видеть хосты их локальной сети.
- Reply Only — Если записи ARP нет в ARP-листе Микротик, то маршрутизатор не увидит хост, а хост не увидит маршрутизатор. В режиме ARP=reply-only будут работать только статические привязки.
Значение оставляем по-умолчанию — Enabled.
ARP Timeout — частота обновления ARP таблицы (я не ошибаюсь?).
Настройку не трогаем.
PCI Info — Информационное поле. Информация о шине PCI, используется в том случае, если радиокарта установлена на шине PCI.
Wireless

Mode — режим работы точки доступа. Возможны режимы:
- alignment-only — Используется для юстировки антенн. В этом режиме ТД непрерывно транслирует в эфир основную информацию о себе.
- ap bridge — Основной режим работы как «прозрачной» точки доступа. Для использования этого режима требуется лицензия не ниже Level 4 (WISP).
- bridge — Режим «прозрачного» радиомоста (PtP). Возможно подключение только одного клиента.
- nstreme dual slave — Используется для построения специального линка на базе проприетарного протокола nstreme, при котором один радиомодуль передает трафик (TX), а другой только принимает (RX). Может использоваться только в устройствах с несколькими wifi-модулями.
- station — Режим «непрозрачной» беспроводной станции. Обычно используется, если клиентская точка выполняет функции роутера.
- station bridge — «Прозрачный» клиент. Обычно используется как клиент PtP-линка или «прозрачная» клиентская станция (без функций роутера).
- station pseudobridge — Режим трансляции MAC-адресов (MAC NAT). Может использоваться совместно с мостом между интерфейсами.
- station pseudobridge clone — Аналогичен режиму station pseudobridge, но в этом режиме MAC-адрес, используемый для трансляции, используется так-же и для подключения к AP.
- station wds — Режим клиента распределенной беспроводной сети. Дополнительно создается WDS-интерфейс, по которому собственно и передаются данные. Требует также наличия WDS-интерфейса на AP. Режим WDS основан на проприетарной реализации и не совместим с режимом WDS на оборудовании других производителей.
- wds slave — Совмещение режимов station wds и ap bridge. Используется для построения распределенных сетей, где точки доступа связаны между собой по WiFi. Работает с тем-же SSID и на той-же частоте, что и другие AP, входящие в распределенную сеть.
По-умолчанию стоит bridge — режим прозрачного радиомоста, при котором возможно подключение только одного клиента.
Выбираем режим работы «ap bridge» — обычная точка доступа.
Band — стандарт и режим работы беспроводной сети.
Для нашей точки выбираем все стандарты, что-бы могли подключится все устройства — «2ghz-b/g/n» и мы получили максимальную скорость.
Channel Width — используемая полоса частот. Возможные значения: 5MHz, 10MHz, 20MHz, 20/40MHz HT Above (с расширением полосы вверх по частоте), 20/40MHz HT Below (с расширением полосы вниз по частоте). Широкие каналы 40Mhz поддерживаются только 802.11n совместимым оборудованием и позволяют добиться их максимальной производительности. Каналы 20Mhz могут дать выигрыш на больших дистанциях улучшив условия приёма. К тому же на узких каналах можно разместить больше точек доступа без интерференции между ними. Протоколы 802.11b/g работают только с узкими каналами. 20/40Mhz HT Above (20/40Mhz HT Below) позволяют управлять динамической составляющей канала 40Mhz. Необходимо чтобы она оставалась в диапазоне работы клиентских Wi-Fi устройств если вы собираетесь их использовать. Above для 1-ого канала (2412mhz) смещает динамическую составляющую до 5-ого (2427mhz) в то время как выбор Below делает недоступной точку доступа так как динамическая составляющая сместится на канал -4. 5 и 10 MHz не подходят, так как половина домашнего оборудования на такой ширине работать не будет. 40МГц используйте тогда, когда у вас гигабитное устройство и прокачка будет более 100 Мбит/с. В остальных случаях используйте полосу 20MHz. Воообще, если работаете в 2.4GHz — просто фиксируйте 20Mhz каналы и все. 40MHz в 2.4 даже одно время не хотели включать в стандарт.
Мы оставляем 20MHz.
Frequency — основная частота или канал. Для методики определения свободной частоты в Mikrotik существует масса инструментов. Описание этих инструментов достойны отдельной статьи, останавливаться тут не буду.
Частоту нужно выбирать наименее загруженную у вас в помещении, используя для этого инструменты RouterOS.
SSID — имя WI-Fi сети;
Выбираете любое имя вашей беспроводной сети.
Radio Name — название устройства беспроводной сети. Отображается, например, при сканировании эфира другими устройствами или в таблице регистрации беспроводных устройств на удаленном устройстве.
Особенно, если вы используете несколько точек с одним SSID рекомендую написать сюда что-то нибудь понятное, типа «office1» для правильной идентификации в сервисных программах.
Scan List — рабочий диапазон частот. В этом диапазоне Mikrotik производит сканирование эфира, мониторинг загрузки каналов и т.д…
Возможные значения:
- «default» — рабочий диапазон определяется настройками региона;
- Фиксированная частота (например, 5180) в MHz;
- Полоса частот «от» и «до» (например, 5150—5250) в MHz;
- Канал или скан-лист, настроенный на вкладке Wireless Tables — Channels;
Оставляем значение «default».
Wireless Protocol — протокол беспроводной связи. Значения:
- any — любой поддерживаемый (автовыбор);
- 802.11 — только стандартные протоколы 802.11abgn. Обычно используется для совместимости с оборудованием других производителей;
- nstreme — «фирменный» протокол Mikrotik, характеризующийся высокой скоростью потока данных в одну сторону (RX или TX);
- nv2 — «фирменный» протокол Mikrotik, характеризующийся высокой скоростью при работе в дуплексе или работе в режиме PtMP (точка-многоточка);
- nv2 nstreme — автовыбор из «фирменных» протоколов;
- nv2 nstreme 802.11 — автовыбор протокола из перечисленных;
- unspecified — то же, что и «any»;
Указываем 802.11 — обычная тока доступа.
Security Profile — профиль безопасности. Настраивается в Wireless Table — Security Profiles.
Можно выбрать Default и отредактировать его в зависимости от своих потребностей по безопасности. Напишу об этом подробней в другой статье.
WPS Mode — Стандарт (и одноимённый протокол) полуавтоматического создания беспроводной сети Wi-Fi. Подразумевает, что в момент подключения к точке доступа на нём программно или физически нажимается соответствующая кнопка и соединение клиента с точкой происходит полностью автоматически. На эту тему есть отдельная статья.
Лично я этот протокол не использую, поэтому — «disabled».
Frequency Mode — региональные ограничения.
- regulatory-domain — ограничение доступных каналов (частот) и максимальной мощности передатчика в соответствии с законодательством выбранного региона;
- manual-txpower — аналогично, но без ограничения максимальной мощности;
- superchannel — тестовый режим, доступны все каналы (частоты), поддерживаемые радиокартой, а также максимальная поддерживаемая мощность.
Я всегда выбираю superchannel. Не хочу ограничений.
Country — Выбор региона. Для каждых стран мира по стандарту 802.11 были сделаны разные частотные диапазоны с разным количеством каналов. Обычно нужно выбирать свою страну. Если выбрать «no_country_set» теоретически должны быть доступны все каналы, но это не так. Например, если выбрать Японию, будет доступно больше каналов.
Дополнение от Сергей Деревянко: Country и частично Frequency Mode — не делают погоды, если с каналом вещания определились четко. Имеют значения только для канала со значением auto. Но тут всплывает один момент — не смотря на то, что для РФ каналов 13, большинство клиентских устройств произведены не в РФ. И как пример — огрызки ничего не знают про каналы выше 11-го.
Выбираем или вашу страну, или «no_country_set».
Antenna Gain — коэффициент усиления антенны в dBi. При использовании внешней антенны желательно делать поправку на потери в кабеле и разъемах.
Дополнение от Сергей Деревянко: Про эту опцию я бы написал так: Имеет смысл использовать только с внешней антенной. На величину указанного значения в этом параметре точка будет понижать усиление сигнала, рассчитывая, что антенна это дело компенсирует собственным усилением.
Внешнюю антенну не используем. Оставляем по-умолчанию — 0.
DFS Mode — динамический выбор частоты (Dynamic Frequency Selection) из списка частот, указанных в Scan List. С обновлением до 6.37, опция dfs-mode становится недоступной, операционная система будет применять необходимые настройки автоматически для каждого частного диапазона, основываясь на установленном регионе (стране).
Proprietary Extensions — режим совместимости со старыми версиями RouterOS (до версии 2.9.25). «post-2.9.25» выключен, «pre-2.9.25» включен.
В новых версиях RouterOS эта функция не актуальна и ее убрали.
WMM Support — поддержка Wi-Fi Multimedia. Принимает значения: enable/disable/required (включен/выключен/обязателен). Если вы будите использовать Multicast, то установите эту опцию в Enabled, это даст большие гарантии на доставление этого пакета. Если вы настраиваете MikroTik дома то включите эту опцию, если же это ресторан или конференц зал, то сожрать весь канал может один клиент.
Дополнение от Сергей Деревянко: На рекомендации включать эту штуку я натыкался, когда дебажил подключения огрызков к моим хотспот-сетям.
Вообще если Микротик стоит дома и устройств не много — «enable». Если офис и Multicast не требуется (а это почти всегда так) — «disable». Рекомендую «disable» — для экономии трафика. Если понадобиться — всегда можно включить.
Bridge Mode — включение/выключение режима «Bridge» на радиокарте для наших беспроводных клиентов. Работает в режиме station-bridge.
Всегда выставляем «enabled».
VLAN-Mode — С помощью VLAN Tagging можно отделить трафик виртуальных беспроводных точек доступа от локальных клиентов (например, что-бы отделитель гостевую сеть от рабочей). Значения:
- no-tag — не использовать VLAN-тегирование на беспроводном интерфейсе;
- use-service-tag — использовать 802.1ad тегирование;
- use-tag — использовать 802.1q тегирование.
VLAN не используем, поэтому «no-tag».
VLAN-ID — VLAN-идентификатор.
VLAN не используем, оставляем по-умолчанию — «1».
Default AP TX Rate — ограничение скорости со стороны AP для подключений, которых нет в Access List (бит/сек., 0 — без ограничений).
При обычной настройке — значение не заполняем.
Default Client TX Rate — ограничение скорости со стороны клиента для подключений, которых нет в Access List (бит/сек., 0 — без ограничений).
При обычной настройке — значение не заполняем.
Default Authenticate — для режимов AP данный параметр определяет, принимать ли подключения от клиентов, которых нет в Access List. Для клиентских режимов — подключаться ли к AP, которых нет в Access List. Фактически при выставленной галочке — могут подключаться все устройства, при снятой — только те, которые есть в списке разрешенных (Wireless-Access List).
Если у нас не стоит ограничение по MAC-адресам или другие спец. настройки в Access List то оставляем по-умолчанию: галочка стоит.
Default Forward — разрешать ли маршрутизацию клиентам, которых нет в Access List. Выставленная галочка означает запрет обмена данными между подключенными клиентскими устройствами. Эта настройка работает только в режиме 802.11 для ноутбуков и устройств без поддержки WDS.
Если это гостевая сеть — разумно снять галочку, если обычная домашняя и офисная — оставляем, нам же нужно, что бы клиенты wi-fi общались друг с другом.
Hide SSID — скрывать имя сети. Сеть не появляется в списке при сканировании. Чтобы подключиться, нужно вручную прописать имя на устройстве клиента.
Обычно SSID не скрывают, поэтому — галочка стоять не должна.
Multicast Helper — механизм диагностики проблем широковещательных рассылок. Имеет смысл использовать только при режимах AP, если клиенты работают в режиме station bridge. Варианты:
- disabled — отключен, мультикаст-пакеты отправляются без изменений;
- full — все MAC-адреса мультикаста изменить на юникаст и отправить в таком виде;
- default — аналогично «disabled».
При использовании IPTV в параметре Multicast Helper выберите full. Это позволит отправлять мультикаст пакеты по MAC адресам клиентам, подключенным к Wi-Fi.
Так как IPTV мы не используем, оставляем без изменений — «default».
Multicast Buffering — буферизировать широковещательные пакеты. Что-бы они доходили до адресата, когда ваше устройство (например смартфон) перешел в спящий режим и отключил WiFi для экономии энергии. Точка может дать команду клиенту что-бы он не переходил в спящий режим, когда идет широковещательная рассылка. Точной документации по этому пункту я не нашел.
Оставляем по-умолчанию — галочка стоит.
Keepalive Frames — функция, возможно тоже связанная с удержанием устройств, которые уходят в режим энергосбережения с отключением WiFi. Точной документации найти не удалось. Если вы знаете, для чего она — напишите в комментариях.
Оставляем по-умолчанию — галочка стоит.
Data Rates

Здесь задаются настройки канальных скоростей.
- Supported Rates — канальные скорости, которые поддерживаются беспроводным интерфейсом;
- Basic Rates — канальные скорости, на которые передается служебный трафик.
Один из вариантов настроек: Можно снять все галочки с B-стандарта, устройства смогут подключиться только на более скоростных стандартах G и N. В таком случаем нужно снять все галочки с «Basic Rates B» — разрешенные модуляции для служебного трафика стандарта B. «Supported Rates A/G» — проставляем все галочки, и в «Basic Rates A/G» оставляем разрешенные модуляции для служебного трафика только 6 Mbps.
Но если ваше устройство старое (старый радио-модуль не поддерживающий скоростные стандарты) — то подключится оно при такой настройке не сможет. В случае если мы выбираем для устройств режим N-only (на вкладке Wireless, поле Band) — то все галочки на этой вкладке снимаются.
В подавляющем большинстве случаев здесь нет необходимости ничего менять.
Ничего не меняем, оставляем «default».
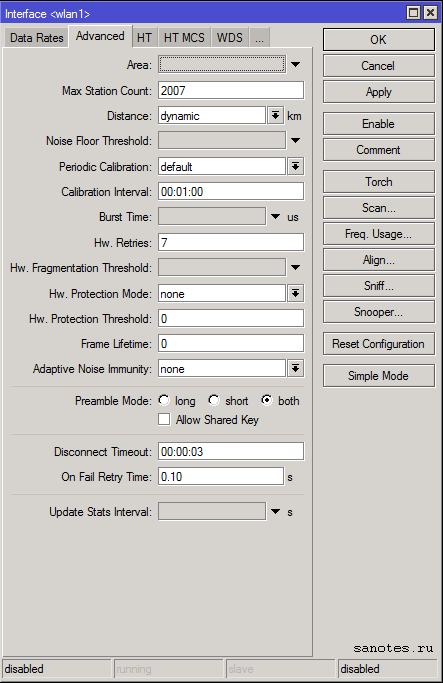
Advanced
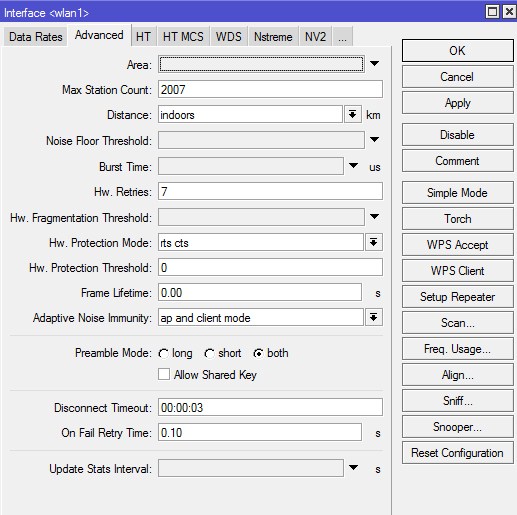
Area — позволяет создать группу и включить беспроводные устройства в нее, а затем использовать определенные правила для этой группы и всех входящих в нее устройств, вместо того, чтобы создавать отдельные правила для каждого устройства. Это значение заполняется в точке доступа, и может быть сопоставлено с правилами в connect-list.
Ничего не меняем, оставляем пустым.
Max Station Count — максимально количество подключенных клиентов, включая WDS-подключения. Актуально только для режимов AP.
Оставляем по-умолчанию — 2007.
Distance — максимальная допустимая дистанция беспроводного линка. Значения:
- dynamic — автонастройка;
- indoor — работа внутри помещения;
- расстояние в километрах. При указании этого параметра вручную рекомендуется указывать не точное расстояние между устройствами (по картам или GPS), а значение больше на 10-20% такого расстояния;
Если клиенты находятся в одном помещении и примерно на одном расстоянии, допустим все в радиусе 20 метров от точки доступа то укажите «indoors», если у вас открытая местность поле или конференц-зал и клиенты находятся на разных расстояниях более 0-20 метров то укажите значение «dynamic». Ну и третье если клиенты находятся на одном расстоянии, допустим 1км, то так и укажите. Данная опция позволяет Mikrotik по вшитому алгоритму рассчитывать доставлен ли пакет до нужного адресата.
Так как точка внутри помещения и клиенты на небольшом расстоянии — «indoor».
Noise Floor Threshhold — ручная корректировка уровня шума на канале (dB). Фактически это значение минимального SNR для беспроводного подключения. Если характеристики подключения хуже этого значения, подключение не будет установлено (или будет разорвано). Данная функция работает только на чипсетах производства Atheros, начиная с AR5212 и более новых. Чаще всего ставятся значения «-92 … -107». Можно также определить его самостоятельно: замерить уровень шума и уменьшить эту цифру на 5-10 единиц. К примеру: фактический уровень шума -107, следовательно, значение выставляем -100.
Настройка специфическая — поле оставляем пустым.
Periodic Calibration — периодическая калибровка линка. Значения default и enable включают эту опцию, если задан интервал в поле Calibration Interval. Значение disabled отключает эту функцию. Данная функция работает только на чипсетах производства Atheros.Чип WiFi во время свое работы греется, и из-за этого может частота съезжать немного, соответственно включите эту опцию. Следующее поле оставьте равным одной минуте. Будет происходить калибровка частоты каждую минуту.
Ставим «enable». Функция в версии 6.38rc38 уже выпилена.
Calibration Interval — периодичность проведения рекалибровки (dd:mm:ss). При значении 00:00:00 рекалибровка отключена.
Ставим 1 минута. Функция в версии 6.38rc38 уже выпилена.
Burst Time — время (в микросекундах) в течение которого может непрерывно производиться передача данных. Данная функция работает только на чипсетах AR5000, AR5001X, AR5001X+.
На офф. форуме рекомендуют оставить как есть — поле пустым.
Hw. Retries — количество попыток отправки пакета до того, как отправка будет признана неудачной. В случае превышения этого значения, скорость соединения с удаленным устройством будет понижена, после чего снова будут предприняты попытки передачи пакета. Если была достигнута минимальная скорость соединения, но пакет не был передан, попытки передачи приостанавливаются на время, указанное в параметре On Fail Retry Time. После этого снова будут предприняты попытки передачи пакета до тех пор, пока не истечет время, указанное в параметре Frame Lifetime, либо удаленное устройство не будет отключено по превышению параметра Disconnect Timeout.
Значения от 1 до 5 — скорость работы сети выше, однако для абонентов с плохим сигналом стабильность связи ухудшится (потеря пакетов, частый дисконнект). Значения от 5 до 10 — золотая середина. Значения от 10 до 15 — максимальная гарантия доставки данных, но в проблемной сети скорость будет замедляться. Исходя из этого, для базовой станции предпочтительно выставлять средние значения (5-7), а для канала точка-точка ставится максимум — 15.
Для офиса оставляем по-умолчанию — 7.
Hw. Fragmentation Threshold — задает максимальный размер фрагмента пакета данных, передающихся по WiFi. Большие пакеты будут разбиваться на такие фрагменты для увеличения надежности и скорости связи. Используется только для 802.11. Настройка, которая, возможно, поможет при линках на большие расстояния но мы фрагментацию не используем.
Настройка специфическая — поле оставляем пустым.
Hw. Protection Mode — режим защиты фреймов (защита от скрытого узла). Данный пункт может помочь в решении проблемы скрытого узла, если указать «rts cts». 802.11 (он же wifi) — это единая среда передачи данных (типа устройства ХАБ), а в стандарте 802.11 указанно, что клиенты сами определяют между собой, кто и когда будет производить запись, но есть один нюанс — это условие будет работать только если клиенты видят друг друга напрямую. Если же два клиента начнут писать одновременно, то мы получаем коллизию.
Как пример представим себе некое поле (То которое на рабочем столе Windows XP). На нём располагается точка доступа на рисунке красная точка, и её радиус бледно красным. А также: Клиент1 (A), Клиент2 (B), Клиент3 (С).

Клиент1 и Клиент2 могут быть нормальными участниками и работать в сети без сбоев, но, а вот из-за Клиента3 могут возникнуть проблемы у всех, дело в том, что Клиент1 и Клиент2 могут общаться напрямую и определять, кто из них будет вещать в данный промежуток времени. А вот Клиент3 не видит не одного из участников нашей сети, и может смело вещать в любой момент даже в тот, когда Клиент1 или Клиент2 будут также вещать, из-за этого и появляются коллизии.
В MikroTik значение «rts cts» означает — «точка доступа сама будет управлять, кому вещать в данный момент», что решит проблему скрытого узла. Данный параметр слегка снизит пропускную способность и увеличит нагрузку на точку доступа.
Значение выставляем в «rts cts».
Hw. Protection Threshold — пороговый размер кадра, при котором должна включится функция Hw. Protection Mode для беспроводного интерфейса. Значение 0 — функция активна для всех фреймов.
Оставляем по-умолчанию — 0.
Frame Lifetime — смотри параметр «Hw. Retries».
Оставляем по-умолчанию — «0.00».
Adaptive Noise Immunity — режим адаптивной подстройки некоторых параметров приемника для минимизации интерференции и влияния шумов на качество сигнала. Работает только на чипах Atheros AR5212 и более новых. Этот параметр позволяет чипу 802.11 отфильтровывать шумы, например — отражённый сигнал самой точки доступа от соседнего здания.
Ставим значение “ap and client mode”.
Preamble Mode — настройка использование преамбулы. Варианты:
- long — только длинная преамбула;
- short — только короткая;
- both — оба варианта.
Выбираем both — включение короткой и длинной преамбулы пакетов, если поставить — short возможно не все устройства смогут подключиться к сети.
Оставляем значение «both».
Allow Shared Key — разрешает подключение клиентов с открытым ключем WEP. Для безопасности эта галочка снята.
Оставляем снятую галочку.
Disconnect Timeout — временной промежуток, через который клиент, не отвечающий на запросы, будет отключен. Смотри параметр «Hw. Retries».
Оставляем значение «00:00:03».
On Fail Retry Time — время ожидания устройства перед повторной пересылкой данных. Смотри параметр «Hw. Retries».
Оставляем значение «0.10».
Update Stats Interval — интервал времени, через который будут обновляться статистические данные беспроводных клиентов (скорость соединения, CCQ и т.п.).
Ничего не меняем, оставляем пустым.
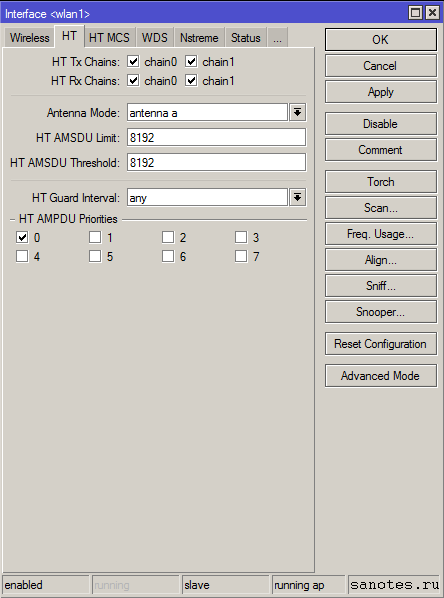
HT

Tx Chain и Rx Chain — В устройствах MikroTik обычно две встроенные антенны, данный параметр говорит через какие антенны принимать и передавать. По умолчанию включен только нулевой канал, поэтому при использовании MIMO не достигаются высокие скорости, а дальность работы существенно меньше. В случае если у вашего устройства радиомодуль, например MIMO R2T2, состоящий из двух приемопередатчиков, которые подключены к разным антеннам (или к одной антенне с двумя различными поляризациями), то эти настройки позволяют, например, осуществлять передачу через одну антенну, а получить данных через другую (или через различные поляризации одной антенны).
Отмечаем 4 галочки.
Antena Mode — режим есть тогда, когда есть возможность подключить к роутеру внешнюю антенну. Он указывает разные режимы работы антенны. Варианты:
- antenna a — работают встроенные антенны устройства;
- antenna b — работают внешняя и внутренние антенны параллельно, при условии отмеченных 4 галочек в Tx Chain и Rx Chain. Что-бы работала только внешняя антенна — снять галочки с канала chain0.
- tx-a/rx-b — одна антенна работает на приём, вторая на отдачу;
- rx-a/tx-b — аналогично, только наоборот.
Оставляем по-умолчанию — «antenna a».
AMSDU Limit — максимальный размер агрегированного пакета AMSDU (Aggregated Mac Service Data Unit).
Оставляем по-умолчанию — «8192».
AMSDU Threshold — максимальный размер фрейма, который может быть включен в пакет AMSDU. Агрегация может значительно увеличить пропускную способность линка, особенно при большом количестве мелких пакетов, но в то же время увеличить время задержки, в случае потери пакетов из-за повторной передачи агрегированного пакета. Включение AMSDU также увеличивает нагрузку на процессор.
Оставляем по-умолчанию — «8192».
Guard Interval — защитный интервал. Всегда выставляем «long», если используется стандарт N для наружных линков.
Так как точка внутри помещения — оставляем по-умолчанию — «any».
AMPDU Priorities — приоритеты пакетов, которые будут посланы с использованием механизма AMPDU (Aggregated Mac Protocol Data Unit). Рекомендуется использовать только для пакетов с высоким приоритетом, так как отправка большого количества пакетов через AMPDU приводит к увеличению времени задержки и повышению нагрузки.
Классы приоритета передачи в беспроводном интерфейсе, который можно пометить: Best Effort (0), Background (1), Spare (2), Excellent (3), Control Lead (4), Video
Оставляем по-умолчанию — включена только 1 галочка.
HT MCS
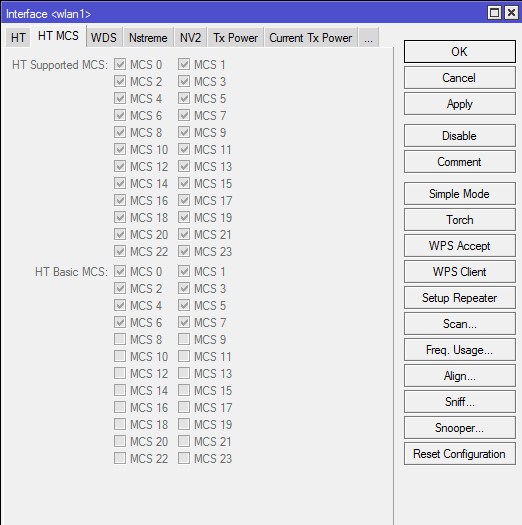
На вкладке HT MCS, так же как и на DATA RATES производится управление канальными скоростями. Тут происходит управление беспроводной сетью в режиме N и MIMO, каждая галочка позволяет работать на каждом типе модуляции/скорости и изменения этих параметров производить не следует. Обычно используется для тонкой настройки сети при определенных условиях, но это практически не требуется при использовании внутри помещений. Для настройки обычной точки доступа на этой вкладке не нужно производить никакие изменения.
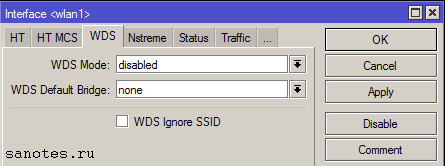
WDS
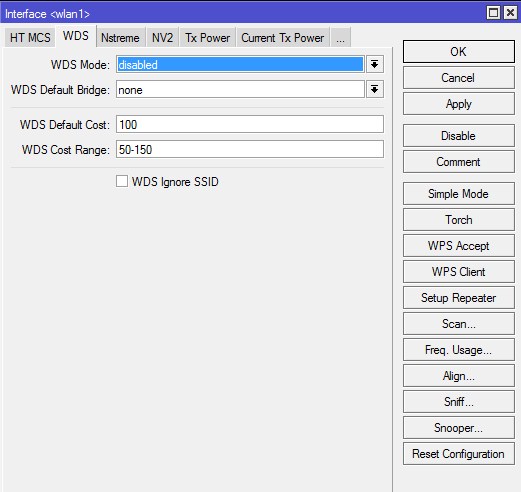
WDS Mode — тип WDS-моста. Значения:
- disabled — режим WDS выключен;
- dynamic — автоматическое добавление WDS-интерфейсов при подключении клиентов;
- dynamic mesh — позволяет клиенту перемещаться между wi-fi точками без обрыва связи;
- static — означает что для соединения в режиме WDS на обоих точках необходимо прописывать MAC адреса удалённых точек;
- static mesh — по аналогии с dynamic mesh, позволяет клиенту перемещаться между wi-fi точками без обрыва связи, на которых заранее были прописаны mac-адреса.
Рекомендуется выставлять режим Dynamic, тогда новые клиенты в бридж будут добавляться автоматически. В случае предпочтения ручного добавления выбираем Static.
В обычной точке доступа мы WDS не используем, а значит оставляем по-умолчанию -«disabled».
WDS Default Bridge — дефолтно клиенты будут добавляться в указанный в этом поле бридж. Поэтому указываем здесь его наименование, например «bridge1».
Оставляем по-умолчанию — «none».
WDS Default Cost — стоимость (или метрика) WDS-интерфейса который будет помещен в бридж.
Оставляем по-умолчанию — «100».
WDS Cost Range — метрика WDS-интерфейса может автоматически корректироваться в зависимости от пропускной способности канала. Проверка происходит каждые 5 секунд и если пропускная способность изменилась более чем на 10% — параметр cost корректируется. Если установить 0 — механизм будет отключен.
Оставляем по-умолчанию — «50-150».
WDS Ignore SSID — по умолчанию WDS связь между двумя точками может быть создана только тогда , когда они работают на одной и той же частоте и имеют одинаковое значение SSID. Если поставить галочку — идентификатор SSID не будет проверяться. Это свойство не оказывает никакого влияния на клиентов в WDS режиме.
Оставляем по-умолчанию — галочка снята.
Nstreme
На этой вкладке задаются настройки поллингового (polling — «опрос готовности устройств») протокола. Nstreme — фирменный Mikrotik-протокол. Поллинговый протокол в основном используется для передачи данных в беспроводных сетях на большие расстояния. Для этого используется механизм циклического опроса клиентов сети друг за другом, чтобы узнать есть ли у них данные для передачи по радиоканалу. Если такие данные есть то устройству предоставляется разрешение на их передачу. Все другие устройства в это время молчат. Если при опросе у клиента нет данных для передачи то происходит опрос следующего клиента и так далее по очереди.Поллинговые протоколы позволяют улучшить качество и скорость работы беспроводной сети, но все клиенты должны поддерживать их. Такими клиентами могут быть только устройства фирмы Mikrotik. Ноутбуки, коммуникаторы и смартфоны такими клиентами не являются, поэтому поллинговые протоколы следует отключить.
Enable Nstreme — включает фирменный поллинговый протокол Mikrotik.
Оставляем по-умолчанию — галочка снята.
Enable Polling — включает динамический опрос подключенных клиентов.
Снимает галочку.
Disable CSMA — отключает режим контроля несущей и обнаружения коллизий.
Оставляем по-умолчанию — галочка снята.
Framer Policy — выбирает режим упаковки маленьких пакетов в большие. Оптимальное значение — Dynamic Size.
Механизм не используем — «none».
Framer Limit — размер пакета, оптимальное значение 3200.
Оставляем по-умолчанию — «3200».
Если вы используете этот протокол то: nstream – делает прокачку на линке немного больше + выключает ACK, polling – делает порядок в сети (хотя для режима точка-точка с него толку мало), и CSMA – выключает стандартный для 802.11.abg доступ к среде передачи, включается только после того как вы включили опцию Polling. Ещё для увеличения прокачки линка можно проиграться с параметрами Frame Policy.
NV2

На вкладке NV2 производится управление поллинговым протоколом Nstreme Version 2.
TDMA Period Size — задает время передачи, чем меньше значение — тем меньше задержка, и меньше максимальная скорость, чем больше значение – тем больше скорость, однако, возрастает и задержка. Обычно используют значения 1-5.
Так как для обычной точки это протокол не используем, оставляем по-умолчанию — 2.
Cell Radius — максимальная дальность работы клиента, 10 километров — минимальное значение.
Оставляем по-умолчанию — 30.
Security — включение шифрования на канале. При использовании NV2 применяется свое отдельное шифрование.
Оставляем по-умолчанию — галочка снята.
Preshared Key — ключ беспроводной сети.
Поле не заполняем.
Queue Count — определяет, сколько очередей приоритетов используются в сети NV2. Подробнее…
Оставляем по-умолчанию — «2».
QoS — Устанавливает механизм приоритета пакета данных. Подробнее… Значения:
- frame-priority — ручная установка, совместно с Mangle-правилами.
- default — установка по умолчанию, где небольшие пакеты получают приоритет.
Оставляем по-умолчанию — «default».
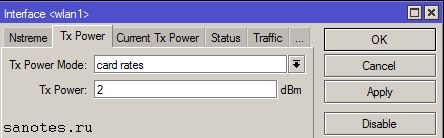
TX Power

Большинство MikroTik используют 1W передатчики. По законодательству России и Украины разрешено использовать точки доступа без регистрации не более 0.1W.
Усиление в 17 dBm — примерно 0.1W. Увеличение на три пункта, увеличивает мощность передатчика вдвое. И того:
- 18 dBm ~ 0.12W
- 21 dBm ~ 0.25W
- 24 dBm ~ 0.5W
- 27 dBm ~ 1W — по умолчанию обязательно убрать.
Не нужно боятся указывать низкую мощность, т.к. на практике это обычно увеличивает скорости работы и снижает помеховое воздействие на соседние устройства. Не забывайте, что мощность передатчиков мобильных устройств обычно лежит в пределах 6-16дБм, поэтому установив мощность на точке доступа максимально высокую получится ситуация, когда клиенты видят сеть в списке, но подключиться не могут, т.к. точка не слышит от них слабых сигналов.
Значения:
- default — режим по умолчанию — мощность выбирается из специальной таблицы в памяти роутера MikroTik. Обычно — максимальная мощность.
- card rates — мощность подбирается по специальному алгоритму, который использует значение мощности, установленное пользователем. Режим не доступен на многих устройствах.
- manual — для каждой скорости можно вручную указать мощность передачи;
- all rates fixed — для всех скоростей используется один уровень мощности, установленный пользователем. Говорят, что этот режим не рекомендуется использовать, поскольку на высоких скоростях могут возникать ошибки передачи данных, перегреваться и выходить из строя чипы роутера. В то-же время на многих роутерах — это единственный режим ограничения мощности. Поэтому вполне возможно эта проблема уже решена. Лично я всегда ставлю это режим — проблем нет.
Желательно установить значение равным 15 и если не будет хватать — то поднять не более 17-19.
Current Tx Power
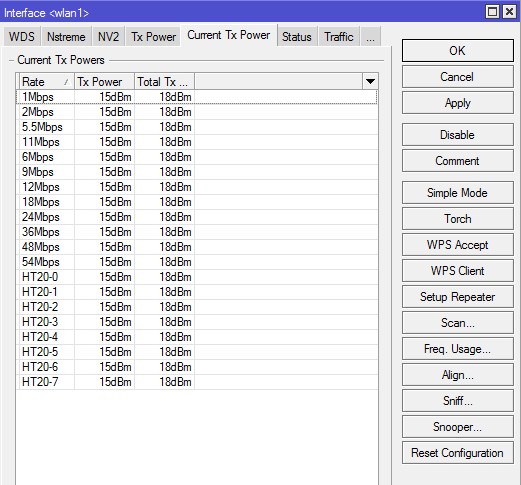
Здесь отображаются текущие настройки мощности Wi-Fi передатчика произведенные на вкладке Tx Power. В первом столбике Rate указаны канальные скорости, в столбике Tx Power мощность указанная в настройках, столбик Real Tx Power показывает реальную выходную мощность по каждому каналу, а Total Tx Power суммарную по всем каналам. При использовании MIMO происходит увеличение энергетики на 3dBm.
Status

- Last Link Down Time — время последнего дисконнекта интерфейса.
- Last Link Up Time — время последнего включения интерфейса.
- Link Downs — количество выключений интерфейса.
- Channel — частота, на которой работает базовая станция.
- Registered Client — количество зарегистрированных клиентов (устройств).
- Authenticated Clients — количество (устройств) прошедших аутентификацию.
- Overall Tx CCQ – усреднённый CCQ (качество канала на передачу/прием) только на передачу Tx. На базовой станции он показывает усреднённые значения по качеству передачи на всех подключившихся wi-fi клиентах.
- Distance — расстояние до противоположной точки.
- Noise Floor — шум на этой частоте со стороны клиента. Нормальным значением шума считается -95 и более. Если значение шума -90, то связь будет нестабильной. В этом случае нужно перейти на более свободную от помех частоту или уменьшить ширину канала.
На этом все. Продолжение следует…
Продолжение: Wi-Fi в Mikrotik: Защита Wi-Fi
Используемый материал
Overview
Standards:
Package: wireless
RouterOS wireless comply with IEEE 802.11 standards, it provides complete support for 802.11a, 802.11b, 802.11g, 802.11n and 802.11ac as long as additional features like WPA, WEP, AES encryption, Wireless Distribution System (WDS), Dynamic Frequency selection (DFS), Virtual Access Point, Nstreme and NV2 proprietary protocols and many more. Wireless features compatibility table for different wireless protocols.
Wireless can operate in several modes: client (station), access point, wireless bridge etc. Client/station also can operate in different modes, a complete list of supported modes can be found here.
General interface properties
Sub-menu: /interface wireless
| Property | Description |
|---|---|
| adaptive-noise-immunity (ap-and-client-mode | client-mode | none; Default: none) | This property is only effective for cards based on Atheros chipset. |
| allow-sharedkey (yes | no; Default: no) | Allow WEP Shared Key clients to connect. Note that no authentication is done for these clients (WEP Shared keys are not compared to anything) — they are just accepted at once (if access list allows that) |
| ampdu-priorities (list of integer [0..7]; Default: 0) | Frame priorities for which AMPDU sending (aggregating frames and sending using block acknowledgment) should get negotiated and used. Using AMPDUs will increase throughput, but may increase latency, therefore, may not be desirable for real-time traffic (voice, video). Due to this, by default AMPDUs are enabled only for best-effort traffic. |
| amsdu-limit (integer [0..8192]; Default: 8192) | Max AMSDU that device is allowed to prepare when negotiated. AMSDU aggregation may significantly increase throughput especially for small frames, but may increase latency in case of packet loss due to retransmission of aggregated frame. Sending and receiving AMSDUs will also increase CPU usage. |
| amsdu-threshold (integer [0..8192]; Default: 8192) | Max frame size to allow including in AMSDU. |
| antenna-gain (integer [0..4294967295]; Default: 0) | Antenna gain in dBi, used to calculate maximum transmit power according to country regulations. |
| antenna-mode (ant-a | ant-b | rxa-txb | txa-rxb; Default: ) | Select antenna to use for transmitting and for receiving
|
| area (string; Default: ) | Identifies group of wireless networks. This value is announced by AP, and can be matched in connect-list by area-prefix. This is a proprietary extension. |
| arp (disabled | enabled | proxy-arp | reply-only; Default: enabled) | Read more >> |
| arp-timeout (auto | integer; Default: auto) | ARP timeout is time how long ARP record is kept in ARP table after no packets are received from IP. Value auto equals to the value of arp-timeout in /ip settings, default is 30s |
| band (2ghz-b | 2ghz-b/g | 2ghz-b/g/n | 2ghz-onlyg | 2ghz-onlyn | 5ghz-a | 5ghz-a/n | 5ghz-onlyn | 5ghz-a/n/ac | 5ghz-onlyac | 5ghz-n/ac; Default: ) | Defines set of used data rates, channel frequencies and widths. |
| basic-rates-a/g (12Mbps | 18Mbps | 24Mbps | 36Mbps | 48Mbps | 54Mbps | 6Mbps | 9Mbps; Default: 6Mbps) | Similar to the basic-rates-b property, but used for 5ghz, 5ghz-10mhz, 5ghz-5mhz, 5ghz-turbo, 2.4ghz-b/g, 2.4ghz-onlyg, 2ghz-10mhz, 2ghz-5mhz and 2.4ghz-g-turbo bands. |
| basic-rates-b (11Mbps | 1Mbps | 2Mbps | 5.5Mbps; Default: 1Mbps) | List of basic rates, used for 2.4ghz-b, 2.4ghz-b/g and 2.4ghz-onlyg bands.
Client will connect to AP only if it supports all basic rates announced by the AP. This property has effect only in AP modes, and when value of rate-set is configured. |
| bridge-mode (disabled | enabled; Default: enabled) | Allows to use station-bridge mode. Read more >> |
| burst-time (integer | disabled; Default: disabled) | Time in microseconds which will be used to send data without stopping. Note that no other wireless cards in that network will be able to transmit data during burst-time microseconds. This setting is available only for AR5000, AR5001X, and AR5001X+ chipset based cards. |
| channel-width (20/40/80/160mhz-Ceeeeeee | 20/40/80/160mhz-XXXXXXXX | 20/40/80/160mhz-eCeeeeee | 20/40/80/160mhz-eeCeeeee | 20/40/80/160mhz-eeeCeeee | 20/40/80/160mhz-eeeeCeee | 20/40/80/160mhz-eeeeeCee | 20/40/80/160mhz-eeeeeeCe | 20/40/80/160mhz-eeeeeeeC | 20/40/80mhz-Ceee | 20/40/80mhz-eCee | 20/40/80mhz-eeCe | 20/40/80mhz-eeeC | 20/40/80mhz-XXXX | 20/40mhz-Ce | 20/40mhz-eC | 20/40mhz-XX | 40mhz-turbo | 20mhz | 10mhz | 5mhz; Default: 20mhz) | Use of extension channels (e.g. Ce, eC etc) allows additional 20MHz extension channels and if it should be located below or above the control (main) channel. Extension channel allows 802.11n devices to use up to 40MHz (802.11ac up to 160MHz) of spectrum in total thus increasing max throughput. Channel widths with XX and XXXX extensions automatically scan for a less crowded control channel frequency based on the number of concurrent devices running in every frequency and chooses the “C” — Control channel frequency automatically. |
| comment (string; Default: ) | Short description of the interface |
| compression (yes | no; Default: no) | Setting this property to yes will allow the use of the hardware compression. Wireless interface must have support for hardware compression. Connections with devices that do not use compression will still work. |
| country (name of the country | no_country_set; Default: etsi) | Limits available bands, frequencies and maximum transmit power for each frequency. Also specifies default value of scan-list. Value no_country_set is an FCC compliant set of channels. |
| default-ap-tx-limit (integer [0..4294967295]; Default: 0) | This is the value of ap-tx-limit for clients that do not match any entry in the access-list. 0 means no limit. |
| default-authentication (yes | no; Default: yes) | For AP mode, this is the value of authentication for clients that do not match any entry in the access-list. For station mode, this is the value of connect for APs that do not match any entry in the connect-list |
| default-client-tx-limit (integer [0..4294967295]; Default: 0) | This is the value of client-tx-limit for clients that do not match any entry in the access-list. 0 means no limit |
| default-forwarding (yes | no; Default: yes) | This is the value of forwarding for clients that do not match any entry in the access-list |
| disable-running-check (yes | no; Default: no) | When set to yes interface will always have running flag. If value is set to no’, the router determines whether the card is up and running — for AP one or more clients have to be registered to it, for station, it should be connected to an AP. |
| disabled (yes | no; Default: yes) | Whether interface is disabled |
| disconnect-timeout (time [0s..15s]; Default: 3s) | This interval is measured from third sending failure on the lowest data rate. At this point 3 * (hw-retries + 1) frame transmits on the lowest data rate had failed. During disconnect-timeout packet transmission will be retried with on-fail-retry-time interval. If no frame can be transmitted successfully during disconnect-timeout, the connection is closed, and this event is logged as «extensive data loss». Successful frame transmission resets this timer. |
| distance (integer | dynamic | indoors; Default: dynamic) | How long to wait for confirmation of unicast frames (ACKs) before considering transmission unsuccessful, or in short ACK-Timeout. Distance value has these behaviors:
Acknowledgments are not used in Nstreme/NV2 protocols. |
| frame-lifetime (integer [0..4294967295]; Default: 0) | Discard frames that have been queued for sending longer than frame-lifetime. By default, when value of this property is 0, frames are discarded only after connection is closed. |
| frequency (integer [0..4294967295]; Default: ) | Channel frequency value in MHz on which AP will operate.
Allowed values depend on the selected band, and are restricted by country setting and wireless card capabilities. Note: If using mode «superchannel», any frequency supported by the card will be accepted, but on the RouterOS client, any non-standard frequency must be configured in the scan-list, otherwise it will not be scanning in non-standard range. In Winbox, scanlist frequencies are in bold, any other frequency means the clients will need scan-list configured. |
| frequency-mode (manual-txpower | regulatory-domain | superchannel; Default: regulatory_domain) | Three frequency modes are available:
List of available channels for each band can be seen in /interface wireless info allowed-channels. This mode allows you to test wireless channels outside the default scan-list and/or regulatory domain. This mode should only be used in controlled environments, or if you have special permission to use it in your region. Before v4.3 this was called Custom Frequency Upgrade, or Superchannel. Since RouterOS v4.3 this mode is available without special key upgrades to all installations. |
| frequency-offset (integer [-2147483648..2147483647]; Default: 0) | Allows to specify offset if the used wireless card operates at a different frequency than is shown in RouterOS, in case a frequency converter is used in the card. So if your card works at 4000MHz but RouterOS shows 5000MHz, set offset to 1000MHz and it will be displayed correctly. The value is in MHz and can be positive or negative. |
| guard-interval (any | long; Default: any) | Whether to allow use of short guard interval (refer to 802.11n MCS specification to see how this may affect throughput). «any» will use either short or long, depending on data rate, «long» will use long. |
| hide-ssid (yes | no; Default: no) |
This property has an effect only in AP mode. Setting it to yes can remove this network from the list of wireless networks that are shown by some client software. Changing this setting does not improve the security of the wireless network, because SSID is included in other frames sent by the AP. |
| ht-basic-mcs (list of (mcs-0 | mcs-1 | mcs-2 | mcs-3 | mcs-4 | mcs-5 | mcs-6 | mcs-7 | mcs-8 | mcs-9 | mcs-10 | mcs-11 | mcs-12 | mcs-13 | mcs-14 | mcs-15 | mcs-16 | mcs-17 | mcs-18 | mcs-19 | mcs-20 | mcs-21 | mcs-22 | mcs-23); Default: mcs-0; mcs-1; mcs-2; mcs-3; mcs-4; mcs-5; mcs-6; mcs-7) | Modulation and Coding Schemes that every connecting client must support. Refer to 802.11n for MCS specification. |
| ht-supported-mcs (list of (mcs-0 | mcs-1 | mcs-2 | mcs-3 | mcs-4 | mcs-5 | mcs-6 | mcs-7 | mcs-8 | mcs-9 | mcs-10 | mcs-11 | mcs-12 | mcs-13 | mcs-14 | mcs-15 | mcs-16 | mcs-17 | mcs-18 | mcs-19 | mcs-20 | mcs-21 | mcs-22 | mcs-23); Default: mcs-0; mcs-1; mcs-2; mcs-3; mcs-4; mcs-5; mcs-6; mcs-7; mcs-8; mcs-9; mcs-10; mcs-11; mcs-12; mcs-13; mcs-14; mcs-15; mcs-16; mcs-17; mcs-18; mcs-19; mcs-20; mcs-21; mcs-22; mcs-23) | Modulation and Coding Schemes that this device advertises as supported. Refer to 802.11n for MCS specification. |
| hw-fragmentation-threshold (integer[256..3000] | disabled; Default: 0) | Specifies maximum fragment size in bytes when transmitted over the wireless medium. 802.11 standard packet (MSDU in 802.11 terminologies) fragmentation allows packets to be fragmented before transmitting over a wireless medium to increase the probability of successful transmission (only fragments that did not transmit correctly are retransmitted). Note that transmission of a fragmented packet is less efficient than transmitting unfragmented packet because of protocol overhead and increased resource usage at both — transmitting and receiving party. |
| hw-protection-mode (cts-to-self | none | rts-cts; Default: none) | Frame protection support property read more >> |
| hw-protection-threshold (integer [0..65535]; Default: 0) | Frame protection support property read more >> |
| hw-retries (integer [0..15]; Default: 7) | Number of times sending frame is retried without considering it a transmission failure. Data-rate is decreased upon failure and the frame is sent again. Three sequential failures on the lowest supported rate suspend transmission to this destination for the duration of on-fail-retry-time. After that, the frame is sent again. The frame is being retransmitted until transmission success, or until the client is disconnected after disconnect-timeout. The frame can be discarded during this time if frame-lifetime is exceeded. |
| installation (any | indoor | outdoor; Default: any) | Adjusts scan-list to use indoor, outdoor or all frequencies for the country that is set. |
| interworking-profile (enabled | disabled; Default: disabled) | |
| keepalive-frames (enabled | disabled; Default: enabled) | Applies only if wireless interface is in mode=ap-bridge. If a client has not communicated for around 20 seconds, AP sends a «keepalive-frame». Note, disabling the feature can lead to «ghost» clients in registration-table. |
| l2mtu (integer [0..65536]; Default: 1600) | |
| mac-address (MAC; Default: ) | |
| master-interface (string; Default: ) | Name of wireless interface that has virtual-ap capability. Virtual AP interface will only work if master interface is in ap-bridge, bridge, station or wds-slave mode. This property is only for virtual AP interfaces. |
| max-station-count (integer [1..2007]; Default: 2007) | Maximum number of associated clients. WDS links also count toward this limit. |
| mode (station | station-wds | ap-bridge | bridge | alignment-only | nstreme-dual-slave | wds-slave | station-pseudobridge | station-pseudobridge-clone | station-bridge; Default: station) | Selection between different station and access point (AP) modes.
Station modes:
AP modes:
Special modes:
|
| mtu (integer [0..65536]; Default: 1500) | |
| multicast-buffering (disabled | enabled; Default: enabled) | For a client that has power saving, buffer multicast packets until next beacon time. A client should wake up to receive a beacon, by receiving beacon it sees that there are multicast packets pending, and it should wait for multicast packets to be sent. |
| multicast-helper (default | disabled | full; Default: default) | When set to full, multicast packets will be sent with a unicast destination MAC address, resolving multicast problem on the wireless link. This option should be enabled only on the access point, clients should be configured in station-bridge mode. Available starting from v5.15.
|
| name (string; Default: ) | name of the interface |
| noise-floor-threshold (default | integer [-128..127]; Default: default) | For advanced use only, as it can badly affect the performance of the interface. It is possible to manually set noise floor threshold value. By default, it is dynamically calculated. This property also affects received signal strength. This property is only effective on non-AC chips. |
| nv2-cell-radius (integer [10..200]; Default: 30) | Setting affects the size of contention time slot that AP allocates for clients to initiate connection and also size of time slots used for estimating distance to client. When setting is too small, clients that are farther away may have trouble connecting and/or disconnect with «ranging timeout» error. Although during normal operation the effect of this setting should be negligible, in order to maintain maximum performance, it is advised to not increase this setting if not necessary, so AP is not reserving time that is actually never used, but instead allocates it for actual data transfer.
|
| nv2-noise-floor-offset (default | integer [0..20]; Default: default) | |
| nv2-preshared-key (string; Default: ) | |
| nv2-qos (default | frame-priority; Default: default) | Sets the packet priority mechanism, firstly data from high priority queue is sent, then lower queue priority data until 0 queue priority is reached. When link is full with high priority queue data, lower priority data is not sent. Use it very carefully, setting works on AP
|
| nv2-queue-count (integer [2..8]; Default: 2) | |
| nv2-security (disabled | enabled; Default: disabled) | |
| on-fail-retry-time (time [100ms..1s]; Default: 100ms) | After third sending failure on the lowest data rate, wait for specified time interval before retrying. |
| periodic-calibration (default | disabled | enabled; Default: default) | Setting default enables periodic calibration if info default-periodic-calibration property is enabled. Value of that property depends on the type of wireless card. This property is only effective for cards based on Atheros chipset. |
| periodic-calibration-interval (integer [1..10000]; Default: 60) | This property is only effective for cards based on Atheros chipset. |
| preamble-mode (both | long | short; Default: both) | Short preamble mode is an option of 802.11b standard that reduces per-frame overhead.
|
| prism-cardtype (100mW | 200mW | 30mW; Default: ) | Specify type of the installed Prism wireless card. |
| proprietary-extensions (post-2.9.25 | pre-2.9.25; Default: post-2.9.25) | RouterOS includes proprietary information in an information element of management frames. This parameter controls how this information is included.
|
| radio-name (string; Default: MAC address of an interface) | Descriptive name of the device, that is shown in registration table entries on the remote devices. This is a proprietary extension. |
| rate-selection (advanced | legacy; Default: advanced) | Starting from v5.9 default value is advanced since legacy mode was inefficient. |
| rate-set (configured | default; Default: default) | Two options are available:
|
| rx-chains (list of integer [0..3]; Default: 0) | Which antennas to use for receive. In current MikroTik routers, both RX and TX chain must be enabled, for the chain to be enabled. |
|
scan-list (Comma separated list of frequencies and frequency ranges | default.Since v6.35 (wireless-rep) type also support range:step option; Default: default) |
The default value is all channels from selected band that are supported by card and allowed by the country and frequency-mode settings (this list can be seen in info). For default scan list in 5ghz band channels are taken with 20MHz step, in 5ghz-turbo band — with 40MHz step, for all other bands — with 5MHz step. If scan-list is specified manually, then all matching channels are taken. (Example: scan-list=default,5200-5245,2412-2427 — This will use the default value of scan list for current band, and add to it supported frequencies from 5200-5245 or 2412-2427 range.)
Since RouterOS v6.0 with Winbox or Webfig, for inputting of multiple frequencies, add each frequency or range of frequencies into separate multiple scan-lists. Using a comma to separate frequencies is no longer supported in Winbox/Webfig since v6.0. To specify specific channels or channel lists, defined under «/interface wireless channels», use scan-list=«channel1,channel2» in quotation marks. |
| security-profile (string; Default: default) | Name of profile from security-profiles |
| secondary-channel (integer; Default: «») | Specifies secondary channel, required to enable 80+80MHz transmission. To disable 80+80MHz functionality, set secondary-channel to «» or unset the value via CLI/GUI. |
| ssid (string (0..32 chars); Default: value of system/identity) | SSID (service set identifier) is a name that identifies wireless network. |
| skip-dfs-channels (string | 10min-cac | all | disabled; Default: disabled) | These values are used to skip all DFS channels or specifically skip DFS CAC channels in range 5600-5650MHz which detection could go up to 10min. |
| station-bridge-clone-mac (MAC; Default: ) | This property has effect only in the station-pseudobridge-clone mode.
Use this MAC address when connection to AP. If this value is 00:00:00:00:00:00, station will initially use MAC address of the wireless interface. As soon as packet with MAC address of another device needs to be transmitted, station will reconnect to AP using that address. |
| station-roaming (disabled | enabled; Default: disabled) | Station Roaming feature is available only for 802.11 wireless protocol and only for station modes. Read more >> |
| supported-rates-a/g (list of rates [12Mbps | 18Mbps | 24Mbps | 36Mbps | 48Mbps | 54Mbps | 6Mbps | 9Mbps]; Default: 6Mbps; 9Mbps; 12Mbps; 18Mbps; 24Mbps; 36Mbps; 48Mbps; 54Mbps) | List of supported rates, used for all bands except 2ghz-b. |
| supported-rates-b (list of rates [11Mbps | 1Mbps | 2Mbps | 5.5Mbps]; Default: 1Mbps; 2Mbps; 5.5Mbps; 11Mbps) | List of supported rates, used for 2ghz-b, 2ghz-b/g and 2ghz-b/g/n bands. Two devices will communicate only using rates that are supported by both devices. This property has effect only when value of rate-set is configured. |
| tdma-period-size (integer [1..10]; Default: 2) | Specifies TDMA period in milliseconds. It could help on the longer distance links, it could slightly increase bandwidth, while latency is increased too. |
| tx-chains (list of integer [0..3]; Default: 0) | Which antennas to use for transmitting. In current MikroTik routers, both RX and TX chain must be enabled, for the chain to be enabled. |
| tx-power (integer [-30..40]; Default: ) | For 802.11ac wireless interface it’s total power but for 802.11a/b/g/n it’s power per chain. |
| tx-power-mode (default, card-rates, all-rates-fixed, manual-table; Default: default) | sets up tx-power mode for wireless card
|
| update-stats-interval (; Default: ) | How often to request update of signals strength and ccq values from clients.
Access to registration-table also triggers update of these values. This is proprietary extension. |
| vht-basic-mcs (none | MCS 0-7 | MCS 0-8 | MCS 0-9; Default: MCS 0-7) | Modulation and Coding Schemes that every connecting client must support. Refer to 802.11ac for MCS specification.
You can set MCS interval for each of Spatial Stream
|
| vht-supported-mcs (none | MCS 0-7 | MCS 0-8 | MCS 0-9; Default: MCS 0-9) | Modulation and Coding Schemes that this device advertises as supported. Refer to 802.11ac for MCS specification.
You can set MCS interval for each of Spatial Stream
|
| wds-cost-range (start [-end] integer[0..4294967295]; Default: 50-150) | Bridge port cost of WDS links are automatically adjusted, depending on measured link throughput. Port cost is recalculated and adjusted every 5 seconds if it has changed by more than 10%, or if more than 20 seconds have passed since the last adjustment.
Setting this property to 0 disables automatic cost adjustment. Automatic adjustment does not work for WDS links that are manually configured as a bridge port. |
| wds-default-bridge (string | none; Default: none) | When WDS link is established and status of the wds interface becomes running, it will be added as a bridge port to the bridge interface specified by this property. When WDS link is lost, wds interface is removed from the bridge. If wds interface is already included in a bridge setup when WDS link becomes active, it will not be added to bridge specified by , and will (needs editing) |
| wds-default-cost (integer [0..4294967295]; Default: 100) | Initial bridge port cost of the WDS links. |
| wds-ignore-ssid (yes | no; Default: no) | By default, WDS link between two APs can be created only when they work on the same frequency and have the same SSID value. If this property is set to yes, then SSID of the remote AP will not be checked. This property has no effect on connections from clients in station-wds mode. It also does not work if wds-mode is static-mesh or dynamic-mesh. |
| wds-mode (disabled | dynamic | dynamic-mesh | static | static-mesh; Default: disabled) | Controls how WDS links with other devices (APs and clients in station-wds mode) are established.
|
| wireless-protocol (802.11 | any | nstreme | nv2 | nv2-nstreme | nv2-nstreme-802.11 | unspecified; Default: any) | Specifies protocol used on wireless interface;
Warning! Nv2 doesn’t have support for Virtual AP |
| wmm-support (disabled | enabled | required; Default: disabled) | Specifies whether to enable. Only applies to bands B and G. Other bands will have it enabled regardless of this setting WMM. |
| wps-mode (disabled | push-button | push-button-virtual-only; Default: depending on the device model) | Read more >> |
Transmit Power representation on 802.11n and 802.11ac
802.11n wireless chipsets represent power per chain and the 802.11ac wireless chipsets represent the total power, for reference see the table below:
| Wireless chipset | Enabled Chains | Power per Chain | Total Power |
|---|---|---|---|
| 802.11n | 1 | Equal to the selected Tx Power | Equal to the selected Tx Power |
| 802.11n | 2 | Equal to the selected Tx Power | +3dBm |
| 802.11n | 3 | Equal to the selected Tx Power | +5dBm |
| 802.11ac | 1 | Equal to the selected Tx Power | Equal to the selected Tx Power |
| 802.11ac | 2 | -3dBm | Equal to the selected Tx Power |
| 802.11ac | 3 | -5dBm | Equal to the selected Tx Power |
| 802.11ac | 4 | -6dBm | Equal to the selected Tx Power |
Basic and MCS Rate table
| band | basic rates | basic-HT-mcs | basic-VHT-mcs | VHT-mcs | HT-mcs | supported rates |
|---|---|---|---|---|---|---|
| 2.4ghz-b | 1 | — | — | — | — | 1-11 |
| 2.4ghz-onlyg | 6 | — | — | — | — | 1-11,6-54 |
| 2.4ghz-onlyn | 6 | 0-7 | — | — | 0-23 | 1-11,6-54 |
| 2.4ghz-b/g | 1-11 | — | — | — | — | 1-11,6-54 |
| 2.4ghz-b/g/n | 1-11 | none | — | — | 0-23 | 1-11,6-54 |
| 2.4ghz-g/n | 6 | none | — | — | 0-23 | 6-54 |
| 2.4ghz-g-turbo | 6 | — | — | — | — | 6-54 |
| 5ghz-a | 6 | — | — | — | — | 6-54 |
| 5ghz-a/n | 6 | none | — | — | 0-23 | 6-54 |
| 5ghz-onlyn | 6 | 0-7 | — | — | 0-23 | 6-54 |
| 5ghz-a/n/ac | 6 | none | none | 0-9 | 0-23 | 6-54 |
| 5ghz-onlyac | 6 | none | 0-7 | 0-9 | 0-23 | 6-54 |
Used settings when rate-set=configured
| band | used settings |
|---|---|
| 2.4ghz-b | basic-b, supported-b |
| 2.4ghz-b/g, 2.4ghz-onlyg | basic-b, supported-b, basic-a/g, supported-a/g |
| 2.4ghz-onlyn, 2.4ghz-b/g/n | basic-b, supported-b, basic-a/g, supported-a/g, ht-basic-mcs, ht-supported-mcs |
| 2.4ghz-g/n | basic-a/g,supported-a/g,ht-basic-mcs,ht-supported-mcs |
| 5ghz-a | basic-a/g,supported-a/g |
| 5ghz-a/n, 5ghz-onlyn | basic-a/g,supported-a/g,ht-basic-mcs,ht-supported-mcs |
| 5ghz-a/n/ac, 5ghz-onlyac | basic-a/g,supported-a/g,ht-basic-mcs,ht-supported-mcs,vht-basic-mcs,vht-supported-mcs |
Settings independent from rate-set:
- allowed mcs depending on number of chains:
- 1 chain: 0-7
- 2 chains: 0-15
- 3 chains: 0-23
- if standard channel width (20Mhz) is not used, then 2ghz modes (except 2.4ghz-b) are not using b rates (1-11)
Frame protection support (RTS/CTS)
802.11 standard provides means to protect transmission against other device transmission by using RTS/CTS protocol. Frame protection helps to fight «hidden node» problem. There are several types of protection:
- RTS/CTS based protection — device willing to send frame at first sends RequestToSend frame and waits for ClearToSend frame from intended destination. By «seeing» RTS or CTS frame 802.11 compliant devices know that somebody is about to transmit and therefore do not initiate transmission themselves
- «CTS to self» based protection — device willing to send frame sends CTS frame «to itself». As in RTS/CTS protocol every 802.11 compliant device receiving this frame know not to transmit. «CTS to self» based protection has less overhead, but it must be taken into account that this only protects against devices receiving CTS frame (e.g. if there are 2 «hidden» stations, there is no use for them to use «CTS to self» protection, because they will not be able to receive CTS sent by other station — in this case stations must use RTS/CTS so that other station knows not to transmit by seeing CTS transmitted by AP).
Protection mode is controlled by hw-protection-mode setting of wireless interface. Possible values: none — for no protection (default), rts-cts for RTS/CTS based protection or cts-to-self for «CTS to self» based protection.
Frame size threshold at which protection should be used is controlled by hw-protection-threshold setting of wireless interface.
For example, to enable «CTS-to-self» based frame protection on AP for all frames, not depending on size, use command:
[admin@MikroTik] /interface wireless> set 0 hw-protection-mode=cts-to-self hw-protection-threshold=0
To enable RTS/CTS based protection on client use command:
[admin@MikroTik] /interface wireless> set 0 hw-protection-mode=rts-cts hw-protection-threshold=0
Nv2
MikroTik has developed a new wireless protocol based on TDMA technology (Time Division Multiple Access) — (Nstreme version 2). See the Nv2 documentation: NV2
TDMA is a channel access method for shared medium networks. It allows several users to share the same frequency channel by dividing the signal into different time slots. The users transmit in rapid succession, one after the other, each using his own time slot. This allows multiple stations to share the same transmission medium (e.g. radio frequency channel) while using only a part of its channel capacity.
The most important benefits of Nv2 are:
- Increased speed
- More client connections in PTM environments
- Lower latency
- No distance limitations
- No penalty for long distances
Starting from RouterOS v5.0beta5 you can configure Nv2 in the Wireless menu. Please take
a look at the NV2 protocol implementation status.
Nv2 protocol limit is 511 clients.
![]()
Warning: Nv2 doesn’t have support for Virtual AP
Nv2 Troubleshooting
Increase throughput on long distance with tdma-period-size. In Every «period», the Access Point leaves part of the time unused for data transmission (which is equal to round trip time — the time in which the frame can be sent and received from the client), it is used to ensure that client could receive the last frame from Access Point, before sending its own packets to it. The longer the distance, the longer the period is unused.
For example, the distance between Access Point and client is 30km. Frame is sent in 100us one direction, respectively round-trip-time is ~200us. tdma-period-size default value is 2ms, it means 10% of the time is unused. When tdma-period-size is increased to 4ms, only 5% of time is unused. For 60km wireless link, round-trip-time is 400ms, unused time is 20% for default tdma-period-size 2ms, and 10% for 4ms. Bigger tdma-period-size value increases latency on the link.
Access List
Sub-menu: /interface wireless access-list
Access list is used by access point to restrict allowed connections from other devices, and to control connection parameters.
The default behaviour of the access list is to allow connection.
Access list rules are processed one by one until matching rule is found. Then the action in the matching rule is executed. If action specifies that client should be accepted, client is accepted, potentially overriding it’s default connection parameters with ones specified in access list rule.
There are the following parameters for access list rules:
- client matching parameters:
- address — MAC address of client
- interface — optional interface to compare with interface to which client actually connects to
- time — time of day and days when rule matches
- signal-range — range in which client signal must fit for rule to match
- allow-signal-out-of-range — option which permits client’s signal to be out of the range always or for some time interval
- connection parameters:
- ap-tx-limit — tx speed limit in direction to client
- client-tx-limit — tx speed limit in direction to AP (applies to RouterOS clients only)
- private-passphrase — PSK passphrase to use for this client if some PSK authentication algorithm is used
- vlan-mode — VLAN tagging mode specifies if traffic coming from client should get tagged (and untagged when going to client).
- vlan-id — VLAN ID to use if doing VLAN tagging.
Operation:
- Access list rules are checked sequentially.
- Disabled rules are always ignored.
- Only the first matching rule is applied.
- If there are no matching rules for the remote connection, then the default values from the wireless interface configuration are used.
- If the remote device is matched by a rule that has authentication=no value, the connection from that remote device is rejected.
![]()
Warning: If there is no entry in ACL about client which connects to AP (wireless,debug wlan2: A0:0B:BA:D7:4D:B2 not in local ACL, by default accept), then ACL for this client is ignored during all connection time.
For example, if client’s signal during connection is -41 and we have ACL rule
/interface wireless access-list
add authentication=yes forwarding=yes interface=wlan2 signal-range=-55..0
Then the connection is matched to the ACL rule, but if signal drops to -70..-80, the client will not be disconnected.
Please note that if «default-authentication=yes» is set on wireless interface, clients will be able to join even if there are no matching access-list entries.
To make it work correctly it is required that client is matched by any of ACL rules.
If we modify ACL rules in the previous example to:
/interface wireless access-list
add interface=wlan2 signal-range=-55..0
add authentication=no forwarding=no interface=wlan2 signal-range=-120..-56
Then if signal drops to -56, client will be disconnected.
Properties
| Property | Description |
|---|---|
| ap-tx-limit (integer [0..4294967295]; Default: 0) | Limit rate of data transmission to this client. Value 0 means no limit. Value is in bits per second. |
| authentication (yes | no; Default: yes) |
|
| client-tx-limit (integer [0..4294967295]; Default: 0) | Ask client to limit rate of data transmission. Value 0 means no limit.
This is a proprietary extension that is supported by RouterOS clients. Value is in bits per second. |
| comment (string; Default: ) | Short description of an entry |
| disabled (yes | no; Default: no) | |
| forwarding (yes | no; Default: yes) |
|
| interface (string | any | all; Default: any) | Rules with interface=any are used for any wireless interface and the interface=all defines interface-list “all” name. To make rule that applies only to one wireless interface, specify that interface as a value of this property. |
| mac-address (MAC; Default: 00:00:00:00:00:00) | Rule matches client with the specified MAC address. Value 00:00:00:00:00:00 matches always. |
| management-protection-key (string; Default: «») | |
| private-algo (104bit-wep | 40bit-wep | aes-ccm | none | tkip; Default: none) | Only for WEP modes. |
| private-key (string; Default: «») | Only for WEP modes. |
| private-pre-shared-key (string; Default: «») | Used in WPA PSK mode. |
| signal-range (NUM..NUM — both NUM are numbers in the range -120..120; Default: -120..120) | Rule matches if signal strength of the station is within the range.
|
| time (TIME-TIME,sun,mon,tue,wed,thu,fri,sat — TIME is time interval 0..86400 seconds; all day names are optional; value can be unset; Default: ) | Rule will match only during specified time.
Station will be disconnected after specified time ends. Rule will match only during specified days of the week. |
Align
Sub-menu: /interface wireless align
Align tool is used to help in alignment devices running this tool.
| Property | Description |
|---|---|
| active-mode (yes | no; Default: yes) | If in active mode, will send out frames for align. |
| audio-max (integer [-2147483648..2147483647]; Default: -20) | Maxumum signal strength for beeper |
| audio-min (integer [-2147483648..2147483647]; Default: -100) | Minimum signal strength for beeper |
| audio-monitor (MAC; Default: 00:00:00:00:00:00) | Which MAC address to use for audio monitoring |
| filter-mac (MAC; Default: 00:00:00:00:00:00) | Filtered out MAC address that will be shown in monitor screen. |
| frame-size (integer [200..1500]; Default: 300) | Size of the frames used by monitor. |
| frames-per-second (integer [1..100]; Default: 25) | Frame transmit interval |
| receive-all (yes | no; Default: no) | If set to «yes», monitor will find all available devices. |
| ssid-all (yes | no; Default: no) | Whether to show all SSIDs in the monitor or only one configured in wireless settings. |
Menu Specific Commands
| Property | Description |
|---|---|
| monitor (interface name) | Start align monitoring |
| test-audio (integer [-2147483648..2147483647]) | Test the beeper |
Connect List
Sub-menu: /interface wireless connect-list
connect-list is used to assign priority and security settings to connections with remote access points, and to restrict allowed connections.
connect-list is an ordered list of rules. Each rule in connect-list is attached to specific wireless interface, specified in the interface property of that rule (this is unlike access-list, where rules can apply to all interfaces).
Rule can match MAC address of remote access point, it’s signal strength and many other parameters.
Operation:
- connect-list rules are always checked sequentially, starting from the first.
- disabled rules are always ignored.
- Only the first matching rule is applied.
- If SSID or exact wireless protocol is provided in the wireless interface configuration Connect List SSIDs or wireless protocols not covered by wireless interface configuration are ignored.
- If connect-list does not have any rule that matches remote access point, then the default values from the wireless interface configuration are used.
- If access point is matched by rule that has connect=no value, connection with this access point will not be attempted.
- If access point is matched by rule that has connect=yes value, connection with this access point will be attempted.
- In station mode, if several remote access points are matched by connect list rules with connect=yes value, connection will be attempted with access point that is matched by rule higher in the connect-list.
- If no remote access points are matched by connect-list rules with connect=yes value, then value of default-authentication interface property determines whether station will attempt to connect to any access point. If default-authentication=yes, station will choose access point with best signal and compatible security.
- In access point mode, connect-list is checked before establishing WDS link with remote device. If access point is not matched by any rule in the connect list, then the value of default-authentication determines whether WDS link will be established.
Properties
| Property | Description |
|---|---|
| 3gpp (string; Default: ) | |
| area-prefix (string; Default: ) | Rule matches if area value of AP (a proprietary extension) begins with specified value.area value is a proprietary extension. |
| comment (string; Default: ) | Short description of an entry |
| connect (yes | no; Default: yes) | Available options:
|
| disabled (yes | no; Default: no) | |
| mac-address (MAC; Default: 00:00:00:00:00:00) | Rule matches only AP with the specified MAC address. Value 00:00:00:00:00:00 matches always. |
| security-profile (string | none; Default: none) | Name of security profile that is used when connecting to matching access points, If value of this property is none, then security profile specified in the interface configuration will be used. In station mode, rule will match only access points that can support specified security profile. Value none will match access point that supports security profile that is specified in the interface configuration. In access point mode value of this property will not be used to match remote devices. |
| signal-range (NUM..NUM — both NUM are numbers in the range -120..120; Default: -120..120) | Rule matches if signal strength of the access point is within the range. If station establishes connection to access point that is matched by this rule, it will disconnect from that access point when signal strength goes out of the specified range. |
| ssid (string; Default: «») | Rule matches access points that have this SSID. Empty value matches any SSID. This property has effect only when station mode interface ssid is empty, or when access point mode interface has wds-ignore-ssid=yes |
| wireless-protocol (802.11 | any | nstreme | tdma; Default: any) | |
| interface (string; Default: ) | Each rule in connect list applies only to one wireless interface that is specified by this setting. |
Usage
Restrict station connections only to specific access points
- Set value of default-authentication interface property to no.
-
/interface wireless set station-wlan default-authentication=no
- Create rules that matches allowed access points. These rules must have connect=yes and interface equal to the name of station wireless interface.
-
/interface wireless connect-list add interface=station-wlan connect=yes mac-address=00:11:22:33:00:01/interface wireless connect-list add interface=station-wlan connect=yes mac-address=00:11:22:33:00:02
Disallow connections to specific access points
- Set value of default-authentication interface property to yes.
-
/interface wireless set station-wlan default-authentication=yes
- Create connect=no rules that match those access points that station should not connect to. These rules must have connect=no and interface equal to the name of station wireless interface.
-
/interface wireless connect-list add interface=station-wlan connect=no mac-address=00:11:22:33:44:55
Select preferred access points
- Create rules that match preferred access points. These rules must have connect=yes and interface equal to the name of station wireless interface.
- Put rules that match preferred access points higher in the connect-list, in the order of preference.
Restrict WDS link establishment
- Place rules that match allowed access points at the top.
- Add deny-all rule at the end of connect list.
Info
Sub-menu: /interface wireless info
Is used to gather information
| Property | Description |
|---|---|
| 2ghz-10mhz-power-channels () | |
| 2ghz-11n-channels () | |
| 2ghz-5mhz-power-channels () | |
| 2ghz-b-channels () | |
| 2ghz-g-channels () | |
| 2ghz-g-turbo-channels () | |
| 5ghz-10mhz-power-channels () | |
| 5ghz-11n-channels () | |
| 5ghz-5mhz-power-channels () | |
| 5ghz-channels () | |
| 5ghz-turbo-channels () | |
| allowed-channels () | List of available channels for each band |
| capabilities () | |
| country-info () | Takes country name as argument, shows available bands, frequencies and maximum transmit power for each frequency. |
| chip-info () | |
| default-periodic-calibration () | |
| firmware () | |
| ht-chains () | |
| interface-type () | |
| name () | |
| pci-info () | |
| supported-bands () |
Manual TX Power Table
Sub-menu: /interface wireless manual-tx-power-table
| Property | Description |
|---|---|
| comment (string; Default: ) | Short description of an entry |
| manual-tx-powers (list of [Rate:TxPower];
Rate ::= 11Mbps | 12Mbps | 18Mbps | 1Mbps | 24Mbps | … TxPower ::= integer [-30..30] ; Default: ) |
|
| name (string) | Name of the wireless interface to which tx powers will be applied. |
Wireless hardware table
![]()
Warning: You must follow to regulatory domain requirements in your country. If you are allowed to use other frequencies, note that Antenna Gain and Transmit Power may decrease depending on board and frequency. Devices are calibrated only for regulatory frequencies, use non standard frequencies at your own risk. The list only specifies frequencies accepted by the wireless chip, these frequencies might not always work due to antenna that is built into the product, device design, filters and other factors. USE STRICTLY AT YOUR OWN RISK
| Board name | Wireless interfaces | Frequency range [MHz] | Supported channel widths [Mhz] |
|---|---|---|---|
| 2011UAS-2HnD | 1 | 2312-2732 | 20,40 |
| 751G-2HnD | 1 | 2200-2700 | 20,40 and advanced channel support |
| 751U-2HnD | 1 | 2200-2700 | 20,40 and advanced channel support |
| 911-2Hn | 1 | 2312-2732 | 20,40 |
| 911-5HacD | 1 | 4920-6100 | 20,40,80 |
| 911-5Hn | 1 | 4920-6100 | 5,10,20,40 |
| 911-5HnD | 1 | 4920-6100 | 20,40 |
| 911G-2HPnD | 1 | 2312-2732 | 20,40 |
| 911G-5HPacD /-NB /-QRT | 1 | 4920-6100 | 20,40,80 |
| 911G-5HPnD /-QRT | 1 | 4920-6100 | 5,10,20,40 |
| 912UAG-2HPnD /-OUT | 1 | 2312-2732 | 20,40 |
| 912UAG-5HPnD /-OUT | 1 | 4920-6100 | 5,10,20,40 |
| 921GS-5HPacD-15S /-19S | 1 | 4920-6100 | 51,101,20,40,80 |
| 921UAGS-5SHPacD-NM | 1 | 4920-6100 | 20,40,80 |
| 921UAGS-5SHPacT-NM | 1 | 4920-6100 | 20,40,80 |
| 922UAGS-5HPacD /-NM | 1 | 4920-6100 | 20,40,80 |
| 922UAGS-5HPacT /-NM | 1 | 4920-6100 | 20,40,80 |
| 941-2nD /-TC | 1 | 2312-2732 | 20,40 |
| 951G-2HnD | 1 | 2312-2732 | 20,40 |
| 951Ui-2HnD | 1 | 2312-2732 | 20,40 |
| 951Ui-2nD | 1 | 2312-2732 | 20,40 |
| 952Ui-5ac2nD /-TC | 2 | 2312-2732,4920-6100 | 20,40 and 20,40,80 |
| 953GS-5HnT /-RP | 1 | 4920-6100 | 5,10,20,40 |
| 962UiGS-5HacT2HnT | 2 | 2312-2732,4920-6100 | 20,40 and 20,40,80 |
| cAP2n | 1 | 2312-2732 | 20,40 |
| cAP2nD | 1 | 2312-2732 | 20,40 |
| cAPL-2nD | 1 | 2312-2732 | 20,40 |
| CRS109-8G-1S-2HnD-IN | 1 | 2312-2732 | 20,40 |
| CRS125-24G-1S-2HnD-IN | 1 | 2312-2732 | 20,40 |
| Disc-5nD | 1 | 4920-6100 | 20,40 |
| DynaDishG-5HacD | 1 | 4920-6100 | 51,101,20,40,80 |
| Groove52HPn | 1 | 4920-6100,2312-2732 | 5,10,20,40 and 5,10,20,40 |
| GrooveA-52HPn | 1 | 4920-6100,2312-2732 | 5,10,20,40 and 5,10,20,40 |
| GrooveG-52HPacn | 1 | 4920-6100,2312-2732 | 20,40,80 and 20,40 |
| GrooveGA-52HPacn | 1 | 4920-6100,2312-2732 | 20,40,80 and 20,40 |
| LDF-5nD | 1 | 4920-6100 | 20,40 |
| LHG-5nD | 1 | 4920-6100 | 20,40 |
| mAP2n | 1 | 2312-2732 | 20,40 |
| mAP2nD | 1 | 2312-2732 | 20,40 |
| mAPL-2nD | 1 | 2312-2732 | 20,40 |
| Metal2SHPn | 1 | 2200-2700 | 20,40 and advanced channel support |
| Metal5SHPn | 1 | 4800-6100 | 5,10,20,40 and advanced channel support |
| Metal9HPn | 1 | 902-928 | 5,10,20 |
| MetalG-52SHPacn | 1 | 4920-6100,2312-2732 | 20,40,80 and 20,40 |
| OmniTikG-5HacD | 1 | 4920-6100 | 20,40,80 |
| OmniTikPG-5HacD | 1 | 4920-6100 | 20,40,80 |
| OmniTIKU-5HnDr2 | 1 | 4920-6100 | 20,40 |
| OmniTIKUPA-5HnDr2 | 1 | 4920-6100 | 20,40 |
| QRTG-2SHPnD | 1 | 2312-2732 | 20,40 |
| SEXTANTG-5HPnD | 1 | 4920-6100 | 20,40 |
| SXT2nDr2 | 1 | 2312-2732 | 20,40 |
| SXT5HacD2n | 2 | 2312-2732,4920-6100 | 51,101,20,40 and 51,101,20,40,80 |
| SXT5HPnDr2 | 1 | 4920-6100 | 20,40 |
| SXT5nDr2 | 1 | 4920-6100 | 20,40 |
| SXTG-2HnD | 1 | 2200-2700 | 20,40 |
| SXTG-2HnDr2 | 1 | 2312-2700 | 20,40 |
| SXTG-5HPacD | 1 | 4920-6100 | 51,101,20,40,80 |
| SXTG-5HPacD-HG /-SA | 1 | 4920-6100 | 51,101,20,40,80 |
| SXTG-5HPnD-HGr2 /-SAr2 | 1 | 4920-6100 | 20,40 |
| SXTG-6HPnD | 1 | 5500-6500 | 20,40 |
| SXTsq2nD | 1 | 2312-2484 | 20,40 |
| wAP2nD /-BE | 1 | 2312-2732 | 20,40 |
| wAPG-5HacT2HnD /-BE | 2 | 2312-2732,4920-6100 | 20,40 and 20,40,80 |
| R11e-2HnD | 1 | 2312-2732 | 20,40 |
| R11e-2HPnD | 1 | 2312-2732 | 20,40 |
| R11e-5HacD | 1 | 4920-6100 | 20,40,80 |
| R11e-5HacT | 1 | 4920-6100 | 20,40,80 |
| R11e-5HnD | 1 | 4920-6100 | 20,40 |
| R2SHPn | 1 | 2200-2700 | 20,40 and advanced channel support |
| R52H | 1 | 4920-6100,2192-2507 | 20 and 20 |
| R52HnD | 1 | 4800-6100,2200-2700 | 20,40 and 20,40 |
| R52nM | 1 | 4800-6100,2200-2700 | 20,40 and 20,40 and advanced channel support |
| R5SHPn | 1 | 4800-6100 | 20,40 and advanced channel support |
NOTES:
- — Only in 802.11a/n standard
Nstreme
Sub-menu: /interface wireless nstreme
This menu allows to switch a wireless card to the nstreme mode. In this case the card will work only with nstreme clients.
| Property | Description |
|---|---|
| comment (string; Default: ) | Short description of an entry |
| disable-csma (yes | no; Default: no) | Disable CSMA/CA when polling is used (better performance) |
| enable-nstreme (yes | no; Default: no) | Whether to switch the card into the nstreme mode |
| enable-polling (yes | no; Default: yes) | Whether to use polling for clients |
| framer-limit (integer [100..4000]; Default: 3200) | Maximal frame size |
| framer-policy (best-fit | dynamic-size | exact-size | none; Default: none) | The method how to combine frames. A number of frames may be combined into a bigger one to reduce the amount of protocol overhead (and thus increase speed). The card is not waiting for frames, but in case a number of packets are queued for transmitting, they can be combined. There are several methods of framing:
|
| name (string) | Name of an interface, to which setting will be applied. Read only. |
![]()
Note: The settings here (except for enabling nstreme) are relevant only on Access Point, they are ignored for client devices! The client automatically adapts to the AP settings.
WDS for Nstreme protocol requires using station-wds mode on one of the peers. Configurations with WDS between AP modes (bridge and ap-bridge) will not work.
Nstreme Dual
Sub-menu: /interface wireless nstreme-dual
Two radios in nstreme-dual-slave mode can be grouped together to make nstreme2 Point-to-Point connection. To put wireless interfaces into a nstreme2 group, you should set their mode to nstreme-dual-slave. Many parameters from /interface wireless menu are ignored, using the nstreme2, except:
- frequency-mode
- country
- antenna-gain
- tx-power
- tx-power-mode
- antenna-mode
| Property | Description |
|---|---|
| arp (disabled | enabled | proxy-arp | reply-only; Default: enabled) | Read more >> |
| comment (string; Default: ) | Short description of an entry |
| disable-csma (yes | no; Default: no) | Disable CSMA/CA (better performance) |
| disable-running-check (yes | no; Default: no) | Whether the interface should always be treated as running even if there is no connection to a remote peer |
| disabled (yes | no; Default: yes) | |
| framer-limit (integer [64..4000]; Default: 2560) | Maximal frame size |
| framer-policy (best-fit | exact-size | none; Default: none) | The method how to combine frames. A number of frames may be combined into one bigger one to reduce the amout of protocol overhead (and thus increase speed). The card are not waiting for frames, but in case a number packets are queued for transmitting, they can be combined. There are several methods of framing:
|
| ht-channel-width (2040mhz | 20mhz | 40mhz; Default: 20mhz) | |
| ht-guard-interval (both | long | short; Default: long) | |
| ht-rates (list of rates [1,2,3,4,5,6,7,8]; Default: 1,2,3,4,5,6,7,8) | |
| ht-streams (both | double | single; Default: single) | |
| l2mtu (integer [0..65536]; Default: ) | |
| mtu (integer [0..65536]; Default: 1500) | |
| name (string; Default: ) | Name of an entry |
| rates-a/g (list of rates [6Mbps,9Mbps, 12Mbps, 18Mbps, 24Mbps, 36Mbps, 48Mbps, 54Mbps]; Default: 6Mbps,9Mbps,12Mbps, 18Mbps, 24Mbps, 36Mbps, 48Mbps, 54Mbps) | Rates to be supported in 802.11a or 802.11g standard |
| rates-b (list of rates [1Mbps, 2Mbps, 5.5Mbps, 11Mbps]; Default: 1Mbps, 2Mbps, 5.5Mbps, 11Mbps) | Rates to be supported in 802.11b standard |
| remote-mac (MAC; Default: 00:00:00:00:00:00) | Which MAC address to connect to (this would be the remote receiver card’s MAC address) |
| rx-band (2ghz-b | 2ghz-g | 2ghz-n | 5ghz-a | 5ghz-n; Default: ) | Operating band of the receiving radio |
| rx-channel-width (10mhz; Default: 20mhz) | |
| rx-frequency (integer [0..4294967295]; Default: ) | RX card operation frequency in Mhz. |
| rx-radio (string; Default: ) | Name of the interface used for receive. |
| tx-band (2ghz-b | 2ghz-g | 2ghz-n | 5ghz-a | 5ghz-n; Default: ) | Operating band of the transmitting radio |
| tx-channel-width (10mhz; Default: 20mhz) | |
| tx-frequency (integer [0..4294967295]; Default: ) | TX card operation frequency in Mhz. |
| tx-radio (string; Default: ) | Name of the interface used for transmit. |
![]()
Warning: WDS cannot be used on Nstreme-dual links.
![]()
Note: The difference between tx-freq and rx-freq should be about 200MHz (more is recommended) because of the interference that may occur!
![]()
Note: You can use different bands for rx and tx links. For example, transmit in 2ghz-g and receive data, using 2ghz-b band.
Registration Table
Sub-menu: /interface wireless registration-table
In the registration table, you can see various information about currently connected clients. It is used only for Access Points.
All properties are read-only.
| Property | Description |
|---|---|
| 802.1x-port-enabled (yes | no) | whether the data exchange is allowed with the peer (i.e., whether 802.1x authentication is completed, if needed) |
| ack-timeout (integer) | current value of ack-timeout |
| ap (yes | no) | Shows whether registered device is configured as access point. |
| ap-tx-limit (integer) | transmit rate limit on the AP, in bits per second |
| authentication-type () | authentication method used for the peer |
| bridge (yes | no) | |
| bytes (integer , integer) | number of sent and received packet bytes |
| client-tx-limit (integer) | transmit rate limit on the AP, in bits per second |
| comment (string) | Description of an entry. comment is taken from appropriate Access List entry if specified. |
| compression (yes | no) | whether data compresson is used for this peer |
| distance (integer) | |
| encryption (aes-ccm | tkip) | unicast encryption algorithm used |
| evm-ch0 () | |
| evm-ch1 () | |
| evm-ch2 () | |
| frame-bytes (integer,integer) | number of sent and received data bytes excluding header information |
| frames (integer,integer) | Number of frames that need to be sent over wireless link. This value can be compared to hw-frames to check wireless retransmits. Read more >> |
| framing-current-size (integer) | current size of combined frames |
| framing-limit (integer) | maximal size of combined frames |
| framing-mode () | the method how to combine frames |
| group-encryption () | group encryption algorithm used |
| hw-frame-bytes (integer,integer) | number of sent and received data bytes including header information |
| hw-frames (integer,integer) | Number of frames sent over wireless link by the driver. This value can be compared to frames to check wireless retransmits. Read more >> |
| interface (string) | Name of the wireless interface to which wireless client is associated |
| last-activity (time) | last interface data tx/rx activity |
| last-ip (IP Address) | IP address found in the last IP packet received from the registered client |
| mac-address (MAC) | MAC address of the registered client |
| management-protection (yes | no) | |
| nstreme (yes | no) | Shows whether Nstreme is enabled |
| p-throughput (integer) | estimated approximate throughput that is expected to the given peer, taking into account the effective transmit rate and hardware retries. Calculated once in 5 seconds |
| packed-bytes (integer, integer) | number of bytes packed into larger frames for transmitting/receiving (framing) |
| packed-frames (integer, integer) | number of frames packed into larger ones for transmitting/receiving (framing) |
| packets (integer.integer) | number of sent and received network layer packets |
| radio-name (string) | radio name of the peer |
| routeros-version (string) | RouterOS version of the registered client |
| rx-ccq () | Client Connection Quality (CCQ) for receive. Read more >> |
| rx-rate (integer) | receive data rate |
| signal-strength (integer) | average strength of the client signal recevied by the AP |
| signal-strength-ch0 () | |
| signal-strength-ch1 () | |
| signal-strength-ch2 () | |
| signal-to-noise () | |
| strength-at-rates () | signal strength level at different rates together with time how long ago these rates were used |
| tdma-retx () | |
| tdma-rx-size () | |
| tdma-timing-offset () | tdma-timing-offset is proportional to distance and is approximately two times the propagation delay. AP measures this so that it can tell clients what offset to use for their transmissions — clients then subtract this offset from their target transmission time such that propagation delay is accounted for and transmission arrives at AP when expected. You may occasionally see small negative value (like few usecs) there for close range clients because of additional unaccounted delay that may be produced in transmitter or receiver hardware that varies from chipset to chipset. |
| tdma-tx-size (integer) | Value in bytes that specifies the size of data unit whose loss can be detected (data unit over which CRC is calculated) sent by device. In general — the bigger the better, because overhead is less. On the other hand, small value in this setting can not always be considered a signal that connection is poor — if device does not have enough pending data that would enable it to use bigger data units (e.g. if you are just pinging over link), this value will not go up. |
| tdma-windfull () | |
| tx-ccq () | Client Connection Quality (CCQ) for transmit. Read more >> |
| tx-evm-ch0 () | |
| tx-evm-ch1 () | |
| tx-evm-ch2 () | |
| tx-frames-timed-out () | |
| tx-rate () | |
| tx-signal-strength () | |
| tx-signal-strength-ch0 () | |
| tx-signal-strength-ch1 () | |
| tx-signal-strength-ch2 () | |
| uptime (time) | time the client is associated with the access point |
| wds (yes | no) | whether the connected client is using wds or not |
| wmm-enabled (yes | no) | Shows whether WMM is enabled. |
Security Profiles
Sub-menu: /interface wireless security-profiles
Security profiles are configured under the /interface wireless security-profiles path in the console, or in the «Security Profiles» tab of the «Wireless» window in the WinBox. Security profiles are referenced by the Wireless interface security-profile property and security-profile property of Connect Lists.
Basic properties
| Property | Description |
|---|---|
| mode (none | static-keys-optional | static-keys-required | dynamic-keys; Default: none) | Encryption mode for the security profile.
|
| name (text; Default: ) | Name of the security profile |
WPA properties
These properties have effect only when mode is set to dynamic-keys.
| Property | Description |
|---|---|
| authentication-types (wpa-psk | wpa2-psk | wpa-eap | wpa2-eap; Default: ) | Set of supported authentication types, multiple values can be selected. Access Point will advertise supported authentication types, and client will connect to Access Point only if it supports any of the advertised authentication types. |
| disable-pmkid (no | yes; Default: no) | Whether to include PMKID into the EAPOL frame sent out by the Access Point. Disabling PMKID can cause compatibility issues with devices that use the PMKID to connect to an Access Point.
This property only has effect on Access Points. |
| unicast-ciphers (tkip | aes-ccm; Default: aes-ccm) | Access Point advertises that it supports specified ciphers, multiple values can be selected. Client attempts connection only to Access Points that supports at least one of the specified ciphers. One of the ciphers will be used to encrypt unicast frames that are sent between Access Point and Station. |
| group-ciphers (tkip | aes-ccm; Default: aes-ccm) | Access Point advertises one of these ciphers, multiple values can be selected. Access Point uses it to encrypt all broadcast and multicast frames. Client attempts connection only to Access Points that use one of the specified group ciphers.
|
| group-key-update (time: 30s..1d; Default: 5m) | Controls how often Access Point updates the group key. This key is used to encrypt all broadcast and multicast frames. property only has effect for Access Points. |
| wpa-pre-shared-key (text; Default: ) | WPA pre-shared key mode requires all devices in a BSS to have common secret key. Value of this key can be an arbitrary text. Commonly referred to as the network password for WPA mode. property only has effect when wpa-psk is added to authentication-types. |
| wpa2-pre-shared-key (text; Default: ) | WPA2 pre-shared key mode requires all devices in a BSS to have common secret key. Value of this key can be an arbitrary text. Commonly referred to as the network password for WPA2 mode. property only has effect when wpa2-psk is added to authentication-types. |
![]()
Note: RouterOS also allows to override pre-shared key value for specific clients, using either the private-pre-shared-key property, or the Mikrotik-Wireless-Psk attribute in the RADIUS MAC authentication response. This is an extension.
WPA EAP properties
These properties have effect only when authentication-types contains wpa-eap or wpa2-eap, and mode is set to dynamic-keys.
| Property | Description |
|---|---|
| eap-methods (eap-tls | eap-ttls-mschapv2 | passthrough | peap; Default: passthrough) | Allowed types of authentication methods, multiple values can be selected. This property only has effect on Access Points.
|
| supplicant-identity (text; Default: «MikroTik») | EAP identity that is sent by client at the beginning of EAP authentication. This value is used as a value for User-Name attribute in RADIUS messages sent by RADIUS EAP accounting and RADIUS EAP pass-through authentication. If set to an empty value, value of mschapv2-username is used instead. |
| mschapv2-username (text; Default: ) | Username to use for authentication when eap-ttls-mschapv2 authentication method is being used. This property only has effect on Stations. |
| mschapv2-password (text; Default: ) | Password to use for authentication when eap-ttls-mschapv2 authentication method is being used. This property only has effect on Stations. |
| tls-mode (verify-certificate | dont-verify-certificate | no-certificates | verify-certificate-with-crl; Default: no-certificates) | For interfaces in station mode, determines policy for handling the TLS certificate of the RADIUS server. For interfaces in AP mode, determines policy for handling the TLS certificate of station and so only has effect when eap-methods contains eap-tls.
|
| tls-certificate (none | name; Default: none) | Access Point always needs a certificate when configured when tls-mode is set to verify-certificate, or is set to dont-verify-certificate. Client needs a certificate only if Access Point is configured with tls-mode set to verify-certificate. In this case client needs a valid certificate that is signed by a CA known to the Access Point. This property only has effect when tls-mode is not set to no-certificates and eap-methods contains eap-tls. |
![]()
Note: The order of allowed authentication methods in eap-methods is important, the same order is going to be used to send authentication method offers to the Station. Example: Access Point uses security-profile where eap-methods is set to eap-tls,passthrough; 1) Access Point offers EAP-TLS method to the client; 2) Client refuses; 3) Access Point starts relaying EAP communication to the radius server.
![]()
Note: When the AP is used for passthrough it is not required to add certificates on the AP itself, the AP device works as a transparent bridge and forwards the EAP-TLS association data from RADIUS server to the end client.
![]()
Note: When tls-mode is using either verify-certificate or dont-verify-certificate, then the remote device has to support one of the RC4-MD5, RC4-SHA or DES-CBC3-SHA TLS cipher suites. When using no-certificates mode, then the remote device must support «ADH-DES-CBC3-SHA» cipher suite.
RADIUS properties
| Property | Description |
|---|---|
| radius-mac-authentication (yes | no; Default: no) | This property affects the way how Access Point processes clients that are not found in the Access List.
|
| radius-mac-accounting (yes | no; Default: no) | Explicitly enable accouting packets for radius-mac authentication |
| radius-eap-accounting (yes | no; Default: no) | Explicitly enable accouting packets for radius-eap authentication |
| radius-called-format (mac | mac:ssid | ssid; Default: mac:ssid) | Format of how the «called-id» identifier will be passed to RADIUS. When configuring radius server clients, you can specify «called-id» in order to separate multiple entires. |
| interim-update (time; Default: 0) | When RADIUS accounting is used, Access Point periodically sends accounting information updates to the RADIUS server. This property specifies default update interval that can be overridden by the RADIUS server using Acct-Interim-Interval attribute. |
| radius-mac-format (XX:XX:XX:XX:XX:XX | XXXX:XXXX:XXXX | XXXXXX:XXXXXX | XX-XX-XX-XX-XX-XX | XXXXXX-XXXXXX | XXXXXXXXXXXX | XX XX XX XX XX XX; Default: XX:XX:XX:XX:XX:XX) | Controls how MAC address of the client is encoded by Access Point in the User-Name attribute of the MAC authentication and MAC accounting RADIUS requests. |
| radius-mac-mode (as-username | as-username-and-password; Default: as-username) | By default Access Point uses an empty password, when sending Access-Request during MAC authentication. When this property is set to as-username-and-password, Access Point will use the same value for User-Password attribute as for the User-Name attribute. |
| radius-mac-caching (disabled | time; Default: disabled) | If this value is set to time interval, the Access Point will cache RADIUS MAC authentication responses for specified time, and will not contact RADIUS server if matching cache entry already exists. Value disabled will disable cache, Access Point will always contact RADIUS server. |
WEP properties
These properties have effect only when mode is set to static-keys-required or static-keys-optional.
| Property | Description |
|---|---|
| static-key-0 | static-key-1 | static-key-2 | static-key-3 (hex; Default: ) | Hexadecimal representation of the key. Length of key must be appropriate for selected algorithm. See the Statically configured WEP keys section. |
| static-algo-0 | static-algo-1 | static-algo-2 | static-algo-3 (none | 40bit-wep | 104bit-wep | tkip | aes-ccm; Default: none) | Encryption algorithm to use with the corresponding key. |
| static-transmit-key (key-0 | key-1 | key-2 | key-3; Default: key-0) | Access Point will use the specified key to encrypt frames for clients that do not use private key. Access Point will also use this key to encrypt broadcast and multicast frames. Client will use the specified key to encrypt frames if static-sta-private-algo is set to none. If corresponding static-algo-N property has value set to none, then frame will be sent unencrypted (when mode is set to static-keys-optional) or will not be sent at all (when mode is set to static-keys-required). |
| static-sta-private-key (hex; Default: ) | Length of key must be appropriate for selected algorithm, see the Statically configured WEP keys section. This property is used only on Stations. Access Point uses corresponding key either from private-key property, or from Mikrotik-Wireless-Enc-Key attribute. |
| static-sta-private-algo (none | 40bit-wep | 104bit-wep | tkip | aes-ccm; Default: none) | Encryption algorithm to use with station private key. Value none disables use of the private key. This property is only used on Stations. Access Point has to get corresponding value either from private-algo property, or from Mikrotik-Wireless-Enc-Algo attribute. Station private key replaces key 0 for unicast frames. Station will not use private key to decrypt broadcast frames. |
Management frame protection
Used for: Deauthentication attack prevention, MAC address cloning issue.
RouterOS implements proprietary management frame protection algorithm based on shared secret. Management frame protection means that RouterOS wireless device is able to verify source of management frame and confirm that particular frame is not malicious. This feature allows to withstand deauthentication and disassociation attacks on RouterOS based wireless devices.
Management protection mode is configured in security-profile with management-protection setting. Possible values are: disabled — management protection is disabled (default), allowed — use management protection if supported by remote party (for AP — allow both, non-management protection and management protection clients, for client — connect both to APs with and without management protection), required — establish association only with remote devices that support management protection (for AP — accept only clients that support management protection, for client — connect only to APs that support management protection).
Management protection shared secret is configured with security-profile management-protection-key setting.
When interface is in AP mode, default management protection key (configured in security-profile) can be overridden by key specified in access-list or RADIUS attribute.
[admin@mikrotik] /interface wireless security-profiles> print
 0 name="default" mode=none authentication-types="" unicast-ciphers=""
  group-ciphers="" wpa-pre-shared-key="" wpa2-pre-shared-key=""
  supplicant-identity="n-str-p46" eap-methods=passthrough
  tls-mode=no-certificates tls-certificate=none static-algo-0=none
  static-key-0="" static-algo-1=none static-key-1="" static-algo-2=none
  static-key-2="" static-algo-3=none static-key-3=""
  static-transmit-key=key-0 static-sta-private-algo=none
  static-sta-private-key="" radius-mac-authentication=no
  radius-mac-accounting=no radius-eap-accounting=no interim-update=0s
  radius-mac-format=XX:XX:XX:XX:XX:XX radius-mac-mode=as-username
  radius-mac-caching=disabled group-key-update=5m
  management-protection=disabled management-protection-key=""
[admin@mikrotik] /interface wireless security-profiles> set default management-protection=
                                                        allowed  disabled  required
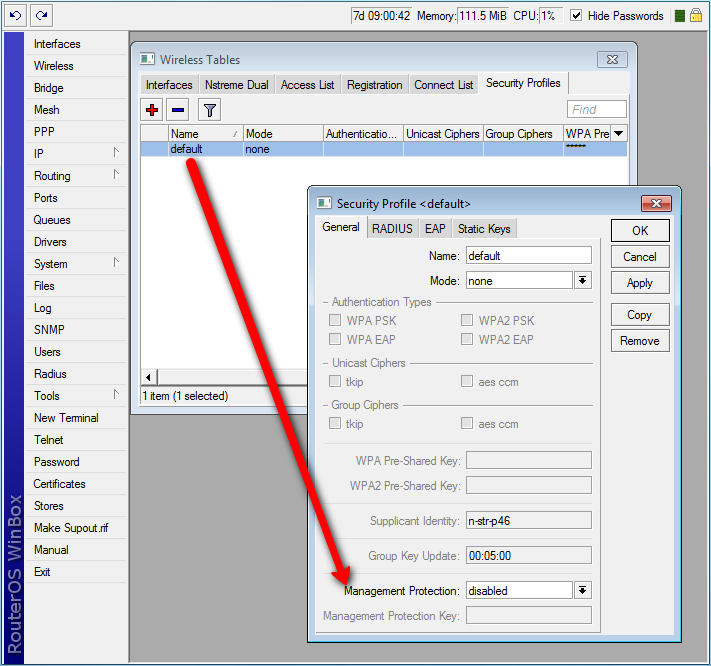
Operation details
RADIUS MAC authentication
Note: RADIUS MAC authentication is used by access point for clients that are not found in the access-list, similarly to the default-authentication property of the wireless interface. It controls whether client is allowed to proceed with authentication, or is rejected immediately.
When radius-mac-authentication=yes, access point queries RADIUS server by sending Access-Request with the following attributes:
- User-Name — Client MAC address. This is encoded as specified by the radius-mac-format setting. Default encoding is «XX:XX:XX:XX:XX:XX».
- Nas-Port-Id — name of wireless interface.
- User-Password — When radius-mac-mode=as-username-and-password this is set to the same value as User-Name. Otherwise this attribute is empty.
- Calling-Station-Id — Client MAC address, encoded as «XX-XX-XX-XX-XX-XX».
- Called-Station-Id — MAC address and SSID of the access point, encoded as «XX-XX-XX-XX-XX-XX:SSID» (minus separated pairs of MAC address digits, followed by colon, followed by SSID value).
- Acct-Session-Id — Added when radius-mac-accounting=yes.
When access point receives Access-Accept or Access-Reject response from the RADIUS server, it stores the response and either allows or rejects client. Access point uses following RADIUS attributes from the Access-Accept response:
- Ascend-Data-Rate
- Ascend-Xmit-Rate
- Mikrotik-Wireless-Forward — Same as access-list forwarding.
- Mikrotik-Wireless-Enc-Algo — Same as access-list private-algo.
- Mikrotik-Wireless-Enc-Key — Same as access-list private-key.
- Mikrotik-Wireless-Psk — Same as access-list private-pre-shared-key.
- Mikrotik-Wireless-Mpkey — Same as Management-protection-key in Access list
- Session-Timeout — Time, after which client will be disconnected.
- Acct-Interim-Interval — Overrides value of interim-update.
- Class — If present, value of this attribute is saved and included in Accounting-Request messages.
Caching
Caching of RADIUS MAC authentication was added to support RADIUS authentication for clients that require from the access point very quick response to the association request. Such clients time out before response from RADIUS server is received. Access point caches authentication response for some time and can immediately reply to the repeated association request from the same client.
RADIUS EAP pass-through authentication
When using WPA EAP authentication type, clients that have passed MAC authentication are required to perform EAP authentication before being authorized to pass data on wireless network. With pass-through EAP method the access point will relay authentication to RADIUS server, and use following attributes in the Access-Request RADIUS message:
- User-Name — EAP supplicant identity. This value is configured in the supplicant-identity property of the client security profile.
- Nas-Port-Id — name of wireless interface.
- Calling-Station-Id — Client MAC address, encoded as «XX-XX-XX-XX-XX-XX».
- Called-Station-Id — MAC address and SSID of the access point, encoded as «XX-XX-XX-XX-XX-XX:SSID» (pairs of MAC address digits separated by minus sign, followed by colon, followed by SSID value).
- Acct-Session-Id — Added when radius-eap-accounting=yes.
- Acct-Multi-Session-Id — MAC address of access point and client, and unique 8 byte value, that is shared for all accounting sessions that share single EAP authentication. Encoded as AA-AA-AA-AA-AA-AA-CC-CC-CC-CC-CC-CC-XX-XX-XX-XX-XX-XX-XX-XX.
- Added when radius-eap-accounting=yes.
Access point uses following RADIUS attributes from the Access-Accept server response:
- Class — If present, value of this attribute is saved and included in Accounting-Request messages.
- Session-Timeout — Time, after which client will be disconnected. Additionally, access point will remember authentication result, and if during this time client reconnects, it will be authorized immediately, without repeating EAP authentication.
- Acct-Interim-Interval — Overrides value of interim-update.
Usage
Radius authentication with one server
1.Create security-profile.
-
/interface wireless security-profiles add name=radius mode=dynamic-keys authentication-types=wpa2-eap supplicant-identity=RadUserIdent
2. Asign the security-profile to WLAN interface:
-
/interface wireless set security-profile=radius
3.Add Radius server client:
-
/radius add address=x.x.x.x secret=MySecret service=wireless
Radius authentication with different radius servers for each SSID
1.Create security-profile:
-
/interface wireless security-profiles add name=radius mode=dynamic-keys authentication-types=wpa2-eap supplicant-identity=RadUserIdent radius-called-format=ssid
2. Asign the security-profile to WLAN interface:
-
/interface wireless set security-profile=radius
3.Add Radius server1 client:
-
/radius add address=x.x.x.x secret=MySecret service=wireless called-id=WLAN_SSID1
4.Add Radius server2 client:
-
/radius add address=y.y.y.y secret=MySecret service=wireless called-id=WLAN_SSID2
Statically configured WEP keys
Different algorithms require different length of keys:
- 40bit-wep — 10 hexadecimal digits (40 bits). If key is longer, only first 40 bits are used.
- 104bit-wep — 26 hexadecimal digits (104 bits). If key is longer, only first 104 bits are used.
- tkip — At least 64 hexadecimal digits (256 bits).
- aes-ccm — At least 32 hexadecimal digits (128 bits).
Key must contain even number of hexadecimal digits.
WDS security configuration
WDS links can use all available security features. However, they require careful configuration of security parameters.
It is possible to use one security profile for all clients, and different security profiles for WDS links. Security profile for WDS link is specified in connect-list. Access point always checks connect list before establishing WDS link with another access point, and used security settings from matching connect list entry. WDS link will work when each access point will have connect list entry that matches the other device, has connect=yes and specifies compatible security-profile.
WDS and WPA/WPA2
If access point uses security profile with mode=dynamic-keys, then encryption will be used for all WDS links. Since WPA authentication and key exchange is not symmetrical, one of the access points will act as a client for the purpose of establishing secure connection. This is similar to how static-mesh and dynamic-mesh WDS modes work. Some problems, like single sided WDS link between two incorrectly configured access points that use non-mesh mode, is not possible if WPA encryption is enabled. However, non-mesh modes with WPA still have other issues (like constant reconnection attempts in case of configuration mismatch) that are solved by use of the -mesh WDS modes.
In general, WPA properties on both access points that establish WPA protected WDS link have to match. These properties are authentication-types, unicast-ciphers, group-ciphers. For non-mesh WDS mode these properties need to have the same values on both devices. In mesh WDS mode each access point has to support the other one as a client.
Theoretically it is possible to use RADIUS MAC authentication and other RADIUS services with WDS links. However, only one access point will interact with the RADIUS server, the other access point will behave as a client.
Implementation of eap-tls EAP method in RouterOS is particularly well suited for WDS link encryption. tls-mode=no-certificates requires no additional configuration, and provides very strong encryption.
WDS and WEP
mode, static-sta-private-key and static-sta-private-algo parameters in the security profile assigned to the WDS link need to have the same values on both access points that establish WDS link with WPA encryption.
Security profile and access point matching in the connect list
Client uses value of connect-list security-profile property to match only those access points that support necessary security.
- mode=static-keys-required and mode=static-keys-optional matches only access points with the same mode in interface security-profile.
- If mode=dynamic-keys, then connect list entry matches if all of the authentication-types, unicast-ciphers and group-ciphers contain at least one value that is advertised by access point.
Virtual interfaces
VirtualAP
It is possible to create virtual access points using the add command in the wireless menu. You must specify the master-interface which the virtual interface will belong to. If «master-interface» mode is «station», Virtual AP will work only when «master-interface» will be active. The Virtual AP can have it’s own SSID and Security Profile.
Virtual AP interface will only work if master interface is in ap-bridge, bridge, station or wds-slave mode. It works only with 802.11 protocol, Nv2 is not supported.
This feature is useful for separating access for different types of users. You can assign different bandwidth levels and passwords and instruct users to connect to the specific virtual network, it will appear to wireless clients as a different SSID or a different device.
For example, when using QuickSet to configure a guest network, the VirtualAP feature is used in the background.
To create a new virtual-ap: /interface> wireless add mode=ap-bridge master-interface=wlan1 ssid=guests security-profile=guests (such security profile first needs to be created)
Note: you can create up to 127 virtual interfaces per physical interface. It is not recommended to create more 30, since the performance will start to degrade.
Virtual Clients
![]()
Note: Starting from 6.35 only in wireless-rep or wireless-cm2 package
It is also possible to create virtual clients and have both an AP and a Client on the same physical interface. This allows to make a repeater setup with only using one hardware card. The process of configuration is exacly the same as above, but use mode station:
To create a new virtual-client: /interface> wireless add mode=station master-interface=wlan1 ssid=where-to-connect security-profile=your-profile (such security profile first needs to be created)
![]()
Note: Virtual interfaces will always use the Master interface wireless frequency. If the Master interface has ‘auto’ frequency enabled it will use the wireless frequency that the Master interface selected.
Sniffer
Sub-menu: /interface wireless sniffer
Wireless sniffer allows to capture frames including Radio header, 802.11 header and other wireless related information.
| Property | Description |
|---|---|
| channel-time (; Default: 200ms) | How long to sniff each channel. Used only if multiple-channels=yes |
| file-limit (integer [10..4294967295]; Default: 10) | Allocated file size in kilobytes which will be used to store captured data. Applicable if file-name is specified. |
| file-name (string; Default: ) | Name of the file where to store captured data. |
| memory-limit (integer [10..4294967295]; Default: 10) | Allocated memory buffer in kilobytes used to store captured data. |
| multiple-channels (yes | no; Default: no) | Whether to sniff multiple channels or a single channel. No means that all channel settings will be taken from /interface wireless, Yes means that all channel settings will be taken from scan-list under /interface wireless. |
| only-headers (yes | no; Default: no) | If set to yes, then sniffer will capture only information stored in frame headers. |
| receive-errors (yes | no; Default: no) | Whether to process crc mismatch packets |
| streaming-enabled (yes | no; Default: no) | Whether to stream captured data to specified streaming server |
| streaming-max-rate (integer [0..4294967295]; Default: 0) | Maximum packets per second allowed. 0 equals unlimited |
| streaming-server (IPv4; Default: 0.0.0.0) | IP address of the streaming server. |
![]()
Note: Use the command /interface wireless info scan-list to verify your scan-list defined under /interface wireless channels when using multiple-channels=yes
Packets
Sub-menu: /interface wireless sniffer packet
Sub-menu shows captured packets.
Scan
Scan command allows to see available AP in the frequency range defined in the scan-list.
Using scan command the interface operation is disabled (wireless link is disconnected during the scan operation)
Since RouterOS v6.35 (wireless-rep) background scan is supported which can be used during the wireless interface operation without disconnecting the wireless link. Background scan is supported only using 802.11 wireless protocol.
Scan tool will continue scanning for AP until user stops the scan process. It is possible to use ’rounds’ setting for the scan tool to do scan through the scan-list entries specific times. It is useful when running scan tool using scripts. Example of scan command for one round:
/interface wireless scan wlan1 rounds=1
‘save-file’ option allows to do scripted/scheduled scans and save the results in file for future analysis. Also this feature together with rounds setting allows to get scan results from the remote wireless clients — executing that command will start the scan tool which disconnect the wireless link, does the scan through the scan-list frequencies and saves the results to file, exits the scan and connects the wireless link back. Example:
/interface wireless scan wlan1 rounds=1 save-file=scan1
To use background wireless scan the ‘background=yes’ setting should be provided. Example:
/interface wireless scan wlan1 background=yes
Background scan feature is working in such conditions:
- Wireless interface should be enabled
- For wireless interface in AP mode — when it is operating in 802.11 protocol mode and is on fixed channel (that is — channel selection and initial radar checking is over)
- For wireless interface in Station mode — when it is connected to 802.11 protocol AP.
Scan command is supported also on the Virtual wireless interfaces with such limitations:
- It is possible when virtual interface and its master is fixed on channel (master AP is running or master station is connected to AP).
- Scan is only performed in channel master interface is on.
- It does not matter if background=yes|no — on virtual interface scan does not disconnect clients/AP, so it is always «background».
Snooper
This tool monitors surrounding frequency usage, and displays which devices occupy each frequency. It’s available both in console, and also in Winbox. Snooper will use frequencies from scan-list.
Sub-menu: /interface wireless snooper
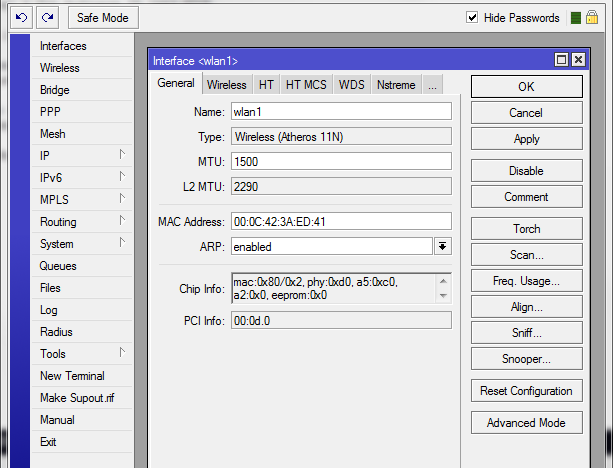
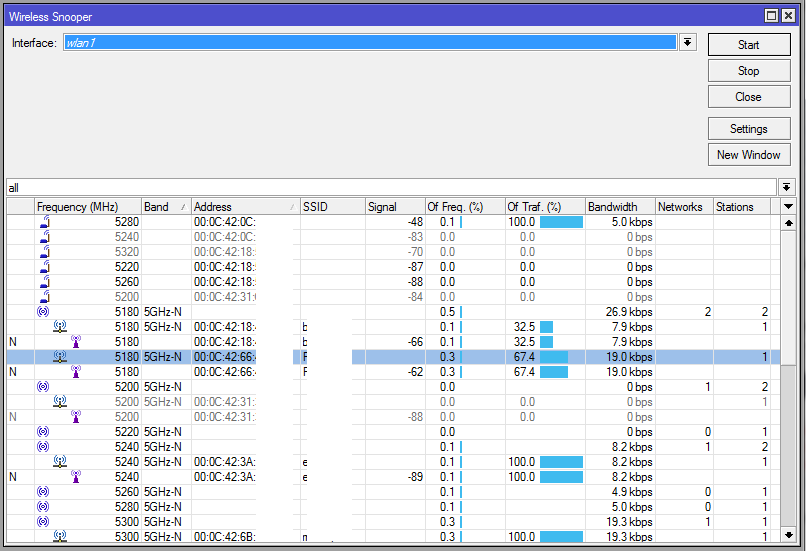
Settings
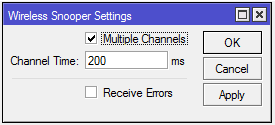
Spectral scan
- See separate document Manual:Spectral_scan
WDS
Sub-menu: /interface wireless wds
Properties:
| Property | Description |
|---|---|
| arp (disabled | enabled | proxy-arp | reply-only; Default: enabled) | |
| comment (string; Default: ) | |
| disable-running-check (yes | no; Default: no) | |
| disabled (yes | no; Default: yes) | |
| l2mtu (integer [0..65536]; Default: ) | |
| master-interface (string; Default: ) | |
| mtu (integer [0..65536]; Default: 1500) | |
| name (string; Default: ) | |
| wds-address (MAC; Default: 00:00:00:00:00:00) |
Read-only properties:
| Property | Description |
|---|---|
| dynamic (yes | no) | |
| mac-address (MAC) | |
| running (yes | no) |
WPS
Wireless interface supports WPS Server and also WPS Client (supported by wireless-rep package starting from RouterOS v6.35).
WPS Server
WPS Server allows to connect wireless clients that support WPS to AP protected with the Pre-Shared Key without specifying that key in the clients configuration.
WPS Server can be enabled by changing the WPS Mode setting for the wireless interface. Example:
/interface wireless set wlan1 wps-mode=push-button
Wps-mode has 3 options
- disabled
- push-button — WPS is activated by pushing physical button on the board (few boards has such button marked on the board case/label)
- push-button-virtual-only — WPS is activated by pushing «WPS Accept» button from the RouterOS wireless interface menu
By pushing the WPS physical/virtual button the AP enables the WPS functionality. If within 2 minutes the WPS process isn’t initiated the WPS Accept Function is stopped.
WPS Server is enabled by default on few boards that has physical WPS button marked. For example, hap lite, hap, hap ac lite, hap ac, map lite
WPS Server is active only when wireless AP interface has Pre-Shared Key Authentication (PSK) enabled.
It is possible to configure this mode for the Virtual AP interfaces as well.
WPS Client
WPS Client function allows the wireless client to get the Pre-Shared Key configuration of the AP that has WPS Server enabled.
WPS Client can be enabled by such command:
/interface wireless wps-client wlan1
WPS Client command outputs all the information of the WPS Enabled AP on the screen. Example:
[admin@MikroTik] /interface wireless> wps-client wlan1
          status: disconnected, success
            ssid: MikroTik
     mac-address: E4:8D:8C:D6:E0:AC
      passphrase: presharedkey
  authentication: wpa2-psk
      encryption: aes-ccm
It is possible to specify additional settings for the WPS-Client command:
- create-profile — creates wireless security profile with the specified name, configures it with security details received from the WPS AP, specifies the wireless interface to use the new created security profile
- ssid — get WPS information only from AP with specified SSID
- mac-address — get WPS information only from AP with specified mac-address
Repeater
Wireless repeater will allow to receive the signal from the AP and repeat the signal using the same physical interface locally for connecting other clients. This will allow to extend the wireless service for the wireless clients.
Wireless repeater function will configure the wireless interface to connect to the AP with station-bridge or station-pseudobridge option, create a virtual AP interface, create a bridge interface and add both (main and the virtual) interfaces to the bridge ports.
If your AP supports button-enabled WPS mode, you can use the automatic setup command:
/interface wireless setup-repeater wlan1
The setup-repeater does the following steps:
- searches for WPS AP with button pushed
- acquires SSID, key, channel from AP
- resets main master interface config (same as reset-configuration)
- removes all bridge ports that were added for virtual interfaces added to this master (so there are no dangling invalid bridge ports later)
- removes all virtual interfaces added to this master
- creates security profile with name «<interfacename>-<ssid>-repeater», if such security profile already exists does not create new, just updates settings
- configures master interface, interface mode is selected like this: if AP supports bridge mode, use station-bridge, else if AP supports WDS, use station-wds, else use station-pseudobridge
- creates virtual AP interface with same SSID and security profile as master
- if master interface is not in some bridge, creates new bridge interface and adds master interface to it
- adds virtual AP interface to the same bridge master interface is in.
If your AP does not support WPS, it is possible to specify the settings manually, using these parameters:
- address — MAC address of AP to setup repeater for (optional)
- ssid — SSID of AP to setup repeater for (optional)
- passphrase — key to use for AP — if this IS specified, the command will just scan for AP and create security profile based on info in beacon and with this passphrase. If this IS NOT specified, the command will do WPS to find out passphrase.
![]()
Note: Configuring the address field will add a connection-list entry with the specified MAC address and set master WLAN interface with default-authenticate=no
If you want to allow the repeater to connect to an AP with the same SSID/Passphrase but different MAC, but still prioritize address configured MAC, set default-authenticate=yes, otherwise adjust connection-list manually or don’t use the address field
The same options are available in the GUI:
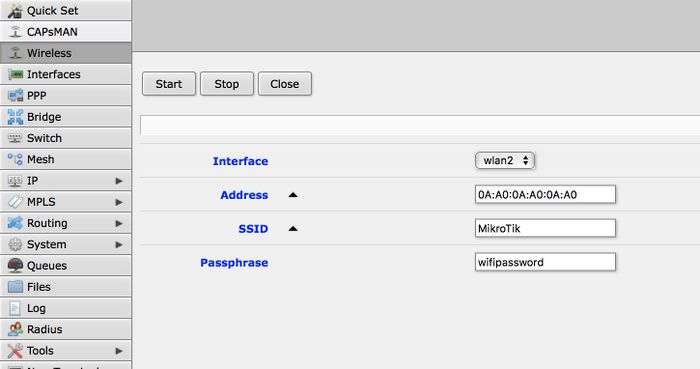
Station-Roaming
Station Roaming feature is available only for 802.11 wireless protocol and only for station modes.
When RouterOS wireless client is connected to the AP using 802.11 wireless protocol it will periodically perform the background scan with specific time intervals. When the background scan will find an AP with better signal it will try to roam to that AP. The time intervals between the background scans will become shorter when the wireless signal becomes worse and the background scan interval will become longer when the wireless client signal will get better.
![]()
Note: If you have only one possible AP that the station/-s connects to, it is recommended to disable the feature as it can increase traffic latency during the background scan or in some cases even briefly disconnect station from the AP
VLAN tagging
Sub-menu: /interface wireless
With VLAN tagging it is possible to separate Virtual AP traffic on Ethernet side of «locally forwarding» AP (the one on which wireless interfaces are bridged with Ethernet). This is necessary to separate e.g. «management» and «guest» network traffic of Ethernet side of APs.
VLAN is assigned for wireless interface and as a result all data coming from wireless gets tagged with this tag and only data with this tag will send out over wireless. This works for all wireless protocols except that on Nv2 there’s no Virtual AP support.
You can configure your RADIUS authentication server to assign users or groups of users to a specific VLAN when they authenticate to the network. To use this option you will need to use RADIUS attributes.
![]()
Note: In case to use this option you must enable wireless-fp or wireless-cm2 package for RouterOS version up to 6.37. Starting from RouterOS v6.37 you can do that with regular wireless package.
| Property | Description |
|---|---|
| vlan-mode (no tag | user service tag | use tag; Default: no tag) | Three VLAN modes are available:
|
| vlan-id (integer [1..4095]; Default: 1) | VLAN identification number |
Vlan tag override
Per-interface VLAN tag can be overridden on per-client basis by means of
access-list and RADIUS attributes (for both — regular wireless and
wireless controller).
This way traffic can be separated between wireless clients even on the
same interface, but must be used with care — only «interface VLAN»
broadcast/multicast traffic will be sent out. If working
broadcast/multicast is necessary for other (overridden) VLANs as well,
multicast-helper can be used for now (this changes every multicast
packet to unicast and then it is only sent to clients with matching VLAN
ids).
[ Top | Back to Content ]
Winbox
Winbox is a small utility that allows administration of Mikrotik RouterOS using a fast and simple GUI.
![]()
Note: Current Tx Power gives you information about transmit power currently used at specific data rate. Currently not supported for Atheros 802.11ac chips (e.g. QCA98xx).
Interworking Realms setting
Starting from RouterOS v6.42rc27 we have added such feature:
realms-raw — list of strings with hex values. Each string specifies contents of «NAI Realm Tuple», excluding «NAI Realm Data Field Length» field.
Each hex encoded string must consist of the following fields:
- NAI Realm Encoding (1 byte)
- NAI Realm Length (1 byte)
- NAI Realm (variable)
- EAP Method Count (1 byte)
- EAP Method Tuples (variable)
For example, value «00045465737401020d00» decodes as:
- NAI Realm Encoding: 0 (rfc4282)
- NAI Realm Length: 4
- NAI Realm: Test
- EAP Method Count: 1
- EAP Method Length: 2
- EAP Method Tuple: TLS, no EAP method parameters
Note, that setting «realms-raw=00045465737401020d00» produces the same advertisement contents as setting «realms=Test:eap-tls».
Refer to 802.11-2016, section 9.4.5.10 for full NAI Realm encoding.
Начинаю цикл статей про настройку Wi-Fi в Mikrotik. Так как тема довольно обширная охватить одной статьей ее не реально, поэтому будет несколько связанных публикаций, которые можно будет отфильтровать по метке «Wi-Fi».
В первой статье я опишу ВСЕ пункты, которые есть в настройке wlan-интерфейса в режиме Advanced Mode. Все остальные настройки будут описаны в следующих статьях. Описание буду проводить на самом распространенном маршрутизаторе Микротик для дома и офиса — RouterBoard 951G-2HnD с версией RouterOS самой новой на время написания статьи — 6.38rc38.
В зависимости от модели роутера некоторые функции и настройки могут появляться или пропадать, так же это касается и версии RouterOS — это нужно учитывать при прочтении. Я же попытался описать наиболее полные параметры. При настройке я часто обращался в гугл для выискивания значения того или иного параметра, мне попадалось много статей. В одних описаны сами параметры, но без рекомендаций по их установке. В других — только рекомендации, без объяснений. Тут я попытался написать и значения установок и рекомендации для настройки. По-возможности описал почему именно так нужно устанавливать, а не иначе. Значения описанные в этой статье подходят для настройки роутера для дома и малого офиса с небольшой нагрузкой и небольшое количество устройств. Что является самым распространенным применением точки доступа Mikrotik. Все рекомендации по значениям параметров я выделил курсивом. Данная статья подразумевает, что человек уже настраивал wi-fi в Микротик, но хотел бы получить больше информации по доступным параметрам и их значениям.
И так, начнем — заходим в wireless и входим в наш интерфейс wlan1.
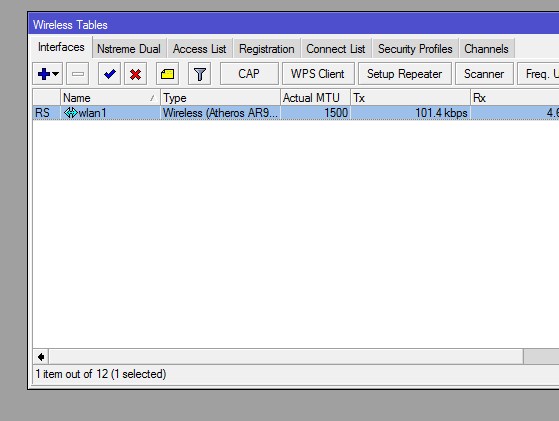
Выбираем режим Advanced Mode.
 |
|
Включение режима Advanced Mode. |
Вкладка General

Name — Название интерфейса.
Рекомендую задавать имя типа «wlan1_office3», где office3 — ваш идентификатор. Так удобней отслеживать очередность интерфейсов.
Type — Информационное поле. Тип wireless-интерфейса и в скобках модель wireless-карты.
MTU (maximum transmission unit) — максимальный размер полезного блока данных одного пакета, который может быть передан протоколом без фрагментации. MTU определяет размер фрейма при передаче блока данных на канальном уровне сети. Когда IP хочет отослать блок данных большего размера происходит его фрагментация (разбиение). Для fast- и gigabit-ethernet сетей по умолчанию это 1500 байт.
Значение оставляем по-умолчанию — 1500.
Actual MTU — Информационное поле. (Actual MTU = configured MTU on physical interface — protocols overhead.). Фактически Actual MTU — это значение MTU на интерфейсе минус накладные расходы протоколов. Например туннель GRE имеет накладных расходов на 24 байт, значит Actual MTU будет MTU — 24 байта.
L2 MTU — MTU для L2. MTU (обычный) — это размер IP-пакетов а L2 MTU — это размер кадров Ethernet (без заголовка с MAC адресом).
Значение оставляем по-умолчанию — 1600.
MAC Address — MAC-адрес wireless-интерфейса;
Если вам не требуется изменять MAC беспроводного интерфейса — значение оставляем по-умолчанию.
ARP (Address Resolution Protocol) — протокол определения адреса, предназначенный для определения MAC-адреса по известному IP-адресу. Значения:
- Disabled — на ARP запросы от клиентом на этом интерфейсе маршрутизатор отвечать не будет. Клиентам нужно будет добавлять статические записи ARP. Например, IP и MAC — адреса маршрутизатора должны быть добавлены к рабочим станциям Windows с помощью команды arp типа «C:\> arp -s 10.5.8.254 00-aa-00-62-c6-09».
- Enabled — Режим по-умолчанию. Протокол ARP будет обнаружен автоматически. Новые динамические записи будут добавлены в таблицу ARP.
- Local-Proxy ARP — позволяет маршрутизатору отвечать на ARP-запросы, даже если целевой IP-адрес находится в той же IP-подсети, откуда ARP-запрос поступил. Данная настройка может пригодится, если мы хотим, чтобы трафик в рамках одного широковещательного домена шёл через интерфейс нашего маршрутизатора.
- Proxy ARP — Техника использования ARP-протокола, позволяющая объединить две не связанные на канальном уровне сети в одну. Хосты, находящиеся в этих сетях, могут использовать адреса из одной IP-подсети и обмениваться трафиком между собой без использования маршрутизатора (как им кажется). Такое поведение может быть полезным, например, если вы используете туннели (PPP, PPPoE, PPTP) и клиенты этих туннелей должны видеть хосты их локальной сети.
- Reply Only — Если записи ARP нет в ARP-листе Микротик, то маршрутизатор не увидит хост, а хост не увидит маршрутизатор. В режиме ARP=reply-only будут работать только статические привязки.
Значение оставляем по-умолчанию — Enabled.
ARP Timeout — частота обновления ARP таблицы (я не ошибаюсь?).
Настройку не трогаем.
PCI Info — Информационное поле. Информация о шине PCI, используется в том случае, если радиокарта установлена на шине PCI.
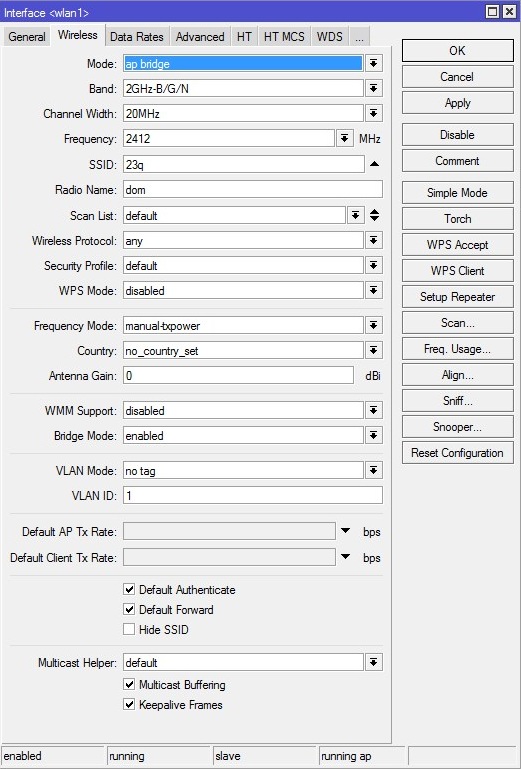
Mode — режим работы точки доступа. Возможны режимы:
- alignment-only — Используется для юстировки антенн. В этом режиме ТД непрерывно транслирует в эфир основную информацию о себе.
- ap bridge — Основной режим работы как «прозрачной» точки доступа. Для использования этого режима требуется лицензия не ниже Level 4 (WISP).
- bridge — Режим «прозрачного» радиомоста (PtP). Возможно подключение только одного клиента.
- nstreme dual slave — Используется для построения специального линка на базе проприетарного протокола nstreme, при котором один радиомодуль передает трафик (TX), а другой только принимает (RX). Может использоваться только в устройствах с несколькими wifi-модулями.
- station — Режим «непрозрачной» беспроводной станции. Обычно используется, если клиентская точка выполняет функции роутера.
- station bridge — «Прозрачный» клиент. Обычно используется как клиент PtP-линка или «прозрачная» клиентская станция (без функций роутера).
- station pseudobridge — Режим трансляции MAC-адресов (MAC NAT). Может использоваться совместно с мостом между интерфейсами.
- station pseudobridge clone — Аналогичен режиму station pseudobridge, но в этом режиме MAC-адрес, используемый для трансляции, используется так-же и для подключения к AP.
- station wds — Режим клиента распределенной беспроводной сети. Дополнительно создается WDS-интерфейс, по которому собственно и передаются данные. Требует также наличия WDS-интерфейса на AP. Режим WDS основан на проприетарной реализации и не совместим с режимом WDS на оборудовании других производителей.
- wds slave — Совмещение режимов station wds и ap bridge. Используется для построения распределенных сетей, где точки доступа связаны между собой по WiFi. Работает с тем-же SSID и на той-же частоте, что и другие AP, входящие в распределенную сеть.
По-умолчанию стоит bridge — режим прозрачного радиомоста, при котором возможно подключение только одного клиента.
Выбираем режим работы «ap bridge» — обычная точка доступа.
Band — стандарт и режим работы беспроводной сети.
Для нашей точки выбираем все стандарты, что-бы могли подключится все устройства — «2ghz-b/g/n» и мы получили максимальную скорость.
Channel Width — используемая полоса частот. Возможные значения: 5MHz, 10MHz, 20MHz, 20/40MHz HT Above (с расширением полосы вверх по частоте), 20/40MHz HT Below (с расширением полосы вниз по частоте). Широкие каналы 40Mhz поддерживаются только 802.11n совместимым оборудованием и позволяют добиться их максимальной производительности. Каналы 20Mhz могут дать выигрыш на больших дистанциях улучшив условия приёма. К тому же на узких каналах можно разместить больше точек доступа без интерференции между ними. Протоколы 802.11b/g работают только с узкими каналами. 20/40Mhz HT Above (20/40Mhz HT Below) позволяют управлять динамической составляющей канала 40Mhz. Необходимо чтобы она оставалась в диапазоне работы клиентских Wi-Fi устройств если вы собираетесь их использовать. Above для 1-ого канала (2412mhz) смещает динамическую составляющую до 5-ого (2427mhz) в то время как выбор Below делает недоступной точку доступа так как динамическая составляющая сместится на канал -4. 5 и 10 MHz не подходят, так как половина домашнего оборудования на такой ширине работать не будет. 40МГц используйте тогда, когда у вас гигабитное устройство и прокачка будет более 100 Мбит/с. В остальных случаях используйте полосу 20MHz. Воообще, если работаете в 2.4GHz — просто фиксируйте 20Mhz каналы и все. 40MHz в 2.4 даже одно время не хотели включать в стандарт.
Мы оставляем 20MHz.
Frequency — основная частота или канал. Для методики определения свободной частоты в Mikrotik существует масса инструментов. Описание этих инструментов достойны отдельной статьи, останавливаться тут не буду.
Частоту нужно выбирать наименее загруженную у вас в помещении, используя для этого инструменты RouterOS.
SSID — имя WI-Fi сети;
Выбираете любое имя вашей беспроводной сети.
Radio Name — название устройства беспроводной сети. Отображается, например, при сканировании эфира другими устройствами или в таблице регистрации беспроводных устройств на удаленном устройстве.
Особенно, если вы используете несколько точек с одним SSID рекомендую написать сюда что-то нибудь понятное, типа «office1» для правильной идентификации в сервисных программах.
Scan List — рабочий диапазон частот. В этом диапазоне Mikrotik производит сканирование эфира, мониторинг загрузки каналов и т.д…
Возможные значения:
- «default» — рабочий диапазон определяется настройками региона;
- Фиксированная частота (например, 5180) в MHz;
- Полоса частот «от» и «до» (например, 5150—5250) в MHz;
- Канал или скан-лист, настроенный на вкладке Wireless Tables — Channels;
Оставляем значение «default».
Wireless Protocol — протокол беспроводной связи. Значения:
- any — любой поддерживаемый (автовыбор);
- 802.11 — только стандартные протоколы 802.11abgn. Обычно используется для совместимости с оборудованием других производителей;
- nstreme — «фирменный» протокол Mikrotik, характеризующийся высокой скоростью потока данных в одну сторону (RX или TX);
- nv2 — «фирменный» протокол Mikrotik, характеризующийся высокой скоростью при работе в дуплексе или работе в режиме PtMP (точка-многоточка);
- nv2 nstreme — автовыбор из «фирменных» протоколов;
- nv2 nstreme 802.11 — автовыбор протокола из перечисленных;
- unspecified — то же, что и «any»;
Указываем 802.11 — обычная тока доступа.
Security Profile — профиль безопасности. Настраивается в Wireless Table — Security Profiles.
Можно выбрать Default и отредактировать его в зависимости от своих потребностей по безопасности. Напишу об этом подробней в другой статье.
WPS Mode — Стандарт (и одноимённый протокол) полуавтоматического создания беспроводной сети Wi-Fi. Подразумевает, что в момент подключения к точке доступа на нём программно или физически нажимается соответствующая кнопка и соединение клиента с точкой происходит полностью автоматически. На эту тему есть отдельная статья.
Лично я этот протокол не использую, поэтому — «disabled».
Frequency Mode — региональные ограничения.
- regulatory-domain — ограничение доступных каналов (частот) и максимальной мощности передатчика в соответствии с законодательством выбранного региона;
- manual-txpower — аналогично, но без ограничения максимальной мощности;
- superchannel — тестовый режим, доступны все каналы (частоты), поддерживаемые радиокартой, а также максимальная поддерживаемая мощность.
Я всегда выбираю superchannel. Не хочу ограничений.
Country — Выбор региона. Для каждых стран мира по стандарту 802.11 были сделаны разные частотные диапазоны с разным количеством каналов. Обычно нужно выбирать свою страну. Если выбрать «no_country_set» теоретически должны быть доступны все каналы, но это не так. Например, если выбрать Японию, будет доступно больше каналов.
Дополнение от Сергей Деревянко: Country и частично Frequency Mode — не делают погоды, если с каналом вещания определились четко. Имеют значения только для канала со значением auto. Но тут всплывает один момент — не смотря на то, что для РФ каналов 13, большинство клиентских устройств произведены не в РФ. И как пример — огрызки ничего не знают про каналы выше 11-го.
Выбираем или вашу страну, или «no_country_set».
Antenna Gain — коэффициент усиления антенны в dBi. При использовании внешней антенны желательно делать поправку на потери в кабеле и разъемах.
Дополнение от Сергей Деревянко: Про эту опцию я бы написал так: Имеет смысл использовать только с внешней антенной. На величину указанного значения в этом параметре точка будет понижать усиление сигнала, рассчитывая, что антенна это дело компенсирует собственным усилением.
Внешнюю антенну не используем. Оставляем по-умолчанию — 0.
DFS Mode — динамический выбор частоты (Dynamic Frequency Selection) из списка частот, указанных в Scan List. С обновлением до 6.37, опция dfs-mode становится недоступной, операционная система будет применять необходимые настройки автоматически для каждого частного диапазона, основываясь на установленном регионе (стране).
Proprietary Extensions — режим совместимости со старыми версиями RouterOS (до версии 2.9.25). «post-2.9.25» выключен, «pre-2.9.25» включен.
В новых версиях RouterOS эта функция не актуальна и ее убрали.
WMM Support — поддержка Wi-Fi Multimedia. Принимает значения: enable/disable/required (включен/выключен/обязателен). Если вы будите использовать Multicast, то установите эту опцию в Enabled, это даст большие гарантии на доставление этого пакета. Если вы настраиваете MikroTik дома то включите эту опцию, если же это ресторан или конференц зал, то сожрать весь канал может один клиент.
Дополнение от Сергей Деревянко: На рекомендации включать эту штуку я натыкался, когда дебажил подключения огрызков к моим хотспот-сетям.
Вообще если Микротик стоит дома и устройств не много — «enable». Если офис и Multicast не требуется (а это почти всегда так) — «disable». Рекомендую «disable» — для экономии трафика. Если понадобиться — всегда можно включить.
Bridge Mode — включение/выключение режима «Bridge» на радиокарте для наших беспроводных клиентов. Работает в режиме station-bridge.
Всегда выставляем «enabled».
VLAN-Mode — С помощью VLAN Tagging можно отделить трафик виртуальных беспроводных точек доступа от локальных клиентов (например, что-бы отделитель гостевую сеть от рабочей). Значения:
- no-tag — не использовать VLAN-тегирование на беспроводном интерфейсе;
- use-service-tag — использовать 802.1ad тегирование;
- use-tag — использовать 802.1q тегирование.
VLAN не используем, поэтому «no-tag».
VLAN-ID — VLAN-идентификатор.
VLAN не используем, оставляем по-умолчанию — «1».
Default AP TX Rate — ограничение скорости со стороны AP для подключений, которых нет в Access List (бит/сек., 0 — без ограничений).
При обычной настройке — значение не заполняем.
Default Client TX Rate — ограничение скорости со стороны клиента для подключений, которых нет в Access List (бит/сек., 0 — без ограничений).
При обычной настройке — значение не заполняем.
Default Authenticate — для режимов AP данный параметр определяет, принимать ли подключения от клиентов, которых нет в Access List. Для клиентских режимов — подключаться ли к AP, которых нет в Access List. Фактически при выставленной галочке — могут подключаться все устройства, при снятой — только те, которые есть в списке разрешенных (Wireless-Access List).
Если у нас не стоит ограничение по MAC-адресам или другие спец. настройки в Access List то оставляем по-умолчанию: галочка стоит.
Default Forward — разрешать ли маршрутизацию клиентам, которых нет в Access List. Выставленная галочка означает запрет обмена данными между подключенными клиентскими устройствами. Эта настройка работает только в режиме 802.11 для ноутбуков и устройств без поддержки WDS.
Если это гостевая сеть — разумно снять галочку, если обычная домашняя и офисная — оставляем, нам же нужно, что бы клиенты wi-fi общались друг с другом.
Hide SSID — скрывать имя сети. Сеть не появляется в списке при сканировании. Чтобы подключиться, нужно вручную прописать имя на устройстве клиента.
Обычно SSID не скрывают, поэтому — галочка стоять не должна.
Multicast Helper — механизм диагностики проблем широковещательных рассылок. Имеет смысл использовать только при режимах AP, если клиенты работают в режиме station bridge. Варианты:
- disabled — отключен, мультикаст-пакеты отправляются без изменений;
- full — все MAC-адреса мультикаста изменить на юникаст и отправить в таком виде;
- default — аналогично «disabled».
При использовании IPTV в параметре Multicast Helper выберите full. Это позволит отправлять мультикаст пакеты по MAC адресам клиентам, подключенным к Wi-Fi.
Так как IPTV мы не используем, оставляем без изменений — «default».
Multicast Buffering — буферизировать широковещательные пакеты. Что-бы они доходили до адресата, когда ваше устройство (например смартфон) перешел в спящий режим и отключил WiFi для экономии энергии. Точка может дать команду клиенту что-бы он не переходил в спящий режим, когда идет широковещательная рассылка. Точной документации по этому пункту я не нашел.
Оставляем по-умолчанию — галочка стоит.
Keepalive Frames — функция, возможно тоже связанная с удержанием устройств, которые уходят в режим энергосбережения с отключением WiFi. Точной документации найти не удалось. Если вы знаете, для чего она — напишите в комментариях.
Оставляем по-умолчанию — галочка стоит.
Data Rates

Здесь задаются настройки канальных скоростей.
- Supported Rates — канальные скорости, которые поддерживаются беспроводным интерфейсом;
- Basic Rates — канальные скорости, на которые передается служебный трафик.
Один из вариантов настроек: Можно снять все галочки с B-стандарта, устройства смогут подключиться только на более скоростных стандартах G и N. В таком случаем нужно снять все галочки с «Basic Rates B» — разрешенные модуляции для служебного трафика стандарта B. «Supported Rates A/G» — проставляем все галочки, и в «Basic Rates A/G» оставляем разрешенные модуляции для служебного трафика только 6 Mbps.
Но если ваше устройство старое (старый радио-модуль не поддерживающий скоростные стандарты) — то подключится оно при такой настройке не сможет. В случае если мы выбираем для устройств режим N-only (на вкладке Wireless, поле Band) — то все галочки на этой вкладке снимаются.
В подавляющем большинстве случаев здесь нет необходимости ничего менять.
Ничего не меняем, оставляем «default».
Advanced

Area — позволяет создать группу и включить беспроводные устройства в нее, а затем использовать определенные правила для этой группы и всех входящих в нее устройств, вместо того, чтобы создавать отдельные правила для каждого устройства. Это значение заполняется в точке доступа, и может быть сопоставлено с правилами в connect-list.
Ничего не меняем, оставляем пустым.
Max Station Count — максимально количество подключенных клиентов, включая WDS-подключения. Актуально только для режимов AP.
Оставляем по-умолчанию — 2007.
Distance — максимальная допустимая дистанция беспроводного линка. Значения:
- dynamic — автонастройка;
- indoor — работа внутри помещения;
- расстояние в километрах. При указании этого параметра вручную рекомендуется указывать не точное расстояние между устройствами (по картам или GPS), а значение больше на 10-20% такого расстояния;
Если клиенты находятся в одном помещении и примерно на одном расстоянии, допустим все в радиусе 20 метров от точки доступа то укажите «indoors», если у вас открытая местность поле или конференц-зал и клиенты находятся на разных расстояниях более 0-20 метров то укажите значение «dynamic». Ну и третье если клиенты находятся на одном расстоянии, допустим 1км, то так и укажите. Данная опция позволяет Mikrotik по вшитому алгоритму рассчитывать доставлен ли пакет до нужного адресата.
Так как точка внутри помещения и клиенты на небольшом расстоянии — «indoor».
Noise Floor Threshhold — ручная корректировка уровня шума на канале (dB). Фактически это значение минимального SNR для беспроводного подключения. Если характеристики подключения хуже этого значения, подключение не будет установлено (или будет разорвано). Данная функция работает только на чипсетах производства Atheros, начиная с AR5212 и более новых. Чаще всего ставятся значения «-92 … -107». Можно также определить его самостоятельно: замерить уровень шума и уменьшить эту цифру на 5-10 единиц. К примеру: фактический уровень шума -107, следовательно, значение выставляем -100.
Настройка специфическая — поле оставляем пустым.
Periodic Calibration — периодическая калибровка линка. Значения default и enable включают эту опцию, если задан интервал в поле Calibration Interval. Значение disabled отключает эту функцию. Данная функция работает только на чипсетах производства Atheros.Чип WiFi во время свое работы греется, и из-за этого может частота съезжать немного, соответственно включите эту опцию. Следующее поле оставьте равным одной минуте. Будет происходить калибровка частоты каждую минуту.
Ставим «enable». Функция в версии 6.38rc38 уже выпилена.
Calibration Interval — периодичность проведения рекалибровки (dd:mm:ss). При значении 00:00:00 рекалибровка отключена.
Ставим 1 минута. Функция в версии 6.38rc38 уже выпилена.
Burst Time — время (в микросекундах) в течение которого может непрерывно производиться передача данных. Данная функция работает только на чипсетах AR5000, AR5001X, AR5001X+.
На офф. форуме рекомендуют оставить как есть — поле пустым.
Hw. Retries — количество попыток отправки пакета до того, как отправка будет признана неудачной. В случае превышения этого значения, скорость соединения с удаленным устройством будет понижена, после чего снова будут предприняты попытки передачи пакета. Если была достигнута минимальная скорость соединения, но пакет не был передан, попытки передачи приостанавливаются на время, указанное в параметре On Fail Retry Time. После этого снова будут предприняты попытки передачи пакета до тех пор, пока не истечет время, указанное в параметре Frame Lifetime, либо удаленное устройство не будет отключено по превышению параметра Disconnect Timeout.
Значения от 1 до 5 — скорость работы сети выше, однако для абонентов с плохим сигналом стабильность связи ухудшится (потеря пакетов, частый дисконнект). Значения от 5 до 10 — золотая середина. Значения от 10 до 15 — максимальная гарантия доставки данных, но в проблемной сети скорость будет замедляться. Исходя из этого, для базовой станции предпочтительно выставлять средние значения (5-7), а для канала точка-точка ставится максимум — 15.
Для офиса оставляем по-умолчанию — 7.
Hw. Fragmentation Threshold — задает максимальный размер фрагмента пакета данных, передающихся по WiFi. Большие пакеты будут разбиваться на такие фрагменты для увеличения надежности и скорости связи. Используется только для 802.11. Настройка, которая, возможно, поможет при линках на большие расстояния но мы фрагментацию не используем.
Настройка специфическая — поле оставляем пустым.
Hw. Protection Mode — режим защиты фреймов (защита от скрытого узла). Данный пункт может помочь в решении проблемы скрытого узла, если указать «rts cts». 802.11 (он же wifi) — это единая среда передачи данных (типа устройства ХАБ), а в стандарте 802.11 указанно, что клиенты сами определяют между собой, кто и когда будет производить запись, но есть один нюанс — это условие будет работать только если клиенты видят друг друга напрямую. Если же два клиента начнут писать одновременно, то мы получаем коллизию.
Как пример представим себе некое поле (То которое на рабочем столе Windows XP).
На нём располагается точка доступа на рисунке красная точка, и её радиус бледно красным.
А также
Клиент1 (A), Клиент2 (B), Клиент3 (С)

Клиент1 и Клиент2 могут быть нормальными участниками и работать в сети без сбоев, но, а вот из-за Клиента3 могут возникнуть проблемы у всех, дело в том, что Клиент1 и Клиент2 могут общаться напрямую и определять, кто из них будет вещать в данный промежуток времени. А вот Клиент3 не видит не одного из участников нашей сети, и может смело вещать в любой момент даже в тот, когда Клиент1 или Клиент2 будут также вещать, из-за этого и появляются коллизии.
В MikroTik значение «rts cts» означает — «точка доступа сама будет управлять, кому вещать в данный момент», что решит проблему скрытого узла. Данный параметр слегка снизит пропускную способность и увеличит нагрузку на точку доступа.
Значение выставляем в «rts cts».
Hw. Protection Threshold — пороговый размер кадра, при котором должна включится функция Hw. Protection Mode для беспроводного интерфейса. Значение 0 — функция активна для всех фреймов.
Оставляем по-умолчанию — 0.
Frame Lifetime — смотри параметр «Hw. Retries».
Оставляем по-умолчанию — «0.00».
Adaptive Noise Immunity — режим адаптивной подстройки некоторых параметров приемника для минимизации интерференции и влияния шумов на качество сигнала. Работает только на чипах Atheros AR5212 и более новых. Этот параметр позволяет чипу 802.11 отфильтровывать шумы, например — отражённый сигнал самой точки доступа от соседнего здания.
Ставим значение “ap and client mode”.
Preamble Mode — настройка использование преамбулы. Варианты:
- long — только длинная преамбула;
- short — только короткая;
- both — оба варианта.
Выбираем both — включение короткой и длинной преамбулы пакетов, если поставить — short возможно не все устройства смогут подключиться к сети.
Оставляем значение «both».
Allow Shared Key — разрешает подключение клиентов с открытым ключем WEP. Для безопасности эта галочка снята.
Оставляем снятую галочку.
Disconnect Timeout — временной промежуток, через который клиент, не отвечающий на запросы, будет отключен. Смотри параметр «Hw. Retries».
Оставляем значение «00:00:03».
On Fail Retry Time — время ожидания устройства перед повторной пересылкой данных. Смотри параметр «Hw. Retries».
Оставляем значение «0.10».
Update Stats Interval — интервал времени, через который будут обновляться статистические данные беспроводных клиентов (скорость соединения, CCQ и т.п.).
Ничего не меняем, оставляем пустым.
HT

Tx Chain и Rx Chain — В устройствах MikroTik обычно две встроенные антенны, данный параметр говорит через какие антенны принимать и передавать. По умолчанию включен только нулевой канал, поэтому при использовании MIMO не достигаются высокие скорости, а дальность работы существенно меньше. В случае если у вашего устройства радиомодуль, например MIMO R2T2, состоящий из двух приемопередатчиков, которые подключены к разным антеннам (или к одной антенне с двумя различными поляризациями), то эти настройки позволяют, например, осуществлять передачу через одну антенну, а получить данных через другую (или через различные поляризации одной антенны).
Отмечаем 4 галочки.
Antena Mode — режим есть тогда, когда есть возможность подключить к роутеру внешнюю антенну. Он указывает разные режимы работы антенны. Варианты:
- antenna a — работают встроенные антенны устройства;
- antenna b — работают внешняя и внутренние антенны параллельно, при условии отмеченных 4 галочек в Tx Chain и Rx Chain. Что-бы работала только внешняя антенна — снять галочки с канала chain0.
- tx-a/rx-b — одна антенна работает на приём, вторая на отдачу;
- rx-a/tx-b — аналогично, только наоборот.
Оставляем по-умолчанию — «antenna a».
AMSDU Limit — максимальный размер агрегированного пакета AMSDU (Aggregated Mac Service Data Unit).
Оставляем по-умолчанию — «8192».
AMSDU Threshold — максимальный размер фрейма, который может быть включен в пакет AMSDU. Агрегация может значительно увеличить пропускную способность линка, особенно при большом количестве мелких пакетов, но в то же время увеличить время задержки, в случае потери пакетов из-за повторной передачи агрегированного пакета. Включение AMSDU также увеличивает нагрузку на процессор.
Оставляем по-умолчанию — «8192».
Guard Interval — защитный интервал. Всегда выставляем «long», если используется стандарт N для наружных линков.
Так как точка внутри помещения — оставляем по-умолчанию — «any».
AMPDU Priorities — приоритеты пакетов, которые будут посланы с использованием механизма AMPDU (Aggregated Mac Protocol Data Unit). Рекомендуется использовать только для пакетов с высоким приоритетом, так как отправка большого количества пакетов через AMPDU приводит к увеличению времени задержки и повышению нагрузки. Классы приоритета передачи в беспроводном интерфейсе, который можно пометить: Best Effort (0), Background (1), Spare (2), Excellent (3), Control Lead (4), Video <100ms Latency (5), Voice <100ms Latency (6), Network Control (7).
Оставляем по-умолчанию — включена только 1 галочка.
HT MCS

На вкладке HT MCS, так же как и на DATA RATES производится управление канальными скоростями. Тут происходит управление беспроводной сетью в режиме N и MIMO, каждая галочка позволяет работать на каждом типе модуляции/скорости и изменения этих параметров производить не следует. Обычно используется для тонкой настройки сети при определенных условиях, но это практически не требуется при использовании внутри помещений. Для настройки обычной точки доступа на этой вкладке не нужно производить никакие изменения.
WDS

WDS Mode — тип WDS-моста. Значения:
- disabled — режим WDS выключен;
- dynamic — автоматическое добавление WDS-интерфейсов при подключении клиентов;
- dynamic mesh — позволяет клиенту перемещаться между wi-fi точками без обрыва связи;
- static — означает что для соединения в режиме WDS на обоих точках необходимо прописывать MAC адреса удалённых точек;
- static mesh — по аналогии с dynamic mesh, позволяет клиенту перемещаться между wi-fi точками без обрыва связи, на которых заранее были прописаны mac-адреса.
Рекомендуется выставлять режим Dynamic, тогда новые клиенты в бридж будут добавляться автоматически. В случае предпочтения ручного добавления выбираем Static.
В обычной точке доступа мы WDS не используем, а значит оставляем по-умолчанию -«disabled».
WDS Default Bridge — дефолтно клиенты будут добавляться в указанный в этом поле бридж. Поэтому указываем здесь его наименование, например «bridge1».
Оставляем по-умолчанию — «none».
WDS Default Cost — стоимость (или метрика) WDS-интерфейса который будет помещен в бридж.
Оставляем по-умолчанию — «100».
WDS Cost Range — метрика WDS-интерфейса может автоматически корректироваться в зависимости от пропускной способности канала. Проверка происходит каждые 5 секунд и если пропускная способность изменилась более чем на 10% — параметр cost корректируется. Если установить 0 — механизм будет отключен.
Оставляем по-умолчанию — «50-150».
WDS Ignore SSID — по умолчанию WDS связь между двумя точками может быть создана только тогда , когда они работают на одной и той же частоте и имеют одинаковое значение SSID. Если поставить галочку — идентификатор SSID не будет проверяться. Это свойство не оказывает никакого влияния на клиентов в WDS режиме.
Оставляем по-умолчанию — галочка снята.
Nstreme

На этой вкладке задаются настройки поллингового (polling — «опрос готовности устройств») протокола. Nstreme — фирменный Mikrotik-протокол. Поллинговый протокол в основном используется для передачи данных в беспроводных сетях на большие расстояния. Для этого используется механизм циклического опроса клиентов сети друг за другом, чтобы узнать есть ли у них данные для передачи по радиоканалу. Если такие данные есть то устройству предоставляется разрешение на их передачу. Все другие устройства в это время молчат. Если при опросе у клиента нет данных для передачи то происходит опрос следующего клиента и так далее по очереди.Поллинговые протоколы позволяют улучшить качество и скорость работы беспроводной сети, но все клиенты должны поддерживать их. Такими клиентами могут быть только устройства фирмы Mikrotik. Ноутбуки, коммуникаторы и смартфоны такими клиентами не являются, поэтому поллинговые протоколы следует отключить.
Enable Nstreme — включает фирменный поллинговый протокол Mikrotik.
Оставляем по-умолчанию — галочка снята.
Enable Polling — включает динамический опрос подключенных клиентов.
Снимает галочку.
Disable CSMA — отключает режим контроля несущей и обнаружения коллизий.
Оставляем по-умолчанию — галочка снята.
Framer Policy — выбирает режим упаковки маленьких пакетов в большие. Оптимальное значение — Dynamic Size.
Механизм не используем — «none».
Framer Limit — размер пакета, оптимальное значение 3200.
Оставляем по-умолчанию — «3200».
Если вы используете этот протокол то: nstream – делает прокачку на линке немного больше + выключает ACK, polling – делает порядок в сети (хотя для режима точка-точка с него толку мало), и CSMA – выключает стандартный для 802.11.abg доступ к среде передачи, включается только после того как вы включили опцию Polling. Ещё для увеличения прокачки линка можно проиграться с параметрами Frame Policy.
NV2
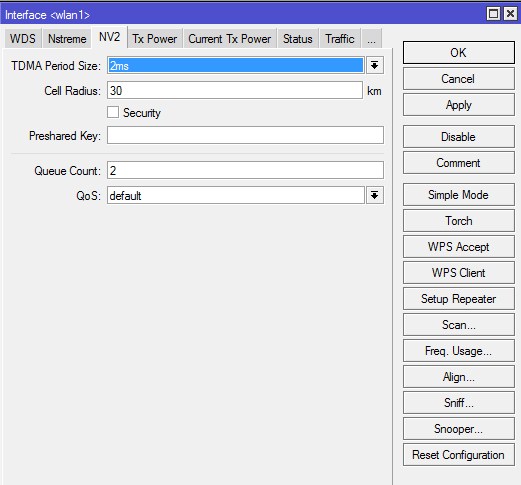
На вкладке NV2 производится управление поллинговым протоколом Nstreme Version 2.
TDMA Period Size — задает время передачи, чем меньше значение — тем меньше задержка, и меньше максимальная скорость, чем больше значение – тем больше скорость, однако, возрастает и задержка. Обычно используют значения 1-5.
Так как для обычной точки это протокол не используем, оставляем по-умолчанию — 2.
Cell Radius — максимальная дальность работы клиента, 10 километров — минимальное значение.
Оставляем по-умолчанию — 30.
Security — включение шифрования на канале. При использовании NV2 применяется свое отдельное шифрование.
Оставляем по-умолчанию — галочка снята.
Preshared Key — ключ беспроводной сети.
Поле не заполняем.
Queue Count — определяет, сколько очередей приоритетов используются в сети NV2. Подробнее.
Оставляем по-умолчанию — «2».
QoS — Устанавливает механизм приоритета пакета данных. Подробнее. Значения:
- frame-priority — ручная установка, совместно с Mangle-правилами.
- default — установка по умолчанию, где небольшие пакеты получают приоритет.
Оставляем по-умолчанию — «default».
TX Power

Большинство MikroTik используют 1W передатчики. По законодательству России и Украины разрешено использовать точки доступа без регистрации не более 0.1W.
Усиление в 17 dBm — примерно 0.1W. Увеличение на три пункта, увеличивает мощность передатчика вдвое.
И того:
- 18 dBm ~ 0.12W
- 21 dBm ~ 0.25W
- 24 dBm ~ 0.5W
- 27 dBm ~ 1W — по умолчанию обязательно убрать.
Не нужно боятся указывать низкую мощность, т.к. на практике это обычно увеличивает скорости работы и снижает помеховое воздействие на соседние устройства. Не забывайте, что мощность передатчиков мобильных устройств обычно лежит в пределах 6-16дБм, поэтому установив мощность на точке доступа максимально высокую получится ситуация, когда клиенты видят сеть в списке, но подключиться не могут, т.к. точка не слышит от них слабых сигналов.
Значения:
- default — режим по умолчанию — мощность выбирается из специальной таблицы в памяти роутера MikroTik. Обычно — максимальная мощность.
- card rates — мощность подбирается по специальному алгоритму, который использует значение мощности, установленное пользователем. Режим не доступен на многих устройствах.
- manual — для каждой скорости можно вручную указать мощность передачи;
- all rates fixed — для всех скоростей используется один уровень мощности, установленный пользователем. Говорят, что этот режим не рекомендуется использовать, поскольку на высоких скоростях могут возникать ошибки передачи данных, перегреваться и выходить из строя чипы роутера. В то-же время на многих роутерах — это единственный режим ограничения мощности. Поэтому вполне возможно эта проблема уже решена. Лично я всегда ставлю это режим — проблем нет.
Желательно установить значение равным 15 и если не будет хватать — то поднять не более 17-19.
Current Tx Power

Здесь отображаются текущие настройки мощности Wi-Fi передатчика произведенные на вкладке Tx Power. В первом столбике Rate указаны канальные скорости, в столбике Tx Power мощность указанная в настройках, столбик Real Tx Power показывает реальную выходную мощность по каждому каналу, а Total Tx Power суммарную по всем каналам. При использовании MIMO происходит увеличение энергетики на 3dBm.
Status
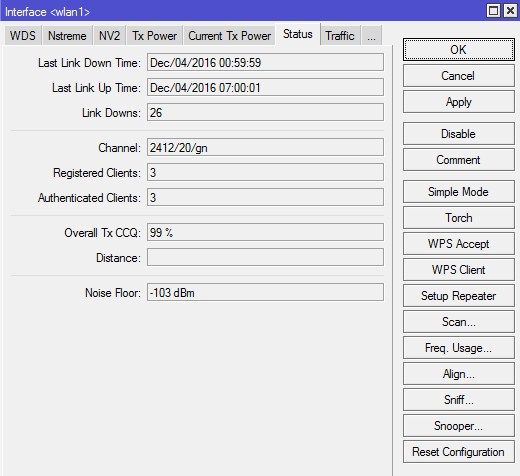
Last Link Down Time — время последнего дисконнекта интерфейса.
Last Link Up Time — время последнего включения интерфейса.
Link Downs — количество выключений интерфейса.
Channel — частота, на которой работает базовая станция.
Registered Client — количество зарегистрированных клиентов (устройств).
Authenticated Clients — количество (устройств) прошедших аутентификацию.
Overall Tx CCQ – усреднённый CCQ (качество канала на передачу/прием) только на передачу Tx. На базовой станции он показывает усреднённые значения по качеству передачи на всех подключившихся wi-fi клиентах.
Distance — расстояние до противоположной точки.
Noise Floor — шум на этой частоте со стороны клиента. Нормальным значением шума считается -95 и более. Если значение шума -90, то связь будет нестабильной. В этом случае нужно перейти на более свободную от помех частоту или уменьшить ширину канала.
Setting up a Mikrotik as a wireless SOHO router at home is a relatively easy task for even a seasoned system administrator. Setting up 802.11 protocol to perform fast, fluent and adapted to the environment is an advanced thing that requires some in-depth knowledge of the field.
Some time ago I purchased a used RB951Ui-2HnD and set it to work in default mode.
After making some basic settings such as the wireless channel, channel width and transmission power, I have noticed that the connection speed and latency in remote corners of the apartment is still awful. The signal is bearable, but I get only 5mbps out of 50mbps download speed over the air. 50 mbps is the tariff that comes from the ISP, but I get some sure 45-48mbps when measured in clear site with the router, over WLAN. My apartment is 70m2 and most of the walls are made of think concrete. Obviously, increasing solely the transmission power will bring nothing, except lots of extra signal noise. I needed a way to improve the situation without purchasing any additional hardware or cabling.
802.11 protocol starting from the e revision boasts a possibility to do frame aggregation on the MAC layer, thus giving more space to solve throughput problems for the technology and improve overall band width by means of the OSI Level 2. The so-called A-MSDU and A-MPDU (Aggregated Mac Protocol Data Unit) units allow consolidating frames, which then contain a few frames at once as long as their destination is the same. This allows avoiding duplicating overhead, which otherwise comes from the MAC layer, the PHY layer as well as inter-frame gaps, etc. At high data rates, this overhead can consume more bandwidth than the payload data frame, so putting it only once when aggregating saves us bandwidth (the ratio of payload data to total data is higher).
Here is how MSDU aggregation works (images from CWAP Study Guide):

There’s a good article explaining this here.
In RouterOS, we have three parameters available in the HT section:
AMSDU Limit, AMSDU Threshold and AMPDU Priorities. There are also options such as Guard Interval, but these should not bother in light of the goal we have. AMSDU Limit is the maximum size of the already aggregated frame, while AMSDU Threshold is the maximum size of a subframe, before aggregation. The maximum size of a AMSDU is 7935 bytes (8192 bytes in Mikrotik notation), so technically we could do a simple calculation to see how many and which size subframes could fit into a aggregated frame. The problem arises right here — the entire package now has only one CRC check and the error rate increases with the number of probable errors. Since the CRC check happens once, we cannot re-send only part of the AMSDU, thus the whole thing is re-sent.
Surprisingly, the secret for Mikrotik setup in my environment was to benefit from setting the default size of A-MSDU, thus dropping A-MSDU as an enhancement in the protocol completely:
AMSDU Limit: 2048
What is set in HT AMSDU Threshold does not make sense no more, so we can leave it as-is.
Here is someting absolutely true from some article I stumbled on:
A-MPDU should not be used with applications that require low latency such as VOIP since the price paid for higher throughput is increased latency.
Although this features A-MPDU, which is more preferred on most devices nowadays, one should understand that A-MPDU requires more efficient hardware, as performance comes from frequent re-sends of the whole aggregated frame, each including and is probably most suitable on long-distance wireless links when applied to 802.11 protocol family.
AMPDU Priorities defines which priority packages are aggregated using A-MPDU mechanism, where lower number means higher priority packages. It’s recommended to use this only for high-priority data, as sending big number of packages using A-MPDU yields high CPU usage and latency of the network device:
HT AMPDU Priorities: 0