

Сегодня у нас апгрейд сервера HP Proliant DL360 Gen9, у него освободилось четыре слота под диски, а у меня как раз есть четыре новых SSD. Будем собирать из них RAID10.
Вход в Smart Storage Administrator
Для управления массивами в Gen9 серверах используем SSA.
Загружаем сервер, при загрузке входим в SSA — Smart Storage Administrator. Это можно сделать несколькими способами. Например, жмём F9.
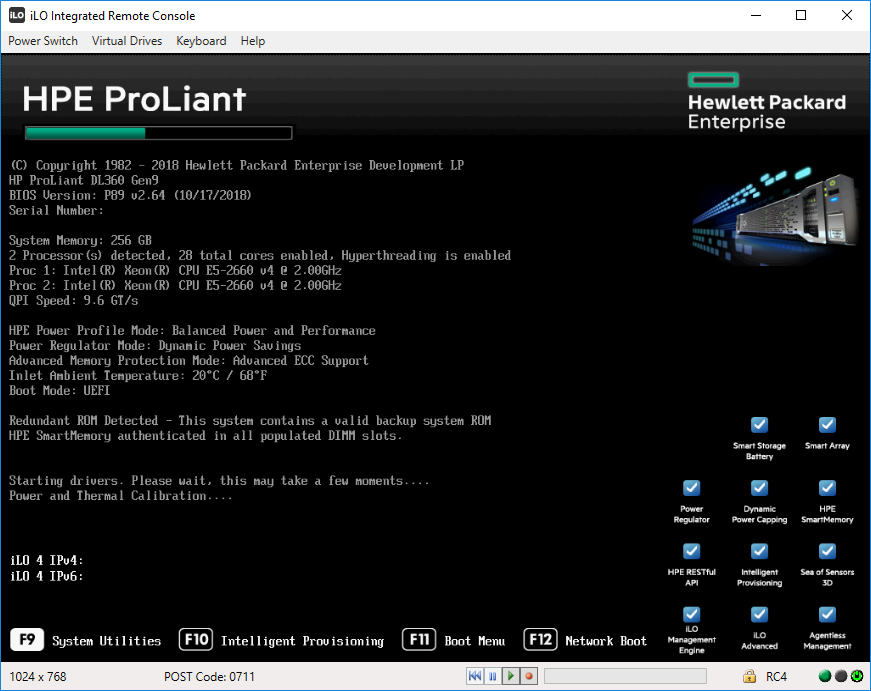
Попадаем в BIOS. Заходим в System Configuration.
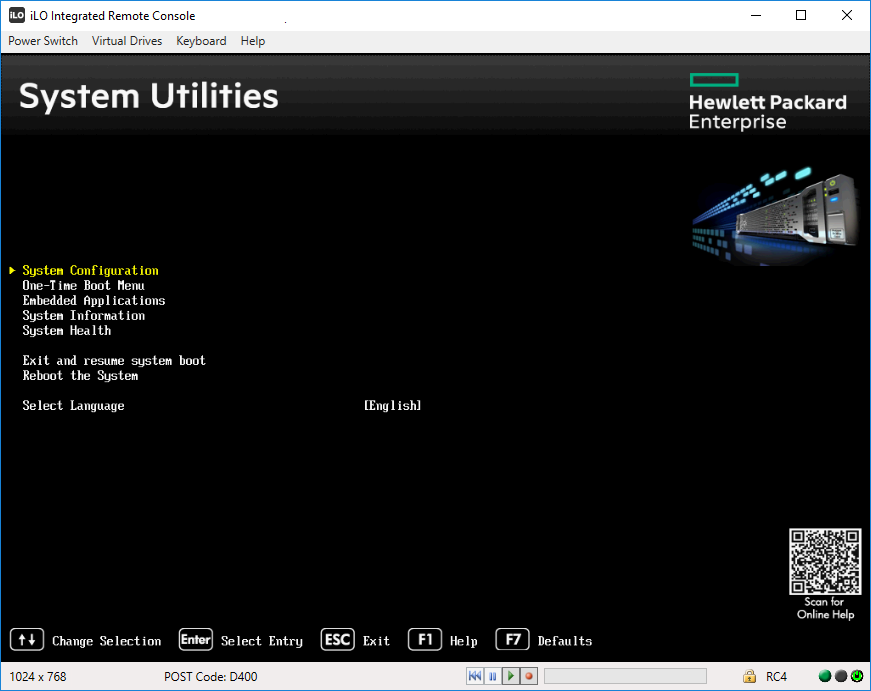
Потом в RAID контроллер.
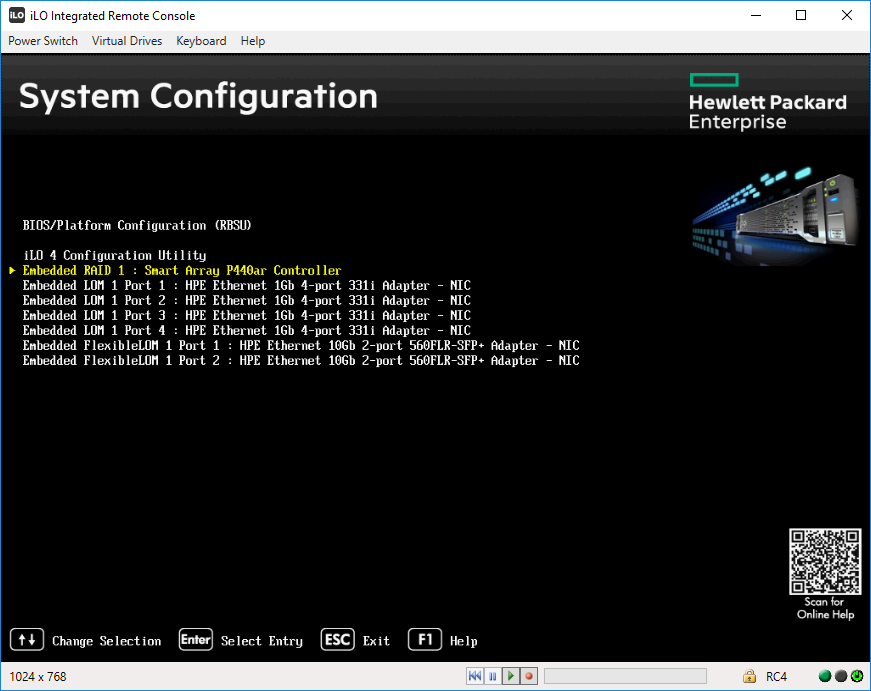
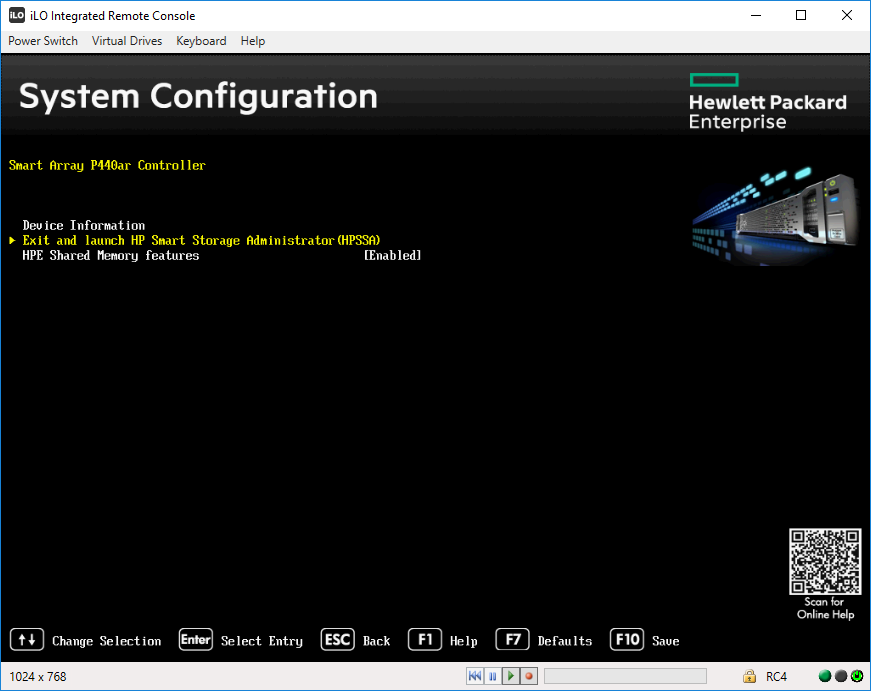
Выбираем пункт Exit and launch HP Smart Storage Administrator (HPSSA).
Запускается SSA.
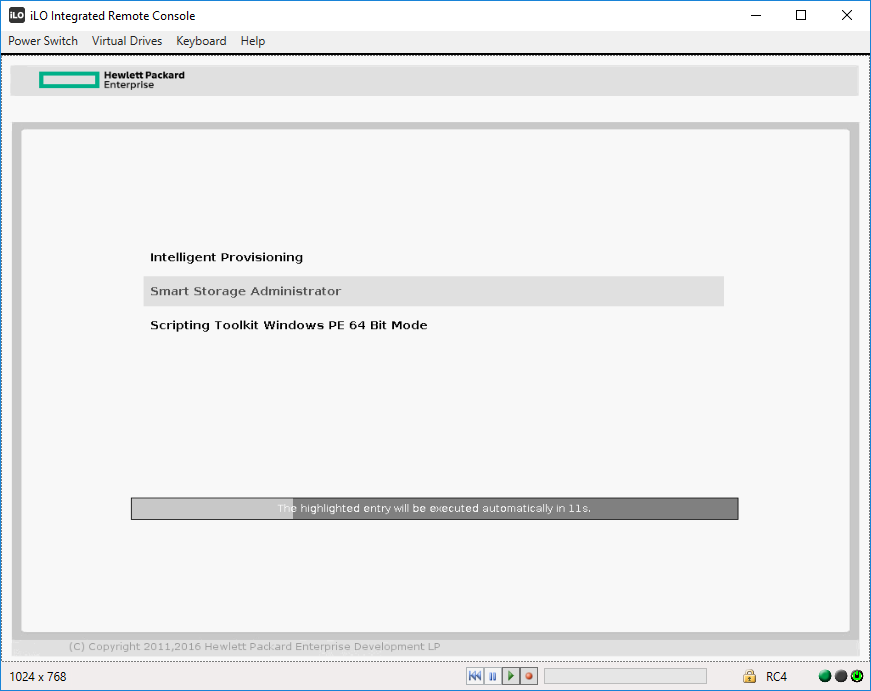
Идёт загрузка.

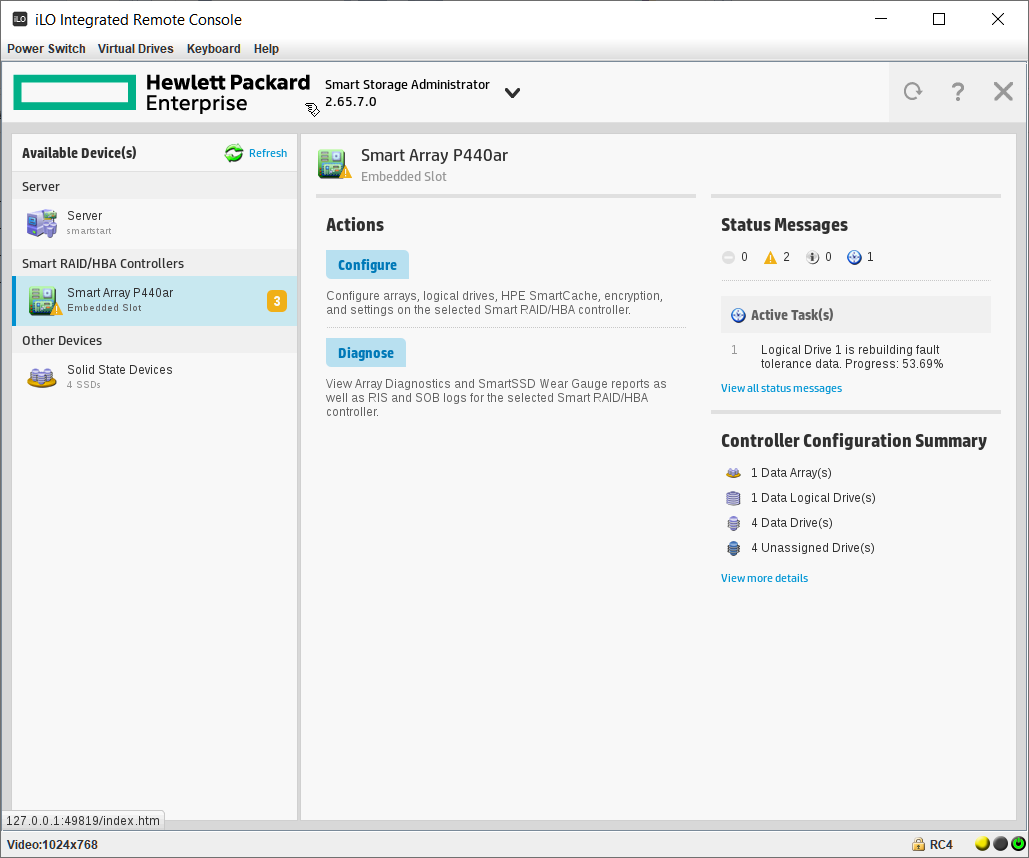
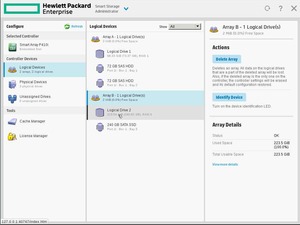
Попадаем в Smart Storage Administrator и сразу видим два предупреждения и информационное сообщение. А ещё видим, что у нас 4 Unassigned Drives и ещё 4 диска уже используются в каком-то массиве.
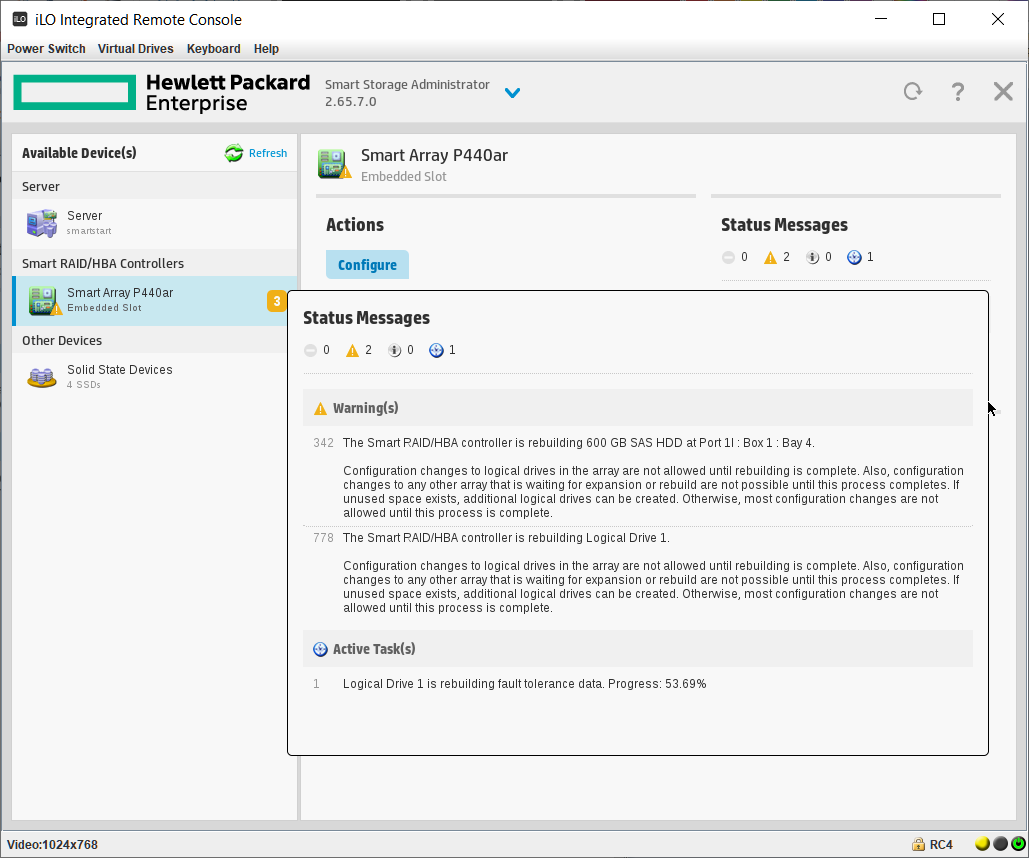
Одно предупреждение говорит нам о том, что идёт перестроение массива. Это я только что заменил сбойный HDD диск в том же сервере, не обращаем на него внимание. Информационное сообщение говорит о том, что идёт перестроение на логическом диске, это то же самое. И второе предупреждение говорит о том, что изменилась конфигурация. Ещё бы, я четыре старых HDD выкинул и поставил вместо них четыре новых SSD. Так что всё в порядке.
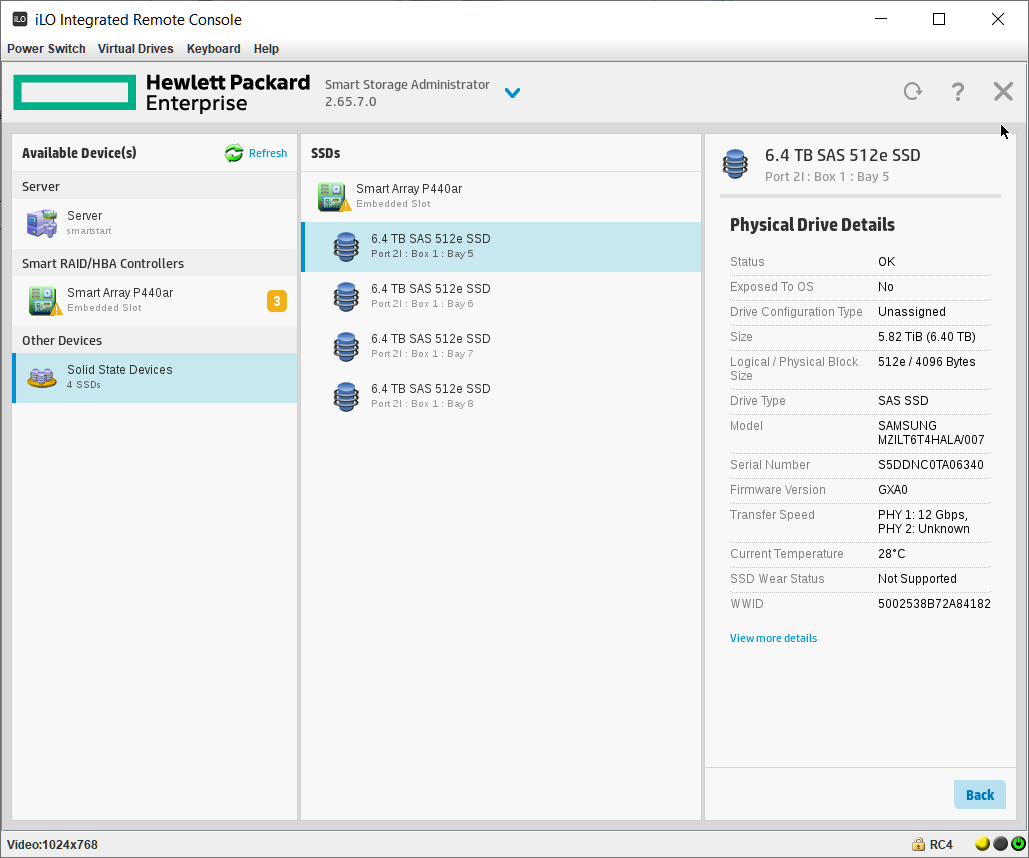
Перед началом работ убедимся в том, что SSD определились верно. Диски в порядке:
Samsung SSD 6.4 ТБ — MZILT6T4HALA-00007
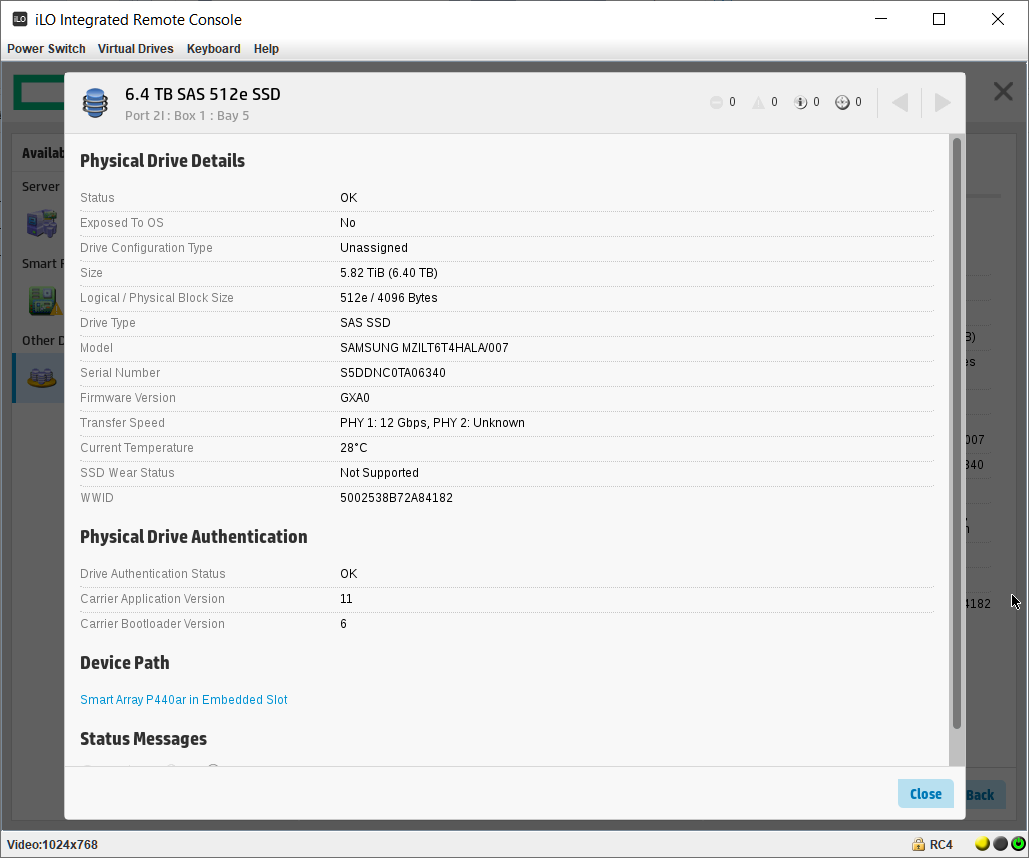
По нашей просьбе поставщики прошили диск MZILT7T6HALA-00007 DWPD1 другой прошивкой, сделав объём 6.4 ТБ, при этом DWPD подняли до 3.
RAID10 из SSD
Пора делать массив.
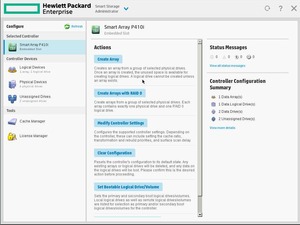
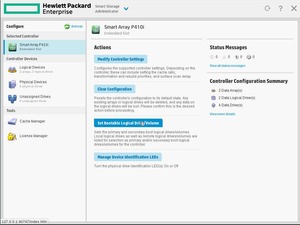
Выбираем слева нужный RAID контроллер, у меня это Smart Array P440ar. Actions → Configure.
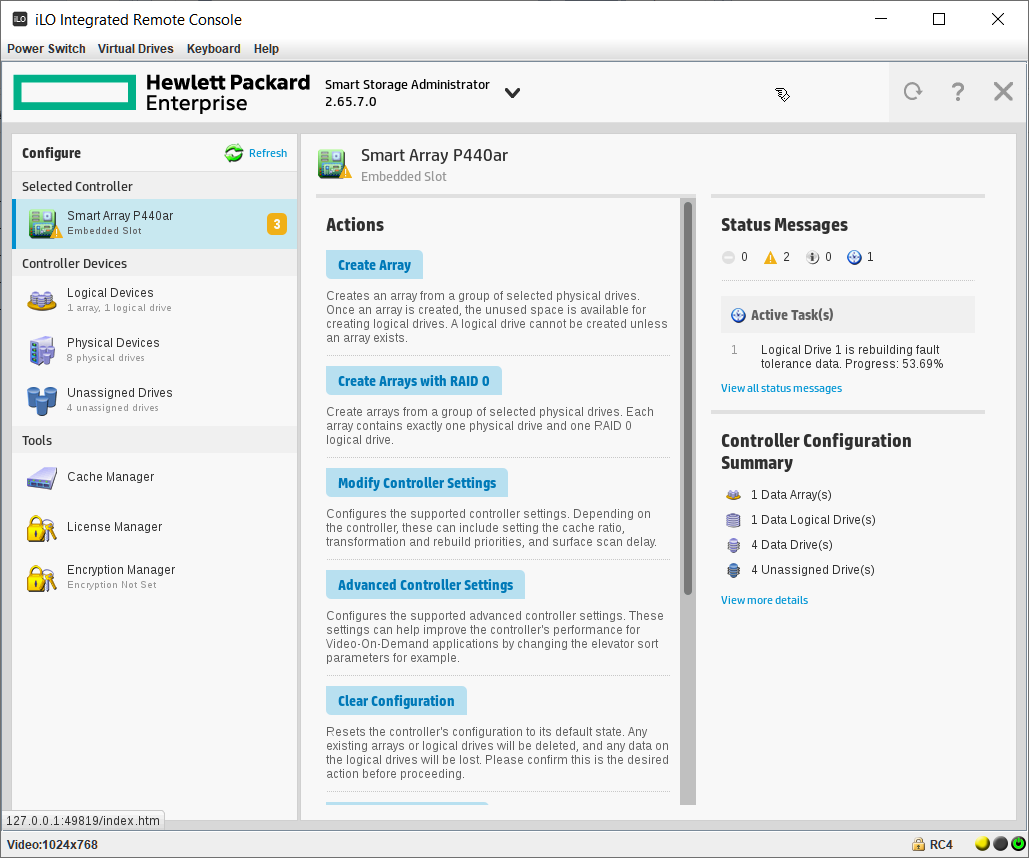
Actions → Create Array.
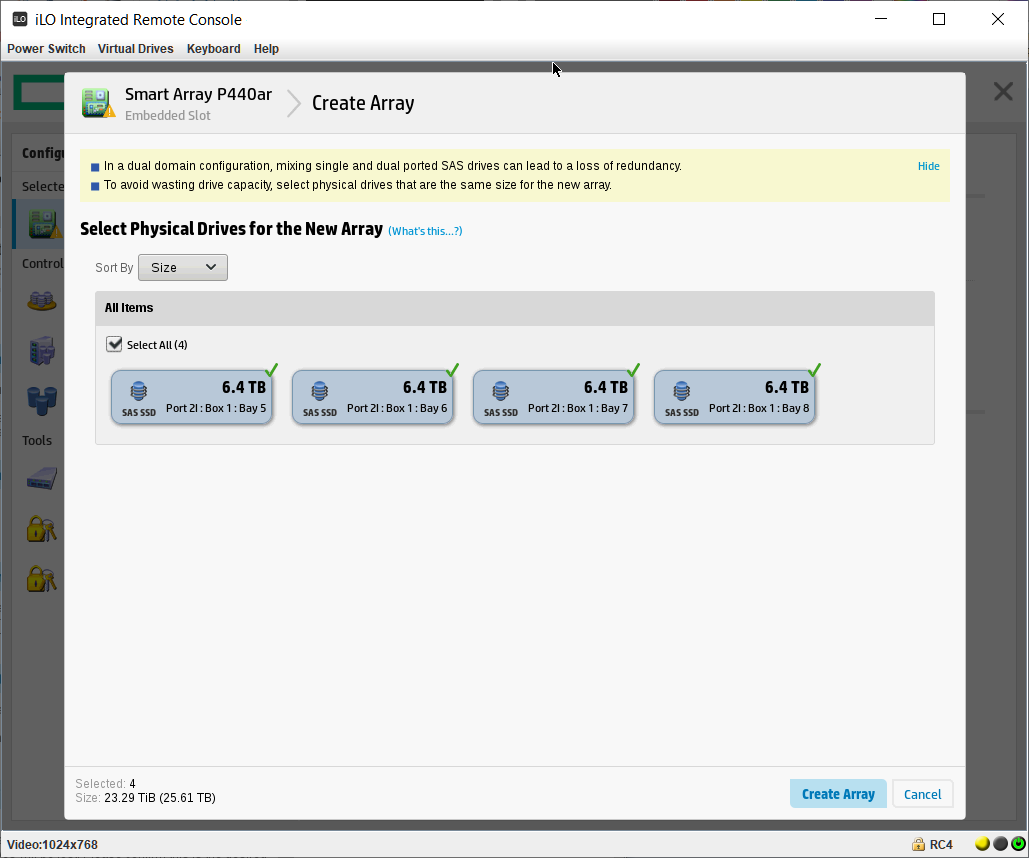
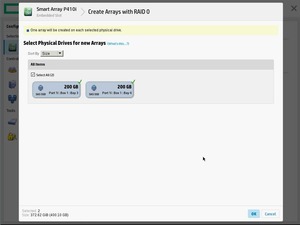
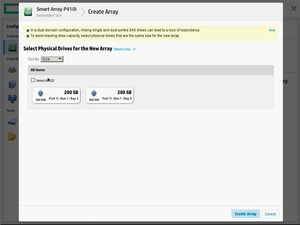
Открывается мастер создания массива. Выбираем все диски. Create Array.
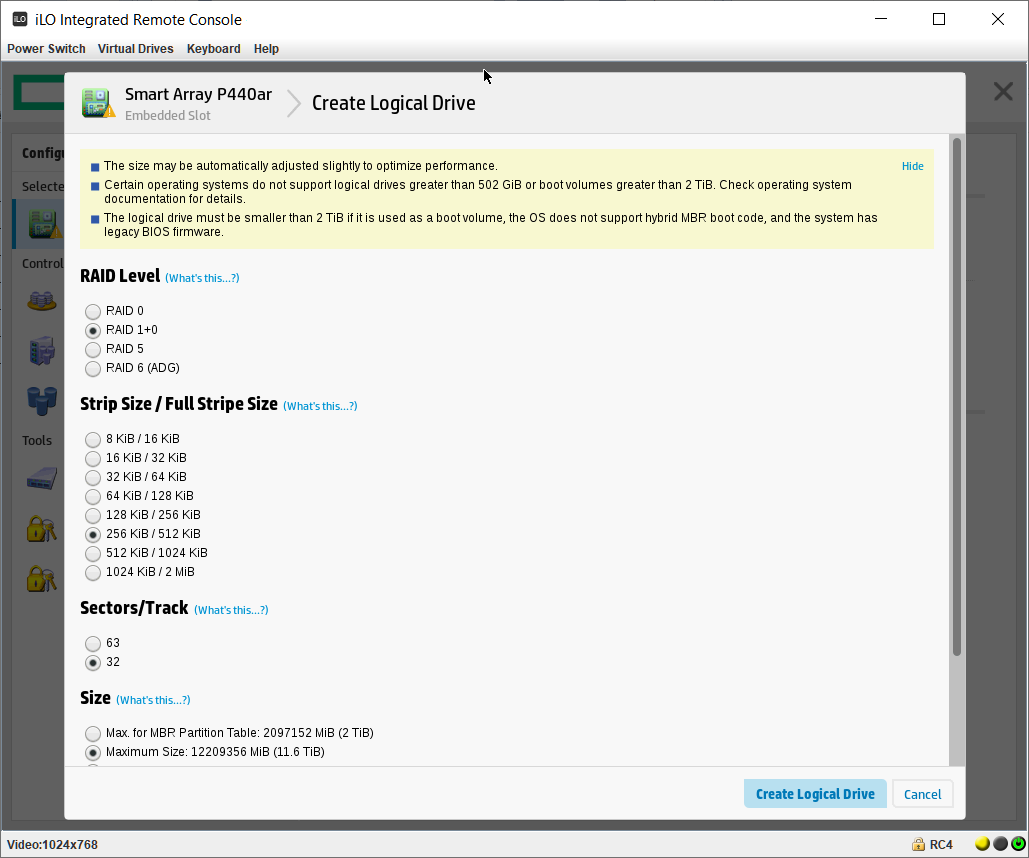
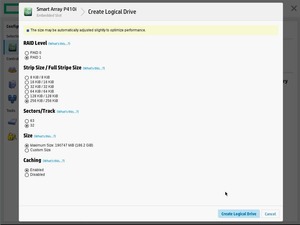
Выбираем RAID Level — RAID 1+0. Остальное оставляю по умолчанию.

Разрешаем SSD Over Provisioning Optimization.
SSD Over Provisioning — это опция, которая резервируют некоторый объём диска под нужды контроллера. Если она уже не зарезервирована. Как правило, резервная область составляет около 7% общей ёмкости. В серверах такой процент может доходить до 28%. У нас уже с дисками всё в порядке, DWPD 3 всё-таки.
Любой SSD диск состоит из микросхем NAND памяти. NAND Flash разделена на блоки размером 512 Кб или 256 Кб. Блоки разделены на страницы по 4 Кб. Писать страницы можно только в пустые блоки. Перезапись страницы осуществляется так: сначала считываются все страницы блока, блок стирается, потом блок записывается со старыми и новыми страницами. Это долго, если есть чистый блок, то старый блок считывается, пишется в чистый с новой страницей. А потом уже лишнее стирается в фоновом режиме. Чем больше таких чистых блоков, тем быстрее запись. К тому же из Over Provisioning области выделяются блоки на смену вышедшим из строя. К сожалению, цикл перезаписи в NAND памяти ограничен. Ресурс разнится от 100000 до 1000-3000 циклов в зависимости от технологии производства.
Create Logical Drive.
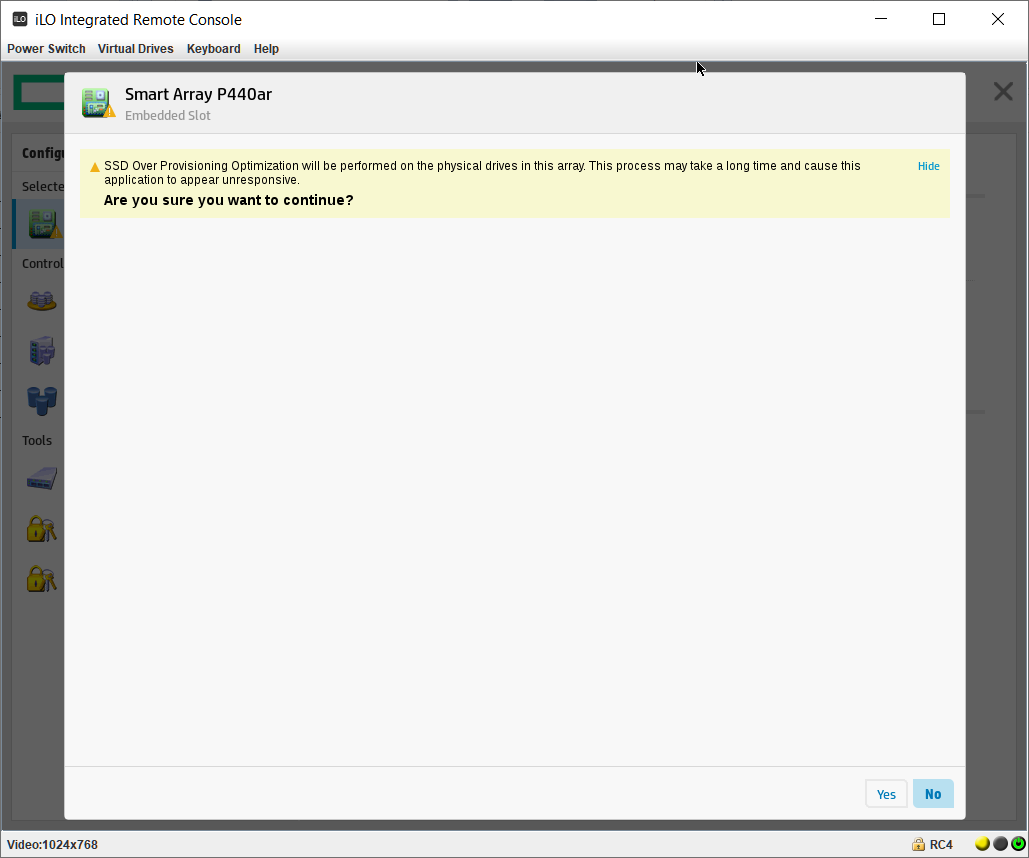
Нас предупреждают о том, что процесс оптимизации может быть долгим. На самом деле с таким не сталкивался. Yes.
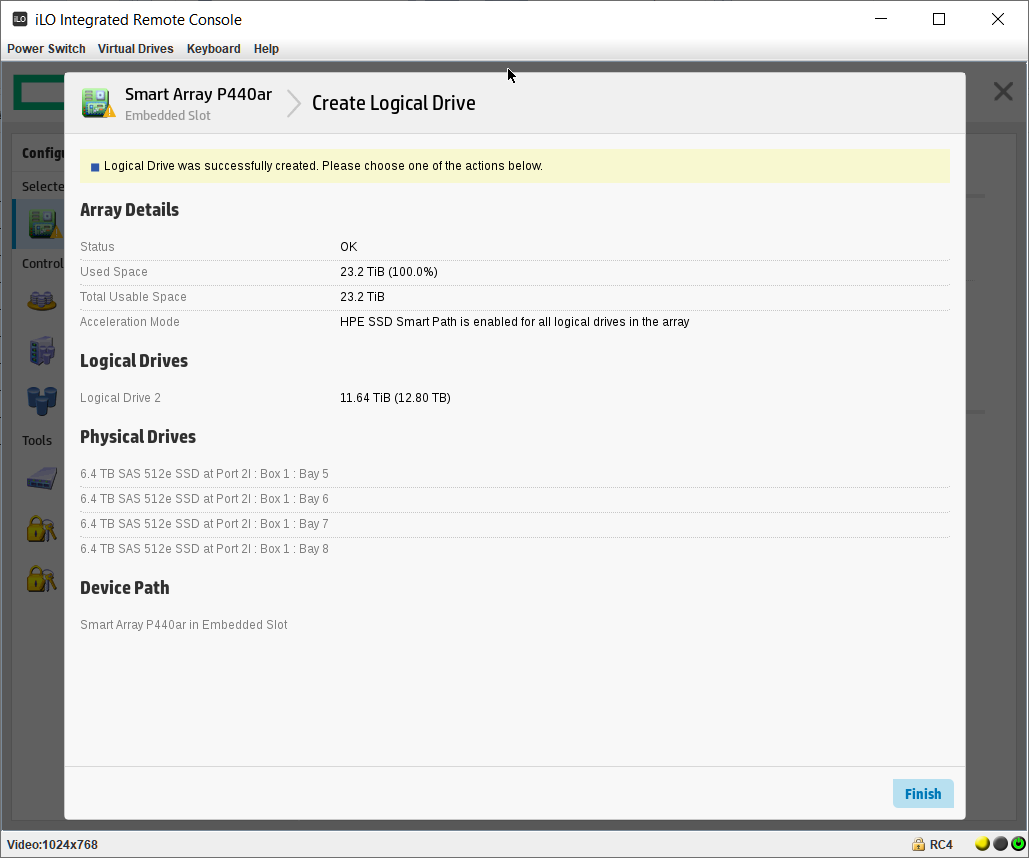
Finish.

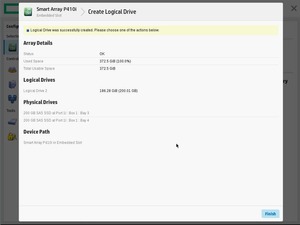
Массив создан. Мы видим его как Array B.
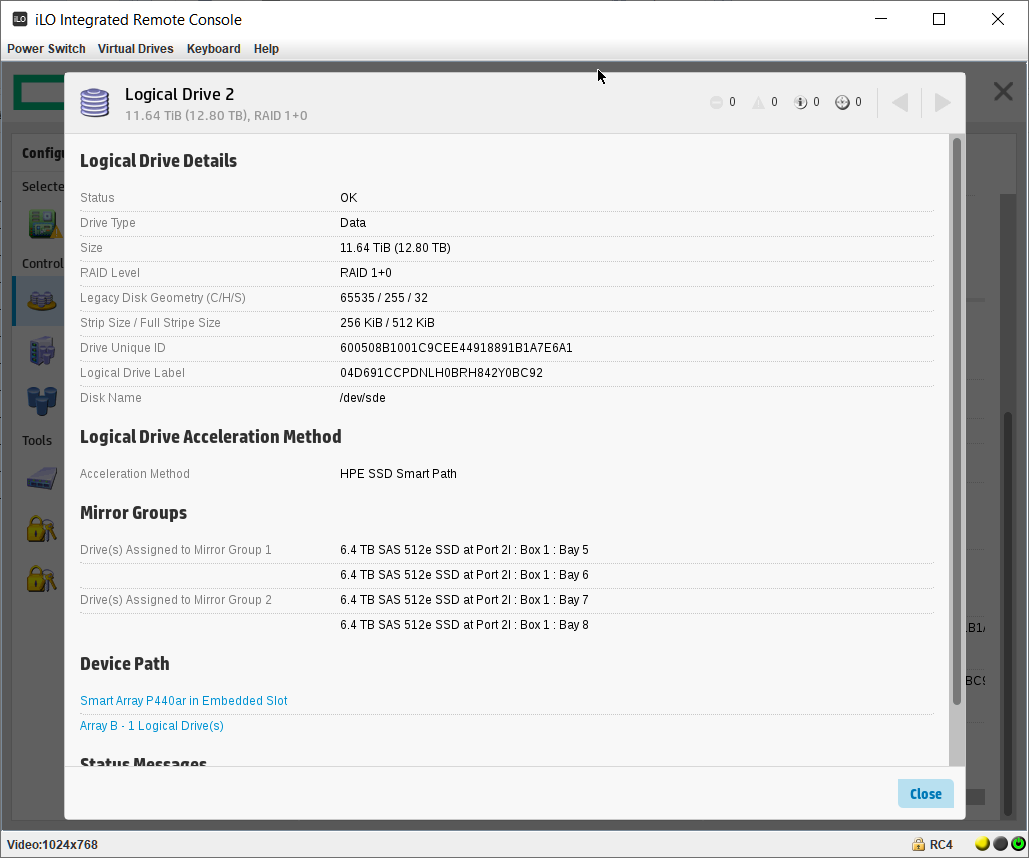
На массиве создан логический том RAID 1+0. Размер страйпа задан по умолчанию 256 KiB.
Иногда возможностей конфигурационной утилиты, встроенной в RAID-контроллер, не достаточно.
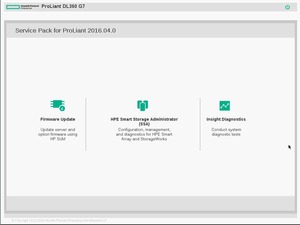
Например, когда требуется изменить размер страйпа массива. Сделать это можно через HPe Array Configuration Utility из установленной операционной системы. Что делать, собранного массива, еще нет и OS ставить попросту некуда? Поможет инструмент Service Pack for Proliant, включающий в себя средство управления дисками.
И так, начнем. Монтируем образ Service Pack или вставляем диск либо флешку, ждем завершения процесса инициализации оборудования:
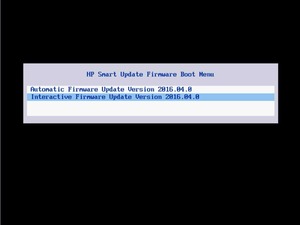
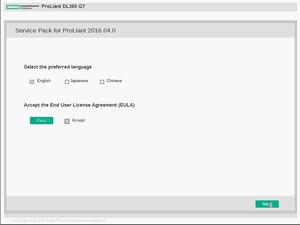
Выбираем «Interactive Firmware Update», соглашаемся с лицензионным соглашением:
На следующем экране выбираем HPE Smart Storage Administrator (SSA):
А вот и утилита:
Контроллер P411 сигнализирует о проблеме:
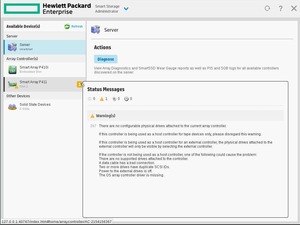
Сообщение гласит о том, что контроллер не видит ни одного физического диска. Действительно, на данный момент, к нему ничего не подключено. Переключаемся на контроллер p410i:

На этом контроллере два массива: raid1 2x72Gb дисков и raid0 (что, в данном случае эквивалентно прямому подключению) из одного SATA SSD носителя.
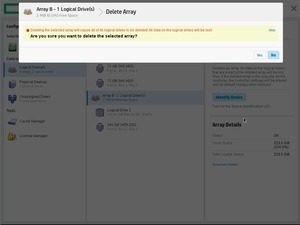
Доступные действия: удалить массив или подсветить физические диски. Удаляем raid0. Вместо SATA SSD вставляем пару SAS SSD и соберем массив на них. Есть возможность имитации «прямого подключения» через создание нескольких raid0 массивов (по количеству дисков):
Либо создать полноценный raid массив:
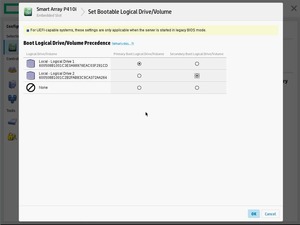
Также, здесь можно выбрать очередность загрузки:
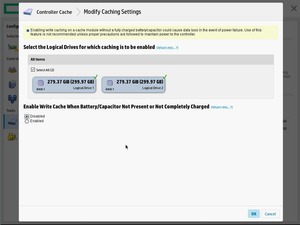
В настройках кэша контроллера можно откючить кэширование для выбранных массивов, либо переключить настройки кэширования на запись, при отсутствующей или не заряженной батареи.
И, в завершении, можно изменить настройки контроллера, в частности — приоритет перестроения массива.

На этом, сей краткий обзор завершен.
Вернуться назад

The name of HP has always been one of the largest manufacturers of servers and storage equipment in the world, and as a result, the largest part of organizations across world, a large part of the server infrastructure and storage organizations, companies and even data centers are HP products. It is dedicated. If you are one of the System administrators who always try to get the most out of their equipment and facilities, you should have worked with HPE Smart Storage Administrator or HPE SSA; however, for those who might not have known this utility, I would say that with the help of this software, you can see the status of the Raid Controller and Logical Drives, as well as the disks on the Windows installed on the HP server, or make changes to the Raid of this Logical Drive, and a number of features that can be easily installed. You will get to know him.
But the main challenge began when the virtualization platform transformed all of the network’s infrastructure comprehensively, and given that the software was controlling and displaying these processes in direct communication with the Raid Controller; in fact, installing this software in Virtual operating systems were useless.
Of course, HP has made up for some of its weaknesses by making significant changes to the ILO and Bios bundles of its servers, but again, in order to access the good GUI, you must reset the server and import the software from the menu as The default ILO v4 is available on servers.
In this tutorial, I am going to introduce you to the HPE Smart Storage Administrator (HPE SSA) CLI for VMware, which covers almost 90% of the processes in the Windows software, except that you must use CLI commands Work with it.
By downloading your Hypervisor package at the bottom of the post and installing it, you can use the software with the instructions below.
After downloading the VIB package and storing it in the Datastore Server, install the package using ESXi Shell environment with this command.
# esxcli software vib install -v <path> <filename.vib>

The installation process is exactly same like installing the ESXi update patche . Please note that if this package is fully installed, you must receive this message The Update Completed Successfully. During the installation process, you need to restart the hosts.
After the host restarts, login to ESXi Shell to ensure that the package is installed, enter this command (uppercase and lowercase letters are important) to verify installation.
# esxcli software vib list | grep hpe

To start working with this utility under CLI, you must first enter the following path.
./opt/smartstorageadmin/ssacli/bin/ssacli
And, according to your needs, run any of the following commands.
Show configuration
./opt/smartstorageadmin/ssacli/bin/ssacl ctrl all show config
Controller status
./opt/smartstorageadmin/ssacli/bin/ssacl ctrl all show status
Show
detail controller information for all controllers ./opt/smartstorageadmin/ssacli/bin/ssacl ctrl all show detail
Show detailed controller information for controller in slot 0
./opt/smartstorageadmin/ssacli/bin/ssacli ctrl slot = 0 show detail
Rescan for New Devices
./opt/smartstorageadmin/ssacli/bin/ssacli rescan
Physical disk status
./opt/smartstorageadmin/ssacli/bin/ssacli ctrl slot = 0 pd all show status
Show detailed physical disk information
./opt/smartstorageadmin/ssacli/bin/ssacli ctrl slot = 0 pd all show detail
Logical disk status
./opt/smartstorageadmin/ssacli/bin/ssacli ctrl slot = 0 ld all show status
View Detailed Logical Drive Status
./opt/smartstorageadmin/ssacli/bin/ssacli ctrl slot = 0 ld 2 show
Create New RAID 0 Logical Drive
./opt/smartstorageadmin/ssacli/bin/ssacli ctrl slot = 0 create type = ld drives = 1I: 1: 2 raid = 0
Create New RAID 1 Logical Drive
./opt/smartstorageadmin/ssacli/bin/ssacli ctrl slot = 0 create type = ld drives = 1I: 1: 1,1I: 1: 2 raid = 1
Create New RAID 5 Logical Drive
./opt/smartstorageadmin/ssacli/bin/ssaclictrl slot = 0 create type = ld drives = 1I: 1: 1,1I: 1: 2,2I: 1: 6,2I: 1: 7, 2I: 1: 8 raid = 5
Delete Logical Drive
./opt/smartstorageadmin/ssacli/bin/ssacli ctrl slot = 0 ld 2 delete
Add New Physical Drive to Logical Volume
./opt/smartstorageadmin/ssacli/bin/ssaclictrl slot = 0 ld 2 add drives = 2I: 1: 6.2I: 1: 7
Add Spare Disks
./opt/smartstorageadmin/ssacli/bin/ssacli ctrl slot = 0 array all add spares = 2I: 1: 6.2I: 1: 7
Enable Drive Write Cache
./opt/smartstorageadmin/ssacli/bin/ssacli ctrl slot = 0 modify dwc = enable
Disable Drive Write Cache
./opt/smartstorageadmin/ssacli/bin/ssacli ctrl slot = 0 modify dwc = disable
Erase Physical Drive
./opt/smartstorageadmin/ssacli/bin/ssacli ctrl slot = 0 pd 2I: 1: 6 modify erase
Turn on Blink Physical Disk LED
./opt/smartstorageadmin/ssacli/bin/ssacli ctrl slot = 0 ld 2 modify led = on
Turn off Blink Physical Disk LED
./opt/smartstorageadmin/ssacli/bin/ssacli ctrl slot = 0 ld 2 modify led = off
Modify smart array cache read and write ratio (cacheratio = readratio / writeratio)
./opt/smartstorageadmin/ssacli/bin/ssacli ctrl slot = 0 modify cacheratio = 100/0
Enable smart array write cache when no battery is present. /
Opt / smartstorageadmin / ssacli / bin / ssacli ctrl slot = 0 modify nbwc = enable
Disable smart array cache for certain Logical Volume
./opt/smartstorageadmin/ssacli/bin/ssacli ctrl slot = 0 logicaldrive 1 modify arrayaccelerator = disable
Enable smart array cache for certain Logical Volume
./opt/smartstorageadmin/ssacli/bin/ssacli ctrl slot = 0 logicaldrive 1 modify arrayaccelerator = enable
Enable SSD Smart Path
./opt/smartstorageadmin/ssacli/bin/ssacli ctrl slot = 0 array a modify ssdsmartpath = enable
Disable SSD Smart Path
./opt/smartstorageadmin/ssacli/bin/ssacli ctrl slot = 0 array a modify ssdsmartpath = disable
Downloads :
HPE Smart Storage Administrator CLI for VMware vSphere 6.5
HPE Smart Storage Administrator (HPE SSA) CLI for VMware 6.0
HP Smart Storage Administrator Diagnostic Utility (HP SSADU) CLI for Windows x64
Last edited on 16 March 2023, at 00:30.
HP Smart Storage Administrator, also abbreviated as HP SSA, is the set of utilities used to manage HP Raid controllers.
Linux[edit | edit source]
For CentOS/RHEL, obtain the RPM packages from https://support.hpe.com/hpsc/swd/public/detail?swItemId=MTX_d6ebba0f5cd642edace4648b9a or try searching for the hpacucli package from http://downloads.linux.hpe.com/SDR/repo/mcp/centos/8/x86_64/12.05/. Install with yum -y install hpacucli.rpm.
For Debian, obtain the DEB packages from: http://downloads.linux.hpe.com/SDR/repo/mcp/debian/pool/non-free/. Install the package with dpkg -i hpacucli.deb.
On RHEL systems, the binary will be placed in /opt/compaq/hpacucli/bld. On Debian, it’s placed in /usr/sbin and is part of the path.
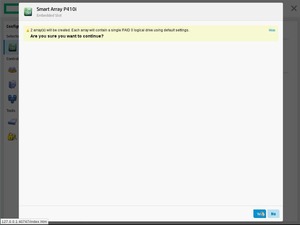
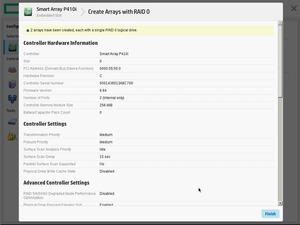
root@x:/root# /opt/compaq/hpacucli/bld/hpacucli ctrl all show  config

Smart Array P410i in Slot 0 (Embedded)    (sn: 50014380236B2020)

   array A (SAS, Unused Space: 0  MB)


      logicaldrive 1 (279.4 GB, RAID 1, OK)

      physicaldrive 1I:1:1 (port 1I:box 1:bay 1, SAS, 300 GB, OK)
      physicaldrive 1I:1:2 (port 1I:box 1:bay 2, SAS, 300 GB, OK)

   unassigned

      physicaldrive 1I:1:3 (port 1I:box 1:bay 3, SATA, 1 TB, OK)

   SEP (Vendor ID PMCSIERA, Model  SRC 8x6G) 250 (WWID: 50014380236B202F)
Quick Usage[edit | edit source]
| Task | Command | Example | |
|---|---|---|---|
| General | Show all controller configs on the system | hpssacli ctrl all show config
|
|
| Show all controller statuses | hpssacli ctrl all show status
|
||
| Show detailed information on all controllers on the system | hpssacli ctrl all show detail
|
||
| Rescan for new controllers | hpssacli rescan
|
||
| Controller specific | Show detailed controller information for controller in slot 0 | hpssacli ctrl slot=0 show detail
|
|
| Enable Drive Write Cache on controller 0 | hpssacli ctrl slot=0 modify dwc=enable
|
||
| Disable Drive Write Cache on controller 0 | hpssacli ctrl slot=0 modify dwc=disable
|
||
| Modify smart array cache read and write ratio on controller 0
cacheratio=readratio/writeratio |
hpssacli ctrl slot=0 modify cacheratio=100/0
|
||
| Enable smart array write cache when no battery is present (No-Battery Write Cache option) | hpssacli ctrl slot=0 modify nbwc=enable
|
||
| Physical Disks | Physical disk status | hpssacli ctrl slot=0 pd all show status
|
|
| Show detailed physical disk information | hpssacli ctrl slot=0 pd all show detail
|
||
| Erase Physical Drive | hpssacli ctrl slot=0 pd 2I:1:6 modify erase
|
||
| Re-enable Physical Drive | hpssacli ctrl slot=0 pd 2I:1:6 modify reenable
|
||
hpssacli ctrl slot=0 pd 2I:1:6 modify
|
|||
| Logical Disks | Logical disk status | hpssacli ctrl slot=0 ld all show status
|
|
| View Detailed Logical Drive Status | hpssacli ctrl slot=0 ld 2 show
|
||
| Create New RAID 0 Logical Drive | hpssacli ctrl slot=0 create type=ld drives=1I:1:2 raid=0
|
||
| Create New RAID 1 Logical Drive | hpssacli ctrl slot=0 create type=ld drives=1I:1:1,1I:1:2 raid=1
|
||
| Create New RAID 5 Logical Drive | hpssacli ctrl slot=0 create type=ld drives=1I:1:1,1I:1:2,2I:1:6,2I:1:7,2I:1:8 raid=5
|
||
| Delete Logical Drive | hpssacli ctrl slot=0 ld 2 delete
|
||
| Add New Physical Drive to Logical Volume | hpssacli ctrl slot=0 ld 2 add drives=2I:1:6,2I:1:7
|
||
| Turn on Blink Physical Disk LED | hpssacli ctrl slot=0 ld 2 modify led=on
|
||
| Turn off Blink Physical Disk LED | hpssacli ctrl slot=0 ld 2 modify led=off
|
||
| Disable smart array cache for certain Logical Volume | hpssacli ctrl slot=0 ld 1 modify arrayaccelerator=disable
|
||
| Enable smart array cache for certain Logical Volume | hpssacli ctrl slot=0 ld 1 modify arrayaccelerator=enable
|
||
| Array | Add Spare Disks for all arrays | hpssacli ctrl slot=0 array all add spares=2I:1:6,2I:1:7
|
|
| Remove a disk from an array | hpssacli ctrl slot=0 array A remove drives=2I:1:6
|
||
| Enable SSD Smart Path | hpssacli ctrl slot=0 array A modify ssdsmartpath=enable
|
||
| Disable SSD Smart Path | hpssacli ctrl slot=0 array A modify ssdsmartpath=disable
|
Troubleshooting[edit | edit source]
Replaced a drive, but it still shows as failed[edit | edit source]
Prior to the disk replacement, dmesg showed this:
hpsa 0000:03:00.0: scsi 1:0:7:0: removed Direct-Access HP EG1200FDNJT PHYS DRV SSDSmartPathCap- En- Exp=0
Replacing the disk didn’t create a new message in dmesg as others have noted. The configs still show the physical drive as failed.
# hpssacli ctrl slot=0 show config

Smart Array P410i in Slot 0 (Embedded)    (sn: 5001438020D43A50)

   array A (SAS, Unused Space: 0  MB)


      logicaldrive 1 (136.7 GB, RAID 0, OK)

      physicaldrive 1I:1:1 (port 1I:box 1:bay 1, SAS, 72 GB, OK)
      physicaldrive 1I:1:2 (port 1I:box 1:bay 2, SAS, 72 GB, OK)

   array B (SAS, Unused Space: 0  MB)


      logicaldrive 2 (5.5 TB, RAID 5, Interim Recovery Mode)

      physicaldrive 1I:1:3 (port 1I:box 1:bay 3, SAS, 1200.2 GB, OK)
      physicaldrive 1I:1:4 (port 1I:box 1:bay 4, SAS, 1200.2 GB, OK)
      physicaldrive 2I:1:5 (port 2I:box 1:bay 5, SAS, 1200.2 GB, OK)
      physicaldrive 2I:1:6 (port 2I:box 1:bay 6, SAS, 1200.2 GB, OK)
      physicaldrive 2I:1:7 (port 2I:box 1:bay 7, SAS, 1200.2 GB, Failed)
      physicaldrive 2I:1:8 (port 2I:box 1:bay 8, SAS, 1200.2 GB, OK)

   SEP (Vendor ID PMCSIERA, Model  SRC 8x6G) 250 (WWID: 5001438020D43A5F)

# hpssacli ctrl slot=0 ld all show

Smart Array P410i in Slot 0 (Embedded)

   Array A

      logicaldrive 1 (136.7 GB, RAID 0, OK)

   Array B

      logicaldrive 2 (5.5 TB, RAID 5, Interim Recovery Mode)

# hpssacli ctrl slot=0 ld 2 modify reenable

Warning: Any previously existing data on the logical drive may not be valid or
         recoverable. Continue? (y/n) y


Error: This operation is not supported with the current configuration. Use the
       "show" command on devices to show additional details about the
       configuration.
Reason: Array status not ok

# hpssacli ctrl slot=0 array B remove drives=1:7

Error: This operation is not supported with the current configuration. Use the
       "show" command on devices to show additional details about the
       configuration.
Reason: Array is transforming
Next thing to try is to reboot the server and check the RAID via the BIOS.
Updates[edit | edit source]
You can get the most recent firmware for the HP Smart Array adapters model P212, P410, P410i, P411, P711m, P712m, and P812 are available at:
- https://support.hpe.com/connect/s/softwaredetails?softwareId=MTX_e4dcf3a67274408a9a3f5bb1cf&language=en_US&tab=revisionHistory
My server at home with the HP Smart Array P410i is actually still running version 2.50 (released in 2009). The last firmware is 6.64 (released 2015). The Linux binary depends on 32bit libs to run, however.
As a side note, the update file doesn’t seem to run on Proxmox 7.3 properly as it keeps on throwing: gzip: stdin: unexpected end of file. Ignoring the bad return code by gzip seems to work because the tar file that it generates seems to extract cleanly.
HBA mode?[edit | edit source]
For older Smart Array adapters, you may be able to enable HBA mode (for passthrough) with this: https://github.com/im-0/hpsahba
Limitations with this appears to be that you will not be able to boot from hard drive.
See Also[edit | edit source]
- https://djfueese.blogspot.ca/2016/08/hp-smart-storage-administrator-hp-ssa.html (offline)
- http://www.opslib.com/2012/05/hpacucli-commands-referrence.html
Linux |
|
|---|---|
| Various Linux Notes |
|
| Linux Tools and Utilites |
|
| Package Management |
|
| Linux Distributions |
|
| Networking |
|
| Containers |
|