If you’re having problems with your PC, the following table can help you decide which recovery option to use.
|
Problem |
See this section |
|---|---|
|
Your PC isn’t working well and you recently installed an update |
Remove an installed Windows update |
|
Your PC isn’t working well and it’s been a while since you installed an app or changed system settings |
Reset your PC |
|
Your PC won’t start or is still loading |
Use the Startup Repair function |
|
Your PC won’t start, you haven’t created a recovery drive, and resetting your PC didn’t work |
Use installation media to reinstall Windows 11 |
|
Your PC won’t start and you haven’t created a recovery drive |
Use installation media to restore your PC |
|
Your PC won’t start and you’ve created a recovery drive |
Use a recovery drive to restore or recover your PC |
|
You want to reinstall your previous operating system |
Go back to your previous version of Windows |
|
Your PC isn’t working well and you recently installed an app |
Restore from a system restore point |
|
You suspect your device has been infected |
Use installation media to reinstall Windows 11 |
Click one of the recovery options below and follow the steps to try to get things working again.
If you’ve recently installed a Windows update, uninstall the update to try to resolve the issue.
-
Select Start > Settings > Windows Update > Update history > Uninstall updates .
View update history -
On the list that appears, select update you want to remove, and then select Uninstall.
Important:
-
If you’ve encrypted your device, you’ll need your BitLocker key to reset your PC. If you don’t know your BitLocker key, see Find my BitLocker recovery key.
-
During the resetting process, it is possible that your screen may go black for a long period of time (occasionally upwards of 15 minutes) and that your device may attempt to restart itself during this period. Manually attempting to restart the device yourself during this process could cause the reset to fail. Please be patient!
Resetting reinstalls Windows 11, but lets you choose whether to keep your files or remove them, and then reinstalls Windows. You can reset your PC from Settings, the sign-in screen, or by using a recovery drive or installation media.
Reset your PC from Settings
-
Select Start > Settings > System > Recovery .
Open Recovery settings -
Next to Reset this PC , select Reset PC. Then choose from the options and/or settings in the table below.
|
Option |
What it does |
|---|---|
|
Keep my files > Change settings > Preinstalled apps On |
|
|
Keep my files > Change settings > Preinstalled apps Off |
|
|
Remove everything |
Note: Data erasure On removes files and cleans the drive. If you’re planning to donate, recycle, or sell your PC, use this option. This might take an hour or two, but it makes it harder for other people to recover files you’ve removed. Data erasure Off just removes files. It takes less time, but is less secure. The data erasure functionality is targeted at consumers and does not meet government and industry data erasure standards. |
Reset your PC from the sign-in screen
If you can’t open Settings, you can reset your PC from the sign-in screen. Here’s how:
-
Press Windows logo key + L to get to the sign-in screen. Then restart your PC by pressing the Shift key while you select the Power button > Restart .
-
Your PC will restart in the Windows Recovery Environment (WinRE) environment.
-
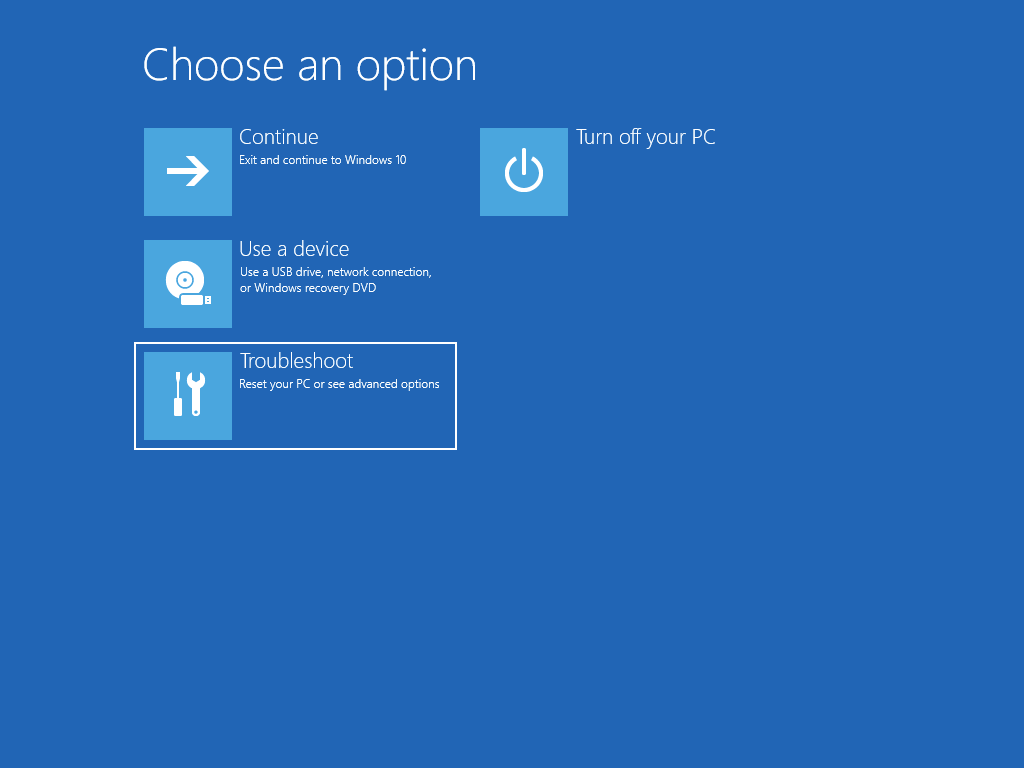
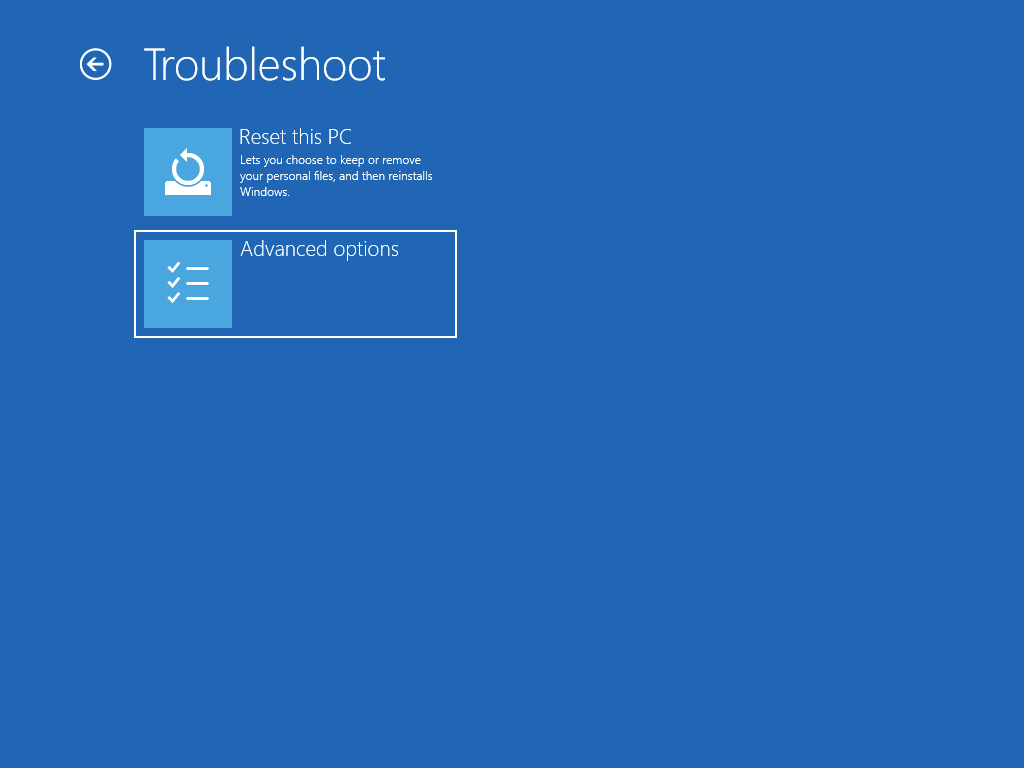
On the Choose an option screen, select Troubleshoot > Reset this PC, and then choose one of the options in the previous table.

Startup Repair helps you fix common problems that can prevent Windows from starting up.
Note: If you’ve encrypted your device, you’ll need your BitLocker key to start in safe mode.
First, you need to enter the Windows Recovery Environment (winRE). To do this, you will repeatedly turn your device off, then on:
-
Hold down the power button for 10 seconds to turn off your device.
-
Press the power button again to turn on your device.
-
On the first sign that Windows has started (for example, some devices show the manufacturer’s logo when restarting) hold down the power button for 10 seconds to turn off your device.
-
Press the power button again to turn on your device.
-
When Windows starts again, hold down the power button for 10 seconds to turn off your device.
-
Press the power button again to turn on your device.
-
This time, allow your device to fully start up.
-
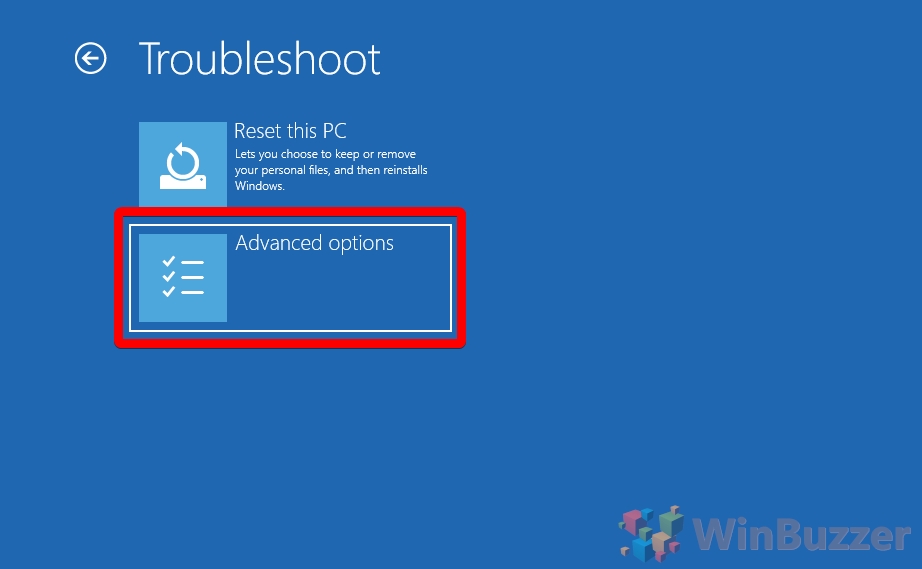
Select Advanced options.
-
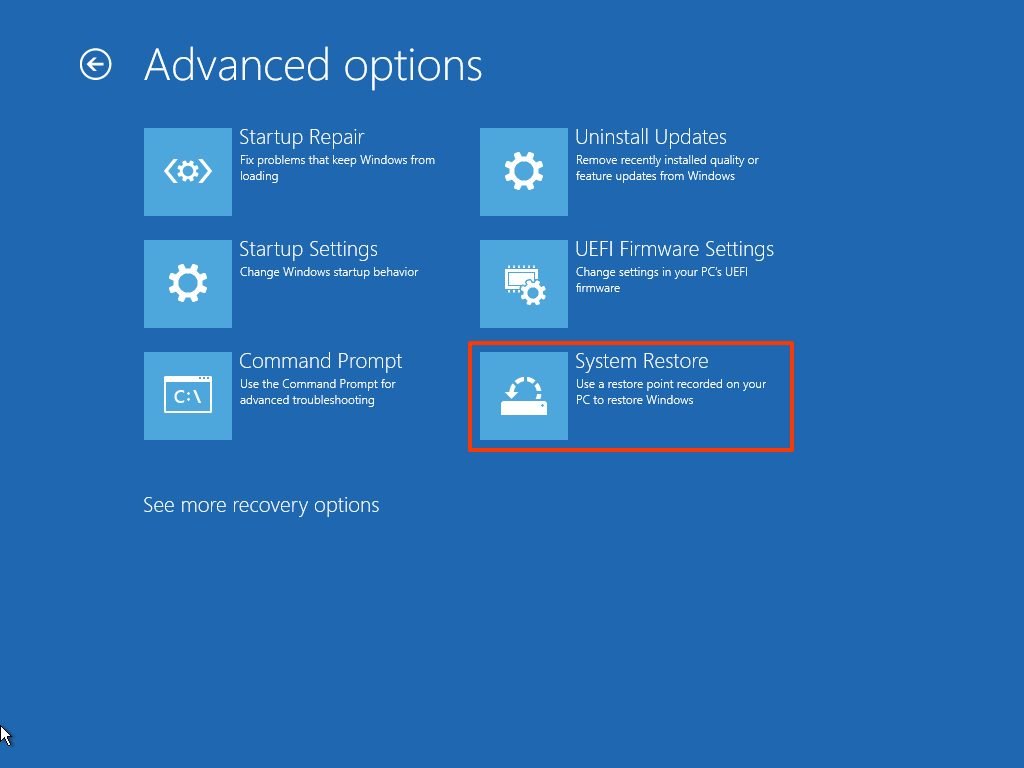
Now that you’re in winRE, on the Choose an option screen, select Troubleshoot > Advanced options > Startup Repair > Restart.

Important: If you’ve encrypted your device, you’ll need your BitLocker key to use a recovery drive to restore or reset your PC If you don’t know your BitLocker key, see Find my BitLocker recovery key.
If your PC won’t start, you can use a recovery drive to restore from a system restore point or recover your PC. For info on how to create a recovery drive on a working PC, see Create a recovery drive.
To restore or recover using the recovery drive:
-
Connect the recovery drive and turn on your PC.
-
Press Windows logo key + L to get to the sign-in screen, and then restart your PC by pressing the Shift key while you select the Power button > Restart .
-
Your PC will restart in the Windows Recovery Environment (WinRE) environment.
-
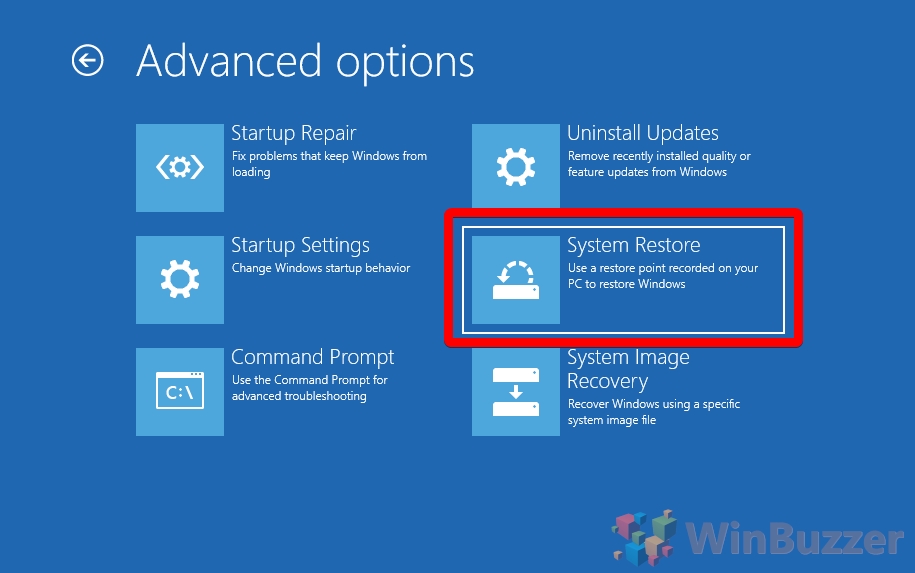
On the Choose an option screen, select Troubleshoot, and then select one of the following two options. (If you don’t see the Choose your option screen, your PC might not be set up to boot from a drive. Check your PC manufacturer’s website for info on how to change your PC’s boot order.)

-
To restore from a system restore point, select Advanced Options > System Restore. This won’t affect your personal files, but it will remove recently installed apps, drivers, and updates that might be causing your PC problems.
-
To reinstall Windows 11, select Advanced Options > Recover from a drive. This will remove your personal files, apps and drivers you installed, and changes you made to settings.
For a limited time after upgrading to Windows 11, you’ll be able to go back to your previous version of Windows by selecting Start > Settings > System > Recovery . Next to Go back , select Go back. This will keep your personal files, but it’ll remove apps and drivers installed after the upgrade, as well as any changes you made to settings. In most cases, you’ll have 10 days to go back.
Open Recovery settings
To go back, you’ll need to:
-
Keep everything in the windows.old and $windows.~bt folders after the upgrade.
-
Remove any user accounts you added after the upgrade.
-
Have the USB drive you used to upgrade to Windows 11 (if you used one).
Notes:
-
The option in Settings to go back to your previous version of Windows is only available for a limited time after upgrading.
-
Apps that have been added, removed, or updated after the upgrade might not be available or function properly after going back to the previous version of Windows.
Info for Windows Insiders
If you’re an Insider and the current preview build isn’t working for you, select Start > Settings > System > Recovery . Next to Go back , select Go back. This won’t remove your personal files, but it’ll remove recently installed apps and drivers, and change settings back to their defaults.
Going back to an earlier build won’t remove you from the Insider Program. When the next preview build is ready, it’ll be installed on your PC.
This option takes your PC back to an earlier point in time, called a system restore point. Restore points are generated when you install a new app or driver, and when you create a restore point manually. Restoring won’t affect your personal files, but it will remove apps, drivers, and updates installed after the restore point was made.
-
In the search box on the taskbar, type control panel, and then choose it from the list of results
-
In the Control Panel search box, type recovery.
-
Select Recovery > Open System Restore.
-
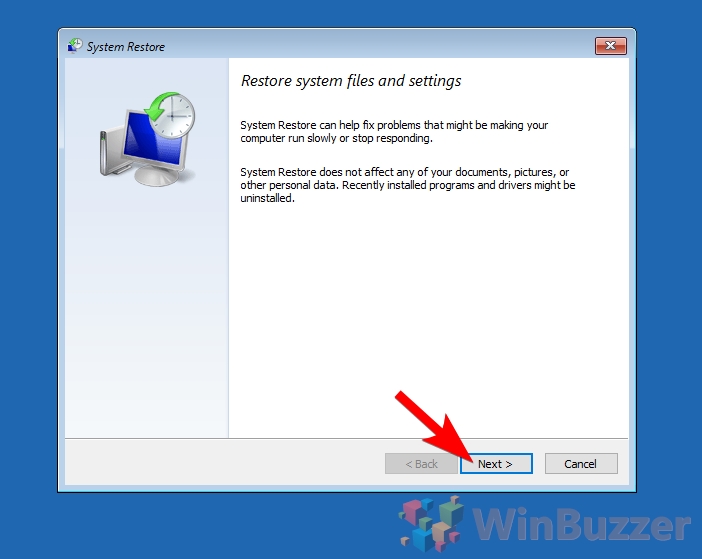
In the Restore system files and settings box, select Next.
-
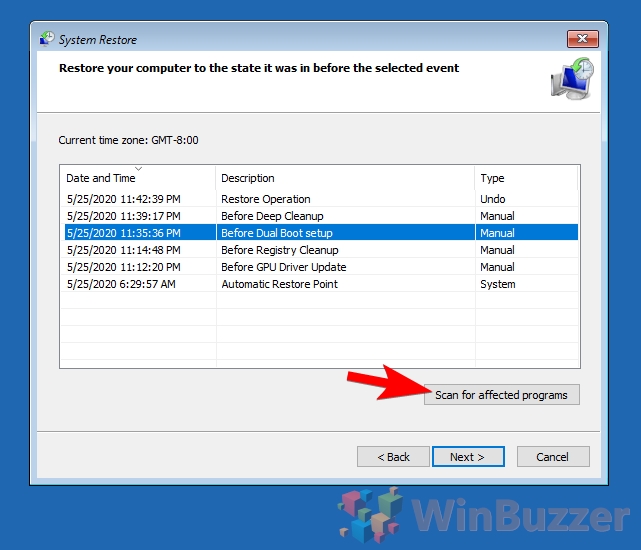
Select the restore point that you want to use in the list of results, and then select Scan for affected programs.
Notes:
-
If you don’t see the restore point that you want to use, select the Show more restore points check box to see more restore points.
-
If you’re not seeing any restore points, it might be because system protection isn’t turned on. Here’s how to check:
-
In the search box on the taskbar, type control panel, and then choose it from the list of results.
-
In the Control Panel search box, type recovery.
-
Select Recovery > Configure System Restore > Configure and see if the Turn on system protection option is selected.
-
If the Turn on system protection option is not selected, system protection isn’t turned on and there aren’t any restore points. In this scenario, you won’t be able to recovery your PC using a system restore point and will need to use one of the other recovery options listed on this page.
-
If the Turn on system protection option is selected, continue with step 6.
-
-
-
-
You’ll see a list of items that will be deleted if you remove this restore point. If you’re OK with the deletions, select Close > Next > Finish.
If you’re having problems with your PC, the following table can help you decide which recovery option to use.
|
Problem |
See this section |
|---|---|
|
Your PC isn’t working well and you recently installed an update. |
Remove an installed Windows update |
|
Your PC isn’t working well and it’s been a while since you installed an app or changed system settings. |
Reset your PC |
|
Your PC won’t start or is still loading |
Use the Startup Repair function |
|
Your PC won’t start, you haven’t created a recovery drive, and resetting your PC didn’t work. |
Use installation media to reinstall Windows 10 |
|
Your PC won’t start and you haven’t created a recovery drive. |
Use installation media to restore your PC |
|
Your PC won’t start and you’ve created a recovery drive. |
Use a recovery drive to restore or recover your PC |
|
You want to reinstall your previous operating system. |
Go back to your previous version of Windows |
|
Your PC isn’t working well and you recently installed an app. |
Restore from a system restore point |
|
You suspect your device has been infected. |
Use installation media to reinstall Windows 10 |
Click one of the recovery options below and follow the steps to try to get things working again.
If you’ve recently installed a Windows update, uninstall the update to try to resolve the issue.
-
Select the Start button, then select Settings > Update & Security > Windows Update > View your update history > Uninstall updates.
View update history settings -
Right-click the update you want to remove, and then select Uninstall.
Important:
-
If you’ve encrypted your device, you’ll need your BitLocker key to reset your PC. If you don’t know your BitLocker key, see Find my BitLocker recovery key.
-
During the resetting process, it is possible that your screen may go black for a long period of time (occasionally upwards of 15 minutes) and that your device may attempt to restart itself during this period. Manually attempting to restart the device yourself during this process could cause the reset to fail. Please be patient!
Resetting reinstalls Windows 10, but lets you choose whether to keep your files or remove them, and then reinstalls Windows. You can reset your PC from Settings, the sign-in screen, or by using a recovery drive or installation media.
Reset your PC from Settings
-
Select the Start button, then select Settings > Update & Security > Recovery .
Open Recovery settings -
Under Reset this PC, select Get started and then choose from the options and/or settings in the table below.
|
Option |
What it does |
|---|---|
|
Keep my files > Change settings > Preinstalled apps On |
|
|
Keep my files > Change settings > Preinstalled apps Off |
|
|
Remove everything |
Note: Remove everything > Change settings gives you two options. Data erasure On removes files and cleans the drive. If you’re planning to donate, recycle, or sell your PC, use this option. This might take an hour or two, but it makes it harder for other people to recover files you’ve removed. Data erasure Off just removes files. It takes less time, but is less secure. |
Reset your PC from the sign-in screen
If you can’t open Settings, you can reset your PC from the sign-in screen. Here’s how:
-
Press Windows logo key + L to get to the sign-in screen, and then restart your PC by pressing the Shift key while you select the Power button > Restart in the lower-right corner of the screen.
-
Your PC will restart in the Windows Recovery Environment (WinRE) environment.
-
On the Choose an option screen, select Troubleshoot > Reset this PC, and then choose one of the options in the previous table.
Startup Repair helps you fix common problems that can prevent Windows from starting up.
Note: If you’ve encrypted your device, you’ll need your BitLocker key to start in safe mode.
First, you need to enter the Windows Recovery Environment (winRE). To do this, you will repeatedly turn your device off, then on:
-
Hold down the power button for 10 seconds to turn off your device.
-
Press the power button again to turn on your device.
-
On the first sign that Windows has started (for example, some devices show the manufacturer’s logo when restarting) hold down the power button for 10 seconds to turn off your device.
-
Press the power button again to turn on your device.
-
When Windows starts again, hold down the power button for 10 seconds to turn off your device.
-
Press the power button again to turn on your device.
-
This time, allow your device to fully start up.
-
Select Advanced options.
-
Now that you’re in winRE, on the Choose an option screen, select Troubleshoot > Advanced options > Startup Repair > Restart.
Important: If you’ve encrypted your device, you’ll need your BitLocker key to use a recovery drive to restore or reset your PC If you don’t know your BitLocker key, see Find my BitLocker recovery key.
If your PC won’t start, you can use a recovery drive to restore from a system restore point or recover your PC. For info on how to create a recovery drive on a working PC, see Create a recovery drive.
To restore or recover using the recovery drive:
-
Connect the recovery drive and turn on your PC.
-
Press Windows logo key + L to get to the sign-in screen, and then restart your PC by pressing the Shift key while you select the Power button> Restart in the lower-right corner of the screen.
-
Your PC will restart in the Windows Recovery Environment (WinRE) environment.
-
On the Choose an option screen, select Troubleshoot, and then select one of the following two options. (If you don’t see the Choose your option screen, your PC might not be set up to boot from a drive. Check your PC manufacturer’s website for info on how to change your PC’s boot order.)
-
To restore from a system restore point, select Advanced Options > System Restore. This won’t affect your personal files, but it will remove recently installed apps, drivers, and updates that might be causing your PC problems.
-
To reinstall Windows 10, select Advanced Options > Recover from a drive. This will remove your personal files, apps and drivers you installed, and changes you made to settings.
For a limited time after upgrading to Windows 10, you’ll be able to go back to your previous version of Windows by selecting the Start button, then select Settings > Update & Security > Recovery and then selecting Get started under Go back to the previous version of Windows 10. This will keep your personal files, but it’ll remove apps and drivers installed after the upgrade, as well as any changes you made to settings. In most cases, you’ll have 10 days to go back.
Open Recovery settings
To go back, you’ll need to:
-
Keep everything in the windows.old and $windows.~bt folders after the upgrade.
-
Remove any user accounts you added after the upgrade.
-
Know the password you used to sign in to Windows 7 or Windows 8.1 (if you used one).
-
Have the USB drive you used to upgrade to Windows 10 (if you used one).
Notes:
-
The option in Settings to go back to your previous version of Windows is only available for a limited time after upgrading.
-
If you go back to Windows 8.1, some apps that came with Windows, like Mail and People, might not work anymore. To fix the apps, reinstall them from the Microsoft Store.
-
Apps that have been added, removed, or updated after the upgrade might not be available or function properly after going back to the previous version of Windows.
Info for Windows Insiders
If you’re an Insider and the current preview build isn’t working for you, select the Start button, then select Settings > Update & Security > Recovery . Under Go back to the previous version of Windows 10, select Get Started. This won’t remove your personal files, but it’ll remove recently installed apps and drivers, and change settings back to their defaults.
Going back to an earlier build won’t remove you from the Insider Program. When the next preview build is ready, it’ll be installed on your PC.
This option takes your PC back to an earlier point in time, called a system restore point. Restore points are generated when you install a new app or driver, and when you create a restore point manually. Restoring won’t affect your personal files, but it will remove apps, drivers, and updates installed after the restore point was made.
-
In the search box on the taskbar, type control panel, and then choose it from the list of results
-
In the Control Panel search box, type recovery.
-
Select Recovery > Open System Restore.
-
In the Restore system files and setting box, select Next.
-
Select the restore point that you want to use in the list of results, and then select Scan for affected programs.
Notes:
-
If you don’t see the restore point that you want to use, select the Show more restore points check box to see more restore points.
-
If you’re not seeing any restore points, it might be because system protection isn’t turned on. Here’s how to check:
-
In the search box on the taskbar, type control panel, and then choose it from the list of results.
-
In the Control Panel search box, type recovery.
-
Select Recovery > Configure System Restore > Configure and see if the Turn on system protection option is selected.
-
If the Turn on system protection option is not selected, system protection isn’t turned on and there aren’t any restore points. In this scenario, you won’t be able to recovery your PC using a system restore point and will need to use one of the other recovery options listed on this page.
-
If the Turn on system protection option is selected, continue with step 6.
-
-
-
-
You’ll see a list of items that will be deleted if you remove this restore point. If you’re OK with the deletions, select Close > Next > Finish.
If you’re having problems with your PC, you can:
-
Refresh your PC to reinstall Windows and keep your personal files and settings. Refresh also keeps the apps that came with your PC and the apps you installed from the Microsoft Store.
-
Reset your PC to reinstall Windows but delete your files, settings, and apps—except for the apps that came with your PC.
-
Restore your PC to undo recent system changes you’ve made.
If you’re having trouble starting (booting) your PC, see Windows Startup Settings (including safe mode), and go to the “Get to Windows Startup Settings in the Windows Recovery Environment” section. You can refresh, reset, or restore your PC from the Windows Recovery Environment.
If you want to back up and restore your personal files, see Back up your Windows PC.
Before you start to refresh or reset your PC
In most cases, once you start to refresh or reset your PC, it’ll finish on its own. However, if Windows needs missing files, you’ll be asked to insert recovery media, which is typically on a DVD disc or thumb drive. If that happens, what you’ll need depends on your PC.
If your PC came with Windows 8.1 or Windows RT 8.1, you’ll need the discs or thumb drive that came with your PC. Check the info that came with your PC to see if your PC manufacturer provided these discs or media. In some cases, you might have created them when you first set up your PC.
If you don’t have either of those, you can make them if you have a USB thumb drive of 16 GB or larger. Having a recovery drive can help you troubleshoot and fix problems with your PC, even if it won’t start. For more info, see Create a USB recovery drive.
If you upgraded your PC to Windows 8.1 or Windows RT 8.1 with a DVD, use that disc. If you don’t have Windows 8.1 or Windows RT 8.1 media, contact Microsoft Support.
Refresh, reset, or restore
Select any of the following for more detailed info.
If your PC isn’t performing as well as it once did, and you don’t know why, you can refresh your PC without deleting any of your personal files or changing your settings.
Note: If you upgraded your PC from Windows 8 to Windows 8.1 and your PC has a Windows 8 recovery partition, refreshing your PC will restore Windows 8. You’ll need to upgrade to Windows 8.1 after the refresh has finished.
Warning: Apps you installed from websites and DVDs will be removed. Apps that came with your PC and apps you installed from Microsoft Store will be reinstalled. Windows puts a list of removed apps on your desktop after refreshing your PC.
To refresh your PC
-
Swipe in from the right edge of the screen, tap Settings, and then tap Change PC settings.
(If you’re using a mouse, point to the upper-right corner of the screen, move the mouse pointer down, select Settings, and then select Change PC settings.) -
Tap or select Update and recovery, and then tap or select Recovery.
-
Under Refresh your PC without affecting your files, tap or select Get started.
-
Follow the instructions on the screen.
If you want to recycle your PC, give it away, or start over with it, you can reset it completely. This removes everything and reinstalls Windows.
Note: If you upgraded your PC from Windows 8 to Windows 8.1 and your PC has a Windows 8 recovery partition, resetting your PC will restore Windows 8. You’ll need to upgrade to Windows 8.1 after the reset has finished.
Warning: All of your personal files will be deleted and your settings will be reset. All apps that you installed will be removed. Only apps that came with your PC will be reinstalled.
To reset your PC
-
Swipe in from the right edge of the screen, tap Settings, and then tap Change PC settings.
(If you’re using a mouse, point to the upper-right corner of the screen, move the mouse pointer down, select Settings, and then select Change PC settings.) -
Tap or select Update and recovery, and then tap or select Recovery.
-
Under Remove everything and reinstall Windows, tap or select Get started.
-
Follow the instructions on the screen.
Note: You’ll be asked to choose whether you want to erase data quickly or thoroughly. If you choose to erase data quickly, some data might be recoverable using special software. If you choose to erase data thoroughly, this will take longer but it makes recovering data less likely.
If you think an app or driver that you recently installed caused problems with your PC, you can restore Windows back to an earlier point in time, called a restore point. System Restore doesn’t change your personal files, but it might remove recently installed apps and drivers.
Notes:
-
System Restore isn’t available for Windows RT 8.1.
-
Windows automatically creates a restore point when you install desktop apps and new Windows updates, if the last restore point is older than 7 days. You can also create a restore point manually at any time.
To restore your PC to an earlier point in time
-
Swipe in from the right edge of the screen, and then tap Search.
(If you’re using a mouse, point to the upper-right corner of the screen, move the mouse pointer down, and then select Search.) -
Enter Control Panel in the search box, and tap or select Control Panel.
-
Enter Recovery in the Control Panel search box, and then tap or select Recovery.
-
Tap or select Open System Restore and then follow the instructions.
If you need additional help refreshing, resetting, or restoring your PC, check out the Repair and Recovery community pages in the Windows forum for solutions that other people have found for problems they’ve experienced.
Need more help?
Want more options?
Explore subscription benefits, browse training courses, learn how to secure your device, and more.
Communities help you ask and answer questions, give feedback, and hear from experts with rich knowledge.
Find solutions to common problems or get help from a support agent.
(Image credit: Future)
On Windows 10, the System Restore feature has been designed to create a snapshot of the current working state of the computer and save it as a «restore point» when significant system changes are detected. If a critical problem occurs after installing an update, driver, or app, or after modifying the system settings incorrectly in the Registry, you can use a restore point to revert the device to an earlier point to resolve the issue without losing your files.
Although this is a convenient recovery feature, it’s disabled by default, meaning you have to enable it before you can create points of restoration manually or the system automatically.
This how-to guide will walk you through the steps to set up System Restore and the steps to recover from problems that may be affecting the normal operation of your computer.
How to enable System Restore on Windows 10
To enable System Restore on Windows 10, use these steps:
- Open Start.
- Search for Create a restore point and click the top result to open the System Properties page.
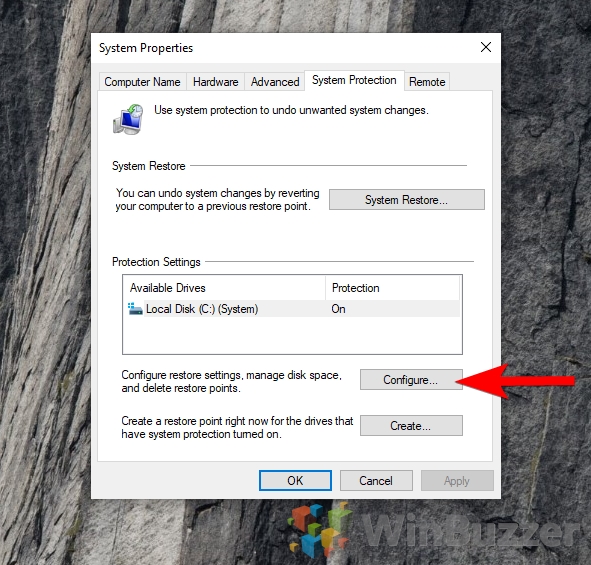
- Under the «Protection Settings» section, select the primary «System» drive.
- Click the Configure button.
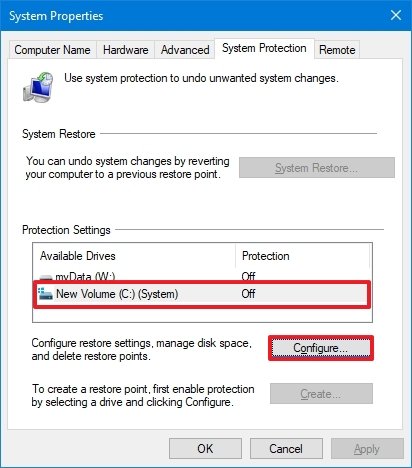
- Select the «Turn on system protection» option.
- Quick tip: Windows 10 can automatically manage the space. However, under the «Disk Space Usage» section, you can use the slider to specify the storage for recovery. You will also find a «Delete» button, which you can use to remove all restore points, which can come in handy to free up space or want to start over with the recovery feature.
- Click the Apply button.
- Click the OK button.
Once you complete the steps, the system automatically creates restore points when applying a new update or specific system changes.
System Restore doesn’t enable automatically for all drives. If you have other drives connected to your computer, you must enable the protection manually on each storage. Also, it’s important to note that this is not a backup solution. It’s only a feature to undo system changes without affecting your files.
How to create a System Restore point on Windows 10
Once System Restore is enabled, it will automatically create a checkpoint when it detects system changes. However, if you plan to make configurations manually, you always want to create a restore point manually.
To create a restore point on Windows 10 manually, use these steps:
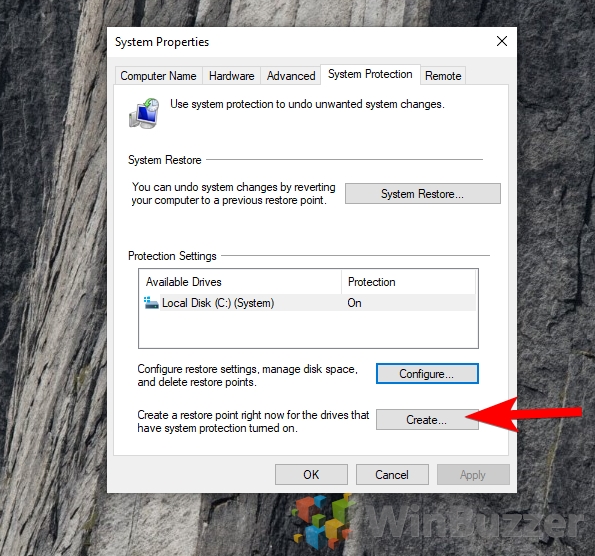
- Open Start.
- Search for Create a restore point, and click the top result to open the System Properties page.
- Under the «Protection Settings» section, click the Create button.
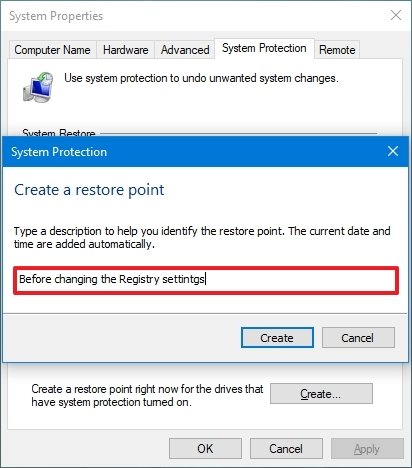
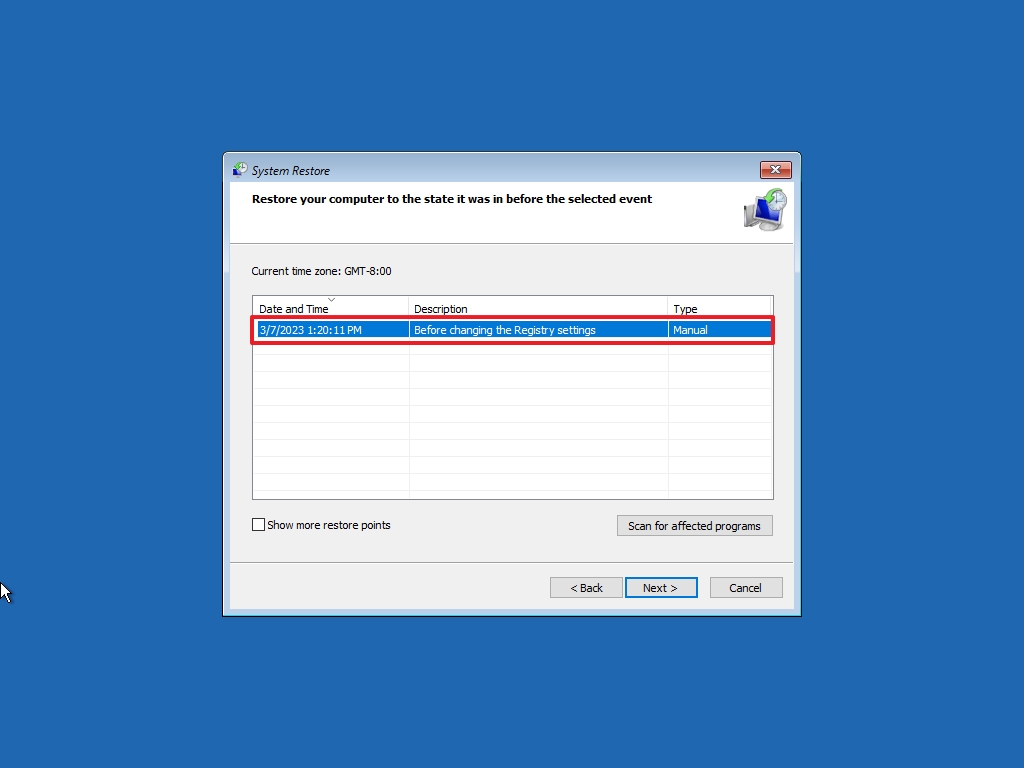
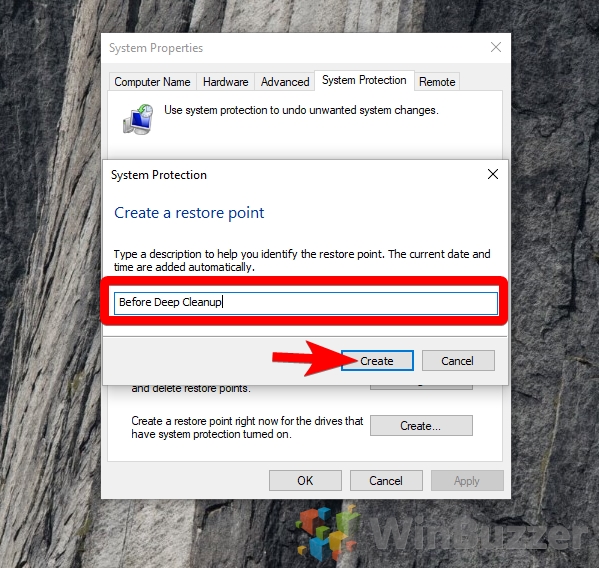
- Type a descriptive name for the restore point — for example, Before modifying the Registry settings.
- Click the Create button.
- Click the Close button.
- Click the OK button.
- Click the Close button.
After you complete the steps, you should be able to undo system changes in the event that something happens while installing a new driver, or program or applying changes to the Registry.
How to recover using System Restore on Windows 10
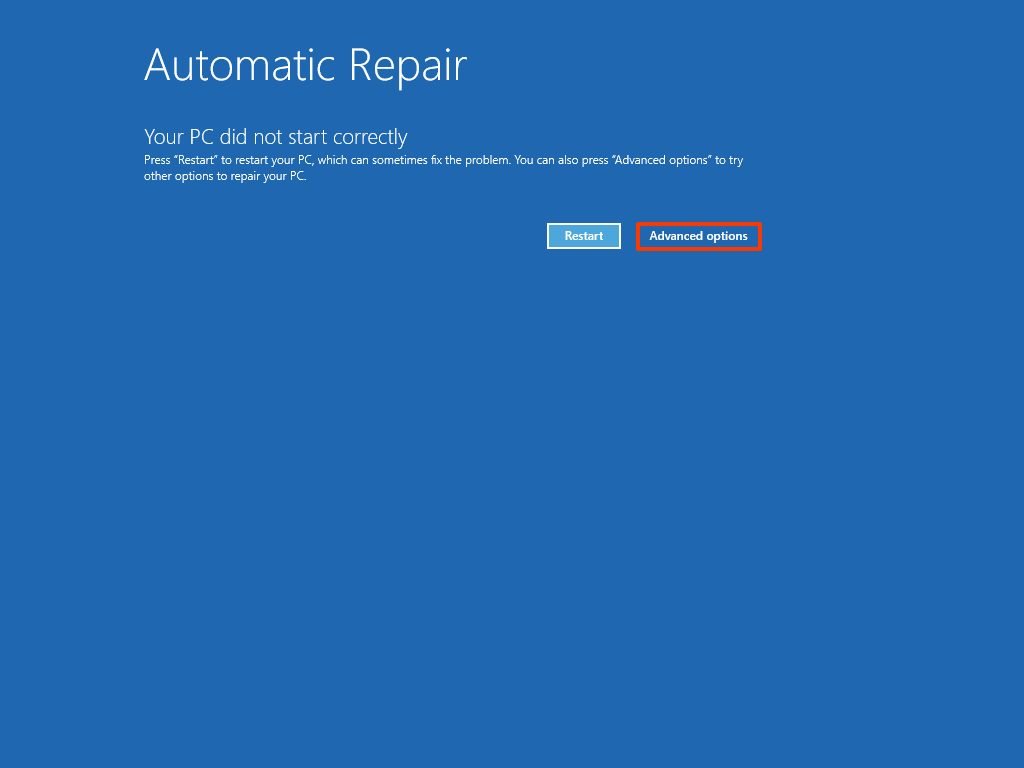
If an error or an unknown problem occurs after installing or modifying system settings, you can use the recovery feature to apply a restore point to undo the changes and fix the issue. If the computer no longer starts correctly, you can complete this task from the Windows 10 desktop or the advanced startup settings.
Undo system changes from desktop
When you have access to the Windows 10 desktop, you can revert changes using these steps:
- Open Start.
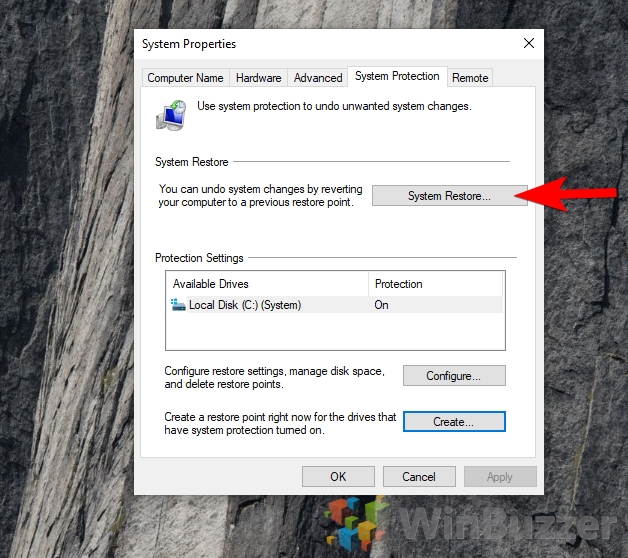
- Search for Create a restore point, and click the top result to open the System Properties page.
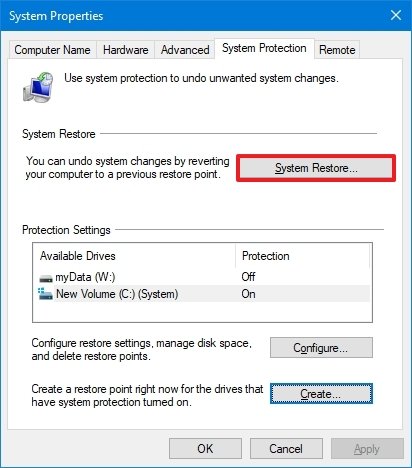
- Click the System Restore button.
- Quick note: If the option is greyed out, no restore points are available.
- Click the Next button.
- Select the restore point to undo changes and fix problems on Windows 10.
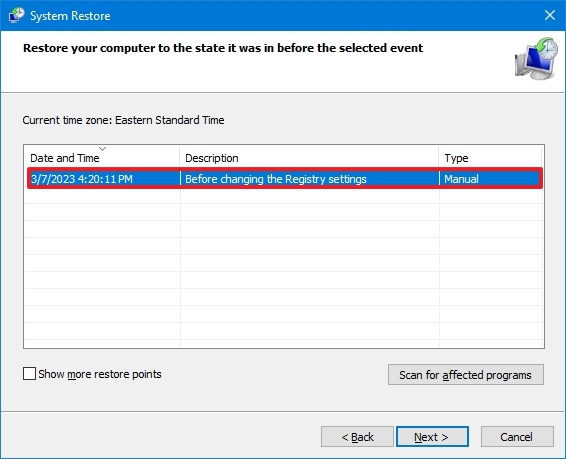
- Click the «Scan for affected programs» button to confirm the apps that will be removed because they were added after creating the original restore point.
- Click the Close button.
- Click the Next button.
- Click the Finish button.
Once you complete the steps, System Restore will restore the computer to the previous working state. If one or more apps were affected, remember to reinstall after the process finishes.
Undo system changes from Advanced startup
Alternatively, you can use the Advanced startup settings to access the System Restore feature to recover the system if the computer doesn’t start correctly.
Access Advanced startup
To use System Restore through the Advanced startup environment, use these steps:
- Start the computer.
- As soon as the Windows logo appears, press the power button to interrupt the boot sequence.

- Repeat steps 1 and 2 two more times. (Or until the device boots into the recovery experience.)
After you complete the steps, you can use the steps below to revert system changes with System Restore.
If you cannot access the recovery environment with these instructions, you can start the device with a Windows 10 installation media, and while in the «Windows Setup» experience, click the Next button, click the Repair your computer button from the bottom-left corner, and then continue with the steps below.
Undo changes with System Restore
To undo system changes on Windows 10 through the Advanced startup environment, use these steps:
- Click the Advanced options button.
- Click on Troubleshoot.
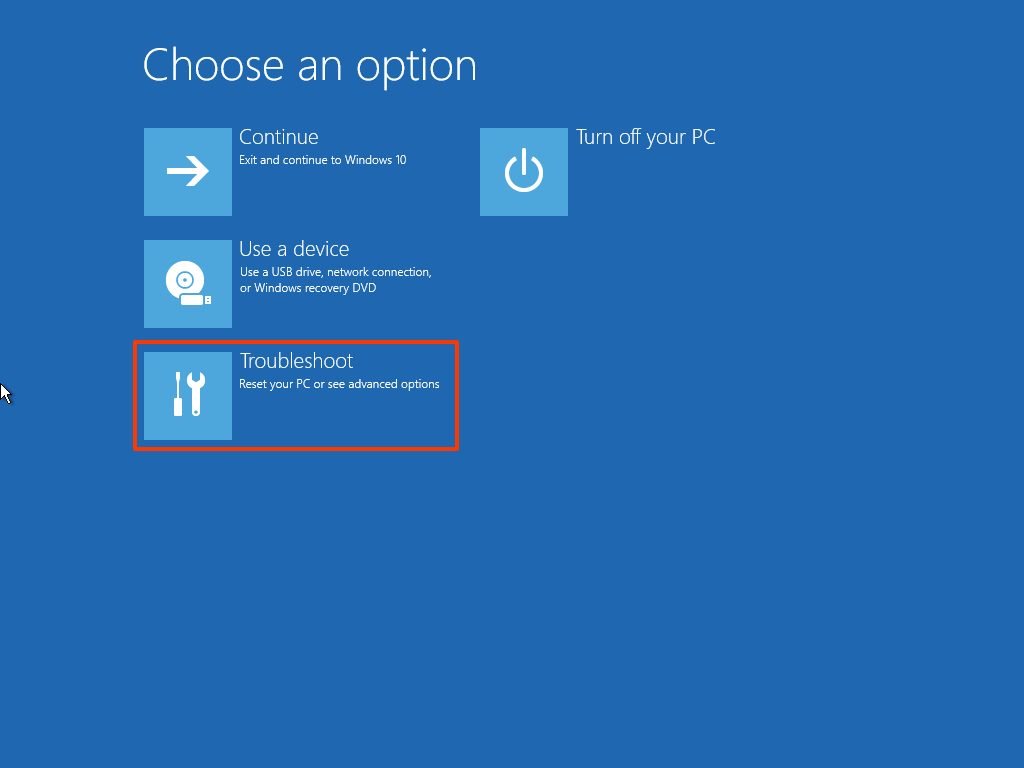
- Click on Advanced options.
- Click on System Restore.
- Select the Windows 10 account.
- Confirm the account password.
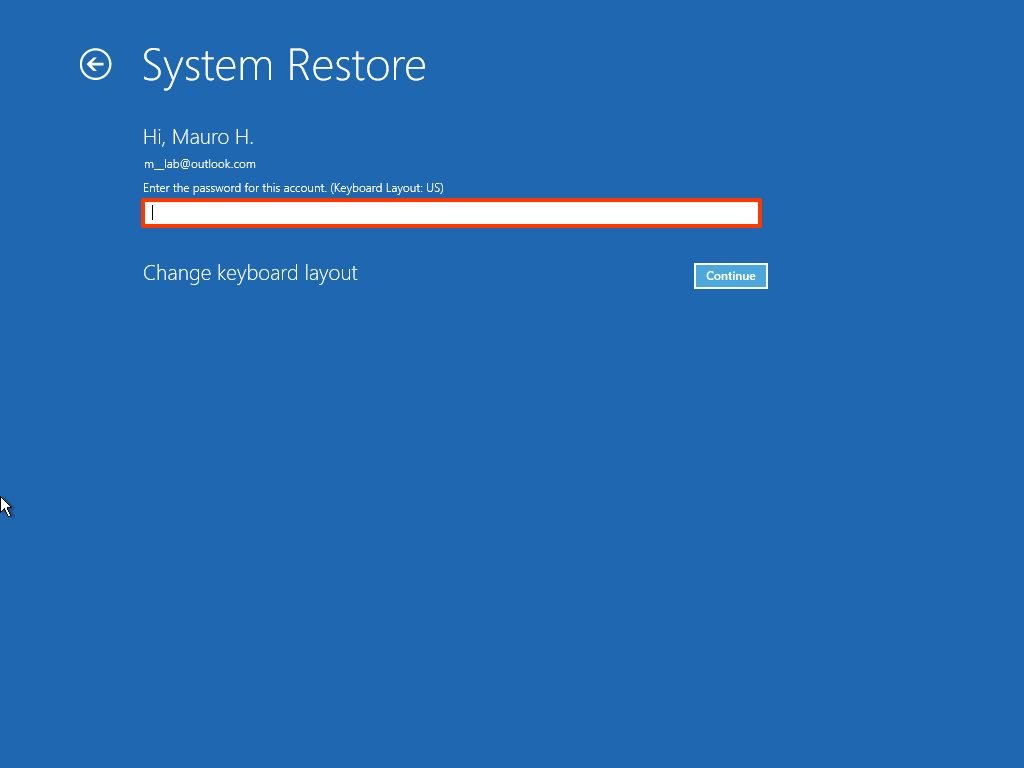
- Click the Continue button.
- Click the Next button.
- Select the restore point to fix the problem with your device.
- Click the «Scan for affected programs» button to confirm the apps that will be removed because they were added after creating the restore point.
- Click the Close button.
- Click the Next button.
- Click the Finish button.

Once you complete the steps, the restore point will apply to undo system changes that may be causing problems, including those preventing the computer from starting correctly.
System Restore is only a feature to recover a device from configuration problems quickly. It is not a feature to replace a backup solution or an option to reset the computer to the factory default settings.
More resources
For more helpful articles, coverage, and answers to common questions about Windows 10 and Windows 11, visit the following resources:
- Windows 11 on Windows Central — All you need to know
- Windows 10 on Windows Central — All you need to know

Cutting-edge operating system
A refreshed design in Windows 11 enables you to do what you want effortlessly and safely, with biometric logins for encrypted authentication and advanced antivirus defenses.
All the latest news, reviews, and guides for Windows and Xbox diehards.
Mauro Huculak is technical writer for WindowsCentral.com. His primary focus is to write comprehensive how-tos to help users get the most out of Windows 10 and its many related technologies. He has an IT background with professional certifications from Microsoft, Cisco, and CompTIA, and he’s a recognized member of the Microsoft MVP community.
Windows 10, как и предыдущие версии этой операционной системы, полностью не защищена от сбоев, воздействия компьютерных вирусов, выхода из строя оборудования и прочих проблем. Поэтому, если у вас возникли неполадки при работе или загрузке ОС, можете воспользоваться встроенными средствами для возвращения операционной системы в работоспособное состояние.
Восстановление Windows 10 можно осуществить несколькими способами.
Если компьютер загружается:
- С помощью точки восстановления.
- Сброс к заводским настройкам.
- История файлов.
Если компьютер не загружается:
- Использование диска восстановления.
- С помощью установочного диска.
Теперь разберем эти варианты восстановления более подробно.
Содержание
- Способ 1 – С помощью точки восстановления системы
- Способ 2 — Сброс к заводским настройкам
- Способ 3 – История файлов
- Способ 4 – Использование диска восстановления
- Способ 5 – С помощью установочного диска
Способ 1 – С помощью точки восстановления системы
Windows периодически сохраняет информацию о программах, системных настройках, драйверах, реестре и драйверах в точках восстановления системы. Это происходит перед значимыми изменениями в ОС, такими как установка программ, драйверов или обновлением системы. Также точку восстановления можно создать вручную. Как это сделать можете прочитать в этой инструкции.
Стоит отметить, что после восстановления ваши данные останутся нетронутыми, а драйвера, программы и обновления, установленные после создания точки восстановления, будут удалены.
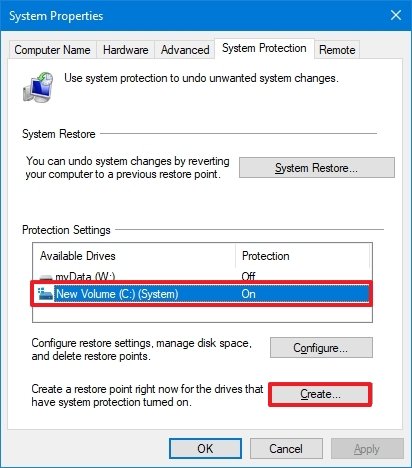
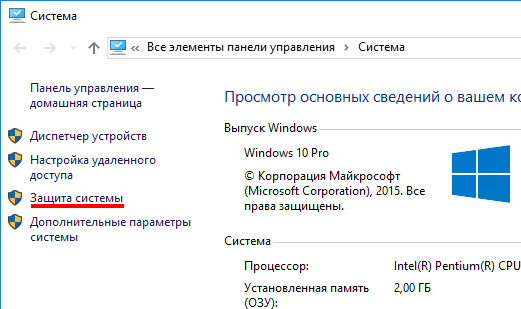
1. Запустите окно свойств системы (сочетание клавиш Windows + Pause) и откройте пункт «Защита системы».
2. Нажмите кнопку «Восстановить», а потом «Далее». В списке доступных точек восстановления выберите нужный пункт и опять нажмите «Далее».

3. Еще раз проверьте выбранные параметры, нажмите кнопку «Готово», а затем «Да» в окне предупреждения. Начнется процесс восстановления, при этом компьютер будет перезагружен.
Способ 2 — Сброс к заводским настройкам
В Windows 10 есть возможность вернуть настройки системы в исходное состояние. При этом можно сделать полный сброс или с сохранением пользовательских файлов. Преимущество этого метода в том, что если вы захотите переустановить систему вам не нужно производить установку Windows c нуля, достаточно просто выполнить сброс.
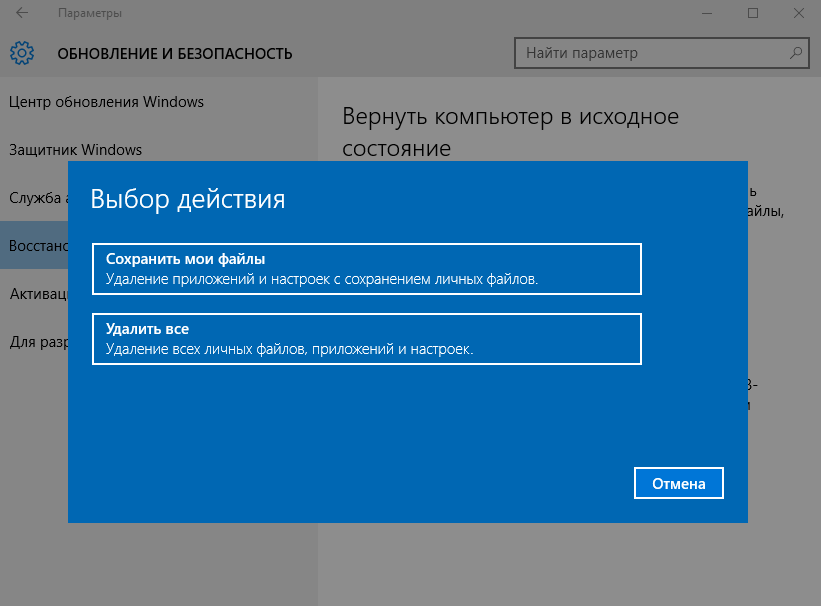
Чтобы воспользоваться этой функцией, нужно перейти в следующий раздел: «Параметры компьютера -> Обновление и безопасность -> Восстановление -> Вернуть компьютер в исходное состояние» и нажать кнопку «Начать».
Более детально процесс сброса к заводским настройкам мы рассмотрели в этой статье: https://compconfig.ru/winset/sbros-windows-10.html
Способ 3 – История файлов
Этот метод непосредственно не связан с восстановлением системы, но в совокупности с остальными способами тоже может быть полезным.
«История файлов» позволяет делать резервные копии ваших файлов в автоматическом и ручном режиме. Вам достаточно активировать эту функцию и указать, какие папки нужно сохранять. Система будет автоматически делать резервные копии ваших документов с периодичностью, которую можно настроить. При необходимости вы сможете легко восстановить файлы нужной вам версии.

Как включить, настроить и использовать этот инструмент вы можете прочитать в этой статье: https://compconfig.ru/winset/istoriya-faylov-windows-10.html
Способ 4 – Использование диска восстановления
Если Windows 10 не загружается, вы можете попробовать произвести реанимацию системы с помощью диска восстановления, который позволит вам получить доступ к дополнительным параметрам запуска.
Если у вас еще нет диска восстановления, воспользуйтесь этой инструкцией:
Как создать диск восстановления Windows 10
После загрузки с USB-диска восстановления перейдите в раздел «Диагностика -> Дополнительные параметры».

Здесь вы можете использовать несколько вариантов реанимации компьютера:
- Восстановление Windows с помощью точки восстановления. Это вариант мы уже рассматривали выше. Смысл его тот же, только запуск производится другим путем.
- Восстановление образа системы. Этот метод известен еще с Windows 7. Если вы ранее создали образ системы в Windows, то можно легко его восстановить через диск восстановления. Как создается образ системы в Windows 10 можно прочитать здесь: https://compconfig.ru/winset/kak-sozdat-obraz-windows-10.html
- С помощью следующего пункта вы можете попробовать автоматически исправить ошибки при загрузке.
- Для более продвинутых пользователей есть возможность запустить командную строку для восстановления системы или других целей.
- Ну и последний вариант – это возвращение Windows к предыдущей сборке.
Также следует отметить, что если при создании диска восстановления системы вы произвели запись системных файлов на диск, то у вас будет возможность переустановить Windows с этого диска. Но если вы покупали компьютер с предустановленной Window 8 (8.1) со скрытым разделом восстановления, то будет восстановлена версия системы, которая изначально поставлялась с компьютером.
Способ 5 – С помощью установочного диска
Если Windows не загружается, и у вас нет диска восстановления, вы можете использовать установочный диск для реанимации компьютера.
Установочный диск можно записать на USB-носитель или DVD-диск, используя средство для создания носителя, которое можно скачать здесь.
Загрузившись с установочного носителя, вы увидите окно, в котором нужно выбрать языковые параметры и нажать кнопку «Далее».

В следующем окне нужно нажать на ссылку «Восстановление системы» в нижнем левом углу.

Далее зайдите в раздел «Поиск и устранение неисправностей». Здесь вы увидите 2 варианта для восстановления:
- Вернуть компьютер в исходное состояние. Будет произведен сброс к заводским настройкам с сохранением файлов пользователя или без. Этот инструмент мы уже рассматривали выше (способ 2).
- Дополнительные параметры. Как и на диске восстановления системы откроется список инструментов, с помощью которых можно вернуть работоспособность Windows с помощью точек восстановления, образа системы и т.д.

Мы рассмотрели основные способы восстановления Windows 10. Обычно их вполне достаточно чтобы вернуть систему в работоспособное состояние. Сюда можно было еще добавить чистую установку Windows, но это уже крайняя мера и к восстановлению системы имеет косвенное отношение.
Some Windows 10 users may be unfamiliar with the feature System Restore and have no idea about how to use it. If you are one of them and you want to know more about it, you can go on reading this passage.
Contents:
- What Is System Restore and its Functions?
- How to Enable System Restore in Windows 10?
- How to Create a System Restore Point in Windows 10
- How to Restore Windows 10 to Previous Date with System Restore
- How to Delete All System Restore Points
What Is System Restore and its Functions?
System Restore is a very useful feature in Windows, for it allows users to revert the computer’s system state to a previous date if you did some unwanted changes or harmful changes to your computer.
But the premise is that you have enabled this feature manually. For example, you have performed Windows Update, but it caused some errors, so you want to restore the system to the point before Windows update is installed. Then System Restore can help you.
If you enabled System Restore function, the Windows system such as Windows 10 will create a restore point once per week automatically and create different restore points before important changes like:
1. When you install software using Windows Installer or other installers aware of System Restore;
2. When you try to perform Windows Update;
3. When you try to install an unsigned driver;
…
And you can also create a restore point manually.
System Restore is recommended when an installation failure or data corruption occurs. It can take a snapshot of your system files, some program files, Windows Registry and device drivers, and save them as restore points.
After restored the system, the software installed after the restore point was created will be uninstalled, and removed software will be restored.
But System Restore only restores some certain types of files, so the restored programs often cannot work properly unless the installers are runs again.
In addition, System Restore is different from making backups, for it will not save copies of personal files, nor delete or replace your personal files. Many errors can be fixed by this feature. But if you choose to use it to remove viruses or malware, it may be not a good choice.
How to Enable System Restore in Windows 10?
System Restore won’t open? By default, System Restore is turned off in Microsoft Windows system, so the System Restore and Create buttons in System Properties window are grayed out, which indicates that System Restore is disabled. Therefore, you need to enable it if you want to use this feature.
Where is System Restore on Windows 10? Here are steps to find the System Restore location and enable it.
1. Type create in the search box, and choose to Create a recovery drive.
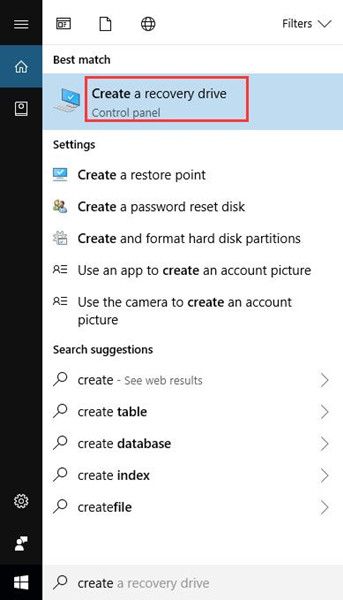
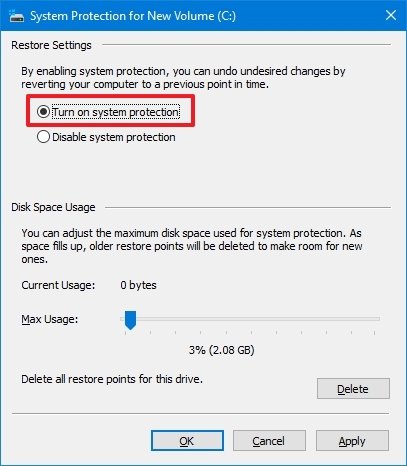
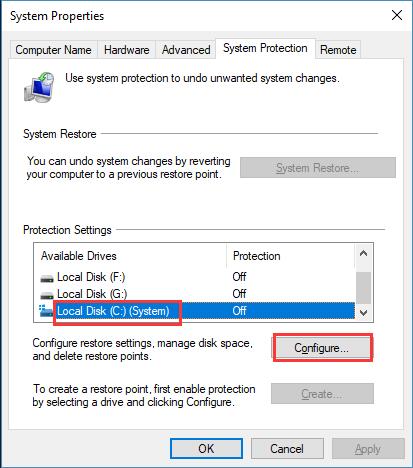
2. On the System Protection tab, you will see available drives and whether the protection is turned on or off. Select a drive and then click Configure. If the protection of disk C hasn’t turned on, choose Local Disk C first.
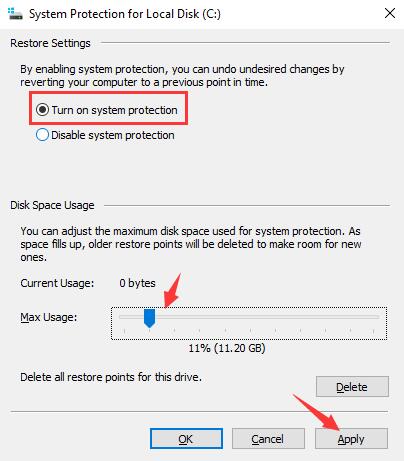
3. Check Turn on system protection. And adjust the Max Usage to the amount you want System Restore to be able to use, and then click Apply.
Then you will see System Restore button and Create button is usable.
How to Create a Restore Point in Windows 10
As we mentioned above, if you enabled this feature, it will create a restore point for your system automatically before you make some important changes. But sometimes you may need to create a restore point manually to restore your laptop or desktop to a previous date. It is quite easy.
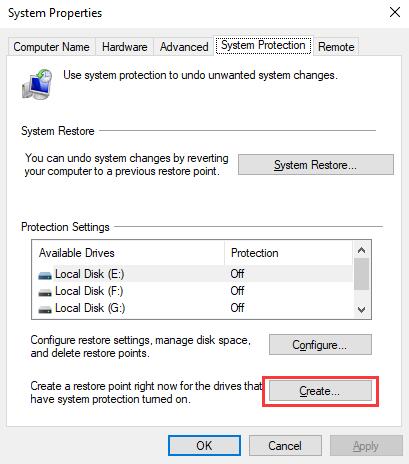
1. Type create in the search box and choose Create a recovery drive.
2. Click Create button.
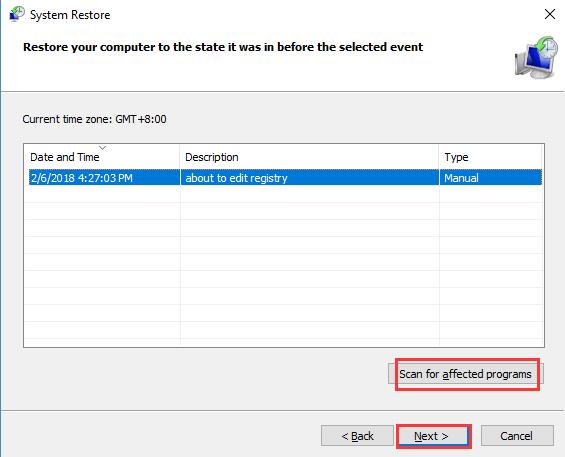
3. Add a simple description to the restore point. For example, if you are going to edit the Registry, you type ‘about to edit Registry‘ in the box.
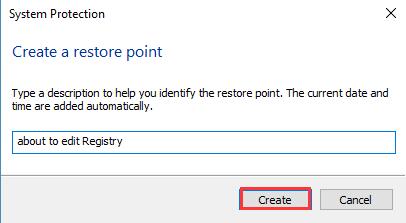
4. Then it will tell you that “The restore point is created successfully”.
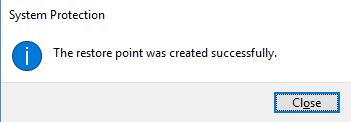
5. Click Close. A system restore point is created.
Note: System Restore will create restore points on all drives whose system protection is turned on.
How to Restore Windows 10 to Previous Date with System Restore?
Supposing some problems appear after you make some important changes, you can use System Restore to make your computer return to a previous state.
- Restore Computer to a Previous Date After Booting Up
- Restore Windows 10 to an Earlier Date from Boot
Restore Computer to a Previous Date After Booting Up
If you can boot your computer and can log in Windows, here are steps of System Restore for you. If you cannot, skip to the next part.
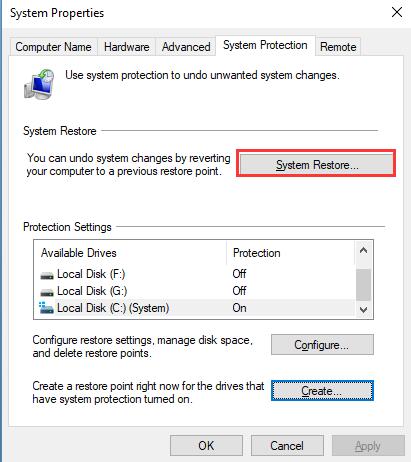
1. Use the same way to get to System Properties window, and click System Restore.
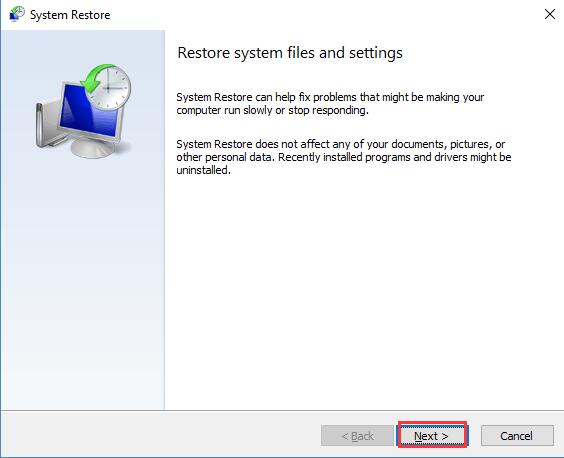
2. Click Next to continue.
3. Then choose a restore point (the latest one is recommended). You can choose Scan for affected programs to look which drivers and programs are about to be deleted or restored after System Restore is performed. Then click Next to go on.
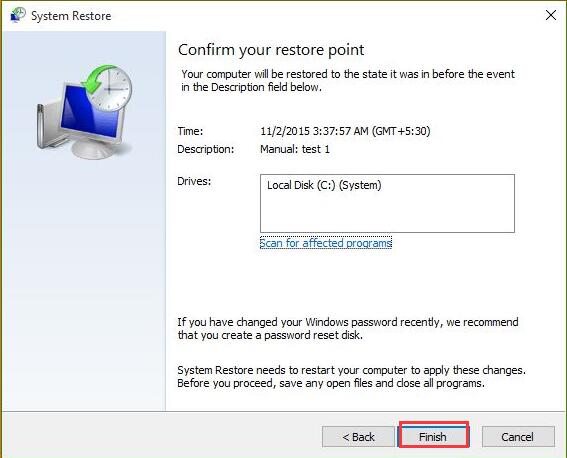
4. Then you’ll see a confirmation, click Finish to continue.
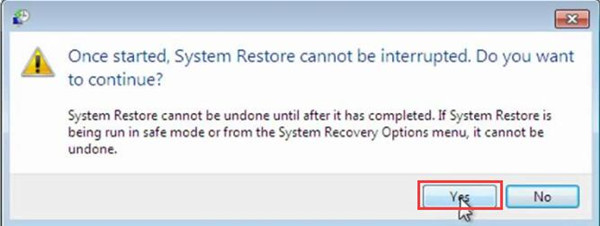
5. When System Restore reminds you that “Once started, System Restore cannot be interrupted. Do you want to continue?“, click Yes to start system restore.
Restore Windows 10 to Earlier Date from Boot
1. Start your computer three times to start automatic repair on Windows 10.
2. Select Advanced Startup > Troubleshoot > Advanced options > System Restore.
3. Select the system account you wish to repair, and type the password, then click Continue.
4. Click Next.
5 The following steps are the same as selecting a restore point after booting up the computer.
6. After these steps are completed, your computer will be restarted and System Restore will begin. After this process finished, your computer will be restored to a previous date when the restore point was created.
Q: How Long Does System Restore Take on Windows 10?
A: Typically, system restore takes between 15-45 minutes. This depends on the file size of the restore point you are creating and whether you are restoring the affected program.
But this restore process does not need to wait for several hours. So if your system restore has been going on for a few hours, then it is stuck.
How to Delete All System Restore Points
After you open the System Restore function on Windows 10, it will create many restore points to take up much space. This will result in less and less disk space being available.
You can prevent new system restore points from being created by turning this function off. For those system restore points that have already been created, you can delete them once and for all by using the following method.
1. Type disk clean up in the search box to open this desktop application.
2. Click OK and then wait for a moment.
3. In More Options tab, under the System Restore and Shadow copies, click Clean up button.
4. In the pop-up window, it reminds you “Are you sure you want to delete all but the most recent restore point”, click Delete.

5. Click OK.
6. Click Delete Files. Then Windows system will delete previous restore points.
Now you had already deleted most of the earlier restore points and free up more disk space.
System Restore is pretty useful to fix some annoying problems. If you want to do some critical changes to your PC, but not sure whether these changes will cause damages to the computer, you can create restore points in advance. After reading this passage, you should have a deeper understanding of System Restore. Hope it can help you.
More Articles:
How to Factory Reset Windows 10
[Solved] There Was a Problem Resetting Your PC on Windows 10
Fix Windows Hello Could Not Turn on Camera on Windows 10

Contents
- 1 How to Automatically Create Restore Points in Windows 10
- 2 How to Manually Create Restore Points in Windows 10
- 3 How to Use System Restore to Return to a Previous Restore Point
- 4 How to load System Restore at Boot from Advanced Startup Options
When something goes wrong with your Windows 10 PC, the first point of call should be to perform a system restore. Though a previously created restore point, you can bring your computer back to a previous point and likely fix many of its issues in the process.
A Windows 10 system restore can be helpful if you run into a faulty update or driver, or if you made incorrect changes to the registry. However, it’s worth pointing out that a system restore won’t affect your documents, pictures, videos, or anything else in the %UserProfile% folder.
As a result, the tool is not suitable for rolling back changes to an Office document, for example, and it isn’t a suitable solution to get rid of malware. Though it may help to remove some malicious files, they can easily persist in the folders that aren’t changed.
Whatever your use, we’re going to show you How to create a restore point in Windows 10 and how to perform a system restore from boot/Windows 10 recovery and via the usual desktop interface. Let’s get started:
How to Automatically Create Restore Points in Windows 10
You can create a restore point in Windows 10 manually or automatically. We’re going to cover the latter first.
- Open system restore
Press the Windows key and type “system restore”. Click the first result under ‘Best match’.

- Configure system restore settings
In the “System Protection” tab, chose the drive press “Configure…”.

- Adjust your space allocation
Move the “Max Usage” slider until it’s at an amount you’re comfortable with. This largely depends on how much space you have to spare on your drive. As a rule of thumb, I wouldn’t go much over 10% of your drive space.

Press “OK”. Your Windows 10 will now automatically create system restore points after an update or other major changes.


How to Manually Create Restore Points in Windows 10
Often, you make changes to your system that Windows 10 doesn’t deem worthy of an automatic restore point. This is when a manual entry comes in handy.
- Open system restore settings
Press the Windows key and type “system restore”. Click the first result under ‘Best match’.
- Initiate restore point creation
In the “System Protection” tab, click “Create…”.

- Name your restore point
In the ‘Create a restore point’ window, type a description. It may be tempting, but don’t call it “asdf”. Names should be descriptive so you can remember exactly why you made it. Windows saves the date and time automatically, so there’s no need to add that. Press “Create”.

How to Use System Restore to Return to a Previous Restore Point
The easiest way to restore from a point is via the system properites interface when already signed in.
- Open System Protection
Press the Windows key and type “system restore”. Click the first result under ‘Best match’.
- Open “System Restore…”

- Click “Next”

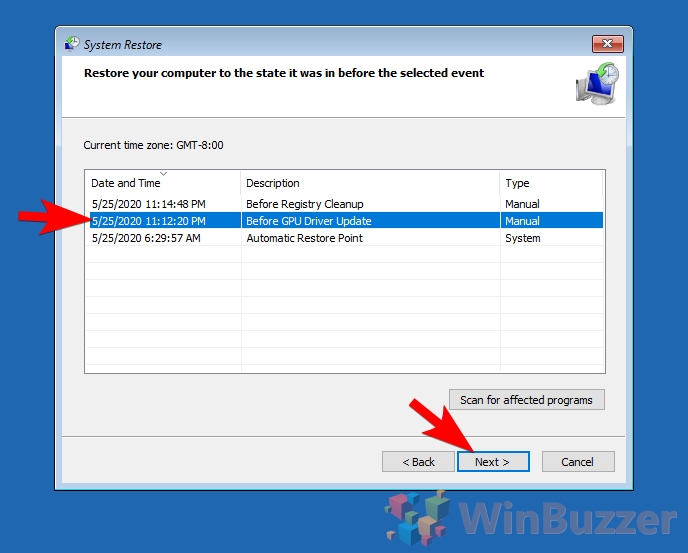
- Select your restore point
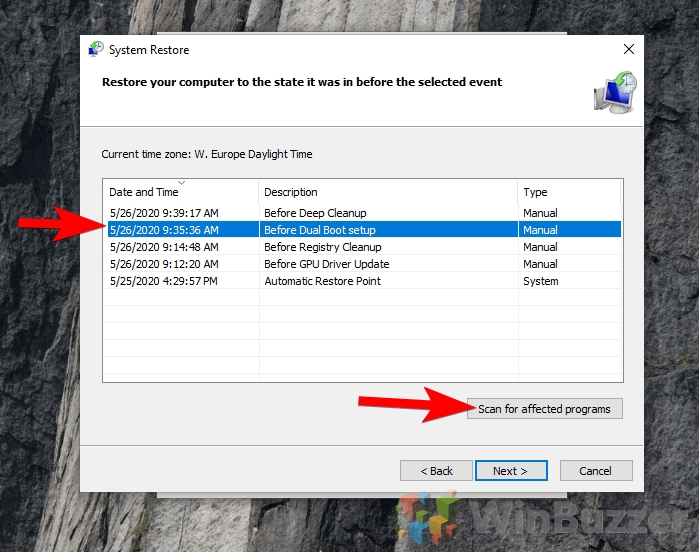
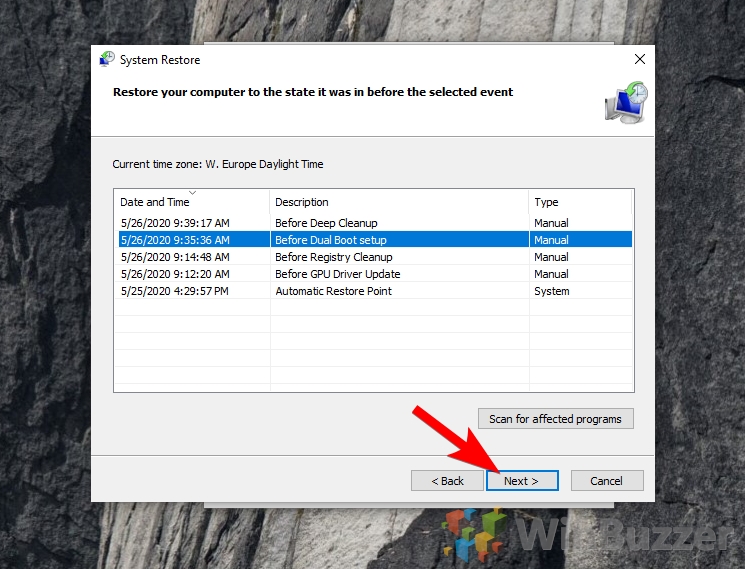
The system restore wizard will now show a list of recent restore points. If you labeled correctly, it should be simple enough to find the one you’re looking for. Otherwise, go by the date and time on the left-hand column. Click on the correct Windows 10 restore point and choose “Scan for affected programs”.

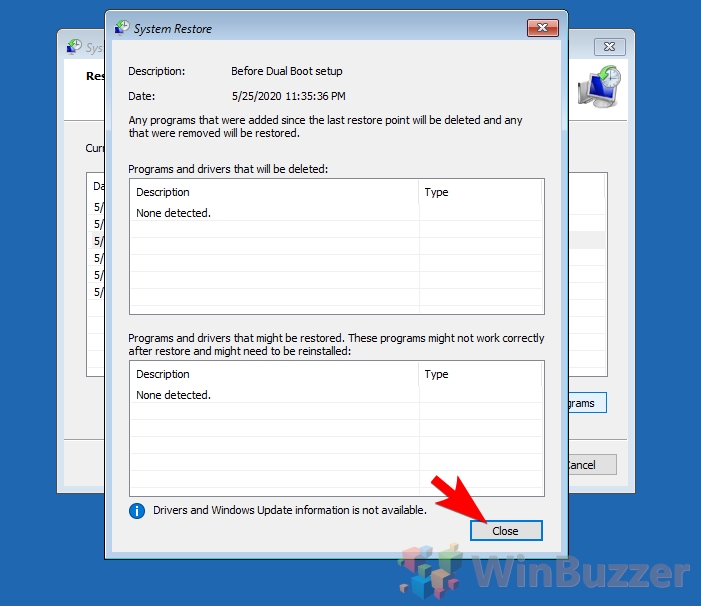
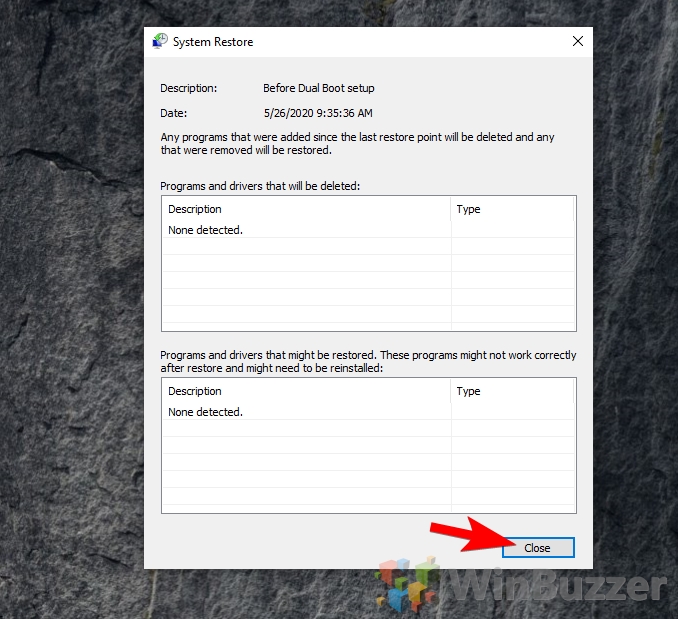
- Check the affected programs list
Windows will now return a list of programs and drivers, including those that will be deleted and restored. If necessary, make a back up of the applications and remember that even restored ones may not function correctly. When you’re done, hit “Close”.

- Continue the restore process
Once you’ve made any necessary backups, press “Next” in the system restore wizard.

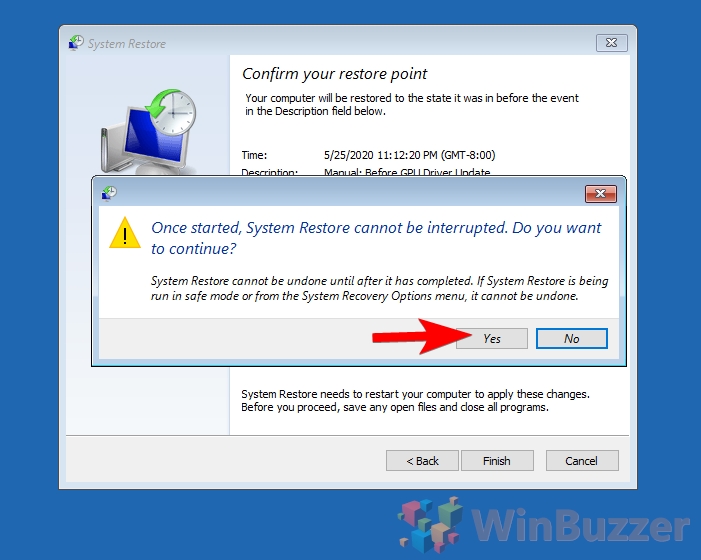
- Press “Finish” to initiate restore point recovery

- Confirm warning message
You’ll now be asked if you’re sure you want to perform a restore. This is because the process can take some time and cannot be undone. If you move to an earlier point, you can’t retrieve your current data again. If you’re fine with that, click “Yes”.
Windows 10 will now perform the restore, restarting several times. You must ensure your laptop is plugged into the mains at this point and do not turn it off even if it looks stuck.


 Windows 10 will now perform the restore, restarting several times. You must ensure your laptop is plugged into the mains at this point and do not turn it off even if it looks stuck.
How to load System Restore at Boot from Advanced Startup Options
If your PC is experiencing serious problems, there’s a good chance you won’t be able to log in to Windows at all. There’s no need to fret, as you can perform a system restore from boot.
- Boot Windows 10 into Advanced Startup Options
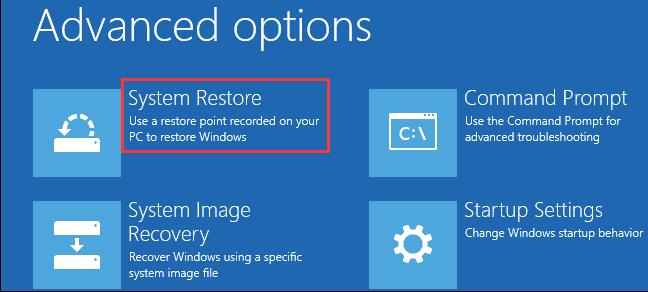
When you boot your PC, enter Windows 10 recovery. If you’re unsure how to do so, refer to our guide here. Click “Troubleshoot”.

- Choose “Advanced options”

- Click “System Restore”

- Press “Next”

- Scan for affected programs
The system restore wizard will now show a list of recent restore points. If you labeled correctly, it should be simple enough to find the one you’re looking for. Otherwise, go by the date and time on the left-hand column. Click on the correct Windows 10 restore point and choose “Scan for affected programs”.

- Note any possible changes to installed programs and drivers
The tool will inform you of any programs and drivers that will be uninstalled or restored. Even if you can’t boot into your OS, you may be able to back up these files via the command line if you want to save the data. Once you’re happy, click “Close”.

- Choose your restore point
Back on Windows 10’s main system restore screen, click on your restore point and then on “Next”.

- Click “Finish” to initiate restore point recovery
Double-check the time and date, before pressing “Finish”.

- Confirm warning message
Once you perform a system restore from boot, there’s no going back. Data outside of your user folder will be permanently changed and you could lose progress if you aren’t vigilant. The process could also take some time, so ensure you’re on mains power and don’t turn off the PC even if it looks stuck.

- Wait for files to be restored

- Wait for the system to restart and configure

- Restart your PC
The system will now tell you that your restore is complete. Click “Restart” to complete the process and use your PC as normal.