#Руководства
-

0
Рассказываем о языке программирования, с помощью которого можно творить чудеса в Windows (и не только).
Иллюстрация: Francesca Tosolini / Unsplash / Annie для Skillbox Media

Журналист, изучает Python. Любит разбираться в мелочах, общаться с людьми и понимать их.
Рядовые пользователи общаются со своими ПК через графический интерфейс: нажимают иконки и кнопки, переключаются между окнами и вкладками.
А системные администраторы используют для этого командную строку. Чтобы компьютер понимал их указания, интерпретатор, он же командная оболочка, переводит всё на машинный язык.
Есть десятки оболочек под разные нужды, предпочтения и операционные системы. В Linux обычно используют Bash, в macOS по умолчанию установлен Zsh, а для Windows (но не только) есть PowerShell.
Из статьи вы узнаете:
- Что такое Windows PowerShell
- Как открыть PowerShell в Windows
- Какие у неё есть команды (они же командлеты)
- Что такое объекты и конвейеры (пайплайны)
- Как запустить выполнение задач в фоновом режиме
- Как работать в PowerShell ISE
- О переменных
- О логических операторах
- Об условиях в Power Shell
- Как работать с циклами
- О массивах, хеш-таблицах, функциях и классах
Windows PowerShell — это одновременно командная оболочка и язык сценариев, основанный на .NET. PowerShell используют для управления компьютером и автоматизации задач. Это полноценный объектно-ориентированный язык, в котором есть переменные, функции, классы и объекты.
В отличие от других командных оболочек, PowerShell работает не со строками, а с объектами. Благодаря этому можно создавать сложную логику. При этом интерпретатор полностью совместим со стандартными командами cmd.exe и может выполнять их.

Команды пишут в интерактивном режиме внутри терминала. Но если вы хотите сохранить какой-то часто используемый скрипт, удобнее использовать ISE.
Windows PowerShell ISE — это интегрированная среда сценариев для PowerShell. В ней можно писать, сохранять и запускать скрипты, есть подсветка синтаксиса, автодополнение, справочник команд и инструменты отладки. PowerShell ISE — легаси-инструмент, он работает для версии языка 5.1 и ниже. Для более поздних обновлений используют IDE общего назначения с плагинами.
С 2016 года язык стал кросс-платформенным. Его можно использовать не только в Windows, но и в macOS (начиная с версии 10.13) и популярных дистрибутивах Linux (каких именно, можно узнать в документации).
Обычно PowerShell предустановлен по умолчанию. Но если у вас его нет, можете воспользоваться инструкцией от Microsoft. Также в документации есть руководства по установке для macOS и Linux.
PowerShell не зависит от версии операционной системы и одинаково работает как на Windows 10, так и на Windows Server.
Есть два основных способа открыть PowerShell или PowerShell ISE в Windows: меню «Пуск» и приложение «Выполнить».
В меню «Пуск» долистайте до папки Windows PowerShell, откройте её и выберите нужное приложение. Здесь есть 32-разрядные (у них х86 в скобках) и 64-разрядные версии терминала и ISE.
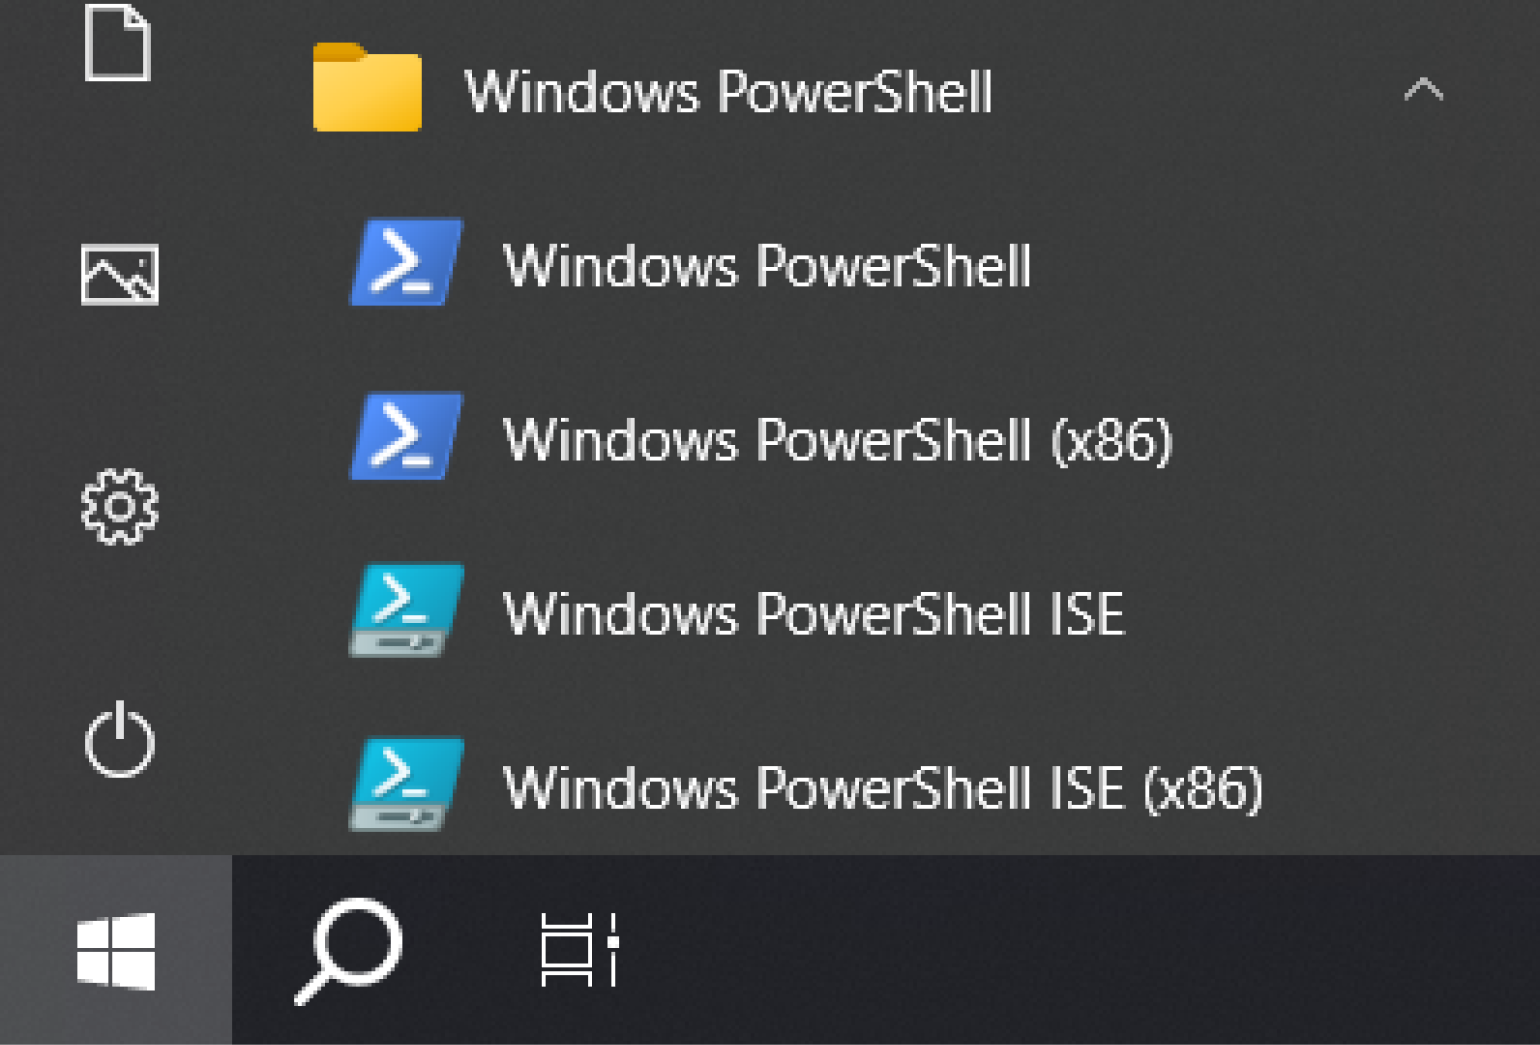
Скриншот: Skillbox Media
Приложение «Выполнить» открывается сочетанием клавиш Win + R. В появившемся окне введите powershell или powershell ise (в зависимости от того, что вам нужно) и нажмите ОК.
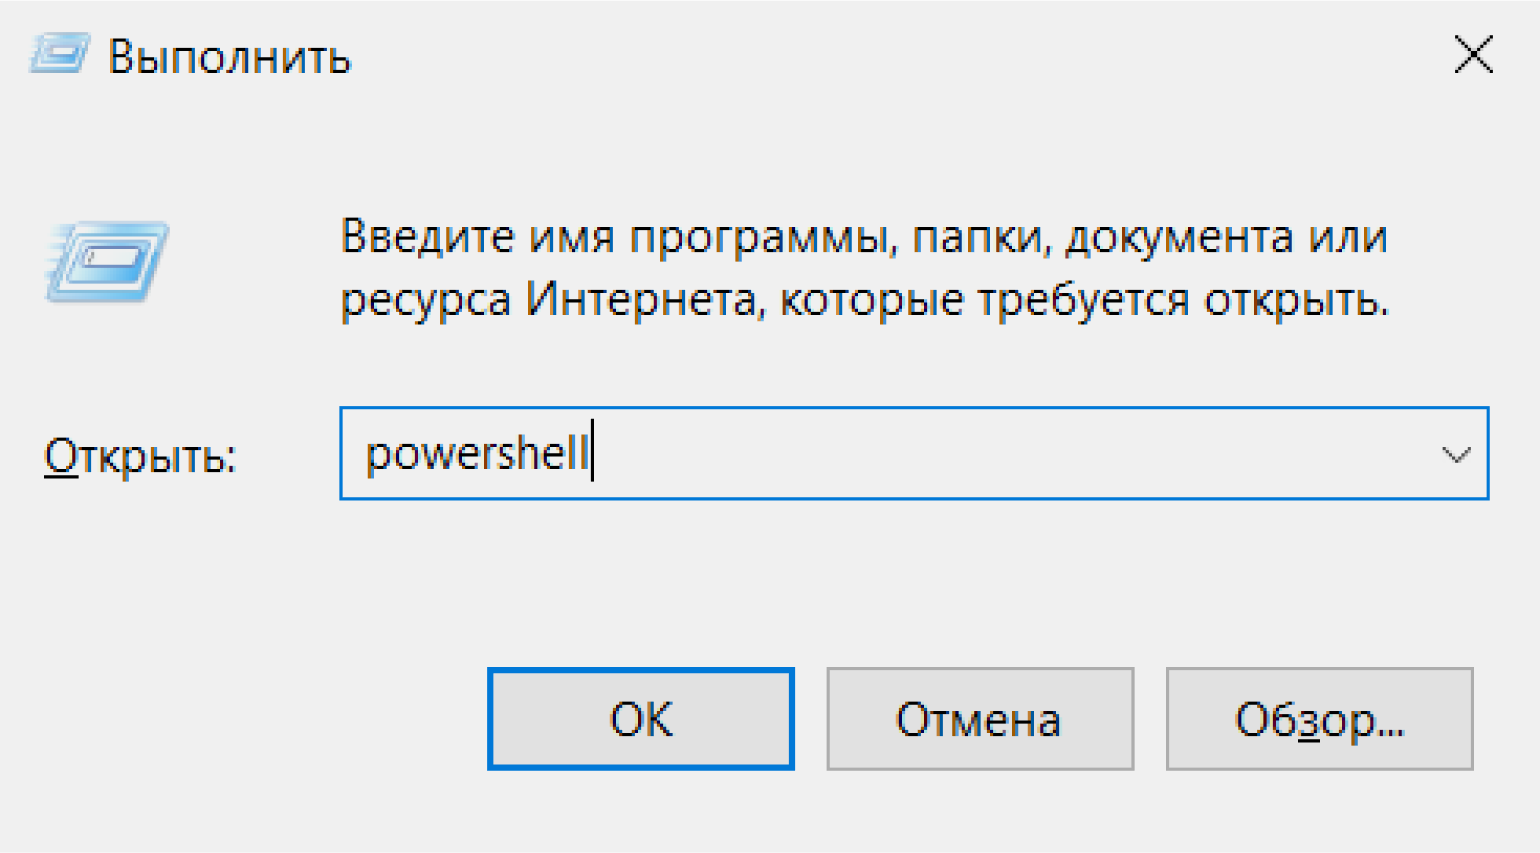
Скриншот: Skillbox Media
Команды в PowerShell называются командлетами (от английского cmdlet). Все они состоят из связки «Глагол-Существительное», или по-другому «Действие-Объект». Например, Get-Services и Start-Process. Благодаря такой структуре можно понять назначение команды, даже если вы с ней ещё не сталкивались.
После самого командлета ему передаются параметры и их значения. Между всеми словами в команде ставится пробел. Вот пример синтаксиса команды, чтобы перейти в каталог C:\:
Set-Location -LiteralPath C:\ -PassThru
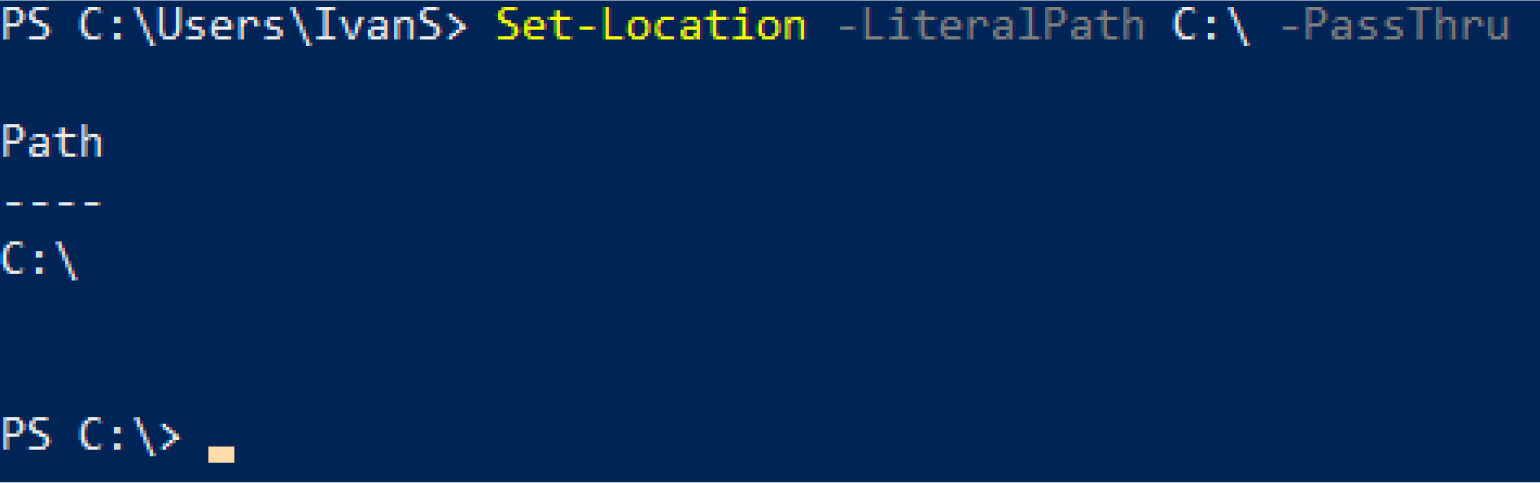
Препарируем её:
- Set-Location — буквально «установить местоположение». Переходит в нужный каталог.
- -LiteralPath C:\ — в этом параметре мы прописываем путь до каталога, в который хотим перейти. У командлета Set-Location это аргумент по умолчанию, поэтому -LiteralPath можно не прописывать отдельно: Set-Location C:\ -Passthru сработает точно так же.
- -PassThru — обычно командлет Set-Location просто меняет местоположение и ничего не возвращает. Этот параметр говорит, что нужно вывести на экран расположение каталога, в который мы перешли.
При этом в PowerShell не важен регистр. Эту же команду можно записать только заглавными буквами, только строчными и даже «лесенкой» — она всё равно сработает.
sEt-loCATion -PATH c:\ -passthru

Если в одной строке написаны сразу несколько команд, они разделяются точкой с запятой ;.
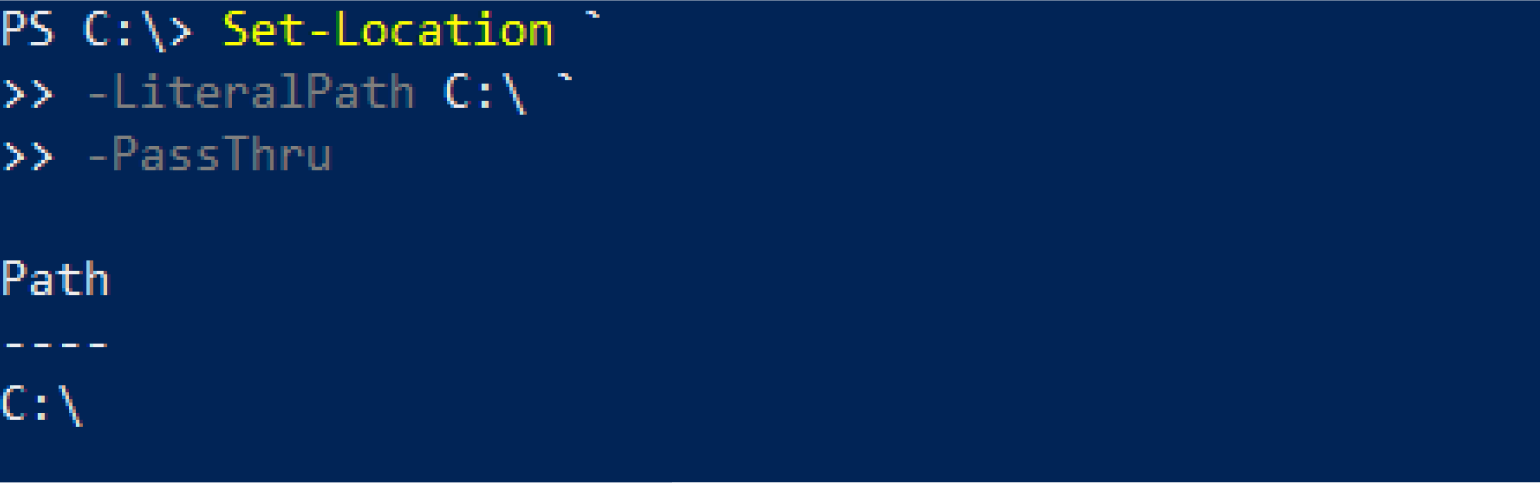
Иногда команда может получиться слишком длинной. Чтобы разбить её на несколько строк, в месте переноса ставится гравис `. Создать новую строку можно сочетанием клавиш Shift + Enter (появится ниже текущей) или Ctrl + Enter (появится выше текущей).
Разделим предыдущую команду:
Set-Location `
-LiteralPath C:\ `
-PassThru
Совет
Стрелки вверх и вниз позволяют прокручивать историю команд, которые вы вводили. Это удобно, если нужно выполнить одну из предыдущих команд ещё раз или внести в неё небольшие изменения.
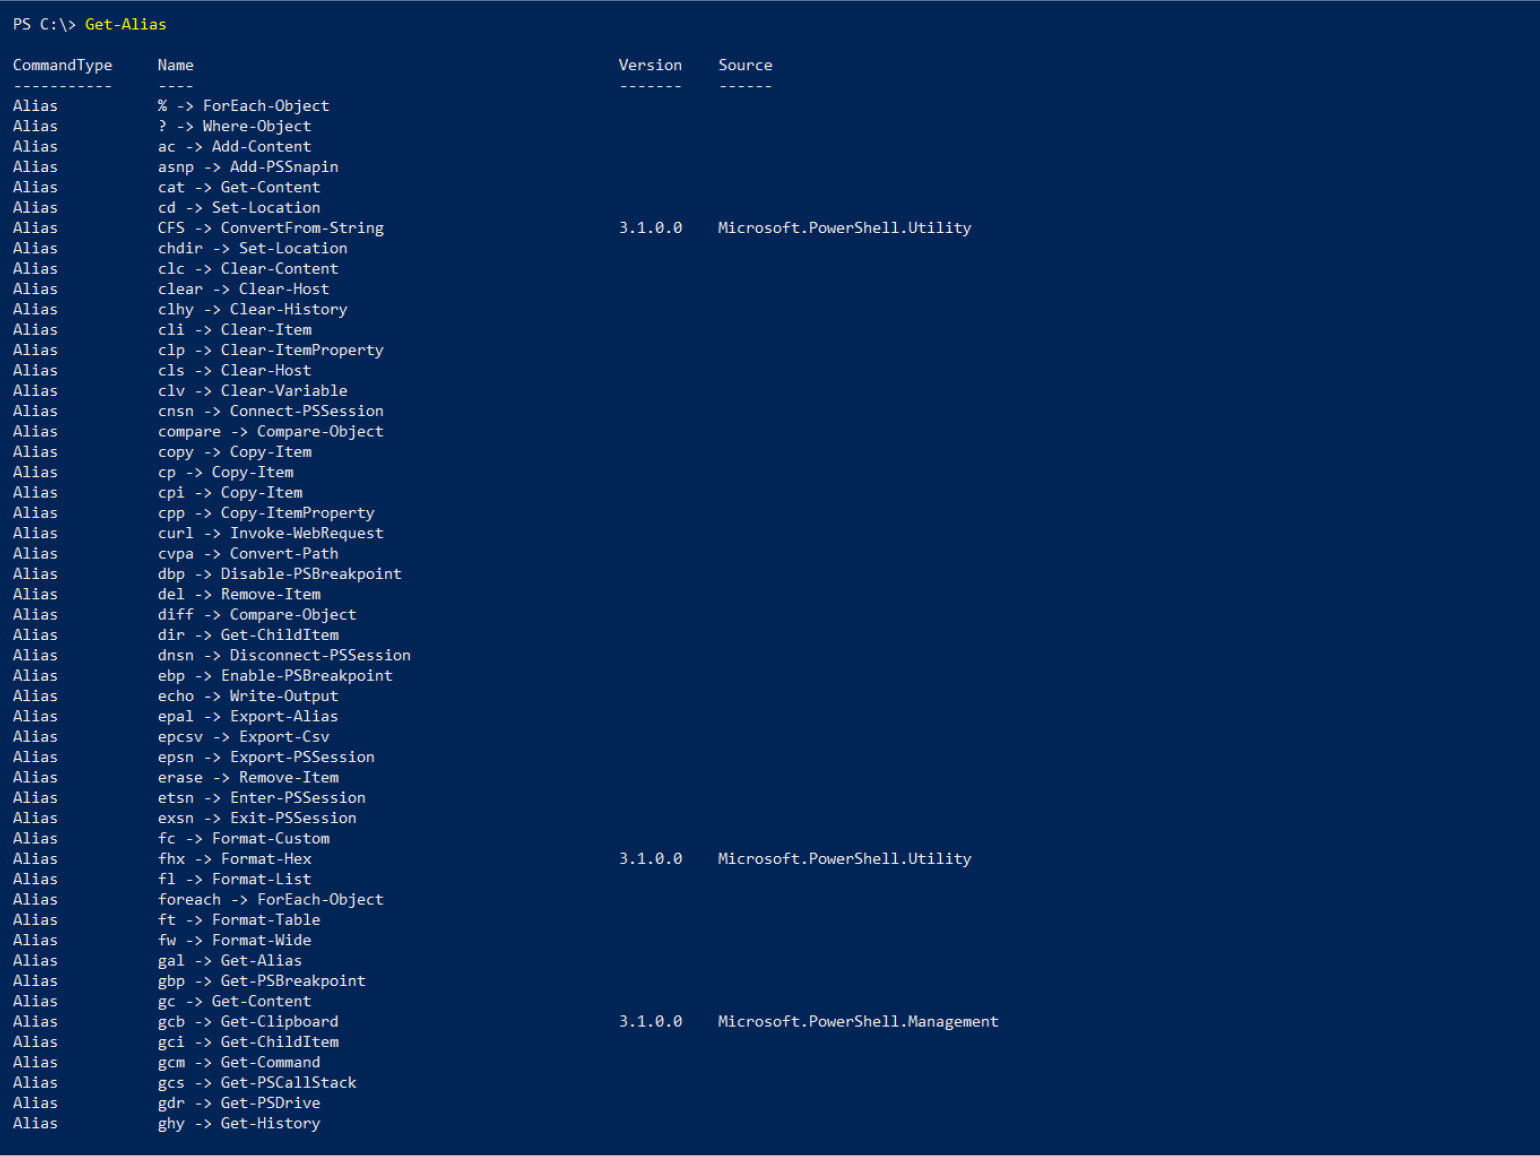
При работе с терминалом в интерактивном режиме бывает неудобно каждый раз вводить полные названия командлетов. Поэтому у самых распространённых есть псевдонимы, или алиасы, — их сокращённые версии.
Получить список доступных алиасов можно командой Get-Alias (у неё тоже есть свой псевдоним — gal).
Чтобы узнать список алиасов для отдельного командлета, воспользуйтесь параметром -Definition. Например:
Get-Alias -Definition Get-ChildItem

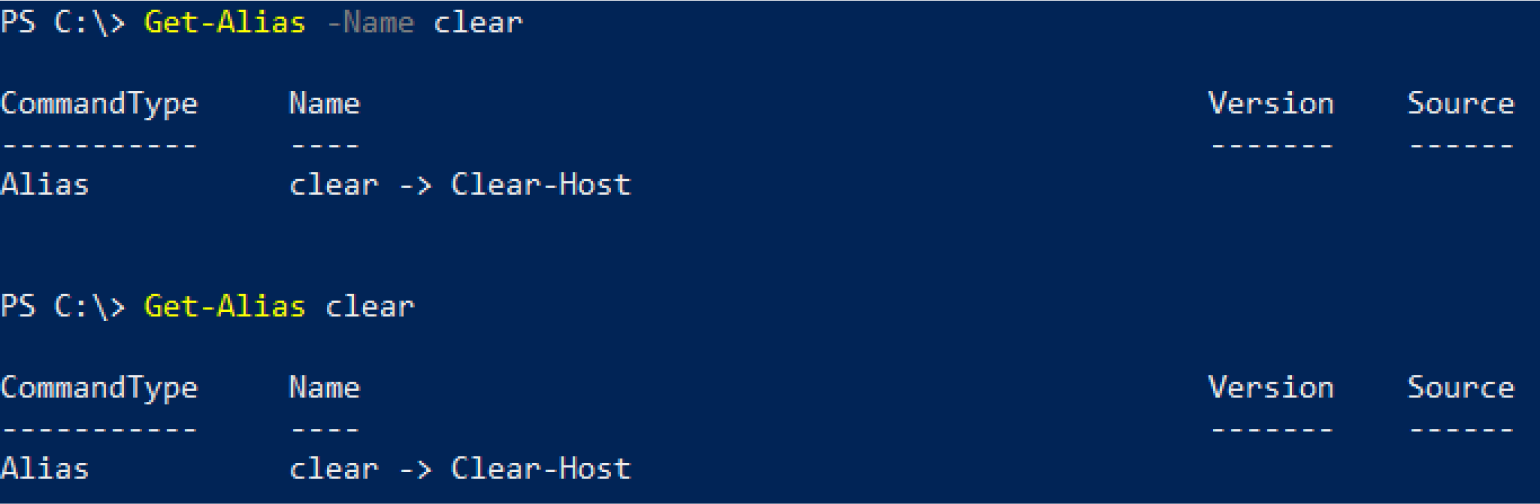
Если вы по алиасу хотите узнать полное название командлета, примените параметр -Name. Это аргумент по умолчанию, поэтому писать его необязательно.
# Оба варианта равноправны
Get-Alias -Name clear
Get-Alias clear
Многим командлетам для работы нужно передать путь до файла или каталога. Делается это в виде строки, например: C:\Windows\System32.
Но если в этом адресе встретится пробел или другой спецсимвол, PowerShell воспримет его как разделитель. Например:
# Эта команда не будет работать
Set-Location C:\Program Files

PowerShell «видит» пробел и думает, что путь до папки закончился на слове Program, а files — это уже значение какого-то другого параметра.
Есть два способа избежать таких ситуаций:
- Экранировать проблемные символы обратным грависом `: C:\Program` Files. Если путь длинный, то это может быть неудобно.
- Поместить весь путь в одинарные или двойные кавычки: ‘C:\Program Files’ или «C:\Program Files» (лучше одинарные).
Также в PowerShell есть сокращения для быстрого доступа к ближайшим директориям:
- Точка . указывает на текущий каталог. Например, Get-ChildItem . позволяет посмотреть все папки и файлы в нынешнем местоположении.
- Две точки .. указывают на родительский каталог. Например, Set-Location .. позволяет быстро к нему перейти. Это может быть полезно, если вы находитесь где-то в глубоко вложенной директории.
У многих командлетов есть сразу два параметра, в которых можно указать путь до папки или файла: -Path и -LiteralPath. Разница между ними в том, что в -Path можно подставлять переменные, а -LiteralPath воспринимает символы буквально, даже если в них указано имя переменной. О переменных в PowerShell мы рассказываем ниже.
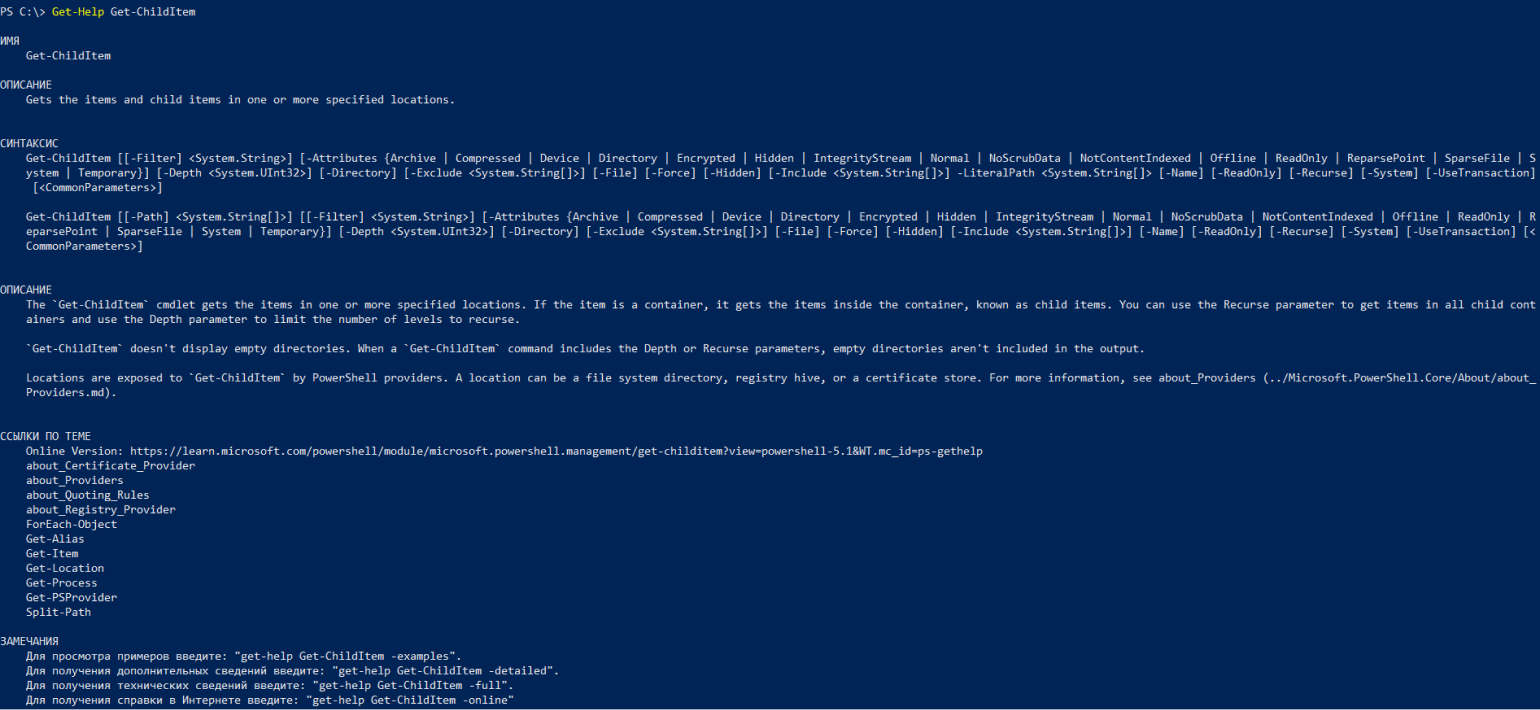
Чтобы узнать подробную информацию о командлете, используйте Get-Help Название-Командлета. Например:
Get-Help Get-Childitem
У Get-Help есть несколько полезных параметров:
- -Detailed даёт более детальную справку.
- -Full даёт полную справку.
- -Examples приводит примеры использования командлета.
- -Online перенаправляет на веб-страницу с документацией.
Командлеты PowerShell возвращают в терминал не строки, а объекты — структуру данных с набором свойств и методов. Подробно об объектах можно прочитать в нашей статье.
Строка, которую вы видите в терминале после выполнения команды — только визуальное представление объекта. PowerShell в виде таблицы показывает некоторые свойства, но не все.
Так же, как командлеты возвращают объекты, они могут принимать и обрабатывать их. Можно написать команду, на выходе получить объект, передать его другому командлету, получить объект уже от него, передать — и так до бесконечности. Это и есть конвейеры, или пайплайны.
Чтобы передать результат командлета другому командлету, между ними ставят вертикальную черту |.
Get-Process возвращает список процессов, запущенных на компьютере. Если передать ему название процесса (или шаблон, написанный с помощью регулярных выражений), командлет выведет только нужные элементы списка.
Вызовем запущенный процесс powershell.
Get-Process powershell

Мы получили объект и таблицу с некоторыми его свойствами. Чтобы узнать все свойства и методы, передадим объект командлету Get-Member. Для этого нам и понадобится конвейер.
Get-Process powershell | Get-Member
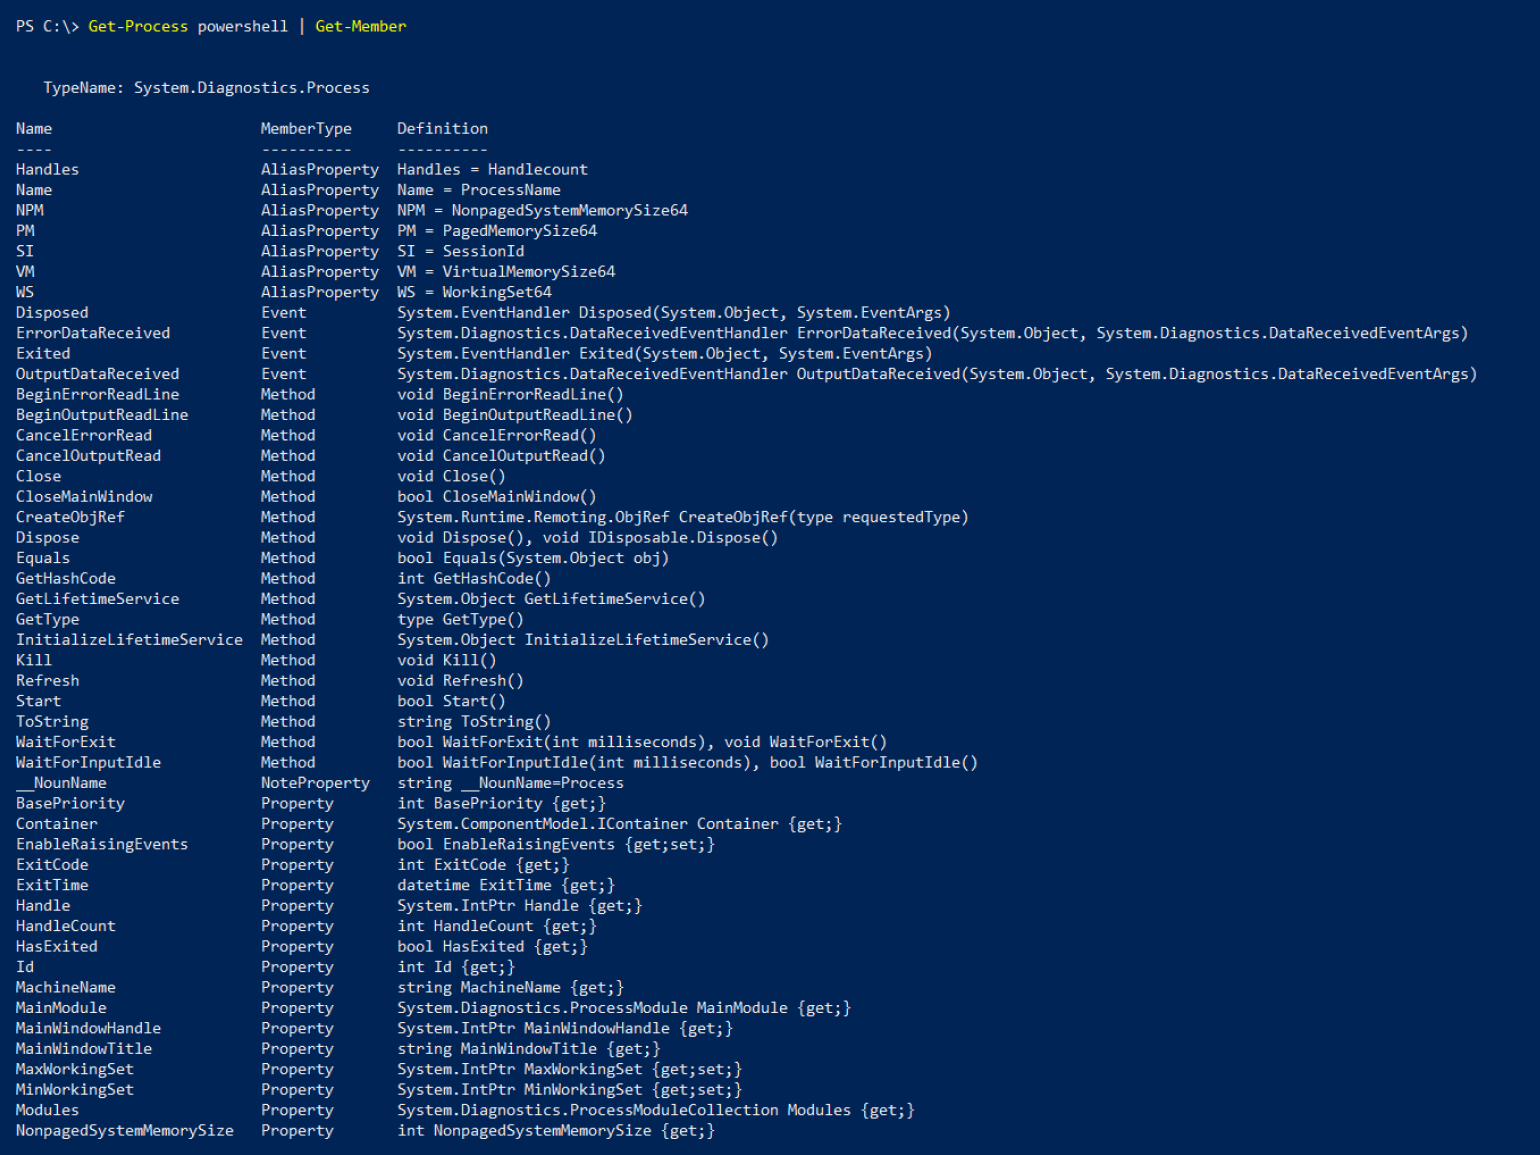
Get-Member получил объект от Get-Process и вывел таблицу со всем его содержимым. Результат работы Get-Member — тоже объект (вернее, список объектов), который можно передать по конвейеру дальше.
Например, мы хотим отобразить только те строки, в которых MemberType — это Property. Для этого используем командлет Where-Object.
Get-Process powershell | Get-Member | Where-Object {$_.MemberType -eq 'Property'}
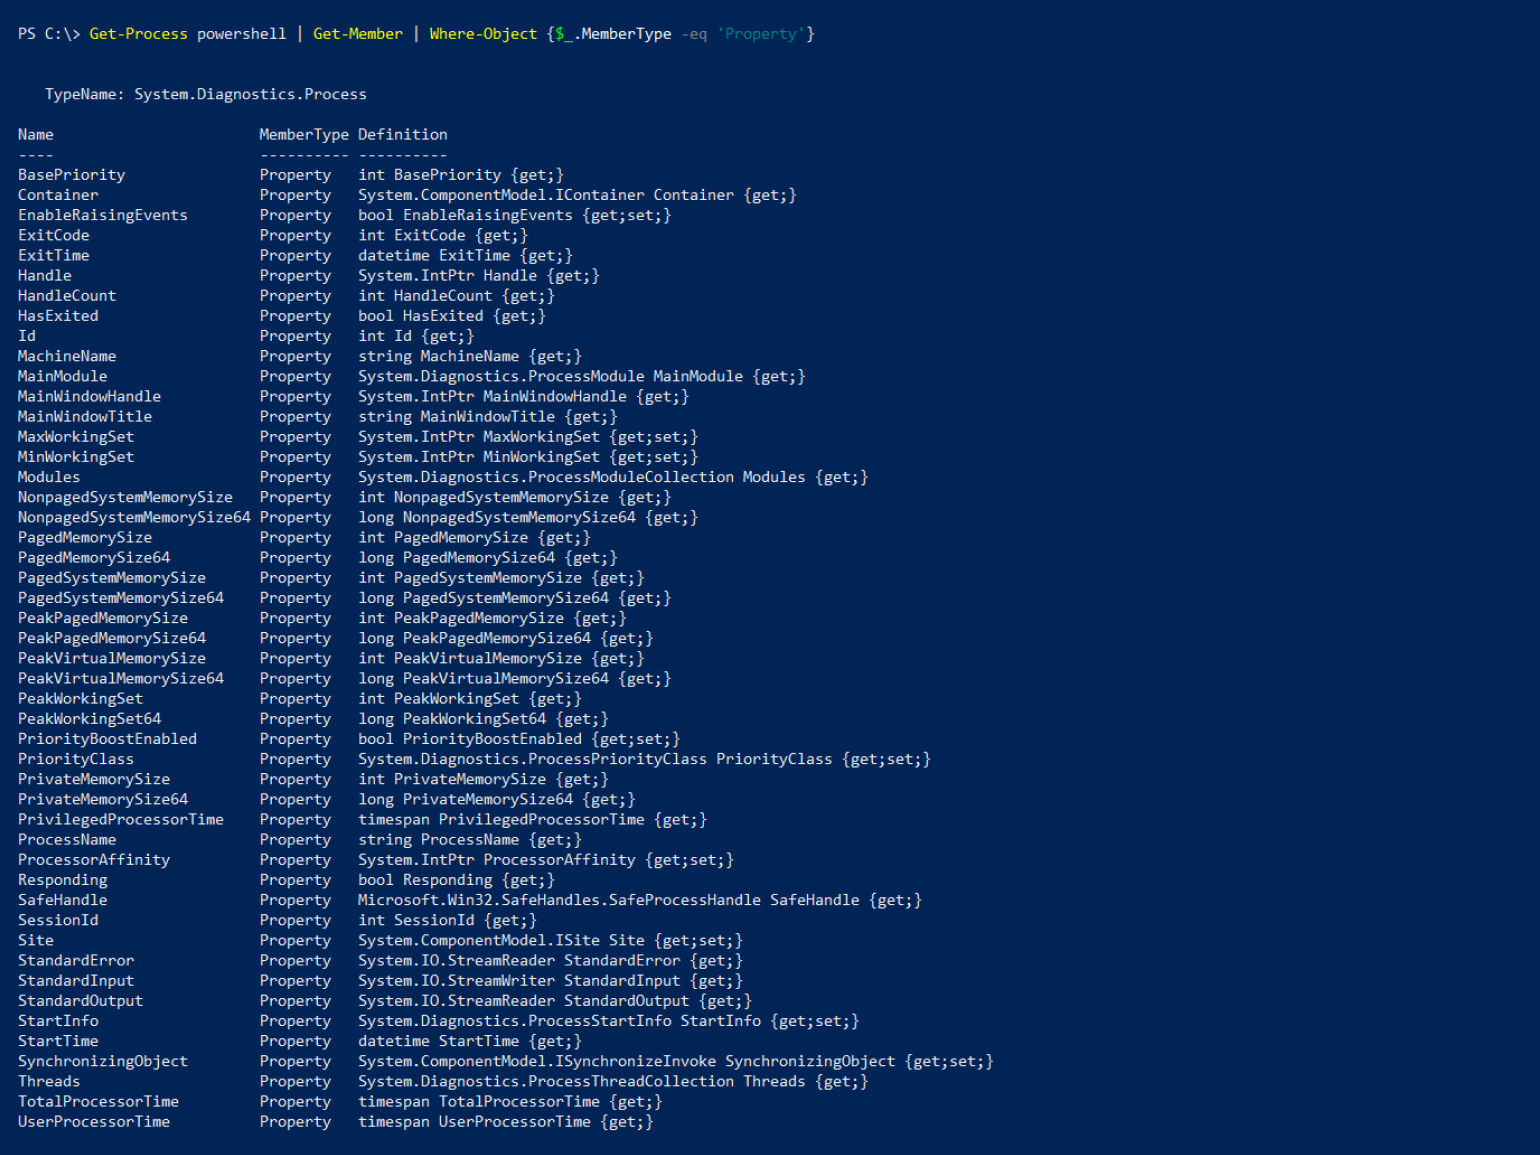
Where-Object по очереди перебирает каждый объект, полученный от Get-Member. Выражение в фигурных скобках — логическое:
- $_ ссылается на текущий объект (то есть на отдельную строку в таблице);
- .MemberType обращается к значению свойства MemberType в этом объекте;
- -eq сравнивает, равно ли выражение слева от него выражению справа от него;
- ‘Property’ — это значение, которое мы ожидаем увидеть у свойства MemberType.
О логических выражениях мы рассказываем ниже.
Командлет Format-Table позволяет настроить отображение таблицы, которую PowerShell выводит в терминале: выбрать свойства и методы, которые в ней будут, установить ширину столбцов, сгруппировать данные по нескольким таблицам и так далее.
Отформатируем таблицу, которую получили от командлета Get-Member.
Get-Process powershell | Get-Member | Format-Table -AutoSize -Wrap -GroupBy MemberType -Property Name, Definition
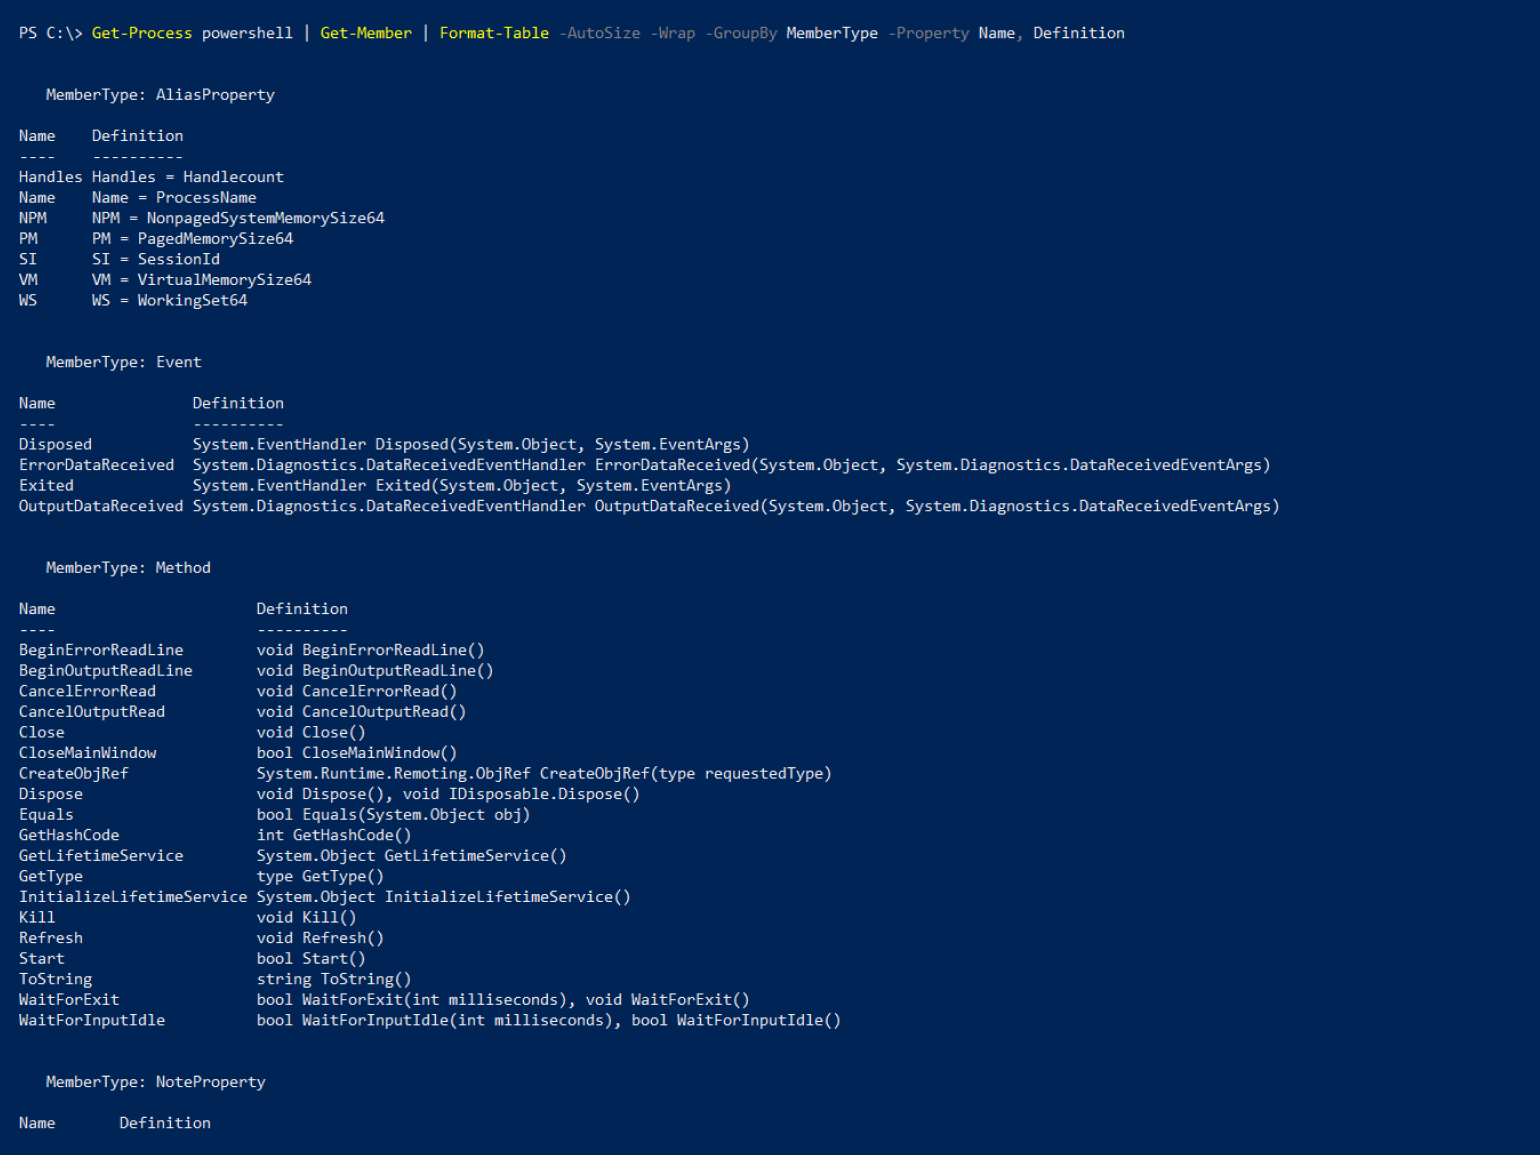
Расшифруем параметры Format-Table:
- -AutoSize выравнивает ширину столбцов по размеру их содержимого;
- -Wrap переносит содержимое ячейки на следующую строку, если она не помещается в размеры экрана (по умолчанию текст обрезается);
- -GroupBy разделяет одну таблицу на несколько, сгруппированных по значению какого-либо свойства (в нашем случае для каждого MemberType создана отдельная таблица);
- -Property указывает, какие свойства объекта будут отображаться в таблице в качестве столбцов (в нашем случае Name и Definition).
Командлет Sort-Object позволяет отсортировать список объектов (то есть таблицу) по значениям её свойств (то есть столбцов). Отсортируем результат работы GetMember по столбцу Name в алфавитном порядке. Для этого используем параметр -Property (работает как у Format-Table).
Get-Process powershell | Get-Member | Sort-Object -Property Name
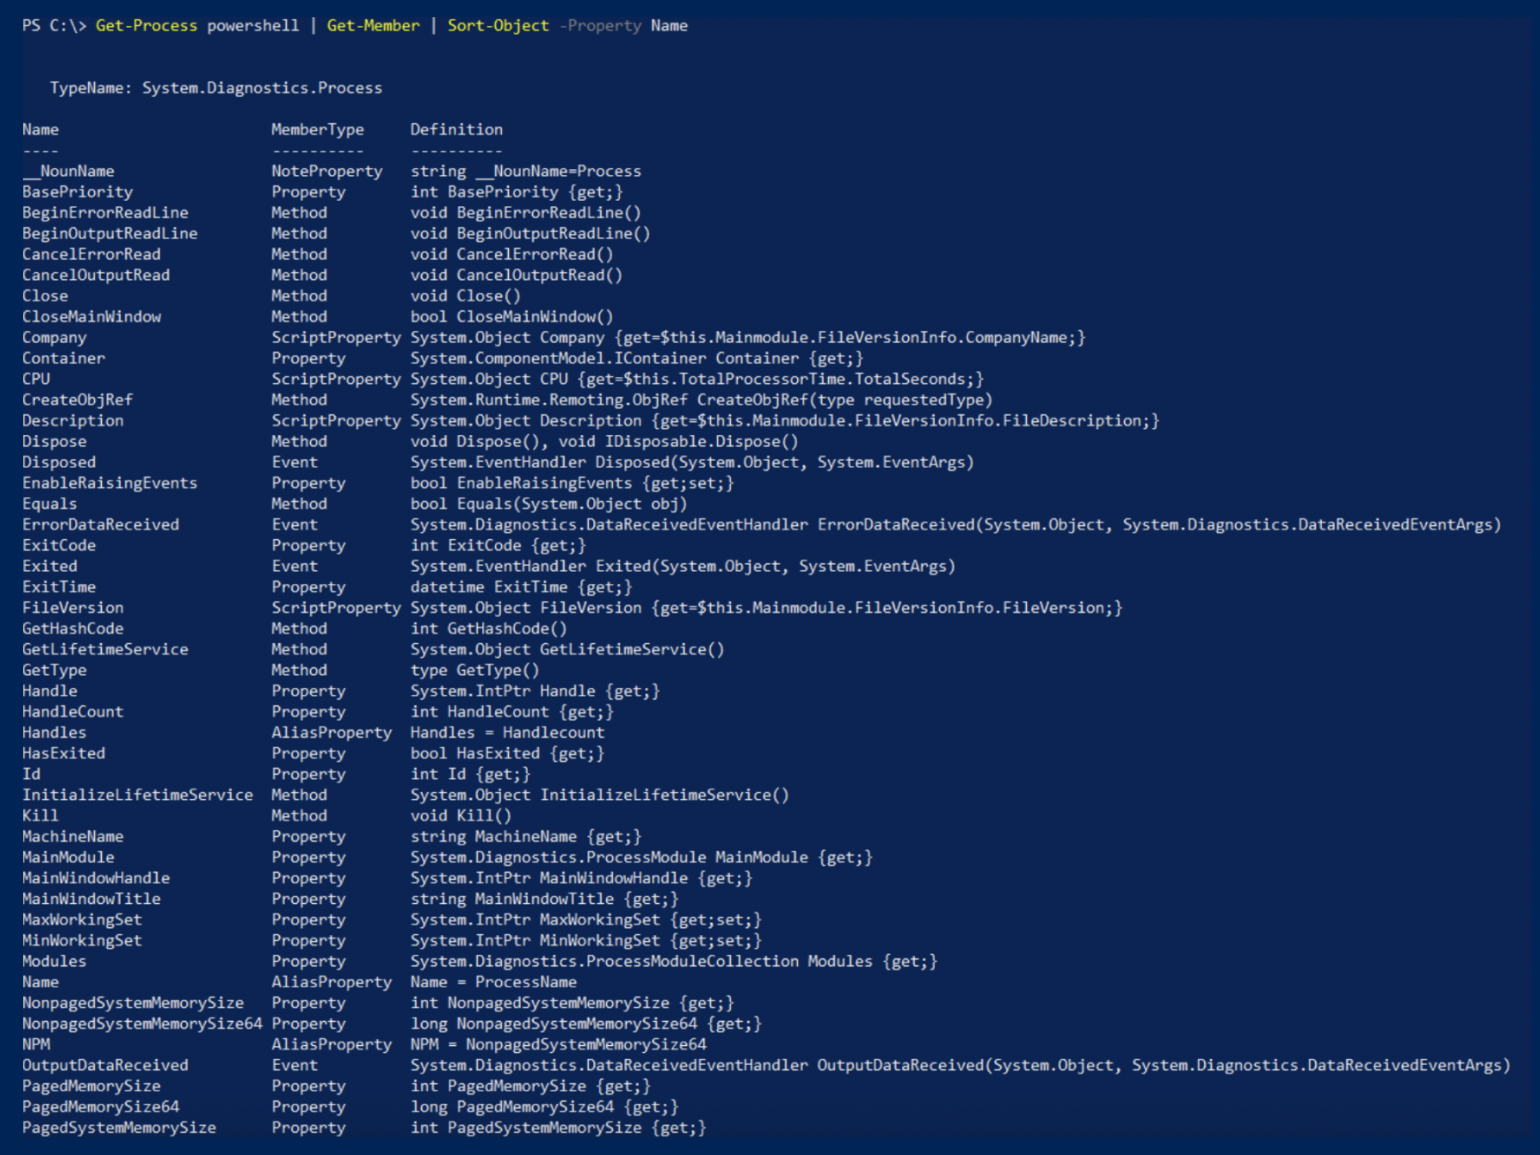
У Sort-Object есть и другие полезные параметры:
- -Descending сортирует объекты в порядке убывания.
- -Unique удаляет дубликаты и возвращает только уникальные объекты.
- -Top получает число N и отображает первые N объектов в таблице.
- -Bottom получает число N и отображает последние N объектов в таблице.
Некоторые задачи могут занимать много времени. Это, например, установка и обновление ПО, поиск файла в большой директории. Пока PowerShell выполняет одну команду, писать другие нельзя.
К примеру, попытаемся найти на всём диске C файл powershell.exe. Используем для этого командлет Get-ChildItem с параметром -Recurse. Так он будет искать не только в текущем каталоге, но и во всех подкаталогах.
PowerShell может попытаться зайти в папки, к которым у него нет доступа, поэтому добавим -ErrorAction SilentlyContinue. Если случится ошибка, команда не станет сообщать об этом и просто продолжит выполняться.
Получается так:
Get-ChildItem -Path C:\ -Name powershell.exe -Recurse -ErrorAction SilentlyContinue

Как видим, пока задача не завершена, командная строка недоступна. Чтобы принудительно прервать её выполнение, нажмите сочетание клавиш Ctrl + C (при этом ничего не должно быть выделено, иначе компьютер воспримет это как команду «Копировать»).
Чтобы не ждать выполнения долгих задач и сразу приступать к следующим, их можно запускать в фоновом режиме. Делается это командлетом Start-Job, а сама команда помещается в фигурные скобки.
Start-Job {Get-ChildItem -Path C:\ -Name powershell.exe -Recurse -ErrorAction SilentlyContinue}

Одновременно можно выполнять любое количество фоновых задач. Помимо Start-Job для работы с фоновыми задачами есть другие командлеты:
- Get-Job выдаёт отчёт со статусом фоновых задач.
- Wait-Job делает консоль недоступной, пока выполняется фоновая задача.
- Stop-Job прерывает выполнение фоновой задачи.
- Receive-Job выводит результат фоновой задачи и удаляет его из памяти. Чтобы сохранить результат в памяти, используйте параметр -Keep.
Wait-Job, Stop-Job и Receive-Job ожидают, что вы примените их к конкретной задаче (или нескольким). Для этого укажите название Name или идентификатор Id. Делать это можно и в связке с Get-Job.
Get-Job Job1

Терминал PowerShell удобен для выполнения небольших коротких однострочных задач. Чтобы создавать и сохранять сложные скрипты, есть интегрированная среда сценариев.
Важно!
PowerShell ISE предназначен для версий языка 5.1 и младше. Для более старших версий Microsoft рекомендует использовать Visual Studio Code с расширением PowerShell.
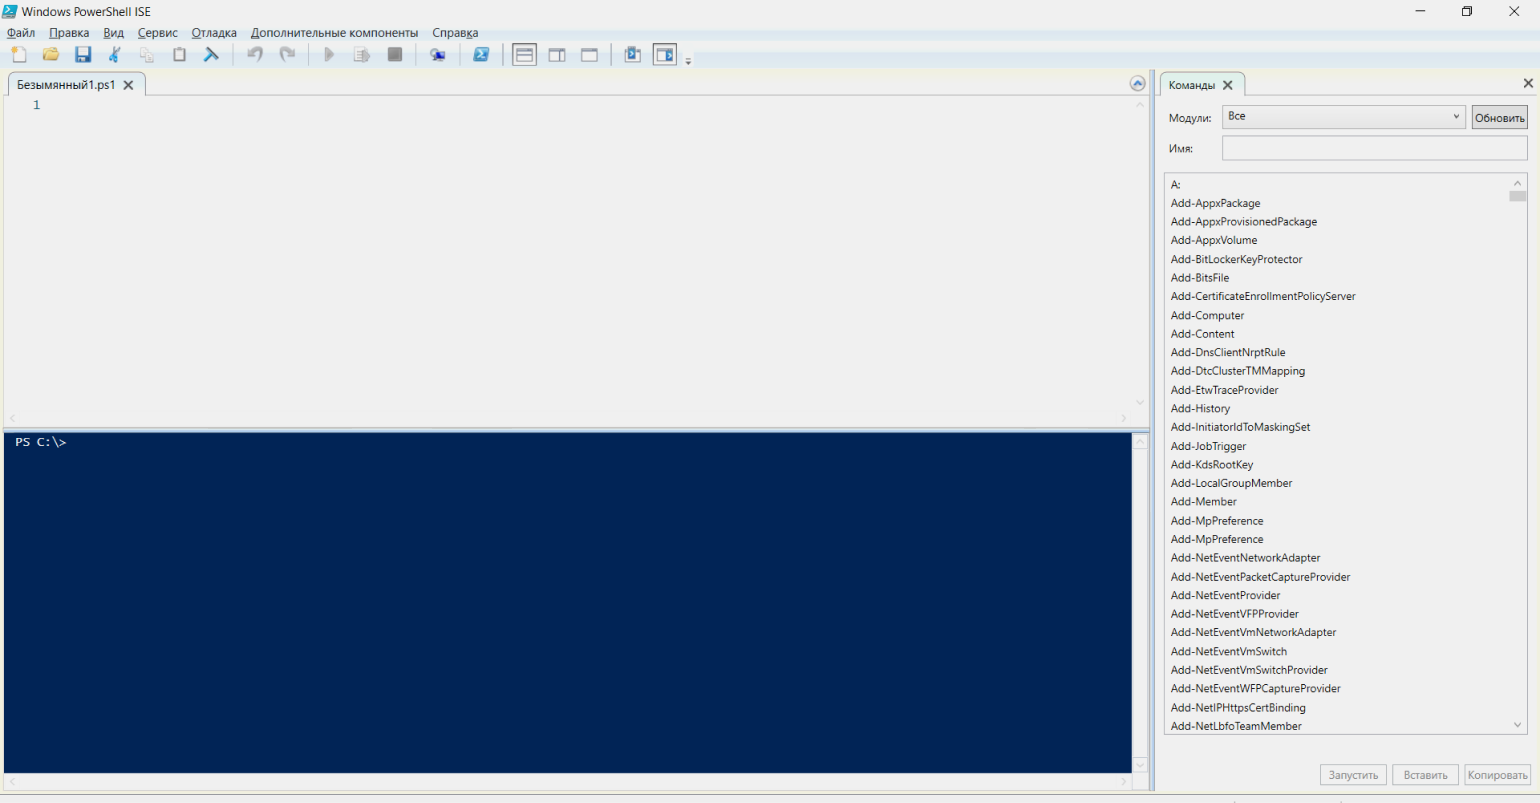
PowerShell ISE состоит из трёх основных окон:
- область сценариев в верхней части экрана — в ней пишут скрипты;
- область консоли в нижней части экрана — работает так же, как обычный терминал, здесь можно писать команды в интерактивном режиме;
- панель команд в правой части экрана — полный справочник команд PowerShell с конструктором, в котором можно указать значения нужных параметров.
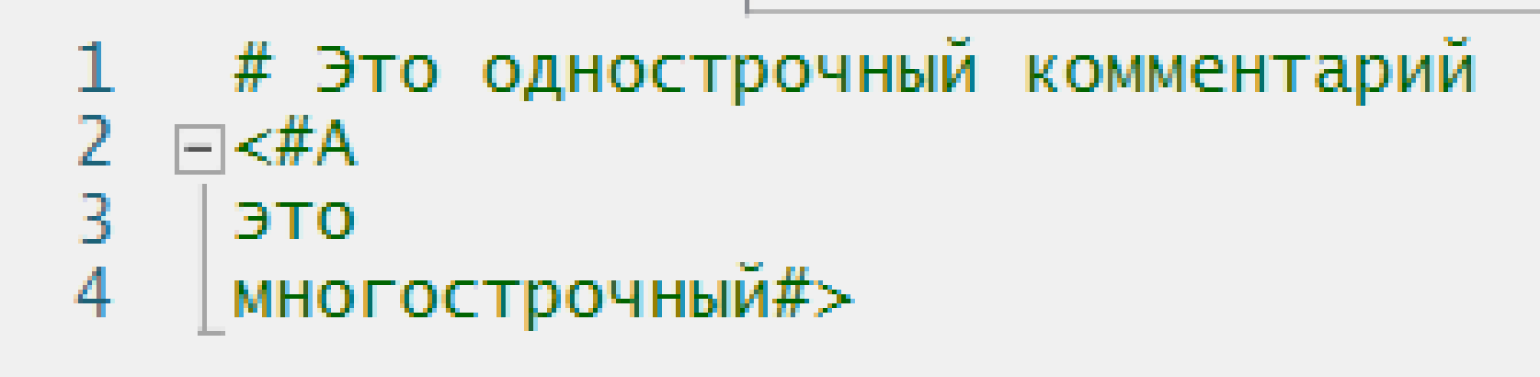
PowerShell позволяет вставлять в код комментарии. Они никак не влияют на выполнение скрипта и нужны людям, которые будут читать вашу программу. Однострочный комментарий начинается с символа #, а многострочный обрамляется с двух сторон символами <# и #>.
Любой код чаще читают, чем пишут, и важно делать его понятным для человека. Разработчики PowerShell договорились между собой о едином своде правил и выпустили стайлгайд. Вот несколько правил оттуда.
Используйте нотацию PascalCase в названиях командлетов, функций, параметров, свойств, методов, переменных и классов. Неправильно писать: get-service, Get-service, GET-SERVICE. Правильно: Get-Service.
Пишите полные названия командлетов. Алиасы удобны для работы в интерактивном режиме, но в скриптах могут затруднять чтение команд. Неправильно: dir, gci, ls. Правильно: Get-ChildItem.
One True Brace Style при оформлении вложенности. Если вы где-то используете фигурные скобки, то код внутри них отбивается табуляцией (четыре пробела), а сами скобки ставятся так:
if ($var1 -eq $var2) {
    # Код внутри условия
} else {
    # Код внутри условия
    # Ещё код внутри условия
}
Исключение из прошлого правила — когда код в фигурных скобках совсем небольшой, его можно записать в одну строку. Например:
Get-ChildItem | Where-Object { $_.Length -gt 10mb }
Комментируйте код. Так будет гораздо проще разобраться, что он делает и как работает. Причём как другому человеку, так и вам самим через полгода.
В PowerShell ISE можно выполнить код целиком или частично, есть инструменты отладки. Скрипты сохраняются в файлах с расширением .ps1. Но запустить их двойным кликом не получится — нужно нажать правую кнопку мыши и в появившемся окне выбрать Выполнить с помощью PowerShell.
Также запустить скрипт можно из оболочки. Например, в каталоге C:\Scripts есть файл test_script.ps1. Выполнить его можно:
- командой PowerShell -File C:\Scripts\test_script.ps1, запущенной из любого места;
- командой .\test_script.ps1, запущенной, когда вы находитесь в каталоге C:\Scripts.
По умолчанию запускать любые файлы с PowerShell-скриптами запрещено. Сделано это в целях безопасности. Узнать нынешнюю политику выполнения можно с помощью командлета Get-ExecutionPolicy. Вот какая она может быть:
- Restricted (установлена по умолчанию) — запрещено запускать любые скрипты.
- AllSigned — разрешено запускать только скрипты, которые были подписаны доверенным разработчиком.
- RemoteSigned — разрешено запускать подписанные доверенным разработчиком и собственные скрипты.
- Unrestricted — разрешено запускать любые скрипты.
Чтобы ваши ps1-файлы запускались, нужно заменить политику выполнения на RemoteSigned. Для этого откройте PowerShell от имени администратора и выполните команду:
Set-ExecutionPolicy RemoteSigned
Чтобы подтвердить действие, введите y.

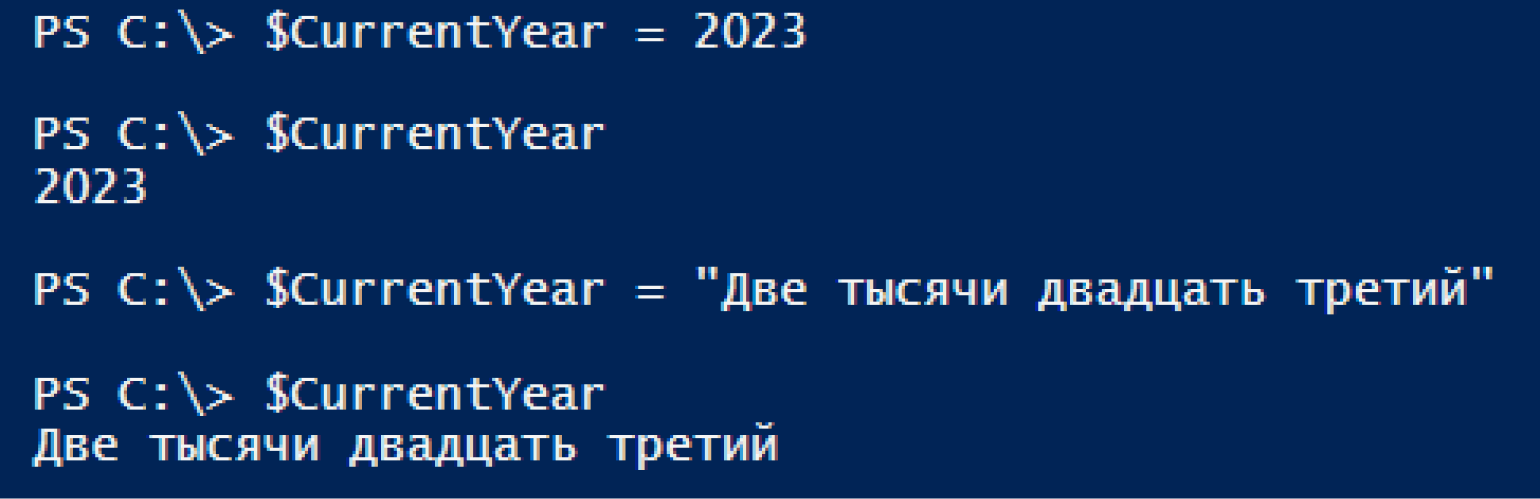
Чтобы сохранять данные и обращаться к ним в будущем, в PowerShell есть переменные. Перед их названием ставится знак доллара $, а сами они могут содержать латинские буквы (заглавные и строчные), цифры и нижние подчёркивания.

Переменная может хранить данные любого типа, и их можно перезаписывать.
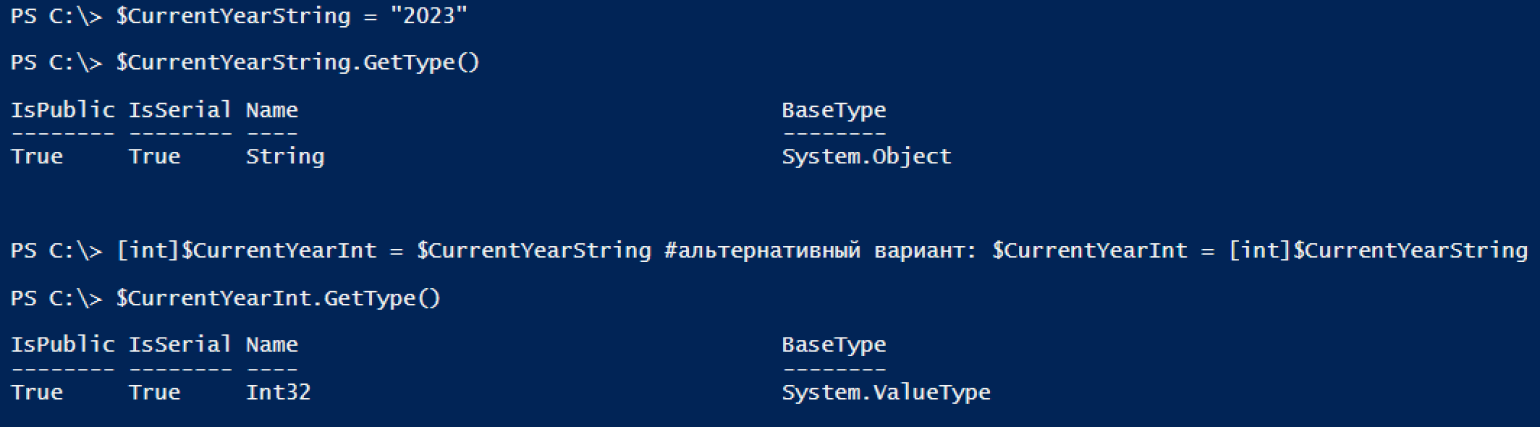
Переменную можно привести к определённому типу данных. Создадим переменную со строкой 2023 и преобразуем её в число. Чтобы узнать тип данных, воспользуемся методом .GetType().
Чтобы удалить переменную, используется метод .Clear().
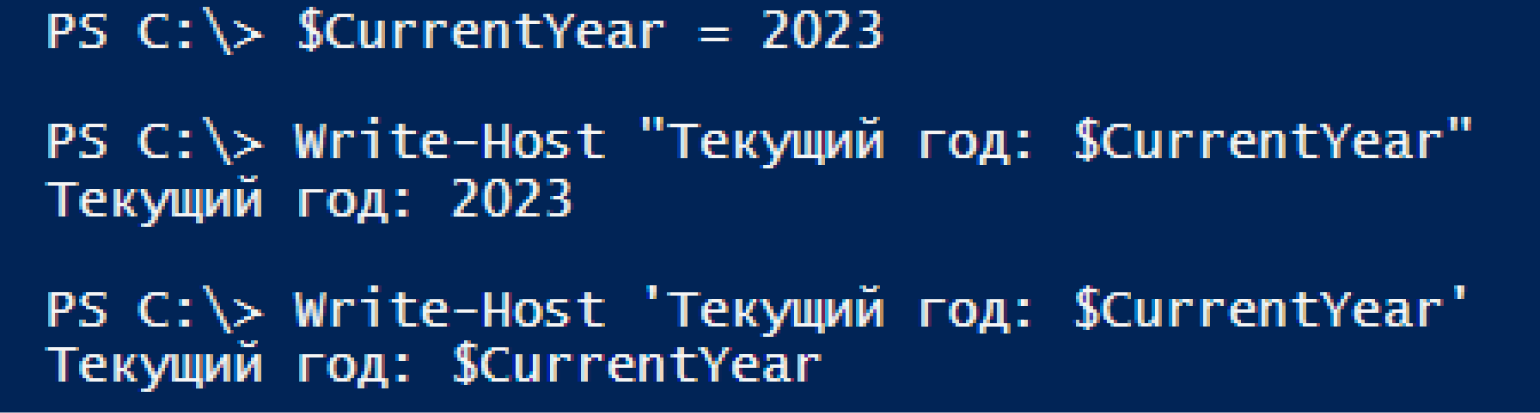
Переменные можно подставлять в строки, если они оформлены двойными кавычками. Если же кавычки одинарные, то PowerShell воспринимает символы в строке буквально. Сравните:
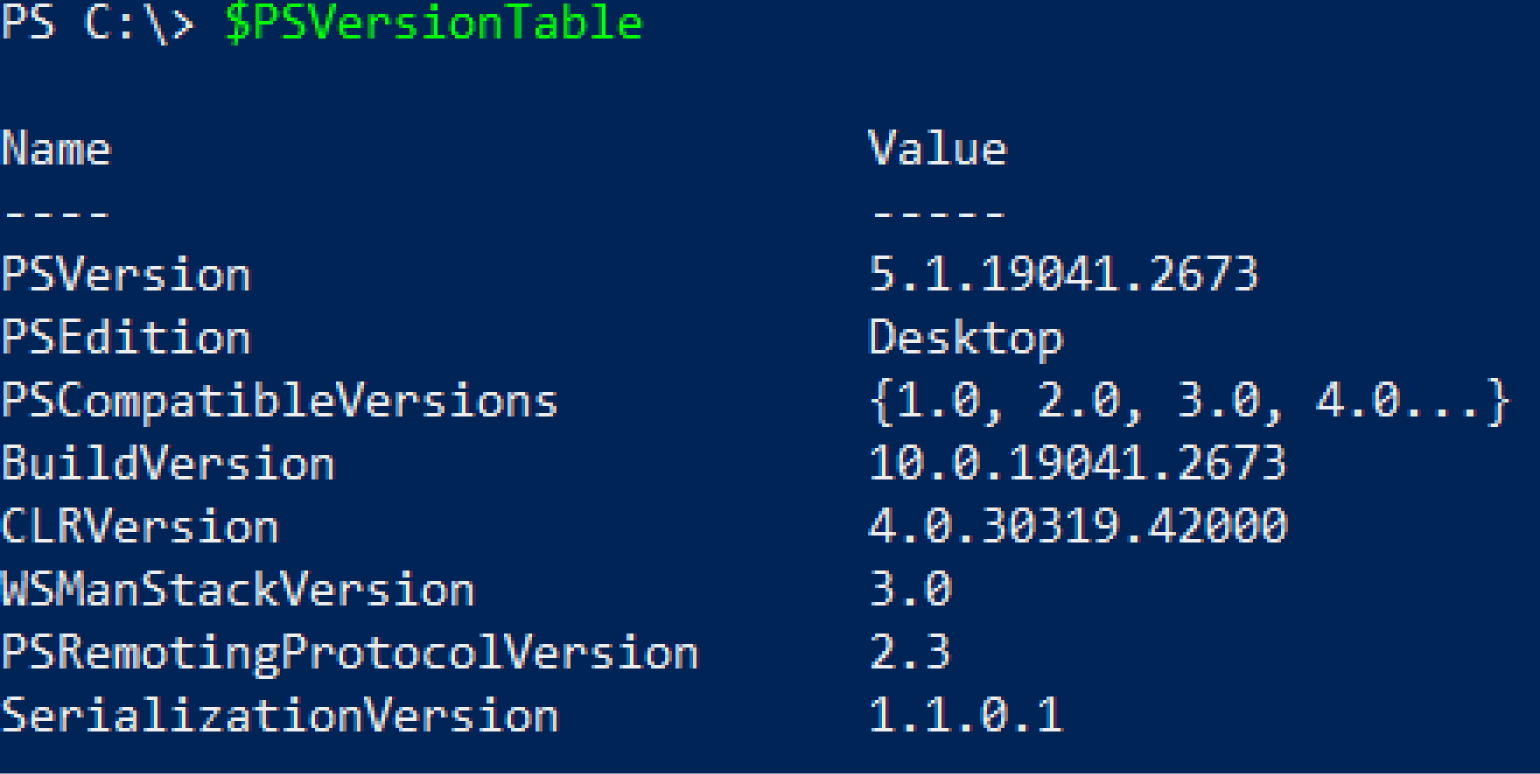
Помимо пользовательских также есть системные переменные. Например, $PSVersionTable хранит информацию о версии PowerShell.
PowerShell позволяет проводить с объектами арифметические операции и сравнивать их друг с другом. Для этого он использует логические операторы.
Арифметические операторы:
- + — сложение;
- — — вычитание;
- * — умножение;
- / — деление;
- % — деление по модулю;
- ( и ) — скобки для группировки операций.
Операторы сравнения оформляются так же, как параметры командлетов. Их названия произошли от английских выражений, указанных в скобках.
- -eq — равно (от equal);
- -ne — не равно (от not equal);
- -gt — больше (от greater than);
- -ge — больше либо равно (от greater than or equal);
- -lt — меньше (от less than);
- -le — меньше либо равно (от less than or equal).
Условия в PowerShell создаются с помощью ключевых слов if, elseif и else. В обычных скобках указывается само условие, в фигурных — код, который запускается при его выполнении. Например:
$Number = 123

if ($Number -gt 0) {
Write-Host 'Число больше нуля'
} elseif ($Number -lt 0) {
Write-Host 'Число меньше нуля'
} else {
Write-Host 'Число равно нулю'
}

>>> Число больше нуля
Также условия можно задавать с помощью ключевого слова switch. Например:
$Day = 2

switch ($Day) {
    1 {Write-Host 'Понедельник'}
    2 {Write-Host 'Вторник'}
    3 {Write-Host 'Среда'}
    4 {Write-Host 'Четверг'}
    5 {Write-Host 'Пятница'}
    6 {Write-Host 'Суббота'}
    7 {Write-Host 'Воскресенье'}
}

>>> Вторник
Windows PowerShell — язык программирования, на котором администрируют операционные системы и автоматизируют процессы. Он поддерживает объектно-ориентированное программирование и позволяет работать в интерактивном режиме, а также писать, сохранять и выполнять полноценные скрипты.
- PowerShell предустановлен в Windows, но его можно скачать на macOS и Linux.
- У языка есть собственная интегрированная среда сценариев PowerShell ISE, предназначенная для старых версий языка (5.1 и ниже).
- PowerShell работает не со строками, а с объектами. Он обрабатывает их с помощью командлетов, построенных по принципу «Глагол-Существительное».
- Результат выполнения одного командлета можно передавать другому в конвейере.
- Задачи можно выполнять в фоновом режиме.
- PowerShell — высокоуровневый язык, на котором можно работать с переменными, логическими операторами, условиями, циклами, массивами, хеш-таблицами, функциями и классами.

Жизнь можно сделать лучше!
Освойте востребованную профессию, зарабатывайте больше и получайте от работы удовольствие. А мы поможем с трудоустройством и важными для работодателей навыками.
Посмотреть курсы
PowerShell is an object-oriented automation engine and scripting language with an interactive command-line shell that Microsoft developed to help IT professionals configure systems and automate administrative tasks.
Built on the .NET framework, PowerShell works with objects, whereas most command-line shells are based on text. PowerShell is a mature and well-proven automation tool for system administrators employed in both IT departments and external entities, such as managed service providers, because of its scripting capabilities.
PowerShell originated as a proprietary offering that was only available on Windows. Today, PowerShell is available by default on most recent Windows systems; simply type «powershell» into the Windows search bar to locate the PowerShell app. In 2016, Microsoft open sourced PowerShell and made it available on Linux and macOS.
What does PowerShell do?
Microsoft designed PowerShell to automate system tasks, such as batch processing, and to create system management tools for commonly implemented processes. The PowerShell language, similar to Perl, offers several ways to automate tasks:
- With cmdlets, which are very small .NET classes that appear as system commands.
- With scripts, which are combinations of cmdlets and associated logic.
- With executables, which are standalone tools.
- With the instantiation of standard .NET classes.
Admins can use PowerShell to handle a wide range of activities. It can extract information on OSes, such as the specific version and service pack levels. «PowerShell providers» are programs that make data contained in specialized data stores accessible at the command line. Those data stores include file system drives and Windows registries.
PowerShell also serves as the replacement for Microsoft’s Command Prompt, which dates back to DOS. Microsoft, for example, made PowerShell the default command-line interface (CLI) for Windows 10 as of build 14791. PowerShell’s role as a command-line shell is how most users become acquainted with the technology.
The most appealing reason to use any kind of CLI is the potential for precise and repeatable control over a desired action or task flow that is difficult, or even impossible, to replicate with a traditional GUI.
Consider using a GUI to perform an intricate task. It can involve clicking buttons, moving sliders, selecting files from multilayered menus and other actions. GUIs were designed to be comfortable for humans to use, but they can be time-consuming, cumbersome and error-prone — especially when a task must be repeated hundreds or thousands of times.
In contrast, PowerShell offers a CLI with a mature and detailed scripting language that enables a user with rudimentary programming skills to craft a detailed set of specific instructions, or a script, for a desired task. The task can be just about anything, from finding a desired file to describing a desired state configuration for the system or other systems. Once the script is created, it can be saved as a file and executed with a click, enabling the same task to be repeated exactly the same way for any number of repetitions. Different scripts can also be chained together to create complex and highly detailed tasks.
These simple-sounding characteristics are absolutely essential for automation and scalability — letting the computer do the work as much as is needed for the environment. Thus, PowerShell can help system administrators perform complex and highly repetitive tasks with a high level of automation and accuracy that a GUI simply can’t replicate.
Key PowerShell features
Microsoft incorporates updates and new features with each PowerShell version, but the following is a list of the primary features and characteristics.
Discoverability. Users can discover PowerShell’s features using cmdlets, such as Get-Command, which creates a list of all the commands — including cmdlets and functions — available on a given computer. Parameters can be used to narrow the scope of the search.
Help capabilities. Users can learn more about PowerShell principles and particular components, such as cmdlets, through the Get-Help cmdlet. The -online parameter provides access to help articles on the web if available for a particular topic.
Remote commands. Admins can perform remote operations on one or multiple computers, taking advantage of technologies such as Windows Management Instrumentation and WS-Management. The WS-Management protocol, for example, lets users run PowerShell commands and scripts on remote computers.
Pipelining. With PowerShell, commands can be linked together through the pipe operator, symbolized as |. This approach lets the output from a given command become the input for the next command in the pipeline sequence. The PowerShell pipeline lets objects, rather than text strings, flow from one cmdlet to another. This powerful capability is important for complex and detailed automation scripts.
Details on additional features can be found in the following sections.
Desired State Configuration
With PowerShell 4.0, Microsoft introduced a configuration management platform called Desired State Configuration (DSC), which admins can use to set a specific configuration for a server. After the admin defines the server settings, PowerShell ensures the target nodes retain that desired state. DSC has two modes of operation: push mode and pull mode.
In push mode, a server sends notifications to the nodes. It’s a one-way communication, where the admin sends notifications from a workstation. Setup costs are less because management runs from a device, but a notification can get lost if the device isn’t connected to the network.
In pull mode, the IT department creates a pull server with the configuration details of each node using a Managed Object Format file. Each node contacts the pull server to check for a new configuration. If the new configuration is available, the pull server sends the configuration to the node. Admins can manage all devices regardless of their network connection. When a device connects to the network, it automatically contacts the pull server to check for a new configuration.
DSC resources
DSC resources are the components of a desired state configuration script. Admins can check the available DSC resources on a machine with the Get-DscResource command.
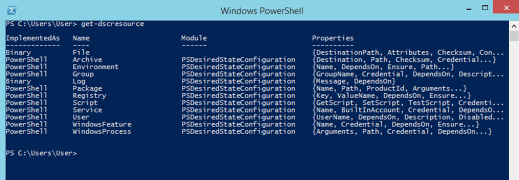
Admins use these resources to configure components, such as registry keys and Windows services, or to create and manage local users through a configuration script. For instance, the File resource manages files and folders, the Environment resource manages environment variables and the Registry resource manages the registry keys of a node. Windows default, or built-in, DSC resources include the following:
- Archive resource.
- Environment resource.
- File resource.
- Group resource.
- GroupSet resource.
- Log resource.
- Package resource.
- ProcessSet resource.
- Registry resource.
- Script resource.
- Service resource.
- ServiceSet resource.
- User resource.
- WindowsFeature resource.
- WindowsFeatureSet resource.
- WindowsOptionalFeature resource.
- WindowsOptionalFeatureSet resource.
- WindowsPackageCabresource resource.
- WindowsProcess resource.
Additional resources are available for cross-node dependency, package management and Linux resources.
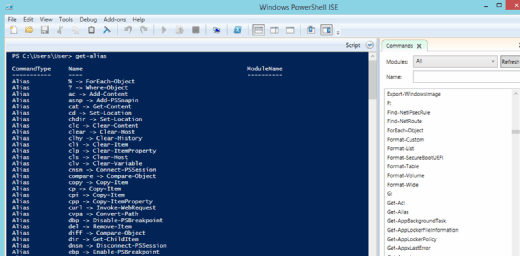
PowerShell Integrated Scripting Environment
PowerShell Integrated Scripting Environment (ISE), introduced by Microsoft in PowerShell version 2.0, is a PowerShell host application used to write, test and debug scripts or write commands in a Windows GUI. To access the ISE, click Start, select Windows PowerShell and choose Windows PowerShell ISE. As an alternative, simply type powershell_ise.exe in the command shell or Windows Run box.
PowerShell ISE comes with multiple features, such as language help, syntax coloring, multiline editing, context-sensitive help and tab completion.
PowerShell ISE has sophisticated features that are familiar to Windows users. For instance, a user can highlight and copy a portion of a PowerShell command with a mouse or with the Shift + Arrow hot-key combination. The user can also paste the content anywhere in the editor window.
Another useful feature is the ability to keep different versions of a command in the editor and run commands you need in the PowerShell ISE.
The F5 key launches a command directly from the editor. To execute a particular line, select it and press F8. The context-sensitive help displays matching cmdlets when the user starts to enter a command. A command add-on shows a list of cmdlets to select.
PowerShell ISE provides tabs to enable work on multiple administrative tasks. PowerShell ISE enables quick switching from the CLI to scripting mode.
PowerShell modules
PowerShell modules enable admins to reuse a script to automate a task. A PowerShell module can be defined as a set of PowerShell elements — such as cmdlets, providers, functions, workflows, variables and aliases — that are grouped to manage all the aspects of a particular area. PowerShell modules enable admins to reference, load, persist and share code. The simplest way to create a PowerShell module is to save the script as a PSM1 file.
A PowerShell module contains four essential elements:
- A PSM file, which is the module.
- Help files or scripts needed by the module.
- A manifest file that describes the module.
- A directory that stores the content.
A PowerShell module can be one of four types:
- Script module. A PSM1 file that contains various functions to enable admins to perform import, export and management functions.
- Binary module. A .NET framework assembly (DLL file) that contains compiled code. Developers typically use a binary module to create cmdlets with powerful features not easily done with a PowerShell script.
- Manifest module. A manifest module is a module (PSM1) file with an associated manifest (PSD1 file).
- Dynamic module. A dynamic module is created dynamically on demand by a script. It isn’t stored or loaded to persistent storage.
PowerShell cmdlets
A cmdlet is a single basic command used within PowerShell. A cmdlet can be invoked as part of a PowerShell script — an important element of automation — or invoked programmatically through PowerShell APIs. A cmdlet typically performs a specific action and then returns a .NET object to PowerShell that can be used by a subsequent command. PowerShell cmdlets are often created — meaning coded by developers — to handle specific operations.
There are myriad cmdlets for PowerShell. For example, running the Get-Service cmdlet returns a list of services currently running on the computer.
All cmdlets require an attribute needed to declare the code to be a cmdlet. Cmdlets also possess a variety of parameters, such as required, named, positional and switch parameters. Parameters can be used as a set, and some parameters can also be dynamically added at runtime. PowerShell cmdlets can be created to prompt user feedback before the cmdlet acts, effectively creating interactive cmdlets.
Cmdlets vs. commands
The terms cmdlet and command are sometimes used interchangeably. Commands and cmdlets can both tell PowerShell — and the computer — to do something specific. However, cmdlets differ from commands in several ways:
- A command is often a small, standalone executable file, such as the ipconfig command used at the console command line, but cmdlets are instanced .NET classes.
- Cmdlets are typically small and can be created from just several dozen lines of code.
- Commands can often perform parsing, error handling and output formatting. Cmdlets can’t, and such functionality is handled by the PowerShell platform.
- Commands generally don’t participate in a pipeline because data isn’t passed to or used by subsequent commands. Cmdlets are designed to use input objects from the pipeline and then deliver output objects to the pipeline.
- Cmdlets typically process a single object at a time.
PowerShell functions
A PowerShell function is similar to a PowerShell cmdlet, with several slight differences. In simplest terms, a function involves a list of PowerShell statements organized under a single function name or label. The function is invoked by simply typing the function name, and the list of statements is executed as if an administrator typed them at the command prompt. A function can be as simple as one-line command with parameters or as complex as a full cmdlet or application.
Cmdlets are written in a compiled .NET language, such as C#, while functions are written in PowerShell and aren’t compiled. For developers and independent software vendors, it’s easier to package and deploy a PowerShell cmdlet compared to packaging libraries of functions. Cmdlets and advanced functions support powerful parameter bindings.
As with cmdlets, functions can use parameters and return values that can be passed to other functions or cmdlets. By describing a parameter to the shell, admins can use any type of PowerShell parameters, such as named parameters, mandatory parameters and positional PowerShell parameters.
The following is an example of a PowerShell function.
function Set-Something {
   [CmdletBinding()]
   param (
     [Parameter()]
     [string]$Thing
   )
   Write-Host $Thing
 }
A function contains one or more option parameters inside of a parameter block and a body.
Language constructs
As a scripting language, PowerShell offers several language constructs that control the flow of scripts, while making decisions as to what should be done. Some of the language constructs include conditionals, switches, loops and variables.
Conditionals. The language construct if is used to evaluate a conditional expression. When the conditional expression is true, a script block is executed. If the conditional expression is other than true — noted as something else — then alternative commands, functions and cmdlets can be executed.
if ($i -eq 1)
 {
   ## Do something
 }
 else
 {
   ## Do something else
 }
Switch. The switch statement is used when there is a long list of conditional statements to test. Switch is commonly used in place of many if/else constructs.
switch ($i) {
   0
   {
     Write-Host "I is 0"
   }
   1
   {
     Write-Host "I is 1"
   }
   Default
   {
     Write-Host "I is not 0 or 1" >
   }
 }
Loops. Loops provide powerful means of evaluating and repeating complex tasks based on the state of parameters or variables. There are several different types of loops. The while statement repeats code as long as the following conditional expression is true.
while ($i -eq 0) {
   ## Do something >
 }
The do loop is similar to the while loop. The only difference is PowerShell executes the do loop at the end of the loop.
do {
   ## do something
 } while ($i -lt 0)
When you use a foreach loop, PowerShell repeats the code for each item mentioned in the script.
$array = ('item1','item2','item3')
 foreach ($item in $array) {
   $item
 }
Use a for loop to execute statements repeatedly until a condition is met.
for ($i = 0; $i -lt 5; $i++)
 {
   $i
 }
Variables
Variables store data, but PowerShell variables are more powerful because they can be mapped to underlying classes in the .NET framework. PowerShell treats variables as .NET objects, which means they can store data and manipulate data in multiple ways.
Variable names in PowerShell start with a dollar sign and contain a mix of numbers, letters, symbols and spaces. For instance, $var=»HELLO» stores the string HELLO in the $var variable. As another example, the previous code instance uses the variable $i to hold the value evaluated within the for loop. Variables can also have different scopes, such as global, local, script, private and numbered scopes.
Arrays
A PowerShell array is a component that enables the storage of more than one item in a variable or a field. For instance, to assign multiple values to a variable, use the script $a=1,2,3.
PowerShell treats each item in an array as a separate element. To address each item in an array, PowerShell offers index numbers. The first element in the array is indexed as 0 by default. The biggest advantage of PowerShell is that it automatically handles array insertions, so arrays don’t have to be manually destroyed or created when adding or removing elements.
Hash tables
Hash tables are data structures similar to arrays. A PowerShell array stores multiple single items, but with a hash table each item or value is stored using a key or value pair. An array can’t store multiple values under each element, while a hash table can.
Below is an example comparing an array with a hash table.
$array = @('Joe','Susie','Donnie')
 $hashtable = @{FirstName = 'Joe'; FirstName = 'Susie'; FirstName = 'Donnie'}
Help and comments
PowerShell enables the addition of help topics for modules, scripts and individual commands. To view all the help topics, use the Get-Help command.
When importing a module into a session, PowerShell automatically imports the help topics for that module. If there are no help topics for a module, the Get-Help command displays autogenerated help. Three types of help content exist in PowerShell: comment-based help, external help and updatable help.
Comment-based help refers to comments included with a script or command for Get-Help to read. External help enables the author to define help content in an external XML file written in XAML. Updatable help uses external help but enables users to download the latest help content with the Update-Help command.
Executable programs
PowerShell is also a Command Prompt replacement that runs an executable program in multiple ways through the Start-Process command, the ampersand and the Invoke-Expression command. This can be a convenient way for PowerShell to run commands and other executables. Using ping.exe as an example, here’s how a user can run an executable program using PowerShell.
Start-Process -FilePath 'ping.exe' -ArgumentList 'google.com' -Wait -NoNewWindow
 & 'ping.exe' google.com
 ping google.com
 Invoke-Expression -Command 'ping.exe google.com'
History of PowerShell
PowerShell was first demonstrated in 2003 and initially released in 2006. Since then, it has significantly expanded through numerous major releases, each still supported and providing backward compatibility with prior versions. The following are some of the major release versions and dates:
- Windows PowerShell 1.0. Released in 2006 for Windows XP SP2, Windows Server 2003 SP1, Windows Vista and Windows Server 2008.
- Windows PowerShell 2.0. Released in 2009 and integrated with Windows 7, Windows Server 2008 R2, Windows XP SP3, Windows Server 2003 SP2 and Windows Vista SP1. The release included Windows PowerShell ISE v2.0.
- Windows PowerShell 3.0. Released in 2012 and integrated with Windows 8 and Windows Server 2012. It was also released for Windows 7 SP1, Windows Server 2008 SP1 and Windows Server 2008 R2 SP1.
- Windows PowerShell 4.0. Released in 2013 and integrated with Windows 8.1 and Windows Server 2012 R2. It was also released for Windows 7 SP1, Windows Server 2008 R2 SP1 and Windows Server 2012.
- Windows PowerShell 5.0. Released and updated to version 5.1 in 2016 to support Windows Server 2016. Version 5.1 was also released in 2017 for Windows 7, Windows Server 2008, Windows Server 2008 R2, Windows Server 2012 and Windows Server 2012 R2.
- PowerShell Core 6. Released in 2018 as the first free and open source iteration of PowerShell for cross-platform deployment on Windows, macOS and Linux platforms. Versions 6.1 and 6.2 subsequently appeared to fix bugs, enhance performance and improve compatibility with existing cmdlets and support Windows 10 and Windows Server 2019.
- PowerShell 7. Released in 2020 and currently serves many Windows versions, including Windows 7 SP1, Windows 8.1, Windows 10, Windows 11, Windows Server 2008 R2 SP1, Windows Server 2012, Windows Server 2012 R2, Windows Server 2019 and Windows Server 2022. Subsequent versions 7.2 — there was no 7.1 — and 7.3 address improvements in cross-platform installation and fixes.
How do I start learning PowerShell?
PowerShell is a complex and comprehensive platform that can perform a vast array of functions and support sophisticated enterprise-class tasks — many of which can be automated through scripts and custom cmdlet creation, or programming. Consequently, most system administrators must eventually be proficient in PowerShell to effectively perform their regular day-to-day duties.
However, there is no single pathway to learning PowerShell. Learning options are available to almost any level of PowerShell user, but the following are some common approaches:
- Tinker. PowerShell is free and already installed on virtually every Windows computer; simply search for and run the PowerShell app. PowerShell enthusiasts can try new commands and experiment with new cmdlets to gain comfort with PowerShell interface and behavioral basics.
- Take self-paced training. Microsoft provides free and extensive learning content for PowerShell, including a self-paced introduction.
- Study Microsoft documentation. Microsoft provides free and comprehensive documentation for all aspects of PowerShell, including commands and cmdlets. Students and professionals alike can refer to documentation to expand their PowerShell knowledge.
- Read books. There are countless books published to bolster PowerShell expertise in varied learning and use case environments. Several recent titles include Learn PowerShell in a Month of Lunches, Fourth Edition (Travis Plunk, James Petty, Tyler Leonhardt: April 26, 2022) and Windows Server Automation with PowerShell Cookbook, Fourth Edition (Thomas Lee, Jeffrey Snover: July 30, 2021).
- Take classes. Finally, PowerShell users can find a wide range of self-study and guided courses focused on various aspects and use cases for PowerShell. As an example, Udemy promotes a range of PowerShell courses, including «Learning Windows PowerShell,» «Master Microsoft PowerShell» and «PowerShell for Active Directory Administrators.» Local colleges and adult education centers might also offer instructor-led coursework for PowerShell users.
These options are not mutually exclusive. Varied learning options can be used in any combination to accelerate PowerShell adoption and proficiency.
How to launch PowerShell
Any computer running Windows 10 or later already has PowerShell installed by default. PowerShell can be invoked simply by typing «powershell» into the Search bar and selecting the PowerShell app from the resulting search list. Similarly, PowerShell can be invoked by entering powershell.exe in the Run dialog.
PowerShell 7 also supports cross-platform installation on many Linux distributions and can be launched by typing pwsh at the Linux command prompt. The launch process is similar under macOS. Once PowerShell is installed, simply open a Terminal window and type the pwsh command.
How to create and run PowerShell scripts
PowerShell is primarily an execution platform, so developers generally create scripts in a different tool and then run those scripts through PowerShell.
There are countless options for creating a script, including almost any ordinary text editor, the PowerShell ISE, Microsoft Visual Studio Code or even legacy Notepad. Users can embrace almost any editor that meets the organization’s development needs. Consider the basic steps to create a simple one-command script using Notepad on Windows 11:
- Search for and select Notepad to launch the application.
- In Notepad, write the command line Write-Host «This is your first script…Great job!»
- Click File and select the Save As option.
- Enter a useful name for the script, such as script.ps1.
- Click the Save button.
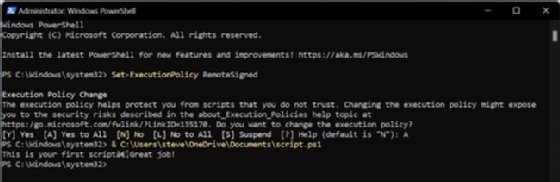
Now that the script is created and saved as a PS1 file, be sure to change the execution policy on the system so that scripts will run, as scripts are blocked by default. To change the execution policy on Windows 11, follow these steps:
- Click Start and search for PowerShell.
- Right-click the PowerShell app in the list and select Run as administrator.
- PowerShell starts. Now type the command Set-ExecutionPolicy RemoteSigned.
- This tells PowerShell to change the execution policy. Select the Yes to All option by typing A and pressing Enter.
Finally, the new script can be executed using the & command, the path to the script and the name of the PS1 file created, such as & C:\Users\steve\OneDrive\Documents\script.ps1.
The text created in the example script is written to the host device — in this case, the monitor.
This is just one simple example. PowerShell scripts are typically far more detailed and complex. When creating script files, it’s a good idea to provide a well-known folder path for holding script files. It’s often a sound practice to include version control or other version management techniques as well, such as adding a version designation to the PS1 file name. For example, rather than simply naming the file script.ps1, it might be more meaningful to name the file script_020123_v1_0.ps1 to indicate that file version 1.0 was created on Feb. 1, 2023.
Future of PowerShell
Even though PowerShell has been consigned to the open source community, Microsoft continues to actively participate and contribute to open source PowerShell development. After two decades, PowerShell has developed a ubiquitous presence and achieved broad — almost irreplaceable — adoption in enterprise environments.
Users shouldn’t expect groundbreaking new features and functionality, but PowerShell will continue to be updated and maintained to meet the changing capabilities of Windows, Linux and macOS well into the foreseeable future. In addition, there are several developments on the horizon, including better and simplified automation, as well as improved configuration and remote operation.
This was last updated in March 2023
Continue Reading About What is PowerShell and how to use it: The ultimate tutorial
- How to secure passwords with PowerShell
- How to test the PowerShell pending reboot module
- Using PowerShell for Azure service principal authentication
- How to transfer FSMO roles with PowerShell
Table of Contents
Windows PowerShell is a new command-line shell designed especially for system administrators. Windows PowerShell includes an interactive prompt and a scripting environment that can be used independently or in combination
Unlike most command-line shells, which accept and return text, Windows PowerShell is built on top of the .NET Framework common language runtime (CLR) and the .NET Framework, and accepts and returns .NET Framework objects. This fundamental change in the environment brings entirely new tools and methods to the management and configuration of Windows.
Like many shells, Windows PowerShell gives you access to the file system on the computer. In addition, Windows PowerShell Providers enable you to access other data stores, such as the registry and the digital signature certificate stores, as easily as you access the file system.
Windows PowerShell Cmdlets
A cmdlet (pronounced as “command-let”) is a single-feature command that manipulates objects in Windows PowerShell. You can recognize cmdlets by their name format which is verb and noun separated by a dash (-), such as Get-Help, Get-Process, and Start-Service.
In traditional shells, the commands are executable programs that range from the very simple (such as ren.exe) to the very complex (such as netsh.exe).
In Windows PowerShell, most cmdlets are very simple, and they are designed to be used in combination with other cmdlets.
For example:
- The Get- cmdlets only retrieve data.
- The Set- cmdlets only change data.
- The Format- cmdlets only format data.
- The Out- cmdlets only direct the output to a specified destination.
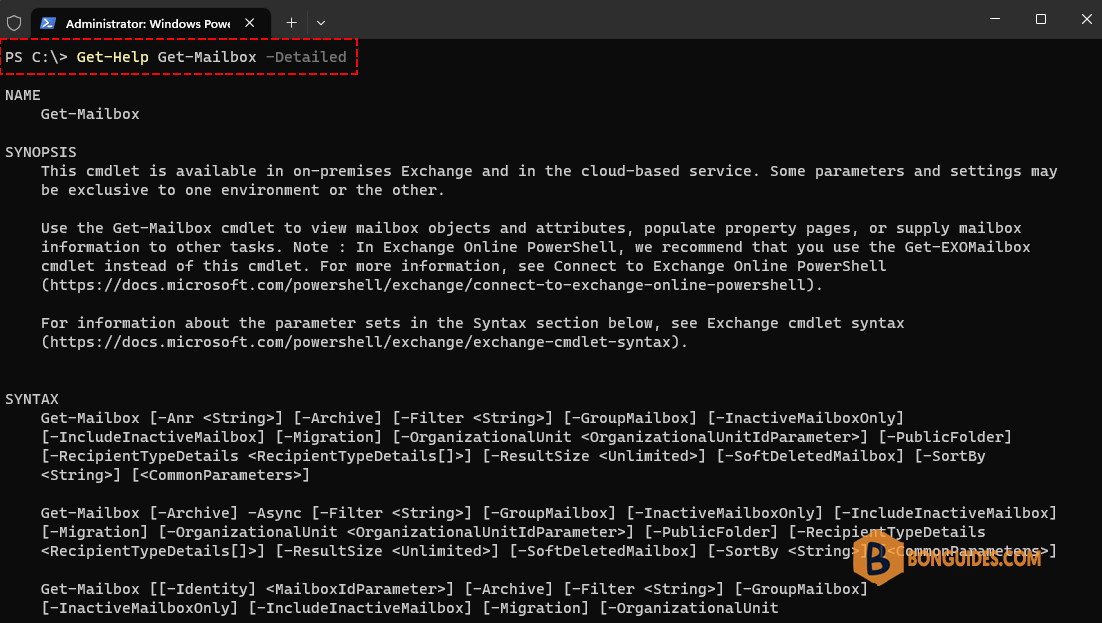
Each cmdlet has a help file that you can access by typing:
Get-Help Get-Mailbox -DetailedThe detailed view of the cmdlet help file includes a description of the cmdlet, the command syntax, descriptions of the parameters, and an example that demonstrate use of the cmdlet.
Windows Commands and Utilities
You can run Windows command-line programs in Windows PowerShell, and you can start Windows programs that have a graphical user interface, such as Notepad and Calculator, at the Windows Powershell prompt. You can also capture the text that Windows programs generate and use that text in Windows PowerShell.
For example, the following commands use ipconfig and net commands.
PS C:\Users\admin> ipconfig

Windows IP Configuration
Ethernet adapter Ethernet:

   Media State . . . . . . . . . . . : Media disconnected
   Connection-specific DNS Suffix  . :

Wireless LAN adapter Wi-Fi:

   Connection-specific DNS Suffix  . :
   IPv4 Address. . . . . . . . . . . : 192.168.1.163
   Subnet Mask . . . . . . . . . . . : 255.255.255.0
   Default Gateway . . . . . . . . . : 192.168.1.1

PS C:\Users\admin> net localgroup administrators
Alias name     administrators
Comment        Administrators have complete and unrestricted access to the computer/domain

Members
-------------------------------------------------------------------------------
admin
Administrator
The command completed successfully.
You can even use Windows PowerShell cmdlets, like Select-String, to manipulate the text that Windows programs return.
For example, the following command uses a pipeline operator to send the results of an ipconfig command to the Windows PowerShell Select-String cmdlet, which searches for text in strings. In this case, you use Select-String to find the pattern IPv4 in the ipconfig output.
PS C:\> ipconfig | Select-String -pattern IPv4

   IPv4 Address. . . . . . . . . . . : 192.168.56.1
   IPv4 Address. . . . . . . . . . . : 192.168.1.163
When a Windows command or tool has parameters, such as the -r (restart) parameter of shutdown command shutdown -r, Windows PowerShell passes the parameters to the tool without interpreting them.
Processing Objects in PowerShell
Although you might not realize it at first, when you work in Windows PowerShell, you are working with .NET Framework objects. As you gain experience, the power of object processing becomes more evident, and you’ll find yourself using the objects and even thinking in objects.
Technically, a .NET Framework object is an instance of a .NET Framework class that consists of data and the operations associated with that data. But you can think of an object as a data entity that has properties, which are like characteristics, and methods, which are actions that you can perform on the object.
For example:
- When you get a service in Windows PowerShell, you are really getting an object that represents the service.
- When you view information about a service, you are viewing the properties of its service object.
- And, when you start a service, that is, when you change the Status property of the service to “Started,” you are using a method of the service object.
All objects of the same type have the same properties and methods, but each instance of an object can have different values for the properties. For example, every service object has a Name and Status property. However, each service can have a different name and a different status.
When you’re ready, it’s easy to learn about the objects. To find out what type of object a cmdlet is getting, use a pipeline operator (|) to send the results of a Get command to the Get-Member cmdlet. For example, the following command sends the objects retrieved by a Get-Mailbox command to Get-Member.
PS C:\> Get-Mailbox | Get-Member

   TypeName: Deserialized.Microsoft.Exchange.Data.Directory.Management.Mailbox

Name                                      MemberType Definition
----                                      ---------- ----------
GetType                                   Method     type GetType()
ToString                                  Method     string ToString(), string ToString(string format, System.IForma...
AcceptMessagesOnlyFrom                    Property   Deserialized.Microsoft.Exchange.Data.Directory.ADMultiValuedPro...
AcceptMessagesOnlyFromDLMembers           Property   Deserialized.Microsoft.Exchange.Data.Directory.ADMultiValuedPro...
AcceptMessagesOnlyFromSendersOrMembers    Property   Deserialized.Microsoft.Exchange.Data.Directory.ADMultiValuedPro...
AccountDisabled                           Property   System.Boolean {get;set;}
AddressBookPolicy                         Property    {get;set;}
AddressListMembership                     Property   Deserialized.Microsoft.Exchange.Data.Directory.ADMultiValuedPro...
AdminDisplayVersion                       Property   System.String {get;set;}
AdministrativeUnits                       Property   Deserialized.Microsoft.Exchange.Data.Directory.ADMultiValuedPro...
AggregatedMailboxGuids                    Property   Deserialized.Microsoft.Exchange.Data.MultiValuedProperty`1[[Sys...
Alias                                     Property   System.String {get;set;}
AntispamBypassEnabled                     Property   System.Boolean {get;set;}
ArbitrationMailbox                        Property    {get;set;}
To find the values of all of the properties of a particular object, use a pipeline operator (|) to send the results of a Get command to a Format-List or Format-Table cmdlet. Use the Property parameter of the format cmdlets with a value of all (*). For example, to find all of the properties of a mailbox, type:
PS C:\> Get-Mailbox [email protected] | Format-List -Property *

Database                                  : APCPR03DG415-db092
DatabaseGuid                              : 43928945-d7cf-4294-bae9-a987e5ebf7ce
MailboxProvisioningConstraint             :
IsMonitoringMailbox                       : False
MailboxRegion                             :
MailboxRegionLastUpdateTime               :
MailboxRegionSuffix                       : None
MessageRecallProcessingEnabled            : True
MessageCopyForSentAsEnabled               : False
MessageCopyForSendOnBehalfEnabled         : False
...
Remember that Windows PowerShell is not case sensitive. It means cmdlet Get-Service and get-service will return same result. But you will see in many blogs that cmdlets are accented such has first letter is always uppercase. This is because Windows PowerShell uses TAB key for auto-completion and TAB key automatically changes the first letter to uppercase. If you type get-mai and press TAB key, you will see that the cmdlet name changes to Get-Mailbox.
Object Pipelines
One major advantage of using objects is that it makes much easier to pipeline commands. Pipeline means to pass the output of one cmdlet to another cmdlet as input. In a traditional command-line environment, you would have to manipulate text to convert output from one format to another and to remove titles and column headings.
Windows PowerShell provides a new architecture that is based on objects, rather than text. The cmdlet that receives an object can act directly on its properties and methods without any conversion or manipulation.
Users can refer to properties and methods of the object by name, rather than calculating the position of the data in the output.
In the following example, the result of Get-Mailbox command is passed to a findstr command. The pipeline operator (|) sends the result of the command on its left to the command on its right. In Windows PowerShell, you do not need to manipulate strings or calculate data offsets.
PS C:\> Get-Mailbox | findstr "admin"
admin                     admin           APCPR03DG415-db092
it-admin                  it-admin        APCPR03DG425-db066
PowerShell Execution Policy
PowerShell execution policy lets you determine the conditions under which PowerShell loads configuration files and runs scripts. You can set an execution policy for the:
- local computer
- urrent user
- or for a particular session
You can also use a Group Policy setting to set execution policy for computers and users.
Execution policies for the local computer and current user are stored in the registry. You do not need to set execution policies in your PowerShell profile.
The execution policy for a particular session is stored only in memory and is lost when the session is closed.
The execution policy is not a security system that restricts user actions. For example, users can easily circumvent a policy by typing the script contents at the command line when they cannot run a script. Instead, the execution policy helps users to set basic rules and prevents them from violating them unintentionally.
To check the current execution policy on system, use Get-ExecutionPolicy cmdlet as shown below:
PS C:\> Get-ExecutionPolicy
Restricted
Restricted is default execution policy on Windows client OSes (e.g., Windows 10/11) and RemoteSigned is the default execution policy on Windows server OSes (e.g., Server 2019/2022).
Modify execution policy
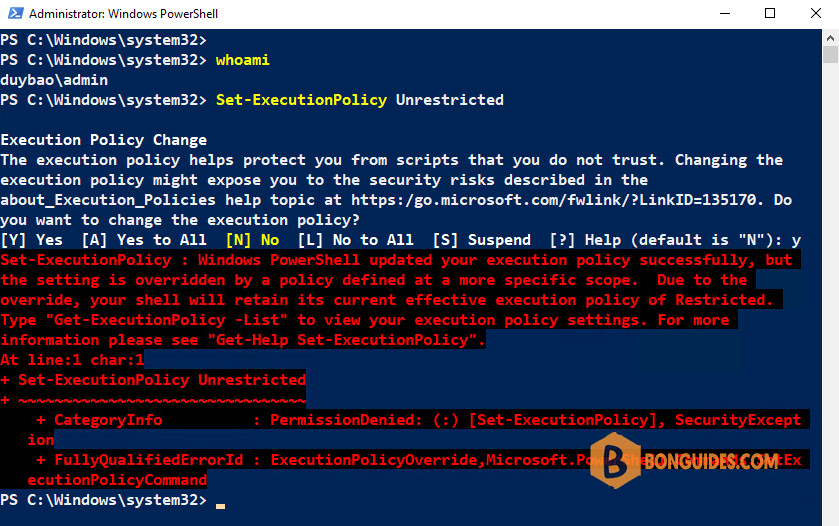
To change the PowerShell execution policy on your computer, use the Set-ExecutionPolicy cmdlet. To run this cmdlet, you must have administrator privileges on computer. The syntax of command is as shown below:
Set-ExecutionPolicy <ExecutionPolicy> [-Scope] [-Force]<ExecutionPolicy> specifies the new execution policy. Valid values are:
- Restricted: Does not load configuration files or run scripts. “Restricted” is the default execution policy. Prevents running of all script files, including formatting and configuration files (.ps1xml), module script files (.psm1), and Windows PowerShell profiles (.ps1).
- AllSigned: Requires that all scripts and configuration files be signed by a trusted publisher, including scripts that you write on the local computer. Learn how to sign a PowerShell script.
- RemoteSigned: Requires that all scripts and configuration files downloaded from the Internet be signed by a trusted publisher.
- Unrestricted: Loads all configuration files and runs all scripts. If you run an unsigned script that was downloaded from the Internet, you are prompted for permission before it runs.
- Bypass: Nothing is blocked and there are no warnings or prompts.
- Undefined: Removes the currently assigned execution policy from the current scope. This parameter will not remove an execution policy that is set in a Group Policy scope.
-Scope specifies the scope of the execution policy. This is an optional parameter, if omitted the ExecutionPolicy is set by default for local machine. However, you can use other valid values for scope parameter. The valid values are:
- Process: The execution policy affects only the current Windows PowerShell process or session.
- CurrentUser: The execution policy affects only the current user.
- LocalMachine: The execution policy affects all users of the computer.
-Force is also an optional parameter which suppresses all prompts or Warnings. By default, Set-ExecutionPolicy displays a warning whenever you change the execution policy.
However, there are other optional parameters which can be used with Set-ExecutionPolicy cmdlet, but they are not usually used. You can see complete list of parameters and description using Get-Help command.
PS C:\Users\admin> Get-Help Set-ExecutionPolicy -Detailed

NAME
    Set-ExecutionPolicy

SYNTAX
    Set-ExecutionPolicy [-ExecutionPolicy] {Unrestricted | RemoteSigned | AllSigned | Restricted | Default | Bypass |
    Undefined} [[-Scope] {Process | CurrentUser | LocalMachine | UserPolicy | MachinePolicy}] [-Force] [-WhatIf]
    [-Confirm]  [<CommonParameters>]


PARAMETERS
    -Confirm

    -ExecutionPolicy <ExecutionPolicy>

    -Force

    -Scope <ExecutionPolicyScope>

    -WhatIf

    <CommonParameters>
        This cmdlet supports the common parameters: Verbose, Debug,
        ErrorAction, ErrorVariable, WarningAction, WarningVariable,
        OutBuffer, PipelineVariable, and OutVariable. For more information, see
        about_CommonParameters (https:/go.microsoft.com/fwlink/?LinkID=113216).
- The change done using Set-ExecutionPolicy cmdlet is effective immediately; you do not need to restart Windows PowerShell.
- If you set the execution policy for the local computer (the default) or the current user, the change is saved in the registry and remains effective until you change it again.
- If you set the execution policy for the current process, it is not saved in the registry. It is retained until the current process and any child processes are closed.
Set execution policy for a single session
You might often need to execute an unsigned script that does not comply with your current execution policy. You can easily do this by bypassing the execution policy for a single PowerShell process. To do this, use the following command:
Set-ExecutionPolicy Bypass -Scope ProcessThe above command does not change your machine’s execution policy permanently but for current PowerShell process only. After running this command, you can run any unsigned script in current PowerShell session until it is closed.
Bypass execution policy for a single script
Sometimes, you might want to execute a particular unsigned PowerShell script without modifying the machine’s execution policy. To achieve this, you can launch PowerShell process with -ExecutionPolicy Bypass option as shown in the following command directly in Run dialog:
powershell.exe -ExecutionPolicy Bypass .\your_script.ps1The above command will launch a PowerShell process with execution policy set to Bypass mode, thus allowing an unsigned script to execute without any problem. This technique is now being exploited by attackers to run malicious PowerShell scripts.
Set execution policy via group policy
If you often need to change the execution policy on computers in your Active Directory domain to allow unsigned scripts, you may want to apply this setting centrally via a Group Policy Object (GPO).
The Set-ExecutionPolicy command allows you to pass the policy values for PowerShell’s operation level. For scripts you write yourself, in most situations, administrators choose the Unrestricted policy.
The Group Policy configuration in Windows Server allows a GPO to be set to configure the PowerShell operation level centrally. Within Group Policy, navigate to:
Computer Configuration | Administrative Templates | Windows Components | Windows PowerShellAnd configure the Turn on Script Execution setting as shown in Figure below:

The Disabled option will prevent PowerShell scripts from being run and enforced via a GPO. If the GPO value is set, the computer accounts do not have the ability to change their local execution policy. The below Figure shows this behavior, even run as a Domain Administrator.
There are a number of considerations for this type of configuration around script security. The best practice will depend on the security policy of the systems involved. Applying the setting that enables PowerShell scripts to a GPO that corresponds to relevant systems is a practice that would fit most situations.
If you are like many typical computer users, you are familiar with the Command Prompt — the command line interpreter that comes standard with most Windows operating systems. But are you familiar with Windows PowerShell? This powerful tool can do everything the Command Prompt does — in fact, it’s designed to replace it — and much, much more. To see this, let’s take a closer look at what Windows Powershell is, and how we can put its power to good use.
What is Windows PowerShell?
Microsoft’s Windows Powershell was developed to facilitate configuration management and task automation.
The name ‘powershell’ is derived from the computer science concept of a ‘shell’: a user interface allowing operator access to the many capabilities of the operating system. The shell can include a graphical user interface (GUI), or it can be utilized via the command line.
Developed using the .NET framework, Windows Powershell includes a scripting language and command line shell. Since Windows NT 4.0, it has been employed across the Microsoft ecosystem in a variety of ways. Windows Powershell gives you the option of using a standard command-line shell or the Integrated Scripting Environment (ISE), a GUI that simplifies the creation of different scripts, eliminating the need to type commands into the command-line.
Difference Between PowerShell and Command Prompt
One of the differences between PowerShell and Command Prompt is that PowerShell uses cmdlets, allowing access to complex system administration functionalities which aren’t available via the command prompt. PowerShell is also object-oriented, providing more flexibility when processing complex data.
How to use Windows PowerShell
Windows PowerShell was designed to help automate repetitive administrative tasks that can become tedious. Using the tool, you can create scripts to run time-consuming tasks in the background while other work is being done. PowerShell contains hundreds of customizable commands that can help to dramatically boost productivity, and it is very helpful for network administrators working with Active Directory.
Because of its ability to simplify management operations and streamline efforts, PowerShell has become extremely popular with many IT administrators. Managers of large networks can implement solutions, such as security patches or other software upgrades, across a vast network of computers or servers, without logging in to each individual machine to make sure the service or solution is installed and running properly. One script created in PowerShell is all that is needed to perform the operation.
Creating a PowerShell script is fairly straightforward. All you have to do is open a file and write your code, then save it. These scripts have a .ps1 extension. You can run your script manually or you can set it to automatically perform daily administration tasks.
Using PowerShell commands and scripts, IT administrators have an easy and efficient way to install software, monitor and collect data about servers, and manage processes, folders services and registries. And while a full listing of the many features of PowerShell is impossible here, they are readily available and easy to discover. Once you get over the initial learning curve, you will be able to use these powerful features and become a superuser!
Training
Are you interested in training? Check out our Windows Powershell training classes here.
Have questions? Need guideance? Contact us by phone at 913.322.7062 / 314.644.6400 or by completing the following form.