Transfer your data with Windows Backup
You’ve got important stuff on your PC. Take your files and most settings and apps6 with you to your new Windows 11 computer with Windows Backup.1 2 5

Transfer your data with Windows Backup
You’ve got important stuff on your PC. Take your files and most settings and apps6 with you to your new Windows 11 computer with Windows Backup.1 2 5
Transfer your data with Windows Backup
You’ve got important stuff on your PC. Take your files and most settings and apps6 with you to your new Windows 11 computer with Windows Backup.1 2 5
Back up your PC files to OneDrive
The best, most secure way to back up your Windows 10 PC is with OneDrive.2 Easily move your files and memories to the cloud, then access them on your new computer.3

Save your files, settings, and apps
When you save what you love on your old PC, Windows Backup will save you time by automatically moving your data to your new computer.3

Feel instantly at home on your new PC
When you set up your new Windows 11 PC, you’ll be able to restore your stuff and settle into the best Windows experience ever.
1. Update your Windows 10 PC
Make sure you’re using the most up-to-date version of Windows 10.
2. Save to Windows Backup
Use the Search bar in Windows 10 to locate and open Windows Backup, then follow the steps to save your data to your Microsoft account.3
3. You’re ready to transfer your data
The first time you start your new Windows 11 PC, sign in and follow the setup instructions to bring your stuff with you.3 5 6
OneDrive is a Microsoft cloud storage service that lets you store your personal files in one place, share them with others, and get to them from any device connected to the internet.2
Learn more about OneDrive
Check out this brief video that will walk you through a few quick steps to set up an account.
A free OneDrive basic account offers 5 GB of storage.2 Need more space? No problem, see available options.
If OneDrive is not the best fit for you, there are other options available. For example, you can use an external hard drive along with Windows Backup.1 There are also other programs designed to help with backing up your files and data and some retailers have service desks that will do the work for you. Learn how.
You can use Windows Backup to restore your list of apps on a new Windows 11 PC.1 Apps will not be transferred or automatically installed. When you open apps for the first time on your new Windows 11 PC, some will reinstall directly from the Microsoft Store when you first open them. Other apps may require you to reinstall them manually from the original app provider.
Get OneDrive
Securely save and share what’s important to you with OneDrive, Microsoft’s cloud-based storage that allows you to access and organize your documents, photos, and more wherever you are.
Compare Windows 10 & 11
See the new Windows 11 features and updates, compare them to features you know in Windows 10, and find the right version of Windows 11 for you.
Learn more about Windows 11
Intuitive navigation. Easy organization. Faster performance. Plus, new features to unlock your productivity and creativity. Learn more and see why Windows 11 is the best Windows ever.
-
Screens simulated. Features and app availability may vary by region.
-
1
Windows can back up files, settings, and apps from PCs running Windows 10 and higher. Restore is available on Windows 11, version 22H2 and higher. Geographic restrictions may apply. -
2
Requires Microsoft account. Up to 5 GB of Microsoft Storage is included. Data transfers exceeding 5 GB require an active Microsoft subscription or trial. -
3
Internet access required. Fees may apply. -
4
Windows 11 Home and Pro editions require internet connectivity and a Microsoft account to complete device setup on first use. -
5
Using Windows Backup to restore to a Windows 11 PC requires you to sign in during initial device setup with the same Microsoft account you used for Windows 10 PC backup. -
6
When you open apps for the first time on your new Windows 11 PC, some will reinstall when you first open them. Other apps may require you to reinstall them manually from the original app provider.
Your Windows PC comes with a one-stop backup solution, Windows Backup, that will help you to back up many of the things that are most important to you. From your files, themes, and some settings to many of your installed apps and Wi-Fi information — Windows Backup will help protect what matters and make it easier than ever to move to a brand-new PC.
This guide will help you to use Windows Backup to back up key things on your Windows PC.
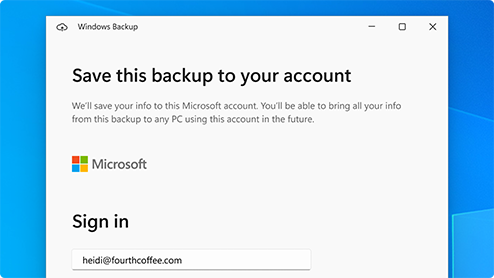
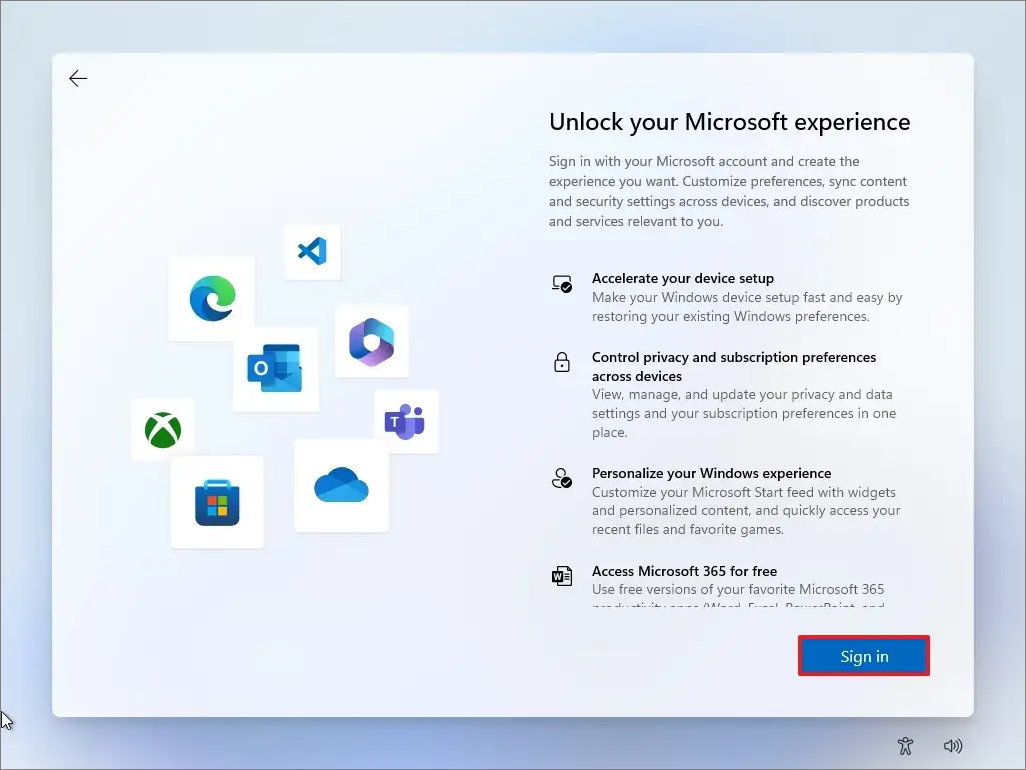
Step 1: Sign in with a Microsoft account
This is the account associated with Windows, Microsoft 365, OneDrive, Xbox, and more. Your backed-up information will be stored with your Microsoft account, so getting back to your things on a new PC is as easy as signing in.
To sign in to your Microsoft account, select Start > Settings > Accounts > Your info . Select Sign in with a Microsoft account instead. You’ll see this only if you’re using a local account. If you see Sign in with a local account instead, you’re already using your Microsoft account.
Important: You must use a personal Microsoft account with Windows Backup. Work or school Microsoft accounts won’t work.
Open account settings
Create a new Microsoft account
Check if you have a Microsoft account
Step 2: Back up your folders
Windows Backup is an easy, single stop for all of your backup needs. Your free Microsoft account comes with 5 GB of OneDrive cloud storage (and more storage is available if you need it), and backing up your folders syncs the folders you specify to your OneDrive account, making them instantly accessible on all computers that you use with this Microsoft account. And since they are synced to OneDrive, once you sign in to OneDrive on a new PC, those files will be available to you once again.
First, launch Windows Backup: select Start , type windows backup, and select Windows Backup from the results. (Or you can select Start > All apps > Windows Backup.)
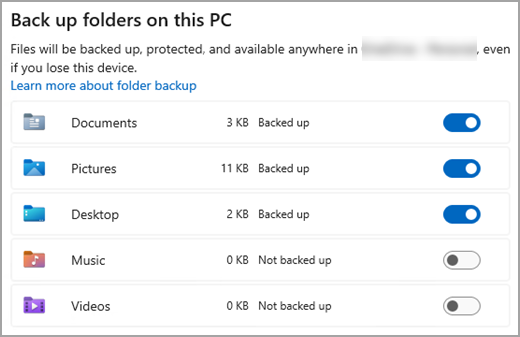
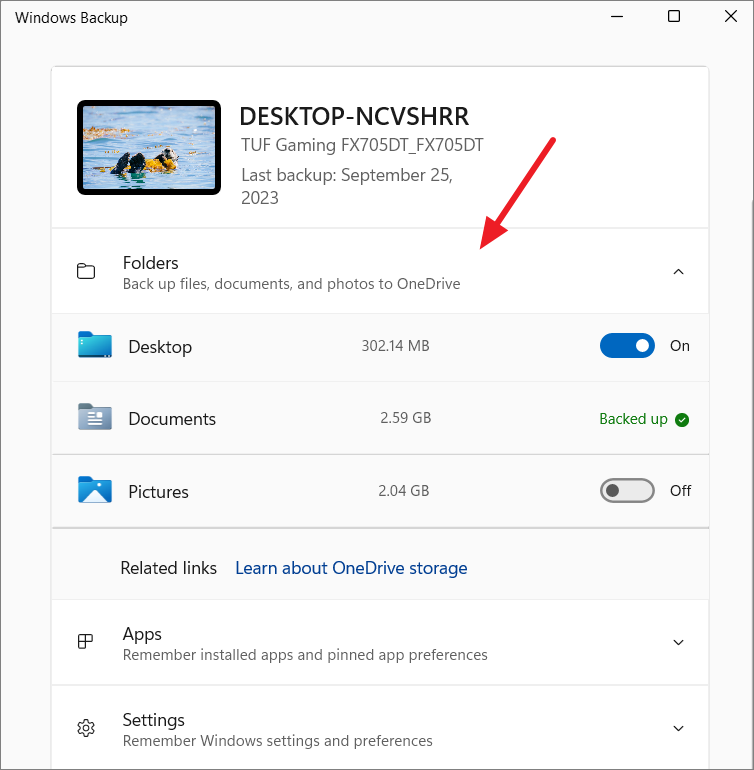
Then select Folders to drop it down, and select which of your user folders you want to back up to OneDrive:
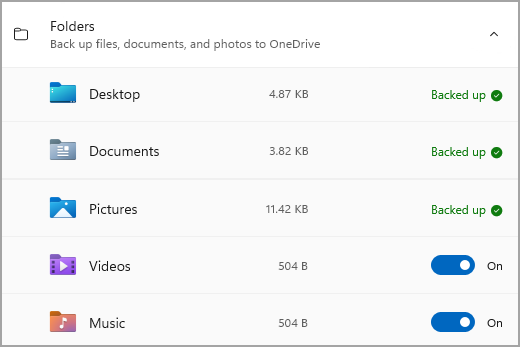
You can back up your Desktop, Documents, Pictures, Videos, and Music folders. Simply toggle the switch for each folder On or Off.
Note: If you have backed up these folders in the past, they will show as Backed Up. If you wish to no longer back up these folders, see What do I do if I want to stop backing something up?, below.
Step 3: Back up your settings
Windows Backup can help back up other Windows settings for you, such as your installed apps, your Wi-Fi network and password information, and other settings such as language preference or your wallpaper settings.
You’ll see the state of all of these settings in Windows Backup:
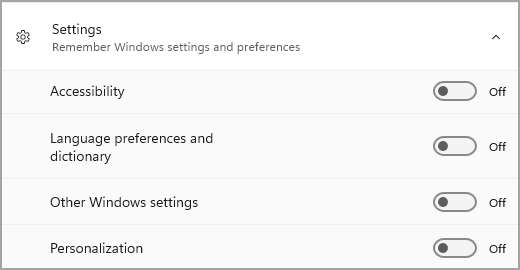
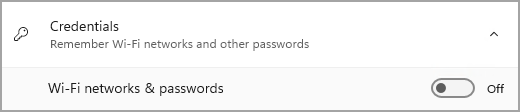
Again, you can simply toggle these settings On or Off.
Note: If these settings have been backed up in the past (and some are by default), they will show as Backed up and the toggle switch will be unavailable. If you want to stop backing these up, see What do I do if I want to stop backing something up?, below.
Once you have everything set up the way you want it, select Back up.
Note: If you receive an error from OneDrive when you try to back up, it’s possible that you aren’t signed in to OneDrive or there may be another issue with OneDrive that needs to be resolved in order for Windows Backup to work. For more, see Fix OneDrive sync problems.
Open Windows backup settings
Step 4: Time to relax!
You’re all set! Your folders and settings are being backed up and you can access your files on all of the computers that you log into with this Microsoft account. It really couldn’t be easier.
If you want to check and make sure everything is still backed up (hey, we all want that sense of security from time to time!), you can just open the Windows Backup app and it will show you the current state of your backup, or you can check on things at the top of the Windows backup page in Settings, at Start > Settings > Accounts > Windows backup.

Open Windows backup settings
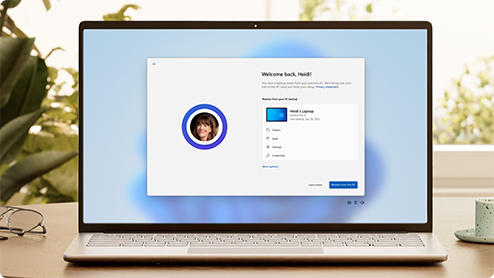
How do I restore this backup?
We have your back! When you get a new PC or if you have to reinstall Windows, when you are setting it up, just log in with the same Microsoft account that you used to make the backup here. We’ll see that you have backups and ask you if you would like to restore one.

If you have more than one computer backed up, you can select More options and select the backup you wish to restore from. When you get to your desktop everything will be right there waiting for you!
Note: Files can be restored anytime simply by signing in to OneDrive with the same Microsoft account you used to make the original backup.
What about my Microsoft Edge preferences?
To easily browse the web from any of your devices and keep your favorites organized, sign in to Microsoft Edge and turn on sync.
Sign in to sync Microsoft Edge across devices
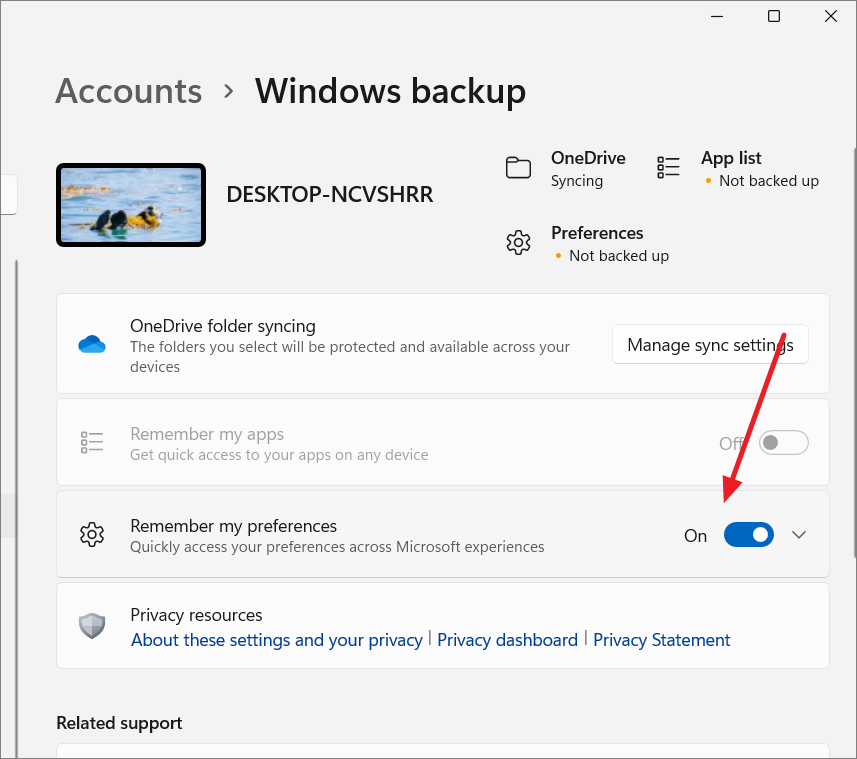
What do I do if I want to stop backing something up?
You may notice that if you have been backing something up in Windows Backup, that item is marked as Backed up and you no longer have access to the switch to turn it On or Off.
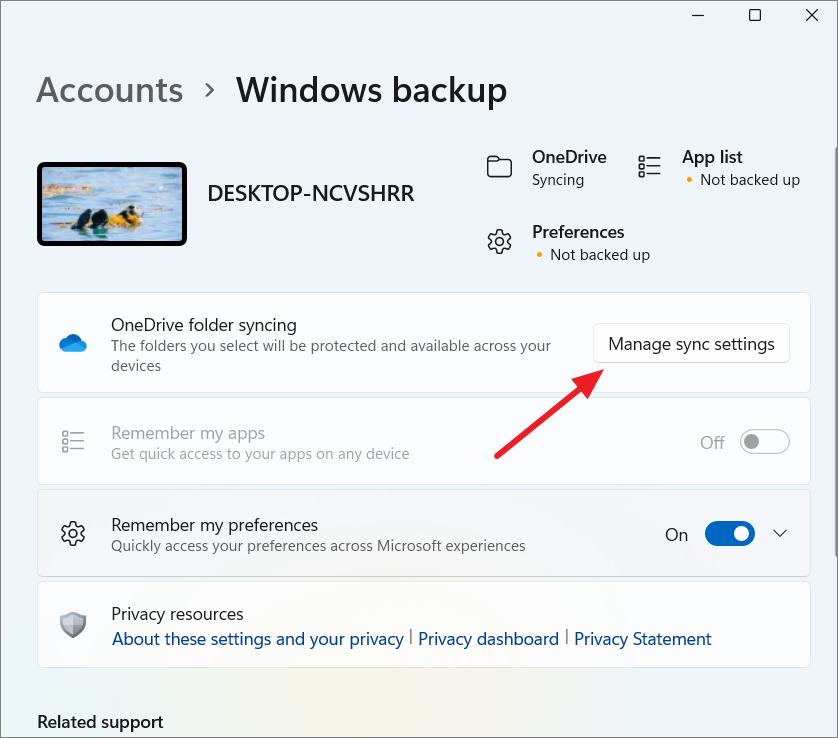
If for some reason you no longer want to back up some of your folders, apps, or settings, the place to control that is in Start > Settings > Accounts > Windows backup.
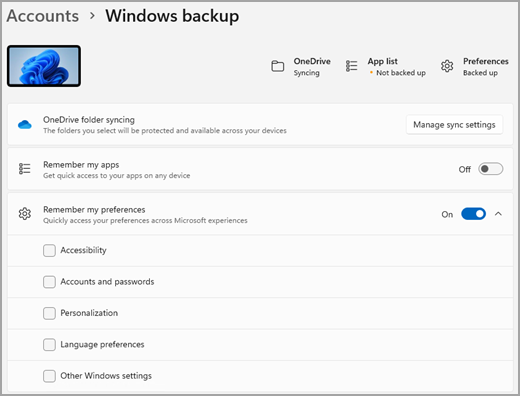
From here, you can deactivate file backup by selecting Manage sync settings next to OneDrive folder syncing and then turning off the folders you no longer wish to back up.
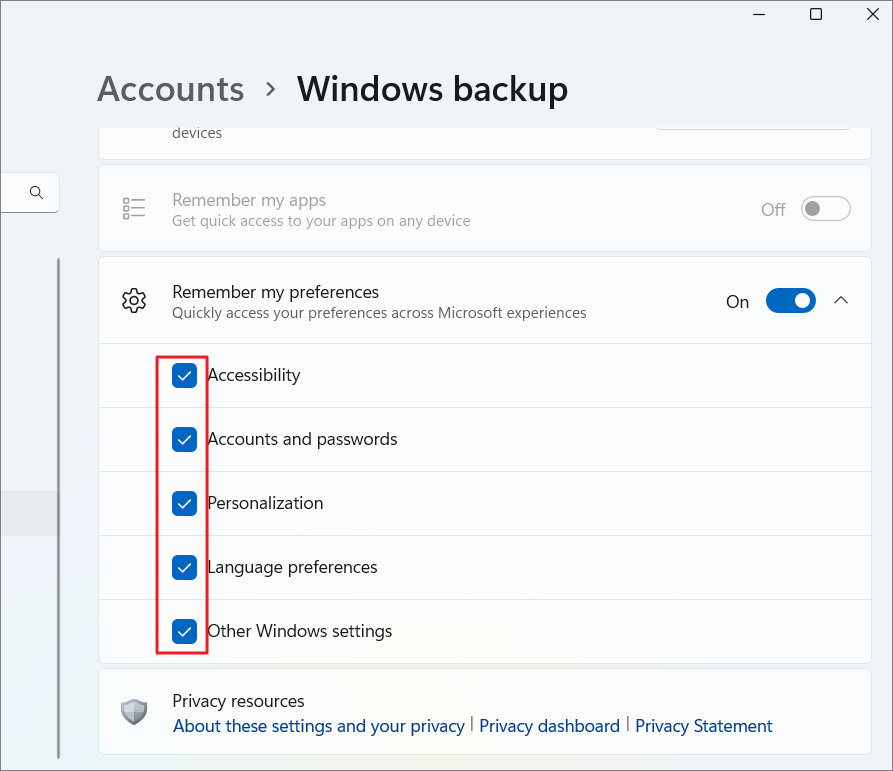
For apps and settings, you can set the switch for Remember my apps to On or Off, or drop down Remember my preferences and ensure the checkboxes for any of the items you wish to back up are checked.
Note:
Accounts and passwords is the box to check in Settings for Wi-Fi networks & passwords in Windows Backup.
Your Windows PC comes with a one-stop backup solution, Windows Backup, that will help you to back up many of the things that are most important to you. From your files, themes, and some settings to many of your installed apps and Wi-Fi information — Windows Backup will help protect what matters and make it easier than ever to move to a brand-new PC.
This guide will help you back up key things on your Windows PC.
Step 1: Sign in with a Microsoft account
This is the account associated with Windows, Microsoft 365, OneDrive, Xbox, and more. Your backed-up information will be stored with your Microsoft account, so getting back to your things on a new PC is as easy as signing in.
To sign in to your Microsoft account, select Start > Settings > Accounts > Your info . Select Sign in with a Microsoft account instead. You’ll see this only if you’re using a local account. If you see Sign in with a local account instead, you’re already using your Microsoft account.
Important: You must use a personal Microsoft account with Windows Backup. Work or school Microsoft accounts won’t work.
Open account settings
Create a new Microsoft account
Check if you have a Microsoft account
Step 2: Back up your folders
Windows Backup is an easy, single stop for all of your backup needs. Your free Microsoft account comes with 5 GB of OneDrive cloud storage (and more storage is available if you need it), and backing up your folders syncs the folders you specify to your OneDrive account, making them instantly accessible on all computers that you use with this Microsoft account. And since they are synced to OneDrive, once you sign in to OneDrive on a new PC, those files will be available to you once again.
First, launch Windows Backup: select Start , then Windows Backup.
Then select Folders to drop it down, and select which of your user folders you want to back up to OneDrive:
You can back up your Desktop, Documents, Pictures, Videos, and Music folders. Simply toggle the switch for each folder On or Off.
Note: If you have backed up these folders in the past, they will show as Backed Up. If you wish to no longer back up these folders, see What do I do if I want to stop backing something up?, below.
Step 3: Back up your settings
Windows Backup can help back up other Windows settings for you, such as your installed apps, your Wi-Fi network and password information, and other settings such as language preference or your wallpaper settings.
You’ll see the state of all of these settings in Windows Backup:
Again, just toggle these settings On or Off.
Note: If these settings have been backed up in the past (and some are by default), they will show as Backed up and the toggle switch will be unavailable. If you want to stop backing these up, see What do I do if I want to stop backing something up?, below.
Once you have everything set up the way you want it, go back to Windows Backup and select Back up.
Note: If you receive an error from OneDrive when you try to back up, it’s possible that you aren’t signed in to OneDrive or there may be another issue with OneDrive that needs to be resolved in order for Windows Backup to work. For more, see Fix OneDrive sync problems.
Open Windows sync settings
Step 4: Time to relax!
You’re all set! Your folders and settings are being backed up and you can access your files on all of the computers that you log into with this Microsoft account. It really couldn’t be easier.
If you want to check and make sure everything is still backed up (hey, we all want that sense of security from time to time!), you can just open the Windows Backup app and it will show you the current state of your backup, or you can check on the state of your OneDrive folder sync at the top of the main Settings page; just open Start > Settings and look for the icon.

Open Windows settings
How do I restore this backup?
We have your back! When you get a new Windows 11 PC, when you are setting it up, just log in with the same Microsoft account that you used to make the backup here. We’ll see that you have backups and ask you if you would like to restore one.
If you have more than one computer backed up, you can select More options and select the backup you wish to restore from. When you get to your desktop everything will be right there waiting for you!
Note: Files can be restored anytime simply by signing in to OneDrive with the same Microsoft account you used to make the original backup.
If you have to reinstall Windows on your Windows 10 PC, you’ll still have your folders synced to OneDrive and your settings synced to your Microsoft account, so as long as you log in with the same account you used to make the backup, everything will restore and you’ll still have your files and settings with you.
What about my Microsoft Edge preferences?
To easily browse the web from any of your devices and keep your favorites organized, sign in to Microsoft Edge and turn on sync.
Sign in to sync Microsoft Edge across devices
What do I do if I want to stop backing something up?
You may notice that if you have been backing something up in Windows Backup, that item is marked as Backed up and you no longer have access to the switch to turn it On or Off.
If you want to stop backing up some of your folders, you’ll need to turn those off in OneDrive. To do that, right-click (or long-press) the OneDrive icon in your system tray, then select Settings > Sync and backup > Manage backup, and turn off the folders you no longer wish to back up.
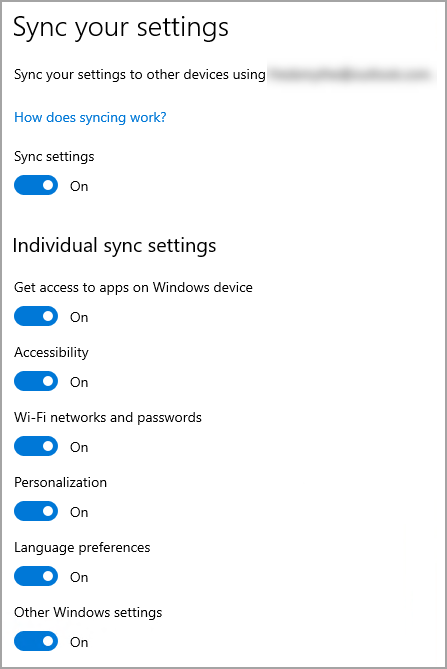
For apps and settings, the place to control that is in Windows Settings. Go to Start > Settings > Accounts > Sync your settings , set Sync Settings to On, and then turn off items you wish to stop backing up.
In a move to ease the backup and restore, Microsoft has introduced a new Windows Backup app for Windows 11 and 10 users. The app, which is currently available only for Windows Insiders, aims to simplify the backup process by allowing users to securely store their data in the cloud, ensuring that their valuable information remains accessible and protected.
In this guide, we will learn how to install and use the new Windows Backup app on Windows 11 and Windows 10.
What is the Windows Backup app?
The Windows Backup app is a recently launched utility designed to facilitate seamless data backup and restoration for Windows 11 and Windows 10 users. This innovative application empowers users to protect their critical information by securely storing it in the cloud, ensuring that it remains readily accessible and shielded from potential data loss scenarios.
Prerequisites for installing Windows Backup
To fully capitalize on the benefits of the Windows Backup app, it’s essential to ensure that you’re utilizing the appropriate environment. Microsoft has seamlessly integrated this app into the latest build.
On Windows 11, you need to install at least Windows 11 Insider Preview Build 23466. Whereas on Windows 10, you need to be at least on Windows 10 KB5029331 version.

How to use the Windows Backup app
Leveraging the Windows Backup app is a user-friendly process that simplifies the complexities of data protection and restoration. To effectively utilize this app, follow these step-by-step instructions:
Step 1: Enable Windows Backup from Settings
Before launching and starting back up using the Windows Backup app, launch Windows settings and navigate to Accounts > Windows backup. Here, turn on the Remember my apps and Remember my preferences options.

Step 2: Open the Windows Backup App
Start by launching the Windows Backup app, which can be found within the Windows operating system. You will be able to search and open the app only if you have installed the minimum required version of Windows 11 or 10.

Step 3: Check What Categories are being Backed up
Upon accessing the app, you’ll be presented with a list of categories that will be backed up. These categories encompass various folders such as Desktop, Documents, Pictures, Videos, Music, and even app preferences. Importantly, the app seamlessly syncs data with your OneDrive account, ensuring that files are stored safely in the cloud.
Step 4: Initiate the Backup Process
Now, proceed by clicking the Back up button at the bottom right. This action triggers the app to initiate the backup process. Allow the application some time to efficiently save the chosen files to your OneDrive account.

Step 5: Effortless Data Restoration
In scenarios where data restoration is required, whether due to data loss or the setup of a new system, the Windows Backup app provides a straightforward process. Users have the option to choose the source PC from which they wish to restore data. This feature is particularly useful when migrating to a new computer and desiring the familiarity of your previous setup.

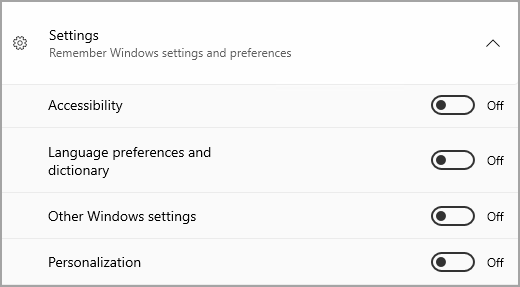
As you can see, the Windows Backup app extends its functionality beyond file backup. It also encompasses crucial Windows settings, including accessibility preferences, language configurations, personalization choices, and even Wi-Fi network credentials. This comprehensive approach ensures that both files and essential system configurations are backed up.
What are the limitations of the Windows Backup app?
Despite its merits, the Windows Backup app does exhibit certain limitations that users should be aware of:
- Limited Control Over App and Setting Selection: In comparison to some third-party backup solutions, the app doesn’t offer extensive control over which apps and settings are included in the backup. Users are unable to individually select apps or settings for backup, making it a more basic backup solution.
- Restore Process Lacks Specific Folder Selection: While users can toggle specific folders for backup, this option is notably absent during the restore process. Consequently, users are unable to selectively restore specific folders, potentially causing inconvenience.
- Exclusion of Desktop Apps from Backup: Notably, the app excludes desktop apps available on the Microsoft Store and Android apps installed on your computer from the backup process. This exclusion could present challenges, particularly for users who rely on specific work-related apps that would need to be set up anew.
- Exclusively Supports Personal Microsoft Accounts: The Windows Backup app solely caters to personal Microsoft accounts and is incompatible with Work or School accounts. This limitation restricts its applicability in professional environments.
Keep your system backed up
While it may not be a comprehensive solution for all backup needs, the Windows Backup app is a step towards ensuring the security and accessibility of valuable data for users across the Windows ecosystem. Its features offer convenience and essential backup options, but it does come with limitations, such as limited app and setting selection and exclusion of certain app types. As this is an early version of the app, it’s hopeful that Microsoft will continue to refine and enhance its functionalities based on user feedback.
Microsoft has unveiled a new cloud-based application that lets you back up and restore your files, apps, settings, and credentials. It works similar to the Time Machine app on macOS. The app is currently available with Windows Insider preview builds and will be generally available to everyone with the Windows 11 23H2 update coming later this year.
The Windows Backup application allows users to create a system backup and utilize it to restore their settings on a fresh Windows installation or after a system reset. The following guide provides instructions on using the Windows Backup app to backup and restore a Windows 11 computer.
Setting up Windows Backup App
The new Windows Backup app is a great way to keep your data safe and secure. It is easy to use and offers a number of new features that make it more convenient than the previous backup tools that were available on Windows.
Before you launch and start backing up your Windows system using the tool, you can choose which files and settings to back up. Here’s how:
- Open Windows Settings, navigate to the ‘Accounts’ section and select ‘Windows Backup’ on the right pane.

- On the Windows backup settings page, you can configure which folders, apps, settings, and credentials you want to back up.
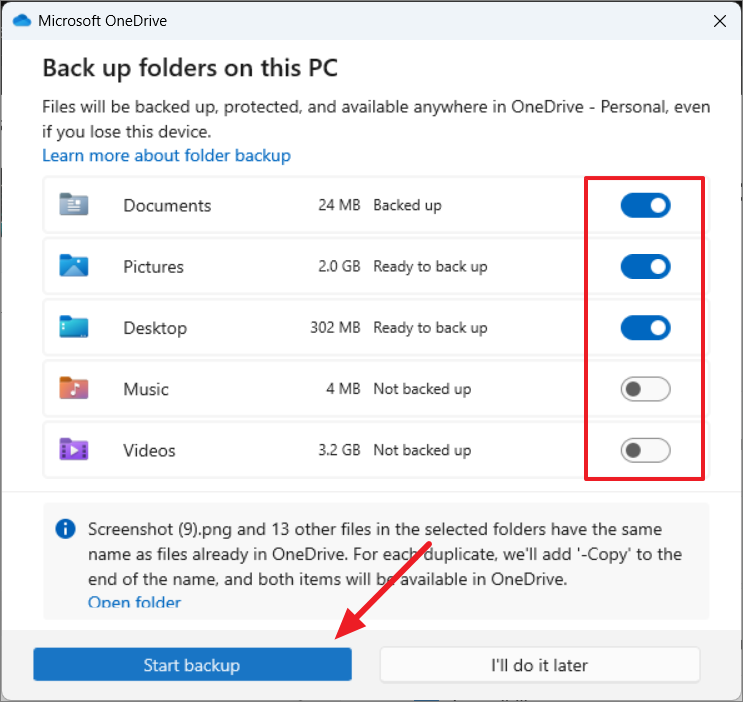
- To specify the library folders you want to be backed up from your computer, click on ‘Manager sync settings’.
On the Microsoft OneDrive window, select the folders you want to back up by turning on the toggles. Then, click on ‘Start backup’.
Next, turn on the ‘Remember my preferences’ toggle and expand the option.
Now, choose the settings you want to be backed up across your Microsoft devices.
You can choose to back up all of your files, apps, and settings, or you can select specific items to back up. Once you have selected the items, you can start backing up your data.
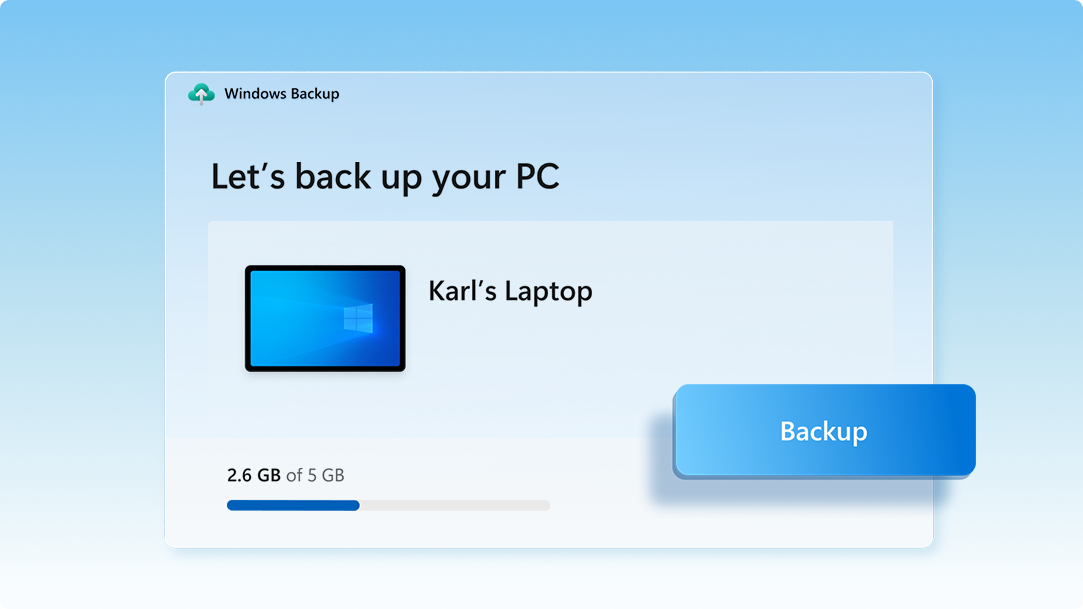
Backing Up Your PC Using Windows Backup App
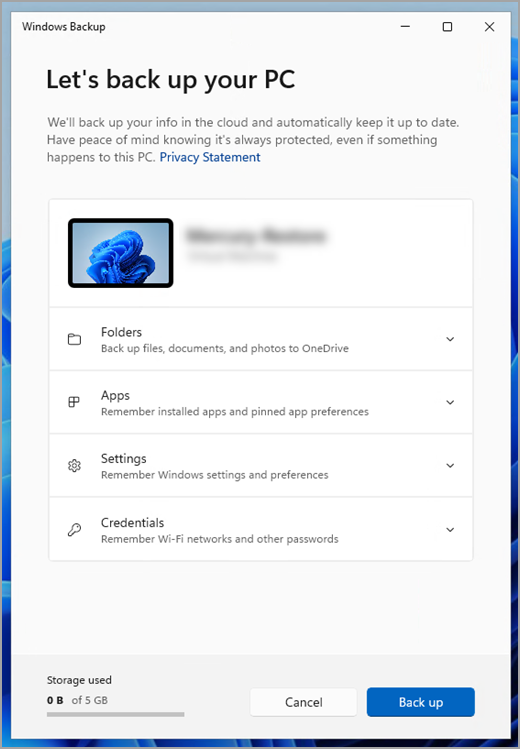
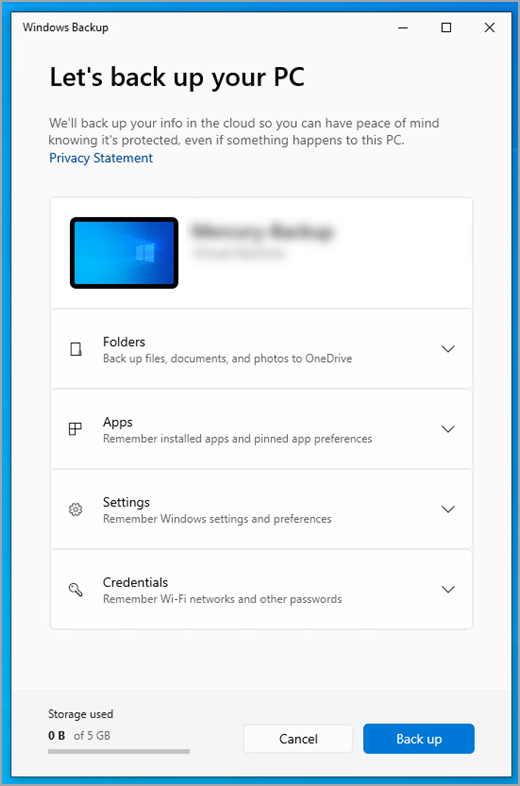
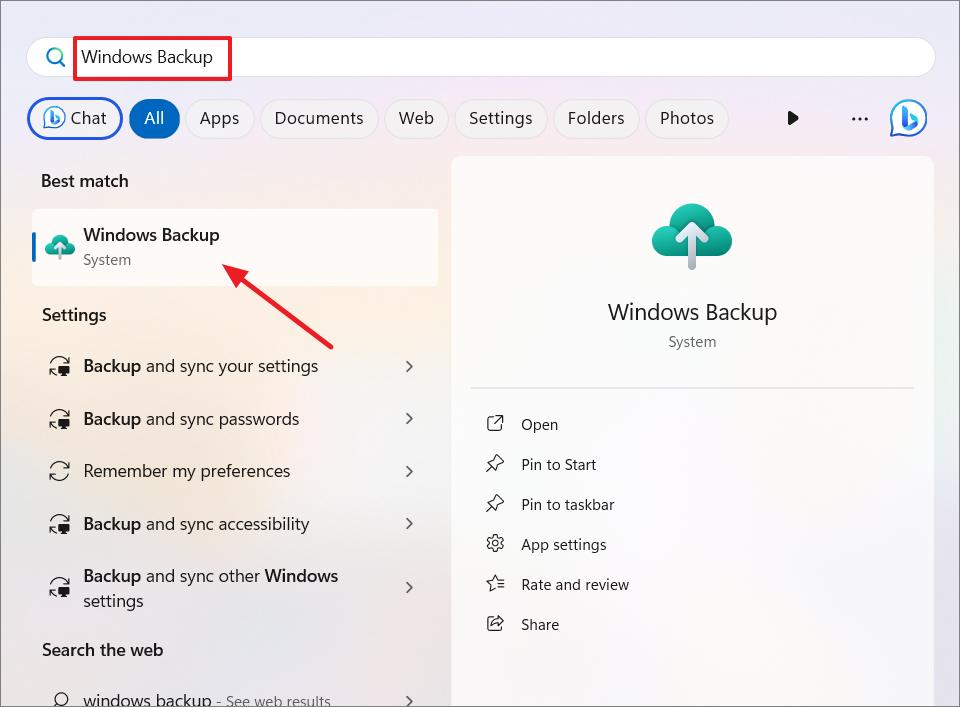
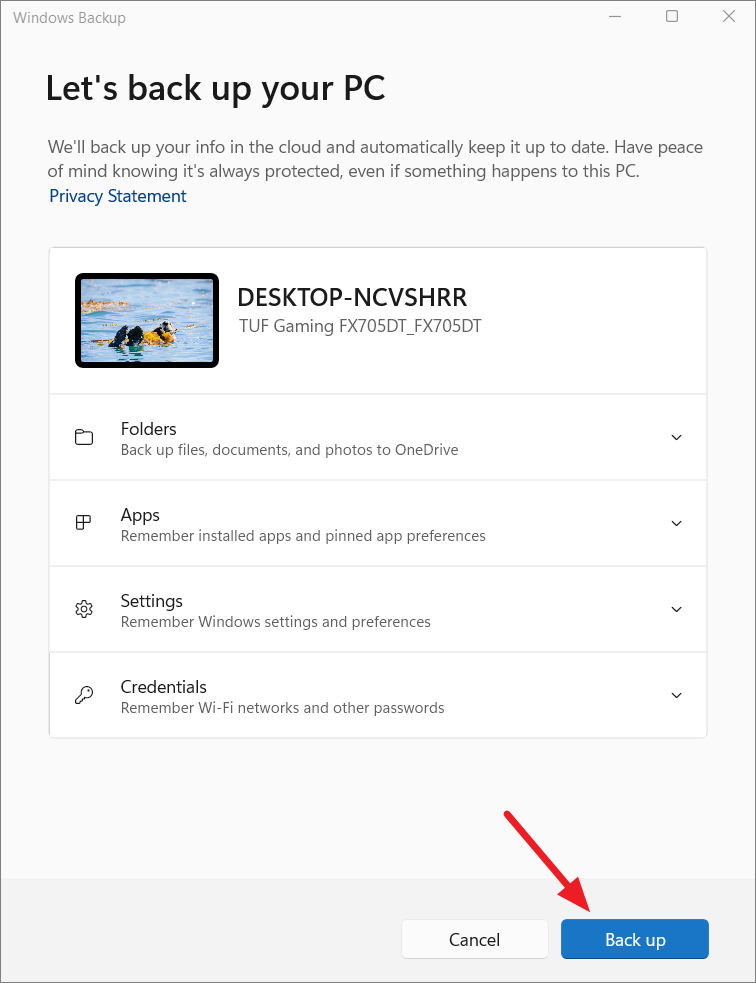
- Open the Windows Backup app on your PC. Search for it in Windows Search, and then select the app from the results.
- Once the app opens, you’ll see the Let’s back up your PC window, which is divided into four sections: Folders, Apps, Settings, and Credentials.
- Folders: This section lets you select library folders you want to backup like Desktop, Documents, Pictures, Videos, and Music.
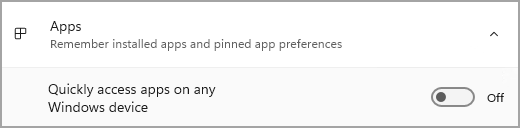
- Apps: It not only remembers the apps you have installed but also retains their specific preferences.
- Settings: Here, you can select which system settings and personal preferences you want to back up.
- Credentials: This option can also preserve your Wi-Fi networks and other passwords.
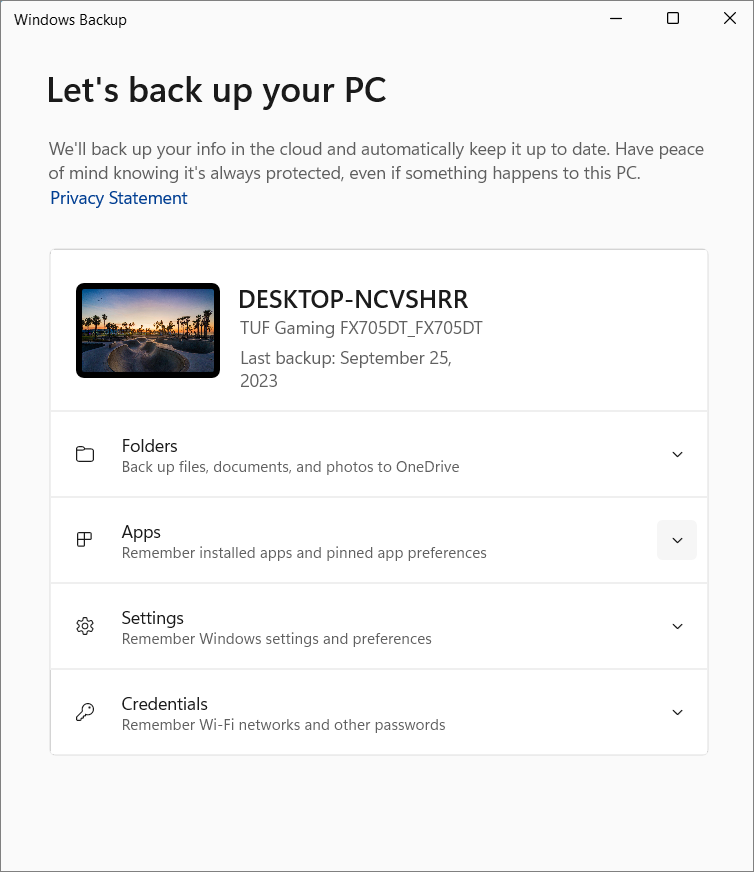
- Expand each section and select or confirm the items you want to preserve.
- After selecting the items, click ‘Back up’.
- The new Windows Backup app will then start backing up your data.
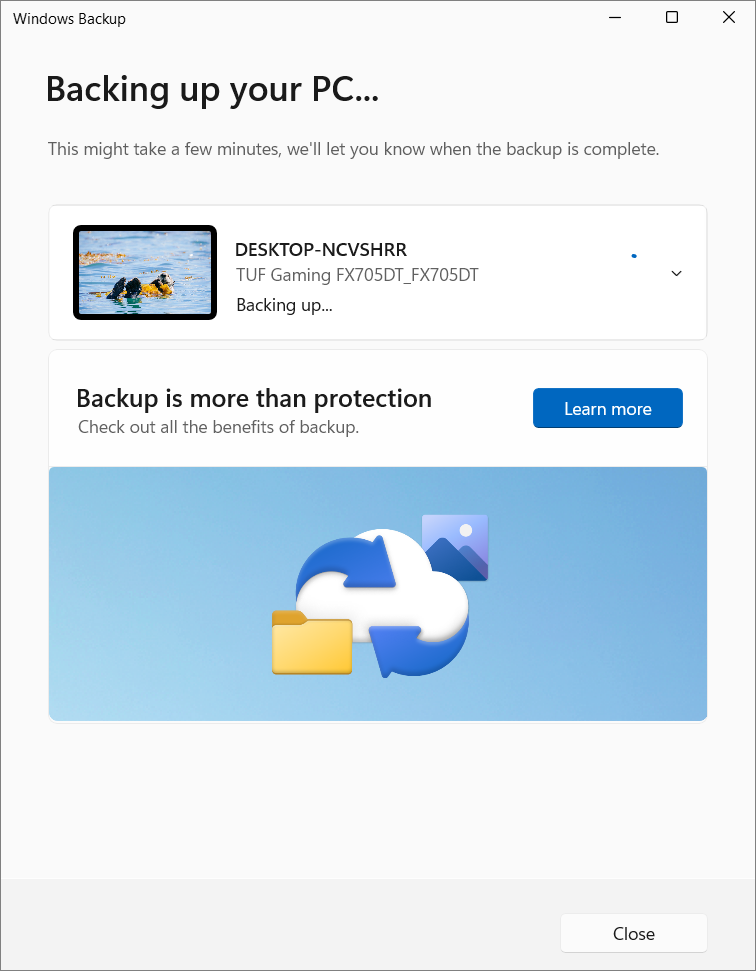
- With these selections made, your data and settings will now be securely backed up.

This feature is especially helpful when you’re moving to a new computer and want your new setup to feel just like your old one, or when you’re resetting your PC.
However, desktop apps available on the Microsoft Store and Android apps installed on your computer are not backed up. This means that users who rely on specific work-related apps will need to set them up again after restoring a backup.
The Windows Backup app can only be used with personal Microsoft accounts. It cannot be used to back up work or school accounts. If you need to back up work-related apps or accounts, you will need to use a third-party backup solution.
How to Restore Your PC from Windows Backup App
When setting up a new Windows 11 PC or following a reset of an existing one, the restore feature can be utilized to retrieve files, applications, and settings from a backup. However, you can only restore backups from the OOBE (out-of-box experience) screen, and you must have Windows 11 Build 23466 or higher.
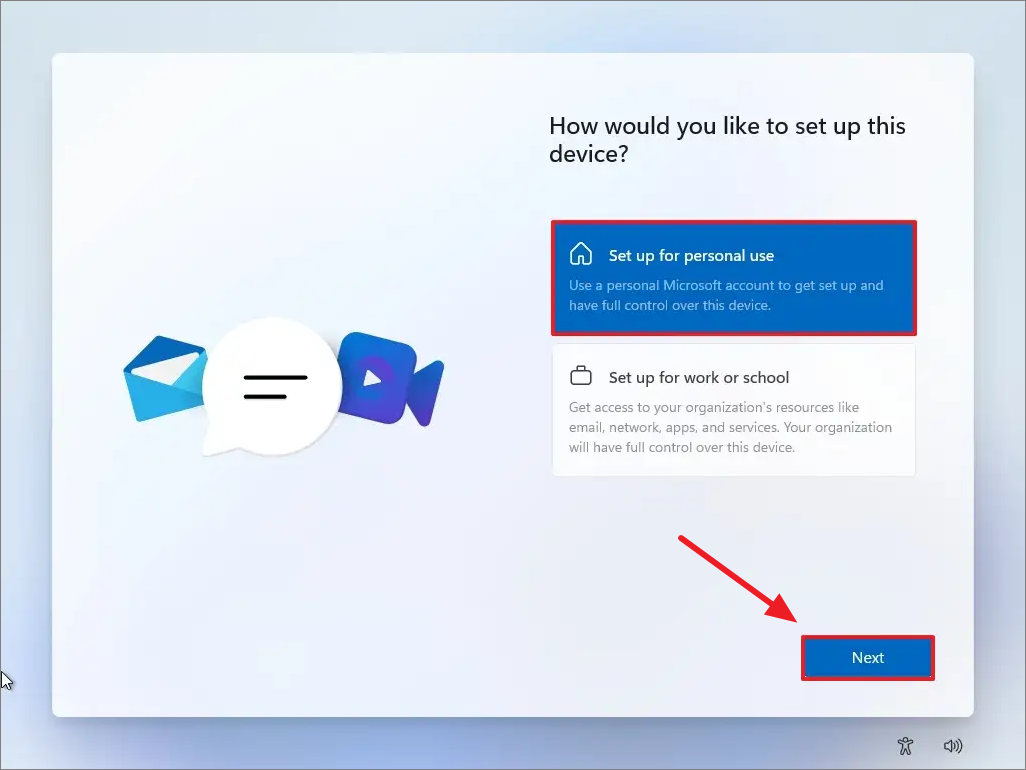
To restore your settings, files, and apps on a new Windows 11 installation during the out-of-box experience (OOBE), follow these instructions:
- Set up your region and your keyboard language.
- Then, choose a name for your computer and click ‘Yes’.
- On the ‘How would you like to set up this device’ screen, select the ‘Set up for personal use’ option.
- On the next screen, click ‘Sign in’ and use the same account that you used for backing up your device to sign in.
- After that, confirm your Microsoft account and click ‘Next.’
- On the ‘Select a device to store from’ screen, choose the backup you want to restore and click on ‘Restore from this PC’.
After completing the above steps, your files, settings, and apps will be restored automatically if you reset your computer. This process will even keep your taskbar pins the same.
However, you cannot use Windows Backup to restore individual items or to restore your entire setup after a hardware failure or file corruption. Instead, your files will always be available through OneDrive, and you can only recover your apps, settings, and credentials when you reinstall Windows.
If you wish to create a full backup of your computer, you can still use the old System Image Backup tool to do so.
How to Backup Windows 11 to an External Drive
Backing up your Windows to an external drive can be rather helpful. Here’s how you can do it in Windows 11.
![]() Raj Kumar
Raj Kumar

We are fairly certain that there must have been a few times that you would’ve lost a couple of your important files on Windows 10. It could be either because of a system error or other reasons. Documents, valuable images, and setups that you have spent a significant amount of time setting up might be lost if you do not take the proactive step of generating complete backups regularly.
If you are using Windows 10, you have access to various ways to generate backups. For instance, you may utilize third-party solutions to back up the whole system, transfer data manually to an external drive, or upload them to a cloud storage service such as OneDrive. Another option is to use a combination of these three methods.
On the other hand, if you do not like to utilize manual techniques or third-party applications, you may always generate a complete backup using the traditional built-in System Backup utility if you do not choose to use either of these options. However, we have a better tool in store that will guide you on How to Do a System Backup on Windows 10.

What Is System Backup on Windows 10?
Your Windows installation and other important software will be safe with a system backup. If you have the storage capacity, creating a system backup can assist you in getting back up and running if anything catastrophic happens to your device.
If your laptop’s system software or hardware fails, you may still access your data thanks to this backup. You may back up your Windows 10 installation by making a system image, including all your important files. Complete system images allow you to roll back to a prior version of your information.
Why Do You Back up a System on Windows 10?
Here are some of the best reasons to have a system backup in Windows 10:
- You do not have to pay anything to use Windows Backup, and there are no fees associated with using it for its backup functions.
- It is a trustworthy and genuine source that may be used for storing and restoring data.
- It provides a backup solution that may be tailored to your needs. You can selectively include or omit certain files from the backup.
- Your data backups will be updated automatically to reflect the change.
- This service provides a safe offline data restoration and backup solution.
- When backing up data, this backup program backs up the whole operating system, including all of its files and apps and the data itself.
- Restoring lost data is a simple and speedy process. It is possible to restore data on local disks or a remote shared folder, both of which are available as alternatives.
How to Do a System Backup on Windows 10?
Creating a backup of the complete operating system is far more difficult than just backing up a folder containing your vacation photos. Let us show you which method below will be most useful to you.
Method 1. How to Do a System Backup on Windows 10 with Windows Backup Software
Method 2. How to Make a System Backup on Windows 10 with Restore Points?
Method 3. How to Create a System Backup on Windows 10 with System Image?
Windows 10, to its credit, has various tools that may be used to create backups of the operating system.
The one shown here is perhaps the one that is recognized the most:
Method 1. How to Do a System Backup on Windows 10 with Windows Backup Software
The best method to do a system backup is to ensure you have backup software that will help you along the way. EaseUS Todo Backup Home has many more functions than are necessary for individual usage. Backups of your system, disks/partitions, and files may be carried either manually or automatically by the application according to a predetermined schedule.
You can create complete, incremental, and differential backups of your data. Start downloading the free Windows backup software and create a complete backup if you want more control over your backups. You may get the program from Microsoft.
Main Features of EaseUS Todo Backup
- Content for flexible backups, including support for folders beyond those offered by File History.
- Provide each user with a FREE cloud storage space of 250 GB from EaseUS.
- Now more options are available for backup destinations, including local, cloud, and NAS drives.
- Additional options for data backup, such as incremental backups and backups triggered by specified circumstances, etc.
Here are the steps you should follow:
Step 1. Launch EaseUS Todo Backup on your computer, and click Create Backup on the home screen and then hit the big question mark to select backup contents.

Step 2. To back up your Windows operating system, click «OS» to begin the backup task.

Step 3. Your Windows operating system information and all system related files and partitions will be automatically selected so you don’t need to do any manual selection at this step. Next, you’ll need to choose a location to save the system image backup by clicking the illustrated area.

Step 4. The backup location can be another local drive on your computer, an external hard drive, network, cloud or NAS. Generally, we recommend you use an external physical drive or cloud to preserve the system backup files.

Step 5. Customiztion settings like enabling an automatic backup schedule in daily, weekly, monthly, or upon an event, and making a differential and incremental backup are available in the Options button if you’re interested. Click «Backup Now«, and the Windows system backup process will begin. The completed backup task will display on the left side in a card style.

Method 2. How to Make a System Backup on Windows 10 with Restore Points?
Restore points are the quickest and easiest way to remedy errors caused by faulty updates or changes to the registry and are also the easiest way to back up the essential system files on Windows 10. Follow the steps below on how to create a backup using restore points:
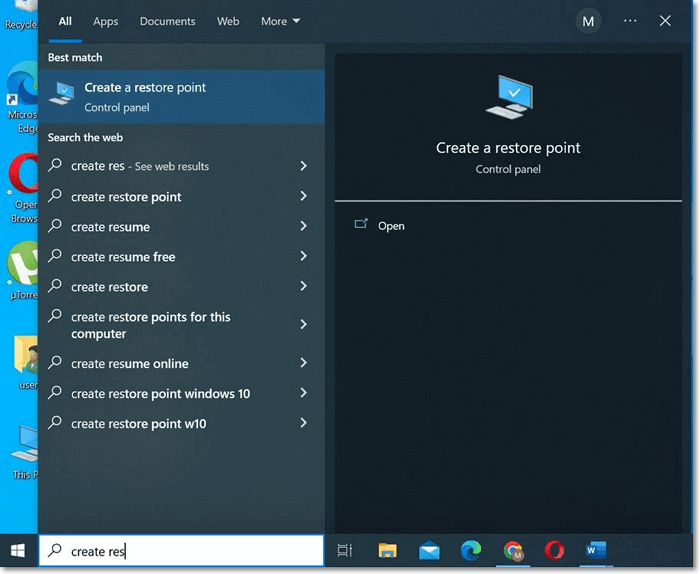
Step 1: Enter «Create a restore point» into the search box located on the taskbar, and then pick the appropriate option from the resulting list.
Step 2: Choose to configure from the System Protection section of System Properties.
Step 3: Click on the button to activate the system protection.
Step 4: Reopen the tab labeled system protection again, and then pick create.
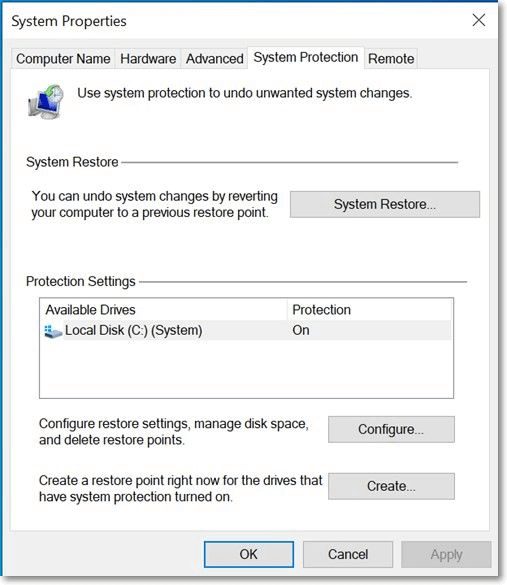
Step 5: After you have typed a description for the restore point, pick the Create > OK button.
Method 3. How to Create a System Backup on Windows 10 with System Image?
System Restore is a tool included in Windows 10 that may be used to fix broken installations by rolling back certain system files and Windows Registry settings to a previous point in time. It achieves this by accessing backups of the system files and registry taken before any issues appeared.
Each disk has a «System Volume Information» folder where restore points are kept at their root level. Creating a restore point does not alter your system, but restoring to that point would. We’ll cover Windows 11 and Windows 10, as the procedures are the same across the two.
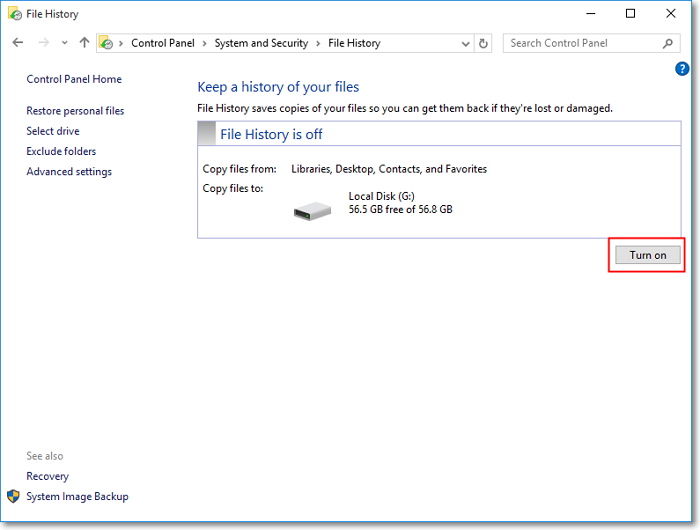
Step 1: In Windows, you may create a system image by going to the «file history» section of the settings menu and selecting «system image backup.»
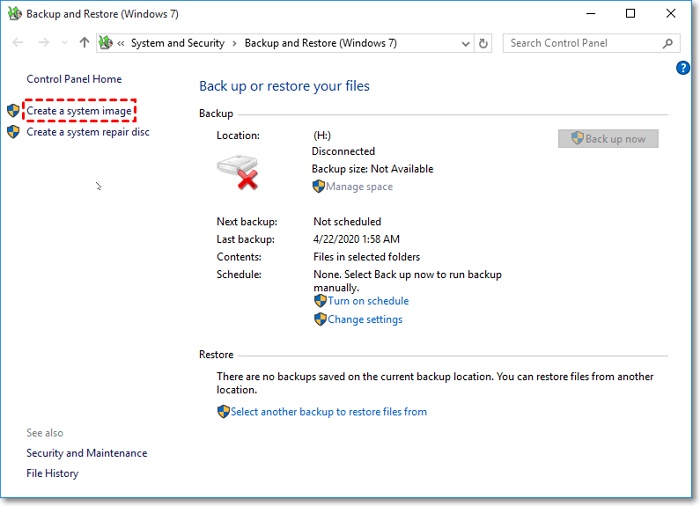
Step 2: Move the mouse to the «generate a system image» option on the left side of the window and click it.
- Note:
- Meanwhile, please wait while it looks for all potential backup drives.
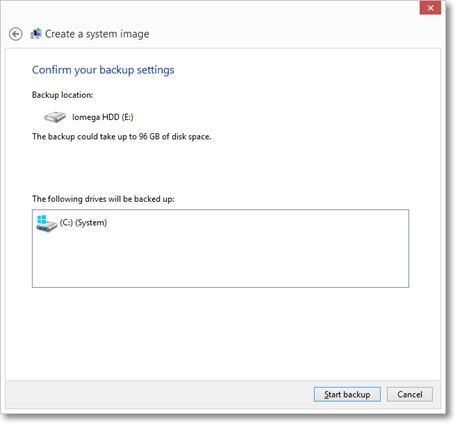
Step 3: Your backup drive option should now be available. If it still doesn’t appear, make sure it’s plugged in and formatted properly.
Step 4: After you’ve made sure you’re backing up the proper drives, you can click «next» and start the backup process.
- Note:
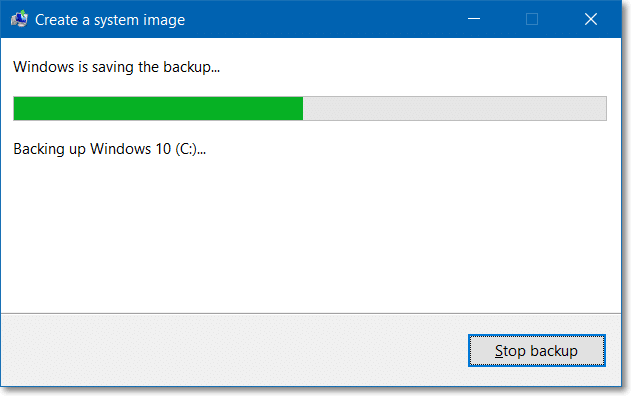
- A backup image will be created on the external hard disk, and Windows will begin the process immediately. This might take a while, depending on how much information is being sent.
Step 5: When it is done copying your data, you may choose to create a system repair disk. This is optional, but it will provide you with a means of recovery if you lose access to Windows and no longer have the installation disk.
- Tip
- After verifying the external disk has your backup, you may now dismiss this window. Then it would help if you took it down and put it away safely.
Final Verdict
Data backups serve a similar purpose as medical insurance. If you don’t need one, you won’t know how much you rely on one. When it happens, it’ll be too late.
You may forget about having any security in regard to your data. It’s always preferable to err on caution, whether with your data or your health.
To answer the issue of how to do system backups on Windows 10, we suggest you try out the EaseUS Todo Backup, which will make backing up and restoring an easy job for you!
System Backup on Windows 10 FAQs
1. How Long Does It Take to do a System Backup on Windows 10?
What you back up is a major factor. Transferring a small file shouldn’t take more than a few seconds, but transferring a huge file (over 1 GB) might take up to five minutes. The backup process might take several hours if you copy everything on your hard disk.
2. How Does Backup Work in Windows 10?
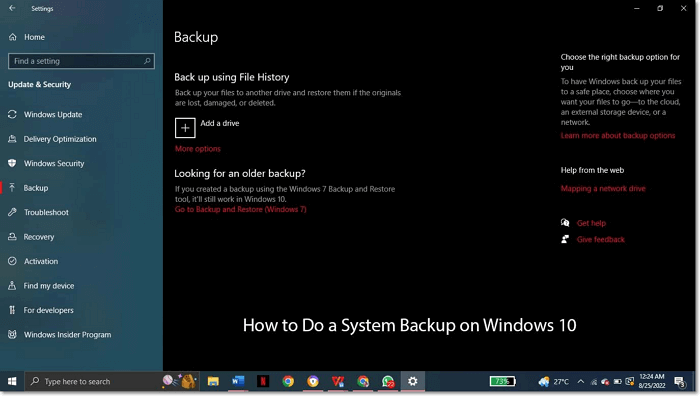
For Windows 10’s backup options, choose the option by selecting the Start menu, then Settings, and then Update & Security. Go to the menu, File History Backup, and Add a drive. Windows will show you a list of available backup devices if you have attached a functional one. It’s time to decide on a storage area for your data copies.
3. Is Windows 10 Backup Good Enough?
More precisely, Microsoft’s built-in Windows backup service has a long track record of falling short. Windows 10’s backup, like Windows 7 and 8, is barely «acceptable,» meaning it’s better than nothing. The good news is that even that is an upgrade from earlier versions of Windows.