Step by step guide to Install and setup vim editor on Window.
This tutorial explains how to install Vim Editor on Windows, Linux, and macOS
How to Install and setup VIM editor on Windows
Following are the steps required to install on Windows.
- Go to vim.org
- Click on the Download link on the left side for navigation
- Download the stable version or old version for the link
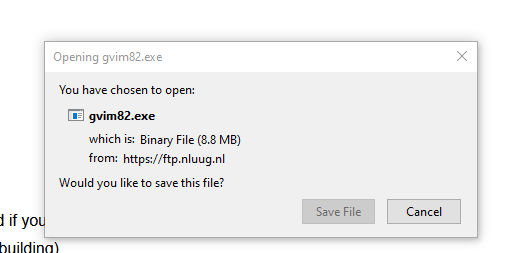
PC: MS-DOS and MS-Windows - It downloads the
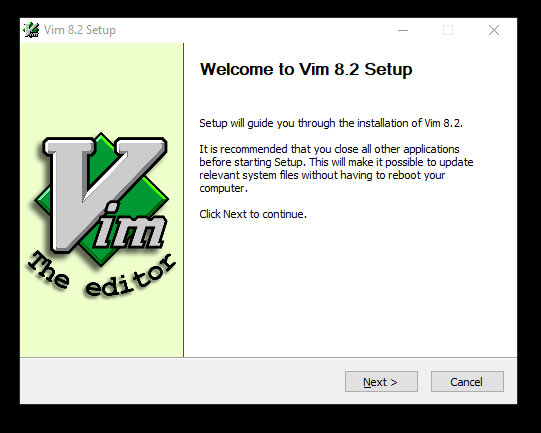
gvim82.exefile to the local system - Double click on this file and follows the installation instructions
- Select language
- privacy policy
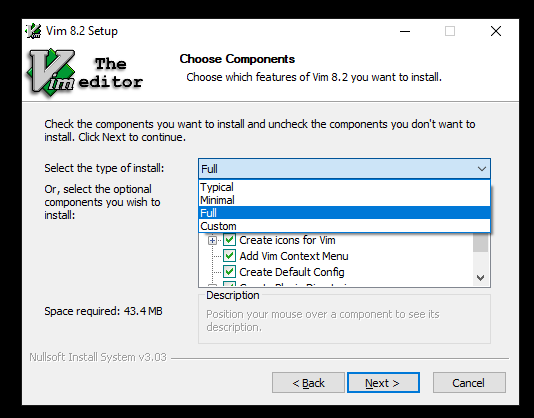
- Choose components
Click on Next to finish the installation
How to run and open vim editor from PowerShell
there are several ways to open vi editors in windows.
- Powershell
- Open windows run by Windows +R command
- type PowerShell
- It opens the PowerShell window
- Windows Terminal
- Open the command prompt and type vim editor
- or you can open the file with
vim filename.
Fixing vim is not recognized as an internal or external command
Once you installed vim on windows, It will not run vim from the command line by default and gives the following error.
vim is not recognized as an internal or external command, operable program, or batch file:
The reason vim is not a recognized command to execute and it does not found in the environment path
So, you have to set environment variables to vim location.
- Go to Control Panel > System — It opens the System properties window
- Edit System environment variables
- VIM is installed on
c:\Program Files (x86)\vimin my windows - Edit PATH environment variable, check vim path is added, if not add this to a PATH environment variable and save it.
Now, the vim command works in terminal and PowerShell windows.

Vim is a powerful code editor. So powerful that both Linux and Mac have it installed by default.
But if you are using Windows as your operating system, you will need to install Vim separately.
Fortunately, Microsoft makes it very easy to install Vim and get it running on your PC.
How to Download Vim
You can download the latest version of the Vim Text Editor straight from Vim themselves.
They have built a special self-executing installer that walks you through the process of installing Vim in the right location on your hard drive.
Note that for Windows you will technically download something called gVim, which is a version of Vim that includes a basic graphic user interface (GUI). You can install it by downloading this executable installer.
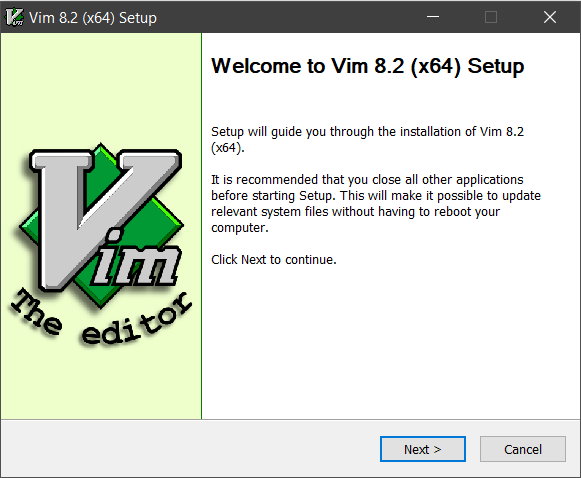
Once you’ve downloaded the file, you just need to run it, and you’ll see a nice installation wizard that looks like this:
They have a recommended «typical» installation. but if you have a reasonably large hard drive, there’s no harm in going ahead with installing everything by choosing the «full» option:
How to Run Vim in PowerShell
Then, once you’ve installed Vim, you should be able to launch it from your Windows command prompt.
Note that as of 2020, PowerShell has all of the same functionality as CMD, plus a whole lot more. I recommend using PowerShell for everything.
You can open PowerShell from the Windows menu bar by typing «powershell» in the search field on the start bar.
Windows will open PowerShell, and you’ll get a command prompt that looks something like this:
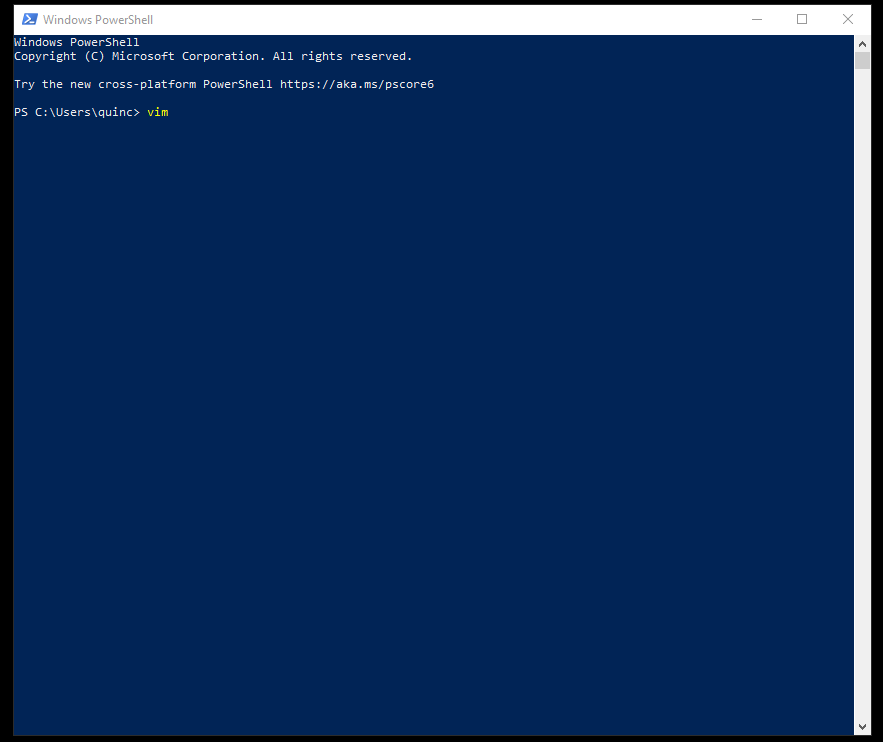
Once you’re in PowerShell, here’s how to run Vim itself. All you have to do is type «vim» and press enter. This will open up Vim. Once Vim is open, this is what you should see:
Congratulations – you now have Vim installed.
How to run Vim inside VS Code
If you are already using VS Code, and want a lot of the speed of Vim without losing the functionality of VS Code, I have good news. It is possible to run a Vim-like experience right within VS Code.
Here is a Vim plugin for VS Code that will help you do this. At the time of me writing this, this plugin has been installed nearly 2 million times.
How to Learn How to Use Vim Properly
Vim is a powerful code editor, and it will take you a lot of practice to get comfortable with it.
Here are a few Vim tutorials that will really help you quickly grasp the basics and get your fingers flying in no time.
For starters, one way Vim is different from other code editors is that Vim has «modes». Here are all of Vim’s modes explained, with examples.
Vim can be intimidating. There is so much to learn. But this guide will show you how not to be afraid of Vim anymore.
If you’re already using VS Code and want to switch completely to Vim, this article will explain how you can do so.
And here are 7 Vim Tips That Changed #100DaysOfCode founder Alex Kallaway’s life. In this article, he not only explain these, but shows demos of these tips in action.
Vim: Learn it, live it, love it.
In the 30 years since Bram Moolenaar first created Vim, its influence has spread far and wide. And even today, the Vim project is actively maintained and constantly improving.
I’ve met so many developers over the years who swear by Vim.
I hope this guide has helped you get running Vim on your Windows PC. And I hope these other tutorials I’ve shared with you here will help you go from zero-to-sixty within the coming months.
The key is to keep practicing and not get discouraged by how many Vim shortcuts there are to remember. Eventually, all of these will become muscle memory, and you’ll be flying from one file to another, banging out code like a terminator.
There is no feeling quite as cool as being able to drop into a codebase and immediately start making changes without ever even reaching for a mouse or trackpad. That is the power that Vim promises, and delivers in spades.
Learn to code for free. freeCodeCamp’s open source curriculum has helped more than 40,000 people get jobs as developers. Get started
These days, Vim becomes
more and more popular on Windows. Today, let’s learn how to install Vim on
Windows, including:
- gVim
-
WSL
(our preferred option) - Cygwin
Installing gVim on Windows
gVim is a Vim GUI for Windows. For sometime, this and the Cygwin alternative
(discussed below) were the main ways to run Vim on Windows.
Installing gVim is
simple and follows the standard way to install applications on Windows. So go ahead and download your installer from
Vim’s official download page, run the installation and follow the instructions.
 |
| Initial Setup |
Choose the components you want to install:
 |
| Choosing your components |
Choose your vimrc settings:
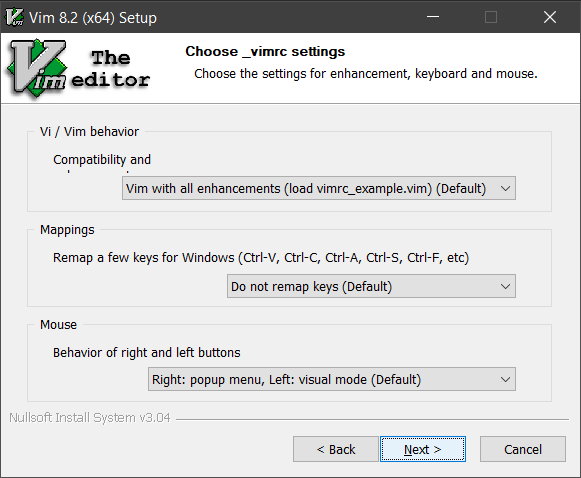 |
| Choosing your .vimrc settings |
Specify the install location:
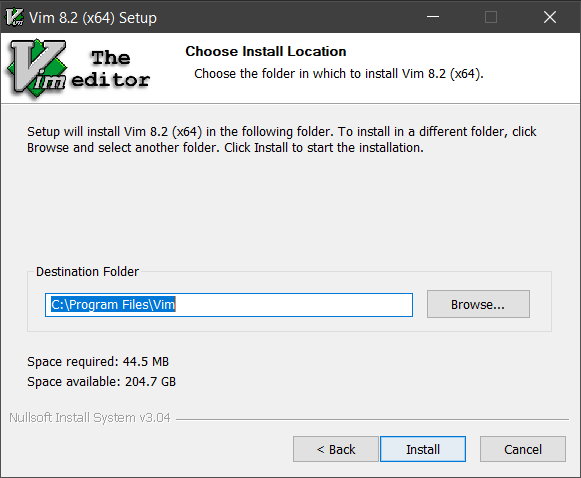 |
| Specifying your install location |
And that’s it! Vim is now installed on your system. Start it from the Start Menu.
Installing Vim on WSL
Despite installing Vim using the installer above feel more natural to Windows users, we’d like to suggest a different approach: installing Vim on WSL. Since it’s really simple, follows the same setup described by
us in our Linux tutorial and is the way you will probably do when using Linux.
For this setup we
assume you have a
Ubuntu WSL instance
and
WSL installed in your system. Installing Vim on Ubuntu under WSL is done by opening a WSL terminal and
typing these commands:
sudo apt-get update
sudo apt-get install vim
Once you install it, open a new WSL terminal and run vim with the vim command from the command line:
Installing Vim using Cygwin
Installing Vim with
Cygwin (a
POSIX-compatible runtime for Windows) may be the least recommended way to do so
these days. However, if you have Cygwin installed already and is comfortable
with it, installing Vim on it simply requires running Cygwin’s setup.exe again
and selecting Vim.
If you don’t have Cygwin installed,
install it and select
Vim from your install screen.
Testing the Install
With Vim installed, next step is to test if it’s running with the command
below:
vim
Exiting Vim
In case it’s your first time with
Vim, to exit press:
<Esc> :q!
Listing installed features
It’s also possible to list which features are installed in your setup by
running from the terminal:
vim —version
The enabled features will be marked with (+) while the disabled should have
the (-) symbol aside.
Conclusion
One this post we reviewed three different ways to install
Vim, with WSL being our recommendation. We hope it helps!
See Also
- How to get started with Vim
- Why use Vim
- Installing Vim on Linux
- Installing Vim on Mac
- Vimtutor — Your first Vim tutorial
- Learn to learn Vim
- Fundamental concepts of Vim
- Vim Modes — All you need to know
Just to supplement, I’m on a fairly highly controlled Windows workstation right now, and don’t have access to much. Downloading the «executable installer» that I usually use did not create the bat files nor, for some reason, vim.exe, though gvim.exe was installed in the vim74 dir for me and worked fine. So though I also needed to set the PATH, that there was no bat file in C:\WiNDOWS nor any command line executable in my VIm runtime folder to call meant that callingvim from the command line (or Powershell) didn’t work.
I’m guessing some portion of the install that’s creating the command-line related stuff, apparently including vim.exe, isn’t recovering gracefully when you don’t have admin permissions.
Either way, the «right» thing to do appears to be to set your PATH to your vim executable folder as usual (note that this might be a little more difficult than usual if you don’t have admin privs), then download the «Win32 console executable» from the usual download page that matches the version of gvim that you’ve already installed, dig vim.exe out of that zip you just downloaded, and place that into the same folder as gvim.exe.
Looking on another box where the executable installer did work «fully», there’s some jive in the vim.bat file that wasn’t installed for me about «collect the arguments in VIMARGS for Win95» and if .%OS%==.Windows_NT goto ntaction, etc etc, but not having any of that doesn’t seem to be a problem on Win7, at least. ;^)
Vim is a versatile editor that is highly customizable. For this reason, it has won the hearts of those who prefer high levels of customization and control in their text editors. With Vim, you can use key mappings to execute sophisticated commands. Vim also offers a Recording feature that makes it possible to automate keystroke sequences to run functions. Like many text editors, Vim gives you the advantage of adding plugins that extend the functionality by adding additional features.
Vim was originally created for Unix-based systems, but as time passed, this text editor found its way to the windows and Mac platforms. So, in this article, you will learn how to install the vim editor on the Windows Operating System.
Let us get started.
Downloading the Vim Editor.
To install the Vim editor, you need the executable file found on the official Vim website. https://www.vim.org/ .
Head over to the site and click on the Download button on the left side of the screen as shown below.

This should take you to the download section where you will find the different Operating systems.

We are interested on the Windows version.
Click on the standard self-installing executable to download the .exe file.
Installing the Vim Editor.
Once the file is saved on your computer, open it to start the installation wizard.

-
Choose the language you wish for the installer and click Okay.
-
On the next page, you will notice that the executable will install Vim version 9. The version should vary depending on the time of download. Click Next to proceed.

- The next step is to accept the terms of License Agreement. Mark the check box and click next to proceed.

-
The next screen prompts you for the features you wish to install. This is step depends on your needs.

- Typical is the default type of install. You can add extra features by clicking on the features you need and this changes the type of install to custom.
- Minimal type of install removes all the extra features while the Full type will install all the additional features.
-
The next screen prompts for the enhancement settings and keyboard/mouse remapping.
-
Leave the Compatibility and enhancement section to default which enables all the vim enhancements.
This screen also enables you to add
key mappingsfor the keyboard and the mouse as you wish. -
To remap the keys, Change the mapping section from
Do not remap keys (Default)toRemap a few keys
-


- Choose the destination folder to install the vim editor and click on the install button.

Once the installation is done, Click finish to exit the installation wizard.
Adding Vim Installation path to the system Variables.
Open the vim installation folder and copy the path. In my case, it is installed on this path.
C:\Program Files (x86)\Vim\vim90
Open the start menu and type System Variables

Click on Environment Variables. This should take you to the next window where you can edit the environment variables
Under system variables, choose Path and click on edit to add the vim installation path you copied.

On the next window, click on new and paste the path then click Okay.

Once you are done with this step, you should be able to use Vim like you do with Vi on Unix systems.
How to Use the Vim editor in Windows.
Now that you have Vim installed on your computer, the next step is to use it.
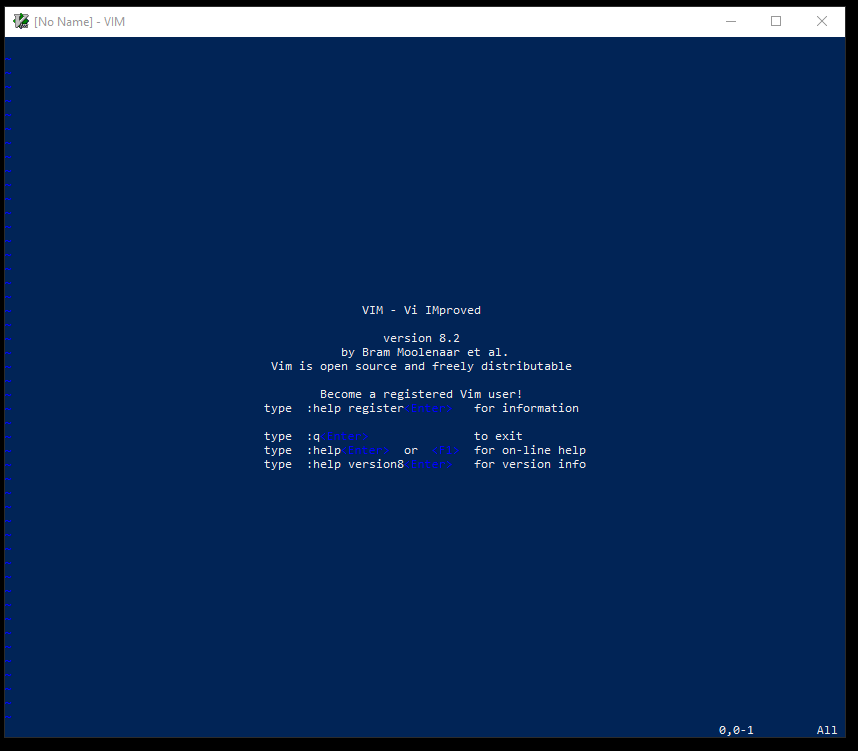
Open Vim by opening the command prompt or powershell and using the vim command.
Vim
If the installation was successful, you should see a similar window as the one below.

Creating files with Vim
Open the cmd and navigate to where you want to create the text file using the cd command.
The syntax to creating a file using Vim is as follows:
vim filname.txt
Example:
vim geekbits.txt
This is how it should look on the commandline.

The command above should open the vim editor where you can write you text and save it.

Saving files with Vim
To save the file, you should press the ESC key to switch to the command mode.
Type :wq then press Enter to save the file and quit Vim.
Learn more about how to use the Vim Editor in this Article: How to use the Vim Editor.
Conclusion
Due to the versatility of the Vim editor, editing text files has become very easy and efficient. The vim editor is very powerful because it has an extensive plugin system and intergrates with many tools and not forgetting the built-in commands.
This article has shown you how to install the Vim editor on the Windows operating system. If you found the article helpful, Share it and subscribe to geekbits to get notified via email everytime we publish interesting articles.
Thanks for reading 
If you enjoy our content, please consider buying us a coffee to support our work:

Edit text file in CMD with Vim
Edit text file in Command Prompt with notepad
cd command in Linux
How to Track Your Screen Time on Linux With ActivityWatch
How to Enable Passwordless SSH Login on Linux
Published by
![]()
Just a guy behind the Screen who lacks knowledge about what the future holds. Join me on my Journey.