When you’re connected to the internet and using a proxy server while browsing the web, that traffic goes through the proxy server instead of coming directly from your Windows 11 PC. A proxy server can be used when you’re connected using Wi-Fi or Ethernet. In some cases, your company or organization might require a proxy server.
To use a proxy server, you’ll need one or more of the following things, depending on how you’re setting it up:
-
Automatically. Windows detects the proxy server settings automatically, so you don’t have to enter any information.
-
Set up script. You’ll need to know the location of the proxy setup script for your organization (if proxy settings aren’t detected automatically). If you don’t know the address for the proxy setup script, you might need to contact the IT department for your organization.
-
Manually. You’ll need to know the proxy server name or IP address and port (optional). If you don’t have this information, you might need to contact your IT department.
Note: If you’re using a VPN connection and it uses a proxy server, you’ll need to set it up separately for that VPN connection.
In general, a VPN and proxy server connection might appear to have some similarities, but a VPN provides a more secure connection compared to a proxy server. For more info about setting up a VPN connection, see Connect to a VPN in Windows.
-
Select the Start button, then select Settings > Network & internet > Proxy.
-
Under Automatic proxy setup, turn on Automatically detect settings.
-
Select the Start button, then select Settings > Network & internet > Proxy.
-
If you or your organization uses a setup script, next to Use setup script, select Set up.
-
In the Edit setup script dialog box, turn on Use setup script, enter the script address, then select Save.
-
Select the Start button, then select Settings > Network & internet > Proxy.
-
Under Manual proxy setup, next to Use a proxy server, select Set up.
-
In the Edit proxy server dialog box, do the following:
-
Turn on Use a proxy server.
-
In the Proxy IP address and Port boxes, enter the proxy server name or IP address and port (optional) in the respective boxes.
-
If you don’t want to use the proxy server when you visit certain websites, enter the ending of the website address in the exception list (for example, *.contoso.com).
For multiple websites, type each website address and separate the addresses with a semicolon (for example: *.contoso.com; *.adatum.com). The * is a wildcard so any website addresses that end with the website address listed will bypass the proxy server.
-
Select or clear the Don’t use the proxy server for local (intranet) addresses check box.
We recommend you select this check box unless your organization requires the proxy server to be used for intranet addresses. -
Select Save.
-
-
Select the Start button, then select Settings > Network & internet > VPN.
-
Select the VPN connection, then select Advanced options.
-
On the VPN connection settings screen, select Edit next to Proxy settings for this VPN connection.
-
In Proxy settings, select the type of proxy setup you want to use, then enter the proxy server information for that VPN connection.
If you don’t know the proxy server settings for your VPN connection, you might need to contact your IT department. -
Select Apply.
Related topic
-
Connect to a VPN in Windows
When you’re connected to the internet and using a proxy server while browsing the web, that traffic goes through the proxy server instead of coming directly from your Windows 10 PC. A proxy server can be used when you’re connected using Wi-Fi or Ethernet. In some cases, your company or organization might require a proxy server.
To use a proxy server, you’ll need one or more of the following things, depending on how you’re setting it up:
-
Automatically. Windows detects the proxy server settings automatically, so you don’t have to enter any information.
-
Set up script. You’ll need to know the location of the proxy setup script for your organization (if proxy settings aren’t detected automatically). If you don’t know the address for the proxy setup script, you might need to contact the IT department for your organization.
-
Manually. You’ll need to know the proxy server name or IP address and port (optional). If you don’t have this information, you might need to contact your IT department.
Note: If you’re using a VPN connection and it uses a proxy server, you’ll need to set it up separately for that VPN connection.
In general, a VPN and proxy server connection might appear to have some similarities, but a VPN provides a more secure connection compared to a proxy server. For more info about setting up a VPN connection, see Connect to a VPN in Windows.
-
Select the Start button, then select Settings > Network & Internet > Proxy.
-
Under Automatic proxy setup, turn on Automatically detect settings.
-
Select the Start button, then select Settings > Network & Internet > Proxy.
-
If you or your organization uses a setup script, turn on Use setup script.
-
In the Script address box, enter the script address, then select Save.
-
Select the Start button, then select Settings > Network & Internet > Proxy.
-
Under Manual proxy setup, turn on Use a proxy server.
-
Do the following:
-
In the Address and Port boxes, enter the proxy server name or IP address and port (optional) in the respective boxes.
-
If you don’t want to use the proxy server when you visit certain websites, enter the ending of the website address in the exception list (for example, *.contoso.com).
For multiple websites, type each website address and separate the addresses with a semicolon (for example: *.contoso.com; *.adatum.com). The * is a wildcard so any website addresses that end with the website address listed will bypass the proxy server.
-
Select or clear the Don’t use the proxy server for local (intranet) addresses check box.
We recommend you select this check box unless your organization requires the proxy server to be used for intranet addresses. -
Select Save.
-
-
Select the Start button, then select Settings > Network & Internet > VPN.
-
Select the VPN connection, then select Advanced options.
-
Under VPN proxy settings, select the type of proxy setup you want to use, then enter the proxy server information for that VPN connection.
If you don’t know the proxy server settings for your VPN connection, you might need to contact your IT department. -
Select Apply.
Related topic
-
Connect to a VPN in Windows
Need more help?
Want more options?
Explore subscription benefits, browse training courses, learn how to secure your device, and more.
Communities help you ask and answer questions, give feedback, and hear from experts with rich knowledge.
При подключении к Интернету и использовании прокси-сервера, во время просмотра веб-страниц, этот трафик идет через прокси-сервер, а не непосредственно с компьютера с Windows 11. Прокси-сервер можно использовать при подключении с помощью Wi-Fi или Ethernet. В некоторых случаях компании или организации может потребоваться прокси-сервер.
Чтобы использовать прокси-сервер, необходимо выполнить одно или несколько из следующих действий в зависимости от способа его настройки:
-
Автоматически. Windows определяет параметры прокси-сервера автоматически, поэтому вам не нужно вводить какие-либо данные.
-
Настройка скрипта. Необходимо знать расположение скрипта установки прокси-сервера для вашей организации (если параметры прокси-сервера не обнаруживаются автоматически). Если вы не знаете адрес для скрипта установки прокси-сервера, может потребоваться обратиться в IT-отдел вашей организации.
-
Вручную. Вам будет необходимо знать имя прокси-сервера или IP-адрес и порт (необязательно). Если у вас нет этой информации, может потребоваться обратиться в IT-отдел.
Примечание: Если вы используете VPN-подключение, которое, в свою очередь, использует прокси-сервер, его необходимо будет настроить отдельно для этого VPN-подключения.
Как правило, VPN-подключение и прокси-сервер могут иметь некоторое сходство, но VPN обеспечивает более безопасное подключение по сравнению с прокси-сервером. Для дополнительных сведений о настройке VPN-подключения см. Подключение к VPN в Windows.
-
Нажмите кнопку Пуск , затем выберите Параметры > Сеть и Интернет > Proxy.
-
В разделе «Автоматическая настройка прокси-сервера» включите Параметры автоматического обнаружения.
-
Нажмите кнопку Пуск , затем выберите Параметры > Сеть и Интернет > Proxy.
-
Если вы или ваша организация используете сценарий установки, рядом с пунктом «Использовать сценарий установки» выберите «Настроить».
-
В диалоговом окне Изменение скрипта установки включите Использовать сценарий установки, введите адрес скрипта и нажмите кнопку Сохранить.
-
Нажмите кнопку Пуск , затем выберите Параметры > Сеть и Интернет > Proxy.
-
В разделе «Настройка прокси-сервера вручную» рядом с пунктом «Использовать прокси-сервер» выберите «Настроить».
-
В диалоговом окне «Изменение прокси-сервера» сделайте следующее:
-
Включите Использование прокси-сервера.
-
В полях IP-адрес прокси-сервера и Порт введите имя прокси-сервера или IP-адрес и порт (необязательно) соответственно.
-
Если вы не хотите использовать прокси-сервер при посещении определенных веб-сайтов, введите окончание адреса веб-сайта в списке исключений (например, *.contoso.com).
Для нескольких веб-сайтов введите адрес каждого веб-сайта и разделите адреса точкой с запятой (например: *.contoso.com; *.adatum.com). * — это подстановочный знак, поэтому все адреса веб-сайтов с таким окончанием будут обходить прокси-сервер.
-
Установите или снимите флажок Не использовать прокси-сервер для локальных адресов (интрасети).
Мы рекомендуем установить этот флажок, если в вашей организации не требуется использовать прокси-сервер для адресов интрасети. -
Нажмите Сохранить.
-
-
Нажмите кнопку Пуск и выберите Параметры > Сеть и Интернет > VPN.
-
Выберите VPN-подключение, а затем выберите Дополнительные параметры.
-
На экране параметров VPN-подключения выберите Изменить рядом с Параметры прокси-сервера для этого VPN-подключения.
-
В пункте Параметры прокси-сервера выберите тип установки прокси-сервера, который вы хотите использовать, а затем введите сведения о прокси-сервере для этого VPN-подключения.
Если вы не знаете параметры прокси-сервера для вашего VPN-подключения, может потребоваться обратиться в IT-отдел. -
Нажмите кнопку Применить.
Статья по теме
-
Подключение к сети VPN в Windows
При подключении к Интернету и использовании прокси-сервера, во время просмотра веб-страниц, этот трафик идет через прокси-сервер, а не непосредственно с компьютера с Windows 10. Прокси-сервер можно использовать при подключении с помощью Wi-Fi или Ethernet. В некоторых случаях компании или организации может потребоваться прокси-сервер.
Чтобы использовать прокси-сервер, необходимо выполнить одно или несколько из следующих действий в зависимости от способа его настройки:
-
Автоматически. Windows определяет параметры прокси-сервера автоматически, поэтому вам не нужно вводить какие-либо данные.
-
Настройка скрипта. Необходимо знать расположение скрипта установки прокси-сервера для вашей организации (если параметры прокси-сервера не обнаруживаются автоматически). Если вы не знаете адрес для скрипта установки прокси-сервера, может потребоваться обратиться в IT-отдел вашей организации.
-
Вручную. Вам будет необходимо знать имя прокси-сервера или IP-адрес и порт (необязательно). Если у вас нет этой информации, может потребоваться обратиться в IT-отдел.
Примечание: Если вы используете VPN-подключение, которое, в свою очередь, использует прокси-сервер, его необходимо будет настроить отдельно для этого VPN-подключения.
Как правило, VPN-подключение и прокси-сервер могут иметь некоторое сходство, но VPN обеспечивает более безопасное подключение по сравнению с прокси-сервером. Для дополнительных сведений о настройке VPN-подключения см. Подключение к VPN в Windows.
-
Нажмите кнопку Пуск, затем выберите Параметры > Сеть и Интернет > Proxy.
-
В разделе «Автоматическая настройка прокси-сервера» включите Параметры автоматического обнаружения.
-
Нажмите кнопку Пуск, затем выберите Параметры > Сеть и Интернет > Proxy.
-
Если вы или ваша организация используете сценарий установки, включите Использовать сценарий установки.
-
В поле Адрес скрипта введите адрес скрипта и нажмите кнопку Сохранить.
-
Нажмите кнопку Пуск, затем выберите Параметры > Сеть и Интернет > Proxy.
-
В разделе Настройка прокси-сервера вручную включите функцию Использовать прокси-сервер.
-
Выполните следующие действия.
-
В полях Адрес и Порт введите имя прокси-сервера или IP-адрес и порт (необязательно) соответственно.
-
Если вы не хотите использовать прокси-сервер при посещении определенных веб-сайтов, введите окончание адреса веб-сайта в списке исключений (например, *.contoso.com).
Для нескольких веб-сайтов введите адрес каждого веб-сайта и разделите адреса точкой с запятой (например: *.contoso.com; *.adatum.com). * — это подстановочный знак, поэтому все адреса веб-сайтов с таким окончанием будут обходить прокси-сервер.
-
Установите или снимите флажок Не использовать прокси-сервер для локальных адресов (интрасети).
Мы рекомендуем установить этот флажок, если в вашей организации не требуется использовать прокси-сервер для адресов интрасети. -
Нажмите Сохранить.
-
-
Нажмите кнопку Пуск и выберите Параметры > Сеть и Интернет > VPN.
-
Выберите VPN-подключение, а затем выберите Дополнительные параметры.
-
В разделе Параметры прокси-сервера VPN выберите тип настройки прокси-сервера, который вы хотите использовать, а затем введите сведения о прокси-сервере для этого VPN-подключения.
Если вы не знаете параметры прокси-сервера для вашего VPN-подключения, может потребоваться обратиться в IT-отдел. -
Нажмите кнопку Применить.
Статья по теме
-
Подключение к сети VPN в Windows
Нужна дополнительная помощь?
Нужны дополнительные параметры?
Изучите преимущества подписки, просмотрите учебные курсы, узнайте, как защитить свое устройство и т. д.
В сообществах можно задавать вопросы и отвечать на них, отправлять отзывы и консультироваться с экспертами разных профилей.
Have you ever tried watching an online video only to find that its availability is limited to certain countries? Or, maybe you live in an area that does not supply your desired service. If one of these is the case, you should learn how to use proxy servers.
Proxies mask the identity of the client or server by sending its IP address in place of the user’s. This replacement IP grants anonymity while sidestepping any regional restrictions.
Have you ever wanted to know how to use a proxy? Then you’ve come to the right place. This article will teach you how to use a proxy server to browse the web anonymously and access blocked websites.
Let’s start with some fundamentals about proxy servers, proxies in general, and then proxies for Windows.
What Is a Proxy Server?
Table of Contents
1
A proxy server is an internet service that allows you to view website content securely. For example, if you are in a school or workplace restricting access to specific websites you want to browse, you may use a proxy server to get around them.
You’ll send requests via the proxy server instead of going straight to the website. By doing this, you can visit any site the proxy server has access to.
Why Would You Want to Use a Proxy Server?
If you’re wondering why you would want to use a proxy server, consider the following reasons:
- Security – Proxy servers protect your privacy. They prevent third parties from tracking the websites you visit and the information you send or receive. This is particularly critical if you often use public Wi-Fi networks.
- Speed – Proxy servers can improve your internet connection speed by permitting many devices to share their bandwidth. Several individuals using a single proxy server for the same site benefit from faster internet connections.
- Accessibility – Many popular websites limit access from certain countries or areas due to local regulations. You might use a VPN (Virtual Private Network) instead of a proxy server for this purpose, but VPNs are more costly than proxies and may restrict what you can access.
What Kinds of Proxies Are There?
Proxies have three primary aspects; their IP type, the protocols they support, and their session style.
Proxy Types By IP
There are three categories of proxy IPs; residential, datacenter, and mobile:
- Residential – These proxies utilize ISP-provided IP addresses linked to residential devices worldwide. This makes these proxies essentially indistinguishable from actual users, making it difficult for web pages to prohibit their use. Typically, residential proxies combo with rotating IPs, which is quite beneficial while web scraping.
- Datacenter – These proxies are housed in data centers globally and are not offered by ISPs. Compared to residential proxies, they are cheaper and quicker. But, they might get banned when the user conducts traffic-intensive operations.
- Mobile – These proxies use the IPs from 3G, 4G, and 5G mobile devices. They’re just as unnoticeable as residential proxies for the target site. Mobile proxies are suitable for testing ads, apps, and customer experience. They are the rarest and most expensive type of proxy.
Proxy Types by Protocol
There are two main categories of proxy protocols; HTTP(S) and SOCKS:
- HTTP(S) – These proxies handle requests for one website at a time through the Hypertext Transfer Protocol (HTTP).
- SOCKS – These proxies help communicate with other servers. They rely on SOCKS protocols and enable the encapsulation of many data types, including TCP and UDP.
Proxy Types by Session
The session determines the duration of each IP used by the proxy. There are three main styles for the session type; static, rotating, and sticky:
- Static – These proxies are a single persistent IP address that remains unchanged as long as you pay for it.
- Rotating – These proxies change your IP address with each request. This isn’t good when logging into an account with a persistent cookie. Randomly changing IPs will make you look suspicious. Conversely, they’re great for web scraping; you look like a new person with every request.
- Sticky – These proxies will eventually cycle your IP address through a rotating list. However, they hold each IP for a fixed time duration. This is good for temporary login sessions that need to keep the same IP for a few requests in a row without staying the same one forever.
How To Configure a Proxy on Windows
There are three methods for configuring proxies; automatic, setup script, and manual.
Automatic Proxy Configuration
In this method, the proxy settings are automatically detected by Windows 10. It doesn’t get much easier than this.
- Navigate to Settings.
- Select “Network & Internet.”
- Select Proxy.
- Turn on Automatically detect settings.

Use a Setup Script To Configure a Proxy
You need a script address provided by a network administrator or company IT department.
This address will be similar to a website URL, something like http://my.proxy.server:8000/.
Proxies are quick and easy to set up with the help of an automated setup script; just follow these steps:
- Navigate to Settings.
- Select “Network & Internet.”
- Select Proxy.
- Turn on the Use Setup Script option.
- Input the script address and then click “Save.”
TIP: To deactivate the proxy, repeat the steps above and, in Step 4, switch the Use Setup Script setting to Off.
Manual Proxy Configuration
Alternatively, you can manually enter the proxy’s port number and IP address. The IP address for a proxy server is like any other network computer, such as 192.168.1.211.
The port could be nearly any up-to-four-digit code ranging from 80 to 8080. It purely depends on how the administrator(s) configured it.
To manually set up a proxy server on Windows 10, follow these steps:
- Navigate to Settings.
- Select “Network & Internet.”
- Select Proxy.
- Turn on the Use a Proxy Server option in the Manual Proxy Setup section.
- Enter the IP address in the Address box.
- Enter the port number in the Port box.
- After clicking Save, close the Settings window.

TIP: To deactivate the proxy, repeat the same procedures as before, but at Step 4, switch the Use a Proxy Server setting to Off.
How To Pick the Best Service Provider for Your Requirements
There are various variables to consider while picking a proxy service. Among the most important factors are:
- The reliability of the provided IP addresses.
- If the provider follows ethical practices.
- IP Address Types – Whether the provider offers residential, mobile, or datacenter IPs. Your use case heavily influences which type is best for you.
- Session Types – There are three types of sessions; static, rotating, and sticky. As mentioned before, static is one unchanging IP address. Rotating sessions will cycle through multiple IP addresses. Lastly, sticky sessions will keep you on one IP address until the preset time is up.
- Protocols Used – Some proxies support HTTP(S), SOCKS, or both.
- Geo-locations – If you need access to specific geo-locations that aren’t available with your current provider, make sure your new provider supports them!
Conclusion
After reading this article, I hope you now understand what proxy servers are and how to set one up for use yourself.
Regardless of your reasons for wanting to use a proxy on your Windows computer, one provider that is easy to use, secure, and dependable is KocerRoxy. KocerRoxy is an excellent choice for everyone, regardless of their prior expertise with proxies or the scope of their project. They offer highly affordable datacenter and residential rotating proxies with the option for 15-minute sticky sessions.
An extra layer of inbetweeners soaks up the harshness of the internet and adds additional functionality. You can use proxies to access geo-restricted content, conceal your IP address, and shield your device from malicious requests.
This guide will demonstrate how to use Oxylabs Residential and Datacenter Proxies on Windows 10 & 11 as well as on previous generations of Microsoft’s operating system.

Setting up proxies on Windows 10 & 11
The proxy setup for Windows 10 and 11 is identical. The newer Windows versions allow you to configure the most important options through the Settings application. To configure proxy server settings, follow the instructions below.
-
Navigate to Start > Settings > Network & Internet > Proxy.
Network & Internet settings
2. Configure Proxy settings. Windows has three ways to set up a proxy: automatically, by setting up a script, or manually.
Automatic proxy setup
While in Proxy settings, turn on Automatically detect settings.
Enabling the automatic settings detection
When you enable this option, Windows will automatically detect authorized proxy server settings using the Web Proxy Auto-Discovery Protocol (WPAD). Organizations authorize (impose) such settings on computers connected to their internal networks to restrict access and protect digital assets.
If you use a personal computer or want to add a proxy manually, turn this setting off.
Setting up a script
While in Proxy settings, enable Use setup script and enter an address.
Enabling the script setup
After clicking Save, the proxy configuration will be imported from a specified list.
Manual proxy setup
To configure a proxy manually, enable Use a proxy server and specify the following details:
Residential Proxies
Proxy type: HTTP, HTTPS, or SOCKS5
Proxy host: pr.oxylabs.io
Proxy port: 7777
You can also use country-specific entries. For example, if you enter fr-pr.oxylabs.io under IP address and 40000 under Port, you’ll acquire a French exit node. For a complete list of country-specific entry nodes or if you need a sticky session, please refer to our documentation.
Configuring Residential Proxies
Dedicated Datacenter Proxies
Proxy type: HTTP or SOCKS5
Proxy host: a specific IP address (e.g., 1.2.3.4)
Proxy port: 60000
In the case of Dedicated Datacenter Proxies, you will have to choose an IP address from the acquired list. Please refer to our documentation for more details.
NOTE: To specify the SOCKS5 proxy type, you’ll have to use legacy Windows features (refer to the following section).
Shared Datacenter Proxies
Proxy type: HTTP
Proxy host: dc.pr.oxylabs.io
Proxy port: 10000
You can also use a country-specific entry. For example, if you enter dc.nl-pr.oxylabs.io under IP address and 44000 under Port, you’ll acquire a Dutch exit node. For a complete list of country-specific entry nodes, please refer to our documentation.
You can also list specific websites that will ignore your proxy server settings. Separate addresses with semicolons to create multiple exceptions. Add an asterisk with a dot (*.) if you want to exclude multiple addresses from the same domain (*.oxylabs.io).
3. Lastly, open a browser, enter your Oxylabs sub-user’s credentials, and Sign in. Use the same credentials you typed in while creating a new sub-user in the Oxylabs dashboard.
Entering Oxylabs sub-user’s credentials
All set up! You’re now passing your web requests through a proxy.
Configuring proxies using legacy Windows settings
These steps apply to all Windows versions (7, 8, and older) and offer some more in-depth features excluded from the Settings app found on Windows 10 & 11. To configure proxy settings, follow the steps below:
-
Navigate to Control Panel > Network and Internet > Internet Options.
Navigating to Network and Internet
Accessing Internet Options
2. Under Internet Properties, select the Connections tab and open LAN settings.
3. Check the Use a proxy server for your LAN option and press Advanced.
4. Specify your proxy details. For a detailed Oxylabs proxy configuration (Residential and Datacenter), refer to the previous section.
Configuring proxy settings
You can also specify the proxy Type (HTTP or SOCKS). These proxy settings correspond to the proxy settings described in the previous section, as they are universal system-wide. If you fill a field here, it also applies in the Settings app if you’re using Windows 10 & 11.
You can also list specific websites that will ignore your proxy settings. Separate addresses with semicolons to create multiple exceptions. Add an asterisk with a dot (*.) if you want to exclude multiple addresses from the same domain (*.oxylabs.io).
5. Launch a browser to authenticate your proxy settings. Enter your Oxylabs sub-user’s credentials, and Sign in. Use the same credentials you typed in while creating a new sub-user in the Oxylabs dashboard.
Entering Oxylabs sub-user’s credentials
All set up! You can now connect to the internet via proxy.
Common Windows proxy errors
Here are some of the most common proxy-related errors encountered on Windows:
-
Windows could not automatically detect this network’s proxy settings.
-
Unable to connect to the proxy server.
-
Cannot turn off proxy settings in Windows.
Go over these options for potential solutions:
-
Review proxy settings.
-
Reboot the device.
-
Update or downgrade network drivers.
-
Check potentially conflicting applications such as VPNs.
-
Use a restore point.
-
Reset network settings.
-
Clear browser cache.
-
Scan the computer for malware.
Wrapping up
There are several ways to set up a proxy on Windows, each bringing the same result, although legacy settings allow you to toggle more settings.
Whether you’re using a Windows PC, Android device, or macOS laptop, Oxylabs got you covered – find out how to use proxies for a variety of applications and operating systems in our integrations.
Don’t hesitate to contact us for more details if you have questions about configuring our proxies for Windows or if you have any inquiries about our solutions.
Please be aware that this is a third-party tool not owned or controlled by Oxylabs. Each third-party provider is responsible for its own software and services. Consequently, Oxylabs will have no liability or responsibility to you regarding those services. Please carefully review the third party’s policies and practices and/or conduct due diligence before accessing or using third-party services.
Frequently asked questions
How to disable proxy settings on Windows?
On Windows 10 & 11, open the Settings app, navigate to Network & Internet > Proxy, and disable all three proxy setup options.
Alternatively, if you’re using an older Windows version, navigate to Network and Internet > Internet Options > Internet Properties > Connections > LAN settings. Untick all three proxy setup options and save your preferences.
If the options above don’t work, you can edit an entry in Windows Registry to set the universal proxy setting. Search for the Registry Editor or press Win+R and type in regedit. Then navigate to HKEY_LOCAL_MACHINE\Software\Policies\Microsoft\Windows\CurrentVersion\Internet Settings, select ProxySettingsPerUser, and change the value to 1. Lastly, restart your computer.
Where to find proxy settings on Windows?
For setting up a proxy, Windows 10 & 11 have two options – the Settings app and Control Panel’s options. Older Windows versions host proxy settings only under the Control Panel’s internet settings.
How to change proxy settings on Windows 7 and older versions?
Access the proxy settings through Control Panel > Network and Internet > Internet Options > Internet Properties > Connections > LAN settings.
Useful resources
Get Windows proxies for $15/GB
Дата публикации: 22 июня 2022 года
Windows, или Microsoft Windows, — это операционная система, разработанная компанией Microsoft для персональных компьютеров. Это самая популярная операционная система в мире: более 1,4 миллиарда устройств работают под управлением Windows. С момента своего первого выпуска было выпущено множество версий Windows, последняя из которых — Windows 11.
Windows, или Microsoft Windows, — это операционная система, разработанная компанией Microsoft для персональных компьютеров. Это самая популярная операционная система в мире: более 1,4 миллиарда устройств работают под управлением Windows. С момента своего первого выпуска было выпущено множество версий Windows, последняя из которых — Windows 11.
Вы можете использовать прокси, если хотите оптимизировать свое время при работе с компьютером под управлением Windows. Прокси-сервер Windows имеет множество полезных функций даже для обычного пользователя. Если вы хотите полностью защитить свою личность при работе в Интернете, вы можете использовать прокси-сервер Windows, так как он скроет ваш IP-адрес на любом сайте, который вы посещаете.
Если у вас медленное интернет-соединение и вы хотите подключиться к более быстрому, вы можете сделать это с помощью прокси-сети Windows. Вам не придется иметь дело с постоянными буферами при просмотре интернет-страниц или задержками в игре.
Если вы хотите выполнять сложные задачи, такие как автоматизация или веб-скрейпинг, вам также понадобится прокси-сервер Windows, чтобы предотвратить запрет вашей учетной записи и IP-адреса. С прокси-сервером Windows сайты будут думать, что ваш бот — настоящий пользователь, а не бот.
Давайте настроим прокси-сервер Windows.
Настройки прокси в Window
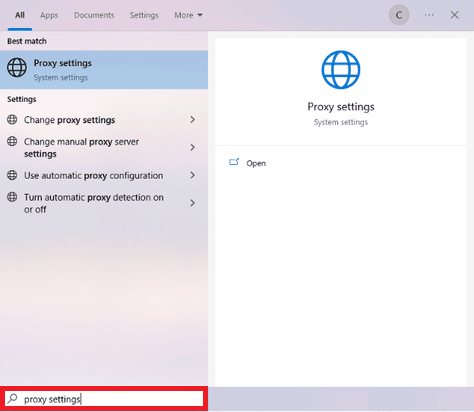
Шаг 1. В строке поиска Window введите «Proxy Settings «.
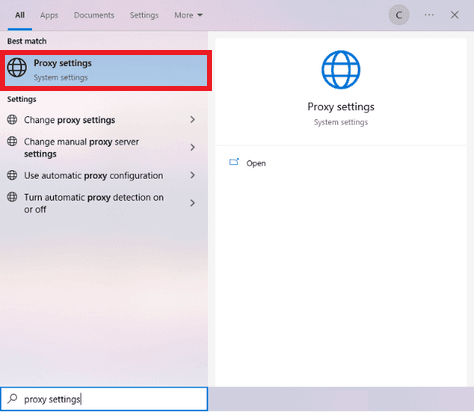
Шаг 2. Нажмите на результат поиска «Настройки прокси «.
Шаг 3. Вам будет предложено выбрать «Автоматическая настройка прокси» или «Ручная настройка прокси «. Для примера мы выберем «Ручная установка прокси «.
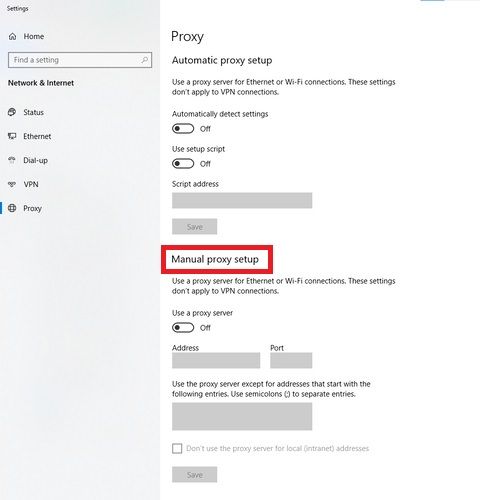
Шаг 4. Включите «Использовать прокси-сервер «.
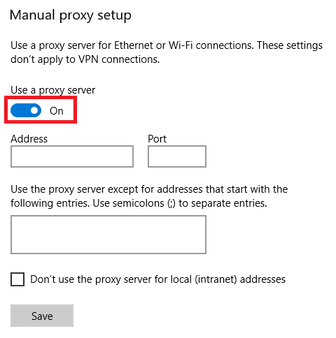
Теперь вам нужно обратиться к провайдеру и получить данные прокси-сервера. Если вы хотите получить их от Geonode, вы можете перейти к разделу «Получение информации о прокси-сервере с помощью Geonode».
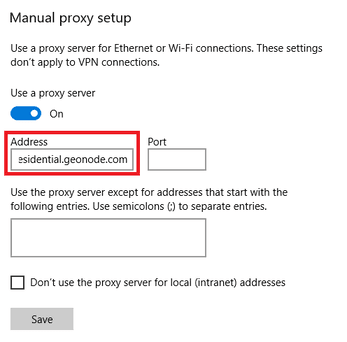
Шаг 5. Введите «Имя хоста « или «IP-адрес» вашего прокси-сервера. Это первая часть перед точкой с запятой, в нашем примере это «premium-residential.geonode.com «.
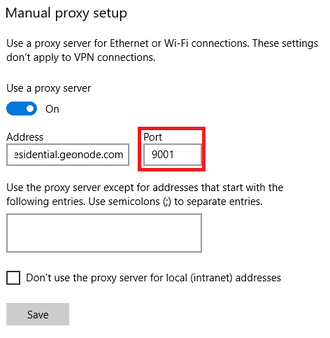
Шаг 6. Введите «Номер порта « вашего прокси. Это вторая часть перед точкой с запятой, в нашем примере это «9001».
Шаг 7. Введите все «адреса веб-сайтов «, которые вы хотите посетить без прокси.
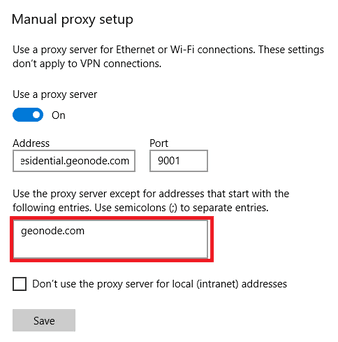
Если вы хотите получить доступ к локальному серверу без прокси, установите флажок «Не использовать прокси-сервер для локальных адресов «.
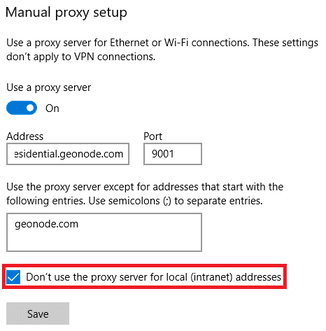
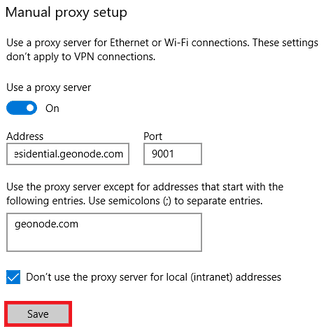
Шаг 8. Нажмите «Сохранить «.
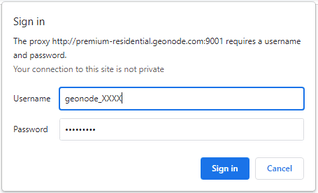
Шаг 9. Наконец, зайдите на любой сайт в Google Chrome, и появится всплывающее окно с просьбой ввести учетные данные вашего аккаунта. Введите «Имя пользователя « и «Пароль «. Затем нажмите на «Войти «.
Поздравляю! Теперь вы настроили прокси-сервер для вашей операционной системы Windows.
Получение информации о прокси-сервере с помощью Geonode
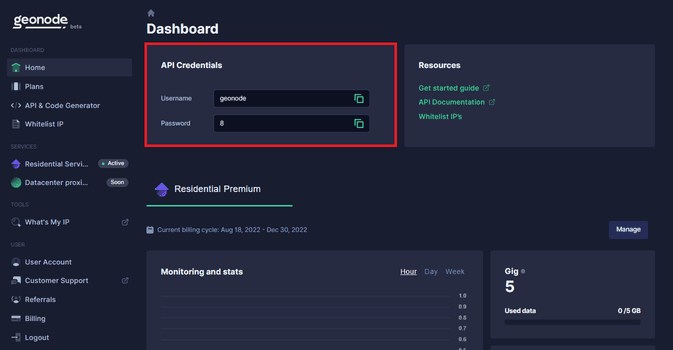
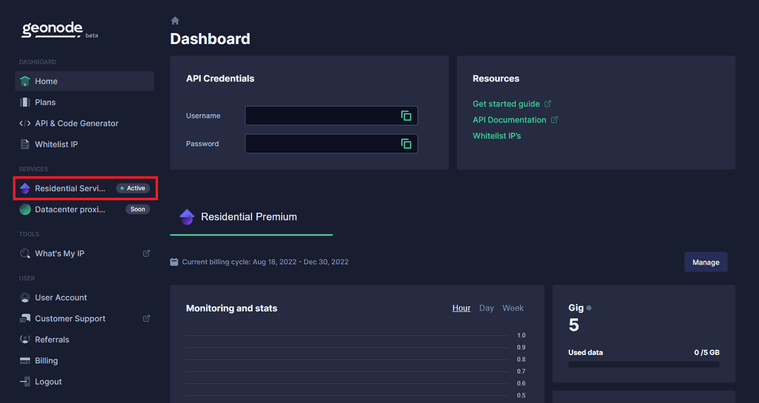
Шаг 1. Зайдите на Geonode и войдите в систему с существующей учетной записью или зарегистрируйтесь, чтобы создать новую.

Шаг 2. На главной странице нажмите на «Жилищные услуги «.
Шаг 3. Прокрутите страницу вниз, пока не увидите «Конечные точки «.
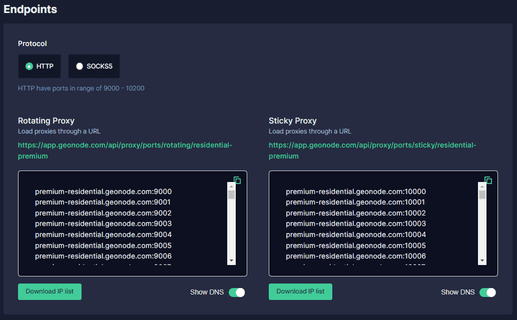
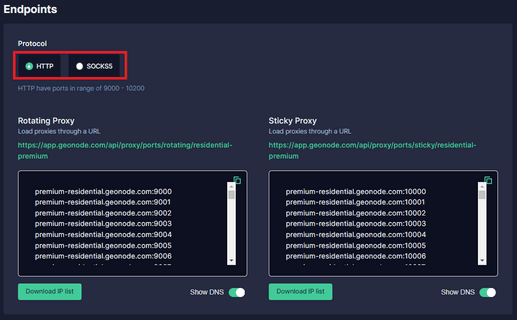
Шаг 4. Выберите, какой «Протокол прокси « вы хотите использовать: «Протокол HTTP « или «Протокол SOCKS5».
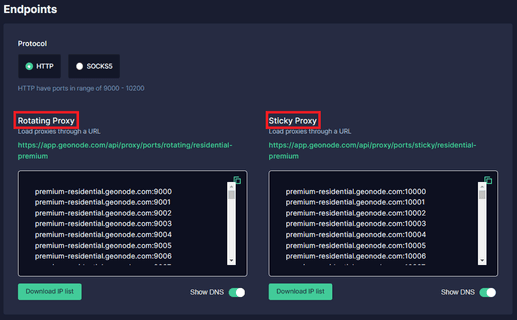
Шаг 5. Выберите «Тип сессии «, который вы хотите использовать: «Rotating Proxy « или «Sticky Proxy «.
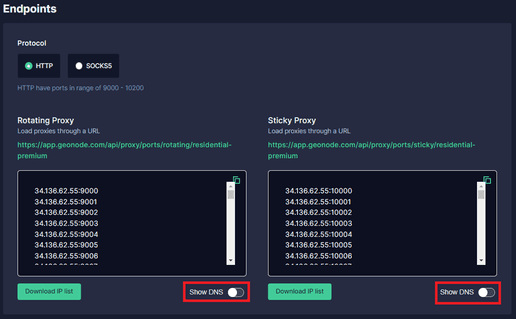
Шаг 6. Выберите, какой прокси вы хотите использовать. Для примера мы будем использовать выделенный прокси «premium-residential.geonode.com:9001».
![geonodenew4.png] (https://res.cloudinary.com/delbwqa4s/image/upload/v1661142523/geonodenew4_975090d5dd.png)
Если вы хотите использовать IP-адрес вместо DNS, просто выключите кнопку Show DNS, и IP-адреса будут отображаться.
Шаг 7. Теперь вам нужны «Authentication Details» вашей учетной записи прокси. Для Geonode это находится на главной странице вашего аккаунта.