This guide discusses how to install packages using pip and
a virtual environment manager: either venv for Python 3 or virtualenv
for Python 2. These are the lowest-level tools for managing Python
packages and are recommended if higher-level tools do not suit your needs.
Note
This doc uses the term package to refer to a
Distribution Package which is different from an Import
Package that which is used to import modules in your Python source code.
Installing pip
pip is the reference Python package manager. It’s used to install and
update packages. You’ll need to make sure you have the latest version of pip
installed.
Unix/macOS
Debian and most other distributions include a python-pip package; if you
want to use the Linux distribution-provided versions of pip, see
Installing pip/setuptools/wheel with Linux Package Managers.
You can also install pip yourself to ensure you have the latest version. It’s
recommended to use the system pip to bootstrap a user installation of pip:
python3 -m pip install --user --upgrade pip
python3 -m pip --version
Afterwards, you should have the latest version of pip installed in your
user site:
pip 21.1.3 from $HOME/.local/lib/python3.9/site-packages (python 3.9)
Windows
The Python installers for Windows include pip. You can make sure that pip is
up-to-date by running:
py -m pip install --upgrade pip
py -m pip --version
Afterwards, you should have the latest version of pip:
pip 21.1.3 from c:\python39\lib\site-packages (Python 3.9.4)
Installing virtualenv
Note
If you are using Python 3.3 or newer, the venv module is
the preferred way to create and manage virtual environments.
venv is included in the Python standard library and requires no additional installation.
If you are using venv, you may skip this section.
virtualenv is used to manage Python packages for different projects.
Using virtualenv allows you to avoid installing Python packages globally
which could break system tools or other projects. You can install virtualenv
using pip.
Unix/macOS
python3 -m pip install --user virtualenv
Windows
py -m pip install --user virtualenv
Creating a virtual environment
venv (for Python 3) and virtualenv (for Python 2) allow
you to manage separate package installations for
different projects. They essentially allow you to create a “virtual” isolated
Python installation and install packages into that virtual installation. When
you switch projects, you can simply create a new virtual environment and not
have to worry about breaking the packages installed in the other environments.
It is always recommended to use a virtual environment while developing Python
applications.
To create a virtual environment, go to your project’s directory and run
venv. If you are using Python 2, replace venv with virtualenv
in the below commands.
The second argument is the location to create the virtual environment. Generally, you
can just create this in your project and call it env.
venv will create a virtual Python installation in the env folder.
Note
You should exclude your virtual environment directory from your version
control system using .gitignore or similar.
Activating a virtual environment
Before you can start installing or using packages in your virtual environment you’ll
need to activate it. Activating a virtual environment will put the
virtual environment-specific
python and pip executables into your shell’s PATH.
You can confirm you’re in the virtual environment by checking the location of your
Python interpreter:
It should be in the env directory:
Unix/macOS
Windows
...\env\Scripts\python.exe
As long as your virtual environment is activated pip will install packages into that
specific environment and you’ll be able to import and use packages in your
Python application.
Leaving the virtual environment
If you want to switch projects or otherwise leave your virtual environment, simply run:
If you want to re-enter the virtual environment just follow the same instructions above
about activating a virtual environment. There’s no need to re-create the virtual environment.
Installing packages
Now that you’re in your virtual environment you can install packages. Let’s install the
Requests library from the Python Package Index (PyPI):
Unix/macOS
python3 -m pip install requests
Windows
py -m pip install requests
pip should download requests and all of its dependencies and install them:
Collecting requests
  Using cached requests-2.18.4-py2.py3-none-any.whl
Collecting chardet<3.1.0,>=3.0.2 (from requests)
  Using cached chardet-3.0.4-py2.py3-none-any.whl
Collecting urllib3<1.23,>=1.21.1 (from requests)
  Using cached urllib3-1.22-py2.py3-none-any.whl
Collecting certifi>=2017.4.17 (from requests)
  Using cached certifi-2017.7.27.1-py2.py3-none-any.whl
Collecting idna<2.7,>=2.5 (from requests)
  Using cached idna-2.6-py2.py3-none-any.whl
Installing collected packages: chardet, urllib3, certifi, idna, requests
Successfully installed certifi-2017.7.27.1 chardet-3.0.4 idna-2.6 requests-2.18.4 urllib3-1.22
Installing specific versions
pip allows you to specify which version of a package to install using
version specifiers. For example, to install
a specific version of requests:
Unix/macOS
python3 -m pip install 'requests==2.18.4'
Windows
py -m pip install "requests==2.18.4"
To install the latest 2.x release of requests:
Unix/macOS
python3 -m pip install 'requests>=2.0.0,<3.0.0'
Windows
py -m pip install "requests>=2.0.0,<3.0.0"
To install pre-release versions of packages, use the --pre flag:
Unix/macOS
python3 -m pip install --pre requests
Windows
py -m pip install --pre requests
Installing from source
pip can install a package directly from source, for example:
Unix/macOS
cd google-auth
python3 -m pip install .
Windows
cd google-auth
py -m pip install .
Additionally, pip can install packages from source in
development mode,
meaning that changes to the source directory will immediately affect the
installed package without needing to re-install:
Unix/macOS
python3 -m pip install --editable .
Windows
py -m pip install --editable .
Installing from version control systems
pip can install packages directly from their version control system. For
example, you can install directly from a git repository:
google-auth @ git+https://github.com/GoogleCloudPlatform/google-auth-library-python.git
For more information on supported version control systems and syntax, see pip’s
documentation on VCS Support.
Installing from local archives
If you have a local copy of a Distribution Package’s archive (a zip,
wheel, or tar file) you can install it directly with pip:
Unix/macOS
python3 -m pip install requests-2.18.4.tar.gz
Windows
py -m pip install requests-2.18.4.tar.gz
If you have a directory containing archives of multiple packages, you can tell
pip to look for packages there and not to use the
Python Package Index (PyPI) at all:
Unix/macOS
python3 -m pip install --no-index --find-links=/local/dir/ requests
Windows
py -m pip install --no-index --find-links=/local/dir/ requests
This is useful if you are installing packages on a system with limited
connectivity or if you want to strictly control the origin of distribution
packages.
Using other package indexes
If you want to download packages from a different index than the
Python Package Index (PyPI), you can use the --index-url flag:
Unix/macOS
python3 -m pip install --index-url http://index.example.com/simple/ SomeProject
Windows
py -m pip install --index-url http://index.example.com/simple/ SomeProject
If you want to allow packages from both the Python Package Index (PyPI)
and a separate index, you can use the --extra-index-url flag instead:
Unix/macOS
python3 -m pip install --extra-index-url http://index.example.com/simple/ SomeProject
Windows
py -m pip install --extra-index-url http://index.example.com/simple/ SomeProject
Upgrading packages
pip can upgrade packages in-place using the --upgrade flag. For example, to
install the latest version of requests and all of its dependencies:
Unix/macOS
python3 -m pip install --upgrade requests
Windows
py -m pip install --upgrade requests
Using requirements files
Instead of installing packages individually, pip allows you to declare all
dependencies in a Requirements File. For
example you could create a requirements.txt file containing:
requests==2.18.4
google-auth==1.1.0
And tell pip to install all of the packages in this file using the -r flag:
Unix/macOS
python3 -m pip install -r requirements.txt
Windows
py -m pip install -r requirements.txt
Freezing dependencies
Pip can export a list of all installed packages and their versions using the
freeze command:
Which will output a list of package specifiers such as:
cachetools==2.0.1
certifi==2017.7.27.1
chardet==3.0.4
google-auth==1.1.1
idna==2.6
pyasn1==0.3.6
pyasn1-modules==0.1.4
requests==2.18.4
rsa==3.4.2
six==1.11.0
urllib3==1.22
This is useful for creating Requirements Files that can re-create
the exact versions of all packages installed in an environment.
Back to top
Edit this page
Toggle table of contents sidebar
To get started with using pip, you should install Python on your system.
Ensure you have a working pip#
As a first step, you should check that you have a working Python with pip
installed. This can be done by running the following commands and making
sure that the output looks similar.
Linux
$ python --version
Python 3.N.N
$ python -m pip --version
pip X.Y.Z from ... (python 3.N.N)
MacOS
$ python --version
Python 3.N.N
$ python -m pip --version
pip X.Y.Z from ... (python 3.N.N)
Windows
C:> py --version
Python 3.N.N
C:> py -m pip --version
pip X.Y.Z from ... (python 3.N.N)
If that worked, congratulations! You have a working pip in your environment.
If you got output that does not look like the sample above, please read
the Installation page. It provides guidance on how to install pip
within a Python environment that doesn’t have it.
Common tasks#
Install a package#
Linux
$ python -m pip install sampleproject
[...]
Successfully installed sampleproject
MacOS
$ python -m pip install sampleproject
[...]
Successfully installed sampleproject
Windows
C:> py -m pip install sampleproject
[...]
Successfully installed sampleproject
By default, pip will fetch packages from Python Package Index, a
repository of software for the Python programming language where anyone can
upload packages.
Install a package from GitHub#
Linux
$ python -m pip install git+https://github.com/pypa/sampleproject.git@main
[...]
Successfully installed sampleproject
MacOS
$ python -m pip install git+https://github.com/pypa/sampleproject.git@main
[...]
Successfully installed sampleproject
Windows
C:> py -m pip install git+https://github.com/pypa/sampleproject.git@main
[...]
Successfully installed sampleproject
See VCS Support for more information about this syntax.
Install a package from a distribution file#
pip can install directly from distribution files as well. They come in 2 forms:
-
source distribution (usually shortened to “sdist”)
-
wheel distribution (usually shortened to “wheel”)
Linux
$ python -m pip install sampleproject-1.0.tar.gz
[...]
Successfully installed sampleproject
$ python -m pip install sampleproject-1.0-py3-none-any.whl
[...]
Successfully installed sampleproject
MacOS
$ python -m pip install sampleproject-1.0.tar.gz
[...]
Successfully installed sampleproject
$ python -m pip install sampleproject-1.0-py3-none-any.whl
[...]
Successfully installed sampleproject
Windows
C:> py -m pip install sampleproject-1.0.tar.gz
[...]
Successfully installed sampleproject
C:> py -m pip install sampleproject-1.0-py3-none-any.whl
[...]
Successfully installed sampleproject
Install multiple packages using a requirements file#
Many Python projects use requirements.txt files, to specify the
list of packages that need to be installed for the project to run. To install
the packages listed in that file, you can run:
Linux
$ python -m pip install -r requirements.txt
[...]
Successfully installed sampleproject
MacOS
$ python -m pip install -r requirements.txt
[...]
Successfully installed sampleproject
Windows
C:> py -m pip install -r requirements.txt
[...]
Successfully installed sampleproject
Upgrade a package#
Linux
$ python -m pip install --upgrade sampleproject
   [...]
Successfully installed sampleproject
MacOS
$ python -m pip install --upgrade sampleproject
   [...]
Successfully installed sampleproject
Windows
C:> py -m pip install --upgrade sampleproject
   [...]
Successfully installed sampleproject
Uninstall a package#
Linux
$ python -m pip uninstall sampleproject
Uninstalling sampleproject:
   [...]
Proceed (Y/n)? y
Successfully uninstalled sampleproject
MacOS
$ python -m pip uninstall sampleproject
Uninstalling sampleproject:
   [...]
Proceed (Y/n)? y
Successfully uninstalled sampleproject
Windows
C:> py -m pip uninstall sampleproject
Uninstalling sampleproject:
   [...]
Proceed (Y/n)? y
Successfully uninstalled sampleproject
Next Steps#
It is recommended to learn about what virtual environments are and how to use
them. This is covered in the Installing Packages
tutorial on packaging.python.org.
Introduction
PIP is a package management system used to install and manage software packages written in Python. It stands for “preferred installer program” or “Pip Installs Packages.”
PIP for Python is a utility to manage PyPI package installations from the command line.
If you are using an older version of Python on Windows, you may need to install PIP. You can easily install PIP on Windows by downloading the installation package, opening the command line, and launching the installer.
This tutorial will show how to install PIP on Windows, check its version, upgrade, and configure.
Note: The latest versions of Python come with PIP pre-installed, but older versions require manual installation. The following guide is for version 3.4 and above. If you are using an older version of Python, you can upgrade Python via the Python website.
Prerequisites
- Computer running Windows or Windows server
- Access to the Command Prompt window
Before you start: Check if PIP is Already Installed
PIP is automatically installed with Python 2.7.9+ and Python 3.4+ and it comes with the virtualenv and pyvenv virtual environments.
Before you install PIP on Windows, check if PIP is already installed.
1. Launch the command prompt window:
- Press Windows Key + X.
- Click Run.
- Type in cmd.exe and hit enter.
Alternatively, type cmd in the Windows search bar and click the “Command Prompt” icon.
2. Type in the following command at the command prompt:
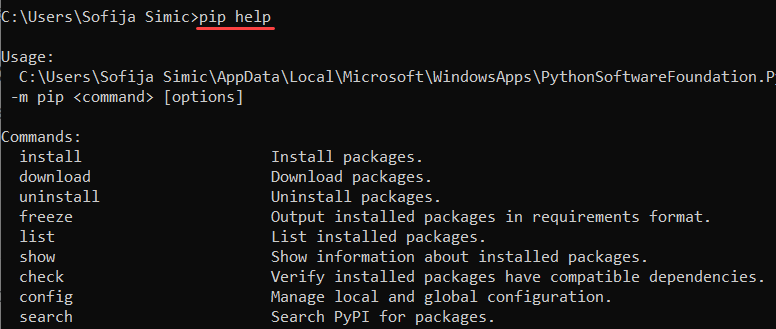
pip helpIf PIP responds, then PIP is installed. Otherwise, there will be an error saying the program could not be found.

Installing PIP On Windows
Follow the steps outlined below to install PIP on Windows.
Step 1: Download PIP get-pip.py
Before installing PIP, download the get-pip.py file.
1. Launch a command prompt if it isn’t already open. To do so, open the Windows search bar, type cmd and click on the icon.
2. Then, run the following command to download the get-pip.py file:
curl https://bootstrap.pypa.io/get-pip.py -o get-pip.py
Step 2: Installing PIP on Windows
To install PIP type in the following:
python get-pip.py
If the file isn’t found, double-check the path to the folder where you saved the file. You can view the contents of your current directory using the following command:
dirThe dir command returns a full listing of the contents of a directory.
Step 3: Verify Installation
Once you’ve installed PIP, you can test whether the installation has been successful by typing the following:
pip helpIf PIP has been installed, the program runs, and you should see the location of the software package and a list of commands you can use with pip.
If you receive an error, repeat the installation process.
Step 4: Add Pip to Windows Environment Variables
To run PIP from any location, you need to add it to Windows environment variables to avoid getting the «not on PATH» error. To do so, follow the steps outlined below:
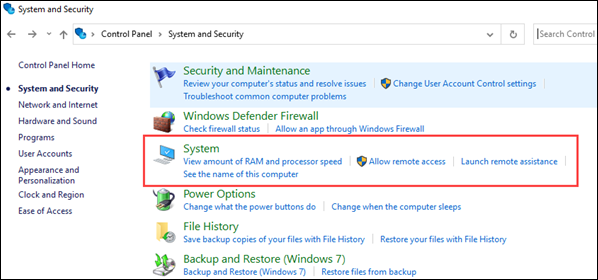
- Open the System and Security window by searching for it in the Control Plane.
- Navigate to System settings.
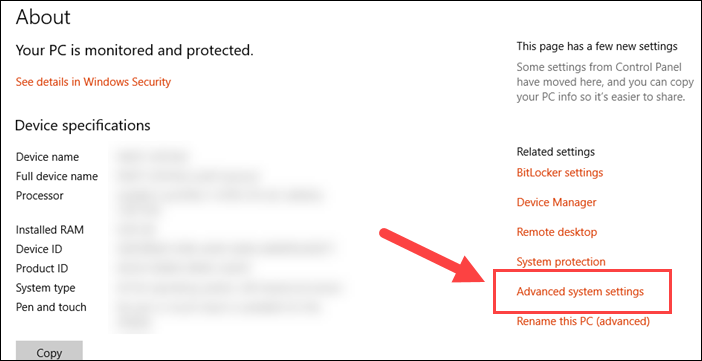
- Then, select Advanced system settings.
- Open the Environment Variables and double-click on the Path variable in the System Variables.

- Next, select New and add the directory where you installed PIP.
- Click OK to save the changes.
Step 5: Configuration
In Windows, the PIP configuration file is %HOME%\pip\pip.ini.
There is also a legacy per-user configuration file. The file is located at %APPDATA%\pip\pip.ini.
You can set a custom path location for this config file using the environment variable PIP_CONFIG_FILE.
Upgrading PIP for Python on Windows
New versions of PIP are released occasionally. These versions may improve the functionality or be obligatory for security purposes.
To check the current version of PIP, run:
pip --version
To upgrade PIP on Windows, enter the following in the command prompt:
python -m pip install --upgrade pipThis command uninstalls the old version of PIP and then installs the most current version of PIP.
Downgrade PIP Version
Downgrading may be necessary if a new version of PIP starts performing undesirably. To downgrade PIP to a prior version, specifying the version you want.
To downgrade PIP, use the syntax:
python -m pip install pip==version_numberFor example, to downgrade to version 18.1, you would run:
python -m pip install pip==18.1You should now see the version of PIP that you specified.
Conclusion
Congratulations, you have installed PIP for Python on Windows. Check out our other guides to learn how to install PIP on other operating systems:
- Install PIP on CentOS
- Install PIP on Ubuntu
- Install PIP on Debian
- Install PIP on Mac
Now that you have PIP up and running, you are ready to manage your Python packages.
NumPy is a library for the Python programming language, adding support for large, multi-dimensional arrays and matrices. Check out our guide and learn how to install NumPy using PIP.
In this tutorial, we will identify PIP for Python, when we use it, how to install it, how to check its version, how to configure it on Windows, and how to upgrade (or downgrade) it.
What Is PIP for Python?
PIP stands for «PIP Installs Packages», which is a recursive acronym (the one that refers to itself) coined by its creator. In more practical terms, PIP is a widely used package-management system designed to install libraries that aren’t included in the standard distribution of the Python programming language on our local machine — and then manage them from the command line.
By default, PIP fetches such libraries from Python Package Index (PyPI), which is a central online repository containing a vast collection of third-party packages for various applications. If necessary, PIP can also connect to another local or online repository as long as it complies to PEP 503.
How to Install PIP on Windows
Before proceeding to PIP installation on Windows, we need to make sure that Python is already installed and PIP is not installed.
Check If Python Is Available
To verify that Python is available on our local machine, we need to open the command line (in Windows search, type cmd and press Enter to open Command Prompt or right-click on the Start button and select Windows PowerShell), type python, and press Enter.
If Python is properly installed, we will see a notification like the one below:
Python 3.10.2 (tags/v3.10.2:a58ebcc, Jan 17 2022, 14:12:15) [MSC v.1929 64 bit (AMD64)] on win32 Type "help," "copyright," "credits," or "license" for more information.
In the opposite case, we will see the following notification:
'python' is not recognized as an internal or external command, operable program or batch file.
This means that Python is either not installed on our local machine or is installed incorrectly and needs setting system variables. If you need further guidance on how to properly install Python on Windows, you can use this article in the Dataquest blog: Tutorial: Installing Python on Windows.
Check If PIP Is Already Installed
Now that we verified that Python is installed on Windows (or, if it was not, have installed it), let’s check if PIP is already installed on our system.
The latest releases Python 3.4+ and Python 2.7.9+, as well as the virtual environments virtualenv and pyvenv, automatically ship with PIP (we can check our Python version by running python --version or python -V in the command line). However, the older versions of Python don’t have this advantage by default. If we use an older Python release and cannot upgrade it for some reason (e.g., when we have to work with the projects made in old versions of Python incompatible with the newer versions), we may need to manually download and install PIP on Windows.
To check if PIP is already installed on Windows, we should open the command line again, type pip, and press Enter.
If PIP is installed, we will receive a long notification explaining the program usage, all the available commands and options. Otherwise, if PIP is not installed, the output will be:
'pip' is not recognized as an internal or external command, operable program or batch file.
This is exactly the case when we have to manually install PIP on Windows.
Download PIP
Before installing PIP, we have to download the get-pip.py file. We can do this two ways:
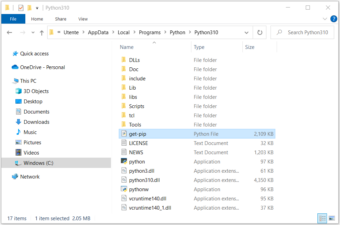
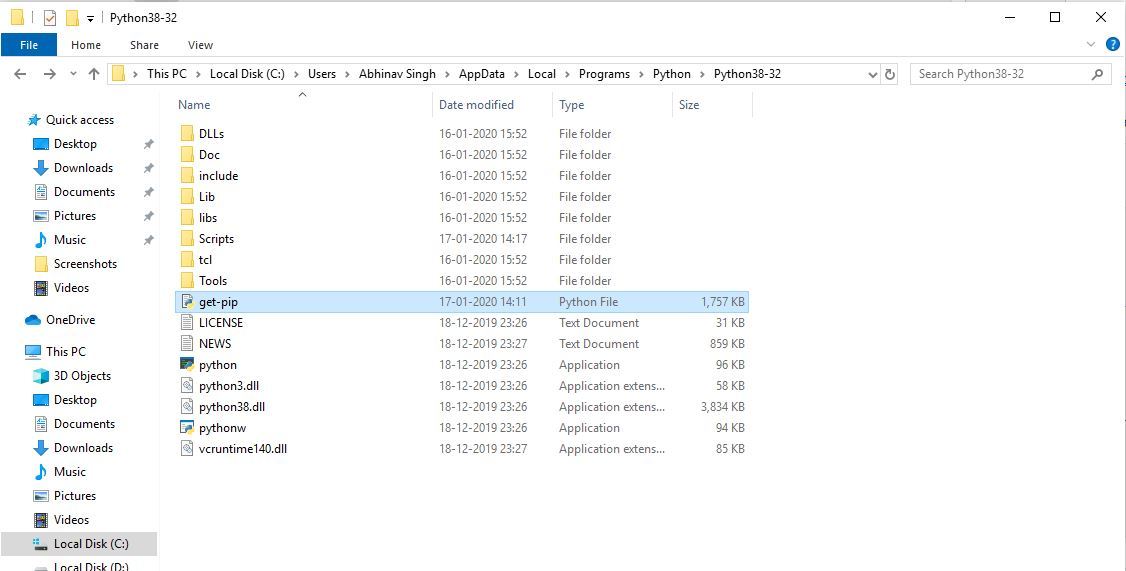
- Go to https://bootstrap.pypa.io/get-pip.py and save this file as
get-pip.pyin the same folder where Python is located.
By default, the Python installation is stored in the folderAppData. The entire path could look like the following:
C:\Users\User\AppData\Local\Programs\Python\Python310
The folder User can be called differently on a particular machine, and also the final folder in the above path depends on the version of Python. In our case – Python 3.10:
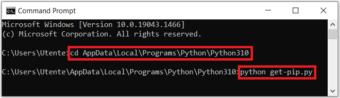
- Open the command line and navigate to the folder where Python is stored using the
cdcommand (see the previous point if you are not sure about Python’s location).
Now, run the following curl command:
curl https://bootstrap.pypa.io/get-pip.py -o get-pip.py

Install PIP on Windows
Now that we downloaded the get-pip.py file, we need to complete the followings steps.
- Open the command line
- Navigate to the folder where Python and the
get-pip.pyfile are stored using thecdcommand - Launch the installer by running the following command:
python get-pip.py
After a quick installation process, a message appears with all the details of the installation, and the final line appears as follows:
Successfully installed pip-22.0.1 wheel-0.37.1
PIP is now successfully installed on Windows.
Verify the PIP Installation Process and Check the PIP Version
To double-check if PIP has been installed properly and check its version, we need to run one of these commands in the command line:
pip --version
or
pip -V
If PIP is installed correctly, we will see a message indicating the version of PIP and its location on the local system, like the following:
pip 22.0.2 from C:\Users\Utente\AppData\Local\Programs\Python\Python310\lib\site-packages\pip (python 3.10).
If instead, an error is thrown, it is necessary to repeat the installation process.
Add PIP to Windows Environment Variables
To be able to run PIP without issues from any folder in the command line (rather than navigating every time to the folder where the PIP installer is stored, as we did earlier), we have to add the path to the folder with the get-pip.py file to Windows environment variables. This is especially important in that rare case when, we have installed several versions of Python, including old ones. In this situation, to avoid installing PIP separately for each old version of Python, we should install it only for one of them and then perform the following steps:
- Open
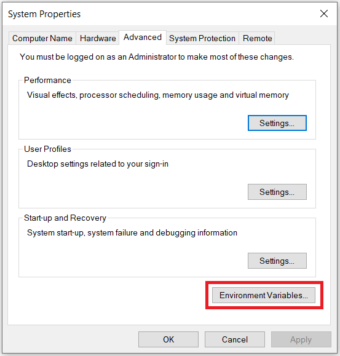
Control Panel(typing it in Windows search), selectSystem and Security, then selectSystem. - Go to the end of the opened window and select
Advanced system settings:

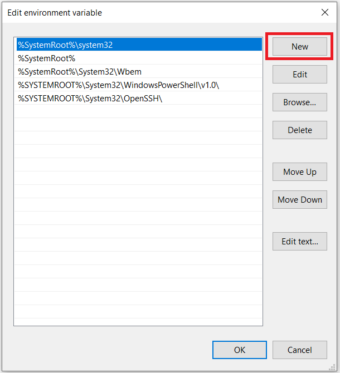
- Click
Environment Variables:
- In the
System variablessection, find and double-click the variablePath:
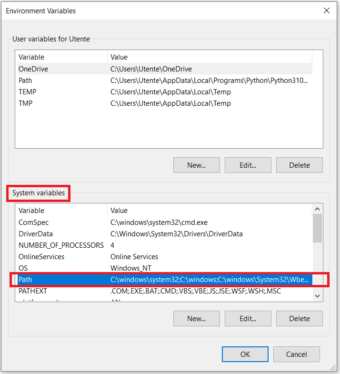
- Click
Newand add the path to the folder where the PIP installer is stored:
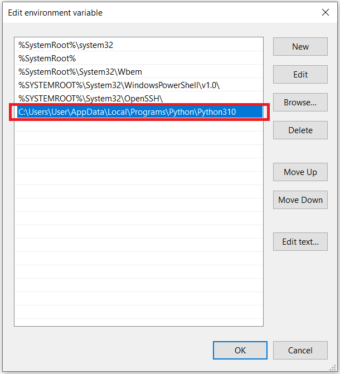
- Click
OKto confirm modifications.
Upgrade PIP on Windows
Sometimes, we may need to update PIP on Windows to the latest version to keep it up-to-date and working flawlessly. For this purpose, we can run the following command in the command line:
python -m pip install --upgrade pip
As a result, the old version of PIP will be uninstalled and the most recent release will be installed.
Downgrade PIP on Windows
We can also want to downgrade PIP to a specific older version. This operation may be necessary in certain cases, for example, if a new version works with some compatibility issues. To downgrade PIP on Windows, we need to open the command line and run a command with the following syntax:
python -m pip install pip==<version>
Let’s say, we want to downgrade it to v20.3. Then the exact command will be:
python -m pip install pip==20.3
After downgrading PIP, we can verify that we now have the necessary version of it by running python -V.
Conclusion
In this tutorial we covered various topics regarding the installation of PIP on Windows:
- How PIP works
- How to check if Python and PIP are already installed
- When it may be necessary to manually install PIP on Windows
- How to download and install PIP on Windows
- How to verify if PIP has been successfully installed and check its version
- How to configure PIP on Windows and when it may be necessary
- When and how to upgrade or downgrade PIP on Windows
Now that we have PIP properly installed on Windows, we can begin using it to manage Python libraries. Let’s start with running pip help in the command line and exploring the available commands and options for this program.
Prerequisite: Python Language Introduction
Before we start with how to install pip for Python on Windows, let’s first go through the basic introduction to Python. Python is a widely-used general-purpose, high-level programming language. Python is a programming language that lets you work quickly and integrate systems more efficiently.
PIP is a package management system used to install and manage software packages/libraries written in Python. These files are stored in a large “online repository” termed as Python Package Index (PyPI). pip uses PyPI as the default source for packages and their dependencies. So whenever you type:
pip install package_name
pip will look for that package on PyPI and if found, it will download and install the package on your local system.
Check if Python is installed
Run the following command to test if python is installed or not. If not click here.
python --version
If it is installed, You will see something like this:
Python 3.10.0
Download and Install pip
The PIP can be downloaded and installed using the command line by going through the following steps:
Method 1: Using cURL in Python
Curl is a UNIX command that is used to send the PUT, GET, and POST requests to a URL. This tool is utilized for downloading files, testing REST APIs, etc.
Step 1: Open the cmd terminal
Step 2: In python, a curl is a tool for transferring data requests to and from a server. Use the following command to request:
curl https://bootstrap.pypa.io/get-pip.py -o get-pip.py
python get-pip.py

Method 2: Manually install PIP on Windows
Pip must be manually installed on Windows. You might need to use the correct version of the file from pypa.io if you’re using an earlier version of Python or pip. Get the file and save it to a folder on your PC.
Step 1: Download the get-pip.py (https://bootstrap.pypa.io/get-pip.py) file and store it in the same directory as python is installed.
Step 2: Change the current path of the directory in the command line to the path of the directory where the above file exists.

Step 3: get-pip.py is a bootstrapping script that enables users to install pip in Python environments. Run the command given below:
python get-pip.py
Step 4: Now wait through the installation process. Voila! pip is now installed on your system.

Verification of the installation process
One can easily verify if the pip has been installed correctly by performing a version check on the same. Just go to the command line and execute the following command:
pip -V
or
pip --version

Adding PIP To Windows Environment Variables
If you are facing any path error then you can follow the following steps to add the pip to your PATH. You can follow the following steps to set the Path:
- Go to System and Security > System in the Control Panel once it has been opened.
- On the left side, click the Advanced system settings link.
- Then select Environment Variables.
- Double-click the PATH variable under System Variables.
- Click New, and add the directory where pip is installed, e.g. C:Python33Scripts, and select OK.
Upgrading Pip On Windows
pip can be upgraded using the following command.
python -m pip install -U pip
Downgrading Pip On Windows
It may happen sometimes that your pip current pip version is not supporting your current version of python or machine for that you can downgrade your pip version with the following command.
Note: You can mention the version you want to install
python -m pip install pip==17.0
Last Updated :
17 Apr, 2023
Like Article
Save Article