Bash has been one of the most well-known feature of Linux distributions, which due to its flexibility as well as ease of usage, made it popular among programmers. The Windows’ operating system’s command line interface, cmd.exe, on the other hand, lacked various capabilities of it’s Linux counterpart.
Microsoft, therefore, in their Anniversary Update, added several features to the Windows 10 OS, with bash being one of them. To install and use it on Windows 10, one need to perform the following steps :
- Start -> Settings -> Update&Security. Under the ‘Use Developer Features’, select ‘Developer mode’.

- Selecting the developer mode will pop the following alert. Click yes, and let the computer restart.


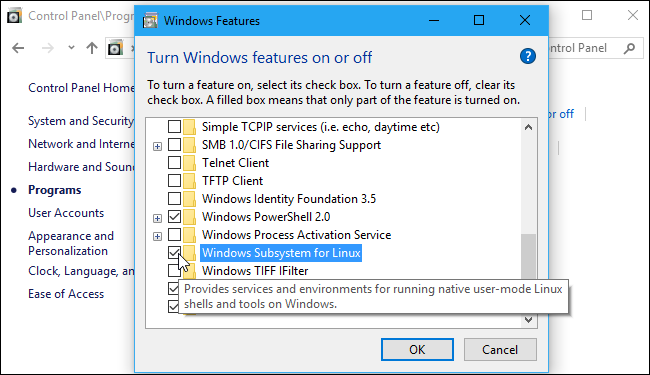
- Go to Control Panel -> Programs and Features -> Turn Windows Features On and Off. In the window that appears, check the ‘Windows Subsystem for Linux’ option, and click OK.

- This will trigger an alert asking for the system to be restarted to complete the installation of the required components. After the restart is complete, go to the command prompt, and type ‘bash’. Follow the instructions that appear to install bash from Windows store. After it is installed, it will be required to create a UNIX username. After completing the installation, exit the prompt.
- To access the shell, simply type ‘bash’ in the Windows command prompt, and everything is good to go.


Note that bash runs natively on Windows 10, which is different from using emulators like ‘cygwin’ for Windows which enabled GNU tools to run on unsupported Windows environment. Also, Linux subsystem for Windows 10 is only available on the 64-bit version of the OS.
Last Updated :
11 Jul, 2022
Like Article
Save Article
Уровень сложности
Простой
Время на прочтение
2 мин
Количество просмотров 5.7K
Для пользователя Linux командная строка Windows кажется чем-то непривычным и неудобным. С появлением WSL казалось, что проблема использования Bash решена, но запуск виртуальной машины требует времени, да и пути в WSL отличаются от Windows. Плюс скорость файловых операций на виртуальной машине хуже.
Ещё есть возможность использовать Bash через MSYS2, но мне хотелось найти что-то более компактное и легковесное, а также простое в настройке и установке.
Так как я часто использовал Linux на роутерах, то познакомился с BusyBox, набор UNIX-утилит командной строки, используемой в качестве основного интерфейса во встраиваемых операционных системах. Оказалось, есть версия BusyBox для Windows. В 2020 году появился Windows Terminal, а в нем есть возможность создавать вкладку с запуском конкретной программы.

Сложив эти два факта, пришла очевидная мысль, использовать BusyBox, содержащий в себе Bash, в Windows Terminal как отдельную консоль.

Для этого необходимо скачать BusyBox 64, и я, например положил файл в C:/Program Files/Busybox. А дальше создать новый профиль Windows Terminal и поменять его имя на Bash и указать команду для запуска как C:/Program Files/Busybox/busybox64.exe bash

У этого подхода был один минус, при запуске терминала не из конкретной папки, а из ярлыка на рабочем столе или из панели задач.

То адрес рабочей папки был C:/Windows/System32, и если случайно ввести команду удаления или создания файла, то мы портим важную системную папку. Обойти возможно используя аналог .bashrc или /etc/profile или .profile.

Но просто создать файл .profile мало, BusyBox для Windows их не считывает, для этого необходимо добавить путь к этому файлу в ENV в “Переменные среды”.

Теперь мы можем написать скрипт, который будет настраивать рабочую директорию при запуске консоли.
#!/bin/bash

domain=$(echo $PWD | tr '[:upper:]' '[:lower:]')

if [ $domain = "c:/windows/system32" ]; then
    cd $HOME
fi
Теперь если мы запустили терминал из ярлыка или панели задач, то рабочей директорией по умолчанию становится домашняя папка пользователя, а если мы запускаем из конкретной папки то, она и становится рабочей директорией.
Мы получили Bash в Windows Terminal с удобной начальной директорией.
In order to run natively, you will likely need to use Cygwin (which I cannot live without when using Windows). So right off the bat, +1 for Cygwin. Anything else would be uncivilized.
HOWEVER, that being said, I have recently begun using a combination of utilities to easily PORT Bash scripts to Windows so that my anti-Linux coworkers can easily run complex tasks that are better handled by GNU utilities.
I can usually port a Bash script to Batch in a very short time by opening the original script in one pane and writing a Batch file in the other pane. The tools that I use are as follows:
- UnxUtils (http://sourceforge.net/projects/unxutils/)
- Bat2Exe (http://bat2exe.net/)
I prefer UnxUtils to GnuWin32 because of the fact that [someone please correct me if I’m wrong] GnuWin utils normally have to be installed, whereas UnxUtils are standalone binaries that just work out-of-the-box.
However, the CoreUtils do not include some familiar *NIX utilities such as cURL, which is also available for Windows (curl.haxx.se/download.html).
I create a folder for the projects, and always SET PATH=. in the .bat file so that no other commands other than the basic CMD shell commands are referenced (as well as the particular UnxUtils required in the project folder for the Batch script to function as expected).
Then I copy the needed CoreUtils .exe files into the project folder and reference them in the .bat file such as «.\curl.exe -s google.com», etc.
The Bat2Exe program is where the magic happens. Once your Batch file is complete and has been tested successfully, launch Bat2Exe.exe, and specify the path to the project folder. Bat2Exe will then create a Windows binary containing all of the files in that specific folder, and will use the first .bat that it comes across to use as the main executable. You can even include a .ico file to use as the icon for the final .exe file that is generated.
I have tried a few of these type of programs, and many of the generated binaries get flagged as malware, but the Bat2Exe version that I referenced works perfectly and the generated .exe files scan completely clean.
The resulting executable can be run interactively by double-clicking, or run from the command line with parameters, etc., just like a regular Batch file, except you will be able to utilize the functionality of many of the tools that you will normally use in Bash.
I realize this is getting quite long, but if I may digress a bit, I have also written a Batch script that I call PortaBashy that my coworkers can launch from a network share that contains a portable Cygwin installation. It then sets the %PATH% variable to the normal *NIX format (/usr/bin:/usr/sbin:/bin:/sbin), etc. and can either launch into the Bash shell itself or launch the more-powerful and pretty MinTTY terminal emulator.
There are always numerous ways to accomplish what you are trying to set out to do; it’s just a matter of combining the right tools for the job, and many times it boils down to personal preference.
Are you a Windows 10 user who’s interested in learning how to use the Bash command line? Bash is the de facto standard for command line interfaces, and it’s available on Windows 10 as part of their Linux subsystem. If you’re a Windows 10 user and you want to harness the power of Bash, then you’re in the right place! In this guide, you’ll learn all the basics of using Bash on Windows 10, from installation to writing your first Bash script. By the end, you’ll be able to use Bash to perform all sorts of command line tasks on your Windows 10 machine. So let’s get started!
Bash on Windows 10: Bash is a Linux-based command line (shell) environment. It can be used to perform various tasks such as managing files and running software. Windows 10 includes a Linux subsystem that can be used to run Bash. To use it, open the Start menu and search for ‘Bash’. Select the ‘Bash on Ubuntu on Windows’ option to launch the environment. Once launched, you can use it as you would in a Linux environment. You can use the same commands as you would in Linux, such as ls for listing files and directories, cd for changing directories, and so on.

What is Bash?
Bash is a Unix shell and command language written by Brian Fox for the GNU Project as a free software replacement for the Bourne shell. It is widely used as the default shell in most Linux distributions and macOS. Bash is a powerful programming language, one perfectly designed for use on the command line and in shell scripts.
Bash can be used for a wide variety of tasks such as writing simple scripts, performing advanced file manipulation, and automating various system administration tasks. It can also be used to create powerful command-line interfaces for programs written in other languages.
Installing Bash on Windows 10
Microsoft has made it much easier to use the Bash shell on Windows 10. The Windows Subsystem for Linux (WSL) allows users to run a Linux environment directly on Windows 10 without the overhead of a virtual machine.
To install Bash on Windows 10, you must first enable the Windows Subsystem for Linux feature. This can be done through the Windows Features screen. Once the feature is enabled, you can use the Microsoft Store to install the version of Bash you want to use.
Using Bash on Windows 10
Once Bash is installed on Windows 10, you can access it from the command line. To do this, open the Start menu and type “bash” into the search box. This will open the Bash shell. From here, you can use the same commands you would in a Linux environment.
Bash scripts can also be used on Windows 10. To execute a script, type “bash scriptname.sh” at the Bash prompt. This will execute the script in the same way it would be executed in a Linux environment.
Using Bash Commands on Windows 10
Bash commands can be used on Windows 10 to perform a variety of tasks. For example, the “ls” command can be used to list the contents of a directory. The “cd” command can be used to change the current working directory. And the “cat” command can be used to view the contents of a file.
Using Bash Scripts on Windows 10
Bash scripts can be used on Windows 10 just as they can be used in a Linux environment. To execute a script, type “bash scriptname.sh” at the Bash prompt. This will execute the script in the same way it would be executed in a Linux environment.
Bash scripts can be used to automate a variety of tasks such as file manipulation and system administration. They can also be used to create powerful command-line interfaces for programs written in other languages.
Using Bash on Windows 10 for Development
Bash can also be used for development tasks on Windows 10. For example, Bash can be used to compile and build programs written in other languages such as C and C++. It can also be used to manage projects and dependencies with tools such as Git.
Bash can also be used for web development tasks such as running a local web server or deploying applications to a server. It can also be used to manage databases and process data with tools such as MySQL and PostgreSQL.
Conclusion
Bash is a powerful shell and command language that can be used on Windows 10 to perform a variety of tasks. It can be used to run commands, execute scripts, and automate system administration tasks. It can also be used for development tasks such as compiling programs and managing projects.
Few Frequently Asked Questions
What is Bash?
Bash is a command-line shell and scripting language designed for Linux and UNIX-like operating systems. It is the default shell for Unix-based systems and is widely used by developers and system administrators. Bash is a powerful tool that allows users to interact with their computer by typing commands directly into the terminal. Bash is also used to create shell scripts that automate commonly used tasks.
What is Windows 10 Bash?
Windows 10 Bash is a feature that was added to the Windows 10 operating system in the Anniversary update. It allows users to access a Bash shell environment from within Windows. This environment provides users with access to many of the same command-line tools and utilities that are available on Linux and UNIX operating systems. It also provides Windows users with the ability to run shell scripts written for Linux and UNIX systems.
How do I enable Windows 10 Bash?
To enable Windows 10 Bash, you will need to first open the Settings menu. From there, select Update & Security > For Developers > Developer Mode. Once you have enabled the Developer Mode, you will need to open the Windows Features menu and turn on the Windows Subsystem for Linux (Beta). This will install the necessary components for Bash to run on your system.
What is the difference between Windows 10 Bash and Linux Bash?
Windows 10 Bash is a version of the Linux Bash shell that has been optimized to run on Windows 10. It is based on the same code as the Linux Bash shell, but it has been modified to work better with Windows 10’s filesystem and other features. While the commands and syntax are the same, some of the features may work differently in Windows 10 Bash than in the Linux Bash shell.
How do I run Bash scripts on Windows 10?
Once Windows 10 Bash is enabled, you can run Bash scripts in the same way as you would on a Linux or UNIX system. To do this, open the Windows 10 Bash shell by typing “bash” in the command line. Once in the Bash shell, you can run your script by typing “./”.
Are there any limitations when using Windows 10 Bash?
Yes, there are a few limitations when using Windows 10 Bash. For example, some Linux-based programs may not work in Windows 10 Bash, and some Bash commands may not work as expected. Additionally, the Windows 10 Bash environment does not support some of the more advanced functionality that is available on Linux and UNIX systems.
How to Run Linux/Bash on Windows 10 | Windows 10 Bash & Linux Subsystem Setup
Using Bash on Windows 10 is an incredibly powerful tool that can help streamline and automate your workflows. Whether you’re a developer, a system administrator, or a student, Bash can help you get your tasks done more efficiently. With its wide array of commands and its ability to access the Windows Subsystem for Linux, Bash is a great addition to any Windows 10 user’s arsenal. With a little practice, you’ll be a Bash pro in no time.
Quick Links
- What You Need to Know About Windows 10’s Bash Shell
- How to Install Bash on Windows 10
- How to Use The Bash Shell and Install Linux Software
- Bonus: Install the Ubuntu Font for a True Ubuntu Experience
Key Takeaways
First, enable the Windows Subsystem for Linux (WSL) from the Features window or via the «wsl —install» command. After rebooting your PC, install Ubuntu or any other Linux distribution of your choice from the Microsoft Store.
The Windows Subsystem for Linux, introduced in the Anniversary Update, became a stable feature in the Fall Creators Update. You can now run Ubuntu, openSUSE, a remix of Fedora, and plenty of others on Windows, with more Linux distributions coming soon.
What You Need to Know About Windows 10’s Bash Shell
How Windows Subsystem for Linux 1 (WSL1) Works
Windows 10 offers a full Windows Subsystem intended for Linux (WSL) for running Linux software. This isn’t a virtual machine, a container, or Linux software compiled for Windows (like Cygwin). It’s based on Microsoft’s abandoned Project Astoria work for running Android apps on Windows.
Think of it as the opposite of Wine. While Wine allows you to run Windows applications directly on Linux, the Windows Subsystem for Linux allows you to run Linux applications directly on Windows.
Microsoft worked with Canonical to offer a full Ubuntu-based Bash shell environment that runs atop this subsystem. Technically, this isn’t Linux at all. Linux is the underlying operating system kernel, and that isn’t available here. Instead, this allows you to run the Bash shell and the exact same binaries you’d normally run on Ubuntu Linux. Free software purists often argue the average Linux operating system should be called «GNU/Linux» because it’s really a lot of GNU software running on the Linux kernel. The Bash shell you’ll get is really just all those GNU utilities and other software.
While this feature was originally called «Bash on Ubuntu on Windows,» it also allows you to run Zsh and other command-line shells. It now supports other Linux distributions, too. You can choose openSUSE Leap or SUSE Enterprise Server instead of Ubuntu, and there is a remix of Fedora available.
There are some limitations here. It won’t officially work with graphical Linux desktop applications. Not every command-line application works, either, as the feature isn’t perfect.
How Windows Subsystem for Linux 2 (WSL2) Works
Windows Subsystem for Linux 2 (WSL2) is designed to provide the exact same user experience as its predecessor, but the similarities mostly end there.
WSL2 runs a full Linux Kernel in an extremely efficient virtual machine. Just like WSL1, WSL2 allows you use a range of different Linux Distros including, Ubuntu, Debian, Kali, openSUSE, Fedora, and others. That also means that most any Linux application, package, or command will work without an issue.
WSL2 supports GUI applications on Windows 11.
How to Install Bash on Windows 10
This feature doesn’t work on the 32-bit version of Windows 10, so ensure you’re using the 64-bit version of Windows. It’s time to switch to the 64-bit version of Windows 10 if you’re still using the 32-bit version, anyway.
Assuming you have 64-bit Windows, to get started, head to Control Panel > Programs > Turn Windows Features On Or Off. Enable the «Windows Subsystem for Linux» option in the list, and then click the «OK» button.
Click «Restart now» when you’re prompted to restart your computer. The feature won’t work until you reboot.
Starting with the Fall Creators Update, you no longer have to enable Developer Mode in the Settings app to use this feature. You just need to install it from the Windows Features window.
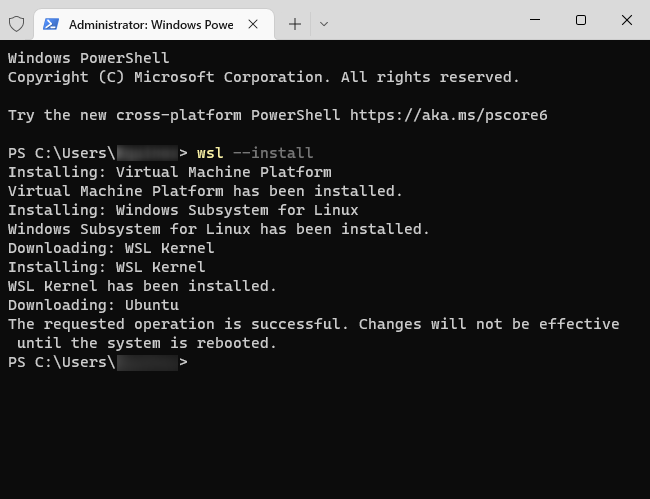
Alternatively, you can also install it using PowerShell. Launch PowerShell as an Administrator, then enter:
wsl --install
It’ll take a few minutes to download and install all of the required components — after it does, you need to restart your computer.
After your computer restarts, open the Microsoft Store from the Start menu, and search for «Linux» in the store.
Starting with the Fall Creators Update, you can no longer install Ubuntu by running the «bash» command. Instead, you have to install Ubuntu or another Linux distribution from the Store app or using the wsl --install -d <Distribution> command.
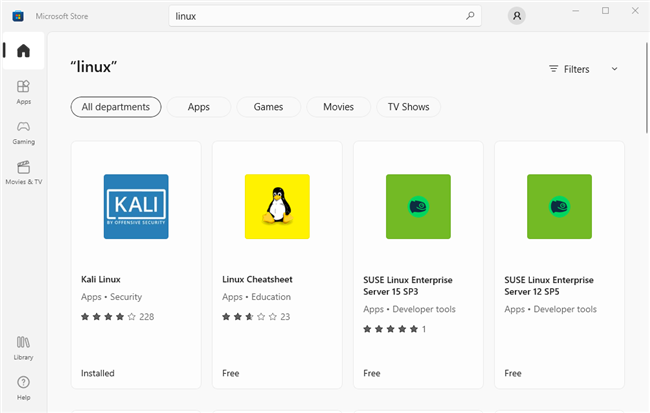
You’ll see a list of every Linux distribution currently available in the Windows Store. As of the Fall Creators Update, this includes Ubuntu, openSUSE Leap, and openSUSE Enterprise, with a promise that Fedora will arrive soon.
Debian, Kali, and a remix of Fedora are now available in the Store. Search for «Debian Linux,» «Kali Linux,» or «Fedora Linux» to find and install them.
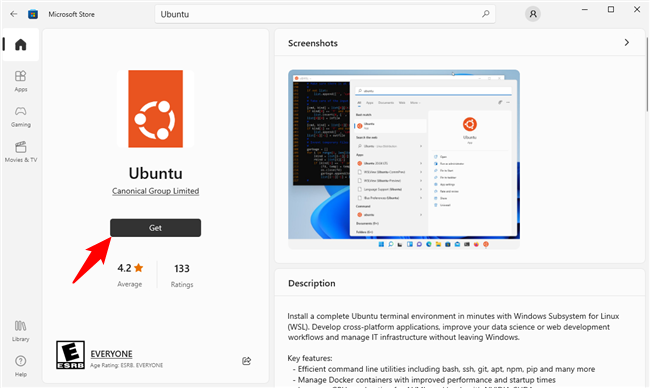
To install a Linux distribution, click it, and then click the «Get» or «Install» button to install it like any other Store application.
If you’re not sure which Linux environment to install, we recommend Ubuntu. This popular Linux distribution was previously the only option available, but other Linux systems are now available for people who have more specific needs.
You can also install multiple Linux distributions and they’ll each get their own unique shortcuts. You can even run multiple different Linux distributions at a time in different windows.
How to Use The Bash Shell and Install Linux Software
You now have a full command-line bash shell based on Ubuntu, or whatever other Linux distribution you installed.
Because they’re the same binaries, you can use Ubuntu’s apt or apt-get command to install software from Ubuntu’s repositories if you’re using Ubuntu. Just use whatever command you’d normally use on that Linux distribution. You’ll have access to all the Linux command line software out there, although some applications may not yet work perfectly.
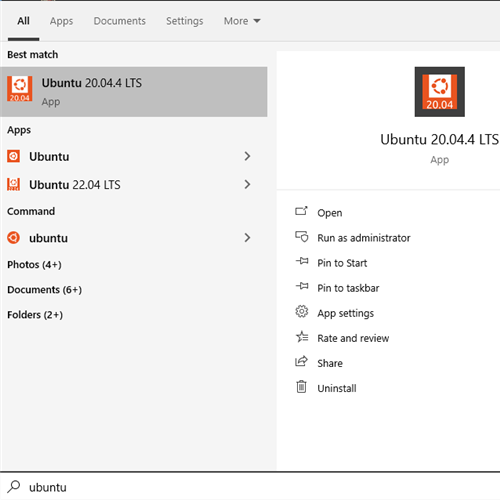
To open the Linux environment you installed, just open the Start menu and search for whatever distribution you installed. For example, if you installed Ubuntu, launch the Ubuntu shortcut.
You can pin this application shortcut to your Start menu, taskbar, or desktop for easier access.
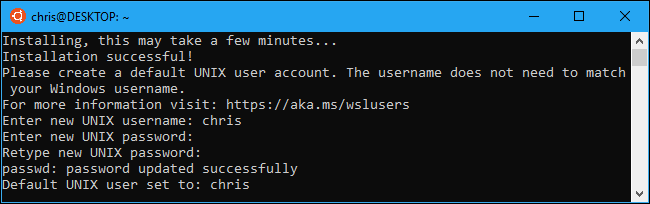
The first time you launch the Linux environment, you’re be prompted to enter a UNIX username and password. These don’t have to match your Windows username and password, but will be used within the Linux environment.
For example, if you enter «bob» and «letmein» as your credentials, your username in the Linux environment will be «bob» and the password you use inside the Linux environment will be «letmein» — no matter what your Windows username and password are.
You can launch your installed Linux environment by running the wsl command. If you have multiple Linux distributions installed, you can choose the default Linux environment this command launches.
If you have Ubuntu installed, you can also run the ubuntu command to install it. For openSUSE Leap 42, use opensuse-42 . For SUSE Linux Enterprise Sever 12, use sles-12 . These commands are listed on each Linux distribution’s page on the Windows Store.
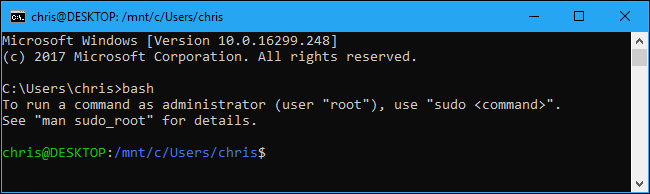
You can still launch your default Linux environment by running the bash command, but Microsoft says this is deprecated. This means the bash command may stop functioning in the future.
If you’re experienced using a Bash shell on Linux, Mac OS X, or other platforms, you’ll be right at home.
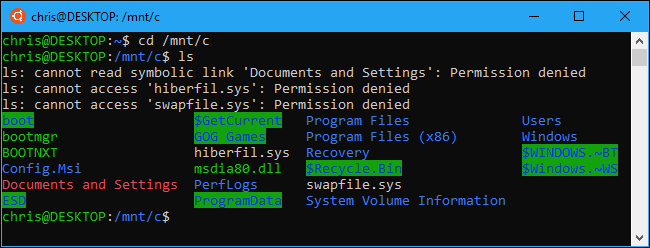
On Ubuntu, you need to prefix a command with sudo to run it with root permissions. The «root» user on UNIX platforms has full system access, like the «Administrator» user on Windows. Your Windows file system is located at /mnt/c in the Bash shell environment.
Use the same Linux terminal commands you’d use to get around. If you’re used to the standard Windows Command Prompt with its DOS commands, here are a few basic commands common to both Bash and Windows:
- Change Directory:
cdin Bash,cdorchdirin DOS - List Contents of Directory:
lsin Bash,dirin DOS - Move or Rename a File:
mvin Bash,moveandrenamein DOS - Copy a File:
cpin Bash,copyin DOS - Delete a File:
rmin Bash,delorerasein DOS - Create a Directory:
mkdirin Bash,mkdirin DOS - Use a Text Editor:
viornanoin Bash,editin DOS
It’s important to remember that, unlike Windows, the Bash shell and its Linux-imitating environment are case-sensitive. In other words, «File.txt» with a capital letter is different from «file.txt» without a capital.
For more instructions, consult our beginner’s guide to the Linux command-line and other similar introductions to the Bash shell, Ubuntu command line, and Linux terminal online.

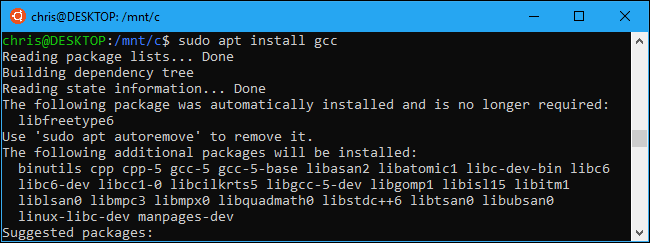
You’ll need to use the apt command to install and update the Ubuntu environment’s software. Be sure to prefix these commands with sudo , which makes them run as root—the Linux equivalent of Administrator. Here are the apt-get commands you’ll need to know:
- Download Updated Information About Available Packages:
sudo apt update - Install an Application Package:
sudo apt install packagename(Replace «packagename» with the package’s name.) - Uninstall an Application Package:
sudo apt remove packagename(Replace «packagename» with the package’s name.) - Search for Available Packages:
sudo apt search word(Replace «word» with a word you want to search package names and descriptions for.) - Download and Install the Latest Versions of Your Installed Packages:
sudo apt upgrade
If you installed a SUSE Linux distribution, you can use the zypper command to install software instead.
After you’ve downloaded and installed an application, you can type its name at the prompt, and then press Enter to run it. Check that particular application’s documentation for more details.
Bonus: Install the Ubuntu Font for a True Ubuntu Experience
If you want a more accurate Ubuntu experience on Windows 10, you can also install the Ubuntu fonts and enable them in the terminal. You don’t have to do this, as the default Windows command prompt font looks pretty good to us, but it’s an option.
Here’s what it looks like:
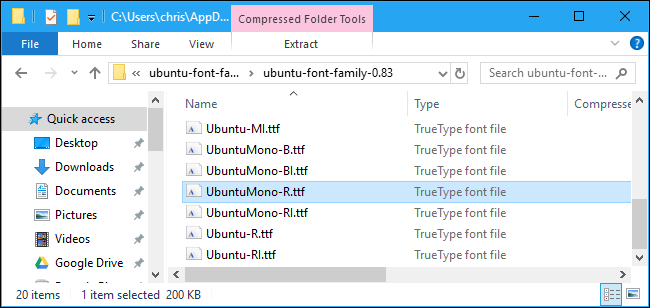
To install the font, first download the Ubuntu Font Family from Ubuntu’s website. Open the downloaded .zip file and locate the «UbuntuMono-R.ttf» file. This is the Ubuntu monospace font, which is the only one used in the terminal. It’s the only font you need to install.
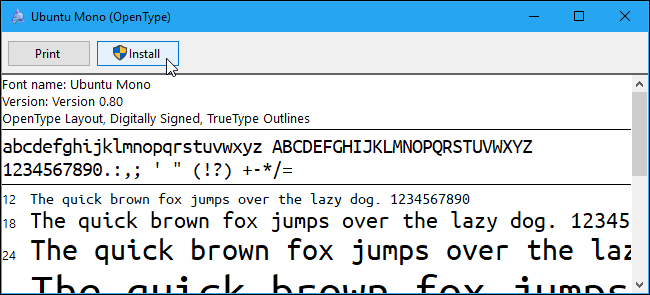
Double-click the «UbuntuMono-R.ttf» file and you’ll see a preview of the font. Click «Install» to install it to your system.
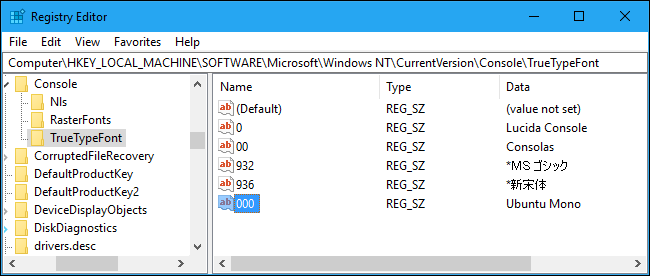
To make the Ubuntu monospace font become an option in the console, you’ll need to add a setting to the Windows registry.
Open a registry editor by pressing Windows+R on your keyboard, typing regedit , and then pressing Enter. Navigate to the following key or copy and paste it into the Registry Editor’s address bar:
HKEY_LOCAL_MACHINE\SOFTWARE\Microsoft\Windows NT\CurrentVersion\Console\TrueTypeFont
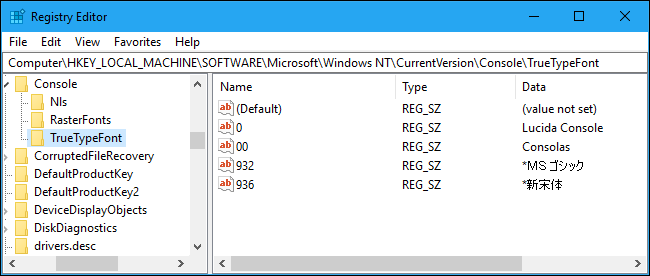
Right-click in the right pane and select New > String Value. Name the new value 000 .
Double-click the «000» string you just created, and then enter Ubuntu Mono as its value data.
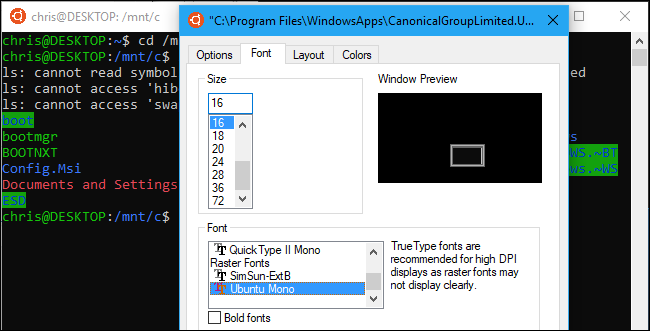
Launch an Ubuntu window, right-click the title bar, and then select the «Properties» command. Click the «Font» tab, and then select «Ubuntu Mono» in the font list.
Software you install in the Bash shell is restricted to the Bash shell. You can access these programs from the Command Prompt, PowerShell, or elsewhere in Windows, but only if you run the bash -c command.