Java is a high-level, robust, object-oriented, and secure programming language that was developed in the year 1995 by Sun Microsystems (which is now part of Oracle group), and James Gosling is known as the father of Java. It is a general-purpose programming language intended to let programmers write once, and run anywhere, meaning that compiled Java code is compatible to run on all platforms that support Java without the need to recompile which is a major advantage.
Java Update
Java Update is a feature that keeps your windows computer up to date with the latest Java releases. You can use Java’s update feature to manually force an available update on windows. But, when you have auto update enabled, your system periodically checks for new versions of Java and updates it automatically.
Auto Update in Java
We can get the auto-update feature in Java
First, you need to check whether the windows check for update automatically you can do this by following the steps:
- Open the start by clicking on the windows logo on the bottom left side of the screen, and the start menu will pop up.
- Now type configures Java and clicks on configure Java option from the list of matching programs, this will open Java control panel.
- Once Java Control Panel is launched click on the update tab to access settings.
- Select the Check for Updates Automatically check box for enabling Java updates to check for updates automatically.
Now, whenever an update is available you will receive a notification asking your permission to download the update, and a tooltip balloon appears on your Windows desktop. To install the new update, click on the notification dialog.
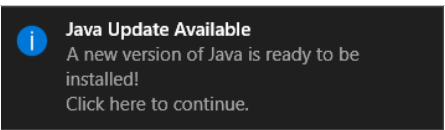
Update Notification for Java
Now an Update Available dialog appears. To start the installation, click Update. Otherwise, you can click Later to install the update at a later time. When the installation is complete a dialog appears where you can click Finish to complete the installation.
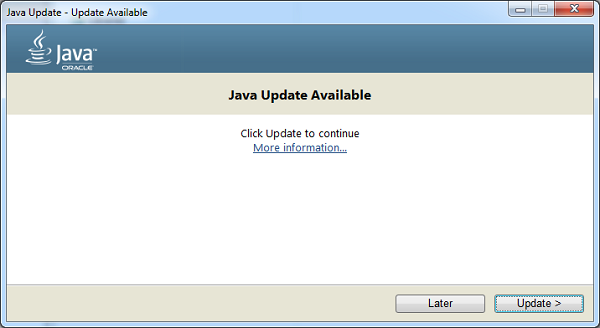
An update Available dialog box
Using the Update Schedule, you can change the frequency for updates accordingly: daily, weekly, or monthly (default). To do this follow the given steps:
- From the Java Control panel click on the Update tab, then select Advanced, now the Automatic Update Advanced Settings dialog will appear.
- Here you can change the frequency and the date and time for the Java Update, finally click OK.
Java Update scheduler will check for newer Java updates and notify you at the scheduled frequency.
Java Manual Update
1. Open the Start option by clicking the Windows logo in the bottom-left corner of the screen. The Start menu will pop up.
.png)
Main Screen with start option
2. Type in configure java in the search box and searches for matching programs will be displayed.
.png)
List of matches
3. Click on configure java option from the list of matching programs and the Java Control Panel will open.
.png)
Java Control Panel
4. Click on the update option in the Java control panel and then click on the Update now option at the bottom-right corner of the window and this initiates the Java to look for new updates.
.png)
Java Control Panel after clicking on the Update tab
5. If Java finds an available update, follow any on-screen prompts that appear to confirm the update, then allow your computer to install the latest version of Java.
You cannot update to a new version of Java if you receive a dialog box saying that you are already running the latest version of Java.
.png)
This notification appears when you are using the latest Java version
Finally, if you are not sure about the Java version then go to the official link to update to the latest version.
Last Updated :
02 Jan, 2023
Like Article
Save Article
This wikiHow teaches you how to update Java on your Windows PC using Internet Explorer or the Java application in the Start menu.
-

1
Navigate to https://java.com/en/download/win10.jsp Internet Explorer. The plugin required to update an existing Java installation requires Internet Explorer to run.[1]
You’ll find it in the All Apps section of the Windows/Start menu.[2]
-
2
Tap Agree and Continue. It’s the red button at the center of the screen. A pop-up will appear.
-
3
Click Run. The site will now check your current version. If it’s time to upgrade, you’ll see a message that says “A newer version of Java is available.” If you don’t see this message, there’s no need to update Java now.
-
4
Click Download Java Now.
-
5
Click Agree and Start Free Download. A welcome message will appear.
-
6
Click Install to install Java to the default location. If you want to install Java to a different folder, check the box next to “Change destination folder” and choose a location first.
-
7
Select the current Java version and click Uninstall. Out-of-date installations may present a security risk.
-
8
Click Next. You should see a confirmation message appear.
-
9
Click Close. Your version of Java is now up-to-date.
- To verify that your update is complete, return to https://www.java.com/en/download/installed.jsp, select Agree and Continue, then click Run. You should see a message that says you’re using the most recent version of Java.


-
1
Click the
menu. It’s usually at the bottom-left corner of the screen.
-
2
Click All Apps. If you already see a list of your applications you can skip this step.
-
3
Scroll down and click the down-arrow next to “Java.” This expands the menu.
-
4
Click Check for Updates.
-
5
Click Update Now. If there is an update available, you will now be prompted to install it.
-
6
Follow the prompts to complete the installation. Once the installation is complete, you’ll see a confirmation message informing you that your version of Java is now up-to-date.


Ask a Question
200 characters left
Include your email address to get a message when this question is answered.
Submit
References
About this article
Thanks to all authors for creating a page that has been read 1,209 times.
Is this article up to date?
Java update mechanism could be different on Windows 10 depending on your needs:
- If you want to update from one major version of Java to another one, e.g. from Java 8 to Java 11 – you need to uninstall an old version and install a new one.
- If you want to update a minor version of Java – keep reading
Update Java 11 and newer
It’s recommended to use Windows 10 auto-update mechanism to update Java. Just install Windows updates from time to time and your Java version will be actual.
Since the 9th version, Java Control Panel was deprecated and in the 11th it was completely removed. So we can’t use it anymore for updates. One more possible option is to download and install a new version of Java from scratch.
Update Java before 11 release
Open Start menu and search for “Java”:

Launch Check For Updates – this will open Java Control Panel on Update tab:

Press Check Now – If new Java version is available installation will start:

Press “Update” to update to a new Java:

So Java upgrade is successfully installed.

![]()
Download Article
![]()
Download Article
This wikiHow teaches you how to update Java on your computer. Although Java will usually update itself when possible, you can use Java’s update feature to force an available update on Windows and Mac computers.
-
1
Open Start
. Click the Windows logo in the bottom-left corner of the screen. The Start menu will pop up.
-
2
Type in configure java. Doing so searches for matching programs.
Advertisement
-
3
Click Configure Java. It’s at the top of the list of matching programs. Doing so opens the Java control panel.
-
4
Click the Update tab. This is at the top of the Java control panel window.
-
5
Click Update Now. You’ll find this button in the bottom-right corner of the window. Doing so prompts Java to begin looking for an update.
-
6
Allow Java to update. If Java finds an available update, follow any on-screen prompts to confirm the update, then allow your computer to install the latest version of Java.
- If you receive a message that says you’re already running the latest version of Java, you can’t update Java.


Advertisement
-
1
Open the Apple menu
. Click the Apple logo in the top-left corner of the screen. A drop-down menu will appear.
-
2
Click System Preferences…. It’s in the drop-down menu. The System Preferences window will open.
-
3
Click Java. This coffee cup-shaped icon should be at the bottom of the System Preferences window, though you may need to scroll down.
- If you don’t see the Java option in System Preferences, skip to the last step in this method.
-
4
Click the Update tab. You’ll find it at the top of the window.
-
5
Click Update Now. This is on the lower-right side of the window.
-
6
Click Install Update when prompted. It’s in the bottom-right corner of the window.[1]
- If you receive a message that says you’re already running the latest version of Java, you can’t update Java.
-
7
Allow Java to update. Java will retrieve the update and begin downloading the most recent version of Java.
- You may be prompted to enter your Mac’s password at some point in the update process. If so, enter your password, then press ⏎ Return.
-
8
Download the most recent version of Java. If you couldn’t find the Java entry in the System Preferences window, you can update Java by reinstalling it:
- Go to https://www.java.com/en/ in your computer’s web browser.
- Click the red Free Java Download button.
- Click Agree and Start Free Download.
- Double-click the downloaded Java DMG file.
- Drag the Java logo onto the «Applications» folder icon in the window that opens.
- Follow the on-screen installation prompts.


Advertisement
Add New Question
-
Question
My computer is giving errors when I try to update java.

Try shutting the computer down for a few minutes then boot it back up.
Ask a Question
200 characters left
Include your email address to get a message when this question is answered.
Submit
Advertisement
-
Java will usually update automatically, but manually installing an update as indicated in this article can help speed up the update process.
-
Installing the latest version of Java will replace your current version with the updated Java installation.
Thanks for submitting a tip for review!
Advertisement
-
If you receive a Java update pop-up window on a random page in your browser, close the page and attempt to update Java as outlined in this article rather than using the pop-up. Some pages will use fake update messages to get you to install a virus.
Advertisement
About This Article
Thanks to all authors for creating a page that has been read 110,678 times.
Is this article up to date?
Like every other software, Java releases regular updates to fix bugs, improve performance, and add new features.
And if you want to adopt new features in the language, you must update Java to its latest version.
Updating Java is easy and takes just a few minutes. This blog will provide a step-by-step guide to updating Java on Windows.
So, let’s get started!
Update Java on Windows
Before you update Java on Windows, check which version you currently use.
Open the command prompt and run the command:
java --versionThis displays the current Java version on my Windows.

The output will depend on the Java version you have installed on your computer.
As you can see, I have Java 17.0.1. Updating Java may require a different approach, depending on the version you want to update.
Update to the major Java version
To update Java 17 to Java 18, you must uninstall Java 17 and install Java 18.
Update to a minor Java version
To update Java 17.0.1 to Java 17.0.5, you can make Java itself check and update to the latest minor version for you.
Let’s discuss each approach in brief.
Update to the Major Java Version
You can update the major Java version in two steps:
1. Uninstall the old Java version
Open the Start menu and search for Apps and Features.

Open it, and you will get a list of applications on your computer.

Search for the Java SE Development Kit and uninstall it. If you see the Java application on this list, uninstall it as well.
And you are done.
Now it’s time to install the new Java version you are updating.
2. Install the new Java version
The easy way to install Java in Windows is to install the Java installer from the official site.
Go to Oracle, and go to the Windows section.

Make sure you navigate to the Java version of your choice. Once you reach this page, download the Installer.
Once the download is complete, open the installation file. The prompt will ask for permission and lead you to the installation.
After a few easy steps, Java will download on your computer.
To check if the installation was successful, run the command again
java --versionThis is the output in my command prompt.

As I’ve successfully installed Java 19, the command prompt shows the Java version installed on your system.
To get a detailed guide, visit How to Install Java?
Update to a Minor Java Version
You do not need to uninstall and reinstall anything to update a minor Java version.
You can update by simple, easy steps. Open the start button and search for Java. You will find the Check For Updates options. Launch it.

This will open the Java Control Panel. There you will find Update Now button.

Click it to check if any new minor Java version is available. If the update is available, it will be installed automatically.
This is how you update a minor Java version on Windows.
Frequently Asked Questions
1. How do I update my current version of Java?
You can update the current Java version on Windows in the following steps:
1. Search for Java in the Start menu and open «Click For Update» to open the Java prompt
2. Go to the «Update Now» button and press «Ok».
This will check for Java updates and install the new version if available. For example, if you have Java 17.0.1, it will update to the latest version of Java 17, which could be Java 17.0.5.
However, to update to the major Java version, let’s say, from Java 17 to Java 19, you need to follow a different approach.
First, you must uninstall Java 17 from your system before you install Java19 from the official Oracle site.
2. Which is the latest version of Java?
Java 19.0.1 is the latest version of Java.
3. How to install Java 11?
To install Java 11, go to Oracle’s official site and download Java 11 installer. After that, run the installation file, follow the prompt, and Java will be installed on your system.
For a detailed guide, visit How to install Java?
Subscribe to Programiz PRO Blog!
Be the first to receive the latest tutorial from Programiz by signing up to our email subscription. Also more bonus like inside looks on the latest feature and many more.