Windows Subsystem for Linux (WSL) allows you to completely remove any Linux distribution (for example, Ubuntu, Kali, Mint, and Debian) in at least three ways, whether you are on Windows 11 or Windows 10.
Since Linux distros are available through the Microsoft Store, they are considered applications, which means you can use the Settings app and the Windows Package Manager (winget) command to uninstall any distribution.
You can also use the --unregister option with the wsl.exe tool, but it only resets the Linux instance without deleting the files. However, this command would remove a distribution you restored from the backup.
This guide will teach you how to uninstall any Linux distribution on Windows 11 or 10.
- Remove Linux distro on WSL from Settings
- Remove Linux distro on WSL from Command Prompt or PowerShell
- Remove imported Linux distro on WSL with commands
Remove Linux distro on WSL from Settings
Whether you have Windows 11 or Windows 10, the steps to use the Settings app to remove a Linux distro would be slightly different.
Uninstall WSL distro on Windows 11
To completely remove a Linux distro on WSL, use these steps:
-
Open Settings on Windows 11.
-
Click on Apps.
-
Click the Installed apps page.
Quick note: On version 21H2, the page’s name was “Apps & features.”
-
Select the Linux distro, open the menu (three-dotted button) on the right side, and choose the “Uninstall” option.

-
Click the Uninstall option again.

Once you complete the steps, the Linux instance and the distribution will be removed from Windows 11.
Uninstall WSL distro on Windows 10
To uninstall a distro on Windows 10, use these steps:
-
Open Settings.
-
Click on Apps.
-
Click on Apps & features.
-
Select the Linux distro and click the Uninstall button.

-
Click the Uninstall button again.

After you complete the steps, the Ubuntu, Kali, Mint, Debian, or the specific distribution will no longer be available on Windows 10
Remove Linux distro on WSL from Command Prompt or PowerShell
To remove any WSL distribution with commands on Windows 11 or 10, use these steps:
-
Open Start.
-
Search for Command Prompt (or PowerShell), right-click the top result, and select the Run as administrator option.
-
Type the following command to list all the apps installed on Windows 11 and press Enter:
winget uninstall

-
Type the following command to remove the Linux distro (Ubuntu, Debian, Kali, Mint, etc.) and press Enter:
winget uninstall --id "DISTRO-ID-NAME"
In the command, specify the name of the Linux distro to remove from Windows 11 completely. For example, this command removes the Ubuntu distro:
winget uninstall --id Canonical.Ubuntu


Once you complete the steps, the instance and distribution files will be removed from your computer.
Remove imported Linux distro on WSL with commands
If you imported a Linux distro from a backup on Windows 11 or 10, the option to uninstall it won’t appear in the Settings app, Command Prompt, or PowerShell. In this situation, you will need to unregister the distribution to delete it.
To remove a Linux distro after being imported (restored) from a backup, use these steps:
-
Open Start.
-
Search for Command Prompt, right-click the top result, and select the Run as administrator option.
-
Type the following command to view a list of all available distros and press Enter:
wsl --list
Quick tip: You can also write the command like this:
wsl -l. -
Type the following command to set a distro as the new default on Windows and press Enter:
wsl --unregister DISTRO-NAME
In the command, replace DISTRO-NAME with the name of the distro you want to set as default (see step 3). For example, this command unregisters and deletes the Ubuntu Linux distribution:
wsl --unregister Ubuntu
-
Type the following command to confirm distros and press Enter:
wsl --list

Once you complete the steps, the distro will reset and no longer be available in WSL, but it won’t be uninstalled from the computer. If you want to reinstall the distro, you can open it again from the Start menu.
Trust me, installing Ubuntu in dual boot with Windows is not that difficult a task. Similarly, removing Ubuntu from dual boot is also not that complicated.
In both cases, you need to take a bit of precautions with disk partitions. Having a Windows recovery and proper backups always helps.
In this tutorial, I am going to show you the steps for uninstalling Ubuntu from Windows dual boot. The steps should be equally valid for any other Linux distribution be it Linux Mint, Debian, Fedora, Arch etc.
Uninstall Ubuntu safely from Windows dual boot mode
The process is composed of two parts:
- Change the boot order in UEFI settings and give priority to Windows Boot Manager. You may also delete Grub entry from UEFI setting, if your system gives you this option. If that doesn’t work then you’ll have to repair boot with a bootable Windows disk.
- Deleting the Ubuntu partition from Windows.
As a last resort, you need to have a bootable Windows disk or recovery disk so that you can use it to repair the boot after removing Ubuntu (if needed).
Part 1: Run a sanity check and make Windows the default boot manager
I want you to have as few troubles as possible. Hence I recommend changing the boot setting and making Windows boot manager as the default option to boot.
Let me explain a bit here. When you install Ubuntu or some other Linux, it adds Grub bootloader to your boot settings and makes it the default.
So, now your system has two boot loaders or boot manager (whatever you want to call it). Grub gives you option to boot into Ubuntu or Windows.
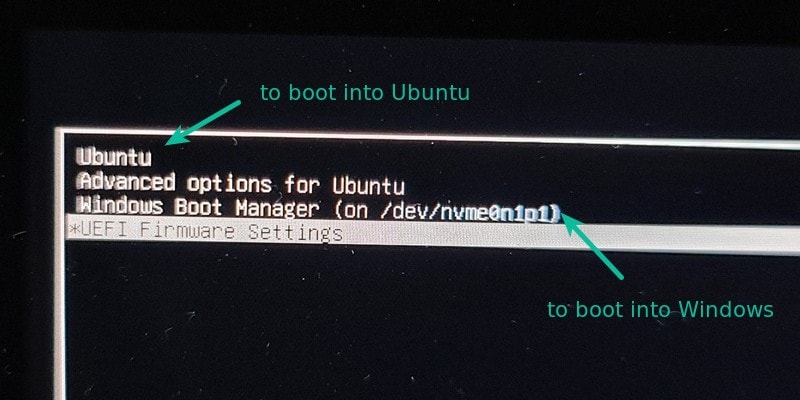
Windows boot manager lets you boot into Windows directly. And this is what you are going to use here.
Step 1: Access UEFI boot settings
Before you go on and delete the Linux partition, it will be a wise move to check if you can make Windows boot manager as the default boot option. This way, when you remove Linux, your boot process won’t be disturbed.
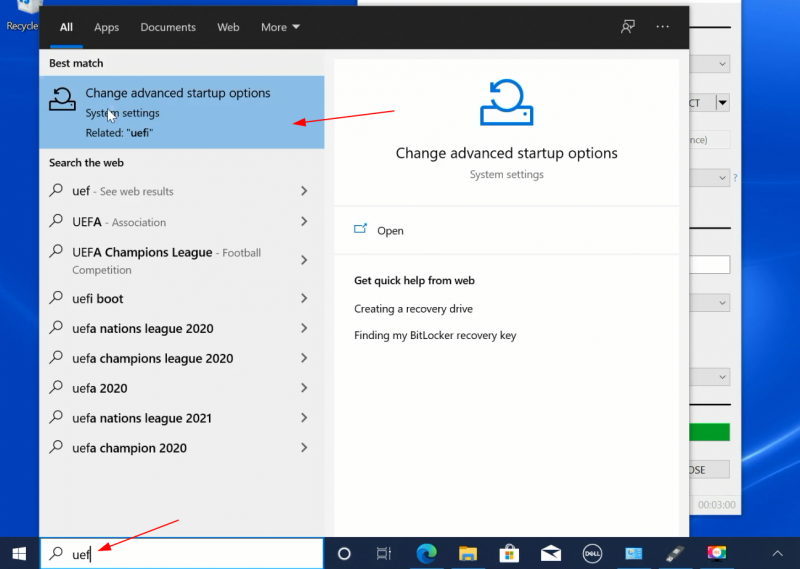
Access the UEFI settings from Windows. Search for UEFI and go to Change advanced startup options:
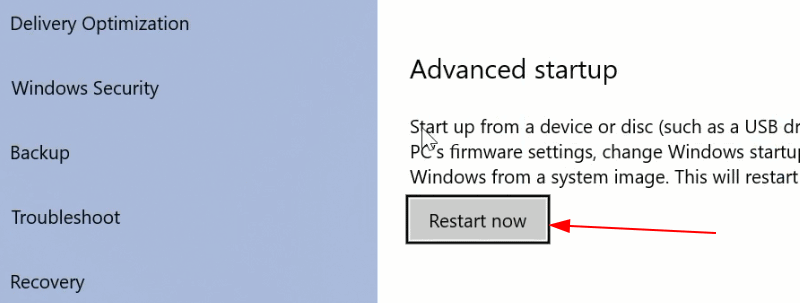
Click on Restart now:
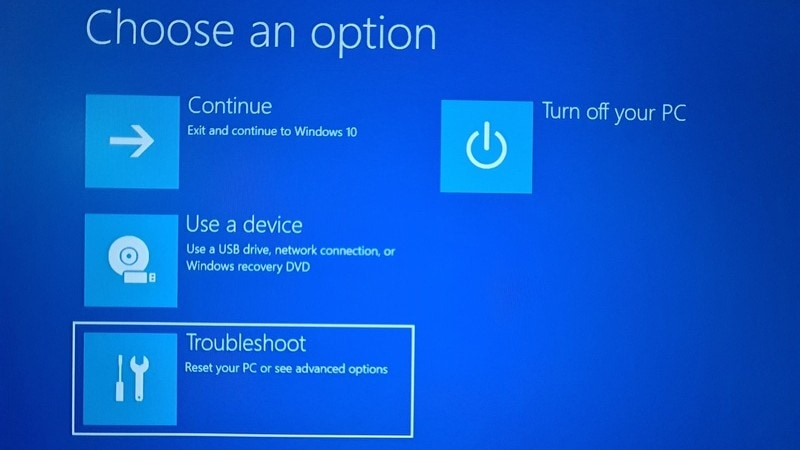
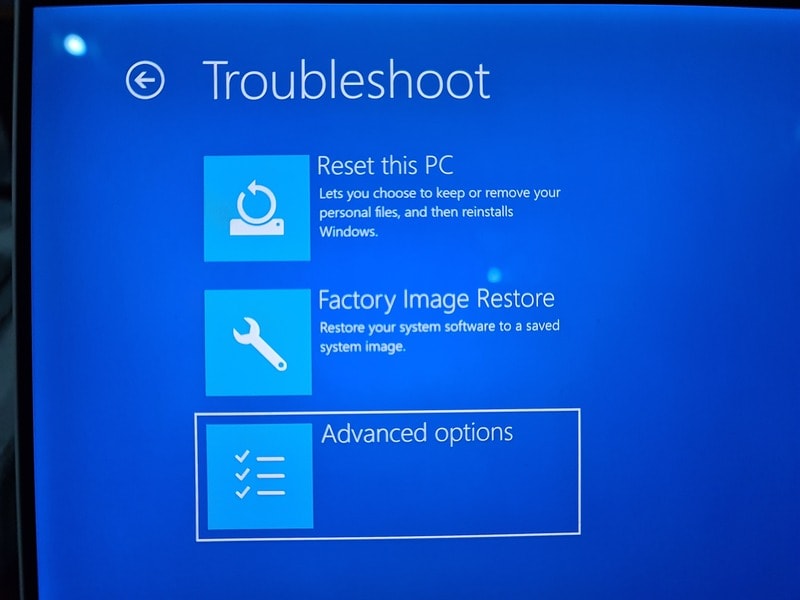
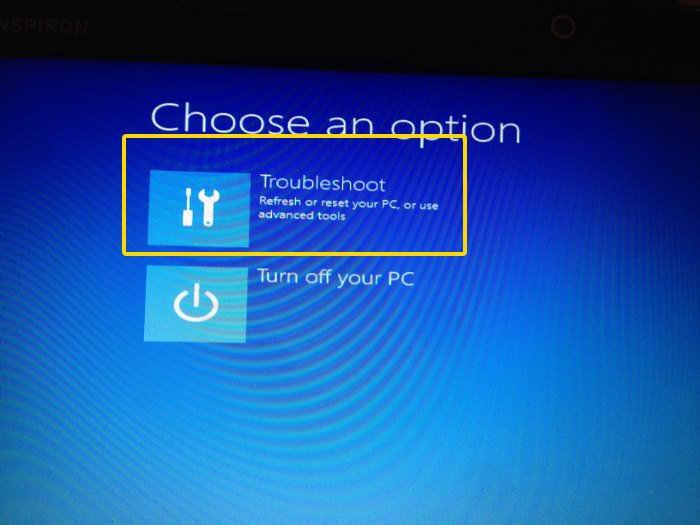
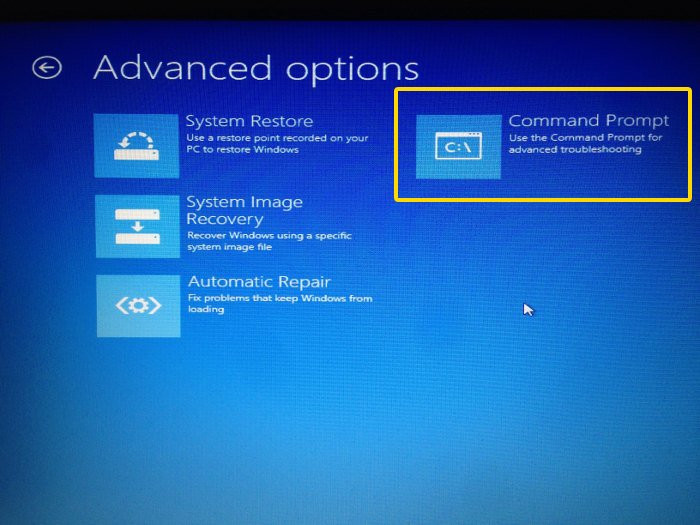
On the blue screen next, select Troubleshoot:
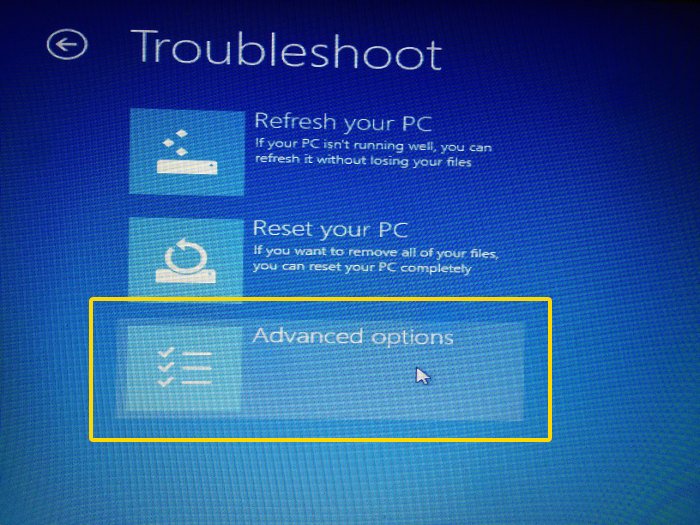
Select Advanced Options next:
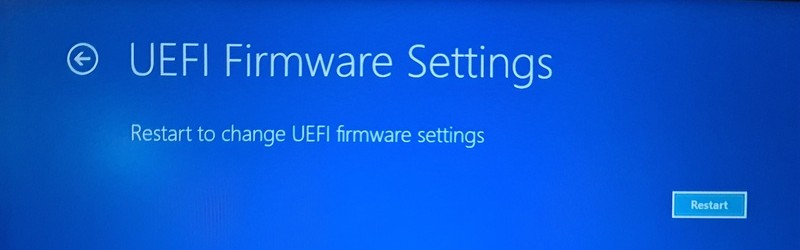
On the next screen, select UEFI Firmware Settings:

Hit restart button on the next screen:
Step 2: Move Windows Boot Manager up the boot order
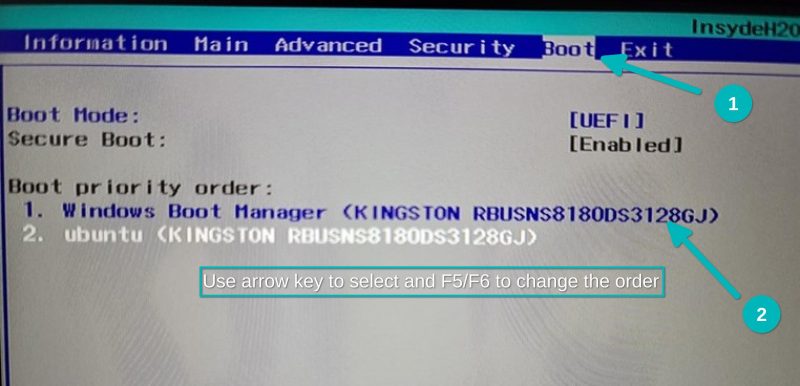
Now, your system will boot into UEFI settings. Now, the next screen will look different for different systems and manufacturers. You have to look for boot tab here.
On my Acer predator, it looks like the image below. Here, use arrow keys to select Windows Boot Manager and press F5 to move it up the order. Press F10 to save and exit.
Now, your system should boot straight into Windows. To verify, restart your system a couple of times and see if the system boots into Windows without showing the grub screen of Linux.
🚧
This is crucial. You should be able to boot into Windows by default without grub. Ensure that otherwise you’ll end up with boot issues.
If that happens, you are good to go with the next step: delete the Linux partition and reclaim your disk space.
Part 2: Deleting Linux partition on Windows
Let’s see how to delete the Linux partition and extend your Windows disk with available free space afterwards.
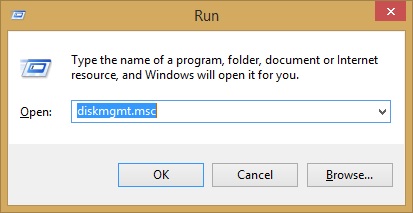
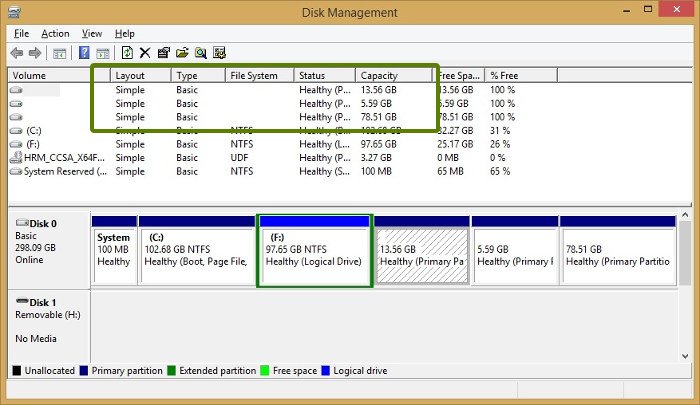
Step 1: Go to disk management
Log into Windows. Press Windows+R and type diskmgmt.msc into the dialog box. This will open the Windows disk management tool.
Step 2: Identify Linux partition
Since you installed Linux, it’ll be easy to recognize the Linux partition by size.
💡
Another hint for identifying the Linux partition is to look for those that don’t have a file system and drive number. Windows partitions are labeled with a drive number, such as C, D, E, etc., and usually use the NTFS or FAT file system.
As you can see, I have three Linux partitions here as I created root, swap and home separately when I installed Ubuntu.
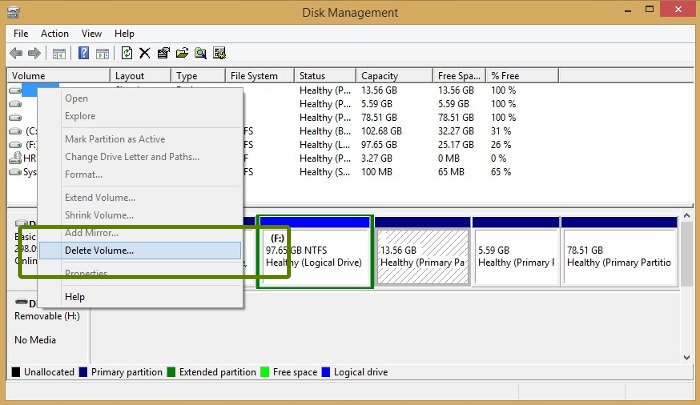
Step 3: Delete the Linux partition
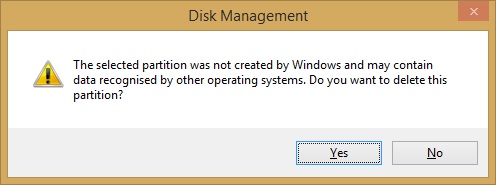
Select the Linux partition(s), right-click on them and opt for the Delete Volume option.
It will throw you a warning – just select Yes here.
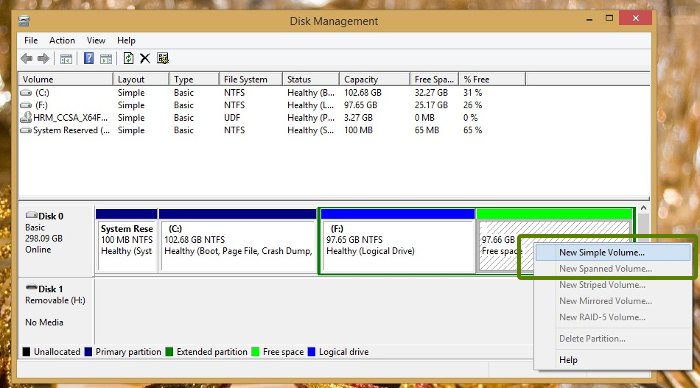
Step 4: Extend Windows partition
The deleted partition(s) will now be available as a chunk of free space. You can either extend the existing volume or create a new Windows partition from it.
I would suggest that you create a new drive (or volume or partition, whatever you want to call it) as this will be easier if you decide to dual-boot Linux with Windows again.
Troubleshooting tips to fix the Windows boot loader
After deleting the Linux partition, if your system boots into a broken Grub screen which shows a message like Grub rescue error, you need to use a Windows recovery disk and fix the Windows bootloader.
Put in the Windows installation disk and restart your computer. Press F10 or F12 at boot time to go into BIOS/UEFI and choose to boot from removable disk.
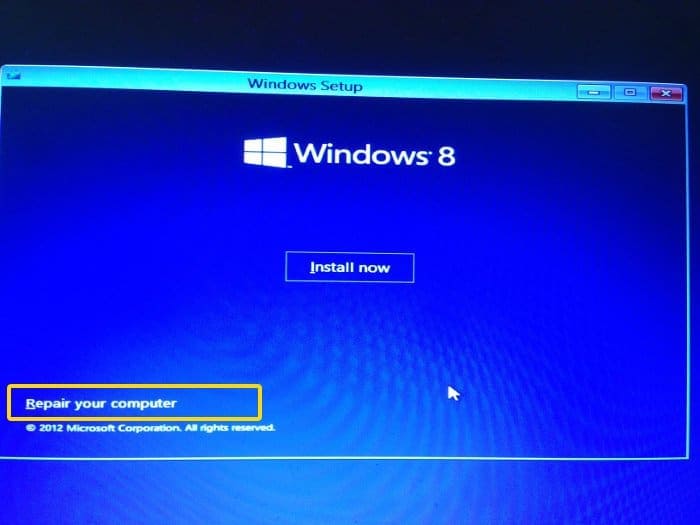
Choose to repair your computer:
Go for the Troubleshoot option here:
On the troubleshooting page, choose Advanced options:
Look for the command prompt option in here:
In the command line, type the following command to fix the Windows boot loader:
bootrec.exe /fixmbrNormally, it works instantly. You don’t even have to wait for it.
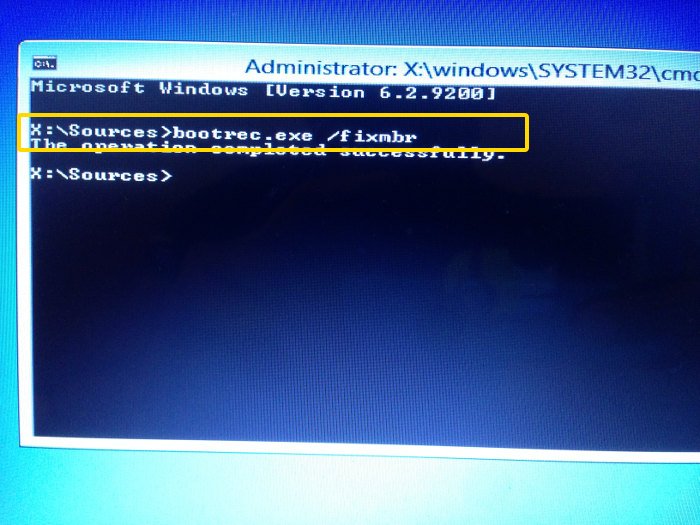
Once it’s done, restart your computer and boot normally from the hard disk. You should be able to boot into Windows. If you still see a Grub rescue error, try the steps below.
If the trick in step 6 didn’t work
If the command in step 6 didn’t work, try Automatic repair from the advanced troubleshooting options.
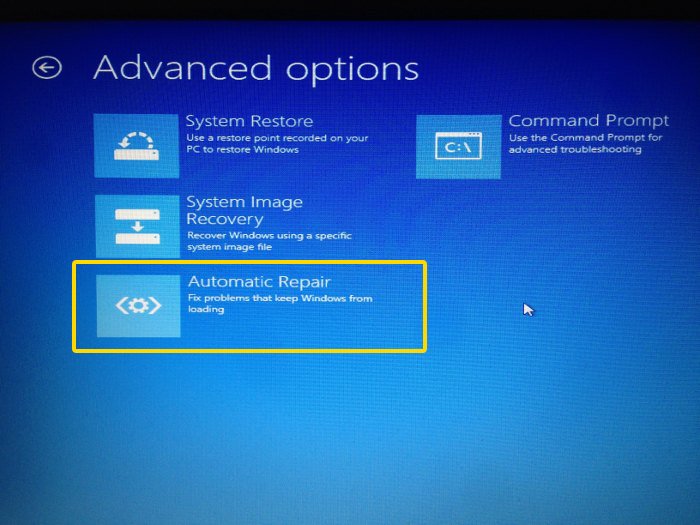
It will take some time to find the issue and then repair it.
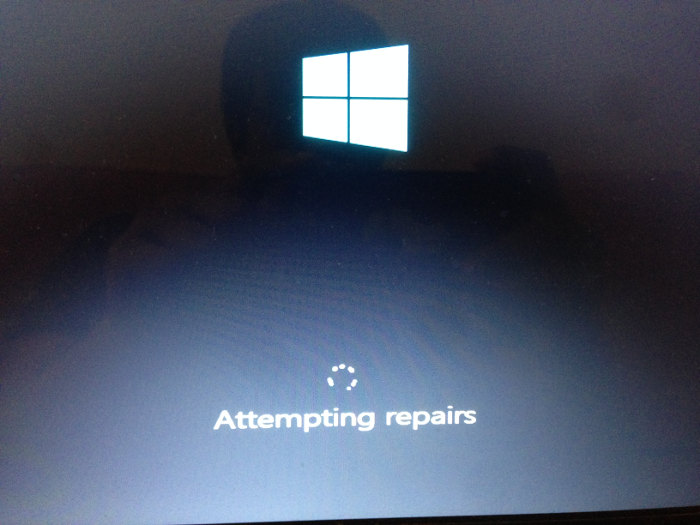
Now if you reboot, you should go into Windows normally without seeing any Grub rescue error thingy.
Conclusion
I hope this guide helped you safely remove Ubuntu from Windows dual boot. Feel free to ask any questions or make a suggestion.

In this article, we will walk you through the process of uninstalling Ubuntu 20.04 WSL (Windows Subsystem for Linux) from your Windows 10 system. Whether you’re looking to free up some space, switch to a different Linux distro, or simply no longer have a need for it, uninstalling Ubuntu 20.04 WSL is a straightforward process.
To uninstall Ubuntu 20.04 WSL from Windows 10, you can use the Start Menu, Control Panel, or Command Prompt/PowerShell. Simply locate the Ubuntu shortcut in the Start menu and click «Uninstall», or open the Control Panel and navigate to «Programs» -> «Turn Windows Features On or Off» to uncheck the «Windows Subsystem for Linux» box. Alternatively, you can use the Command Prompt or PowerShell to unregister and uninstall the specific distro using the wsl --unregister <DistroName> command.
- What is WSL?
- Uninstalling Ubuntu 20.04 WSL
- Uninstall via Start Menu
- Uninstall via Control Panel
- Uninstall via Command Prompt or PowerShell
- Final Thoughts
What is WSL?
Before we dive into the uninstallation process, let’s briefly touch on what WSL is. The Windows Subsystem for Linux (WSL) is a compatibility layer for running Linux binary executables natively on Windows 10. This allows developers and users to run Linux command-line tools and apps alongside their Windows applications.
Uninstalling Ubuntu 20.04 WSL
There are several methods to uninstall Ubuntu 20.04 WSL from your Windows 10 system. We will cover the three main methods: uninstalling via the Start Menu, Control Panel, and Command Prompt or PowerShell.
Uninstall via Start Menu
This is the simplest method to uninstall Ubuntu 20.04 WSL:
- Locate the Ubuntu shortcut in your Start menu.
- Right-click on the shortcut.
- Click on “Uninstall”.
This will remove Ubuntu from your system. If you wish to reinstall Ubuntu at a later date, you can download it again from the Microsoft Store.
Uninstall via Control Panel
You can also uninstall Ubuntu 20.04 WSL through the Control Panel:
- Open the Control Panel.
- Navigate to “Programs” -> “Turn Windows Features On or Off”.
- Uncheck the box next to “Windows Subsystem for Linux”.
- Click “OK”.
This will uninstall the Windows Subsystem for Linux, along with the bash.exe and lxrun.exe commands.
Uninstall via Command Prompt or PowerShell
For more advanced users, you can uninstall Ubuntu 20.04 WSL using the Command Prompt or PowerShell:
- Open a Command Prompt or PowerShell prompt.
- Use the command
wsl -lto see a list of installed distro names. - Use the command
wsl --unregister <DistroName>to unregister and uninstall the specific distro.
Replace <DistroName> with the name of the Ubuntu distro you want to uninstall. For example, if your distro is named “Ubuntu-20.04”, the command would be wsl --unregister Ubuntu-20.04.
The --unregister option will remove the specified Linux distribution from the WSL and also delete the home folder of the distro, which includes the user data.
Final Thoughts
Remember, it’s always a good idea to back up any important data before uninstalling Ubuntu or making any system changes. If you encounter any issues during the uninstallation process, consider using an unlocker program in Windows 10 to unlock and delete the files associated with Ubuntu. However, this should be considered as a last resort.
We hope this article has provided you with a clear understanding of how to uninstall Ubuntu 20.04 WSL from Windows 10. If you have any further questions, feel free to reach out to us or consult the Microsoft WSL Documentation.
Remember, the Windows Subsystem for Linux (WSL) is primarily a command-line interface and does not provide a graphical user interface (GUI) by default. If you are looking for a GUI, you may want to consider using a virtual machine or a dual-boot setup instead.
Yes, you can reinstall Ubuntu 20.04 WSL at a later date. Simply download it again from the Microsoft Store.
Uninstalling Ubuntu 20.04 WSL will remove the Linux distribution and its associated files, including the home folder that contains user data. It’s always a good idea to back up any important data before uninstallation.
Yes, the uninstallation process is the same regardless of the Linux distribution you have installed. You can follow the steps mentioned in the article to uninstall any Linux distribution running under WSL.
Yes, you can uninstall the entire Windows Subsystem for Linux (WSL) from Windows 10. To do this, follow the steps mentioned in the article to uninstall Ubuntu 20.04 WSL via the Control Panel, but instead of unchecking only the «Windows Subsystem for Linux» box, uncheck all the WSL-related boxes.
Yes, uninstalling Ubuntu 20.04 WSL requires administrative privileges. Make sure you have the necessary permissions before attempting to uninstall it.
Uninstalling Ubuntu 20.04 WSL will not affect your Windows applications. WSL operates separately from your Windows applications, and removing it will not impact their functionality.
Yes, you can install a different version of Ubuntu or any other Linux distribution after uninstalling Ubuntu 20.04 WSL. The uninstallation process only removes the specific distribution and does not prevent you from installing a different one.
Yes, you can have multiple Linux distributions installed under WSL. If you want to use a different distribution alongside Ubuntu 20.04 WSL, you can simply install it without uninstalling Ubuntu.
Are you looking for an easy way to uninstall Ubuntu on Windows 10? If so, you’ve come to the right place. In this guide, I’ll explain exactly how to uninstall Ubuntu from Windows 10, and ensure that no traces of the operating system remain. With a few simple steps, you can free up your system resources and reclaim the hard drive space used to install Ubuntu. Let’s get started!
Uninstalling Ubuntu from Windows 10
If you installed Ubuntu using the Windows 10 Store, you can uninstall it by going to Settings > Apps > Apps & features, selecting Ubuntu and clicking Uninstall.
If you installed Ubuntu from a USB drive, you can uninstall it by running the uninstallation script that was included with the Ubuntu installation. To do this, open the Ubuntu folder, and double-click the uninstall-ubuntu.bat file.
If you installed Ubuntu using the Wubi installer, you can uninstall it by going to Programs & Features in the Control Panel, selecting Ubuntu and clicking Uninstall.

Uninstalling Ubuntu on Windows 10
Windows 10 offers its users the ability to dual-boot into Ubuntu, one of the most popular Linux distributions. Installing Ubuntu on Windows 10 is a simple process, but uninstalling it is slightly more complicated. In this article, we will guide you through the step-by-step process of uninstalling Ubuntu from your Windows 10 system.
Disabling Ubuntu Boot Option
The first step in uninstalling Ubuntu from your Windows 10 system is to disable the Ubuntu boot option. To do this, open the Settings window and navigate to the “Update & Security” tab. Under the “Advanced Options” section, click on “Startup Settings” and then click on the “Restart” button. This will restart your system and open the “Choose an Option” menu. From here, select “Troubleshoot -> Advanced Options -> UEFI Firmware Settings -> Restart”. This will restart your system and open the UEFI/BIOS menu.
In the UEFI/BIOS menu, navigate to the “Boot” tab and look for the “Ubuntu” entry. This entry will be listed as “Ubuntu Boot Manager”. Select this entry and press the “Delete” key to remove it from the list of boot options. Once the entry is removed, you can press the “F10” key to save the changes and reboot your system.
Removing Ubuntu Partitions
Once the Ubuntu boot option has been disabled, you can now proceed to remove the Ubuntu partitions from your system. To do this, open the “Disk Management” window by pressing the Windows key and typing “disk management” in the search box. This will open the “Disk Management” window. In the “Disk Management” window, you will see a list of all the disks and partitions on your system. Look for the entries labeled as “Ubuntu” and right-click on them to delete them.
Once all the Ubuntu partitions have been deleted, you can now proceed to remove the files associated with Ubuntu from your system. To do this, open the “File Explorer” window by pressing the Windows key and typing “file explorer” in the search box. This will open the “File Explorer” window. In the “File Explorer” window, navigate to the root directory of your system drive (usually the “C:\” drive) and look for the “Ubuntu” folder. Right-click on this folder and select “Delete” to delete all the files associated with Ubuntu from your system.
Updating Windows Boot Manager
The final step in uninstalling Ubuntu from your Windows 10 system is to update the Windows Boot Manager. To do this, open the “Command Prompt” window by pressing the Windows key and typing “command prompt” in the search box. This will open the “Command Prompt” window. In the “Command Prompt” window, type the following command and press the “Enter” key:
bcdedit /delete {ubuntu-id}
This command will delete the Ubuntu entry from the Windows Boot Manager and update the boot options. Once the command has been executed, reboot your system to apply the changes.
Removing Ubuntu Packages
Finally, you can remove the Ubuntu packages from your Windows 10 system. To do this, open the “Control Panel” window by pressing the Windows key and typing “control panel” in the search box. This will open the “Control Panel” window. In the “Control Panel” window, navigate to the “Programs and Features” section and look for the “Ubuntu” entry. Select this entry and click on the “Uninstall” button to uninstall the Ubuntu packages from your system.
Cleaning Up After Uninstallation
Once the Ubuntu packages have been removed from your system, you can now proceed to clean up any leftover files and folders associated with Ubuntu. To do this, open the “File Explorer” window by pressing the Windows key and typing “file explorer” in the search box. This will open the “File Explorer” window. In the “File Explorer” window, navigate to the root directory of your system drive (usually the “C:\” drive) and look for any folders or files associated with Ubuntu. Right-click on them and select “Delete” to delete them from your system.
Verifying Uninstallation
Once all the steps mentioned above have been completed, you can now proceed to verify that Ubuntu has been uninstalled from your Windows 10 system. To do this, open the “Command Prompt” window by pressing the Windows key and typing “command prompt” in the search box. This will open the “Command Prompt” window. In the “Command Prompt” window, type the following command and press the “Enter” key:
wmic os get caption
This command will display the list of operating systems installed on your system. If Ubuntu is not listed in the output, then you have successfully uninstalled Ubuntu from your Windows 10 system.
Frequently Asked Questions
Q1. How do I uninstall Ubuntu on Windows 10?
A1. To uninstall Ubuntu on Windows 10, you can use the Windows Settings app. Open the Start Menu and type “Settings” into the search box. Click on the Settings app, then click on “Apps”. Find the Ubuntu app, then click the “Uninstall” button. This will completely remove the Ubuntu app and all its associated files from your system.
Q2. Are there any other methods for uninstalling Ubuntu on Windows 10?
A2. Yes, there are other methods for uninstalling Ubuntu on Windows 10. You can use the Command Prompt to uninstall Ubuntu. To use the Command Prompt, press the Windows key + X to open the Power User menu, then select “Command Prompt (Admin)” from the list. Type in the following commands: “wmic product where name=”Ubuntu” call uninstall /nointeractive” and press Enter. This will uninstall Ubuntu from your system.
Q3. What are the risks of uninstalling Ubuntu on Windows 10?
A3. Uninstalling Ubuntu on Windows 10 can cause issues with other programs that you have installed on your system. Additionally, it can also cause issues with your boot settings, as Ubuntu was likely installed alongside Windows 10 as a dual boot system. It is recommended that you back up any important files and data before uninstalling Ubuntu from your system.
Q4. Can I reinstall Ubuntu after uninstalling it on Windows 10?
A4. Yes, you can reinstall Ubuntu after uninstalling it on Windows 10. To do this, you will need to download the Ubuntu installation files and create a bootable drive. After that, you can use the bootable drive to install Ubuntu on your system.
Q5. How do I check if Ubuntu has been successfully uninstalled on Windows 10?
A5. To check if Ubuntu has been successfully uninstalled on Windows 10, you can open the Command Prompt. To do this, press the Windows key + X to open the Power User menu, then select “Command Prompt (Admin)” from the list. Type in the following command: “wmic product where name=”Ubuntu” call uninstall /nointeractive” and press Enter. If the command is successful, it will return a “Success” message and Ubuntu will no longer be installed on your system.
Q6. How can I be sure that all of Ubuntu’s files have been removed from my system?
A6. After uninstalling Ubuntu from your system, you can use a third-party program to check for any remaining files. A good example is CCleaner, which is a free tool that can help you identify any leftover files or folders that may be left behind after the uninstallation process. It is important to make sure that all of Ubuntu’s files have been completely removed from your system before you reinstall it.
Delete Ubuntu, put Windows 10 back on in 3 minutes | NETVN
Uninstalling Ubuntu on Windows 10 is a straightforward process that only requires a few clicks. By following the steps outlined in this article, you can successfully un-dual boot Ubuntu and Windows 10, allowing you to return to the state you were in prior to the installation of Ubuntu. Uninstalling Ubuntu is an easy task, and can be completed quickly and without any hassle, allowing you to get back to using Windows 10 without any further complications.
Welcome to my blog, where we explore the world of uninstall apps. Today, we dive into the process of WSL Uninstall Ubuntu, helping you keep your system organized and efficient. Stay tuned for our step-by-step guide!
Effortless Steps to Uninstall Ubuntu on Windows Subsystem for Linux (WSL)
If you have Ubuntu installed on your Windows Subsystem for Linux (WSL) and wish to uninstall it, follow these effortless steps:
1. First, open the Windows PowerShell with administrative privileges. To do this, search for “PowerShell” in the Start menu, right-click on it and select “Run as administrator.”
2. To check if you have any installed distributions, run the command:
“`
wsl –list –verbose
“`
This will display a list of installed distributions on your system.
3. To uninstall Ubuntu, execute the following command:
“`
wsl –unregister
“`
Replace “DistroName” with the name of the Ubuntu distribution you wish to uninstall. For example, if you want to uninstall “Ubuntu-20.04,” the command should be:
“`
wsl –unregister Ubuntu-20.04
“`
4. Once you run the command, the selected distribution will be removed from your system. Note that this process will also delete all files and data related to the distribution, so make sure you have a backup if necessary.
5. If you are using WSL2 and want to remove the virtual hard disk associated with the uninstalled distribution, navigate to the following path on your system:
“`
%USERPROFILE%AppDataLocalPackages
“`
Find the folder corresponding to the removed distribution (usually with a name like “CanonicalGroupLimited.Ubuntu20.04onWindows_79rhkp1fndgsc“) and delete it.
6. You have now successfully uninstalled Ubuntu from your Windows Subsystem for Linux. If you wish to install a different distribution or reinstall Ubuntu, you can find them in the Microsoft Store.
Following these steps, you can effortlessly uninstall Ubuntu on the Windows Subsystem for Linux and keep your system clean and organized.
how to remove ubuntu os from laptop
Replacing pre-installed Windows with Ubuntu OS
How do I completely remove Ubuntu from wsl?
To completely remove Ubuntu from WSL (Windows Subsystem for Linux), follow these steps:
1. Open the **Command Prompt** by typing `cmd` in the search bar and pressing Enter.
2. Type the following command to list all installed WSL distributions:
“`
wsl –list
“`
You should see a list of installed distributions, including Ubuntu.
3. To uninstall Ubuntu, type the following command:
“`
wsl –unregister Ubuntu
“`
Replace “Ubuntu” with the exact name of your installed distribution if necessary. This will completely **remove the Ubuntu distribution** from your system.
4. If you wish to **remove the entire Windows Subsystem for Linux** feature, follow these steps:
a. Press **Windows key + X** and select **Windows PowerShell (Admin)** or simply search for **PowerShell** in the search bar, right-click on it, and choose **Run as Administrator**.
b. Type the following command and press Enter:
“`
wsl –set-default-version 1
“`
c. Now, open **Control Panel** > **Programs** > **Turn Windows features on or off**.
d. Locate and **uncheck “Windows Subsystem for Linux”** within the list, click **OK**, and restart your computer when prompted.
Now you have successfully removed Ubuntu from WSL and, if desired, the entire Windows Subsystem for Linux feature.
How to uninstall Ubuntu from command line?
Uninstalling Ubuntu from the command line involves removing the partitions and restoring the bootloader. Before we start, make sure to back up any important files, as this process will erase all the data on the Ubuntu partition.
Follow these steps to uninstall Ubuntu from the command line:
1. Boot into a live USB or CD: You’ll need a live USB or CD with the same system installer you used when installing Ubuntu (e.g., Ubuntu Desktop or Server). Boot your computer using the live USB/CD by changing the boot order in your BIOS or UEFI settings.
2. Once you’ve booted into the live system, open a Terminal by pressing `Ctrl` + `Alt` + `T`.
3. Find the partition containing the Ubuntu installation you want to remove. You can do this by running the following command:
“`
sudo fdisk -l
“`
Look for the partition(s) with the “Linux” filesystem type. Take note of the device name, such as `/dev/sda5` or `/dev/sda6`.
4. Unmount the partition if it’s mounted. Run the following command to unmount it:
“`
sudo umount /dev/sdaX
“`
Replace `/dev/sdaX` with the correct device name for your partition.
5. Delete the partition containing your Ubuntu installation. Be careful when doing this, as you’ll lose all data stored on this partition. Run the following command:
“`
sudo fdisk /dev/sda
“`
* Type `d` and press `Enter` to delete a partition.
* Enter the partition number that you want to delete.
* Type `w` and press `Enter` to save the changes and exit fdisk.
6. Now, it’s time to restore the bootloader of your primary operating system (e.g., Windows). Boot into your primary OS installation media (USB or CD) and choose the “Repair your computer” option.
If you’re using Windows, open the Command Prompt from the advanced recovery options and run the following command:
“`
bootrec.exe /fixmbr
“`
This will restore the Master Boot Record and remove the Ubuntu bootloader (GRUB).
7. Finally, reboot your computer. Once it restarts, your primary operating system (e.g., Windows) should boot up without showing the Ubuntu option.
That’s it! You’ve successfully uninstalled Ubuntu from your system using the command line. Remember to delete or format the unallocated space on your hard drive as needed.
How to uninstall Ubuntu in dual boot?
If you have installed Ubuntu alongside another operating system in a dual boot setup and want to uninstall it, follow these steps:
Step 1: Backup your data
Before you begin this process, make sure to backup any important data or files from your Ubuntu partition, as they will be permanently deleted.
Step 2: Boot into the other operating system
Restart your computer and boot into the other operating system (e.g., Windows) that you want to keep.
Step 3: Delete the Ubuntu partitions
To delete the Ubuntu partitions, you’ll need to access the Disk Management tool.
– If you’re using Windows, press Win + X and select Disk Management.
– If you’re using macOS, open Disk Utility from the Applications > Utilities folder.
Locate the Ubuntu partitions (usually labeled as ext4 or swap). Right-click each partition and choose Delete Volume (Windows) or Erase (macOS). Be careful not to delete any other partitions that belong to the other operating system.
Step 4: Extend the primary partition (optional)
After you’ve deleted the Ubuntu partitions, you may want to extend the main partition to utilize the unallocated space. Right-click the primary partition and choose Extend Volume (Windows) or Resize (macOS).
Step 5: Fix the bootloader
Now that Ubuntu is removed, you need to restore the bootloader of your main operating system.
– If you’re using Windows, create a bootable Windows USB and boot from it. Once in the Windows installation screen, click Repair your computer, then Troubleshoot, followed by Command Prompt. In the command prompt, type the following commands:
“`
bootrec /fixmbr
bootrec /fixboot
bootrec /scanos
bootrec /rebuildbcd
“`
After executing these commands, restart your computer.
– If you’re using macOS, reboot your Mac while holding down Cmd + R to enter Recovery Mode. Open Terminal from the Utilities menu and type the following command:
“`
diskutil cs revert /
“`
This command will revert your main partition to a non-Fusion Drive setup. Reboot your Mac afterwards.
Step 6: Test your system
Restart your computer and ensure that it boots directly into your primary operating system without showing the Ubuntu boot menu. If everything works as expected, the process is complete and Ubuntu has been successfully uninstalled.
How to uninstall Ubuntu from Windows 11?
If you have installed **Ubuntu** alongside **Windows 11** using the Windows Subsystem for Linux (WSL) or through a dual boot setup, and now you want to uninstall it, follow these steps:
For WSL:
1. Open the **PowerShell** with administrative privileges. To do this, right-click on the Start button and choose **Windows Terminal (Admin)**.
2. In the terminal window, type the following command and press Enter:
“`
wsl –list –verbose
“`
This command will list all installed WSL distributions, including Ubuntu.
3. Locate the name of your Ubuntu distribution, and then type the following command, replacing “YourUbuntu” with the actual name:
“`
wsl –unregister YourUbuntu
“`
4. Press Enter, and the system will remove the Ubuntu distribution from WSL. This process also deletes all associated files and data.
For Dual Boot:
1. First, create a backup of your important files and data from Ubuntu, as this process will remove the Ubuntu partition and its contents.
2. Boot your computer into **Windows 11**. Right-click on the Start button and select **Disk Management**.
3. In the Disk Management window, locate the Ubuntu partition (usually having an ext4 file system). Right-click on the partition and choose **Delete Volume**. Confirm the action by clicking **Yes**.
4. Next, you need to recover the unallocated space. Right-click on the adjacent **Windows** partition and select **Extend Volume**. Follow the on-screen instructions to complete the process.
5. Finally, you need to repair the Windows bootloader. To do this, insert your Windows 11 installation media (USB or DVD) and restart your computer. Boot from the installation media.
6. On the Windows installation screen, click **Next** and select **Repair your computer**. Choose **Troubleshoot** > **Advanced options** > **Command Prompt**.
7. In the Command Prompt, type the following commands one by one, pressing Enter after each:
“`
bootrec /fixmbr
bootrec /fixboot
bootrec /scanos
bootrec /rebuildbcd
“`
8. Close the Command Prompt and restart your computer. The system should now boot directly into Windows 11, and Ubuntu will be uninstalled.
Remember to backup important data before uninstalling Ubuntu through either of these methods.
What is the most effective method to uninstall Ubuntu from within the Windows Subsystem for Linux (WSL)?
Are there any precautions or important steps to follow when uninstalling Ubuntu from WSL?
When uninstalling Ubuntu from Windows Subsystem for Linux (WSL), it’s essential to follow some important steps and precautions, as an improper uninstallation process can cause issues on your system.
1. Backup your files and data: Before the uninstallation process, make sure to backup any essential files and data from your WSL environment to avoid losing them permanently. You can use `cp`, `tar`, or any other method to copy data to the Windows filesystem.
2. Close all WSL instances: Close all active WSL sessions, as having any open sessions might cause the uninstallation to fail or become incomplete.
3. Unregister the WSL instance: To remove the specific Ubuntu distribution, run the following command in *Windows PowerShell* as an administrator:
“`
wsl.exe –unregister
“`
Replace “ with your installed distribution name, such as “Ubuntu-18.04” or “Ubuntu-20.04”. This command will unregister the distribution and delete its related files.
4. Verify if the instance is removed: To confirm that the distribution has been successfully removed, run this command in the PowerShell:
“`
wsl.exe –list –verbose
“`
If the uninstallation was successful, the previously unregistered distribution should no longer appear in the list.
5. Optional – Remove WSL completely: If you want to remove the WSL feature entirely from your Windows system, follow these additional steps:
a. Disable the WSL feature through PowerShell by running the following command as an administrator:
“`
wsl.exe –set-default-version 0
“`
b. In PowerShell, execute the following command to disable WSL:
“`
dism.exe /online /disable-feature /featurename:Microsoft-Windows-Subsystem-Linux
“`
c. Reboot your computer to complete the WSL feature removal process.
By following these steps, you can safely uninstall Ubuntu from WSL and ensure that the process goes smoothly without causing any unwanted issues on your Windows system.
Can I reinstall a different Linux distribution after uninstalling Ubuntu from WSL, and how do I proceed with that?
Yes, you can reinstall a different Linux distribution after uninstalling Ubuntu from Windows Subsystem for Linux (WSL). To proceed, follow these steps:
1. Uninstall Ubuntu: If you haven’t uninstalled Ubuntu yet, open the Windows PowerShell as an administrator and execute the following command to remove the existing Ubuntu installation from WSL:
“`
wsl –unregister Ubuntu
“`
This command will uninstall Ubuntu distribution and delete its associated data.
2. Visit Microsoft Store: Open the Microsoft Store and search for the desired Linux distribution (e.g., Fedora, Kali Linux, Debian) in the search bar.
3. Install the new distribution: Click on the desired distribution from the search results, and then click on the “Get” or “Install” button to download and install it.
4. Set up the new distribution: After the installation is complete, launch the new distribution from the Start menu. A terminal window will open, and it may take a minute or two to set up the initial configuration. You’ll be prompted to create a Unix username and password which will be used for managing the new distribution.
5. Verify the new installation: Once the setup is complete, you can use the terminal to interact with the new distribution. To check the currently installed distribution, run the following command in the terminal:
“`
wsl -l -v
“`
This will show the list of installed distributions and their corresponding WSL version.
Now you have successfully uninstalled Ubuntu and installed a new Linux distribution on WSL. Enjoy using the new distribution for your development tasks!