Follow these steps to temporarily turn off real-time Microsoft Defender antivirus protection in Windows Security. However, keep in mind that if you do, your device may be vulnerable to threats.
-
Select Start and type «Windows Security» to search for that app.
-
Select the Windows Security app from the search results, go to Virus & threat protection, and under Virus & threat protection settings select Manage settings.
-
Switch Real-time protection to Off. Note that scheduled scans will continue to run. However, files that are downloaded or installed will not be scanned until the next scheduled scan.
Notes:
-
If you just want to exclude a single file or folder from antivirus scanning you can do that by adding an exclusion. This is safer than turning the entire antivirus protection off. See Add an exclusion to Windows Security.
-
If you install a compatible non-Microsoft antivirus program Microsoft Defender antivirus will automatically turn itself off.
-
If Tamper Protection is turned on, you’ll need to turn Tamper Protection off before you’ll be able to turn Real-time protection off.
How malware can infect your PC
Need more help?
Want more options?
Explore subscription benefits, browse training courses, learn how to secure your device, and more.
Communities help you ask and answer questions, give feedback, and hear from experts with rich knowledge.
Время на прочтение
3 мин
Количество просмотров 952K
В Windows 10 имеется встроенный антивирус Windows Defender («Защитник Windows»), защищающий компьютер и данные от нежелательных программ: вирусов, шпионских программ, программ-вымогателей и многих других типов вредоносных программ и действий хакеров.
И хотя встроенного решения для защиты достаточно для большинства пользователей, бывают ситуации, в которых вы можете не захотеть пользоваться этой программой. К примеру, если вы настраиваете устройство, которое не будет выходить в сеть; если вам необходимо выполнить задачу, блокируемую этой программой; если вам нужно уложиться в требования политики безопасности вашей организации.
Единственная проблема связана с тем, что полностью удалить или отключить Windows Defender у вас не выйдет – эта система глубоко интегрирована в Windows 10. Однако есть несколько обходных путей, при помощи которых вы можете отключить антивирус – это использование локальной групповой политики, реестра или настроек Windows в разделе «Безопасность» (временно).
Как отключить Защитник Windows через настройки безопасности Windows
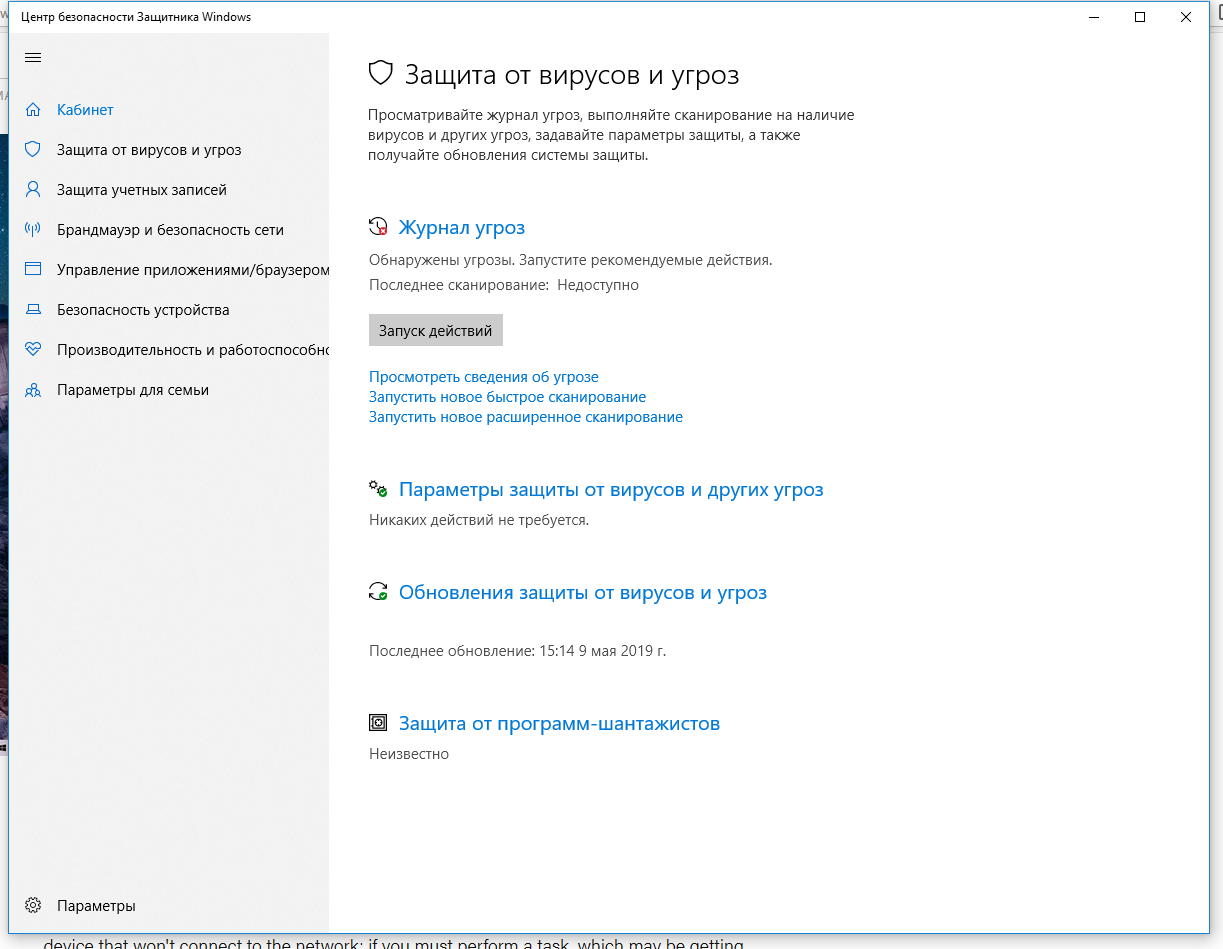
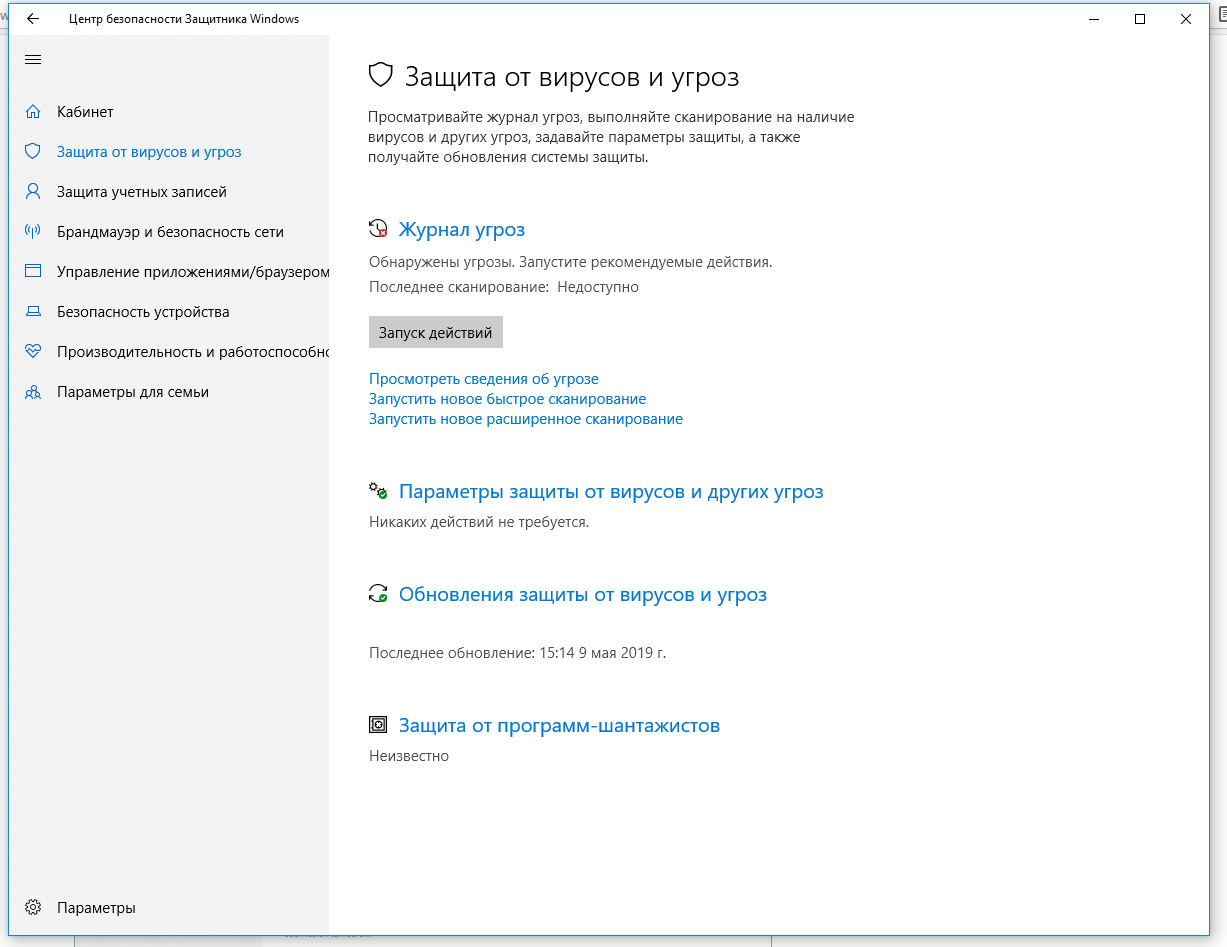
Если вам нужно выполнить определённую задачу, и не нужно отключать Защитника полностью, вы можете сделать это временно. Для этого при помощи поиска в кнопке «Пуск» найдите раздел «Центр безопасности Защитника Windows», и выберите в нём пункт «Защита от вирусов и угроз».
Там перейдите в раздел «Параметры защиты от вирусов и других угроз» и кликните по переключателю «Защита в режиме реального времени».
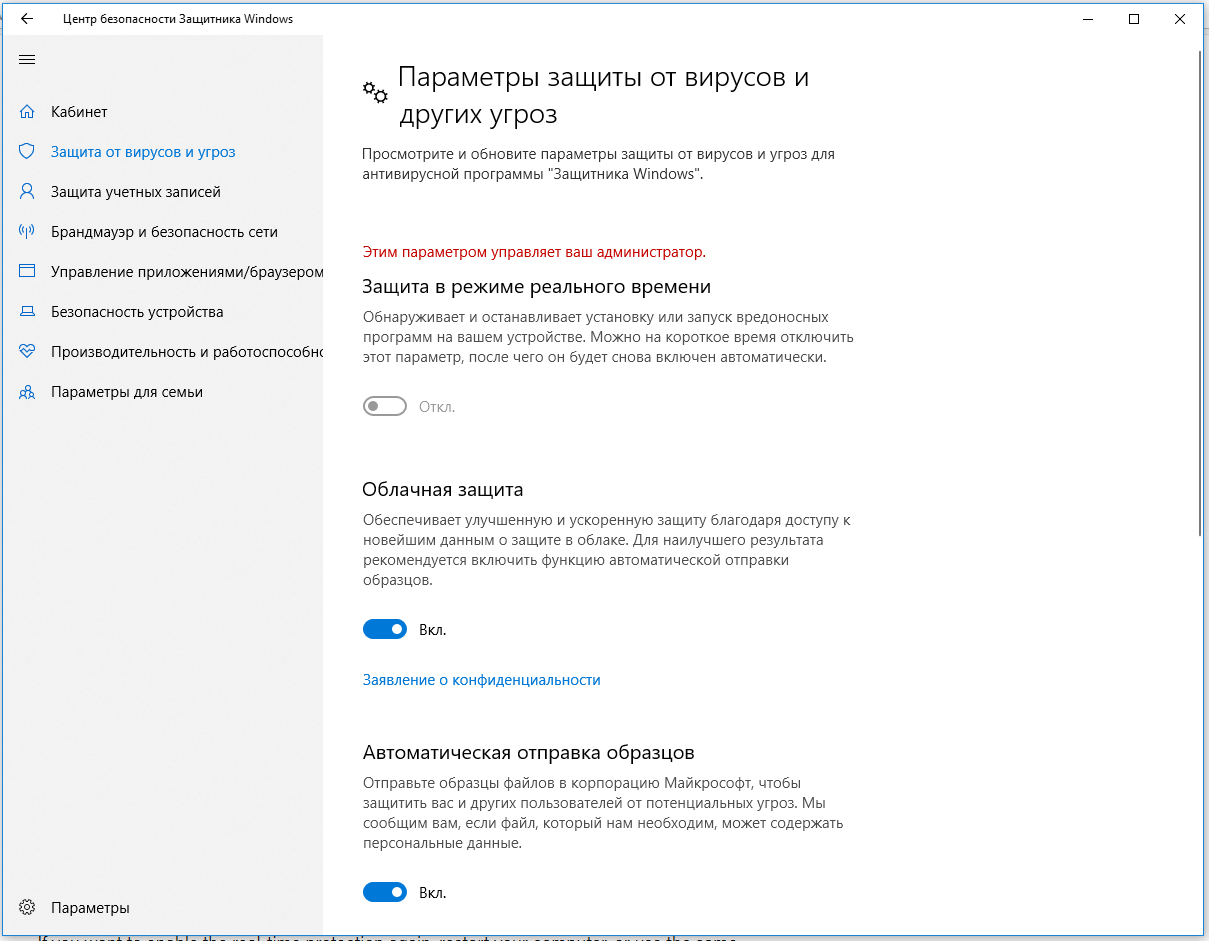
После этого антивирус отключит защиту компьютера в реальном времени, что позволит вам устанавливать приложения или выполнять определённую задачу, которая была недоступна вам из-за того, что антивирус блокировал необходимое действие.
Чтобы снова включить защиту в реальном времени, перезапустите компьютер или заново пройдите все этапы настроек, но на последнем шаге включите переключатель.
Это решение не является постоянным, но лучше всего подходит для отключения антивируса Windows 10 для выполнения определённой задачи.
Как отключить Защитник Windows через групповые политики
В версиях Windows 10 Pro и Enterprise вам доступен редактор локальных групповых политик, где можно навсегда отключить Защитника следующим образом:
Через кнопку «Пуск» запустите исполняемый скрипт gpedit.msc. Откроется редактор политик. Перейдите по следующему пути: Конфигурация компьютера > Административные шаблоны > Компоненты Windows > Антивирусная программа «Защитник Windows».

Двойным нажатием откройте пункт «Выключить антивирусную программу „Защитник Windows“». Выберите настройку «Включено» для включения этой опции, и, соответственно, отключения Защитника.
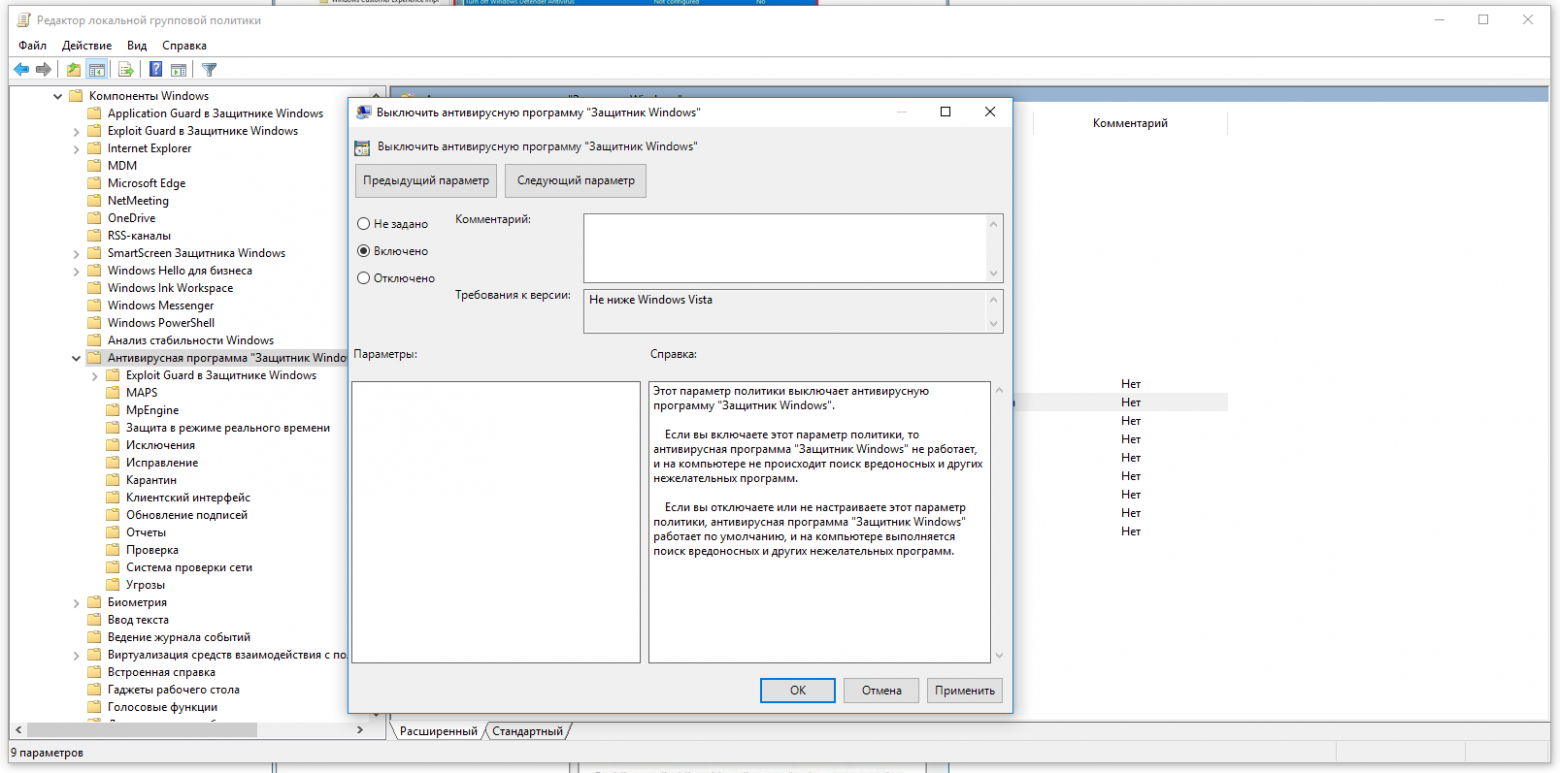
Нажмите «ОК» и перезапустите компьютер.
После этого антивирус будет навсегда отключён на вашем устройстве. Но вы заметите, что иконка со щитом останется в панели задач – так и должно быть, поскольку эта иконка принадлежит к приложению «Безопасность Windows», а не самому антивирусу.
Если вы передумаете, вы всегда можете заново включить Защитника, повторив эти шаги, и на последнем шаге выбрав вариант «Не задано», после чего снова нужно будет перезагрузить компьютер.
Как отключить Защитник Windows через реестр
Если у вас нет доступа к редактору политик, или у вас установлена Windows 10 Home, вы можете отредактировать реестр Windows, отключив тем самым Защитника.
Напоминаю, что редактировать реестр рискованно, и ошибки в этом деле могут нанести непоправимый ущерб текущей установленной копии Windows. Лучше сделать резервную копию системы перед тем, как начинать редактирование.
Чтобы полностью отключить Защитиника через реестр, запустите через кнопку «Пуск» программу regedit, и перейдите в ней по следующему пути:
HKEY_LOCAL_MACHINE\SOFTWARE\Policies\Microsoft\Windows Defender
Совет: этот путь можно скопировать и вставить в адресную строку редактора реестра.
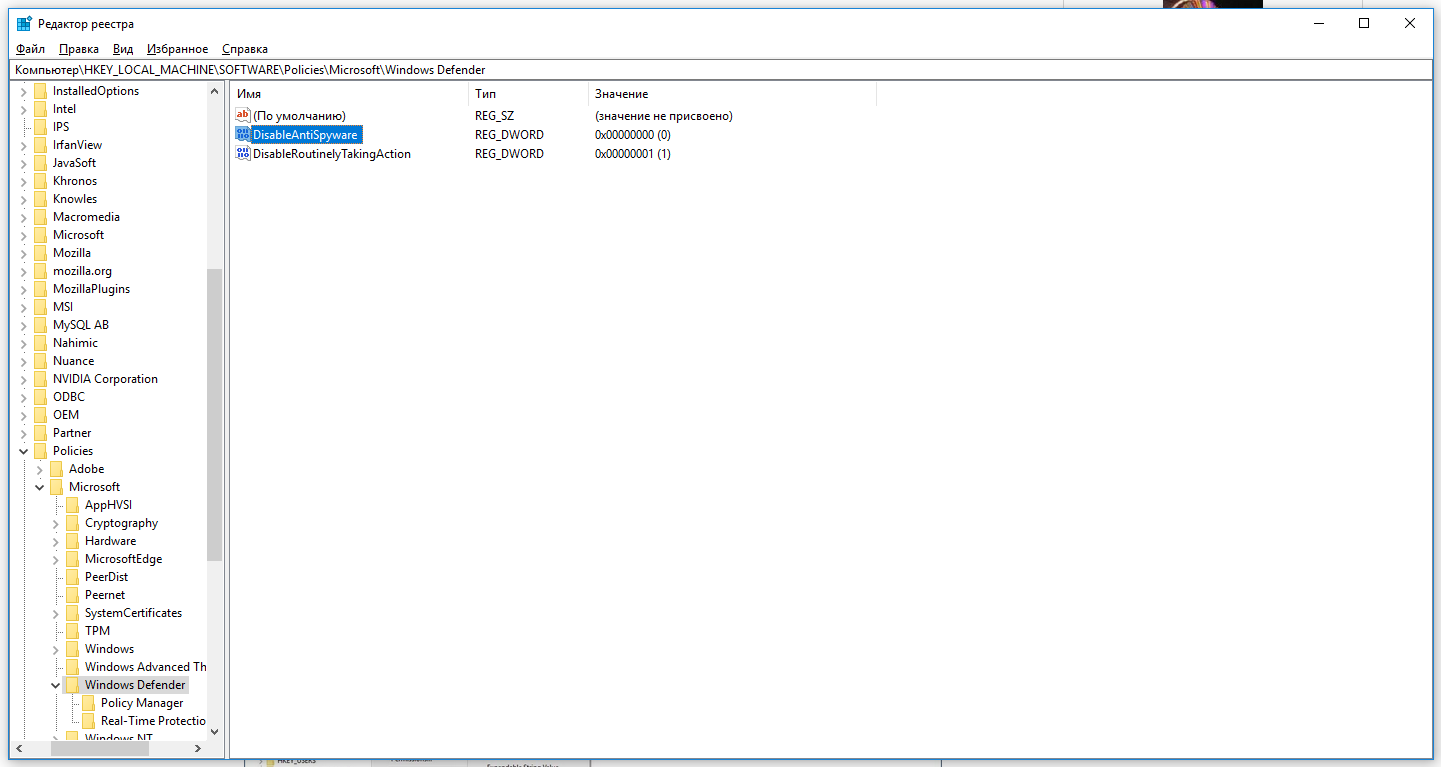
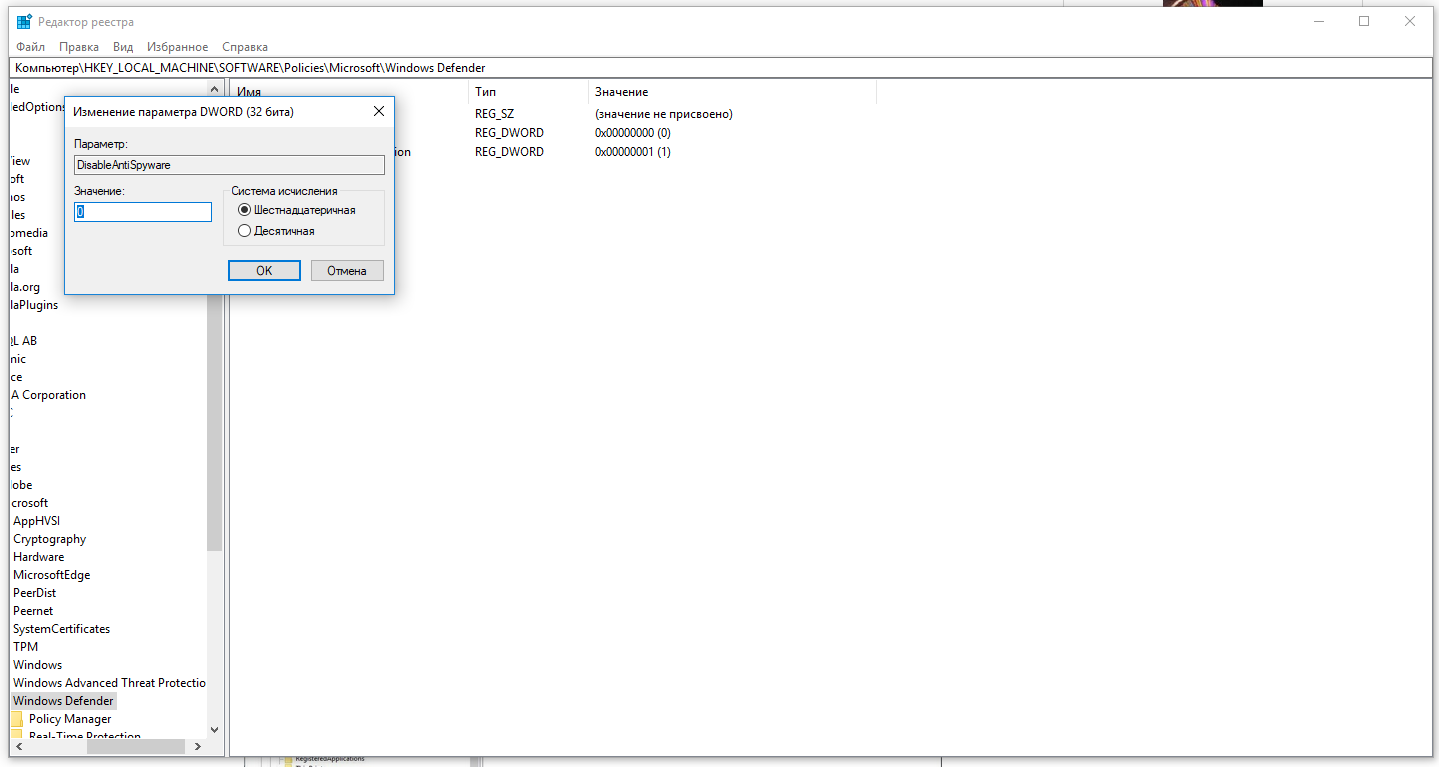
Затем правой клавишей нажмите на ключ (каталог) Windows Defender, выберите «Новый» и DWORD (32-bit) Value. Назовите новый ключ DisableAntiSpyware и нажмите «Ввод». Затем двойным щелчком откройте редактор ключа и задайте ему значение 1.
Нажмите ОК, и перезапустите компьютер.
После этого Защитник Windows уже не будет защищать вашу систему. Если вы захотите отменить эти изменения, повторите все шаги, но в конце удалите этот ключ или назначьте ему значение 0.
Рекомендации
Несмотря на наличие нескольких методов отключения Защитника Windows, мы не рекомендуем использовать компьютер вообще без антивирусных программ. Однако вы можете столкнуться с ситуациями, в которых отключение этой функции будет лучшим вариантом. А если вы устанавливаете стороннюю программу-антивирус, вам не нужно отключать Защитника вручную, поскольку во время установки он отключится автоматически.
![]()
Download Article
Easy step-by-step guide to disable Defender antivirus protection
![]()
Download Article
- Disabling Defender Temporarily
- Disabling Permanently with Other Antivirus Software
- Disabling with Group Policy Editor
- Q&A
- Tips
- Warnings
|
|
|
|
|
This wikiHow guide will show you how to turn off Microsoft Defender (formerly Windows Defender) in Windows 10. Microsoft Defender can be disabled in Settings, but will turn back on automatically when you restart your computer. If you want to turn off Defender permanently, you’ll need to install a different antivirus program. You can also use the built-in Group Policy Editor to permanently turn off Defender. Keep in mind that turning off Defender without having another antivirus installed will open up your PC to security threats.
Things You Should Know
- Go to Settings > Update & Security > Windows Security > Virus & threat protection to turn off Defender temporarily.
- Download a 3rd-party antivirus software to automatically turn off Defender.
- Use the Local Group Policy Editor to permanently turn off Defender.
- Note that the Group Policy Editor is only available on Windows Pro, Ultimate, and Enterprise.
-

1
Open your Windows Settings
. Click the gear-shaped Settings icon in the lower-left side of the Start menu. Doing so opens the Settings window.
- This method turns off Microsoft Defender’s real-time antimalware protection temporarily, which can be helpful if you need to install trusted software that Defender improperly flags as harmful. Defender will turn back on automatically after you restart your PC.
-
2
Click
Update & Security. It’s in the bottom row of Settings options.
Advertisement
-
3
Click Windows Security. This tab is in the upper-left side of the window.
-
4
Click Virus & threat protection. It’s the first option below the «Protection areas» heading near the top of the page. Doing so opens the Windows Defender window.
-
5
Click Virus & threat protection settings. You’ll find this option in the middle of the page.
-
6
Disable Microsoft Defender’s real-time scanning. Turning off real-time protection will mean your device is vulnerable until it turns back on.[1]
- Click the blue «On» switch
below the «Real-time protection» heading.
- Click Yes when prompted. This will turn off the real-time scanning feature of Microsoft Defender.
- You can also disable Microsoft Defender’s cloud-based protection by clicking the blue «On» switch below the «Cloud-delivered protection» heading and then clicking Yes when prompted.
- Microsoft Defender will turn itself back on the next time you restart your computer.
- Click the blue «On» switch


Advertisement
-
1
Go to the website for your preferred 3rd-party antivirus program. To turn off Microsoft Defender permanently, you can install a 3rd party antivirus software like Bitdefender, McAfee Antivirus Plus, or Malwarebytes Premium.
- For more general info, check out our guide on protecting your computer with antivirus software.
-
2
Download the setup file for the 3rd-party antivirus. The download location on the website will vary depending on your selected software.
- For example, Bitdefender Antivirus Free for Windows is available through the FOR HOME tab on their website. The button says FREE DOWNLOAD FOR WINDOWS.
- Make sure your computer meets the minimum specifications for the software.
-
3
Double-click the setup file. This is the file downloaded from the antivirus’s website. The installer will open to begin installing the antivirus on your computer.
-
4
Complete the installation. Follow the instructions provided by the installer to finish installing the antivirus. You may be required to restart your computer during the process. Once you’ve installed a different antivirus program, Microsoft Defender will automatically turn off.
- For additional computer safety, make sure to password protect your Windows PC.


Advertisement
-
1
Turn off Tamper Protection. If you’re using Windows 10 Pro or Enterprise, you can use the built-in Group Policy Editor to permanently turn off Microsoft Defender. Note that your computer will be vulnerable to malware after turning off Defender. You’ll need to turn off Tamper Protection to turn off Microsoft Defender:[2]
- Open the Windows Security app.
- Click Virus & threat protection.
- Click Manage settings.
- Switch Tamper Protection to “Off”.
-
2
Press ⊞ Win+R. The Run menu will open.
-
3
Type gpedit.msc in the Run window and press ↵ Enter. This will open the Group Policy Editor menu.[3]
-
4
Navigate to the policy to turn off Microsoft Defender. Take these steps in the Group Policy Editor to find this option:
- Computer Configuration
- Administrative Templates
- Windows Components
- Microsoft Defender Antivirus
- In the policy list, look for “Turn off Microsoft Defender Antivirus”.
-
5
Double-click “Turn off Microsoft Defender Antivirus”. This will open an options menu for the policy.
-
6
Click Enabled.
-
7
Click OK. This will confirm the choice to turn off Microsoft Defender and close the window.
-
8
Restart your computer. Microsoft Defender will be turned off.
- Change the “Turn off Microsoft Defender Antivirus” to Not Configured in the Group Policy Editor to turn Microsoft Defender back on.


Advertisement
Add New Question
-
Question
I did not order Microsoft Defender, how do I delete it?

Microsoft Defender comes with Windows 10, and, unfortunately, it cannot be deleted.
-
Question
Is there a way to turn it off without admin privileges?
No, you need to be an administrator to disable Windows Defender. This is a security measure to prevent viruses from turning Windows Defender off. However, if you know what you are doing and are certain of the safety of a third party app, it is possible to turn it off by using third party operating systems or startup disks which can access system settings of this system or user account, and disabling services with help of third party apps.
-
Question
It keeps getting switched back to on. Why?
This is because Microsoft Defender automatically turns itself back on whenever Windows restarts.

See more answers
Ask a Question
200 characters left
Include your email address to get a message when this question is answered.
Submit
Advertisement
-
Installing a third-party antivirus will not delete Microsoft Defender, but it will deactivate it so that they don’t conflict.
Thanks for submitting a tip for review!
Advertisement
-
Disabling Microsoft Defender may also disable any other antivirus programs, such as Norton or McAfee.
-
Disabling Microsoft Defender may open your computer up to security threats. You should not do this unless you know what you are doing.
Advertisement
About This Article
Article SummaryX
1. Open the Start menu.
2. Click Settings.
3. Click Update & Security.
4. Click Windows Security.
5. Click Virus & threat protection.
6. Click Virus & threat protection settings.
7. Toggle off «Real-time protection.»
For more information on how to disable Microsoft Defender, read on!
Did this summary help you?
Thanks to all authors for creating a page that has been read 1,976,233 times.
Is this article up to date?
Windows Defender is a security software that helps protect your computer against pop-ups, slow performance, and security threats caused by spyware and other unwanted software. In the event that you want to disable it, there are three ways presented below to doing so. This article walks you through different ways to disable Windows Defender on your Windows 10 PC.
Please note that turning off Windows Defender without an alternative security software running will leave your PC open to possible security threats. As such, we advise that you install another security software or Antivirus programme if you are turning off Windows Defender.
 1")
How to disable Windows Defender using the Security Center app
Difficulty Level: Easy. Every PC user can do this comfortably. Keep in mind that disabling Windows Defender will open your computer to security threats..
If you are not a techie person, this is the easiest way to turn off Windows Defender. It is straightforward and direct. The following process only disables Windows Defender Antivirus temporarily. The next time you restart your PC, Windows Defender will re-enable automatically.
To proceed and disable Windows Defender temporarily, follow these steps:
- Click the Windows logo in the bottom-left corner of the screen. The Start menu will pop up.
- Click on the Gear icon to open your PC’s Security menu.
- Click Update & Security.
- Click on Windows Defender in the upper-left side of the window.
- Open Windows Defender Security Center.
- Click on Virus & threat protection.
- Click Virus & threat protection settings.
- Turn off the Real-time protection toggle switch.
That is it. Windows Defender is disabled temporarily. Note that it will be active once again the next time you restart your PC.
 2")
How to disable Windows Defender using the Registry Editor
Difficulty Level: Fairly Difficult. This disables the software permanently but requires you having a knowledge of command line. Using the Registry Editor can harm or even brick your computer. You proceed with the steps below at your own risk. Preferably, make a backup of your PC at this point.
Here is how to disable disable Windows Defender permanently using the Registry Editor:
- Use the Windows key + R keyboard shortcut to open the Run command.
- Type regedit, and click OK to open the Registry.
- Browse the following path:
HKEY_LOCAL_MACHINE\SOFTWARE\Policies\Microsoft\Windows DefenderQuick Tip: You can now copy and paste the path in the new Registry’s address bar to quickly jump to the key destination. - If you don’t see the DisableAntiSpyware DWORD, right-click the Windows Defender (folder) key, select New, and click on DWORD (32-bit) Value.
- Name the key DisableAntiSpyware and press Enter.
- Double-click the newly created DWORD and set the value from 0 to 1.
- Click OK.
- Restart your computer.
Windows Defender Antivirus is now disabled.
How to re-enable Windows Defender using the Registry Editor
If you ever want to re-enable the service at any time, follow these steps:
- Go back to the Windows Defender folder in Registry Editor by following steps 1 to 4 above.
- Click on the “Windows Defender” folder.
- Open the “DisableAntiSpyware” value by double-clicking it.
- Change the “Value data” from 1 to 0.
- Click OK, then restart your computer.
How to turn off Windows Defender using Local Group Policy
Difficulty Level: Fairly Difficult. This requires you having a knowledge of command line. Using the Registry Editor can harm or even brick your computer. You proceed with the steps below at your own risk. Preferably, make a backup of your PC at this point.
The following steps detail how to disable Windows Defender permanently for Windows 10 Pro, Enterprise, or Education users using the Local Group Policy Editor:
- Use the Windows key + R keyboard shortcut to open the Run command.
- Type gpedit.msc and click OK to open the Local Group Policy Editor.
- Browse the following path:
Computer Configuration > Administrative Templates > Windows Components > Windows Defender Antivirus - On the right, double-click the Turn off Windows Defender Antivirus policy.
- Select the Enabled option to disable Windows Defender.
- Click Apply.
- Click OK.
- Restart your computer.
You have disabled Windows Defender Antivirus permanently.
How to re-enable Windows Defender using the Registry Editor
If you ever want to re-enable Defender at any time, follow these steps:
- Go back to the Windows Defender folder in Registry Editor by following steps 1 to 4 above.
- At step 5, select the Not Configured option.
- Click OK.
- Restart your computer.
That is it.
- Don’t miss our reviews.
- Follow our news on Google News.
- Join our WhatsApp Group, to be notified of the most important articles and deals,
- Follow us on Instagram, Facebook, Twitter, and YouTube.
How to turn off Windows Defender in Windows 10 permanently? Sometimes you want to disable Windows Defender for testing purposes. If you have an Antivirus application running, Windows Defender will be automatically disabled. That’s because your Antivirus software will take over the security from now on. This article will teach you how to turn off Windows Defender in Windows 10 temporarily and permanently.
Table of contents
- Windows Defender unable to stop service
- Check status Windows Defender in Windows Security
- Disable Windows Defender in Windows 10 temporarily
- How to turn off Windows Defender in Windows 10 permanently
- Step 1. Download Autoruns for Windows
- Step 2. Turn off Real-time protection
- Step 3. Boot into safe mode
- Step 4. Start Autoruns for Windows
- Step 5. Enable Windows Services in Autoruns
- Step 6. Uncheck Windows Defender Antivirus Service
- Step 7. Boot into normal startup
- Verify that Windows Defender is kept turned off after Windows 10 restart
- Revert the changes
- Conclusion
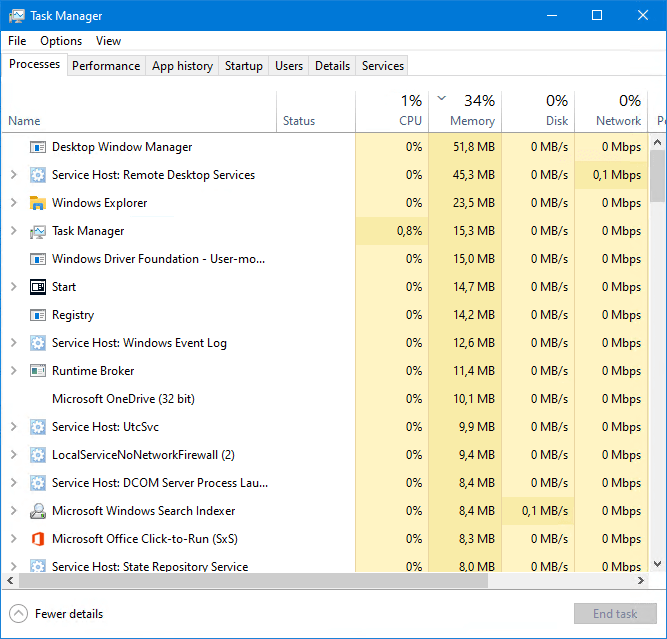
Windows Defender unable to stop service
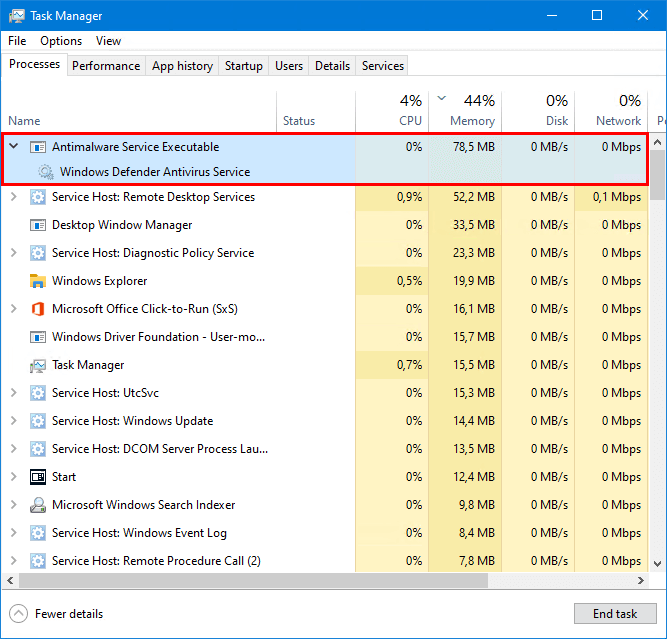
Start Task Manager on Windows 10. Find the Windows Defender service that is running. Search for the task name Antimalware Service Executable and the service Windows Defender Antivirus Service.
Right-click the Windows Defender Antivirus Service and click Stop.
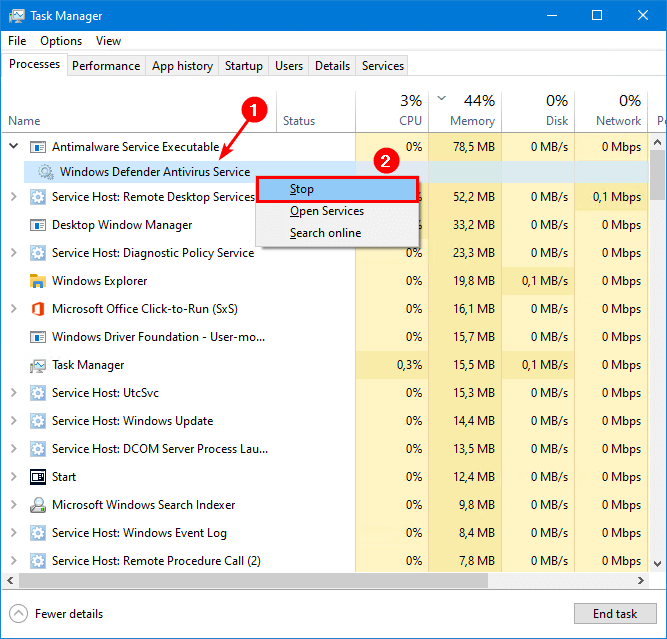
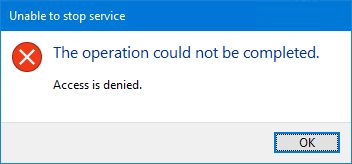
An error will show up that the operation could not be completed. Access is denied. It’s unable to stop the service.
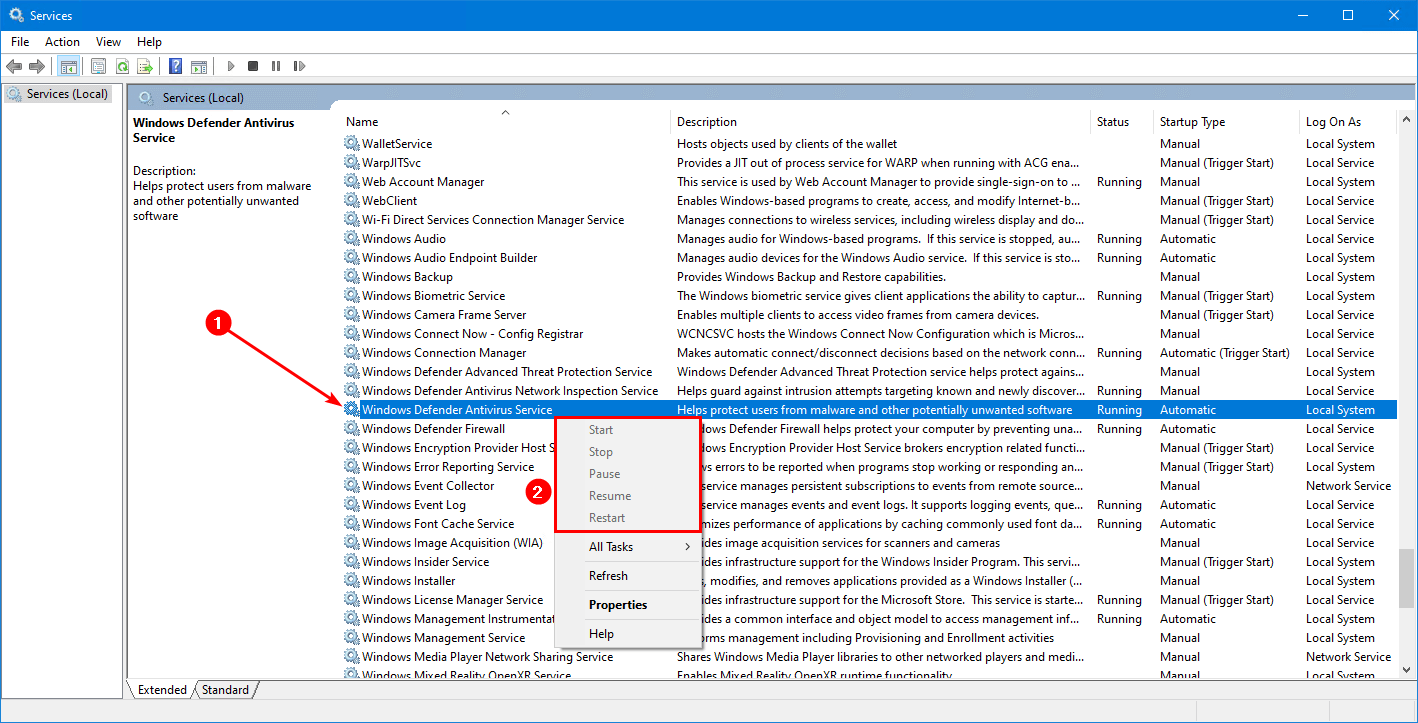
Start the application Services and right-click on Windows Defender Antivirus Service. You can see that the following options are greyed out:
- Start
- Stop
- Pause
- Resume
- Restart
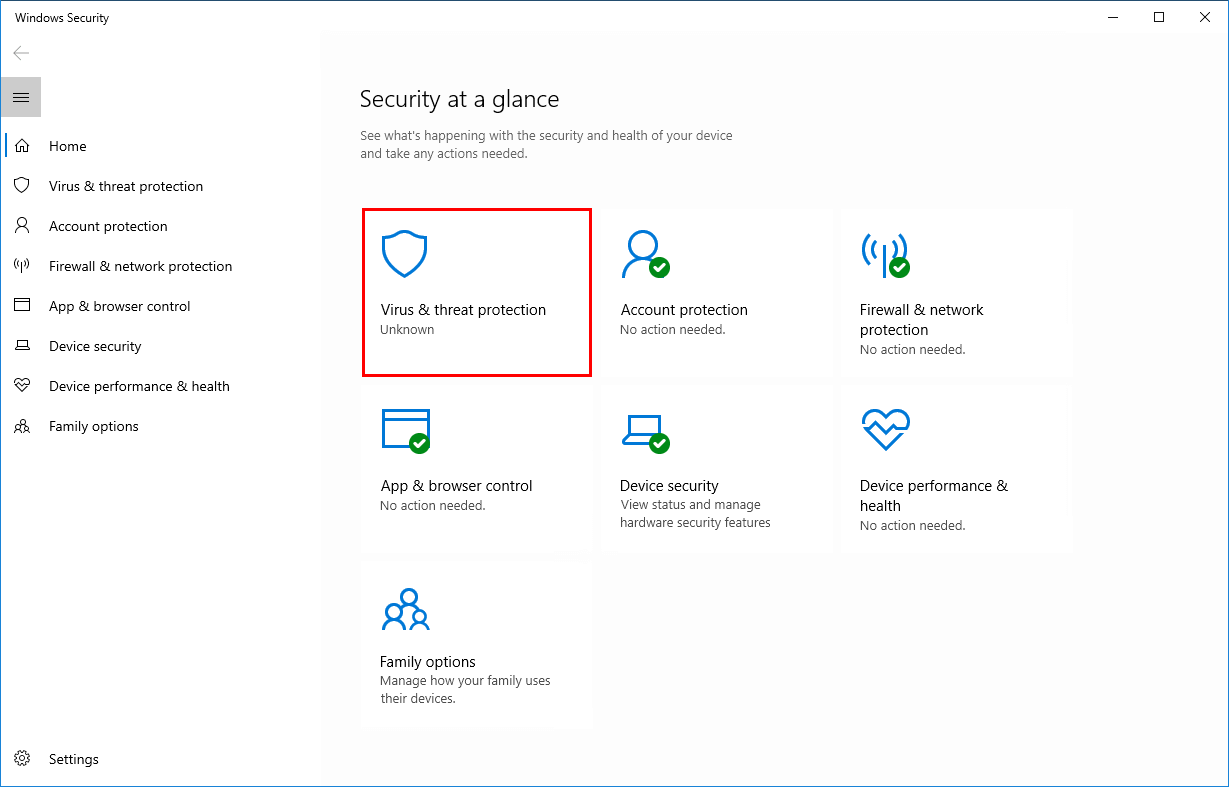
Check status Windows Defender in Windows Security
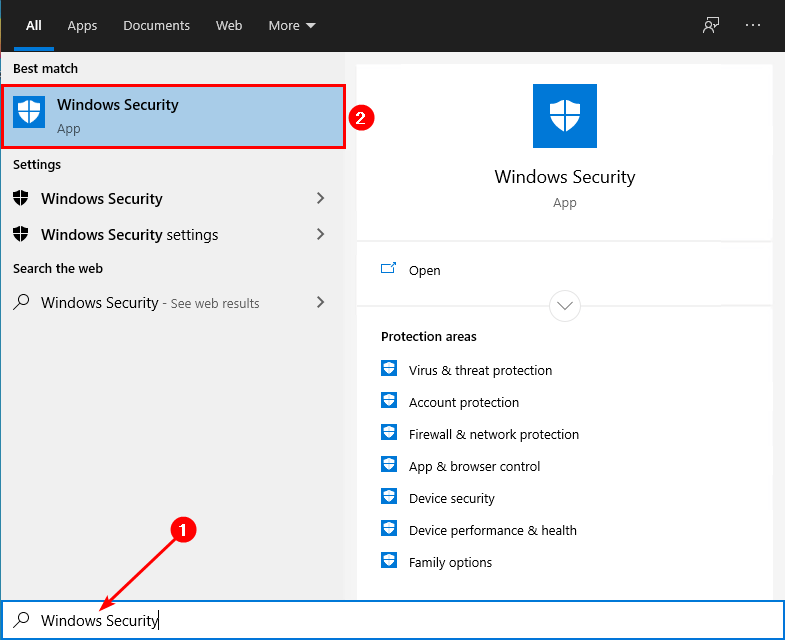
Open the Windows Start menu. Type Windows Security.
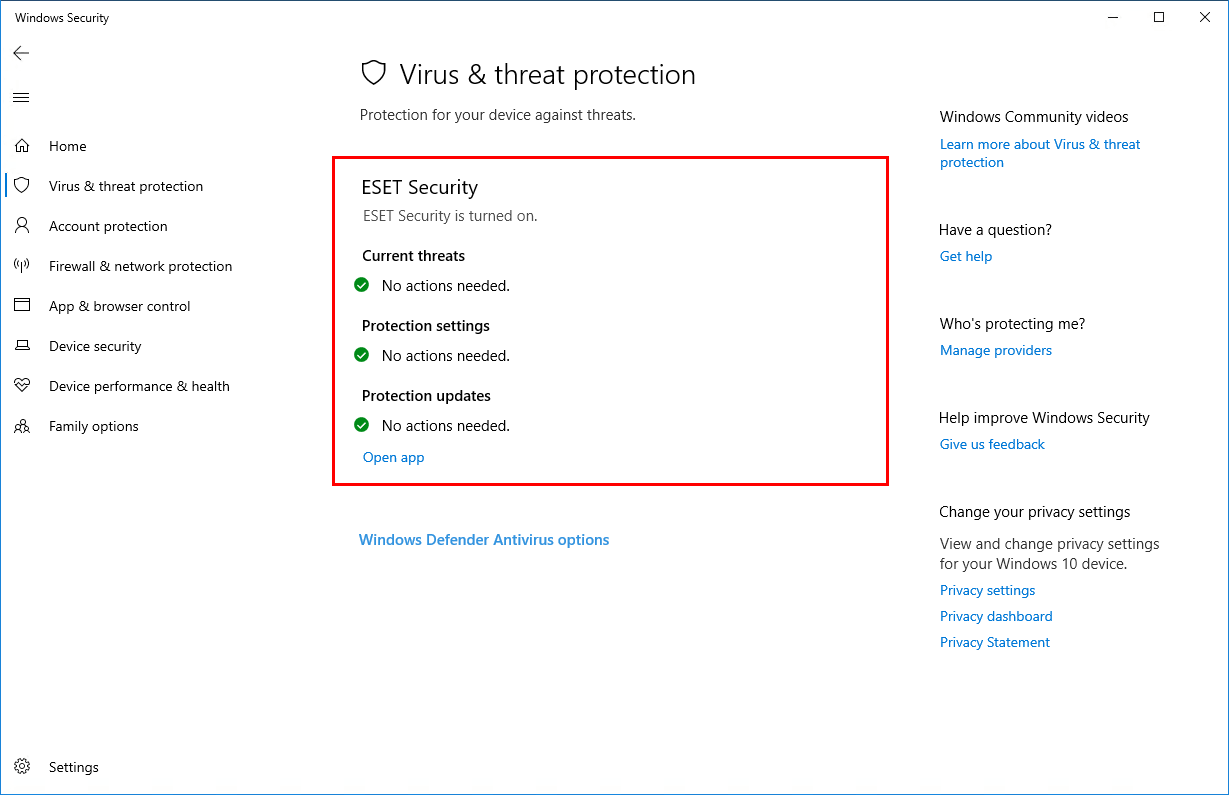
Click on Virus & threat protection.
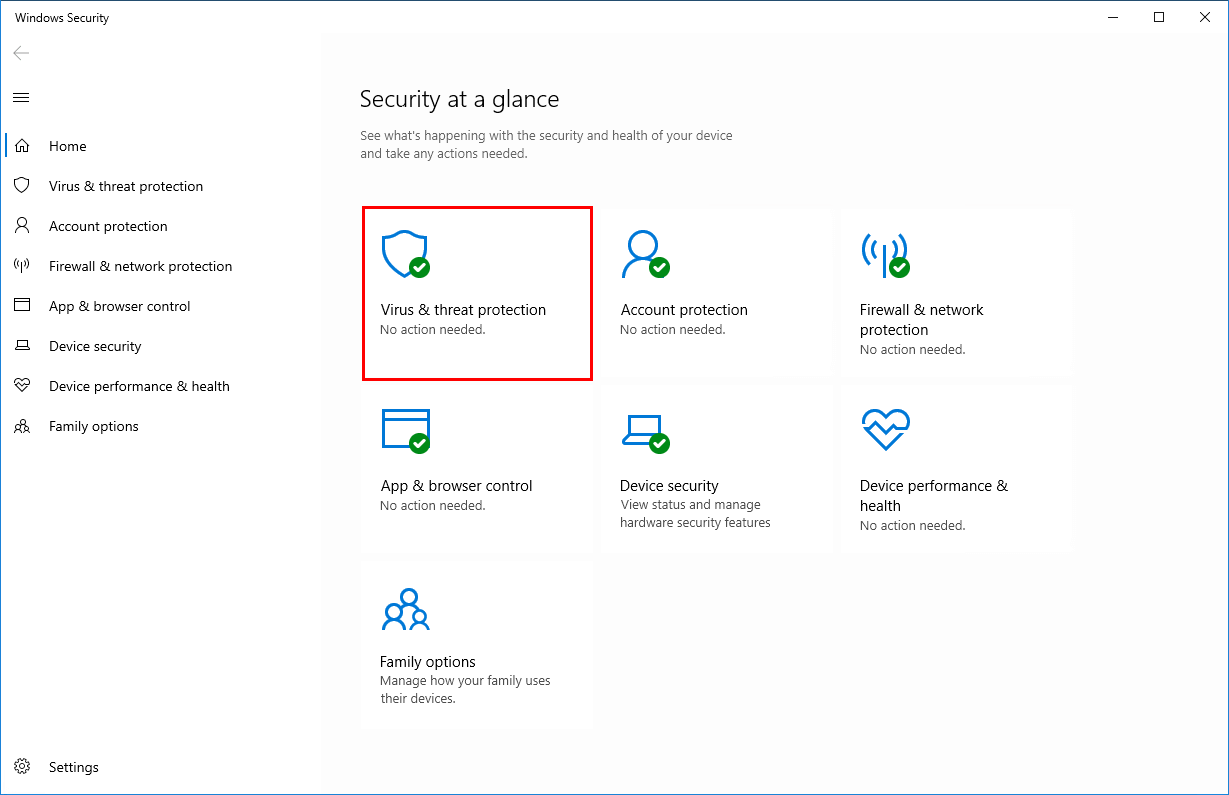
Windows Defender is enabled.

If you installed another security product, you would see the following screen.
Windows Defender will automatically disable and not run if periodic scanning is turned off (which is the default when you install a third-party security product). However, when turning on periodic scanning, Windows Defender will run simultaneously with the third-party security product.
Disable Windows Defender in Windows 10 temporarily
In Windows Security, click on Virus & threat protection.
Click on Manage Settings.
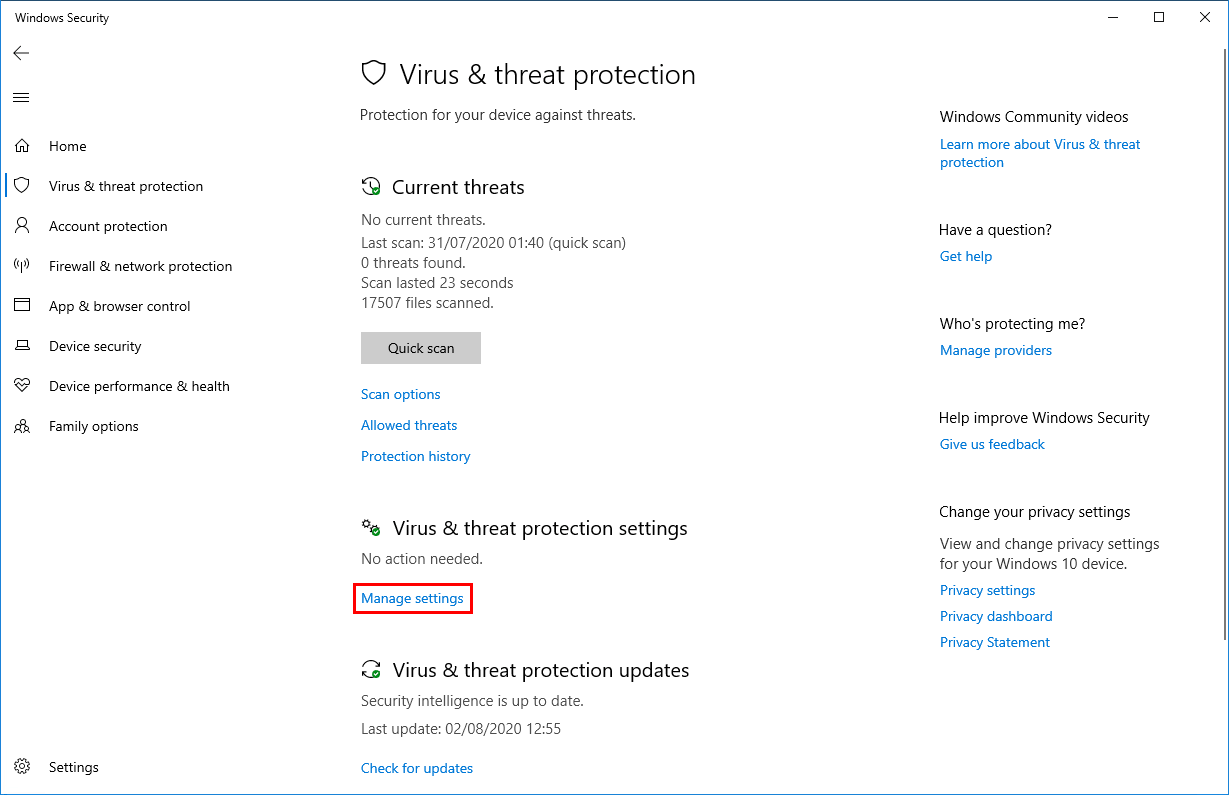
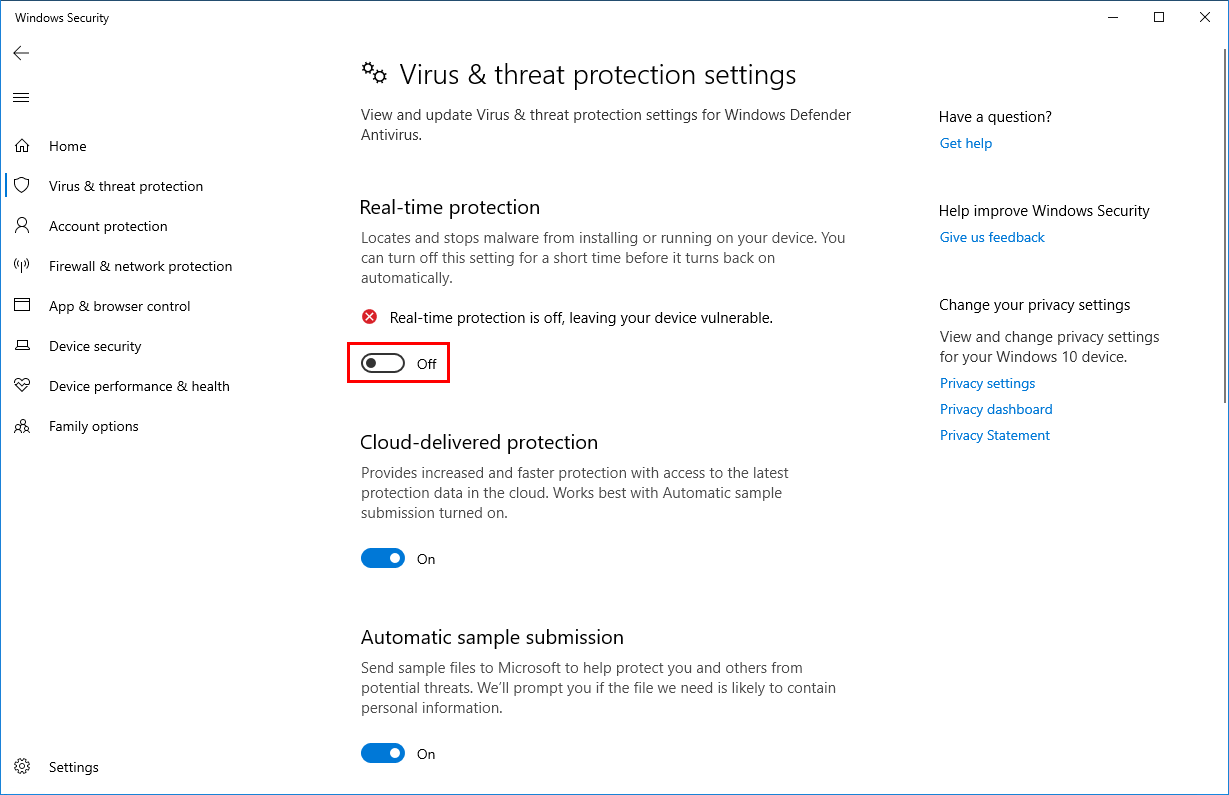
Click the toggle button under Real-time protection to turn off Windows Defender Antivirus.
Doing that, you can see that:
- The service is still running in the background
- A reboot will automatically enable Windows Defender
How can you disable Windows Defender service completely and keep it disabled after a reboot? Find out in the next step.
Step 1. Download Autoruns for Windows
Download Autoruns for Windows. Extract the zip file. You don’t need to do anything yet. You need Autoruns at a later stage.
Step 2. Turn off Real-time protection
As shown in the previous step, make sure that Real-time protection is Off.
Important: Turn off Real-time protection.
Step 3. Boot into safe mode
Click on Windows Start and search for msconfig. Run System Configuration as administrator.
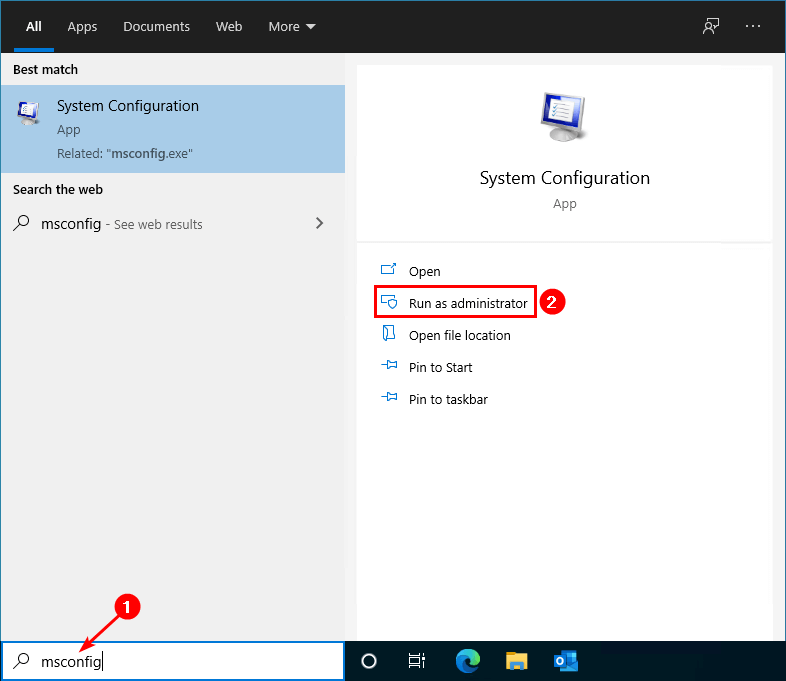
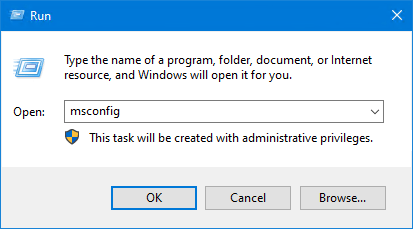
You can also start the program Run. Type msconfig and click on OK.
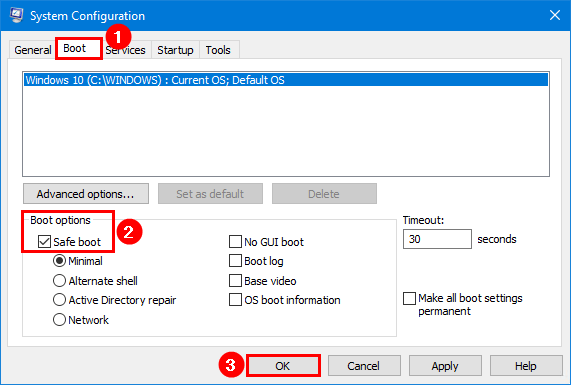
Select the tab Boot. In the section Boot options, enable Safe boot. Click on OK.
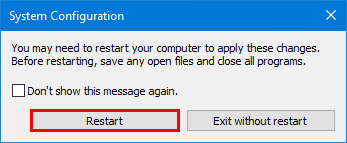
Click on Restart.
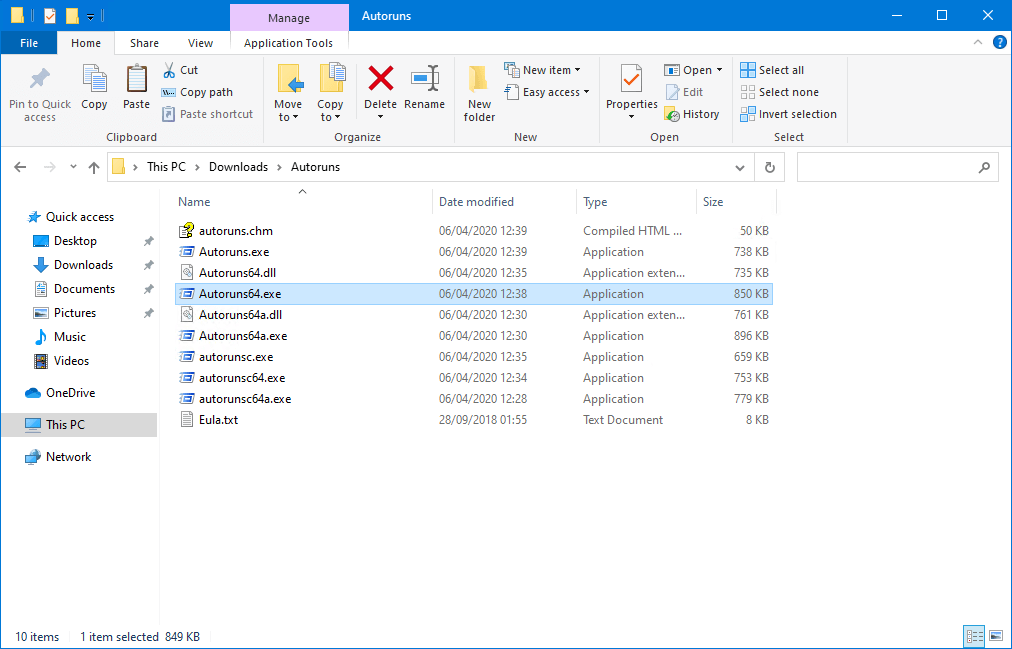
Step 4. Start Autoruns for Windows
In the previous step, you already did download and extract Autoruns for Windows. Browse to the Autoruns folder and start the executable Autoruns64.exe. If you are running Windows 10 32-bit, start Autoruns.exe.

Step 5. Enable Windows Services in Autoruns
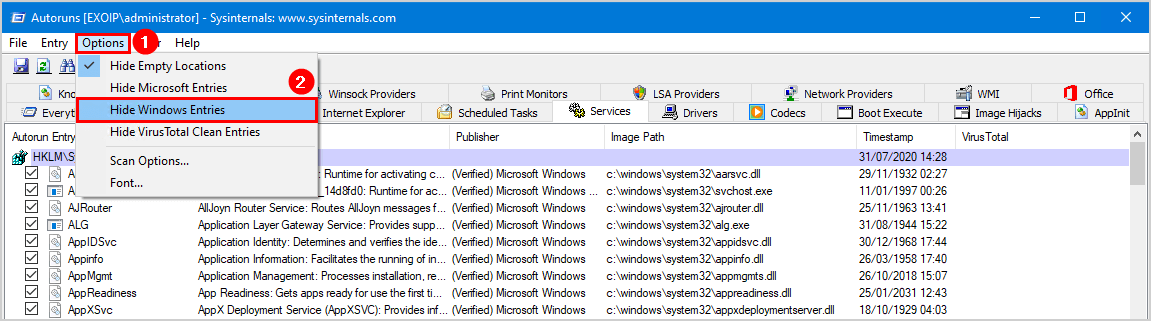
Go to the tab Services. It will not show many services. That’s because Windows services are not showing by default.
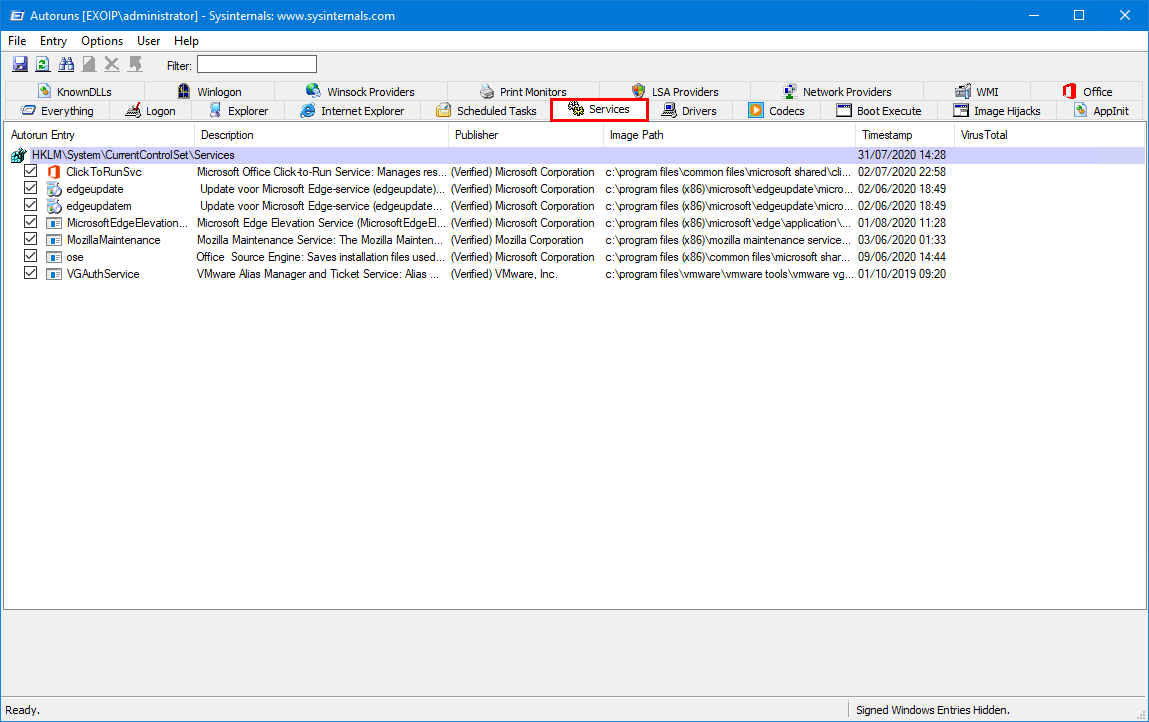
Click in the menu bar on Options. Uncheck Hide Windows Entries. It will show the Windows services in the list view.
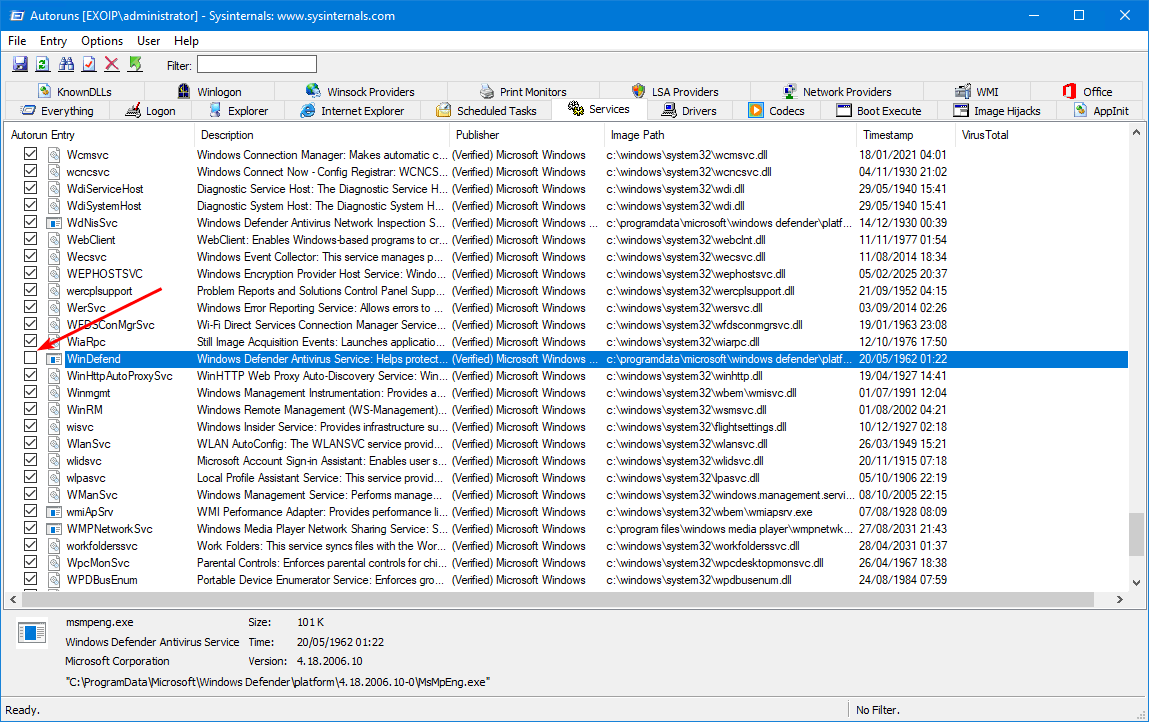
Step 6. Uncheck Windows Defender Antivirus Service
Search for WinDefend and uncheck the checkbox. Unchecking will prevent the Windows Defender automatic startup after every reboot.
Step 7. Boot into normal startup
Start the application msconfig.
Select the Normal startup. Click on OK.
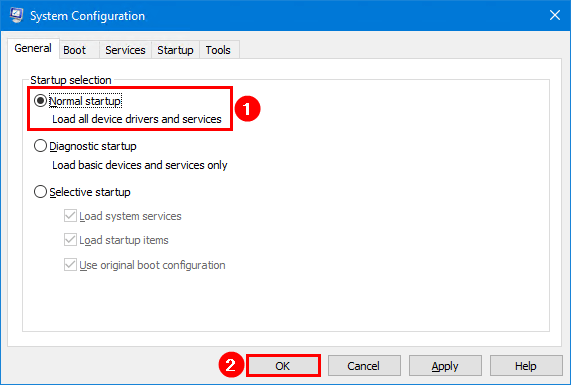
Click on Restart.
Verify that Windows Defender is kept turned off after Windows 10 restart
After a restart, start Task Manager. There is no more Windows Defender service running.
Start Windows Security and have a look at Virus & threat protection. You will see that there is a spinning icon, or the status is showing as unknown. That’s because it’s fetching the information.
Important: Do not click on the Virus & threat protection tile while it’s fetching information or the status is unknown. If you do that, it will enable Windows Defender. Keep waiting till you see it’s disabled.
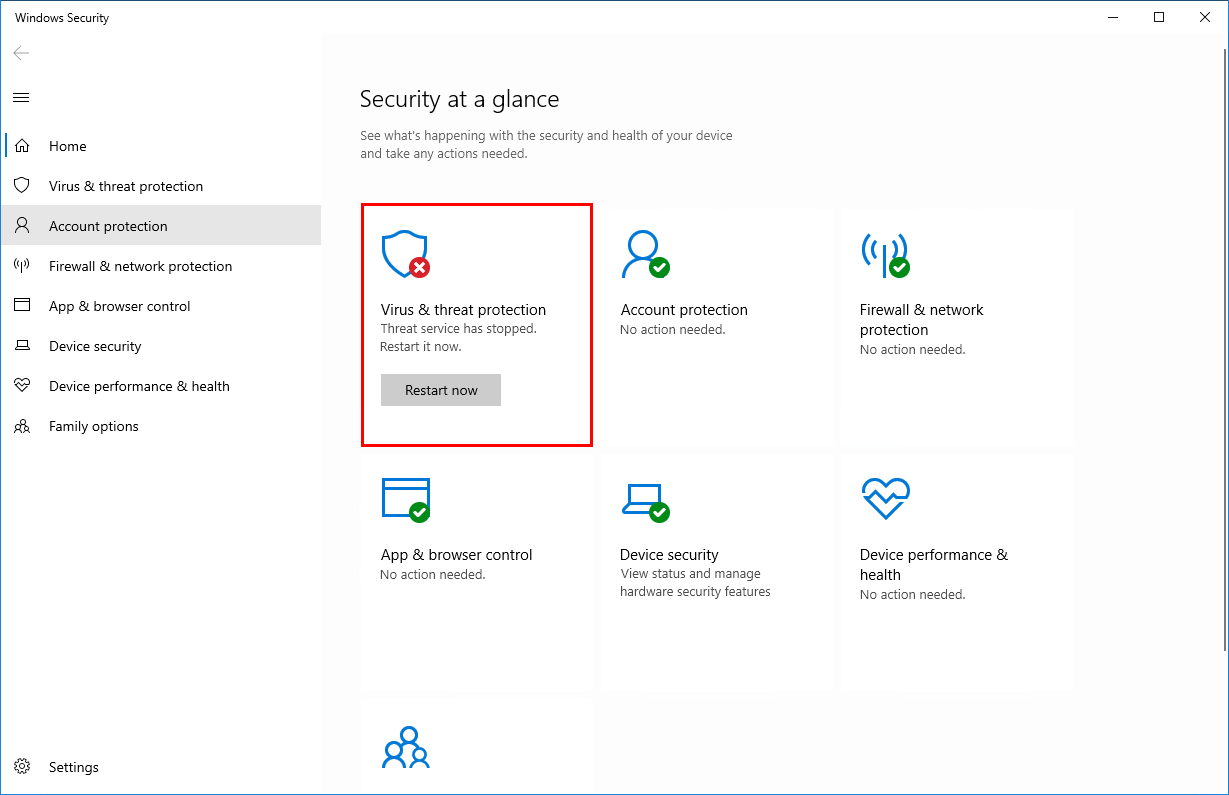
Give it a couple of minutes. After that, you will see that Virus & threat protection is disabled.
Note: The first attempt might not work, and you have to do the steps a second time before it will turn off Windows Defender permanently.
Microsoft releases big Windows 10 OS updates a couple of times a year. After it’s installed and the Windows 10 OS is up to date with the new version, it sometimes triggers the Windows Defender service settings and starts automatically again. This means you must go through the steps to ensure that Windows Defender doesn’t start.
Revert the changes
Suppose you like to revert the changes. Then, click on the Restart Now button in Windows Security. Another way is to boot into safe mode, start Autoruns, and check the WinDefend service.
Keep on reading: Disable Windows Firewall with PowerShell »
Conclusion
In this article, you learned how to turn off Windows Defender in Windows 10 permanently. Make sure to follow the exact steps, as shown in the article. After doing that, Windows Defender will be kept turned off.
Did you enjoy this article? You may also like Disable Symantec Endpoint Protection (SEP). Don’t forget to follow us and share this article.