Transfer photos from an iPhone to your PC.
First, connect your iPhone to a PC with a USB cable that can transfer files.
-
Turn your phone on and unlock it. Your PC can’t find the device if the device is locked.
-
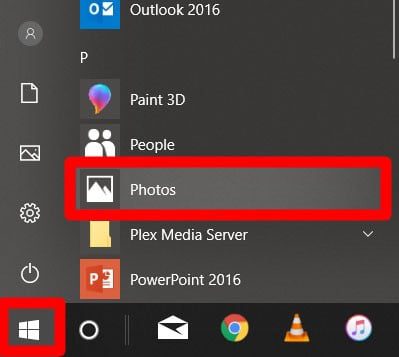
On your PC, select the Start button and then select Photos to open the Photos app.
-
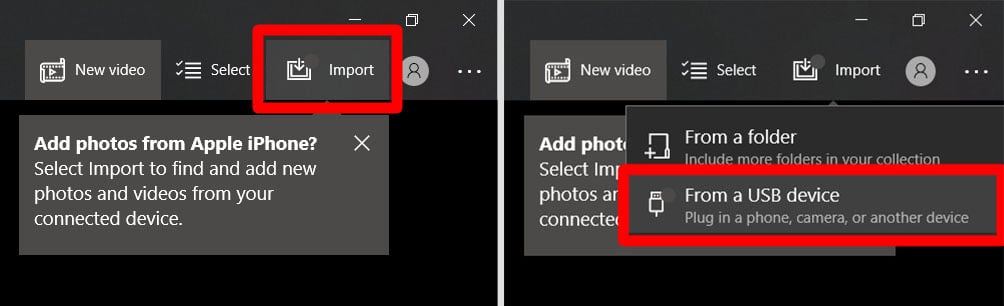
Select Import > From a USB device, then follow the instructions. You can pick the items you want to import and select where to save them. Allow a few moments for detection and transfer.
Make sure the photos you want to import are actually on the device rather than in the cloud. Then, follow the steps for your type of device.
For more info, see Import photos and videos from phone to PC
Need more help?
Want more options?
Explore subscription benefits, browse training courses, learn how to secure your device, and more.
Communities help you ask and answer questions, give feedback, and hear from experts with rich knowledge.
When it comes to choosing a suitable transfer software, there are three key factors that should be taken into consideration: transfer speed, photo quality, and storage space. A fast transfer speed can significantly reduce the waiting time; More photo quality choices enable you to transfer photos without losing quality; Unlimited free storage brings great convenience for transferring large photos.
It is hard to find one that can meet all your requirements, but you can choose the one that most matches your needs. If you’re looking for such a tool, here are some best free software worth a try!
| Tools | Difficulty |
Supported OS |
Effectiveness |
| EaseUS MobiMover | Super Easy |
Windows, iOS, Mac |
Get all or part of the photos moved from phone to a PC without restrictions on the number of photos |
|
File Explorer |
Easy |
Windows |
Work well on transferring photos and videos between mobile phones and computers |
| Photos App | Easy | Windows, Mac | Free to view and manage photos on your computer or an external device |
| iCloud | Super Easy | Windows, iOS, Mac | Easy to transfer photo data |
| iTunes | Easy |
Windows, Mac |
Free software to transfer photos from iPhone to PC |
How to Transfer Photos from iPhone to PC via EaseUS MobiMover
EaseUS MobiMover is the first utility we recommend. With this light iPhone data transfer tool, you can easily connect phone to computer and get all or part of the photos moved from phone to a PC with several clicks. The best part of this tool is that it has no restrictions on the number of photos you can transfer and has no internet requirement. This undoubtedly makes the transfer process incredibly easy and convenient.
✅Beyond that, it has many other outstanding features:
- Easy to use
- Good transfer speed
- Unlimited storage (This depends on your computer’s storage space)
- No quality loss
- No internet required
Besides, it is also a good option if you’re struggling to transfer photos from iPhone to iPhone. Now, you can free download it on your computer and start to transfer photos.
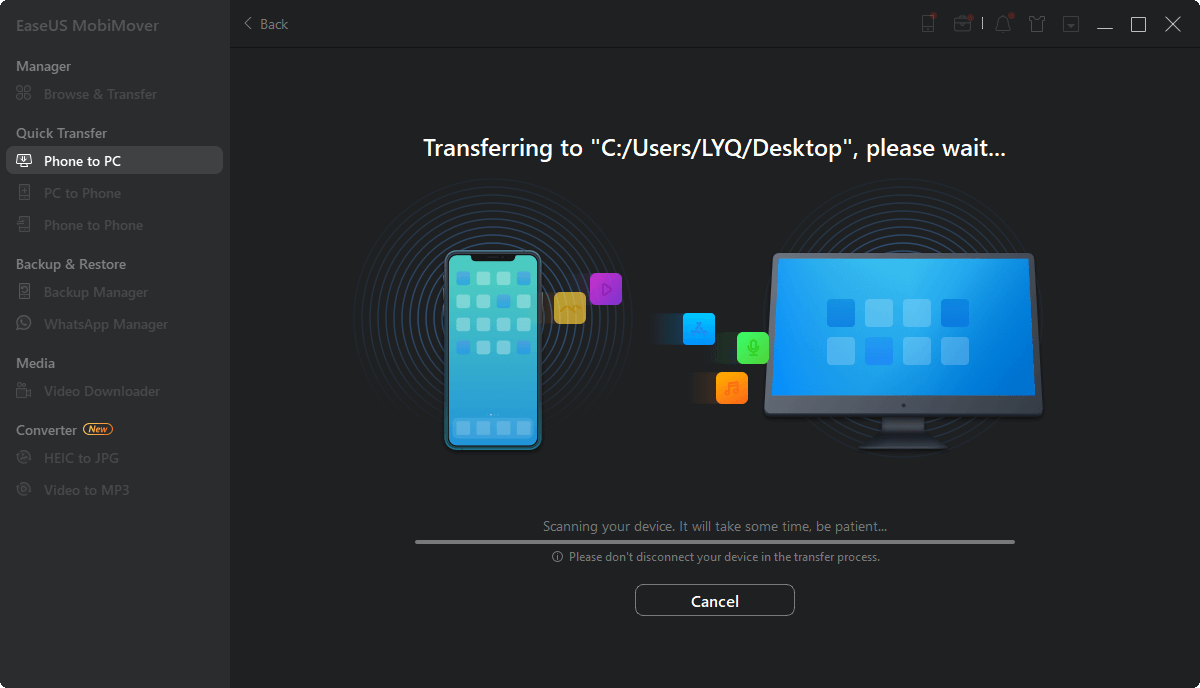
Step 1. Connect your iPhone to PC running Windows 7 or later. Run EaseUS MobiMover, choose «Phone to PC» and click the «Next» button on the screen. This mode allows you to transfer data from iPhone to PC in one click.

Step 2. MobiMover supports transferring audio, videos, pictures, books, contacts, messages, etc. from iPhone to PC. Here, choose «Pictures» only. MobiMover will save the files on your desktop by default. You can customize the path as you need.

Step 3. Now, click the «Transfer» button to start transferring photos from your iPhone to PC. The transfer time depends on the file size. Wait patiently
How to Transfer Photos from iPhone to PC for Free via File Explorer
File Explorer, a file manager application for PCs, also does an excellent job transferring photos and videos between mobile phones and computers. It doesn’t require an internet connection and has no restrictions on the number of photos you can transfer.
The only drawback of this way is that if you want to transfer photos selectively, you have to spend much more time selecting the items since all images and videos are stored in the folder in an unorganized way.
To transfer photos from iPhone to PC via File Explorer:
Step 1. Connect your iPhone to your PC via a USB cable.
Step 2. Open File Explorer on your computer. If you’re using Windows 8 or Windows 10, you can open it by pressing Windows key + E.
Step 3. Click on «This PC» in the sidebar. Then you will see your iPhone under «Devices and drives.» If you’re using Windows 7, then your iPhone is under «Computer.»
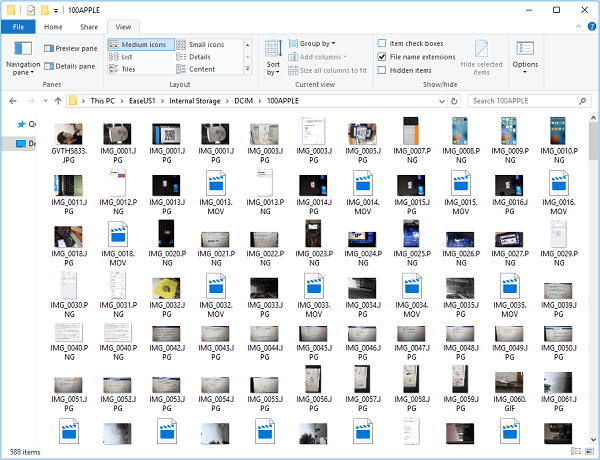
Step 4. Double-click your iPhone’s name and then click on «Internal Storage» then DICM.
Step 5. Find the folder that holds the photos you’d like to import and drag (copy) them to the folder you want to house them.
How to Transfer Photos from iPhone to PC with the Windows 10 Photos App
The Photos app is a free photo viewer and editor included with Windows 10. With it, you can free to view and manage photos on your computer or an external device. Only a USB is needed for this method.
To transfer iPhone pictures to a PC with Windows 10 Photos app:
Step 1. Open Photos on your PC from the Start Menu, desktop, or taskbar. Meanwhile, connect your iPhone to your PC.
Step 2. Click «Import» in the upper-right corner.
Step 3. Click «From a USB device.»
Step 4. Choose the photos you’d like to import.
Step 5. Click «Continue.»

How to Transfer Photos from iPhone to PC via iCloud Wirelessly
iCloud for Windows is another application that is worth a try. Before making use of this application, several things should be noted:
- Notice:
- 💡Make sure you’ve installed the iCloud application on your computer
- 💡Make sure both your iPhone and computer have connected to a stable internet
- 💡Make sure your iCloud has enough storage
To transfer photos from iPhone to PC via iCloud:
Step 1. First of all, you’ll need to enable iCloud Photo Library on your iPhone.
- Go to your Settings.
- Tap [your name].
- Tap «Photos.»
- Enable «iCloud Photo Library.»
Step 2. Then you can download photos from iCloud to your PC.
- Open the iCloud Control Panel on your computer.
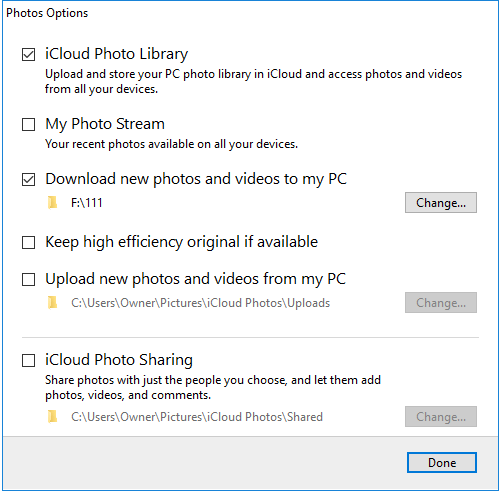
- Click «Options» next to Photos.
- Tick the box next to «iCloud Photo Library» and «Download new photos and videos to my PC.»
- Go to your computer to check the photos and videos from your iPhone.
If you didn’t install the iCloud Control Panel on your computer, you could go to the iCloud website to get the job done as well.
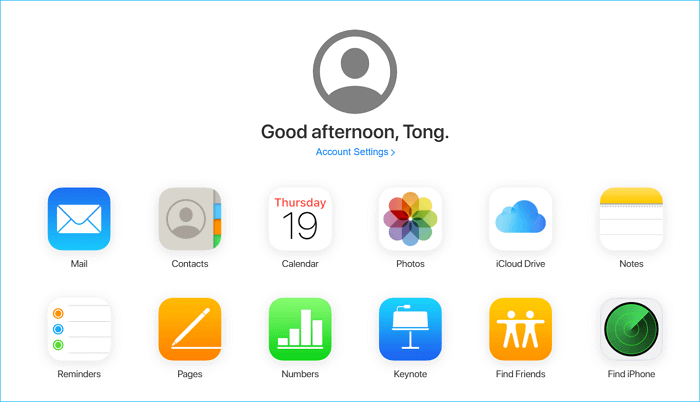
Step 1. Go to iCloud.com on your computer and sign in with your Apple ID and password.
Step 2. Select «Photos» to view all photos stored in your iCloud.
Step 3. Choose and download the items to your PC.
How to Transfer iPhone Photos to PC via iTunes
iTunes is also free software to transfer photos from iPhone to PC. But the images you backed with iTunes are not viewable unless restoring them to your iPhone or iPad, which will erase your current data on the iPhone.
Step 1. Plug your iPhone into the computer with a USB cable, then launch iTunes.
Step 2. Find the device icon on the menu and click the «Photos» tab under the Settings section.
Step 3. From the right side of iTunes, tick «Sync Photos.»
Step 4. Select «all photos and album» or specific files and click «Apply.»
Step 5. Wait for the syncing process to complete, and then click «Done.»
Step 6. Then, you can find iPhone backup location on Windows.
The Bottom Line
We hope you have successfully transferred photos from iPhone to PC with the five apps we offered in this post. If you have any questions about this topic, then you can contact us to help you out. During the process of transferring, you may meet data loss. If that unfortunately happens, don’t forget to recover the deleted photos back.
For more information about free software to transfer photos from iPhone to PC, check the following questions that people also asked.
1. Why can’t I transfer photos from iPhone to PC?
You are not allowed to transfer photos from iPhone to PC if you are only storing a smaller preview of your images on the iPhone. Your photos are actually stored on iCloud.
2. What is the fastest way to transfer photos from iPhone to PC?
Connect your iPhone to a PC with a USB cable and then follow the steps below:
- Unlock your phone and turn it on. In the event that the device is locked, your PC cannot locate it.
- On your PC, select the Start button > Photos to open it.
- Select Import > From a USB device, then follow the instructions.
3. How do I transfer large amounts of photos between iPhones?
It is strongly recommended to use an iCloud backup to transfer photos from an old iPhone to a new iPhone.
![]()
Download Article
Easily store your iPhone photos on your computer with this user-friendly guide
![]()
Download Article
- Using the Photos App
- Using the File Explorer
- Using iCloud Photo Library
- Video
- Q&A
|
|
|
|
Do you need to move photos from your iPhone to your Windows computer? If you have iTunes, you can easily import photos using Windows’ built-in Photos app. You can also manually import photos by using the File Explorer. If you don’t want to connect your device to your computer via wires, you can use iCloud to transfer photos over Wi-Fi. This wikiHow will show you how to transfer photos from your iPhone to a Windows PC.
Things You Should Know
- You must have iTunes installed when using the Windows Photo app to import photos.
- Connect your phone to your PC, then open iTunes. Open the Photos app and click the import icon. Select From a connected device, then choose your photos.
- When using the File Explorer, right-click your connected iPhone, then click Import pictures and videos. Click Import all new items now.
-

1
Connect your iPhone to the PC. Use the USB charging cable that came with your phone.
- If this is the first time connecting your iPhone to the computer, you will need to tap Trust on the iPhone and then enter your iPhone’s passcode, Touch ID, or Face ID.
- Be sure to update your iPhone.
-
2
On your computer, open iTunes. This resembles a multicolored musical note on a white background. In order for a Windows computer to recognize an iPhone, you must open iTunes and allow the phone to connect to it.[1]
- If you don’t have iTunes, you’ll need to install it. You’ll need iTunes version 12.5.1 or later.
Advertisement
-
3
Wait for the «Device» icon to appear. This iPhone-shaped icon will appear in the upper-left side of the iTunes Library page. Once you see it appear, you can proceed.
- It may take several seconds for your iPhone to connect to iTunes.
- If the Library tab near the top of the iTunes window isn’t highlighted, click it to shift to Library view.
-
4
On your computer, open the Photos app. This looks like two mountains with a blue background. You can find this app by clicking the Start menu. Locate Photos in your App Library, or type Photos into the search bar.
-
5
Click the «Import» icon. This is the icon of the down-arrow in front of a photo square. You can find this in the top-right corner of the Photos window.
- A drop-down menu will open.
-
6
Click From a connected device. This is the bottom option in the drop-down menu.
- Your computer will begin looking for new photos and videos.
-
7
Select the pictures you want to import and click Continue. All selected items will have a checkmark in the top-right of the preview image.
- You can also click Select All at the top to select all the pictures and video.
-
8
Click Import. This will begin importing the images and videos from the iPhone.
- You can check the box next to «Delete imported items from Apple iPhone after importing» if you don’t want to keep the original photos or videos on the iPhone.


Advertisement
-
1
Connect your iPhone to the PC. Use the USB charging cable that came with your phone.
-
2
Unlock your iPhone. Unlock your iPhone using Touch ID or your phone’s passcode. This will prompt a question asking if you want to trust the computer you just connected to.
-
3
On the iPhone, tap Trust or Allow. This allows the iPhone to share data with the computer so you can download the pictures and video.
-
4
On your computer, open the File Explorer
. File Explorer allows you to browse files and devices connected to your computer.
-
5
Locate the connected iPhone. It should be listed on the left-side of the File Explorer window under «This PC». Click the arrow next to This PC to see a list of connected devices.
- If the iPhone doesn’t appear, try disconnecting the iPhone and plugging it back in.
-
6
Right-click on the iPhone and select Import pictures and video. It’s near the bottom of the drop-down menu.
- If you have a lot of photos, it may take a few moments to load.
-
7
Select the Import all new items now option and click Next. This will automatically import all the images and videos stored on your iPhone to your Pictures folder. Once finished importing, the Pictures folder will open automatically.
- You can also select Review, organize, and group items to import if you only want to select certain folders or photos.
- A window will open with your importing status. Depending on the number of files you’re transferring, this can take up to ten minutes or longer.
- Check the box next to Erase after importing if you want to delete the photos from your phone when the process is complete.
-
8
Locate your photos. The folder will automatically open in your Pictures folder. To find it, open File Explorer and click Pictures. You can also search for it in the Start menu.


Advertisement
-
1
Ensure that you have enough storage space. This method allows you to upload all of your photos to iCloud, at which point you can download them onto any computer with Internet access. However, you must have enough storage space to support the photos you want to transfer.
- You start with 5 gigabytes of free storage, but you may need to upgrade your storage before you can store your photos.
-
2
Open your iPhone’s
Settings. This is the grey cog icon.
-
3
Tap your Apple ID. This can be found at the very top of Settings. You’ll see your name and profile picture.
- If you are not signed in, tap Sign in to iPhone, enter your Apple ID and password, then tap Sign In. You can also create an Apple ID.
-
4
Tap iCloud. This will be below Subscriptions, next to a blue cloud icon. You’ll be able to see your storage space next to iCloud.
-
5
Tap Photos. This is underneath the Apps using iCloud header.
-
6
Toggle on
«Sync this iPhone». Your Camera Roll photos and videos will be uploaded to your iCloud account as long as you’re connected to Wi-Fi.
- If you have a lot of photos, this may take some time to sync.
-
7
On your computer, go to the iCloud website. Enter your Apple ID and password, then click the arrow to log in.
- If you’re already logged in, skip this step.
-
8
Click
Photos. It’s a multicolored pinwheel-shaped icon.
-
9
Click the Photos tab. You can find this in the upper-left side of the page.
-
10
Select photos to download. You can select multiple photos by holding CTRL and clicking each photo.
-
11
Click the «Download» button
. This is the cloud-shaped icon with a downward-facing arrow that’s in the top-right side of the page. Your photos will download onto your computer.
- You may be asked to choose a destination folder first.
- Once the download is complete, navigate to the destination folder to find your photos.


Advertisement
Add New Question
-
Question
What happens if I unplug the iPhone before the transfer of photos is complete?

You will probably find that not all of your photos have transferred to the PC.
-
Question
How can I back the photos up to a PC and still keep them on the iPhone?
Connect the iPhone to PC with the IPhone charging cable (one end is USB) and switch on the phone. The phone will ask whether to allow to connect the phone to PC. Tap ‘allow’. Then you can go to PC and the phone act as a camera connected via USB port. You can download any photo now.
-
Question
Can I download all of my photos from the cloud to my PC and then delete them from my phone and the cloud to free up storage?
Yes you can. As long as they are stored on another device, you are safe to delete them from iPhone or iCloud storage.
See more answers
Ask a Question
200 characters left
Include your email address to get a message when this question is answered.
Submit
Advertisement
Video
References
About This Article
Article SummaryX
To transfer photos from your iPhone to a PC, start by using your phone’s USB cable to connect your iPhone to the PC. Once your devices are connected, unlock your phone and tap “Trust” or “Allow” when you see the message asking whether you trust this computer. Then, click the Start menu on your computer, followed by “File Explorer,” which will bring up a list of connected devices on the left side of the File Explorer window. From here, right-click on “iPhone” and select “Import pictures and videos.” Finish by selecting “Import all new items now “and clicking “Next” to begin importing your photos. To learn more, including how to transfer specific images from your iPhone using the Windows 10 Photos App, scroll down!
Did this summary help you?
Thanks to all authors for creating a page that has been read 912,242 times.
Reader Success Stories
-

«I used the procedure as described above, and it works great and very quickly. Many thanks.»
Is this article up to date?
If you are wondering how to take all your family photos off your iPhone and put them on your computer, wonder no more. This step-by-step guide will show you how to transfer photos from an iPhone to a PC.
How To Transfer Photos From iPhone to PC Using a USB Cable
There are three ways to import your photos to a Windows PC with a USB Cable. One of the easiest ways to import your photos to a Windows PC is through the Photos app that comes preloaded on your computer. Here’s how to transfer your photos to a Windows PC using the Photos app:
How To Download iPhone Photos to a PC Using the Windows Photos App
- Using a USB cable, connect your iPhone to your PC.
- Open the Photos app. This can be found by going into the Start Menu by clicking on the Windows icon on the very bottom left-hand side of your screen. Then scroll down the list of applications you have until you reach Photos.
- Click the “Import” button. If you’re using Windows 10, the import button will be in the upper right corner of the app. On Windows 8, the Import option will appear when you right-click anywhere in the Photos app.
- Then select “import from a USB device” from the drop-down menu.
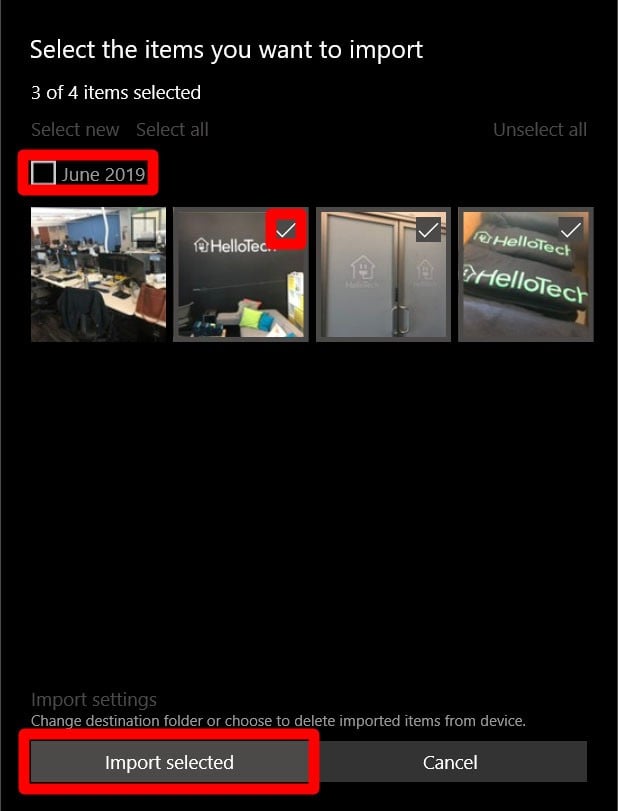
- Choose the photos you want to transfer and click “import selected.” You can select entire albums of photos by date, or select individual photos by clicking on the small checkmark in the upper right-hand corner of each image.
- Now you can find the photos you imported in your Pictures folder. You can find this folder under the file path: C:\Users\YOUR USERNAME\Pictures.
If you are using a PC with Windows
7, you won’t have access to the Photos app. Here’s how to download your photos
to a Windows 7 PC using the AutoPlay app instead:
How To Download iPhone Photos to a PC Using Windows AutoPlay
- Connect your iPhone to
your PC using a
USB cable. - An AutoPlay window should pop up automatically.
- Select the 4th option:
Import photos and videos – Photos. - Wait for your photos to be imported.
- You will find the imported photos in your Pictures folder. You can find this folder
under the file path: C:\Users\YOUR USERNAME\Pictures.
How To Import iPhone Photos to PC Using File Explorer
- Connect your iPhone to your PC using a USB cable. If prompted, allow the iPhone to connect to your PC by entering a passcode.
- Open File Explorer. If you are using Windows 8 or Windows 10, you can easily open File Explorer by pressing the Windows Key + “E” at the same time.
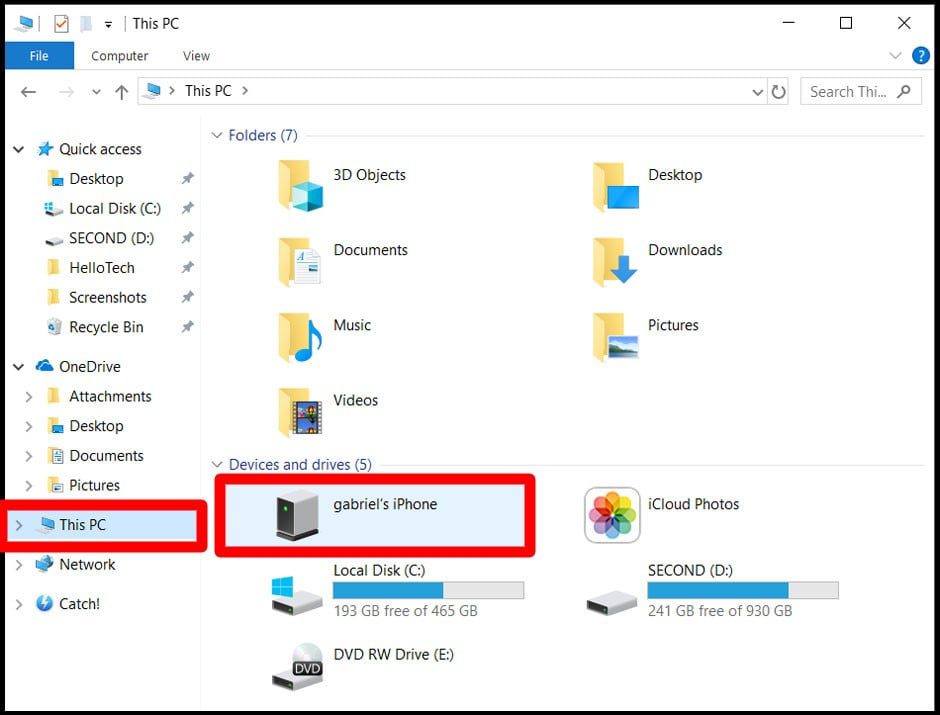
- Click “This PC” in the sidebar. You will see your iPhone under Devices and Drives. If using Windows 7, open Windows Explorer. You will see your iPhone under “Computer.”
- Double click on the icon with your iPhone’s name.
- Then double click on Internal Storage > DCIM.
- Find the folders that contain the photos that you want to import.
- Finally, copy or drag the photos to the location that you want to keep them. If you want to keep your photos organized, it might be a good idea to move these photos to your Pictures folder.
Note: Deleting your photos through File Explorer will not delete your photos off your iPhone.
Don’t have a USB cable handy? Find out how to import your photos wirelessly with iCloud by clicking this link.
Having an iPhone and a Windows PC can seem like a compatibility nightmare. It’s just drilled into our minds, “Apple devices don’t play well with others.” That has to be the farthest thing from the truth, though.
Transferring data from your iPhone to Windows PC or even your Windows PC to your iPhone isn’t all that daunting. The same goes for your iPhone photos. In fact, there are several ways you can transfer photos or videos from your iPhone to your Windows 11 PC.
Transfer Photos Using iCloud Photos
Apple’s cloud service iCloud makes it eerily easy to transfer photos from your iPhone to your PC if you have iCloud Photos on from your iPhone. iCloud Photos automatically uploads all photos and videos from your iPhone to the cloud and they are available on all your Apple devices, icloud.com, and even your Windows 11 PC. They update in real-time and are in sync across all devices.
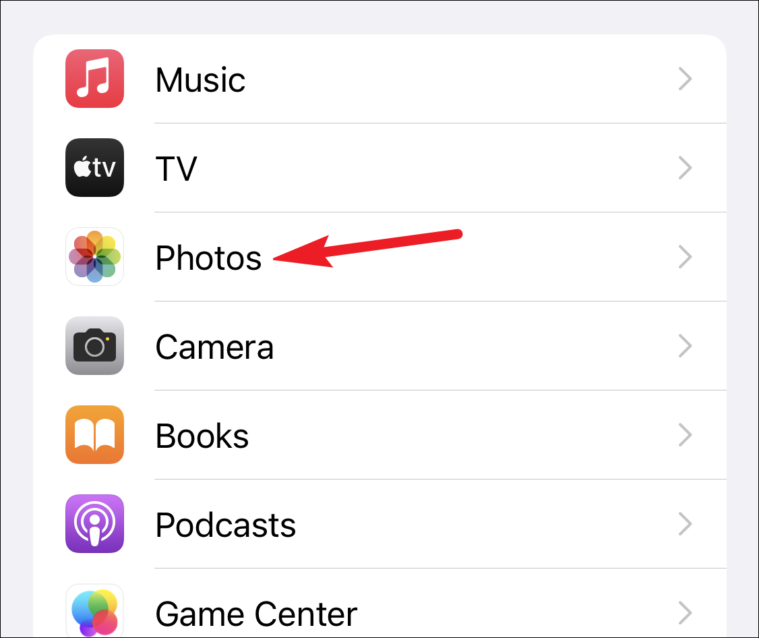
If you don’t use the iCloud Photo Library, you can start using it now. Open the Settings app on your iPhone and go to the option for ‘Photos’.
![]()
Then, enable the toggle for ‘iCloud Photos’. But your iCloud account must have enough storage for your photos. If you don’t have enough storage, you’d have to upgrade your storage before you can enable and use this feature.
![]()
After you enable iCloud Photos, it can take some time for all your photos and videos to sync to iCloud depending on the gallery size and your internet speed.
Now, you also need the iCloud app on your Windows 11 PC. If you don’t have it, this guide covers everything you need to know to download and set up the iCloud app.
Once you’ve set up the iCloud app for Windows 11, open File Explorer on your computer. You can also use the Windows logo key + E keyboard shortcut to open File Explorer. Go to ‘iCloud Photos’ from the navigation pane on the left.

This provides you directly with all of your photos and videos from your iPhone on your Windows PC. iCloud Photos keeps all your photos updated, so you don’t even have to manually transfer your photos. You can access them at any you want.
But you can transfer the photos and videos to your PC from the cloud. Whether you’re running out of storage, or you’d like to have a backup (photos sync the same on all devices and when you delete it from one place, it deletes from everywhere), you can transfer them elsewhere on your PC.
You can copy the photos that are downloaded on your PC from the cloud. To download a photo on your device, double-click a photo to download it. When a photo is on the device, it’ll have a green tick against a white background to indicate its status instead of the cloud icon.

Another type of downloaded photo (permanently downloaded photos) will have a white tick against a green background.

To permanently download a photo, right-click it and select ‘Always keep on this device’ from the menu. You can copy or move both types of downloads to your device.

Just select the photo(s) and copy them. Then, go to the location and paste them. You can also move (drag and drop) or cut and paste the photos. But doing so will delete the photos from your iCloud Photos across all devices.
Note: If you use any other cloud service like Google Photos, Dropbox, OneDrive, etc., to store your iPhone photos, you can directly download your photos to your Windows 11 PC from these clouds services.
Transfer Photos Using Windows 11 Photos App
iCloud Photos isn’t your only way of transferring photos from your iPhone to Windows 11 PC. If you don’t use iCloud Photos, the Windows Photos app is available at your disposal, too. If you’ve transferred photos from a camera to your PC, you might already be very well-acquainted with the Photos app.
This form of transfer requires you to use a USB cable. You must also have iTunes version 12.5.1 or later installed on your computer.
Connect your iPhone to the Windows 11 computer using a USB cable. Make sure your phone is unlocked. If a prompt asking to trust the computer appears on your iPhone, tap ‘Trust’.

You might also have to enter your iPhone’s passcode. If you get another prompt alerting that the computer can access all your photos and videos, tap ‘Allow’ to continue.
An Autoplay notification will appear towards the notification area. Click it to open further options.
![]()
Then, click ‘Import photos and videos’ to import photos using the Windows 11 Photos app. The ‘Import Items’ overlay window will appear.
![]()
If you missed the autoplay notification, had previously selected some other option, or don’t want the computer to import photos every time you connect your iPhone, another way to import using the Photos app is to directly open the app on your computer. Go to the search option and search for ‘Photos’. Click the option for ‘Open’.
![]()
Windows 11 Photos app will open. Click the ‘Import’ option in the top-right corner.
![]()
Few options will expand underneath. Click the ‘From the connected device’ option.
![]()
You’ll reach the ‘Import Items’ overlay window. Select the photos you want to import by clicking the tickbox on their thumbnail.
Other than selecting the photos individually, you can choose to select all photos or select the photos since the last import. Click the drop-down menu to select all photos or photos since the last import.
![]()
By default, the photos will be imported to the ‘Pictures’ folder. Click ‘Change destination’ to select another location.
![]()
You can also choose to delete the photos from your iPhone after they are transferred to your computer. Click the tickbox for ‘Delete original items after import’.
![]()
Finally, click the ‘Import [number] items’ button.
![]()
Note: If you have enabled iCloud Photos on your iPhone, you need to download the original, full-resolution photos to your iPhone before you can import them to your PC. Essentially, if you have the option for ‘Optimize Storage’ on for iCloud Photos on your iPhone, “optimized” photos can’t be imported unless you download their original versions to your iPhone.
Transfer Photos Using File Explorer on Windows 11
If you’re better acquainted with the File Explorer and find the Photos app complicated, no worries. You can also transfer your iPhone photos from File Explorer in Windows 11. Again for this method, you need to connect your iPhone to your PC using the USB cable. And you must have iTunes version 12.5.1 or later installed on your desktop.
Connect your iPhone to your PC using the USB cable and open the File Explorer in Windows 11. You can use the keyboard shortcut Windows + E to open the File Explorer or open it from the taskbar. Then, go to ‘This PC’ from the navigation pane on the left. You can also directly go to ‘This PC’ from your Start Menu.
![]()
Your iPhone will appear as a new device under ‘Devices and Drives’ as an “Apple iPhone” or with your device’s name. Double-click to open it.
![]()
Then, double-click ‘Internal Storage’ to open it.
![]()
You’d see a folder named ‘DCIM’.
![]()
DCIM has further folders that have your photos and videos. You can copy/paste individual photos, or sub-folders, or the entire DCIM folder to your computer to transfer photos.
![]()
Instead of copying, you can also cut/paste or drag and drop the photos. But beware that this will remove the photos from your iPhone as you transfer them. You cannot transfer any photos back to your iPhone either by dropping them in the DCIM folder if you move them by mistake. You’d have to use iCloud Photos for that.
Are iPhone Photos Not Compatible in Windows?
iPhone photos use a variety of formats ranging from .jpg, .png, and .mov to HEIF and HEVC media types. Now, .jpg, .png, and .mov are the standard formats that you can easily view on your Windows 11 PC. But HEIF and HEVC aren’t compatible with all devices.
You can either convert these file types to compatible formats after transferring them to your PC. Or, you can make sure your iPhone converts these before any transfer.
Open the Settings apps on your iPhone and scroll down to ‘Photos’.
In the settings for Photos, scroll all the way down. Under ‘Transfer to Mac or PC’, choose ‘Automatic’.
![]()
When you choose ‘Keep Originals’, any photos and videos captured in the HEIF and HEVC formats aren’t converted to JPEG, PNG, or MOV while transferring them to your PC. This only increases the number of steps you have to perform to open the said photos and videos on your PC. Other than that, this setting does not affect the quality of photos on your iPhone in any way. iPhone also won’t convert the photos and videos if your PC supports the formats.
So, there you see. iPhone does not play “not well” with others. If anything, it does the complete opposite. With multiple ways to transfer your photos to a Windows 11 PC, there’s something for everyone. Whichever way you find easy, you can go ahead with it.