Despite Windows 10’s widespread popularity, certain issues still exist, and people are always wary if the next update will botch up the performance. Currently, Windows 10 is quite fast and frankly, it is way better than the earlier versions of Windows. However, on older PCs, the performance may have gotten worse over the years. Also, if you use lots of apps on your Windows 10 computer, chances are your computer will become slow over time. So in this article, we bring you some neat hacks which can speed up Windows 10 considerably. On that note, let’s jump to the steps and learn how to boost Windows 10 performance.
Speed Up Windows 10 (Updated August 2022)
Note: This article is aimed at Windows 10 users. If you’re using Windows 11, we have a dedicated article for speeding up Windows 11 that you can check out.
In this article, I will take you through some beginner tips for Windows 10 that you should be acquainted with. After that, you can move to advanced steps to further improve your Windows 10 performance. For quick navigation, you can click on the link below and jump to the relevant section.
Table of Contents
1. Disable Startup Programs
Startup programs are basically applications that start running the moment you turn on your Windows 10 PC. Even if you have not opened them manually, these programs run in the background and sit in your system tray. These apps eat away at your computer resources and slow down Windows significantly.
The biggest problem with these startup programs is that they make your Windows 10 PC slow to boot as there are too many apps gobbling up your PC resources. To stop these programs from automatically running when your computer starts, follow these steps.
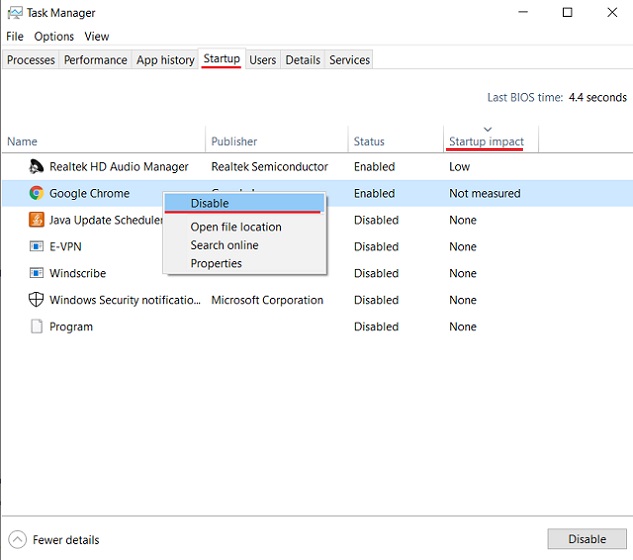
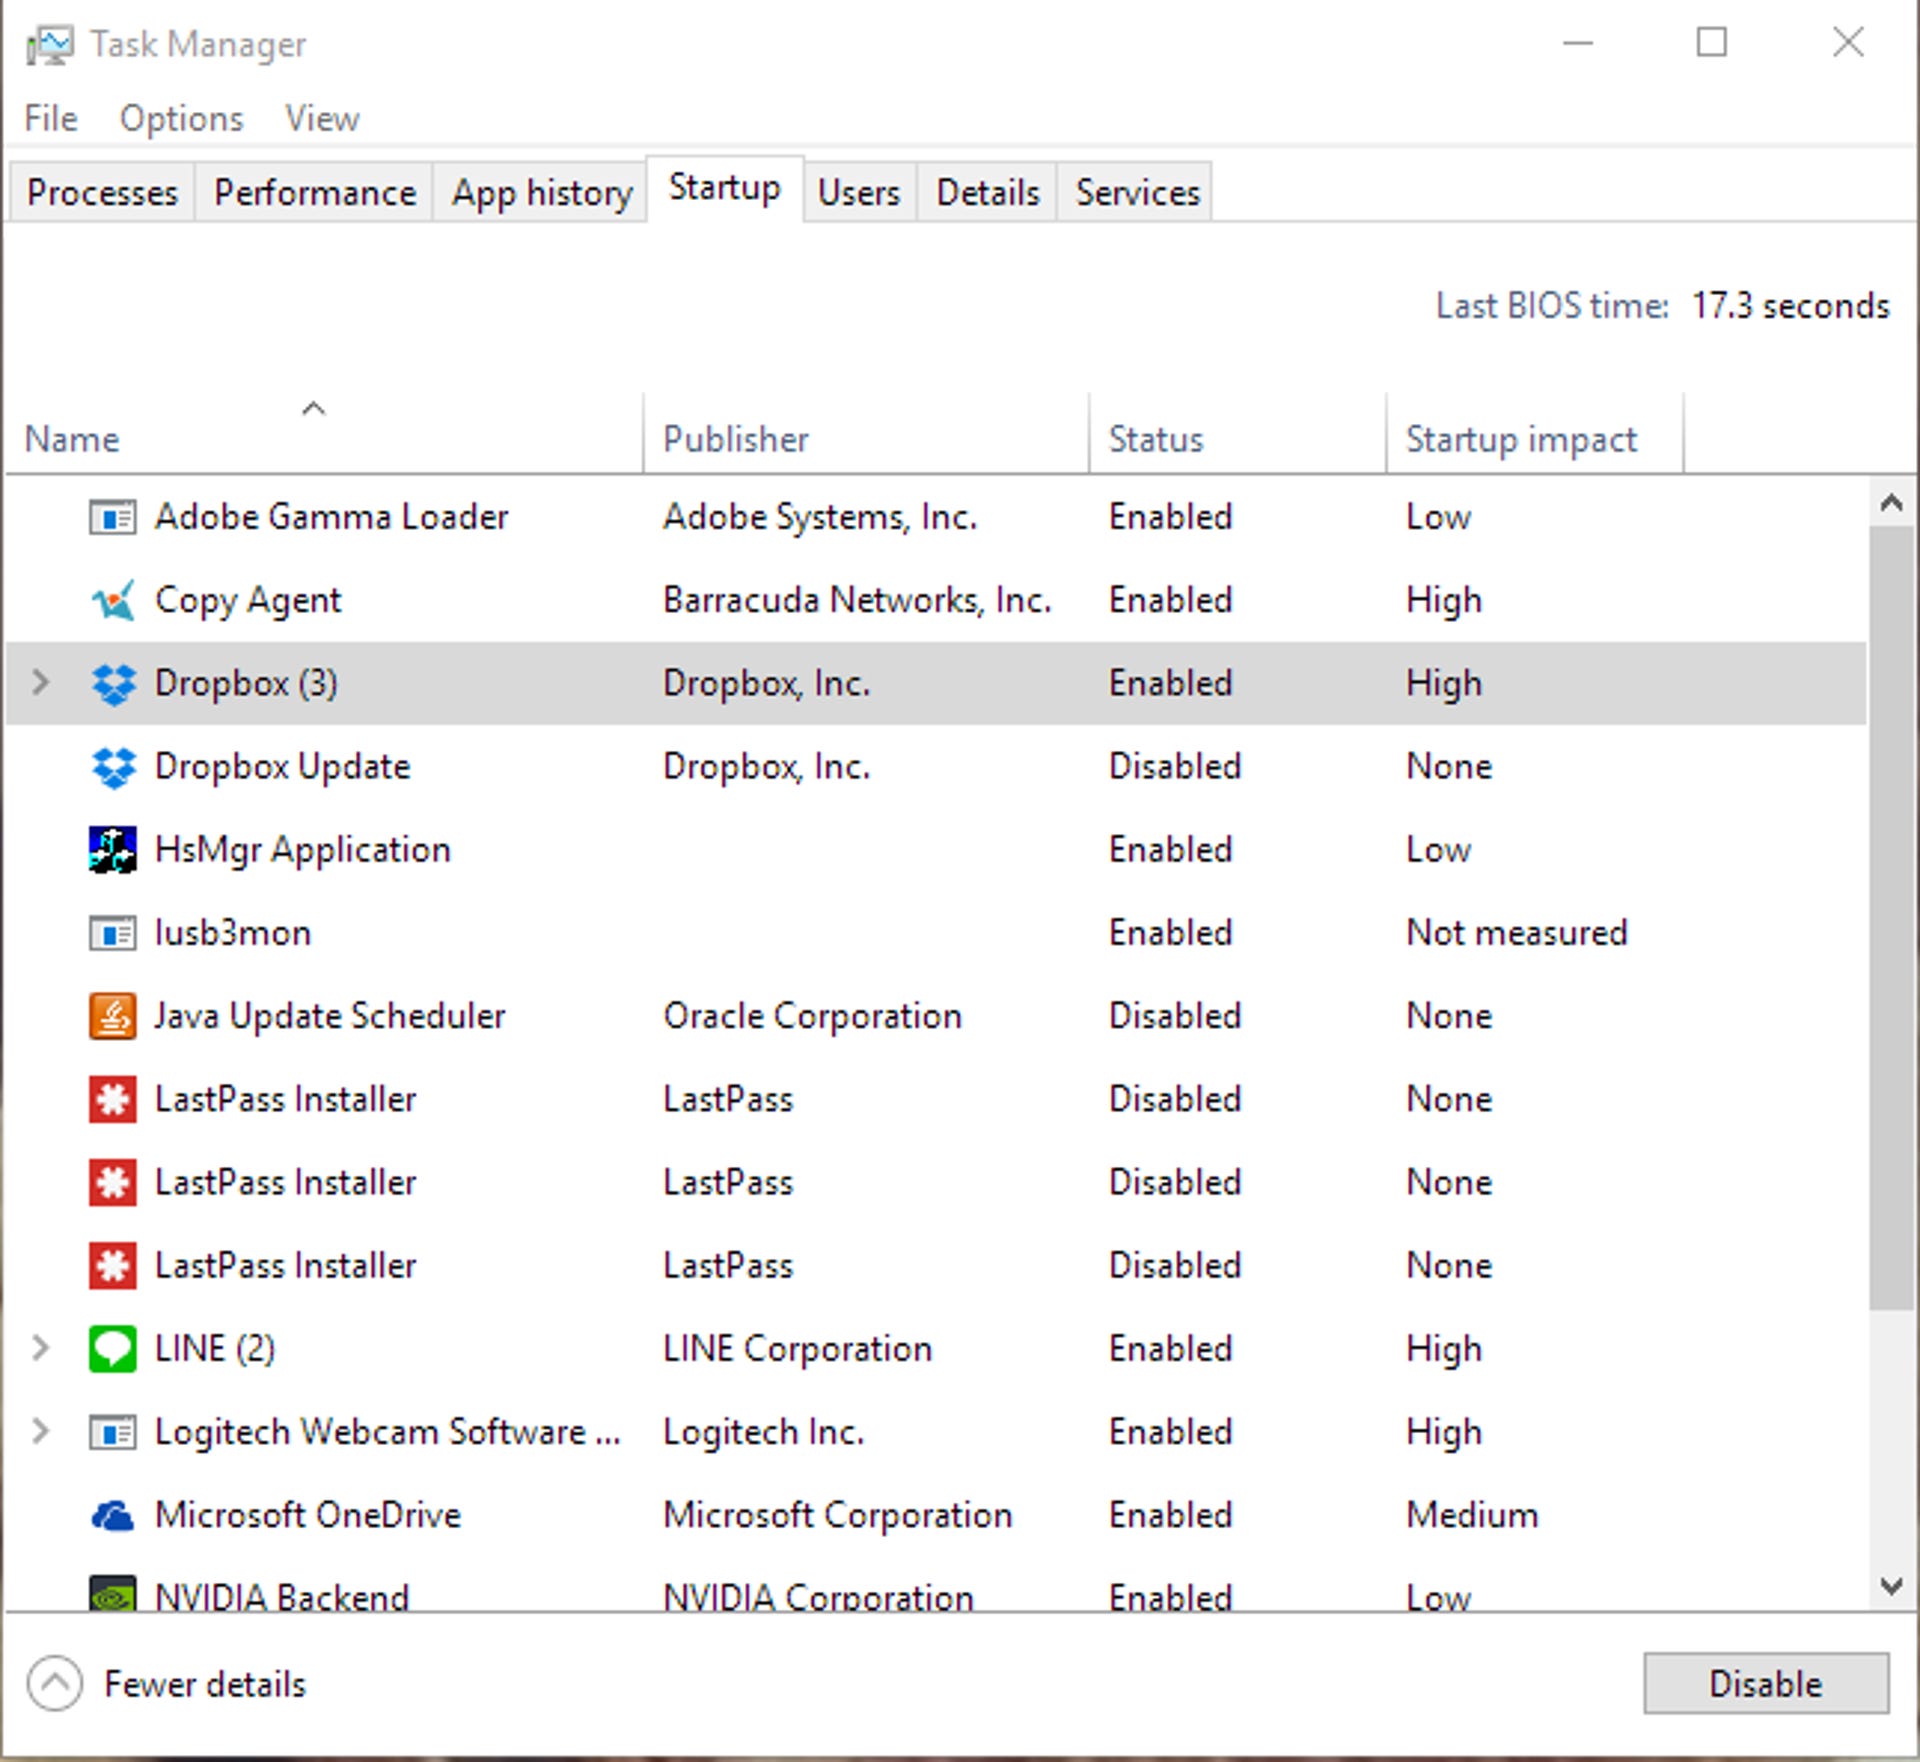
1. Right-click on the Taskbar and open Task Manager (or simply, press Ctrl + Shift + Esc).
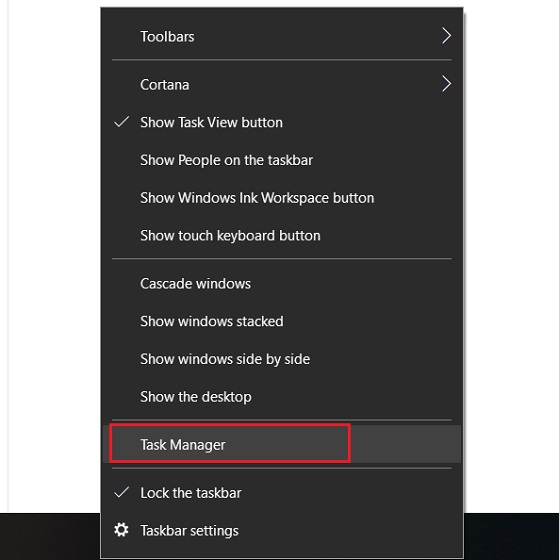
2. Switch to the “Startup” tab and check for unnecessary apps with a higher impact on the system. You can do so by clicking on the “Startup Impact” label. Next, right-click on applications and click on “Disable”. Do this for every unnecessary app. This will speed up Windows 10 every time you turn on your PC.
Note: Over time, with the installation of new programs, fresh apps are added to this list. So keep checking the Startup tab periodically and disable unnecessary apps right away.
2. Disable Background Apps
Background apps are Windows apps that run in the background to receive notifications and updates. While messaging and email apps may require background sync, apps like Candy Crush and Calculator don’t need it at all. These apps continuously run in the background and make the computer slow, besides draining the battery. So to drastically speed up Windows 10, first disable the background apps. Here is how to do it.
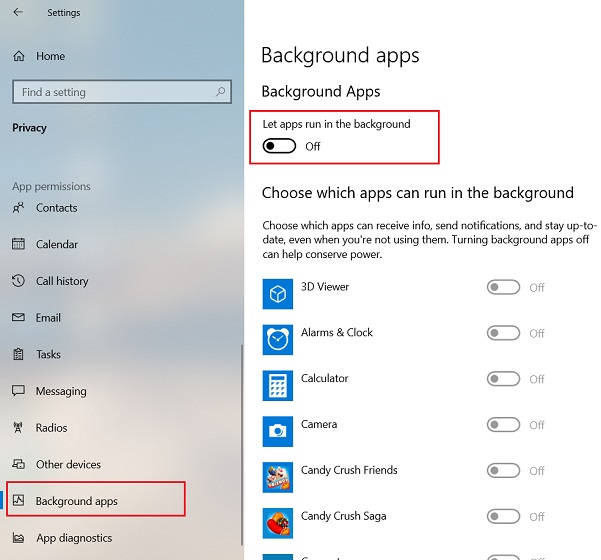
1. Open Windows Settings and click on “Privacy”.
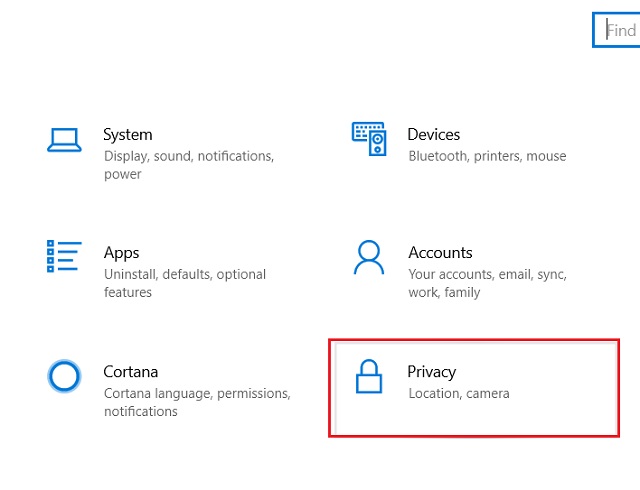
2. Here, scroll down and open the “Background apps” tab from the left pane. On the top, disable the “Let apps run in the background” option altogether. If you wish to customize the settings per app, you can do so as well.
3. Block Apps After Reboot
To make Windows 10 faster, you must block apps from automatically restarting after reboot. It is different from Background and Startup apps. Windows 10 allows some apps to restart their services and launch the last session so the apps are ready at launch. However, it can have a detrimental effect on the performance of your Windows 10 laptop or desktop. Here is how you can disable it.
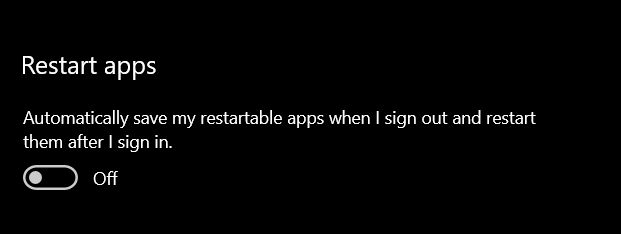
1. Press the “Windows” key once and search for “restart apps”. Now, open “Restart apps after signing in“.
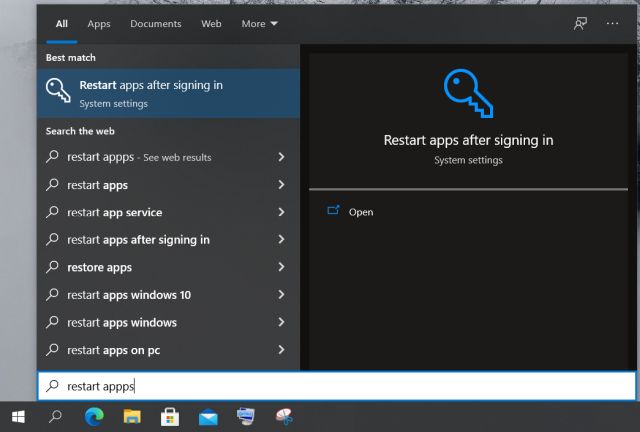
2. Here, simply disable the toggle for Restart Apps and that’s it.
4. Disable Cortana
If you use Cortana regularly, then you may skip this section. However, if you do not use Cortana (like most of us) and want to limit your search to just your local PC, then it’s better to disable it at once. It will save you a lot of computer resources as Cortana keeps hogging memory and important resources in the background. Follow these steps to disable Cortana and speed up Windows 10 significantly.
1. We have created two Registry files that you can use to enable or disable Cortana with one click. So download both the files from here.
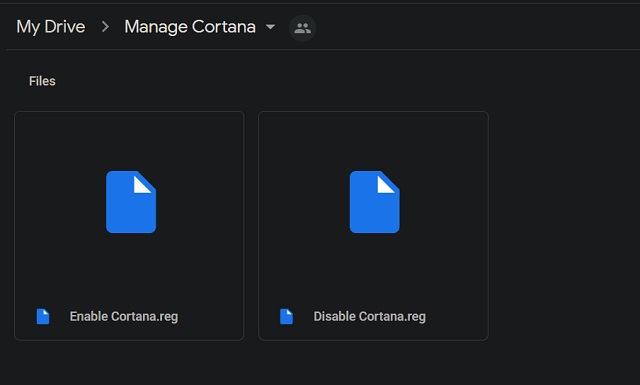
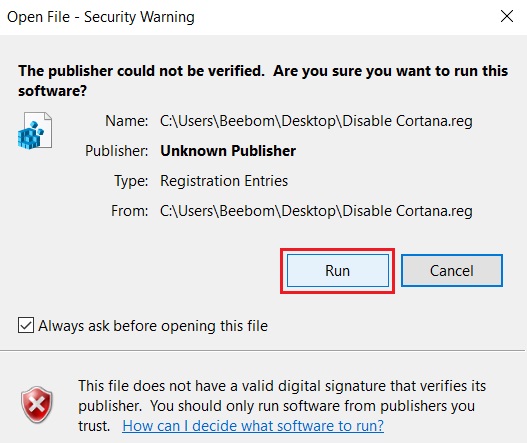
2. After that, double click on “Disable Cortana” and click on “Run”. That’s it. Now restart your computer and Cortana will be gone.
4. In case you want Cortana back, then simply double click on “Enable Cortana” and run the file. Restart your PC, and Cortana will be at your service once again.
Note: Microsoft keeps adding back Cortana after every Windows update. So you will have to run the same Registry files to disable it again.
5. Remove Junk Files
You should periodically clean up junk files on your PC to speed up Windows 10. These files stay on the hard drive and eat up space even though they have no utility in the functioning of the OS. Having said that, keep in mind, do not install third-party programs to remove junk files. Most of those programs slow down the PC. Instead, I would recommend you to use the built-in Windows 10 tool to clean up your PC.
1. Press the Windows key once and search for “Storage”. Now, open “Storage Settings”.
![How to Speed up Windows 10 in 2021 [Effective Methods]](https://beebom.com/wp-content/uploads/2021/02/3-6.jpg)
2. Here, click on “Temporary files“.
![How to Speed up Windows 10 in 2021 [Effective Methods]](https://beebom.com/wp-content/uploads/2021/02/4-5.jpg)
3. After that, simply click on “Remove files“. You are done.
![How to Speed up Windows 10 in 2021 [Effective Methods]](https://beebom.com/wp-content/uploads/2021/02/5-2.jpg)
6. Adjust Visual Effects
If you don’t have a powerful GPU, then it’s better to disable visual effects. It will offload tasks from the CPU and help boost Windows 10 performance.
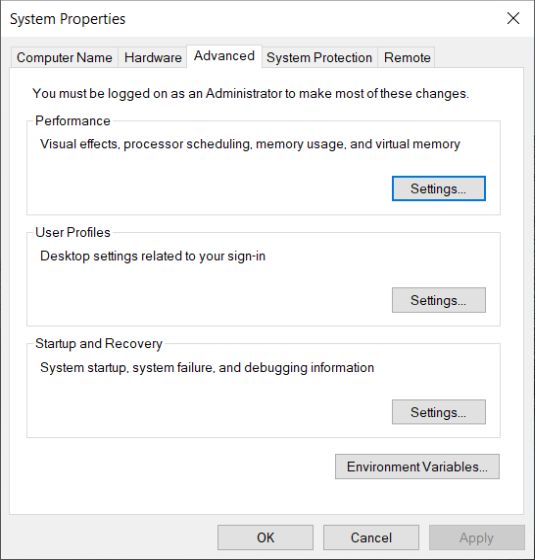
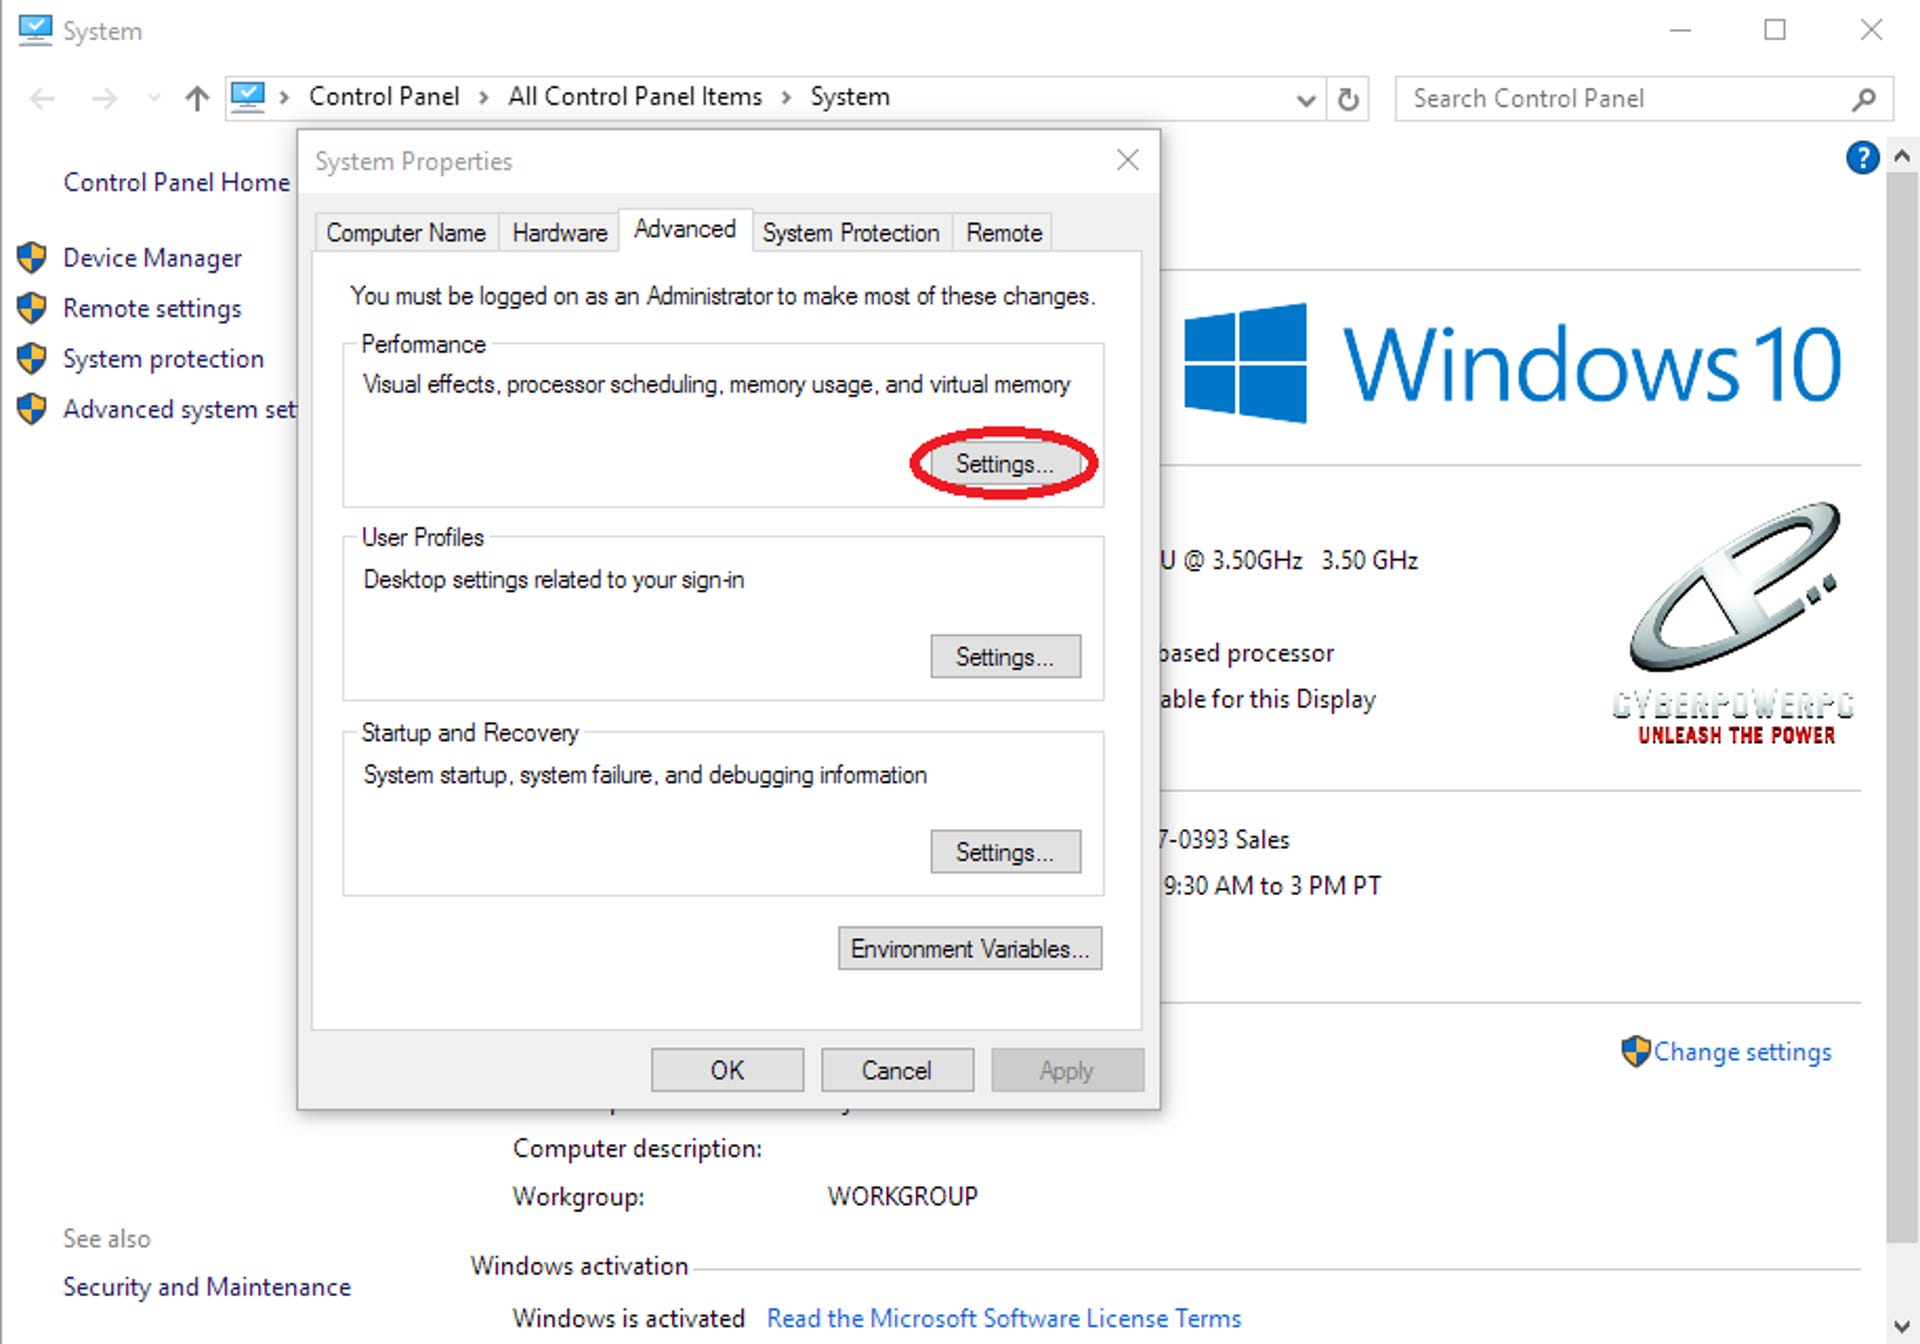
1. Press the Windows key once and search for “system settings”. Now, open “View advanced system settings“.
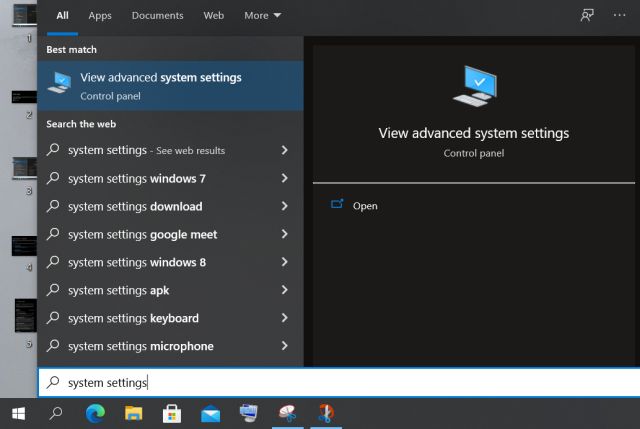
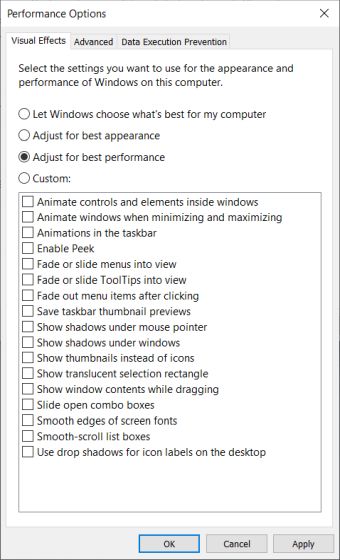
2. Here, click on “Settings” under the Performance section.
3. Finally, click on “Adjust for best performance” and then apply the changes.
7. Use GPU for Intensive Programs
If you have a powerful GPU, then you can force programs to take advantage of the GPU instead of the CPU. There might be apps that don’t use it often and rely on the CPU to carry out tasks. By forcing these apps to use the GPU, the CPU on your Windows 10 PC will be available for other tasks, and the performance will get much better.
1. Press the Windows key once and type “GPU”. Now, open “Graphics Settings“.
![How to Speed up Windows 10 in 2021 [Effective Methods]](https://beebom.com/wp-content/uploads/2021/02/9-3.jpg)
2. Here, click on the app that you want to run through the GPU. After that, click on “Options” and choose “High Performance,” which will use the dedicated GPU. If an app is not available on the list, then you can add new apps from the “Browse” button.
![How to Speed up Windows 10 in 2021 [Effective Methods]](https://beebom.com/wp-content/uploads/2021/02/10-2.jpg)
8. Disable Game Mode
If you don’t play games on your PC, it’s better to disable Xbox Game Mode on Windows 10. You might not be aware, but it takes up a huge chunk of resources due to the availability of instant screen, video, and audio capturing.
1. Open the Start Menu and search for “Game Mode“. Now, open “Game Mode Settings”.
![How to Speed up Windows 10 in 2021 [Effective Methods]](https://beebom.com/wp-content/uploads/2021/02/11-1.jpg)
2. On the next page, disable the toggle for Game Mode.
![How to Speed up Windows 10 in 2021 [Effective Methods]](https://beebom.com/wp-content/uploads/2021/02/12.jpg)
3. After that, go to “Xbox Game Bar“ and “Captures” settings and disable all of the toggles and checkboxes.

9. Uninstall Multiple Antivirus Programs
It is a bad idea to install multiple Antivirus programs to secure your PC. An antivirus checks file integrity in the background, which in turn eats disk usage. Having multiple antiviruses will further make your computer slow. Installing an antivirus on Windows 10 is avoidable as the OS comes with Windows Defender pre-installed. And frankly, it’s pretty good and reliable.
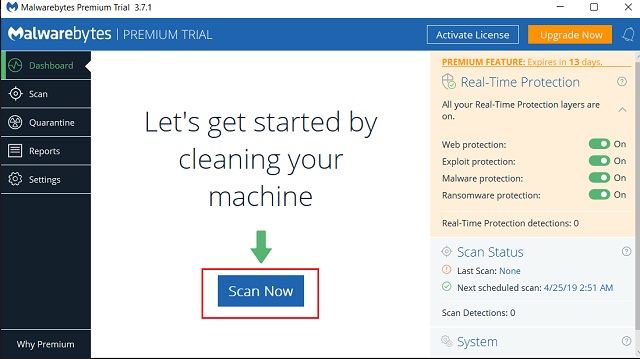
In case, your PC is attacked by some rogue virus and Windows Defender is unable to remove it then we recommend installing Malwarebytes to clean up your PC. Malwarebytes will speed up Windows 10 and also remove malware and rogue programs.
Install Malwarebytes (Free, Premium version starts at $39.99/year)
10. Speed Up Windows 10 by Managing Windows Settings
There are a few Windows settings that you should change to maximize the performance on your Windows PC. Of all the options, we start with the Power Options
Change Power Plan
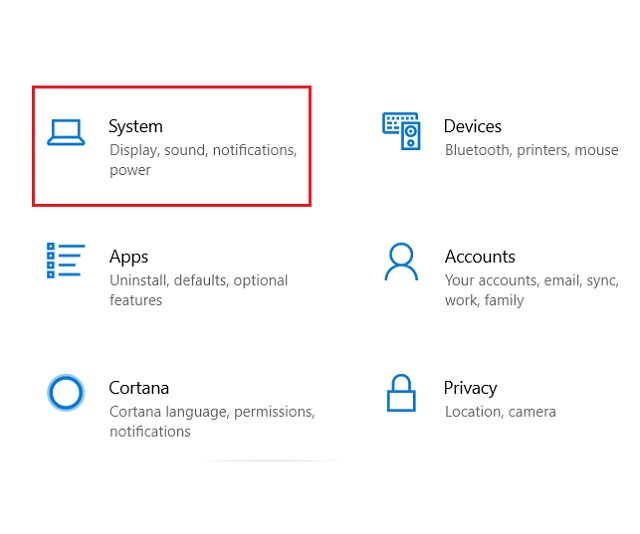
1. Open Settings and click on “System”.
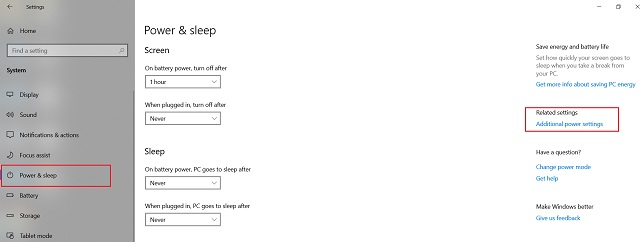
2. Now click on “Power & Sleep” on the left pane. After that, click on “Additional Power Settings” on the extreme right pane.
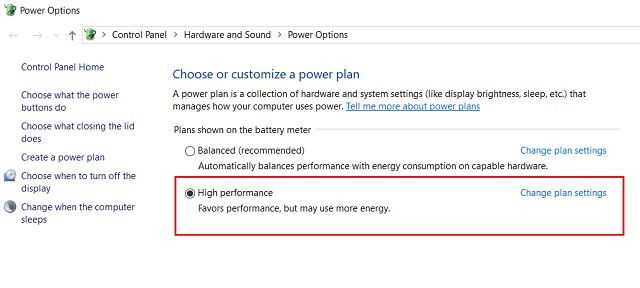
3. In the Control Panel window, choose “High Performance” as your power plan. That’s it. You should now see a performance jump on your Windows 10 PC.
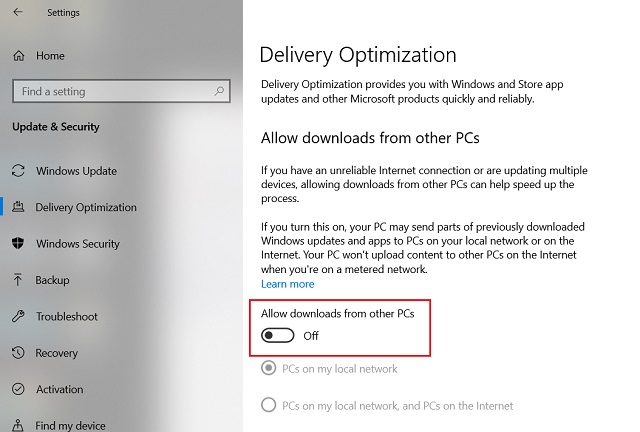
Disable Delivery Optimization
To provide faster updates, Windows offers a feature called Delivery Optimization. It uses computers on the local network to transfer chunks of Windows update files to the nearby PC. If you keep it turned on, then your PC may be used as a node to connect with other PC for sending update files. While it’s a good effort by Microsoft, it comes at the cost of performance deterioration. Also, it eats your bandwidth bringing down the overall performance of your PC. So, to turn it off and drastically speed up Windows 10, follow the steps listed below:
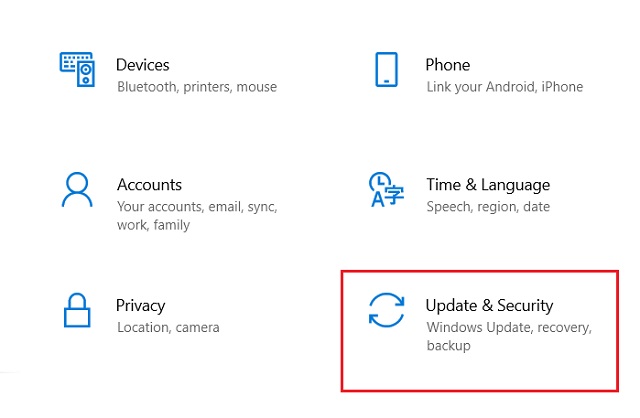
1. Open Settings and then click on “Update and Security”.
2. Here, click on “Advanced Options”.
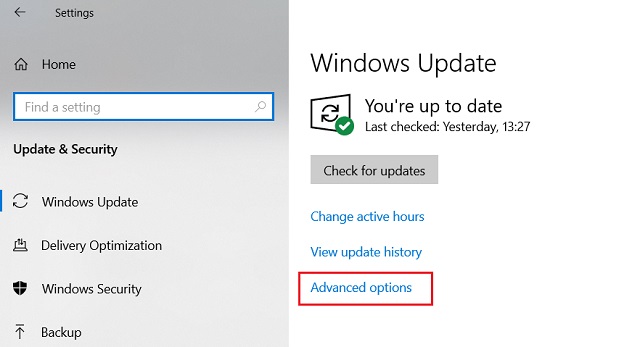
3. Now, scroll down and click on “Delivery Optimization”.
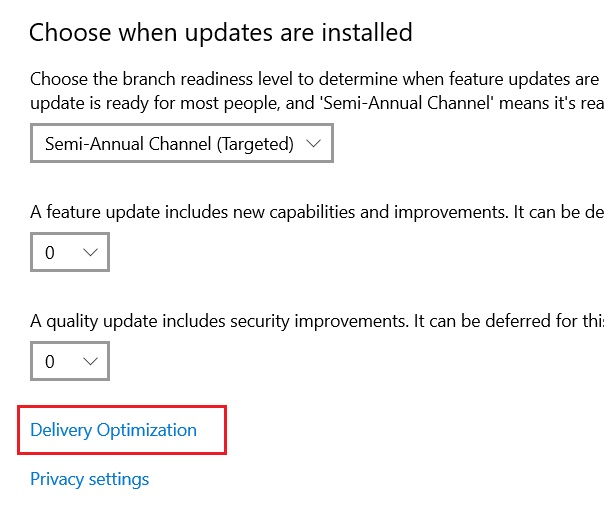
4. Finally, turn off the toggle below “Allow download from other PCs”. You are done.
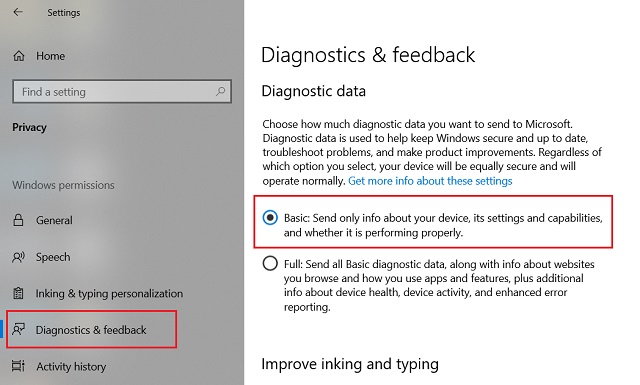
Change Privacy Settings
1. Open Settings and click on “Privacy”.
2. Now, go to the “Diagnostics and feedback” tab and change the Diagnostic Data to “Basic”. It will prevent your PC from sending huge amounts of data in the background.
Note: There are many options under the Privacy Settings. We recommend you go through each menu and decide if you want to hand over your data to Microsoft. If not, disable it then and there. It will stop constant telemetry in the background and may offload some resources from your PC, hence boosting the Windows 10 performance.
11. Disable Windows Update
Asking users to disable Windows Update is not sound advice as there can be security implications. However, Windows is terrible at handling updates and makes the PC slow altogether. For example, if you are running an old PC with low-powered specs, you don’t want to install feature updates. Yet, Microsoft shoves down every Windows update user’s throat. Also, Windows keeps downloading and transferring huge files in the background, which significantly slows down your PC.
So it is better to disable the update and turn it on, only when you want to update your Windows 10 machine. It will offload unnecessary background processes and will notably speed up Windows 10. So to disable Windows 10 updates, follow these steps.
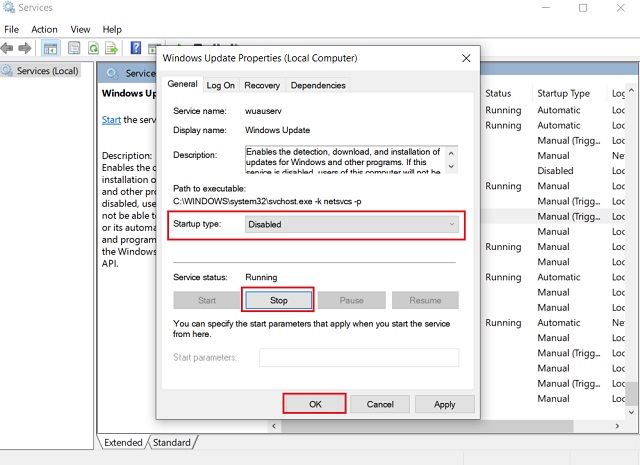
1. Press Windows and R keys at once on your keyboard. A small ‘Run’ window will appear in the bottom-left corner. Type services.msc and hit enter.

2. The Services window will open. Here, scroll down and look for “Windows Update”. Right-click on it and open “Properties”.
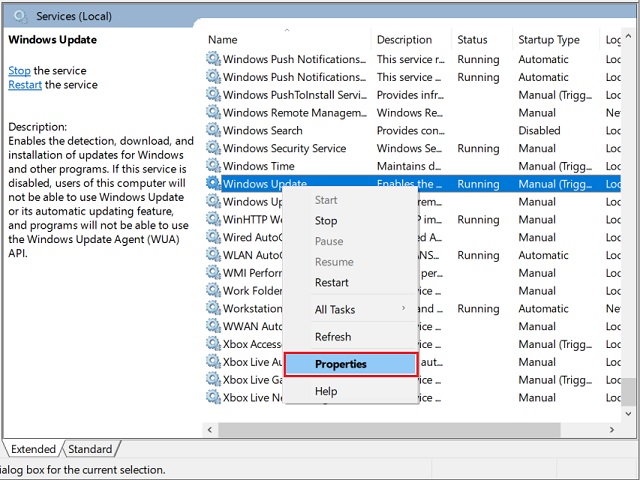
3. Here, click on the “Stop” button and then change the Startup Type to “Disabled”. Finally, click on the “Ok” button.
Note: While the above steps are good to stop the current cycle of Windows update, it gets reactivated after a while. To fully disable Windows update, you have to block it using the firewall. I have written an extensive guide on how to completely block Windows update. Give it a read if that’s what you desire.
12. Disable Indexing on Older Windows 10 PCs
In simple terms, Indexing means keeping a list of all the files located on your PC. It helps Windows in finding the file quickly when you hit the search button. However, on older PCs, the indexing process eats up too many resources and makes the PC remarkably slow. Note that if you are using a Windows PC with powerful configs, then disabling indexing will not make a considerable difference.
The reason I am recommending you to disable indexing is that having good performance all the time outweighs searching quickly once a day. So the bottom line is, if you are using an old PC with low configs, then go ahead and disable indexing to speed up Windows 10 PC.
Note: The popular myth is that disabling indexing turns off Windows search. But that is simply not true. You can still search on your Windows PC, however, it will be a tad slower.
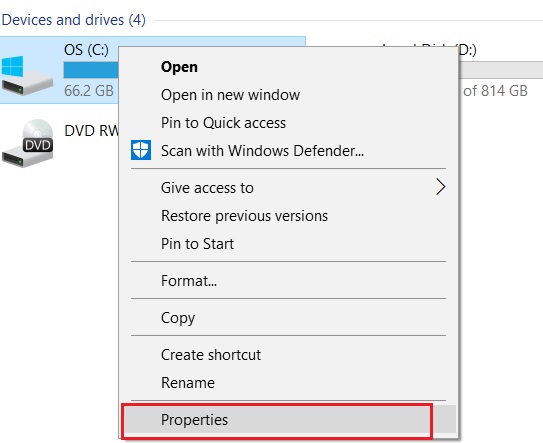
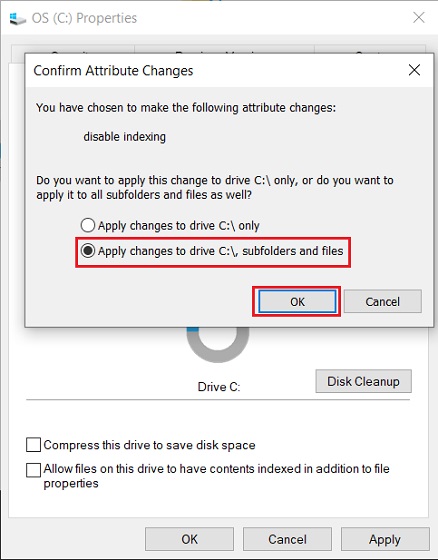
1. Open “My Computer” and right-click on the “C: drive”. Here, select “Properties”.
2. Now, uncheck “Allow files in this drive to have contents indexed” at the bottom. After that, click the “Apply” button.
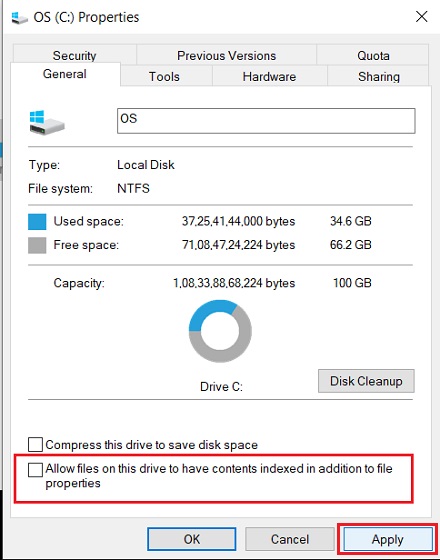
3. On the next screen, choose “Apply Changes to drive C:\, subfolders, and files” and click on “OK”.
4. The C: drive will then start deindexing and will take some time to complete the task. The time depends on how long you have been using your PC. It may vary from 5 to 30 minutes.
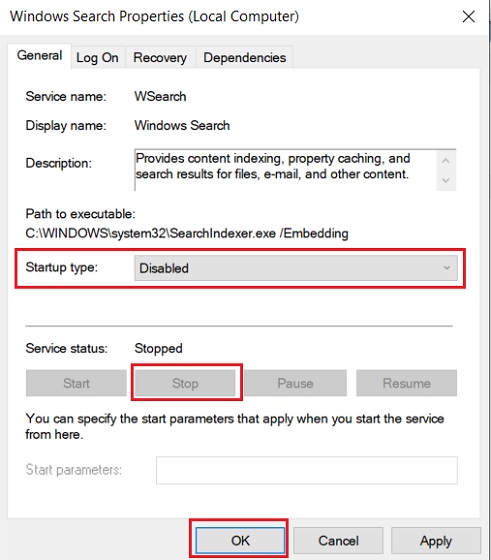
5. Now to completely disable indexing, open the Services window by pressing Windows and R keys. Here, type services.msc and hit Enter.
6. On the Services window, look for “Windows Search” and right-click on it. Choose “Properties”.

7. Here, click on the “Stop” button and then change the startup type to “Disabled”. Don’t worry, this will not disable Windows search, but only stop further indexing of files. Finally, click on the “OK” button and you are done.
13. Debloat Windows 10
Of late, Windows has become incredibly bloated with useless apps and services. These apps take up crucial RAM, processing power, and disk space. It significantly slows down the system, leaving you with a laggy mess. The sad part is that you can’t even uninstall these apps through the Control Panel. So, we are using Administrator privilege and Execution Policy as a workaround to remove such apps and services. Here are the steps to do it, which will finally speed up Windows 10 significantly.
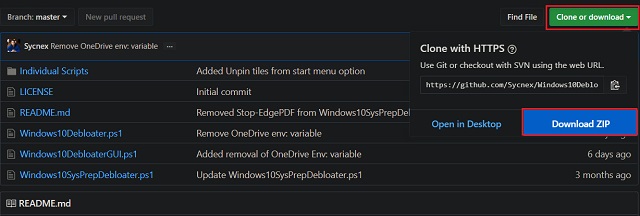
Note: We are using an automated PowerShell script to debloat Windows 10. It’s developed by a developer named Sycnex on GitHub. Also, make sure you are using Windows on your Administrator account for this to work.
1. First up, download the Windows 10 Debloater ZIP file from the GitHub page. Click on the “Clone or download” button and then click on “Download ZIP”.
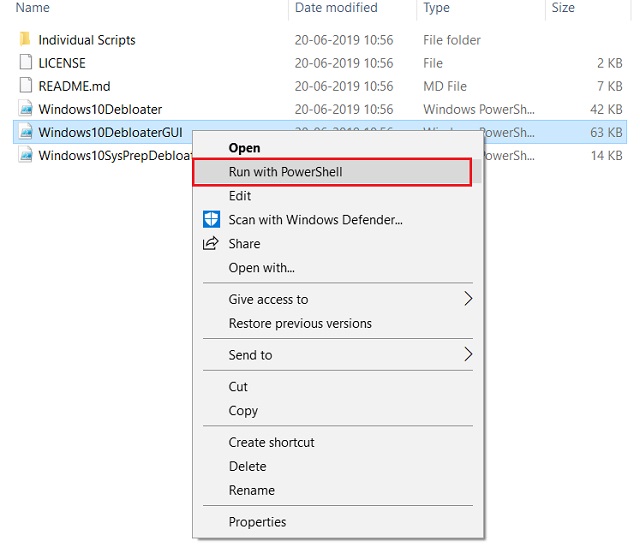
2. Extract the ZIP file and open it. You will find three major files, but right-click on the “Windows10DebloaterGUI” file and select “Run with Powershell”.
3. On the first run, it will ask if you want to grant Execution Policy permission to the script. Type “Y” and hit enter to allow the PowerShell script to run.
4. Now Windows 10 Debloater window will open. Here, click on “Remove all bloatware”. It will start removing such apps and services.
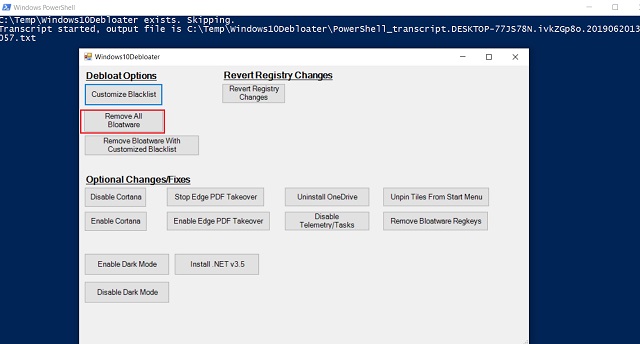
5. The process will take some time to complete so keep patience. Also, you will be prompted with many dialogues during the process to re-confirm your action. So keep a check on your PC during the process.
6. After the debloating process is complete, simply restart your PC. Now Windows 10 will become completely bloat-free without unnecessary apps. You will notice a remarkable boost in your Windows 10 computer’s performance.
7. Apart from this, I will also recommend you to click on “Disable Telemetry” to cut off all telemetry services in the background. This will significantly increase your computer speed running Windows 10.
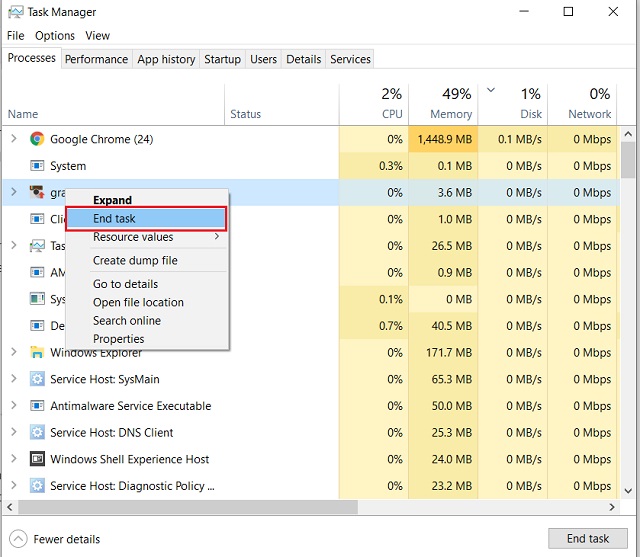
14. Keep a Check on Background Processes
More often, some unknown processes keep running in the background and cause your Windows 10 PC to slow down. So make a habit to check the background process through the Task Manager whenever you feel the PC is not performing well. You can click on each label to sort the processes in descending order.
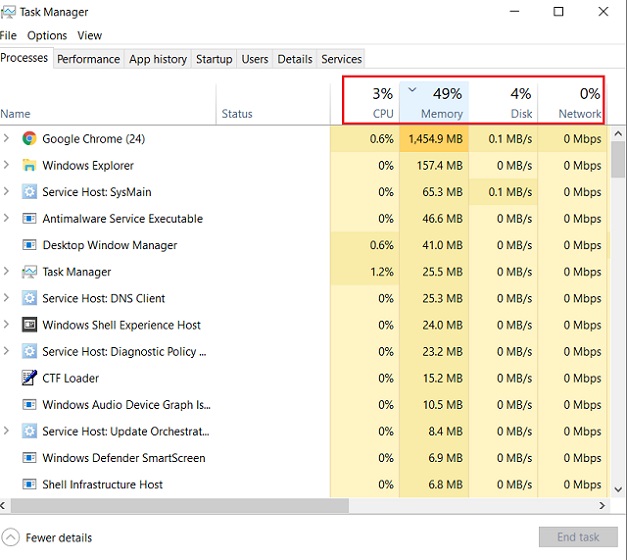
If you find some rogue process eating up your Disk or CPU to an unusual degree, then end the process right away. Just right-click on the process and click on “End task”. And If some unnecessary app is causing the spike then consider uninstalling it altogether from the Control Panel. This way you will always be in control of your PC and it will eventually speed up your Windows 10 PC.
15. Use an Efficient Browser
Most of us use a web browser on our Windows 10 PC to browse the internet. In my case, I use Chrome all the time because I am deep into Google’s ecosystem. However, it is well-known that Chrome is a resource hogger. It eats up most of my computer resources, making it slow and overall laggy. If you are in a similar situation, then you can use a better browser, well suited to Microsoft’s ecosystem.
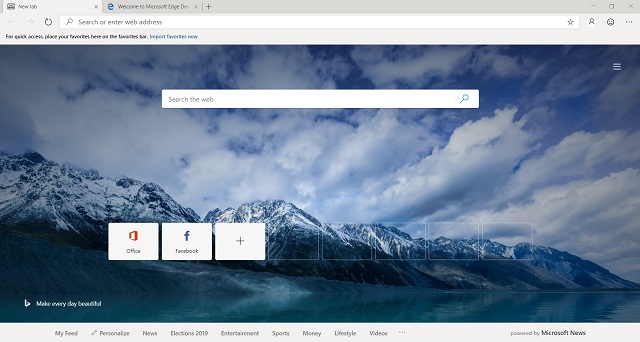
Recently, Microsoft unveiled its Chromium-based Microsoft Edge browser, and it looks awesome. The performance is on par with Chrome, and unsurprisingly, it consumes less power and resources than Google Chrome. The best part is that you can install Chrome extensions on the new Edge browser, so you are not missing out on much. I have written a short guide on installing the Chromium-based Edge on Windows 10, so check it out. I am pretty sure that you might like it.
16. Switch to an SSD
I believe Windows 10 is a great operating system — almost as good as the macOS — but it has been marred by sloppy hardware over the years. Most of us use Windows 10 on a mechanical hard drive (HDD), which is quite slow, and further results in sluggish performance. However, swapping it with a modern-age solid-state drive (SSD) speeds up Windows 10 to a far greater degree. SSD is much faster than HDD because of its flash memory chip. The difference between SSD and HDD is simply day and night.

If you have done everything mentioned in this article and still your Windows PC is slow, it’s simply because of the old hardware. As they say, you cannot replace the hardware with software. You should consider replacing the HDD with an SSD. I am confident you will notice a sea-level change in daily operations and overall tasks. And in the future, always prefer an SSD laptop over an HDD one.
Speed Up Your Windows 10 PC Using These Tips
Well, that ends our exhaustive list of various ways to speed up Windows 10 even on PCs having just 4GB RAM. We started with some basics and have gone through the advanced steps as well. If you want to completely speed up Windows 10 without any bloatware, go through all the points mentioned in this article. In case you are not a pro user, you can skip debloating Windows 10 as it requires some technical knowledge of Windows 10. So, which pointers did you try out and what effect have you noticed in your computer’s speed? Share your experience in the comments below.
If your PC is running slowly, the following suggestions might help speed things up. The tips are listed in order, so start with the first one, see if that helps, and then continue to the next one if it doesn’t.
One of the best ways to get the most out of your PC is to make sure you have the latest version of Windows 11 installed. When you check for updates, your PC will also search for the latest device drivers, which can also help improve your PC’s performance.
To check for updates
-
Do one of the following:
-
If the status says «You’re up to date,» continue and check for optional updates.
-
If the status says «Updates are available,» once they are downloaded, select Install now.
-
-
Select the updates you want to install, then select Install.
-
Restart your PC and see if it seems to run better.
Sometimes an optional update, like a new non-critical driver, will be available that may help.
To check for optional updates
-
Select the Start button, then select Settings > Windows Update > Advanced options > Optional updates.
-
If additional updates are available, select them and then select Download & install.
-
Restart your PC and see if it seems to run better.
For more info about updates, including how you can have them installed automatically, see the Windows Update FAQ.
For Windows Update troubleshooting info, see Update Windows and Troubleshoot problems updating Windows.
If your PC still runs slowly, continue to the next tip.
Having many apps, programs, web browsers, and so on open at once can slow down your PC. Having a lot of browser tabs open at once can also slow it down quite a bit. If this is happening, close any apps, browser tabs, etc., that you don’t need and see if that helps speed up your PC. If it doesn’t seem to help, restart your PC and then open just the apps, programs and browser windows you need.
To restart your PC
-
Select the Start button, then select Power > Restart .
-
After your PC restarts, open just the apps you need, then close them when you’re done.
Sometimes apps that were made for an earlier version of Windows will still run on Windows 11, but they might slow down your PC. If this happens after you open a certain program, check the software company’s website for an updated version, or run the Program Compatibility Troubleshooter.
To run the Program Compatibility Troubleshooter
-
Select Search , type troubleshoot in the search box, then select Troubleshoot settings > Other troubleshooters .
-
Under Other, select the Run button next to Program Compatibility Troubleshooter .
-
Select the program that you’re having problems with, then select Next and continue through the troubleshooter.
PC still running slowly? Continue to the next tip.
ReadyBoost lets you use a removable drive, like a USB flash drive, to improve your PC’s performance without opening your PC and adding more memory (RAM). To use ReadyBoost, you’ll need a USB flash drive or a memory card that has at least 500 MB free and a high data transfer rate.
To use ReadyBoost
-
Insert the USB flash drive into a USB port on your PC.
-
Select File Explorer from the taskbar.
-
Press and hold (or right-click) the USB flash drive (or SD card if you used one instead), then select Properties.
-
Select the ReadyBoost tab, then select Use this device.
Windows determines if the device can use ReadyBoost. If it can’t, it’ll let you know. -
After Windows determines how much free space to use to optimize memory, select OK to reserve this space so ReadyBoost can use it.
When you look at the contents of the USB flash drive in File Explorer, you’ll see a file named ReadyBoost.sfcache on the flash drive. This file shows how much space is reserved for ReadyBoost.
Note: ReadyBoost can’t be used if Windows is installed on a solid state drive (SSD). An SSD is already fast, and ReadyBoost won’t be able to improve its performance.
The paging file is an area on your hard disk that Windows uses like memory. There’s a setting in Windows 11 that manages the page file size automatically, which can help improve your PC’s performance.
To make sure automatic page file management is turned on
-
Select Search on the taskbar, type advanced system in the search box, and then select View advanced system settings, which has Control panel listed underneath it.
-
In System Properties, select the Advanced tab, then select Settings in the Performance area.
-
In Performance Options, select the Advanced tab, then select Change in the Virtual memory area.
-
Make sure the Automatically manage paging file size for all drives check box is selected. If it is, continue to the next tip. If it’s not, select it and then restart your PC by selecting Start > Power > Restart .
Use your PC and see if it’s running better. If it’s not, try the next tip.
You may improve performance if you free some disk space on your PC.
To check for low disk space
-
Your drives will be listed in the Storage area. Note the amount of free space and total size for each drive.
Note: If your PC is not low on space, try the next tip.
You can use Storage Sense to delete unnecessary or temporary files from your device, which can also free up space.
If you turn on Storage Sense, Windows will automatically free up space by getting rid of unnecessary files—including files in your recycle bin—when you’re low on disk space or at intervals you specify. The instructions below show you how to delete temporary files and how to turn on and configure Storage Sense.
If you can’t find Storage Sense on your device using the following steps, see the «Free up space with Disk cleanup» section below instead.
Note: You may not want to delete temporary files to improve performance. While these files may not be used at the moment, they help your apps load and run faster.
To delete temporary files with Storage Sense
-
Select Temporary files in the storage breakdown. Note: If you don’t see Temporary files listed, select Show more categories.
-
Windows will take a few moments to determine what files and apps are taking up the most space on your PC.
-
Select the items you want to delete, and then select Remove files.
To see what’s in your Recycle Bin before you empty it, open it from your desktop. If you don’t see the Recycle Bin icon on your desktop, in the search bar on the taskbar, type recycle bin, then select Recycle Bin from the list of results.
Note: Windows moves files you delete to the Recycle Bin in case you change your mind and need them again in the future. You might be able to free up a significant amount of space by deleting Recycle Bin files to permanently remove files you’ve previously deleted.
To turn on and configure Storage Sense
-
In the Storage management area, turn on Storage Sense.
-
Select the for Storage Sense to configure it.
-
Under Cleanup of temporary files, ensure Keep Windows running smoothly by automatically cleaning up temporary system and app files is checked.
-
Under Configure cleanup schedules, choose how often you want Storage Sense to run.
-
For the files you want Storage Sense to delete (your choices are files in your Recycle Bin and in your Downloads folder), select the preferred time intervals, or select Never if you want Storage Sense to leave those types of files alone.
-
Scroll down and select Run Storage Sense now.
-
Windows will take a few moments to clean up your files, and then you’ll see a message indicating how much disk space has been freed up.
If your system doesn’t have Storage Sense, you can use the Disk Cleanup tool to delete temporary files and system files from your device.
To run Disk Cleanup
-
Select Search , type disk cleanup, then select Disk Cleanup from the list of results.
-
Select the checkbox next to the type of files you want to delete. (To view a description of each type of file, select the name.) By default, Downloaded Program Files, Temporary Internet Files, and Thumbnails are selected. Be sure to clear those check boxes if you don’t want to delete those files.
-
To free up even more space, select Clean up system files. Disk Cleanup will take a few moments to calculate the amount of space that a can be freed up.
Note: If it’s been fewer than 10 days since you upgraded to Windows 11, your previous version of Windows will be listed as a system file you can delete. If you need to free up drive space, you can delete it, but keep in mind that you’ll be deleting your Windows.old folder, which contains files that give you the option to go back to your previous version of Windows. If you delete your previous version of Windows, this can’t be undone. (You won’t be able to go back to your previous version of Windows.)
-
Select the types of files you want to delete, select OK, then select Delete files in the confirmation window to start the cleanup.
If your PC still runs slowly, try uninstalling apps you don’t use anymore.
To uninstall apps you don’t use anymore
-
Search for a specific app or sort them to see which ones are using the most space.
-
When you find an app to remove, select the More icon next to it and, if possible, select Uninstall.
-
Restart your PC and see if performance has improved.
If your PC still runs slowly, try moving files to another drive.
If you have photos, music, or other files that you want to keep but don’t use often, consider saving them to removable media, like a USB drive. You’ll still be able to use them when the drive is connected, but they won’t take up space on your PC.
To move files to another drive
-
Connect the removable media to your PC.
-
Select File Explorer from the taskbar and find the files you want to move.
-
Select the files, then on the taskbar, select Cut .
-
Select your removable media from the location list, then select Paste .
-
When the move is complete, restart your PC and see if performance has improved.
Get more info about freeing drive space in Windows.
If your PC still runs slowly, try the next tip.
Windows 11 includes many visual effects, such as animations and shadow effects. These look great, but they can also use additional system resources and can slow down your PC. This is especially true if you have a PC with a smaller amount of memory (RAM).
To adjust the visual effects in Windows
-
Select Search , type performance, then select Adjust the appearance and performance of Windows in the list of results.
-
On the Visual Effects tab, select Adjust for best performance > Apply.
-
Restart your PC and see if that speeds up your PC.
If your PC still runs slowly, continue to the next tip.
Your PC settings let you choose where files will be saved by default. You can save files on your PC or to OneDrive by default and sync files between the two locations. This lets you get to your files from any device that can connect to the internet, and it helps make sure your files are backed up in case your PC is ever damaged or lost. However, files must sync between your PC and OneDrive, and syncing can slow down your PC. You can pause OneDrive syncing temporarily and see if it helps improve your PC performance.
To pause syncing to OneDrive
-
On the taskbar, look for OneDrive near the notification area.
-
Select OneDrive > Help & Settings > Pause syncing, and then choose how long you want to pause syncing your files.
-
Restart your PC and see if your performance issues have improved with syncing paused.
-
To resume syncing your files, select OneDrive > Help & Settings > Resume syncing.
You can also visit Fix OneDrive sync problems to check for any sync issues.
When you turn on your PC, some programs start automatically and run in the background. You can disable these programs so they don’t run when your PC starts.
Many programs are designed to start automatically when Windows does. You don’t realize they’re running, but they’ll open quickly when you go to use them. This is helpful for programs you use a lot, but not for programs you don’t use often because it increases the time it takes Windows to start.
Find the programs that start automatically
Sometimes you can determine which programs start automatically by looking at the program icons in the notification area on the far right of the taskbar. Check there first to see if there are any programs running that you don’t want to start automatically. To try to find out the name of the program, point to the icon with your mouse pointer. Make sure you select Show hidden icons , so you don’t miss any programs.
Even after you check the notification area, you might still miss some programs that run automatically at startup. Here’s how you can find all the programs that start automatically, and stop the ones that you don’t want to start automatically when Windows starts.
To stop a program from starting automatically
-
In the Startup Apps area, find the program you want to stop from starting automatically and set it to Off.
Note: If you turn off a program and it continues to start automatically when Windows starts, you should scan for viruses and malware. See the next section for more info.
A virus, malware, or malicious software could cause your PC to run slowly. Other symptoms include unexpected pop-up messages, programs that unexpectedly start automatically, or the sound of your hard disk constantly working.
The best way to handle viruses and malicious software is to try to prevent them by running antimalware and antivirus software and keeping it up to date. However, even if you take precautions, your PC can still become infected.
You can scan your PC for viruses or other malicious software by using Windows Security (formerly Windows Defender Security Center), which is included in Windows 11. For more info, see How to protect your Windows PC.
Notes:
-
If you’re using other antivirus or anti-malware software, see the documentation for that program to learn how to scan for viruses. Also, make sure multiple antivirus programs aren’t running at the same time. If they are, choose the one you want to run, and then disable or uninstall any others.
-
If you have another antivirus program installed and turned on, Windows Security will be turned off by default.
To scan for viruses using Windows Security
-
Select Virus & threat protection, then select Protection updates under Virus & threat protection updates.
-
On the Protection updates screen, select Check for updates to make sure you have the most recent updates.
-
Select Virus & threat protection, then select Quick scan.
Wait for Windows Security to finish scanning for viruses and malware.
-
Do one of the following, depending on the results of the scan:
-
Run the recommended advanced scan. This scan takes longer but searches more extensively for threats on your PC.
-
If Windows Security finds a virus or malware and can’t remove or quarantine it, contact Microsoft Support for help.
-
If no viruses are found, restart your PC and try to reproduce the performance problem you were having with your PC.
-
Note: If Windows Security doesn’t open, can’t update the definition file, or can’t finish scanning for viruses, try running Microsoft Defender Antivirus (offline scan), which is explained below.
To scan for malware and viruses with Microsoft Defender Antivirus (offline scan)
-
Save any documents or anything else you might have open on your PC.
-
Select Virus & threat protection, and then under Current threats, select Scan options > Microsoft Defender Antivirus (offline scan) > Scan now.
Your PC will restart, and Microsoft Defender Antivirus (offline scan) will run and scan for viruses and malware. The scan might take 15 minutes or so, and your PC will restart again after that.
-
Try to reproduce the performance issue.
If your PC still runs slowly, continue to the next tip.
Restoring your PC undoes recent changes that might be causing problems. If you think a recently installed app, driver, or update for Windows could be causing problems, you might get things running normally again by restoring your PC to an earlier point, called a restore point.
Notes:
-
Restoring from a restore point won’t affect your personal files, but it will remove apps, drivers, and updates that were installed after the restore point was created.
-
System restore works for changes made in the last 7 to 14 days.
To restore your PC from a restore point
-
Select Search on the taskbar, type advanced system, then select View advanced system settings from the list of results.
-
On the System Protection tab, select System Restore.
-
Select Recommended restore to go with the most recent restore point Windows has made automatically, or Choose a different restore point to select one yourself, then select Next.
-
If you chose to select a different restore point, select one, then select Next. Either way, select Finish to begin restoring.
-
Once the restore is completed, restart your PC and see if performance has improved.
If you don’t see any restore points, it might be because system protection isn’t turned on.
To turn on system protection
-
In the search box on the taskbar, type create a restore point, then select Create a restore point from the list of results.
-
On the System Protection tab, select Configure.
-
Select Turn on system protection > OK.
If your PC is running slowly, the following suggestions might help speed things up. The tips are listed in order, so start with the first one, see if that helps, and then continue to the next one if it doesn’t.
One of the best ways to get the most out of your PC is to make sure you have the latest version of Windows 10 installed. When you check for updates, your PC will also search for the latest device drivers, which can also help improve your PC’s performance.
To check for updates
-
Select the Start button, then select Settings > Update & Security > Windows Update > Check for updates.
Check for Windows updates
-
Do one of the following:
-
If the status says «You’re up to date,» go to the next tip.
-
If the status says «Updates are available,» select Install now.
-
-
Select the updates you want to install, then select Install.
-
Restart your PC and see if it seems to run better.
For more info about updates, including how you can have them installed automatically, see the Windows Update FAQ.
For Windows Update troubleshooting info, see Update Windows 10 and Troubleshoot problems updating Windows 10.
If your PC still runs slowly, continue to the next tip.
Having many apps, programs, web browsers, and so on open at once can slow down your PC. Having a lot of browser tabs open at once can also slow it down quite a bit. If this is happening, close any apps, browser tabs, etc., that you don’t need and see if that helps speed up your PC. If it doesn’t seem to help, restart your PC and then open just the apps, programs and browser windows you need.
To restart your PC
-
Select the Start button, then select Power > Restart.
-
After your PC restarts, open just the apps you need, then close them when you’re done.
Sometimes apps that were made for an earlier version of Windows will still run on Windows 10, but they might slow down your PC. If this happens after you open a certain program, check the software company’s website for an updated version, or run the Program Compatibility Troubleshooter.
To run the Program Compatibility Troubleshooter
-
In the search box on the taskbar, type troubleshoot, then select Troubleshoot settings, which has System settings listed underneath it.
-
In the list of troubleshooters, select Program Compatibility Troubleshooter > Run the troubleshooter.
-
Select the program that you’re having problems with, then select Next and continue through the troubleshooter.
PC still running slowly? Continue to the next tip.
ReadyBoost lets you use a removable drive, like a USB flash drive, to improve your PC’s performance without opening your PC and adding more memory (RAM). To use ReadyBoost, you’ll need a USB flash drive or a memory card that has at least 500 MB free and a high data transfer rate.
To use ReadyBoost
-
Insert the USB flash drive into a USB port on your PC.
-
Select File Explorer from the taskbar.
-
Press and hold (or right-click) the USB flash drive (or SD card if you used one instead), then select Properties.
-
Select the ReadyBoost tab, then select Use this device.
Windows determines if the device can use ReadyBoost. If it can’t, it’ll let you know. -
After Windows determines how much free space to use to optimize memory, select OK to reserve this space so ReadyBoost can use it.
When you look at the contents of the USB flash drive in File Explorer, you’ll see a file named ReadyBoost.sfcache on the flash drive. This file shows how much space is reserved for ReadyBoost.
Note: ReadyBoost can’t be used if Windows is installed on a solid state drive (SSD). An SSD is already fast, and ReadyBoost won’t be able to improve its performance.
The paging file is an area on your hard disk that Windows uses like memory. There’s a setting in Windows 10 that manages the page file size automatically, which can help improve your PC’s performance.
To make sure automatic page file management is turned on
-
In the search box on the taskbar, type advanced system, and then select View advanced system settings, which has Control panel listed underneath it.
-
In System Properties, select the Advanced tab, then select Settings in the Performance area.
-
In Performance Options, select the Advanced tab, then select Change in the Virtual memory area.
-
Make sure the Automatically manage paging file size for all drives check box is selected. If it is, continue to the next tip. If it’s not, select it and then restart your PC by selecting the Start button > Power > Restart.
Use your PC and see if it’s running better. If it’s not, try the next tip.
You may improve performance if you free some disk space on your PC.
To check for low disk space
-
Your drives will be listed in the Storage area. Note the amount of free space and total size for each drive.
Note: If your PC is not low on space, try the next tip.
You can use Storage Sense to delete unnecessary or temporary files from your device, which can also free up space.
If you turn on Storage Sense, Windows will automatically free up space by getting rid of unnecessary files—including files in your recycle bin—when you’re low on disk space or at intervals you specify. The instructions below show you how to delete temporary files and how to turn on and configure Storage Sense.
If you can’t find Storage Sense on your device using the following steps, see the «Free up space with Disk cleanup» section below instead.
Note: You may not want to delete temporary files to improve performance. While these files may not be used at the moment, they help your apps load and run faster.
To delete temporary files with Storage Sense
-
Select Temporary files in the storage breakdown. Note: If you don’t see Temporary files listed, select Show more categories.
-
Windows will take a few moments to determine what files and apps are taking up the most space on your PC.
-
Select the items you want to delete, and then select Remove files.
To see what’s in your Recycle Bin before you empty it, open it from your desktop. If you don’t see the Recycle Bin icon on your desktop, in the search bar on the taskbar, type recycle bin, then select Recycle Bin from the list of results.
Note: Windows moves files you delete to the Recycle Bin in case you change your mind and need them again in the future. You might be able to free up a significant amount of space by deleting Recycle Bin files to permanently remove files you’ve previously deleted.
To turn on and configure Storage Sense
-
In the Storage area, turn on Storage Sense.
-
Select Configure Storage Sense or run it now.
-
In the Storage Sense area, choose how often you want Storage Sense to run.
-
In the Temporary Files area, select Delete temporary files that my apps aren’t using.
-
Select which files you want Storage Sense to delete (your choices are files in your Recycle Bin and in your Downloads folder), then select the corresponding time intervals.
-
Scroll down and select Clean now.
-
Windows will take a few moment to clean up your files, and then you’ll see a message indicating how much disk space has been freed up.
If your system doesn’t have Storage Sense, you can use the Disk Cleanup tool to delete temporary files and system files from your device.
To run Disk Cleanup
-
In the search box on the taskbar, type disk cleanup, then select Disk Cleanup from the list of results.
-
Select the checkbox next to the type of files you want to delete. (To view a description of each type of file, select the name.) By default, Downloaded Program Files, Temporary Internet Files, and Thumbnails are selected. Be sure to clear those check boxes if you don’t want to delete those files.
-
To free up even more space, select Clean up system files.Disk Cleanup will take a few moments to calculate the amount of space that a can be freed up.
Note: If it’s been fewer than 10 days since you upgraded to Windows 10, your previous version of Windows will be listed as a system file you can delete. If you need to free up drive space, you can delete it, but keep in mind that you’ll be deleting your Windows.old folder, which contains files that give you the option to go back to your previous version of Windows. If you delete your previous version of Windows, this can’t be undone. (You won’t be able to go back to your previous version of Windows.)
-
Select the types of files you want to delete, select OK, then select Delete files in the confirmation window to start the cleanup.
If your PC still runs slowly, try uninstalling apps you don’t use anymore.
To uninstall apps you don’t use anymore
-
Search for a specific app or sort them to see which ones are using the most space.
-
When you find an app to remove, choose it from the list and select Uninstall.
-
Restart your PC and see if performance has improved.
If your PC still runs slowly, try moving files to another drive.
If you have photos, music, or other files that you want to keep but don’t use often, consider saving them to removable media, like a USB drive. You’ll still be able to use them when the drive is connected, but they won’t take up space on your PC.
To move files to another drive
-
Connect the removable media to your PC.
-
Select File Explorer from the taskbar and find the files you want to move.
-
Select the files, go to Home, then select Move to >Choose location.
-
Select your removable media from the location list, then select Move.
-
Restart your PC and see if performance has improved.
Get more info about freeing drive space in Windows 10.
If your PC still runs slowly, try the next tip.
Windows 10 includes many visual effects, such as animations and shadow effects. These look great, but they can also use additional system resources and can slow down your PC. This is especially true if you have a PC with a smaller amount of memory (RAM).
To adjust the visual effects in Windows
-
In the search box on the taskbar, type performance, then select Adjust the appearance and performance of Windows in the list of results.
-
On the Visual Effects tab, select Adjust for best performance > Apply.
-
Restart your PC and see if that speeds up your PC.
If your PC still runs slowly, continue to the next tip.
Your PC settings let you choose where files will be saved by default. You can save files on your PC or to OneDrive by default and sync files between the two locations. This lets you get to your files from any device that can connect to the internet, and it helps make sure your files are backed up in case your PC is ever damaged or lost. However, files must sync between your PC and OneDrive, and syncing can slow down your PC. You can pause OneDrive syncing temporarily and see if it helps improve your PC performance.
To pause syncing to OneDrive
-
On the taskbar, look for OneDrive near the notification area.
-
Select OneDrive > More > Pause syncing, and then choose how long you want to pause syncing your files.
-
Restart your PC and see if your performance issues have improved with syncing paused.
-
To resume syncing your files, select OneDrive > More >Resume syncing.
You can also visit Fix OneDrive sync problems to check for any sync issues.
Notes:
-
If you have Window 10 version 1709 or higher, you can use OneDrive Files On-Demand to choose which files you want to sync and always keep on your PC. This can help improve PC performance if you reduce the number of files that are synced to your PC. To see which version of Windows 10 your device is currently running, select the Start button, then select Settings > System > About.
Open About settings -
For more info on OneDrive Files On-Demand, see Learn about OneDrive Files On-Demand.
When you turn on your PC, some programs start automatically and run in the background. You can disable these programs so they don’t run when your PC starts.
Many programs are designed to start automatically when Windows does. You don’t realize they’re running, but they’ll open quickly when you go to use them. This is helpful for programs you use a lot, but not for programs you don’t use often because it increases the time it takes Windows to start.
Find the programs that start automatically
Sometimes you can determine which programs start automatically by looking at the program icons in the notification area on the far right of the taskbar. Check there first to see if there are any programs running that you don’t want to start automatically. To try to find out the name of the program, point to the icon with your mouse pointer. Make sure you select Show hidden icons , so you don’t miss any programs.
Notification area with mouse pointing to show hidden icons
Even after you check the notification area, you might still miss some programs that run automatically at startup. Here’s how you can find all the programs that start automatically, and stop the ones that you don’t want to start automatically when Windows starts.
To stop a program from starting automatically
-
In the Startup Apps area, find the program you want to stop from starting automatically and set it to Off.
Notes:
-
If you turn off a program and it continues to start automatically when Windows starts, you should scan for viruses and malware. See the next section for more info.
-
To use the procedure above to stop a program from starting automatically, you need to have Windows 10 (Version 1803 or higher) installed. To see which version of Windows 10 your device is currently running, select the Start button, then select Settings > System > About.
Open About settings -
If you have Windows 10 (Version 1709 or earlier) installed, press Ctrl + Alt + Delete, select Task Manager, select Startup, select the program you want to stop from starting automatically, then select Disable.
A virus, malware, or malicious software could cause your PC to run slowly. Other symptoms include unexpected pop-up messages, programs that unexpectedly start automatically, or the sound of your hard disk constantly working.
The best way to handle viruses and malicious software is to try to prevent them by running antimalware and antivirus software and keeping it up to date. However, even if you take precautions, your PC can still become infected.
You can scan your PC for viruses or other malicious software by using Windows Security (formerly Windows Defender Security Center), which is included in Windows 10. For more info, see How to protect your Windows 10 PC.
Notes:
-
If you’re using other antivirus or anti-malware software, see the documentation for that program to learn how to scan for viruses. Also, make sure multiple antivirus programs aren’t running at the same time. If they are, choose the one you want to run, and then disable or uninstall any others.
-
If you have another antivirus program installed and turned on, Windows Security will be turned off by default.
To scan for viruses using Windows Security (Windows 10 Version 1809 or later)
-
Select Virus & threat protection, then select Check for updates under Virus & threat protection updates.
-
On the Protection updates screen, select Check for updates to make sure you have the most recent updates.
-
Select Virus & threat protection, then select Quick scan.
Wait for Windows Security to finish scanning for viruses and malware.
-
Do one of the following, depending on the results of the scan:
-
Run the recommended advanced scan. This scan takes longer but searches more extensively for threats on your PC.
-
If Windows Security finds a virus or malware and can’t remove or quarantine it, contact Microsoft Support for help.
-
If no viruses are found, restart your PC and try to reproduce the performance problem you were having with your PC.
-
Notes:
-
If Windows Security doesn’t open, can’t update the definition file, or can’t finish scanning for viruses, try running Windows Defender Offline, which is explained below in To scan for malware and viruses with Windows Defender Offline (Windows 10 Version 1809 or later).
-
To see which version of Windows 10 your device is currently running, select the Start button, then select Settings > System > About.
Open About settings
To scan for viruses using Windows Defender Security Center (Windows 10 Version 1803)
-
Select Virus & threat protection, then select Virus & threat protection updates > Check for updates to make sure you have the latest definition file.
-
Select the Virus & threat protection tab, then select Scan now.
Wait for Windows Defender Security Center to finish scanning for viruses and malware.
-
Do one of the following, depending on the results of the scan:
-
Run the recommended advanced scan. This scan takes longer but searches more extensively for threats on your PC.
-
If Windows Defender Security Center finds a virus or malware and can’t remove or quarantine it, contact Microsoft Support for help.
-
If no viruses are found, restart your PC and try to reproduce the performance problem you were having with your PC.
-
Notes:
-
If Windows Defender Security Center doesn’t open, can’t update the definition file, or can’t finish scanning for viruses, try running Windows Defender in Offline Mode, which is explained below in To scan for malware and viruses with Windows Defender Offline (Windows 10 Version 1803).
-
To see which version of Windows 10 your device is currently running, select the Start button, then select Settings > System > About.
Open About settings
To scan for malware and viruses with Windows Defender Offline (Windows 10 Version 1809 or later)
-
Save any documents or anything else you might have open on your PC.
-
Select Virus & threat protection, and then under Current threats, select Scan options > Windows Defender Offline scan > Scan now.
Your PC will restart, and Windows Defender Offline will run and scan for viruses and malware. The scan might take 15 minutes or so, and your PC will restart again after that.
-
Try to reproduce the performance issue.
If your PC still runs slowly, continue to the next tip.
To scan for malware and viruses with Windows Defender Offline (Windows 10 Version 1803)
-
Save any documents or anything else you might have open on your PC.
-
Select Virus & threat protection, then select Run a new advanced scan > Windows Defender Offline scan > Scan now.
Your PC will restart, and Windows Defender Offline will run and scan for viruses and malware. The scan might take 15 minutes or so, and your PC will restart again after that.
-
Try to reproduce the performance issue.
If your PC still runs slowly, continue to the next tip.
Restoring your PC undoes recent changes that might be causing problems. If you think a recently installed app, driver, or update for Windows could be causing problems, you might get things running normally again by restoring your PC to an earlier point, called a restore point.
Notes:
-
Restoring from a restore point won’t affect your personal files, but it will remove apps, drivers, and updates that were installed after the restore point was created.
-
System restore works for changes made in the last 7 to 14 days.
To restore your PC from a restore point
-
In the search box on the taskbar, type restore point, then select Create a restore point from the list of results.
-
On the System Protection tab, select System Restore.
-
Select Next, then choose the restore point related to the app, driver, or update that might be causing the problem. Then select Next > Finish.
-
Restart your PC and see if performance has improved.
If you don’t see any restore points, it might be because system protection isn’t turned on.
To turn on system protection
-
In the search box on the taskbar, type restore point, then select Create a restore point from the list of results.
-
On the System Protection tab, select Configure.
-
Select Turn on system protection > OK.
Need more help?
Want more options?
Explore subscription benefits, browse training courses, learn how to secure your device, and more.
Communities help you ask and answer questions, give feedback, and hear from experts with rich knowledge.
Find solutions to common problems or get help from a support agent.
Watch this: 10 quick ways to speed up Windows 10
If your formerly shiny, new Windows 10 PC has begun to lose some of its luster, there are ways to put a little pep back in its step. Here are some quick, easy ways to improve its performance without swapping out any hardware.
1. Go opaque
Windows 10’s new Start menu is sexy and see-through, but that transparency will cost you some (slight) resources. To reclaim those resources, you can disable transparency in the Start menu, taskbar, and action center: Open the Settings menu and go to Personalization > Colors and toggle off Make Start, taskbar, and action center transparent.

Enlarge Image

2. No special effects
Making the Start menu, taskbar, and action center transparent is one thing, but Windows 10 still has a lot of other snazzy, built-in special effects. To really go bare-bones on the special effects, right-click the Start button and click System.

Enlarge Image
Click Advanced system settings to open the System Properties menu. On the Advanced tab under Performance, click Settings…

Enlarge Image
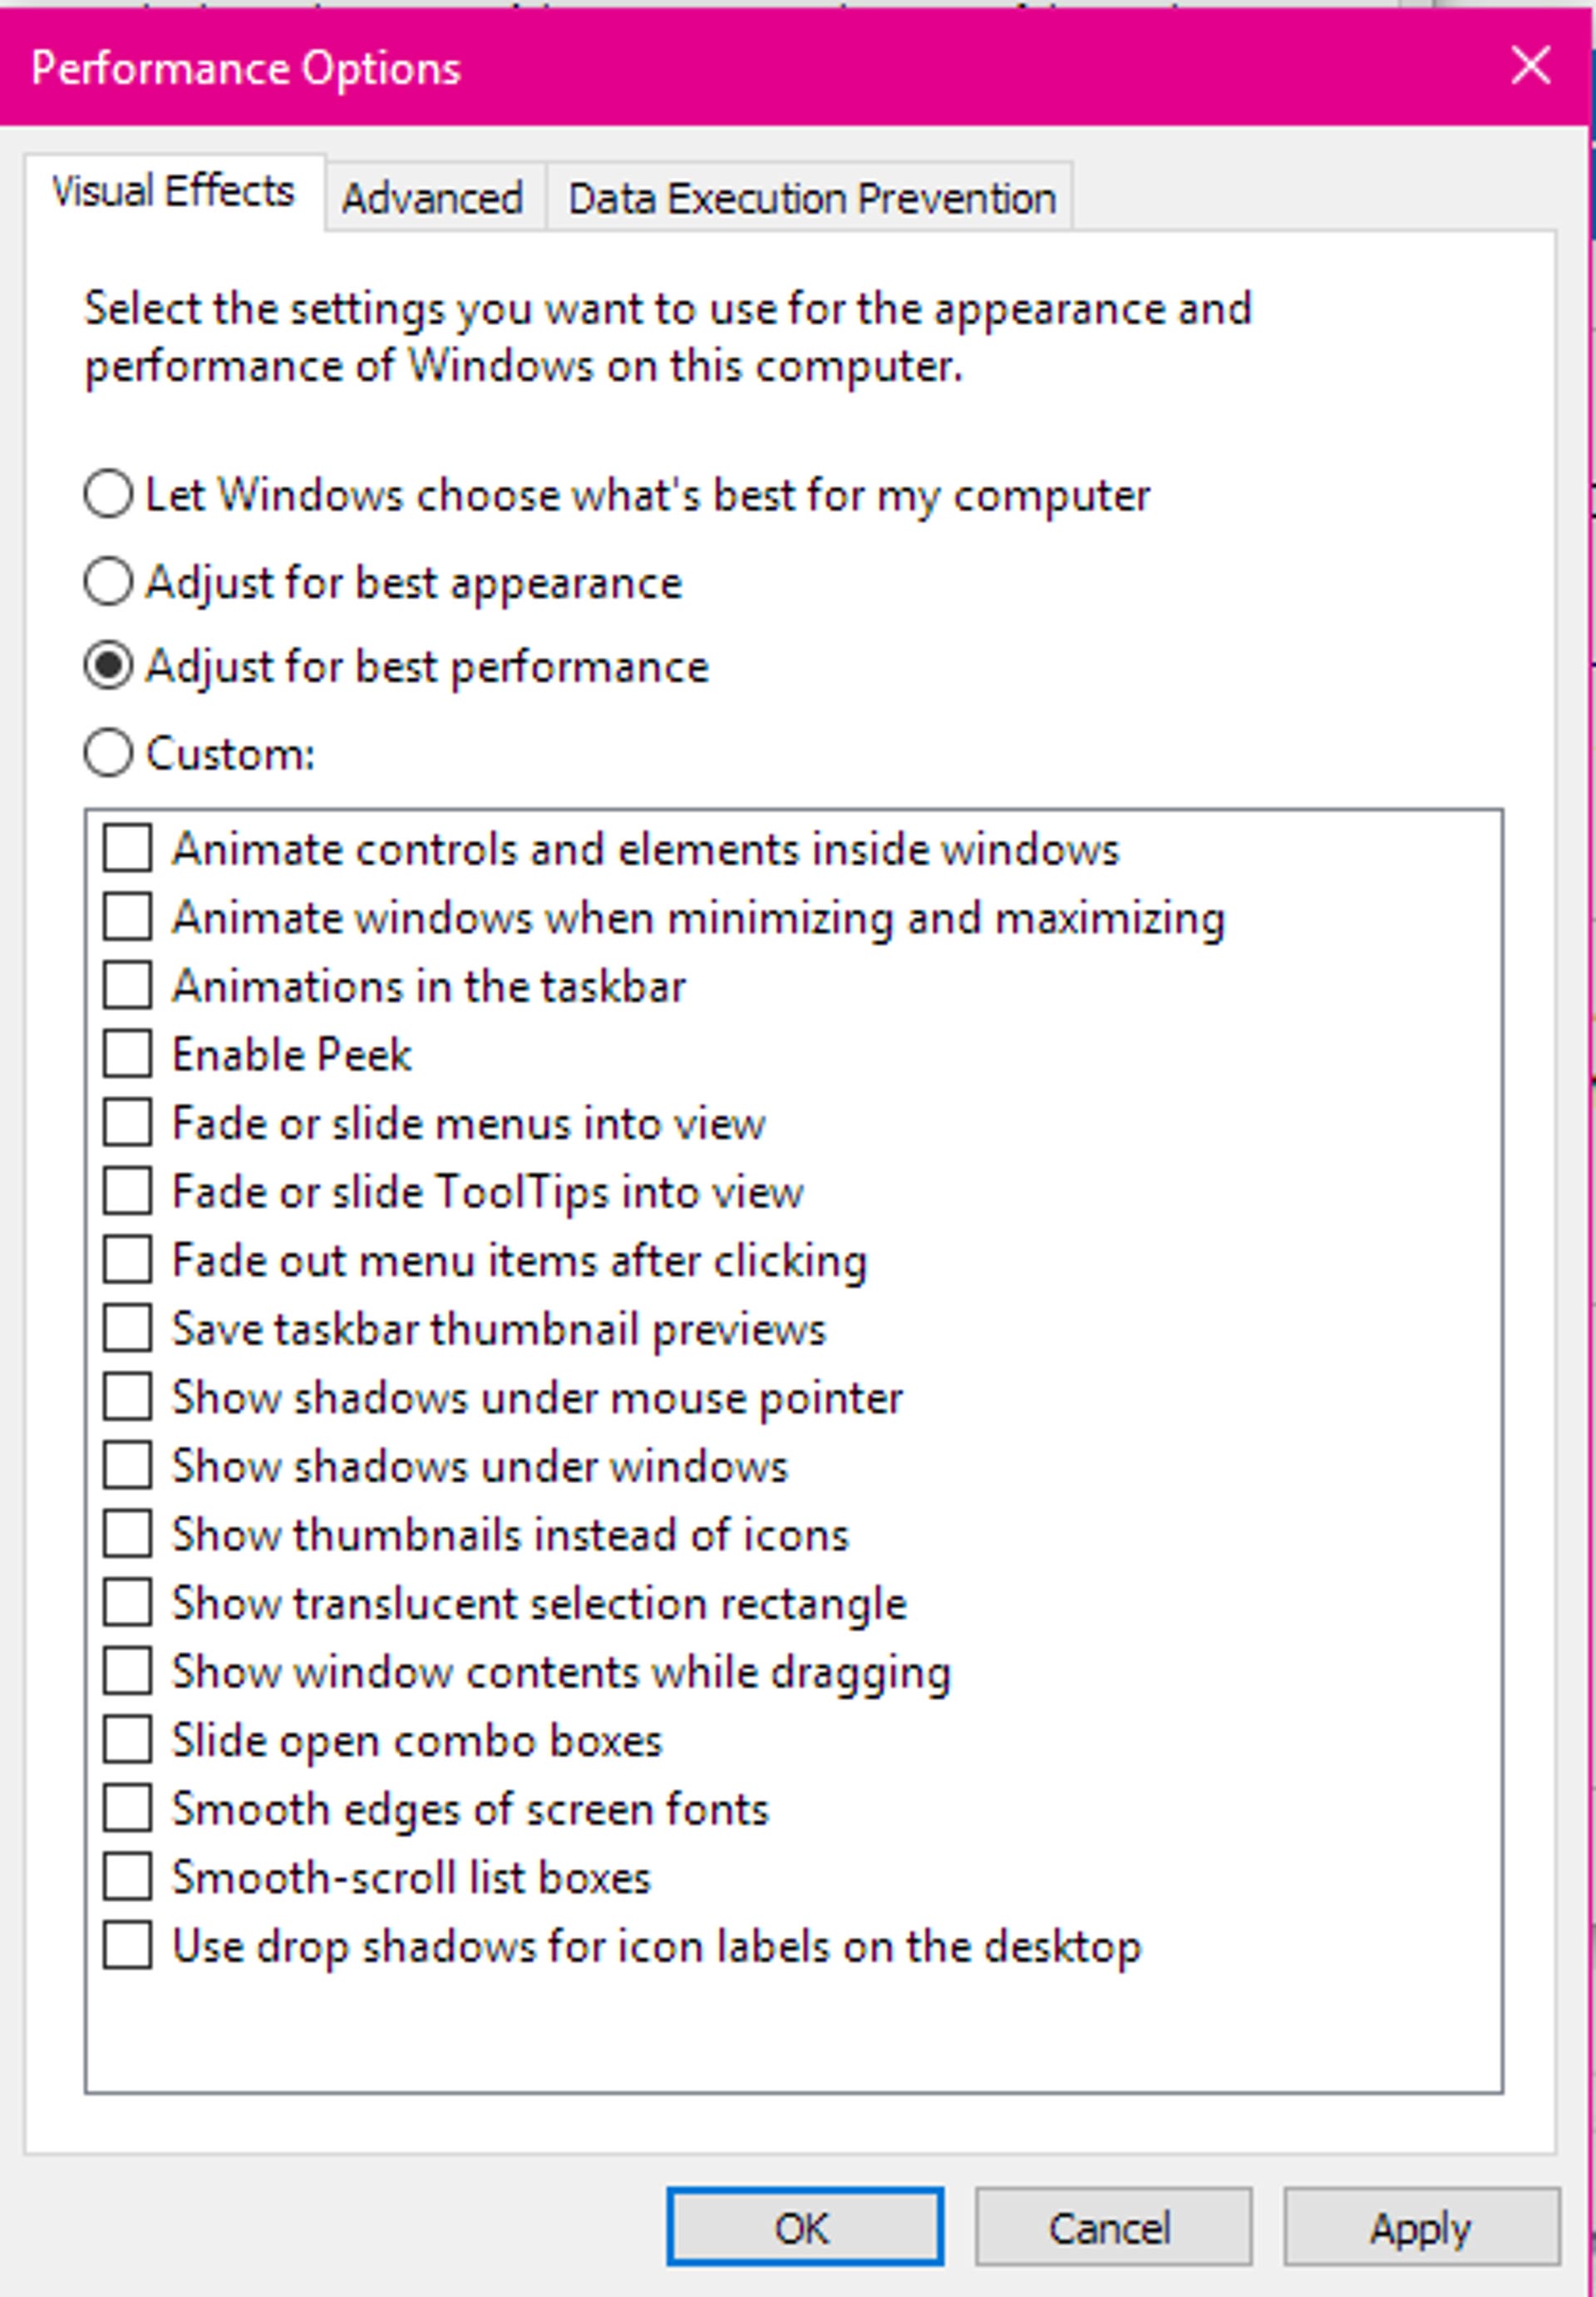
This will open the Performance Options menu. In the Visual Effects tab, either choose Adjust for best performance to turn off all unnecessary animations and special effects, or choose Custom: and deselect the visual effects you think can live without. When you’re finished, click OK to apply your changes.
3. Disable Startup programs
If your PC is taking a long time to boot up — and you’ve enabled Fast Startup and everything — you may have too many programs starting up when you turn your computer on. To fix this, right-click on the Start button and click Task Manager. Click the Startup tab (click More details if you don’t see the Startup tab) and peruse the list of programs that start up with your computer. If you see a program that doesn’t need to be there, right-click it and click Disable. You can also arrange the list of programs by Startup impact, if you’d like to see the programs that are taking up the most resources (and time).

Enlarge Image
4. Find (and fix) the problem
Windows 10 has a built-in performance troubleshooter that can help you find and fix any problems that might be affecting your PC’s speed. To open the troubleshooter, right-click on the Start button and click Control Panel. Under Security and Maintenance at the top, click Troubleshoot common computer problems. Next, under System and Security, click Run maintenance tasks.
5. Reduce the Boot Menu Time-out
When your computer starts up, the boot menu is displayed for a certain amount of time before the operating system loads. This gives you time to do things like start Windows in Safe Mode. You can shave a few seconds off your startup time by changing the boot menu time-out, which is set to 30 seconds by default.
Enlarge Image
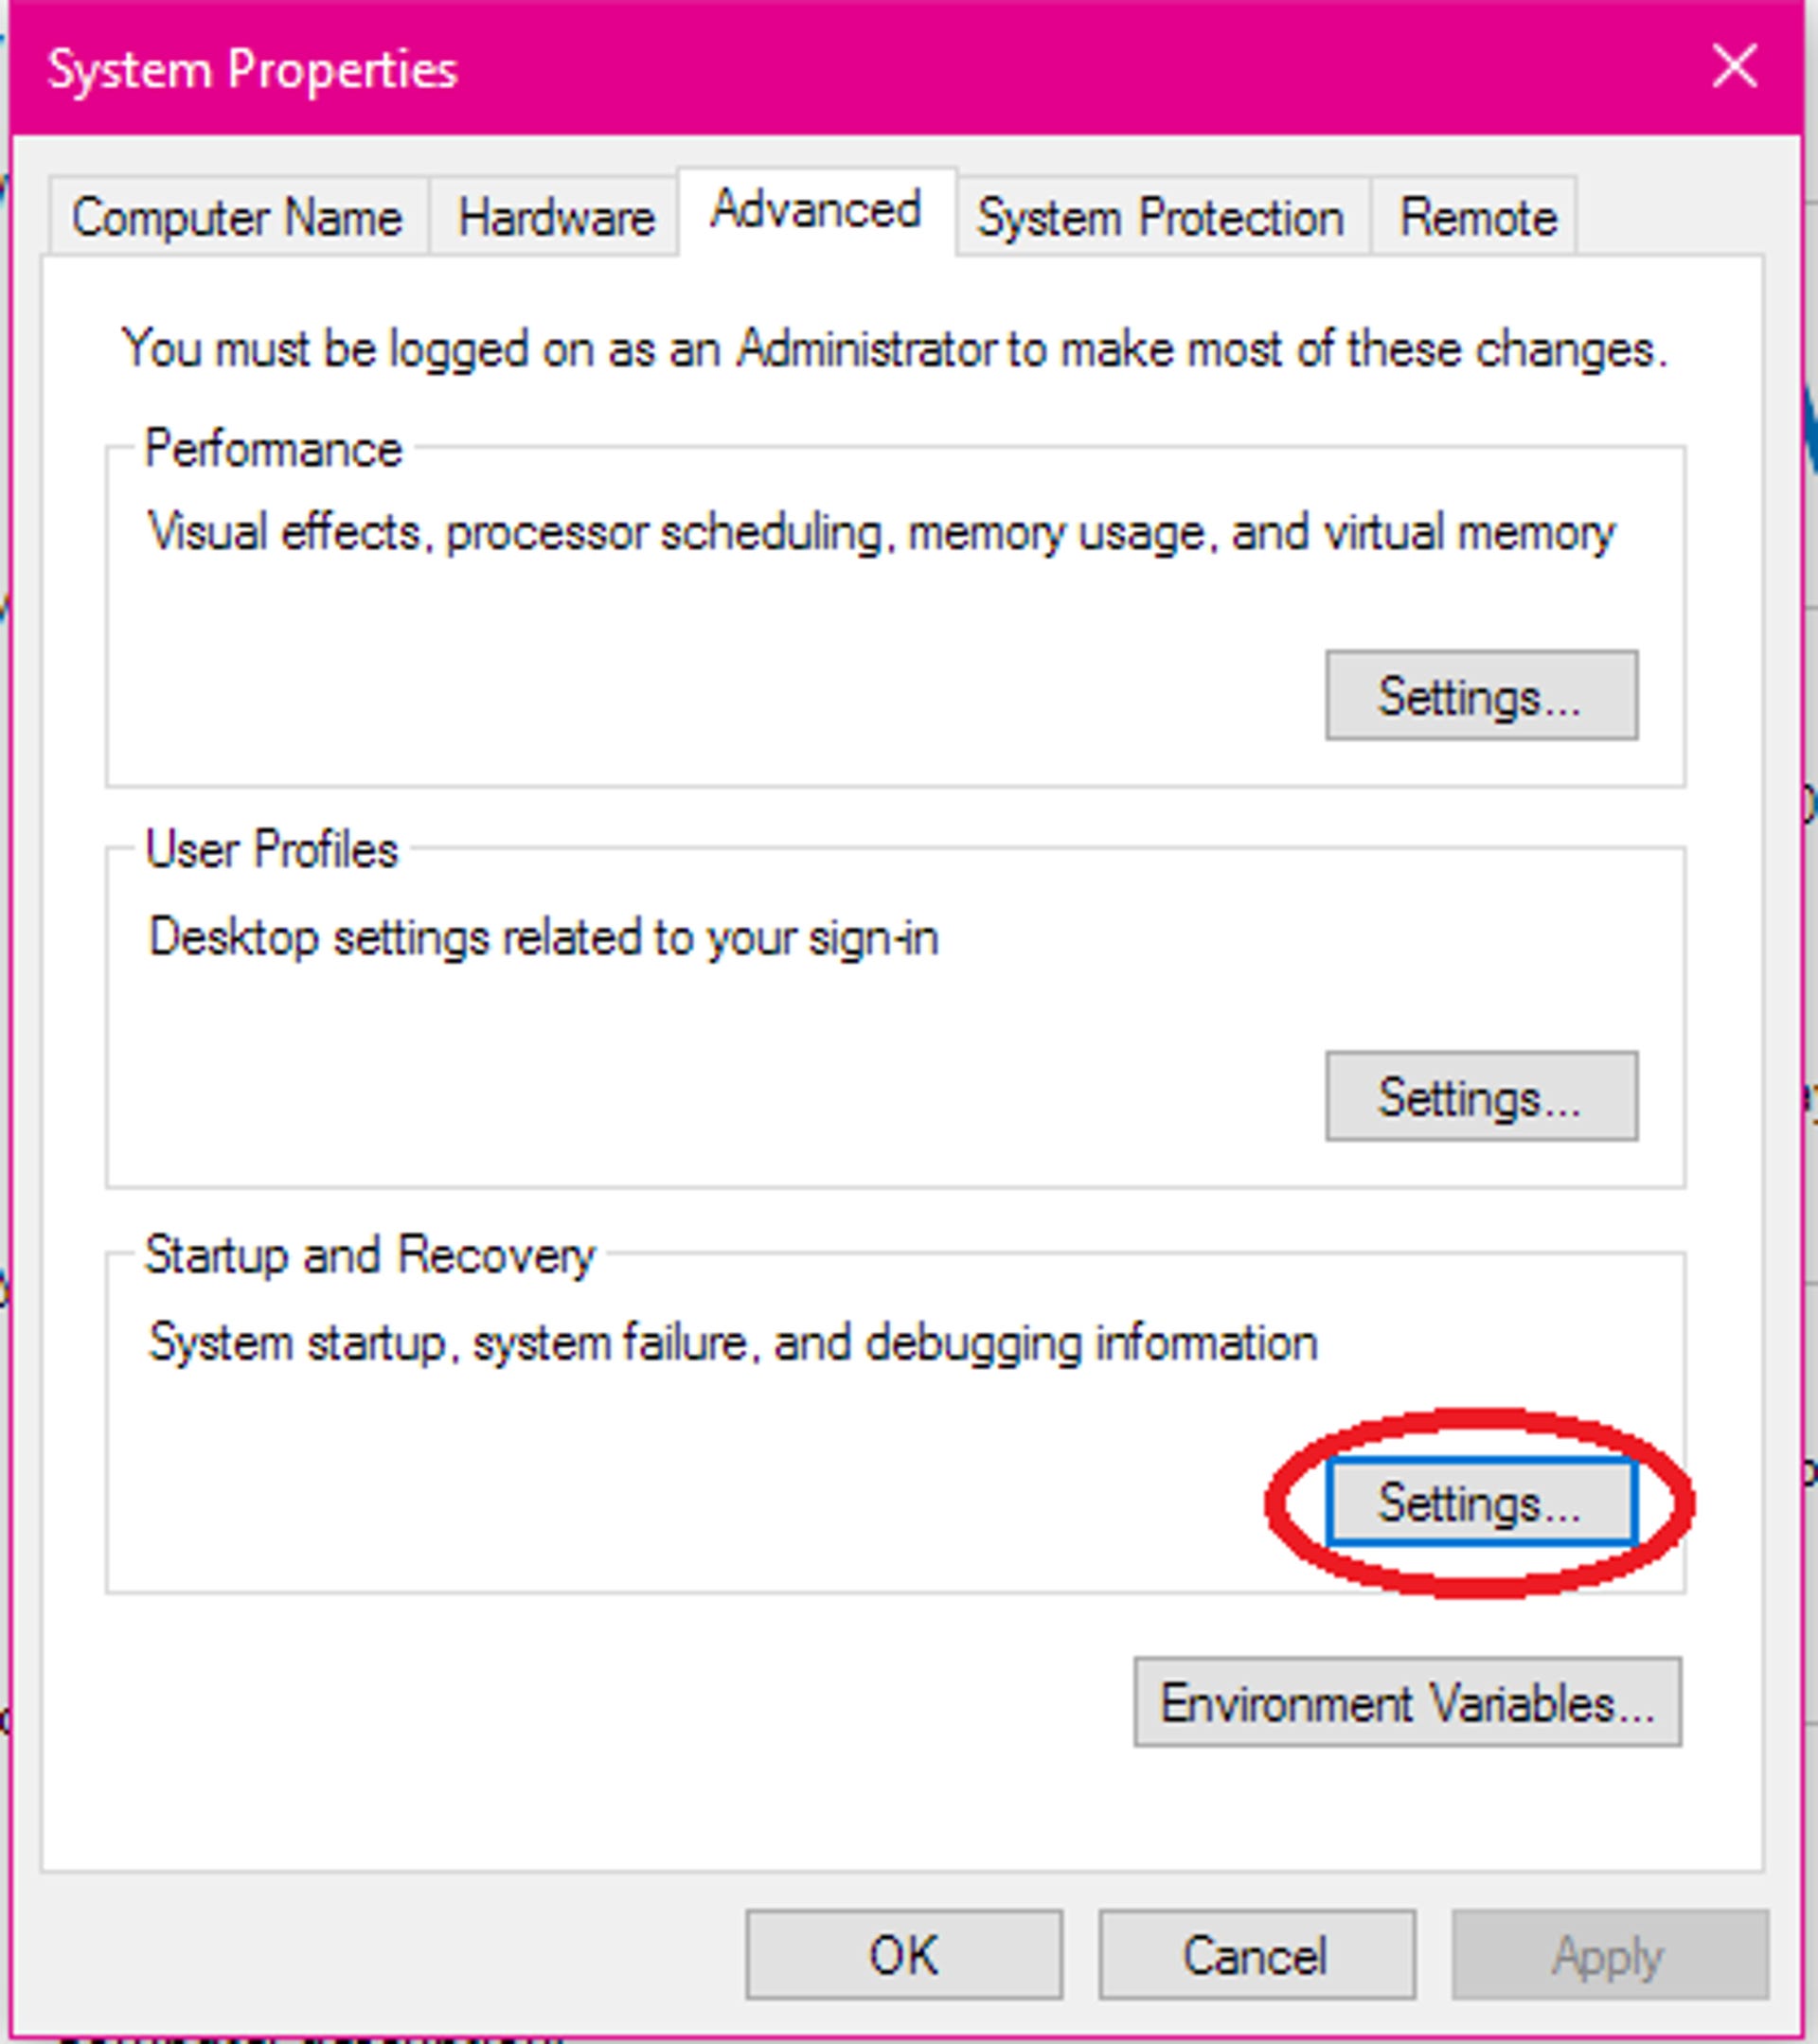
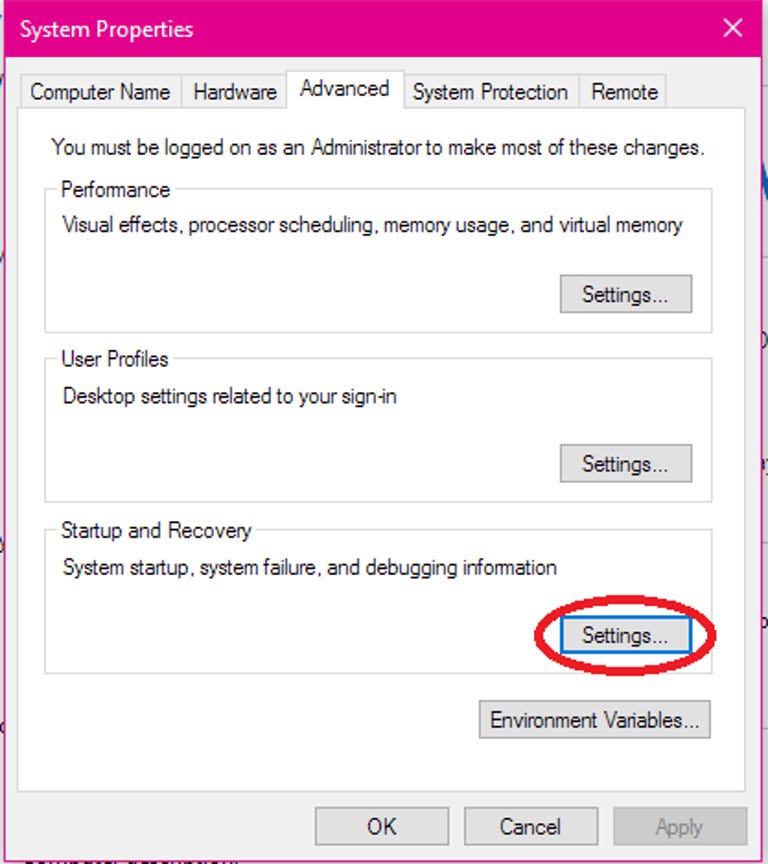
To do this, right-click on the Start button and click Control Panel. Go to System > Advanced system settings, and, under Startup and Recovery, click Settings.
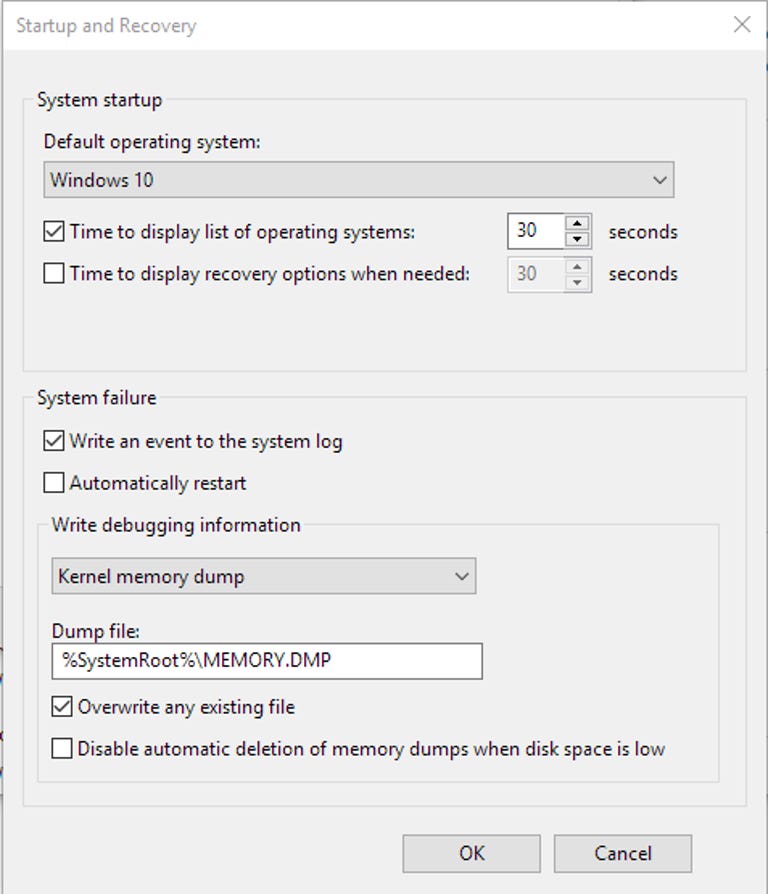
Enlarge Image

Next to Time to display list of operating systems:, change the value from 30 seconds to 10 seconds and click OK.
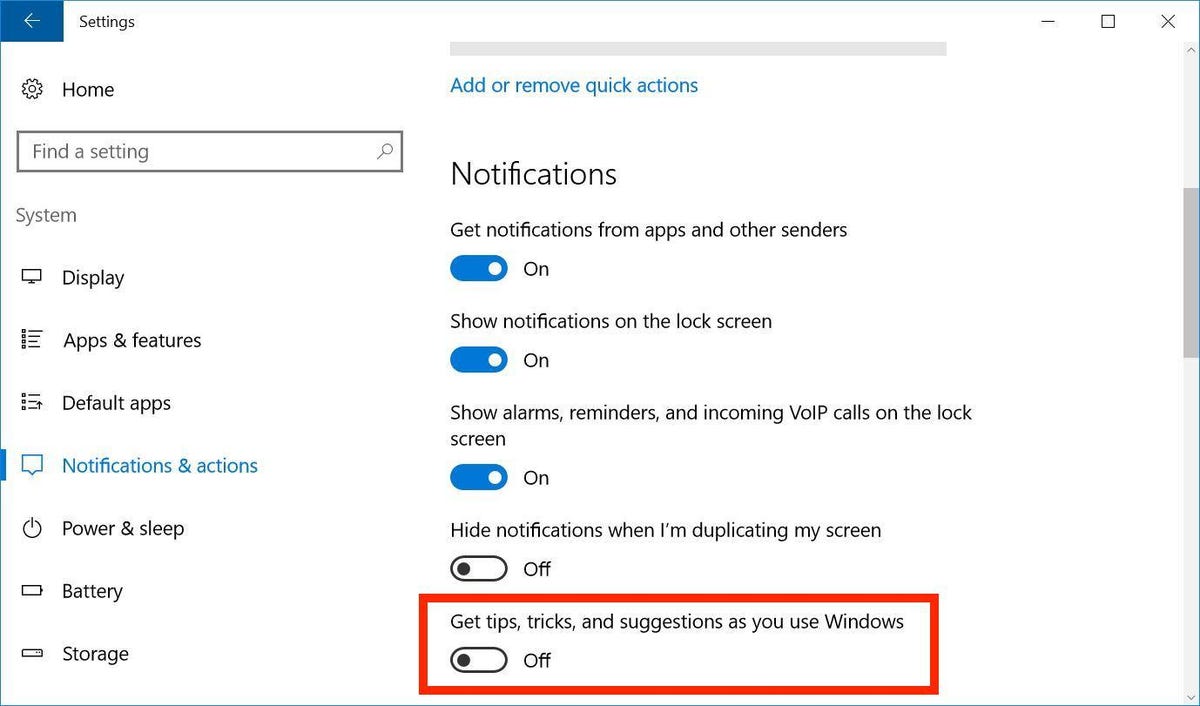
6. No tipping
In an effort to be helpful, Windows 10 will sometimes give you tips on how to get the most out of the OS. It scans your computer in order to do this, a process that can have a slight impact on performance. To turn off these tips, go to Start > Settings > System > Notifications & actions and toggle off Get tips, tricks and suggestions as you use Windows.
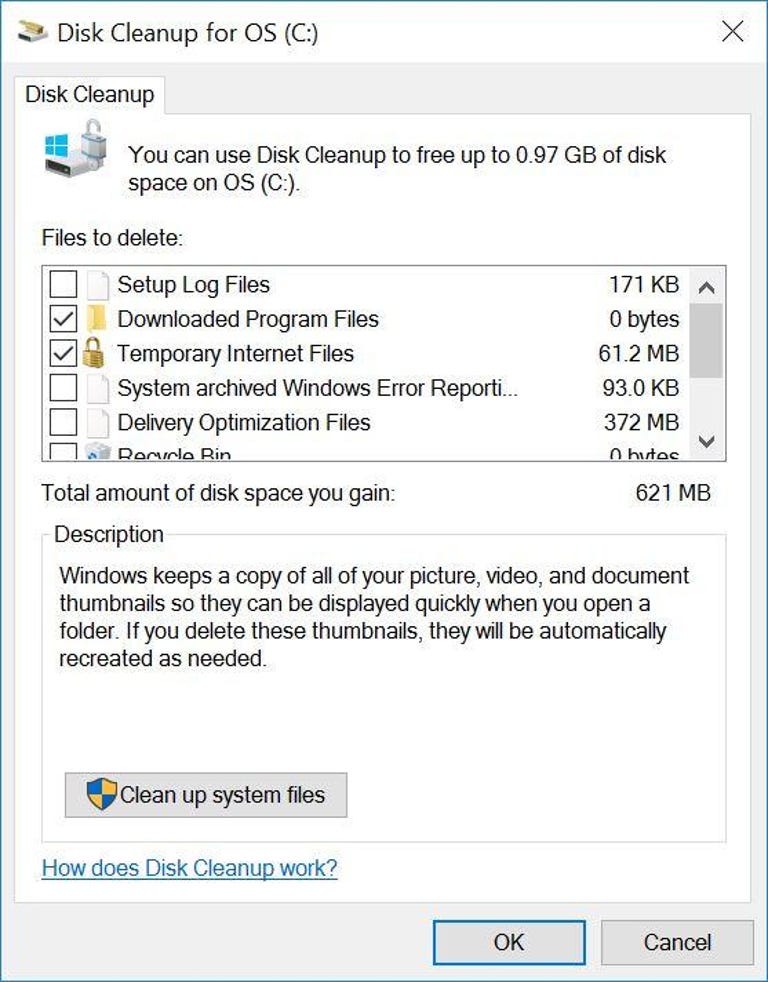
7. Run Disk Cleanup
This one’s a win-win. It’ll improve performance and free up space on your hard drive. Disk Cleanup has been around forever, but this trusted Windows utility can still help clean out the temporary files, installers and other junk littering your hard drive. To run it, just search for Disk Cleanup, run it and click the button labeled Clean up system files.
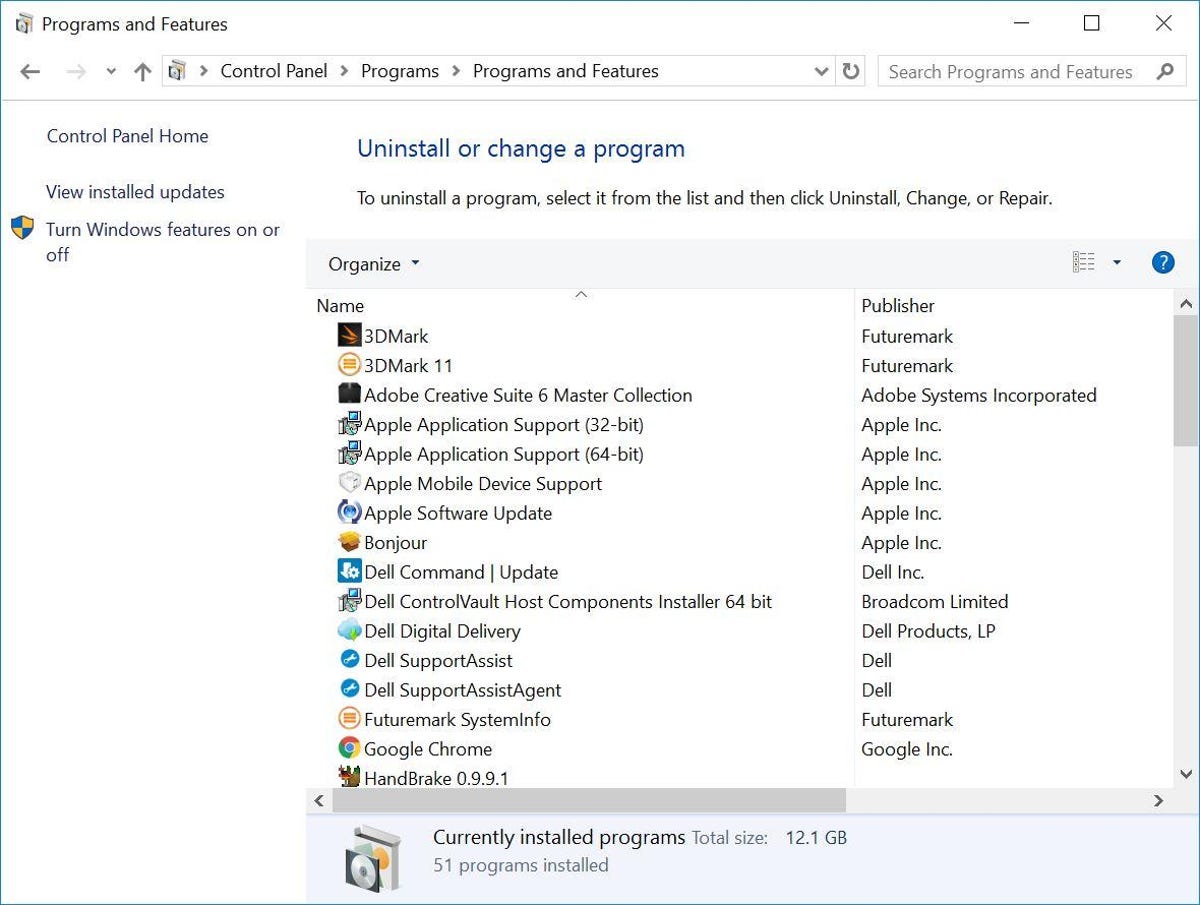
8. Eradicate bloatware
If your PC came with preinstalled apps you don’t want or need, get rid of them. Same goes for any apps you installed that you later found to be of little or no use. Right-click the Start menu, choose Control Panel and under the Programs header, click Uninstall a program. Peruse the list from time to time and select the programs you no longer need and click Uninstall at the top of the list.
9. Power plan
Make sure you aren’t using a Power saver plan if you don’t need to. Even desktops will sometimes feature a power-saver option, which doesn’t do you any good unless you are trying to conserve battery life. Open the Control Panel and go to Hardware and Sound > Power Options to see which power plan you are currently using. For better performance, make sure you are using a High Performance or Balanced plan (or a plan from the PC manufacturer that says it’s balanced).
10. Restart your PC
Is speeding up your computer as simple as…restarting it? Maybe. Restarting your PC clears out its memory and stops any processes that might be taking up resources. Also, shutting down your computer is not the same as restarting it — shutdown is affected by Windows 10’s Fast Startup, which saves a snapshot of your PC and its processes in a hiberfile for faster boot-up. Restart is not affected by Fast Startup, so if you have Fast Startup enabled, restarting your PC is the only way to fully clear the memory and shutdown processes.
Editors’ note: This story was originally published on April 12, 2016, and has since been updated with more tips.
Windows 10 and 11 tips
If you want to optimize Windows 10, take a few minutes to try out these tips to speed up your PC and make it less prone to performance and system issues.
Contributing Editor,
Computerworld |
Thinkstock 
Want Windows 10 to run faster? We’ve got help. In just a few minutes you can try out these tips; your machine will be zippier and less prone to performance and system issues.
1. Change your power settings
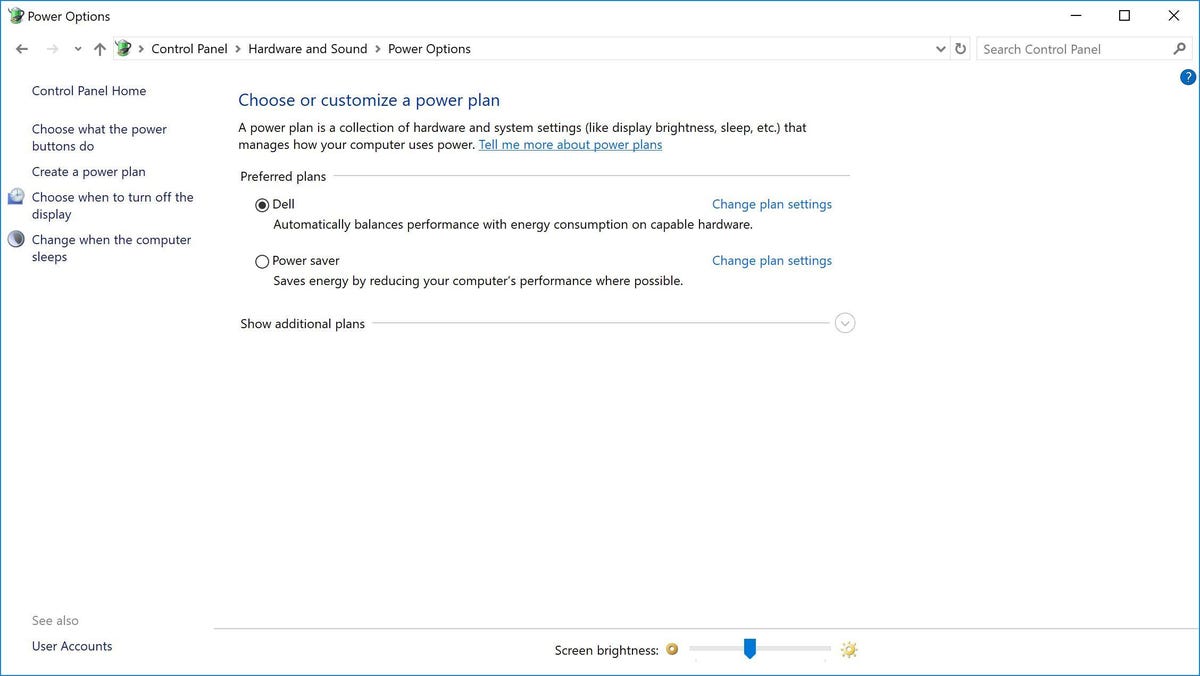
If you’re using Windows 10’s “Power saver” plan, you’re slowing down your PC. That plan reduces your PC’s performance in order to save energy. (Even desktop PCs typically have a “Power saver” plan.) Changing your power plan from “Power saver” to “High performance” or “Balanced” will give you an instant performance boost.
To do it, launch the Control Panel app, then select Hardware and Sound > Power Options. You’ll typically see two options: “Balanced (recommended)” and “Power saver.» (Depending on your make and model, you might see other plans here as well, including some branded by the manufacturer.) To see the “High performance” setting, click the down arrow by “Show additional plans.”
Change your power settings in Control Panel to give your PC a performance boost. (Click image to enlarge it.)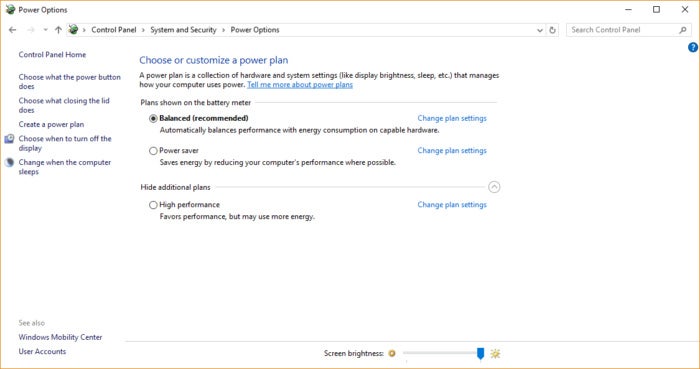 IDG
IDG
To change your power setting, simply choose the one you want, then exit Control Panel. “High performance” gives you the most oomph, but uses the most power; “Balanced” finds a happy medium between power use and better performance; and “Power saver” does everything it can to give you as much battery life as possible. Desktop users have no reason to choose “Power saver,” and even laptop users should consider the “Balanced” option when unplugged — and “High performance” when connected to a power source.
2. Disable programs that run on startup
One reason your Windows 10 PC may feel sluggish is that you’ve got too many programs running in the background — programs that you rarely or never use. Stop them from running, and your PC will run more smoothly.
Start by launching the Task Manager: Press Ctrl-Shift-Esc, right-click the lower-right corner of your screen and select Task Manager, or type task manager into the Windows 10 search box and press Enter. If the Task Manager launches as a compact app with no tabs, click “More details” at the bottom of your screen. The Task Manager will then appear in all of its full-tabbed glory. There’s plenty you can do with it, but we’re going to focus only on killing unnecessary programs that run at startup.
Click the Startup tab. You’ll see a list of the programs and services that launch when you start Windows. Included on the list is each program’s name as well as its publisher, whether it’s enabled to run on startup, and its “Startup impact,” which is how much it slows down Windows 10 when the system starts up.
To stop a program or service from launching at startup, right-click it and select “Disable.” This doesn’t disable the program entirely; it only prevents it from launching at startup — you can always run the application after launch. Also, if you later decide you want it to launch at startup, you can just return to this area of the Task Manager, right-click the application and select “Enable.”
You can use the Task Manager to help get information about programs that launch at startup and disable any you don’t need. (Click image to enlarge it.)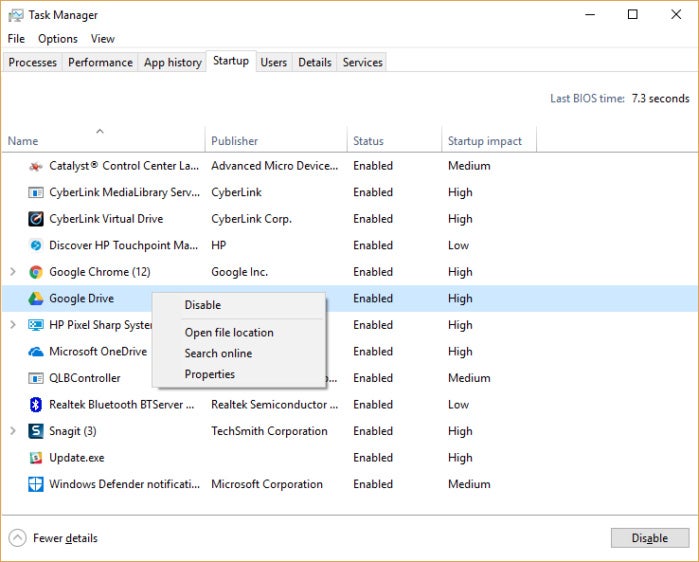 IDG
IDG
Many of the programs and services that run on startup may be familiar to you, like OneDrive or Evernote Clipper. But you may not recognize many of them. (Anyone who immediately knows what “bzbui.exe” is, please raise your hand. No fair Googling it first.)
The Task Manager helps you get information about unfamiliar programs. Right-click an item and select “Properties” for more information about it, including its location on your hard disk, whether it has a digital signature, and other information such as the version number, the file size and the last time it was modified.
You can also right-click the item and select “Open file location.” That opens File Explorer and takes it to the folder where the file is located, which may give you another clue about the program’s purpose.
Finally, and most helpfully, you can select “Search online” after you right-click. Bing will then launch with links to sites with information about the program or service.
If you’re really nervous about one of the listed applications, you can go to a site run by Reason Software called Should I Block It? and search for the file name. You’ll usually find very solid information about the program or service.
Now that you’ve selected all the programs that you want to disable at startup, the next time you restart your computer, the system will be a lot less concerned with unnecessary programs.
3. Go to a Previous Restore Point
As you use Windows 10, it automatically creates restore points that are essentially snapshots of your system at specific moments in time, including installed software, drivers and updates. Restore points are a kind of safety net so if something goes wrong, you can always restore your PC to a previous state.
They can also be used to speed up your PC if you notice — for no reason you can fathom — it’s started to slow down. Recently installed problematic drivers, software, or updates could be to blame, so going back to a previous restore point could speed things up again because the system will be returned to the state it was in before the problems started. Keep in mind, though, that you’ll only be able to restore your system to the state it was in during the last seven to 10 days. (Restore points don’t affect your files, so you won’t lose any files by going to a restore point.)
To go to a previous restore point:
- Save any open files and close all your programs.
- In the search box type advanced system and then click View advanced system settings. You’ll be sent to the Advanced tab of System Properties in the Control Panel.
- Click the System Protection tab.
- In the System Restore area, click System Restore. From the screen that appears, click Next.
- You’ll see the most recent restore point. Click Next if you want to go that restore point. To see others, click Show more restore points. Highlight the one you want to use and click Next.
- Click Finish from the screen that appears.
- Your system will restore to the restore point you chose and shut down. Restart your PC.
Going to a restore point can help speed up your PC if you’ve recently installed drivers, software, or updates that have slowed down your system. Microsoft
Note: there’s a chance System Restore isn’t turned on, meaning you won’t be able to use this tip. If that’s the case, you should turn it on to solve any future problems. To do so:
- In the search box, type create a restore point, then click Create a restore point.
- On the System Protection tab and select Configure.
- Select Turn on system protection. Leave the other settings on the page as they are.
- Click OK. From now on your PC will automatically create restore points.
4. Use ReadyBoost to speed up disk caching
Windows 10 regularly stores cached data on your hard disk, and then when it needs the data, fetches it from there. The time it takes to fetch cached data depends on the speed of your hard disk. If you have a traditional hard disk instead of an SSD, there’s a trick that can help speed up your cache: use Windows’ ReadyBoost feature. It tells Windows to cache data to a USB flash drive, which is faster than a hard disk. Fetching data from that speedier cache should speed up Windows.
First, plug a USB flash drive into one of your PC’s USB ports. The flash drive needs to support at least USB 2.0, and preferably USB 3 or faster. The faster your flash drive, the more of a speed boost you should see. Also, look for a flash drive that is at least double the size of your PC’s RAM for maximum performance.
After you plug in in the drive, open File Explorer and click “This PC.” Look for the flash drive. It may have an odd name, like UDISK 28X, or something even less-obvious. Right-click it, choose Properties and click the ReadyBoost tab.
Turn on ReadyBoost from this screen to speed up your PC.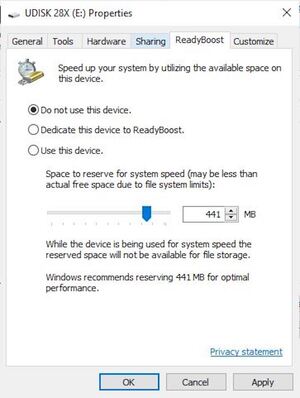 Microsoft
You’ll come to a screen that asks whether you want to use the flash drive as a cache and recommends a cache size. Leave the cache size as is or change it if you like. Then select “Dedicate this device to ReadyBoost” and click Apply and then click OK.
(Note that if you see the message, “This device cannot be used for ReadyBoost” when you click the ReadyBoost tab it means your flash drive doesn’t meet ReadyBoost’s minimum performance standards, so you’ll have to insert a new one.)
As you use your computer, ReadyBoost will start filling the cache with files, so you may notice an increase in disk activity. Depending on how much you use your PC, it can take a few days for your cache to fill and offer maximum improved performance. If you don’t see an increase in performance, try a flash disk with more capacity.
Note: If you have an SSD, you won’t get any extra speed from ReadyBoost, and it might even hurt performance. So don’t use this on a system with an SSD.
5. Shut off Windows tips and tricks
As you use your Windows 10 PC, Windows keeps an eye on what you’re doing and offers tips about things you might want to do with the operating system. In my experience, I’ve rarely if ever found these “tips” helpful. I also don’t like the privacy implications of Windows constantly taking a virtual look over my shoulder.
Windows watching what you’re doing and offering advice can also make your PC run more sluggishly. So if you want to speed things up, tell Windows to stop giving you advice. To do so, click the Start button, select the Settings icon and then go to System > Notifications & actions. Scroll down to the Notifications section and uncheck the box marked “Get tips, tricks, and suggestions as you use Windows.”
Turning off Windows’ suggestions for you should help things run more smoothly (and give you back a measure of privacy). (Click image to enlarge it.)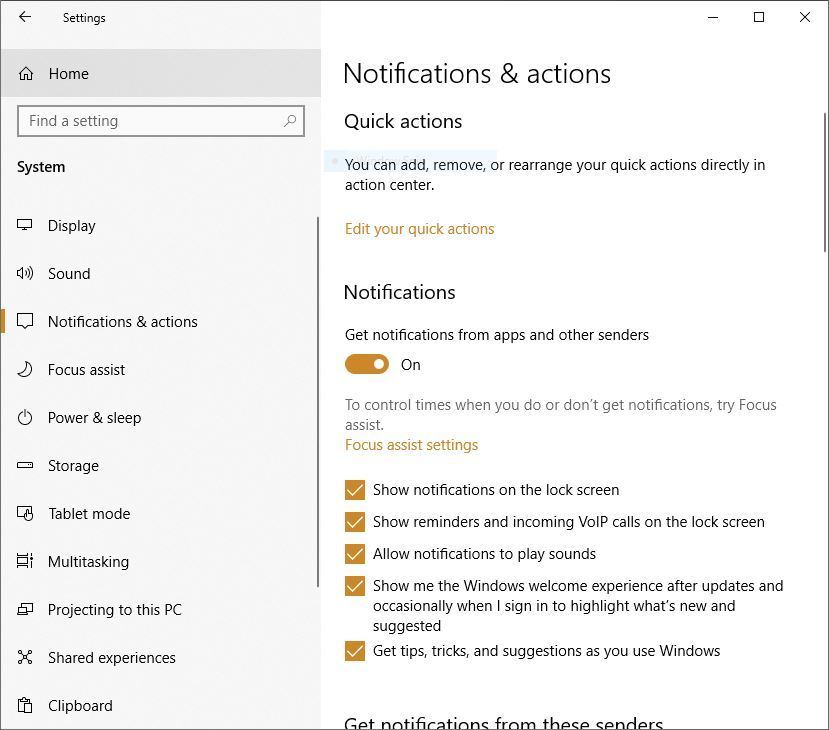 IDG
IDG
That’ll do the trick.
6. Stop OneDrive from syncing
Microsoft’s cloud-based OneDrive file storage, built into Windows 10, keeps files synced and up to date on all of your PCs. It’s also a useful backup tool so that if your PC or its hard disk dies, you still have all your files intact, waiting for you to restore them.
Here’s how to turn off OneDrive syncing temporarily, to see if that boosts system performance. (Click image to enlarge it.)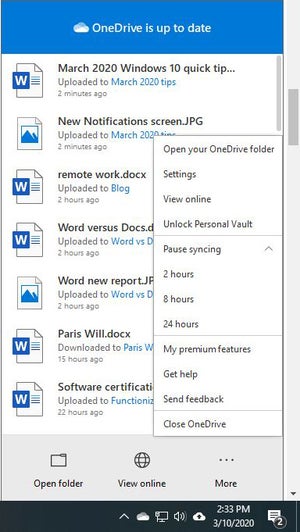 IDG
IDG
It does this by constantly syncing files between your PC and cloud storage — something that can also slow down your PC. That’s why one way to speed up your PC is to stop the syncing. Before you turn it off permanently, though, you’ll want to check whether it is actually slowing down your PC.
To do so, right-click the OneDrive icon (it looks like a cloud) in the notification area on the right side of the taskbar, then click the More button at the bottom of the screen. From the popup screen that appears, click “Pause syncing” and select either 2 hours, 8 hours or 24 hours, depending upon how long you want it paused. During that time, gauge whether you’re seeing a noticeable speed boost.
If so, and you decide you do indeed want to turn off syncing, right-click the OneDrive icon, and from the popup, select Settings > Account. Click “Unlink this PC,” and then from the screen that appears, click “Unlink account.” When you do that, you’ll still be able to save your files to your local OneDrive folder, but it won’t sync with the cloud.
If you find that OneDrive slows down your PC but prefer to keep using it, you can try to troubleshoot OneDrive problems. For info on how to do that, check out Microsoft’s “Fix OneDrive sync problems” page.
7. Use OneDrive Files on-Demand
Some users may not want to stop OneDrive from syncing; doing so defeats its purpose of making sure you have the latest files on whatever device you use. And it would also mean you won’t be able to use OneDrive as a way to safely back up files.
But there’s a way to get the best of both worlds: You can keep syncing to an absolute minimum and only do it when absolutely necessary. You’ll speed up performance, and still get the best of what OneDrive has to offer.
To do this, you use Windows’ OneDrive Files on-Demand feature. With it, you can choose to keep only certain files on your PC, but still have access to all your other OneDrive files in the cloud. When you want to use one of those online files, you open it directly from the cloud. With fewer files on your PC sync, you should see a performance boost.
Right-click the OneDrive icon on the right side of the Taskbar and select Settings, then click the Settings tab on the dialog box that appears. Check the box next to Files On-Demand. Now click the OneDrive icon and select Open Folder. OneDrive appears in a File Explorer window. Right-click a folder whose files you want stored only in the cloud, but not on your PC, then select “Free up space.” Files from that folder will be removed from your disk, but still kept in OneDrive in the cloud.
For every folder whose files you want kept on your PC, right-click the folder and select “Always Keep on this Device.” You can change the options on any folder at any time by right-clicking it and choosing what you want done.
Use this dialog box to turn on OneDrive Files on-Demand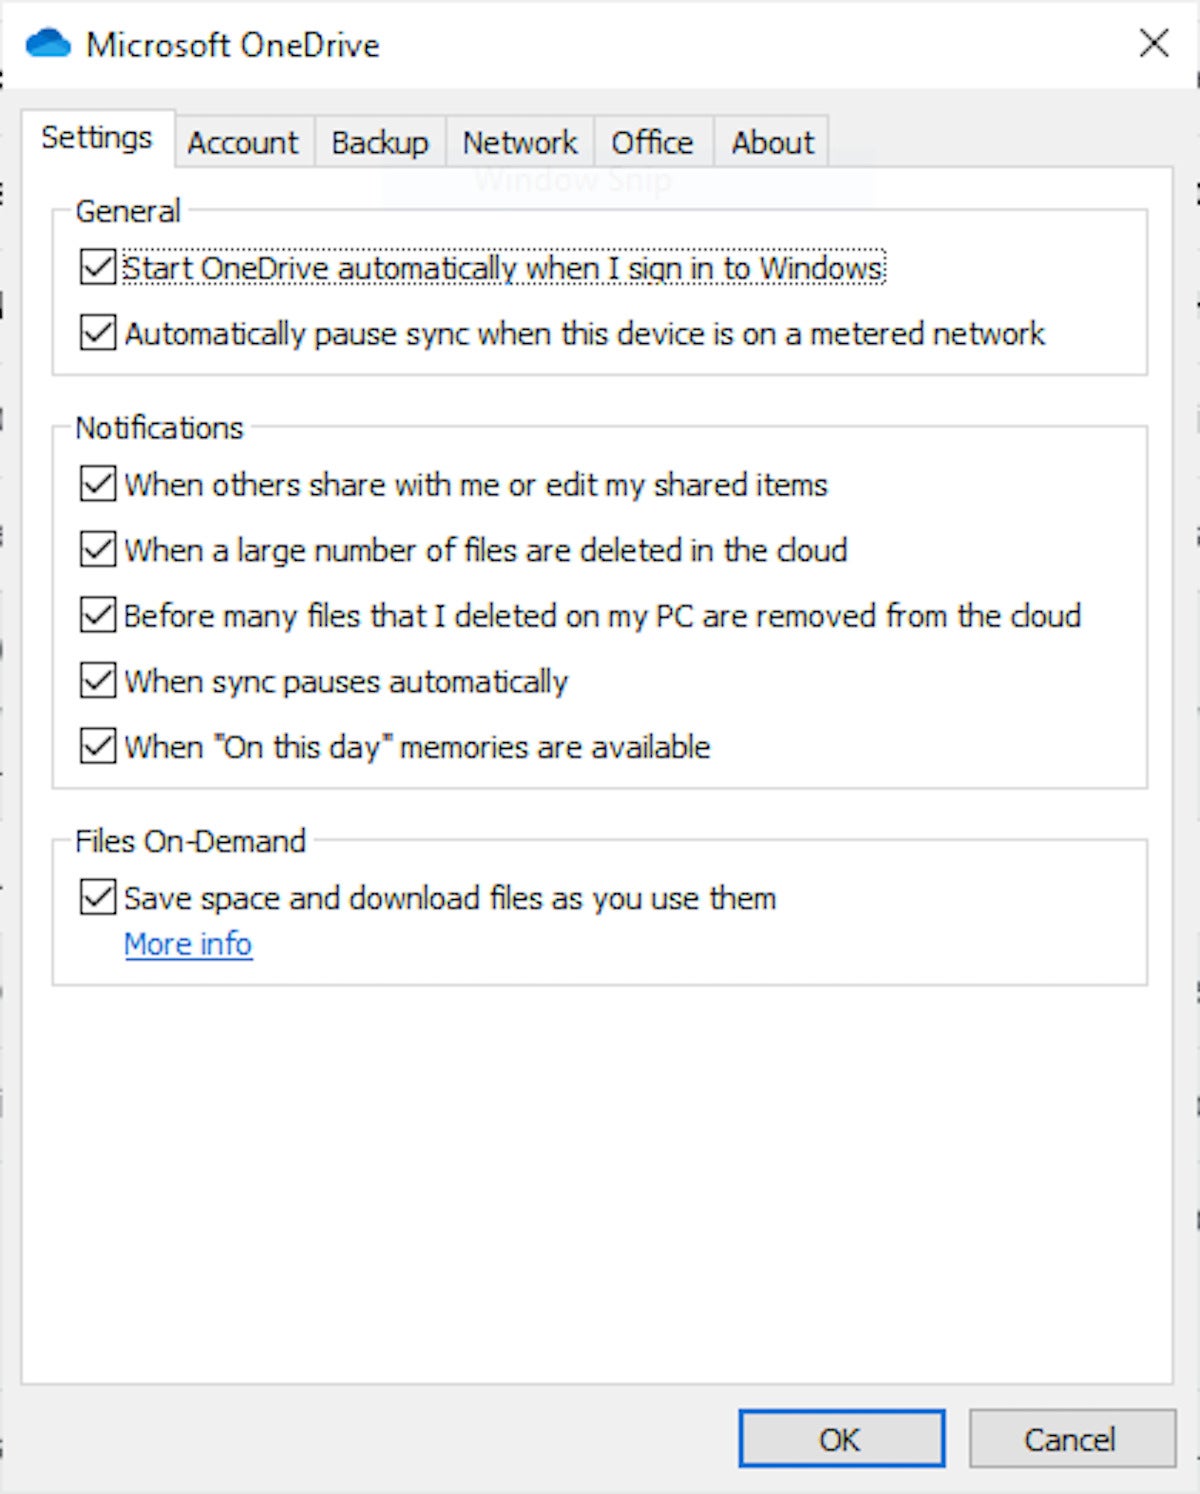 Microsoft
If you change your mind and want all your files stored locally and kept in sync via OneDrive, go back to the OneDrive settings dialog box and uncheck the box next to Files on-Demand.
Note that OneDrive Files on-Demand is available only on Windows Version 1709 and higher.
8. Turn off search indexing
Windows 10 indexes your hard disk in the background, allowing you — in theory — to search your PC more quickly than if no indexing were being done. But slower PCs that use indexing can see a performance hit, and you can give them a speed boost by turning off indexing. Even if you have an SSD disk, turning off indexing can improve your speed, because the constant writing to disk that indexing does can eventually slow down SSDs.
To get the maximum benefit in Windows 10, you need to turn indexing off completely. To do so, type services.msc in the Windows 10 search box and press Enter. The Services app appears. Scroll down to either Indexing Service or Windows Search in the list of services. Double-click it, and from the screen that appears, click Stop. Then reboot your machine. Your searches may be slightly slower, although you may not notice the difference. But you should get an overall performance boost.
Here’s how to turn off Windows 10 indexing. (Click image to enlarge it.)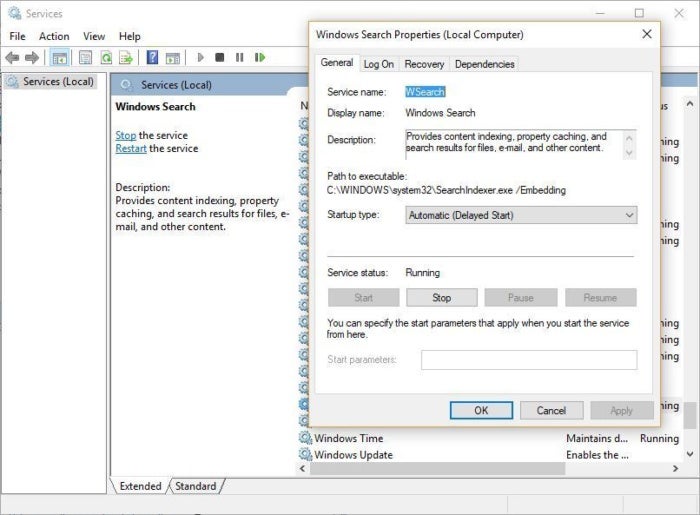 IDG
IDG
If you’d like, you can turn off indexing only for files in certain locations. To do this, type index in the Windows 10 search box and click the Indexing Options result that appears. The Indexing Options page of the Control Panel appears. Click the Modify button, and you’ll see a list of locations that are being indexed, such as Microsoft Outlook, your personal files, and so on. Uncheck the box next to any location, and it will no longer be indexed.
9. Clean out your hard disk
If you’ve got a bloated hard disk filled with files you don’t need, you could be slowing down your PC. Cleaning it out can give you a speed boost. Windows 10 has a surprisingly useful built-in tool for doing this called Storage Sense. Go to Settings > System > Storage and at the top of the screen, move the toggle from Off to On. When you do this, Windows constantly monitors your PC and deletes old junk files you no longer need — temporary files, files in the Downloads folder that haven’t been changed in a month, and old Recycle Bin files.
You can customize how Storage Sense works and also use it to free up even more space than it normally would. Underneath Storage Sense, click “Configure Storage Sense or run it now.” From the screen that appears, you can change how often Storage Sense deletes files (every day, every week, every month or when your storage space gets low).
You can also tell Storage Sense to delete files in your Download folder, depending on how long they’ve been there, and set how long to wait to delete files in the Recycle Bin automatically. You can also have Storage Sense move files from your PC to the cloud in Microsoft’s OneDrive cloud storage if they’re not opened for a certain amount of time (every day, or every 14 days, 30 days or 60 days).
Here’s how to customize the way Storage Sense works, and to tell it to delete old versions of Windows. (Click image to enlarge it.)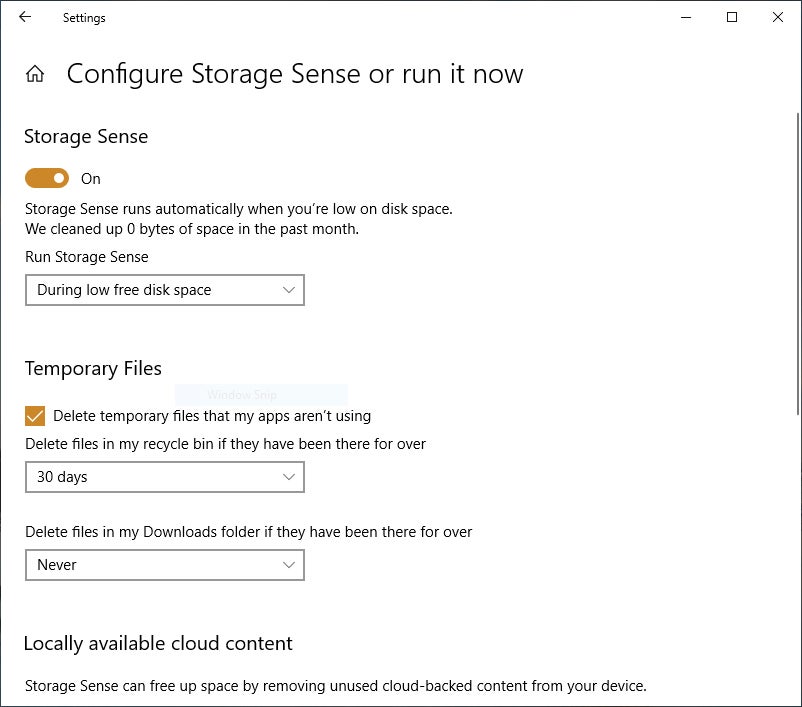 IDG
IDG
You can also delete old versions of Windows that might be hogging space. At the bottom of the screen, check the box next to “Delete previous versions of Windows.” Storage Sense will then delete old versions of Windows ten days after you’ve installed an upgrade. Note that if you do this, you won’t be able to revert to the older version of Windows.
10. Clean out your Registry
Under the Windows hood, the Registry tracks and controls just about everything about the way Windows works and looks. That includes information about where your programs are stored, which DLLs they use and share, what file types should be opened by which program, and just about everything else.
But the Registry is a very messy thing. When you uninstall a program, for example, that program’s settings don’t always get cleaned up in the Registry. So over time, it can get filled with countless outdated settings of all types. And that can lead to system slowdowns.
Don’t even think of trying to clean any of this out yourself. It’s impossible. To do it, you need a Registry Cleaner. There are plenty available, some free and some paid. But there’s really no need to outright buy one, because the free Auslogics Registry Cleaner does a solid job.
Before using Auslogics or any other Registry Cleaner, you should back up your Registry so you can restore it if anything goes wrong. (Auslogics Registry Cleaner does this for you as well, but it can’t hurt to have it backed up twice.) To do your own Registry backup, type regedit.ext in the search box, then press Enter. That runs the Registry editor. From the File menu, select Export. From the screen that appears, make sure to choose the “All” option in the Export range section at the bottom of the screen. Then choose a file location and file name and click Save. To restore the Registry, open the Registry editor, select Import from the File menu, then open the file you saved.
Now download, install and run Auslogics Registry Cleaner. On the left-hand side of the screen you can select the kinds of Registry issues you want to clean up — for example, File Associations, Internet or Fonts. I generally select them all.
Auslogics Registry Cleaner scans for and fixes problems in your Windows Registry. (Click image to enlarge it.) IDG
IDG
Next, tell it to scan the Registry for problems. To do that, click “Scan Now,” and from the drop-down menu that appears, select Scan. That lets you first examine the Registry problems it finds. If you instead choose “Scan and Repair,” it makes the fixes without you checking them.
It now scans your Registry for errors, then shows you what it found. It ranks the errors according to their severity to help you decide which to fix. Click Repair when you’ve made your decision, and make sure that “Back Up Changes” is checked, so you can restore the Registry easily if something goes wrong.
(Image credit: Future)
Although Windows 10 is a fast operating system, the performance will start degrading at some point due to many factors, including compatibility issues and bugs, viruses or other types of malware, hardware problems, and more.
If your computer is getting slower, it does not necessarily mean you have to replace it with a new system. Simple software and hardware tweaks can significantly speed up the Windows 10 experience.
This guide will walk you through a long list of ways to speed up, optimize, and improve the performance of your computer — whether it has an older or modern hardware configuration.
1. Restart computer
Shutting down and restarting your computer is perhaps one of the first things you can do to speed up the system. (It might be obvious, but it’s not the first thing that usually comes to mind.)
When the device restarts, the computer usually terminates the applications and processes. The data loaded into memory also gets cleared, which helps to resolve everyday performance and stability issues due to keeping the operating system running for a long time.
To shut down and restart your computer to speed up Windows 10, use these steps:
- Open Start.
- Click the Power button.
- Select the Shut down option.
- Quick tip: The «Sleep» or «Hibernate» options do not reset the system or clear the data in memory.
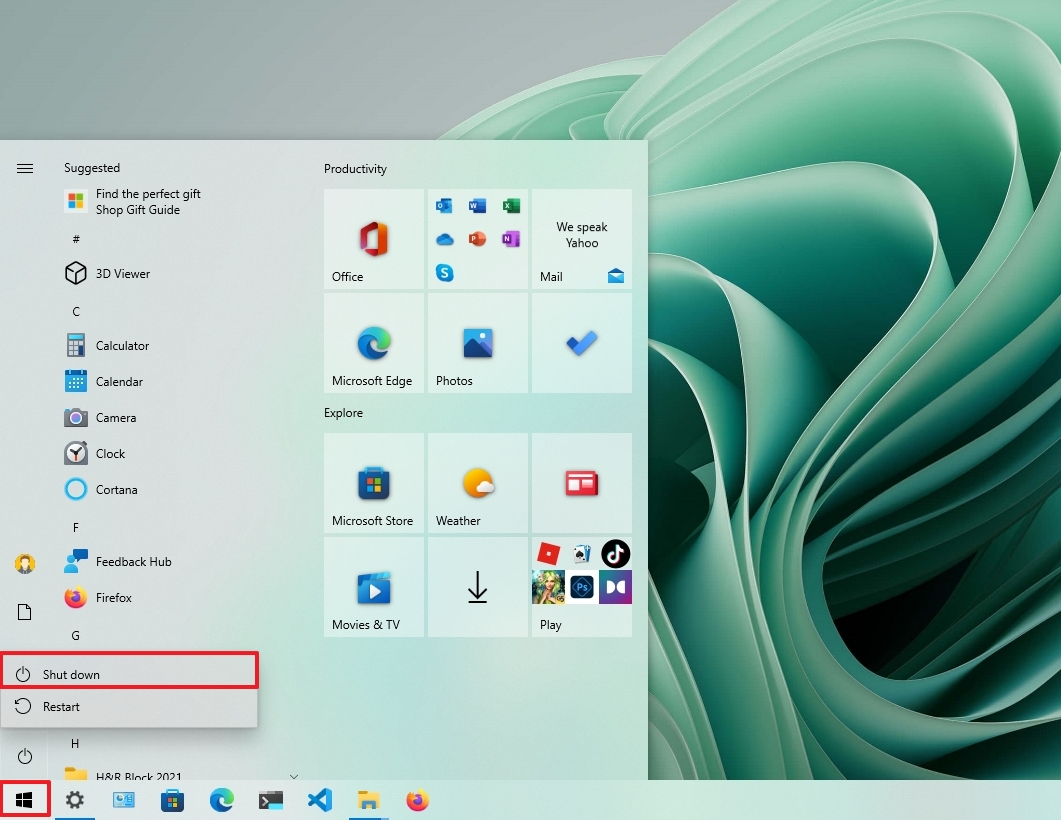
- Press the power button to turn on the computer.
After you complete the steps, Windows 10 will restart, and this time the performance should be noticeably improved.
2. Disable startup apps
On Windows 10, many apps can register themselves to start automatically during startup and continue to run in the background, wasting system resources that can slow down the experience.
When you try to speed up Windows 10, it’s recommended to disable all the apps running at startup, or at least those you do not use regularly.
To disable apps at startup on Windows 10 to speed up the system, use these steps:
- Open Settings.
- Click on Apps.
- Click on Startup.
- Click the Sort by menu and select the Startup impact option.
- Turn off the toggle switch for any unnecessary app (especially those marked as «High impact» by the system).
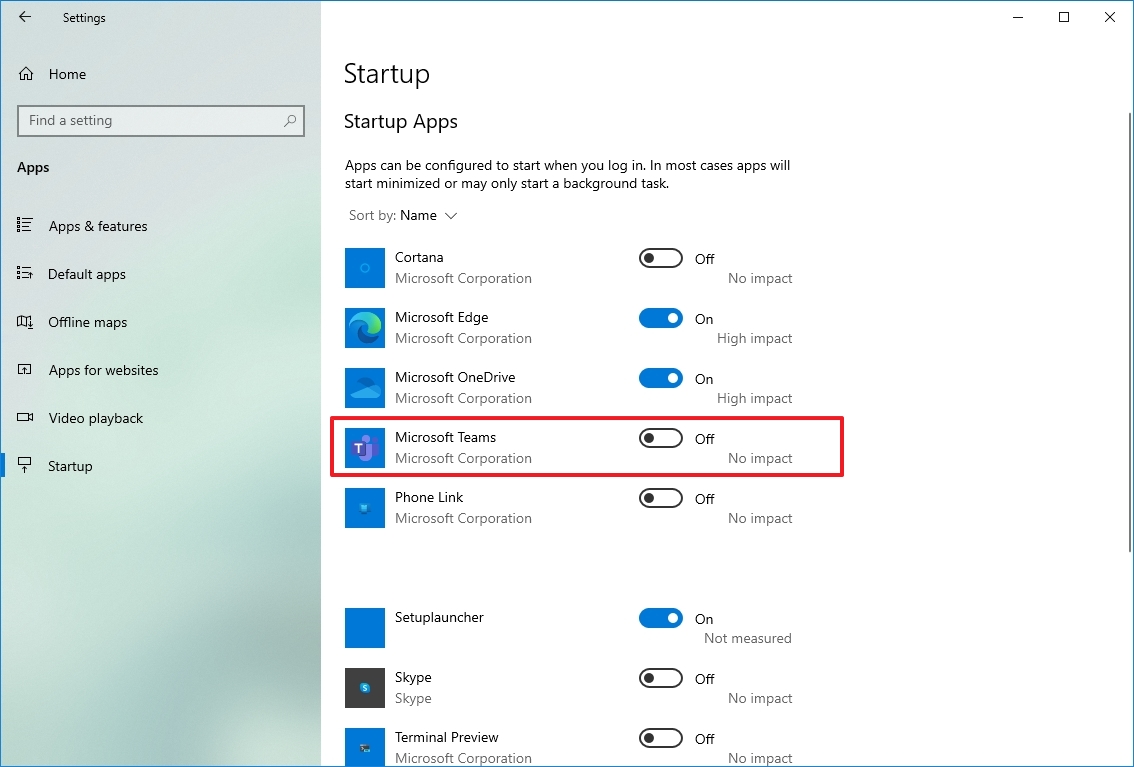
- Restart your computer.
Once you complete the steps, the computer should start faster than before. Of course, the improvement gain will vary depending on the apps you disabled and hardware configuration.
3. Disable apps relaunch on startup
Windows 10 has a feature that restarts the apps from your last session after a reboot, even before you sign in. Although this is a convenience feature that can speed up the process of quickly resuming where you left off, it can also impact system performance.
If the feature to restart apps at startup is enabled, you can disable it with these steps:
- Open Settings.
- Click on Accounts.
- Click on Sign-in options.
- Under the «Restart apps» section, turn off the toggle switch.
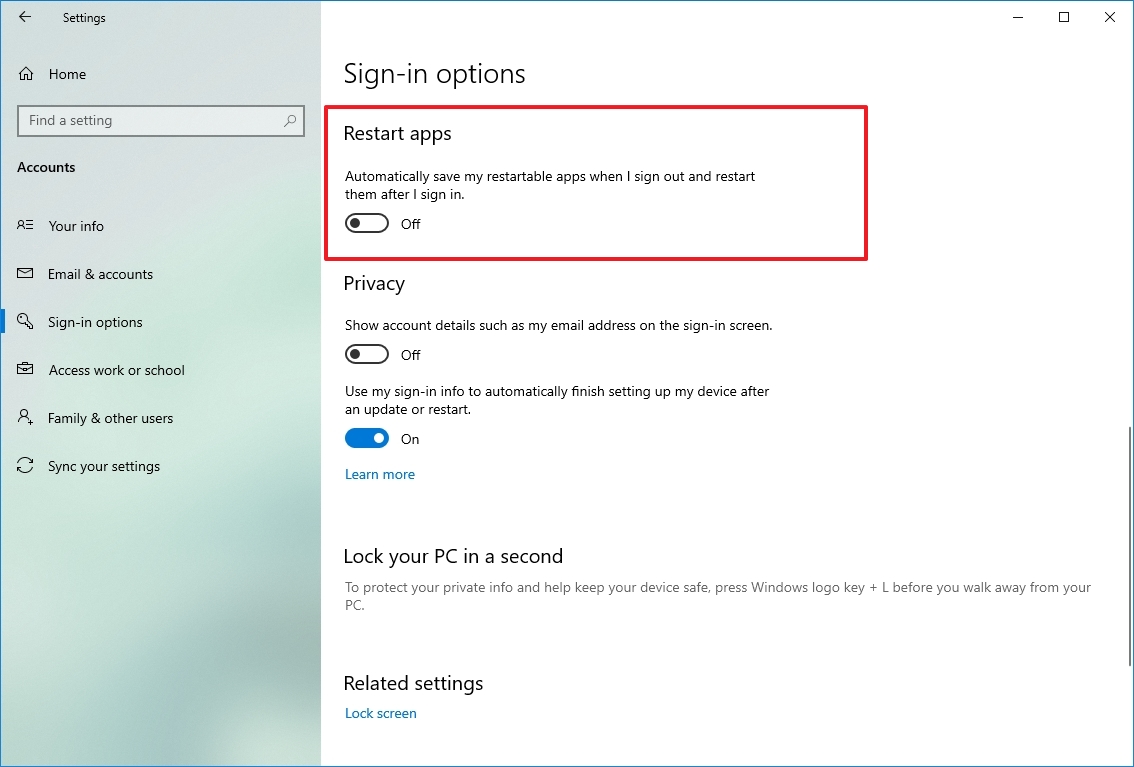
After you complete the steps, the apps running on the desktop won’t reopen during the next restart, speeding up the overall system performance.
4. Disable background apps
On Windows 10, some apps can continue to run tasks in the background even when you’re not using them. If you want to speed up your computer as much as possible, you can decide which apps can operate in the background or disable the feature to block all apps.
To stop apps from running in the background to speed up Windows 10, use these steps:
- Open Settings.
- Click on Privacy.
- Click on Background apps.
- Turn off the toggle switch for the apps you want to stop running in the background.

- (Optional) Turn off the «Let apps run in the background» toggle switch to disable the feature for all modern apps (excluding win32 apps).
Once you complete the steps, apps will not waste any more resources when you do not actively use them to increase system performance.
5. Uninstall non-essential apps
Typically, new devices come with applications you do not need, including the usual bloatware and system tools you will never use, which will only waste space on the drive and resources. When trying to increase the system performance, you should always remove those non-essential applications.
To uninstall non-essential apps on Windows 10, use these steps:
- Open Settings.
- Click on Apps.
- Click on Apps & features.
- Select the app to remove.
- Click the Uninstall button.
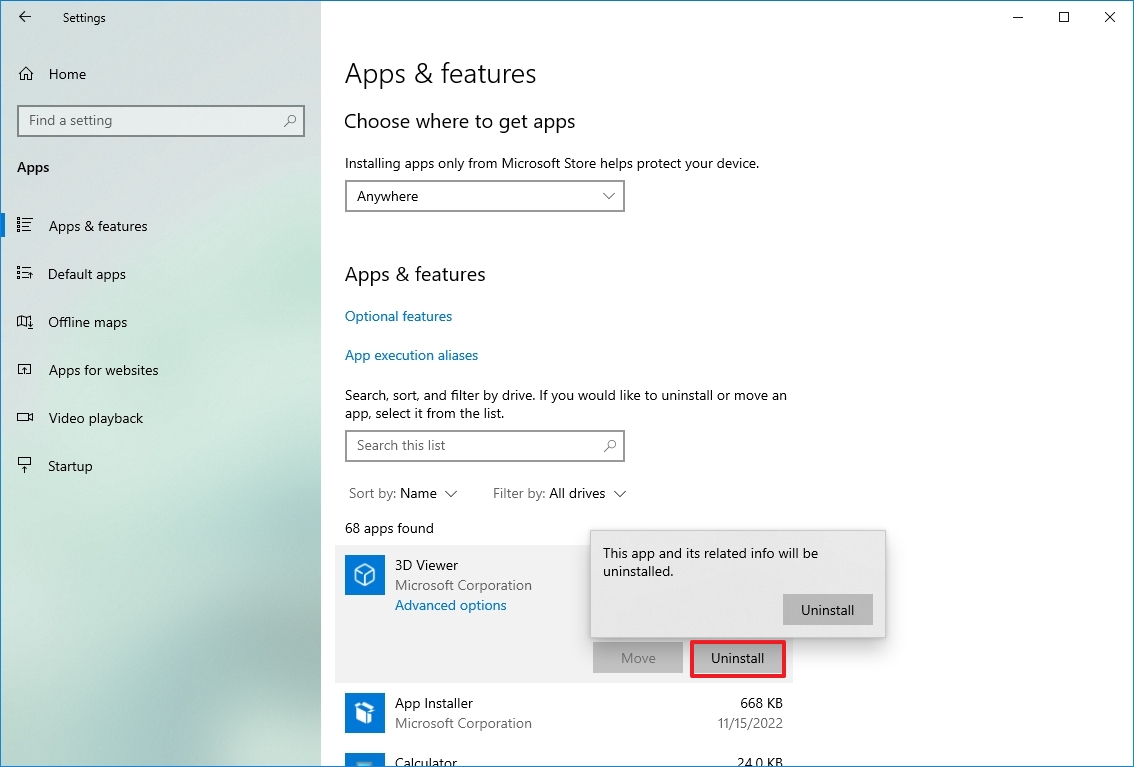
- Click the Uninstall button again. Or continue with the on-screen directions to finish removing the app.
After you complete the steps, you may need to repeat the instructions to uninstall other non-essential apps from the device.
6. Install quality apps only
Old and poorly designed apps and apps that load unnecessary features can negatively affect the performance of your computer. Also, just because an app comes from a company you trust does not mean it’s a good app.
Only install good apps if you want to keep your device healthy and snappy. Typically, you want to install apps available from the Microsoft Store because they’ve been reviewed for security and performance. If the app is not in the store, only download apps from trusted sources and confirm they work on Windows 10.
If you are unsure, you can research online to get more information about the app. For example, you can check the software vendor’s forums to check whether users are experiencing issues or post a question in the forums to find out more details.
To install apps from the Microsoft Store on Windows 10, use these steps:
- Open Microsoft Store.
- Use the search box to find an app.
- Select the app from the result.
- Click the Install button.
Once you complete the steps, the app will install on your device. If the app is not in the Microsoft Store, download the installer from the trusted source, and follow the vendor support website steps to install and configure the program.
7. Clean up hard drive space
Whether you have a traditional Disk Hard Drive (HDD) or Solid-State Drive (SSD), it’s never wise to run Windows with a full hard drive because it will affect performance.
If the device has relatively new hardware and you notice apps, managing files, and other tasks are struggling to complete, it is likely because the drive is running out of space. Usually, this becomes more evident after the drive is filled with around 70 percent of the total capacity.
One way to prevent the storage from impacting performance is to use the Storage settings to delete temporary and unnecessary files to reclaim space.
To free up space with to speed up Windows 10, use these steps:
- Open Settings.
- Click on System.
- Click on Storage.
- Under the «Local Disk» section, click the Temporary files option. (If you do not see the option, click the «Show more categories» option to view the remaining items in the list.)
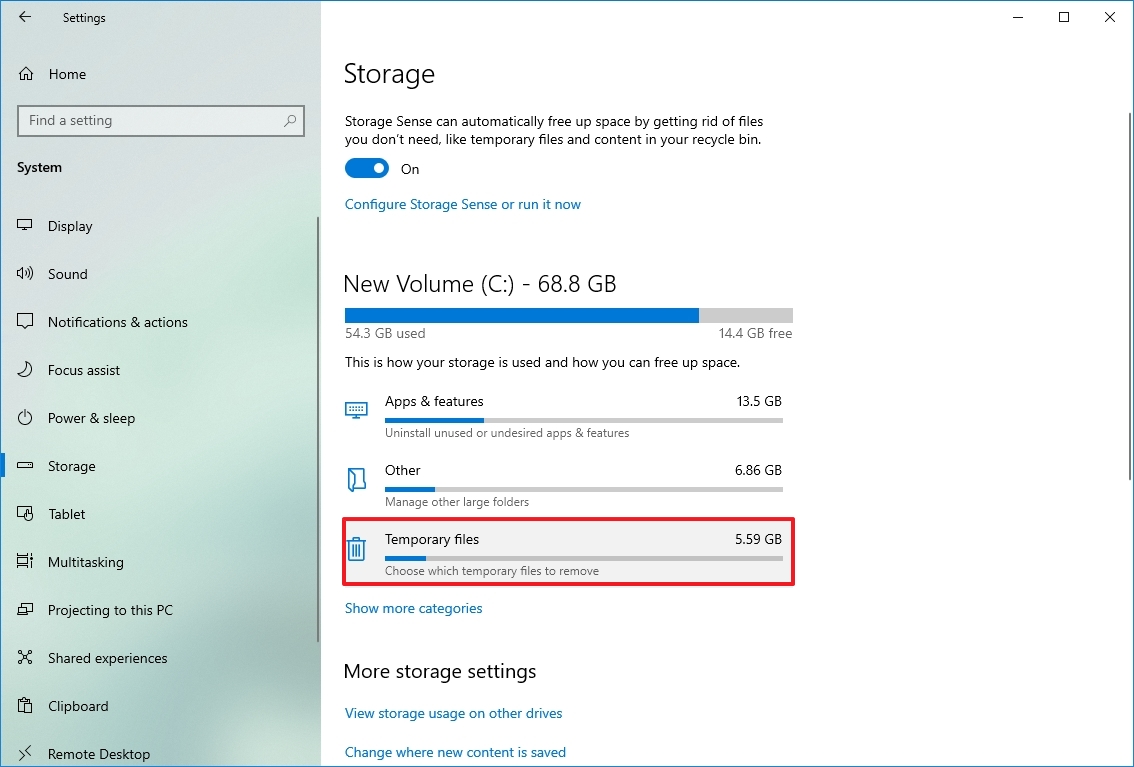
- Check the files you want to delete to reclaim space and improve system performance.
- Quick tip: When selecting the temporary files, remember that checking the Downloads option will delete everything inside the «Downloads» folder. If you want to keep these files, do not check this option. Also, you can select to delete the «Previous Windows Installation(s)» item (if applicable).
- Click the Remove files button.
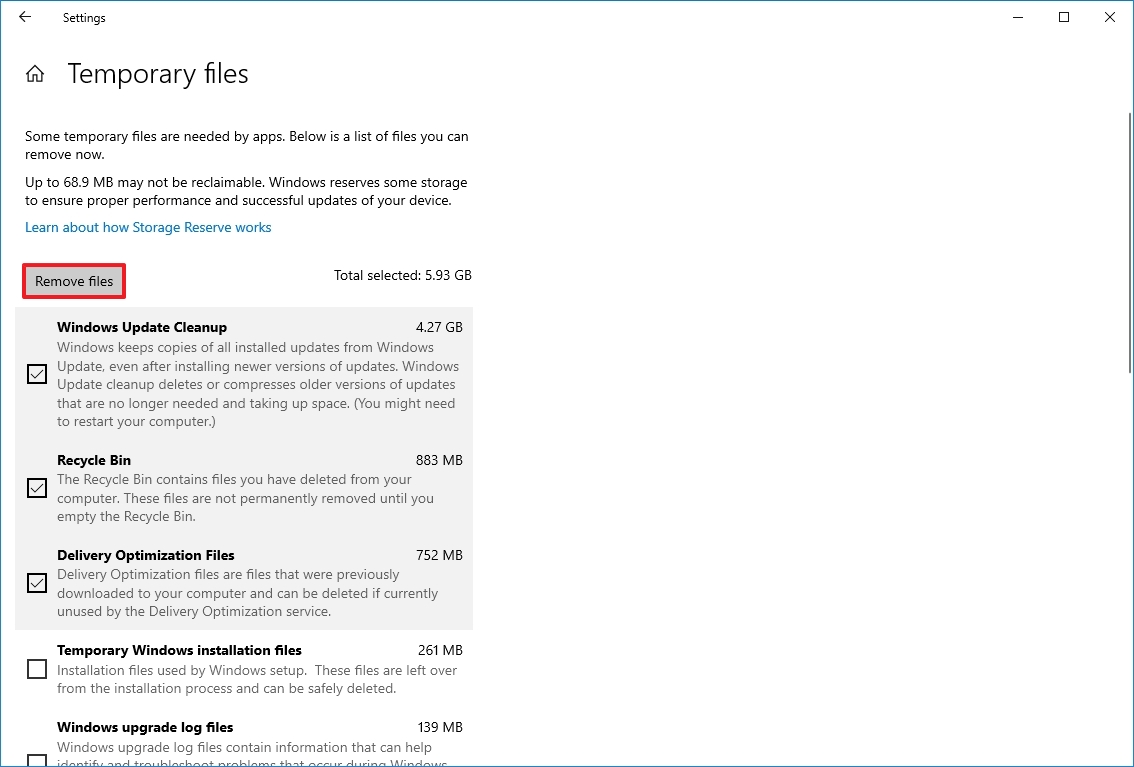
Once you complete the steps, the device’s performance should be noticeably improved if the system can reclaim enough space.
In addition to using the Storage settings, you can also use the OneDrive Files On-demand feature to free up space. You can use these instructions to set up Files On-demand on your device.
If you cannot reclaim enough space, use this guide to find more ways to optimize the storage on your computer.
8. Use drive defragmentation
Organizing the data can increase responsiveness if you have a computer with older hardware and a traditional rotating platters hard drive.
To run the defragmentation tool to speed up the system drive, use these steps:
- Open Settings.
- Click on System.
- Click on Storage.
- Under the «More storage settings» section, click the Optimize Drives option.
- Select the drive that needs defragmentation.
- Click the Optimize button.
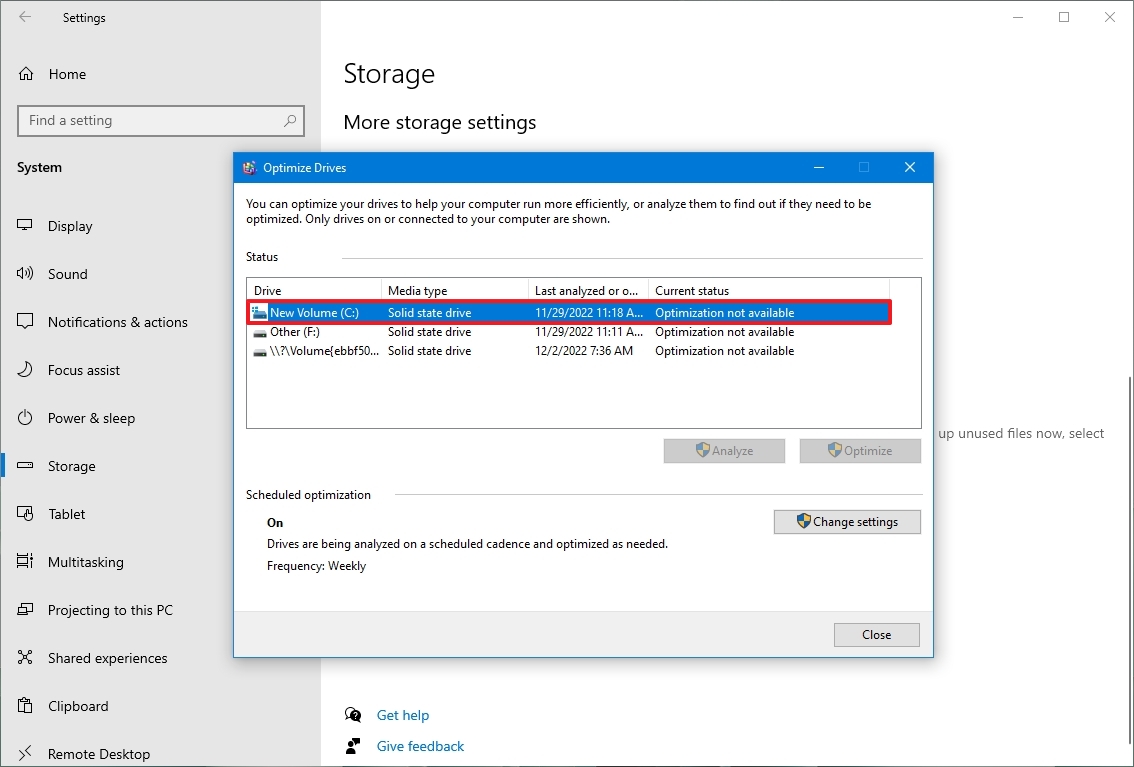
After you complete the steps, the tool will rearrange the files to make them accessible more quickly the next time they are needed, translating into noticeable performance improvement. The only caveat is that the process can take a long time, depending on the data stored on the drive. (If you have an older system, it is best to leave the process running overnight.)
If you have a computer with an SSD, using the defragmentation tool will run the trim command to inform the storage device of the blocks with data that can be safely erased. This process can significantly improve performance because the drive won’t have to erase the blocks during the writing data process.
9. Configure ReadyBoost
In addition, to use the defragmentation tool on computers with older hardware, you can also use the ReadyBoost feature to boost performance.
ReadyBoost is not new to Windows 10. It’s been around for years as a feature that uses a flash drive or SD card to cache files to boost the overall system performance. (If the device has an SSD, this feature won’t be available since it won’t offer additional benefits.)
To enable ReadyBoost to speed up your computer, connect a USB flash drive and use these steps:
- Open File Explorer.
- Click on «This PC» from the left pane.
- Under the «Devices and drives» section, right-click the USB flash drive and select the Properties option.
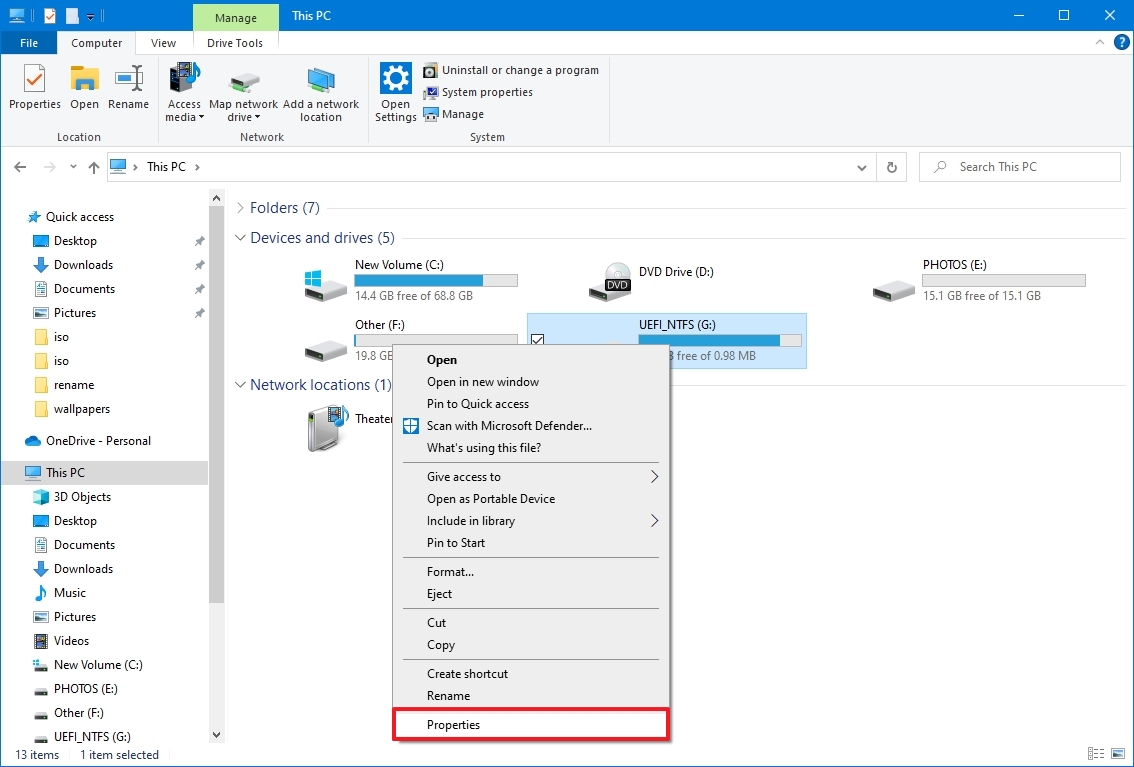
- Click on the ReadyBoost tab.
- Select the «Dedicate this device to ReadyBoost» option.
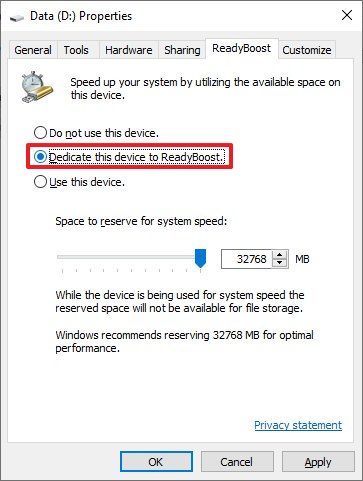
- Click the Apply button.
- Click the OK button.
Once you complete the steps, the removable drive should help boost the computer’s performance.
We recommend the SanDisk Extreme Go if you need a USB flash drive to use with ReadyBoost because of its storage capacity, reliability, and price.
Reliable storage
The SanDisk Extreme Go (CZ800) is an excellent choice to use with the ReadyBoost feature. The USB drive offers up to 128GB of storage with fast transfer speeds of up to 200MB/s, it’s backed by a strong brand, and it is affordable.
10. Perform malware scan
When a device starts to run very slowly, this could indicate a malware infection. Typically, viruses, spyware, and other malware types are known to take up many system resources making a device unusable.
Although Windows 10 comes with the Microsoft Defender Antivirus, it does not guarantee that malware will make its way into the system. If you suspect the device has been infected, you should try running a full virus scan.
To run a full virus scan on Windows 10, use these steps:
- Open Start.
- Search for Windows Security and click the top result to open the app.
- Click on Virus & threat protection.
- Under the «Virus & threat protection updates» section, click the «Check for updates» option.

- Click the Check for updates button.
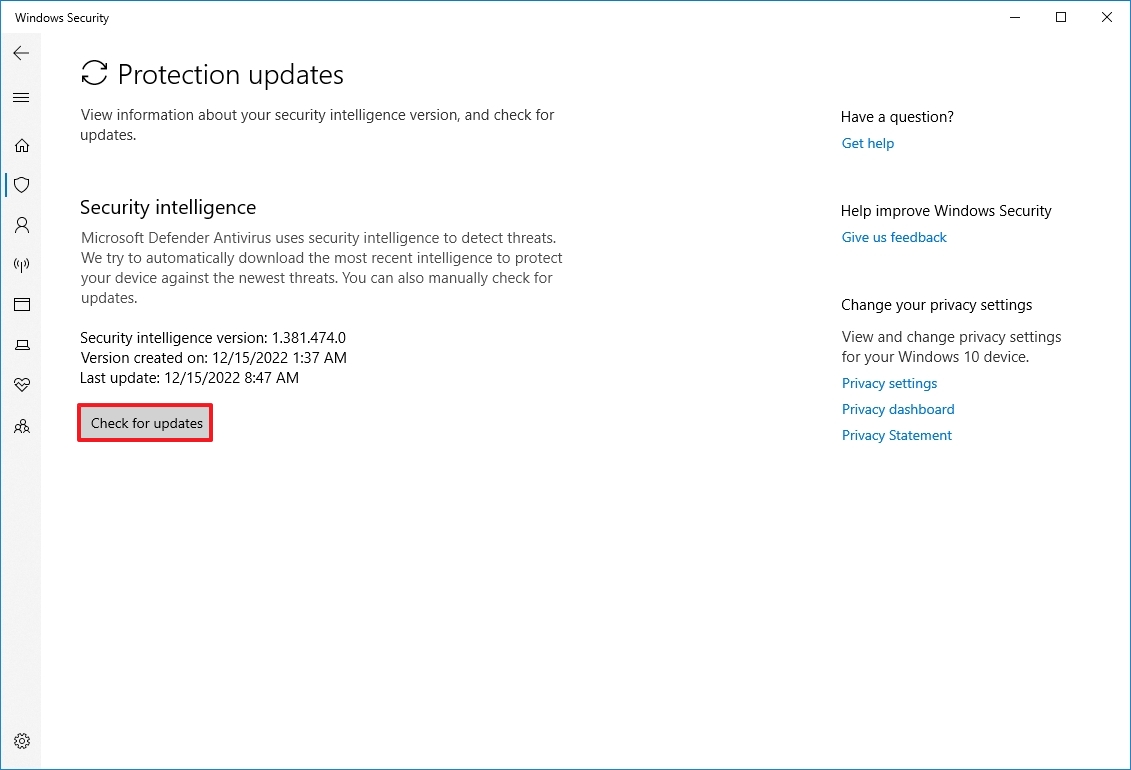
- Click on Virus & threat protection from the left pane.
- Under the «Current threats» section, click the Scan options option.
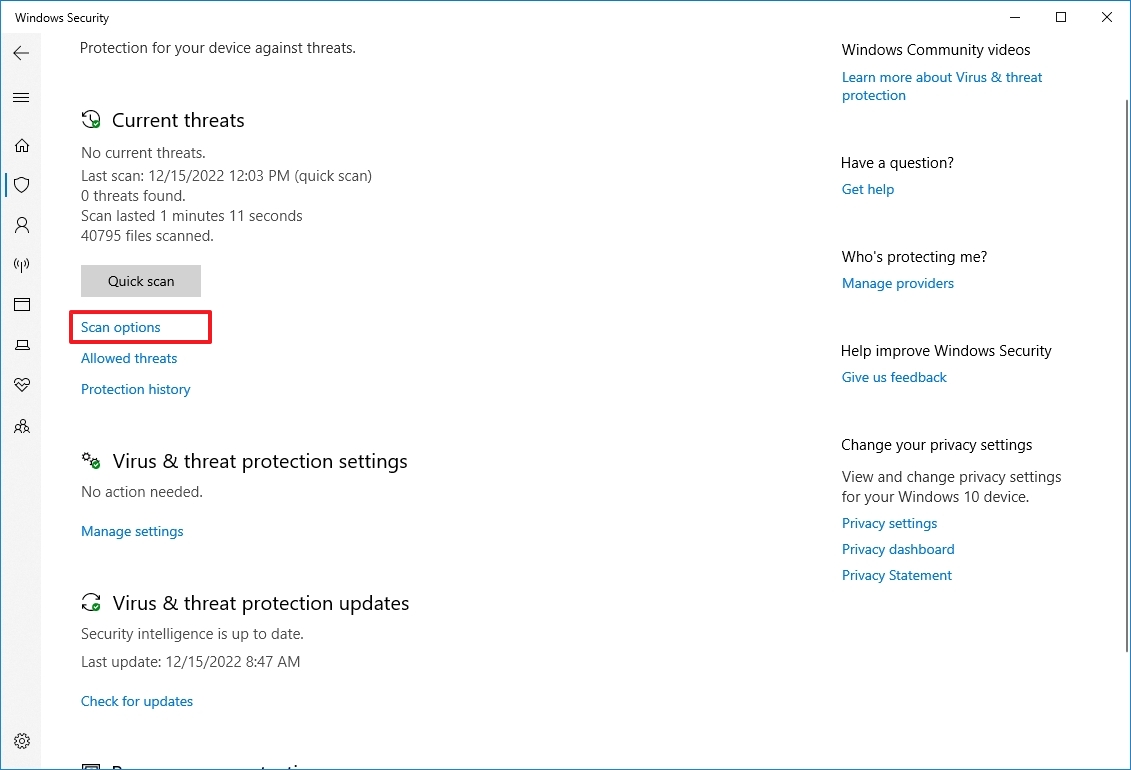
- Select the Full scan option.
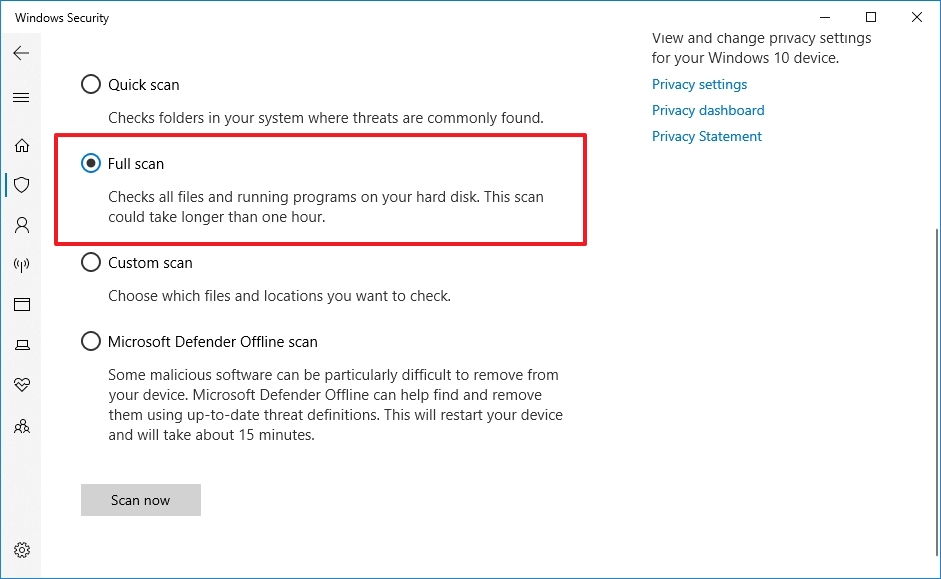
- Click the Scan now button.
After you complete the steps, Microsoft Defender Antivirus should detect and remove any malware impacting performance.
Microsoft Defender Offline scan
If you cannot use the default antivirus because it’s not running, updates don’t work, or scanning problems, the device probably has one of those tricky malware that cannot be removed while the system is running. If this is the case, the antivirus can perform an offline scan.
To complete a Microsoft Defender Antivirus offline scan, use these steps:
- Open Start.
- Search for Windows Security and click the top result to open the app.
- Click on Virus & threat protection.
- Under the «Current threats» section, click the Scan options option.
- Select the «Microsoft Defender Offline scan» option.
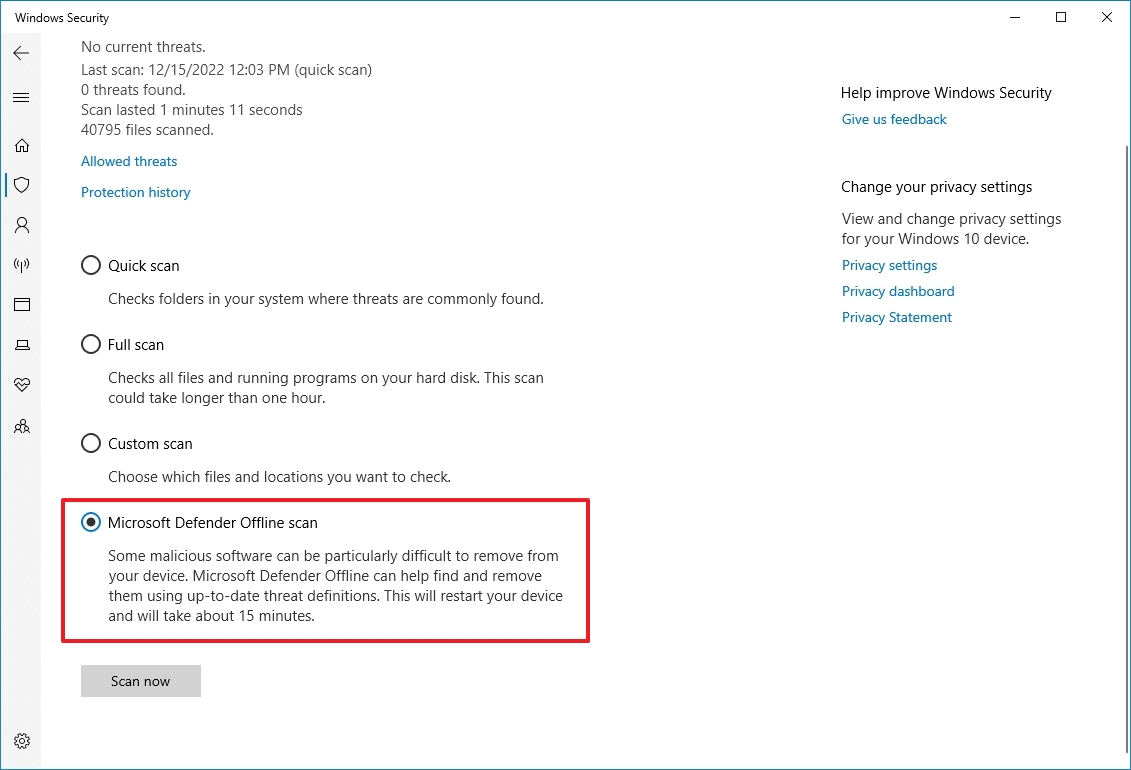
- Click the Scan now button.
Once you complete the steps, the system will automatically restart into the offline experience of Microsoft Defender, and it will perform a scan to detect and remove any threats that could not be removed while Windows 10 was running.
If you use other anti-malware solutions like Malwarebytes, Bitdefender, Trend Micro, or Norton, check their support documentation to remove viruses and other malicious programs.
11. Install latest update
Microsoft proactively releases updates to address problems, add new features, and patch security vulnerabilities. While sometimes updates are the reason for things not working correctly, maintaining the update can speed up your computer.
Install cumulative updates
On Windows 10, updates happen automatically, but depending on the update or the device’s configuration, they don’t always download and install as soon as they become available. If your computer is running slower than usual, it could be possible that an update is available to improve performance.
To install updates manually on Windows 10, use these steps:
- Open Settings.
- Click on Update & Security.
- Click on Windows Update.
- Click the Check for updates button.
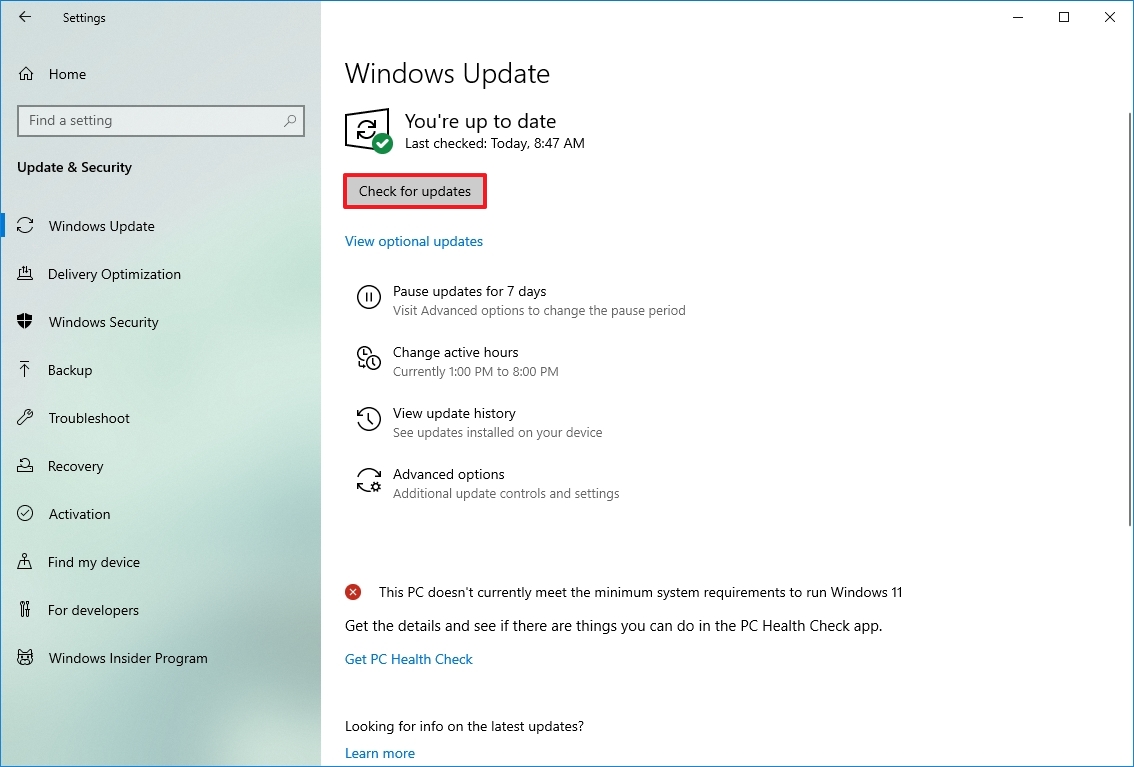
- (Optional) Under the «Optional updates available» section, click the «Download and install now» option if there’s a cumulative update available.
- Click the Restart now button.
After you complete the steps, the new update should help to improve system performance.
Upgrade to latest version
If the device has an older version of Windows 10, upgrading to the most recent version can help speed up the performance or introduce new features that could make you more productive to get work done faster.
To upgrade to the most recent version of Windows 10, use these steps:
- Open Settings.
- Click on Update & Security.
- Click on Windows Update.
- Click the Check for updates button.
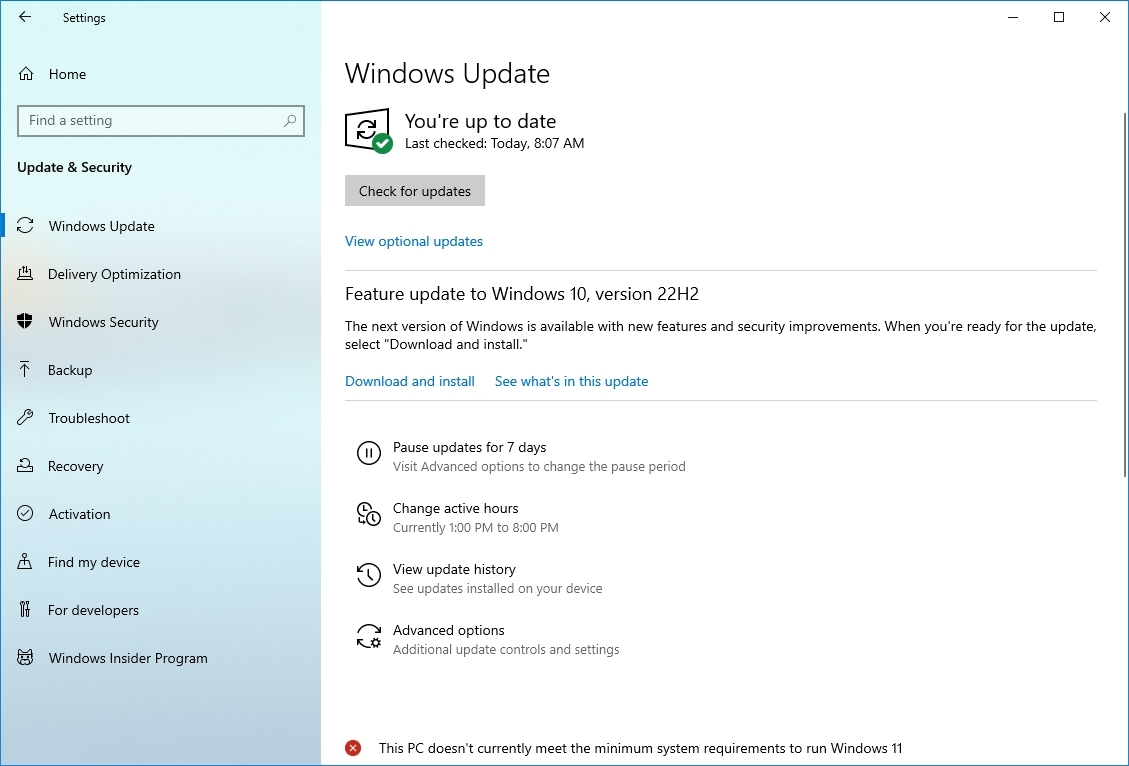
- Under the «Feature Update» section, click the «Download and install» option if a new version is available. (If the option is unavailable, the computer already has the most recent version installed, or the latest version is not yet fully compatible with your hardware configuration.)
- Click the Restart now button.
Once you complete the steps, the device will restart to apply the new version, improving the overall system performance.
Update device drivers
If your computer is running slow because of a compatibility issue or a poorly designed driver, you could resolve the issue by installing the most recent or pre-release version of the driver from the manufacturer’s support website manually.
Before proceeding, you need to download the latest available driver package from the manufacturer’s website, uncompress the files using the self-extracting or .zip extension file, and then use these steps:
Quick note: It is recommended to use the manufacturer support website instructions to complete this task. If instructions are not available, you can refer to the steps below.
- Open Start.
- Search for Device Manager and click the top result to open the app.
- Expand the branch for the device driver causing problems. For example, Display adapters.
- Right-click the device and select the Update driver option.
- Click the «Browse my computer for driver software» option.
- Under the «Search for drivers in this location» section, click the Browse button.
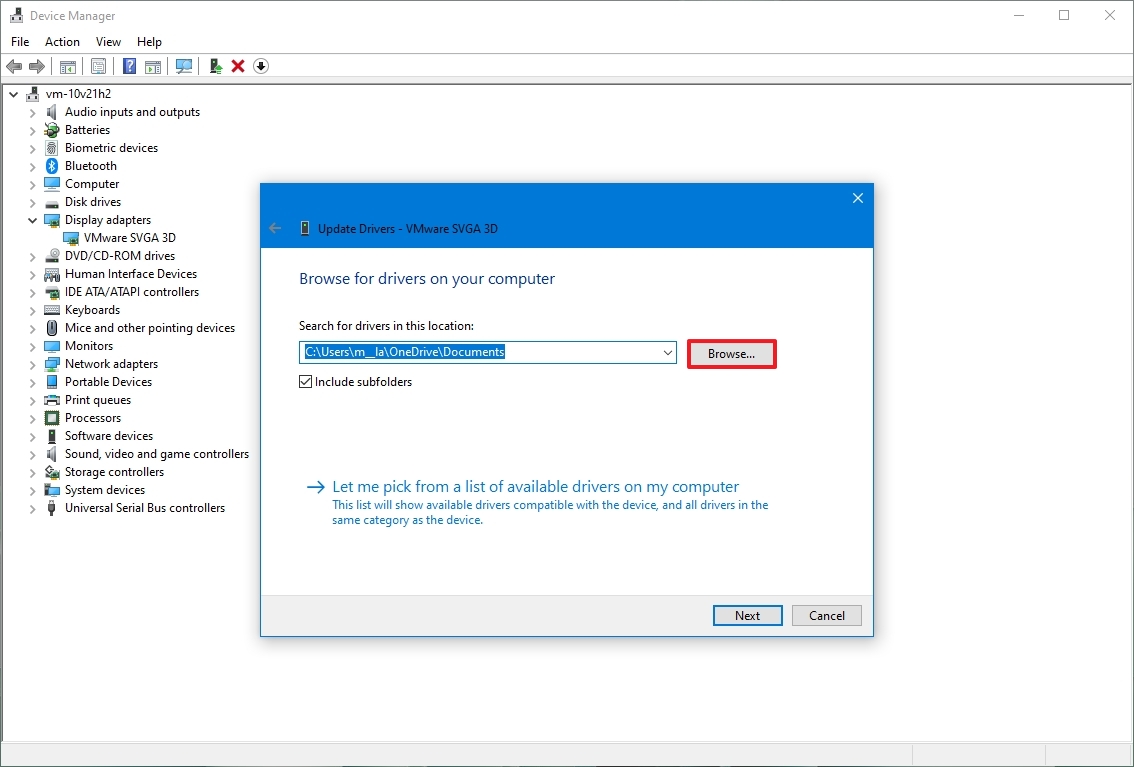
- Select the folder with the device driver installation files.
- Click the OK button.
- Click the Next button.
- Click the Close button.
After you complete the steps, the new version of the driver will install to fix compatibility or any other issues affecting the system and boost performance.
On Windows 10, there are multiple ways to update device drivers. If you need additional assistance, you can use this guide outlining different methods to update a driver manually.
Update applications
Outdated apps can slow down a computer, usually due to bugs or compatibility problems with a newer version of Windows 10.
While apps from the Microsoft Store can update automatically, you have to install updates manually for many traditional desktop apps. If you have an app affecting performance, check your software support website for a newer update and the instructions to apply it.
To update Microsoft Store apps manually on Windows 10, use these steps:
- Open Microsoft Store.
- Click the Library button from the bottom-left corner.
- Click the Get updates button.
Once you complete the steps, if updates are available, they will download and install automatically.
12. Switch to high performance power plan
Windows 10 includes different plans (Balanced, Power saver, and High performance) to optimize the power usage on your computer. If you want to boost the system performance, use the «High performance» option since it allows the device to use more power to operate faster.
To select a new power plan on Windows 10, use these steps:
- Open Settings.
- Click on System.
- Click on Power & sleep.
- Under the «Related settings» section, click the «Additional power settings» option.
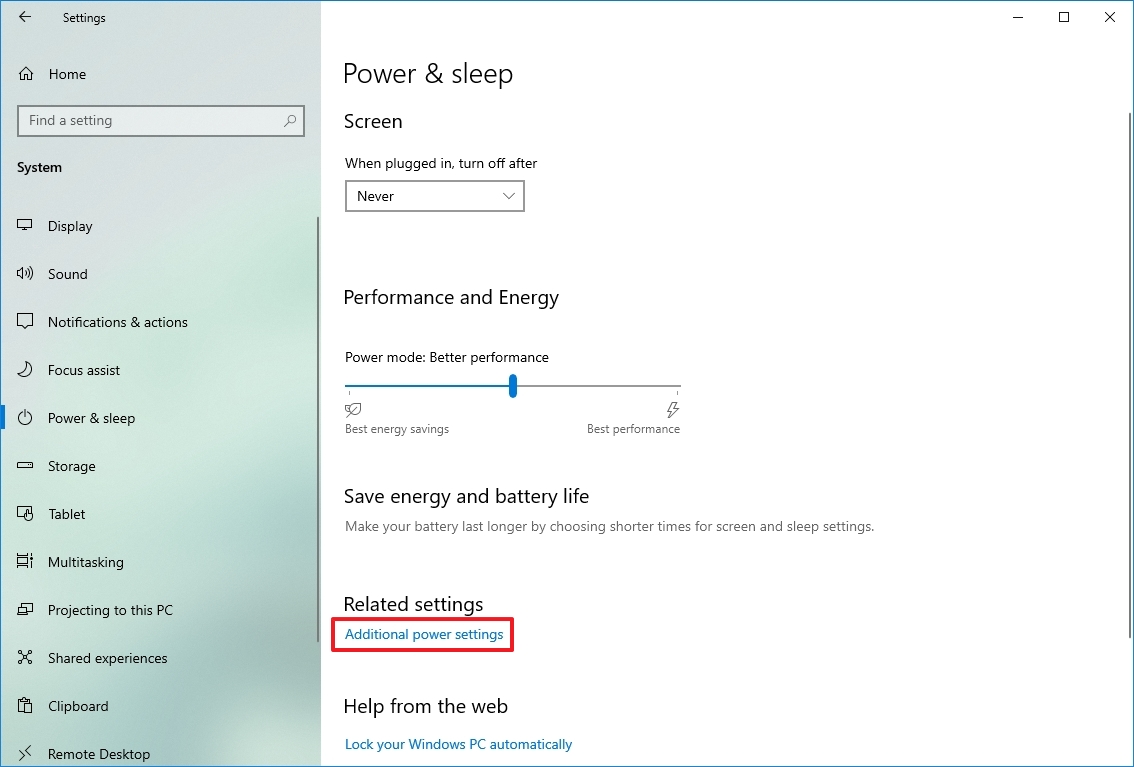
- Click the «Show additional plans» option (if applicable).
- Select the «High-performance power» plan.
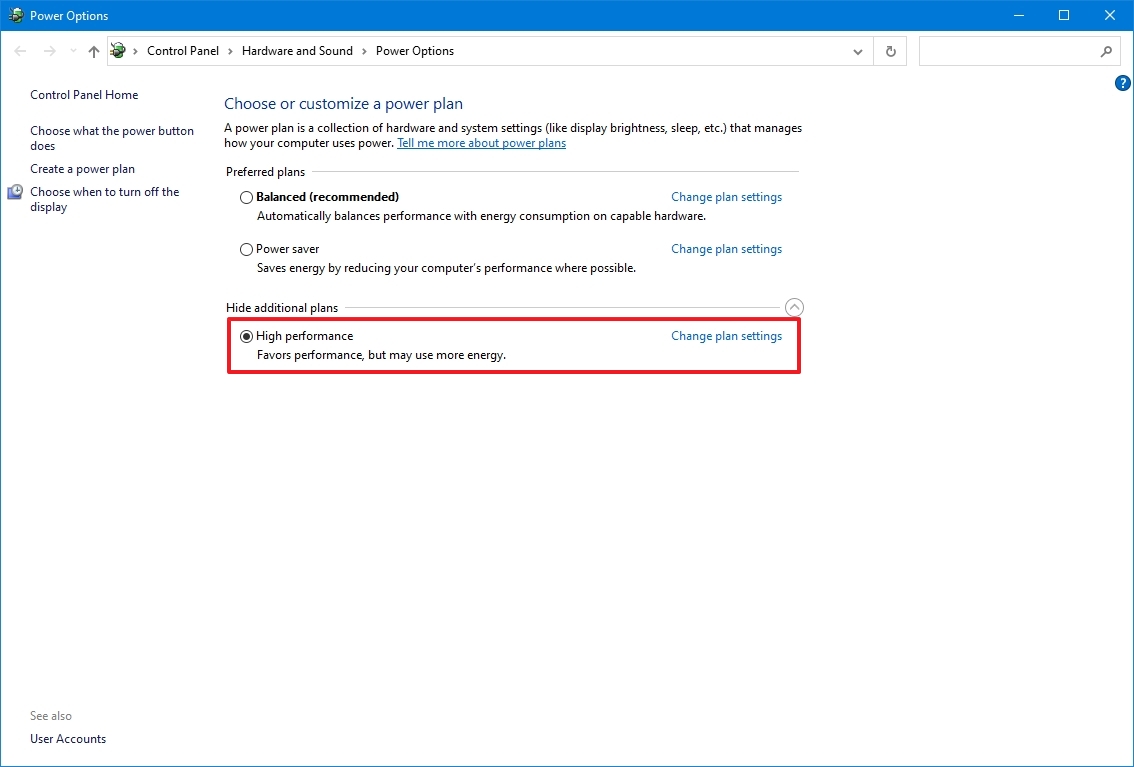
If you don’t see any plans, you may need to create a custom power plan to improve performance using the «High performance» settings.
On laptops, you can also change the mode to increase performance by tapping or clicking the battery icon in the taskbar’s notification area and selecting the Best performance option using the slider.
13. Disable system visual effects
On Windows 10, you will find many visual effects, from animations to shadows to more advanced visual elements, such as blur and transparency, and part of the Fluent Design language.
Although these effects can make the experience more visually appealing, they also require resources that can slow down computers with older hardware. However, you can disable these effects to save resources and make Windows 10 feel faster.
Disable visual effects
To disable animations, shadows, smooth fonts, and other effects on Windows 10, use these steps:
- Open Settings.
- Click on System.
- Click on About.
- Under the «Related settings» section, click the «Advanced system settings» option from the right pane.

- Click the Advanced tab.
- Under the «Performance» section, click the Settings button.
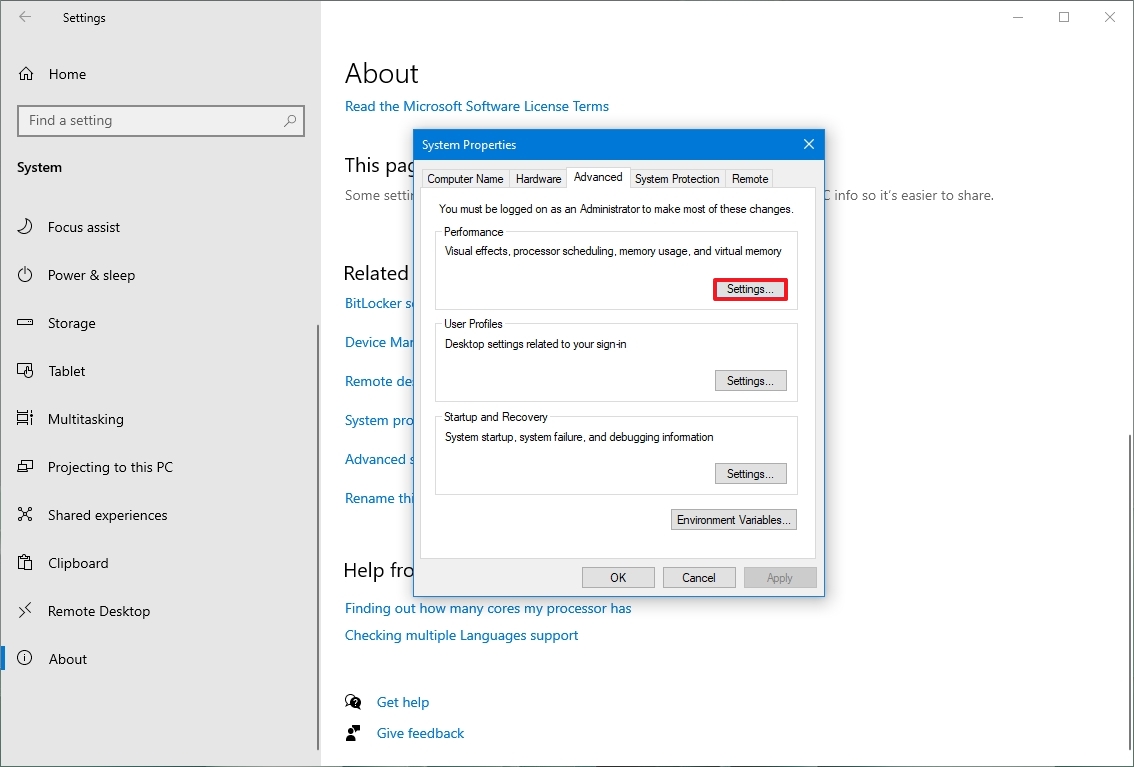
- Click the Visual Effects tab.
- Select the «Adjust for best performance» option to disable all the effects and animations.
- Quick tip: Using this option will also affect the way fonts are rendered. If you want to keep fonts crisp and more readable, select the Custom option, clear all the settings, but leave the «Smooth edges of screen fonts» option checked.
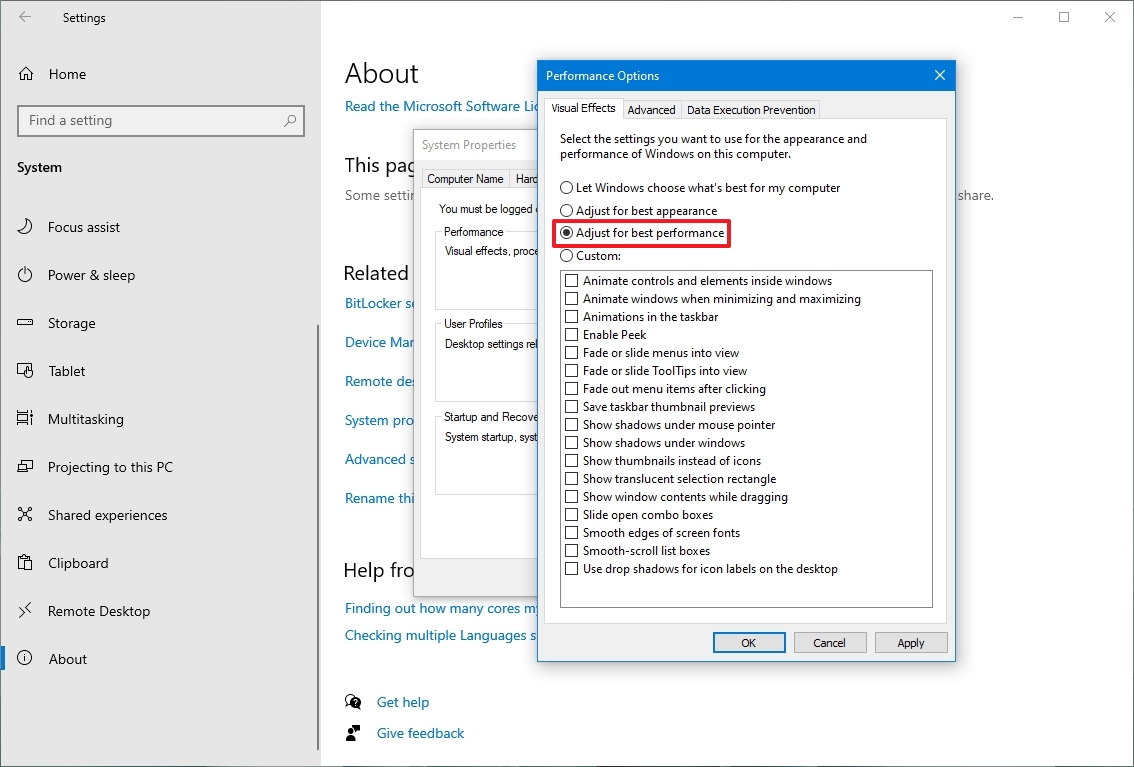
- Click the Apply button.
- Click the OK button.
Once you complete the steps, the visual effects will be disabled, and interacting with elements (windows and menus) will feel more responsive.
Disable transparency effects
To speed up Windows 10 disabling transparency effects, use these steps:
- Open Settings.
- Click on Personalization.
- Click on Colors.
- Turn off the Transparency effects toggle switch.
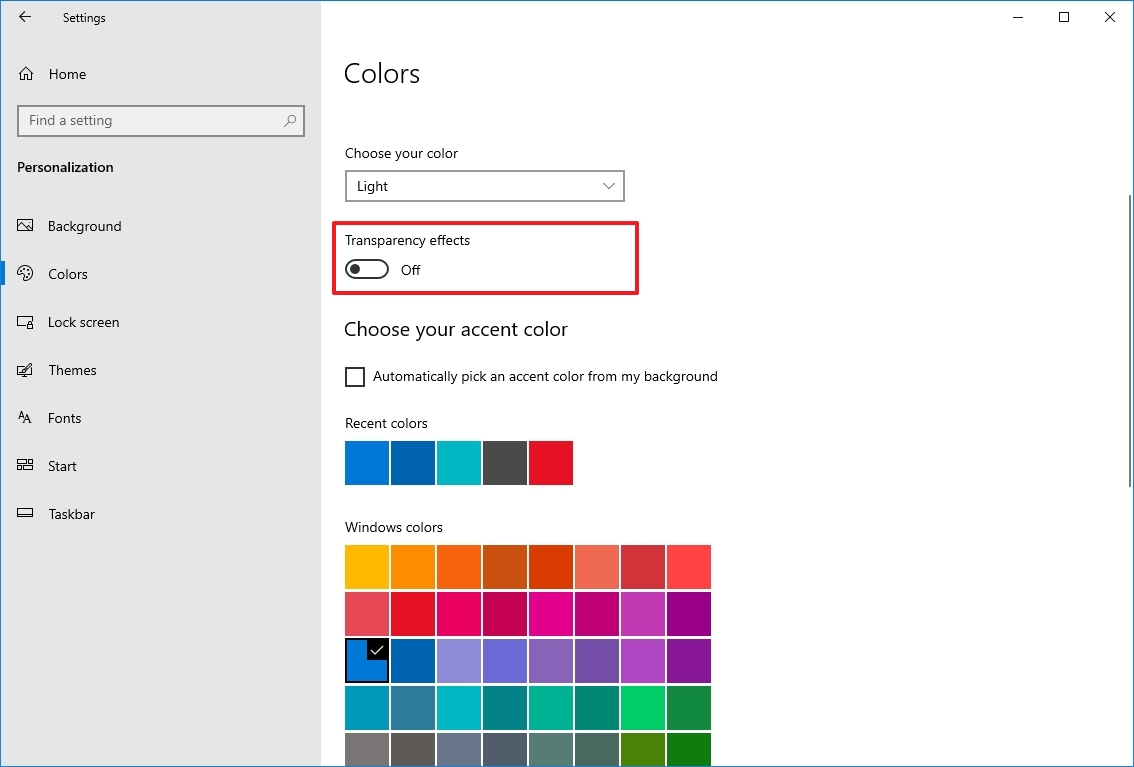
After you complete the steps, Windows 10 will feel faster, and the device will free up some system resources for more critical tasks.
14. Disable search indexing
Although Windows 10 search is an important feature to find apps, settings, and files, the indexing process can sometimes consume resources that can negatively impact the experience – especially on low-end devices. If you want to improve the system performance as much as possible, you can exclude specific locations to prevent the indexer from using resources excessively.
To configure the indexer to improve system performance on Windows 10, use these steps:
- Open Settings.
- Click on Search.
- Click on Search Windows.
- (Optional) Turn on the «Respect Device Power Mode Settings» toggle switch.
- Quick note: When you enable this feature, the system will temporarily throttle or pause search and updates to the index database to extend battery life while on battery power.
- Under the «More Search Indexer Settings» section, click the «Advanced Search Indexer Settings» option.
- Click the Modify button.
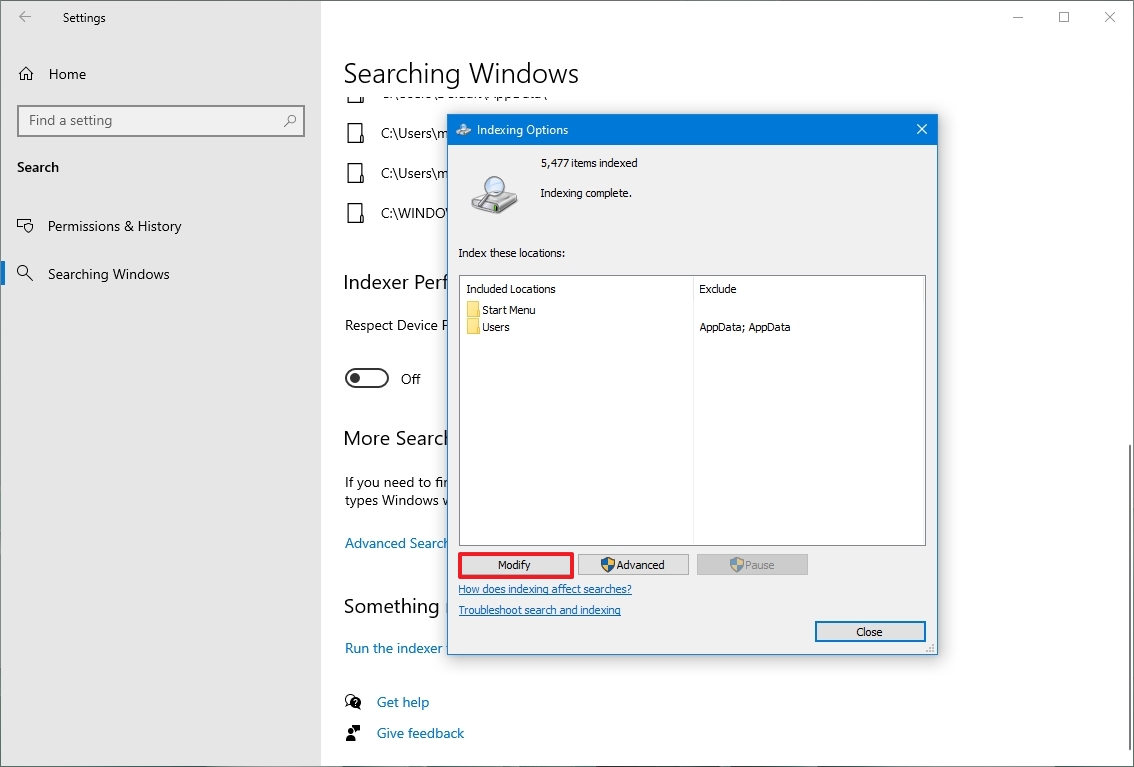
- Click the Show all locations button.
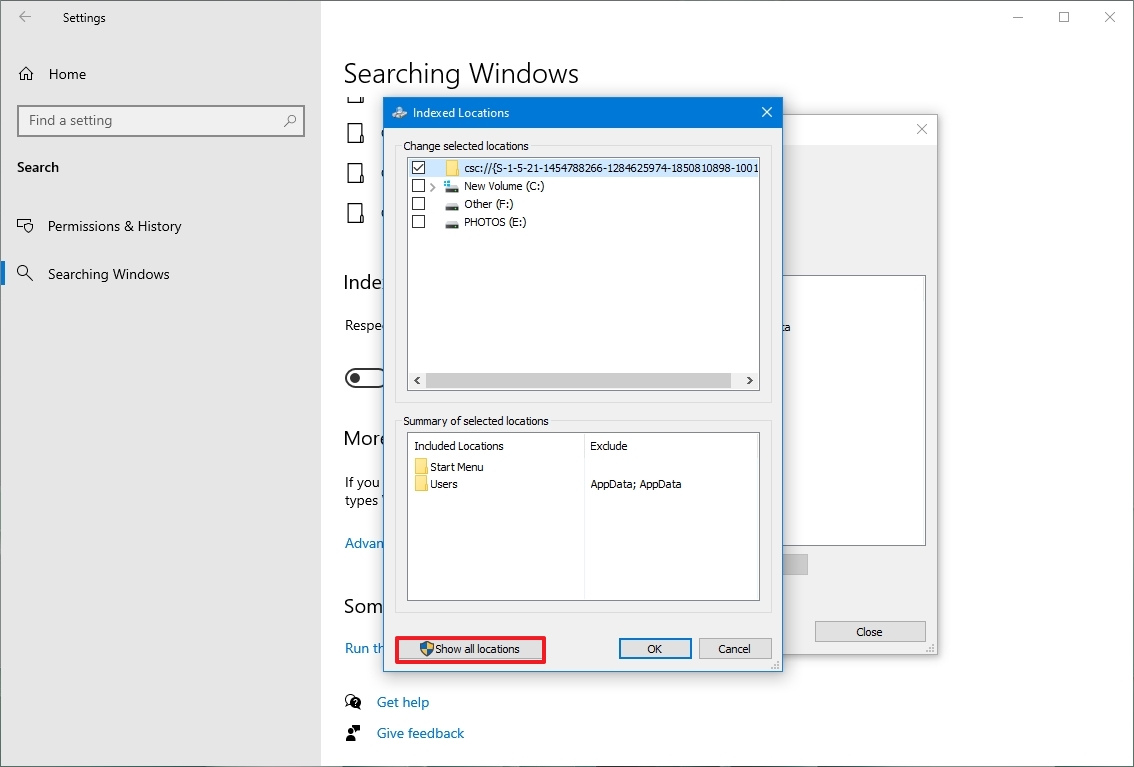
- Under the «Change selected locations» section, clear all the selected locations.
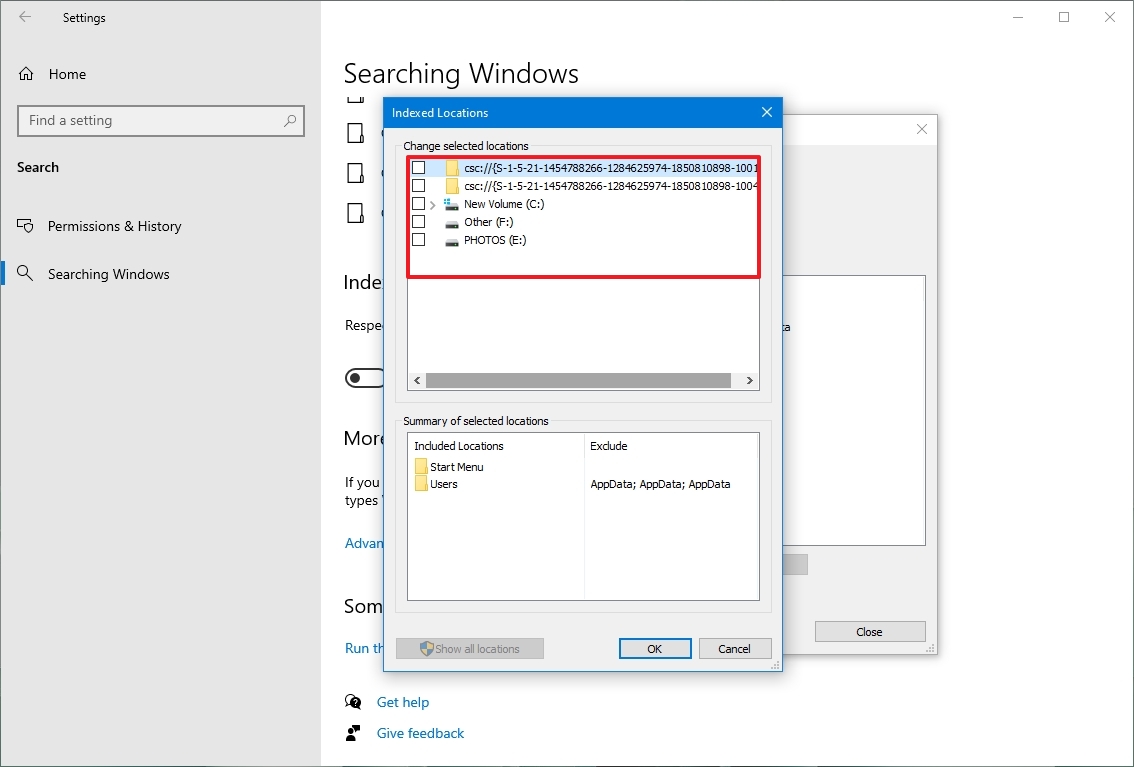
- Click the OK button.
- Click the Close button.
Once you complete the steps, Windows Search will continue to run on your device, but Windows 10 will no longer index the specified locations, improving the overall performance.
15. Increase page file size
On Windows 10, the «page file» is a hidden file on the drive that works as memory, and it acts as an overflow of the system memory, which holds data for apps currently running on the computer.
If you increase the size of the paging file, it can help boost system performance.
To modify the page file to increase performance on Windows 10, use these steps:
- Open Settings.
- Click on System.
- Click on About.
- Under the «Related settings» section, click the «Advanced system settings» option.
- Click the Advanced tab.
- Under the «Performance» section, click the Settings button.
- Click the Advanced tab.
- Under the «Virtual memory» section, click the Change button.
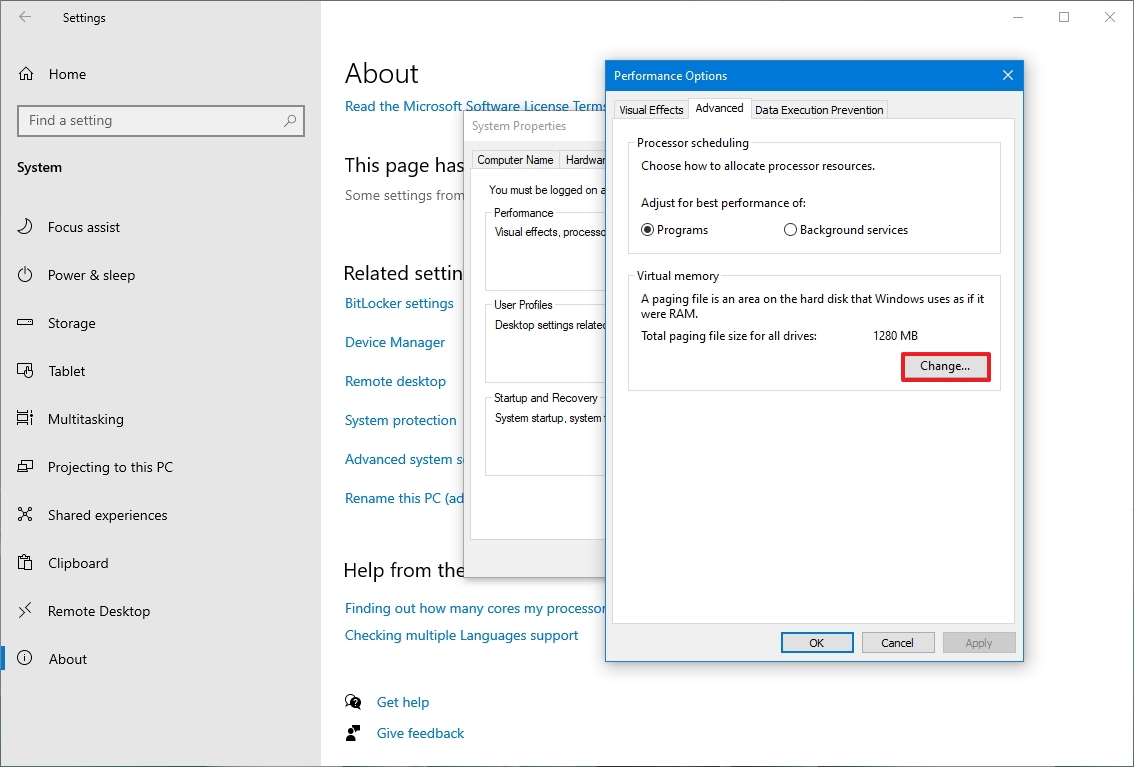
- Clear the «Automatically manage paging files size for all drives» option.
- Select the Custom size option.
- Specify the initial and maximum size for the paging file in megabytes.
- Quick tip: Typically, it is recommended to use a number one and a half times the total available memory for the «Initial size» and three times of available memory for the «Maximum size» when possible. You can confirm the total amount of memory available on the About settings page.

- Click the Set button.
- Click the OK button.
- Click the OK button again.
- Restart your computer.
After you complete the steps, the device will restart, and you should notice a performance boost while using apps. The performance will be more noticeable when configuring the page file in a Solid-State Drive.
If the new settings are causing issues or performance does not improve, you can always revert the changes with the same instructions outlined above. However, on step 9, select the System managed size option and check the «Automatically manage paging files size for all drives» option.
16. Restore previous working state
Sometimes your device will slow down after installing a new system update, driver, or application. If you cannot determine why the computer is slow, you can undo any changes by restoring the previous working state using a System Restore point.
To apply a restore point to fix performance issues on Windows 10, use these steps:
- Open Start.
- Search for Create a restore point and click the top result to open the System Properties app.
- Click the System Protection tab.
- Click the System Restore button.
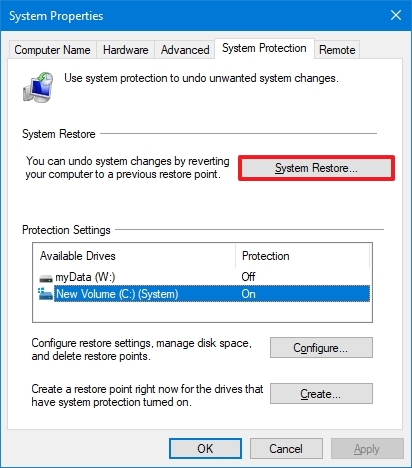
- Click the Next button.
- Select the most recent restore point to resolve the performance issue.
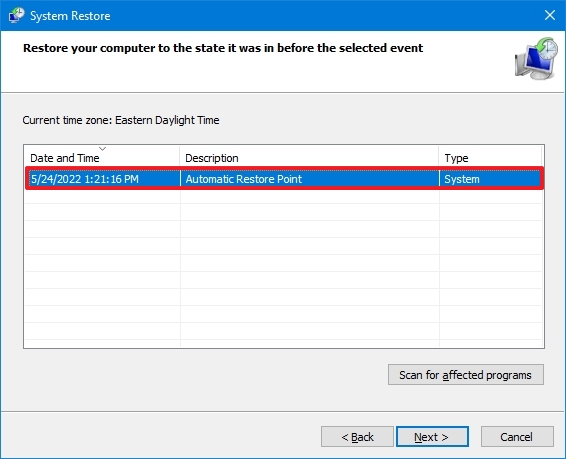
- Click the «Scan for affected programs» button to identify the apps that will be removed if they were installed after the restore point was created.
- Click the Close button.
- Click the Next button.
- Click the Finish button.
Once you complete the steps, the computer will roll back to a previous state bringing back when performance was not an issue.
System Restore is not enabled by default. This means you must set it up before you can revert system changes.
17. Repair Windows setup files
If the computer shows performance issues, it could be due to corrupted system files. If this is the case, you can use the Deployment Image Service and Management Tool (DISM) and System File Checker (SFC) command-line tools to fix the setup without reinstallation.
Fix installation files with DISM
To use DISM to repair corrupted system files to improve performance and stability on Windows 10, use these steps:
- Open Start.
- Search for Command Prompt, right-click the top result, and click the Run as Administrator option.
- Type the following command to repair the installation and press Enter: DISM /Online /Cleanup-image /Restorehealth
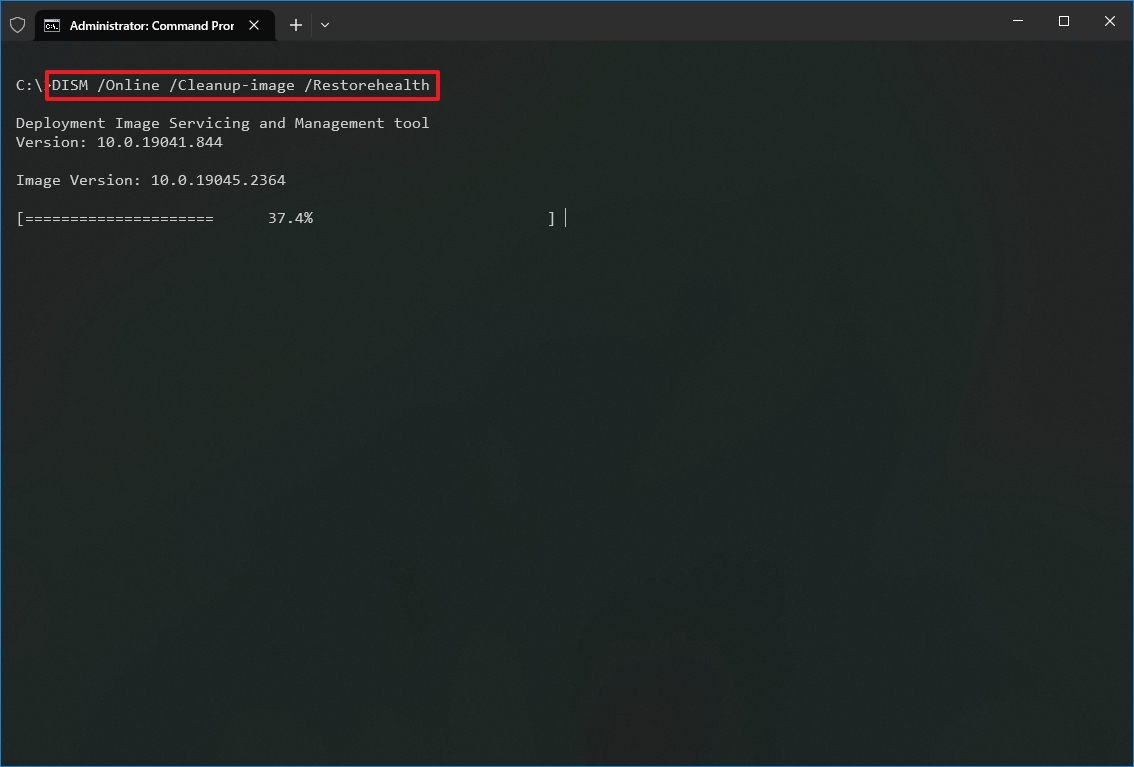
After completing the steps, the device should operate normally if the utility has finished successfully. You should also use the SFC command-line tool if the scan had issues. (You can always learn more about this feature in our DISM walkthrough guide.)
Fix installation files with SFC
To use SFC to repair corrupted system files on Windows 10, use these steps:
- Open Start.
- Search for Command Prompt, right-click the top result and click the Run as Administrator option.
- Type the following command to repair the installation and press Enter: sfc /scannow
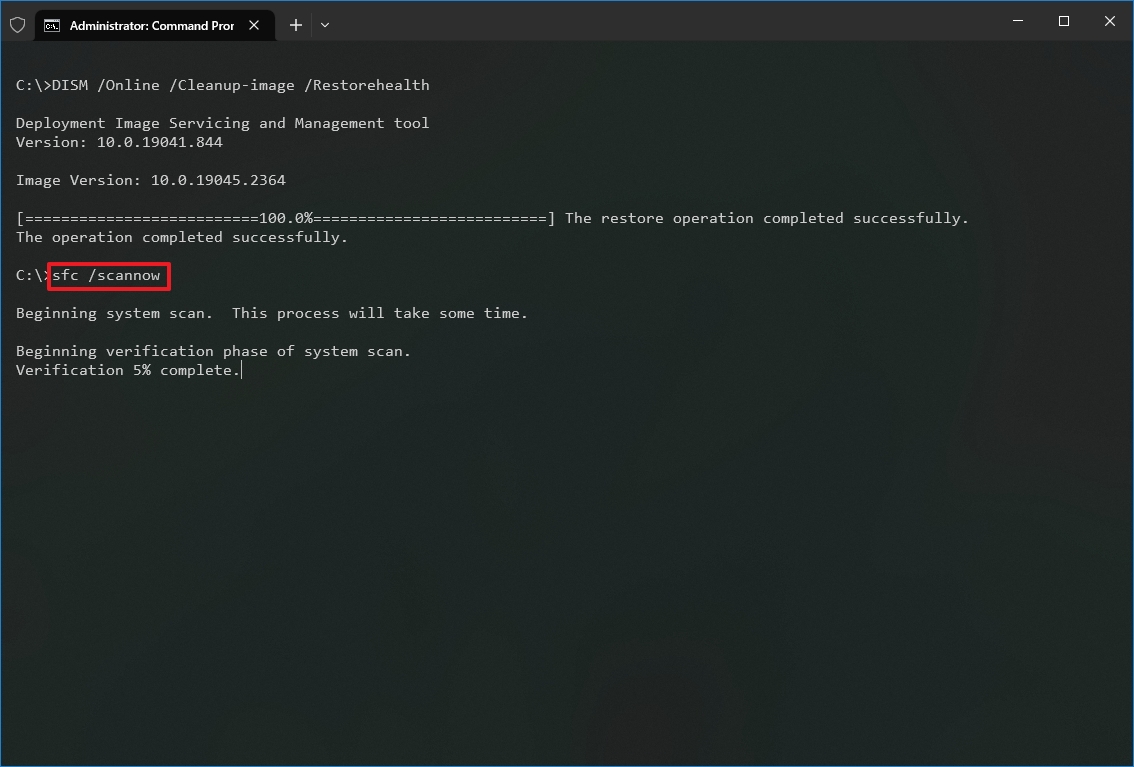
Once you complete the steps, the tool should be able to fix any problem affecting performance.
You can check this guide with more details on using the System File Checker tool, including the steps to view scan details, repair individual files, and perform an offline system repair.
18. Reset device to factory defaults
Alternatively, you can reset the computer to the factory default settings to start fresh with a clean copy of Windows 10 to improve startup and shutdown, battery life, and overall system performance.
Warning: If you choose to erase your files, you should consider creating a full backup or copying your files to an external drive before proceeding.
To reset a device to its default settings on Windows 10, use these steps:
- Open Settings.
- Click on Update & Security.
- Click on Recovery.
- Under the «Reset this PC» section, click the Get started button.
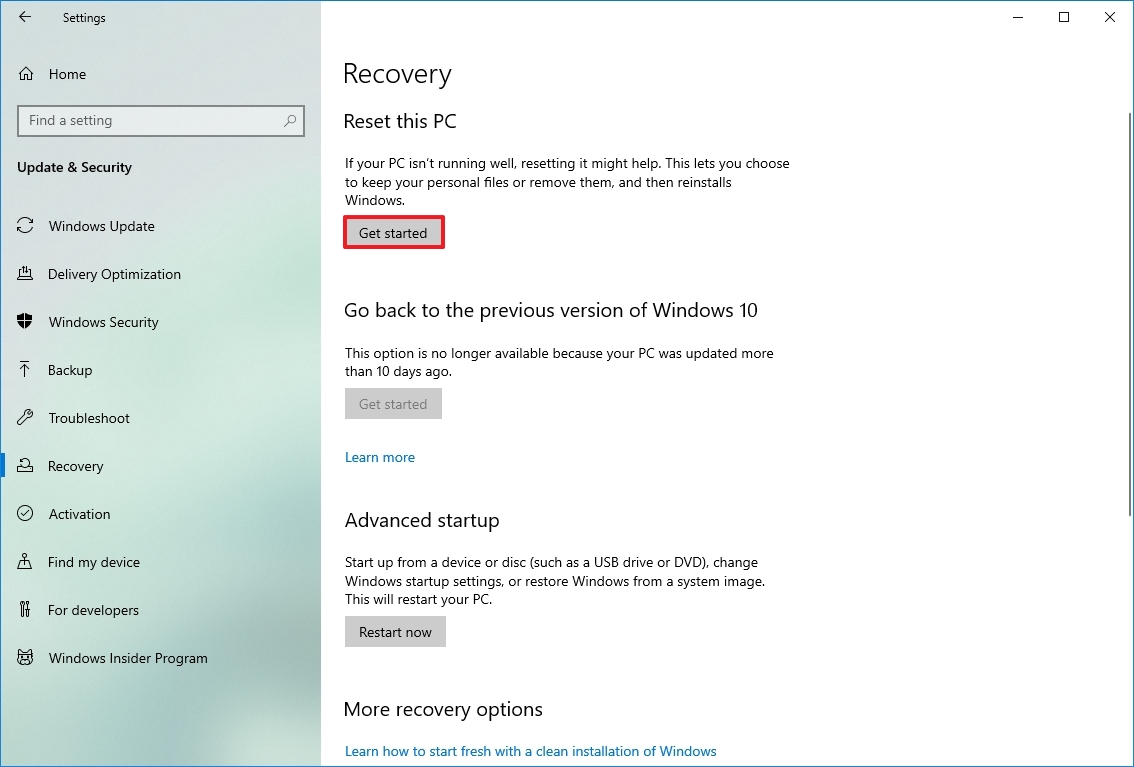
- Click the Keep my files button. (You can also click the Remove everything button to erase everything and install a clean copy of Windows 10.)
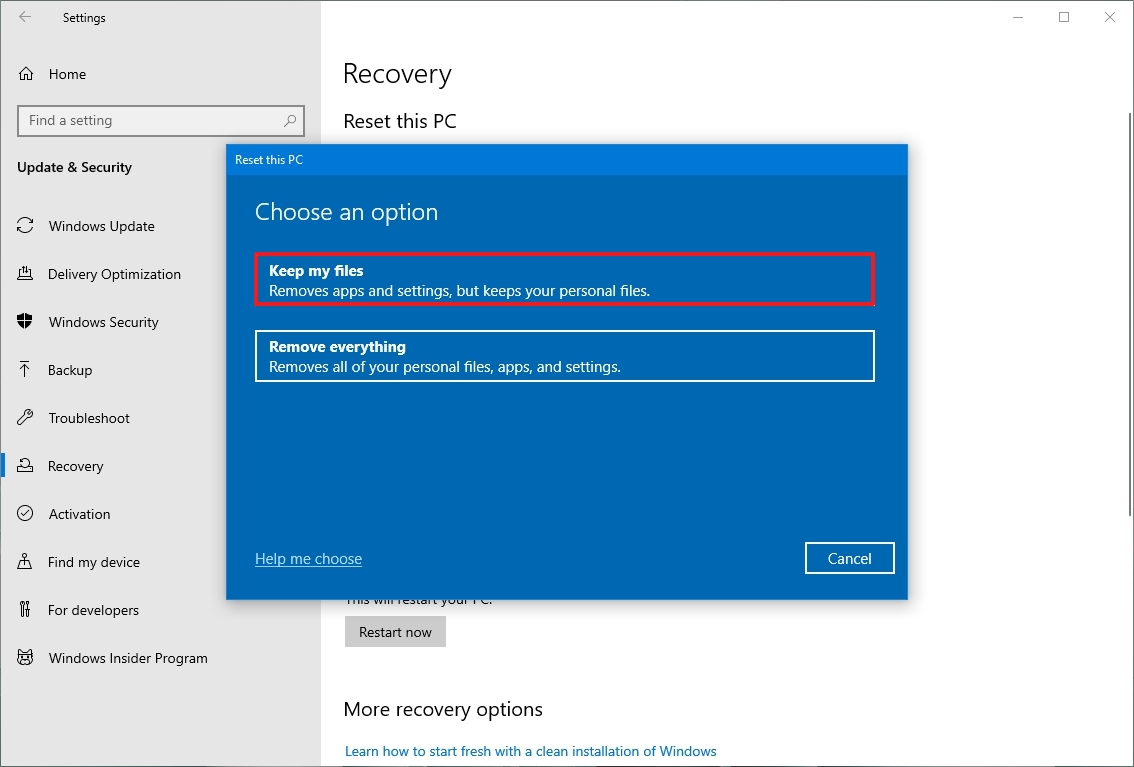
- Select the Local reinstall option.
- Quick tip: If you want a clean installation of Windows 10 without the apps that came pre-installed with the device or if the Local reinstall option does not work, select the Cloud download option.
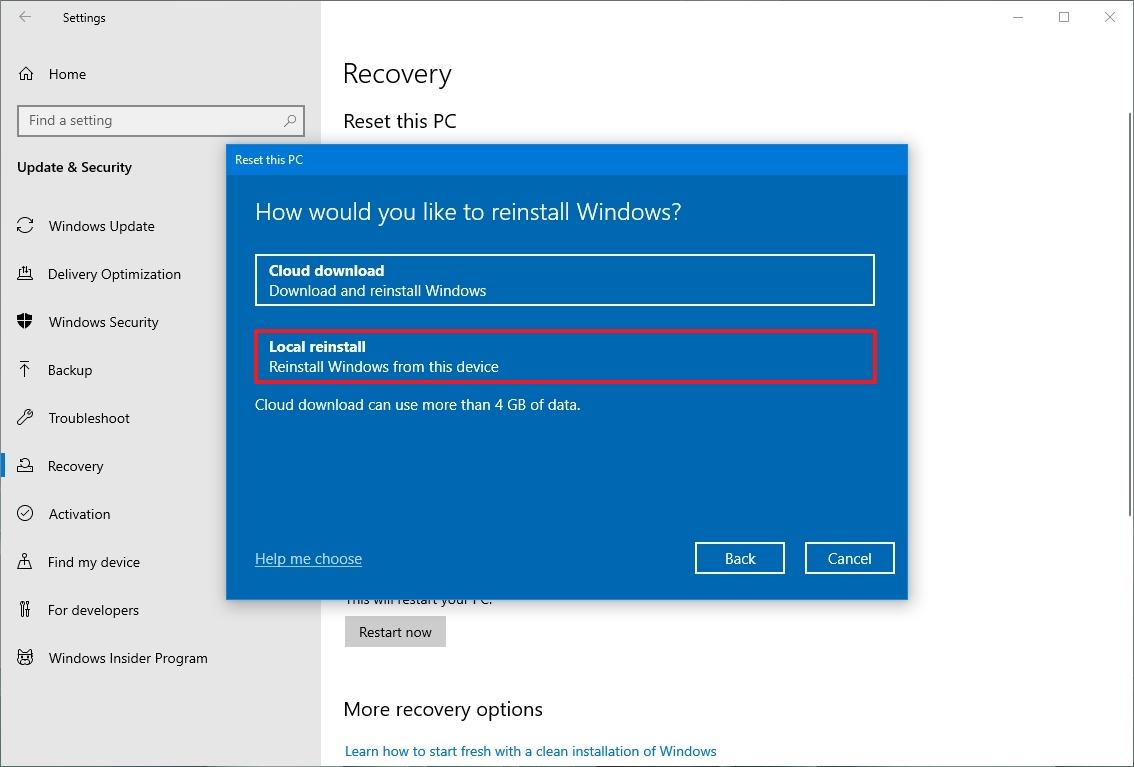
- Click the Next button.
- Click the Reset button.
After you complete the steps, Windows 10 will be reinstalled, removing previous configurations, settings, and apps to help you boost system performance. If you select the option to remove everything, remember to restore your files from a previous backup after the process.
If you want to install Windows 10 from scratch, check out our in-depth guide to do a clean installation.
19. Upgrade to faster drive
If you are not noticing performance improvements even after the reset process, it might be time to upgrade the hard drive to an SSD.
Upgrading to a Solid-State Drive is perhaps one of the best ways to increase performance on older hardware. Usually, SSDs do not have moving parts like traditional hard drives, meaning data can be read and written much faster.
When you replace an HDD with an SSD, Windows 10 will boot noticeably faster, apps will launch and run quicker, and the overall performance will be snappier and faster.
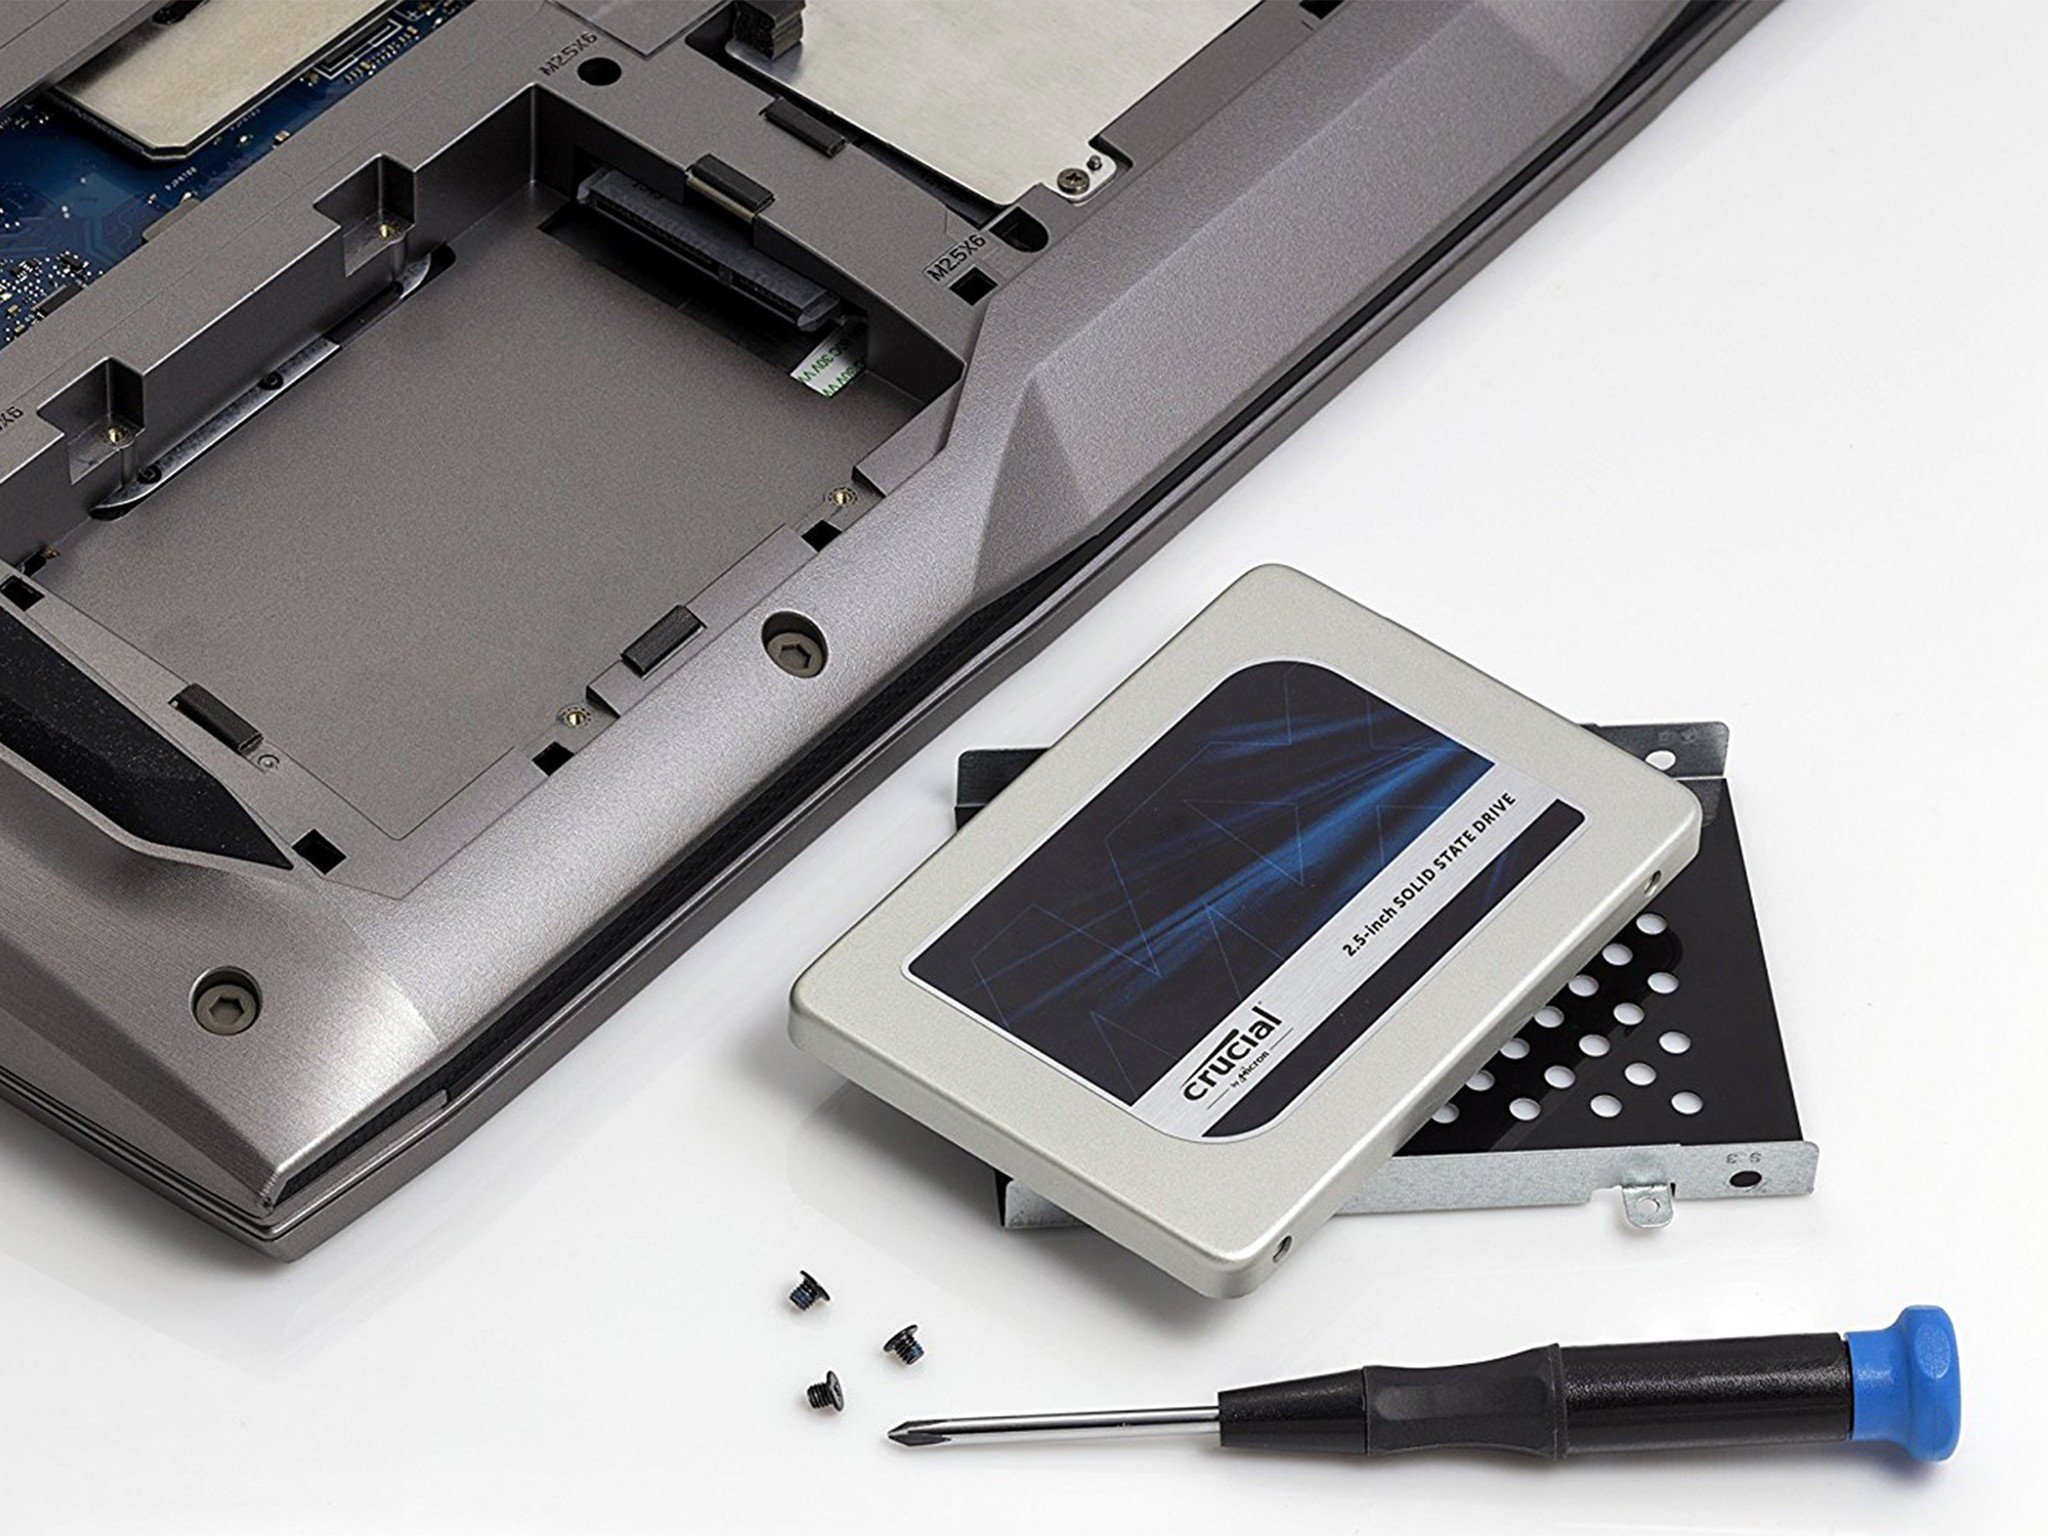
If you plan to upgrade to an SSD, we recommend the Samsung 860 EVO because of its fast performance, reliability, and five-year warranty.
Blazing speeds
The Samsung 870 EVO is one of the most popular Solid-State Drives (SSD) because of its reliability and price. It also offers excellent performance (up to 560MB/s read and 530MB/s write speeds) compared to traditional hard drives, and every drive is backed with a five-year warranty.
20. Upgrade system memory
Insufficient system memory can also be why your computer is running slow, especially if you work with multiple apps and many open tabs in the web browser.
To determine whether your computer needs more memory, you must first confirm the total amount of memory installed on the device and how the system uses it.
To view the total amount and current memory usage on Windows 10, use these steps:
- Open Start.
- Search for Task Manager, and click the top result to open the app.
- Click the Performance tab.
- Click on Memory from the left pane.
- On the right, check the total amount of RAM in the top-right corner, and in the bottom-left corner, under «In use (Compressed),» you can find the out total amount of memory currently in use.
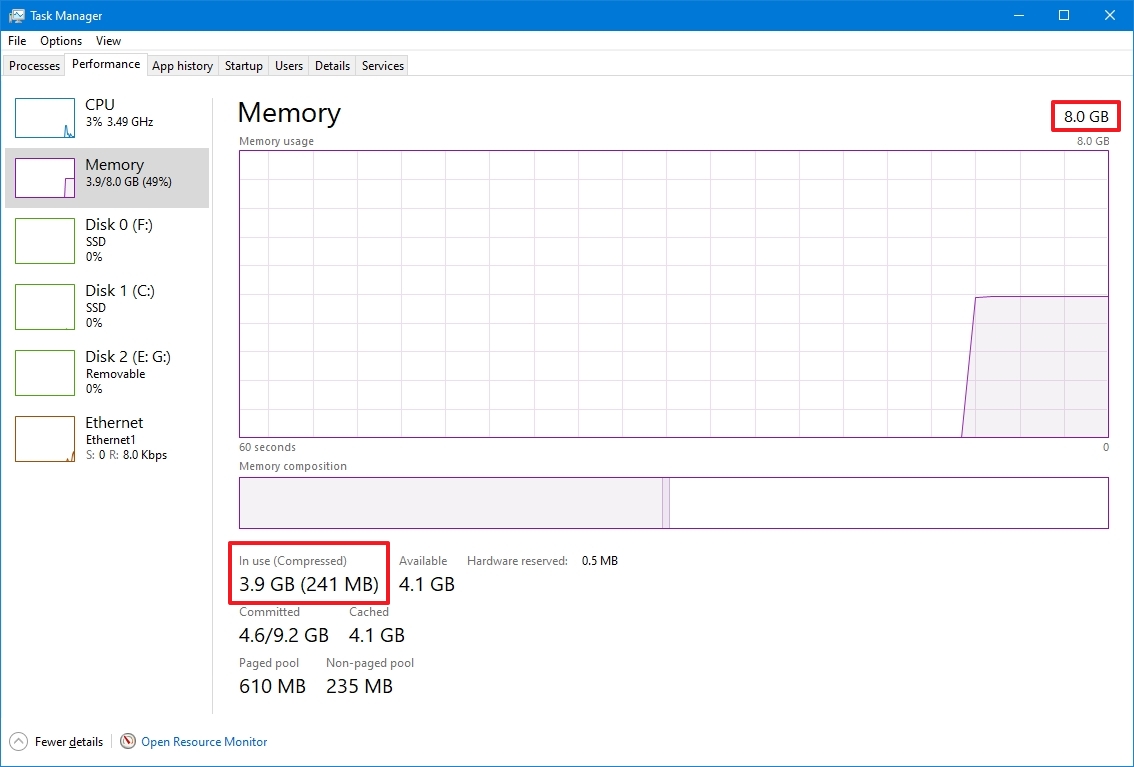
If the total amount of «in use» memory is constantly high (around 80 percent), it’s time to add memory sticks.
Although adding more memory is relatively straightforward, finding a compatible kit can be tricky. Always use Task Manager to find out the type of memory you need and whether any slots are available. It is also recommended to check your device manufacturer’s website to find more specific information about the memory requirements.
More resources
For more helpful articles, coverage, and answers to common questions about Windows 10, visit the following resources:
- Windows 11 on Windows Central — All you need to know
- Windows 10 on Windows Central — All you need to know

Cutting-edge operating system
A refreshed design in Windows 11 enables you to do what you want effortlessly and safely, with biometric logins for encrypted authentication and advanced antivirus defenses.
All the latest news, reviews, and guides for Windows and Xbox diehards.
Mauro Huculak is technical writer for WindowsCentral.com. His primary focus is to write comprehensive how-tos to help users get the most out of Windows 10 and its many related technologies. He has an IT background with professional certifications from Microsoft, Cisco, and CompTIA, and he’s a recognized member of the Microsoft MVP community.