Sign in with Microsoft
Sign in or create an account.
Hello,
Select a different account.
You have multiple accounts
Choose the account you want to sign in with.
-
Open File Explorer from the taskbar.
-
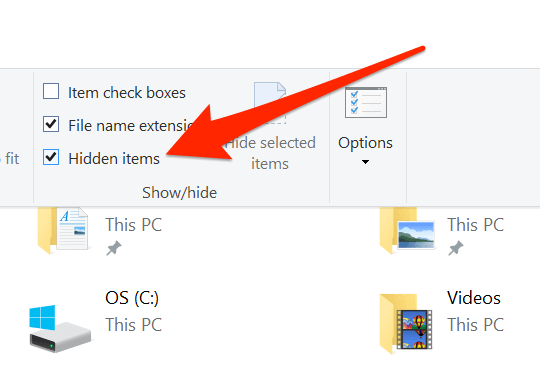
Select View > Show > Hidden items.
-
Open File Explorer from the taskbar.
-
Select View > Options > Change folder and search options.
-
Select the View tab and, in Advanced settings, select Show hidden files, folders, and drives and OK.
Need more help?
Want more options?
Explore subscription benefits, browse training courses, learn how to secure your device, and more.
Communities help you ask and answer questions, give feedback, and hear from experts with rich knowledge.
Thank you for your feedback!
×
If you don’t already know, your computer has many more files than what you normally see in the File Explorer. Many of these files are hidden by your system for certain reasons. However, if you wish to access them, you can get your machine to show hidden files in Windows 10.
Once you’ve made the hidden files visible using any of the methods, you’ll find them available ready to use in your folders with File Explorer.
Use File Explorer To Show Hidden Files In Windows 10
The easiest way to show hidden files in Windows 10 is to enable an option in the File Explorer utility. It’ll then make all of the hidden files visible to you on your screen and it only takes turning on a single option in the tool.
- Open any folder on your PC and it’ll launch the File Explorer utility. Then click on the View tab at the top to manage how the tool shows your files.
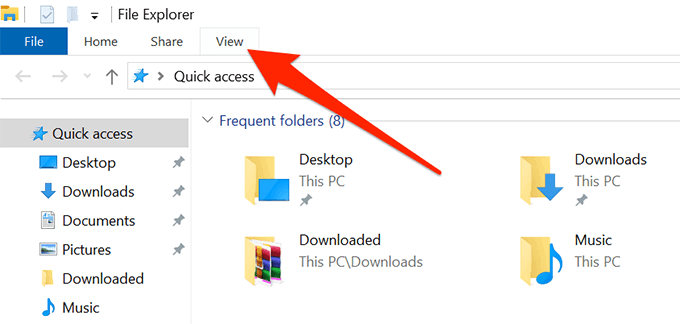
- Once you’re there, look towards the section that says Show/hide. There’s an option here that says Hidden items. It’ll be deselected by default and you need to select it to enable it.
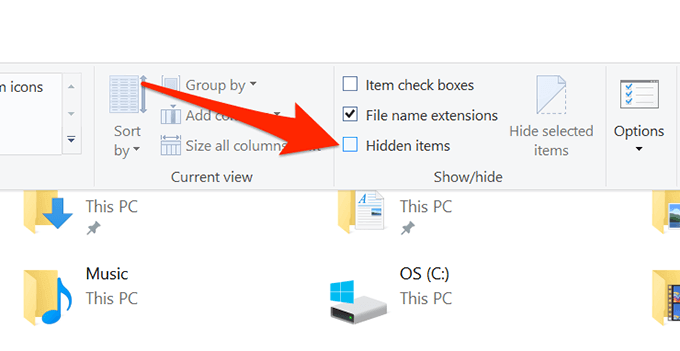
- Once it’s enabled, you’ll be able to see the hidden files available on your computer. You might want to move to the folder where there are hidden files if you don’t see anything in the current folder.
Use Control Panel To Show Hidden Files In Windows 10
If you’re someone who likes to use the traditional Control Panel utility to change your settings, you’ll be glad to know you can use it as well to show hidden files on your Windows 10 computer. Once again, it only requires enabling a single option.
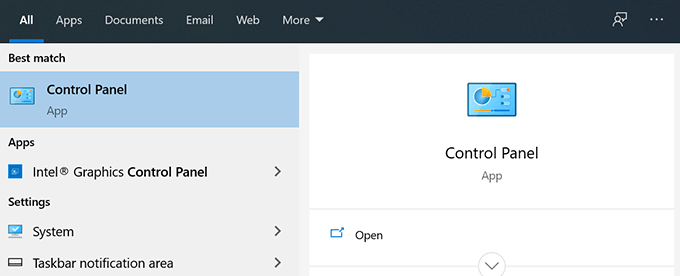
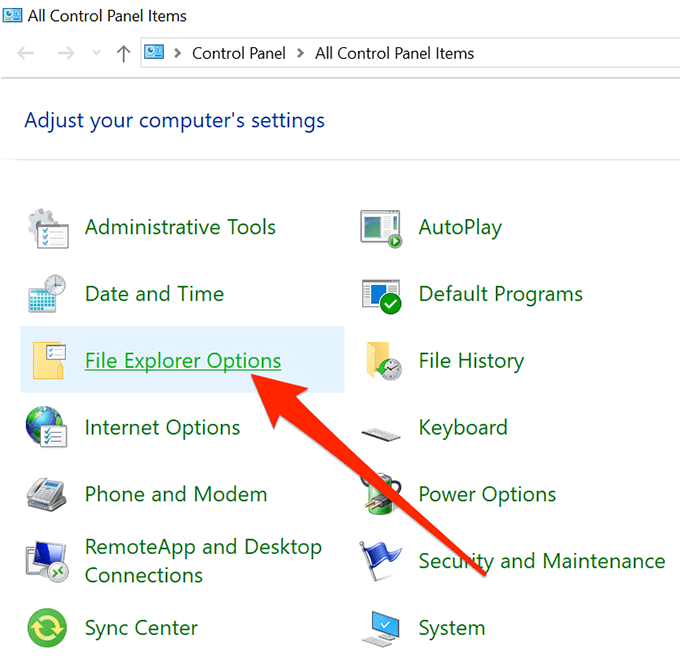
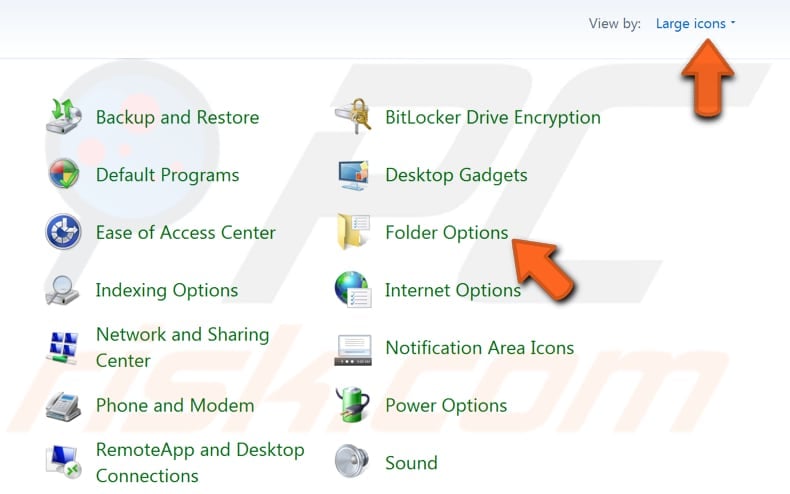
- Launch Control Panel by searching for and clicking on it in the Cortana search box.
- When it opens, select Large icons from the View by option at the top. Then find and click on the option that says File Explorer Options.
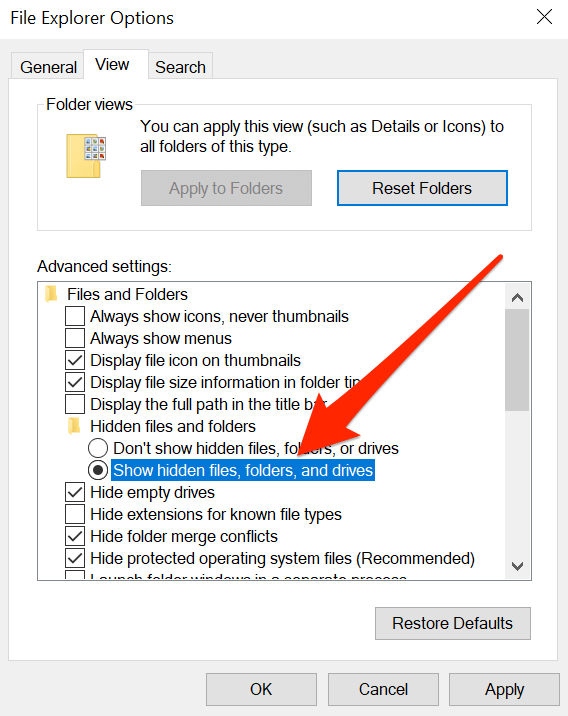
- Click on the View tab at the top to change your File Explorer view settings.
- You’ll find an option that says Show hidden files, folders, and drives on your screen. Enable this option to show hidden files and then click on Apply followed by OK.
Edit a Registry Key To Enable Hidden Files In Windows 10
You’ll probably not want to use a registry method for a task like showing hidden files but if that’s what you prefer for your tasks, you can use it and make all of your hidden files visible in your file manager.
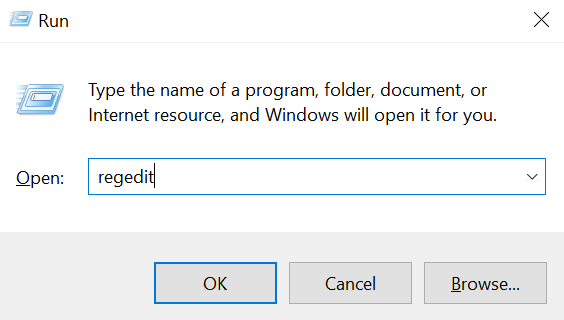
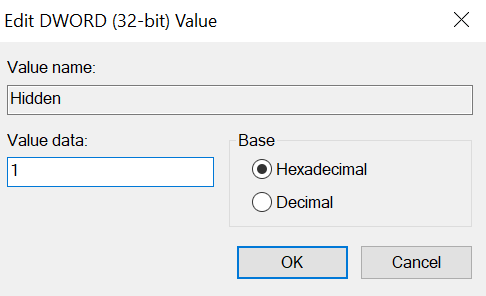
- Press the Windows + R keys at the same time, type regedit in the box on your screen, and press Enter.
- When it opens, navigate to the following path.
HKEY_CURRENT_USER\Software\Microsoft\Windows\CurrentVersion\Explorer\Advanced
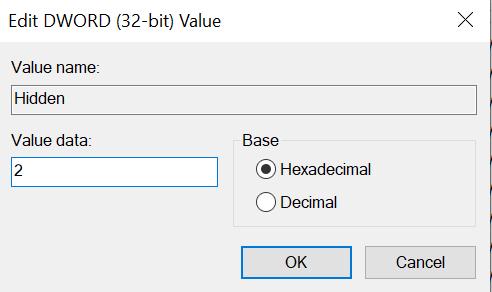
- On the right-hand side, you’ll find several options you can change. You want to find the one that says Hidden and double-click on it to open it.
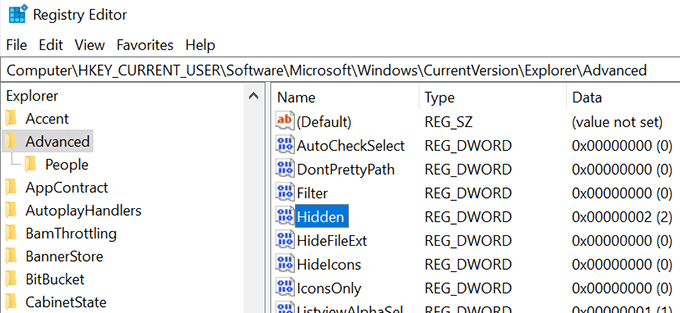
- By default, the entry should have a value of 2 which keeps your hidden files hidden. You need to change this value to 1 to show hidden files on your Windows 10 computer. Make the change and click on OK.
Recognizing Hidden Files In Windows 10
If this is your first time enabling and accessing hidden files on your machine, you’ll probably have no idea what these files look like. Even though these files are exactly the same as any other files on your computer, these look a bit different than the regular files when you view them in the Explorer.
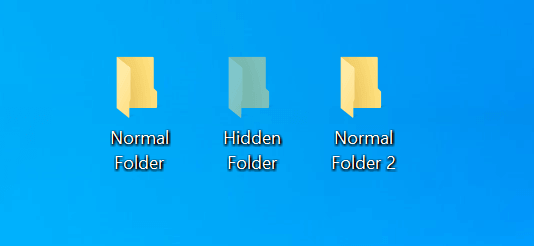
After enabling the option to show hidden files, you’ll see these files with a more light color to their icons. If you’re looking at a hidden folder, you’ll see that its icon doesn’t look as solid as that of a regular folder.
Recognizing hidden files and folders amidst all the regular ones shouldn’t be too difficult as their appearance makes it really easy for you to find them.
If you’re done with what you wanted to do with your hidden files, you might want to disable them again on your computer. This way, they won’t come in your way when you’re working with the regular files on your computer.
Hiding back the hidden files is pretty easy actually in Windows 10. All you need to do is disable an option in the method that you used to enable these files and you’ll be all set.
- If you used the File Explorer method to show hidden files, open a File Explorer window, click on the View tab at the top, and untick the box that says Hidden items.
- If you went for the Control Panel method, go up to the File Explorer Options box and then select the option that says Don’t show hidden files, folders, or drives. Then click on Apply followed by OK.
- Windows Registry method users need to simply change the value of the Hidden entry to 2 and you should be all set. It’ll disable the option that shows hidden files on your PC.
Why Certain Files Are Always Hidden
If you’re anything like us, you’ll probably be curious to find out exactly why your computer hides certain files on your system. While those of you hiding their own files will have their own reasons for doing so, Microsoft actually only has a single reason for it: to prevent any accidental damage to your computer.
Most files that are hidden by default are actually your core system files. They’re hidden to ensure they don’t get deleted or modified. Since these are core files, even a bit of a modification to them may lead to the malfunction of the overall system.
Wrap Up
If you used any of these methods to unhide your files, we’d like to know what those files were and why you chose to unhide them. We await your response in the comments below.
The Windows operating system hides critical system files and folders by default. These are hidden so that the users do not intentionally or accidentally manipulate them since those could damage the OS itself and affect its functionality.
However, occasionally, these hidden and protected files and folders need to be accessed to make informed changes, like the pagefile.sys. Therefore, one needs to be able to view and access them.
In this post, we are going to show you multiple ways to view and access the hidden and protected system files in both Windows 10 and Windows 11 operating systems.
Table of contents
- Windows Hidden Folders VS. Protected Folders
- View Hidden and Protected Folders using File Explorer
- In Windows 11
- Show Hidden Files and Folders in Windows 11 using Explorer
- Show Protected and Hidden Items in Windows 11 using Explorer
- In Windows 10
- Show Hidden Files and Folders in Windows 10 using Explorer
- Show Protected and Hidden Items in Windows 10 using Explorer
- In Windows 11
- View Hidden Files and Folders using Settings App
- In Windows 11
- In Windows 10
- View Hidden and Protected Files and Folders from Control Panel
- View Hidden and Protected Files and Folders from Windows Registry
- View Hidden and Protected Items in Command Prompt
- View Hidden and Protected Items in PowerShell
- Show Files and Folders Hidden by Virus/Malware
- Closing Words
Before we dig into the methods to view these hidden files and folders, there is some insight we would like to share with our readers.
Windows Hidden Folders VS. Protected Folders
Windows has 2 categories of files and folders that are not visible to the users by default. One is the “Hidden” files and folders, and the other is the “Protected” files and folders.
The hidden files and folders can be accessed by a user using either File Explorer or other command-line tools. However, the protected items are blocked by the Windows operating system. If you try to access these items, you will encounter a prompt such as the following:
Access is denied

This is because the protected files and directories are critical to the functionality of the Windows OS and a user has no concern with them. This means that the protected items have nothing to do with what a user might be using the computer for and has no business there.
With that said, files and folders can also be hidden due a malware or virus in your computer. These are usually hidden by ransomware where you are asked to pay a certain amount to bring back your hidden files. In this case, you may need to access/view those protected files as well.
The methods given in this post cover all bases and allow you to view and access when Windows-hidden items as well as those hidden by a virus.
View Hidden and Protected Folders using File Explorer
Using File Explorer to view the hidden files and folders is perhaps the most desired way. However, this method probably won’t work if your device is infected by malware. You can still use this method to access and view the hidden content by Windows.
In Windows 11
The methods to view both the hidden items and the protected items are different when using File Explorer. Therefore, we have divided the method to view them.
Show Hidden Files and Folders in Windows 11 using Explorer
Follow these steps to view the hidden files and folders on Windows 11 OS using Windows Explorer:
-
Open File Explorer and navigate to the directory where you want to view the hidden items.
-
Now click View from the ribbon menu.

Expand View menu -
Now expand Show from the menu, and then click Hidden items.
Show hidden items


You should now be able to see the hidden items inside File Explorer. The icons of these files and folders would be less opaque than the others.

Show Protected and Hidden Items in Windows 11 using Explorer
When viewing the protected items, the hidden items are also shown in File Explorer. Follow these steps to view both hidden and protected files and folders in Windows 11:
-
Open File Explorer and navigate to the directory where you want to view the protected items.
-
Click the ellipses (3 dots) from the ribbon menu and then click Options.
Open Explorer options -
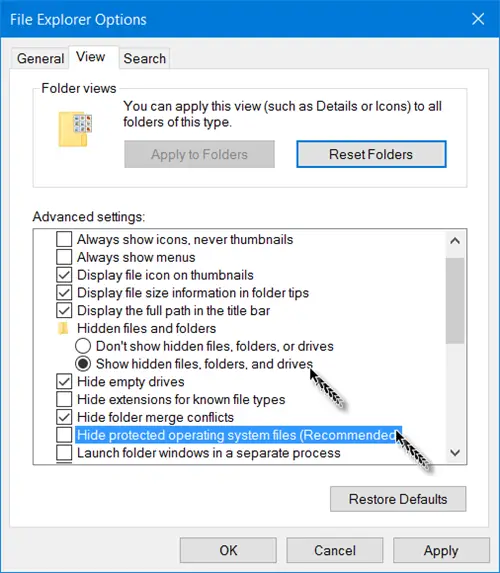
From the Folder Options popup, switch to the View tab, then select the “Show hidden files, folders, and drives” radio button. Also, uncheck the box next to “Hide protected operating system files.”

Show protected items -
You will now be prompted for confirmation. Click Yes.

Confirm action -
Now click Apply and Ok on the Folder Options popup to implement the changes.
Apply changes


You will now be able to see both the hidden as well as protected items in this directory, as well as any other you navigate to. However, there will be no visible difference between the two types.

In Windows 10
Similar to Windows 11, you can also view the hidden folders, or the hidden as well as the protected folders. However, since the Explorer layout is a bit different than the one in Windows 11, we decided to write for Windows 10 in a separate section.
Show Hidden Files and Folders in Windows 10 using Explorer
Follow these steps to view the hidden files and folders on Windows 10 OS using Windows Explorer:
-
Open File Explorer and navigate to the directory where you want to view the hidden items.
-
Now click View from the ribbon menu, and then check the box next to Hidden items in the Show/hide section.

Show hidden items

You will now be able to see the hidden items in Explorer.
Show Protected and Hidden Items in Windows 10 using Explorer
Similar to Windows 11, when viewing the protected items, the hidden items are also shown in File Explorer. Follow these steps to view both hidden and protected files and folders in Windows 10:
-
Open File Explorer and navigate to the directory where you want to view the protected items.
-
Click View from the ribbon menu and then click Options.

Open Explorer options -
From the Folder Options popup, switch to the View tab, then select the “Show hidden files, folders, and drives” radio button. Also, uncheck the box next to “Hide protected operating system files.”
Show protected items -
You will now be prompted for confirmation. Click Yes.
Confirm action -
Now click Apply and Ok on the Folder Options popup to implement the changes.
Apply changes


You will now be able to view both the hidden and protected items.
In the case of both Windows 10 and Windows 11, if you wish to hide the hidden folders again, all you need to do is reverse the action that you used to show them in the first place. To hide both the protected and hidden items, you must go to the View tab in Folder Options, check the box next to “Hide protected operating system files” and select the “Don’t show hidden files, folders, or drives” radio button.

View Hidden Files and Folders using Settings App
You can also show and hide the hidden files and folders from the Settings app in both Windows 10 and 11. Note that this will only work for the hidden items, and not the protected items.
Since the approach to display the hidden files and folders from the Settings app is slightly different for both Windows 10 and Windows 11, we have separated the 2 methods.
In Windows 11
-
Navigate to the following:
Settings appp >> Privacy & security >> For developers
-
Now click File Explorer to expand it.

Expand File Explorer settings -
Now toggle the slider in front of “Show hidden and system files” into the On position.
Enable “Show hidden and system files”


You will now be able to see the hidden items in File Explorer.
In case you want to hide the items again, simply toggle the same slider into the Off position.
In Windows 10
-
Navigate to the following:
Settings app >> Update & Security >> For developers
-
Here, scroll down to the File Explorer section and uncheck all the boxes except “Change settings to show hidden and system files,” and then click Apply.
Show hidden items from Settings app

You will now be able to see the hidden items in File Explorer.
View Hidden and Protected Files and Folders from Control Panel
You can also show the hidden as well as the protected files and folders in File Explorer from the Control Panel. Here is how:
-
Navigate to the following:
Control Panel >> Appearance and Personalization >> File Explorer Options
This will open the Explorer Options window.
-
Now switch to the View tab and select the “Show hidden files, folders, and drives” radio button.
This will show only the hidden items.
Show hidden items -
If you also want to view the protected items, then go ahead and uncheck the box next to “Hide protected operating system files.”
Also show protected items -
When done, click Apply and Ok to save the changes.


View Hidden and Protected Files and Folders from Windows Registry
You can also manipulate the Windows Registry manually to show or hide the hidden and protected items inside Windows Explorer. Here are the details for the registries that you can alter:
| Registry Value | Details | Default Value | Value to show |
| Hidden | Show/Hide hidden items | 2 (hidden) | 1 |
| ShowSuperHidden | Show/Hide protected items | 2 or 0 (hidden) | 1 |
Now follow these steps to make manual changes to the registries:
Note: Misconfiguration of critical values in the system’s registry could be fatal for your operating system. Therefore, we insist that you create a system restore point before proceeding forward with the process.
-
Open the Registry Editor by typing in regedit in the Run Command box.

Open Registry Editor -
Now paste the following in the navigation bar at the top for quick navigation:
Computer\HKEY_CURRENT_USER\Software\Microsoft\Windows\CurrentVersion\Explorer\Advanced

Quick navigation path in Registry Editor -
Here, you will find both Hidden and ShowSuperHidden values in the right pane. Double-click Hidden and change its Value Data to 1, and change the Value data of ShowSuperHidden if you also want to show the protected items.
Hidden and ShowSuperHidden values in Registry Editor -
When done, simply close the Registry Editor and refresh your Explorer window to show the hidden and protected items.
A system restart will not be needed.


You should now be able to see the hidden and protected files and folders in File Explorer.
If you want to revert these settings later and hide the items, you can do so by reverting the settings from within File Explorer Options, or you can change the Value Data for both Hidden and ShowSuperHidden to 2.
View Hidden and Protected Items in Command Prompt
You can also view the hidden and protected files and directories inside the Command Prompt. This method will show you only the items with the hidden attribute, and the items that are already visible in File Explorer will not be shown.
Moreover, this won’t show the hidden items in File Explorer, but only inside the Command Prompt.
Follow these steps to see the hidden and protected files and folders in any given directory:
-
Open an elevated Command Prompt instance and then use the “CD” cmdlet to change your directory and navigate to the directory in which you want to view the hidden items:
CD /d [PathToDirectory]
Change directory We used “../..” since we wanted to go to the root of the C drive.
-
Once in the right directory, run the following cmdlet to see the hidden items:
dir /ah
Show hidden items in Command Prompt


Now, you will see the hidden and protected items, but only inside the Command Prompt.
View Hidden and Protected Items in PowerShell
You can also view the hidden and protected files and directories inside Windows PowerShell. This method will show you the items with the hidden attribute as well as the other items that are already visible.
Like the Command Prompt, this won’t show the hidden items in File Explorer, but only inside the PowerShell instance.
-
Open an elevated PowerShell instance and then use the “CHDIR” cmdlet to change your directory and navigate to the directory in which you want to view the hidden items:
CHDIR [PathToDirectory]
Change directory -
Once in the right directory, run the following cmdlet to see everything inside the directory, including the hidden and protected items:
dir -forceShow hidden items in PowerShell


Now, you will see the hidden and protected items, but only inside PowerShell.
Show Files and Folders Hidden by Virus/Malware
If your computer has been infected by a virus and all your files and folders have disappeared, it is likely that the virus has hidden them and is still present on your computer. To confirm this, you can view the hidden items using either Command Prompt or Windows PowerShell.
To view the items hidden by a virus, run the following cmdlet in an elevated Command Prompt or PowerShell:
Note: This cmdlet will show recursive hidden items, which means that all files and folders inside the hidden folders will also be displayed, which makes the list rather long. Moreover, the “attrib” cmdlet makes changes to the attributes of these files and folders, which isn’t recommended unless absolutely necessary.
To avoid any negative impact on the operating system, we recommend that you create a system restore point before proceeding.
attrib -s -h -r /s /d *.*
The table below tells which switch in the “attrib” cmdlet does what:
| Switch | Details |
| -s | Clears the system attribute. |
| -h | Clears the hidden attribute. |
| -r | Clears the read-only attribute. |
| /s | Executes whatever file attribute display or changes you’re making on the subfolders within whatever drive and/or path you’ve specified, or those within the folder you’re executing from if you don’t specify a drive or path. |
| /d | This option includes directories, not only files, to whatever you’re executing. |
Closing Words
The hidden and protected items inside the Windows operating system are so for a reason. Therefore, we only recommend that you unhide them if you know what you are doing, as deleting or editing them can be fatal for your operating system.
How to Show Hidden Files on Windows 10 and Windows 7
Many important system files and folders in Windows are hidden, but sometimes you may need to access them. This guide shows how to enable the «Show hidden files, folders, and drives» option in Windows 10 and 7.
The Windows operating system hides many system files and folders to avoid deletion, accidental change, moving, etc. Another reason for hiding files and folders is to make Windows clutter-free. In this way, Microsoft attempts to avoid distracting users with «unnecessary» files by hiding them.
In some cases, users might need to access these hidden files or folders, which is straightforward. Remember, though, that hidden files should generally remain hidden.
Leaving them visible could result in accidental deletion, changes, etc., potentially leading to system instability. If you need to unhide hidden files, we recommend returning them to the hidden state when you are finished.
Video Showing How to View Hidden Files
Table of Contents:
- Introduction
- View Hidden Files in Windows 10
- View Hidden Files in Windows 7
- Video Showing How to View Hidden Files
View Hidden Files in Windows 10
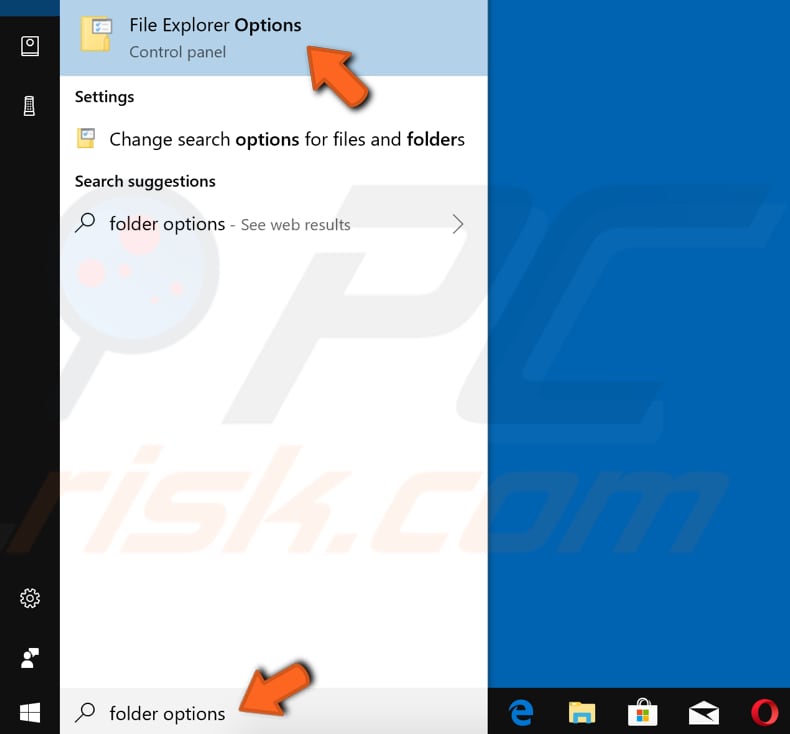
To enable the «Show hidden files» option in Windows 10, type «folder options» or «file explorer options» and click the «File Explorer Options» result.
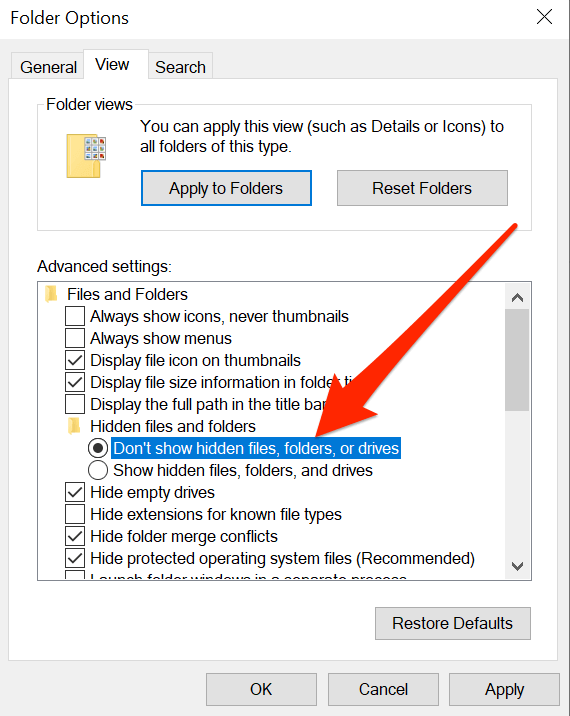
In the File Explorer Options window, find and click the «View» tab. Find the «Show hidden files, folders, and drives» option under Advanced settings. Select it and click «Apply» to save the changes.
Now all hidden files, folders, and drives will be displayed. Once you have finished working with them, we recommend that you re-enable the «Don’t show hidden files, folders, or drives» option.

You can use the Command Prompt and associated commands to view hidden files. Command Prompt is the input field of a text-based user interface screen, a command-line interpreter application available in Windows. This guide describes how to open Command Prompt and the commands used to see hidden files in a particular directory.
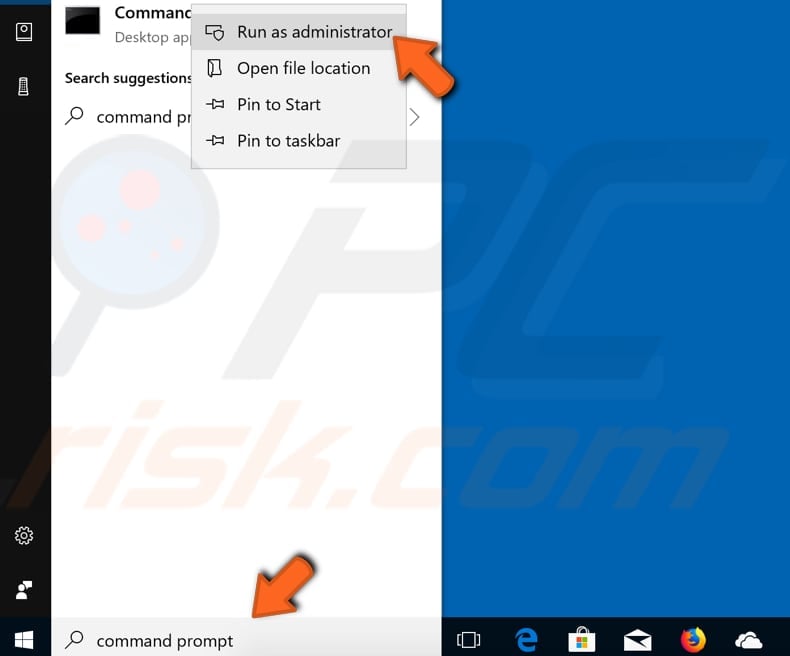
To launch elevated Command Prompt (to run it as administrator), type «command prompt» in Search and right-click the «Command Prompt» result, then select the «Run as administrator» option from the contextual menu.
If you want to see all hidden files and hidden directories in the current directory (the one you have open/currently working with), type the «dir /ah» command and press Enter on your keyboard.

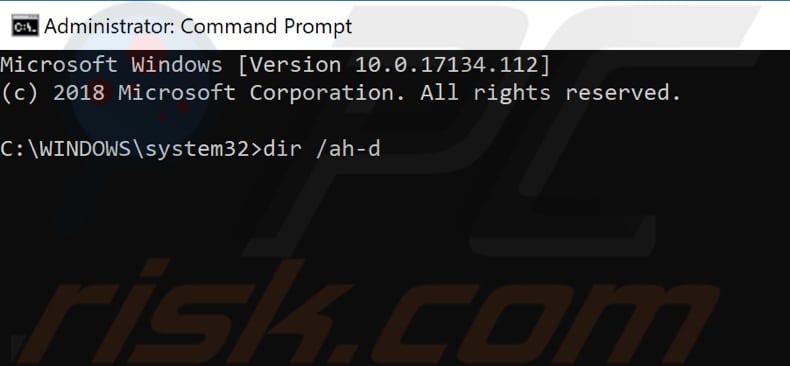
If you want to see all hidden files in the current directory but do not need the hidden subdirectories to be displayed, type the «dir /ah-d» command and press Enter on your keyboard.
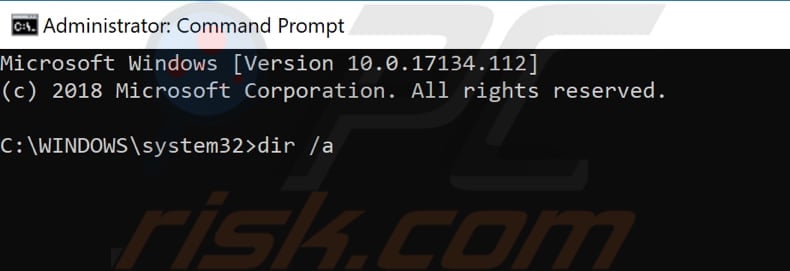
If you want all files and directories, including hidden files and hidden directories of the current directory, to be displayed, then type the «dir /a» command and press Enter on your keyboard.
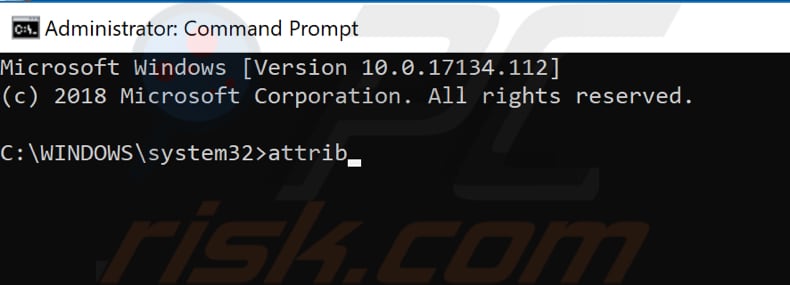
If you type and execute the «attrib» command, you will see all files stored in the current directory with their attributes to the left of the directory path and the filename. Files that have «H» letter next to them will be the hidden files.
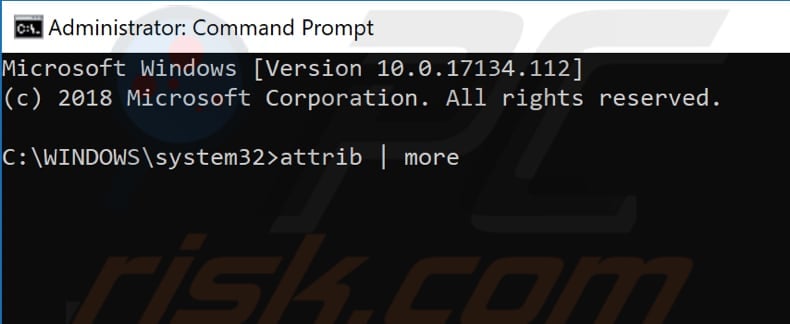
The «attrib | more» command enables you to see more files (if there are too many, and you cannot see all at once).
Now you should know how to enable and disable the «Show hidden files, folders, and drives» option in Windows 10.
[Back to Table of Contents]
View Hidden Files in Windows 7
To view hidden files and folders or drives in Windows 7, go to Control Panel — click the «Start» menu and then click the «Control Panel» option.

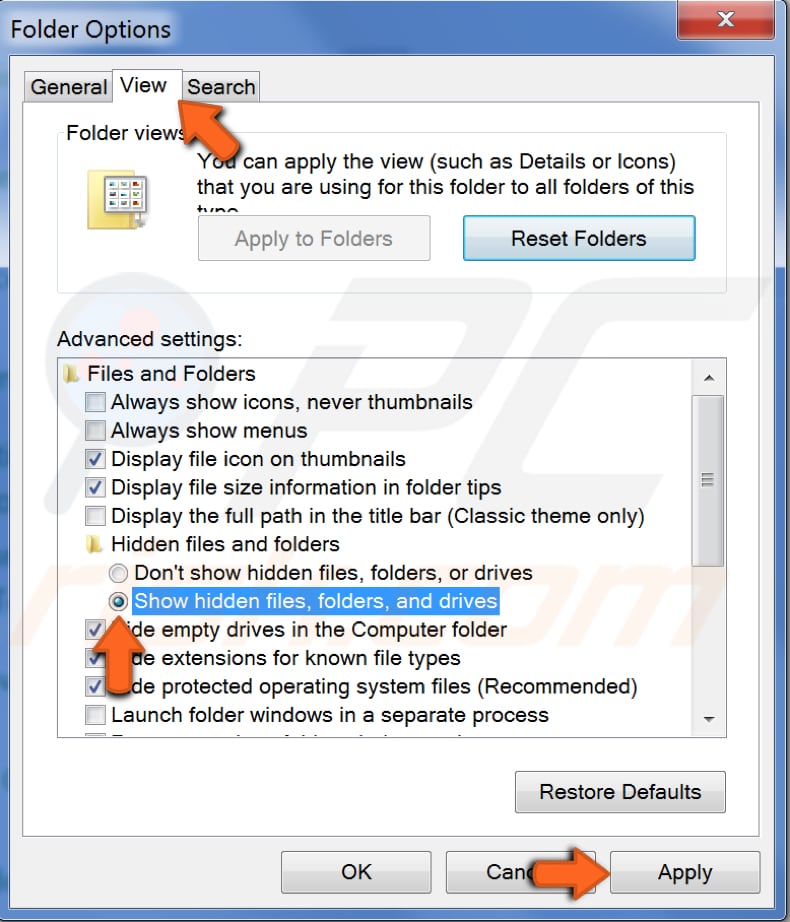
In Control Panel, find the «Folder Options» and click it. If the Control Panel menu window is displayed differently than shown here, set it to view by «Large icons» in the top-right corner.
In the Folder Options window, find and click the «View» tab, then find the «Show hidden files, folders, and drives» option under Advanced settings. Select it and click «Apply» to save the changes. Now all hidden files, folders, and drives will be displayed.
Once you have finished working with them, we recommend that you re-enable the «Don’t show hidden files, folders, or drives» option.
You can also use Command Prompt commands. The same steps apply to both Windows 10 and Windows 7.
We hope that this guide was helpful and you know more about hidden files and folders, why are they hidden, and how to view them. If you have any questions related to this topic, do not hesitate to leave a comment in the section below.
[Back to Top]
In this post, we will see how to show Hidden Files, Folders & Drives along with Protected operating system files in Windows 11/10/8/7, via File Explorer Options in the Control Panel or by using the Command Prompt and PowerShell.
On most days, you would not want to be bothered by the hidden Windows files on your computer. After all, the last thing that an average Windows user needs is some more data to deal with. On some rare instances though, or if you know what you’re getting yourself into, you may need access to these hidden files to make changes to Windows apps or system settings. These hidden files aren’t readily viewable when you open their parent folder(s) in the File Explorer. Ee will walk you through the steps needed to be taken to show hidden files and folders using the Explorer Options, Windows Command Prompt and the PowerShell, two of the strongest methods for the purpose.
Show Hidden Files & Folders in Windows 11/10 via Explorer Options
You will have to open the Control Panel and then select the File Explorer Options in Windows 11/10. File Explorer Options is referred to as Folder Options in Windows 8.1/7.
To show Hidden Files, Folders & Drives on your Windows 11/10 computer:
- Open File Explorer Options
- Click on the View tab
- Locate Hidden Files & Folders
- Select the Show Hidden Files, Folders and Drives option
- Click on Apply and Exit.
You can also open File Explorer Options in Windows 11 as follows:
1] Launch File Explorer on Windows 11.
2] Click on the three horizontal dots and select Option. This will open the Folder Options window.

3] In the Folder Options window, click on the View tab and select the radio button that says Show hidden files, folders, and drives.

4] Click Apply and then OK.
Alternative method via Explorer Menu bar
In Windows 11, you can open Explorer > View > Show > Select Hidden items.
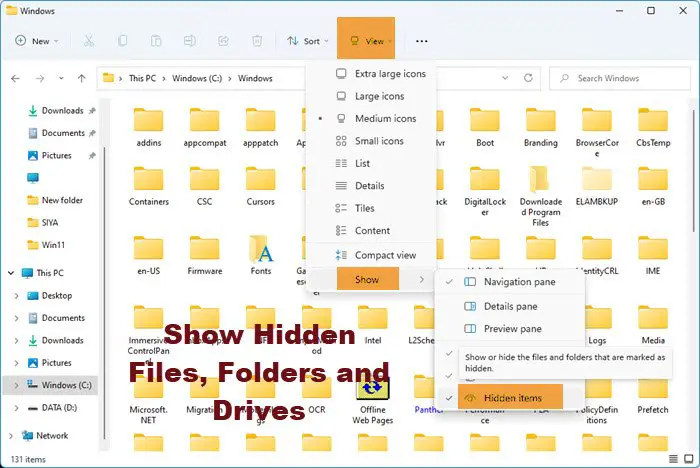
In Windows 10, open Explorer, select the View tab and toggle the Hidden items checkbox to short or hide files and folders.
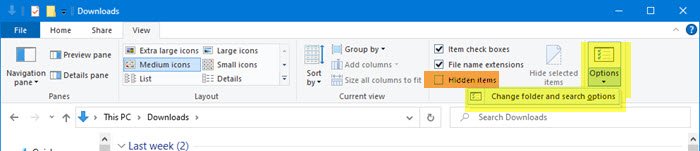
For your information, you can also access the Change folder and search options box from here.
Unhide Protected operating system files
If you wish to unhide and show the Protected operating system files, you need to also uncheck the Hide protected operating system files (Recommended) setting in File Explorer Options, and click Apply.
Show hidden files using Command prompt
The process here is pretty simple. Here are the steps you have to follow:
Open the start command and search for Command Prompt. Select to run it as administrator.
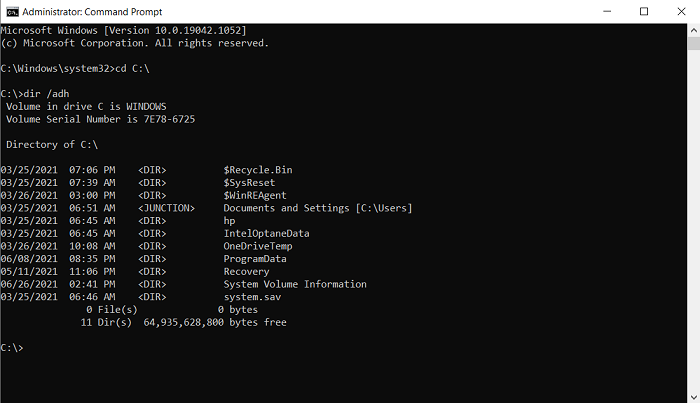
Make a note of the folder in which you want to look for hidden files. For the purposes of this article, we will be using the C:/ drive. Access your drive by using the change directory command cd. Our first command line will look something like
cd C:\
Now, type out the following command line which will show you all the hidden files in the location that you’ve chose
dir /adh
This will show to you all the hidden files, in this case, in the C:/ drive. There are some other keywords that you can use with the dir command if there is some specific information you are looking for. They’re all to be used in a similar manner:
- /a – this will show you only the hidden folders.
- /a:d – this will show you all the directories.
- /a:h – this will show only the hidden files.
- /adh – (The one we’ve used) Gives you all the above information combined.
Let’s now talk about PowerShell and how this process can be replicated there.
Show hidden files using PowerShell
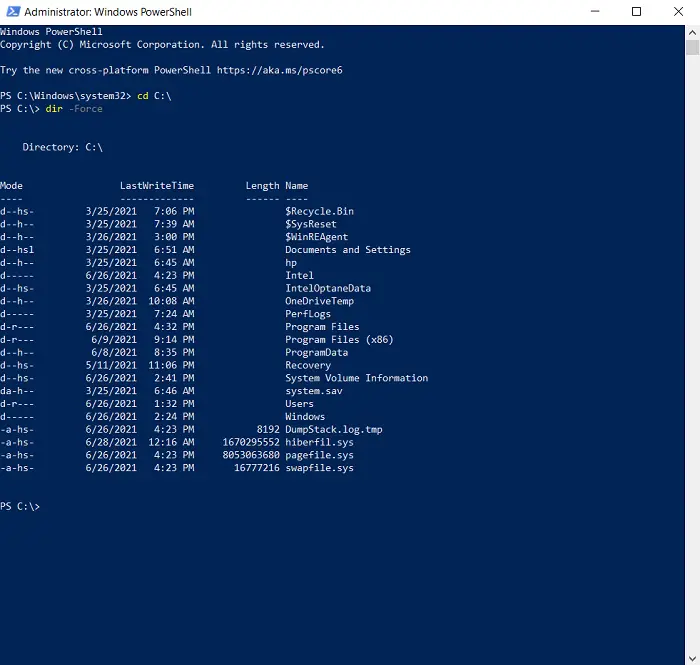
- Open the Start Menu and search for PowerShell, run it as administrator. (You can do the same via the Power User Menu too.)
- The process here is quite similar. Access the location of your choice with the change directory keyword cd. It is used the same way as it was in the Command Prompt.
- Once you’re into the location, type the following command line which will display to you all the hidden files inside it.
dir -Force
- You can browse through the hidden files in a folder inside the drive’s root folder by adding that folder’s name to the cd command. Eg., cd C:\Program Files.
- Once you’re inside this particular folder, type/copy the following command and press enter:
Get-ChildItem -Filter *.* -Recurse -Force -ErrorAction SilentlyContinue | where { $_.Attributes -match “Hidden”}
There is a strong chance that the above command line may return a very high number of hidden files and folders, making it impossible for you to actually read through them.
In that case, you can copy the resultant output and have it saved in a text document by modifying the command line. Simply add a >log.txt to the end of the above Get-ChildItem command and all the data will be saved to a text file named log.txt.
TIP: There is another way! You can use attrib.exe to change File Attributes, and/or show the hidden files.
This post will show you how to make a File or Folder Hidden or Read Only.
If you wish to, you can also list all the hidden files & folders on your Windows computer.
BONUS TIP:
- If you find that the Show Hidden Files, Folders and Drives option is missing, then this registry tweak is sure to help you.
- Alternatively, you could use our freeware FixWin to fix this problem. You will find the fix under its Explorer section.